
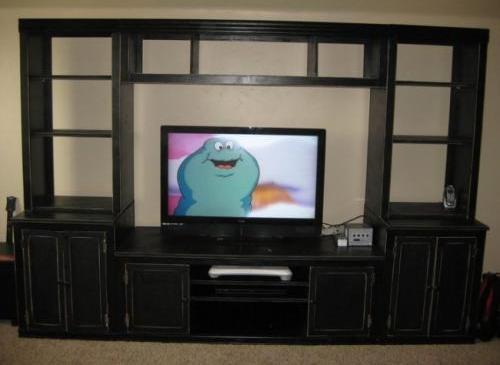

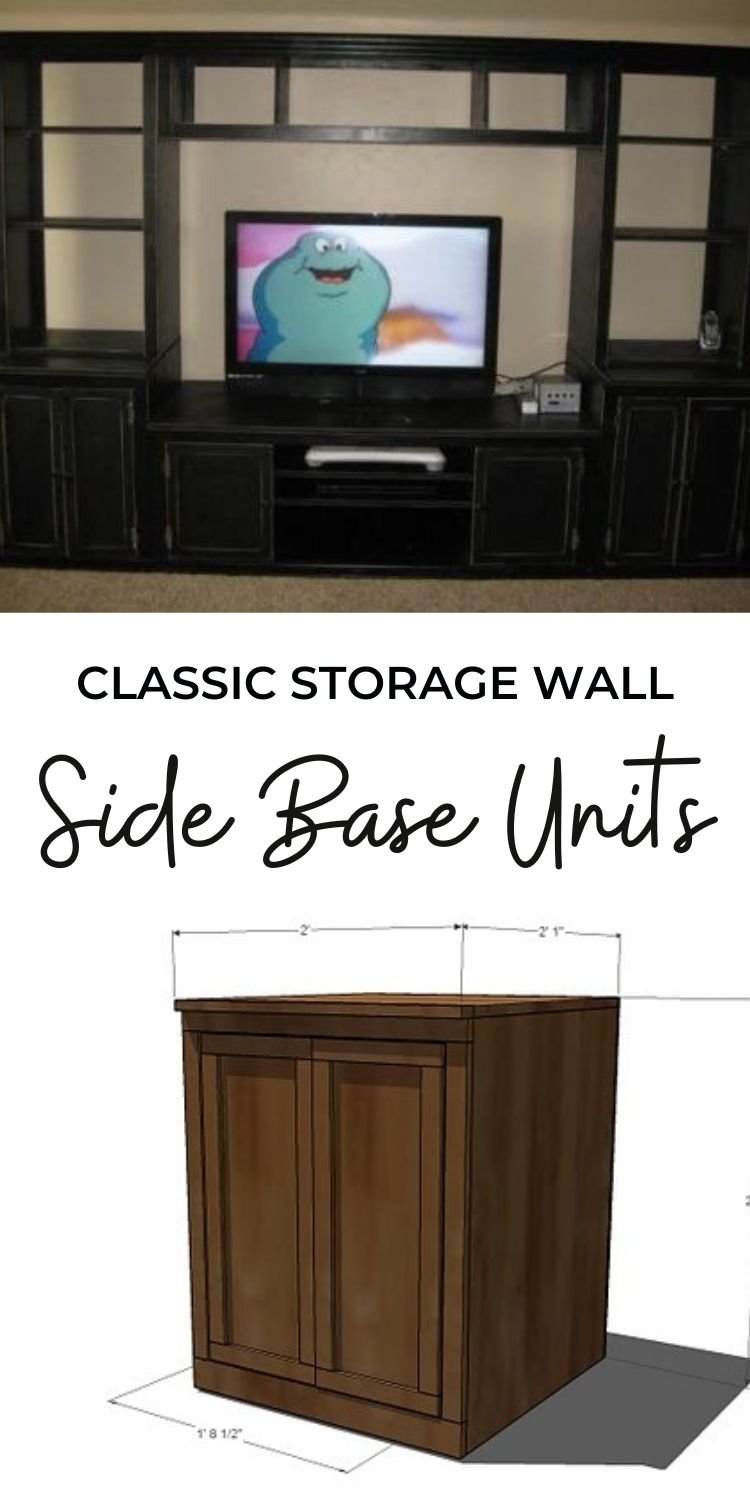
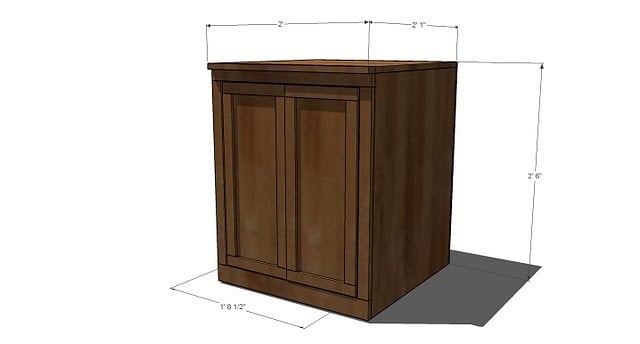
All the beauty and functionality of expensive built-ins, but none of the cost or limitations. Build this base cabinet to keep your media center both beautiful and organized. Features optional shelf and pullout drawer, two doors, and simple moulding details. Works with the rest of the Classic Storage Collection.
Pn For Later!
Preparation
1 Sheet of 3/4″ MDF or Plywood, cut into 23 1/2″ Strips, 8′ long
A) 2 – 1×24 @ 29 1/4″ (Sides)


Cut your 3/4″ Plywood or MDF into strips 23 1/2″ wide by 8′ long. These strips become 1×24 boards. From 2 of the 1×24 boards, cut the the top and a shelf, and the bottom and a shelf. Then cut the remaining sides and middle partitions out of a third 1×24. You will have one 1×24 leftover for future projects. Work on a clean level surface. You can fasten with nails or screws, depending on your tools and the use of this piece. Screws will hold better, nails are easier. My general rule is screw anything that will be “used” like chairs and benches, and nail sedentary pieces like bookcases and hutches. I will leave this up to you. If you are screwing, make sure you predrill and countersink your screws. If you are using MDF, avoid fastening within 1″ of the edge of the MDF. Do not use wood screws on MDF. Wood screws do not have a straight shaft and will split your MDF. I have had luck with drywall screws (after all, drywall is very similar to MDF). Make sure you predrill the entire distance of the screws. It’s going to screeech, so wear hearing protection. And glue, glue, glue. My favorite option is to screw the “box” together, and then use finish nails to add the frame. That way the frame does not have blemishes, but the piece is built sturdy. Make sure you take a square of the project after each step. Measure and mark out any joints before fastening. Be safe, have fun.
Instructions
Step 1
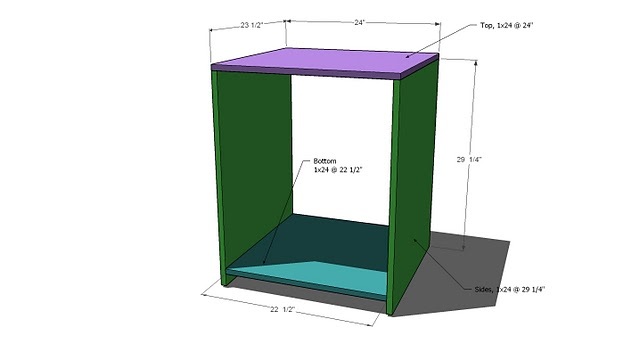
Build the box. Start by fastening the bottom to the sides. Make note that the top of the bottom is 2 1/2″ high, so there will be a 1 3/4″ clearance under the bottom shelf. Then add the top, shown in purple, fastening to the sides. Use 2″ fasteners.
Step 2

Back. TAKE A SQUARE of the project (see HOW-TO section). Then fasten the 3/8″ plywood to the back, as shown above. You can use 1 1/4″ fasteners.
Step 3
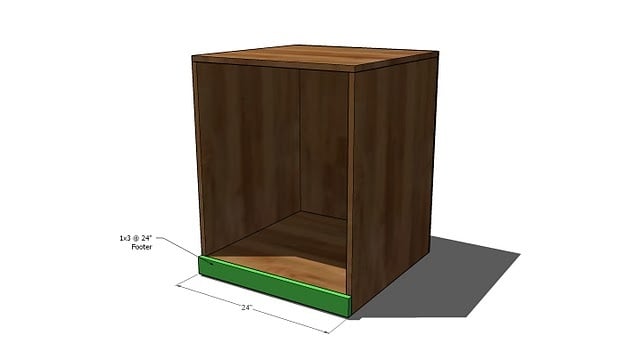
Footer. TAKE A SQUARE. Then add the footer to the front, as shown above. Use the 2″ fasteners.
Step 4
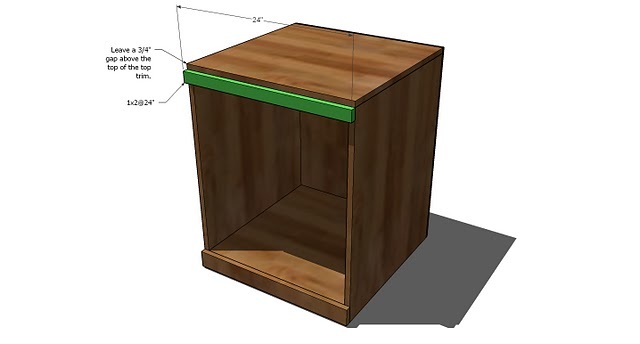
Top Trim. Again, make sure everything is square. Then fasten the top trim in place, as shown above. Keep outside edges flush. Use the 2″ fasteners.
Step 5
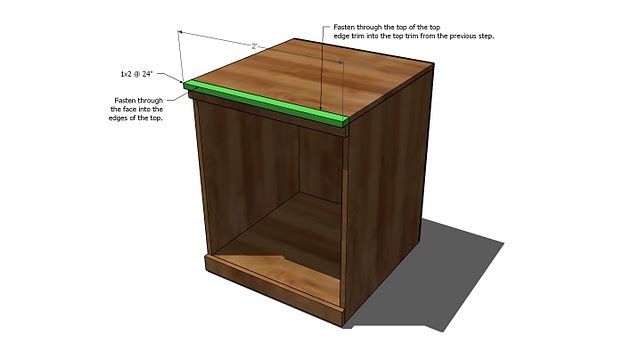
Step 6
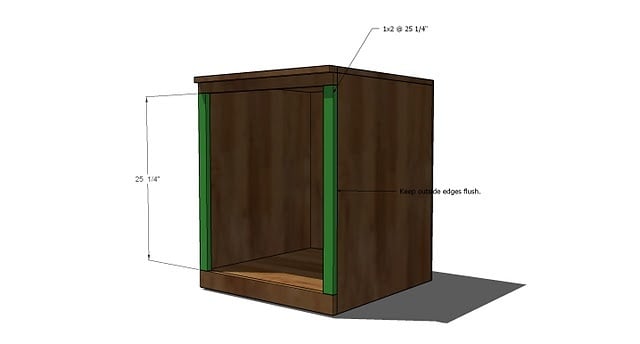
Side Trim. Fasten the side trim, as shown above. Keep outside edges flush. Use the 2″ fasteners.
Step 7
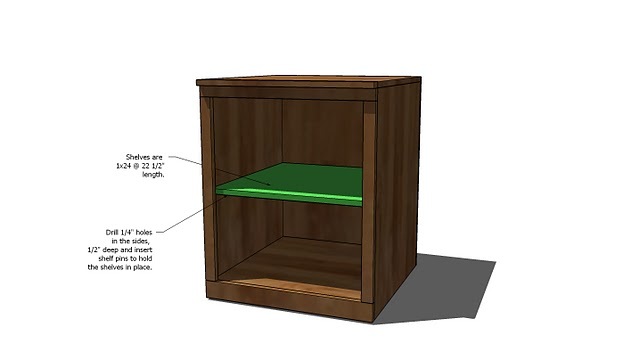
Shelves. Determine where the shelf will be placed and mark the bottom edge with a square. Then drill two holes 1″ from the ends with a 1/4″ bit, 1/2″ deep. You can make sure you are only drilling 1/2″ deep by setting the drill bit in your drill so only 1/2″ is exposed. Insert the shelf pins and add your shelf. You can move your shelf at any time.
If you are building with A1 plywood, you will need to finish the front shelf edge with edge banding. See the HOW-TO section for a post on choosing your wood that talks about Edge Banding. Don’t be intimidated by edge banding. It’s cheap and easy and looks great – the odds are your kitchen cabinets are covered in it!
Step 8
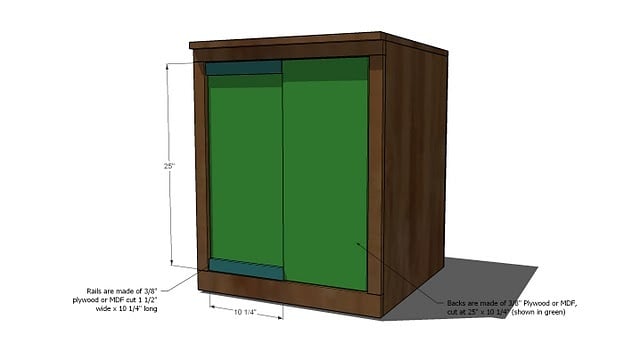
Doors. Dryfit the 3/8″ plywood backs into the base unit. Make sure there is about 1/8″ gap around the door. Check to make sure the type of hinges you choose will als fit in the door. Trim the back if necessary. Then use 5/8 staples or brad nails and glue and clamps to add the rails to the tops and bottoms of the doors, keeping outside edges flush.
Step 9

Stiles on Doors. Add the stiles to the doors as shown above, using the directions in step 8. When the doors are finished, lay flat (you can stack) and then rest a piece of plywood on top, and then a heavy object. Let dry.
Step 10

Base Moulding. If you would like to dress up your base unit, add the base moulding to the foot of the cabinet. Use the 1 1/4″ fasteners.
Step 11
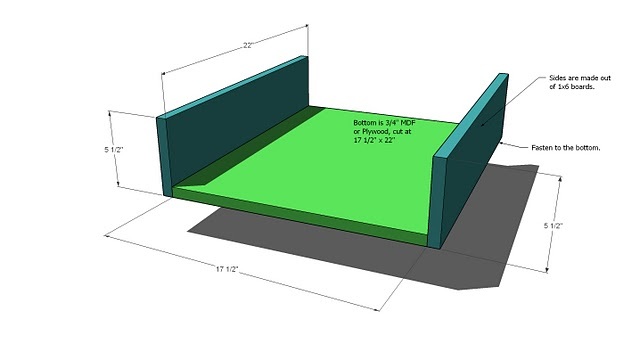
Pull Out Drawers. You might as well build the pullout drawers, because you will have a perfect sized scrap piece leftover. You will need to cut it to the size above. Then fasten the sides, the 1×6 boards cut at 22″ to the sides of the bottom.
Step 12
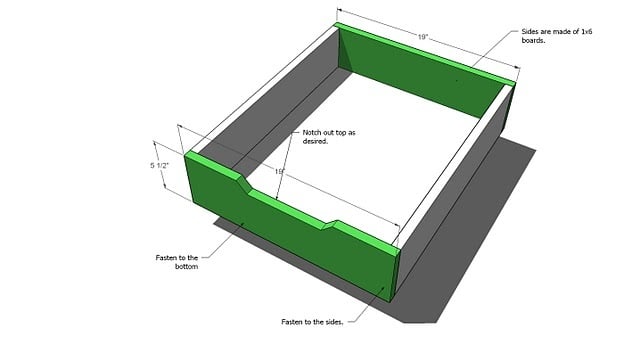
Face and Back of the Pull-Out Drawer. Notch out the front of the face as shown above. Then fasten to the sides and the bottom, as shown above. Use the bottom mount drawer slides to attach the drawers to the base of the cabinet.

Comments
Leigh (not verified)
Thu, 01/21/2010 - 00:48
Thank you for posting this! I
Thank you for posting this! I want to make some of these cabinets and turn it into the base of a desk in my kitchen. If I am going to paint them, what should I use for the top of the desk? Plywood? MDF?
Thank you again, can't wait to get building.
Moose (not verified)
Thu, 01/21/2010 - 04:05
You're the best Ana!
You're the best Ana! Remember to take some time for yourself occasionally...even if that means you dont post on the blog for a few days.
Renee (not verified)
Thu, 01/21/2010 - 04:43
Thank you so much for posting
Thank you so much for posting these plans! I've had my eye on Logan for a long time, but can't stomach paying PB's price :( Now it's looking like I might actually be able to get my living room organized :)
Thank you! Thank you! The wheels in my head are already turning as to the configuration of Logan units I need to house all our stuff :)
Nancy_Drew (not verified)
Thu, 01/21/2010 - 04:44
We found you through
We found you through Shanty2Chic and we love your site!!!
I, like Leigh, am looking for cabinets with a desk for my kitchen. This is a great start. Thanks for all the ideas!
Fitness Journey (not verified)
Thu, 01/21/2010 - 04:45
Ana!! You are amazing!! I
Ana!! You are amazing!! I only discovered your blog recently (like 1.5 wks ago) and can not stop looking at it!! This is my fav website!! Do you think there is a chance that you will be posting plans for the Logan Modular Small Wall Unit, you know, the unit in the photo at the top of your post, with the glass doors?
I appreciate all the time you put in to your blog. Remember to take some time for yourself! :)
Andrea (not verified)
Thu, 01/21/2010 - 05:09
I want you to know that every
I want you to know that every time I see the little "Knock of Wood" in bold in my google reader, it is like Christmas! Thank you so much for all the time I know this takes! You're a rock star. :)
~Andrea
Carol Anne (not verified)
Thu, 01/21/2010 - 05:44
I found you through Young
I found you through Young House Love, and I absolutely ADORE your blog! My hubby and I just moved into our first house from an apartment, so we have no furniture and no money! hehe This is a perfect solution! When the dust settles and we can start on projects, I'll be sure to share photos! Thank you for all your hard work and good luck with HGTV!
Fitness Journey (not verified)
Thu, 01/21/2010 - 05:45
OMG I need to post again.
OMG I need to post again. Are those bases with doors the same on both photos? The media unit and the small wall unit? It looks like they are!
kira (not verified)
Thu, 01/21/2010 - 06:11
Thank you so much for all the
Thank you so much for all the hard work you put into this site! my husband & i are so excited to start some projects (once the tax return comes that is ... lol). Thank you, thank you, thank you! :)
Juls (not verified)
Thu, 01/21/2010 - 06:28
In RE: to what to do with all
In RE: to what to do with all the furniture, You could Auction or sell it for Charity, Or sell it to get more wood for future endeavors.
Lea (not verified)
Thu, 01/21/2010 - 06:59
I am so glad I found your
I am so glad I found your blog, very inspiring, I would just LOVE to be able to do what you do, sounds like fun and what a sense of accomplishment to build your own furniture.
I do have a question/request; for someone like me who has never built ANYTHING, is there a way you could tell us when you post the materials the approximate cost of each item and also the tools that we would need. I don't think I have even one tool right now that would allow me to build my own furniture. VERY NOVICE I tell ya! And I think that if we could get a break down of the cost we could decide if it is something that we could even afford to build, versus going out to buy it all and being shocked by the price. I know you only build affordable things but everyone has a different budget and this way we can plan and save or go out and buy. I know you are super swamped and busy, these are only suggestions that maybe you could work in in the future, I know that I would love to see it and I think others would too. I hope you get to be on the Design Star and THANKS so much for offering a blog like this, I LOVE IT!!!
Laurie (not verified)
Thu, 01/21/2010 - 07:57
Since you live in Alaska,
Since you live in Alaska, shipping the winning furniture to the States would be very expensive. I think you should list every charity within driving distance to where you live that would accept furniture, and the winner of the giveaway could get to pick which charity or needy family it gets donated to. That way the furniture doesn't get wasted and the "winner" gets to have a part and you've done a good deed! Everyone wins.
Ana White (not verified)
Thu, 01/21/2010 - 08:25
Hi Everyone! If you are
Hi Everyone! If you are looking for an office system, you are in luck! I decided I need an office, so you can expect the desk and hutch plans to match this collection shortly. I would be careful about what you use for a tabletop. MDF is good, and you could get away with A1 plywood if you finished it correctly . . . as in lots of sanding! You could alos purchase those premade tabletops. They work great and are cheap.
I am so sorry but I will not be posting approximate prices anymore. Because of the great difference in prices throughout my reader base, it is impossible for me to make a good recommendation. I have had numerous emails of people having an expectation, and the price being different where they live, and the readers being upset. I would head over to you hardware store with a notebook and write down the prices of plywood, boards, and other supplies, and keep this list handy for future reference.
The Logan collection is very deep. This means more wood, and that means more expensive. Also, whenever you can paint over stain, that is going to save you tons.
Ana
Jennifer (not verified)
Thu, 01/21/2010 - 08:34
I love that you think so much
I love that you think so much of yoru readers..."You probably already built the media base from yesterday..." Ha! Sadly, I don't move that fast- but I love that you think we do. Don't be so hard on yourself about not posting fast enough, I am just thrilled I have found you as a resource...Don't Burn Out!!! I'm thinking that I will sloooowly be building the logan set over the next few months (years?) My tv isn't nearly so large, so I may have to figure out a way to modify it a little. (If I could afford a tv that big, with a living room large enough to put it in, I might just have enough to spring for the actually pottery barn furniture.) Thanks so much for posting- you're great.
Jennifer (not verified)
Thu, 01/21/2010 - 08:39
Back again- just saw you are
Back again- just saw you are adding office furniture to the list! LOVE IT!!! I think you are reading my mind. I have been wanting a desk, and have been trying to figure out a way to build one, maybe using a piece of inexpensive ikea butcher block as a top....I will stay tuned!
Crystal (not verified)
Thu, 01/21/2010 - 13:22
I check your blog everyday
I check your blog everyday for new items, but would be fine with a weekly post! ha, like my opinion matters...
but I wanted to thank you for sharing your talent and I cant wait to build some furniture for our house. I plan to start with the farmhouse bed and move on to media stuff.
If you are going to make furniture for a web show, you should then sell it on ebay or Craigs List. People will buy it! I would...
Braden and Melanie (not verified)
Thu, 01/21/2010 - 17:07
I cannot explain how happy I
I cannot explain how happy I am that you are going to make plans for the desk. I have wanted this desk system since I was in highschool. I have been searching for something similar to no avail for months, and the day that I almomst gave up and bought posted the logan base and gave me hope again! Thank you Thank you Thank you!
Amanda (not verified)
Fri, 01/22/2010 - 10:07
Great idea! I've been
Great idea! I've been wanting to build something like this in my library (the first picture) so I can hardly wait for all the rest of the plans! Thanks so much!
tinav307 (not verified)
Tue, 01/26/2010 - 08:51
Ok so I am going to try to
Ok so I am going to try to build this logan 24" base and am trying to understand the plans so I can go buy mdf. I am not sure if I am understanding correctly but you say to cut the 3/4 inch mdf 23 1/2 inchs wide and 8' long and you say you get 4 strips, if mdf is 4x8 my calculations aren't adding up. Does that mean in the original lumber list it should have been 2 sheets of 3/4" mdf? I am somewhat new to building and this will be the biggest project i have taken on so I could be reading wrong.
Thanks again for your site and I can't wait to build all kinds of things from it. Are you going to post the desk plans too? thanks Tina
tinav307 (not verified)
Tue, 01/26/2010 - 09:12
Ok so I think I get it. The
Ok so I think I get it. The 23 1/2 strips should be 4' long not 8', is that right?
Ana White (not verified)
Thu, 01/28/2010 - 08:04
I would generally cut your
I would generally cut your strips the longer way because that gives you more opportunities to use your boards. And sometime you may need a board longer than 48"
bride (not verified)
Sun, 02/07/2010 - 16:04
OMG...I just found your site
OMG...I just found your site a week ago and I am building so much! I started with the farmhouse bed. I'm working on the Logan center now. I do have a question though! What happens if you use your "check for square" tip and you find out it is not square?? I am having a major problem getting these to be square and I keep fiddling with them, but I always get off just a tad!
I also had a suggestion for you: I saw many of your readers wish they could estimate the cost of each unit, but you had stated in other comments that you didn't want to do that because the price varied so much from location to location. Why don't you post a link for each board or MDF sheet to the accompanying product on the Lowe's website or Home Depot website? Both sites have zip code calculators so a reader could punch in their zip code and they could see what the product would cost at their local store. It would provide a simple way for readers to estimate their cost before starting to build!
Also, it really helps me to have cut layouts of the MDF before going to the store. I saw that Shanty2Chic did this on the Cameron center, and I did the same thing on mine. Could I suggest posting cut layouts or linking to your readers who have created cut layouts and posted them online already so that new readers can benefit from it.
THANKS SO MUCH. This site is so fantastic and I've told everyone who will listen how awesome you/your site is!
Anonymous (not verified)
Mon, 02/08/2010 - 07:03
Bride-- my dad and I built
Bride-- my dad and I built the logan base this weekend and were having the same problem. For us, the solution was clamps, lots and lots of clamps, and an extra piece of wood to lay over the top to tap it to square witha hammer before putting in the screw/ finish nailing.
Mel (not verified)
Fri, 02/12/2010 - 07:53
Hi Ana,If you have time,
Hi Ana,
If you have time, could you also show us how to do the lower drawer bases and upper doors in the first photo? This would be great in my dining room...
Thanks so much!
Melissa (not verified)
Tue, 03/09/2010 - 15:27
Am I missing it, or is there
Am I missing it, or is there a post that shows how to do the accordian doors on the Television section in the photo on this post? I love your plans and I love that piece. 4 children give me a great desire to hide my TV!
orange sugar (not verified)
Fri, 03/12/2010 - 17:40
I am wondering the same thing
I am wondering the same thing as Melissa. I don't think you posted the plans for the piece that allows you to close off the TV. Or am I just missing it? I hope you will post those plans eventually. I have always wanted a cabinet where I could close off the TV but could never find one big enough.
The view from … (not verified)
Tue, 12/07/2010 - 04:30
[...] has plans on her site
[...] has plans on her site based on Pottery Barn’s Logan modular wall system that she calls the Classic Storage Wall Base and Classic Storage Wall Hutch. And the wonderful thing about building it yourself? You can [...]
Anonymous (not verified)
Wed, 03/09/2011 - 10:33
Bigger Bases
Would I need to change anything structurally if I wanted to build them 36 inches wide instead of 24 inches? I was thinking maybe something under the base and along the back?
college entran… (not verified)
Wed, 07/25/2012 - 00:10
An interior designer is
An interior designer is someone who conducts such projects. Interior design is a multifaceted profession that includes conceptual development, liaising with the stakeholders of a project and the management and execution of the design.
Regards,
http://www.collegeentranceessays.org
BeachyBabe
Tue, 12/29/2015 - 09:41
36" wide side units
Would this plan be adaptable for 36" side units instead of 24"? If so, do you already have plans for those changes, or would you be able to provide me with some suggestions to change the dimensions? Thank You!