
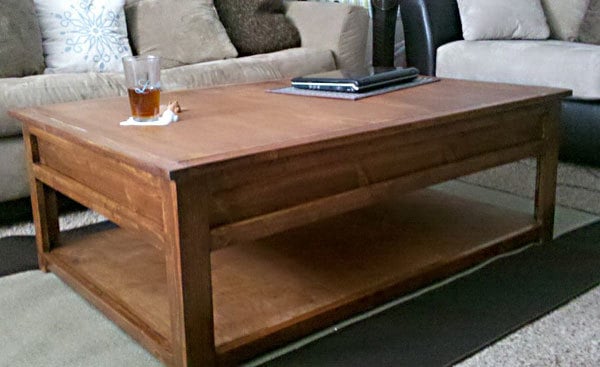

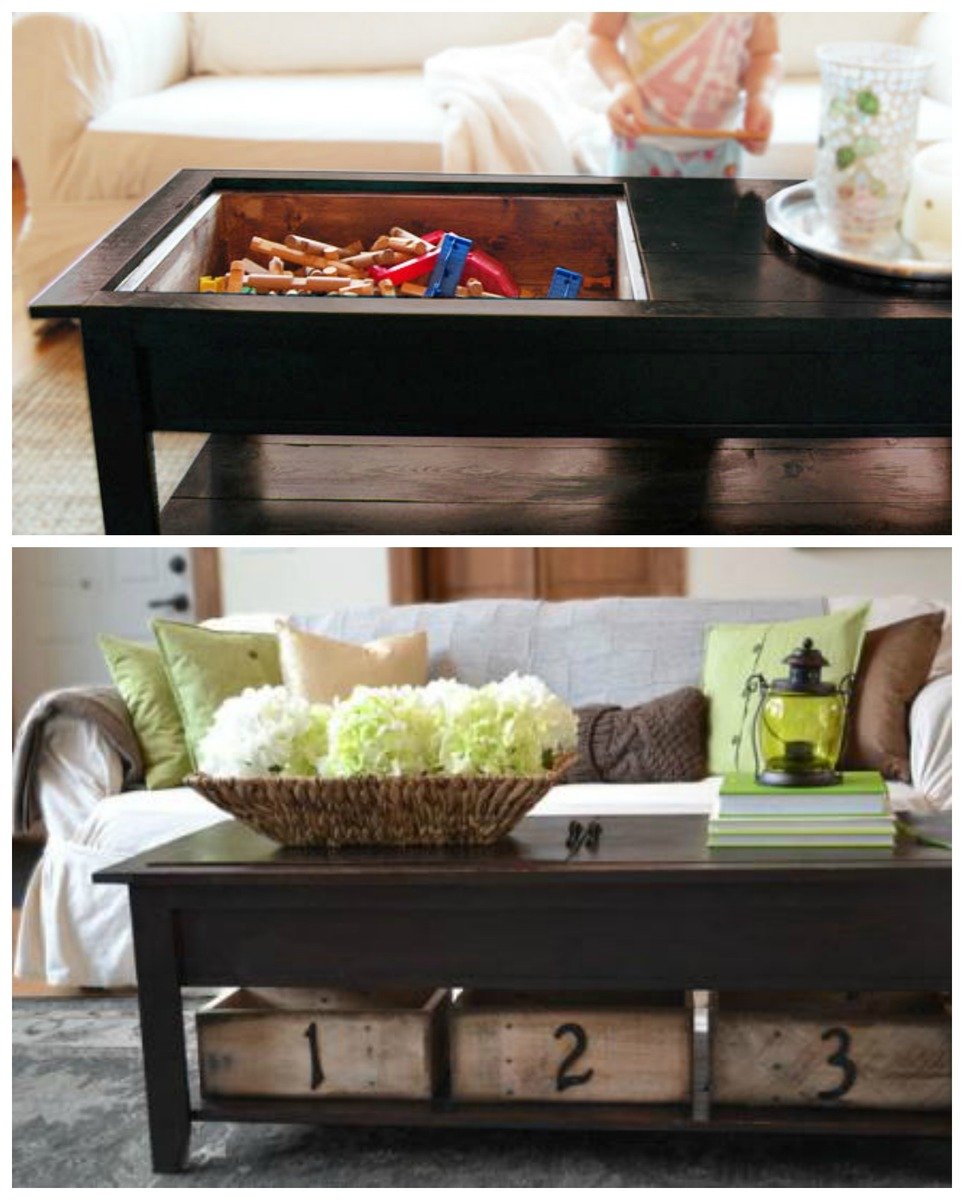
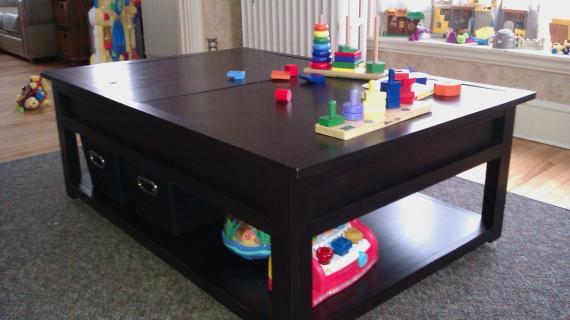
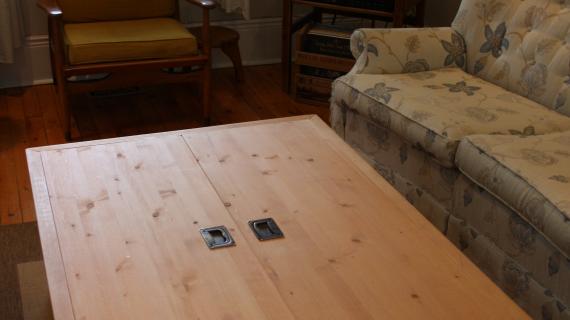
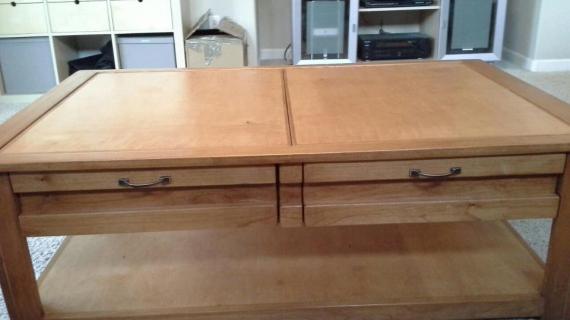
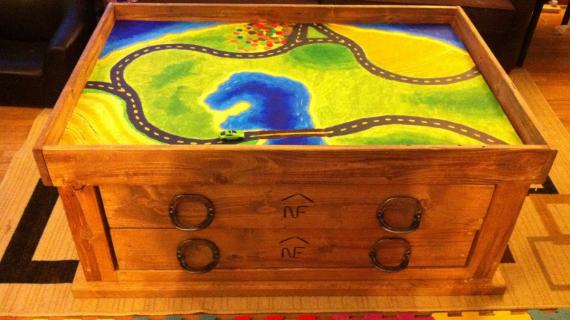
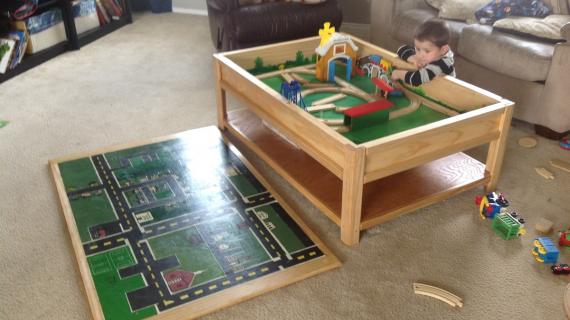
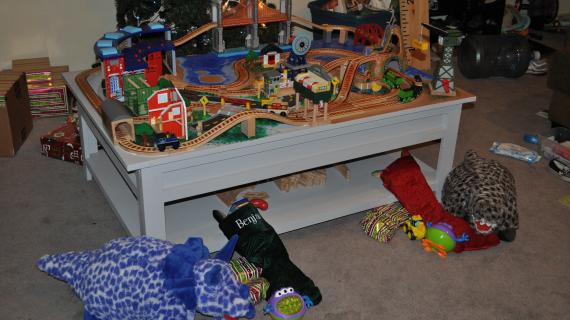
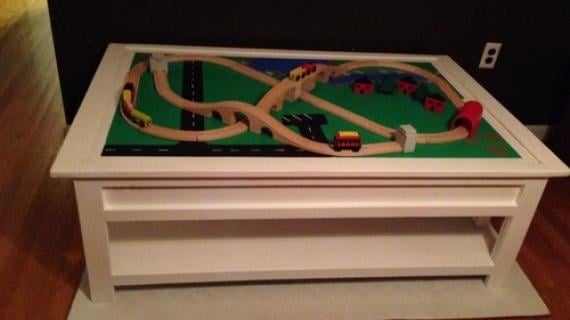
DIY Coffee Table with hidden train table storage inside. Special thanks to Christy for sharing her photos with us.
For a smaller version, check out my original wooden train table - lego - lincoln log etc play table plans here.
Thank you for your beautiful comments and positive feedback on our Lego Table. We all are special in our own unique way. But I am truly blessed because you are giving me an opportunity to follow my dreams, and I can't express how appreciative I am. Truly, thank you for your support.

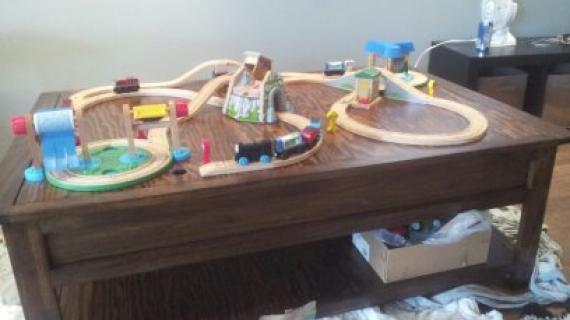
After posting yesterdays Lego Table, I thought it only fair to then post the matching Train Table

The train table is double the width of the lego table. You just need more room for trains to make their tracks go round.
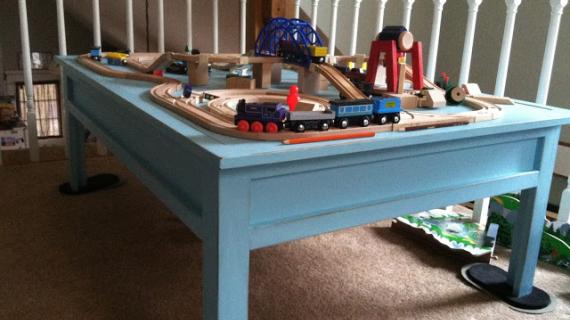
 But you need that extra space for train tracks to wrap around. We tried a small track on Grace's Lego Table, and there's just not enough room.
For this train table, you won't need a whole lot more supplies. Just a full sheet of plywood instead of a half, and a few extra feet of 1x6s and 1x3s and 1x2s.
Preparation
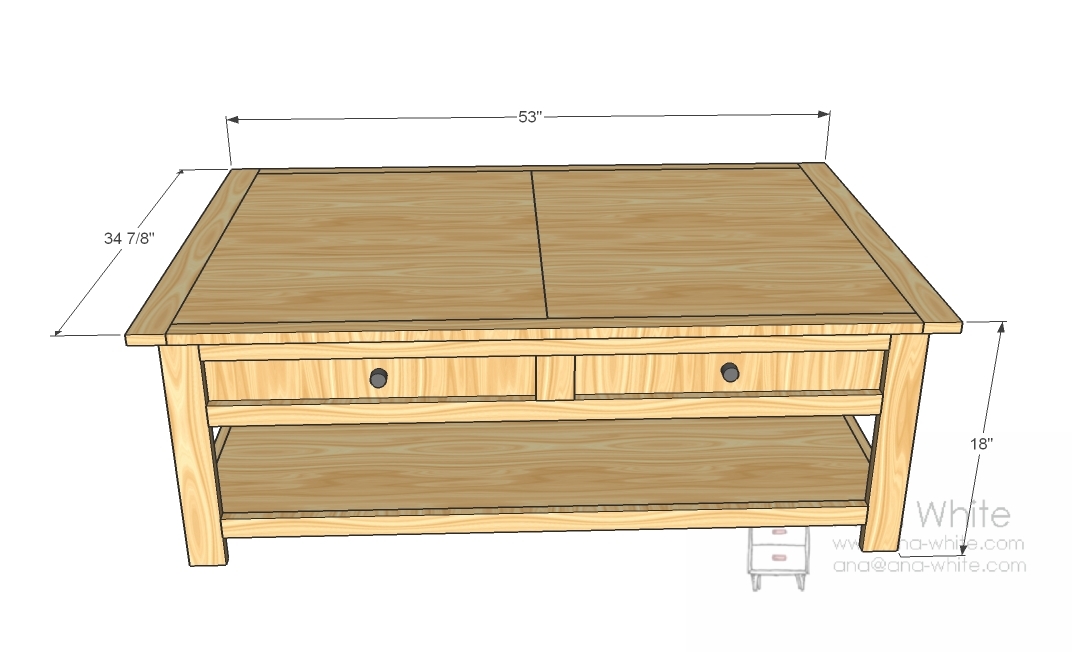
1 – sheet of 3/4″ plywood or MDF cut into strips 31 7/8″ wide x 48″ long (you will get exactly 3 strips) 1 – 1×6, 8 feet long 1 – 1×6, 6 feet long x – 1×3, 8 feet long x – 1×3, 8 feet long 2″ screws 1 1/4″ screws Finish nails Wood Glue Wood Filler Finishing Supplies All visible edges will be finished, so no need for edge banding on this one.
2 – 1×6 @ 48″ 2 – 1×6 @ 30 3/8″ 2 – 3/4″ Plywood or MDF @ 48″ x 31 7/8″ 4 – 1×2 @ 17 1/4″ (Side Legs) 4 – 1×3 @ 17 1/4″ (Front/Back Legs) 2 – 1×2 @48″ (bottom shelf supports) 2 – 1×2 @ 28 7/8″ (bottom shelf) 6 – 1×2 @ 28 7/8″ (trim) 6 – 1×2 @ 44 1/2″ (trim) 2 – 1×3 @ 34 7/8″ (top end) 2 – 1×2 @ 48″ (top sides)


Instructions
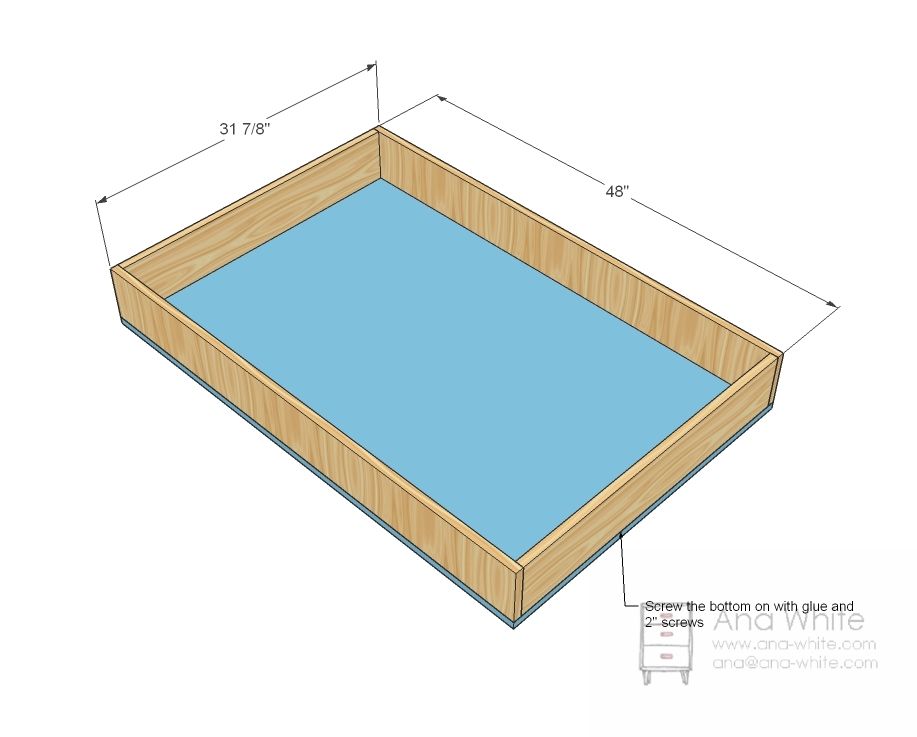
Step 1
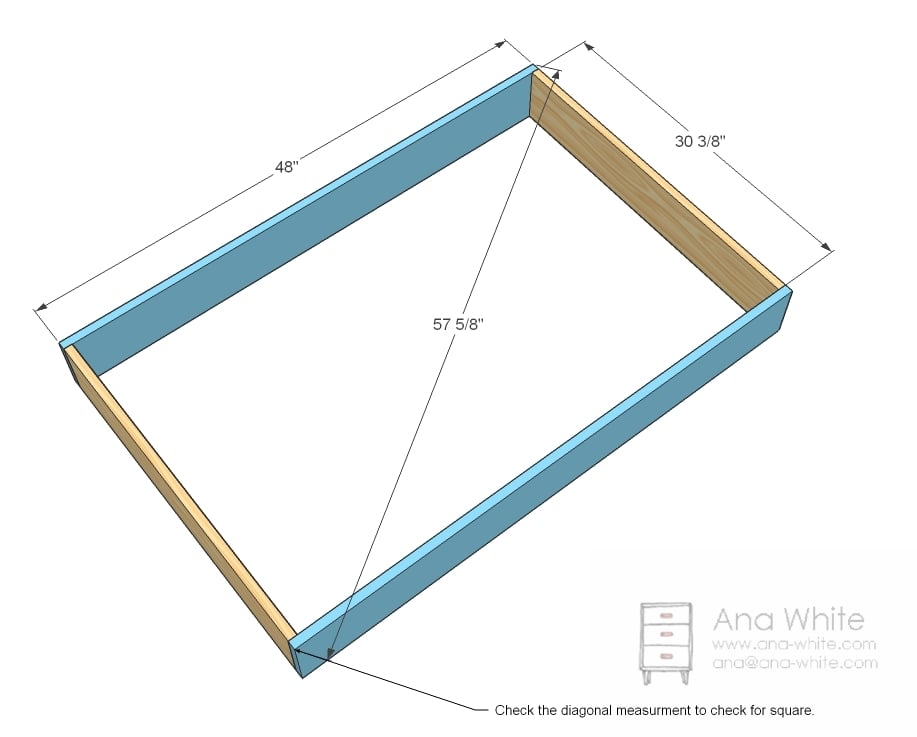
Build the Box Screw the box together as shown above with 2″ screws and glue. The measure across diagonally, checking to see if the measurement matches the diagonal above. Measure the oppostite diagonal. One diagonal will be longer than the other. On the longer diagonal, push the two opposite corners together, decreasing the distance between the corners. This is how you adjust for square. When the diagonals match, you’ve got a square box!
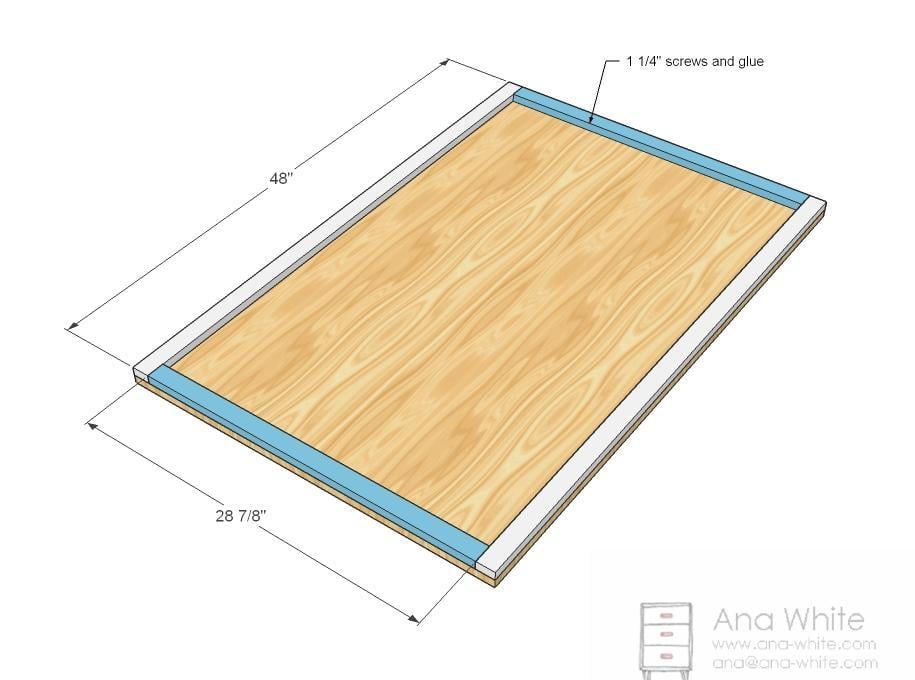
Step 2
Put the Bottom on the Box This diagram really should be upside down. Just lay one of the sheets of plywood on top of the box and screw down with 1 1/4″ screws. Of course, you should always predrill your screw holes and use glue.
Step 3

End Legs Now just screw the legs to the short ends (these are the 1×2 legs) with 1 1/4″ screws and glue. Super easy. Keep things flush to the sides and top.
Step 4

Side Legs Now simply screw the side legs to the end legs and the box sides with 1 1/4″ screws and glue.
Step 5
Step 6
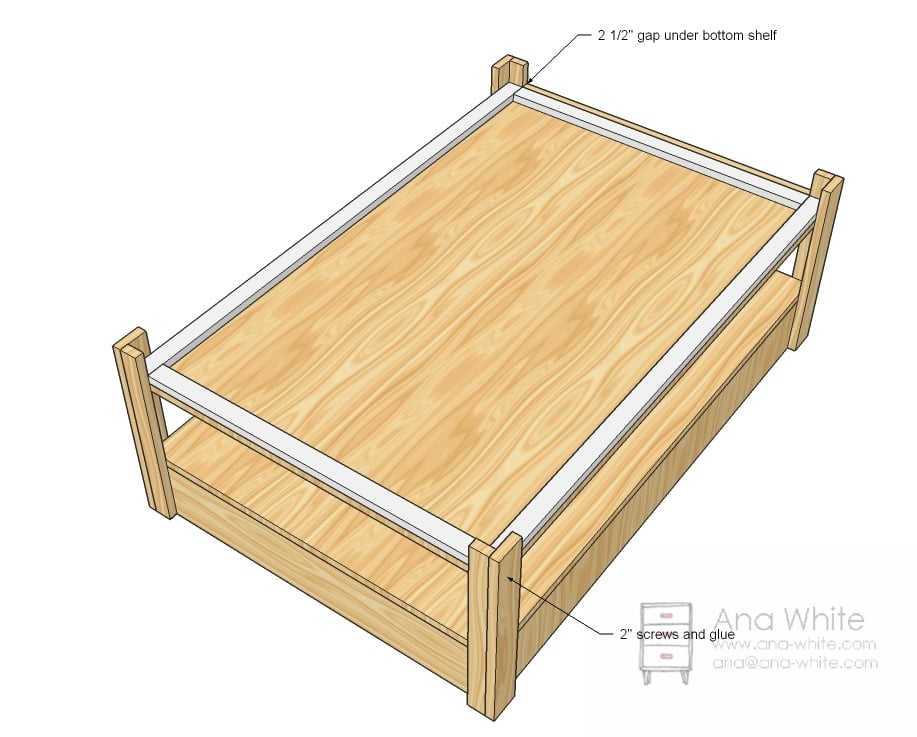
Attach Bottom Shelf Get some help on this one or turn the table on it’s side. Predrill holes and attach the bottom shelf. What I would do is to cut 2 1/2″ long spacers and screw to the inside of the legs on the underside (with the shelf in place) flush with the bottom of the legs. Then let the bottom shelf rest on the tops of these spacers as you predrill holes and screw the bottom shelf on. You could even leave the spacers in.
Step 7
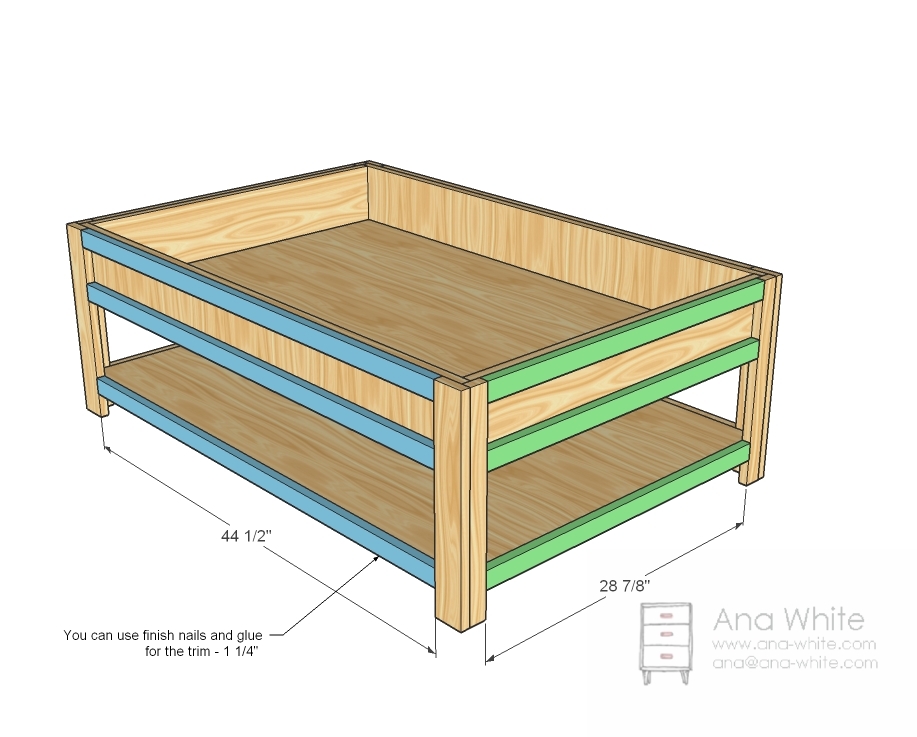
Trim Now the fun part . . at least if you have a nailer. Attach the trim to the sides as shown above. You can use screws or a good ole hammer and nails too.
Step 8

Top Trim Now the top trim. The top trim does not get screwed into the 1×6 sides, rather the legs and the side trim pieces. What I would do is layout the tabletop pieces (see below diagram) and trim around them so you have a nice tight but removeable fit.
Step 9
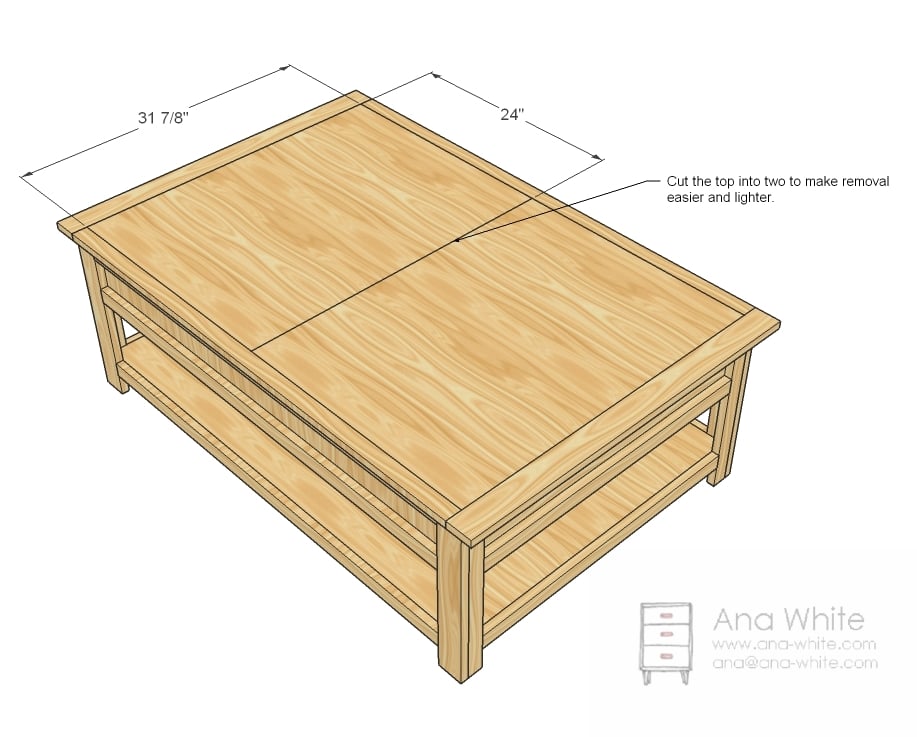
Top Inserts And those are the top inserts I was talking about. Sand them to get a nice fit. You may wish to drill a little hole in the center (half on each insert) to have a spot to pull the inserts up with. For those of you concerned about sagging, I checked the deflection and you should be able to put 70 pounds on each inset with no noticeable deflection – that’s as much as any preschooler would weigh. But if you are going to stand on it, make sure you put a foot on each insert


Comments
Joy K (not verified)
Thu, 12/09/2010 - 09:20
I REALLY think I am love with
I REALLY think I am love with this and you. Thanks so much.
Isabel Jenson (not verified)
Thu, 12/09/2010 - 09:30
You are truly awesome!
You are truly awesome!
Becky (not verified)
Thu, 12/09/2010 - 10:01
Holy Cow! I was JUST thinking
Holy Cow! I was JUST thinking of checking your site for a train table.
The original plan for Christmas was a play kitchen (3.5yo boy, 2yo girl) but my boy wrote a letter to Santa. And sat on his lap. And ALL he can talk about is trains trains trains.
I give up! Trains it is. :)
But I'm also going to build that play house with the bed on top. I can hardly wait for THAT project!
Tanjia (not verified)
Thu, 12/09/2010 - 10:03
hmmmmm... I'm thinking this
hmmmmm... I'm thinking this would also make a great home for Littlest Pet Shops and Strawberry Shortcake dolls that end up all over my living room every day. I think I may try and get this done this month!
StevenC (not verified)
Thu, 12/09/2010 - 10:20
This is a great looking
This is a great looking table!
You might mention that something this size will only be practical for N-scale trains. Any other larger scales and you severely limit the fun by limiting the space.
-- Steven
Joanne (not verified)
Thu, 12/09/2010 - 10:20
Yes little pet shops take
Yes little pet shops take over everything, why not a little pet shop world hehe. i need to have stacking tables, 3 sections lol - trains, legos and little pet shops ;p
we'll def. be making this i wonder which toy will trump.
Sierra (not verified)
Thu, 12/09/2010 - 10:22
Thank you....thank you!!!!
Thank you....thank you!!!! Lego's have taken over my life! I loved the lego table yesterday, but it was a bit small to house millions of legos scattered around my house by my 3 boys and 2 girls. School is out next Thurs., so I'm hoping I can get building next Fri.
meg (not verified)
Thu, 12/09/2010 - 10:59
Perfect! Ana it is like you
Perfect! Ana it is like you read my mind! This will be our first project on 2011! Hopefully Santa brings me that Kreg Jig I have asking for
Rebecca (not verified)
Thu, 12/09/2010 - 11:23
Love this project! Thanks for
Love this project! Thanks for giving us another option with the table. The size of the room would also make a big impact on which project to choose. These tables make me want to stand up and cheer for STORAGE!
Tasha (not verified)
Thu, 12/09/2010 - 16:21
I love, love, love the lego
I love, love, love the lego and train tables! I'm so excited to eventually make the lego table! Is there a possibility that there is also a side table in the process? I would love to have a design like this in a side table for laptops, notepads, stuff that gets left on the side tables in the living room/family room.
James Reeves (not verified)
Thu, 12/09/2010 - 17:08
Ana, once again your nothing
Ana, once again your nothing short of awesome, wish my wife took even 25% interest in woodworking as you and many blogging here have l would be in lala land excellent project as always.
Jim
From Trenton, Ontario, Canada
Shannon (not verified)
Thu, 12/09/2010 - 17:20
You must have been reading my
You must have been reading my mind.
Mary (not verified)
Thu, 12/09/2010 - 17:58
Super fabuluso! I cannot,
Super fabuluso! I cannot, cannot, cannot wait to build this!
Cora (not verified)
Thu, 12/09/2010 - 23:04
Can anyone scroll down the
Can anyone scroll down the furniture plans by type? I can only go down the visible types on my screen so I have clicked "nightstands" but nothing beyond that. And I'm trying to find the wall cubby organizer project to make for a spice rack. Love the plans Ana. Thank you.
Melissa (not verified)
Fri, 12/10/2010 - 03:09
This is AWESOME!!! My son
This is AWESOME!!! My son has a traditional train table in the play room, but I would love one of these in my living room! Can we say toys taking over? The kids want to have them in the living room as we spend time as a family in there, but agh where to put them. This is a solution I've been looking for!!!
Amber (not verified)
Fri, 12/10/2010 - 06:10
Hurray!!!! This is the table
Hurray!!!! This is the table I have been waiting for! Thank you! Thank you!!!
Kaely (not verified)
Fri, 12/10/2010 - 08:11
Oh yes! We need hidden
Oh yes! We need hidden storage side tables side tables.
iluvsawdusting (not verified)
Fri, 12/10/2010 - 09:14
I wish my husband did....
I wish my husband did....
Lisa (not verified)
Fri, 12/10/2010 - 09:55
Ahhhhh! The is AWESOME! I
Ahhhhh! The is AWESOME! I don't know if we have room for a coffee table, but it be worth it to squeeze this in some where. Thank you Thank you THANK YOU!!
Wanda (not verified)
Fri, 12/10/2010 - 10:48
I love the tables and I love
I love the tables and I love the color. Is it a stain or paint? Great Job!
Christy (not verified)
Fri, 12/10/2010 - 20:34
LOVE IT! Again Ana, LOVE IT!
LOVE IT! Again Ana, LOVE IT!
Patti (not verified)
Sun, 12/12/2010 - 10:35
I had just been talking to my
I had just been talking to my hubby about how I would love to have a coffee table that can turn in to a train table. Thank you so much for these plans
michelle m (not verified)
Sun, 12/12/2010 - 18:26
Nice! I pictured it slightly
Nice! I pictured it slightly different tho... i pictured would be four tops with four cubie holes for storage shaped as a square.. this way you could have separate spots for legos, trains, cars, and tracks.
Kelly (not verified)
Mon, 12/13/2010 - 02:42
I love the idea of this and
I love the idea of this and the lego table, but am not jazzed about the style. I am totally new at this building stuff, so not that great at my own modifications. Any plans in the works for something similar but a little mid-century modern? A little herman miller, art decor, in that range. Thanks so much!!!!
kellie (not verified)
Wed, 12/15/2010 - 20:51
Thanks Ana!!! I cant wait to
Thanks Ana!!! I cant wait to make this for our boys! I plan to modify a little by putting a couple of hinges on the backside and adhering the train mat to the other side...it will be more of a kids table than the intended mom table, but looks sturdy!
KD (not verified)
Thu, 12/16/2010 - 14:21
This is good for toy trains
This is good for toy trains like wooden thomas the train type of sets. Not really model electric trains. Although if you were using model trains you are right N-scale would be the biggest size to use realistically.
Matt (not verified)
Wed, 12/22/2010 - 15:49
Just a note that your
Just a note that your shopping list is missing any reference to the 1x2's that are called for in the plans. I think I used 9 - 8' 1x2's to complete it.
Thanks for the plans -- this is a huge table and will serve our kids well.
Ana White (not verified)
Thu, 12/23/2010 - 07:07
Wanda, it's several layers of
Wanda, it's several layers of espresso. My finish is beautiful, but it took 2 WEEKS to dry! Not recommended to put stain on that thick. What I would do is go for semi transparent stain in espresso with high gloss poly over it.
Jenny (not verified)
Tue, 12/28/2010 - 08:51
Any ideas on how to convert
Any ideas on how to convert this to a dining room table? (Rectangle shaped, say 80 or so inches long?)
Ana White (not verified)
Thu, 12/30/2010 - 13:04
This is EXACTLY what I was
This is EXACTLY what I was thinking! A cutting mat on the back for cutting fabric, all my craft supplies inside the table! Standard table height is 30".
christy (not verified)
Sun, 01/02/2011 - 08:25
Ana.... there are no 1x2 on
Ana.... there are no 1x2 on the shopping list.
I picked up eight.... but I just saw someone got nine.
grrrr. You might want to edit that soon.
Renee (not verified)
Sun, 01/02/2011 - 11:44
Yes I got 8 1x2s at 8 ft and
Yes I got 8 1x2s at 8 ft and 1 at 6 ft...
Renee (not verified)
Sun, 01/02/2011 - 11:46
Well I had originally planned
Well I had originally planned on just doing the Lego table, but my son got a train set from his grandparents for Christmas so a train table it is!
I am going tomorrow to get the rest of the supplies I need! This will probably be done by Tuesday!!!!
Thanks ANA!!!!!!!!!!!!!
Renee (not verified)
Sun, 01/02/2011 - 11:47
Oh and I am also adding a 1x6
Oh and I am also adding a 1x6 in the middle of the storage for separation...
Robin (not verified)
Mon, 01/10/2011 - 09:18
So, I'm thinking of excluding
So, I'm thinking of excluding that shelf at the bottom and raising it up so some little preschool sized chairs can fit under here. Maybe ideal for a little homeschooling desk?! Maybe?
Ana White (not verified)
Mon, 01/10/2011 - 09:27
Robin, I really like this
Robin, I really like this idea! Preschool desks tend to be about 21" high and chairs about 14" high. Perhaps what I would consider doing is using 1x4s for the box instead of 1x6s to give a little more leg room. Good luck!
Gerri (not verified)
Mon, 01/10/2011 - 15:00
oooh, wish I had read the
oooh, wish I had read the comments and really taken note of all directions before going to the store. lol. Halfway done with my table and no more 1x2s :( I know it's been mentioned Ana, but if you get a chance to update/edit this might help others in the future. Thanks again!
p.s. I would really love the espresso, but thinking that a dark paint would be more practical for my needs. Really wish I had the time to wait for the stain though-it's beautiful!!
Catherine (not verified)
Fri, 01/14/2011 - 04:27
This is just what we need in
This is just what we need in our house - maybe even two, lol! Thanks!
Katie (not verified)
Tue, 01/18/2011 - 11:30
I'm thinkin' when someone
I'm thinkin' when someone spills their orange juice, you're not gonna be smiling about that table. =P lol
Dave Le Marchand (not verified)
Mon, 01/24/2011 - 02:39
I think when I finally get
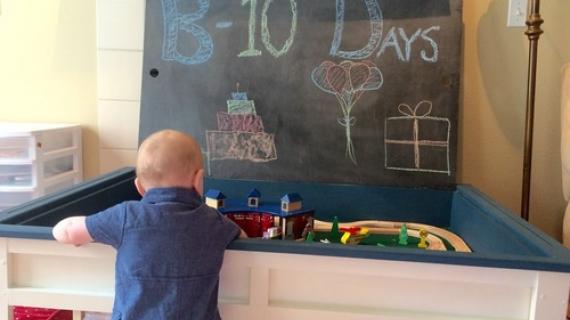
I think when I finally get around to building this that I'll put a dry-wipe board under the lid so that the kids can flip it over and draw to their hearts content.
What a great idea Ana - thanks!
Guest (not verified)
Fri, 04/15/2011 - 17:04
love love love this
ana so are there plans in the work for a sand/water table that i can throw outside for my 4 yr olds? this table is on my "to do" list, but it reminded me that i really need to build an outside table for our smaller yard! ;) Thanks!
Christina
tholthe
Fri, 04/22/2011 - 14:50
kreg jig and lego table
I love your site! You do amazing work and are an inspiration to me! I am working on the lego table and just bought the kreg Jig Jr. after reading all the good things about it. I am new to it though and am wondering what the best placement would be for the screws to put the legs on. Obviously I don't want to be able to see the holes but I can't visualize the best way to accomplish this. If anyone has some good advise for a beginner I would really appreciate it. Keep up the good work!
Donald
Thu, 06/09/2011 - 00:55
modifacation
I would probibly build this but without a bottom shelf so that people can get there legs underneath it and also make the top on a hinge with an overhanging fold up extention for if I need more table space
Chris Wozniak (not verified)
Sat, 08/06/2011 - 10:41
What grade of plywood was used?
We just built the Rhyan End Table, and used cabinet grade pine plywood. But the stain we used (dark walnut) kept all the grains a very light shade. What type of plywood did you use to keep the grains a dark color? Or is it more about the stain than the wood?
We want to build the lego table next, but we're worried about the grains being light again.
Thanks for your help, this site is the best!
Karis (not verified)
Fri, 02/03/2012 - 18:49
Game Table
I have been wanting a game table/coffee table. Think this will be the perfect solution! I think I will chalkboard paint one side so we can keep score if needed and then flip it back over to a finished coffee table. Definitely adding the divider to the middle and leaving out the bottom shelf so we can sit around it to play games and put our legs underneath the table.
Thank you Ana!
Pia (not verified)
Tue, 05/15/2012 - 04:17
Square version
Hi, so I really love this table and want to make it, but a square version would absolutely fit best in my livingroom. If anyone has made this in a square version or really want to help me adapt the plans to a 40x40 table I would be super grateful!
Nolan (not verified)
Mon, 11/05/2012 - 06:01
Confused
Hi Ana,
I feel like a bit of a newb but I need your help! Your shopping list does not mention anything about 1x2's but the plan uses 1x2's. Also how many 1x3's are needed as the shopping list shows 'x' for quantity.
Thank you for the help!!
Fuzzball (not verified)
Mon, 12/03/2012 - 13:35
Nolan, I used 9 – 1x2x8 and 2
Nolan,
I used 9 – 1x2x8 and 2 – 1x3x8.
joemckelvey1@h…
Thu, 12/26/2013 - 19:04
Great table--a few thoughts...
1. 3/4 inch MDF adds a LOT of weight to the base of the train table itself---requiring more screws. Next time I would use 1/2" instead.
2. As others have said, I skipped the bottom shelf which saved material and time.
3. If you read this far, you know to buy extra 1x2s.
knylen
Fri, 12/18/2015 - 07:04
1/4" lip on table top?
I really want to make this table for my daughter. I have very little experience in projects like this but I think that it is straight-forward enough that I can be successful. My question is this: if the top trim (1x2 and 1x3) are flush, won't there be a 1/4" lip from the trim to the 3/4" plywood tabletop?
Thanks,
Kevin