Community Brag Posts

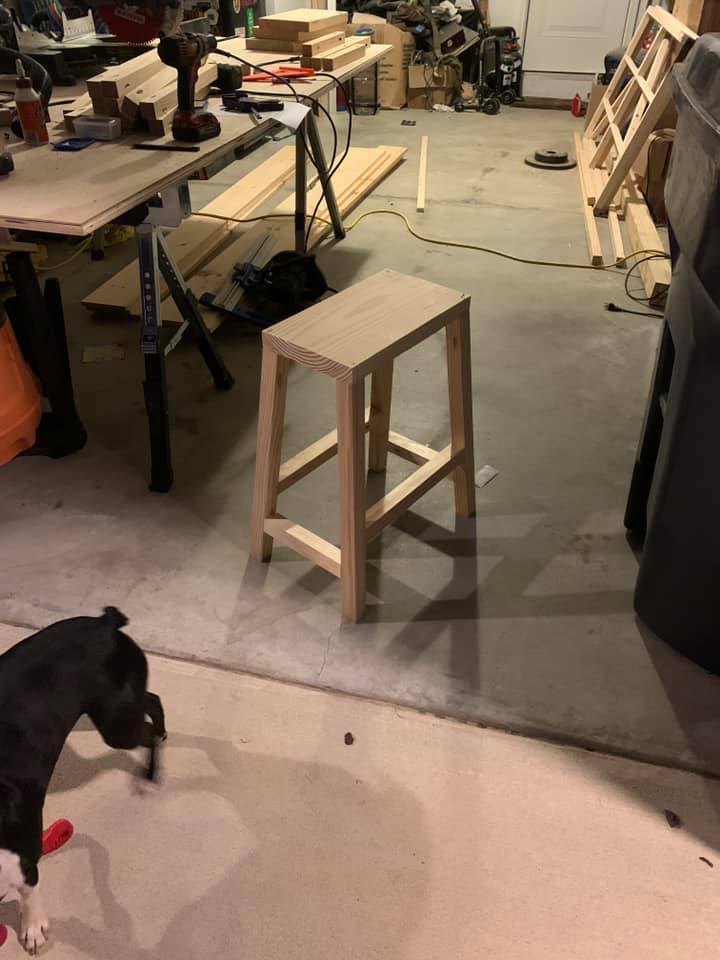
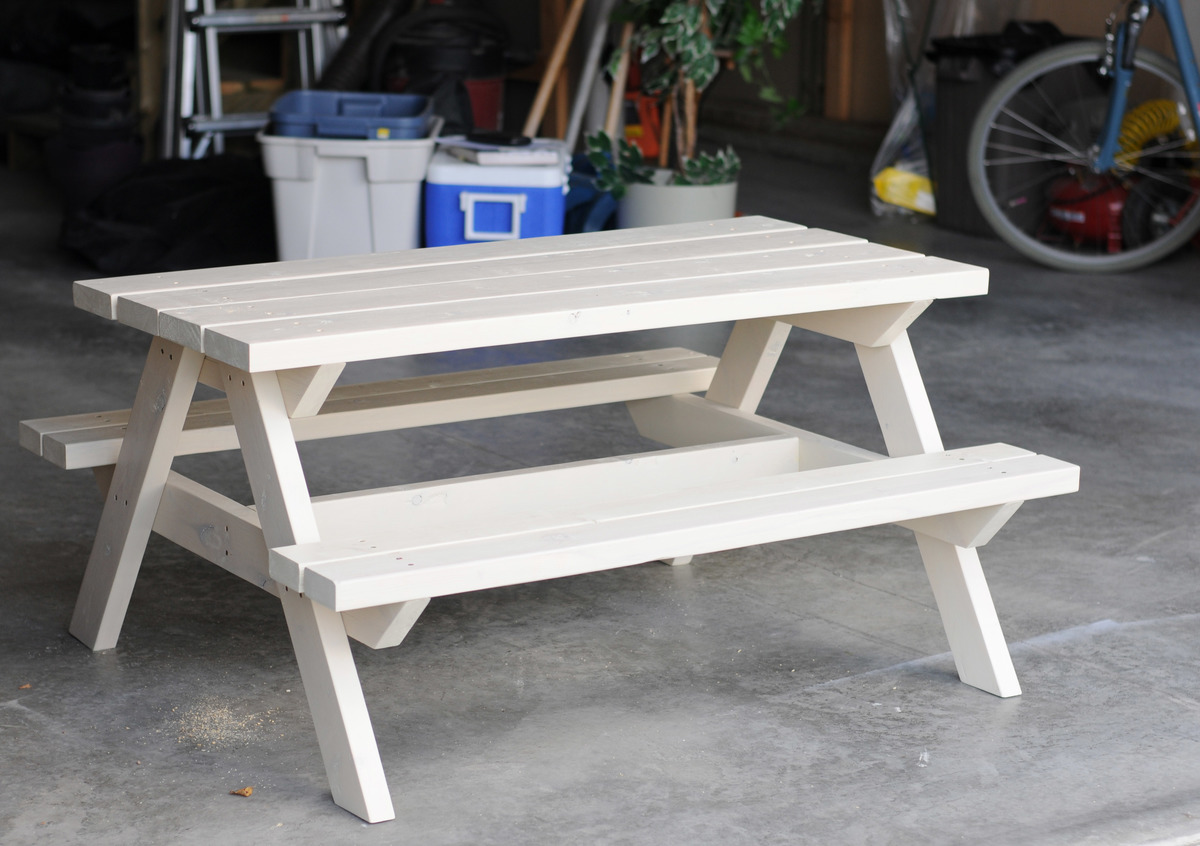
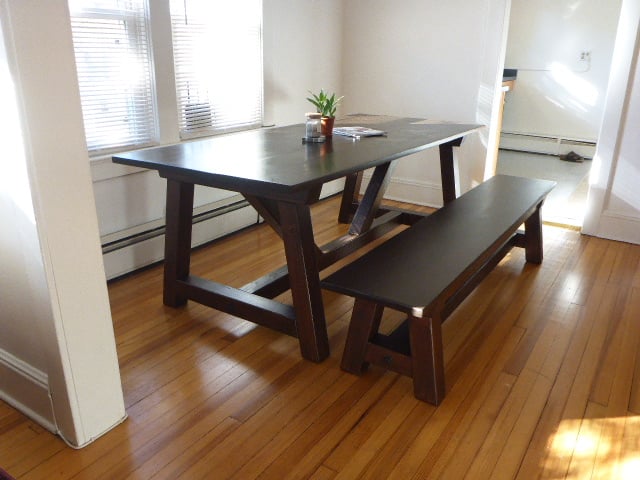
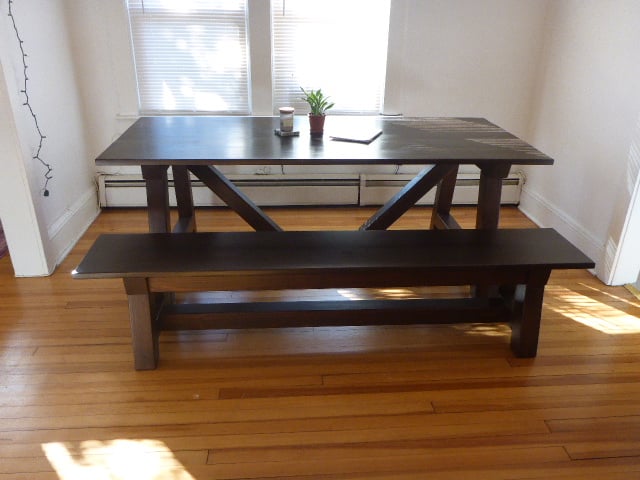
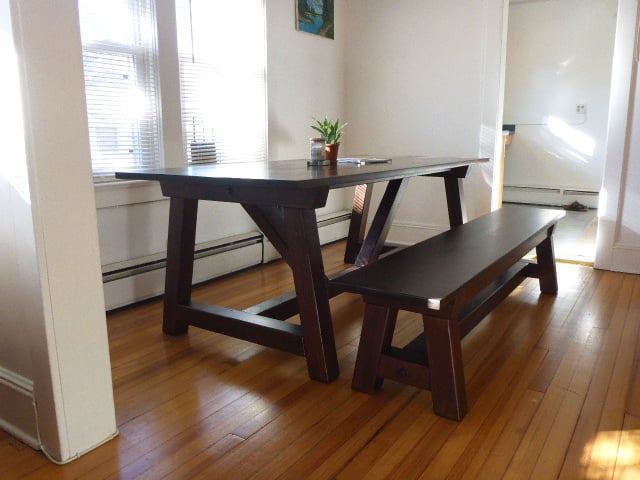
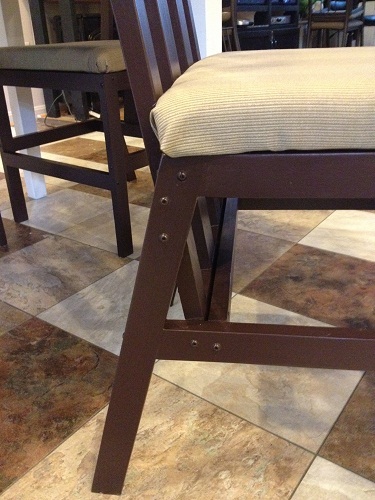
Farmhouse Counter Stools

Submitted by wbengle77 on Wed, 09/23/2020 - 09:09

This was a pretty strait forward project, the only change i made was the wood used. I did not use the 2x2 furring strips i opted for the upgraded Select Pine Boards. So it changed from 3 bucks to 12 a board. I also used metal nylon feet.

Built from Plan(s)
Estimated Cost
depends on wood and finish
Estimated Time Investment
Afternoon Project (3-6 Hours)
Finish Used
I used an antiquing wax, then I used butcher block oil and wax to finish.
Recommended Skill Level
Starter Project

Comments

Potting Bench

I am a complete newbie to anything woodworking. I just turned 60 and used a drill for the first time about 9 months ago. Thanks to Anna and her plans and videos, I have developed some some self confidence in this art and absolutely loving it.

Farmhouse coffee table and king size bed is next.

Thank YOU Anna!!! You totally rock!!!!!!!!

Estimated Time Investment
Day Project (6-9 Hours)
Recommended Skill Level
Beginner

Comments

Harriet Outdoor Dining Chair

Submitted by Jamaunzie on Sun, 03/31/2013 - 10:03

I saw this chair and was looking for something for back yard BBQ's I just beefed it up by using 2X3's instead of 2X2's left the measurements the same. I was playing around with Minwax Express Color to see how well it does and I like it helps control Blotching very easy to use except be careful when squeezing the tube or you like me will have a permanent shirt for staining

Built from Plan(s)
Estimated Time Investment
An Hour or Two (0-2 Hours)
Finish Used
Pine
Recommended Skill Level
Beginner

Modified Garage Shelf (w/ Workbench)

Submitted by Anonymous (not verified) on Thu, 06/08/2017 - 11:15

Great plans allow for versatility and easy customization. Put the whole thing together in a day w/ one other person. My set up is 16' long - 5' on the side shelves and 6' for the workbench. Added a pegboard and fluorescent light under the top middle shelves. I'm also designing a slim drawer to go under the workbencheck area. Thanks a bunch!

Estimated Cost
~$150 including pegboard.
Estimated Time Investment
Afternoon Project (3-6 Hours)
Finish Used
Will stain dark in the future
Recommended Skill Level
Starter Project

Comments

Small cedar shed

Submitted by sarusso82 on Sun, 08/08/2021 - 05:41

First shot at using plans from Ana, and thought it was great! Can’t wait to try another!

Built from Plan(s)
Estimated Cost
500
Estimated Time Investment
Weekend Project (10-20 Hours)
Recommended Skill Level
Beginner

Comments

Clubhouse based on Ana's Plan

Submitted by MattSl on Tue, 05/03/2011 - 09:18

I used Ana's plan as a base.

I changed it from 8x8 to 8x12, made the 4x4x8's to 4x4x10' for a higher main platform and swing platform, and added a 12' long monkey bar set to the other side. Also, an 8' climbing wall and a plank walkway to accompany the two slides.

For the clubhouse, I used Hardiplank 4x8 sheets for the siding and an EZ-Framer kit for the structure itself.

The slides I purchased from Lowes, monkey bars from Amazon, and the swing frame braces from Amazon as well. The swing kits I got from ebay.

Estimated Cost
1500
Estimated Time Investment
Week Long Project (20 Hours or More)
Recommended Skill Level
Intermediate
Seasonal And Holiday

sandbox with benches

Submitted by nananana on Fri, 07/10/2015 - 13:18

This sandbox has been around for some time BUT it is still a great project to build The plans were simple to follow and would be an excellent project for beginners. We built this for our grandson and future grandbaby. Was easy to complete in one day, including painting

Built from Plan(s)
Estimated Cost
Estimated cost was $75.00 including the wood, hinges and paint.
Estimated Time Investment
Day Project (6-9 Hours)
Finish Used
We used a flat exterior paint. paint color was Cool Bamboo. We put on two coats to preserve the wood.
Recommended Skill Level
Beginner

Comments

Seasonal And Holiday

Sewing Table for small spaces

I loaded this project months ago, but somehow it was removed I believe during one of the websit updates. So far in my wife's crafting life she generally cuts things out on the floor. It's not so good. Our dining room table is usually covered in food or playdough so she generally just spreads things out on the floor. I realized how much she needed a table, and armed with new power tools from Christmas and my birthday, I set out to make me a crafting table. This was my first project.

Built from Plan(s)
Estimated Cost
$40
Estimated Time Investment
Afternoon Project (3-6 Hours)
Finish Used
Minwax blue rub on stain and sealer
Recommended Skill Level
Starter Project

Comments

Child's picnic table

Submitted by Anonymous (not verified) on Sun, 10/14/2018 - 14:31

This turned out to be a great birthday gift. So much better than more toys. My 5 year old nieces loved it.

Built from Plan(s)
Estimated Cost
Hard to say, used a lot of 2 x 4 scrap I had already.
Estimated Time Investment
Day Project (6-9 Hours)
Finish Used
2 coats of deck stain. Sanded all the surfaces with a course grit, then a lighter grit, especially the top and seats.
Recommended Skill Level
Beginner

Comments

Seasonal And Holiday

Arbor bench from leftover trellis

Submitted by Anonymous (not verified) on Sat, 07/16/2022 - 17:57

The previous owners planned to built a rose Arbor, and left the pieces in our barn. Using the Arbor bench plan I was able to use all the pieces to build this version. Great summer hangout!

Built from Plan(s)

Comments

Loft bed

Submitted by Anonymous (not verified) on Mon, 01/14/2019 - 07:47

We had to change to a slightly different size wood as the sizing of the original plan would have been very expensive in the UK. 

We also had to adjust to a different mattress size (90x190cm). 

We also had to work around a radiator. We left no gaps on the platform. 

Huge hit and very pleased with the result. 

Estimated Cost
£150
Estimated Time Investment
Weekend Project (10-20 Hours)
Finish Used
Varnish/stain in teak
Recommended Skill Level
Intermediate

4X4 Truss Table and Bench

Submitted by Anonymous (not verified) on Sat, 02/09/2019 - 14:46

My daughter moved into her first apartment and asked me to make her a dining room table. I used the plans found on Ana's website and made a slight modifcations. I used 5/4" pine boards to build the tops and regular douglas fir 4x4s and 2x4s for the bases. All screws are hidden exept the lag bolts I painted black and used to bolt the end trusses to the center truss which gives it kind of a industrial type accent. Thanks to Ana White and Shanty 2 CHIC for the great plans. My daughter loved the table and bench and she is going to find chair for the other side of the table. 

Estimated Cost
Approximately $275 for the table, bench and misc stain, screw, sandpaper etc.
Estimated Time Investment
Weekend Project (10-20 Hours)
Finish Used
Varathane Stain and Poly Mission Oak in Satin. Two coats on the bases and three coats on the tops. Used a pre stain conditioner prior to applying the Stain and Poly.
Recommended Skill Level
Intermediate

Basic changing table for a besty

This was a quick and easy build. My friend needed a changing table and I had several scraps left from a toy box build. I will mention that using 2x2 firring strips is always my worst nightmare. They're rounded, never straight, and full of knots. They just don't give that professional feel. I had to use 1/2"x3" preferred pine on the ends in order for them to sit flush inside the 2x2's. Used the kreg pocket holes and assembly was easy. The changing pad frame on top attaches to the back with an L bracket so they can remove it and still use the table down the road. I hope they enjoy it for many years.

Estimated Cost
$80 using scraps, probably $175 without scraps
Estimated Time Investment
Weekend Project (10-20 Hours)
Finish Used
Glidden Duo interior semi-gloss in muslin white and Minwax satin polycrylic. Love this paint, more than Behr!
Recommended Skill Level
Intermediate

Rustic X Desk

Submitted by bozarthm1 on Sun, 04/19/2020 - 07:57

I built this L shape desk based on Ana White's rustic X desk plan. I would not have attempted this without her guidance. Love how this turned out, probably the nicest project I've ever done. Thanks Ana!

Built from Plan(s)
Estimated Time Investment
Week Long Project (20 Hours or More)
Finish Used
Tops are Watco Dark Walnut with wax finish, prime and paint the legs
Recommended Skill Level
Intermediate

Comments

mfromo

Tue, 05/26/2020 - 09:34

This is awesome! My son and I are looking to build an L shaped desk for him and this looks to be the one. Any thoughts on how I would mount a computer tray beneath? Think there is enough clearance below the 2x4 without hitting knees?
Thanks!

Harriet Chairs

Submitted by JoanneS on Sun, 07/15/2012 - 07:44

Finally I was able to replace my wobbly little dining chairs with solid wood chairs, thanks to Ana’s Harriet Chair plan. For this build, I made a few mods from Ana’s plan: added a padded seat, made the chair 2” wider, and substituted a slatted back. Used select pine 1x2 instead of 2x2 (really liked that look in the inspiration chair) and used 1x3 for the 2 inner slats on the backs. Also added a few more cross supports. Instead of predrilling pocket holes and hiding the screws, I chose to use the round washer head self-tapping screws and left them visible. This saved time on having to pre-drill and fill screw holes, but also thought the exposed screw heads made a nice decorative element. The seats are covered with 1” thick high density foam, batting, and outdoor fabric. The first of the 4 chairs took longest to make (I made and corrected all my mistakes on that one). The remaining 3 went a lot faster (took about 11 hours total for building the 4 chairs, and 12 hrs total for finishing them). The changes/steps I used are documented in a .pdf file in the second plan post linked above. Ana, thank you for all your wonderful plans. You rock!!!

Estimated Cost
Cost: $230 for 4 chairs, which came to about $58 per chair. For 4 chairs: $127 for lumber & screws, $28 for paint, and $70 for chair fabric and foam. (fasteners, glue and sandpaper not included in cost, those were already on hand). I was able to build all 4 chairs for the price it would have cost for just one from the furniture store.
Estimated Time Investment
Week Long Project (20 Hours or More)
Finish Used
Finished with Benjamin Moore Aura satin, in Wenge, 3 coats . Rubbed down all the chairs with Pledge after the paint dried. (I had attempted waxing one of them, but that took way too long for me!) The seat is covered in outdoor fabric (all the fabric and the foam were on sale for half-price @ Joann fabrics – score!!!).
Recommended Skill Level
Intermediate

Comments

JoanneS

Sun, 07/15/2012 - 17:26

Thank you so much! I just posted a plan of the modifications, which includes a .pdf file of the full plan with the steps and photos (still haven't learned sketchup yet). I sure hope it worked! The .pdf file is located about 2/3 of the way down through the plan post, right below General Instructions. Let me know if the .pdf opens for you? :)

JoanneS

Wed, 07/10/2013 - 02:31

Thank you! We still love them and they are holding up great! I made a storage bench to go with these, but it still needs a few tweaks before blogging that one.

JoanneS

Mon, 11/11/2013 - 10:58

Hi AdamR, Thank you very much for the nice comment! Yes, we did the table also. Here's the brag post:

http://ana-white.com/2011/05/my-new-almost-farmhouse-table

This was done under my original username JES. I had locked myself out of that username and had to create a new one ;)

We used our existing table and painted the legs, and added a new top. The tabletop finished dimensions are 56" long x 38 1/2" wide.

Joanne

AdamR

Mon, 11/11/2013 - 19:38

This is what I have been looking for. I know my wife doesn't want any indents or grooves but it seems like everyone build tables out of boards. I don't have a jointer or planer to even the boards out.

Question 1 - the 1x2 trim...to be clear you attached the 1 inch side to the table right?
Question 2 - how has the 3/4 thickness working out? Thick enough?
Question 3 - anything you would have done differently?

Thank you so much for your help. I build some small custom shelves for my son's room, found this site and now got a major bug to build stuff we have been looking for. I actually joined the site just to ask you about the table so thanks again!

Adam

JoanneS

Tue, 11/12/2013 - 07:07

Thanks again for the nice comments, Adam!

On the 1x2 for trim, I attached with the 2" side to the edges of the plywood (the 1x2's were actually 1 1/2" wide and 3/4" thick). This gives the illusion that the table is 1 1/2" thick. On this one I used finish nails and glue to attach the trim. If I had it to do over again, I'd have attached the trim boards to the plywood edges with pocket holes from under the table, so there would be no nail holes to fill.

3/4" thickness for the table top works fine. Our original table had a top thinner than 3/4", so we attached this new top directly on top of it. I didn't think I could get the leg assembly off that old table without damaging it.

If you wanted a more 'beefy' feel to the whole table top, you could stack 2 pieces of plywood, glued and fastened together from the bottom with screws. The 1x2 for the edges would still cover it.

Once you catch the wood working bug, you'll want to build everything you see! :) I hope you post a brag picture when you build this. I'd love to see pictures! :)

Joanne

AdamR

Wed, 11/13/2013 - 06:02

First off thank you for all the info! I see now why you picked the larger trim, I didn't catch it the first time around that you put the new wood right on top of the old table. My kitchen table has the exact opposite problem the legs are weak (plus my wife hates the top too) hence why I will be doing both top and legs. Still debating on one 3/4, two 1/2 or two 3/4 inches for table thickness.

I am going to build the kids trestle table this weekend first. Just the get a project under my belt besides some book shelves. lol

http://ana-white.com/2011/09/kids-trestle-style-play-table

My Kreg Jig will be here Friday, picking up wood on Sat....hopefully I will have a unfinished kids craft table ready to roll by Sunday then the Kitchen table will be my Thanksgiving weekend project.

Thanks again for all of your help.

Adam

Modern Sectional Sofa

Submitted by reinkense on Fri, 05/30/2014 - 17:22

I looked all around my town for a sofa that meet my needs. I wanted something with tall legs, modern lines and fit my living room. I did not have $3,000 to buy one online so I said to myself why not???


Estimated Cost
$400
Estimated Time Investment
Week Long Project (20 Hours or More)
Recommended Skill Level
Intermediate

Comments

reinkense

Sat, 05/31/2014 - 15:58

Thank you! I am really proud of it. I was thinking of putting together some plans.

Samigdal

Fri, 12/25/2015 - 17:48

Are there step-by-step instructions for building this posted anywhere?

walthoca

Fri, 01/06/2017 - 11:06

I am so impressed. We recently spent a small fortune on a sectional, but yours looks equally beautiful. You are incredibly talented! 

Garden Tool Storage

Submitted by Anonymous (not verified) on Sat, 06/13/2020 - 13:36

Great project and super easy! Made such a difference in organizing our tool shed. I modified one of the handles because several of my tools would not fit over the 2x4. I also had a challenge hanging it in my shed due to the metal sheeting for walls, but the build itself was very easy. No more messy tool shed! :) As an organization freak, like Ana, this makes me so happy!!!!

Built from Plan(s)
Estimated Cost
None - had all the materials on hand
Estimated Time Investment
An Hour or Two (0-2 Hours)
Finish Used
none
Recommended Skill Level
Starter Project

Queen storage bed modified

Submitted by Anonymous (not verified) on Thu, 06/18/2020 - 19:11

I used wood from an older Ana white project of a loft bed my daughter had out grown. I liked the look of Ana's Mom bed but wanted storage so I modified the plans slightly. I will add drawers later.

Estimated Cost
200
Estimated Time Investment
Weekend Project (10-20 Hours)
Finish Used
Sweet coconut easy flow paint in Matte
Recommended Skill Level
Intermediate

Modified Simple Rolling Bar Cart

I honestly think Ana is a mind reader. Whenever I need plans for a particular piece of furniture, they magically appear on her site. Of course if she was a true mind reader, everything will be exactly as I need it requiring no modifications. That's what makes her plans so amazing. I can build bigger and better because I've learned to modify her plans to fit my current needs.

This Cart was no exception. I had to make mine a few inches deeper and change the height of the legs and it was a piece of cake. I put this together in less than 2 hours and finishing was easy too.

I did a blog post all about what I did differently including how I constructed a towel bar instead of the pipe. Check it out at www.thepursuitofhandyness.com

Built from Plan(s)
Estimated Cost
$25 Depending upon the type of casters used
Estimated Time Investment
Afternoon Project (3-6 Hours)
Finish Used
Oil Based Primer & Rustoleum Painters Touch Spray Paint in Paprika Satin
Recommended Skill Level
Starter Project