Community Brag Posts

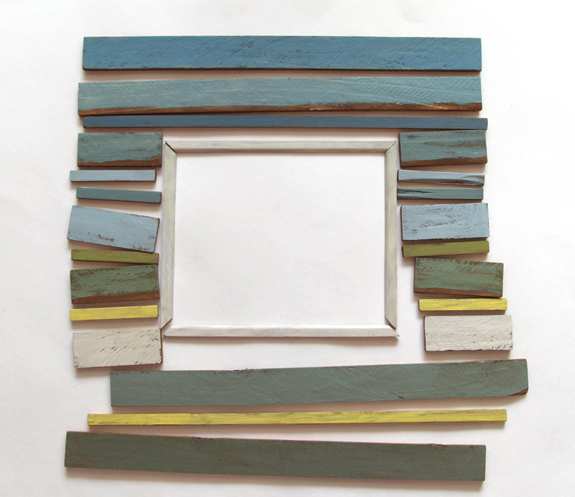
Make Beachy Style Picture Frames From Fence Wood

Submitted by ananda on Wed, 06/18/2014 - 23:32

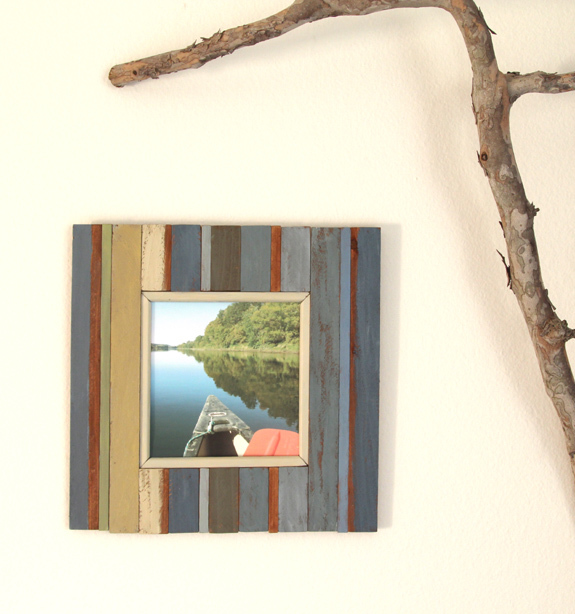
These picture frames are inspired by furniture and frames made from
reclaimed boat wood which came from fishing villages in many parts of
the world. The frames here are made from readily available materials – the humble fence wood boards, some stores call it lathe. An 8' long piece only cost $1-$2. The complete detailed tutorial is here- http://www.apieceofrainbow.com/diy-make-beachy-style-picture-frames-from-fence-wood/

Estimated Cost
$5
Estimated Time Investment
Day Project (6-9 Hours)
Finish Used
paint
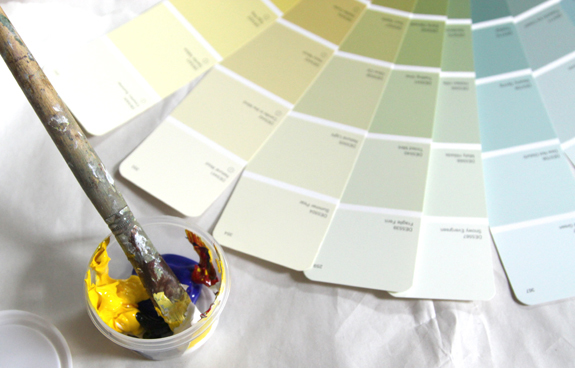
I chose a palette of subdued blues, greens, a little yellow and white. I like acrylic paints because they are non-toxic. Mixing colors becomes a lot easier with the guidance of the fan deck.
Recommended Skill Level
Beginner

Kitchen island

Submitted by deadspuds on Tue, 06/30/2020 - 20:36

Built this island off your coffee table plans...love this sight thank you.

Estimated Cost
200
Recommended Skill Level
Beginner

Garden Enclosure with Raised Beds

Submitted by Anonymous (not verified) on Sat, 04/20/2024 - 07:39

I finished my first project. Although there are some cosmetic errors, I think overall it’s amazing. We had a lot of wood left behind by the builder of our log home. So, I was able to use a lot of that. I made some adjustments to the height of the boxes to help the back!

Michelle M - Jefferson, NC

Built from Plan(s)
Seasonal And Holiday

Camp loft with side stair

Submitted by Theresa W on Mon, 08/27/2012 - 16:15

I finally decided I was going to make the fort bed for my daughter and was about to print off the materials list to take to the lumber yard and the junior height camp loft was front and center on the webpage. Though significantly more bed, it looked perfect my little girl. We really wanted her bed high enough to avoid the only heating vent in the room and didn't want to lose the floor space for play, this seemed to be an ideal fit. When I finally put the bed together I realized that keeping the staircase as in the original plans resulted in a bowling alley sort of space left over. It was awkward and really shrunk the room as the 'alley' wasn't usable for much of anything. I played around a little bit and my husband and I decided that we would put it on the side. It fit perfectly to the wall and was much more space efficient for the room. I am a little nervous about the new openness of the deck portion, but both kids have found it a fun place to read and pretend fish. It was my first project of this size and I did everything until the final assembly by myself and I am so glad to have done it. It took more time than I imagined, but again I am a true novice.

I really wanted it stained so that it would camouflage the wear a little better, but I had a great deal of trouble finding a low VOC stain in my town. I used the lowest I could find and a low VOC water based poly. It matches her dressers and trim nearly perfectly. Her older brother likes the bed so much that nearly everyday he tries to convince her that she wants to switch beds with him.

Estimated Cost
$100-$120
Estimated Time Investment
Week Long Project (20 Hours or More)
Finish Used
Zar UltraMax low VOC stain in Golden Oak
Recommended Skill Level
Beginner

Comments

Triple Pedestal Farm House with Bench

Submitted by hoosierary on Sun, 06/22/2014 - 15:01

So I finally broke down and decided to make the table that my wife had been asking for sometime. This after our last table was damaged by mold in our last move. I have completed a few woodworking projects before this so from a skill level on this project it was not too hard. The problem was that I wanted the table to be perfect but my wife wanted the dings and dents that came along with a farm table, so we compromised somewhat.

I did run into one significant issue that will be a life long lesson. The Douglas Fir wood that I bought had a very high moisture content and during the course of the project most of the wood began to shrink up to a half an inch in some parts as the wood dried out. I was talking to a construction friend in the area when I was finishing up the table and he confirmed that he had the same issue with this wood locally. Would have been nice to know this from the beginning.

Anyways, we followed the Triple Pedestal Table and Bench with the following adjustments. We used all 2x6 boards for the table top in order to provide additional thickness for durability, we also removed the center divider and just opted to use the full length of the 8 foot boards. We then framed the table with 2x6 and then added another lip of 2x6 below the table top. The purpose of this was to create a large enough area to notch the boards for a resting areas of the leg tops. We also rounded all of the 2x6 edges on the top with a router as we didn't want to have any sharp corners for the kids to run into.

On the legs, we opted to use 4x6 posts for the leg bases and tops, as well as the leg post. We (meaning me) wanted to have a nice clean look rather than the layers of 2x6 and 2x4's in the original design. I used the router to create the hole in the post for the runner beam, and used a 2x8 beam rather than the 2x6 beam. Finally I did not have the patience to cut out all of the arches for both the table and the bench and my jig-saw was not working properly, so we just decided to improvise with the design as shown in the pictures.

Estimated Time Investment
Week Long Project (20 Hours or More)
Finish Used
Rustoleum Kona Stain, one coat and wiped dry with towel after 5 minutes. Rustoleum Satin water based polyurethene, 3 coats on legs and 4 coats on bench and table top, sanded after each coat.
Recommended Skill Level
Beginner

Comments

Fold down laptop desk

Submitted by Taa-daa on Wed, 09/21/2016 - 21:42

Inspired by Ana's Flip down wall art desk. It has different dimentions since wall space was limited. I used a magnet as a lock, added upholstered back, dowel for storage and extended the bottom part to add some strength. It is very handy!


Built from Plan(s)
Estimated Cost
30$
Estimated Time Investment
Afternoon Project (3-6 Hours)
Finish Used
spray paint and home made chalk paint
Recommended Skill Level
Beginner

Comments

Surfboard bench

Modified the sofa design and created a surfboard bench

Estimated Cost
£30
Estimated Time Investment
Afternoon Project (3-6 Hours)
Finish Used
Dark Oak woodstain

Dressing Table

Submitted by Anonymous (not verified) on Fri, 04/26/2024 - 13:58

My daughter wanted a dressing table and we had just dismantled a small wooden shed so I made her one by recycling the wood. I’ve only been woodworking for about 2 years and I’m really proud of it. Hope you all like it.
Steve Ross

Cedar Planters made from Reclaimed Fence Pickets

I built Ana's under $20 cedar planters for free. Or, almost free! I had to buy some more wood glue, but I had some of the wood on hand and took some from a friend's pile of old fence wood. It took me about five hours to build both planters from start to finish. See the blog link below for more info.


Pin For Later!

Cedar Planters made from Reclaimed Fence Pickets

Built from Plan(s)
Estimated Cost
Free
Estimated Time Investment
Afternoon Project (3-6 Hours)
Finish Used
Oxidized the new cedar 2x4s with steel wool/vinegar (http://thefriendlyhome.blogspot.com/2012/07/how-to-oxidize-wood.html). Other than that, no finish.
Recommended Skill Level
Beginner

Comments

Seasonal And Holiday

Farmhouse Open Shelves

Submitted by Anonymous (not verified) on Sat, 09/24/2016 - 17:08

We used Ana's plans for her Tiny House shelves and the only real difference was that we decided to use slightly thicker wood. We stained the wood espresso and painted the brackets Albaster by Sherwin Williams. 


The longest part of this process was the staining because the sealer took quite a bit of time to dry before being handled, but this was overall a very simple project with not a lot of effort. It just requires patience! 


We couldn't be happier and it was MUCH cheaper than the custom shelves we had quoted! 


Thanks Ana! 

Finish Used
Espresso Stain and Albaster by Sherwin Williams
Recommended Skill Level
Intermediate

Comments

Simple Wine Hutch

Made from Pine and great for Wine! A couple lengths of pine, some bead board, and coastal accent paint and ...Boooom! Show it off to all your friends and family.

Estimated Time Investment
Day Project (6-9 Hours)
Finish Used
Coastal Paint
Recommended Skill Level
Beginner

Comments

Princess canopy bed

Submitted by GemmaJ on Fri, 06/27/2014 - 17:55

My first ever furniture making attempt . My 5 year old daughter Delilah really wanted a princess canopy bed and we found the perfect one on this site , thank

Built from Plan(s)
Estimated Cost
$70
Estimated Time Investment
Weekend Project (10-20 Hours)
Finish Used
Paint
Recommended Skill Level
Beginner

Comments

audreyandmicah

Sun, 06/28/2015 - 23:32

The bed turned out great! I just finished the same one for our daughter. I'm having a horrible time finding a fabric canopy. Do you remember where you found yours?

Upholstered Leather Headboard with Stacked Wood Frame

Submitted by Anonymous (not verified) on Tue, 09/27/2016 - 09:40

What could be more luxurious than an upholstered leather headboard? The inspiration for the design of this headboard came from the super cool textured wallpaper I recently installed in our master bedroom. See the full tutorial on my blog, The Handyman's Daughter!

Estimated Time Investment
Afternoon Project (3-6 Hours)
Finish Used
Varathane Stain + Poly in Kona
Recommended Skill Level
Beginner

Led cornhole boards

Submitted by boneill on Mon, 07/06/2020 - 20:19

Made some cornhole boards and added led lights to make it super fun. We call it cosmic cornhole lol. Love it.

Estimated Cost
$60.00
Estimated Time Investment
An Hour or Two (0-2 Hours)
Finish Used
Unfinished
Recommended Skill Level
Beginner

Rolling Bar Cart

Submitted by mary tuper on Mon, 05/06/2024 - 12:13

This was my second project using plans on this site and I loved it - I made this for a friend's daughter who was moving into her own apartment. She and her girlfriends loved it too! It was very easy and quick to build. Wheels took a bit of time and effort!

This was a real hit and I'd love to make more, if I had room at my house I'd make one for myself!

Reclaimed Wood Look Headboard

Submitted by JenMash on Mon, 09/03/2012 - 12:49

My husband and I had been looking for a great headboard for a bed in our guest room. We found ones we really liked but didn't like the price tag of 800-1500 dollars (not even including shipping!) We stumbled on this site and absolutely fell in love with the reclaimed wood style headboard. It was exactly what we were looking for. Building it just took a few hours. After we distressed the wood using a chain I found at the hardware store (only $1.60), a drill, a creme brulee torch and a hammer, we prepped the wood (sanded and primed), stained and clear coated. I highly suggest not only vacuuming off the wood but also using a tack cloth (so cheap but it makes such a difference) to make sure all of the dust was off. We bolted the headboard into the bed frame. It will be heavy but it is really sturdy and looks great! A good tip is to decide early what you want the front to be - you can chose the best sides of the wood that way!

Estimated Cost
150.00
Estimated Time Investment
Afternoon Project (3-6 Hours)
Finish Used
We prepped the wood using Minwax pre-stain wood conditioner. We then applied Minwax Provincial stain, waited about 10 minutes and wiped it off with a t-shirt. After we let it dry for the allotted time (we rushed it a bit but were so excited about the new headboard) and then put on a clear-coat finisher.
Recommended Skill Level
Beginner
Seasonal And Holiday

Farmhouse Table

Submitted by wannabee on Sun, 06/29/2014 - 19:04

This is my first furniture building project and I was initially nervous that I have taken up more than I can handle. But things turned out just fine. My wife said she would pick this table if it were in a store and that made this project a success. My wife and I both like the distressed look and nothing in the stores impressed us enough. Three weekends worth of effort and we have a gleaming new table exactly as we wished. So, if you're a beginner like me, do not fret. This is a good starter project if you have the right tools.

The basic specs were from this site but I had to change it to suit my size. Also, for the top I used 2X6's throughout except the center piece which is 2X12. I liked this look a little better. I do not know how much work Kreg Jig will save as I have no experience doing it the other way. Kreg jig is not very common and I did not find it in Home Depot. Lowes carried it. With this design note that you cannot put any chairs on the smaller side of the table as the bottom stretchers will obstruct you.

I had to use a hand planer on many occasions to level things out, especially between the table top planks and the breadboards. With construction grade lumber there will always be warps and twists, so this is something you need to plan for.

Now to the build part,
Top is all 2X6 with center piece 2X12. Rest as per Ana's plans. Construction grade lumber - Douglas Fir.
I did not sand too much - used 120 Grit throughout - did not sand with anything finer than that and it turned out ok. I did this to retain the feel of the grains. It was fun distressing it. We used hammer, chains and nails, but the best effect was from chiseling on the sides. Practice on spare wood first.

For Finish I used Dark Walnut from Rustoleum. One single coat. Then I wiped on Minwax Red Chestnut on top and quickly wiped it off. That gave it a pop. I used 5 coats of Rustoleum Poly on top. Rustoleum makes a huge difference to your project time as it dries much quicker than minwax. Also one single coat of stain did the job as advertised. Note that Rustoleum Poly is milky in color, but dries clear.

Good luck to your project and hope this helped.

Estimated Time Investment
Week Long Project (20 Hours or More)
Finish Used
Rustoleum Dark Walnut one coat, Minwax Red Chestnut one very light coat, Rustoleum Poly Gloss finish 5 coats. Distressed look.
Recommended Skill Level
Beginner
Back