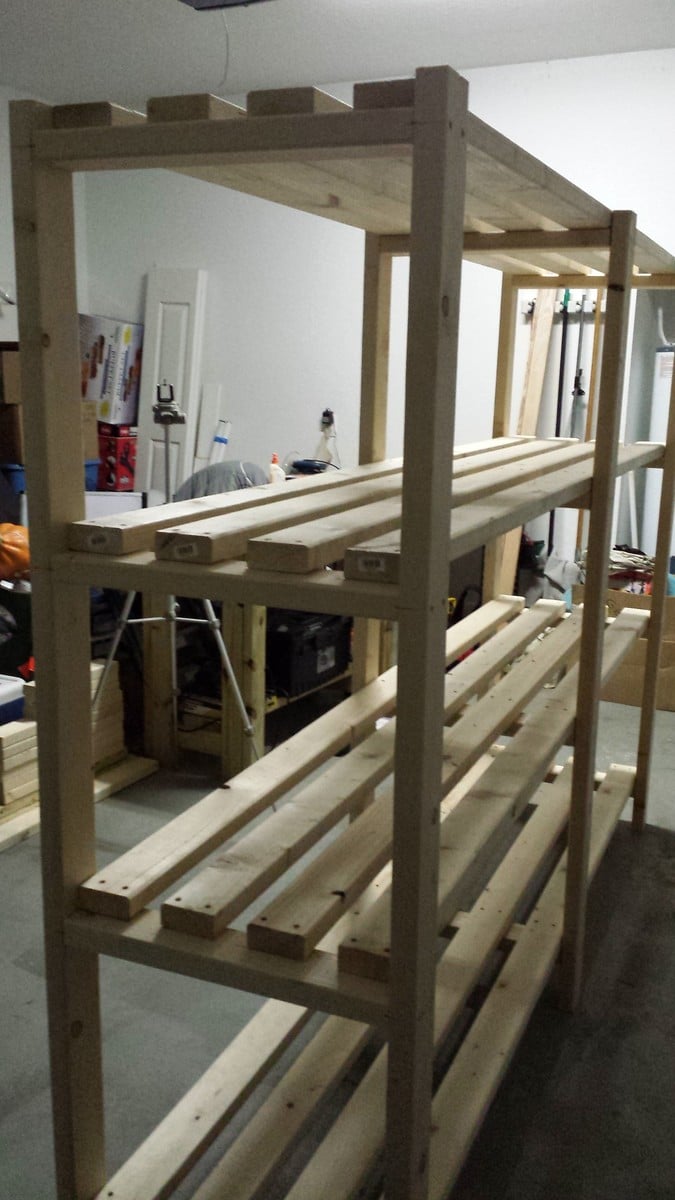
DIY Chicken Coop with Run
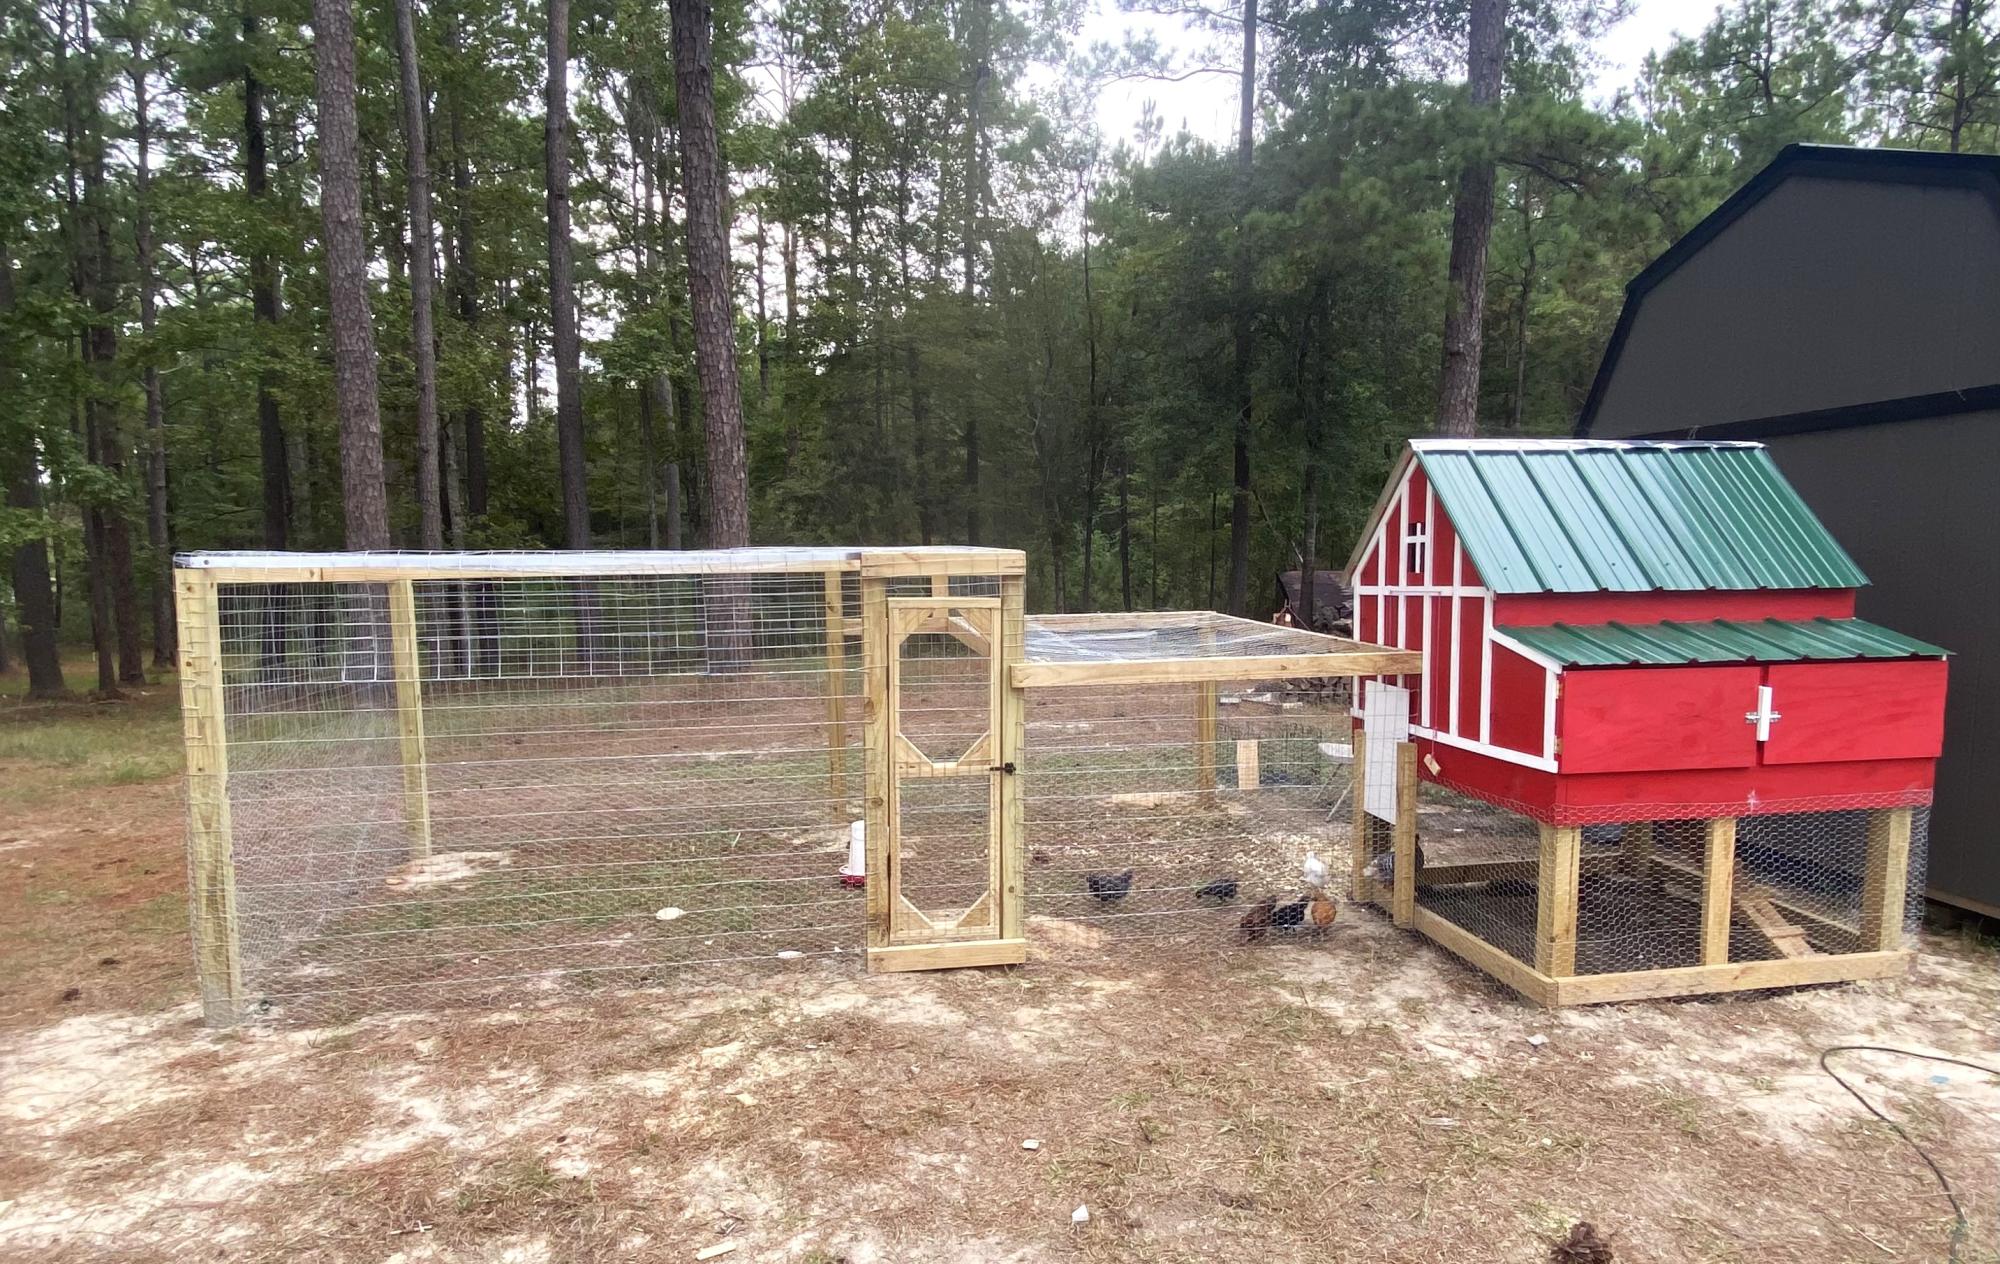
Small coop with run. Awesome plan.
Jinks hill farms
Small coop with run. Awesome plan.
Jinks hill farms

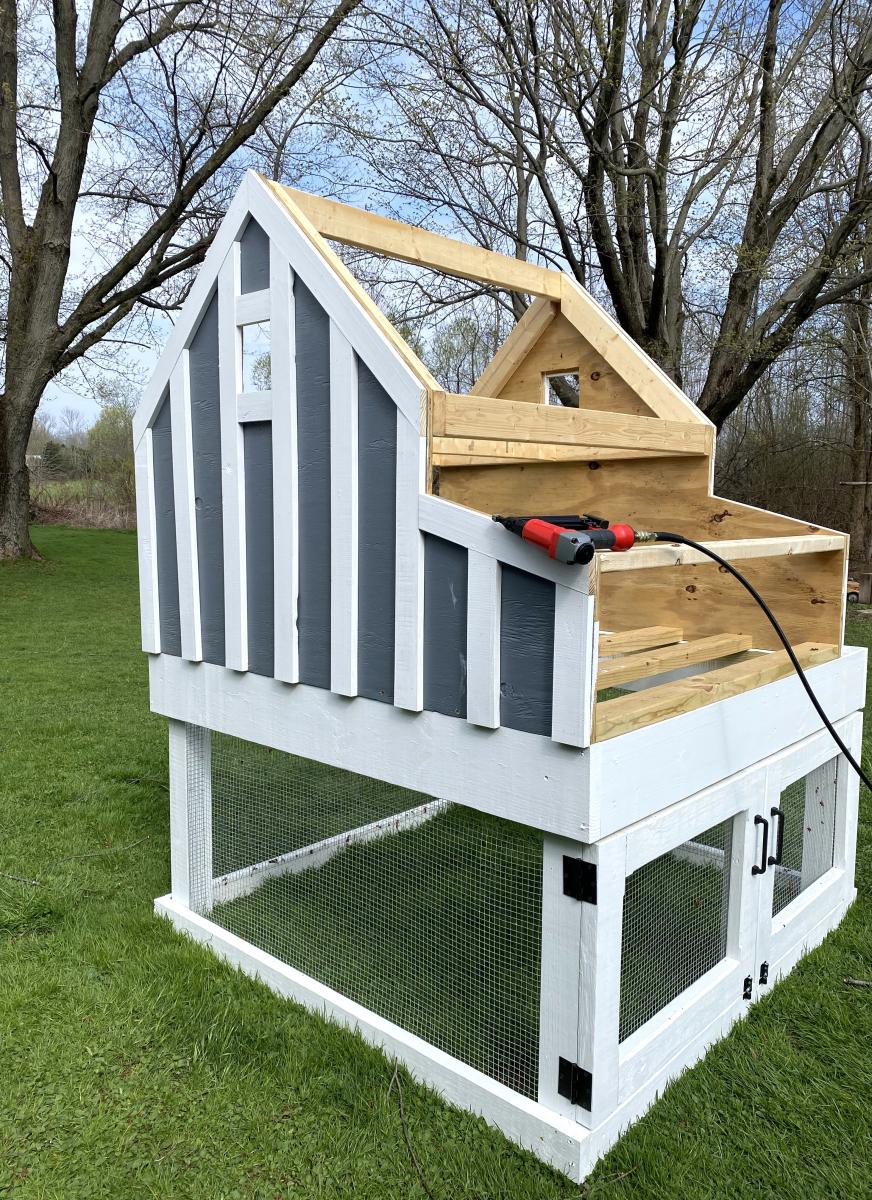
Used the heavy galvanized mesh to make it more chew proof. Obviously it hasn't been painted and stained yet. It took quite a bit more work than the plan to rabbit out for the steel. I'm pleased with the outcome.
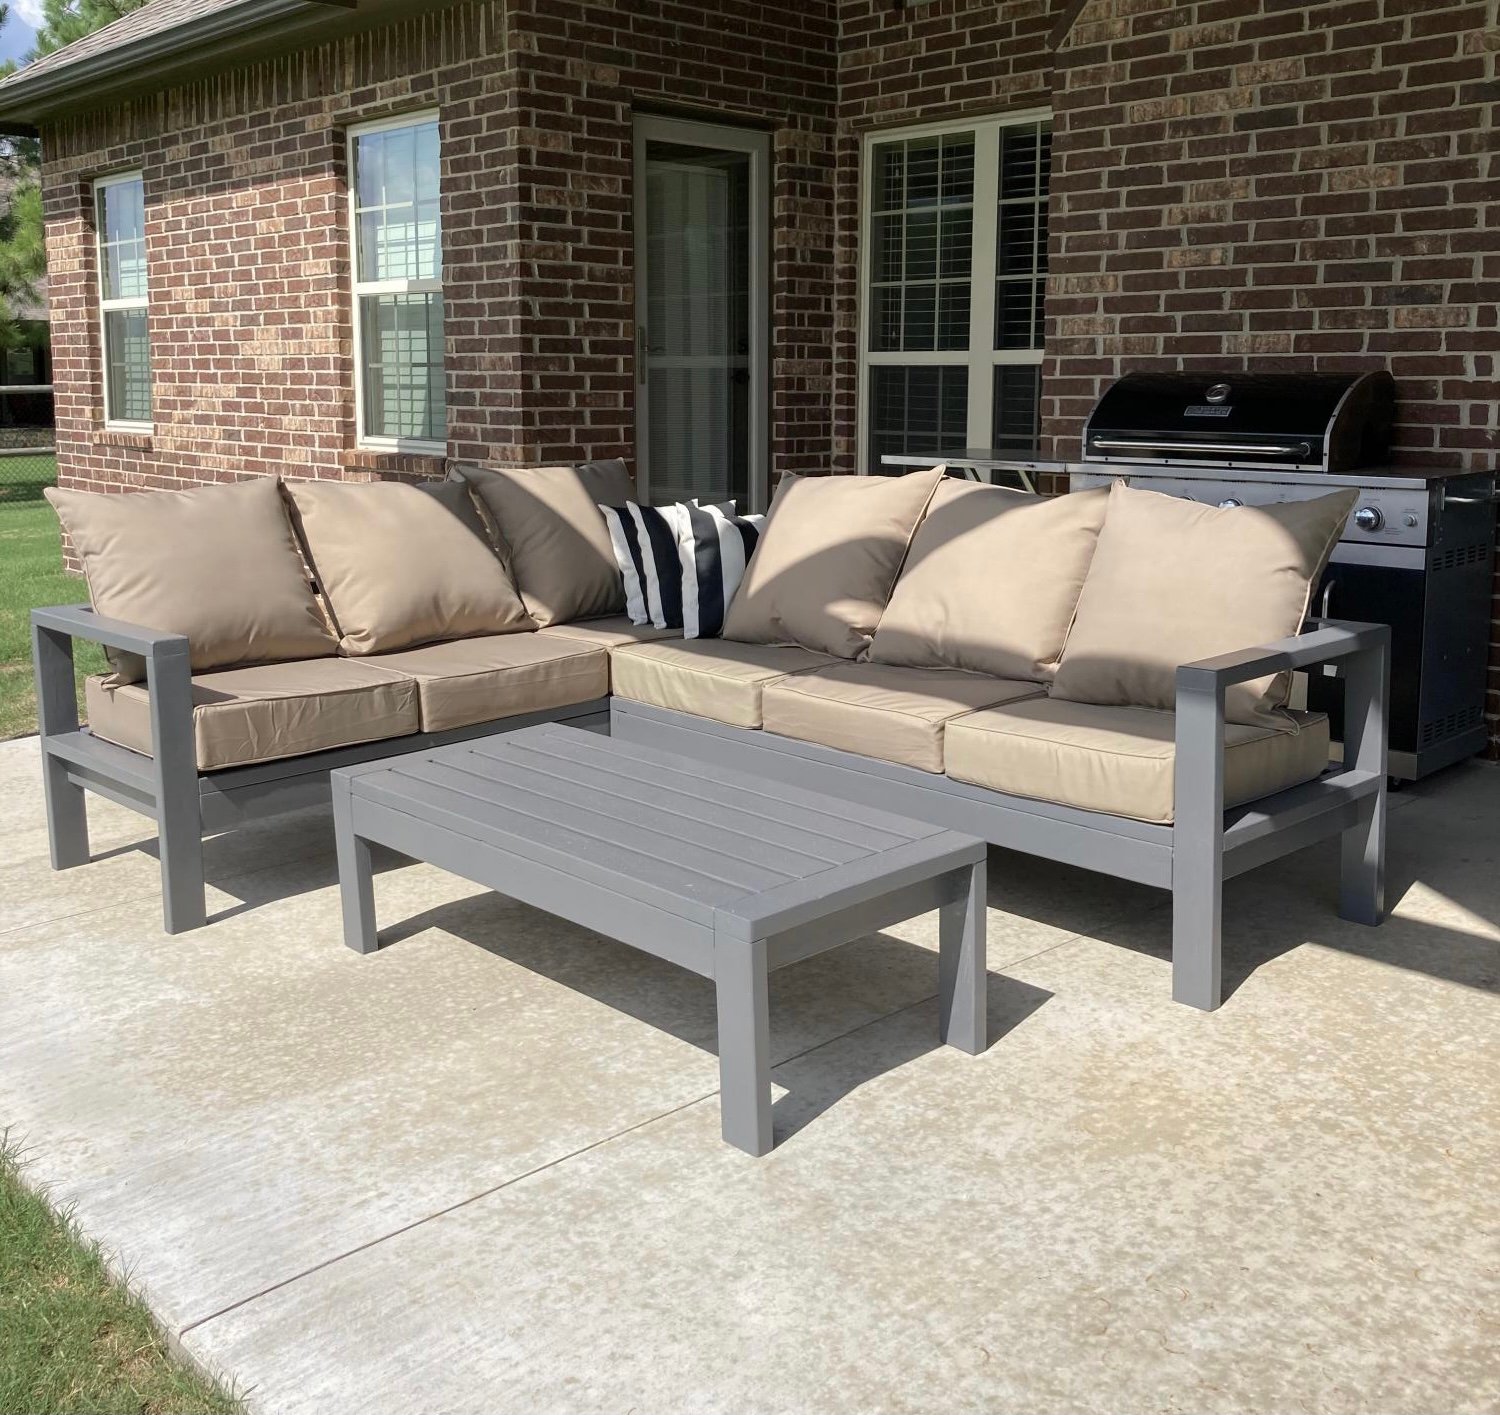
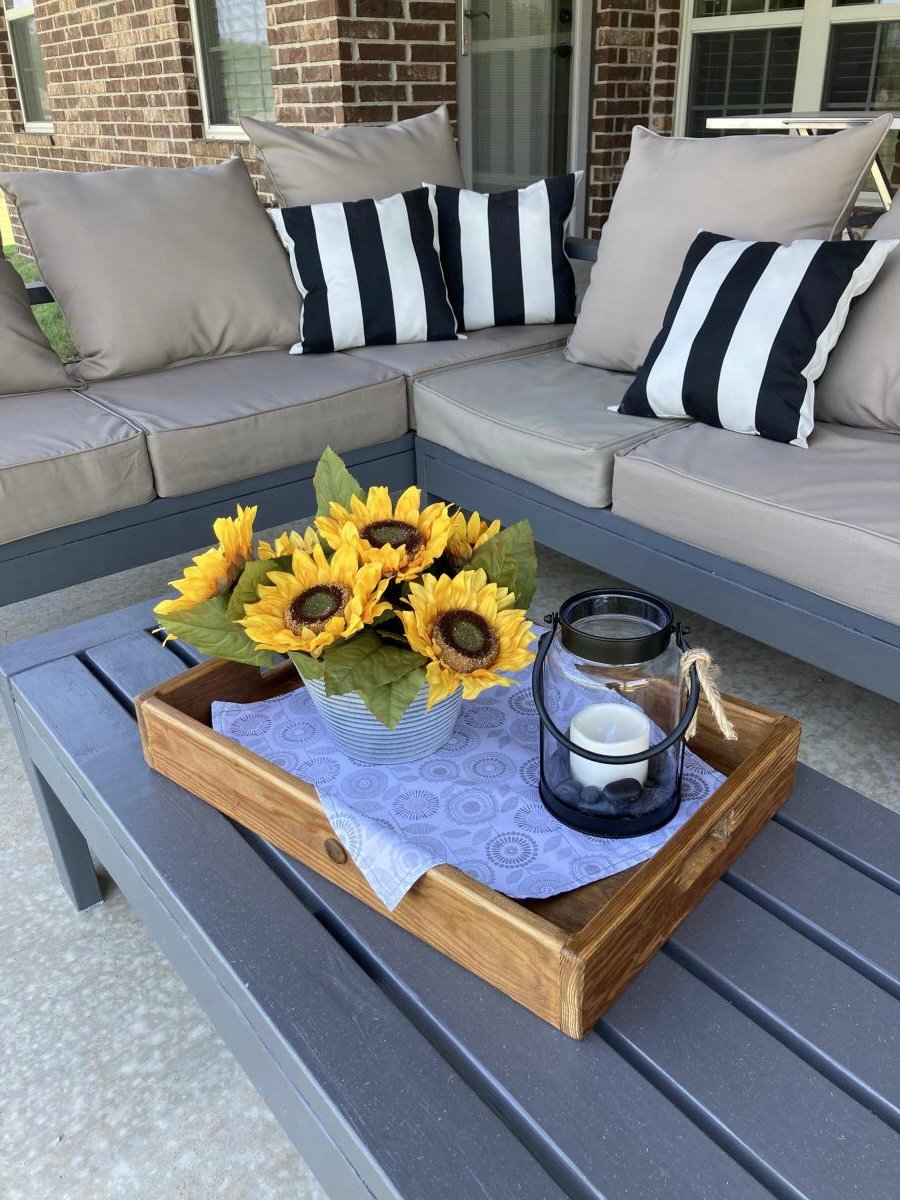
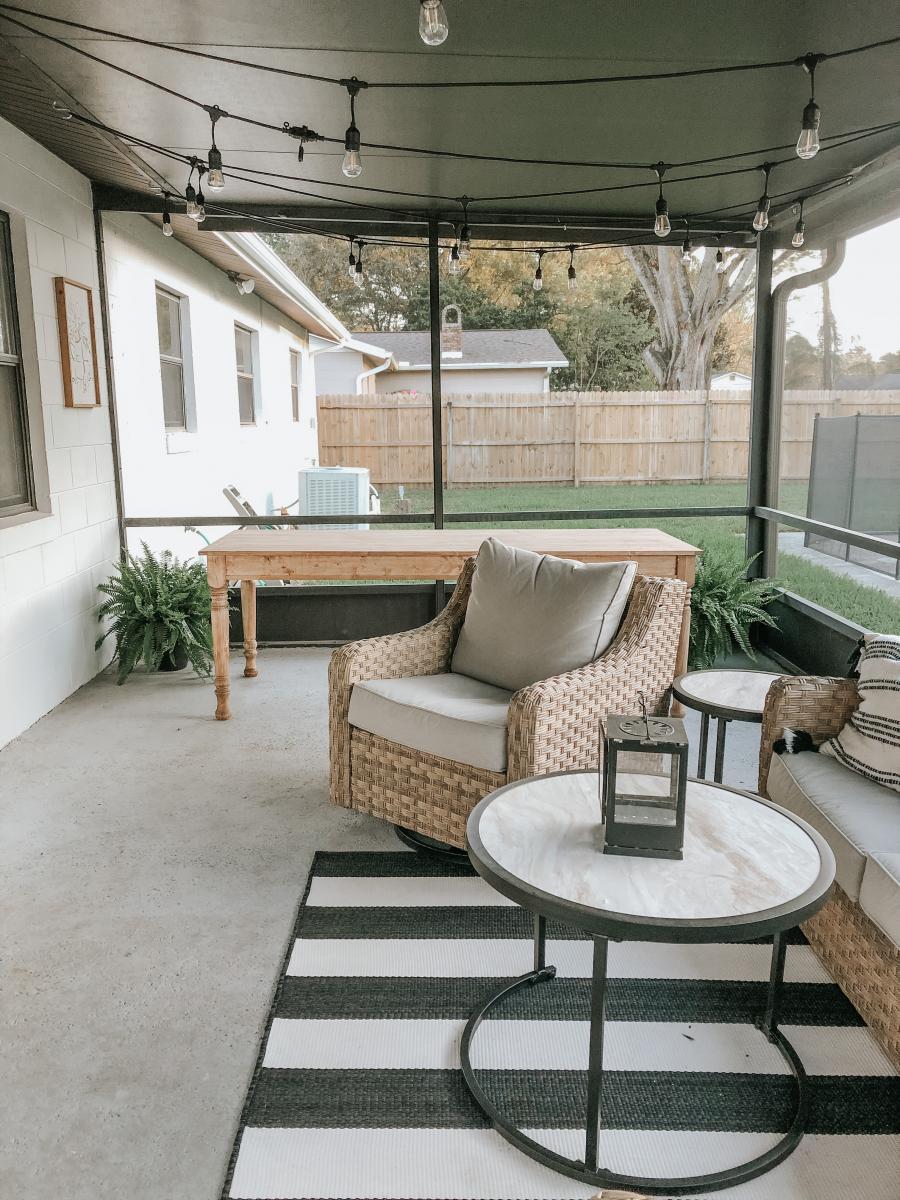
I wanted sturdy seating for my patio. Ana White had the perfect plans for my L shaped seating and coffee table. It was simple to put together and we love it!

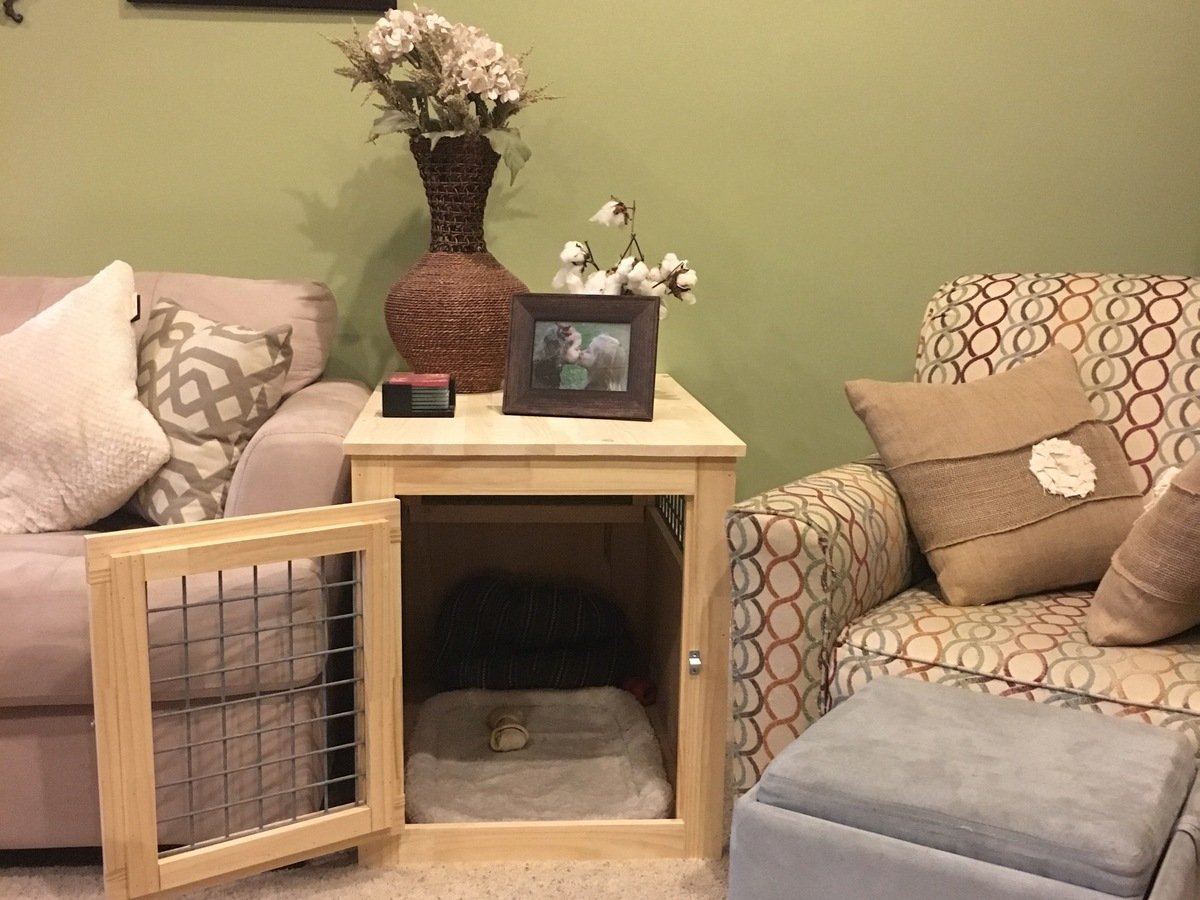
This was a pretty quick build and works perfectly in my son's room. I love all the room for the cubbies! All of his cars and tracks stay off the ground!
The only tricky part for me was attaching the first edges and keeping it straight. Since I was doing this all by myself, I used my nail gun to attach them quickly and then drilled in screws to secure them.
I kept them in three separate parts so it was easier to take upstairs and then I used my nail gun to attach the slats in the middle. Pretty easy and inexpensive for a nice wood full size bed frame!
Check out my blog post for more pictures of my build! http://www.leapoffaithcrafting.com/diy-full-bed-frame-storage/


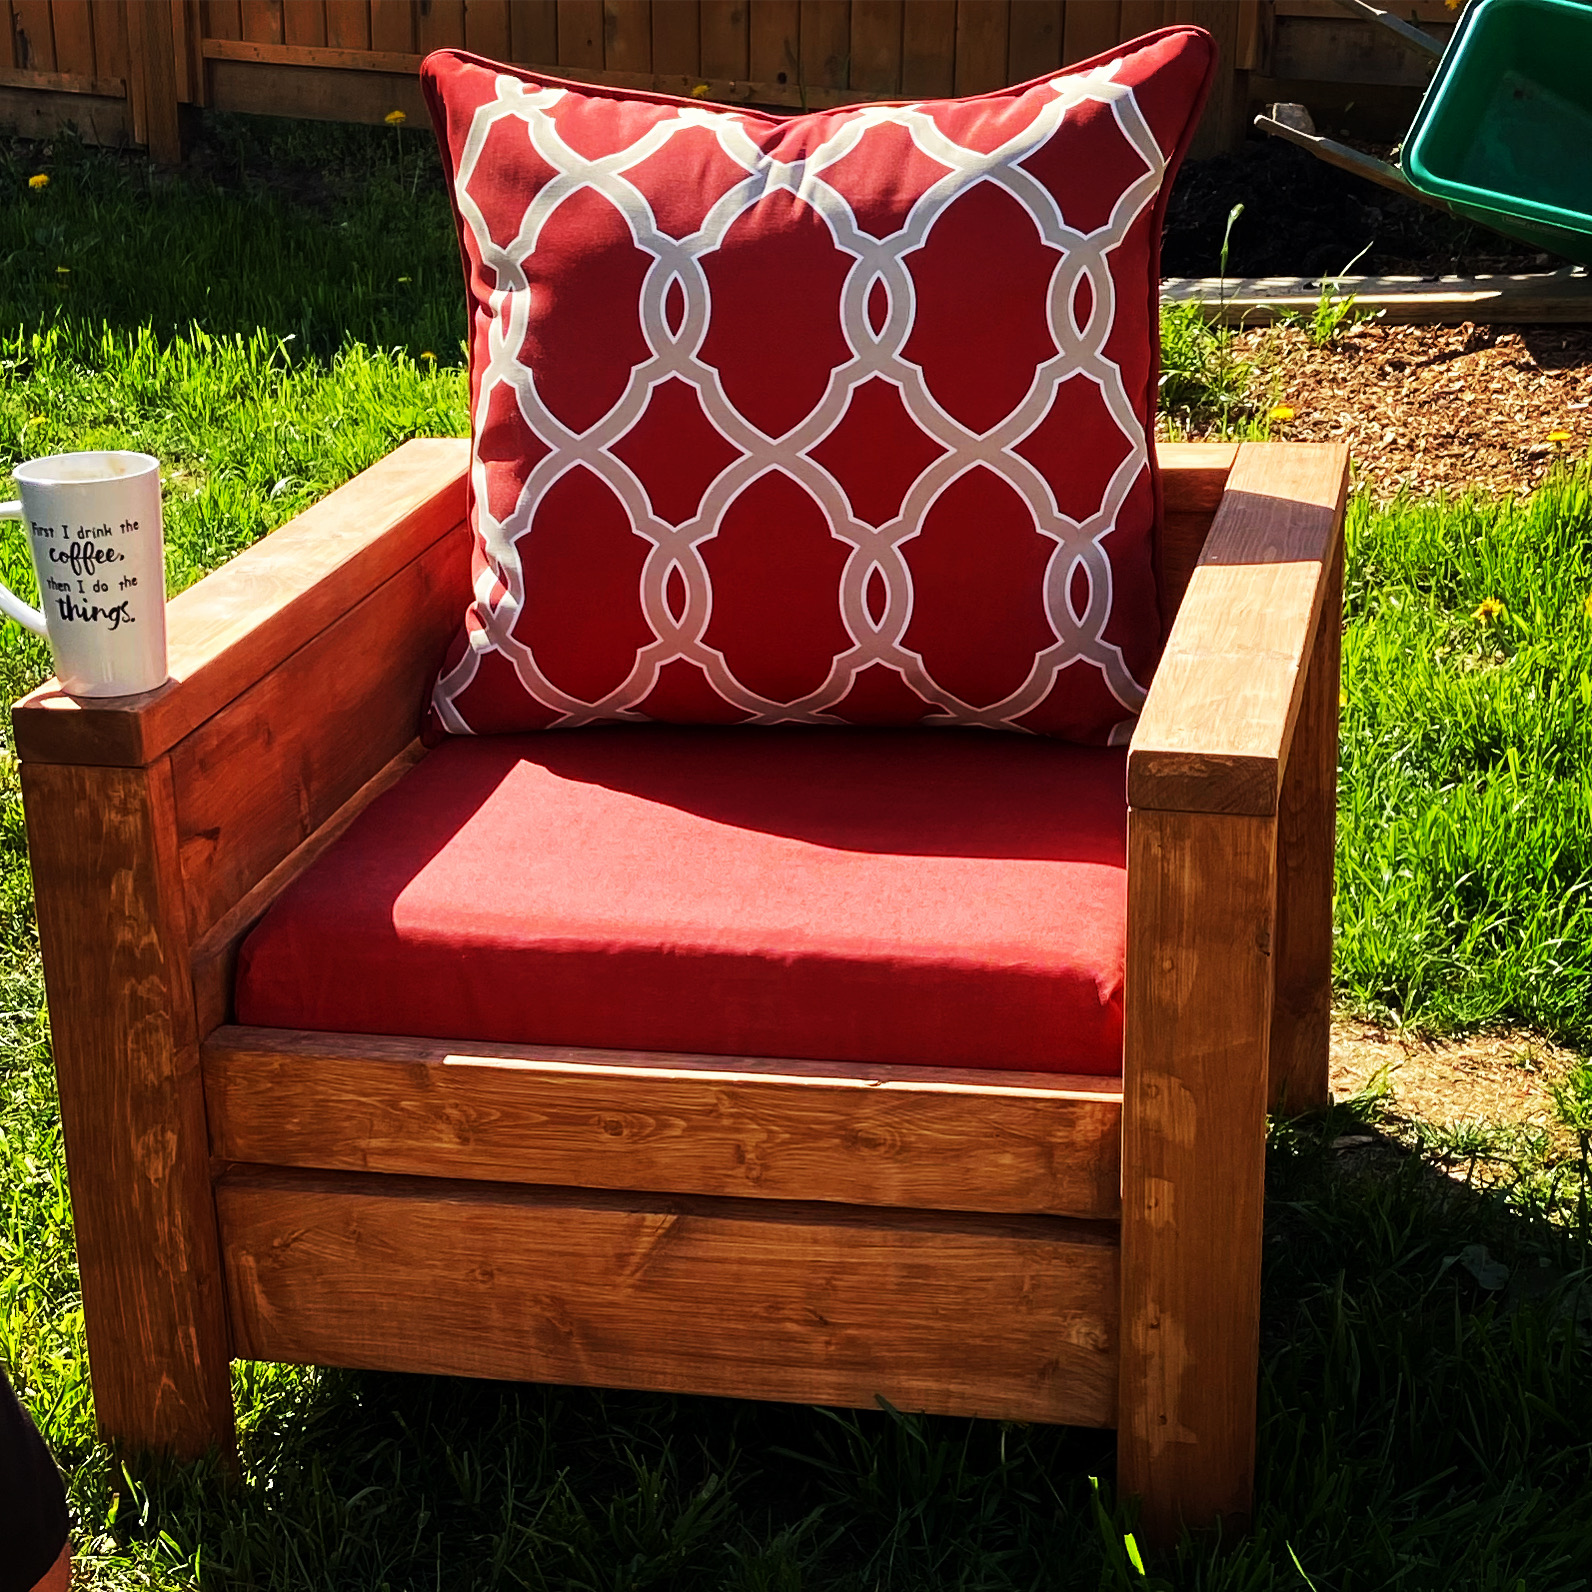
I scaled back the length of the sofa by a few inches and I made the sectional only one seat to fit my space on the deck. This was my first woodworking project that I did by myself. I got the cushions for more than 1/2 off at Ikea so the whole project cost about $150 ($80 for the cushions). It took me about a week to complete but the total time was less than 10 hours to build and stain. I'm pretty happy with how it turned out.

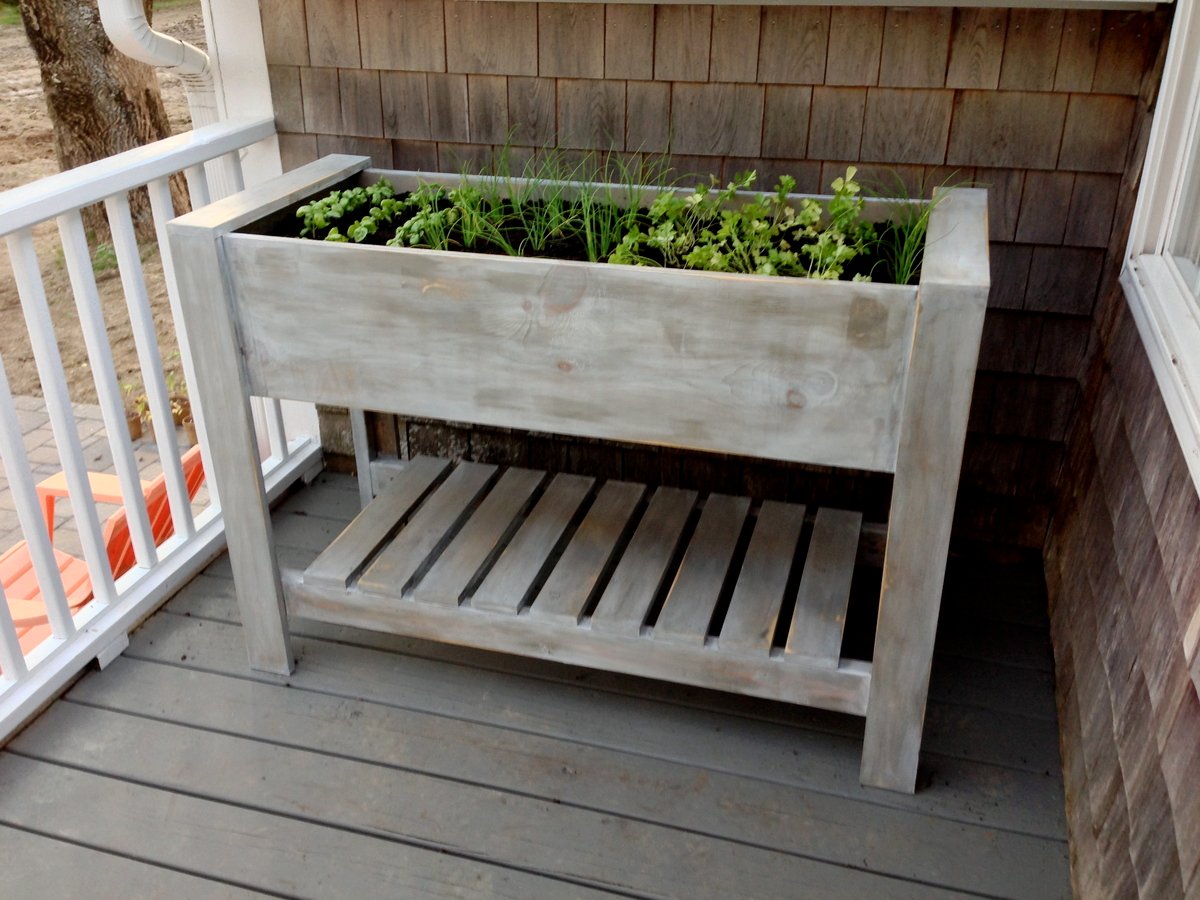
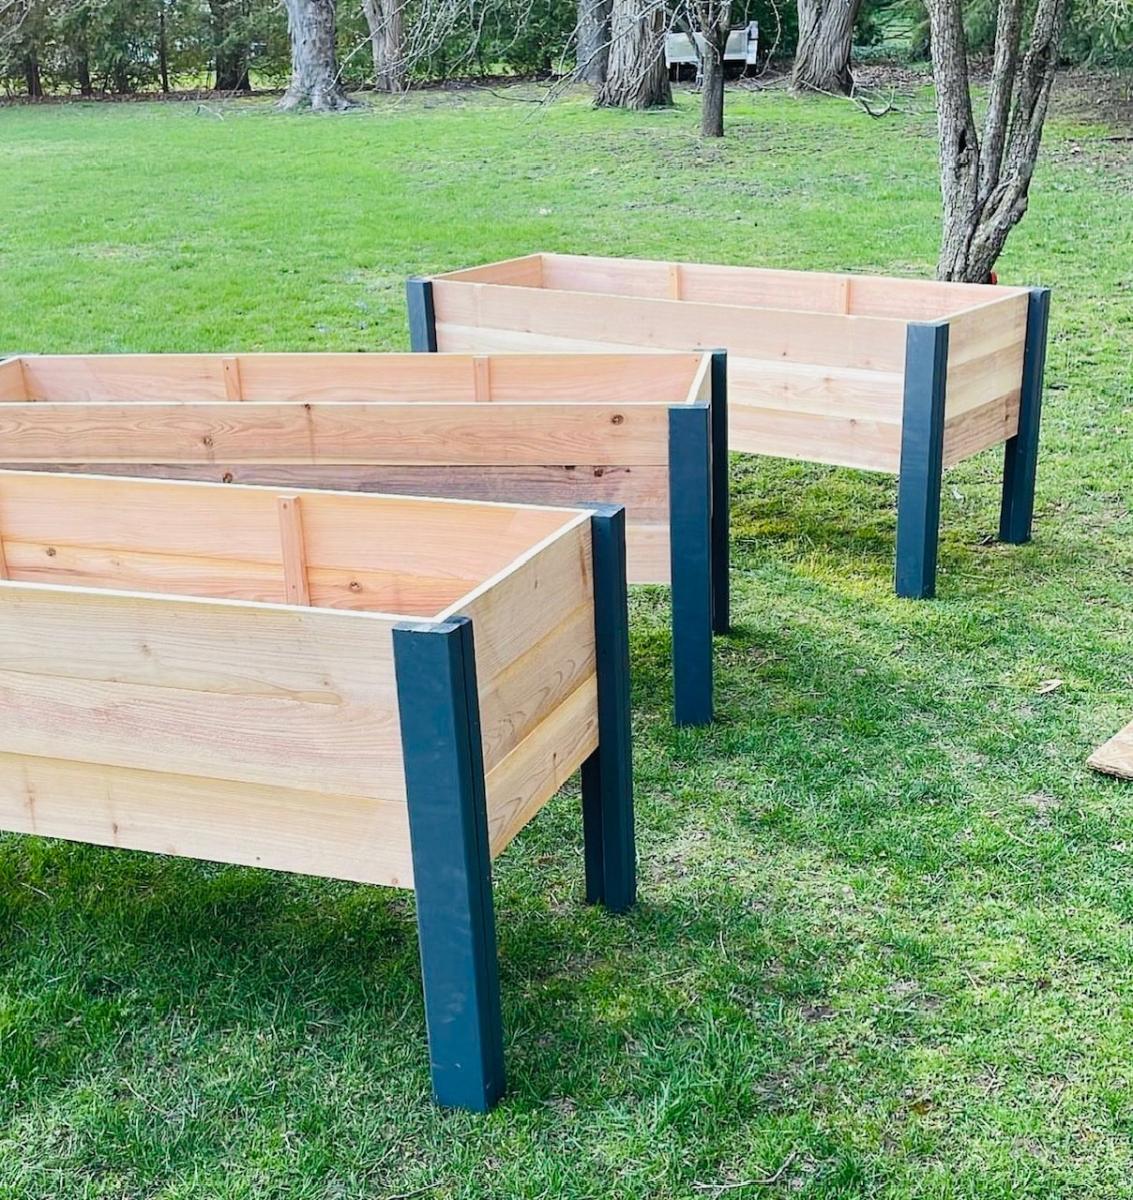
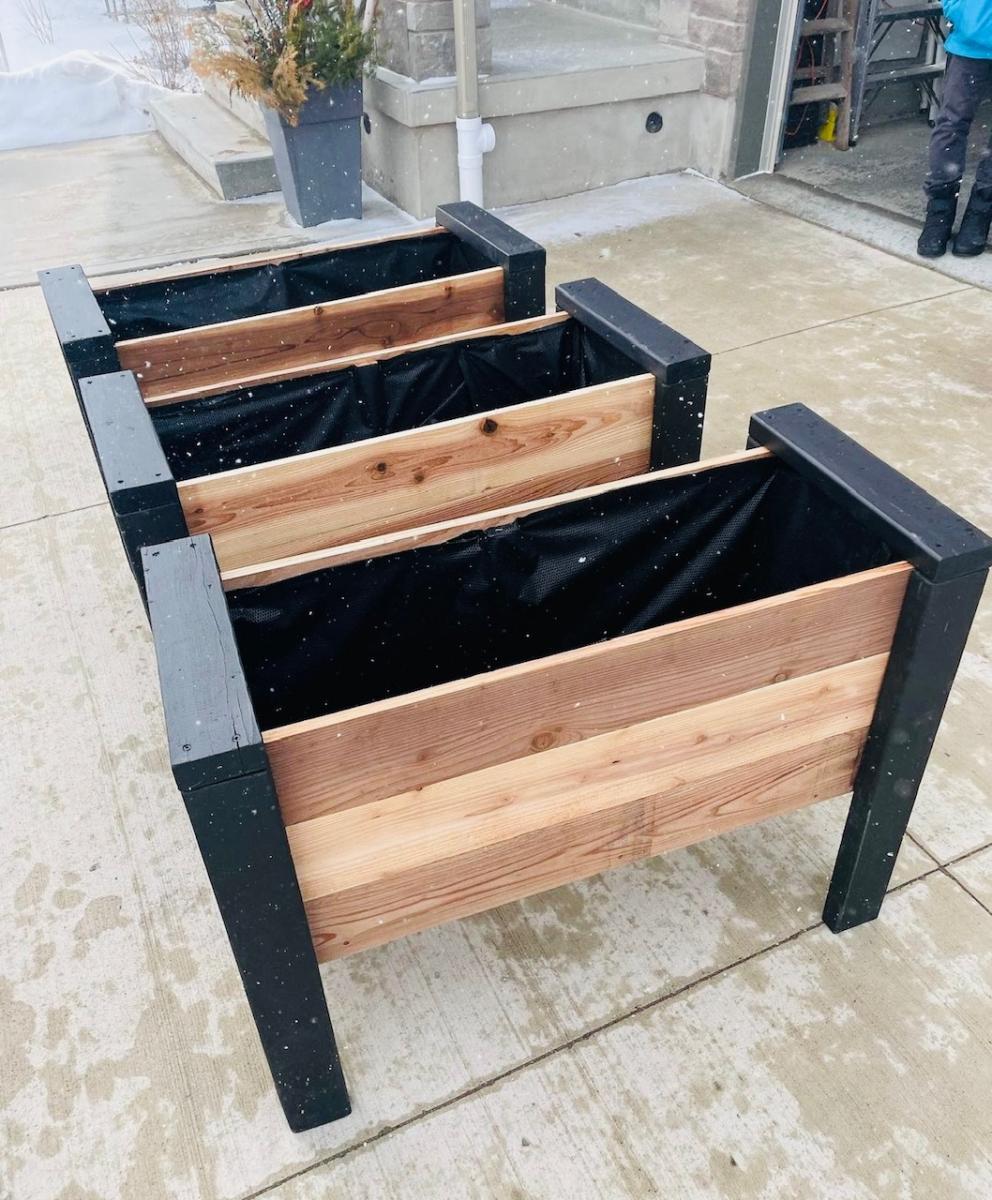
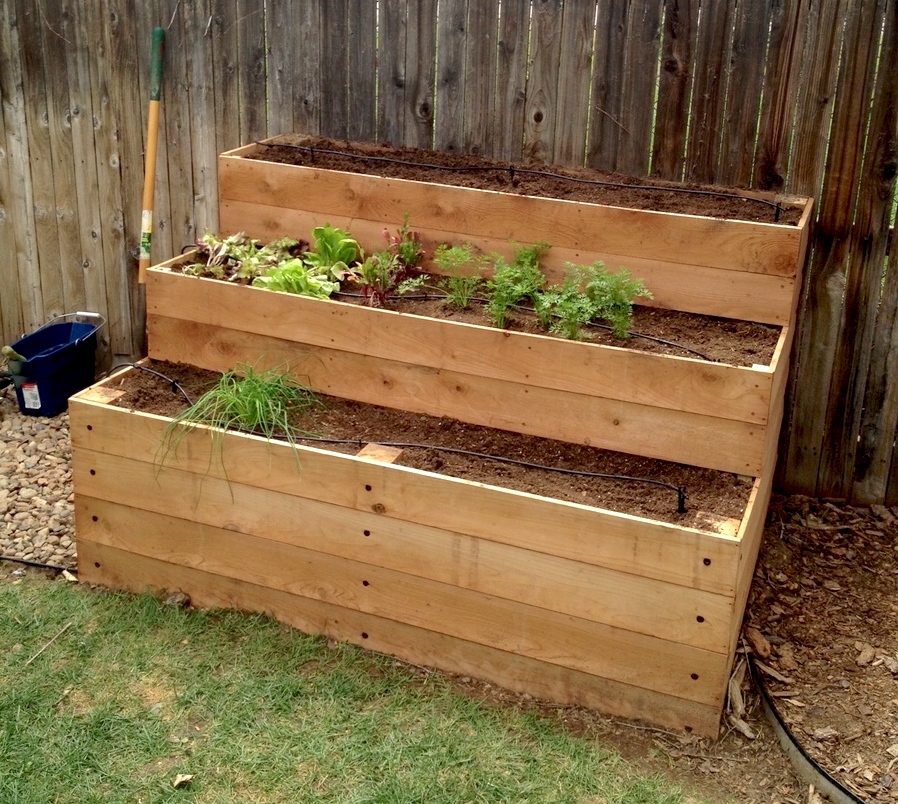
I followed Ana's Raised Planter Box plan exactly. We did purchase a Kreg Jig Jr. recently, which came in handy on this project for sure. It is a very sturdy piece and it only took a couple of hours to assemble.
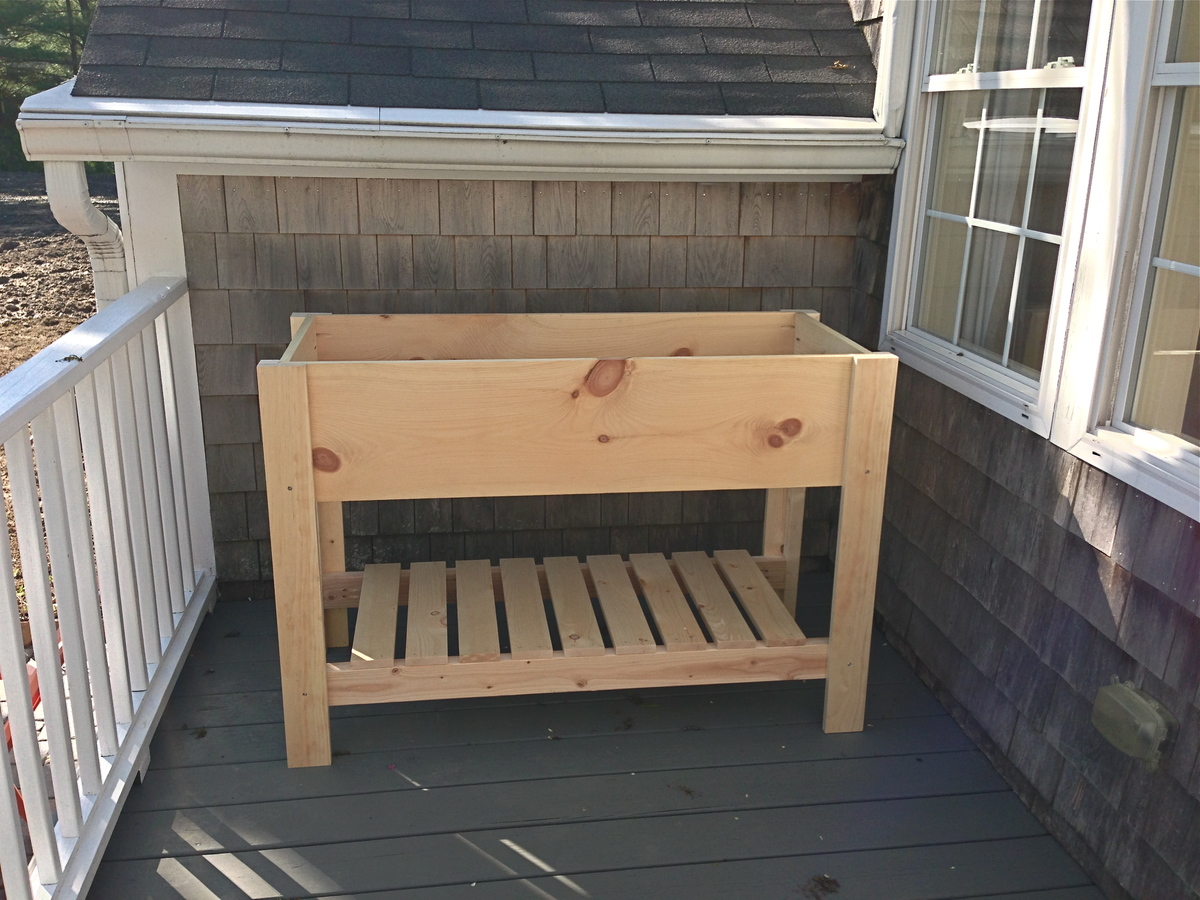
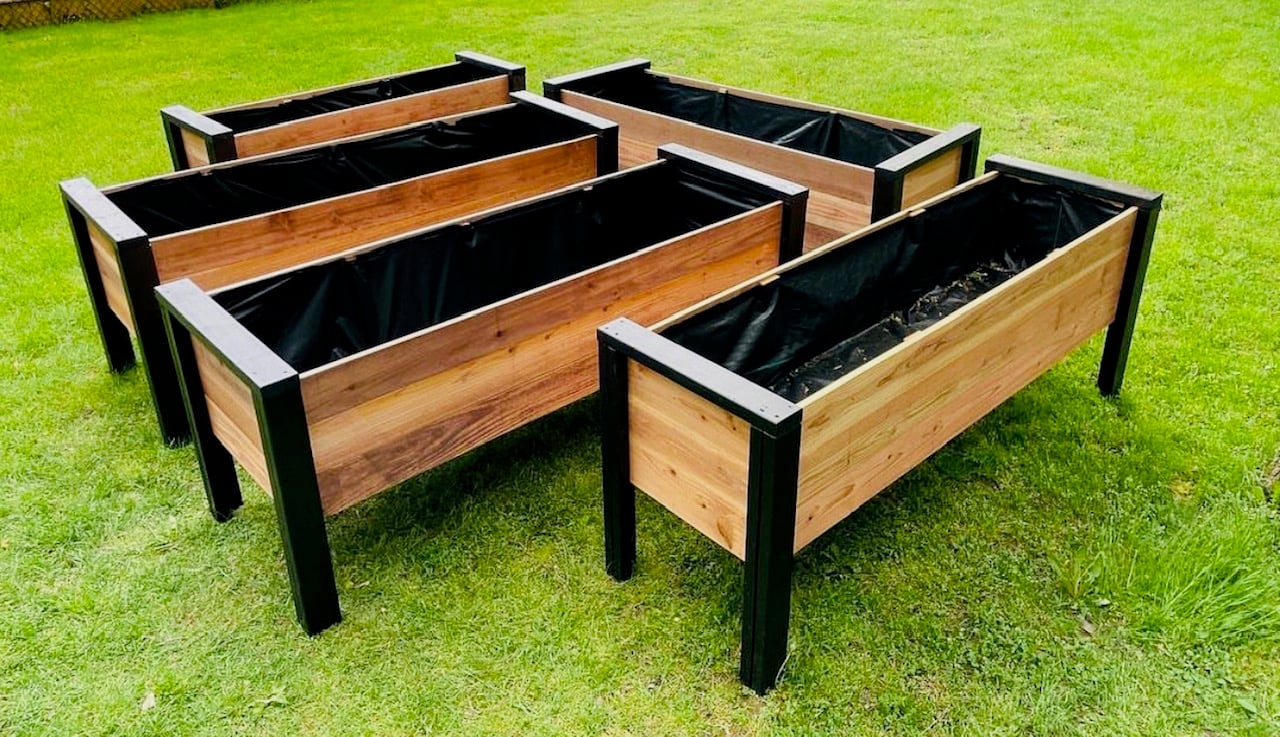
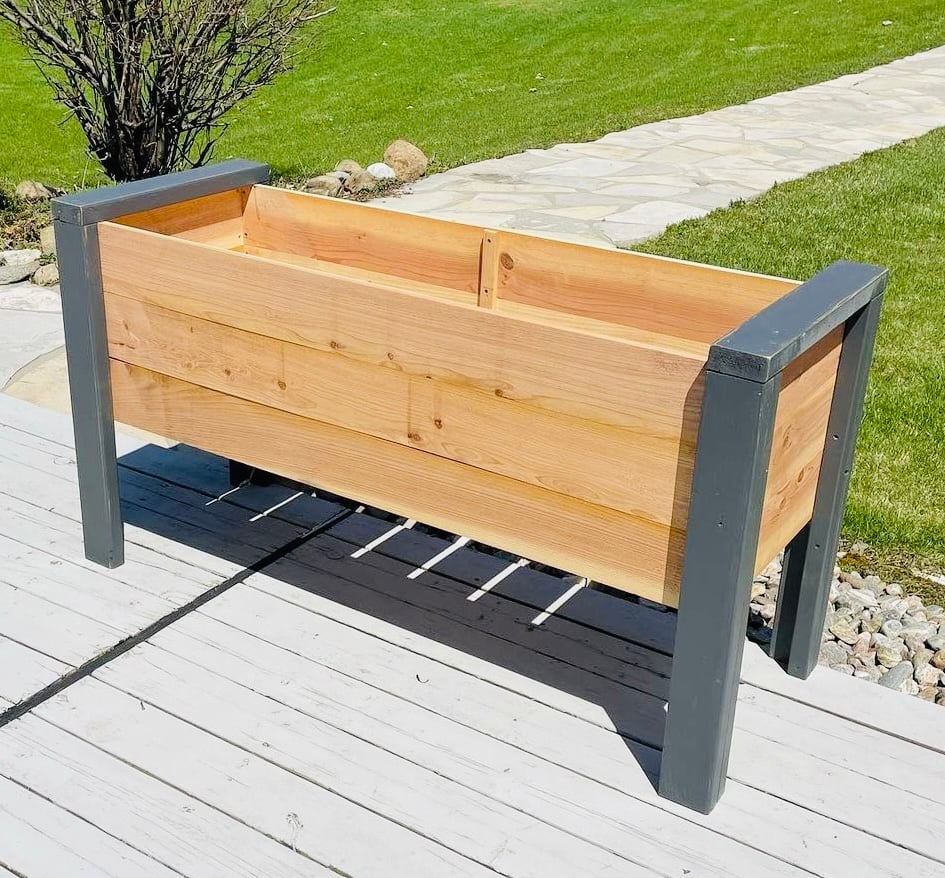
Planters build by Urban Wood Solutions

Fri, 03/31/2023 - 04:23
These are incredible. They look a little deeper, and would be good for vegetables. How deep are they?

I wanted my kids to have more space in their shared room, but I did not want to pay a ton of money for a new bunk bed. My husband and I found a plan for this bunk on Ana-White and fell in love with the design. It turned out so great that we will still be using it in our next home whether it's needed or not. We did change a couple of things on the plan that we didn't care for. The first is that we added a side rail for safety. Secondly we also traded the 1x6 boards on the head and foot boards for 1x4s on the top but kept the 1x6s on the bottom.
Mon, 01/09/2012 - 17:39
With pocket screws on the bottom and then one screw through the 1x4s into the post before the 2x4 on the top goes on. And then the 2x4 is screwed onto the 1x4 and post with trim screws.
Wed, 03/28/2012 - 13:02
Cost us about $300 and over an entire weekend of time spent on this project.
It's not for beginners. My husband has had many many years of experience in carpentry and woodmaking.
Good luck to you.
Also, he changed a few things in the plans we found in order to make it look better.
Thank you
Jillian
Wed, 03/28/2012 - 12:59
Cost us $300.00 to make and almost non-stop making it for the whole weekend. And then stained for hours.
This is with many years of experience in construction and woodmaking.
This is not a beginners project and then expect it to look amazing.
My husband changed these plans a bit to make it look better than the other ppls that we've seen on here.
But, good luck to you and make sure to have plenty of room and time.
Also, we had to make this bed in 10-15 different pieces and put together in the bedroom we wanted it in. There is absolutely no way it will fit otherwise.
Jillian
Sat, 10/25/2014 - 22:25
I don't see how you could put the fill/twin over a queen since the queen is longer. Obviously you could spin the queen around and make it an L-shape but then you are looking at a different build.
Sat, 10/25/2014 - 22:28
I really like the look of this ... I'm going to try to replicate!
What does the bottom of the guard-rail look like? Did you space out your slats a little more than the original design? I like the 2x4 topper instead of the 1x6.

Sat, 02/28/2015 - 16:46
We made this bed over the course of a week, both of us have extensive experience in woodworking and building. Ours is very wobbly on the long axis. We had a friend who is a structural engineer come in and take a look. He offered suggestions to shore it up and nothing really worked. The 3/4" overlap is not enough to secure the side rails, imo, and we used a variety of brackets to make it not wobble, to no avail.
This bed is coming apart in a few weeks and will be stored. If it is ever used again, it will be as two separate beds. I spent about $400 on this. My son never felt safe sleeping on the top bunk and has slept on the bottom exclusively.
Just my $0.02.
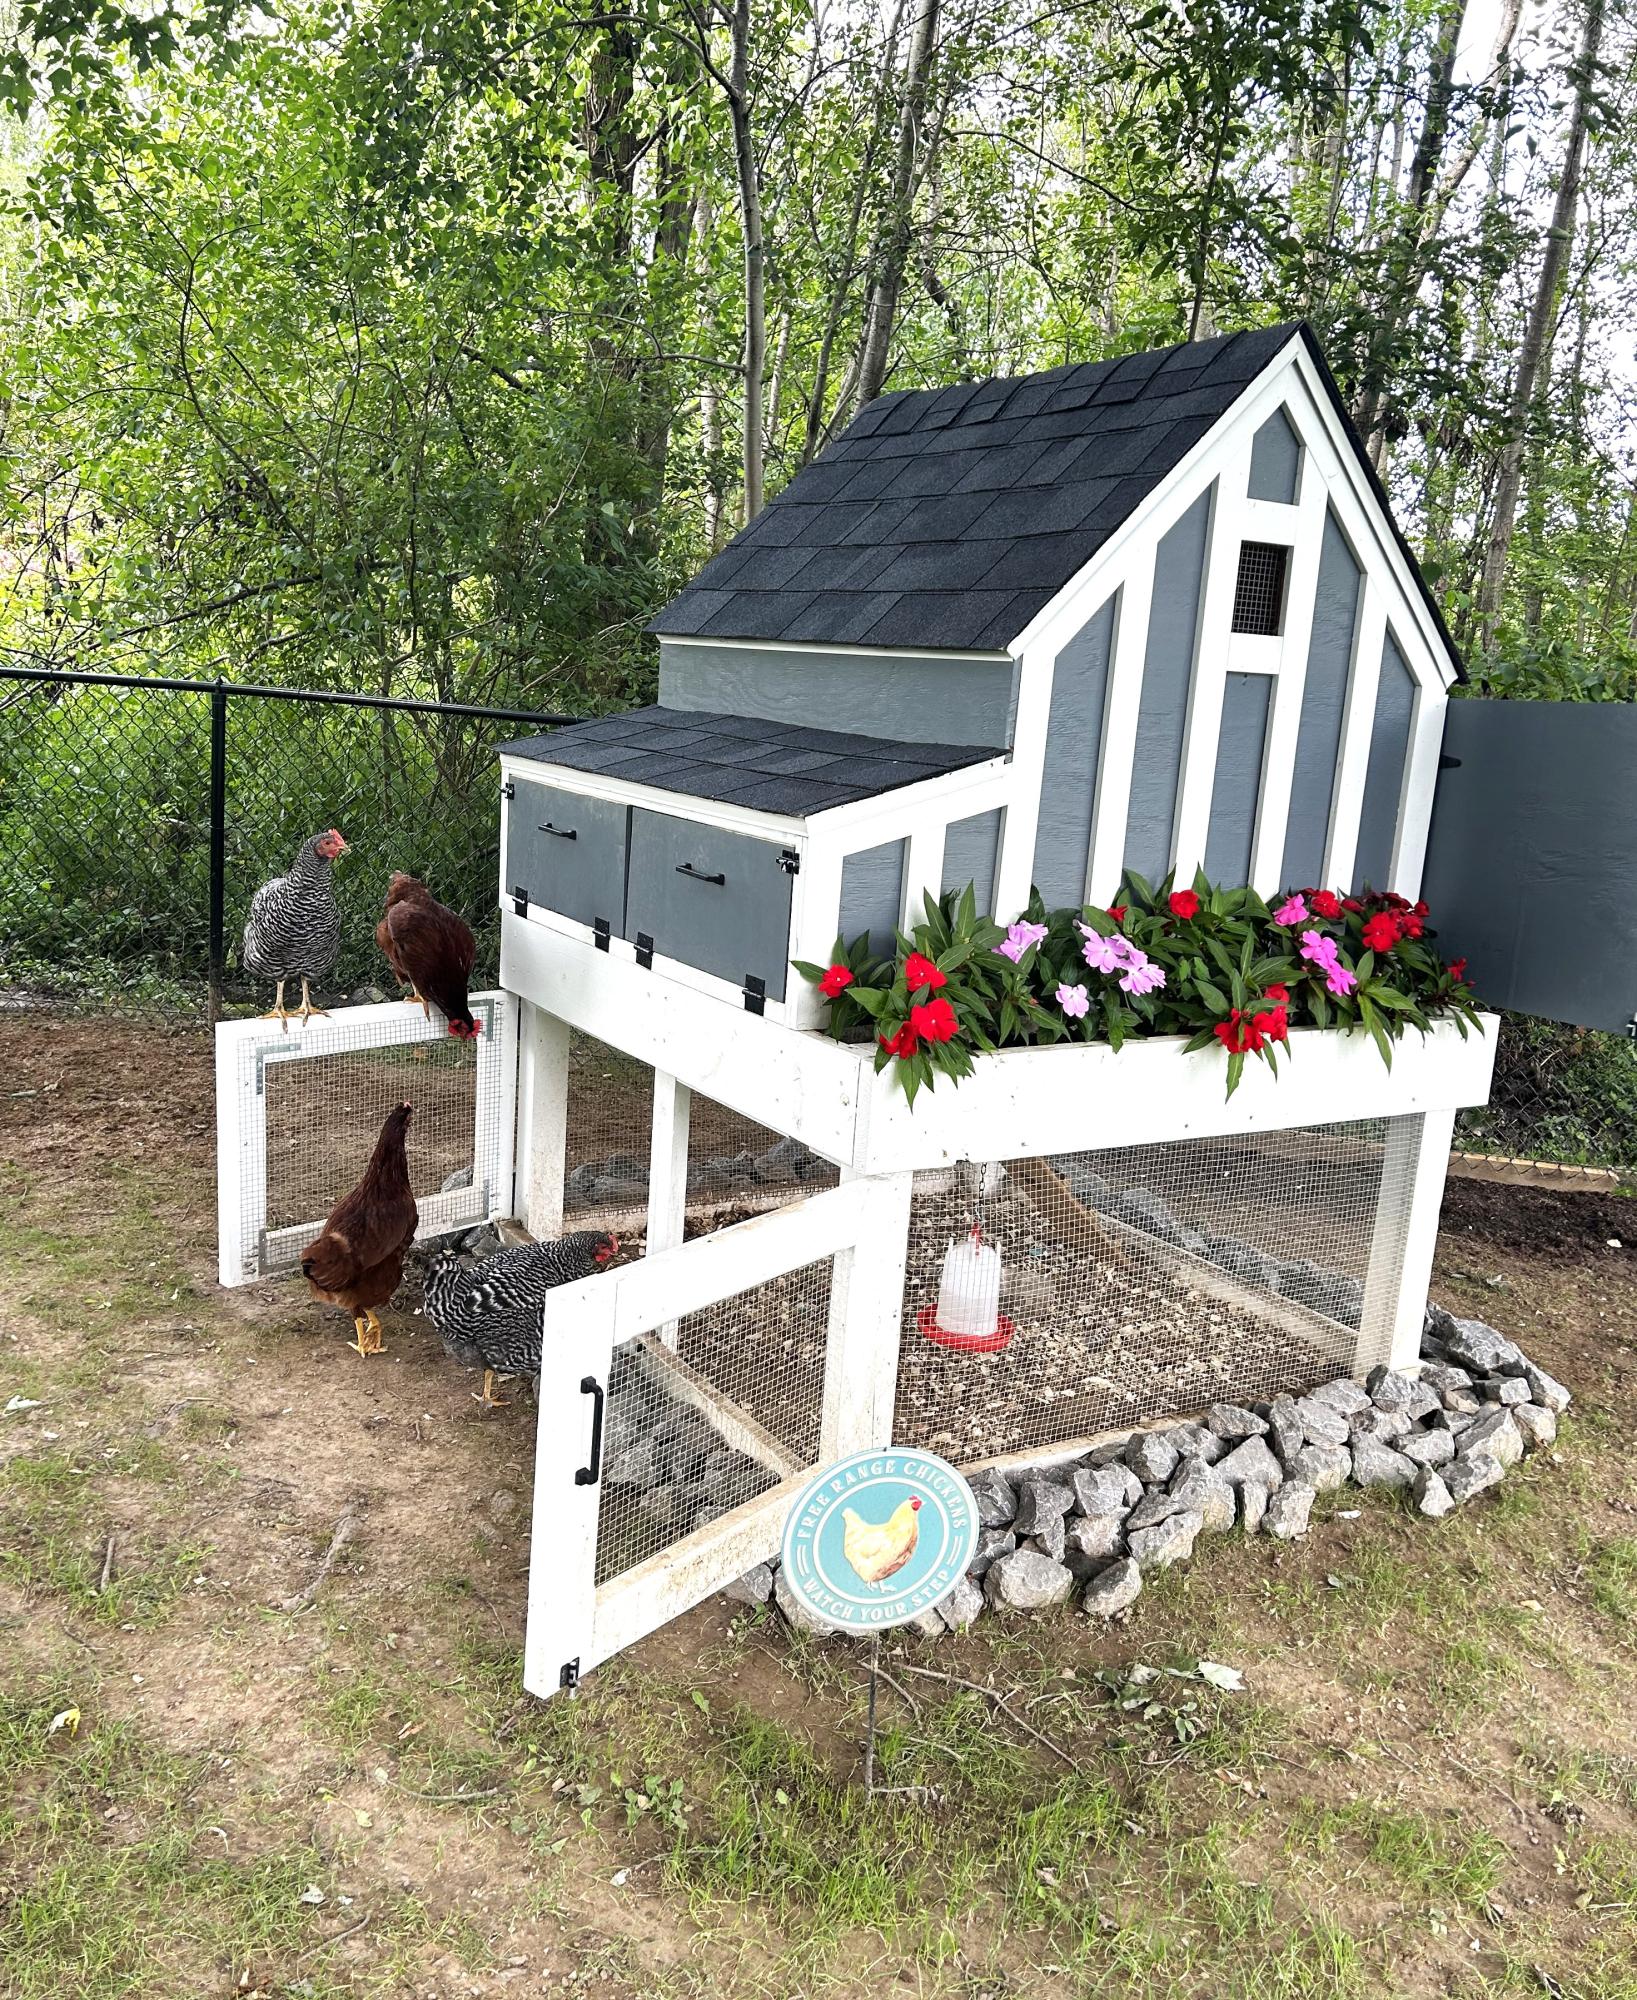
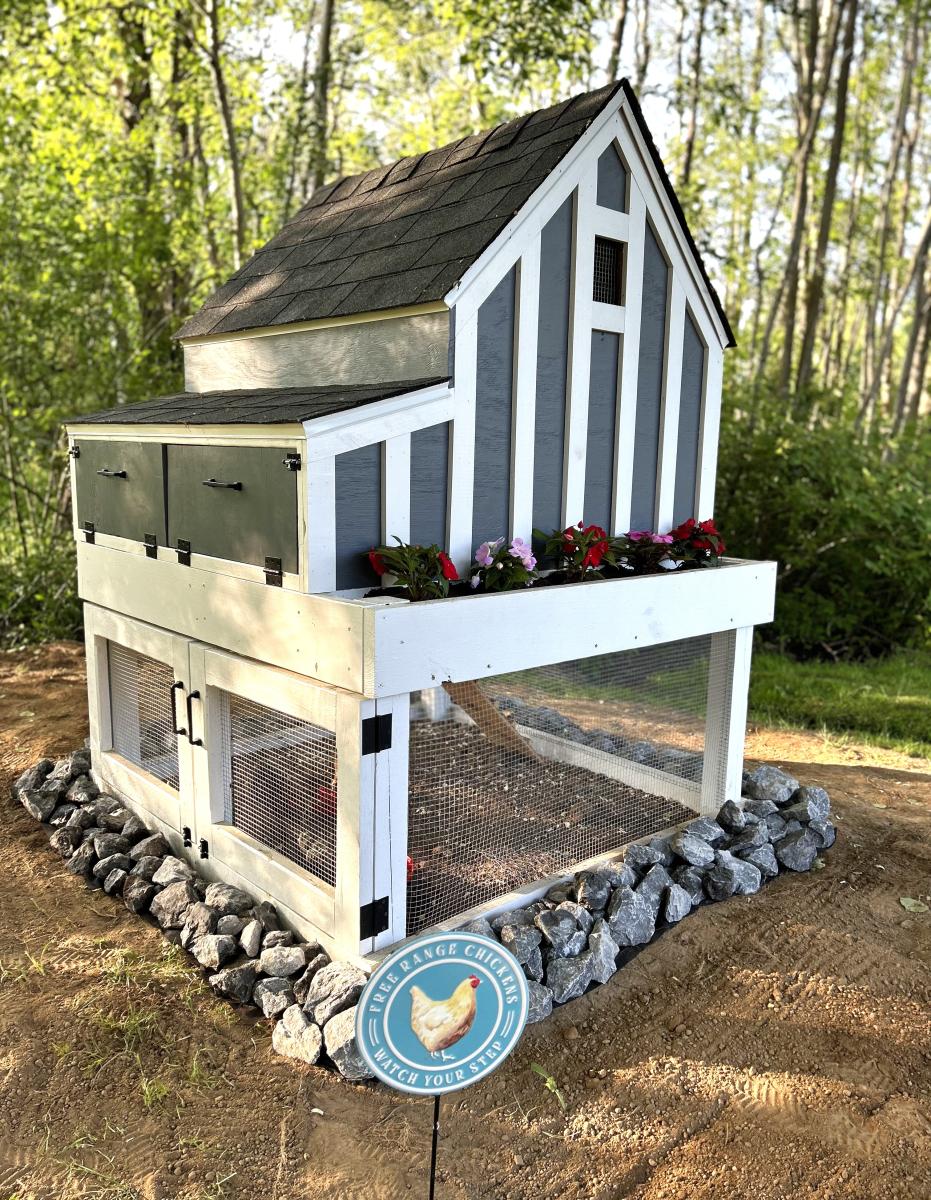
Absolutely loved how this thing turned out. Made a few customizations such as coop extension and drip edge. I have 4 happy hens and a coop that should last a lifetime. Thank you for the help!
Alex

This is my first project. I loved how easy it was and I loved my husband’s reaction to the completed project.
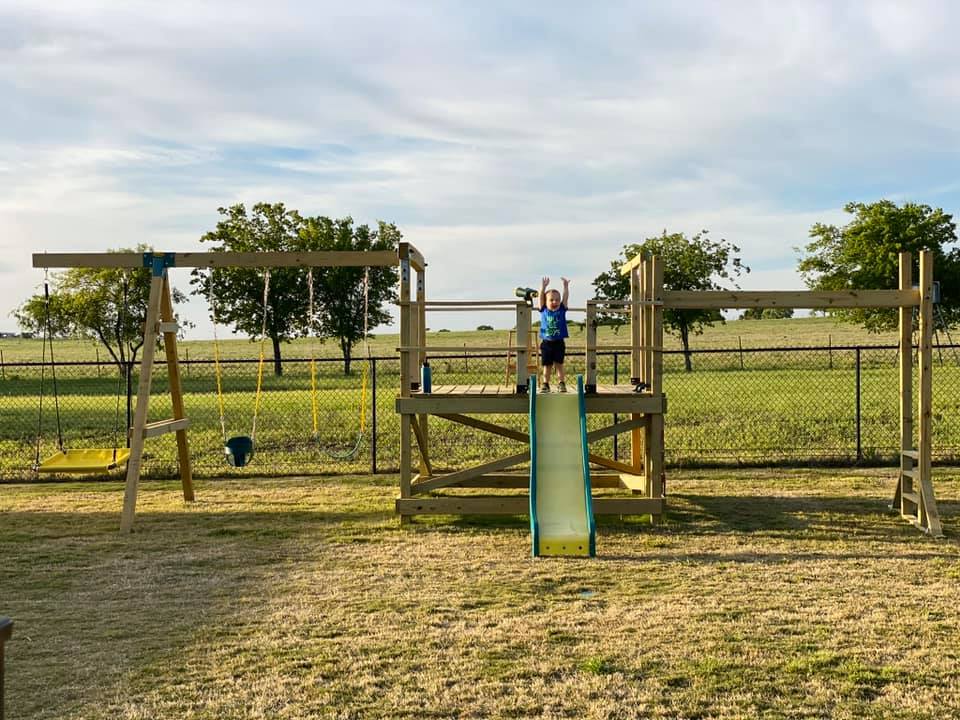
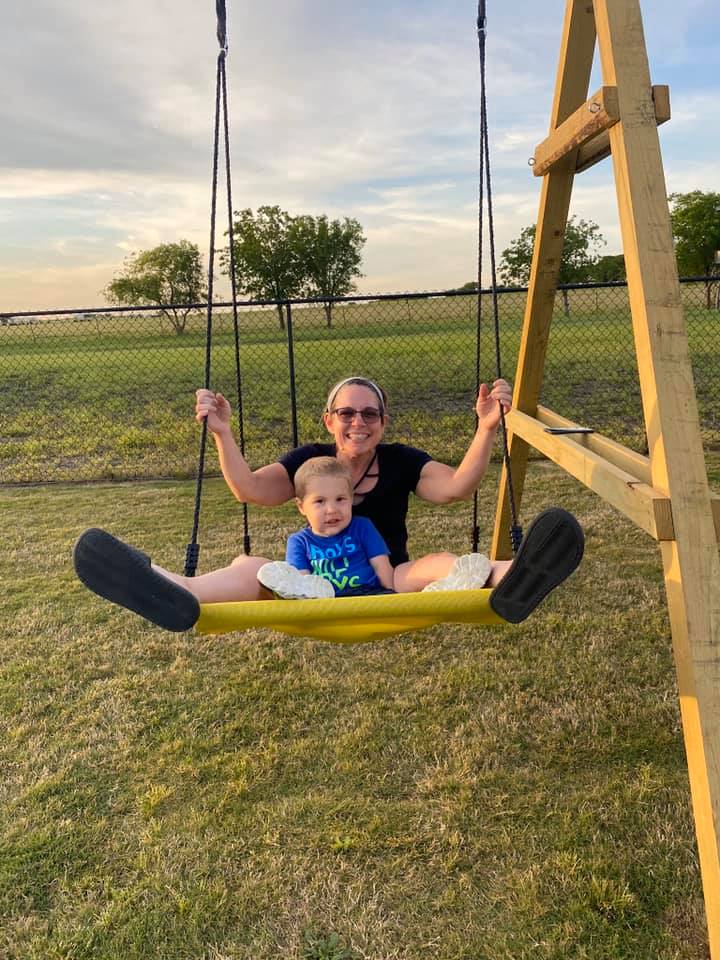
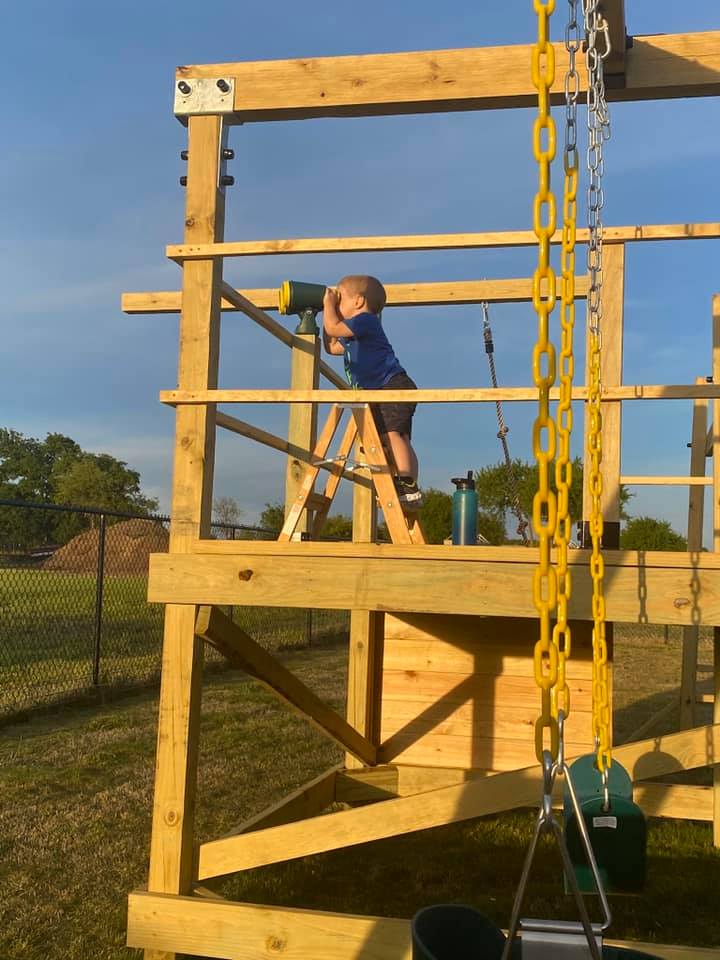
We are used to seeing our grandson every weekend but during the 2020 COVID quarantine we were unable to do so. Instead, we filled our time building him a swing set for our backyard. He loved it!! We are going to add more to the swing side but the hardware I want isn't available right now (apparently there is a lot of swing set building going on during this time). I look forward to many years of playing on this with our grandson and hopefully additional grandkids in the future... Our cost was pretty high mainly because our first round of lumber came from a local lumberyard that was willing to deliver within a few days (big box was going to take several weeks) and they had what is supposed to be higher end lumber (not sure I am convinced of that)....also, i chose some pretty expensive hardware (brackets) just for the added security.....
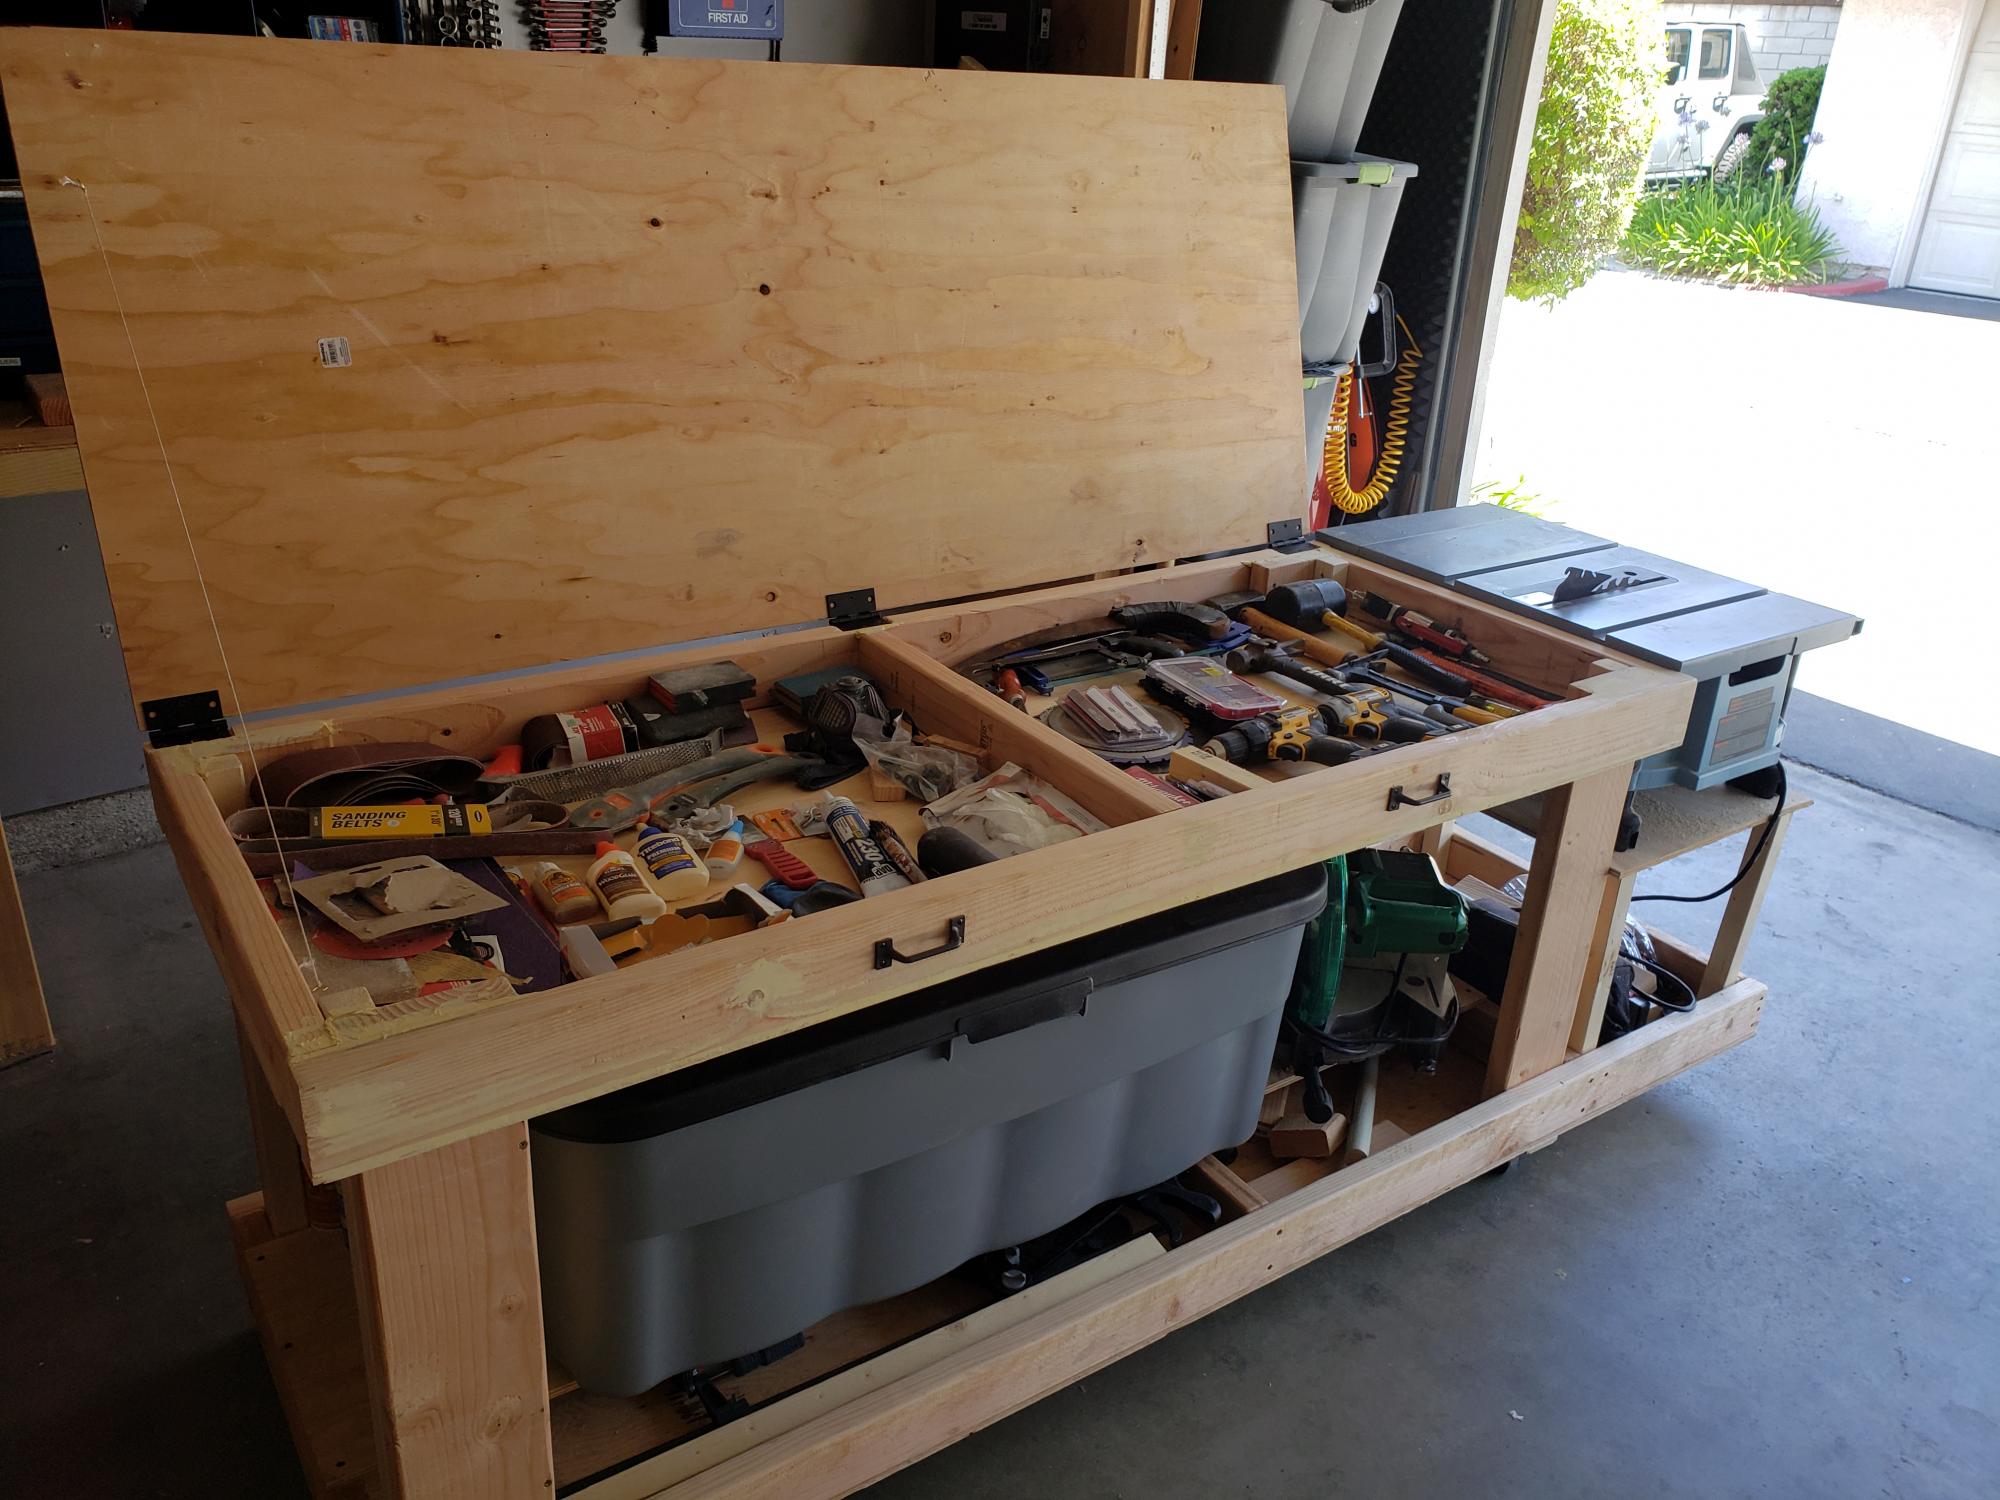
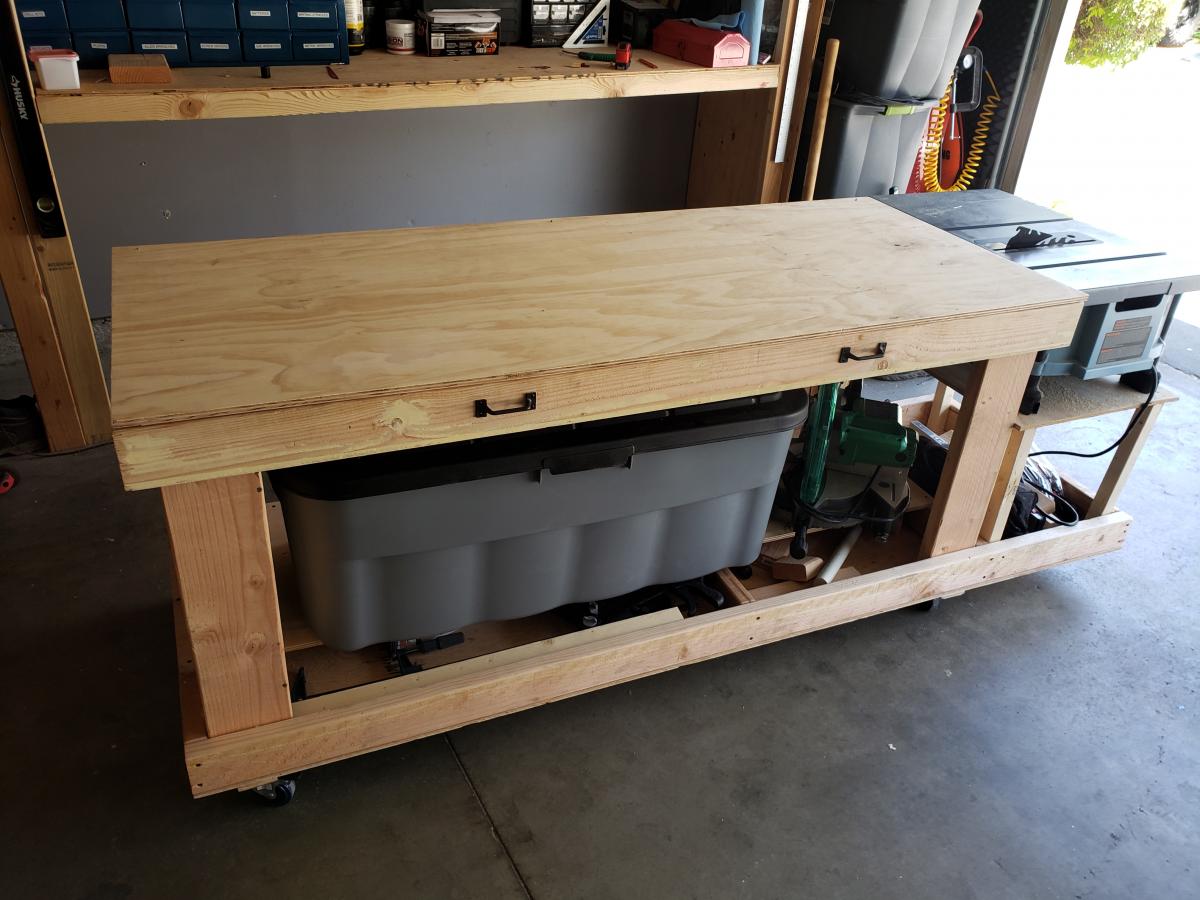
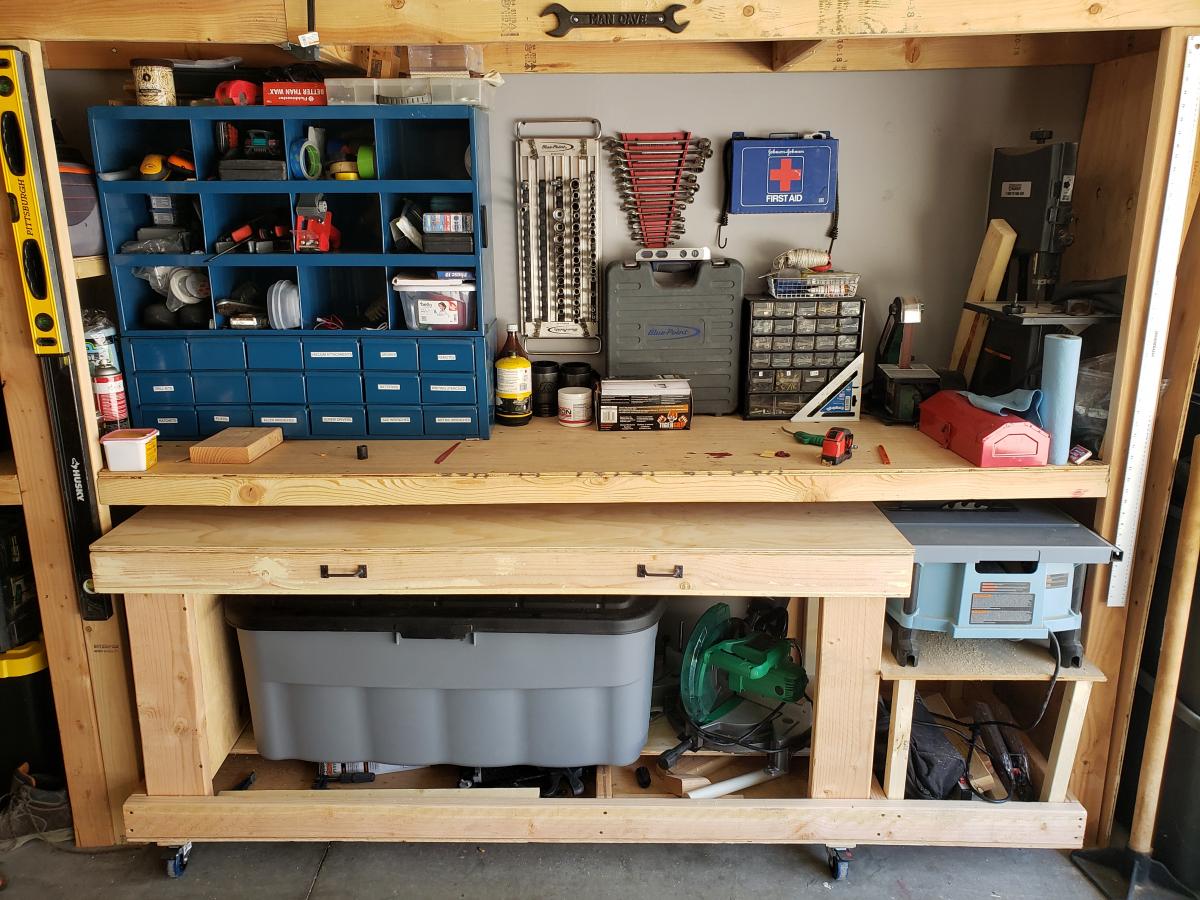
A modification of the traditional work bench. Great for storage. Bench area of 70 inches with 18 additional inches for the table saw.
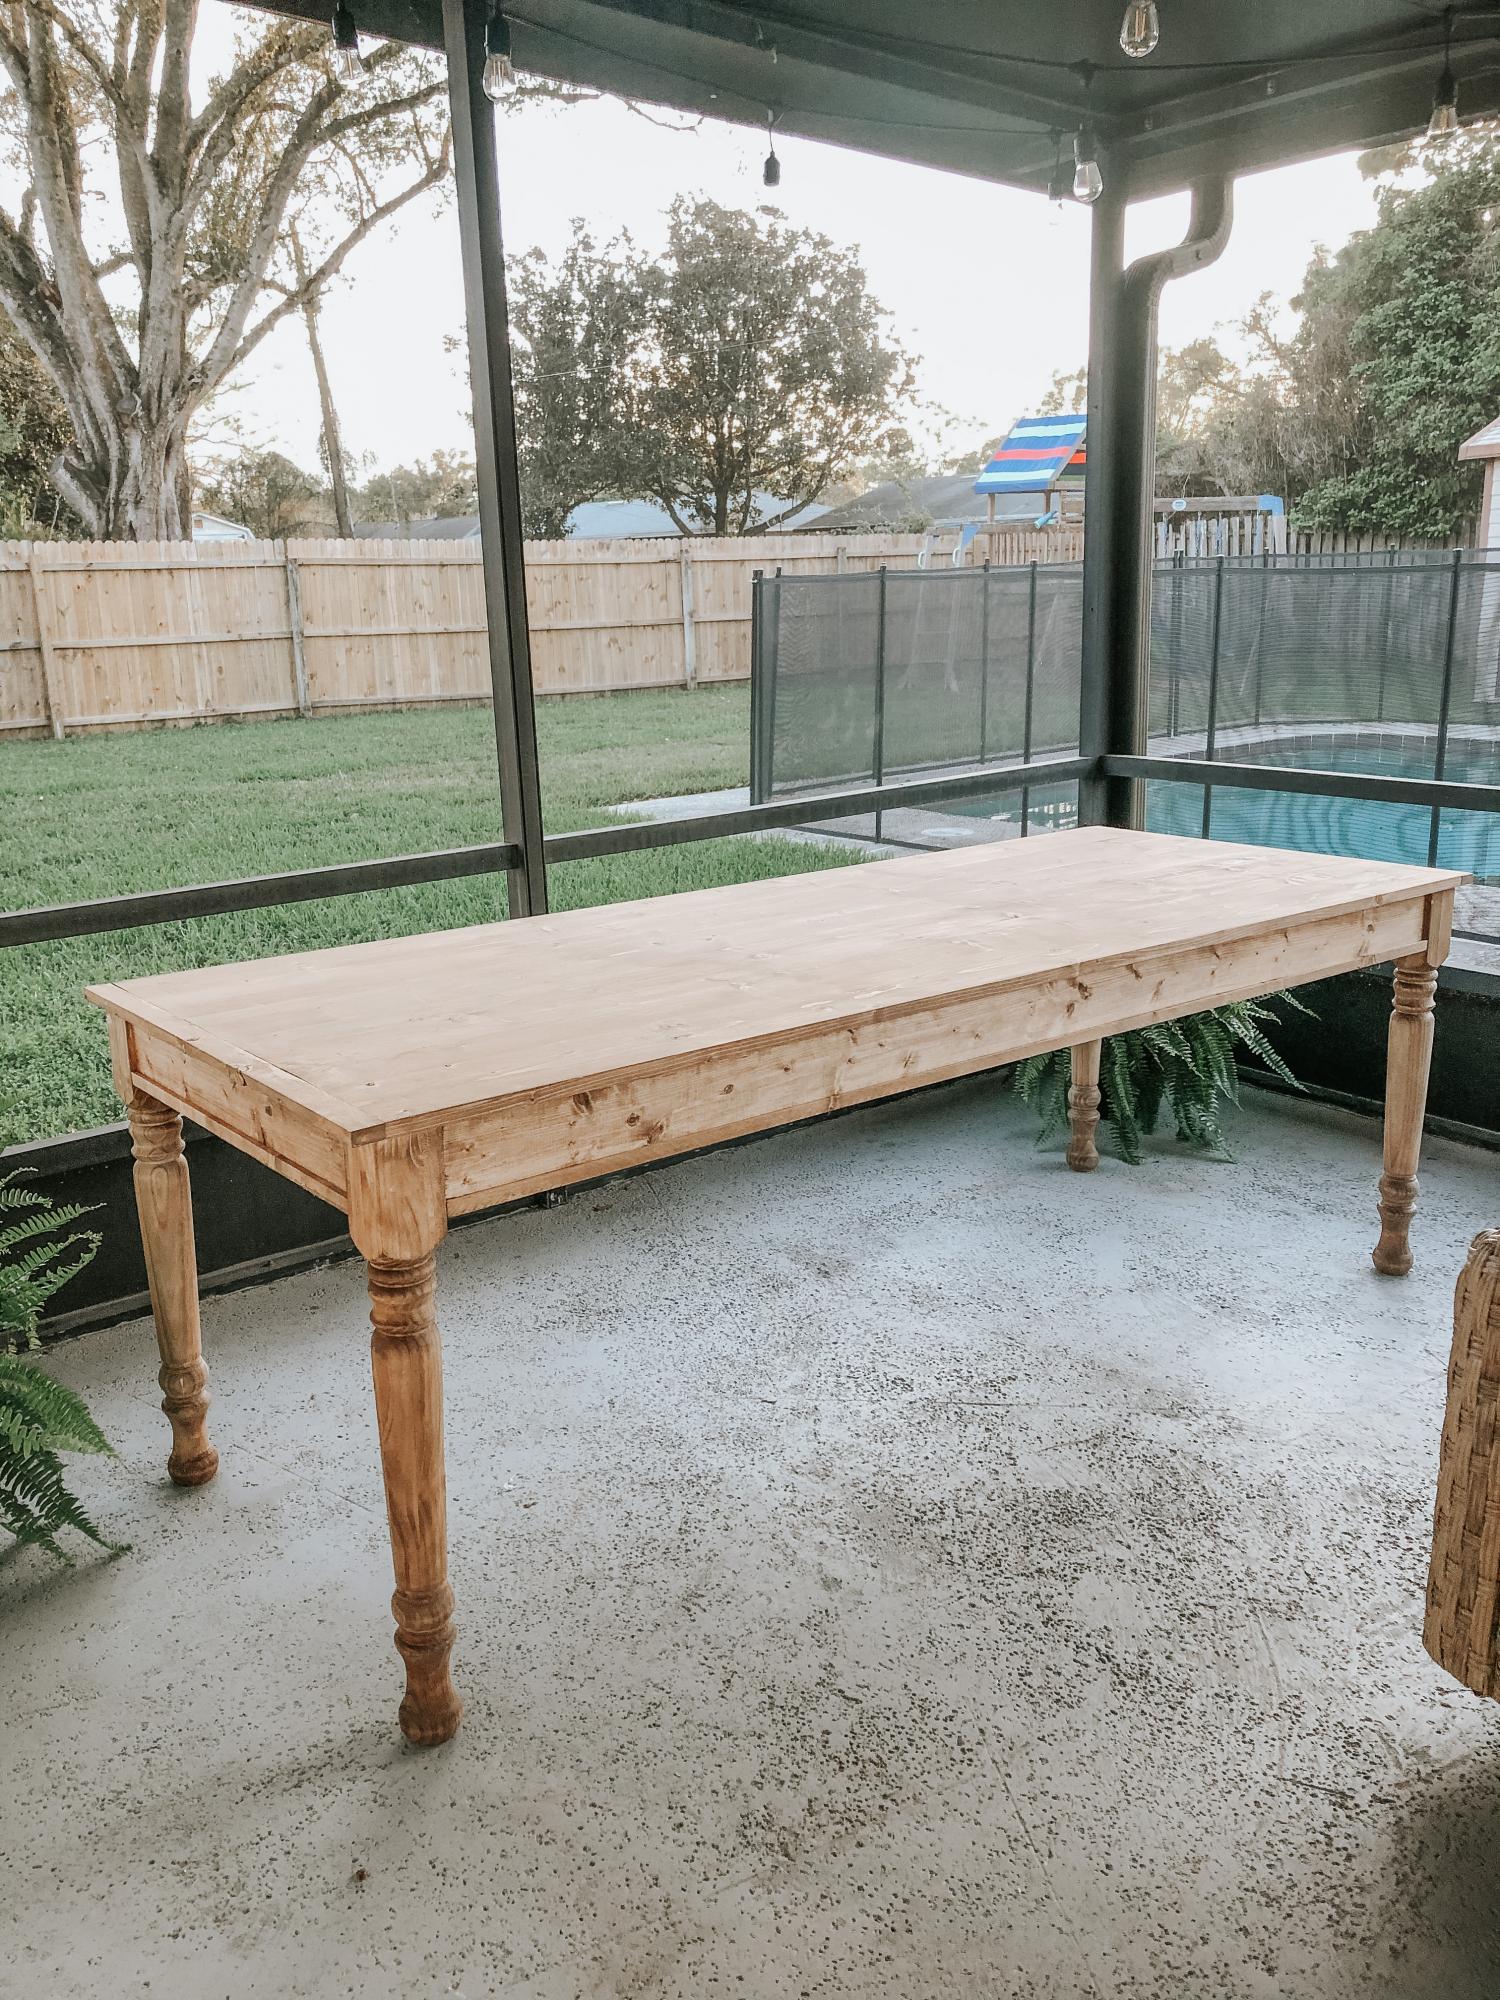
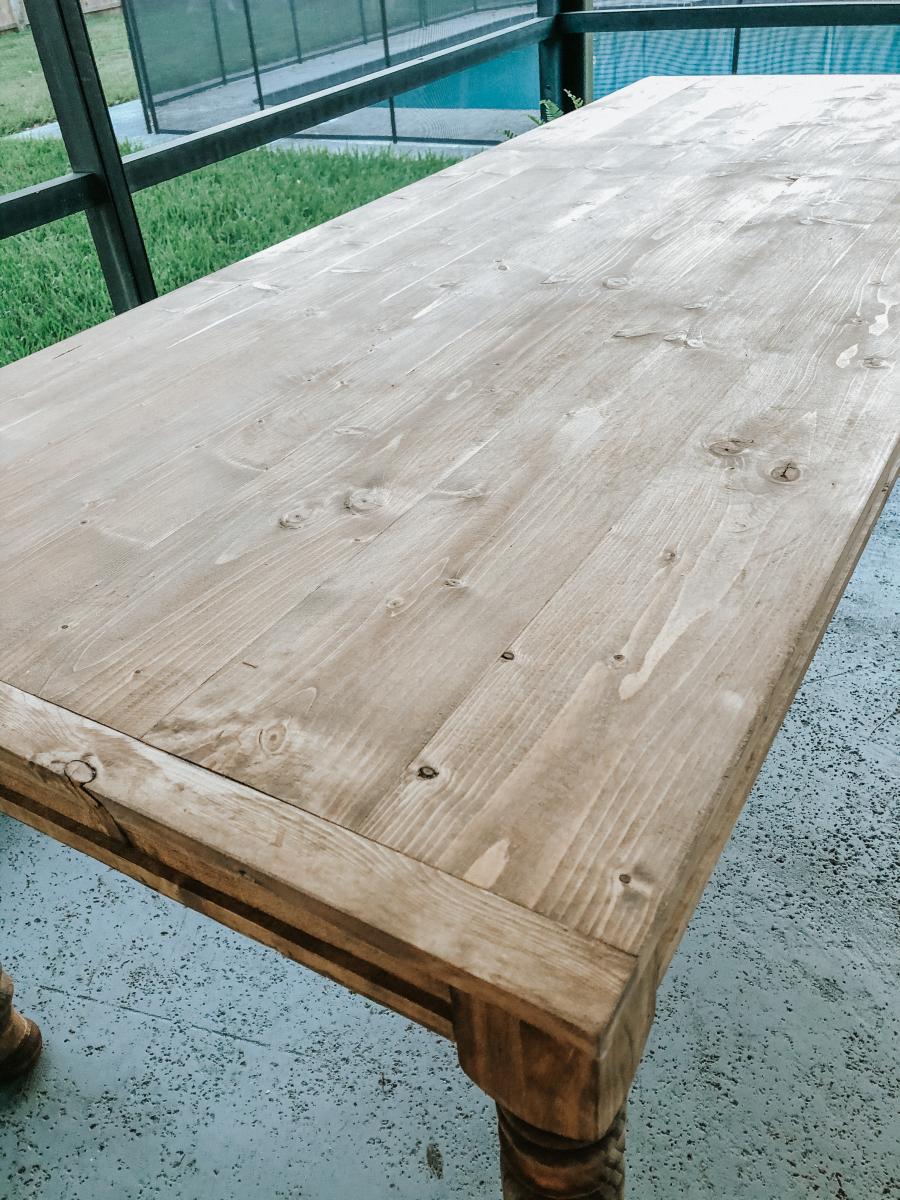
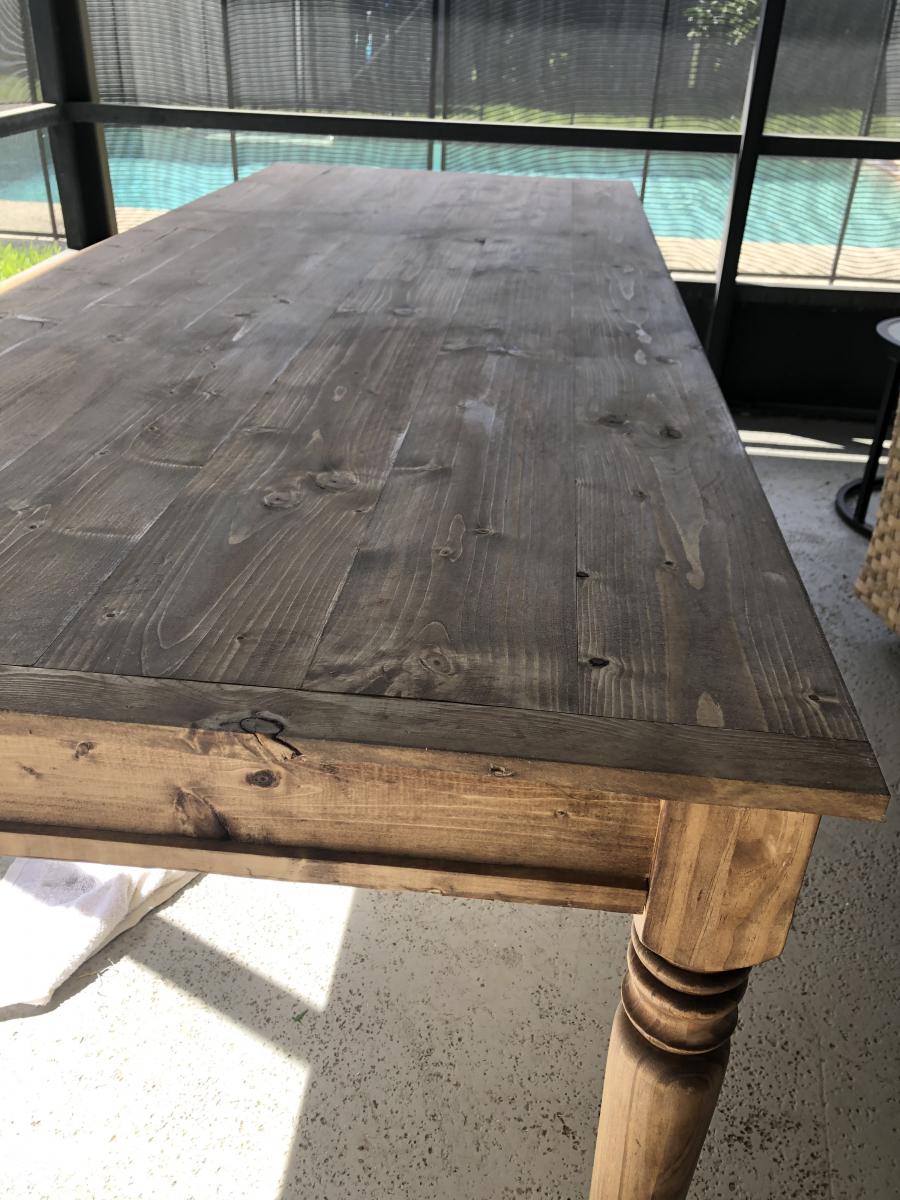
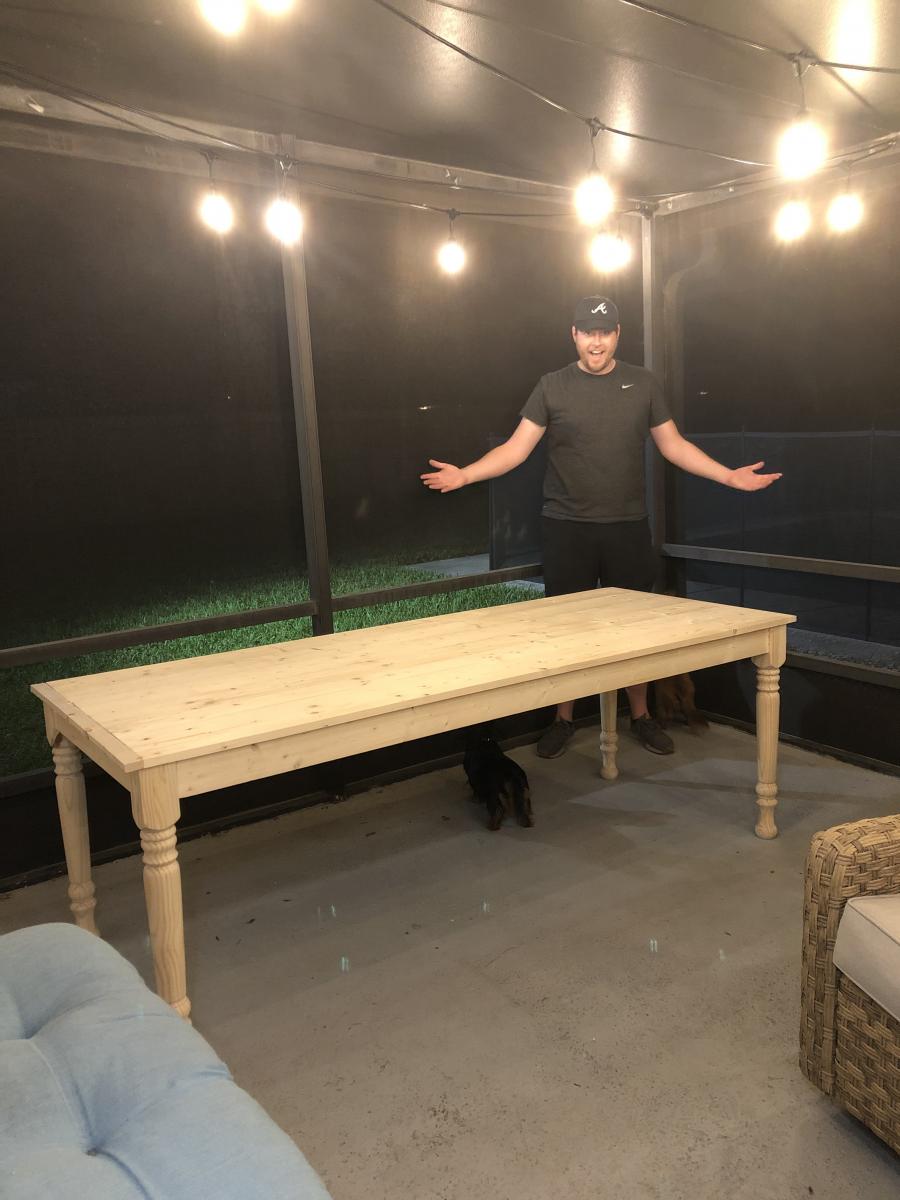
My wife and I were wanting a large outdoor farmhouse table that looked stylish, and like it could have been bought at Pottery Barn or another high-end furniture store. We found this plan that Ana white had made "Small Old English Style Farmhouse Dining Table". We often host groups from our church and will have 15-20 people on our patio or around our pool area, so we needed a bigger table... I just made some modifications to make it longer (7ft) in length to better fit our space and allow for more people to sit.
To make this plan longer, I simply adjusted the cut-list on the long 1x2s, 1x4s, and 1x6; and added a crossbar to prevent the longer tabletop from sagging. I also added the diagonal corner struts to make the table a little sturdier.
Adjusted Shopping List:
4 - 1x2 @ 8ft
5 - 1x4 @ 8 ft
6 - 1x6 @ 8ft
Waterproof 1 1/4" Kreg screws (for outdoor use)
Minwax Weathered Oak
Minwax Vintage Grey
Adjusted Cut-List
• 2 - 1x2 @ 26.5"
• 2 - 1x2 @ 76.5"
• 2 - 1x2 @ ~33.25"
• 2 - 1x4 @ 26.5"
• 2 - 1x4 @ 76.5"
• 4 - 1x4 @ 7.25" w/ 45º miter (diagonal corner supports)
• 1 - 1x4 @ ~28" (Crossbar - I forget the exact measurement)
• 6 - 1x6 @ 82"
For seating we just bought some inexpensive farmhouse weather resistant chairs from Walmart:
https://www.walmart.com/ip/Yaheetech-Metal-Dinning-Chairs-Stackable-Cof…
Tue, 03/02/2021 - 08:46
Love the to see the increased length on this plan. thanks for sharing!

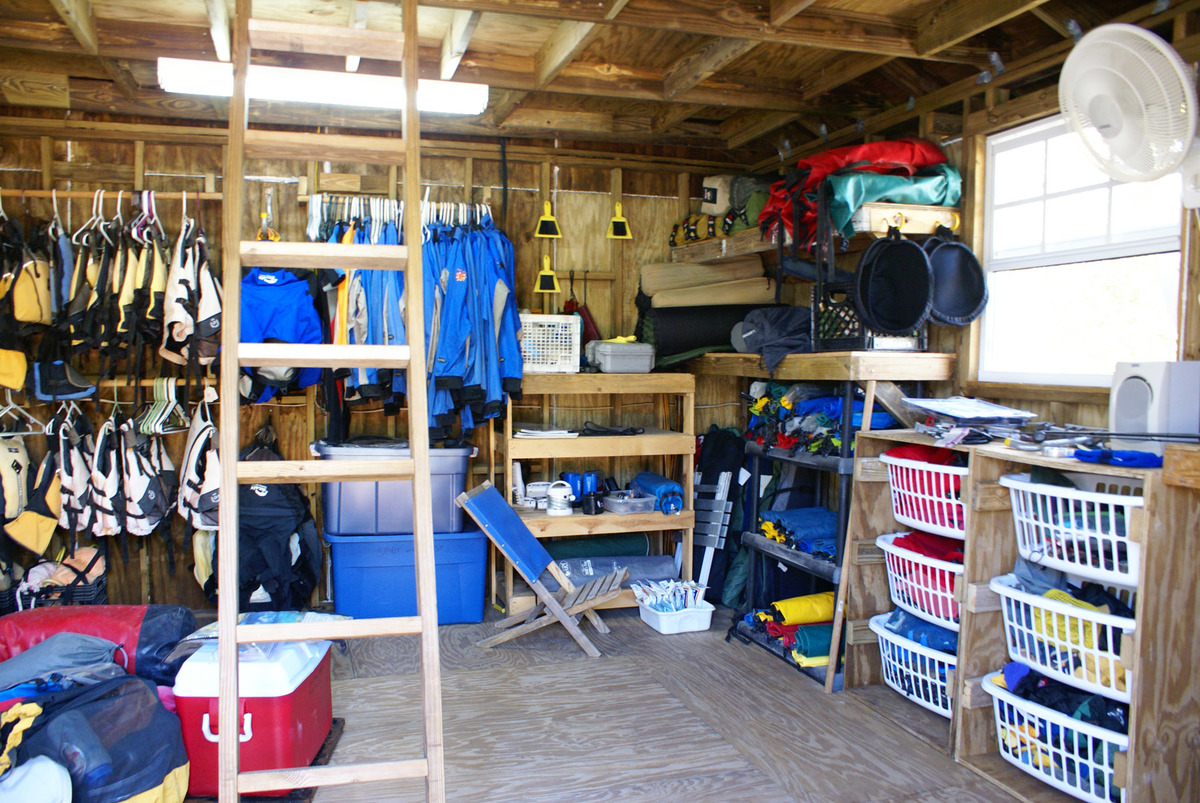
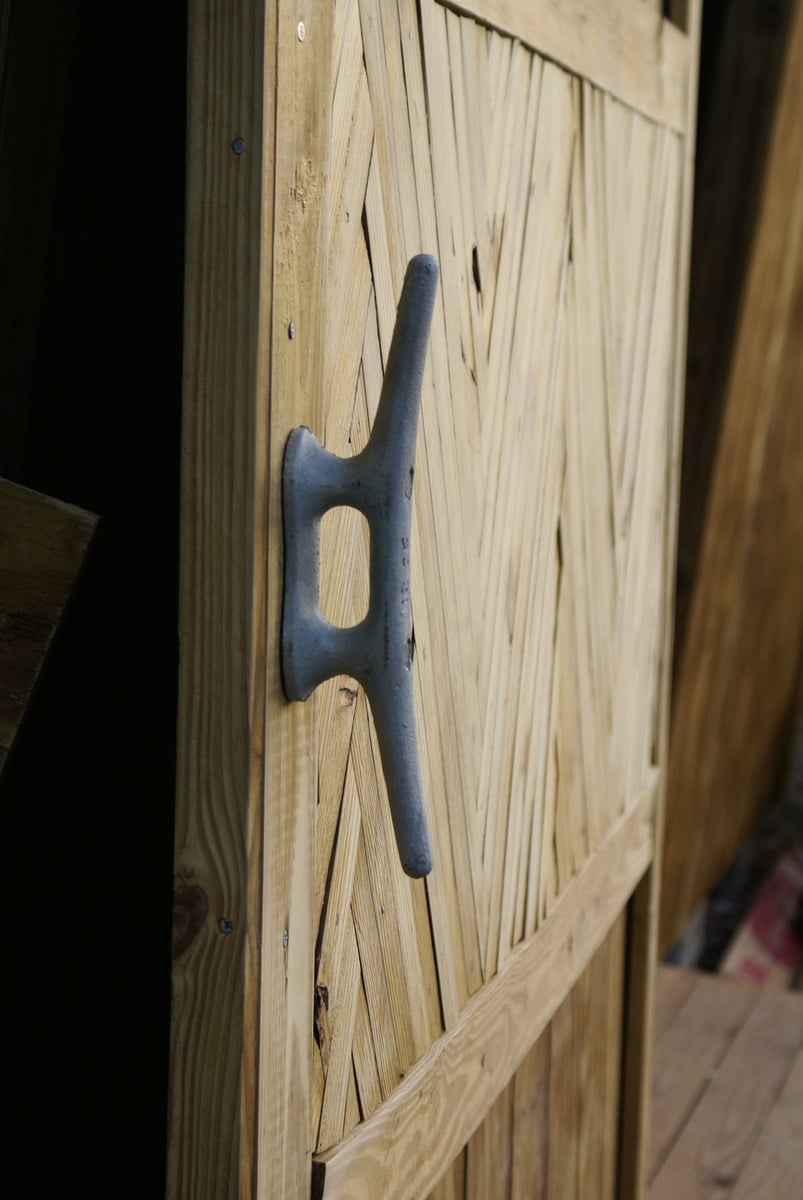
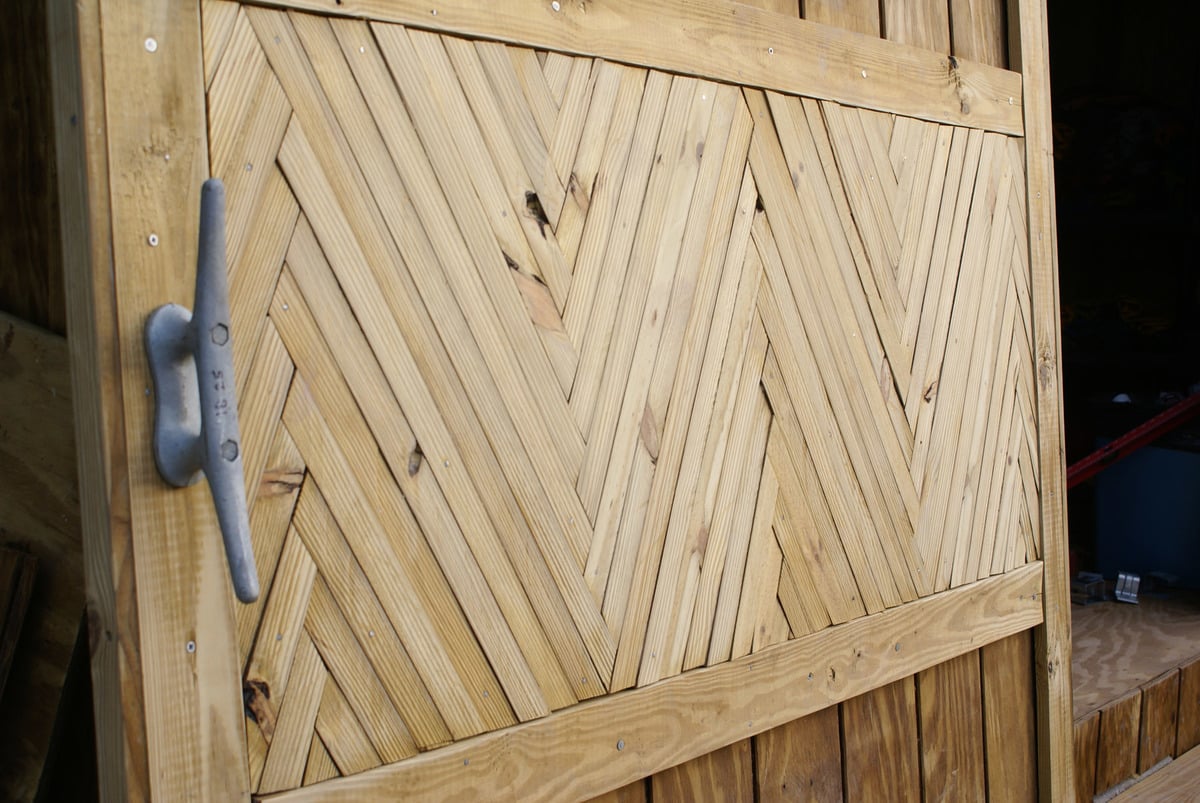
Thanks to the tips and tricks we picked up from Ana here, we were able to build our very own storage shed. We use it for storing our kayaking, sailing and camping gear for our company down here in the Bahamas (which is still a bit unorganized in the photo). It works so much better than what we had before in multiple kit sheds. We even have a loft up top for extra storage, electricity in there with a fan, fridge and lights... MAJOR UPGRADE :) We still need to paint it and finish a few things, but we are very thankful to have it up and being used.
My favorite thing is the door handle (a boat cleat) sliding barn door and the herringbone design for 'eye candy' :)
Thanks go out to Ana and her wonderful site! I would have never attempted this without the foundation I built here!
Sun, 04/14/2013 - 20:37
What did you use to make the sliding door? Can you upload pics? I really want to make one for my bathroom but all the hardware I find is really expensive.

In reply to Sliding door by jbayer80
Mon, 04/15/2013 - 11:29
I've read on some blogs people have found theirs at Lowes or Tractor Supply.
Mon, 04/15/2013 - 06:05
We built the door out of some T1-11 Siding, 1x4's and various scrap pieces. The hardware we used is this Stanley set here: http://www.stanleyhardware.com/default.asp?CATEGORY=HDW+BARN+BOX+TRACK&… Then we bought the steel track separately. This door is super heavy, but it rolls like a charm on the track. Does this help any? Good luck!
Mon, 04/15/2013 - 11:42
And they work perfectly for our camping gear and kayaking gear too :)
Sun, 05/05/2013 - 13:58
Not really any plans that would help. We just drew some rough sketches up some paper and kind of went from there. Between Ana's site here and this book: http://www.amazon.co.uk/Building-Shed-Build-Like-Pro/dp/1561586196 we just pieced things together with the space and money we had. The book just helped me a lot to plan it out, and then all of the building techniques Ana has taught me on here came in handy. It's a group effort :) Hope this helps!
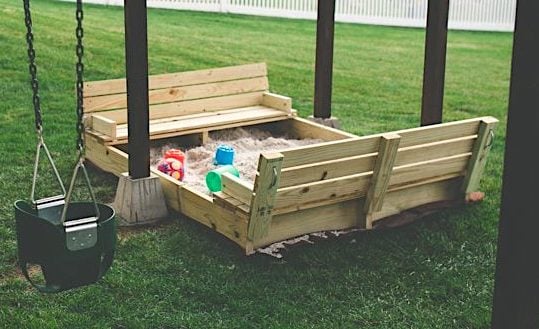
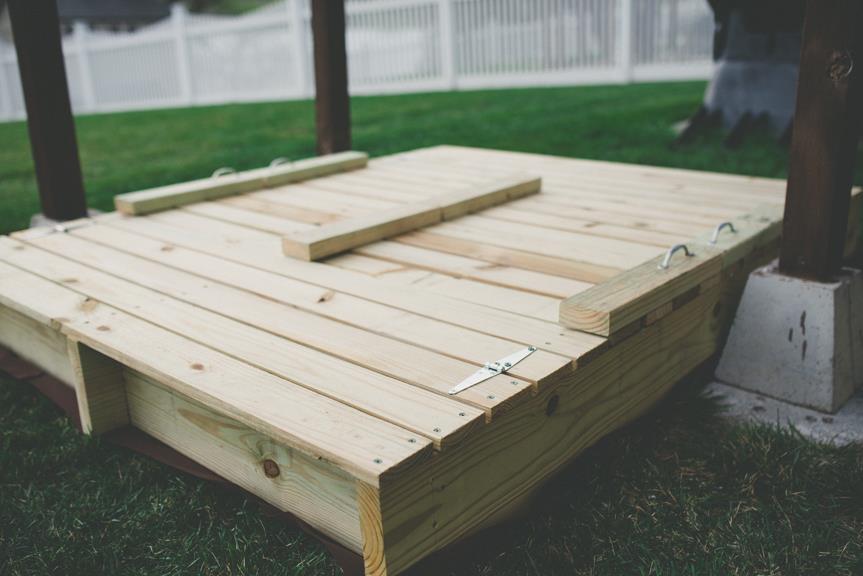
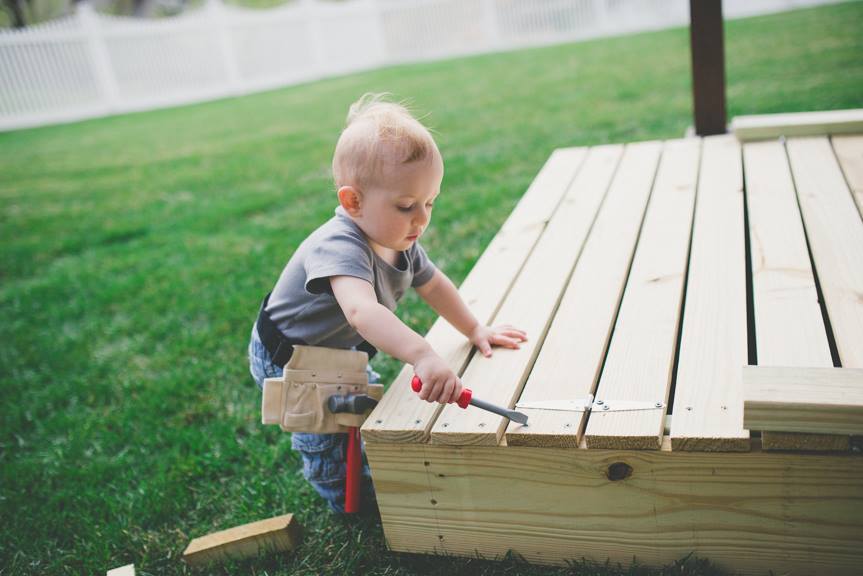
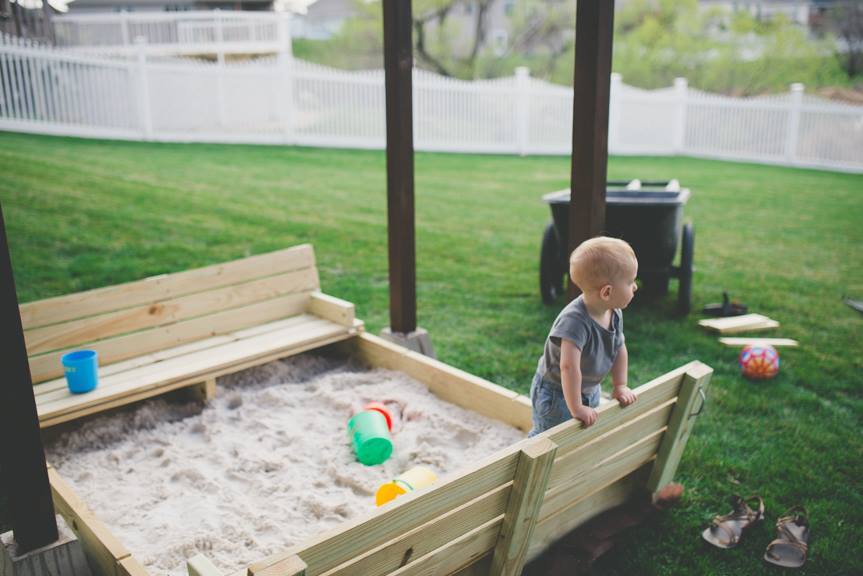
We altered the original plan by enlarging the sandbox (approx 5' x 6') which made for wider benches that can comfortably seat an adult. The benches and back rests are three boards deep instead of two. We added 2x12 supports under the benches for additional support, as well as another 2x4 support in the middle of the backrest.


Tue, 04/14/2015 - 20:00
I just love seeing pictures of these built! Makes my heart swell :-)
Steps:
1) Cut the boards to the specs below or adjust to your space
2) Kreg Jig the cut boards along each of the sides (length wise and on the ends) for attaching and making a box.
3) Make 3 separate boxes, don't assemble until you move to location. I used 4x4 cedar posts in the corners of the base box to add stability. I used 2x2 pine in the front corners of boxes 2 and 3 for stability. Install these after the dirt has been added so you can hammer in as a stake, attach with screws on front and sides. I created 2 stakes for boxes 2 and 3 and added to the front to prevent bowing when the dirt is added.
Box Dimensions:
1) (base) 70.5" L x 46 W x 4 cedar boards high
2) 70.5" L x 32 W x 2 cedar boards high
3) 70.5" L x 16 W x 2 cedar boards high


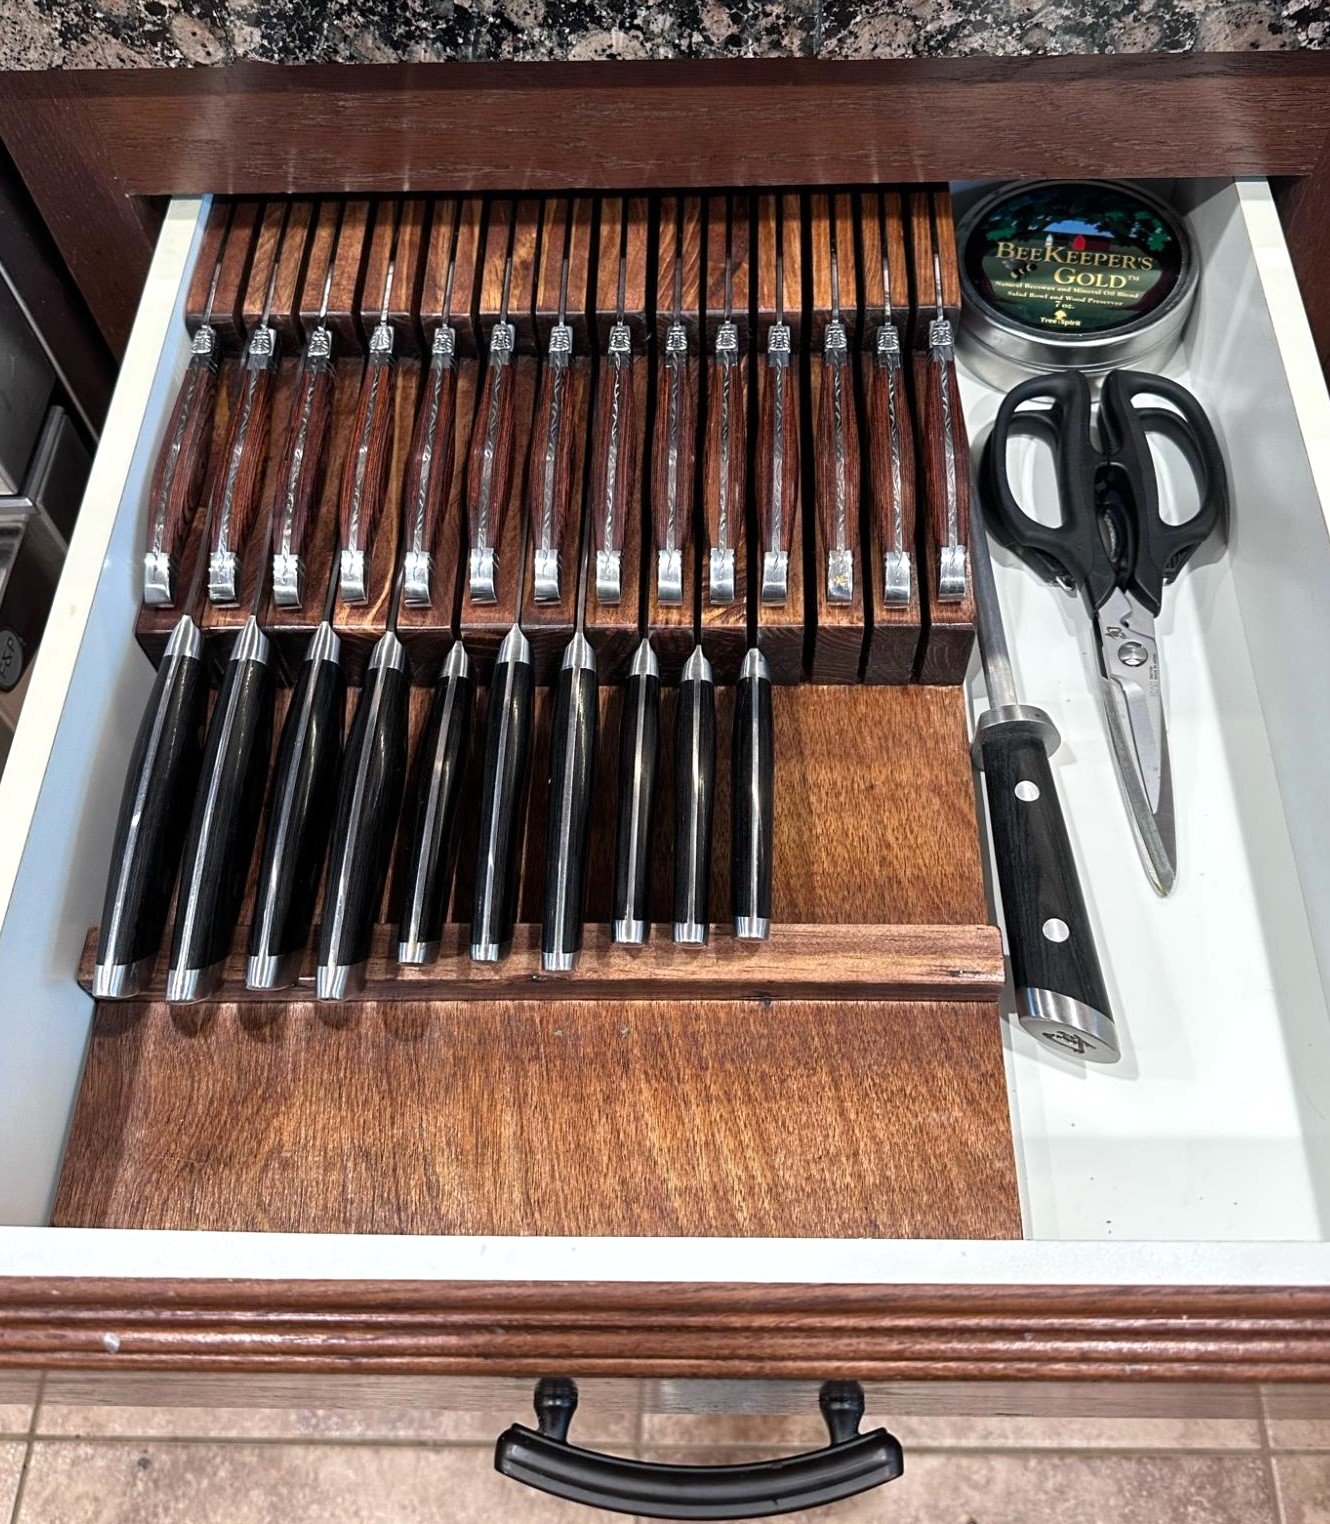
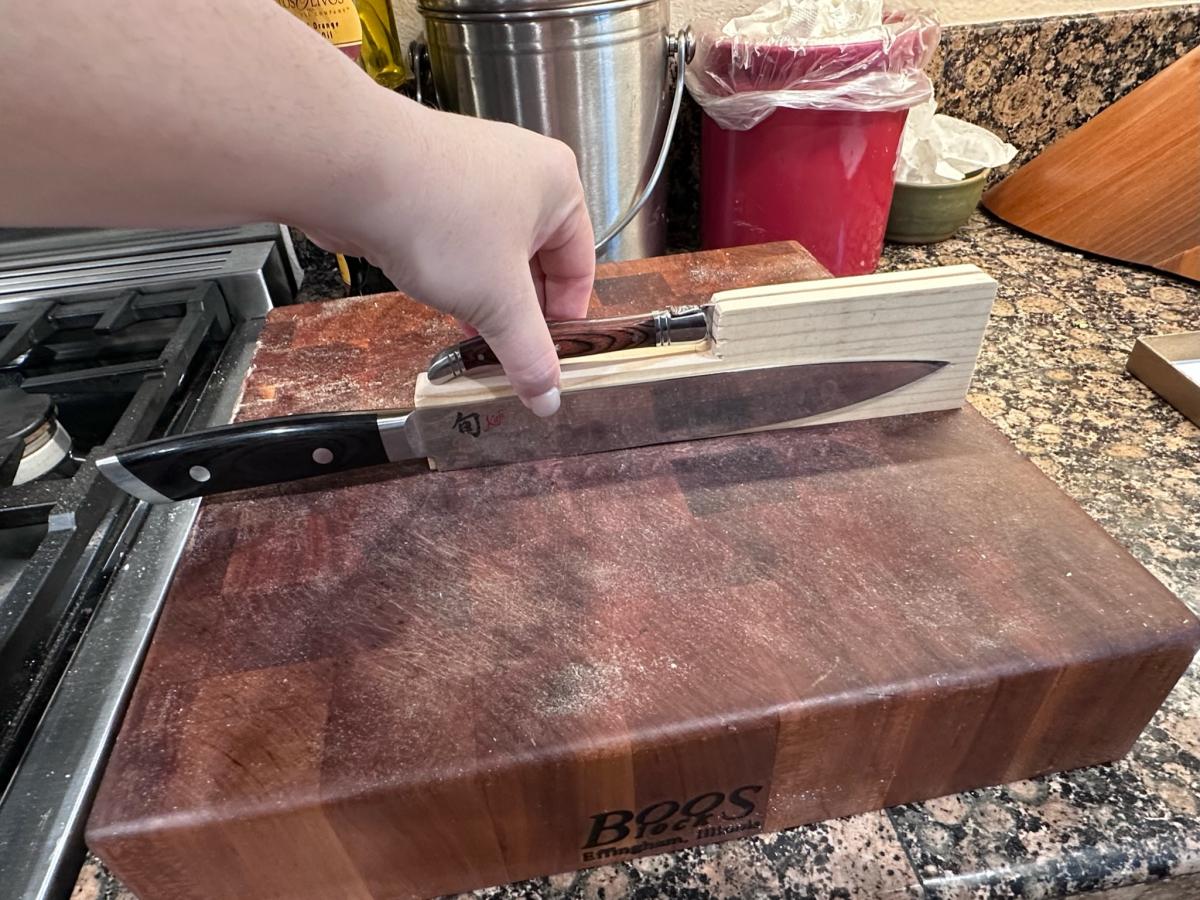
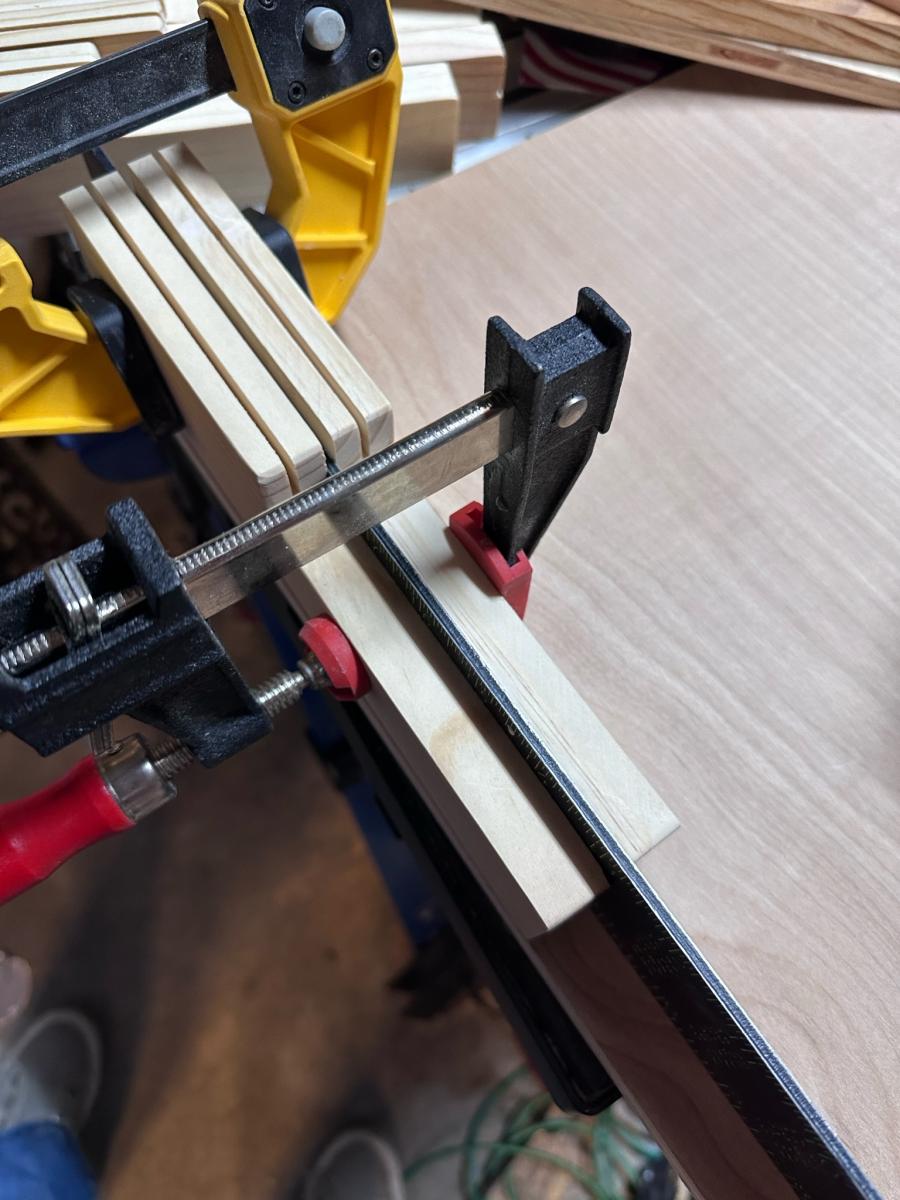
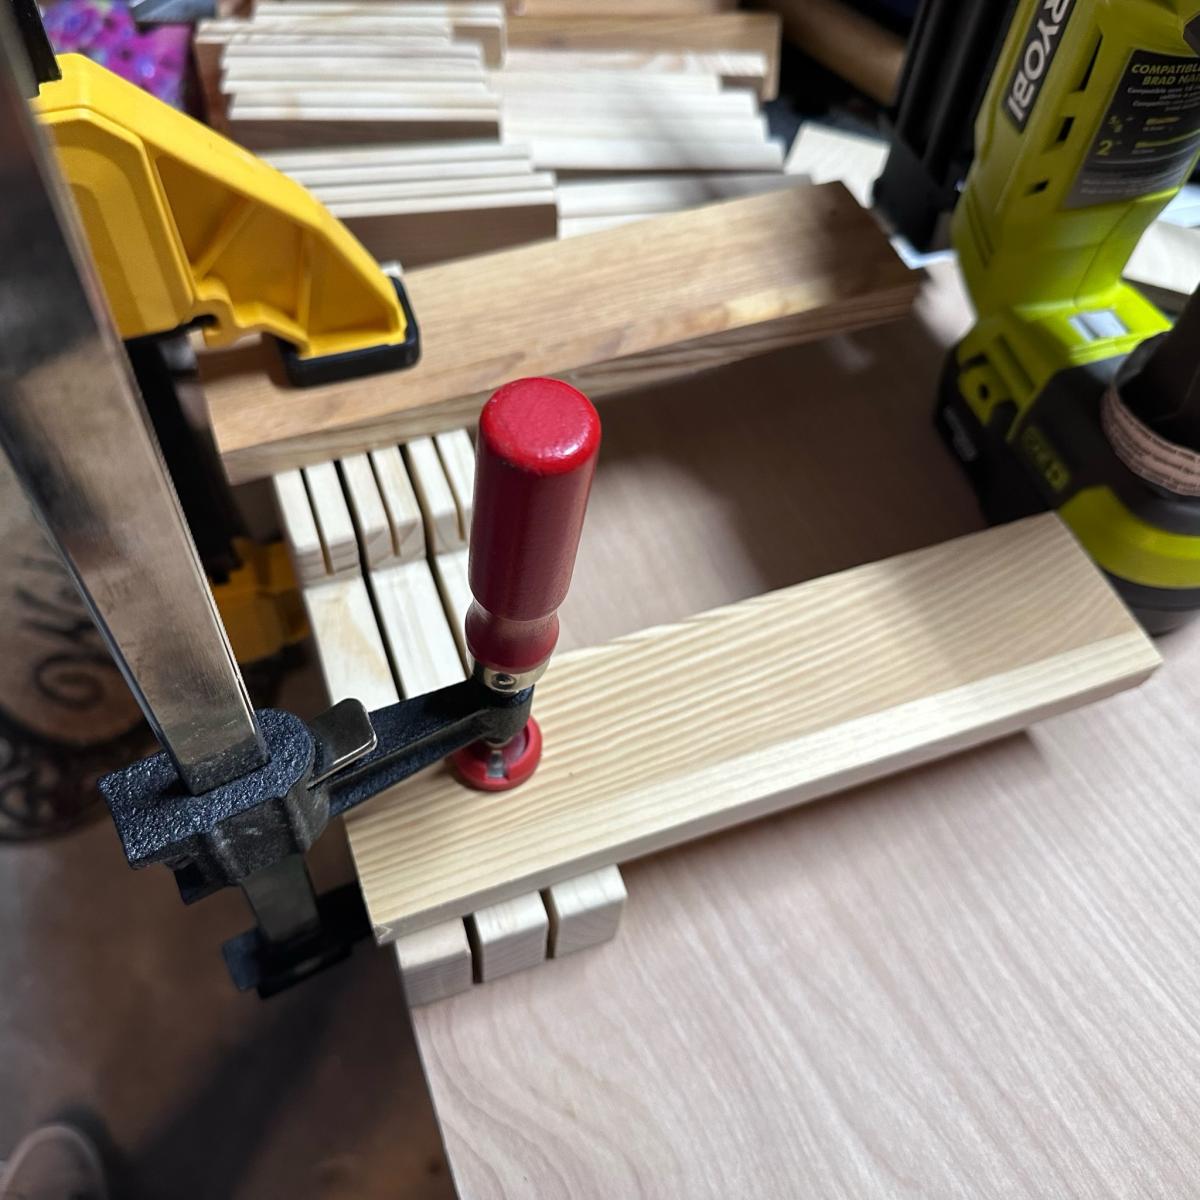
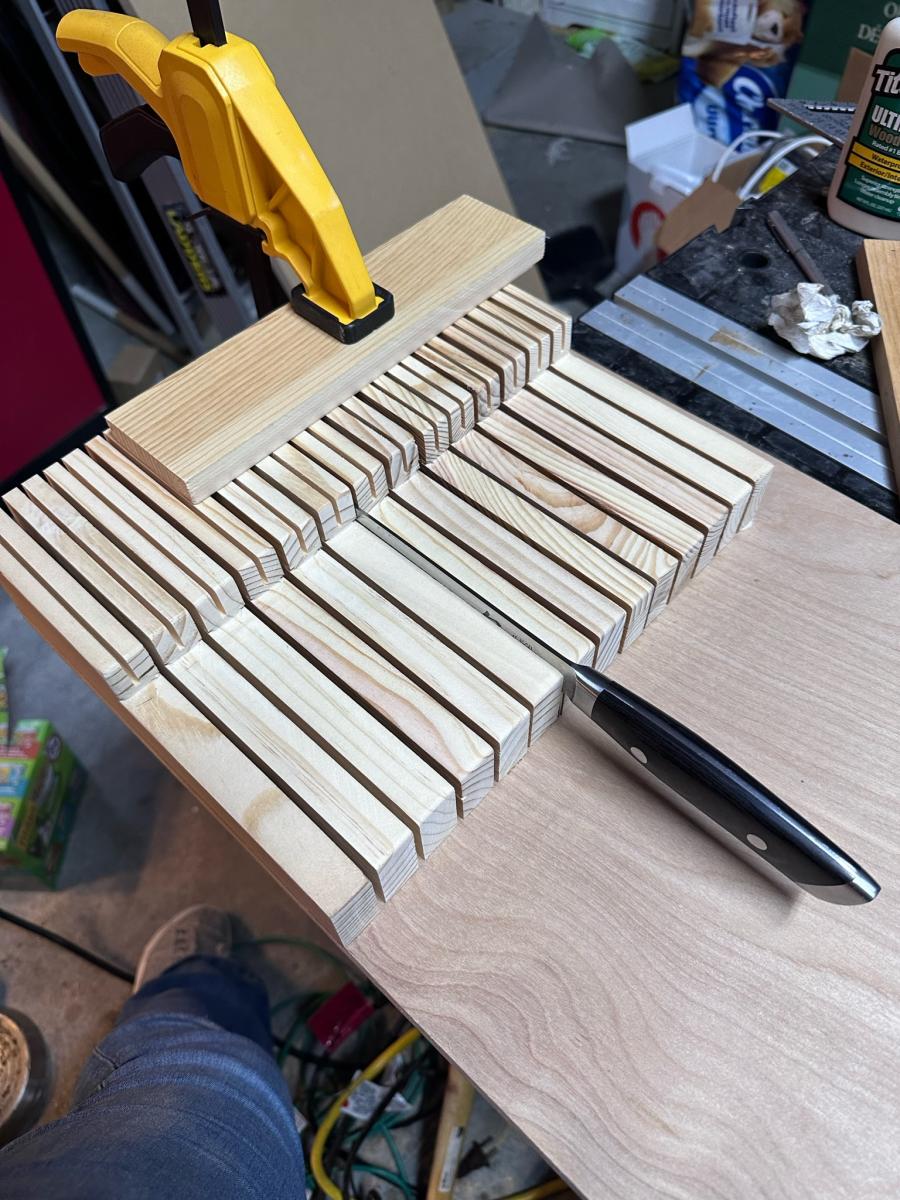
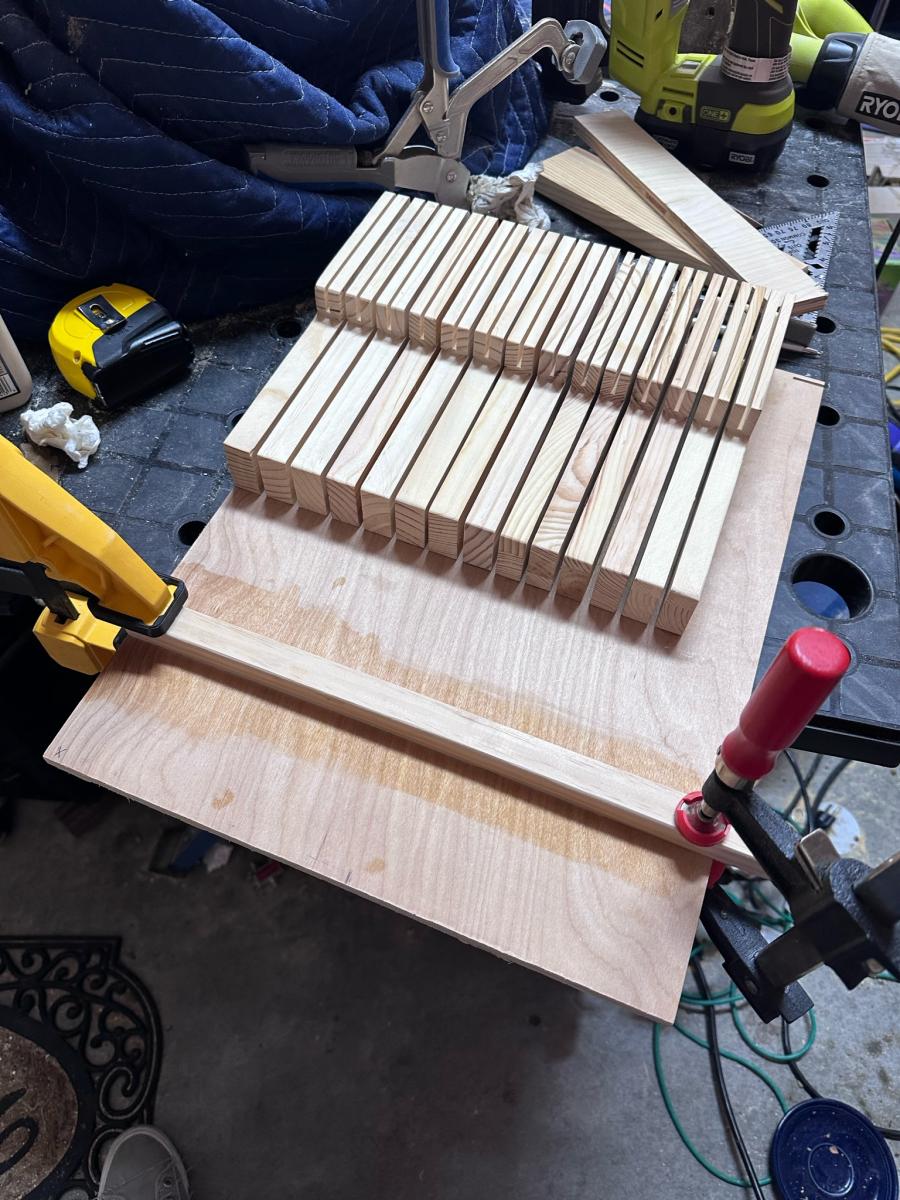
I watched your video and modified mine to take up less space by using 1 x material instead of 2X material, and I cut a notch in the top to allow steak knives to store on top. Once a cut a notch, then I used my table saw to create the space where the steak knife blades fit.
From there, lots of sanding and gluing. I made the plywood base about 1/4” shorter than the depth of my drawer so it could be easily placed inside my drawers that don’t fully extend out.
I finished it with pre-stain conditioner, stain, and then an oil/beeswax blend (used for cuttting boards) applied with 0000 steel wool for a super smooth, satiny finish.
Angie
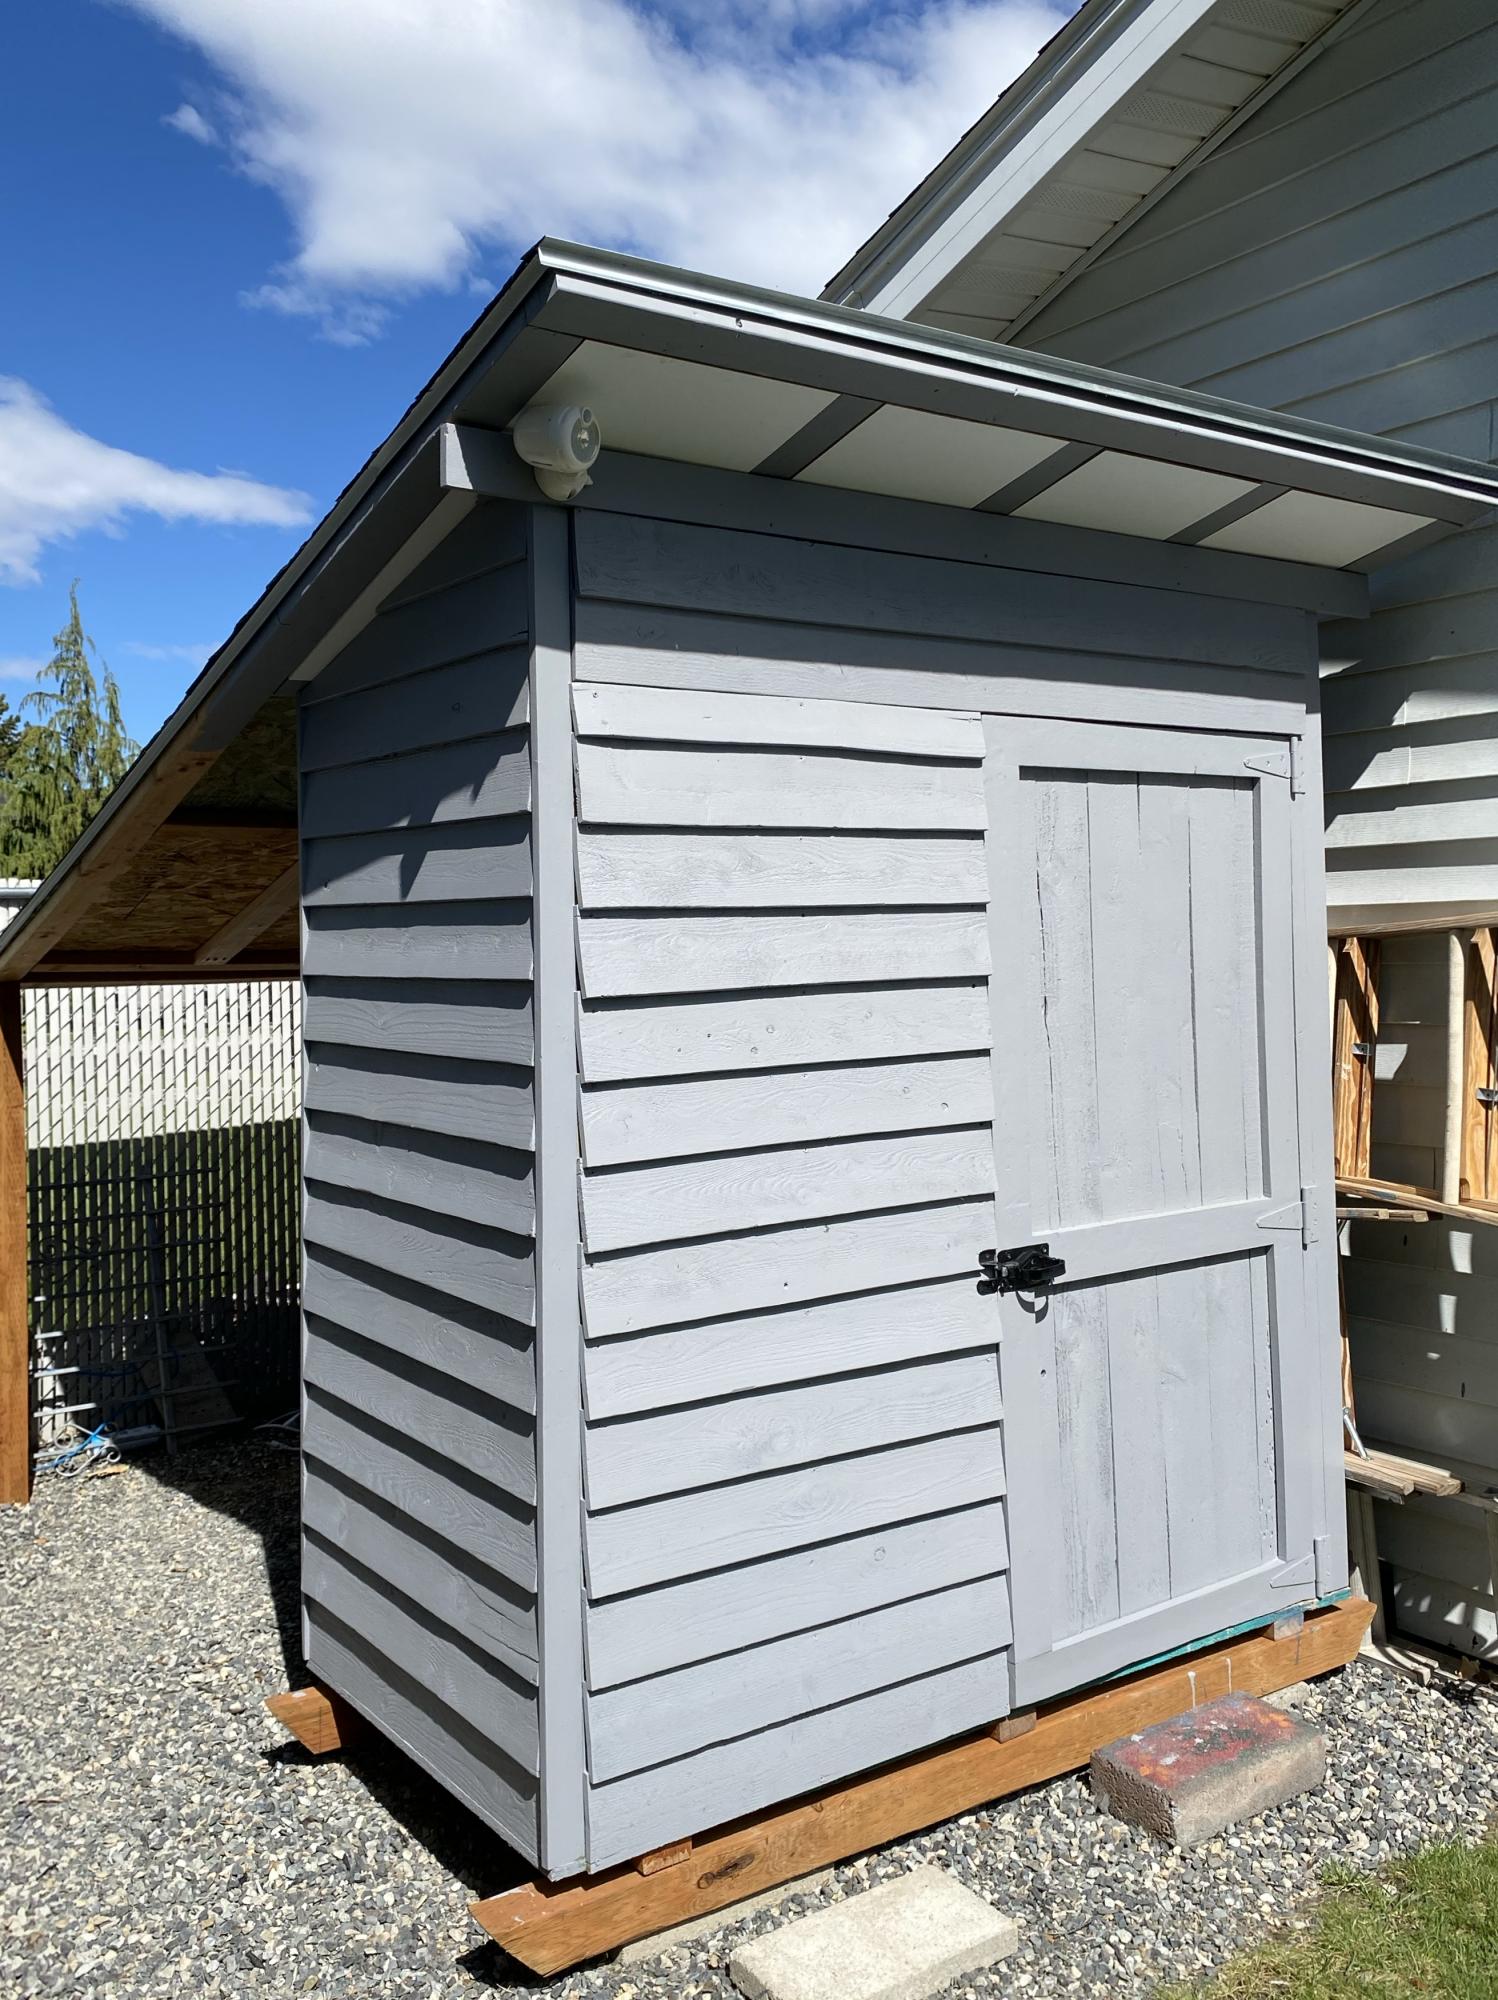
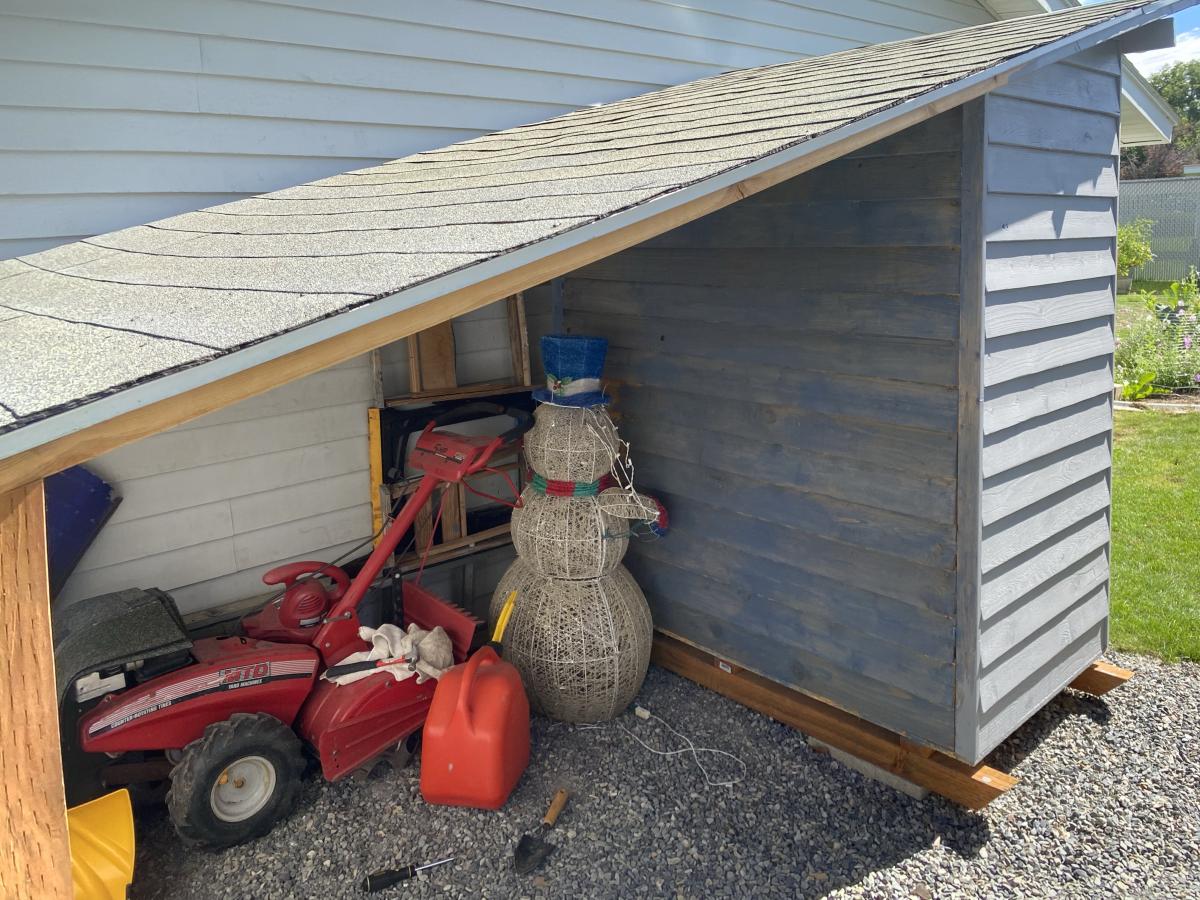
I really needed somewhere to park my rototiller and mower during the summer and ended up modifying the plans to include a lean-too/over hang area. This required flipping the shed to extend the roof line. I continued the 15• roofline and also then had to create and cover the soffits. I also reduced it to one door and placed it on a skid foundation so that technically it would be considered a temporary structure, no permits needed. I first used a semi transparent stain that looked much darker and grayer in the store but looked very blue and terribly streaky on the shed, see back wall area. I then restrained it with a solid stain, which I think looks much better and covered the streaky stain. Because I extended the roof and stained it twice, this really increased the cost, but I think it was well worth it. I can store all my yard and garden tools underneath and inside.

This was an easy project to complete in an afternoon that does not require any advance woodworking skills

Wed, 11/26/2014 - 12:19
This project looks even better than mine! I love look with paint! Well done!
Wed, 12/10/2014 - 09:41
This is my second completed project with plans and ideas from your website. Thanks for your good work!
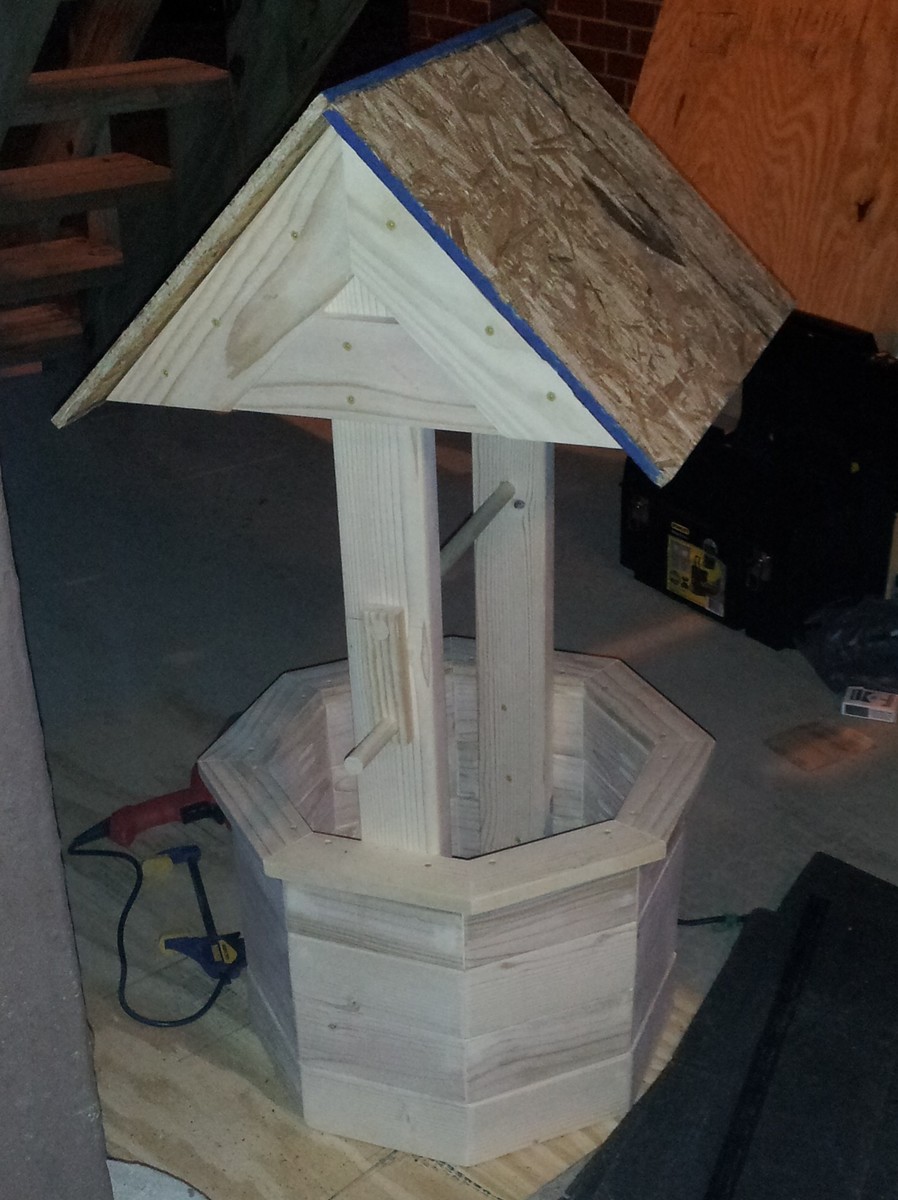
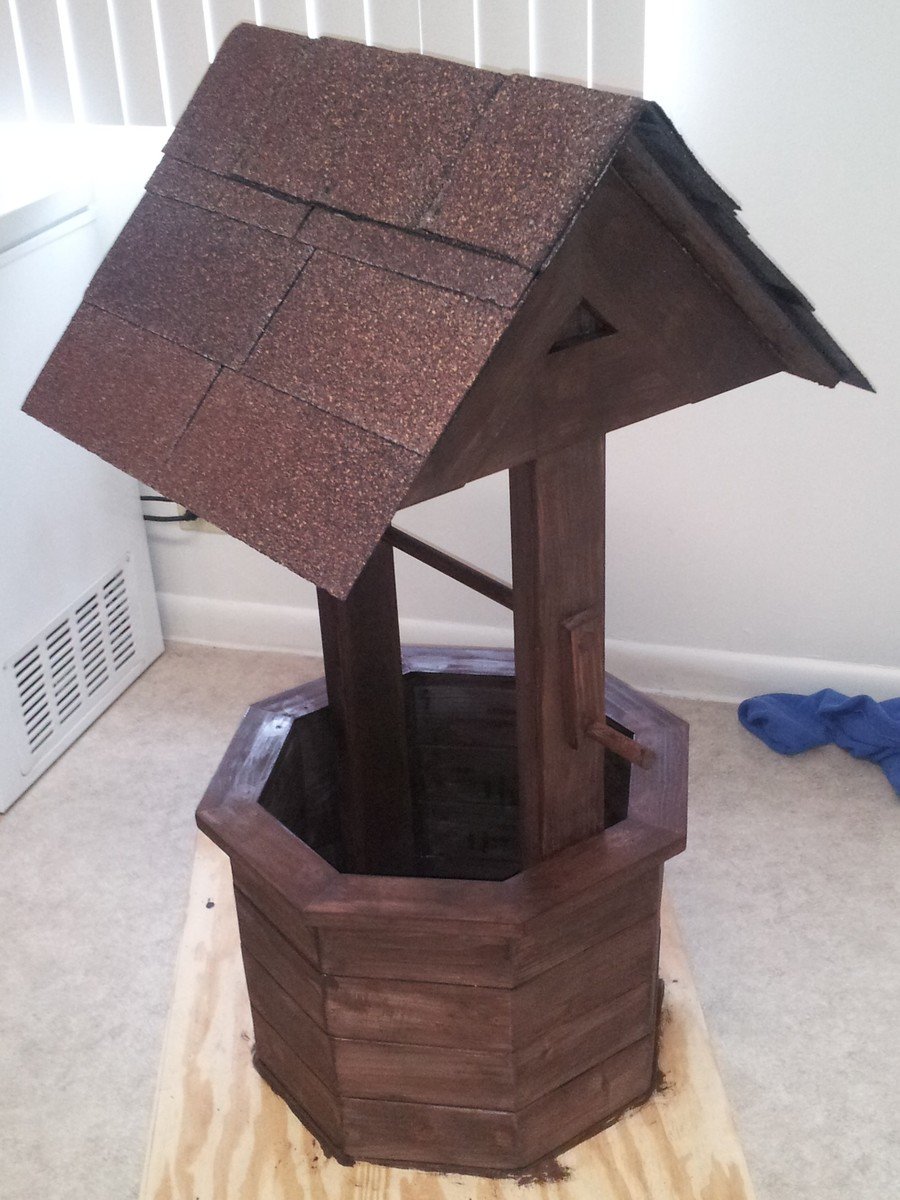
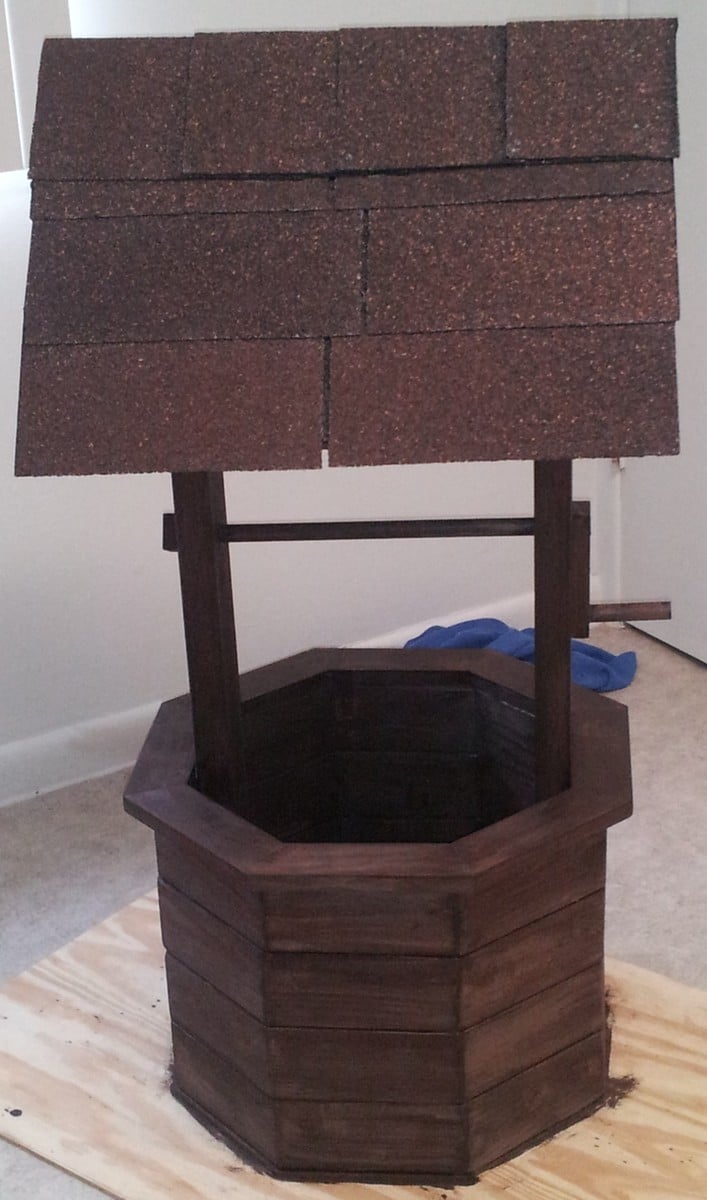
This is a wishing well I made for my sister for her wedding. It will be used during the wedding for people to drop "wish you well" cards into and afterward she can use it as a planter in her yard.
I followed ideas from multiple plans here on Ana-White.com, but I didn't follow any specific plan. Mostly I followed tips and instructions for cutting angles, drilling pocket holes and some finishing tips. This is the first "big" project I've done and I"m quite proud of it.
With everything, it measures 44.5 inches high. The well measures 21 inches across and 15 inches high. The roof measures 22.75 inches by 23.75 inches.
I hope y'all like it. I worked hard on this! :)
Thank you, Ana and everyone who contributes to this site. It's been so much fun and I've got lots of ideas for more stuff. If I was any good at all at Google Sketchup I'd put up the plans but I'm not. If anyone could help me with that, that would great. :)
Have a great day!
Mon, 07/21/2014 - 20:04
Anyway you can please tell me the angle for the boards ont the walls. I reallly like your well, and would like to build this for my wife but im not sure on what angles to use thank you

In reply to wishing well by bellows86
Sun, 07/10/2016 - 17:10
The 8 sided wishing well is going to be 22.5 degrees all the way around. hopes this helps
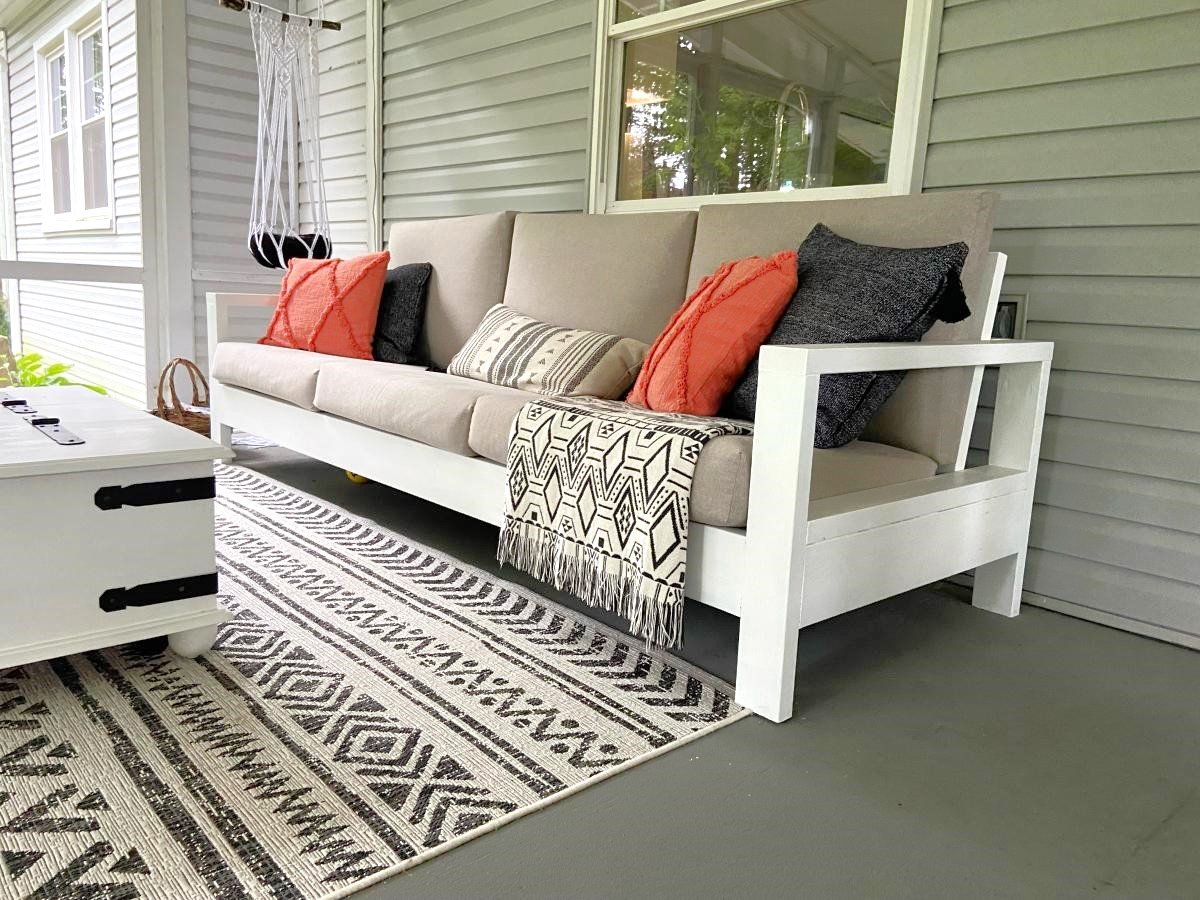
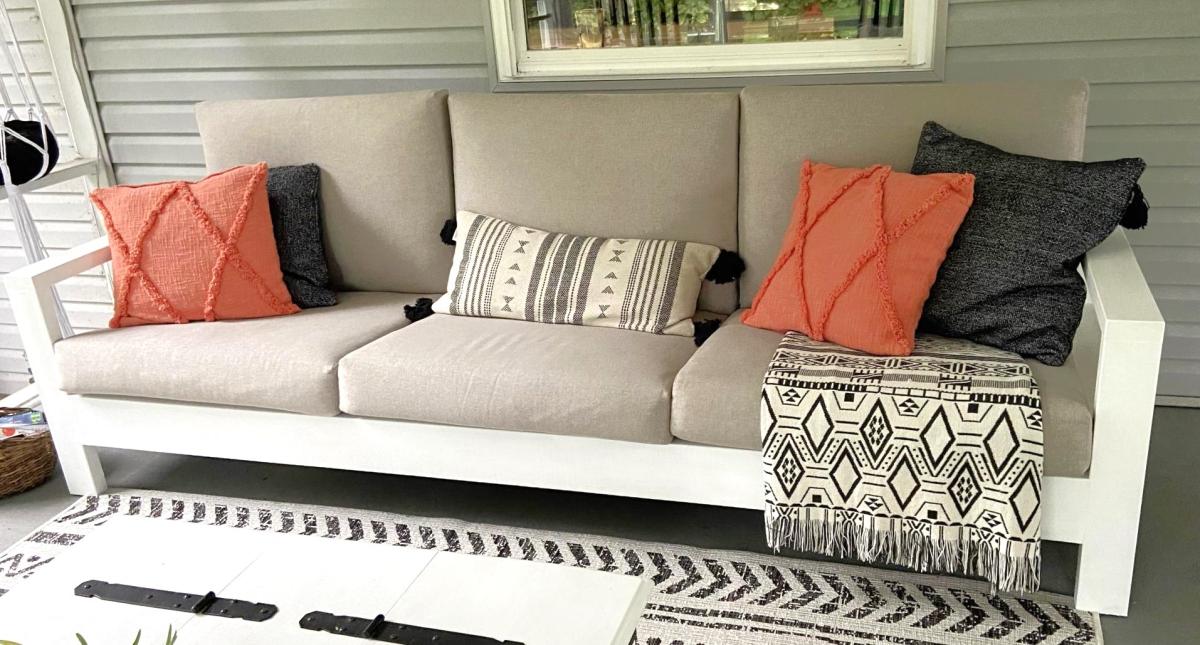
This was our first big project with our Kreg Jig. We adapted the plans to make the sofa 8' long. On Friday night, my husband did all the cuts and I pre-painted everything. With the help of our son, we had the whole sofa built in a few hours on Saturday morning. I puttied the visible holes, did a second coat of paint, and made custom cushions. The plans were very easy to follow. I followed the others' advice about pre-painting and assembling the back on a perfectly level surface. It came out better than I expected and it's super comfortable!
Sun, 04/10/2022 - 10:33
Thank you for sharing, it looks amazing! Would love to hear how you made the cushions.:)
Mon, 04/11/2022 - 07:44
I want the plans for this one! I like this style a lot better. I really like how the bottom cushions are at a slant. I suck at modifying plans.

