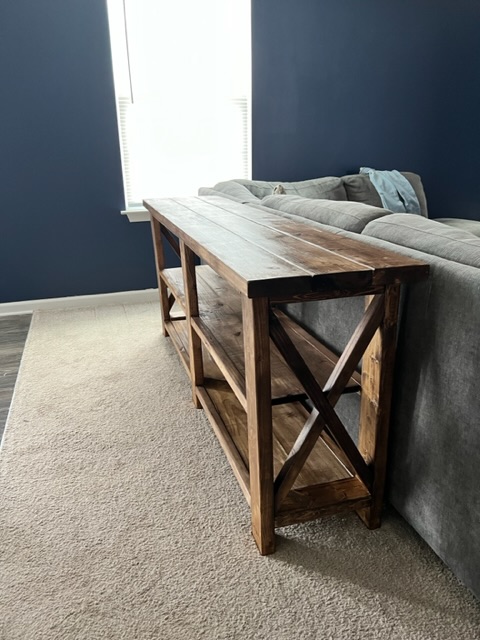
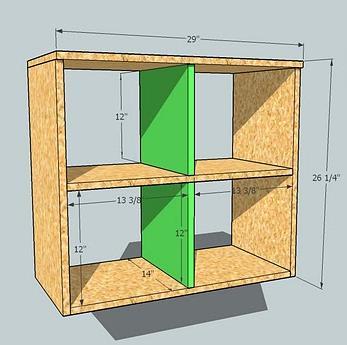
Rustic X
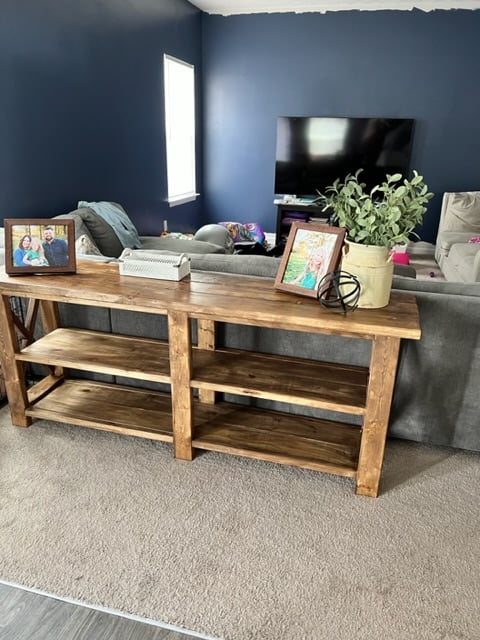
This was a big undertaking for indoor furniture and I learned so much! I slightly adjusted the size to what I had available with some scrap wood from my old stairs so saved a little on costs with lumber!

Built from Plan(s)
This was a big undertaking for indoor furniture and I learned so much! I slightly adjusted the size to what I had available with some scrap wood from my old stairs so saved a little on costs with lumber!
Thank you! My favorite & first is from your mud kitchen! I put in running water!😂 For the GrandLuvs!”
@penny.vanderlugt
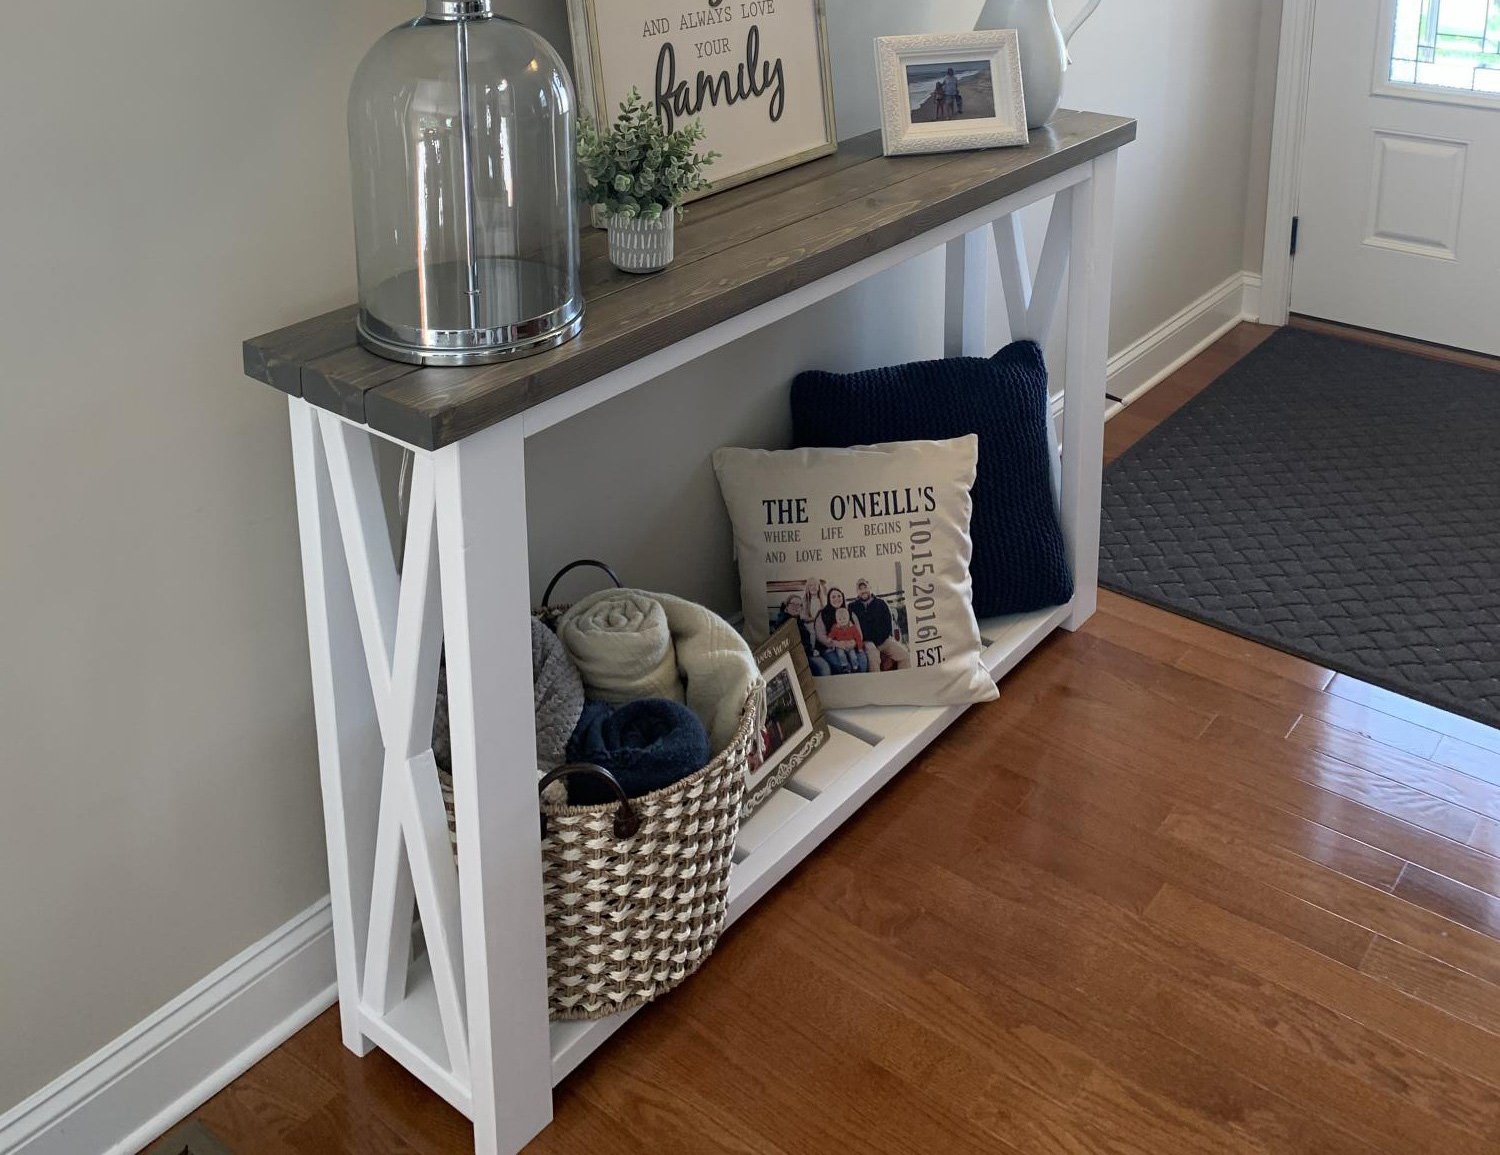
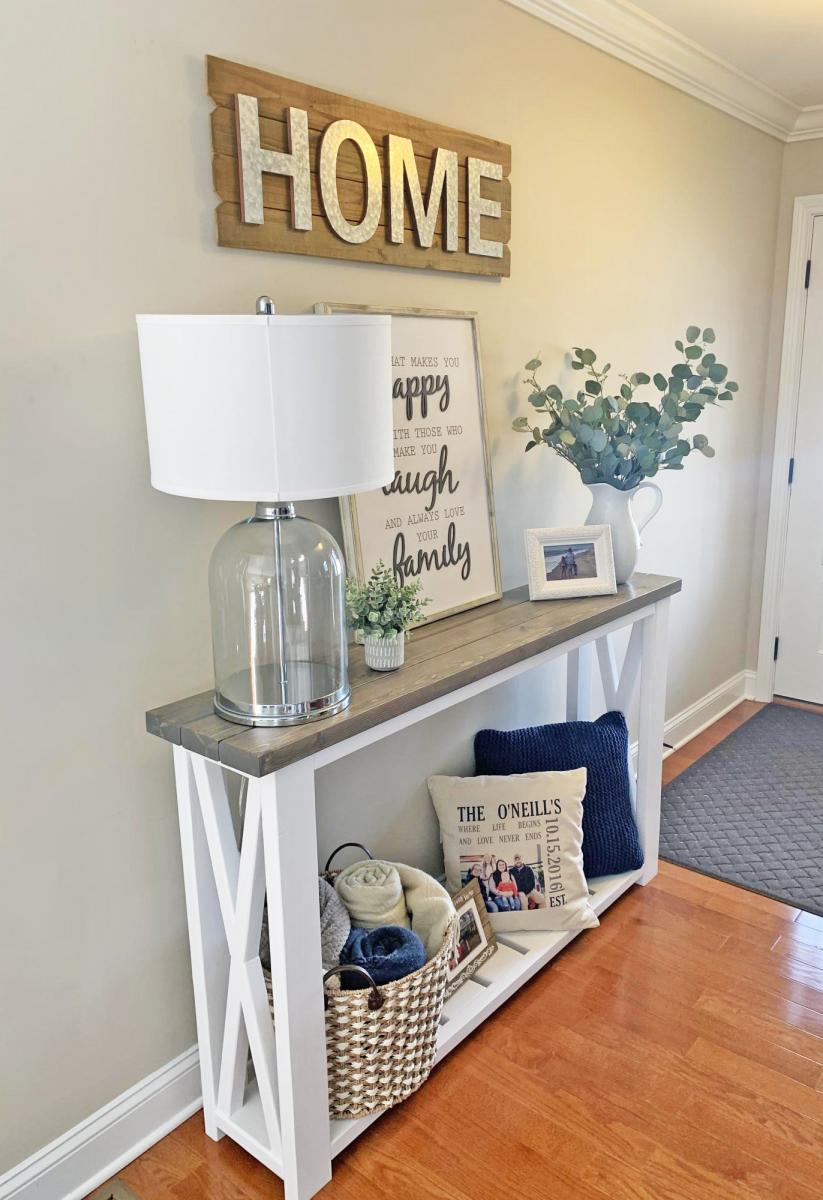
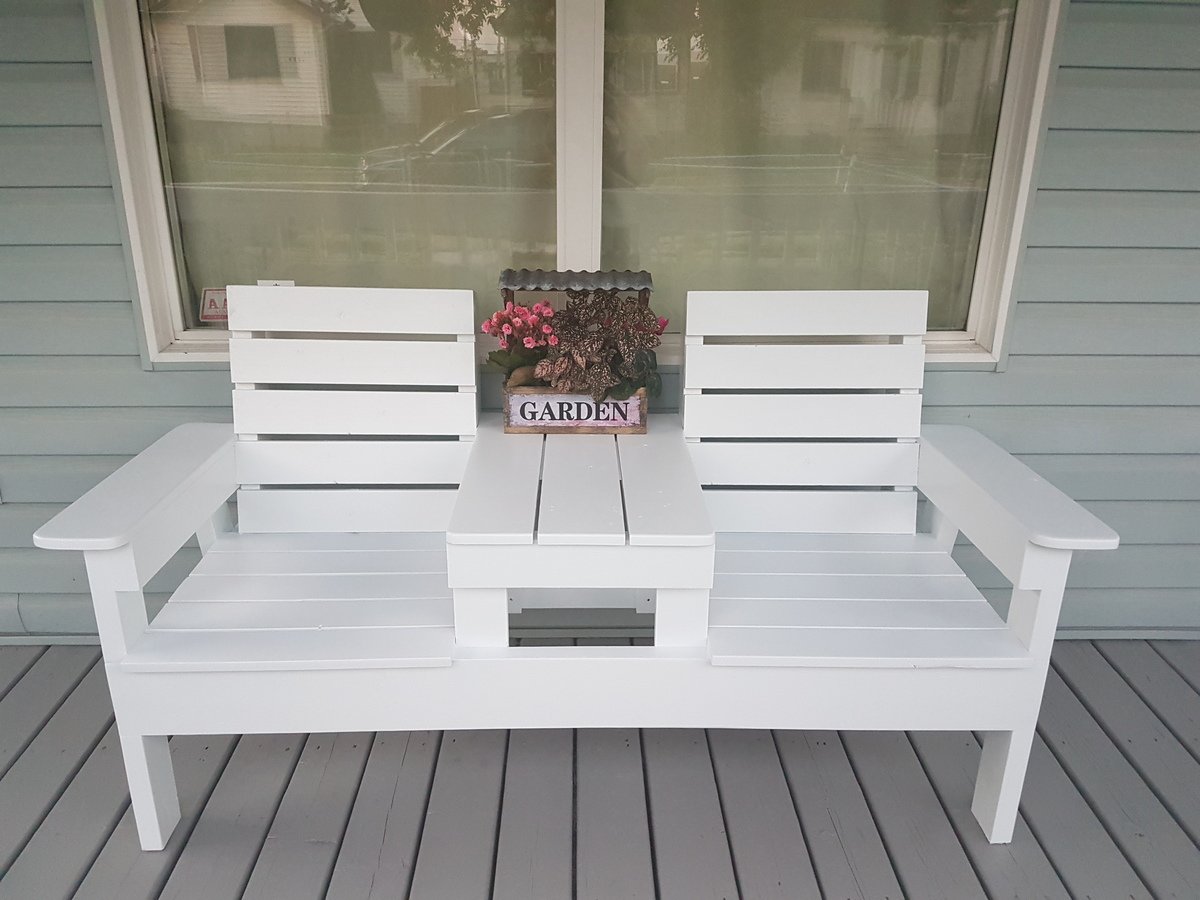
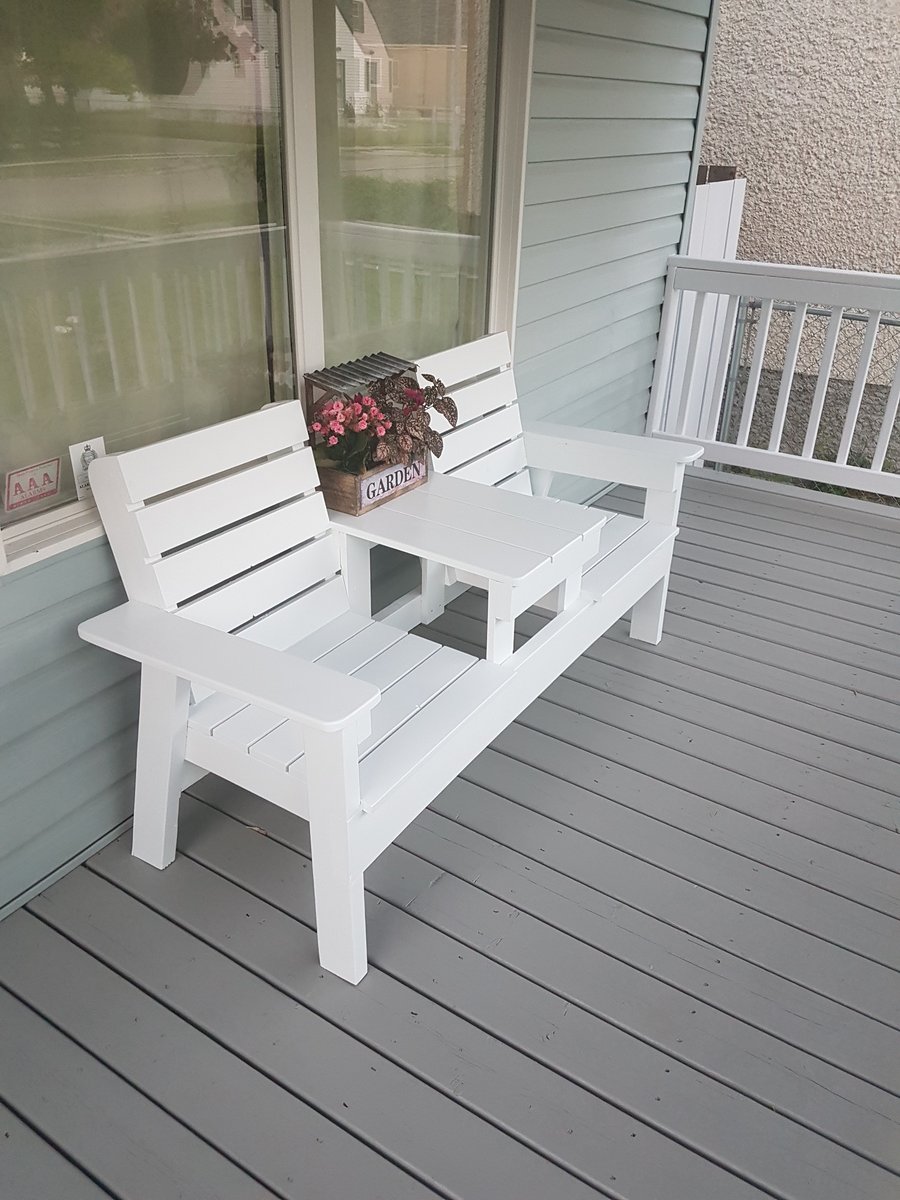
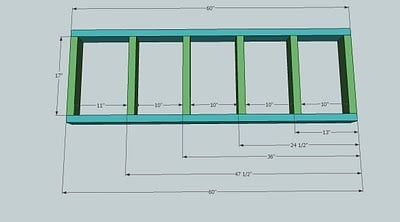
Modified the size to 60” length , 12” depth , 36” height . Went with satin white frame , Minwax classic grey stained top with 3 coats of poly clear coat satin (quick dry).
Mon, 09/07/2020 - 23:07
Do you happen to have a revised shopping/cut list for this table? Thanks!

I wanted to make this porch swing ever since seeing it in the plan catalog (Large Modern Porch Swing). Just a matter of setting aside a weekend to get it done and then to find A frame to support it. I made the A-frame from a combination of this post:
http://www.buildeazy.com/newserve/swing_seat_support_dec07_1.html
and this one:
http://www.hgtv.com/home-improvement/custom-a-frame-childrens-swing-set…
I made the back a bit higher on our swing... and not quite as wide.
Reading several other blogs on this- I chose to attach the chains to the top back of the swing to keep it from tipping backwards...
Now just get to enjoy it!!

Modified the design to allow me to roll lawnmower directly in the end. Fun project.

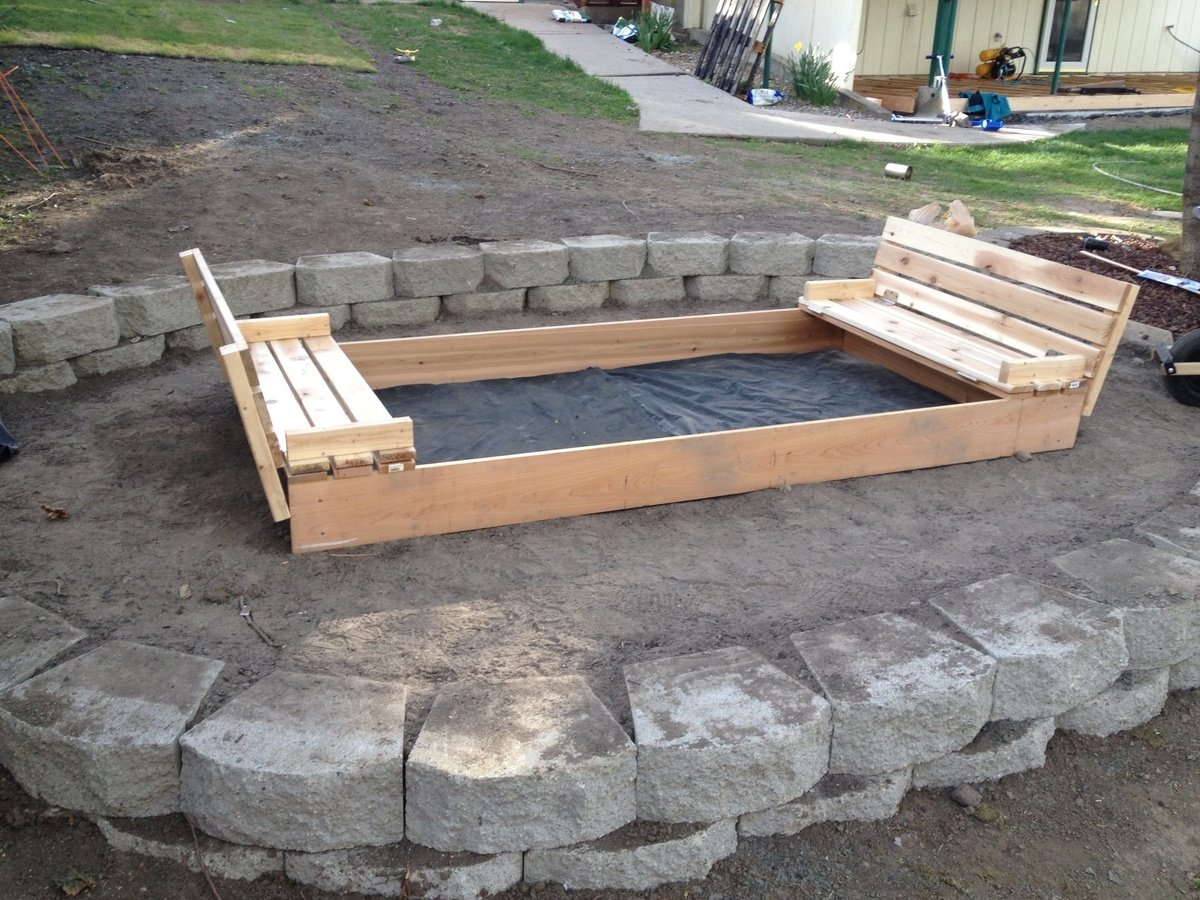
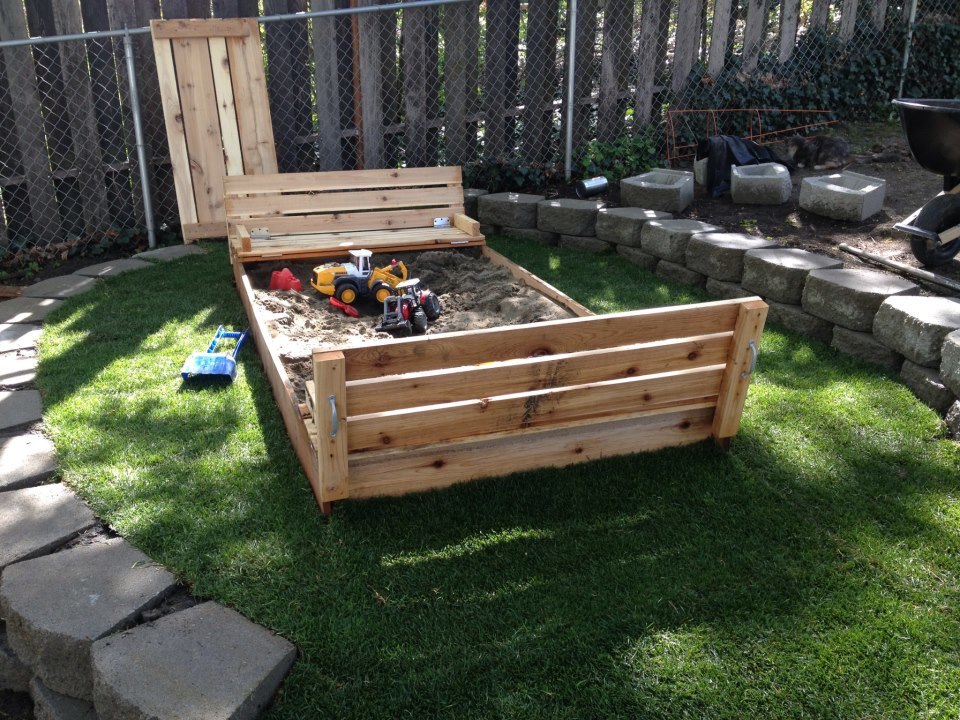
This was my first EVER wood working project.
With that being said, it took me more than just an afternoon.
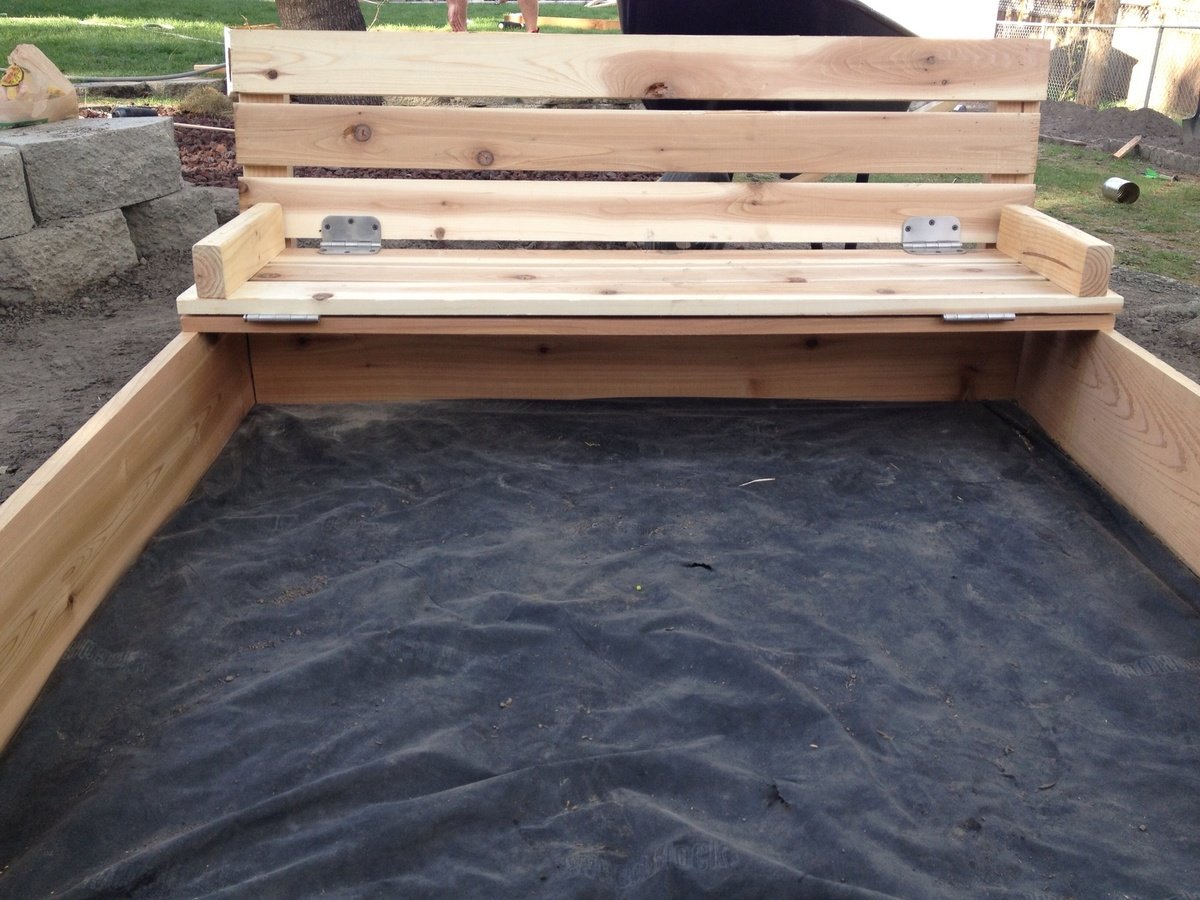
I used cedar, and all the materials on the cut list had to be sanded , since I didn't like the roughness of the cedar.
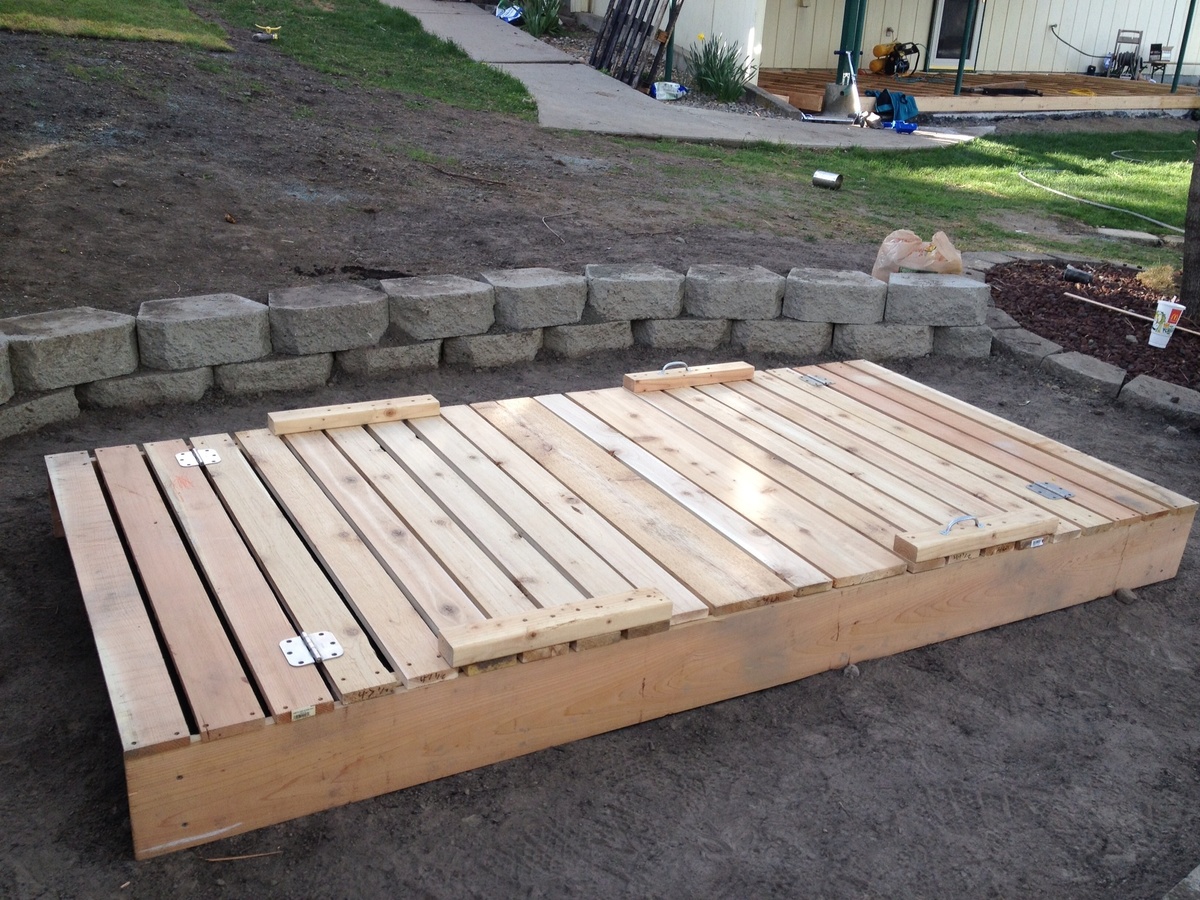
I also made the box 4x8. I didn't take into account that that would require a minimum of 48 inches for the top planks. So, some of my top planks are shorter.
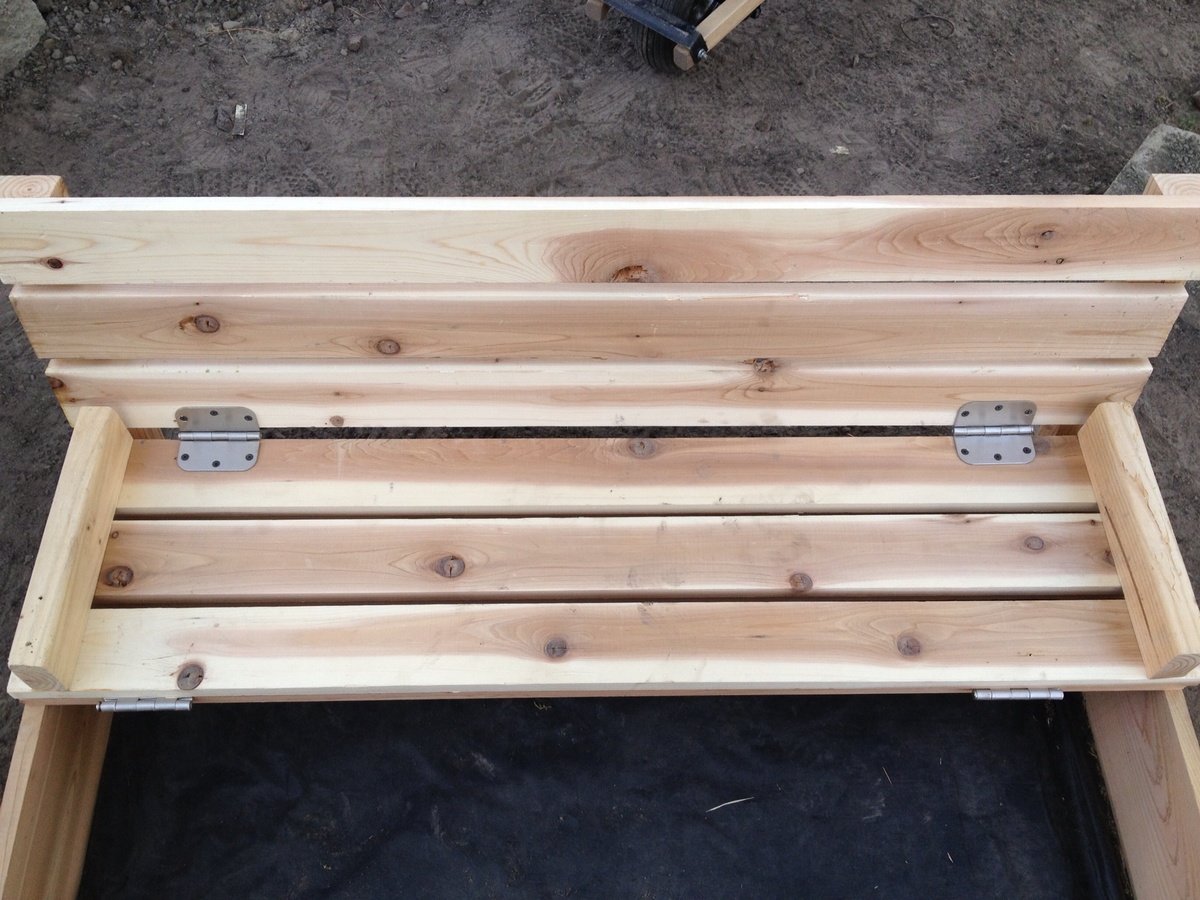
I also wished I had a little more instruction from which side to screw the screws in. May sound a little needy for some of you, but I never did anything with wood before. The instructions simply read attach top planks to arm rests (or something int that manner) and I wish it would have told me from which side to screw in (or give me a picture). Looking at some of the brag posts helped a lot.
Because its larger size, I decided to make the seats 3 top planks wide (and also the back rest) and made another middle cover piece to bridge the additional gap when both seats are folded down.
Also, the cedar was VERY expensive, and all the screws, hinges, and handles almost cost me as much as the wood.
The sand to fill the box ran us another $80 (for good plays and), but that was because we made it so big.
All in all, a rather pricey sandbox, but worth it because of the large custom sizes, and the cute little seats.
Pictures show the sandbox without sand, and with some of the handles still missing. I also still need to fill the holes.
Will add a picture of finished box filled with sand when it is available.
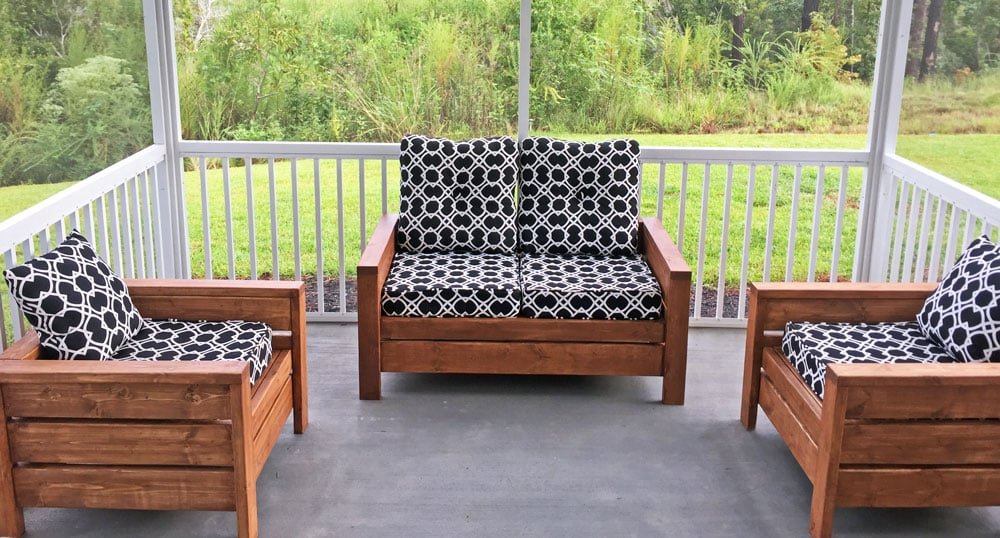
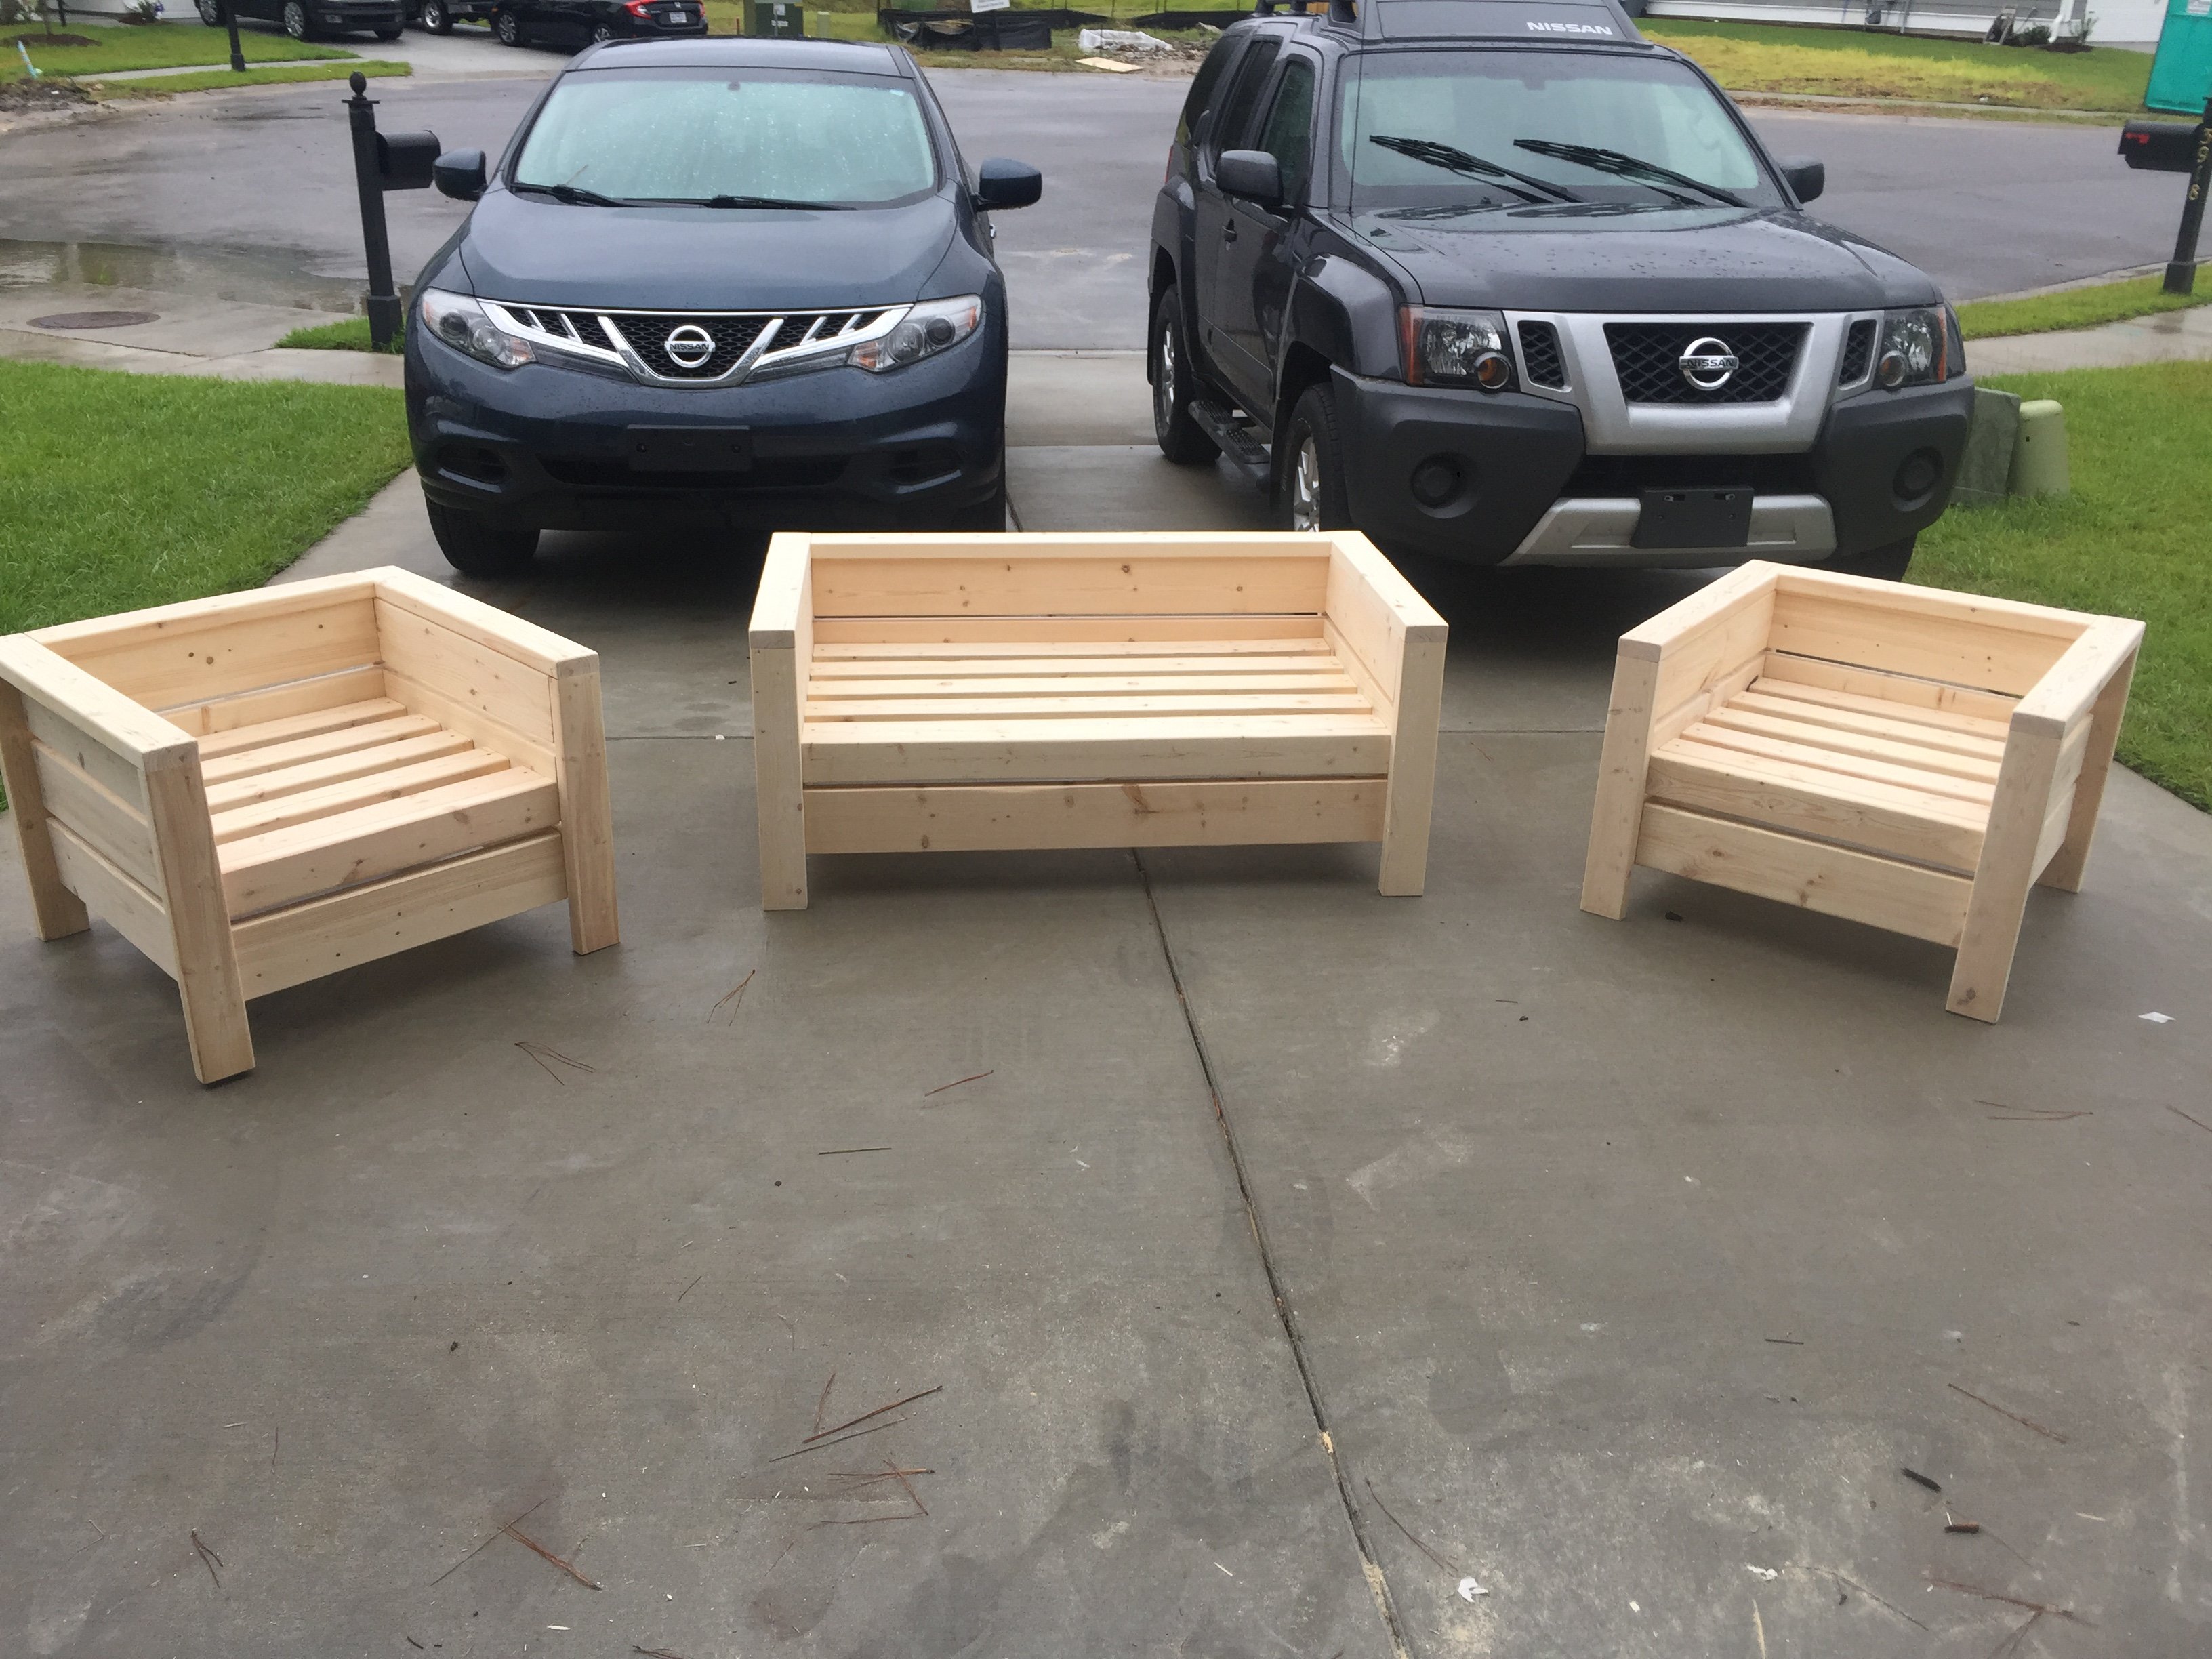
Built the 2 chairs according to the plans, and then modified it for a bench that's 48" (our cushions are 23.5 x 23.5). Worked really well!
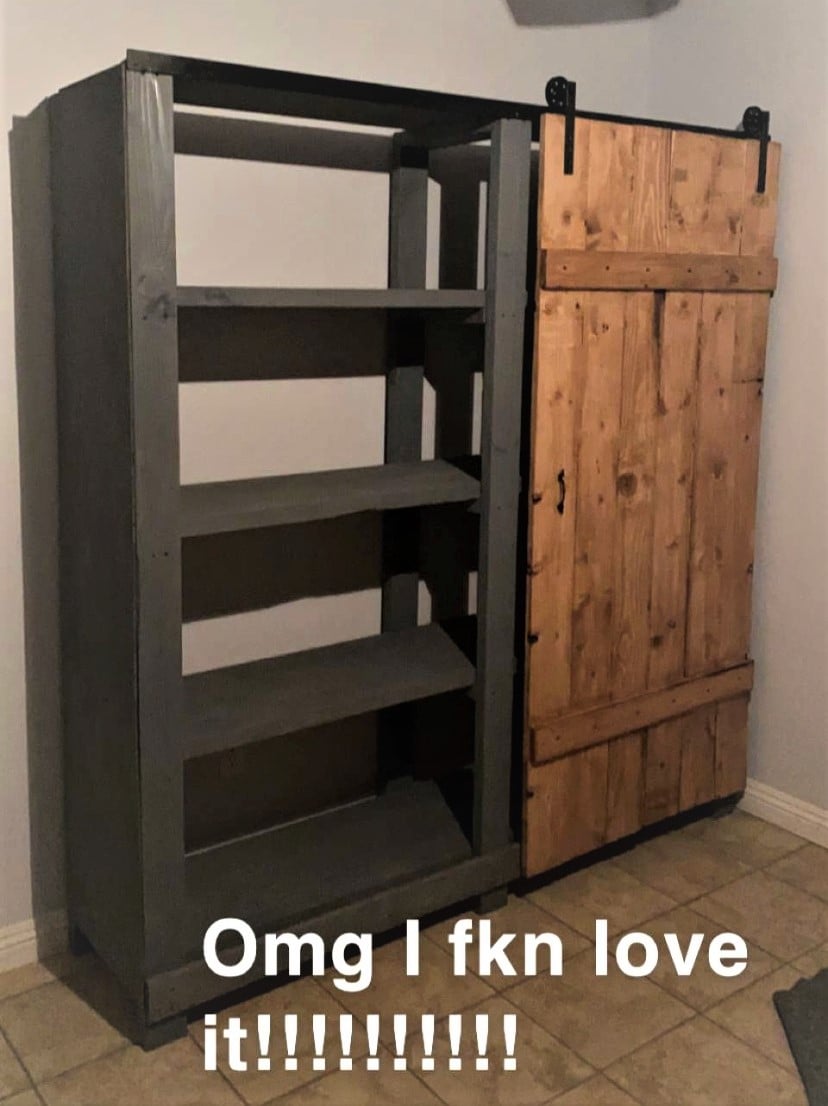
We too you’re 2x4 shelving unit with some small tweaking of measurements and added a barn door!
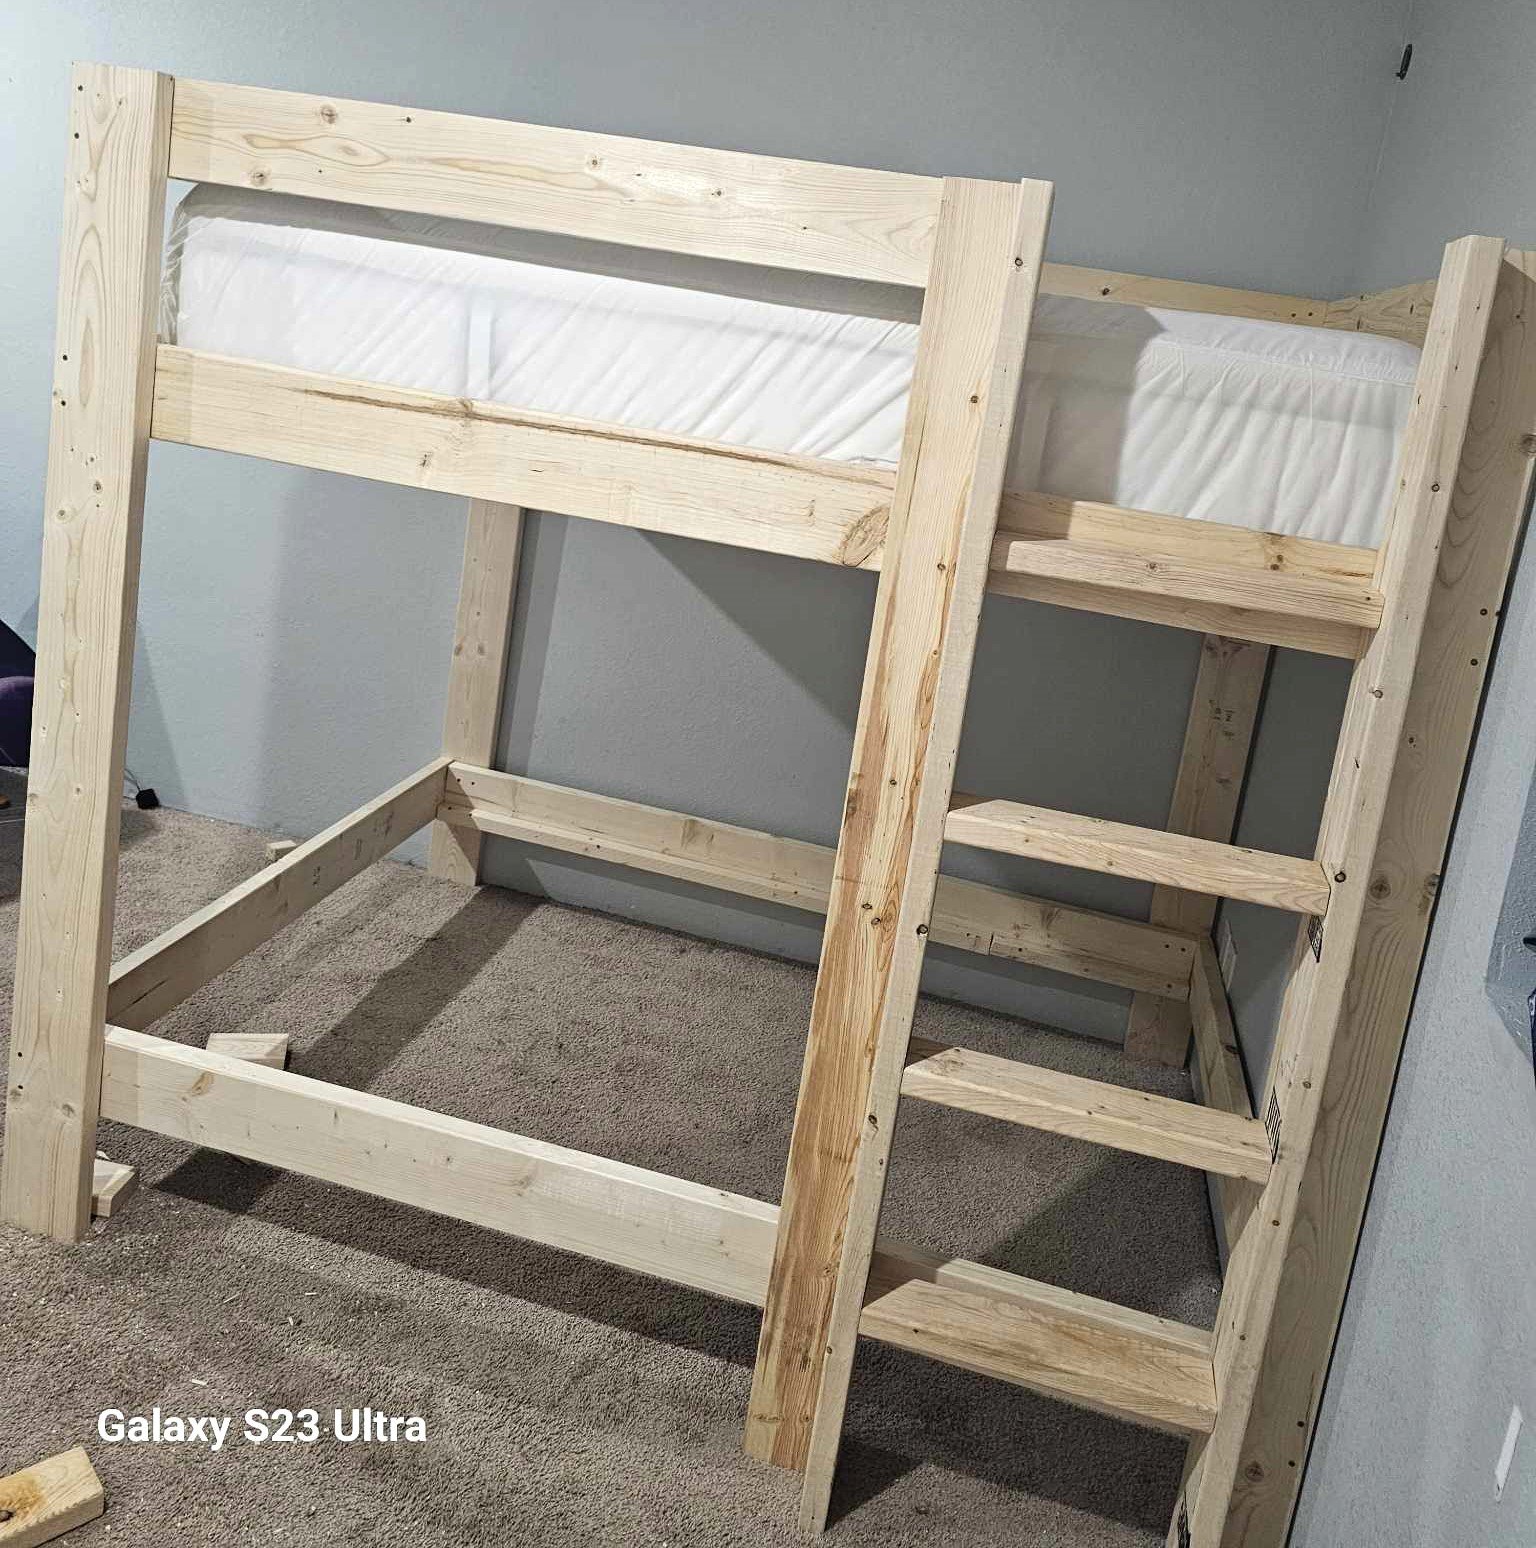
Almost finished but I managed to alter the plans into a full over full! Just use 2×4 instead of 2×1 and use 2×6 for the legs.
Antonio

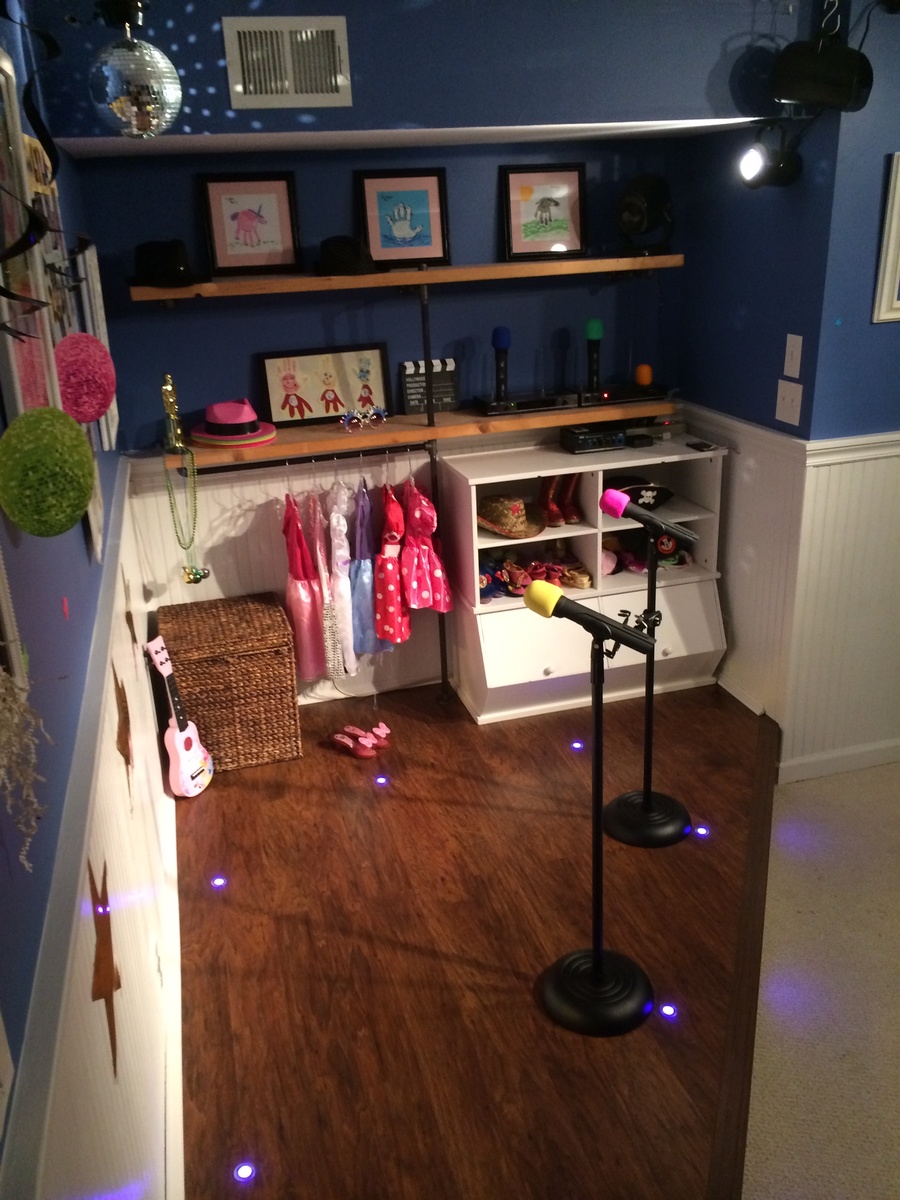
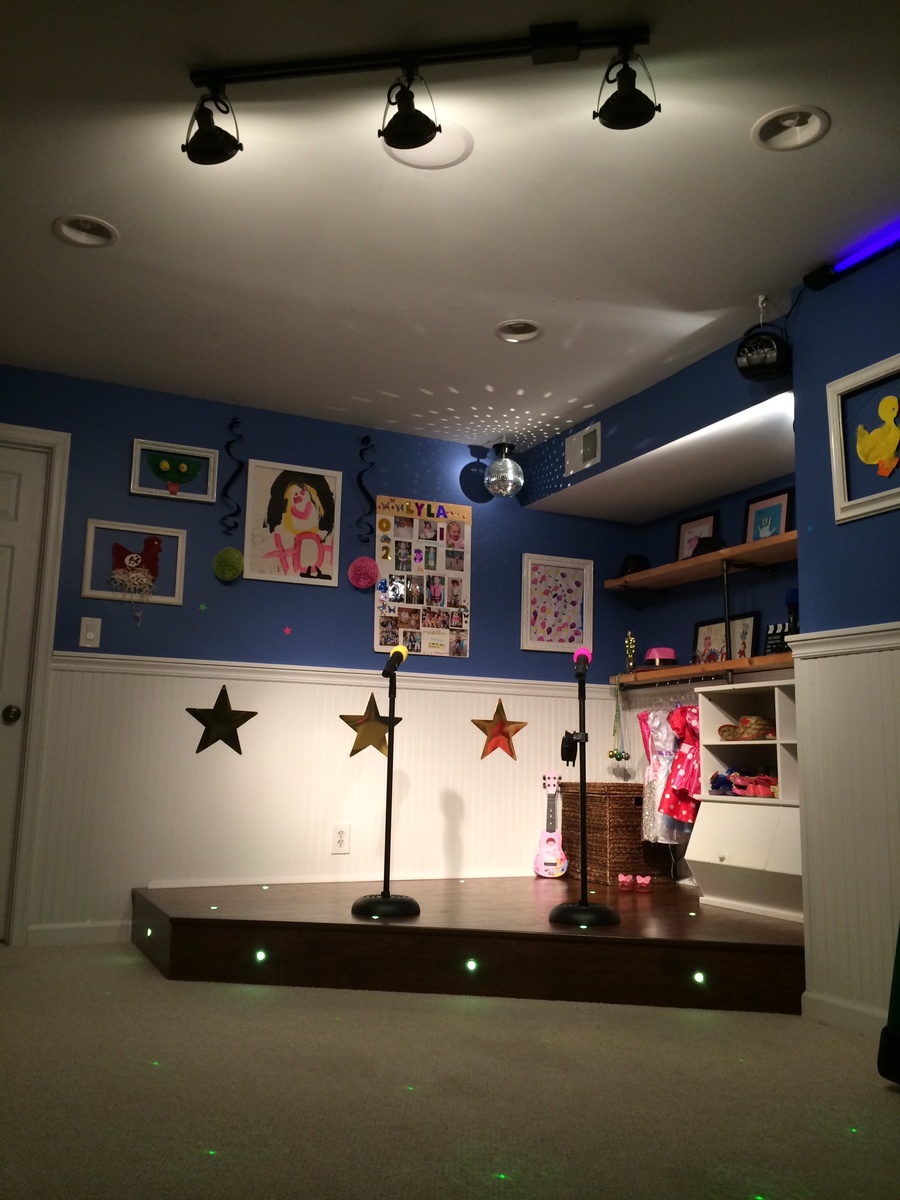
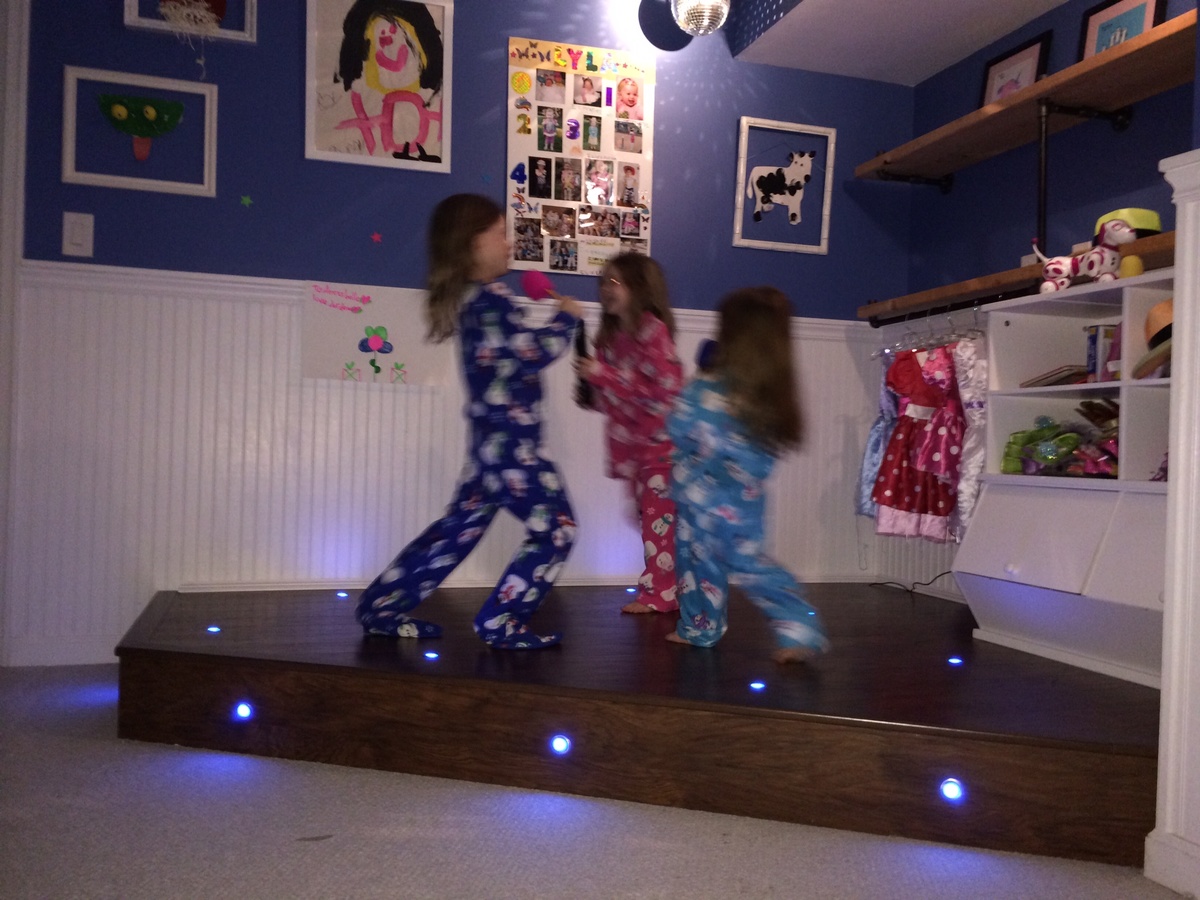
I had a perfect corner in our playroom that was reserved mostly for clutter and always wanted to do something fun with it. The base is made with 2x8"s topped with Handscraped Hickory laminate flooring. Bored holes into the floor and installed 1" diameter color-changing LED decklights. Added theatre-style tracklights, disco ball and other dance floor lighting for extra effect. Of course the stage wouldn't be complete without wireless microphones for karaoke and mic stands hooked up to a small amp and speakers in the ceiling. I made the shelving on the right side with 1/2" black pipe and used leftover 2x12" shelves from an old garage shelving install from 7 years ago! The kids were ecstatic on Christmas morning for the reveal!

Sun, 07/27/2014 - 15:52
This is great! I was just wondering what your dimensions were? I've been looking for something like this to do for my niece but have been struggling to find a plan and figure it out myself LOL.
Tue, 08/05/2014 - 05:58
Hello, the back wall is 8' and side wall is 6.5'. The stage comes out about 2.5' on each side then the front is around 7'.
Hope that helps, good luck!
Sun, 04/10/2016 - 14:44
Actually, I was wondering ,what lights did you use? I'm working on a very similar project and was curious to the lights your used please.
Sun, 12/08/2019 - 17:11
Can I ask about the lights you used or would recommend? Getting started tomorrow. A stage from Santa. Please help! 😬
Sat, 12/18/2021 - 14:09
Hello! Also wondering which lights you used. Thank you!
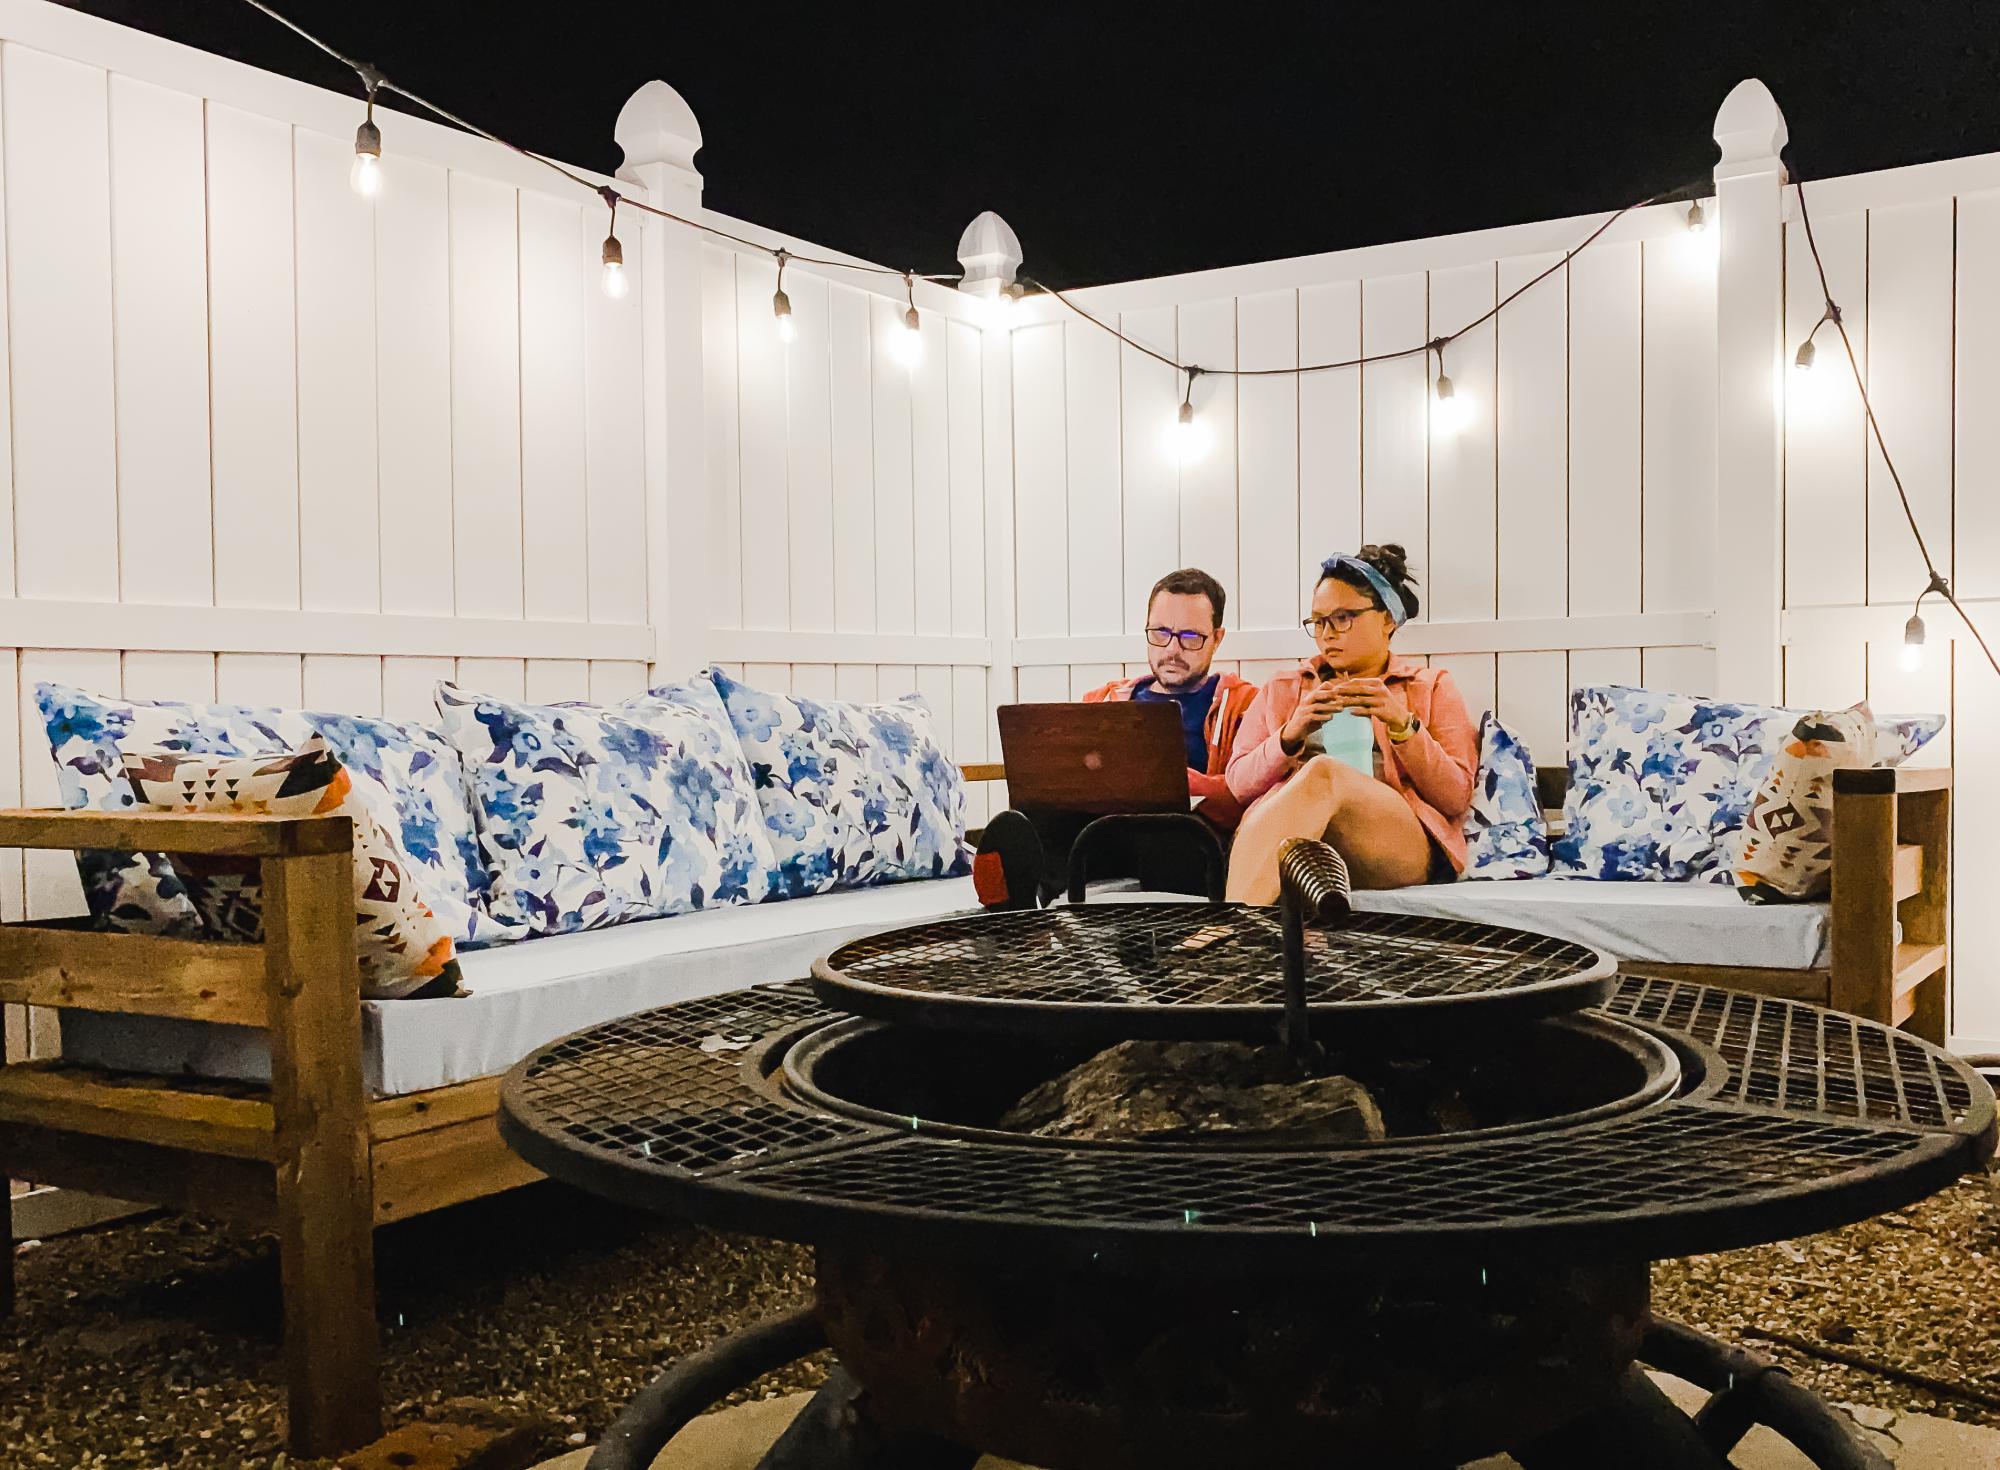
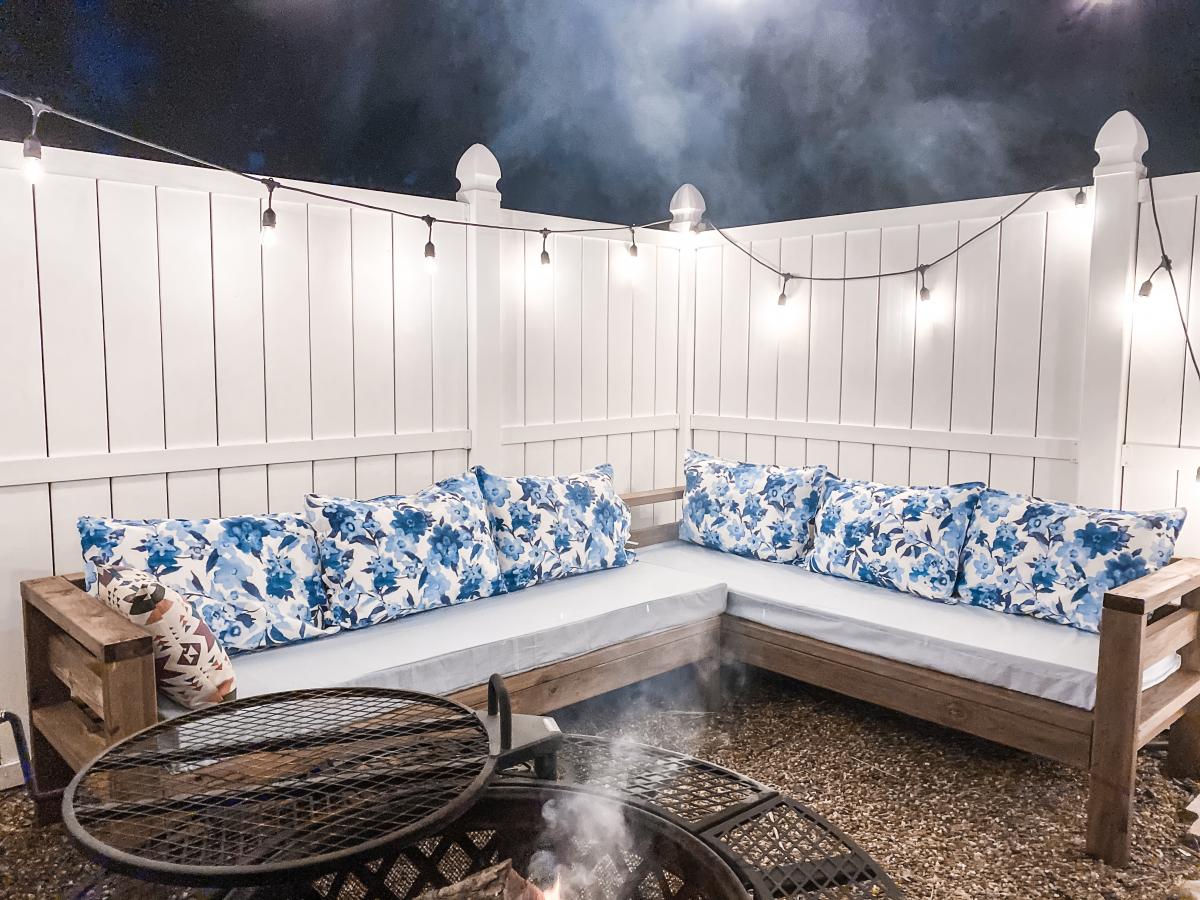
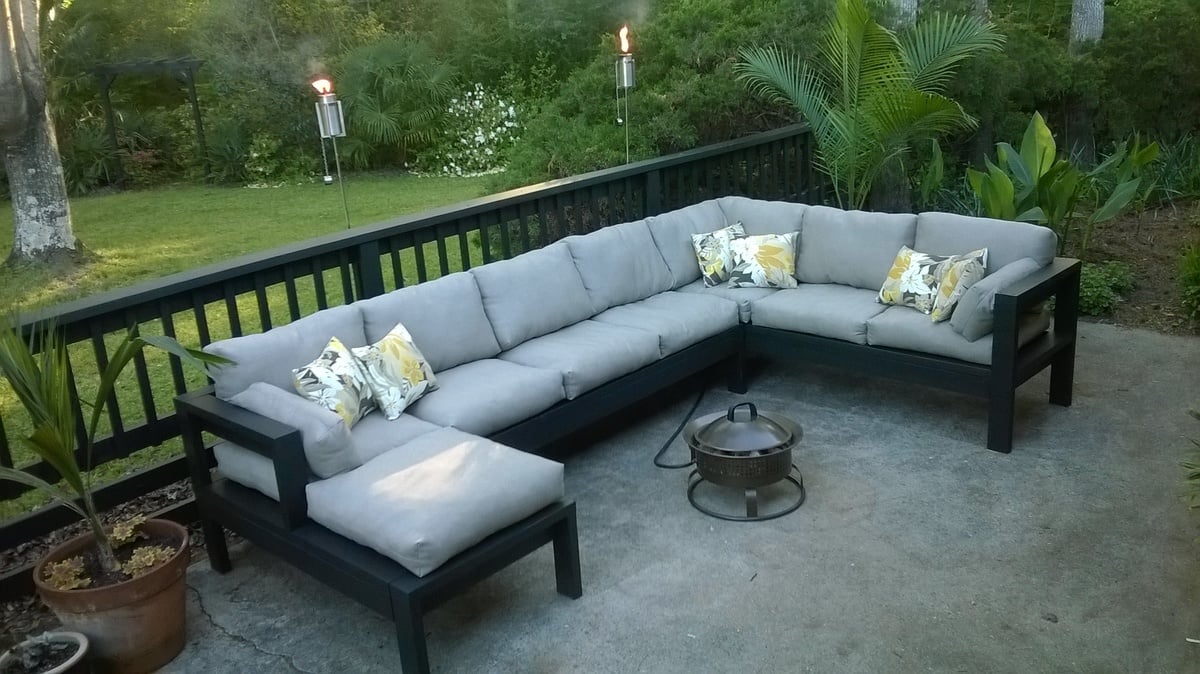
We have been looking for a deal on an outdoor sectional for a whole year. Nothing. The cheapest we could find was $899 for one that was much smaller than this one and with thinner cushions. So we upped and drove to the lumber yard and purchased the lumber on the list and got to building. The total cost of lumber was $200, the Spax screws we already had on hand. We used pocket holes for the joints. The wife made the cushions herself. She had most of the fabric on hand, we just had to buy 3 yards for the back cushions, which are made of standard size pillows. They have been sprayed with fabric protectant for outdoor use (I think she used the Scotch brand). The seat cushions are 5 inches thick (they are wrapped in silk film to protect them from getting soaked when it rains or when someone who just got out of the pool sits on them), around $100 for both. It took her a couple of days to sew the box cushion covers.
Fun build. Plans were easy to follow!
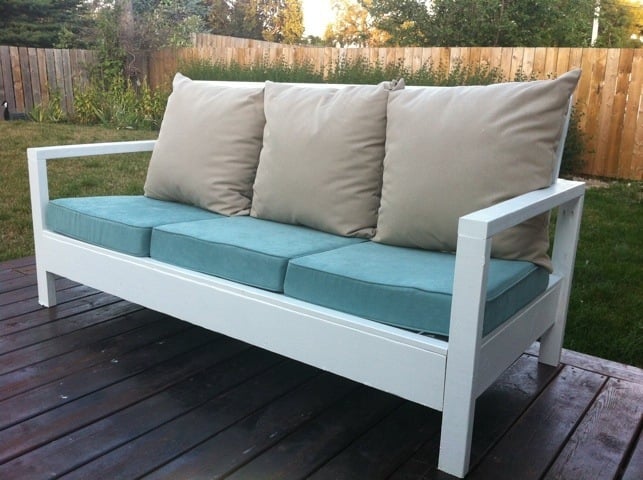
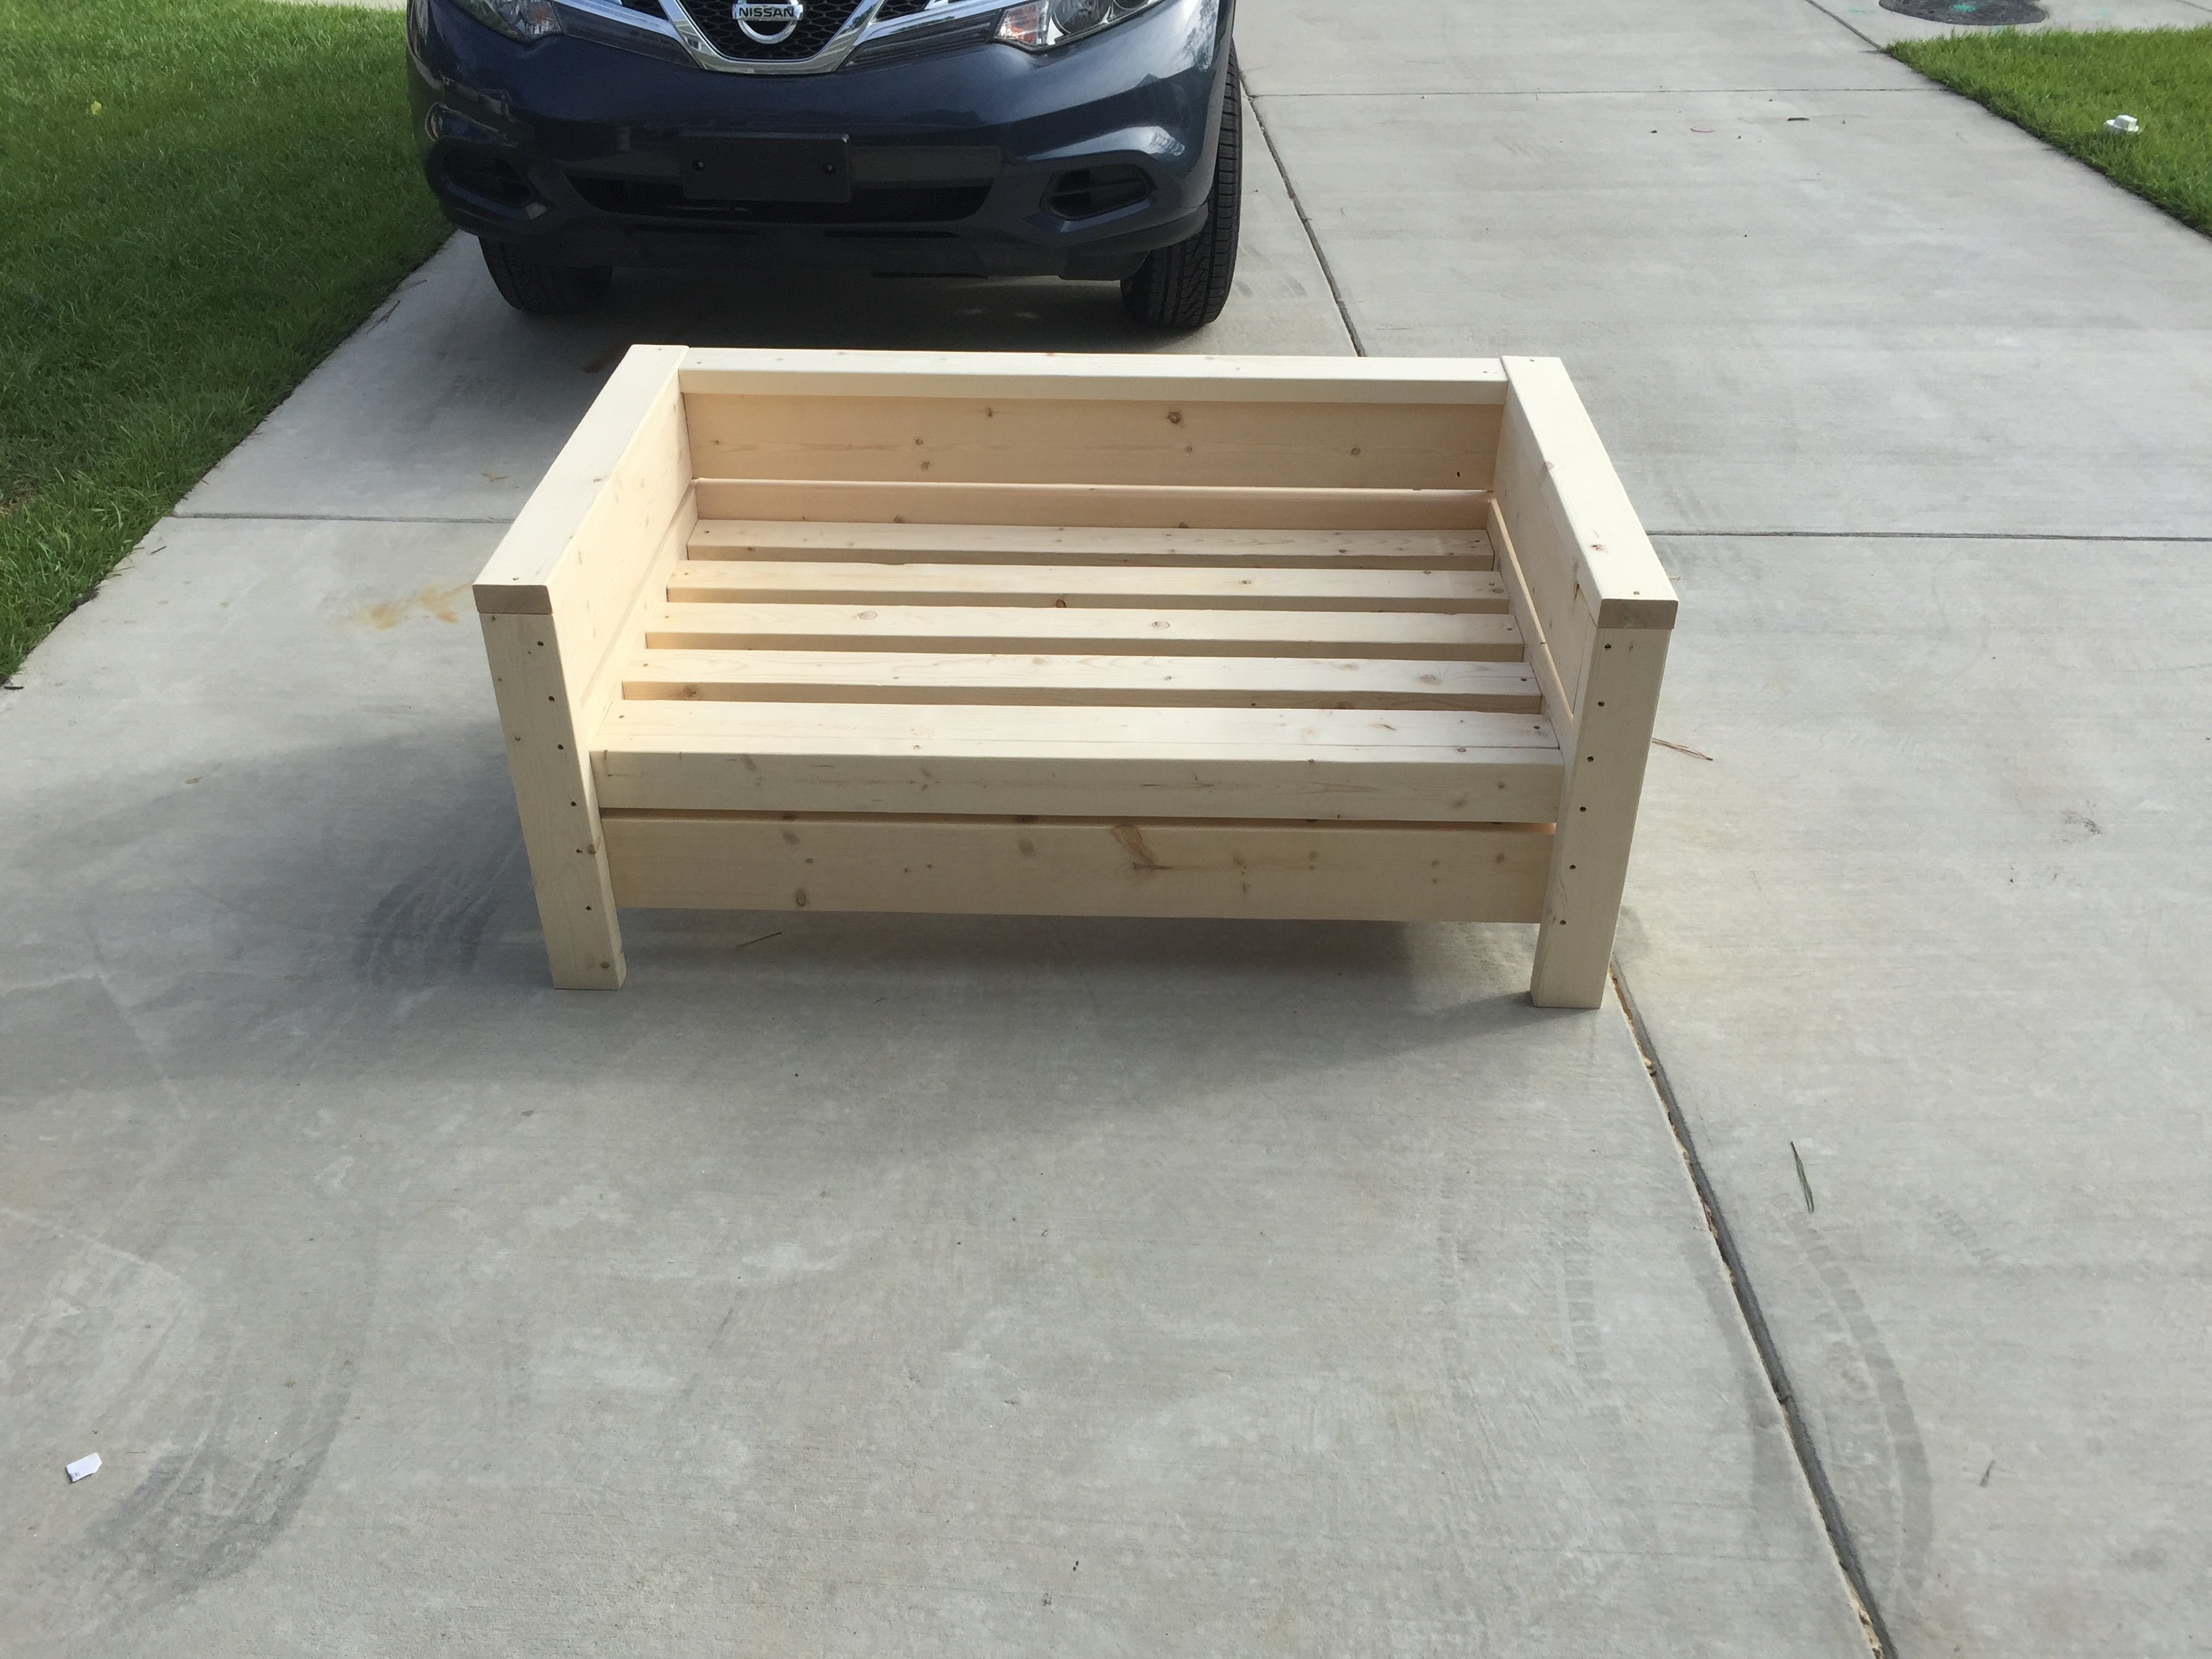
I built this sofa in one day, and painted it the next! I procrastinated all summer, and now that it's almost fall I decided to finally build it so that I could relax on the sofa in the back yard for the last month of nice weather here in Winnipeg. The plans were fantastic, the only problem I had was finding 24x24 cushions. The closest I could find were 22x22, so I adjusted the plans accordingly. It turned out well but I prefer it without the back cushions because that way there's more lounging room. Thank you so much for the plans!

Mon, 09/12/2011 - 08:56
Good idea to look for the cushions first and adjust accordingly. I love the color you chose to... works very well with the white sofa and warm wood deck. I agree that it is more inviting without the back pillows... That way you can see the wonderful detail of the back
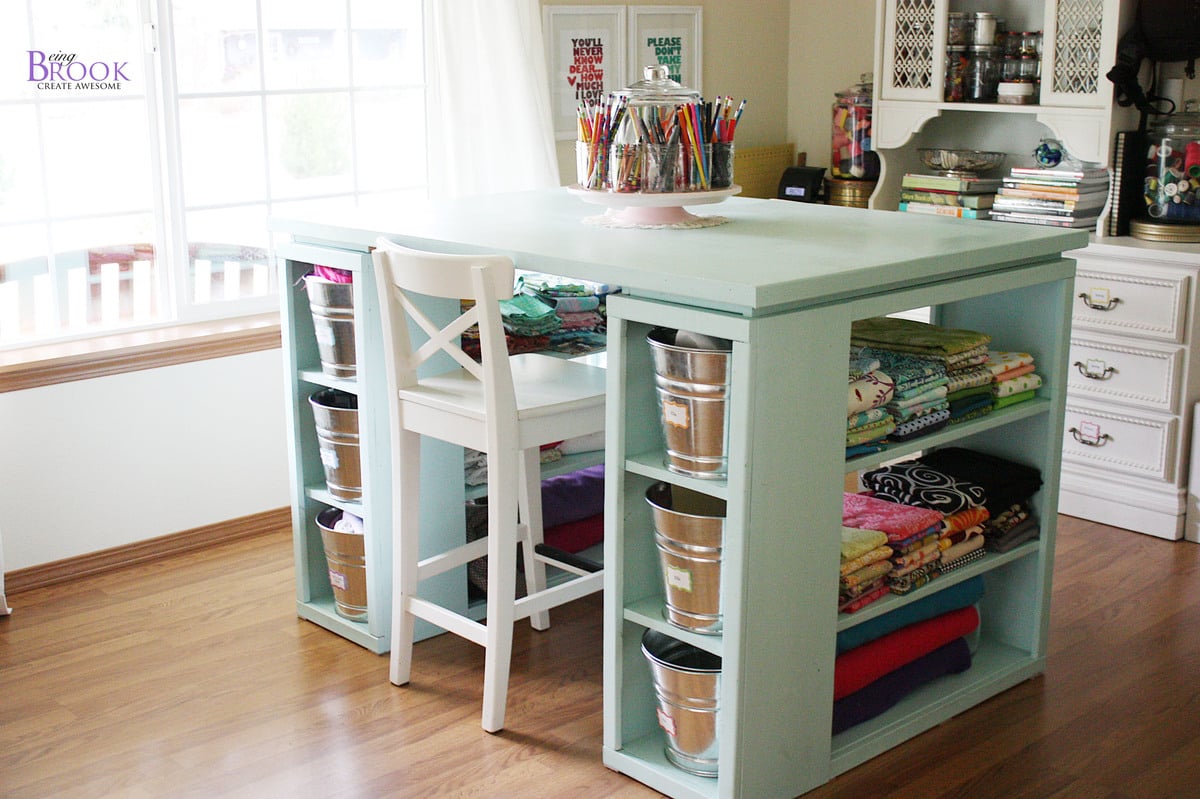
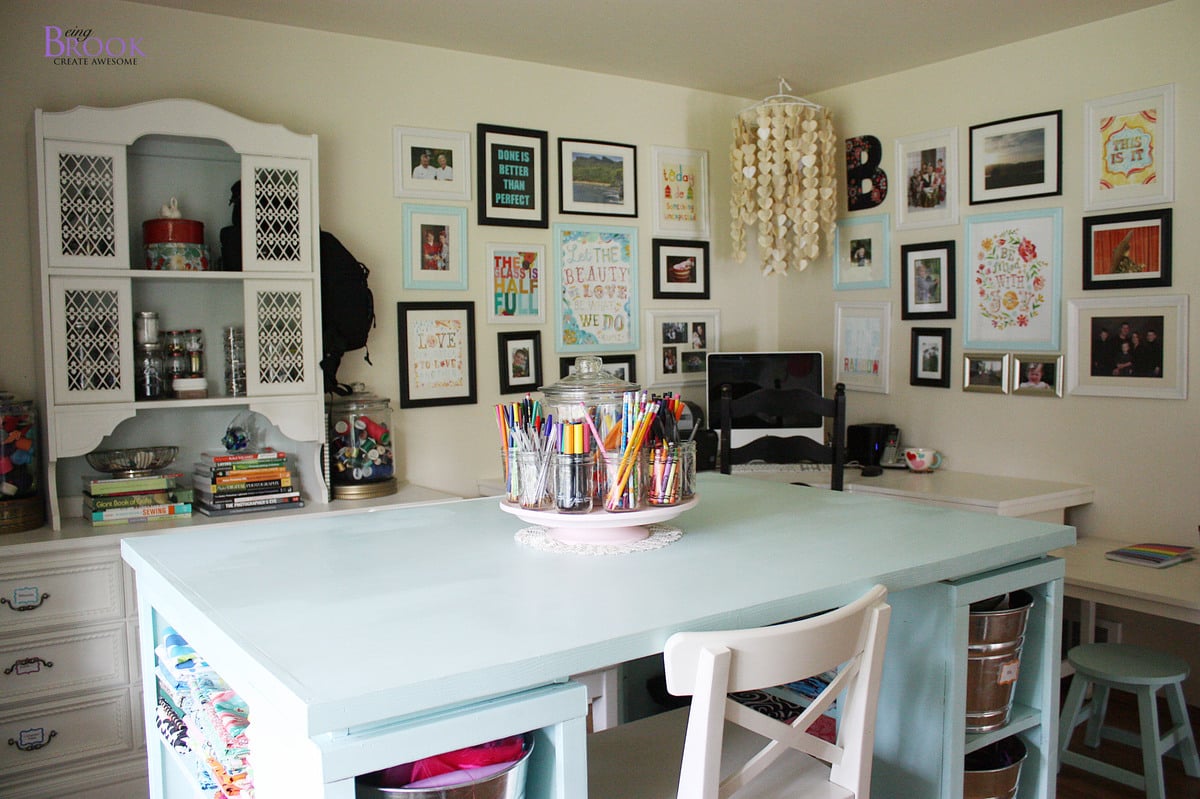
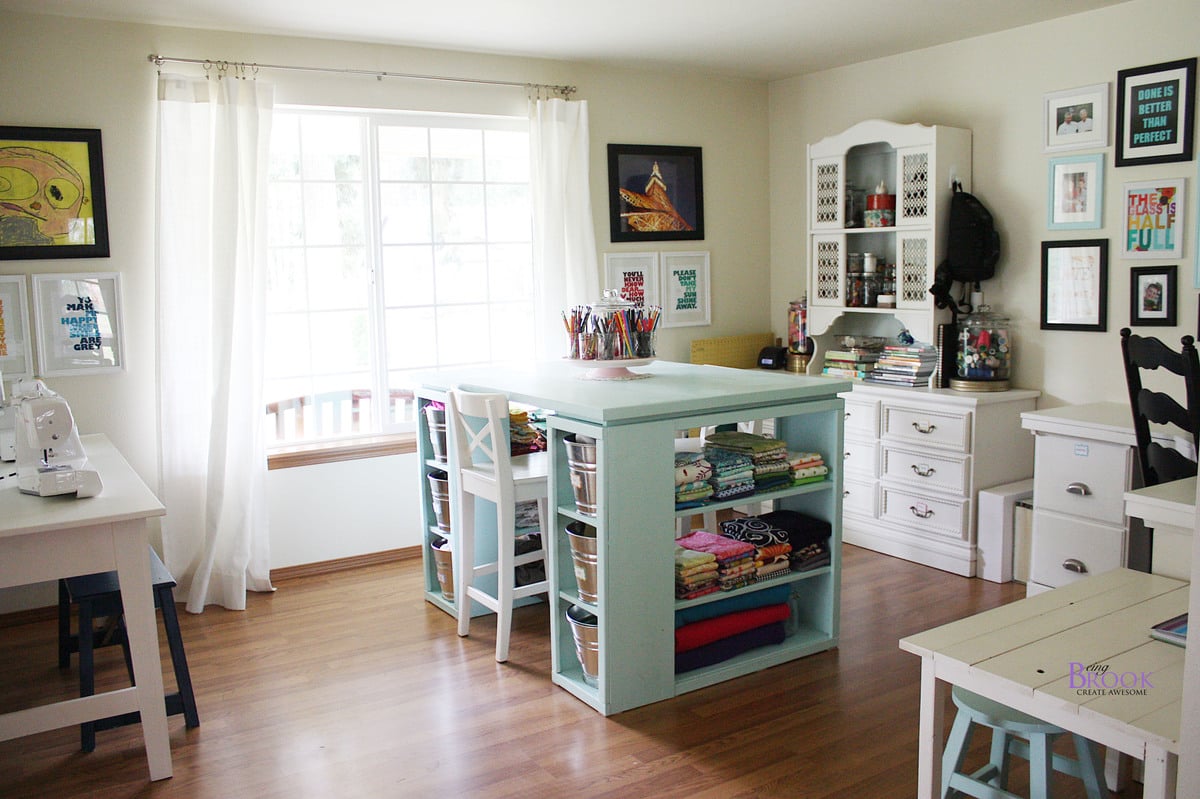
Love the Modern Craft Table! It has lots of storage space and tons of workspace on top. We used pine for the shelves and plywood for the top and edged the top with pine.
There is a spot for two counter stools at the opposite ends of the table which is perfect to give kids their own spot to craft/color.


Sun, 01/15/2012 - 20:10
I love this table but I wonder how do you use it to sew with? or do you sew on this table?

Sun, 01/15/2012 - 21:57
Brook, wow!!! This table is simply amazing! Thank you for sharing such beautiful photos too!
Mon, 01/16/2012 - 10:03
the whole room is beautifull. how many of the other pieces of furniture were built using Anna's plans?
Mon, 01/16/2012 - 10:03
the whole room is beautifull. how many of the other pieces of furniture were built using Anna's plans?
In reply to looks great by Guest (not verified)
Mon, 01/16/2012 - 20:49
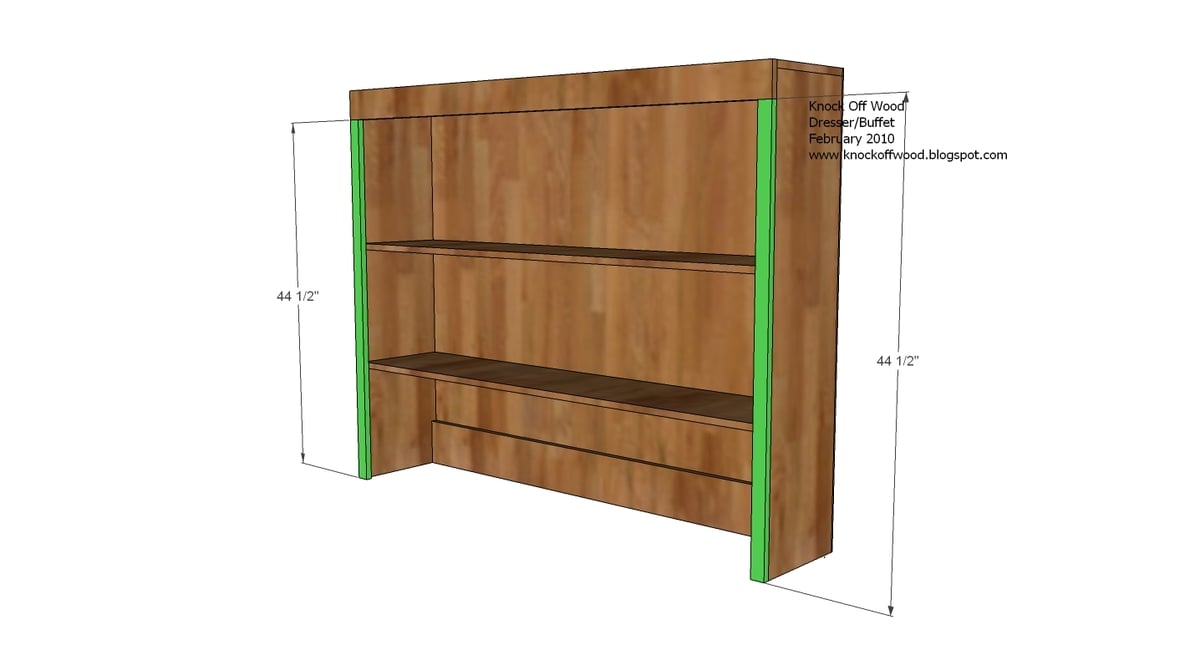
Everything but the dresser/hutch and barstools we built using Ana-White plans!
Mon, 01/16/2012 - 12:06
This table is fabulous and I'm really in love with the color! Thank you for sharing. So many new ideas for my room now!
Mon, 01/16/2012 - 12:06
This table is fabulous and I'm really in love with the color! Thank you for sharing. So many new ideas for my room now!
Mon, 01/16/2012 - 17:32
You won't believe this...but today I was shopping for the wood to make the Modular Craft Table, but I did not buy the wood because I was trying to tweek the plans to change the "cubbies" and size. So, I came back to this sight and here is this craft table that would be much better. I want to make it table height rather than counter height so I can sit down and sew at it. I also want to be able to drop the back 12 inches of the table if I do not need it and so it will fit better in my room, wheels on the bottom to pull it out easily so I can extend the 12 inch table when needed. I love what you have done!
Tue, 01/17/2012 - 11:36
You did a fantastic job on this project! Love the way it looks and the color!
Great job!
Sat, 01/21/2012 - 07:00
I love this table, but I can't seem to find the directions to make it. Can you point me in the right direction to find it?
Wed, 01/25/2012 - 17:24
Is there a reason you can't sew on this (from what I gathered from a previous comment)? I want to build something for my wife's craft room and love this, but she will need to sew as well. Help?
Wed, 01/25/2012 - 17:32
Joe,
It would be hard to sew at this table because the table is counter height. You wouldn't be able to reach the foot peddle to run your sewing machine. You could alter the plans to fit a spot that could hold the peddle foot. I sew on a different table in my craft room and use this for cutting fabric and general crafts.
Brook
Wed, 01/25/2012 - 19:26
at one time I had my sewing machine in a spot that was counter height. I used a wood box to put the foot peddle on. One of anna's steep stool plans or the bathroom platform for kids plan might be good to build with this. It was also nice when I was sewing small pieces that needed lots of ironing to stand and sew at the counter.
Wed, 02/01/2012 - 14:25
I have a modern sewing machine (within last 5 years) and I routinely sew at counter height with no problem. I prefer it because it really helps my back. I cannot wait to make this!
Fri, 02/24/2012 - 22:36
Joe,
I think it would work to mount the foot pedal on the inside of the shelf area. She would use her lower outer thigh to depress the pedal while seated.
Tue, 05/08/2012 - 07:47
I love this table! I'm with Brook and don't sew on mine. Height issue is easily worked around - main issue is usually back support. Sewing at a huge workstation tends to leave you feeling unsupported and sitting on a stool (I have a nice wide comfy one from Target) leaves your back unsupported so you usually slouch (bad! bad!). I sew at my smaller desk in a good supporting chair and use my table for everything else. I use this table for a true work area including cutting. I have an Accuquilt Studio and that sucker is HUGE and heavy!
Mon, 11/12/2012 - 11:22
I just talked my fiance' into building this for me to use as a desk. I need a desk for my work from home position where I can store everything as well as have a large area to spread things out. I loved this the moment I saw it and talked him into building it for me. Can't wait to post the pictures when it is finished.
Thu, 02/28/2013 - 16:15
My husband made this FABULOUS Craft Table for me last weekend, it turned out PERFECT! Thank you so much for posting this with such detailed directions....
What do you have in your galvanized pails? What do the labels say?
Thank you!
I modified the plans slightly, reducing the overall seating depth by 1.5" so I could use 8' lumber with minimal waste, and make 2 cushions out of one 54" width of fabric. I also tweaked the design to make a chaise lounge on one side. I used bargain priced sunbrella fabric (has a few imperfections) and recycled soda bottle fill for the cushions to keep cost lower. Building the wooden part was quick and easy (took an afternoon including two trips to the store), but this was my first sewing project so the total project time reflects my learning curve making and stuffing cushions.
Tue, 04/05/2016 - 06:45
This looks like a very lovely place to relax, can't believe that was your first sewing project!
Wed, 04/06/2016 - 06:34
This looks really great! You have inspired me to stop procrastinating and get started on our outdoor sectional. Every time I think about doing it the building part seems fun but, I'm overwhelmed by the task/cost of the cushions. I'm interested in learning more about the fill you used. Where did you find it and what was the approximate cost? Thanks and great work!
Wed, 06/29/2016 - 20:25
Whoops - sorry about that. This looks amazing, and the detail on the fabric is quite fantastic. I have been wanting to replace some old furniture that is falling apart, and this would really be a wonderful addition to the outdoor space. Kudos on the great work.
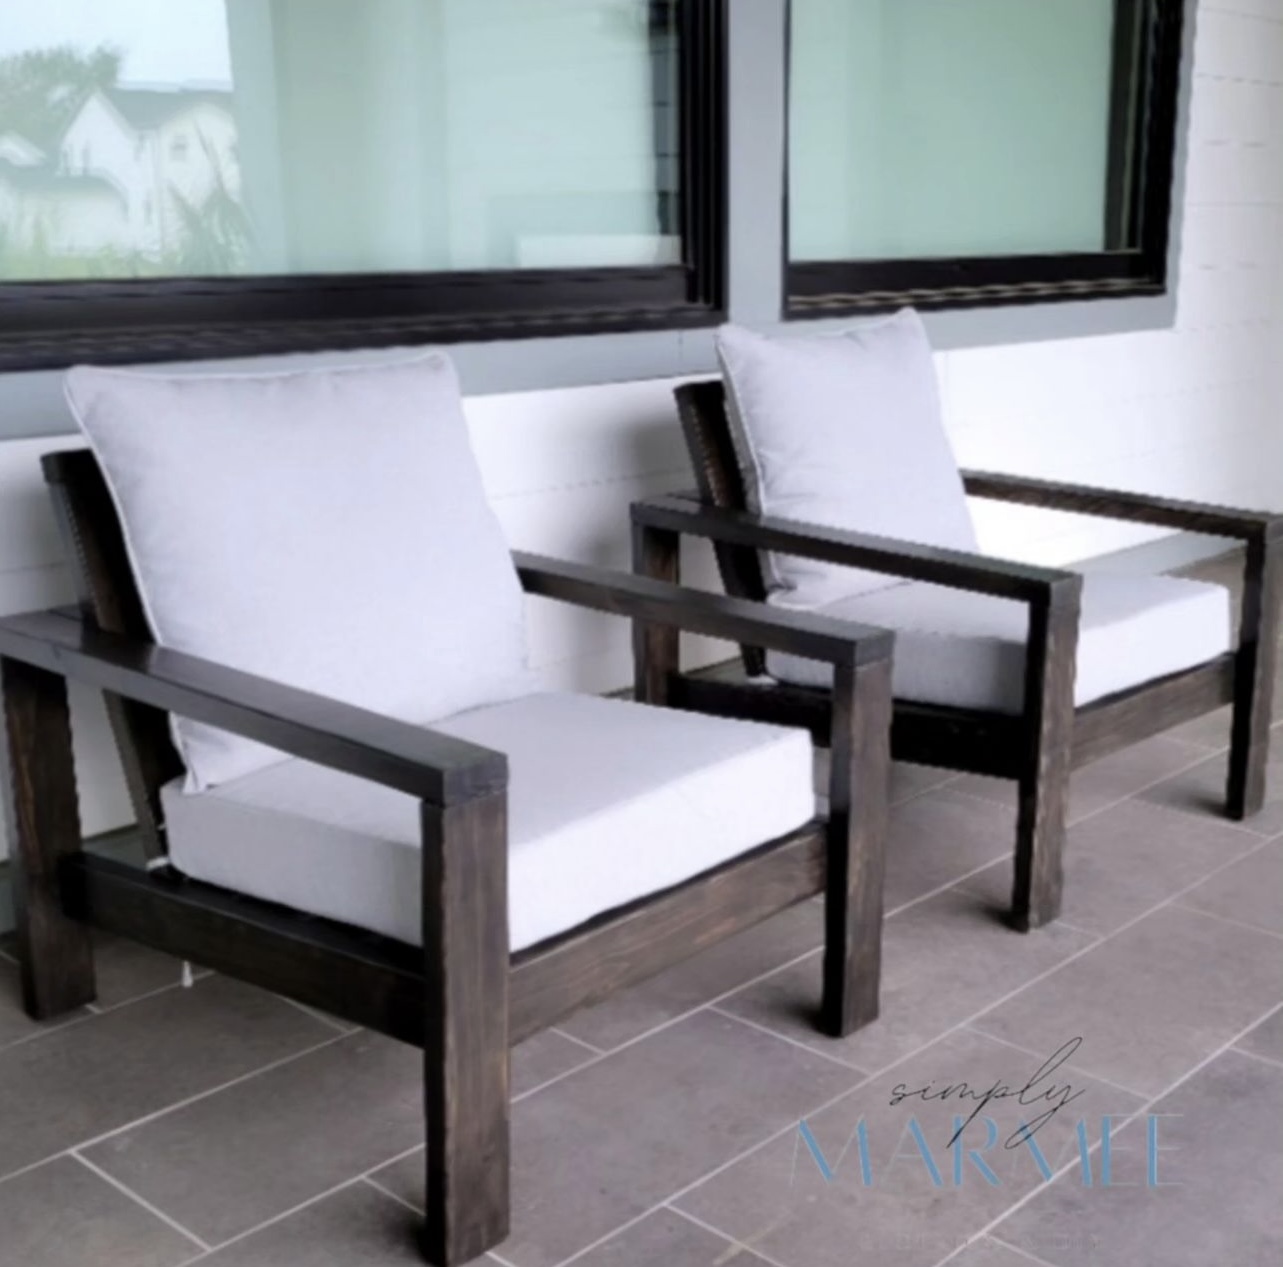
Using just basic tools, I was able to build this super comfy outdoor chair for the fraction of the cost. With a couple of modifications, Ana White's design plan made for a perfect fit for the new deep seat cushions I had found on fb marketplace.

I modified this chair with 2x4's as the base and 2x2 for decoration on arms, this is prior to sanding and finishing

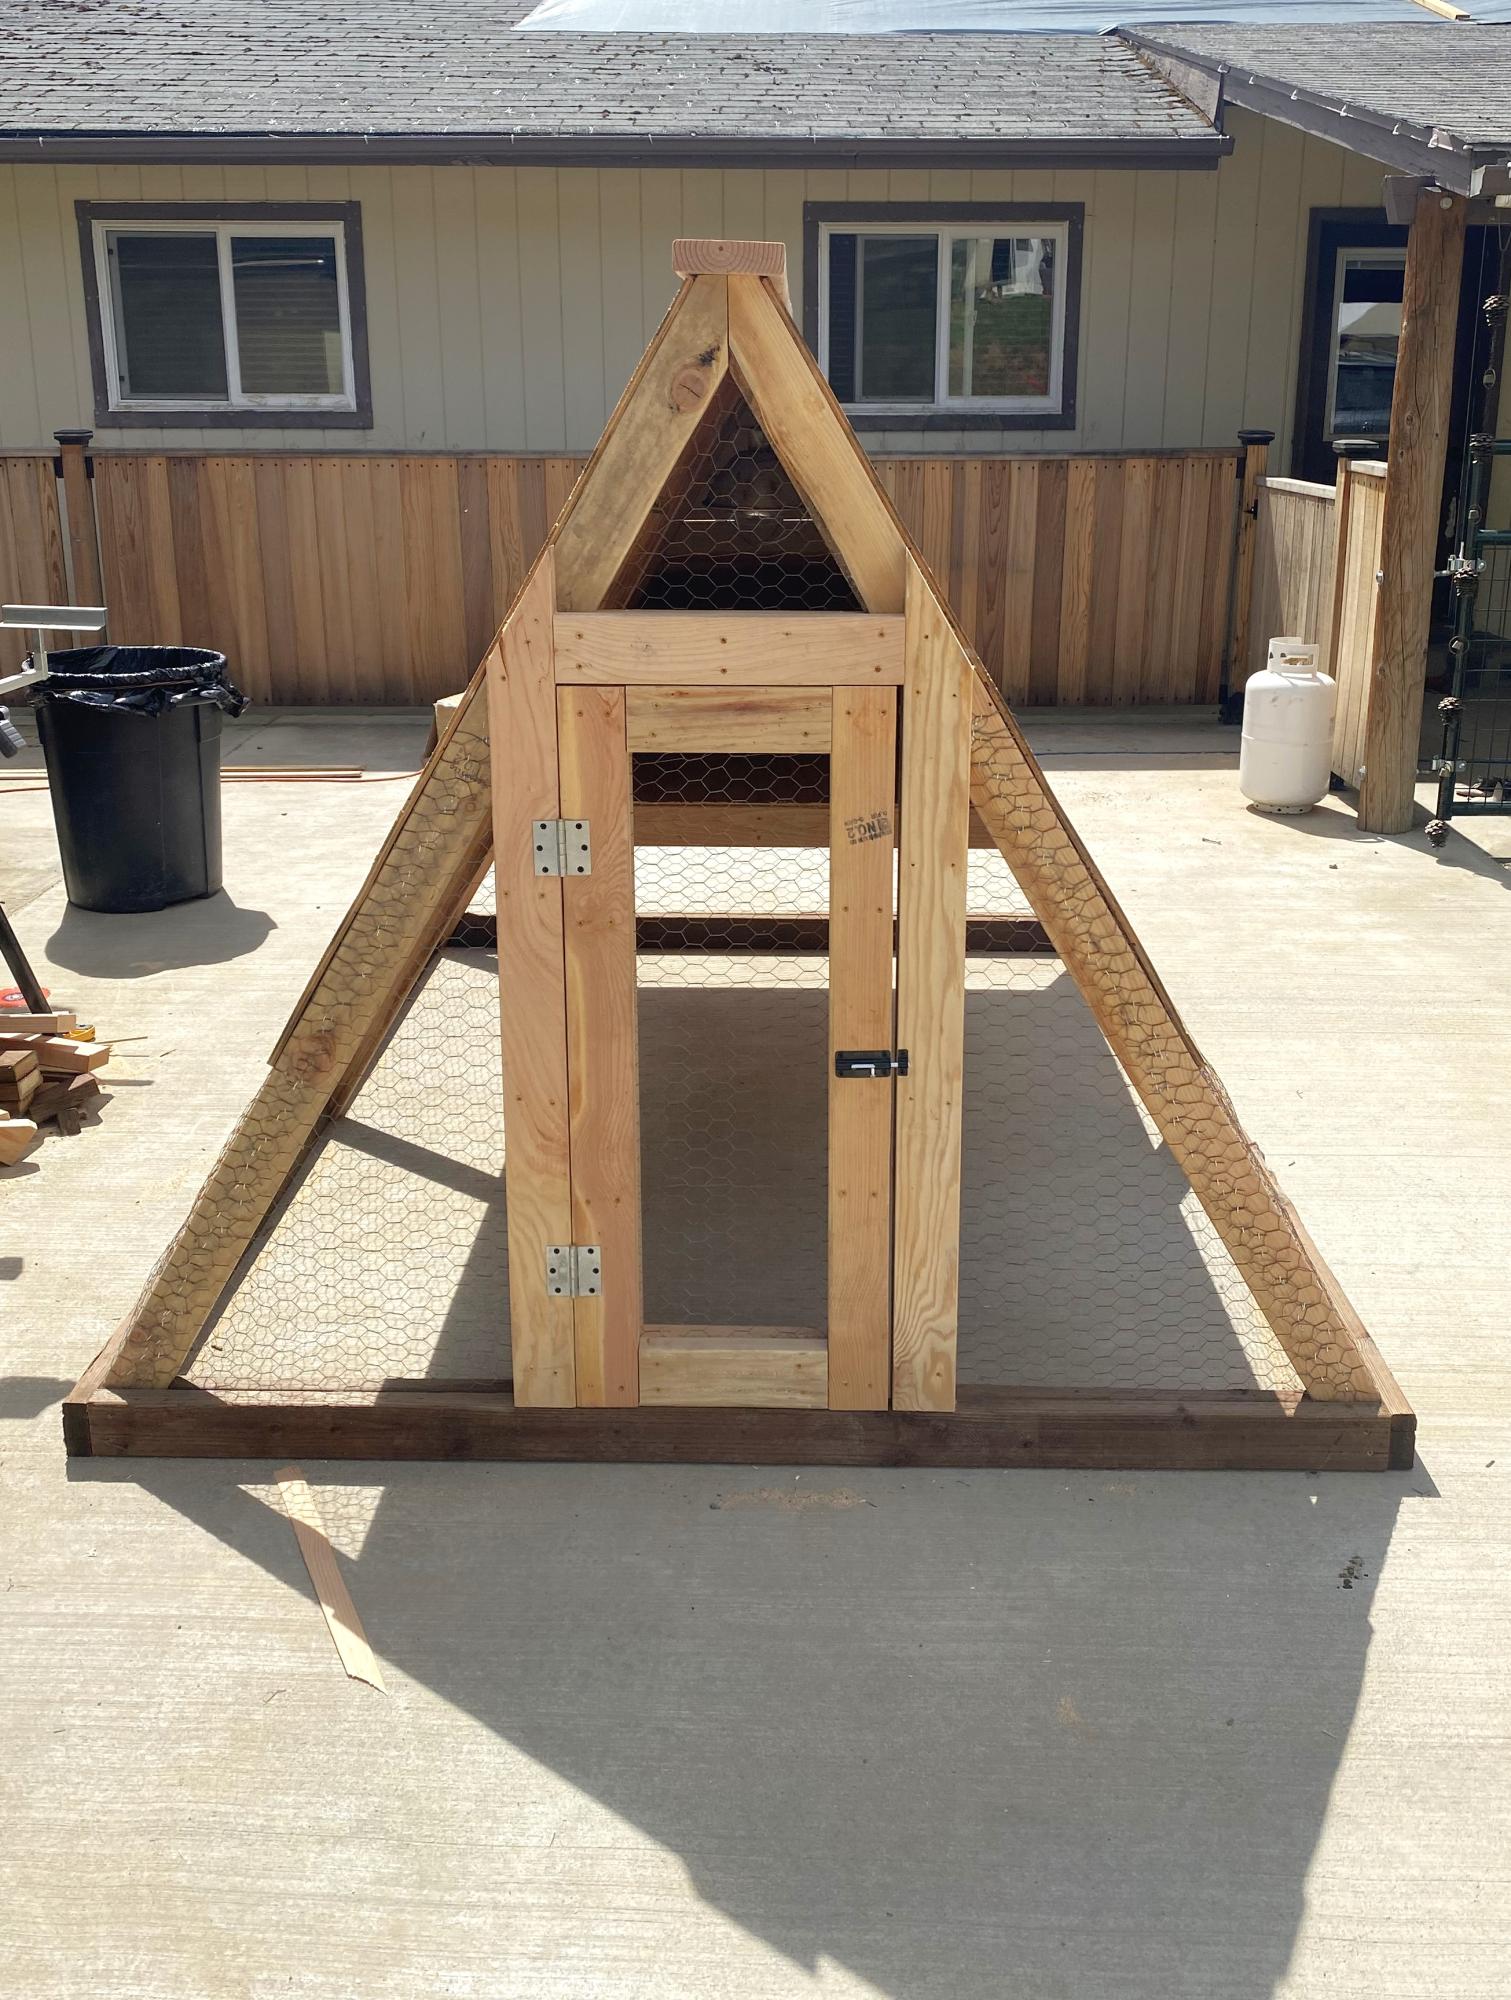
Great easy project to get the bigger chicks out of the garage to integrate with the older hens. Made some modifications because we have a lot of critters trying to kill the chickens/chicks.
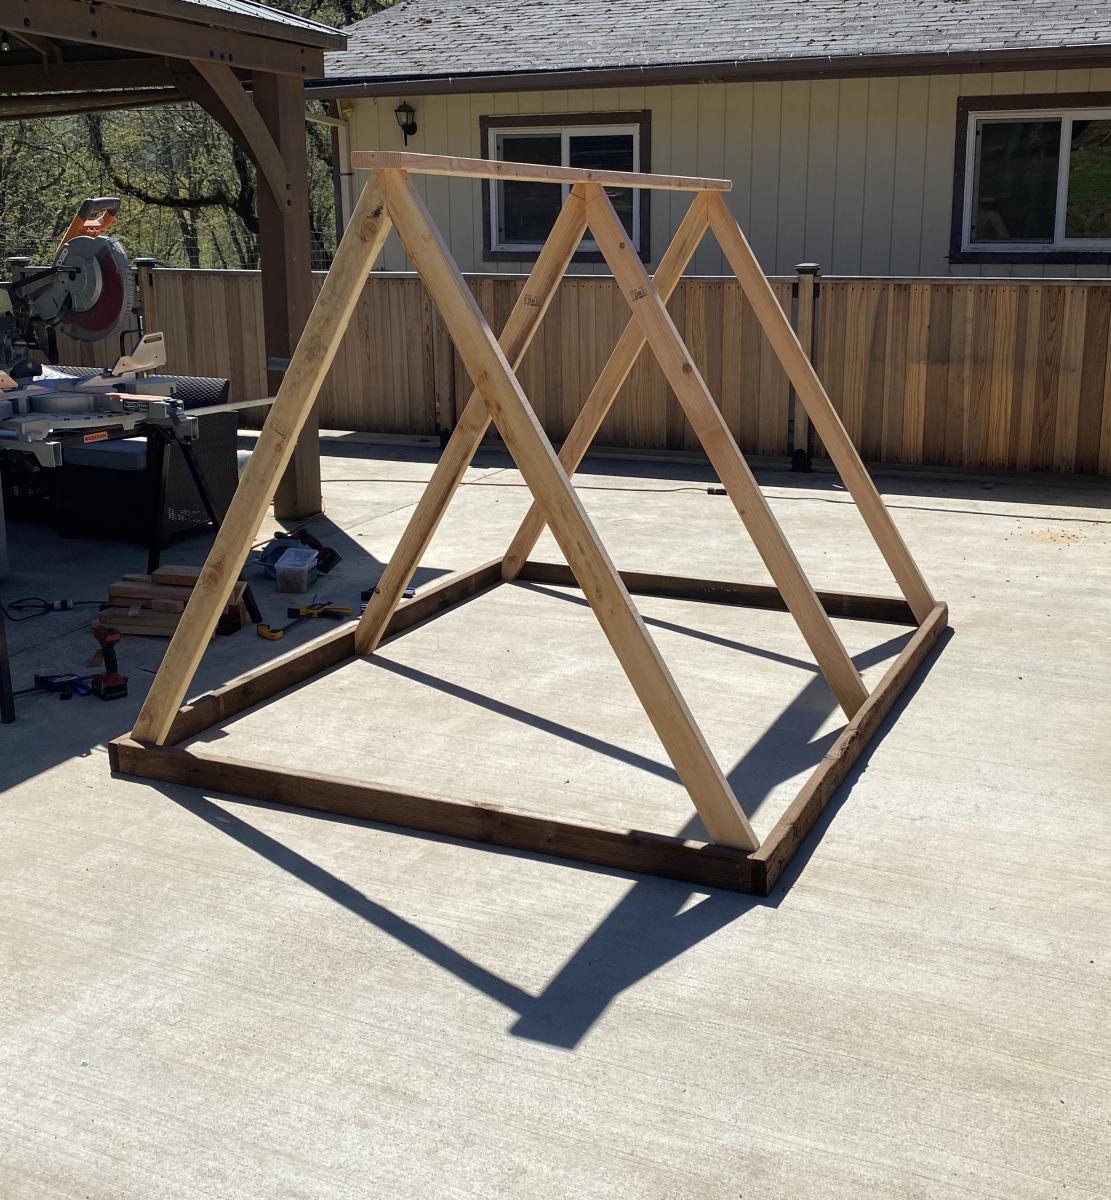
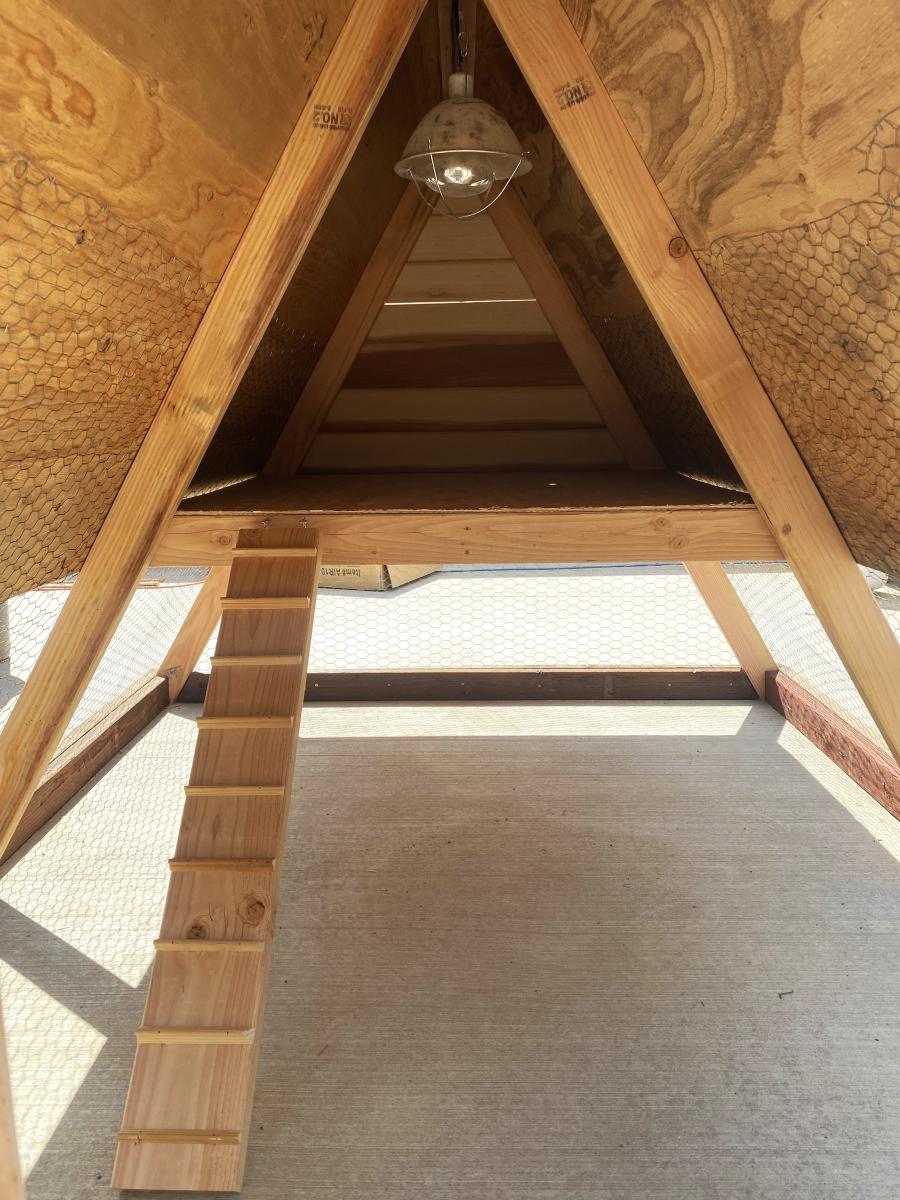
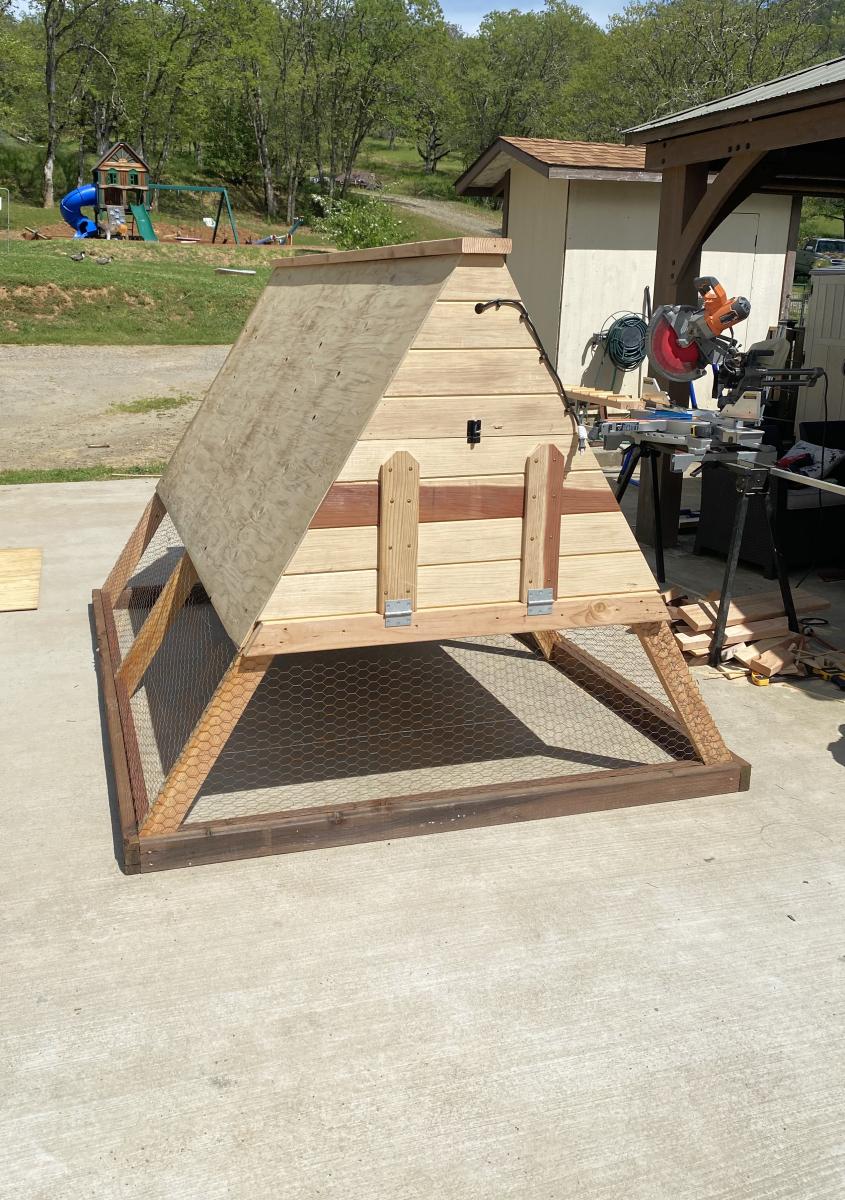
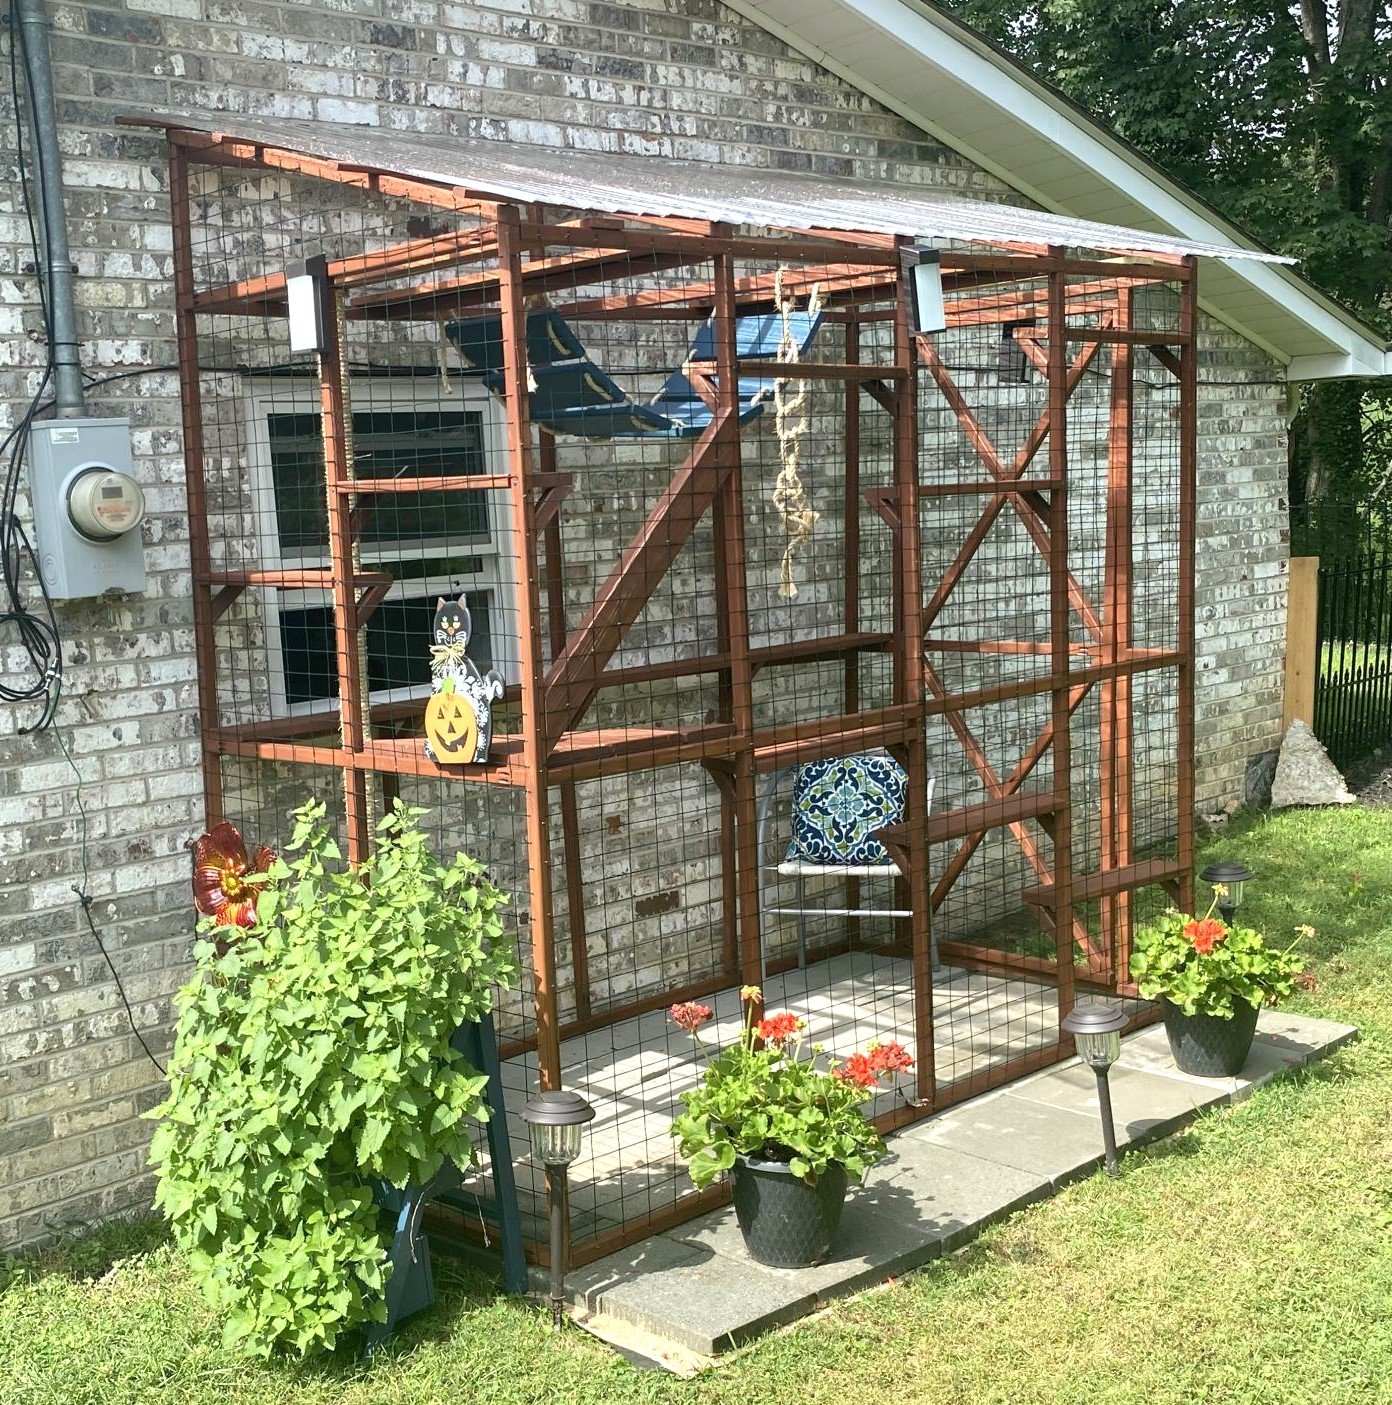
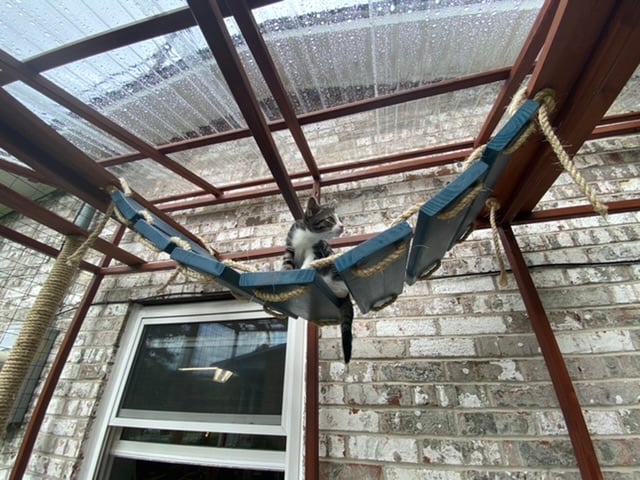
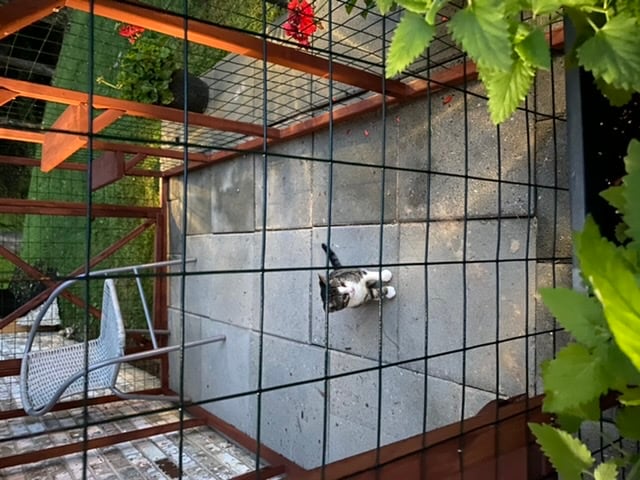
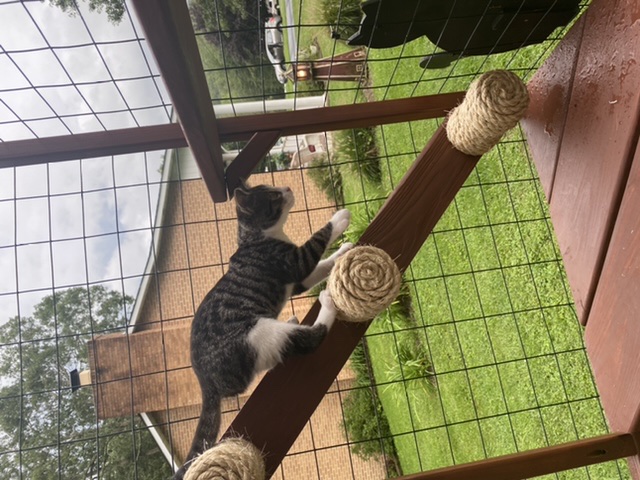
Ana doesn’t have a plan for a catio but she does for a playhouse and a cedar shed made from 2x2’s. I sort of combined my knowledge from making her plans over the last 10 years and came up with this for my cats. It was fun to make!! My baby kitten is loving it. I used garden fencing and stapled it to the outside and pocket holes for the walls. I made each wall individually like the playhouse then connected them once in place.


Wed, 06/09/2021 - 12:36
Thank you for sharing! My daughter wants a cat for her birthday but it can't be inside due to our son's allergies. Roaming outside isn't really an option because we have coyotes. We are going to use one of these in combination with an underground electric fence.
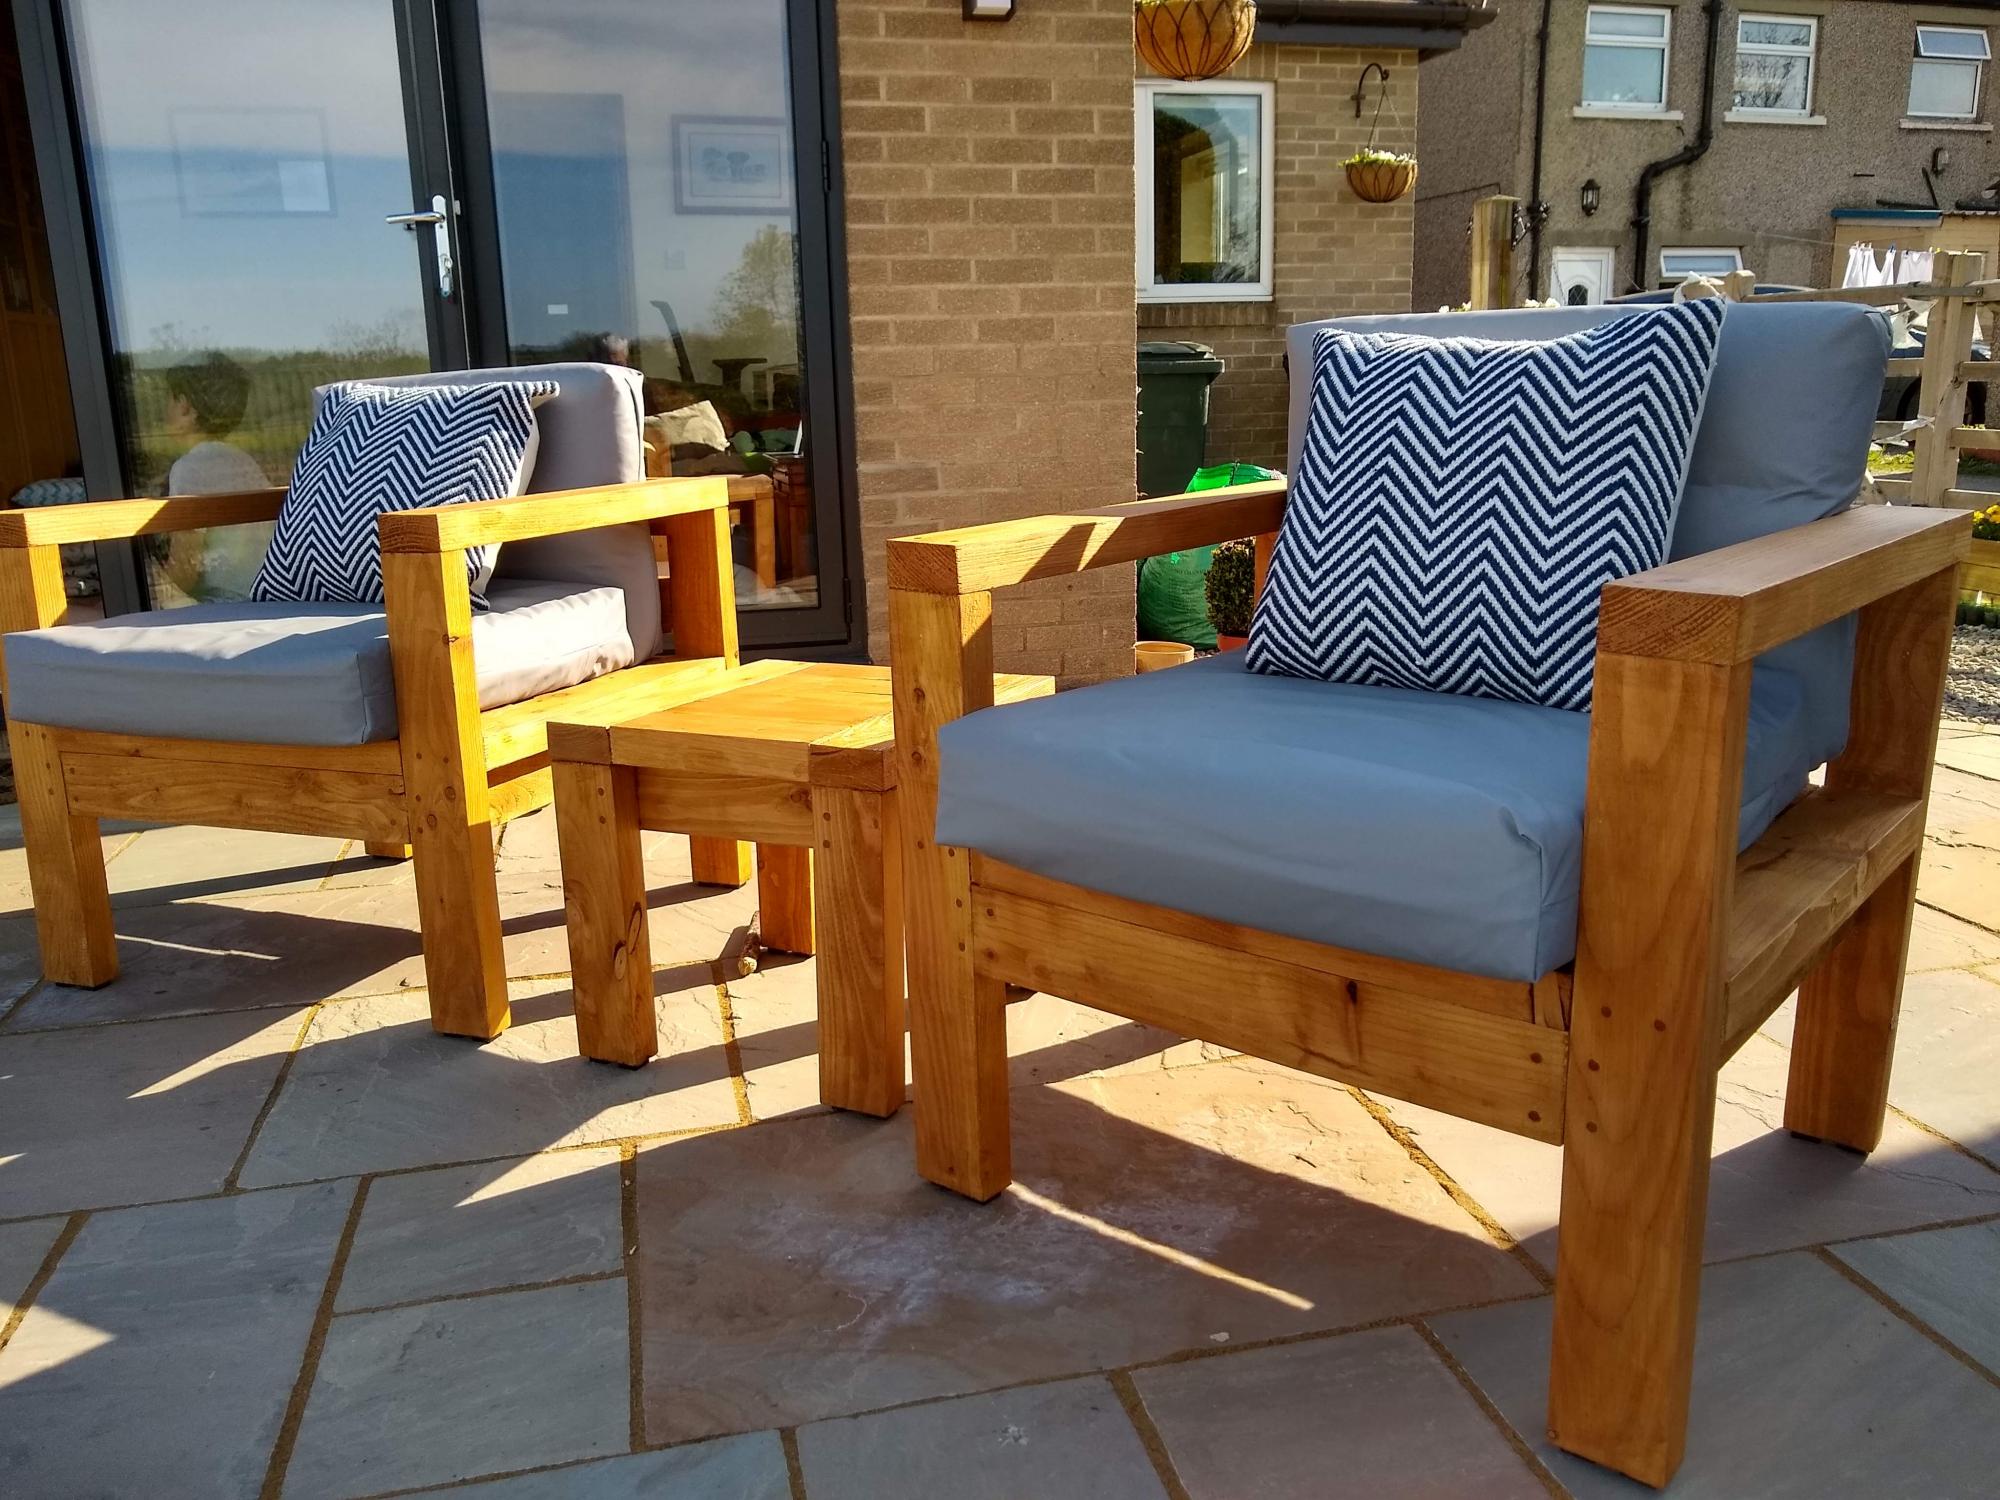
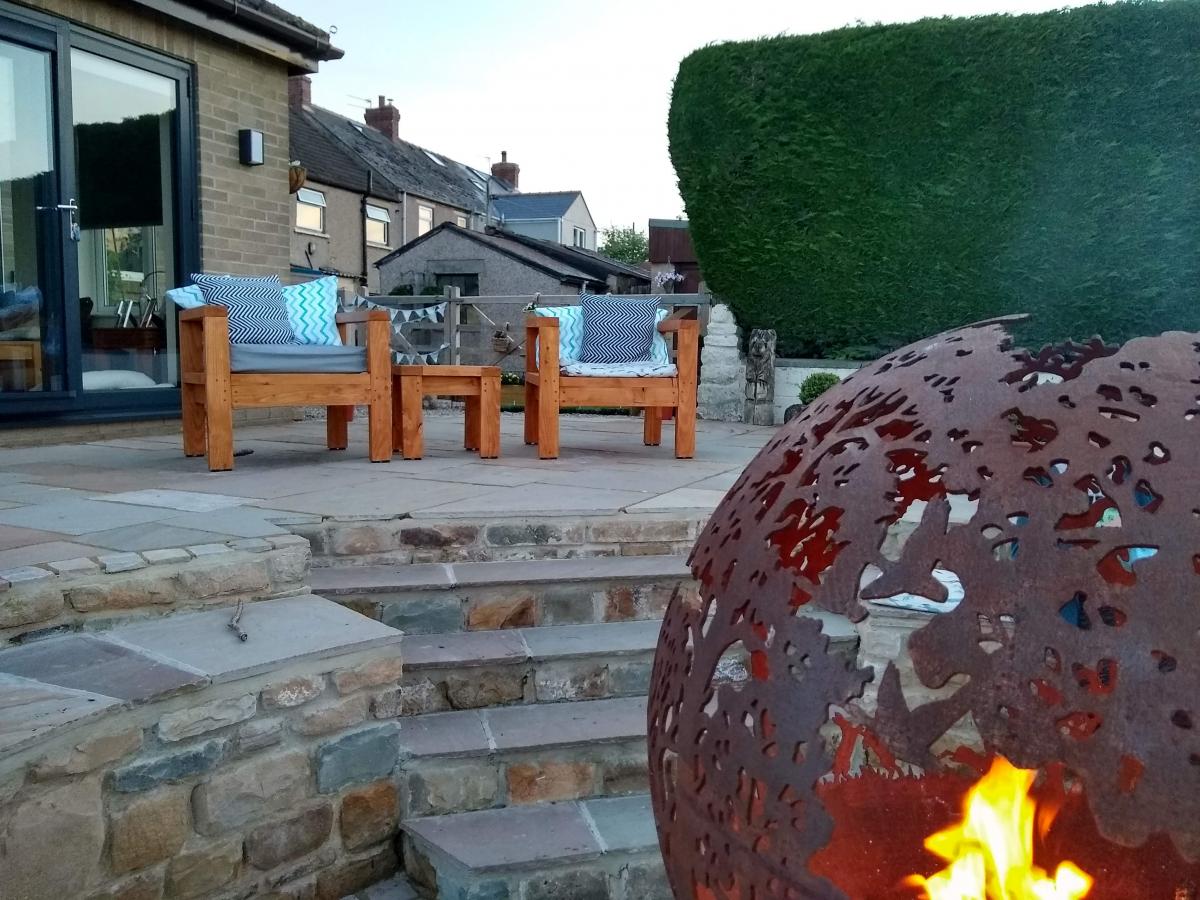
I built the 2 chairs and side table using Ana's plans. Wood in the UK is perhaps not as cheap and ubiquitous, so I managed to get hold of some rough siberian larch to build them. After what seemed like a lot of sanding I started cutting. I've used stainless steel screws and have used a plug cutter on a mahogany board I had to plug the screw holes. I really liked the contrast and neatness that this has given the project. I also used some rubber feet to raise it off the ground and try and reduce any water damage. The side table is reduced in size from the 2 foot version in the plans, this was easy enough once I'd worked out the impact on all of the other measurements. My wife has commented that I should have used less wood in my next project as they are very heavy, they certainly aren't going anywhere! My wife did produce the lovely grey cushions that you see in the pictures.
Sun, 06/06/2021 - 20:17
Love the look, and you and your wife make a great team!

I made the Farmhouse Storage bed for my son's room, which also has to double as the guest room. It has a planked headbord and footboard. I made the slats in removable sections under the mattress to access the storage between the drawer boxes. Also modified the drawers somewhat to use less wood (basically they don't have a double-thickness front). I also used 1/2" plywood to cut down on the weight of the drawers, and they seem to work great! I used iron-on veneer to cover up the raw edges of the plywood on the drawer boxes. More information and pictures on my blog! http://redhenhome.blogspot.com/2013/06/the-handbuilt-bedroom-pt-4-bed.h… http://redhenhome.blogspot.com/2013/07/the-handbuilt-bedroom-pt-6-drawe…


Comments
Ana White Admin
Tue, 04/25/2023 - 11:52
Perfect for behind the couch!
Thanks for sharing, it looks fantastic!