Community Brag Posts

3 Tier Planter

Submitted by ranlim on Thu, 05/18/2017 - 21:24

Love this planter. Used quality pine. Perfect size for the balcony! I use it for fresh herbs... i have have other people wanting one too!

Estimated Cost
17
Estimated Time Investment
An Hour or Two (0-2 Hours)
Finish Used
Special walnut
Recommended Skill Level
Beginner

Shiplap Fireplace

Submitted by Anonymous (not verified) on Tue, 12/20/2022 - 19:10

We did the Easiest Shiplap Fireplace in a weekend, thanks to Ana’s plans. I convinced my husband to help me build this by upgrading to a 65” tv and adjusting the dimensions. We also built a shelf behind the tv to hold our receiver and Xbox that is hidden when the tv is in place. Ana’s tutorial was amazingly and gave us the confidence to finally build something that’s been on our list for 2 years!

Comments

Patio couches

Submitted by Anonymous (not verified) on Thu, 04/27/2023 - 19:14

This project was fun to build with hubby said the shopping list and the cut list was perfect! Love all your designs! King bed is next!

Comments

Seasonal And Holiday

Gas Pump Curio Cabinet

Theses cabinets were built for a customer from plans they had found online. The hardware was ordered with the plans for an extra expense and the glass was made to order. Hope you enjoy them thanks for looking.

Estimated Cost
$450 for two
Estimated Time Investment
Week Long Project (20 Hours or More)
Finish Used
Latex paint
Recommended Skill Level
Advanced

Porch swing bed

Submitted by Beaulook on Tue, 01/28/2014 - 16:29

Started off with the original design but enlarged it to fit an oversize single mattress. The mattress cost me $35 from a local faith farm, while the materials came in around $200. I decided to hang under my backyard pergola. Fun and easy project.

Built from Plan(s)
Estimated Cost
$250
Estimated Time Investment
Day Project (6-9 Hours)
Finish Used
Cedar stain
Recommended Skill Level
Beginner

Comments

bhammond

Tue, 01/28/2014 - 21:10

Wow this looks so inviting I might just have to make one too! Nice work-- it looks great!

Shorty

Tue, 01/28/2014 - 21:26

Really great job on your porch swing bed AND an awesome looking patio/yard. Looks amazing all around!

Debbie Perkins

Mon, 07/27/2015 - 22:45

I want this!  I just made a couple of plant stands for my front porch.  My husband asked me what my next project was, why, a swing bed.  (This was only my second project!)  I want to put cup holders in those big ole arms!  We have a house at the beach in South Alabama, so, you gotta "hydrate."  This is an awesome swing.  I can't wait to do mine...pillows to rest on, one foot on the concrete pushing me in a slow swing. Cold beverage in my hand or in my cup holder. Yep, southern girl has a new project.  Love it!

Classic Bunk Beds Re-Imagined With Stairs

Submitted by edeboode on Mon, 04/03/2017 - 07:57

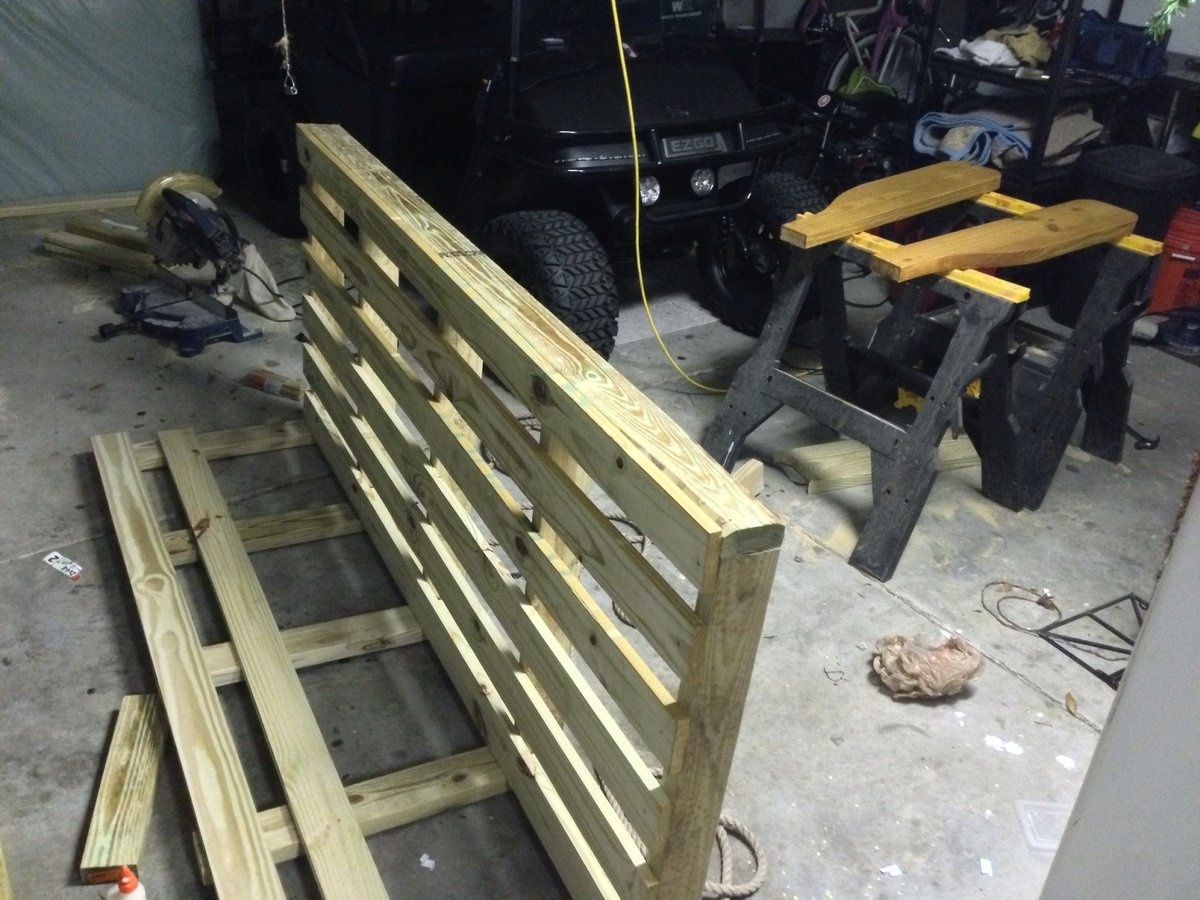
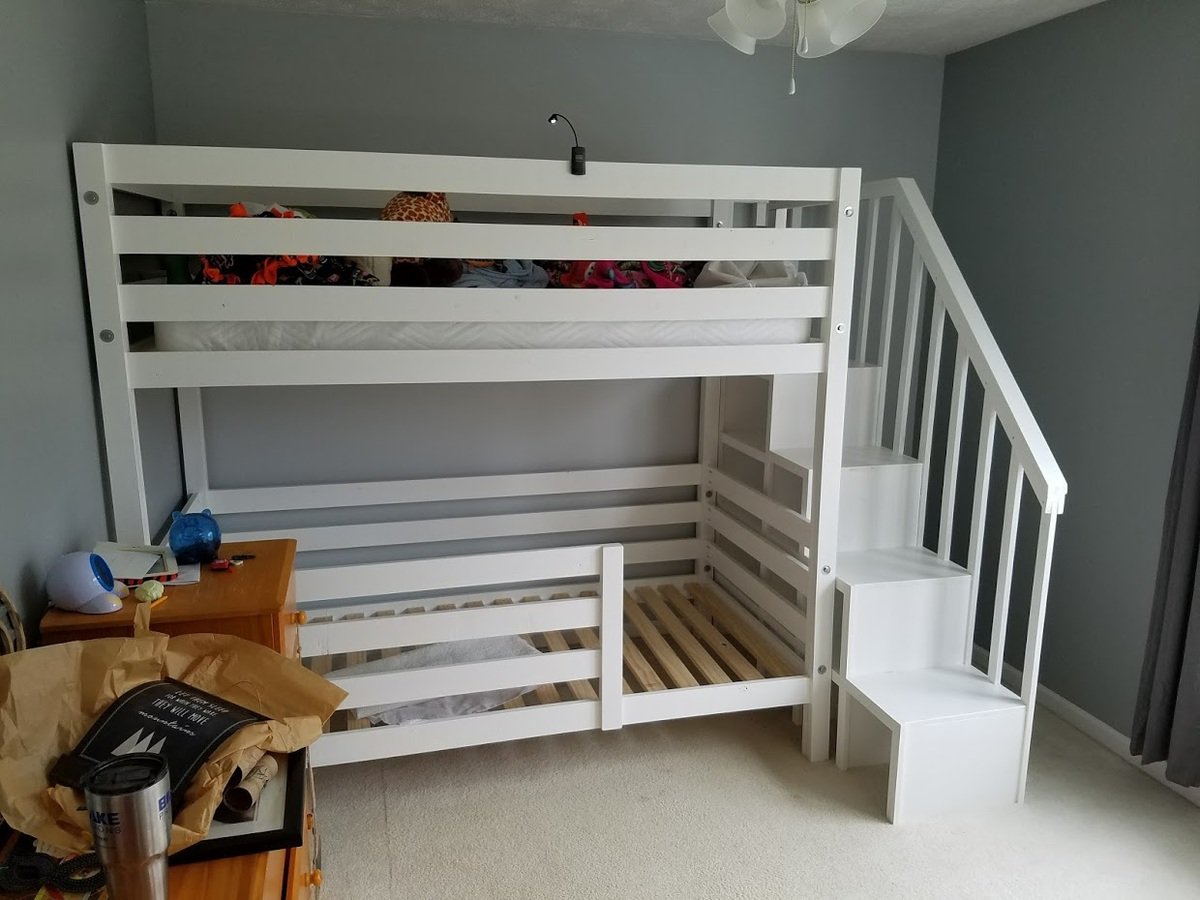
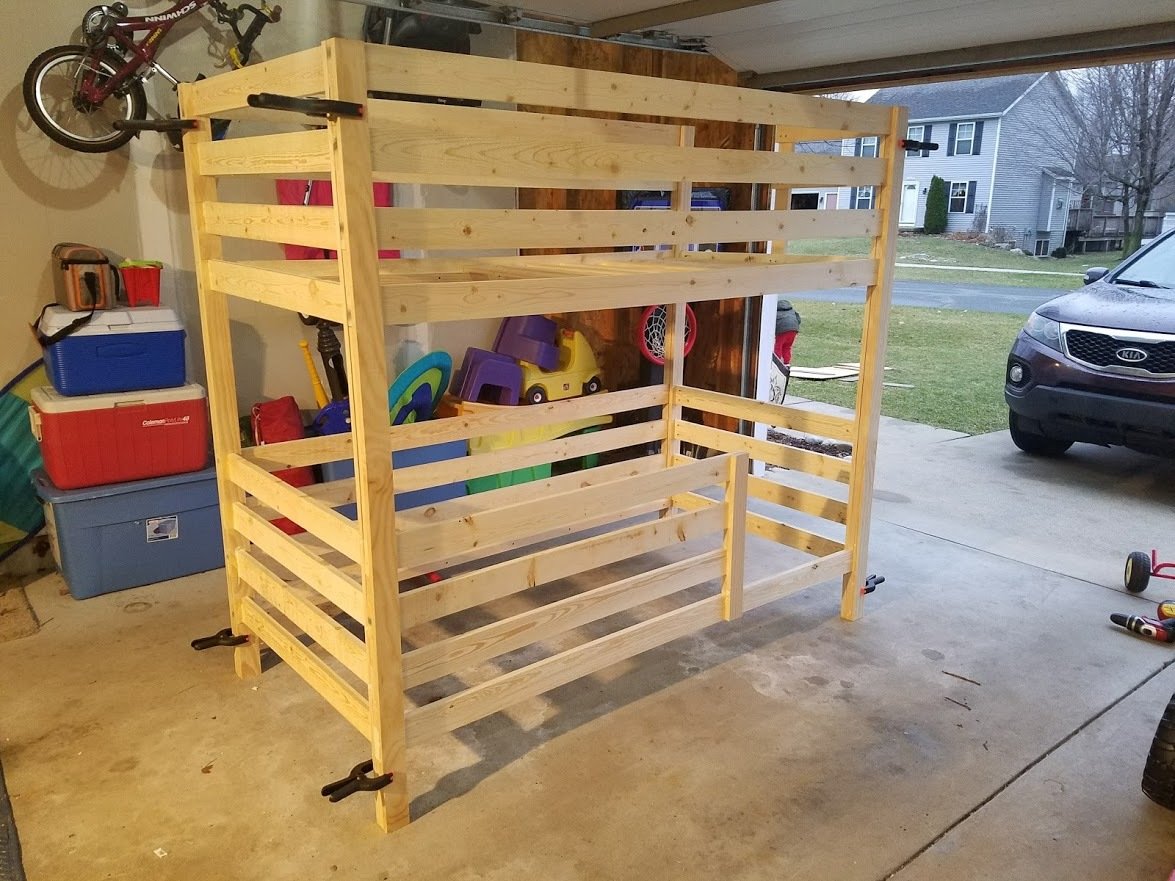
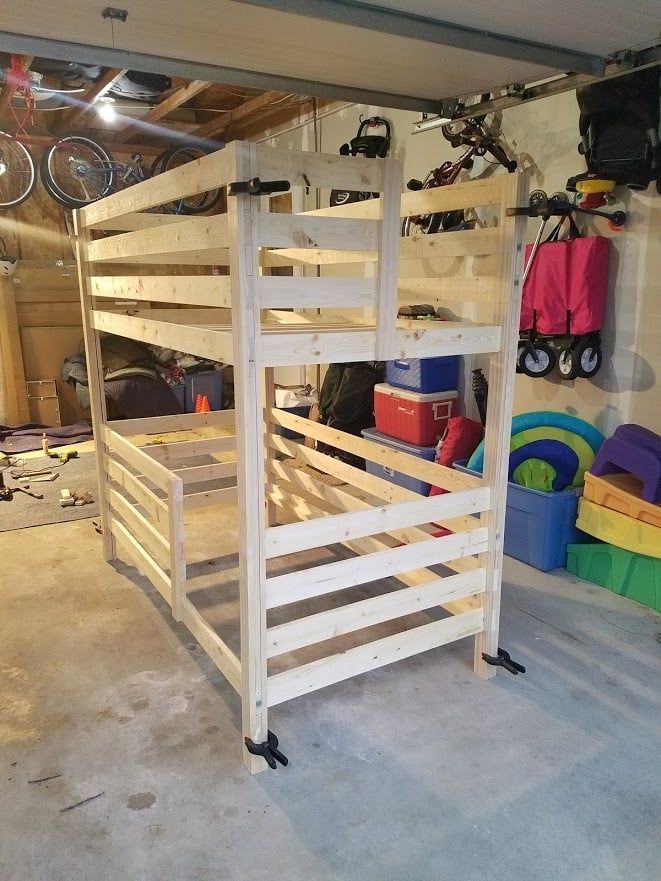
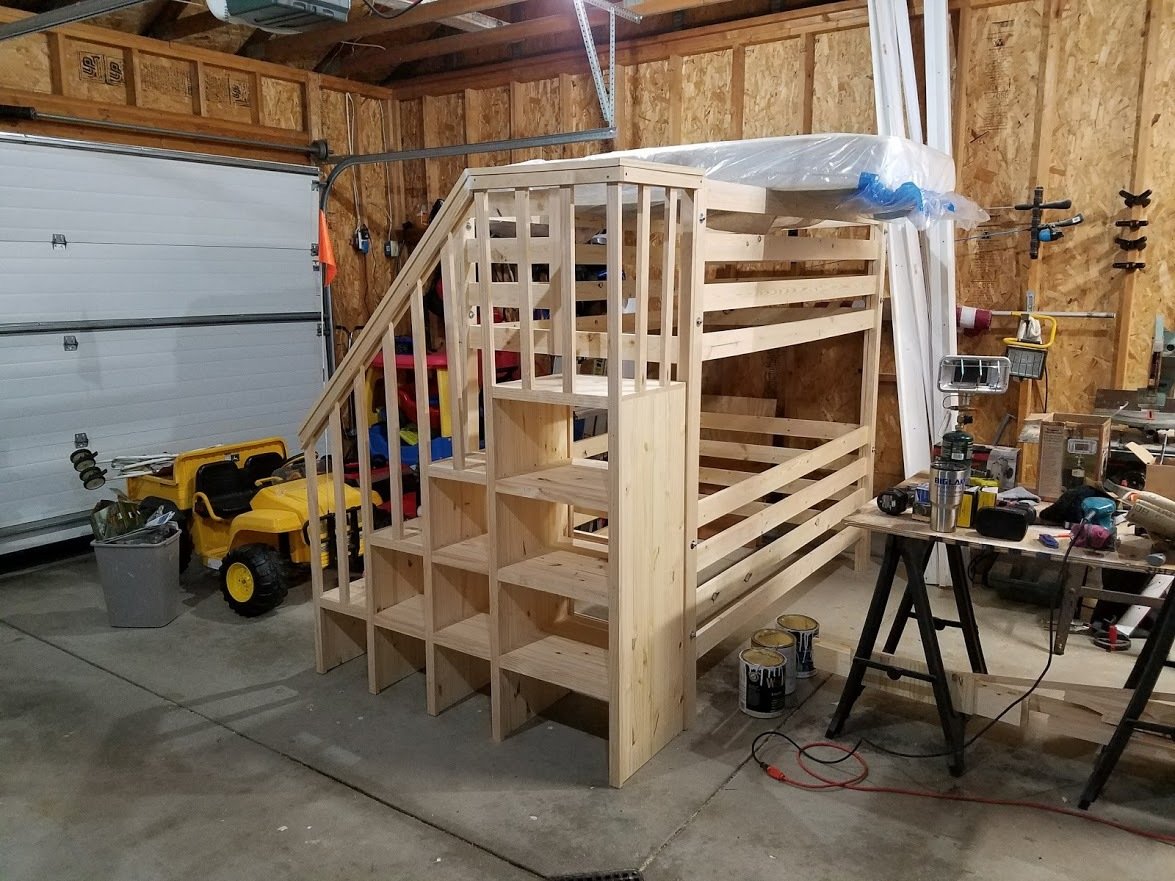
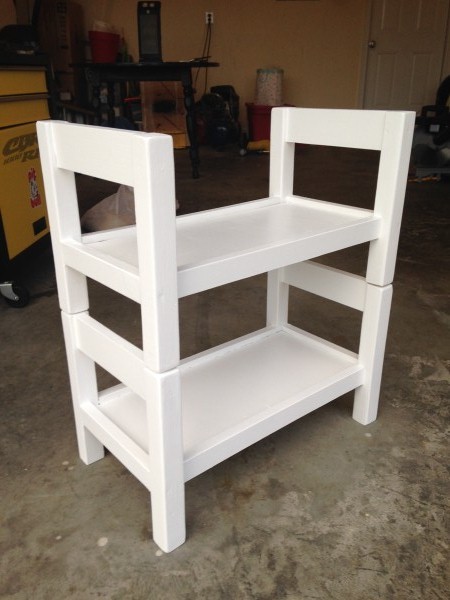
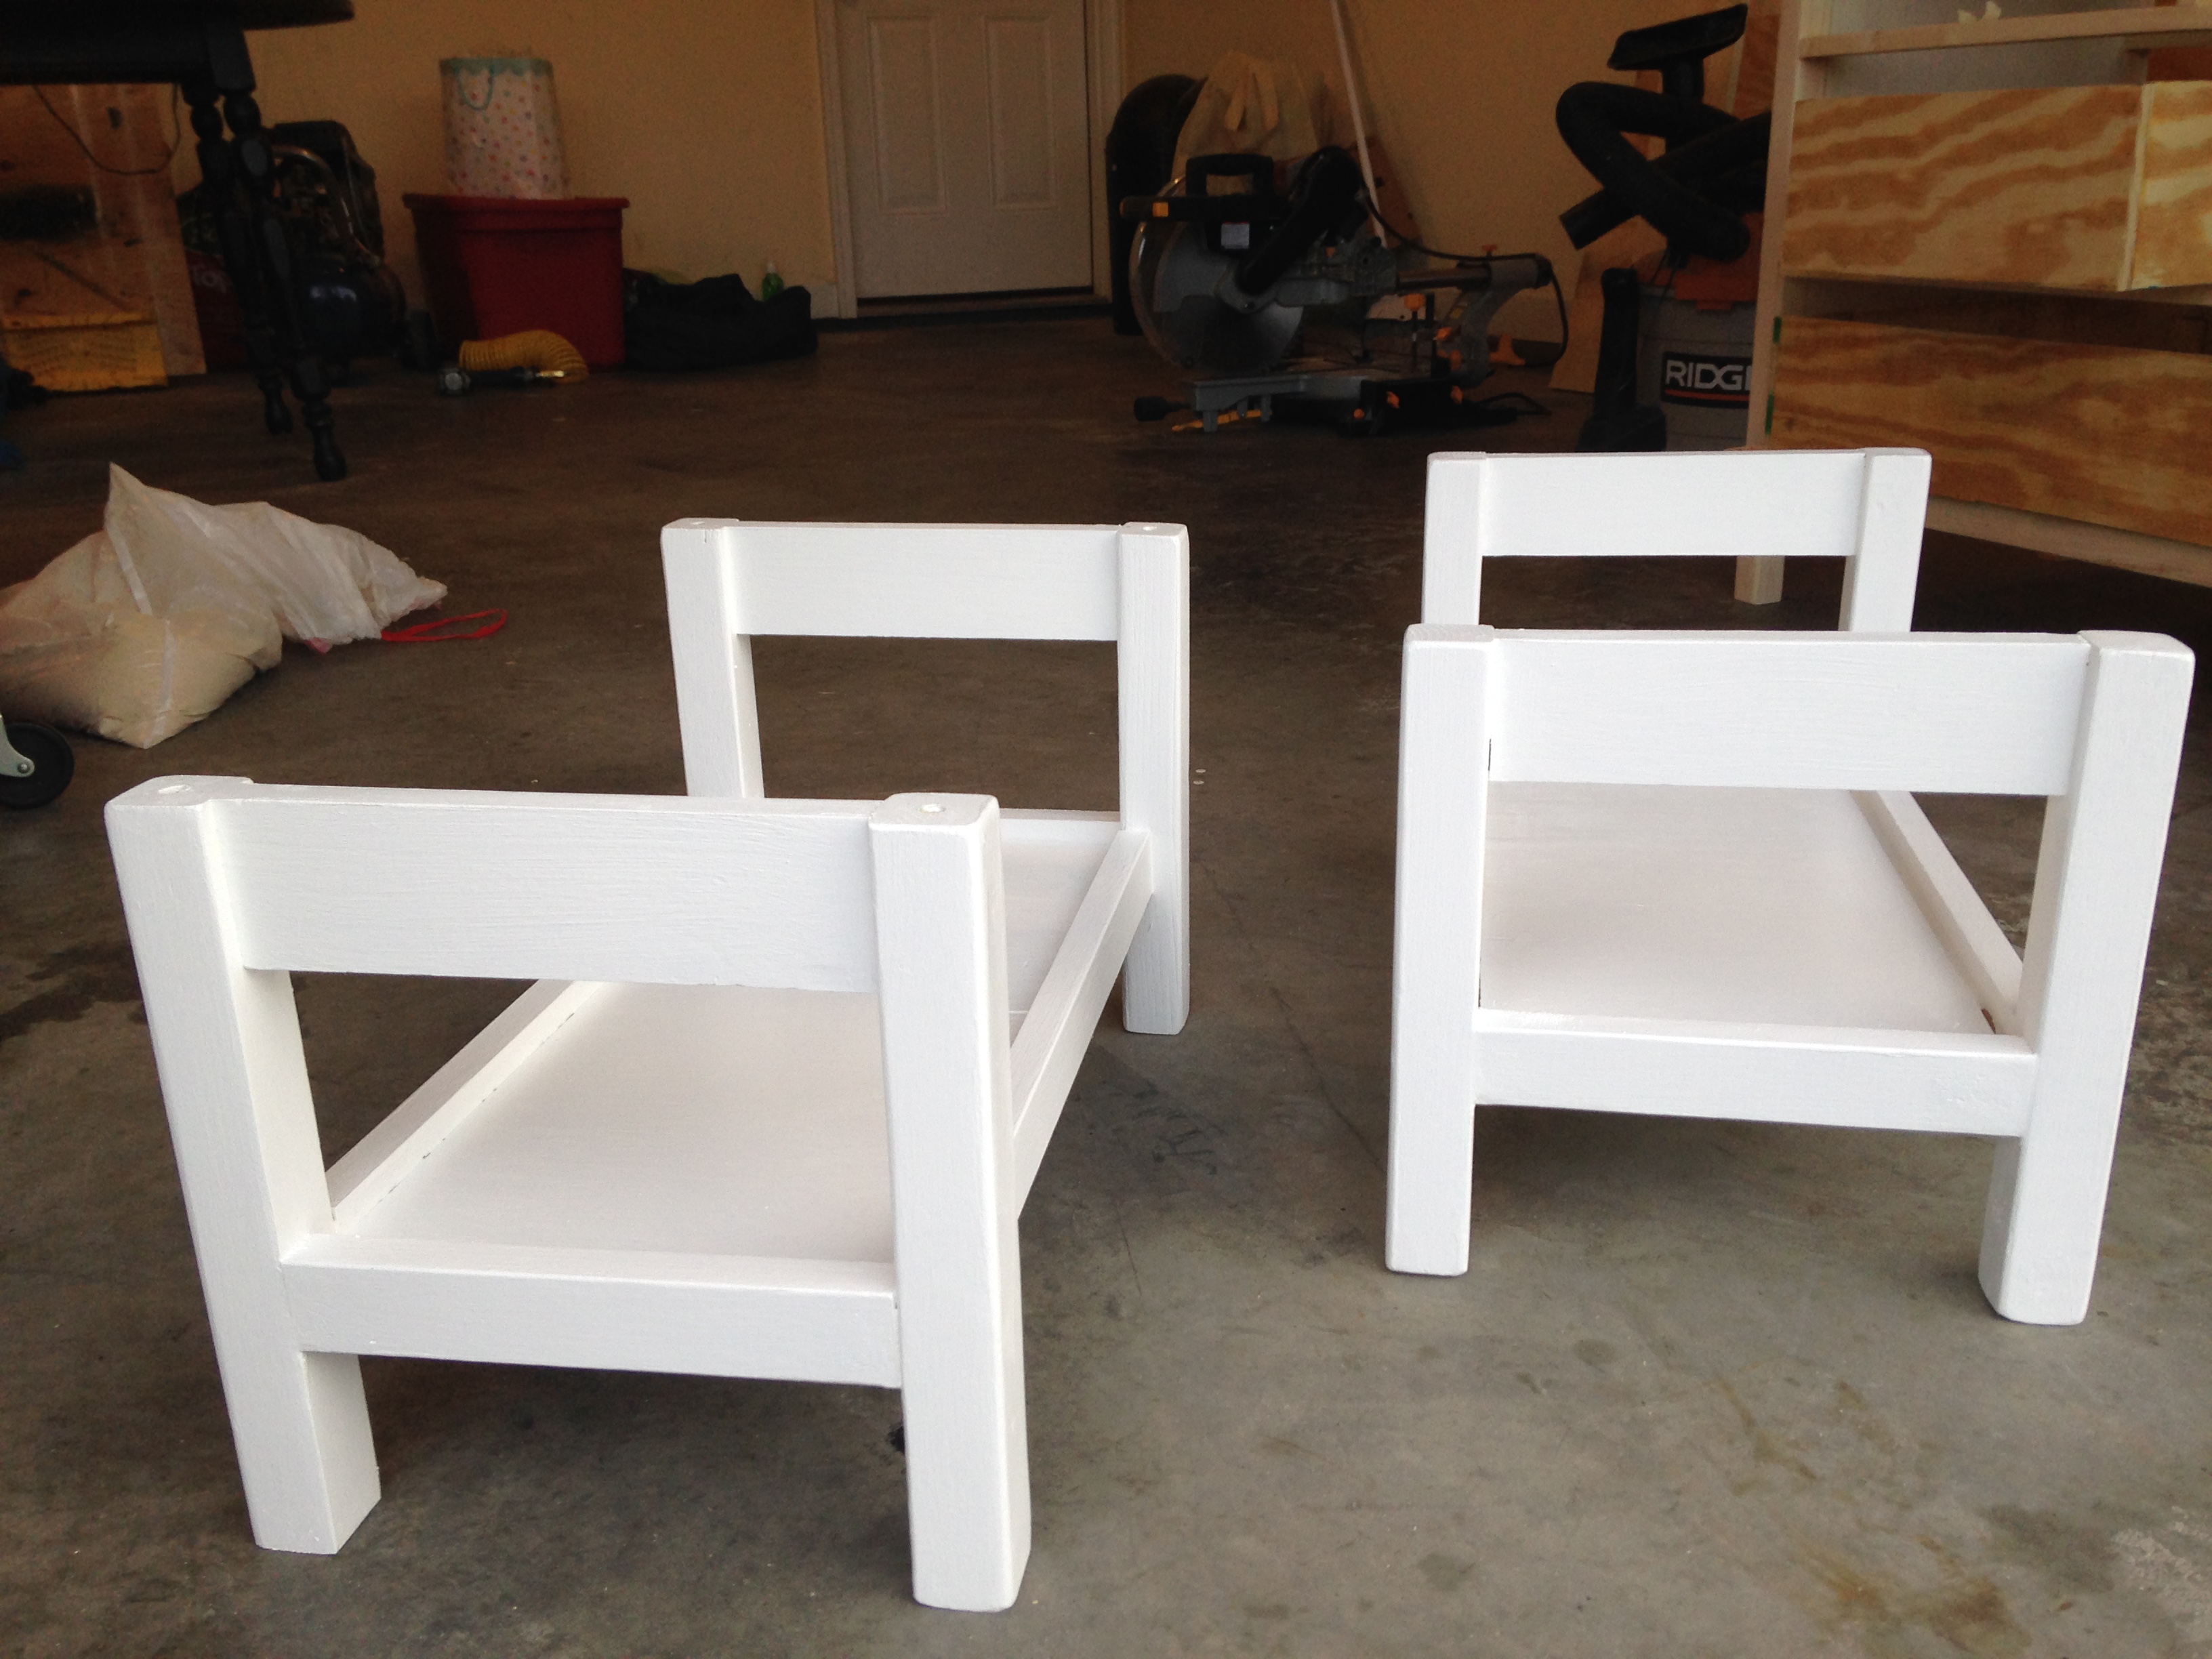
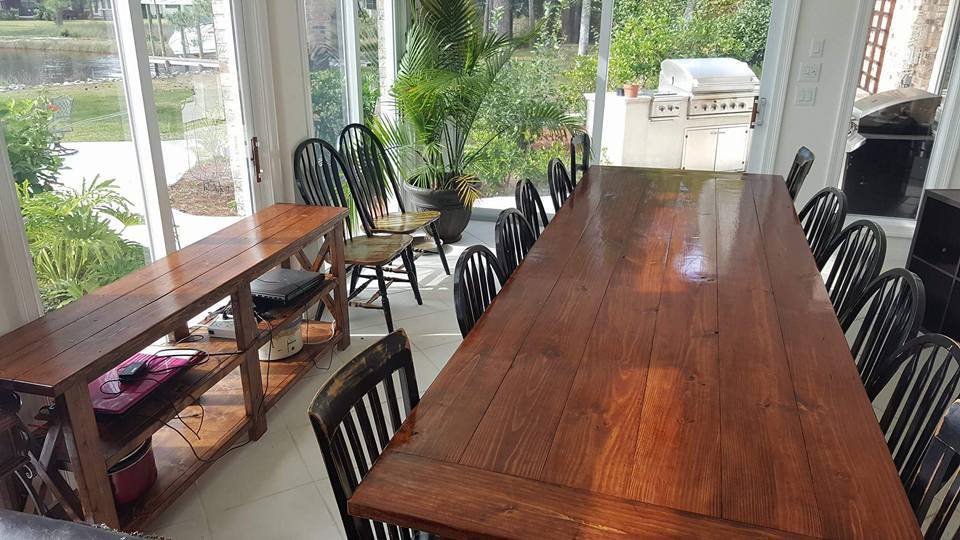
I modified the plans for the Classic Bunk beds by making them 74" tall instead of 63" and added a fourth slat all the way around to add more protection from potential falls.  I created one opening in the front for my youngest to get into the bottom bunk, and built slats about 2/3's across the front to act as a gaurd rail. I created another opening on the side for my oldest to get into the top bunk with stairs instead of ladders to again prevent falls.  I had to modify the Sweet Pea stairs to accomodate for the extra height in the bunk beds, simplified the railings, and I created each cubby to be big enough to use cloth storage totes that were 11x11x11.  Sanded the whole bed and stairs so the corners and edges were all rounded and smooth, and put two coats of white Deck and Porch paint to stand up to the the boys running up and down.  I used brackets to secure the stairs to the bed, and sixteen 3" bolts to bind the bed together.  Precut and drilled 17 slats for each bed seperated them 2" apart.  Spent a few hours every night during the week measuring, cutting, glueing, drilling and assembling the bed and stairs.  Spent an entire weekend sanding and painting.  Very happy with the way these beds turned out.  Overall cost of the project including the paint was around $400.  

Estimated Cost
$400
Estimated Time Investment
Week Long Project (20 Hours or More)
Finish Used
Porch and Deck Paint
Recommended Skill Level
Beginner

Comments

Modified Doll Bunk Bed

Submitted by dbwalk on Mon, 01/12/2015 - 20:19

I made this bunk bed for a friend's daughters.  I modified the plans by using 2x2's for the bed posts instead of 1x2's.  It made it harder to hide the screws but in the end I think it looks better.  

Built from Plan(s)
Estimated Cost
About $20.
Finish Used
I painted the wood with white paint.
Recommended Skill Level
Starter Project

Workbench

Submitted by jaimej on Sun, 04/28/2013 - 18:38

This is our 2nd project - we liked building the bookshelf so much, we decided we're gonna keep going and need a good workbench. Got these plans from the Family Handyman Website (http://www.familyhandyman.com/DIY-Projects/Woodworking/Workbenches/how-…). They claim the cost to be $50, but it was closer to $80 for us - still a GREAT project and easy to put together with the nail gun.

Built from Plan(s)
Estimated Time Investment
Afternoon Project (3-6 Hours)
Finish Used
none
Recommended Skill Level
Beginner

Comments

Nursery Shelves

Submitted by crisaphi on Fri, 07/22/2011 - 14:24

I used Ana's plans to build floating shelves and the ledge shelves for my nursery.

Estimated Cost
$50-75 for both
Estimated Time Investment
Day Project (6-9 Hours)
Finish Used
High gloss white
Recommended Skill Level
Intermediate

Comments

Guest (not verified)

Sun, 07/24/2011 - 09:03

It looks great! Also, where did you find the vintage reading week posters? I'd LOVE to know! Thanks!

Fireplace

Submitted by Anonymous (not verified) on Sun, 02/12/2023 - 07:05

Built this fire place using Ana’s plans and bought the same insert she had. Loved the way it turned out! I added the cabinets and shelving to each side.

Comments

My First Project

Submitted by Anonymous (not verified) on Mon, 06/19/2023 - 15:34

I took a woodworking course through the community college and built this cedar bench for my front porch. I learned so much throughout this process and am proud of how it came out. I am now building up my own arsenal of tools and supplies. I can’t wait to choose my next project!

Plans from myoutdoorplans.com/2x4benchplans

Comments

Dining / Gaming Table

Submitted by bette9182 on Mon, 04/25/2016 - 13:18

My wife and I were looking for a new dining table, the one we had was a bar height which worked well for our daughters high chair, but she was going to be transitioning to a booster seat . We shopped around and had sticker shock at the cost of a dining room set. We enjoy playing board games and I had been looking into possible buying a board gaming table, but those more expensive and some had long lead times as well. I tossed out the idea that I could make our table and my wife agreed but gave me a deadline. I had built a few smaller pieces before but nothing like this. I based my plans off the farmhouse table for the top and used store bought legs. The top needed to be sturdy since it is not attached to the base, I did add blocking on the back so the top doesn’t move around and it is heavy enough that it doesn’t flip up if you lean on it. I moved the typical supports down to the bottom of the side rails and added a ¾” piece of MDF that I had for the gaming top. We used spray adhesive to attach some batting and used blue suede for the gaming surface since we are fans of Doctor Who. I added handles to the top on the inside to help when it is moved off the table for gaming. I built the bench too and made it so we could slide it under the table to save on space when we did not need it. The other chairs are hand me downs and Salvation Army finds that we spray painted. The only addition that I have to make is to build some sort of cup holders.

Estimated Cost
$150 - 200 with all the chairs and fabric.
Estimated Time Investment
Week Long Project (20 Hours or More)
Recommended Skill Level
Beginner

Comments

Breakfast Nook Table

Submitted by vlilly on Sun, 04/27/2014 - 13:37

This table was my very first project and I am proud of myself! After getting married in January and closing on our house in February, I was overwhelmed with all the empty space! (Being 19 and buying a brand new house.. everything was foreign to me! We had NO furniture!) We needed a decent place to eat instead of using the borrowed barstools and my dad has all the tools I could ever need, so I figured I could try out building our own kitchen table! I think it went well! Since then I have made a media cabinet, a dining table and bench, storage cubbys for above the fridge, a mail holder, a towel holder and a wooden tray for our ottoman ALL from Anas plans! I'm just now getting around to posting my brags :)

Estimated Time Investment
Weekend Project (10-20 Hours)
Finish Used
Stained with Rustoleum Dark Walnut and given a couple coats of Rustoleum poly in Matte!
Recommended Skill Level
Intermediate

Plywood Student Desk

Submitted by DangerDad on Tue, 02/10/2015 - 06:22

Simple desk made from maple veneer paint grade plywood.  It's very sturdy and looks great.  The last photo shows a matching dresser that I made as well.  So far I've made two of these identical desks and another with 3 large drawers underneath to one side.  You don't have to have alot of fancy tools and expensive wood to make great looking, sturdy, and functional furniture.  As always, sketchup plans available!

Estimated Cost
About $75
Estimated Time Investment
Weekend Project (10-20 Hours)
Finish Used
3 coast poly (satin finish)
Recommended Skill Level
Beginner

Comments

MATTRUSSO

Fri, 02/20/2015 - 21:31

why can't i get more info on this desk. A cut list and quick diagram.

Chicken coop and run

Submitted by Anonymous (not verified) on Tue, 10/05/2021 - 11:01

I followed the Shed Coop Plans to make this chicken coop and designed my own run. Because I wanted to view the chickens coming in and out of the coop, I moved the chicken door to the front and built a little covered area to shelter the coop door so I did not have to have the entire run extend over the front. I also made the access to the layer boxes be accessible from the front rather than the top so that my kids could more easily access the egg boxes. I thought these were great plans to follow and easy to adapt to fit what I wanted in a coop. I also ended up adding a lean-to storage on the back with an inside access so I could easily refill their feed.

Built from Plan(s)

Comments

Seasonal And Holiday

LARGE FARMHOUSE TABLE

Submitted by mdbennes on Mon, 11/23/2015 - 09:25

I used Ana's plans for this project, but had to deviate since I built it for a friend who needed a table for 14!!  This thing is huge, 12 feet long, and about 44 inches wide.  I made it out of pine, 2x8s for the top but stuck to the plans for the frame.  It weighs about 200lbs or more, and had to move it with 4 guys...used an enclosed trailer to move it from my house to theirs. They love it so that's all that counts!  Oh ya, in the picture, you will see Ana's rustic X console table too! 

Estimated Cost
$150
Estimated Time Investment
Weekend Project (10-20 Hours)
Finish Used
Minwax English Chestnut stain, then a GLOSS polyurethane
Recommended Skill Level
Beginner

Panel Bed for Ray

I made this bed over a weekend while I “room crashed” my oldest’s bedroom. 
I’m so happy with the result. I experimented with stains mixing two, well layering colors. 
That was a lot of fun! 
I hope to write a blog post about it one day. I will add it to my ever-growing To Do List. 
Let me know if you have questions. I love talking about building and all things DIY! 

Estimated Cost
100
Estimated Time Investment
Weekend Project (10-20 Hours)
Finish Used
Layered Simply White and Early American from Minwax.
I applied the Simply White (didn’t remove excess) and then I added the Early American on top. Let it all sit a bit and wiped off the stain.
This left a beautiful color.
Recommended Skill Level
Beginner

Comments

Rustic X End Table

Submitted by brew003 on Mon, 09/05/2016 - 06:40

This was one of the first projects I did, practicing to build a custom Oak bar table...

Built from Plan(s)
Finish Used
Minwax Jacobean stain
Recommended Skill Level
Beginner