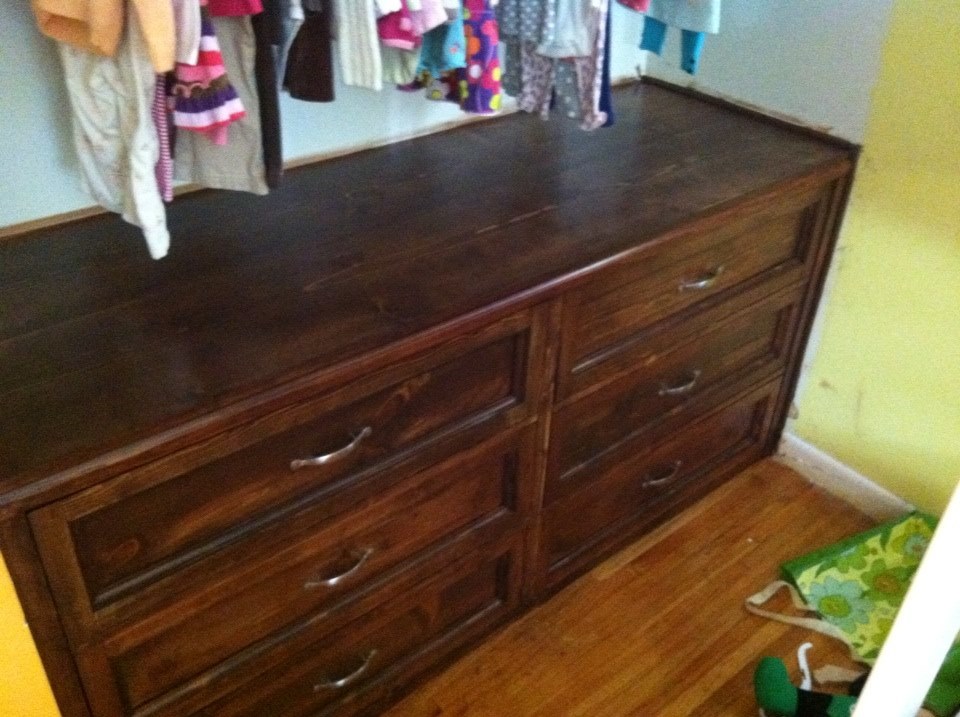
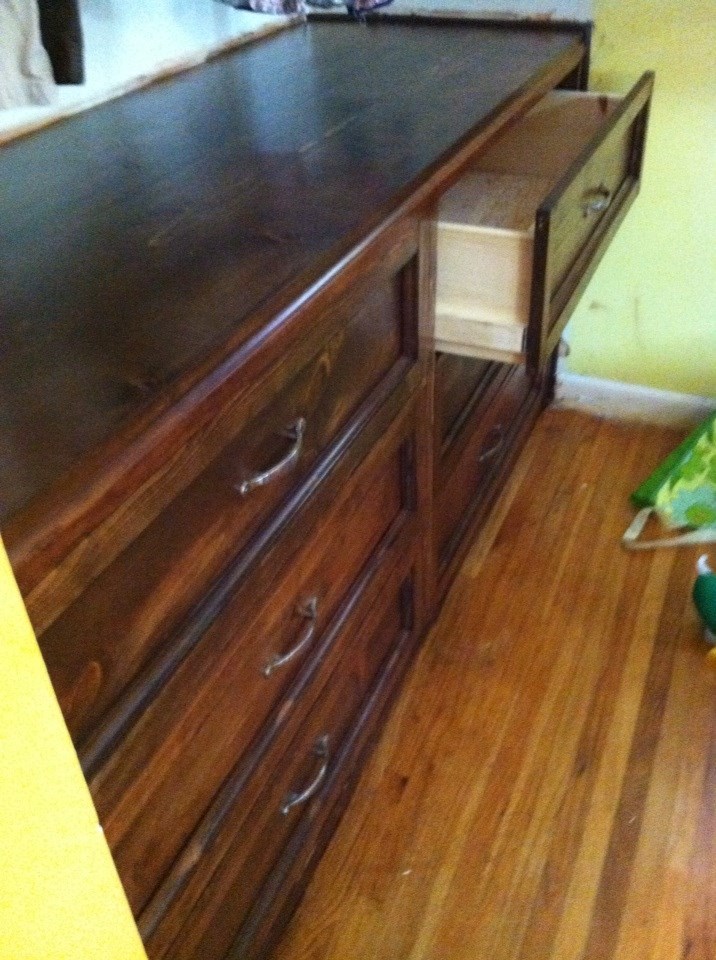
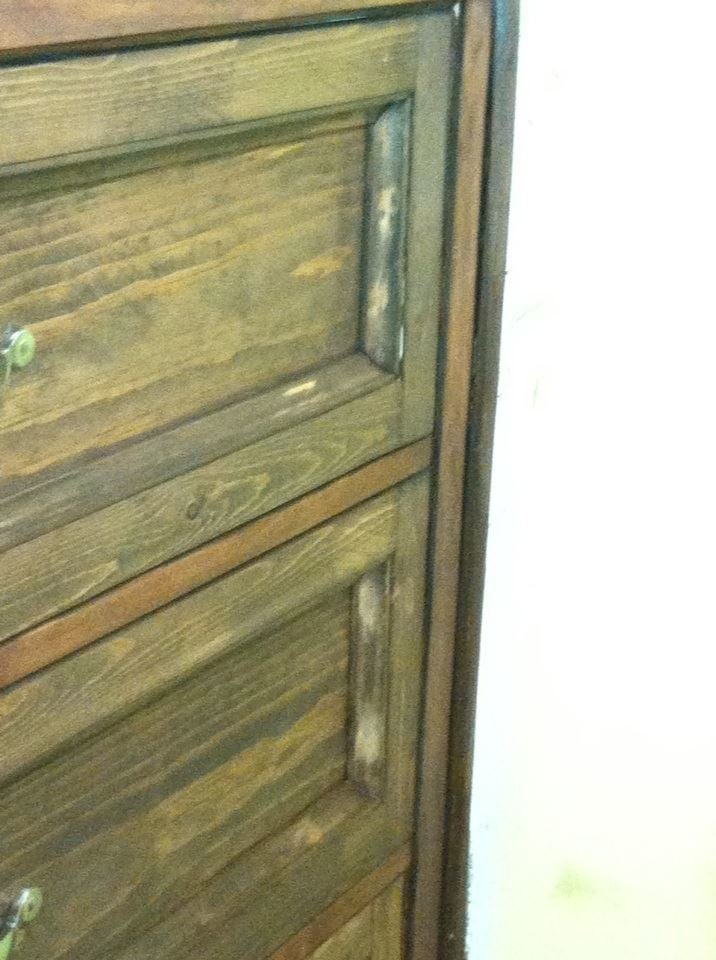
Community Brag Posts

Designer Shoe Shelves on a Budget

When we first bought our house, one of the things that appealed to me was the walk in closet off the upstairs foyer. A walk in closet in a house from the 20′s? That’s unheard of! I know I could have designed this in a way that fit more, but I switch out my shoes seasonally, and I personally wanted slanted shelves. Come on, they’re so much prettier! Shopping List 1 – sheet of 1/2″ plywood (4 x 8′ sheet) 2- Primed 1×2′s @ 8′ 1 – 1/2″ Square Wood Dowel (like this) 2- Chair Rail @ 8′ (like this) Kilz Paint Primer Behr Semi Gloss White Paint Indoor Caulk Wood Putty 2″ Screws 2″ Nails Cuts Plywood- 5 pieces at 23″ wide and 12″ deep. Cut either of the 23″ end at a 45 degree angle. Plywood- 1 piece at 23″ wide and 12″ deep 1×2′s- 10 pieces at 12″ with ends cut at 45 degree angle. Then measure 1″ down from the top of the front piece, and cut it straight across. 1×2′s- 2 pieces at 12″ 1×2′s- 1 piece at 21.5″ Wooden Square Dowel- 3pcs at 23″ Chair Rail- 6 pieces at 23″ How To Build 1. I first figured out how far apart I wanted my shelves to be. I don’t have particularly tall shoes, so I had the first shelf 17″ off the ground in the front, and then they were set approximately 12″ apart after that. I located the studs, and screwed in the 1×2′s on the walls directly into the studs. 2. I then added the wooden dowels to the tops of 3 of the shelves. I didn’t even nail these down, just used wood glue and caulk. I set the wooden dowel 2.5″ from the back of the shelf. 3. After that I dry fit the actual shelf on top of the 1×2′s. This was probably the hardest part because of course this house doesn’t have even walls. Why would anyone ever need even walls? What a silly concept. I ended up having to sand a lot of the edges to make them fit. Caulking will help fill in those gaps! I then nailed in the shelves to the 1×2′s from above. 4. I slowly worked my way up the wall. When I got to the top shelf, I knew that I wanted a flat shelf to store boxes of shoes. I also added an extra 1×2″ to the back wall just in case I really decided to stack those shoes high. I followed the same process as I did for other 1×2′s, and screwed this into the stud. Closet 1x2 All Shelves 5. Then I used the chair rail and aligned it at the bottom of the 1×2″ and nailed it to the front of the shelf. It sticks up higher than the front of the shelf, which is great for catching shoes that tend to slip down. 6. After this I, I ended up using wood putty and caulk to fill any gaps. They work miracles on wood. 7. Finally I just painted everything and viola! Budget 1 – sheet of 1/2″ plywood (4 x 8′ sheet) – $28.97 2- Primed 1×2′s @ 8′- $5.98 1 – 1/2″ Square Wood Dowel - $1.75 Chair Rail - $16.00 Kilz Paint Primer- already owned Behr Semi Gloss White Paint- already owned Indoor Caulk- already owned Wood Putty- already owned Screws- already owned Nails- already owned TOTAL: $52.70

Estimated Cost
$50.00
Estimated Time Investment
Weekend Project (10-20 Hours)
Finish Used
White Semi Gloss Behr Paint
Recommended Skill Level
Beginner

Cottage bedroom bookcase

Submitted by yhaas on Thu, 10/29/2015 - 20:42

I used 1 x 10s to make the bookcase a little shallower, and left the back open. Thanks for the great plan.

Built from Plan(s)
Estimated Cost
$100
Estimated Time Investment
Weekend Project (10-20 Hours)
Finish Used
Varathane diamond finish water-based polyurethane, satin.
Recommended Skill Level
Beginner

Raised Planter Stand

Submitted by Anonymous (not verified) on Sun, 04/30/2023 - 13:02

Created the stand for the raised planter using 2X2 assembled using dowels. Painted the stand mixing black with a bit of white to simulate metal. The actually plastic window box fits within a wood open box with mitered corners fir clean log. Bottom of the stand provides a shelf using (9) 2X2s with a dado placed on either end to fit on the runners of the stand.

Built from Plan(s)

Comments

Canopy Storage Bed

Submitted by arkep on Fri, 12/06/2013 - 12:29

I combined the full-sized Hannah canopy bed plans with the Farmhouse Storage Bed with hinged footboard by birdandsoap here: http://ana-white.com/2011/07/farmhouse-storage-bed-hinged-footboard . Decided not to taper the ends of the 2x3s. There's so much storage underneath!

Estimated Time Investment
Week Long Project (20 Hours or More)
Finish Used
2 coats primer, 2 coats Olympic Premium in Satin Ultra White.
Recommended Skill Level
Intermediate

King Bed Frame for adjustable base

Submitted by Anonymous (not verified) on Tue, 10/08/2019 - 05:50

I could not find a frame which would accommodate my new adjustable king base. Modified Anna's plans by increasing the height of the headboard and footboard. Finished with chalk paint and antique finish for a rustic look. Side rails attached with mortises to allow for moving bed in 4 pieces if needed. Love my new bed

Estimated Cost
$300
Estimated Time Investment
Weekend Project (10-20 Hours)
Finish Used
Chalk paint (purchased from Habitat for Humanity re-store) using recycled paint. Finished with three coats of Annie Sloan wax
Recommended Skill Level
Intermediate

Comments

khowe791

Sat, 11/30/2019 - 03:31

Hi! We are making this headboard this weekend. We want to increase the headboard height and footboard as well. Do you happen to know the cut measurements or how you adjusted the height of the 1x6 (or 1x8 as others used) to make it work? Yours looks perfect! Thank you in advance for any feedback! 

DIY Famhouse Table

Submitted by Anonymous (not verified) on Wed, 07/05/2023 - 08:24

I used the farmhouse table plans, with a few modifications. I made two benches to go along with it. This was my first big wood project and I'm pretty proud of it. My daughter bought her first home and needed a table custom sized to her space so this was perfect. I love all of Ana's plans, so easy to follow.

Square Turned Leg Farmhouse Kitchen Table

I had to do a 3ftx3ft square table since our eating area in the apartment isn't big enough for a dining table, but I really like how it turned out :) I also added breadboard ends because I can't stand how the cut ends look. I got the legs from osborne wood

Built from Plan(s)
Estimated Cost
$160
Estimated Time Investment
Weekend Project (10-20 Hours)
Finish Used
Minwax English Chestnut, Antique Beige Paint, and Helmsman Clearcoat
Recommended Skill Level
Beginner

Comments

First bird house

Submitted by Snoot357 on Fri, 07/15/2016 - 17:14

First bird house..! 

Built from Plan(s)
Estimated Cost
$3.00 for six foot board.
Estimated Time Investment
An Hour or Two (0-2 Hours)
Finish Used
Boiled linseed oil, on the outside only.
Recommended Skill Level
Beginner

Storage Daybed with Trundle Drawers + Storage Headboard and Hutch

I combined Ana's plans for Daybed with Storage Trundle Drawers and a Storage Headboard with a Small Hutch.

This is my 3rd daybed with storage drawers. It's such an easy build and gives so much extra space. The entire project took about 40 hours. I used Minwax stain in Classic Grey and three coats of polyurethane. For the drawers, I used 1.5" casters. I drilled a hole through the back of the headboard to feed cords through. Then I put the whole thing in the back of my truck and drove 500 miles for the final assembly. :)  In the provided photos, some of the pieces are flush because I hadn't permanently attached them. 

Estimated Cost
$450
Estimated Time Investment
Week Long Project (20 Hours or More)
Finish Used
Minwax Classic Grey
Recommended Skill Level
Intermediate

Fancy X Farmhouse Table

Submitted by shannonls on Thu, 09/13/2012 - 14:11

First build ever and we're thrilled with how it turned out. Definitely took us longer than the 4 hours other users have cited, but not bad for total newbies! Thanks for the plans, we love it.

Built from Plan(s)
Estimated Time Investment
Weekend Project (10-20 Hours)
Finish Used
Behr Semi-Transparent Weatherproofing Wood Stain - Coffee
Recommended Skill Level
Beginner

Comments

Garden Tool Storage

Submitted by meisterx on Sun, 08/30/2020 - 12:20

Super easy and useful project. I made mine 8 ft. long because my studs are on 24 in. centers and I had a lot of tools to hang. It was fun building it and even more fun getting all those tools and things off the floor.

Built from Plan(s)
Estimated Cost
$13.00
Estimated Time Investment
An Hour or Two (0-2 Hours)
Finish Used
None
Recommended Skill Level
Starter Project

Comments

Laundry Basket Organizer

Submitted by mseely02 on Thu, 01/10/2013 - 09:02

We have a laundry problem in our house. It piles up in un-organized piles and takes days to sort through and actually get in the washer. Honestly, we could do laundry every single day of the week and still fall behind. I guess that comes with the territory when you have 3 small boys in the house.

This organinzer is going to be great. We currently use it for whites, colors and "grown-up clothes". This keeps us from accidentally washing some of Mommy's more delicate items in the general colors wash which saves me money when we don't ruin her clothes.

The plans call for the 1 x 16's, but I had extra 2 x 4's laying around so I just built a frame using my kreg jig. The most expensive part was the beadboard for the sides and I used some S4S 1 x 4's for the top. Overall the project tooks me months, but that was more a product of my "shop" time coming after 8 pm and general apathy.

I definitely have the bug and have already starting a new project!

Built from Plan(s)
Estimated Time Investment
Afternoon Project (3-6 Hours)
Finish Used
Semi Gloss Interior White, Minwax Dark Walnut Stain
Recommended Skill Level
Beginner

Comments

DIY Queen Headboard

This is one of the coolest things I've ever built! My husband was so proud of me. :) I recently completed built-in bookcases in our 3rd bedroom/office and those were neat and much more complicated, but I think he likes this better because he sleeps next to it every night. This only took about 2 hours to build, but the staining made for a weekend project by the time it was completed and dry. We've gotten a TON of compliments on this and even had friends ask for me to make them one! Thanks, Ana!

Estimated Cost
$150
Estimated Time Investment
Weekend Project (10-20 Hours)
Finish Used
Medium Walnut Stain - Minwax, even coats, 2 applications, ample dry time between each (6-8 hours).
Recommended Skill Level
Beginner

Balin Console With Some Changes

We made this table from the original Balin Console table plans, but faced out the drawer fronts with some mitered trim and added some drawer stops inside to keep the drawers from falling out when pulled all the way.

The drawers were made with a cabinet grade plywood along with the sides and bottom of the table. We used 1x8s on the console top to get that nice wood look, where all corners and ends would be showing, but for the sides and bottom of the table, since the edges were all trimed out, the plywood worked out nicely. 

The legs seemed plenty sturdy without the extra trim, so we skipped that to get a more simple look.

Drawer handles were found at our local Home Depot.

For the finish, we stained (with Minwax ebony) the edges where we wanted distressing, then wiped on vaseline along edges and painted over in Behr Swiss Coffee (white) in matte. After drying we took sandpaper to the edges to show the dark stain through. Because we used matte paint, after everything was finished, we waxed with a clear wax and buffed for a nice shine and a smooth texture.


Pin For Later! 

Balin Console With Some Changes

Built from Plan(s)
Estimated Cost
$125 for plywood, wood pieces and knobs. We already had paint and stain.
Estimated Time Investment
Day Project (6-9 Hours)
Finish Used
Minwax ebony stain, vaseline where you want distressing, then paint Behr (matte) Swiss Coffee on top. Sand all surfaces to distress and smooth, then wax with clear wax to add shine.
Recommended Skill Level
Intermediate

Walk mounted can organizer

Submitted by Anonymous (not verified) on Tue, 10/05/2021 - 20:13

Love this! My husband used this project to help boys learn to use power tools and work with wood. They made one and he did the others. THANK YOU!

Built from Plan(s)

Comments

Bookshelf Hidden Doors Over Closet

Submitted by Anonymous (not verified) on Mon, 10/23/2017 - 10:13

Hidden door bookshelves hide a furnace closet.  Built by Kraig Faulkner

Built from Plan(s)
Recommended Skill Level
Advanced

Comments

charkue

Thu, 09/17/2020 - 08:01

I'm currently working on a basement renovation project. I'm probably going to incorporate a feature like this for my mechanicals, too.

One important safety note for anyone who wants to do this: It's recommended that your furnace be a minimum of 30" away from any combustible materials. That includes walls and partitions. The image of this project displayed is right next to the furnace, which is not a good idea.

Sandbox fun

Submitted by rival on Mon, 05/25/2015 - 12:33

3 boys playing in the sand.

I used 2x8's for box base. I ran into spacing trouble, 1x4's must have been really new, they were about 1/16" over 3 1/2". I had to reduce spacing on each gap a hair to be able to close.

Built from Plan(s)
Estimated Time Investment
Afternoon Project (3-6 Hours)
Recommended Skill Level
Beginner

Hidden closet now a mantle

Needed somewhere to put Christmas stockings in my new house. And had to make it high enough so the new puppy couldn’t reach it. This was easy and perfect.

Built from Plan(s)

Comments

Fantastic Garden Beds

These garden beds are fantastic! They were so easy to build and look great in our backyard. We have always found ourselves with a garden covered in weeds or plants out of control. Our garden this year looks wonderful and we have hardly any weeds in the beds. Thanks for the great plans!

Estimated Cost
$15 each
Estimated Time Investment
An Hour or Two (0-2 Hours)
Finish Used
None
Recommended Skill Level
Starter Project

Comments

Seasonal And Holiday