Blanket Chest
Blanket chest made for my mom. Used a plan of Anna's and just doubled the size because she needed a taller box to store all her blankets and sheets.- Dawn Lonak
Built from Plan(s)
Blanket chest made for my mom. Used a plan of Anna's and just doubled the size because she needed a taller box to store all her blankets and sheets.- Dawn Lonak

My first project with more expensive wood
Top - Cherry wood with White Oak in the middle
Frame- Red Oak
Feet - Black walnut
Feet supports - Maple - Ray C


I know I once said I had enough seats in Tahiti 💁 ♀️🤨. But now it was just that I have a lot of old (and still good) wood in the garage 🙈. And it's just fun to build chairs 🤩
The instructions are once again from @anawhiteplans. And even if I'm not going to start a campfire in Tahiti, the Ultimate Firepit Chair fits perfectly 👌 I'm sure of that 💯 - das_tahiti_projekt
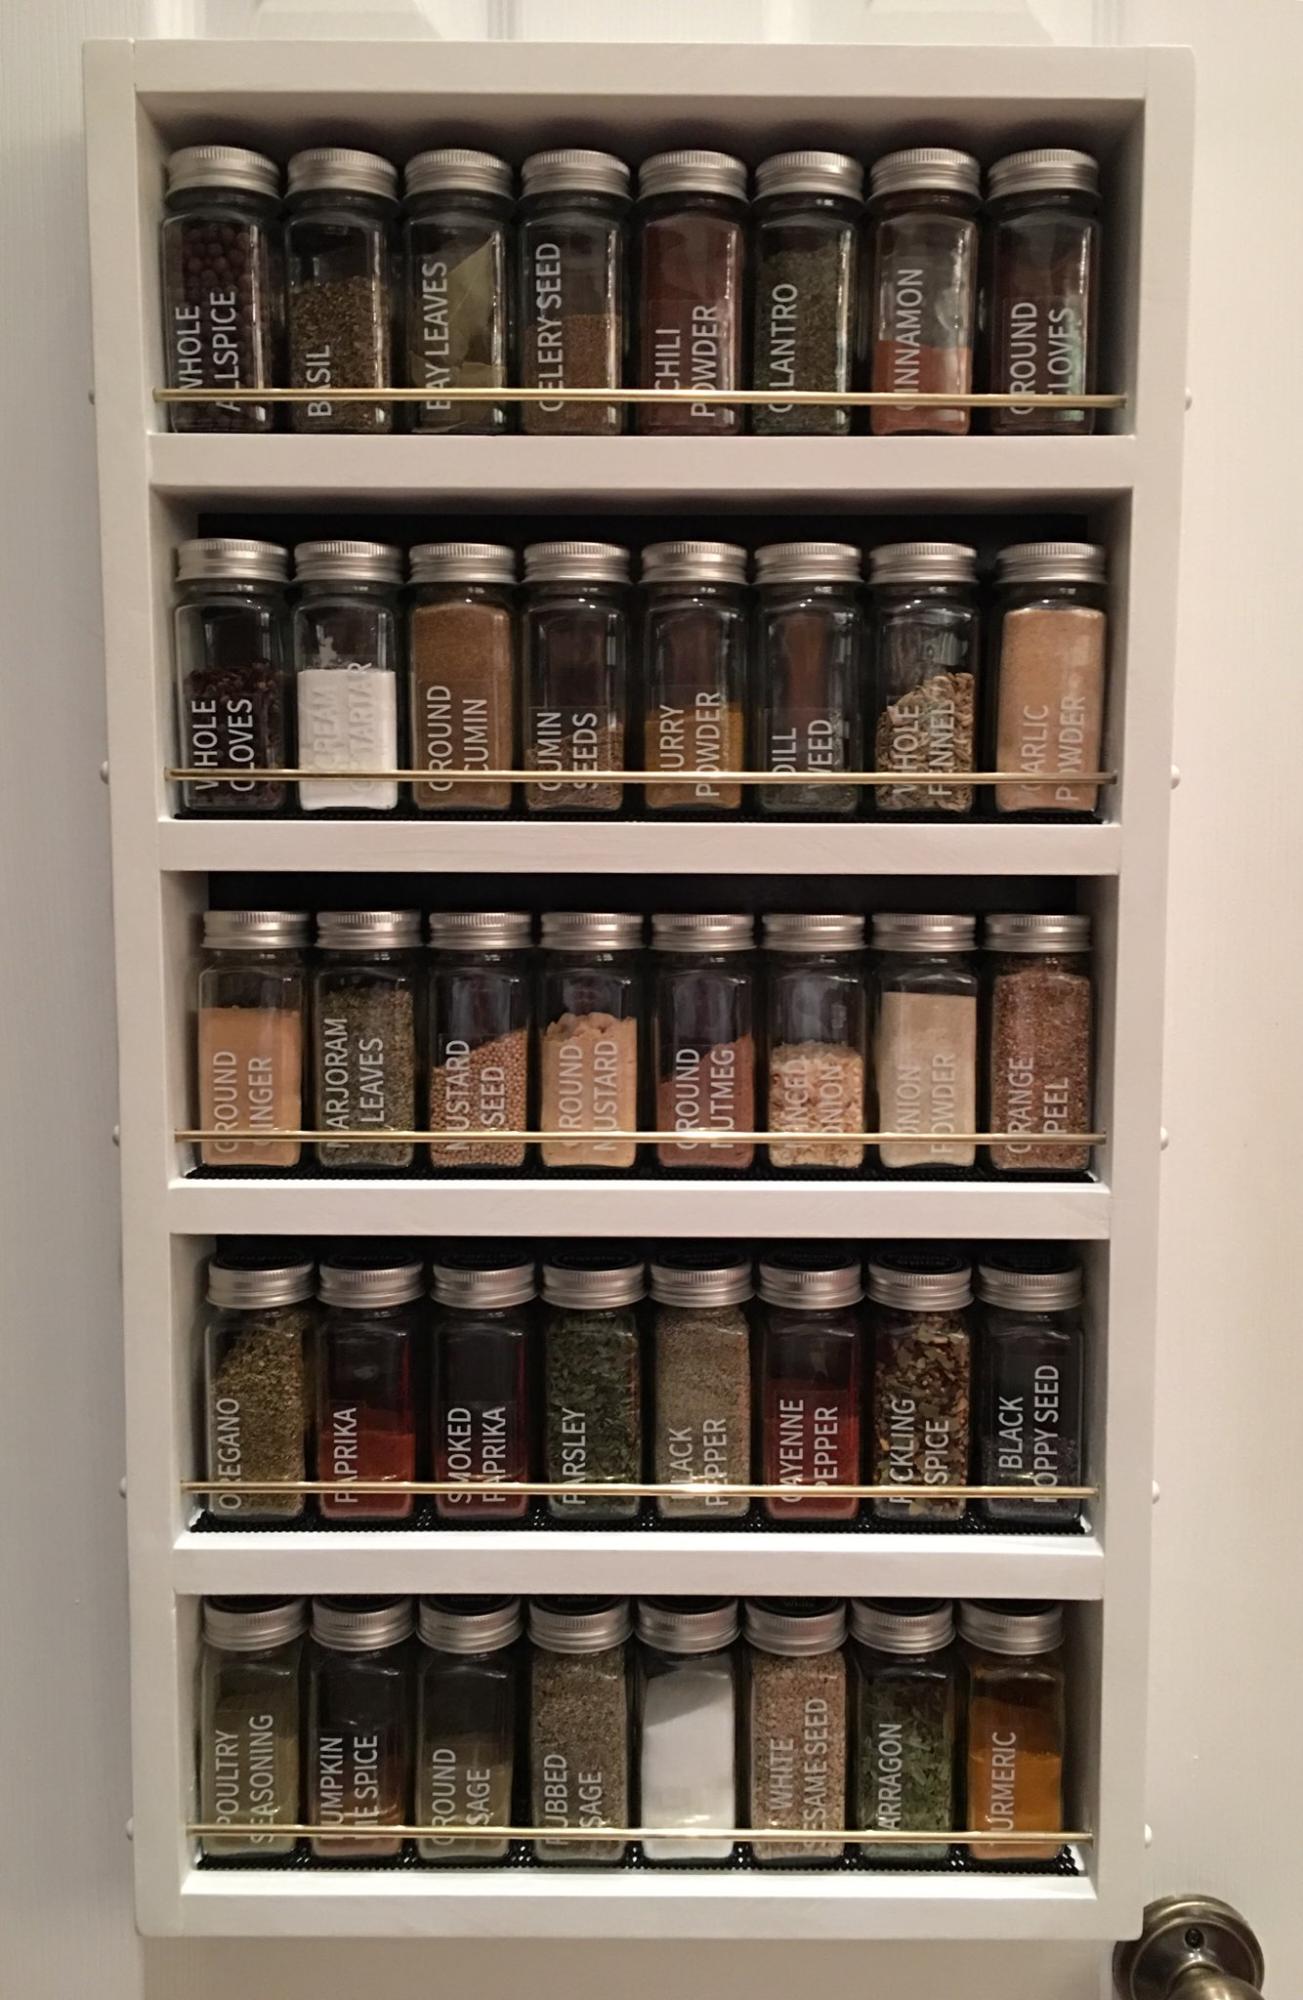
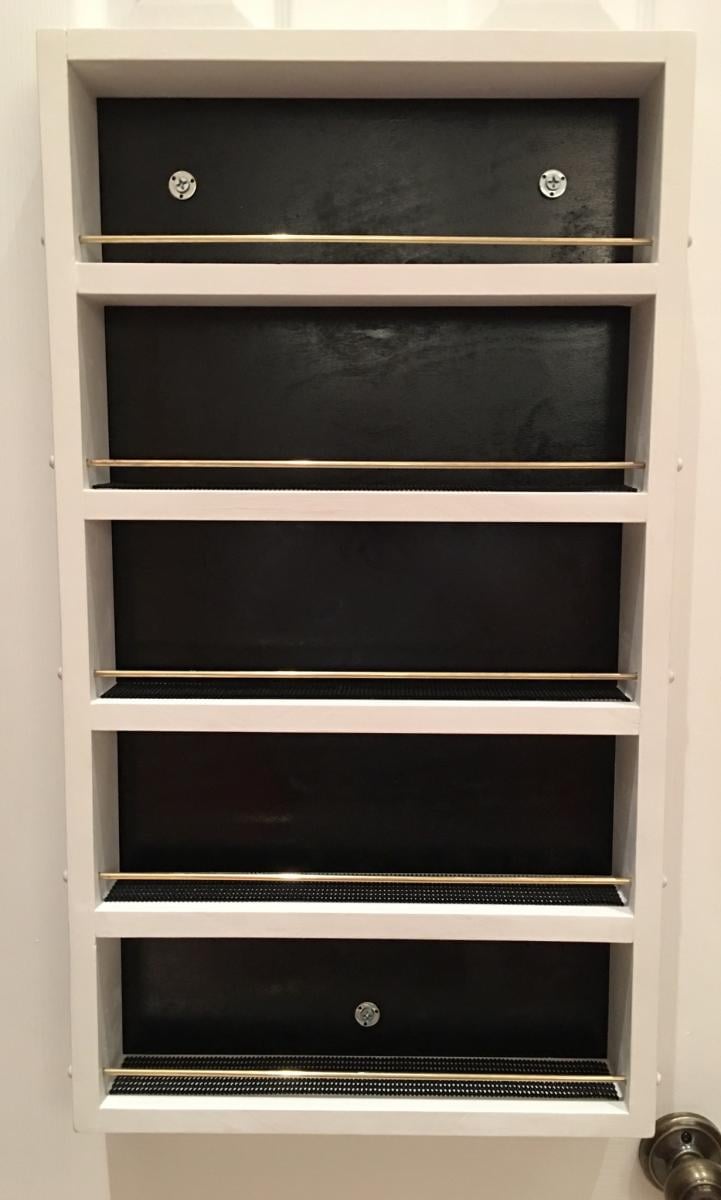
After special ordering glass spice jars for my cupboard I came across your plans for this spice rack and decided to attempt the build. Plans were very well written and easy to execute with a few customizations. I opted for brass rods to hold the jars in place and lined each shelf with shelf liner to ensure the jars don’t move when the pantry door swings. I am very pleased with the outcome and will be making a matching rack for my aluminum foil, plastic wrap, etc.
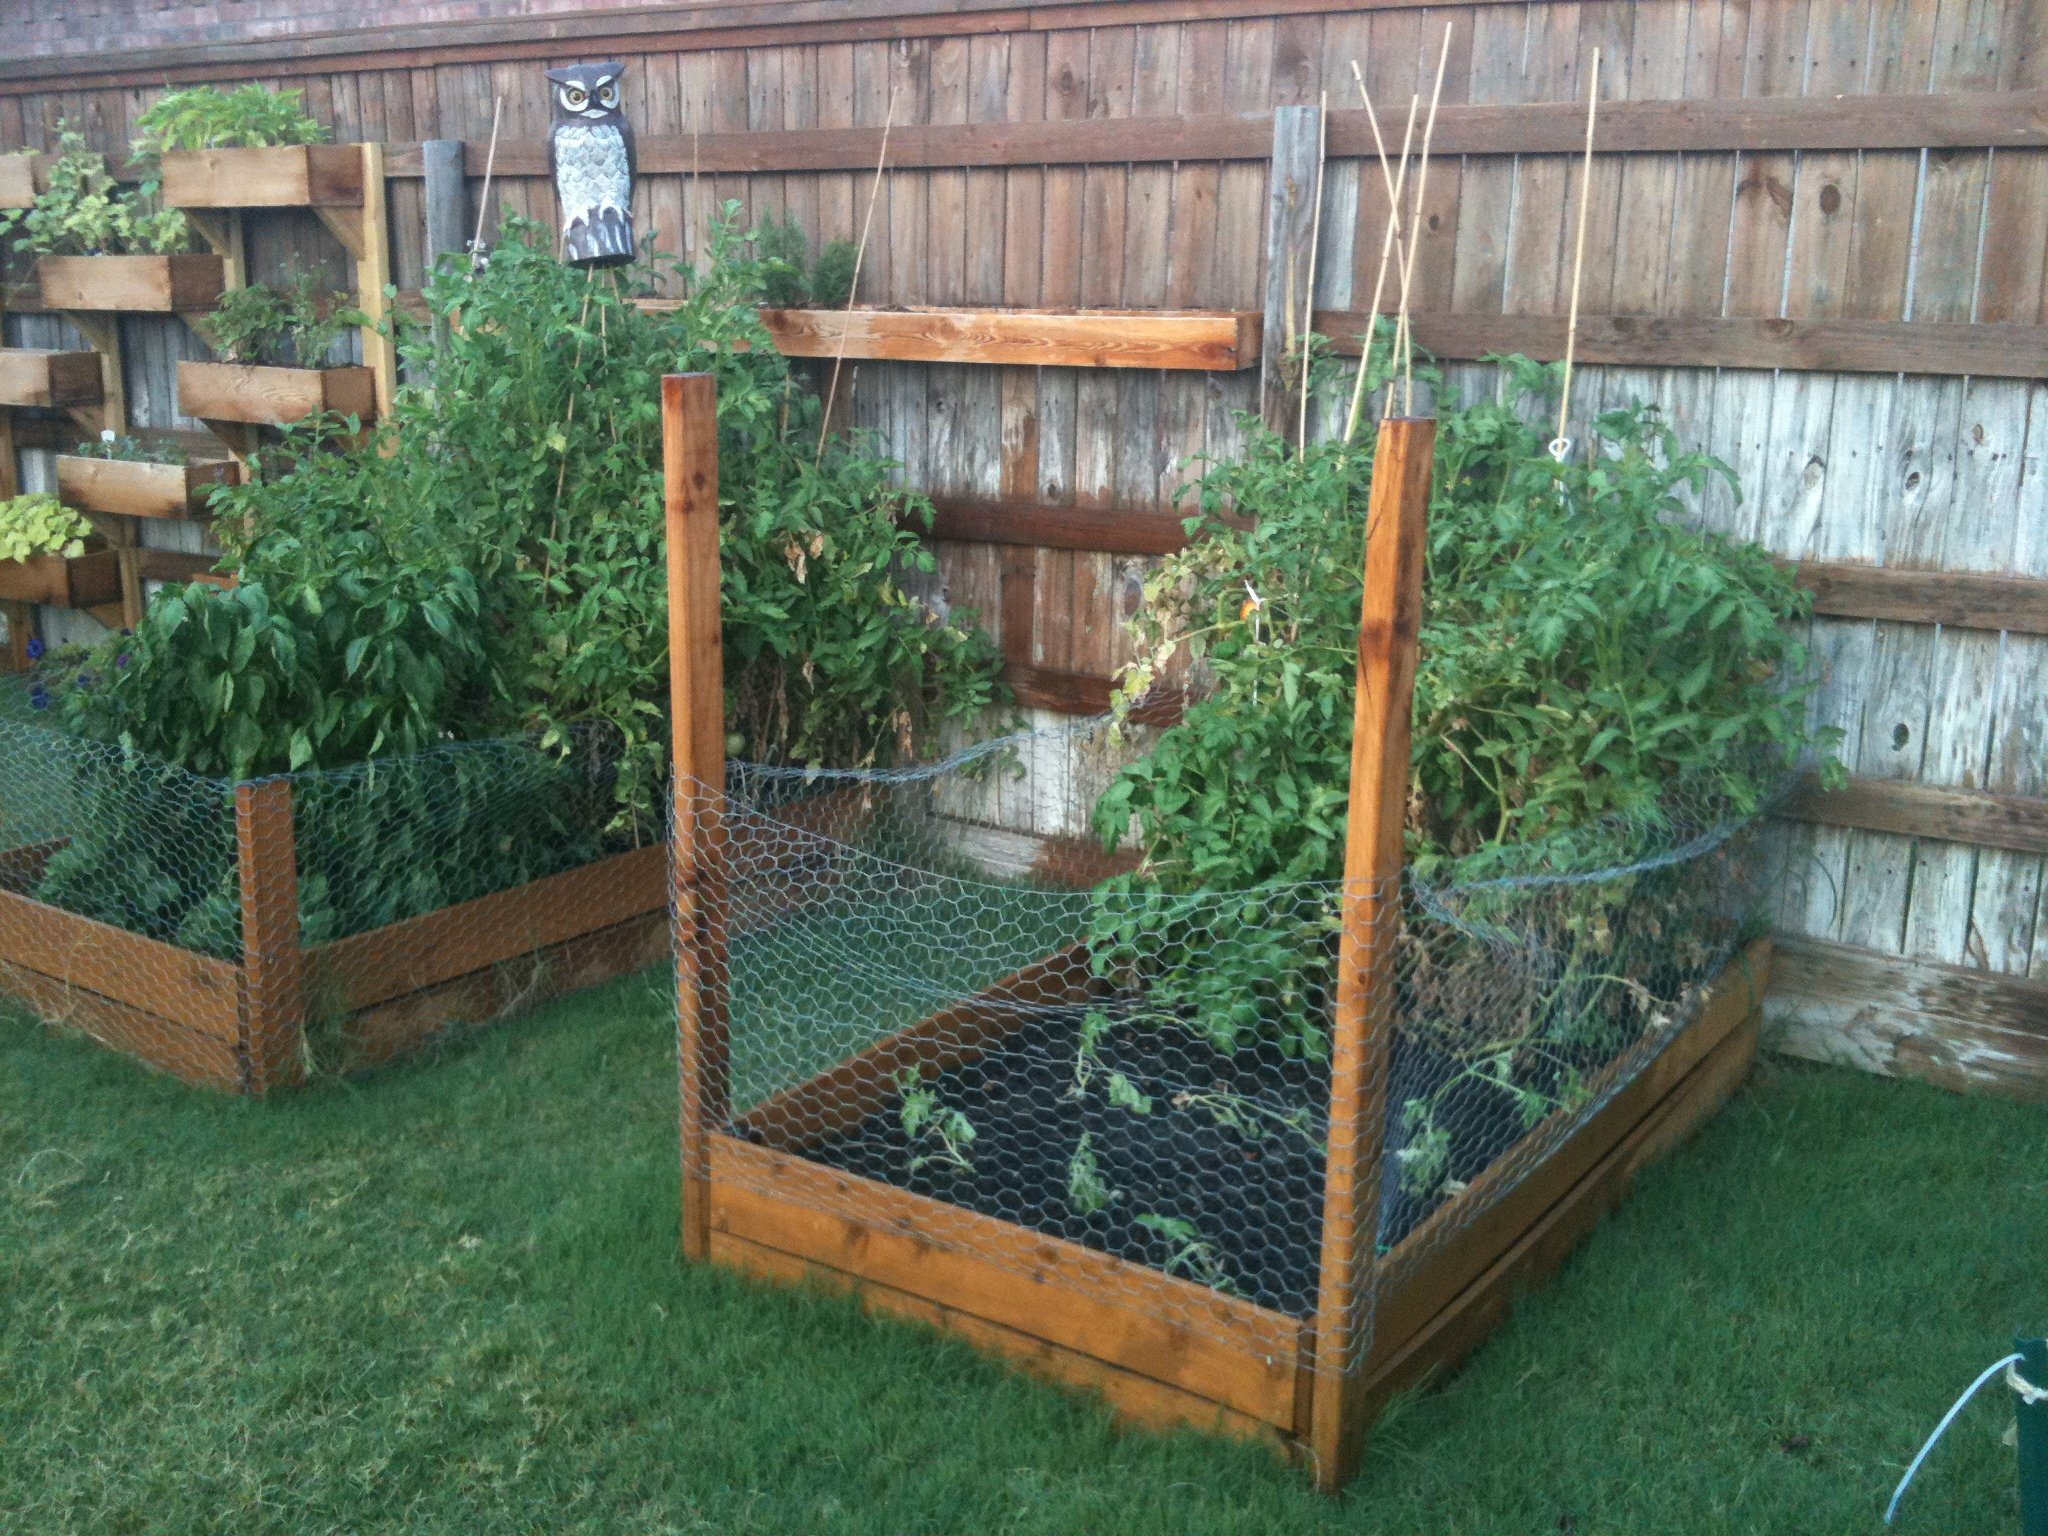
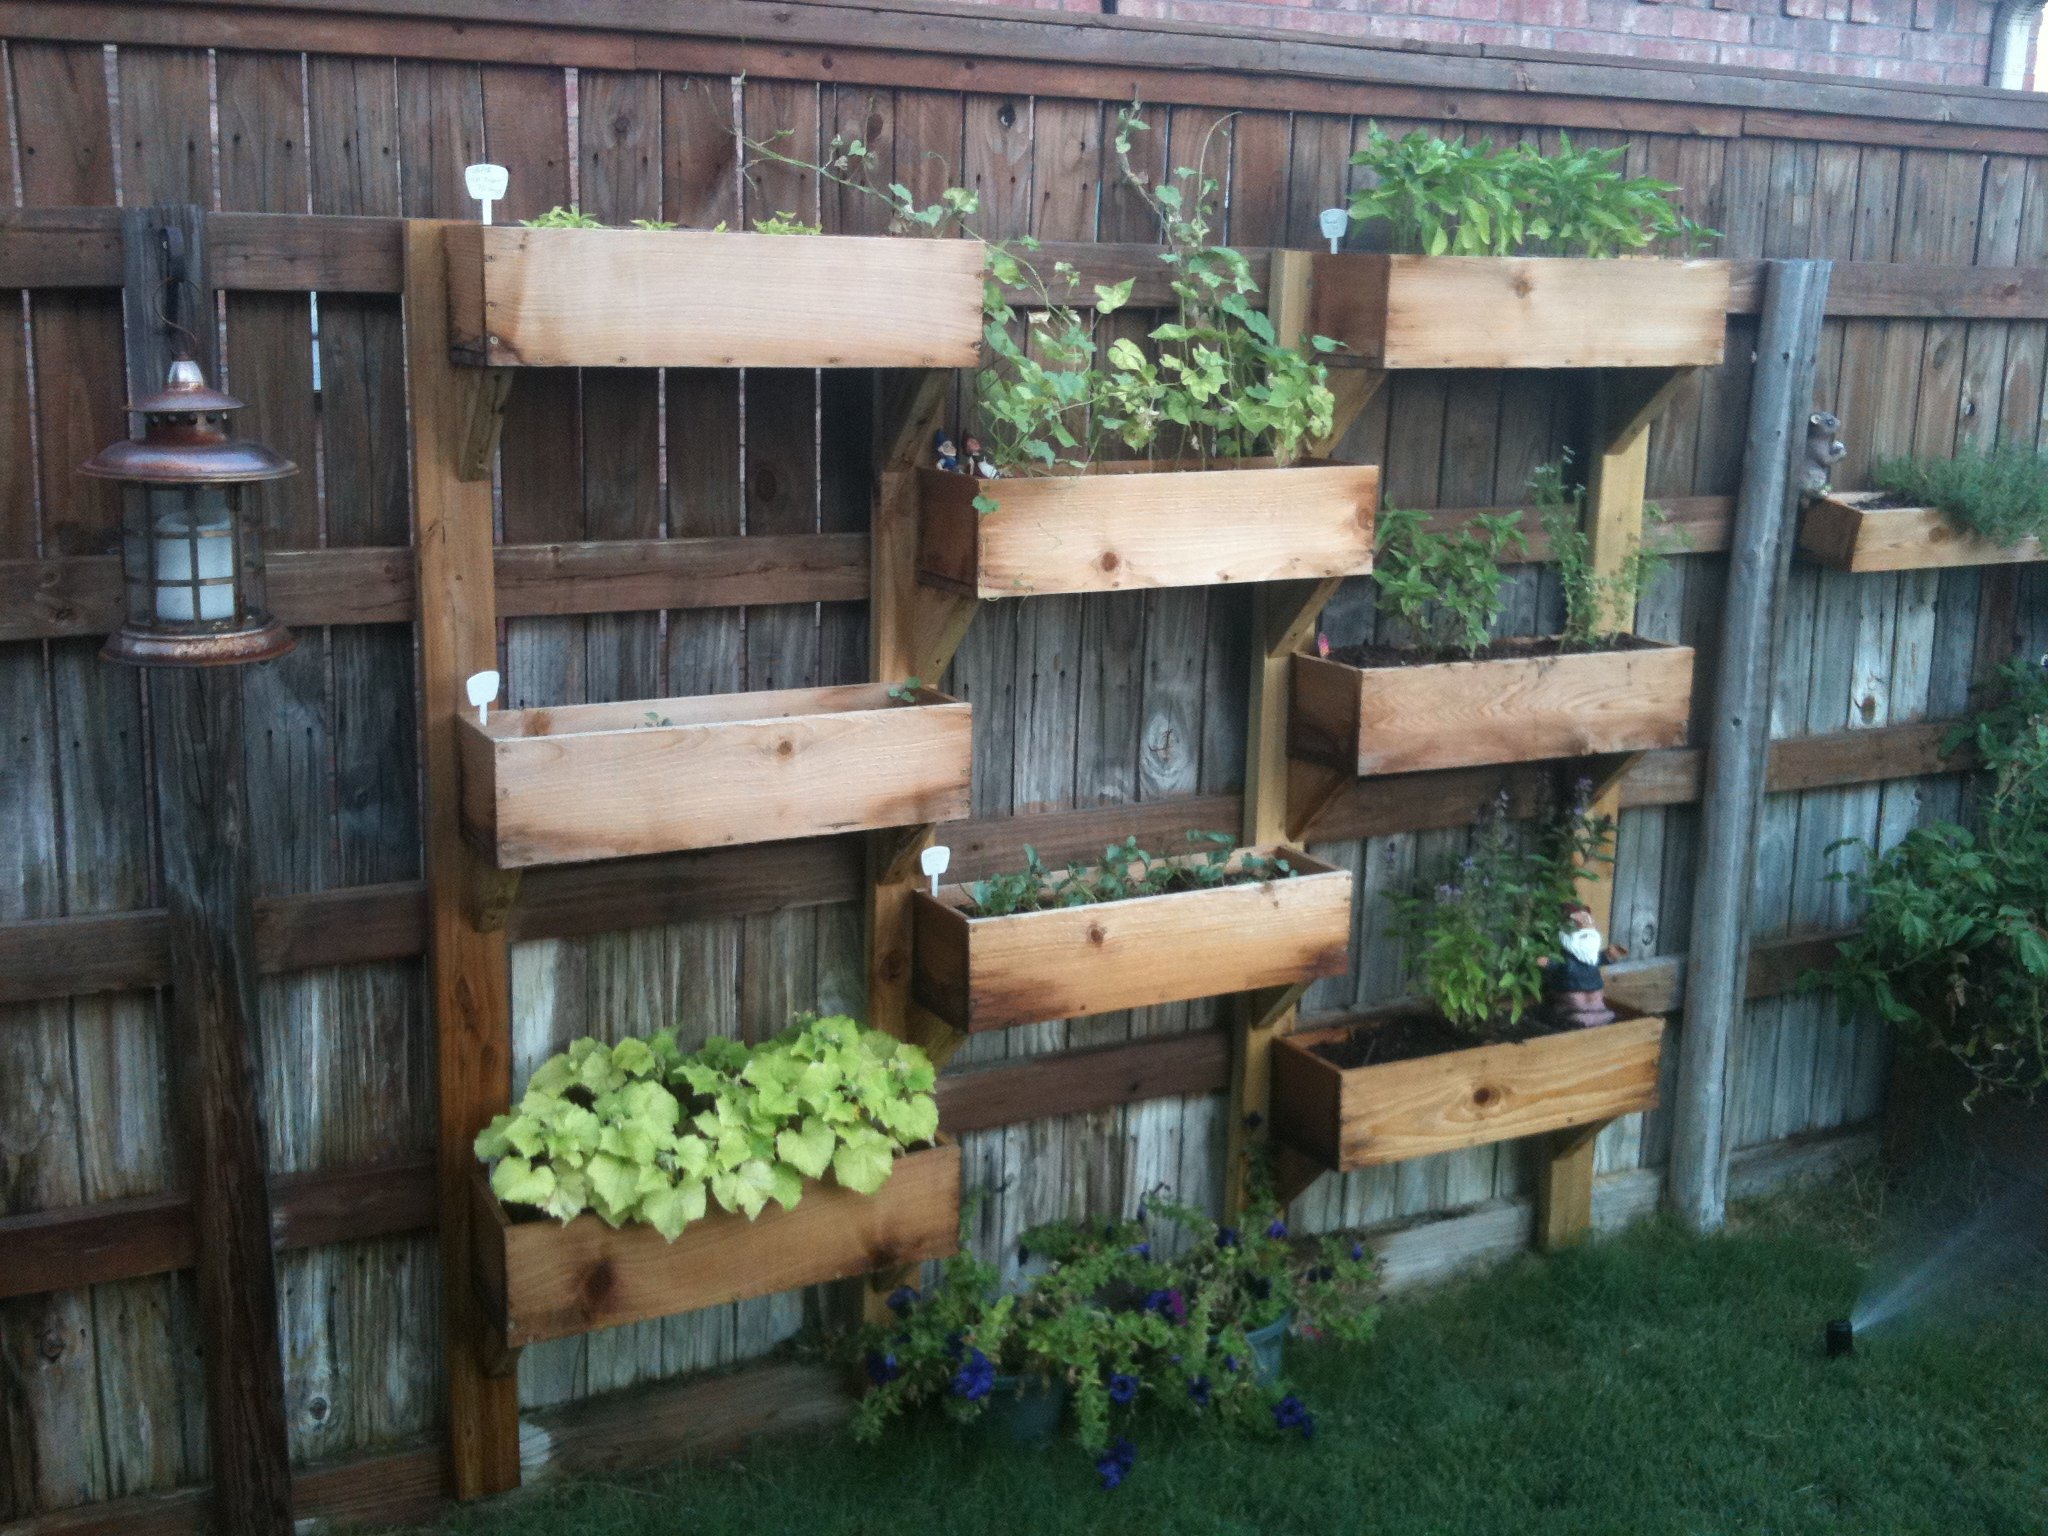
We built these before we saw these plans, but they are pretty much the same... We added the chicken wire to keep the rabbits (and our dog) out of the garden. We added the owl to keep the birds out. We've gotten a ton of tomatoes, onions, and bell peppers so far. Next year, we'll add a few more beds. We also added the verticle garden to take up less space, but its not deep enough. We'll make the next one deeper.

Sun, 07/10/2011 - 14:19
Love the vertical garden! What a wonderful idea! Did you line the boxes with plastic??
Thu, 11/17/2011 - 07:59
We ended up getting a ton of tomoatoes and green peppers from the garden boxes. We've actually built a couple more. We'll probably double again before next spring. We're looking at adding more veggies.
We now have ton of stuff planted for the fall...
Tue, 04/03/2012 - 06:19
i love the vertical boxes. I am just trying my hand at the world with a green thumb and could use as much advice as possible about how to make as well as to line the boxes or not to line them. All advice appreciated!
Fri, 11/23/2012 - 21:53
Hi, my name is berman. I found you pin from my pinterest and your box garden is so great. I am a newbie in this field and so interested to build garden in my house. If i can ask you some question, could you please to answer that?
cheers,
berman
Tue, 03/10/2015 - 21:19
Hello! Do you mind sharing the Vertical Box Instructions? I absolutely love this idea!
Sun, 05/31/2015 - 21:00
Came across this beautiful design while searching for my next diy garden idea. Wondering if there are blueprints available
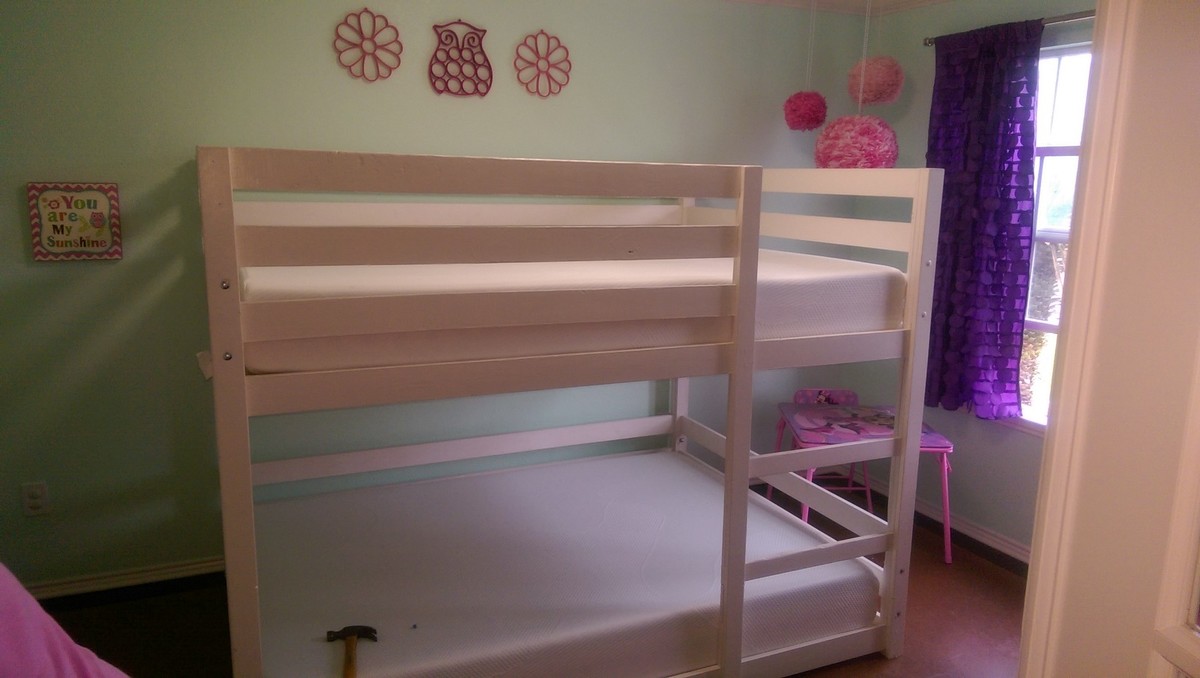
Full over Full bunk beds. Adjusted for Full from a twin measurement. only 1" off floor for more head room.extra rail bar coverage upstairs for my daughter who rolls out of bed regularly.
Wed, 12/30/2020 - 12:15
Would also love to know dimensions used for the full! Thanks for sharing your amazing talent!

Our family loves Doctor Who, and I had given my son 2 posters as gifts. Apparantly keeping them rolled up in the tube would not do, so I tackled a frame.
One of things that I did to make the frame more difficult to build was to use the table saw to cut the angles. I did use the angle guide on the wood pusher, but the pieces were too long to lean against the fence. So, I was aiming the sawblade at my mark. The angle was good, but it was difficult to get the 2 pieces exactly the same length. Next time I will cut the 2 pieces at the same time so they match. I think a miter saw would be the saw of choice here.
Also, I wanted to use glass. To inset the glass on the back I had to learn to use the router. That added a bit of time to the project. But me and my router are friends now, so the next one should go quicker. I cut a 1/4 groove on the inside edge on the back where I could add the glass. I used glazing points, sold by the glass at the depot, to hold the glass in the frame.

I used this plan, https://www.ana-white.com/woodworking-projects/chest-drawers-2-4s , but I made it a little taller and wider. - The Carpenter’s Hija


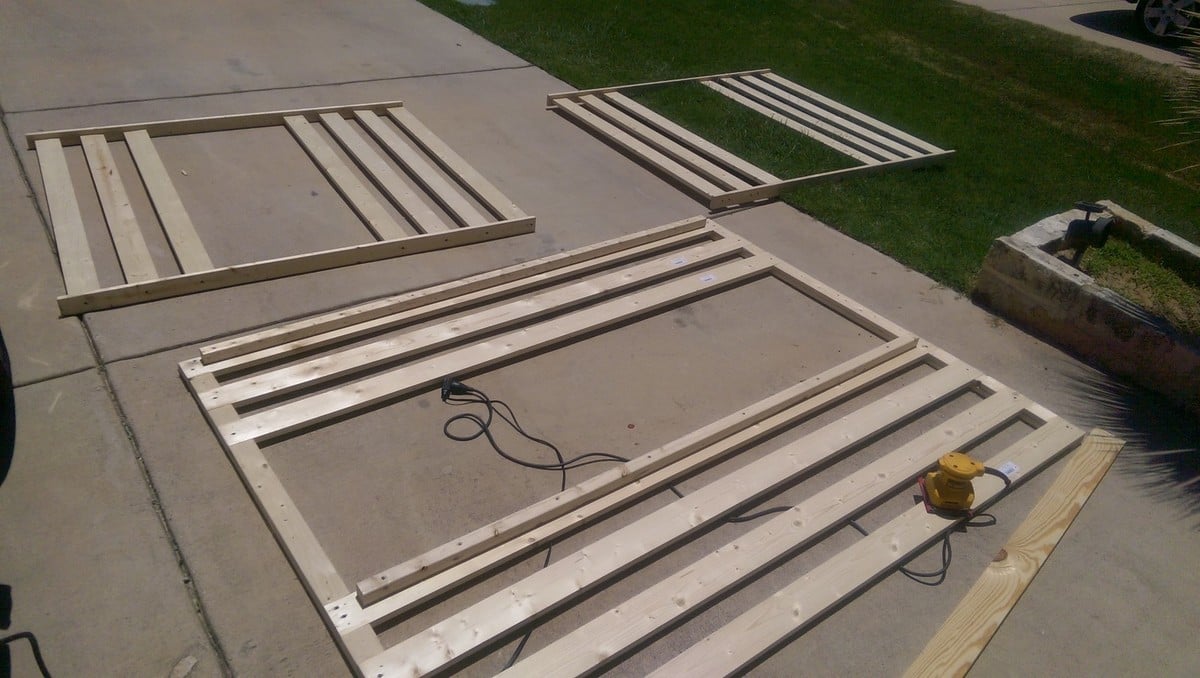
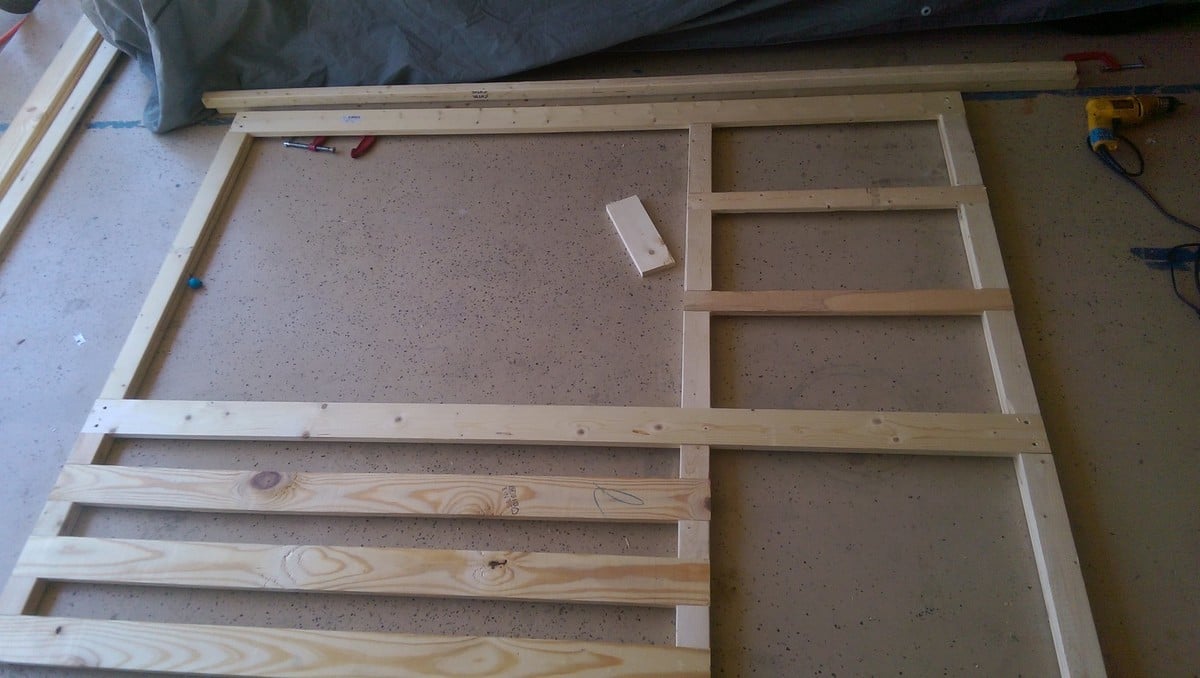
Built as panels adding a large base for holes. Replacement for fire damage wilderness toilets. Loaded into Kodiak aircraft and assembly by volunteers on site. Worked Great! Thanks Ana!! - Wingnut13 RAF theraf.org


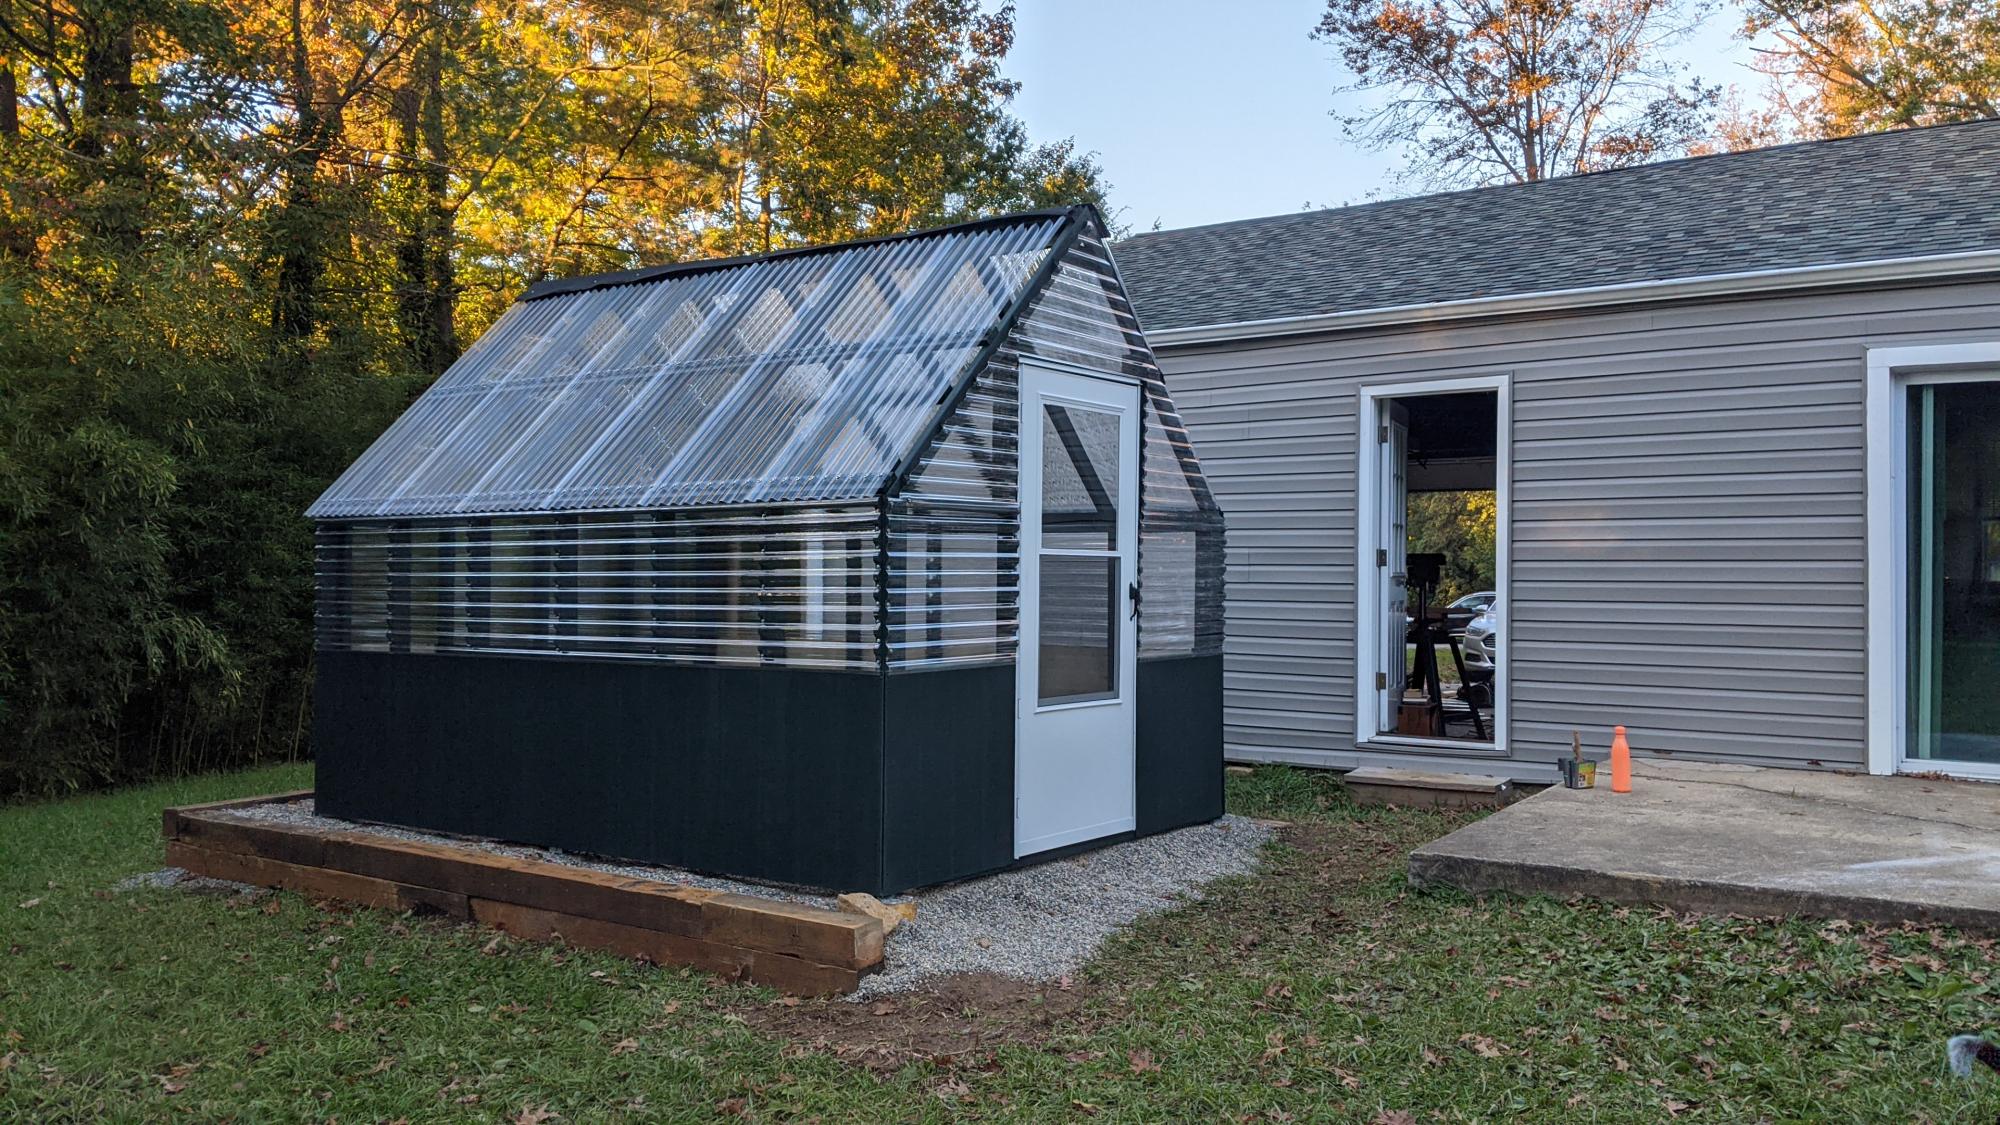
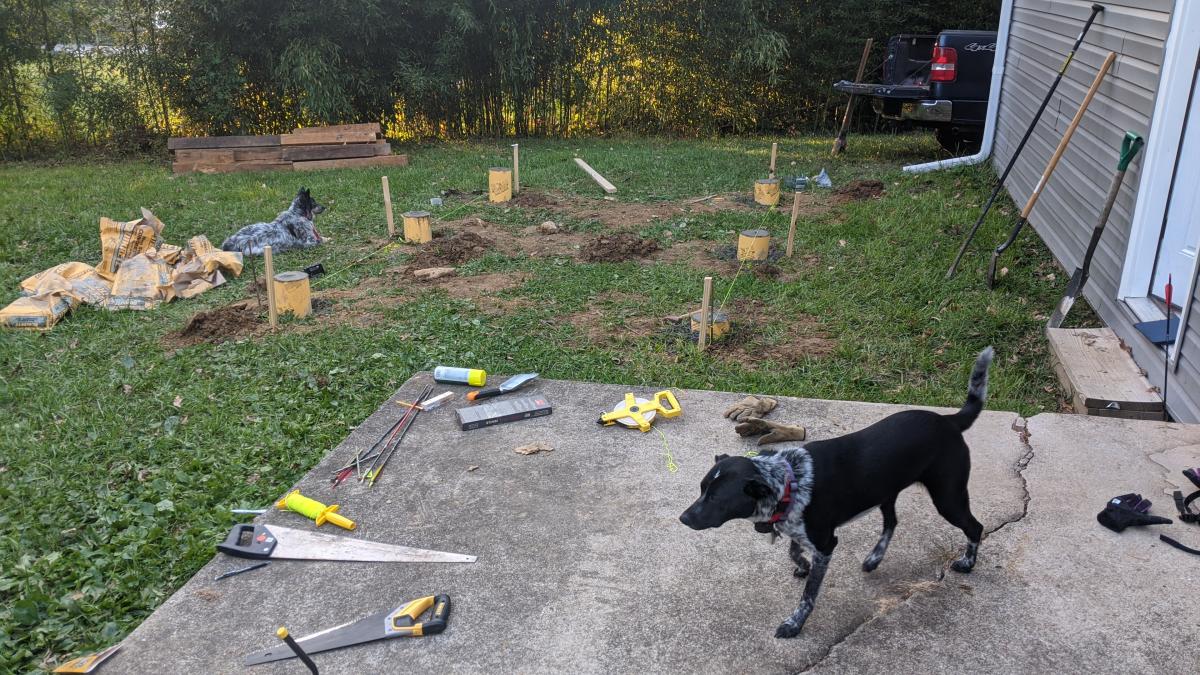
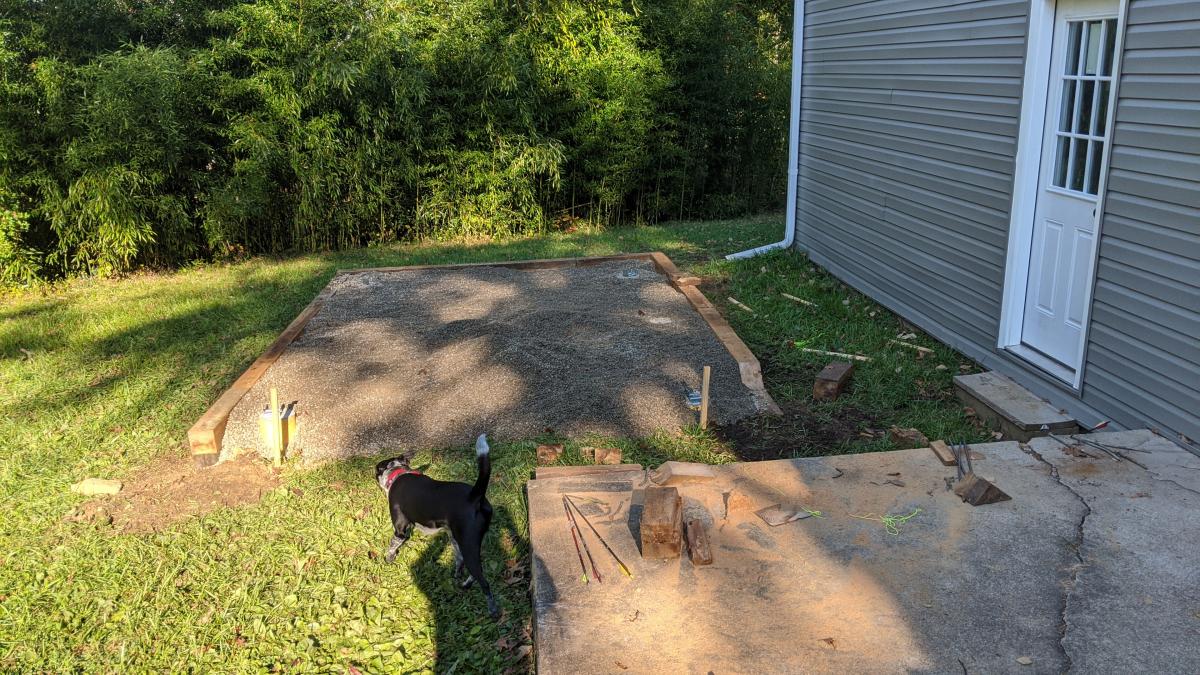
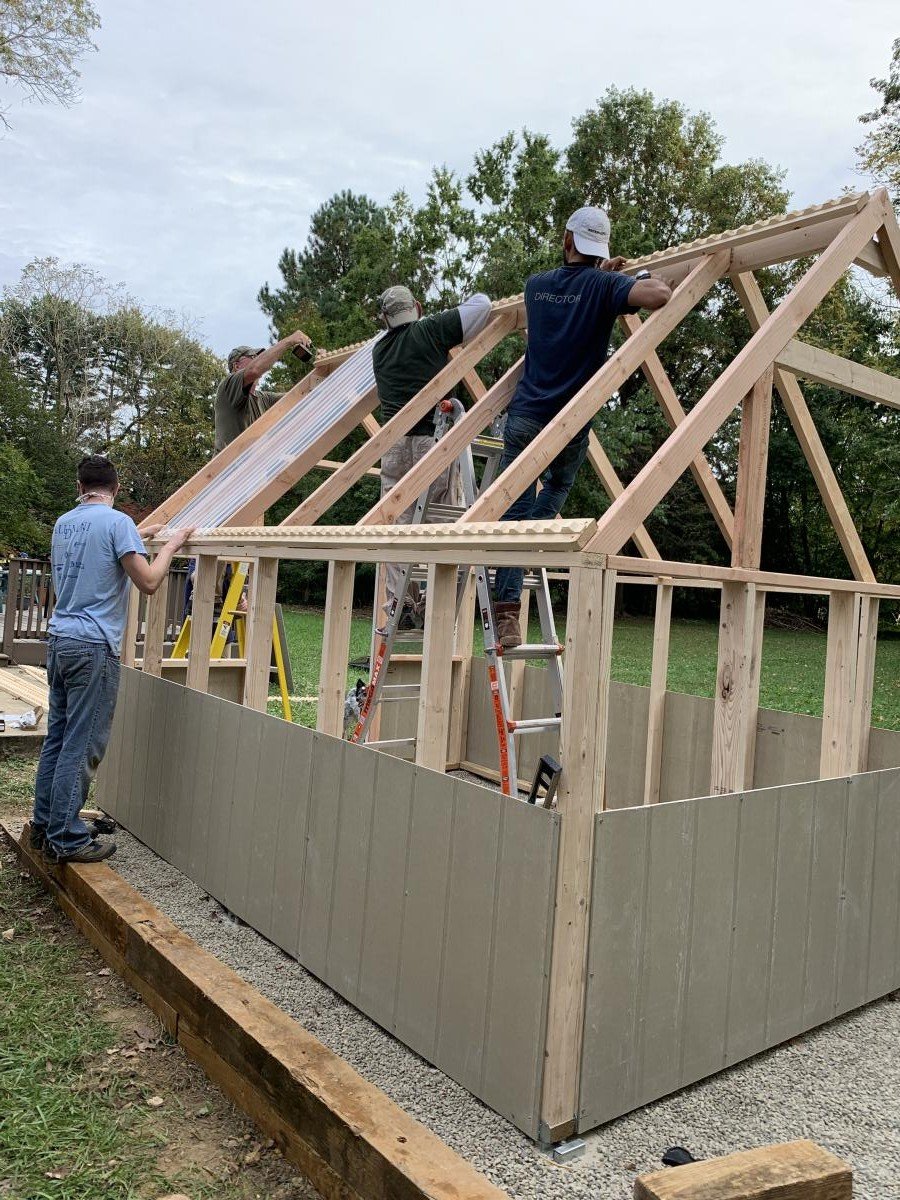
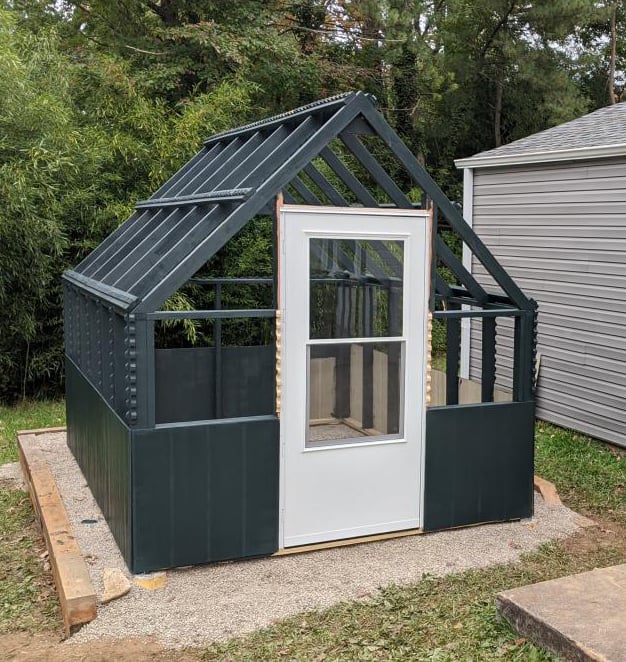
With the help of friends and family, we managed to build this greenhouse rather easily. We had to start with the foundation since the spot we chose was not an even grade. We did this by filling sono tubes with cement and leveling each off so the greenhouse would have a solid place to sit. We then built out a frame around the outside of the cement tubes with some reclaimed 6x6's. After that, we filled the space with 5 tons of river rock and then got to work! After the foundation was ready putting the rest of the house together was a piece of cake. The frame was so easy to put together. We had a few minor kinks to work out here and there, I won't say this house came out 100% perfectly, BUT I am so happy with the end results. We chose to paint it a deep green color as a final touch. So far we just moved a few potted plants from our deck to the greenhouse for the winter. It has been working very well to keep the plants cozy during the colder days we've had. Eventually, I plan to build a potting station, shelving, and most likely a garden bed for winter harvests.

Mon, 11/09/2020 - 09:52
The foundation looks great the greenhouse looks amazing! I'm sure fun was had building it too:) Thanks for sharing.
This was my second build ever, and I'm so extremely satisfied with the entire process! Ana's plan was super easy to follow, and I couldn't be more proud of how they turned out!
Fri, 06/13/2025 - 15:53
Hiking in the Adirondacks and feeling the love for nature, I wanted to meet senior women for dates as an older guy. Found senior dating and hookups, simple with mature users. You can message, use filters, or try video chats. The site’s secure with a free trial. Had a nice dinner with someone.
Thu, 06/19/2025 - 05:37
Planning a chill weekend, I wanted something to keep me busy. Needed a site that’s fun and reliable. Stumbled on Gunsbet Casino, and it caught my eye. This Aussie gem’s packed with slots, roulette, and live games. Their welcome package is solid, with free spins and reload bonuses. Mobile-friendly, secure, and quick payouts. Kept my weekend entertaining, great find!
Fri, 06/20/2025 - 08:28
I recommend Dafabet Casino UK to anyone who likes high-quality slots and fast gameplay without lag. I tried several sites, but this is where I found comfort and honesty. Withdrawals were simple, with no delays, and technical support was polite. Here, you can not only win, but also really relax.
Sat, 06/21/2025 - 13:51
I love to play slots online and my last games were only on this site exclusively on this site from Canada Quatro Casino I love it here I found interesting games that I was very much involved in such slots I could not even imagine they turned out to be extraordinary and interesting definitely worth the attention of players I think, so if you want something new welcome!
Fri, 06/27/2025 - 13:08
Try to play on this site to play online in Canada Hastings Casino where you can spend your vacation or holidays, whatever it is to spend your time here Idin cool and fantastic already catching time I prefer to play on this site online so do not hesitate that here you know where everything will be of first-class quality, I recommend you try it!
Wed, 07/02/2025 - 08:57
My friends and I love watching UFC fights, and I wanted to spice up our watch parties. Looked for platforms to add interactive elements. Came across https://betandyou-affiliate.com/, which has a sleek setup for affiliates. It offers real-time stats, custom links, and promotions like boosted rates for new users. The support is quick, and payouts are flexible. It made our fight nights more exciting, letting us share and earn from the hype.
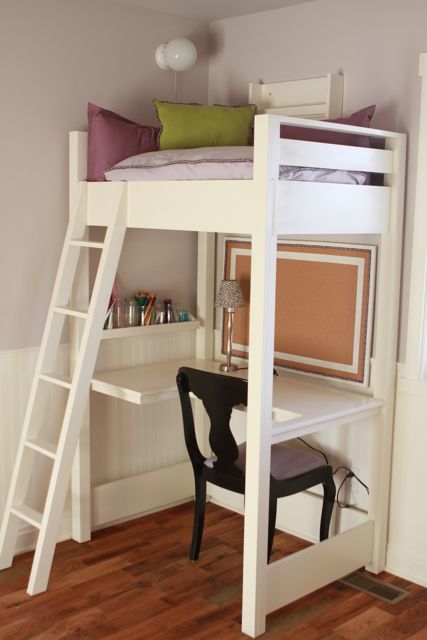
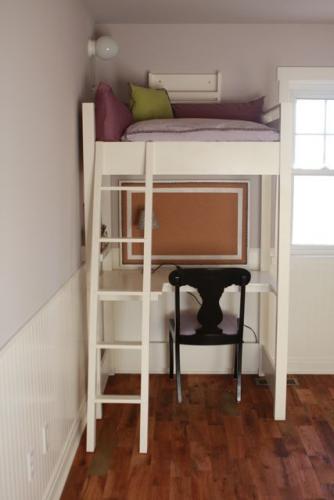
This project is a modified version of Ana's loft bed. We shortened it and made it a bit more narrow to fit our space and because we only needed a place for our eight year old daughter to read and work, not a place to sleep. We also added a desk to the bottom, making it a full-service work station for our elementary school girl!
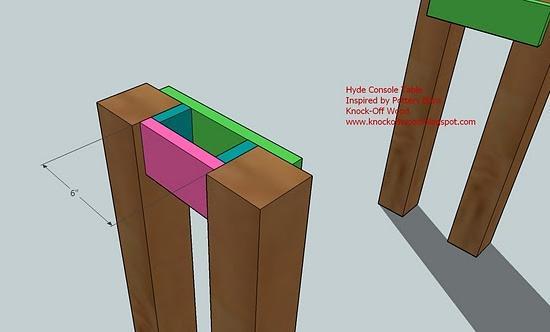
Modified the Cherished Bliss plan a bit to include Carriage bolts instead of pocket holes and I notched the top of the legs to make a shelf for the top.
Legs were cut at 18" and the top is 40". The two center 4x4's are connected with two internal (and smaller diameter) carriage bolts and glued together. The end 4x4's are glued and then a 1/2 x 6" carriage bolt with a pre-drilled "Head" hole (using 1" paddle bit).
Very easy to make but this baby is heavy!!!

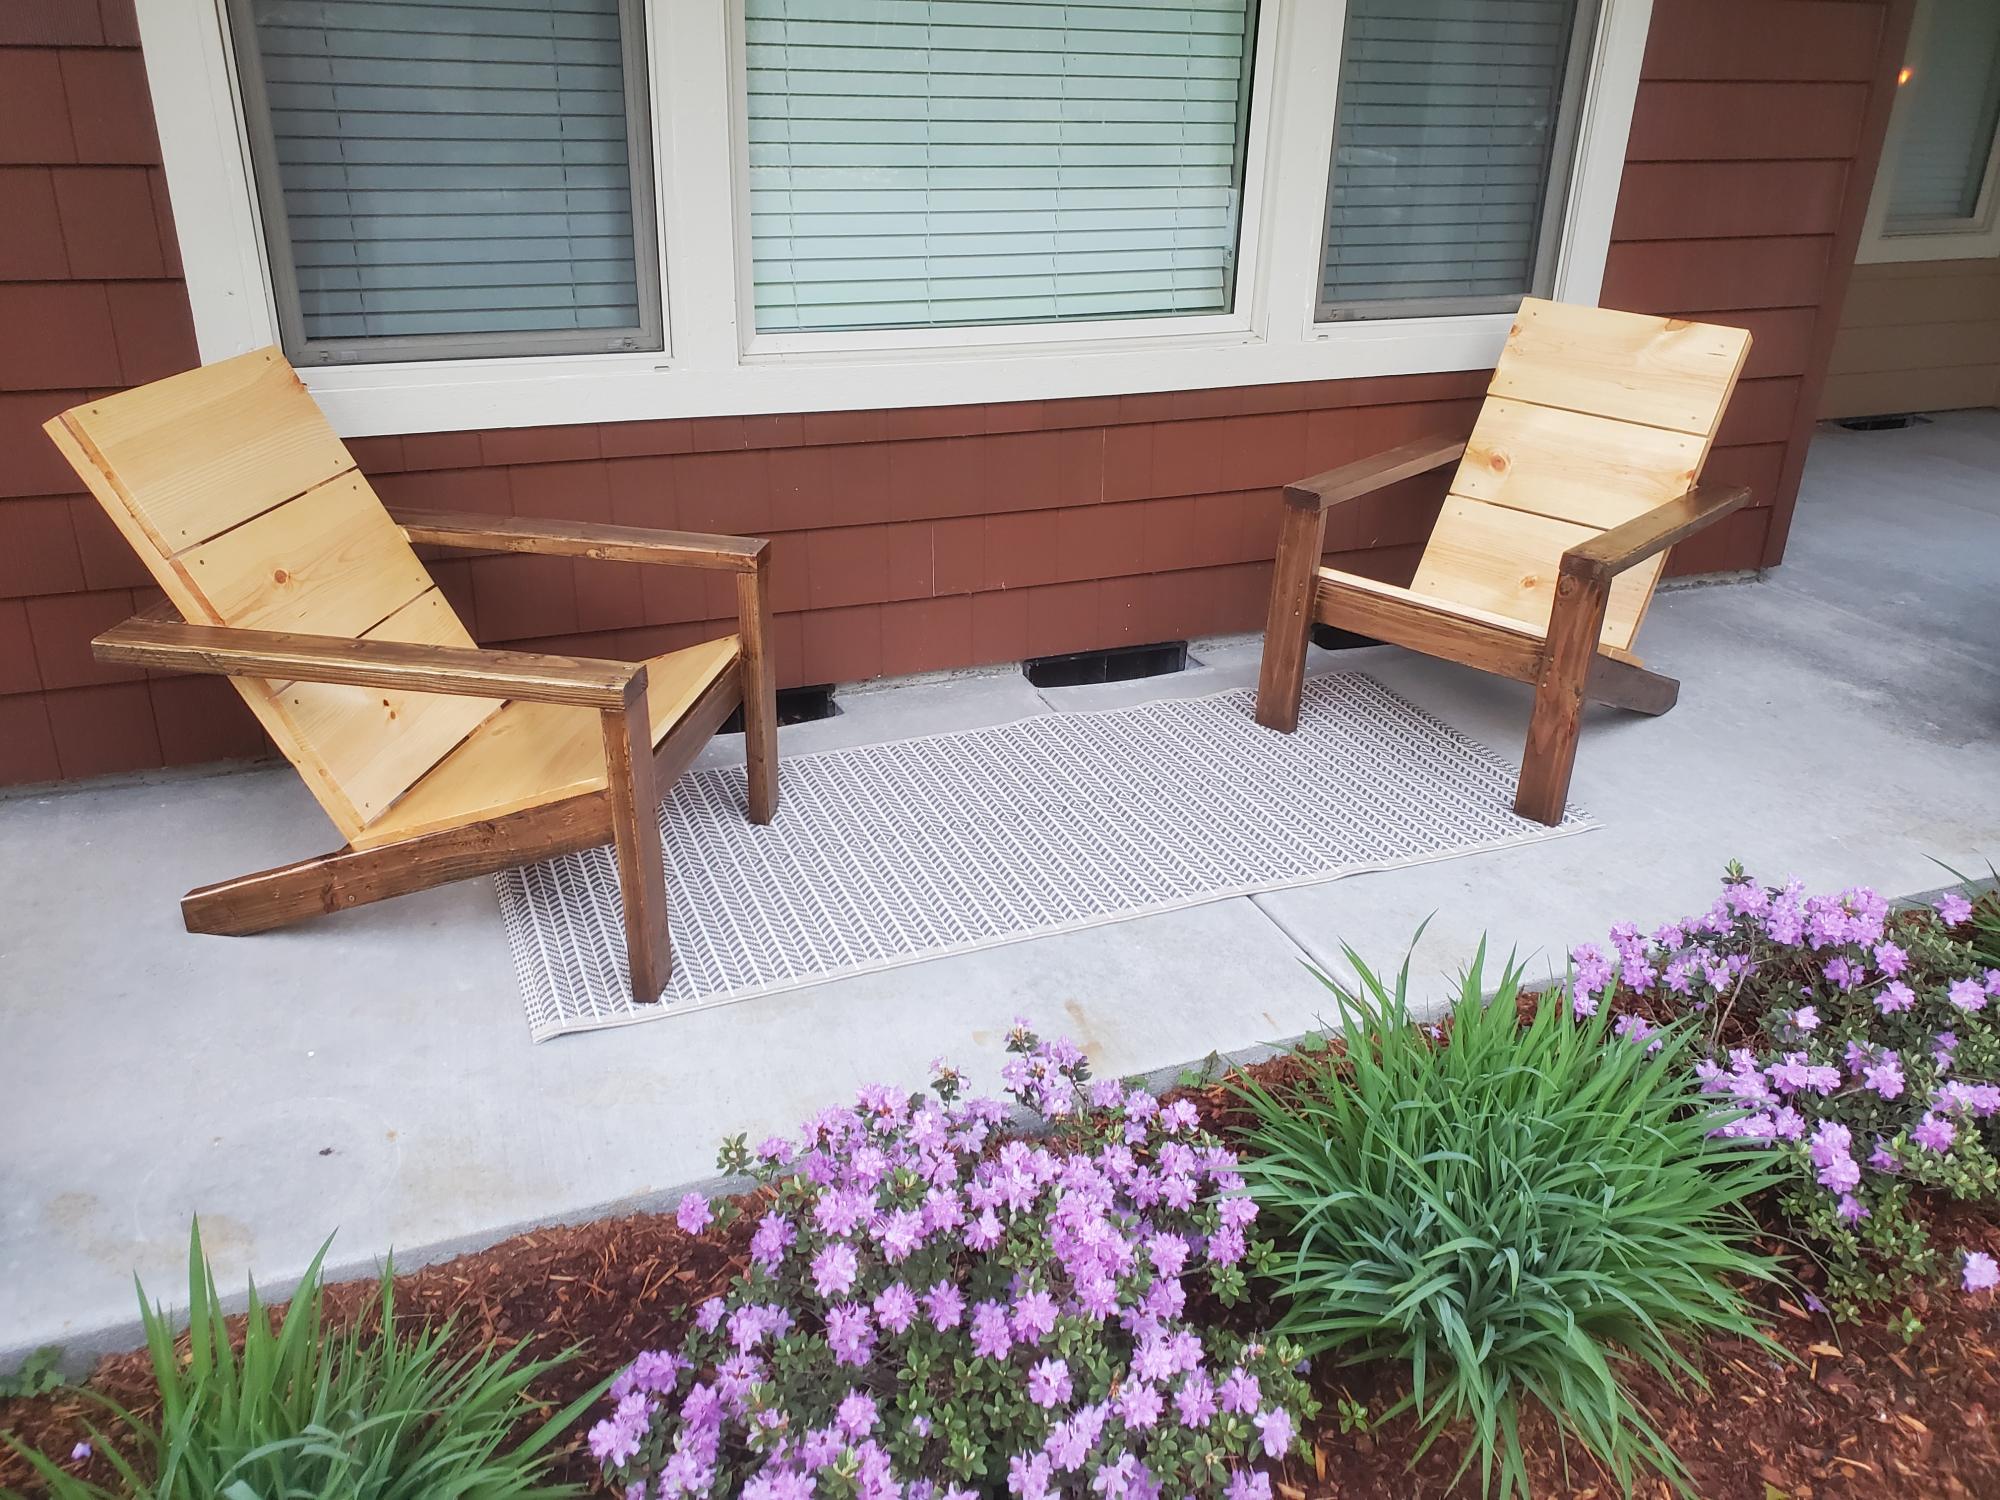
Love the results of my first building project.....a pair of redwood adirondack chairs. Angled cuts were a great way for a beginner to learn to use the miter saw.

Sat, 09/07/2013 - 19:59
Love these gorgeous redwood chairs! The color and grain on that wood is awesome, and the clear coat is perfect for it. You did a great job on this build! I popped over to your blog and I enjoyed your post on this build very much. Well done!
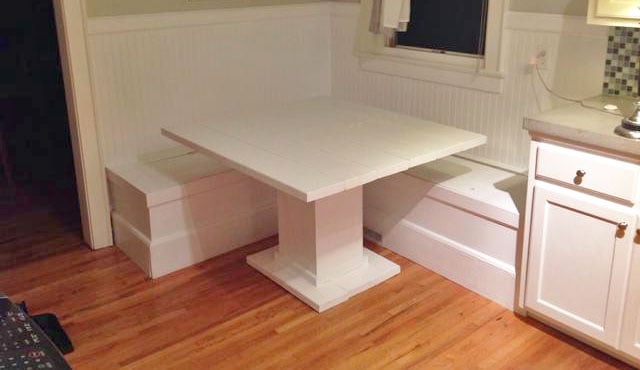
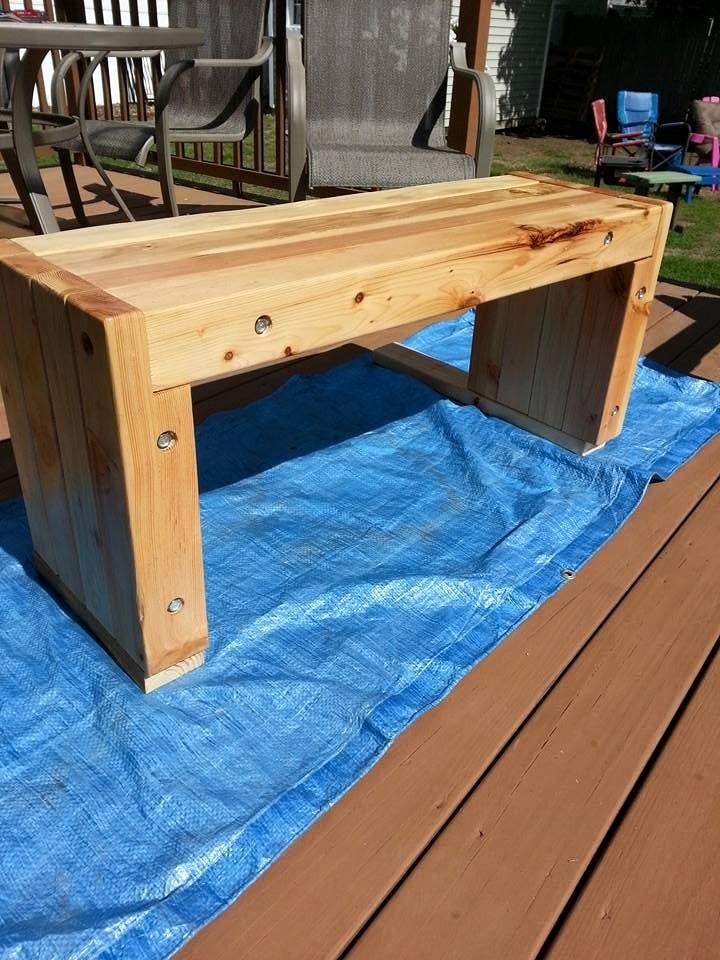
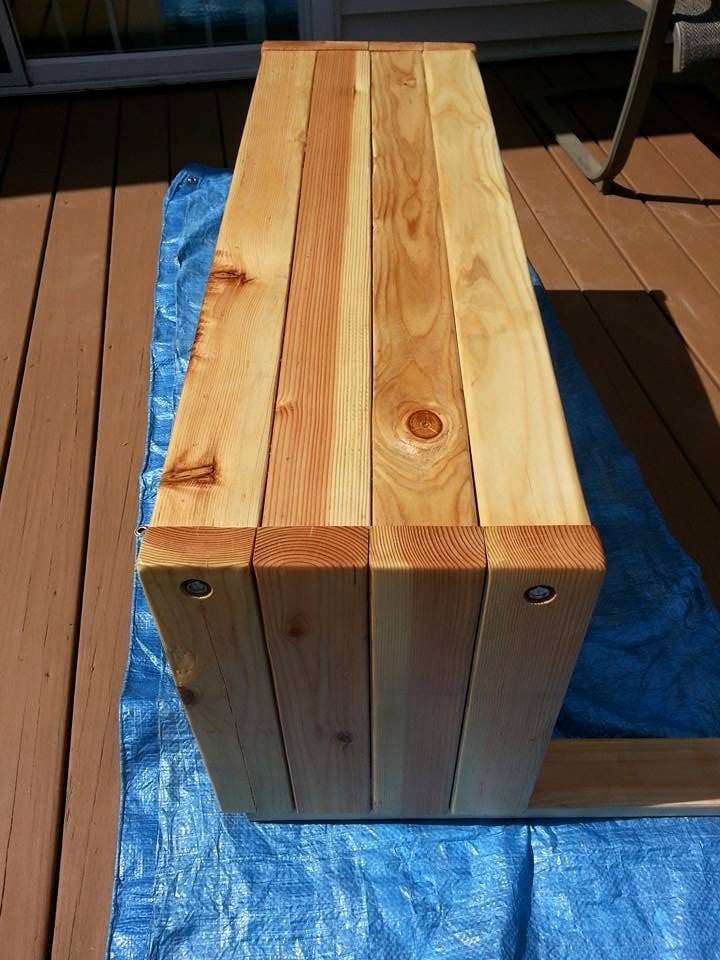
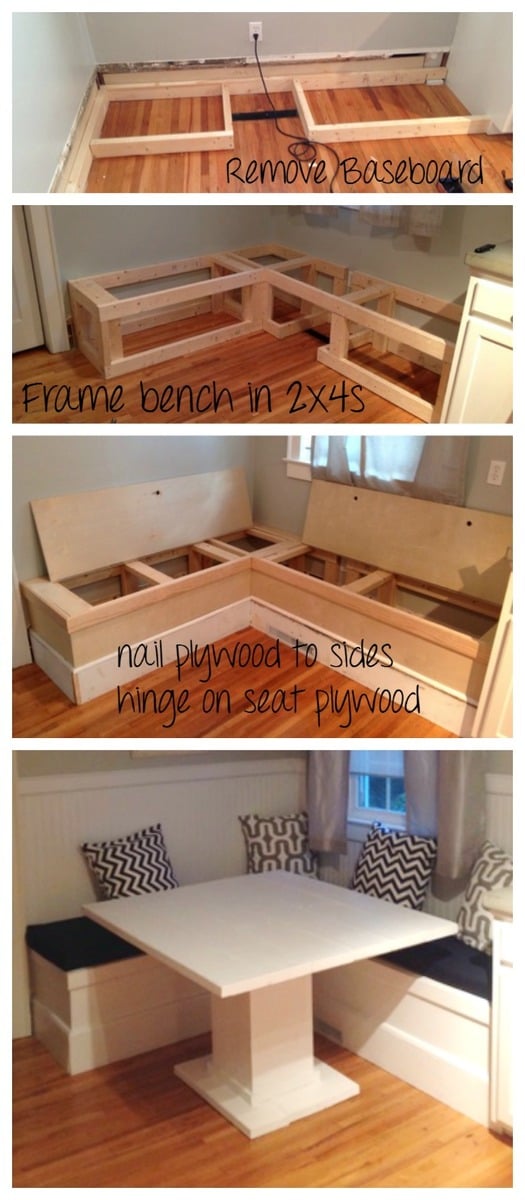
I completed this project in a weekend, over 2 days. The space was an empty void in the corner of our kitchen, so I decided to fill with a functional seating and eating space.
I first removed the trim from the wall, so I could reuse it on the front of the box later, to make the bench match the rest of the kitchen. One challenge I came across was rerouting the a/c vent through the front of the box so we didn't lose that circulation.
My sister-in-law chipped in to make the cushions and pillows to soften it up. I added the DIY table, and further defined the space with wainscoting and trim.
Sun, 01/09/2022 - 16:45
Hey there,
Absolutely love your DIY breakfast nook. Unfortunately the additional blog/info link is no longer working as I'm trying to gather more information. Would anyone be able to send the instructions and/or new link?
Thank you
Tue, 06/24/2025 - 14:21
I was scrolling through a UK football forum when a lad posted about winning a cheeky sum playing slots. Couldn’t resist having a nosey. Landed on Betti Casino and instantly got dragged in by the mad variety of games. Been smashing the blackjack tables and those reels ever since. Can’t say it’s made me rich, but damn, it's proper entertaining when I’m bored at home.

I was in love with the plans, but I knew it needed to be wider to fit my space and be usable. Plus, I didn't want to have the space in the back for stools. I wanted something that had a good amount of storage so I extended the box that was the shelf area and did away with the back board and side boards. I also extended the drawers to the back of the piece.

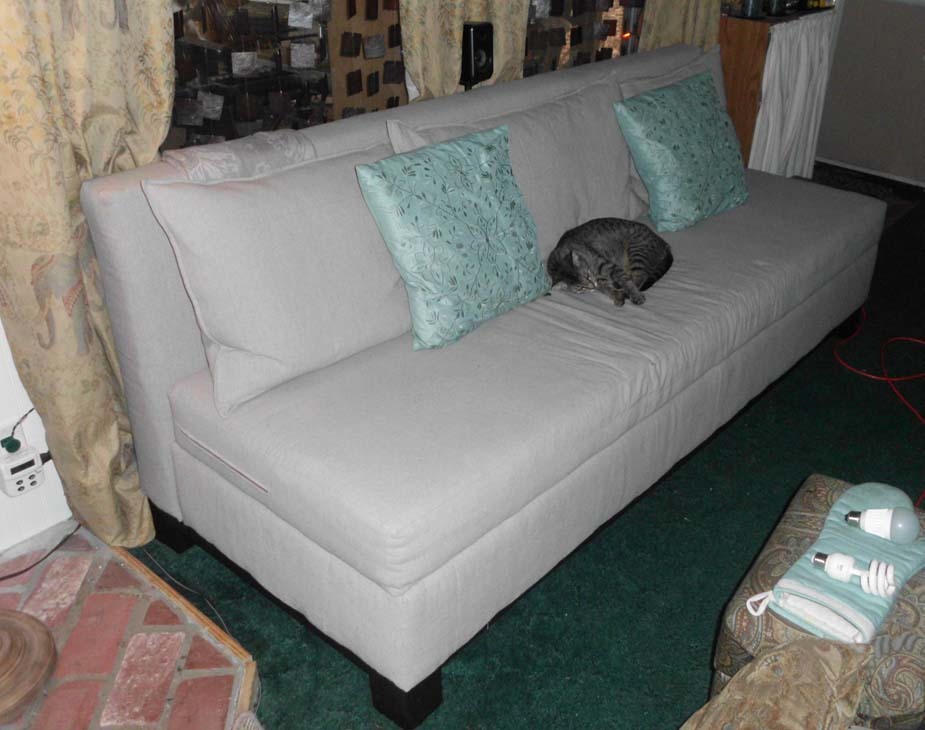
I loved the idea of the storage sofa! Such an easy build and I tweaked the plans to fit my needs... I used 5" high density foam, I lengthened the sofa to 84" (so I wouldn't have any wasted foam and also so my extremely tall son could stretch out on it without his feet hanging off the edge), I used a 2x8 for the box, and used 1/2" plywood for the seat because 1/4" ply was too flexible. I also made the seat with a zippered cover to encase the foam, batting, and plywood. This way, I can easily remove it to wash it. It's my favorite place to sit while I'm working!
Sun, 04/22/2012 - 03:41
OH MY GOSH!!!
beautiful!!! looks storebought, great job!!
Mon, 05/21/2012 - 14:44
very nicely done and im going to have to do this as well thanks again.
Thu, 08/15/2013 - 13:01
It cannot be denied that storage sofa provide sufficient space to keep your various household articles and clothes. They can be perfectly used for adding storage space in small houses.
Regards
Thu, 08/15/2013 - 13:02
It cannot be denied that storage sofa provide sufficient space to keep your various household articles and clothes. They can be perfectly used for adding storage space in small houses.
Regards
Fri, 09/06/2013 - 13:21
It is really a fantastic idea to use storage sofa, as it can be used for dual purposes of storage plus sofa. Moreover, it will not occupy much space in the room. Anyway, please click here to see my site.
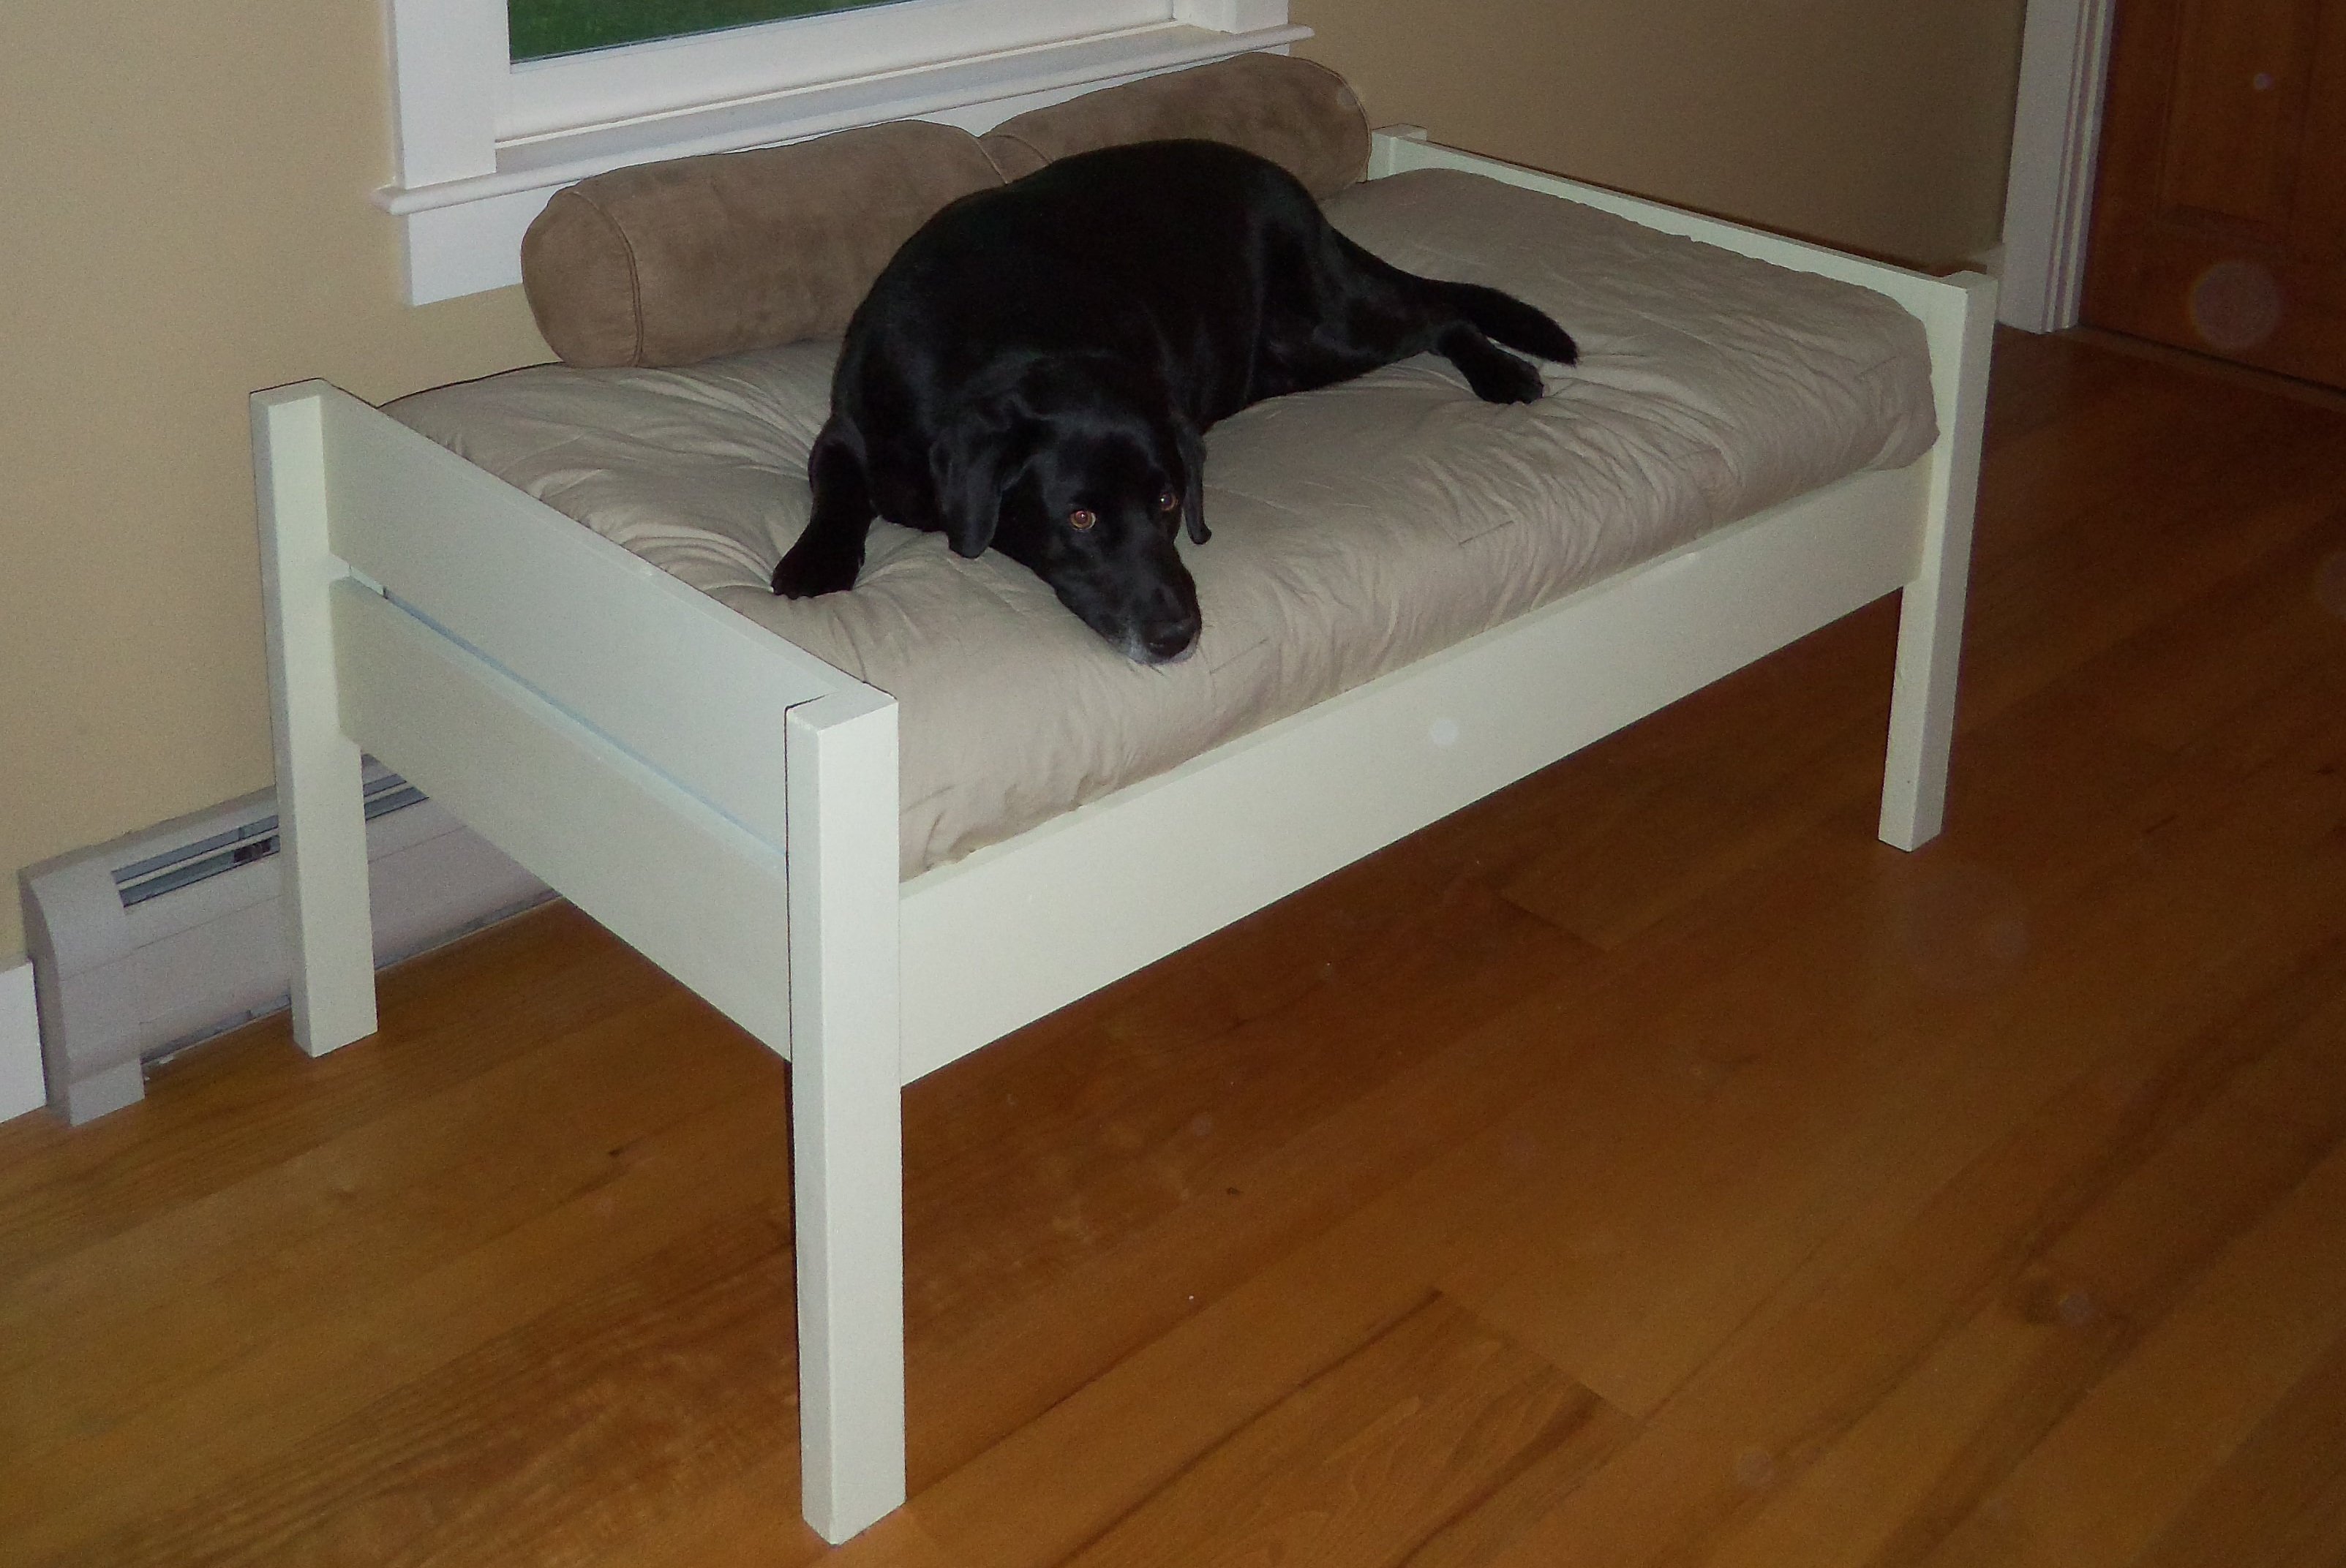
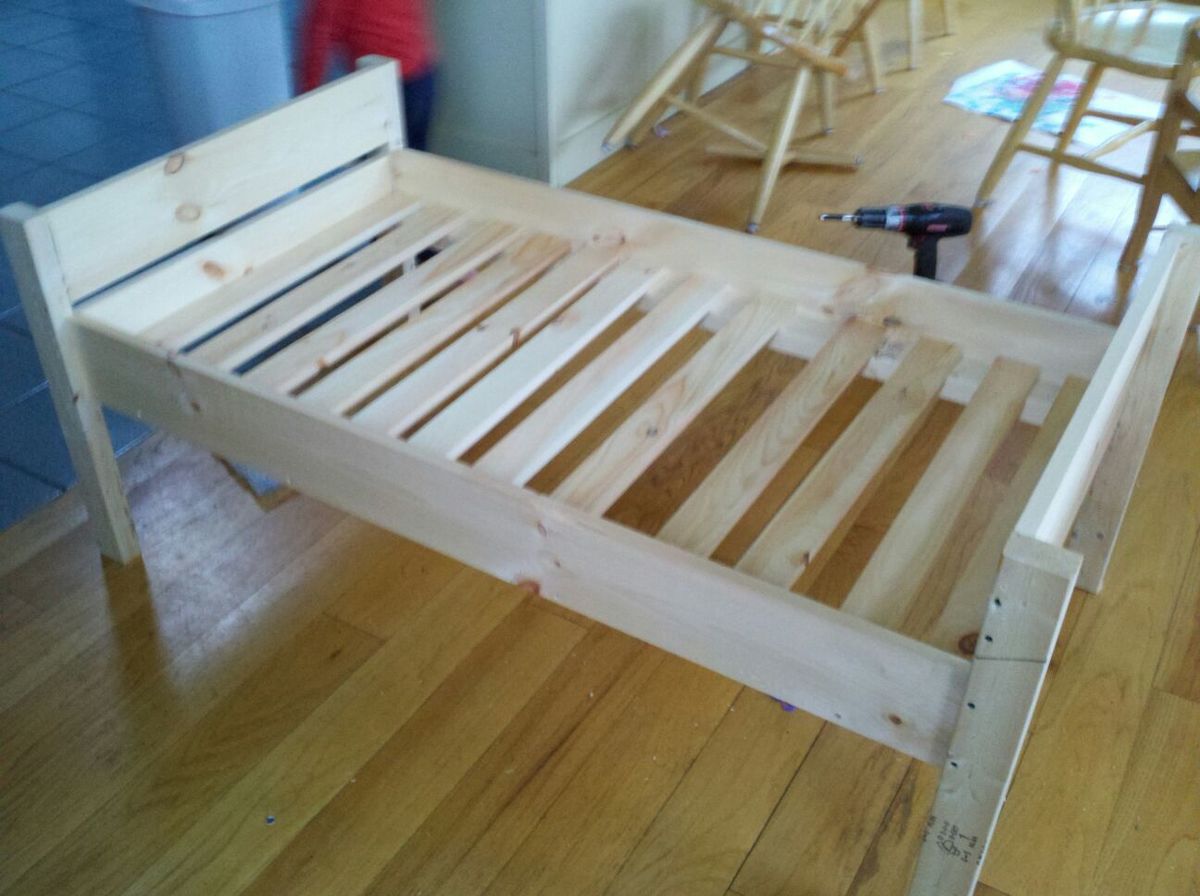
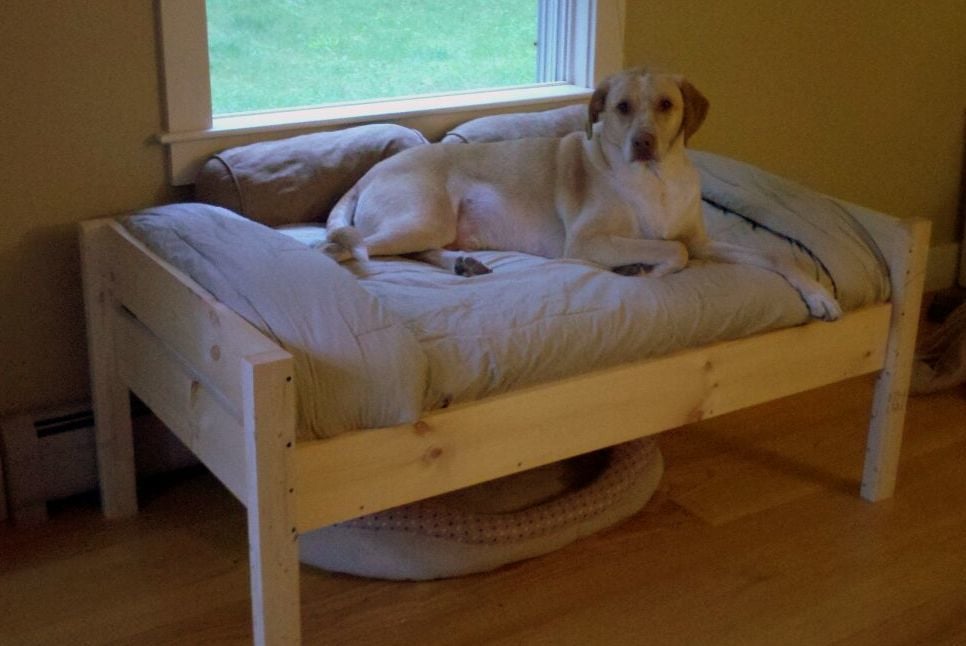
I've thought for a while about building a bed for our dogs, but wasn't sure where to start. We had an extra crib mattress so I set out to find a toddler bed that would work. I decided the Lydia Toddler Bed plan would work best. It doesn't look anything like it, but it was a great starting point.
First, I got rid of the canopy and the decorative side pannels. I also raised the bed 12 inches. (The hope is to add a rug on the floor underneath as sort of a "bottom bunk") The lumber store didn't have 2x2s so I used 2x3s for the legs. I also only used two 1x6s at the head and foot of the bed. They are seperated by 1" because when I got home, I realized they were actually 1x5 (RUDE).
All in all, it turned out exactly as I had hoped and the dogs love it! GOODBYE stinky dogbeds!
**Photo 1: Just finished building--the slats weren't screwed down yet.
**Photo 2: Deacon is testing out his new digs! See the stinky dogbed underneath?YUK!
**Photo 3: Dog Bed Completed! Mac & Deacon love it!
Thu, 10/16/2014 - 18:49
Thanks for sharing the great plans. We built this end in a few hours and she loves it!

Pretty much followed the plan, except I raised the height of the platform. I intended to make the legs longer, but I forgot and cut them to the length on the plan. It looks like the sides of the basket aren't supported as well, but the basket stays in just fine.
I also added little wings on the end to support the ends of the basket. I wanted to be able to remove the basket from the cradle without screwing it in, but also wanted the basket to be secure so I added the little wings. It was easy.
Overall a pretty easy project, except the rockers are time consuming. They're not hard to make, you just need to take your time.


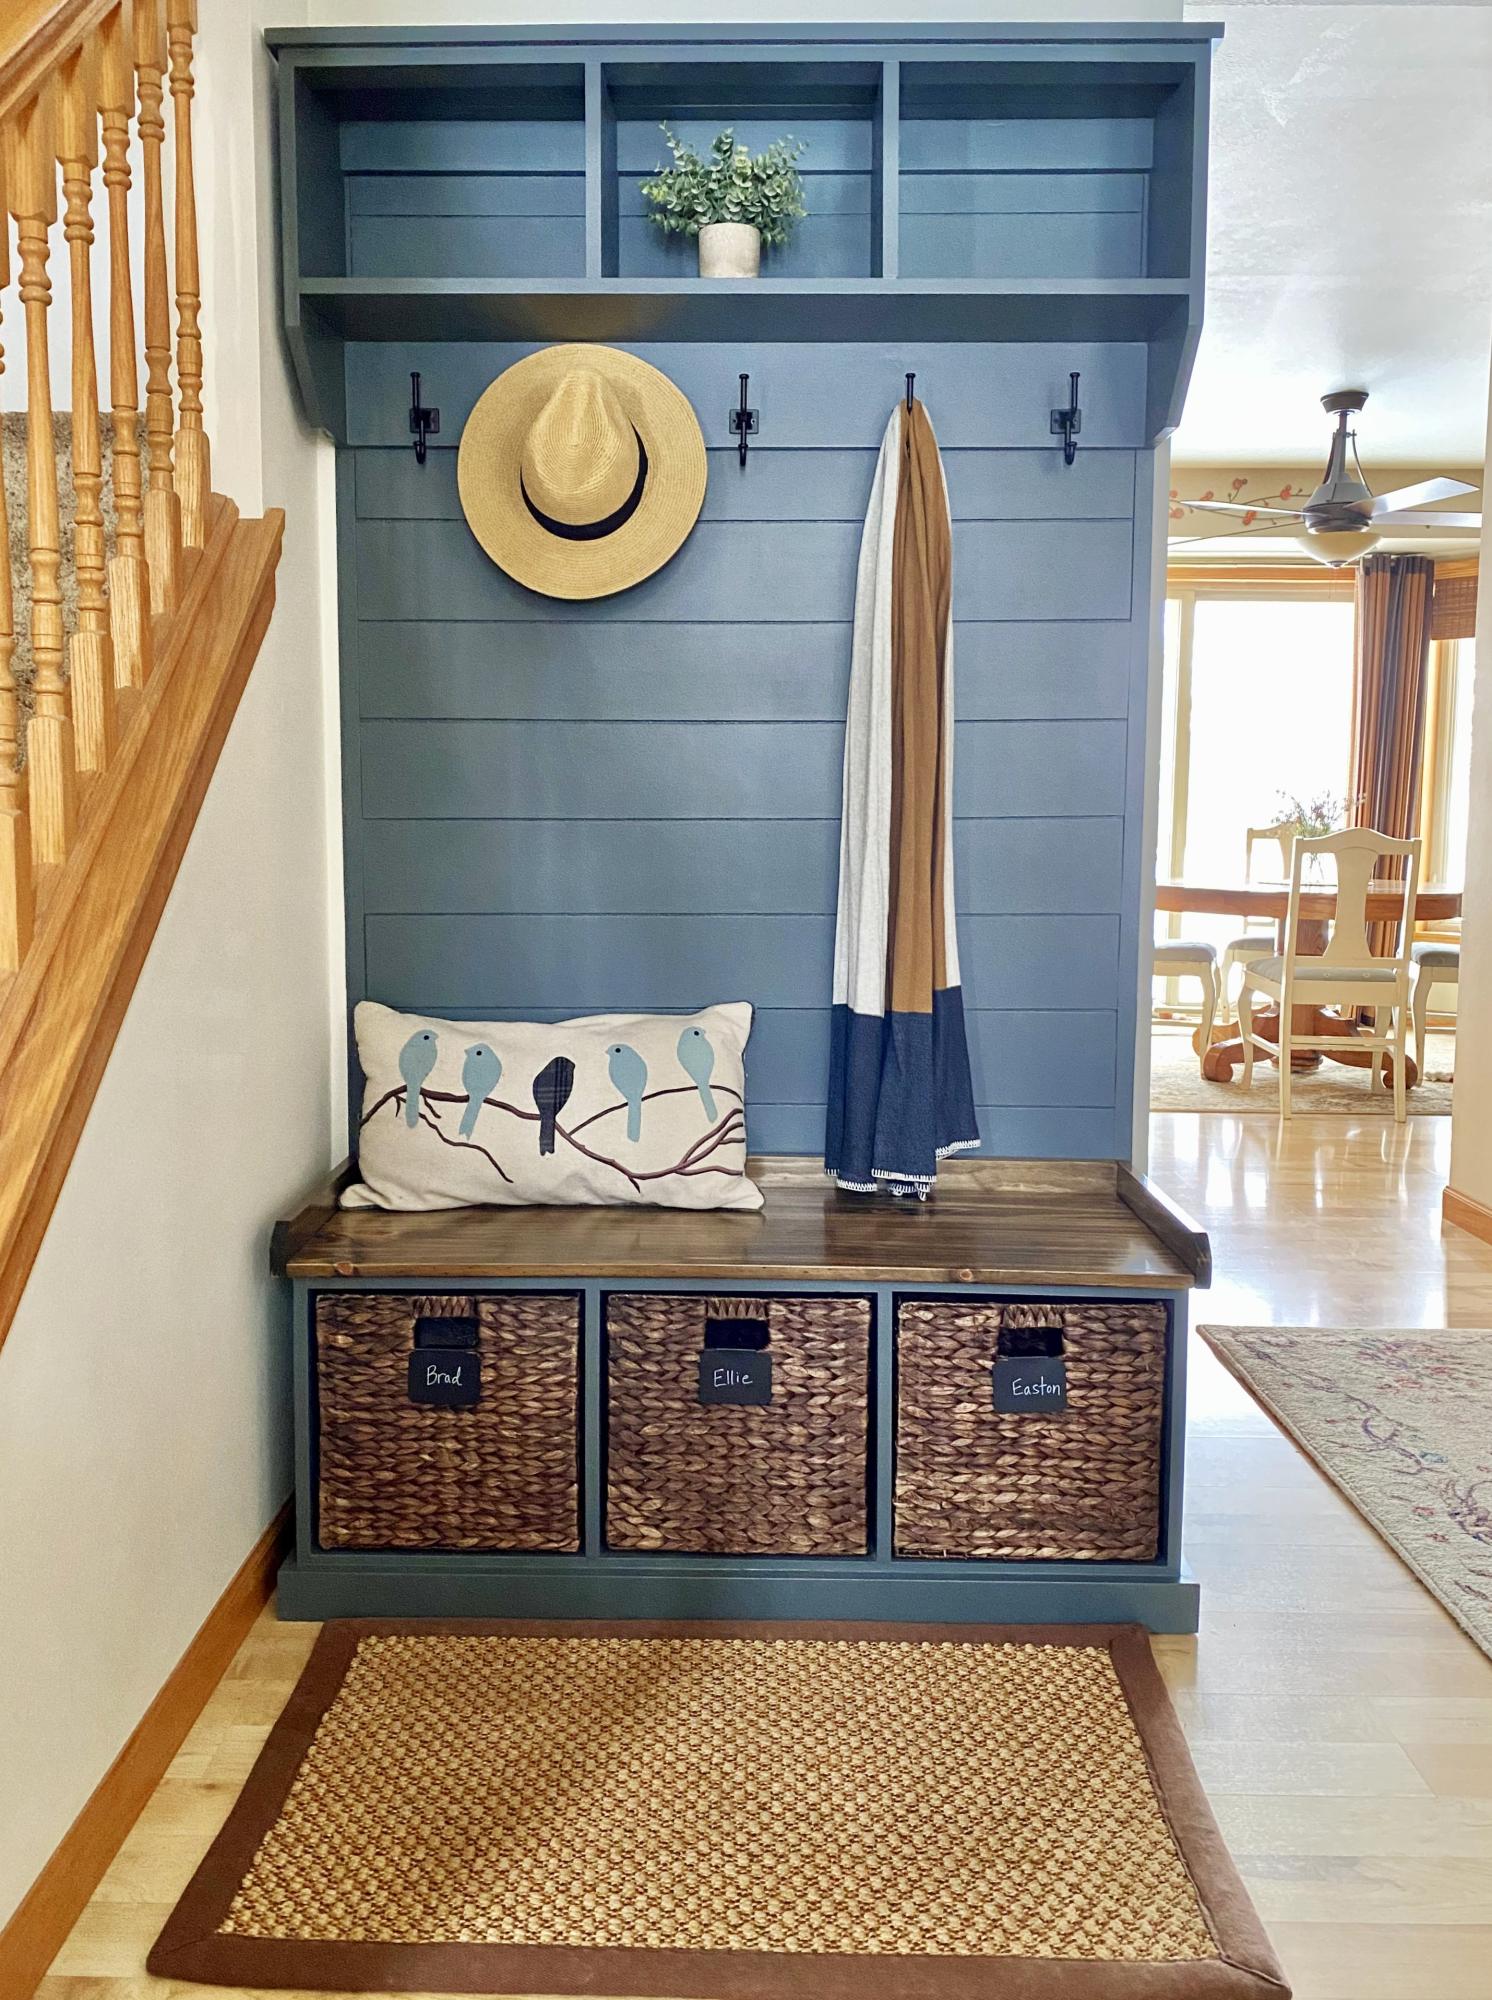
I used plans for the Essential Entryway Bench and Shelf with Hooks, tying them together with a shiplap panel. This was my first big project using a Kreg jig and Rip-Cut. Many more to come!
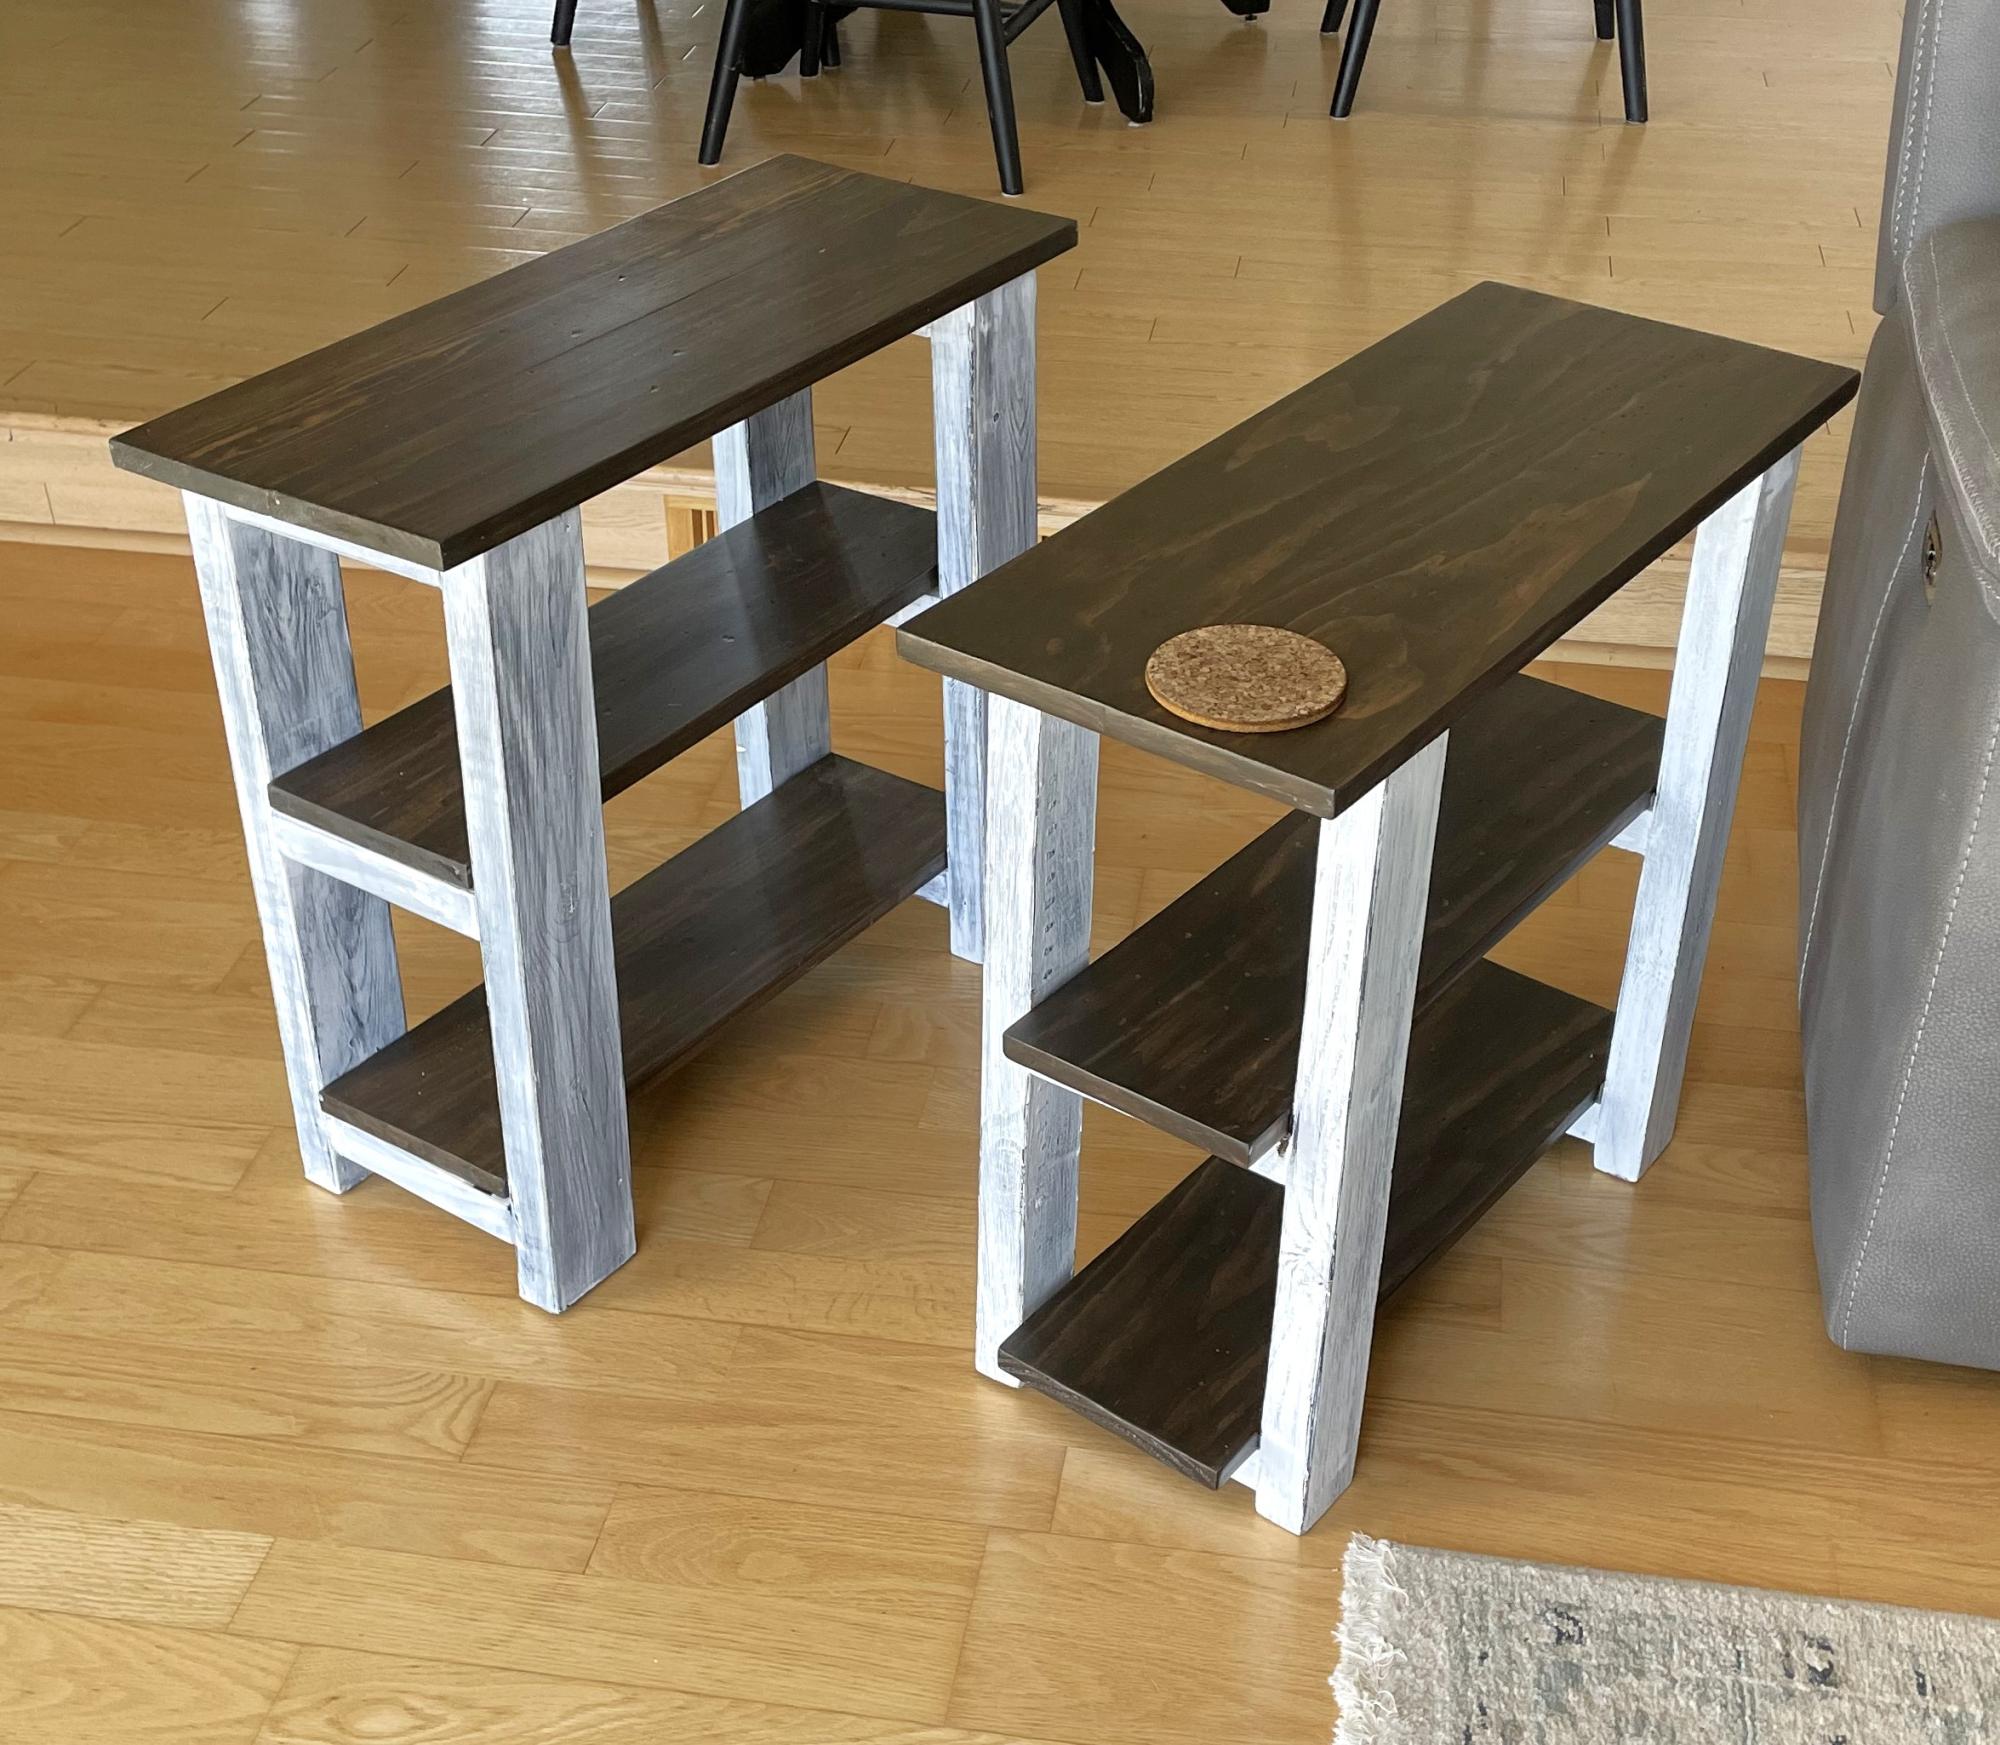
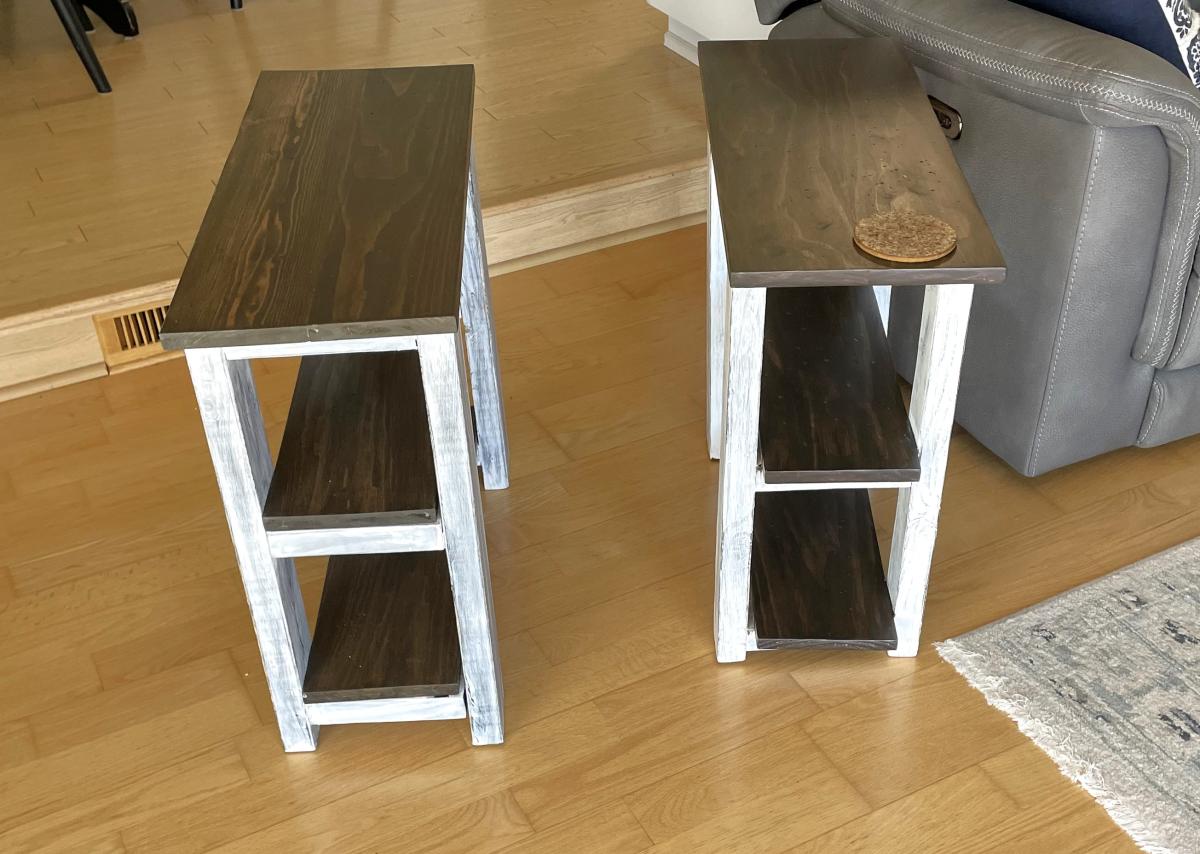
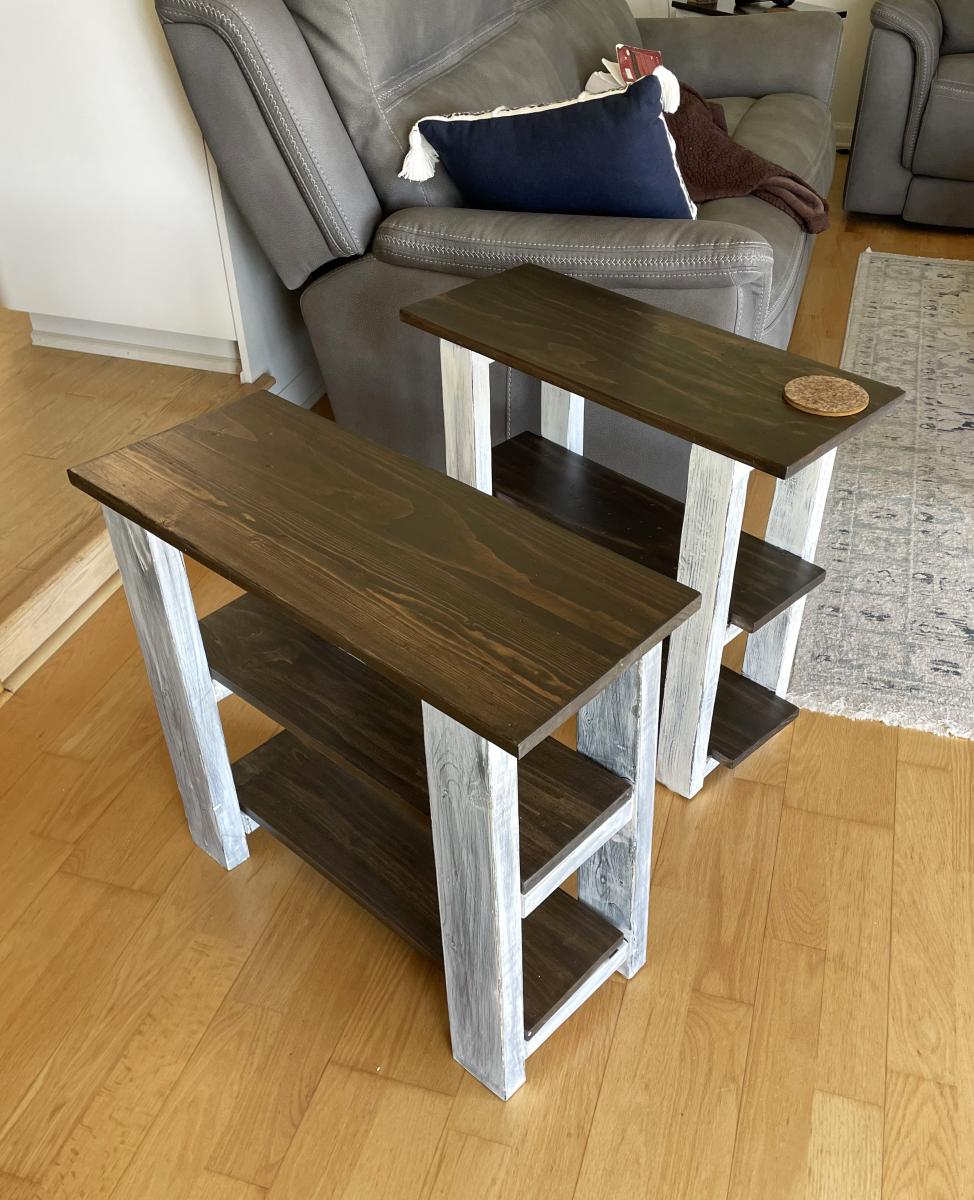
This a good build! I learned a lot especially about measuring where the middle shelf should go so it is even. I am so happy to have made all the tables in our family room!
Kim Rachow