Community Brag Posts

Catio heaven

Submitted by bhoppy on Fri, 09/04/2020 - 15:43

Ana doesn’t have a plan for a catio but she does for a playhouse and a cedar shed made from 2x2’s. I sort of combined my knowledge from making her plans over the last 10 years and came up with this for my cats. It was fun to make!! My baby kitten is loving it. I used garden fencing and stapled it to the outside and pocket holes for the walls. I made each wall individually like the playhouse then connected them once in place.


Estimated Cost
$250
Estimated Time Investment
Week Long Project (20 Hours or More)
Finish Used
Cabot semi transparent outdoor deck and fence stain. ($9 oops section)
Recommended Skill Level
Intermediate

Comments

Wifey

Wed, 06/09/2021 - 12:36

Thank you for sharing! My daughter wants a cat for her birthday but it can't be inside due to our son's allergies. Roaming outside isn't really an option because we have coyotes. We are going to use one of these in combination with an underground electric fence.

Seasonal And Holiday

Pallet wood Dog Bowl Stand

Submitted by zjlawlor on Thu, 09/25/2014 - 18:48

Used some cool old pallet wood to put together a dog food bowl stand I've been meaning to make. My big 10 year old lab is getting a lot slower and struggling a little bit so I thought this could help him out some and get his food and water closer to his face. Winged this one. Had a vague idea in my head that sort of evolved as it progressed. Used some left over 1x4 lumber to build a simple frame, and encased it in the pallet wood to give it the wood crate look (jigged some hand holds in the side to give this same look) . Used jig saw to cut the holes out of the 2 top boards for the bowls. 

Estimated Cost
<$10
Estimated Time Investment
Afternoon Project (3-6 Hours)
Finish Used
Weathered gray stain on top boards and frame. Wiped immediate after application and sanded after dry.

Light white wash on pallet wood slats with primer.
Recommended Skill Level
Beginner

Garage Shelves + Work Bench

I used Ana’s plans for the garage shelves, but modified them to include a work bench. A lot of you tubers have done this, built a combination work bench and shelving, but I built nearly everything according to Ana’s plans. 12 feet long, 24 inches deep. I got some LED lights (two 1600 lumen strip lights) from menards that really brighten up my entire garage and make the work bench more useful. The one thing I really wanted was to not have a supporting pillar on the work bench to keep it open, and I loved how it turned out. I went for 3/4 plywood, mostly to have a stronger work surface, and I’m glad I did. I have since added a supporting 2x6 off of the study to support the top shelf above the bench and its strong enough to do pull-ups off of, and I have reinforced the support leg under the bench with a cross bar. Thanks for the great plans!!

Estimated Cost
~$200 (lumber prices have gone up recently due to supply issues with covid)
Estimated Time Investment
Weekend Project (10-20 Hours)
Recommended Skill Level
Starter Project

Comments

Stylish Chicken Coop

Submitted by Anonymous (not verified) on Wed, 11/11/2020 - 15:52

Housing three (3) hens now that are about a month old. Probably late January before can expect any eggs.

Great project. Metal roof worked well. I used flashing for the ridge caps. Have allowed for as much ventilation as possible for this Southwest Florida heat.

Thanks Anna, for sharing this project.

Estimated Time Investment
Week Long Project (20 Hours or More)
Finish Used
Sherwin-Williams outdoor barn red and white.
Recommended Skill Level
Intermediate

Adirondack chair from Pallets

Submitted by Anonymous (not verified) on Fri, 03/24/2017 - 19:42

I decided to try and use the plans on Ana's site but with a twist. I wanted to limit myself to using only pallets. I think it turned out great! I can't upload all the photos because they exceed the maximum size limit. If I was able to you could see how each chair is slightly different and has a lot of character. I finished them with a waterproofing oil which I highly recommend over other finishes. 

Estimated Cost
$10 for screws.
Estimated Time Investment
Afternoon Project (3-6 Hours)
Finish Used
Cabot oil
Recommended Skill Level
Beginner

Comments

Playhouse kitchen from Modern Vertical Slat Top Console

Submitted by LauraLaura on Mon, 05/27/2013 - 17:21

I've been looking for a simple design for a consol table that I could easily modify to fit in my kids' club house. This one fit the bill perfectly! I also happen to have a pile of 2x4s left over from a closet demo, so I wanted to use those up. I basically built 2 of the consol tables, letting the 2 outer-most horizontal beams extend across and 25.5 inch space and connect the two consols. Then I put in a middle beam and that created the perfect space to set some catering pans in it. Also, I only had 2x4s so I used those for all the pieces, making the gaps a little wider than the original design. And lastly, because I didn't quite have enough wood, I shortened the vertical beams. If you look at the picture, all of this will make more sense! Thanks for the inspiration and direction! ps - I have no idea how to rotate the photos. Sorry!

Estimated Time Investment
Afternoon Project (3-6 Hours)
Finish Used
none yet, but I think I need to paint it or something so it doesn't rot outside.
Recommended Skill Level
Starter Project

Kid's Playhouse and Slide

Submitted by docfin02 on Mon, 03/28/2011 - 18:56

I LOVE these plans. This was my first project, and although it was a big one to start with, the plans were easy to follow. If I can do it, anyone can. I added the rock wall. My kids and I love it. Total cost for me (including all lumber, nails, paint, slide, etc.) is about $850.

Estimated Cost
$850
Estimated Time Investment
Week Long Project (20 Hours or More)
Finish Used
1 coat primer, 2 coats paint
Recommended Skill Level
Intermediate
Seasonal And Holiday

Faux Fireplace with Hearth

We made some modifications by adding a hearth for additional height (the room we have it in is very large and open) and joining 2x4s for the mantel and base which I stained grey for contrast. We decided to use thin brick for in the "firebox" to make it look more realistic. We also have a newborn and spent over two months putting it together a little at a time in our free moments so I'm not sure how long it would actually take to do at once, but cutting and putting up the brick was very time consuming. 

Estimated Cost
$250
Estimated Time Investment
Week Long Project (20 Hours or More)
Finish Used
White paint, Minwax "Classic Grey" stain
Recommended Skill Level
Beginner

Comments

westmoundstar

Thu, 08/27/2020 - 11:16

This looks great! I'm actually in the middle of this build with the hearth as well. Couple questions....
How did you connect the two pieces? Also, did you connect to the wall? I'm assuming you didn't leave the 5 1/2 inch gap on the bottom of the fireplace and connected direct to the hearth. Let me know, thanks!

Seasonal And Holiday

Cedar Boxes

Submitted by drowland on Sat, 07/09/2011 - 07:18

We built these before we saw these plans, but they are pretty much the same... We added the chicken wire to keep the rabbits (and our dog) out of the garden. We added the owl to keep the birds out. We've gotten a ton of tomatoes, onions, and bell peppers so far. Next year, we'll add a few more beds. We also added the verticle garden to take up less space, but its not deep enough. We'll make the next one deeper.

Estimated Cost
$30
Estimated Time Investment
An Hour or Two (0-2 Hours)
Finish Used
none
Recommended Skill Level
Starter Project

Comments

KatieO (not verified)

Sat, 07/09/2011 - 20:11

Wow! LOVE IT! I love the taller posts so you can incorporate the chicken wire! I SOOOO needed to do something like that this year. Also, the vertical garden boxes are BRILLIANT! LOVE IT!

drowland

Thu, 11/17/2011 - 07:59

We ended up getting a ton of tomoatoes and green peppers from the garden boxes. We've actually built a couple more. We'll probably double again before next spring. We're looking at adding more veggies.

We now have ton of stuff planted for the fall...

Guest (not verified)

Tue, 03/13/2012 - 10:46

How did you build the upright planter boxes? Do you mind explaining the building process/design? I really want to plant this in my yard!

colton's mom (not verified)

Tue, 04/03/2012 - 06:19

i love the vertical boxes. I am just trying my hand at the world with a green thumb and could use as much advice as possible about how to make as well as to line the boxes or not to line them. All advice appreciated!

berman (not verified)

Fri, 11/23/2012 - 21:53

Hi, my name is berman. I found you pin from my pinterest and your box garden is so great. I am a newbie in this field and so interested to build garden in my house. If i can ask you some question, could you please to answer that?

cheers,
berman

Seasonal And Holiday

Easy Build wood headboard - King

Submitted by nestbliss on Mon, 11/14/2011 - 19:14

We used this plan for the reclaimed wood look headboard from Ana-White and these dimension mods for a king. We used lots of tips from Create and Delegate who made the same headboard last year. I love how it turned out! I posted more photos and blogged about everything we did for the finish, etc. at - http://nestbliss.blogspot.com/2011/04/we-made-bed.html

Recommended Skill Level
Beginner

Comments

Mudroom Bench with Easy Drawers

Submitted by GeekAthair on Mon, 01/06/2020 - 20:12

We've been desperate for more storage in our little house and this build really helped. The whole bench is 103“ wide and each drawer gives us 24"x17" of usable space. We had to do some custom shaping for the benchtop (two joined fir 2x12's) fit as the walls are not square but in the end we were really pleased.

The hardest part of the project was getting all of this built and in place while working around a busy family as this is our only meal space and the majority of cutting/forming was done either on the weekends or after bedtimes. If I were to do this again I'd prioritize sending the kids to grandparents for the weekend and know king everything except for paint out in one go. 

We could have spent less time with the benchtop by using plywood like in the plans but we wanted the look of a separate benchtop. We may replace the fir with stained oak down the line but this should be plenty sturdy for the next several years. 

Built from Plan(s)
Estimated Cost
$300
Estimated Time Investment
Week Long Project (20 Hours or More)
Finish Used
Valspar paint, minwax clear poly
Recommended Skill Level
Intermediate

Comments

Great weekend project...the "love swing"

Submitted by Don Ellery on Mon, 05/19/2014 - 15:49

A great weekend project...the "love swing"! I used the plan from Ana for the swing seat and added two arm rests from left over 1x6, rounded them off and sanded.

I cobbled together an A-frame to hang everything, made from five 8 foot 4x4s and two 8 foot 2x6s laminated together for the stretcher. Assembled with 1/2" galvanized carriage bolts and hung with 1/4" chain.

Definitely going to want a good miter saw for the A-Frame angles (the top ones are a bit tricky to get everything lined up)

Love it! Thanks for another great plan Ana..and of course..Shanty2Chic!

Built from Plan(s)
Estimated Cost
$200 ish..including the A-Frame... the hardware and chain can be pricey!
Estimated Time Investment
Day Project (6-9 Hours)
Finish Used
Behr exterior weatherproofing stain - Chocolate.

Just 2 thin coats, dries fast...second coat can be applied later the same day.
Recommended Skill Level
Beginner

Comments

Carpenters Daughter

Mon, 12/12/2016 - 17:09

Could you please post the plans to build the a frame as well? I really love what you did and would like to copy it! Great Job!

Don Ellery

Wed, 07/19/2017 - 11:31

Hi! I wish I could, but I didn't take any notes on the angles or lengths when I made this and I left it with the house when we moved. 

Cedar planter and 3 tier planter

Submitted by Anonymous (not verified) on Tue, 08/04/2020 - 17:48

My very first attempts at wood working. My new COVID-19 hobby 🥰

Estimated Cost
20.00
Estimated Time Investment
An Hour or Two (0-2 Hours)
Recommended Skill Level
Beginner

DIY Lego Table

Submitted by hstreat on Mon, 05/01/2017 - 19:39

This is a Lego Table that I built my Grandson for his birthday.  I found the plans for it on Rogueengineer.com

https://rogueengineer.com/free-diy-lego-table-plans/


I switched things up a bit by routing all of the edges to soften them, and I added the little mover men casters under each of the legs.


It's one of the better projects that I done recently, and nothing beat the look on his face when he saw it...

Estimated Cost
Approximately $60.00, mostly cost of wood.
Estimated Time Investment
Weekend Project (10-20 Hours)
Finish Used
Minwax Golden Pecan & Winwax Clear Glossy Polyurethane
Recommended Skill Level
Intermediate

Cleaning Caddy

I wanted to build a cleaning caddy. Normally when I go to clean – I want to do it all at once. We have a bigger house – so I’ll be upstairs in the kids room – and realize I left the Windex downstairs – get upstairs – I left the paper towels downstairs….SERIOUSLY. So – hopefully this will stop that from happening!!!

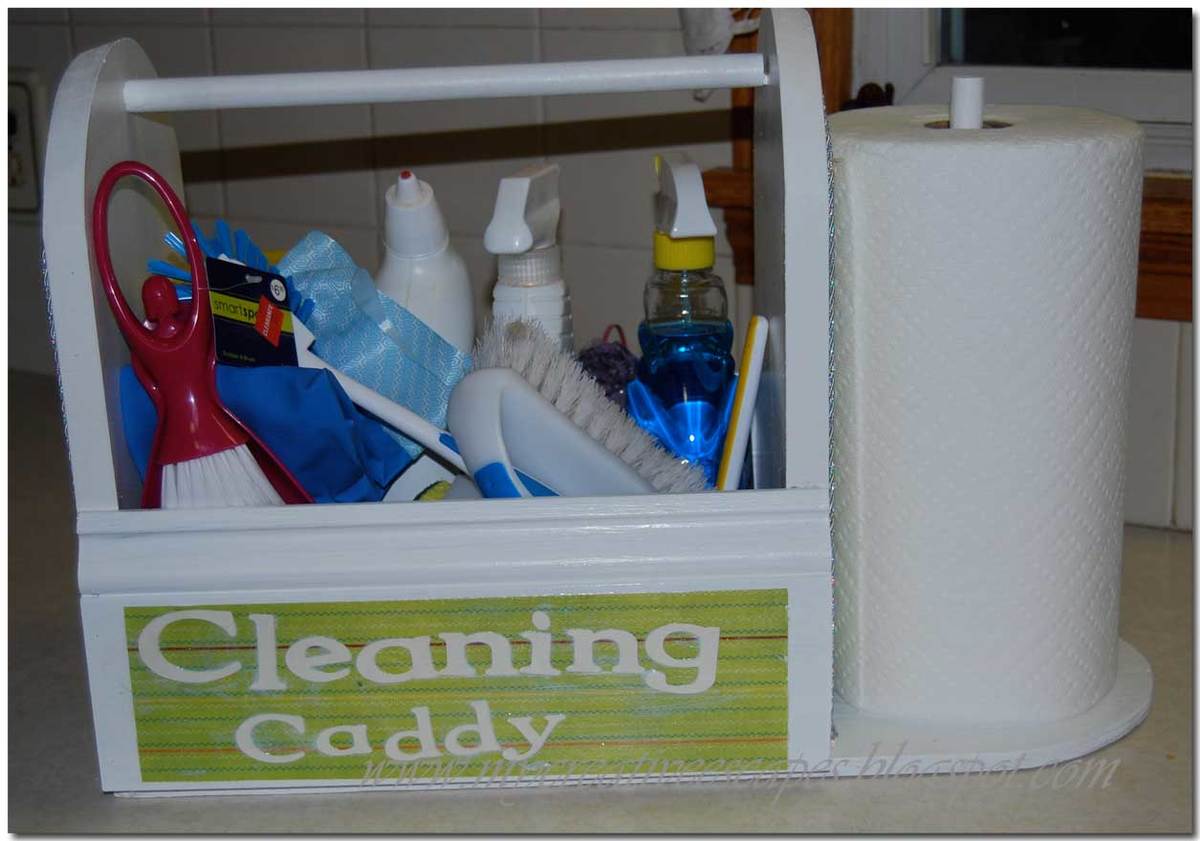
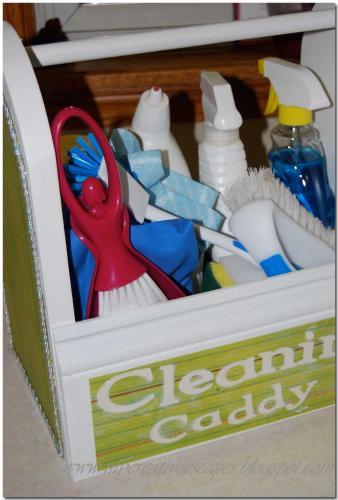
So – here we have my Cleaning Caddy!! It was actually pretty easy to build. I had everything on hand. I had the dowels from another project – so that is how I based everything.

I took two left over pieces of MDF and made a design, cut it out with a Jig Saw. I wanted to make sure it was tall enough for the cleaning bottles.

Then I screwed the dowel to each side of the MDF sides.

I then measure the length I needed for the sides – I used scrap base molding we had laying around – I don’t even know where it came from!

Then came the bottom – I measured out the sides – and then I wanted it long enough to hold a roll of paper towels.

Glued and nailed everything in with the nailer (always use glue too – this thing is kind of heavy with all the cleaning supplies)

I screwed the dowel in from the bottom for the paper towels.

I painted it many times with white trim paint – used many different types of wood so I wanted it to look uniform.

Then for the finishing touches – I went to my abundant scrapbook paper collection – Mod Podged it all up. Love that stuff!!! On the front – I cut out “Cleaning Caddy” with my Cricut. And on the sides I trimmed it out with cording I had on hand, just used hot glue and did about a 6 inch section at a time. I hot glued buttons where my screws were on the outside tops. My counter sink bit was the wrong size, so they stuck out a little. Now it’s a nice decorative element.

Estimated Cost
Free
Estimated Time Investment
An Hour or Two (0-2 Hours)
Finish Used
Sanding, priming, painting, mod podge
Recommended Skill Level
Beginner

Kids Adirondack chairs

Submitted by Anonymous (not verified) on Tue, 10/05/2021 - 04:46

This was my first time building a chair. The plans were so easy to follow. The kids size fits an average child up to about age 5 or 6. If I were to build again I would add a bit of height to the backs so they could fit them even longer. My granddaughters aged 3 & 5 just loved them.

Built from Plan(s)

Project Complete!

Here is my patio sectional made of 2x4s. Used my Kreg Jig for the first time to complete this project. I used pocket holes in as many places as possible, then finished it with two coats of leftover fence stain and two coats of semi-gloss outdoor Varathane spar urethane for a nice sheen. I modified the dimensions to fit the cushions that my wife purchased before I began the project. I made the back substantially taller to support the cushions and left the arms off of both ends of the sectional so people could sit facing sideways too. I left the corner of the sectional without a cushion so people would have a place to set drinks.

Estimated Time Investment
Afternoon Project (3-6 Hours)
Finish Used
Two coats of Behr transperent weatherproofing all in one wood finish stain in "chocolate" (leftover from our fence) and two coats clear semi-gloss outdoor varathane spar urethane.
Recommended Skill Level
Beginner
Seasonal And Holiday

DIY Chaise Lounge Chairs

Submitted by jroubinek on Wed, 07/06/2011 - 10:44

This was my very first project to take on with Ana's plans. It took a little longer than I would have liked only because I got frustrated and put it to the side for a MONTH. I realized how important it was to pre-drill my holes and then got the motivation to get back to it. Once I got started again, it was finished in NO TIME! I still need to stain one of them, but I couldn't be happier with the result.

Estimated Cost
$60
Estimated Time Investment
Weekend Project (10-20 Hours)
Finish Used
I used Wood Conditioner to make sure I didn't have to worry about blotchiness. Then I used a paintbrush to apply Minwax's Dark Walnut stain.
Recommended Skill Level
Beginner

Comments

geophyrd

Sun, 07/31/2011 - 07:55

I'm right in the middle of building one of these. My problem is that the 2x4s specified are 2" thick...having to rip them down and that took a lot of guts. Did them all except the long boards. Going to do those later today (if I don't melt) and when my wife can give me a hand.

How did you rip them to size?

Also, did you use a router table to round the edges?

MichelleC

Fri, 07/20/2012 - 09:21

These look great! Geophyrd...do you mean 2x2's? You just use the ones straight from the store, also referred to as furring strips...that will save you a lot of time and stress rather than ripping down 2x4's. When the plans say 2x2's, they aren't going to actually be 2", and the plans don't say that they have to be 2". Ana writes the plans as simply as possible without us having to do complicated steps like ripping down boards thank goodness!

Double Inset Bookshelf Doors

Submitted by dholubar on Wed, 08/21/2013 - 07:08

You made this project look so simple that I just had to try it. However, to suit my needs I had to make a few alterations to the plans. I had a set of bi-fold doors that were in need of replacement and I thought inset bookshelf doors would be the perfect way to replace them. This project was easy enough for me to do it myself and I am really new to the DIY game but I did have some help. I really love the way they turned out. You can read all about my my adventure at http://heresalittletmi.blogspot.com/2013/08/bookshelf-doors.html

Built from Plan(s)
Estimated Cost
$120.00
Recommended Skill Level
Beginner

Mini console table

Submitted by Mikegarrod on Sun, 02/21/2016 - 21:50

First table built by us. I think it turned out pretty good! Custom built to avoid baseboard heater. 

Built from Plan(s)
Estimated Cost
$30-50 depending on if you need stain or not.
Estimated Time Investment
Afternoon Project (3-6 Hours)
Finish Used
Minwax stain, water based paint and Minwax Polycrilic.
Recommended Skill Level
Beginner

Comments

kg112677

Tue, 06/28/2016 - 19:09

The plans catalog link does not work. Can you please repost these plans? Thanks

Dunnie

Sun, 01/15/2017 - 21:24

I am in desperate need of instructions for

this mini console table.  I can't find them anywhere. I won't be able to modify other plans, lol I need it all planned  out.

theUgly_bear

Tue, 01/17/2017 - 12:35

i plan on making this next week, so i can update you with the plans, the only thing i am doing different is the way i am doing my cross in the back. 

stay tuned 

theUgly_bear

Tue, 01/17/2017 - 12:35

i plan on making this next week, so i can update you with the plans, the only thing i am doing different is the way i am doing my cross in the back. 

stay tuned 

Mrs.tash

Sat, 02/04/2017 - 13:12

This is beautiful and simple! Great job!

You costum built it to fit the baseboard, were the original plans Ana White's? Can you link it or tell me the name to find it?

I'm new to the site and not navigating very well. I'm trying to save plans for a console similar to this to my profile/account and looking for the little "save to plans" to easily find this again