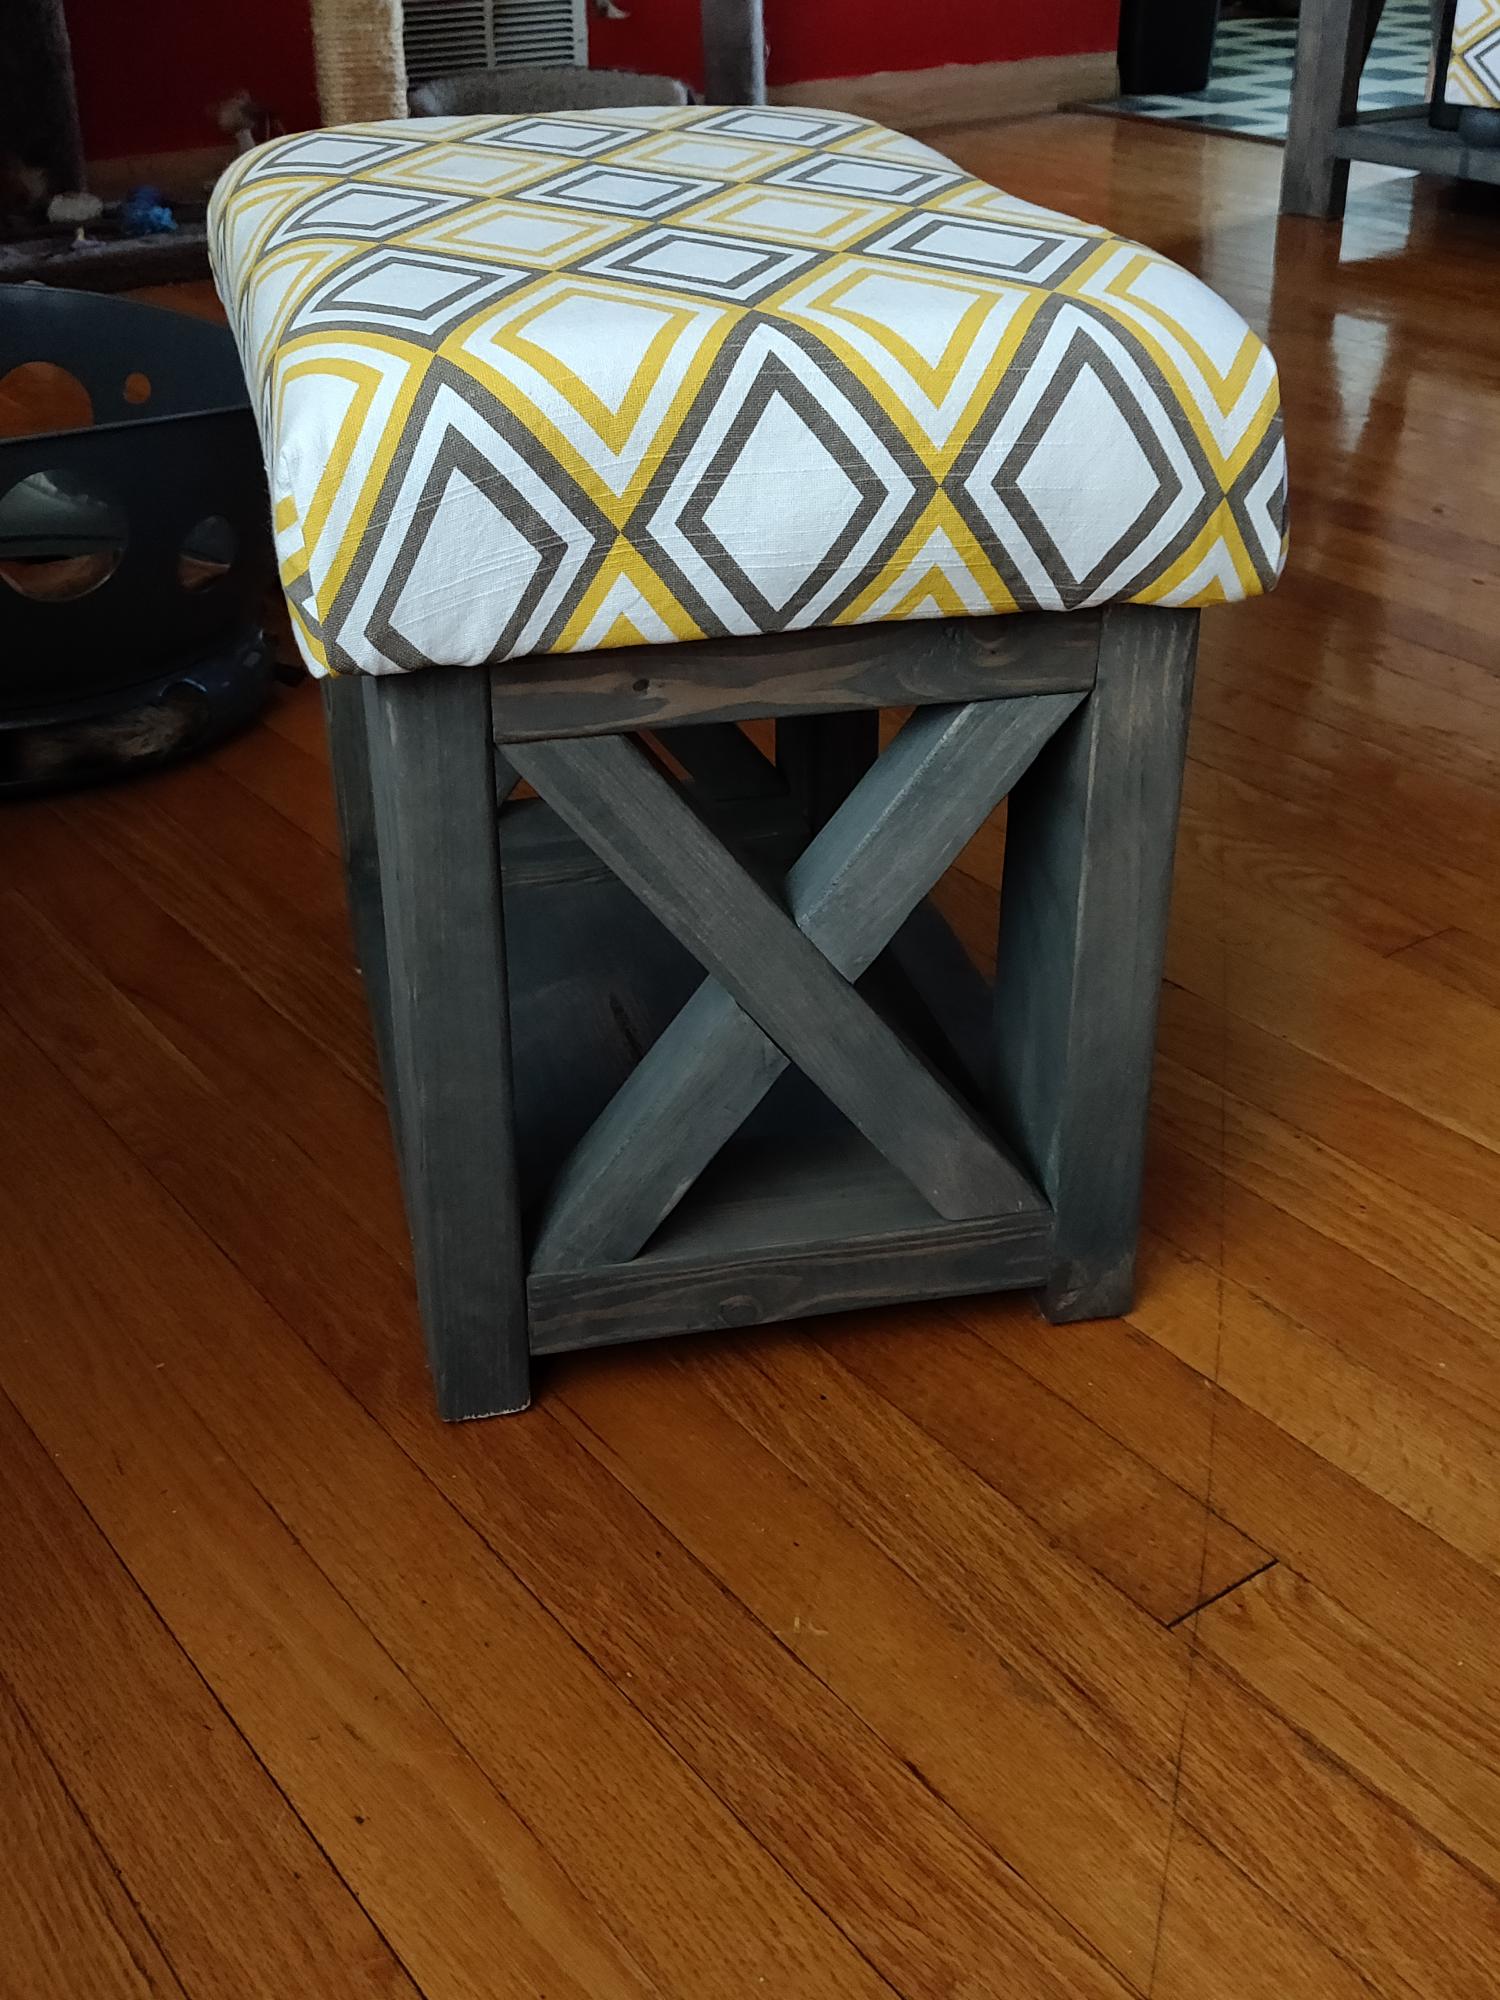
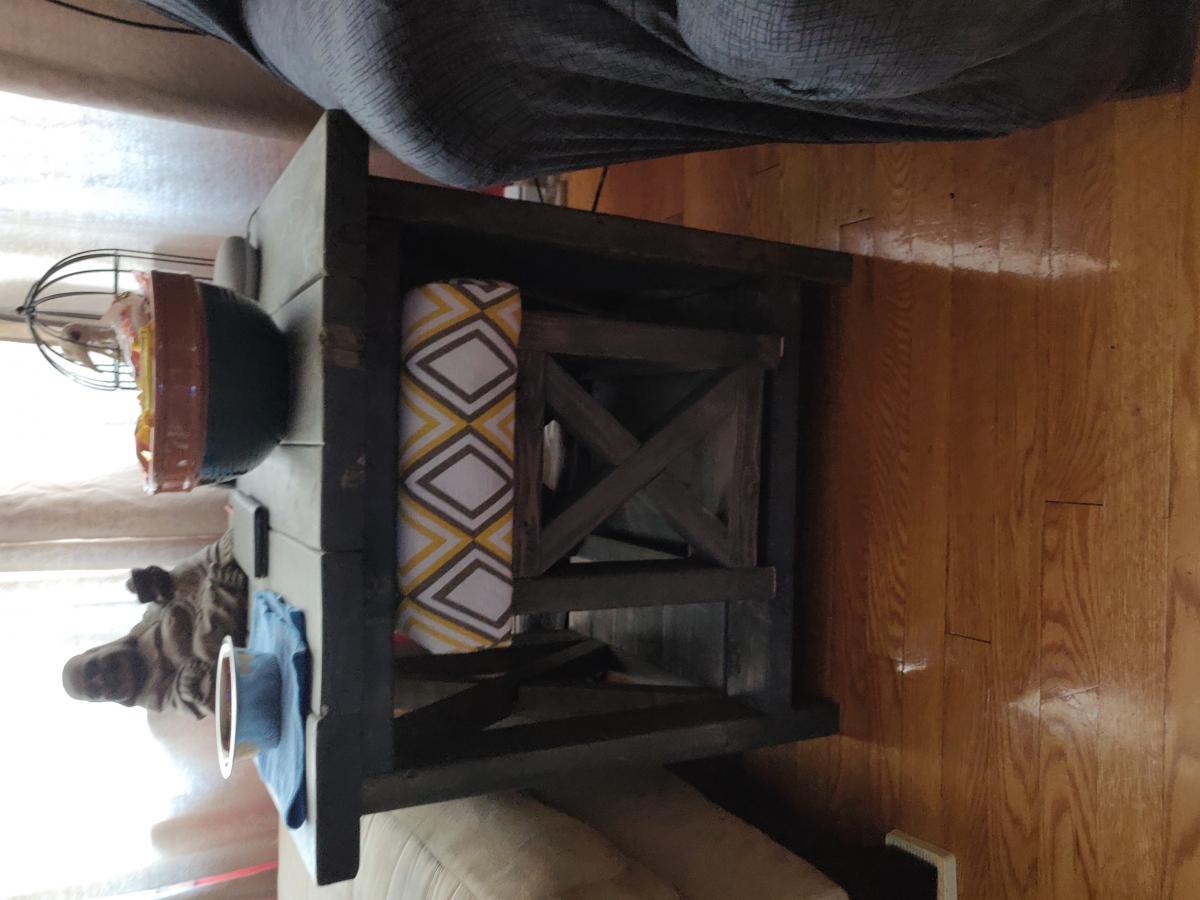
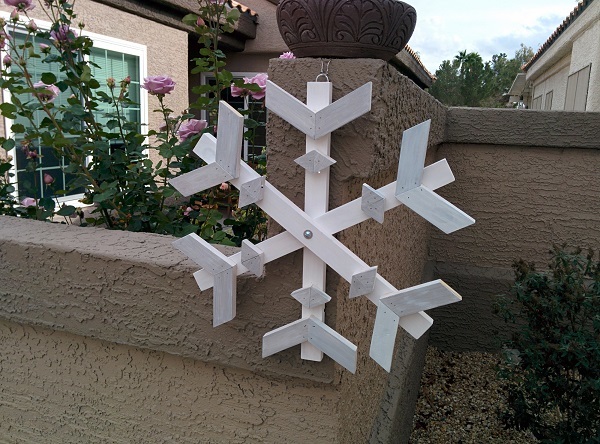
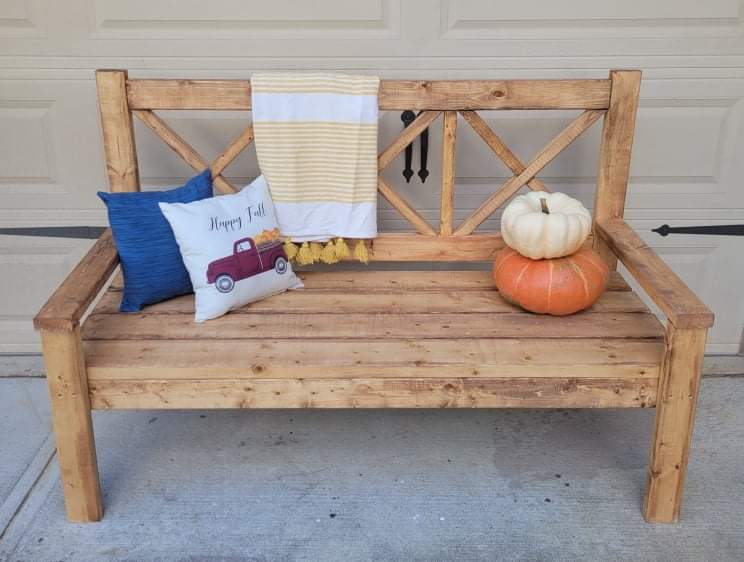
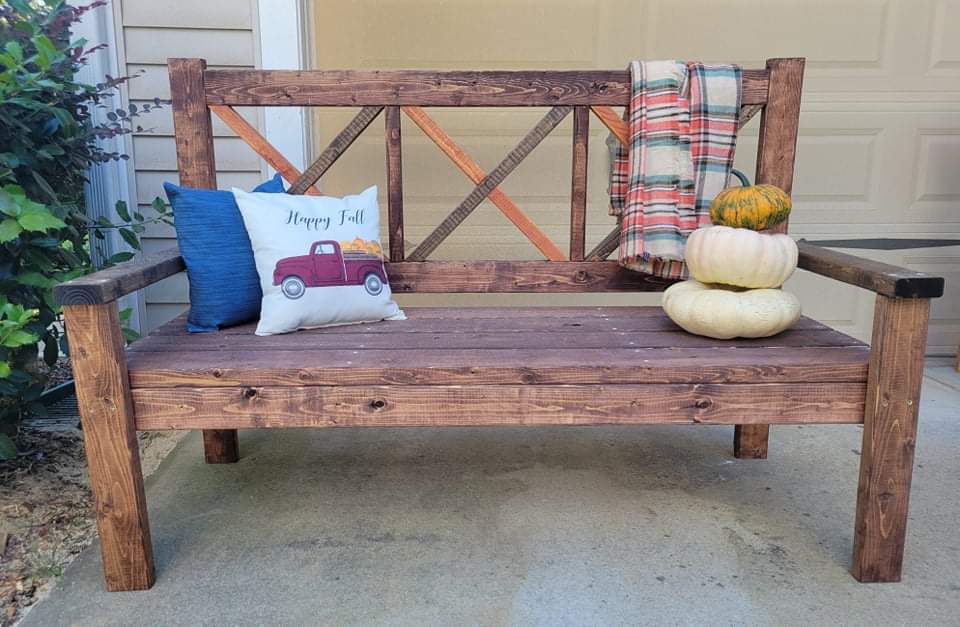
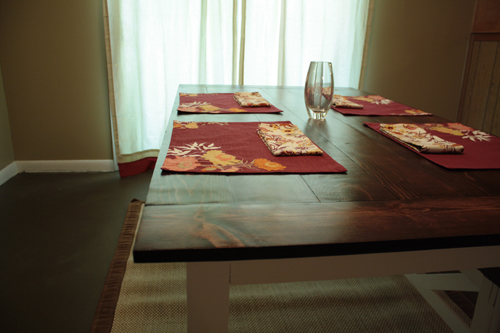
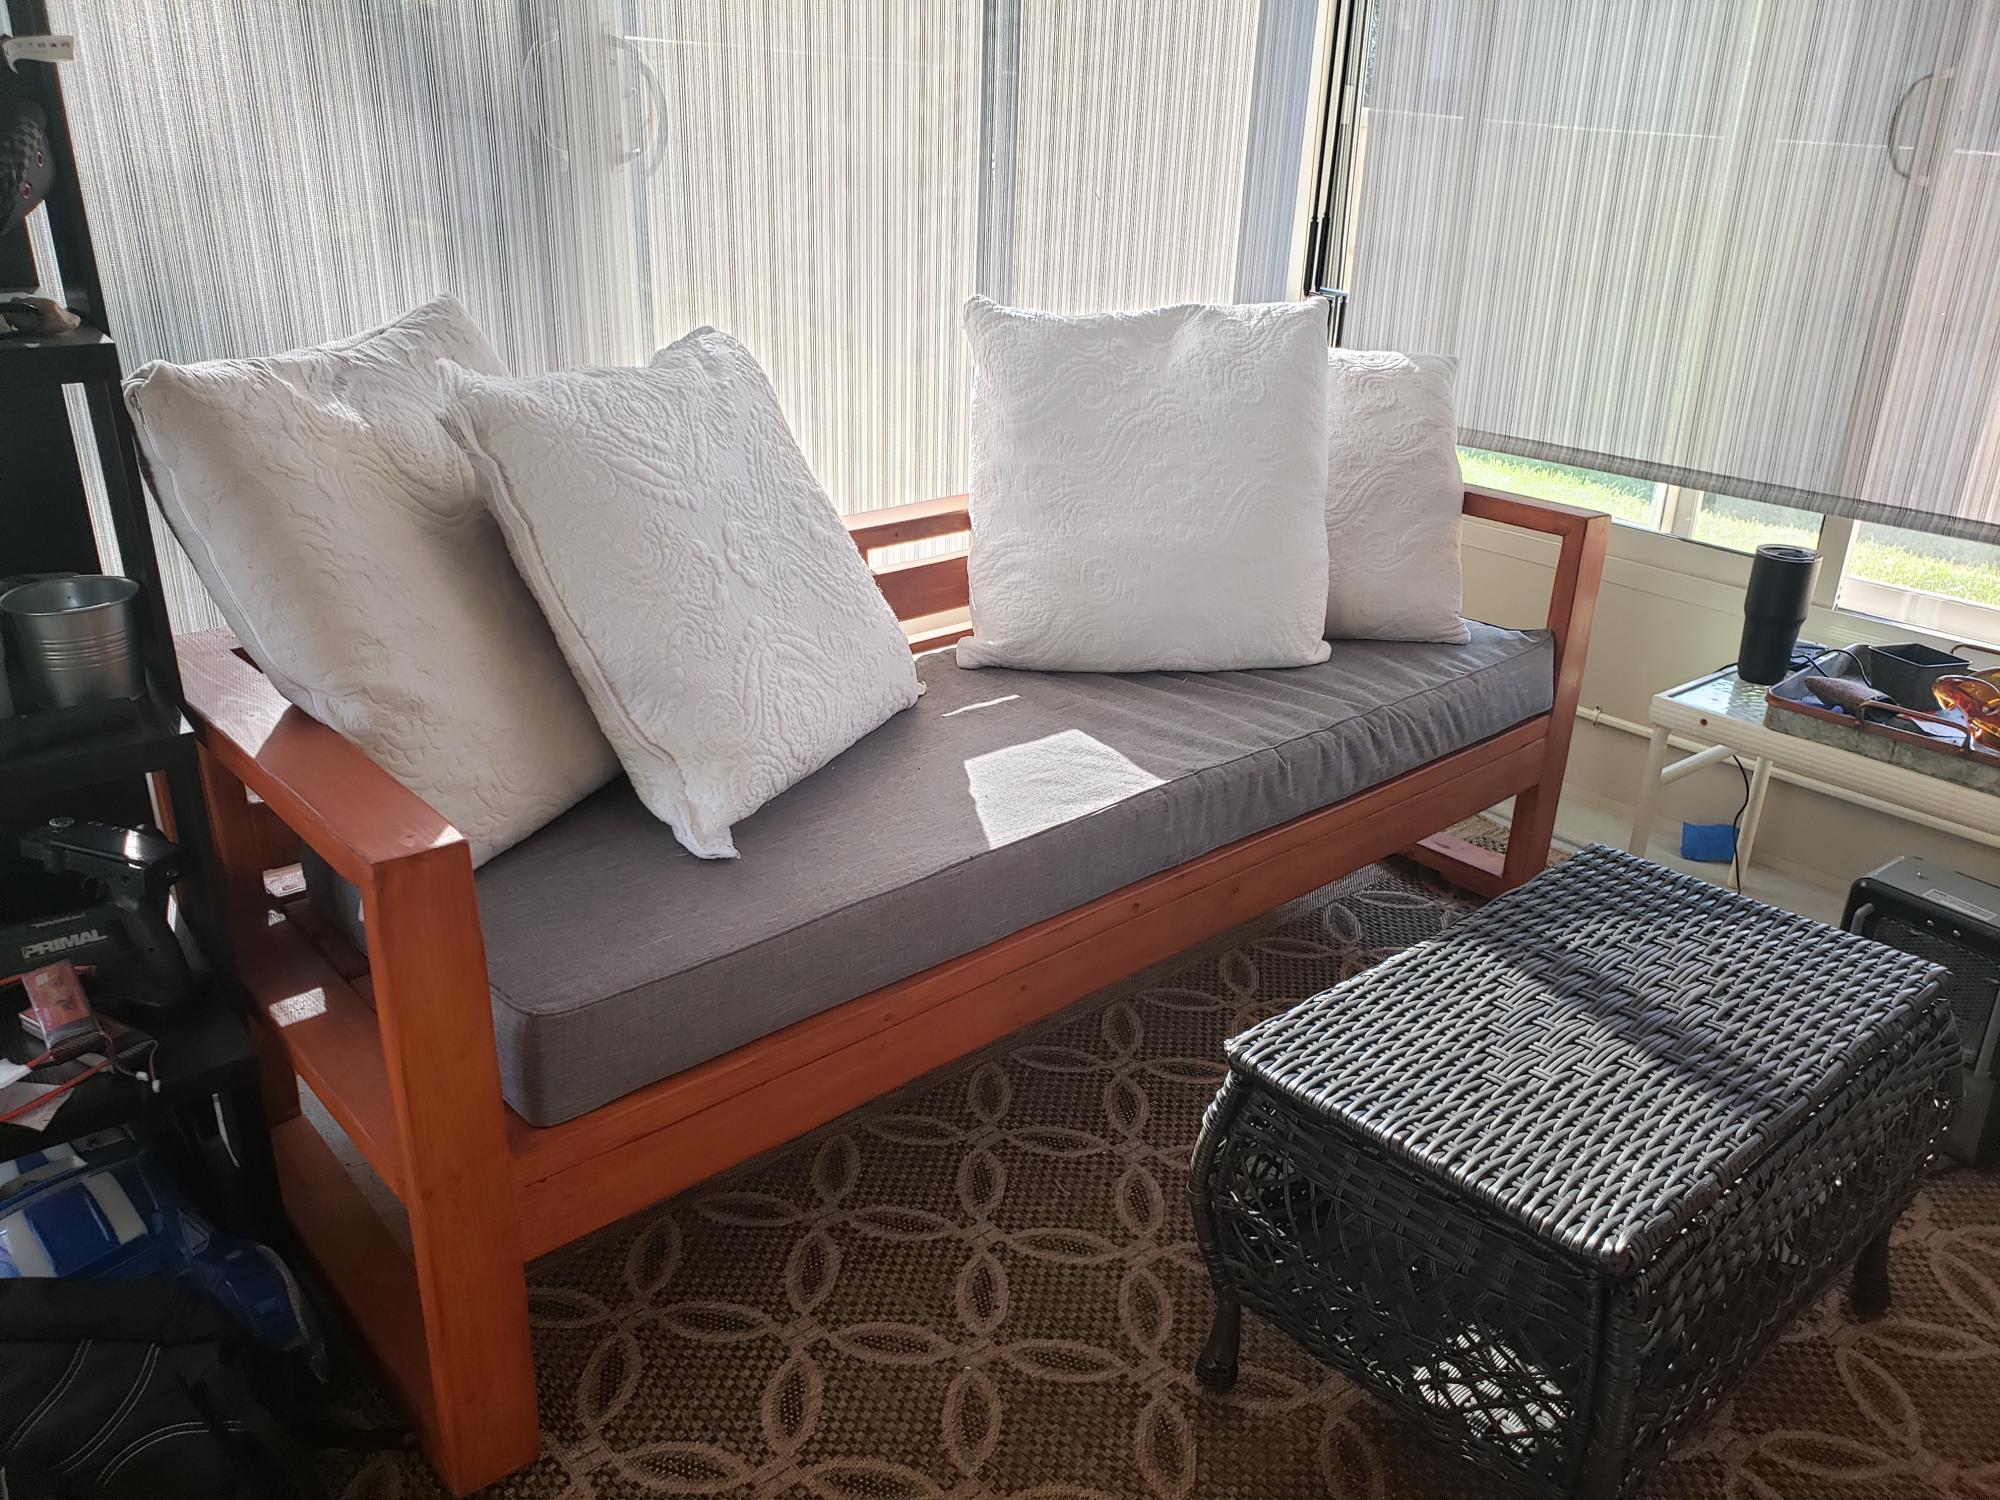
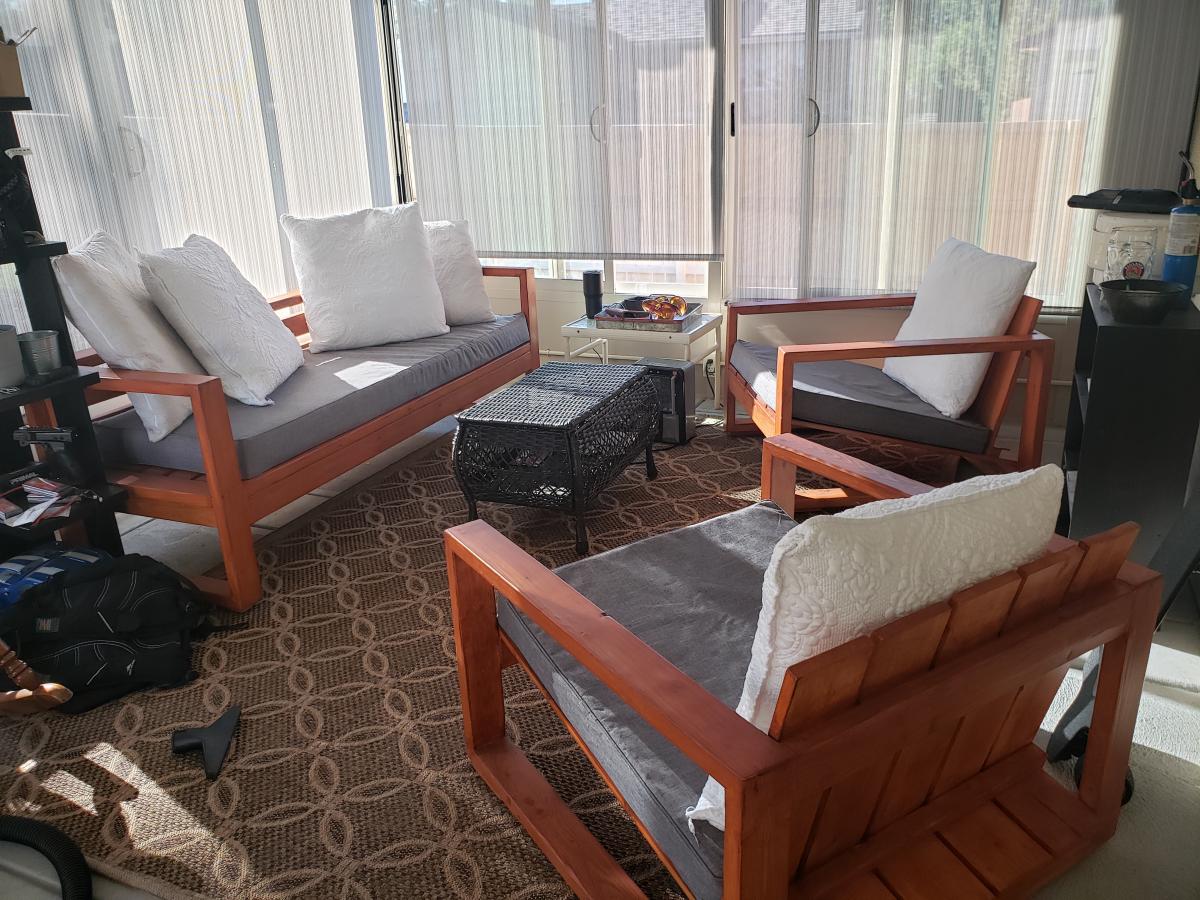
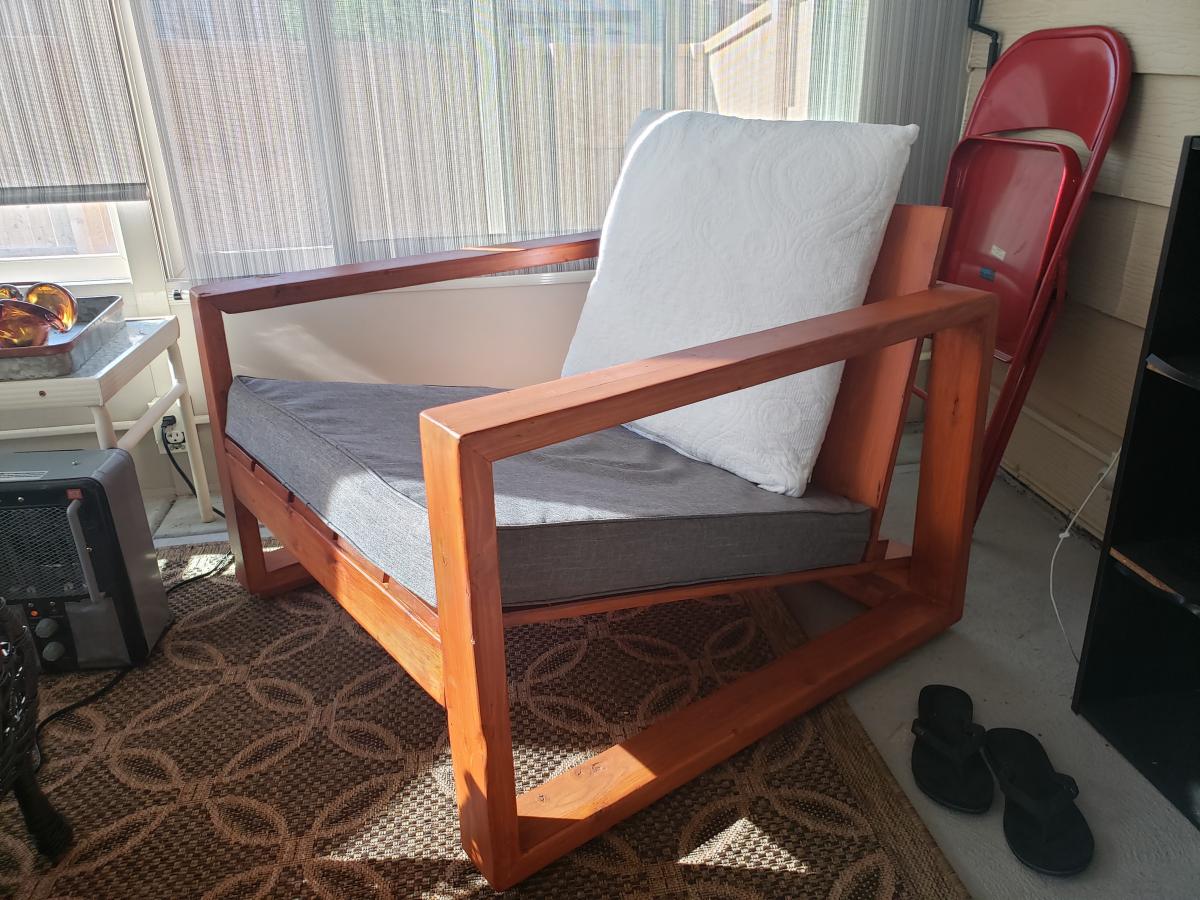
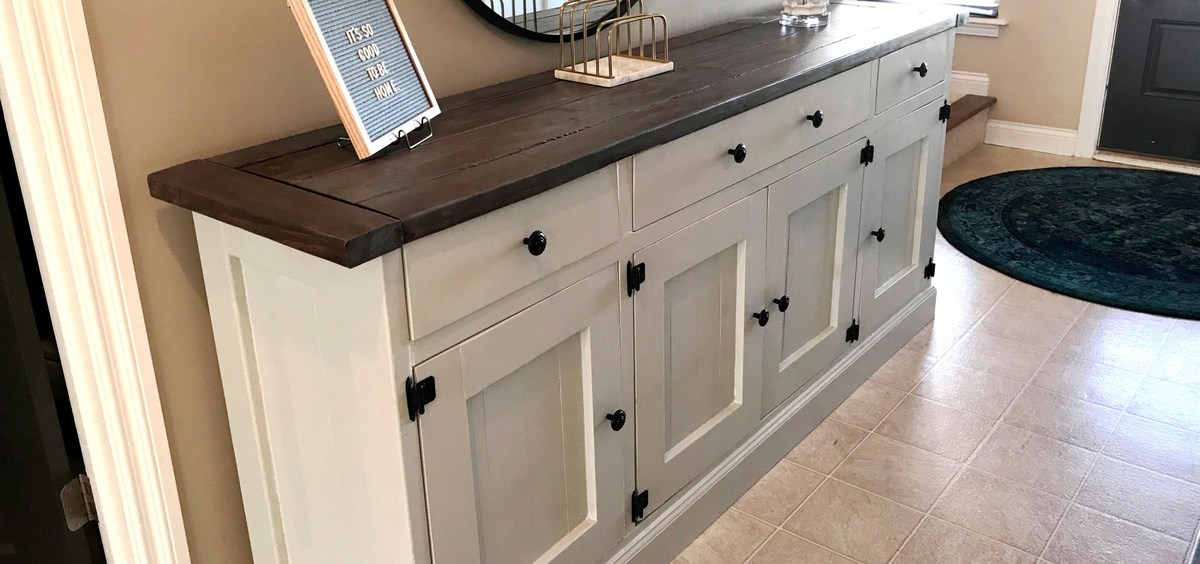
Community Brag Posts

Double X Bench

Submitted by Anonymous (not verified) on Sun, 10/09/2016 - 18:00

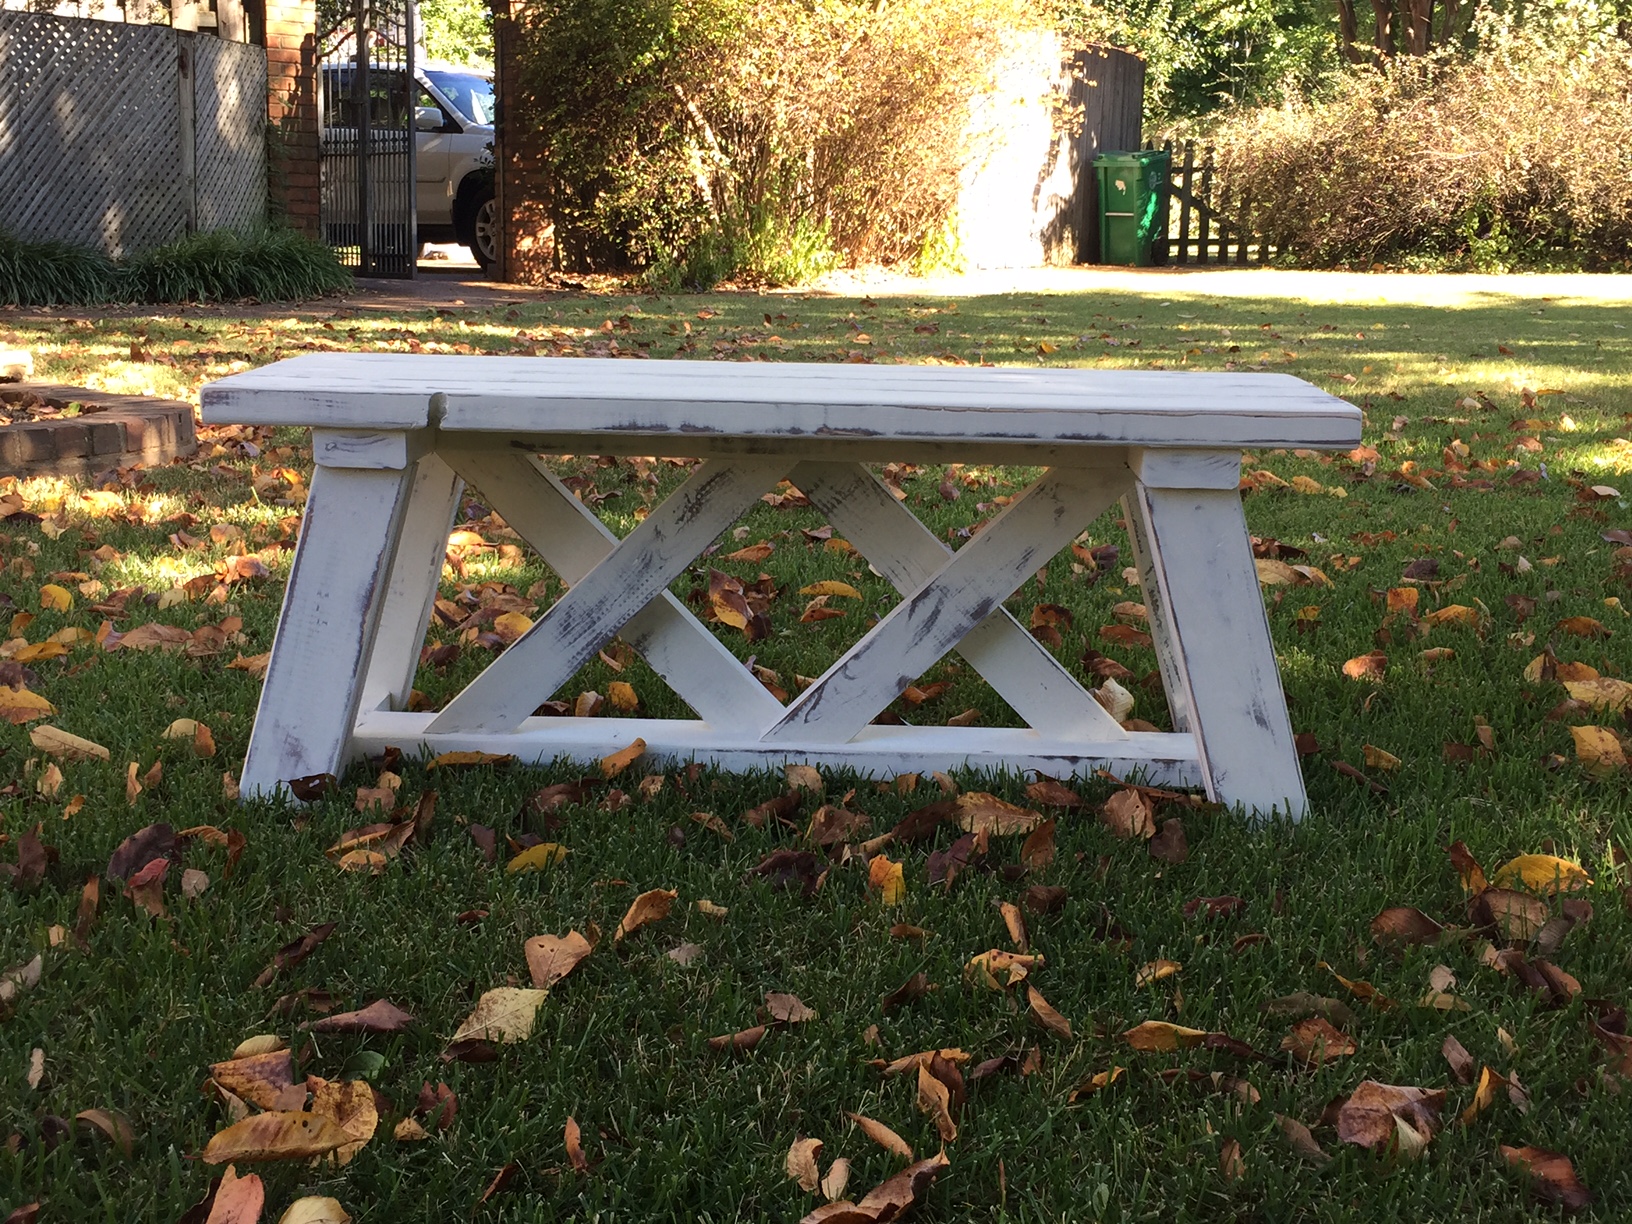
This was the second double x bench that I made.  It was very simple to make.  It took me around 3 hours to build it and another 2 hours to sand, stain and paint it (this does not include the  1 hour between coats that I allowed them to dry).  I used Annie Sloan Old White Chalk Paint and General Finishes Java Gel stain.  Annie Sloan Chalk paint does NOT need a topcoat if it is being used outside.

Built from Plan(s)
Estimated Cost
$15 - i already had the stain, paint and screws.
Estimated Time Investment
Afternoon Project (3-6 Hours)
Finish Used
Annie Sloan Old White Chalk Paint
General Finishes Java Gel
Recommended Skill Level
Beginner

Comments

Tall Wedding Planters

Submitted by swhitead on Mon, 07/20/2020 - 10:14

Made the planters to hold flowers for a small garden wedding. Used 3-1/2" wide fence boards as my HD was out of standard 5-1/2" boards. Used 11 boards for finished height of 38" top was 18" wide, bottom 12-1/2" using a 4° angle. Ripped fence boards to size to use in place of 1x2/1x3 boards. Added center trim as on another brag post, as well as, framed the top to finish off the planter.

Built from Plan(s)
Estimated Cost
$20 each
Estimated Time Investment
Afternoon Project (3-6 Hours)
Finish Used
None
Recommended Skill Level
Intermediate

Comments

Wall Attached Storage Shelves

Submitted by Anonymous (not verified) on Sat, 08/29/2020 - 18:21

We just moved onto a new house with ample unused space I. The unfinished part of the basement so I decided to make a 12’ wall of storage shelves, altering Ana’s plans just a little bit. I did two 24” tall shelves on bottom and two 18” y’all shelves up top. It was a fun project and I got to use my Kreg HD Jig for the first time! These shelves are SOLID!

Estimated Cost
$150
Estimated Time Investment
Afternoon Project (3-6 Hours)
Recommended Skill Level
Beginner

Footstool

Submitted by MandyM on Sun, 09/20/2020 - 14:22

Made a footstool by modifying the rustic X end table plans. I used all scrap wood, foam, and fabric from my various stashes so this was free for me to make. Also, on all of my x tables, I use a dado blade so the exes are intact and not cut and screwed.

Built from Plan(s)
Estimated Cost
$0
Estimated Time Investment
Afternoon Project (3-6 Hours)
Finish Used
Charcoal grey stain

Comments

Farmhouse Table

My husband and I love entertaining, but our small kitchen table was just not cutting it for both our space and our hosting abilities. We decided that instead of searching for the perfect table and spending a ton of money, we would just build our own table. We found that Ana's Rustic Table plans best matched what we were looking for, but my husband being the detailed person that he is didn’t just want to take her measurements and run with them. So we taped off the floor around our old table to decide how large we wanted our own table to be.

We basically followed Ana White’s plans to a T. Until it got to the legs. Ana White used 2×4′s for her legs, but we decided we liked the look of chunkier 4×4 legs instead. We also did things in a different order, like attaching the legs to the apron before attaching the table top. This did make everything way easier when it came to painting, no tape needed. We also stained the bottoms and sides of the tabletop boards before attaching them to the apron. After the top was attached I stained the top side and applied about 3-4 coats of Matte polyurethane. I like the matte finish because it doesn’t add any sheen and makes things look even more rustic; however, we’ll have to add a regular coat of poly as well because the matte is too soft for something that will see such rough use over the years. And now for what you’re all wondering about, how much did this project cost us?

  • Wood – $86
  • Stain (Dark Walnut) – $7.77
  • Paint (Olympic Snow Storm) – $11.97
  • Polyurethane (Rustoleum Matte finish) – $11.93
  • If that is all we needed to buy then our total would have been: $117.67.
Built from Plan(s)
Estimated Cost
$300
Estimated Time Investment
Weekend Project (10-20 Hours)
Finish Used
Dark Walnut
Recommended Skill Level
Beginner

Comments

mistyclinton

Mon, 12/31/2012 - 09:43

Your table is gorgeous! You did an amazing job.

I am getting ready to attempt my first two projects, bookshelves and a buffet table. I had a couple of questions about how you got such a consistent stain.

1) The Stain - What kind of stain did you use? How many coats did it take? Did you use a conditioner first?

2) Wood filler - How did you get the wood filler to match the stained areas so well? What kind did you use?

Thanks for the advice! I was thinking I would have to paint the buffet but after seeing your table I think I may actually attempt the stain.

Garage Storage from Rescued Lumber

My daughter and I used these easy plans to build these two shelving units for the garage. We altered the plan slightly.The sizes that I used were determined by the lumber I had available as we used rescued lumber for this project. The height on each is 5' (tallest 2x4's we had) and the length is 64". All I had for 2x4's were 48" pieces so we used some other rescued lumber for the shelves. We used whatever we had. So they are made from misc lumber. The 2x material made for the strongest shelves. Depth is 17" as in original plans. 

We added additional brackets for support under a couple of the shelves. We also attached to the wall to avoid tipping. I absolutely love these. So useful. No more unstacking each tote to find out what's in the bottom one. I LOVE IT! Thanks for the plans.

We completed these in one afternoon. 

Estimated Cost
Used rescued lumber and screws already on hand.
Estimated Time Investment
Afternoon Project (3-6 Hours)
Recommended Skill Level
Starter Project

Workbench

Submitted by Anonymous (not verified) on Sun, 11/22/2020 - 05:47

Thanks for the simple plans Anna, they worked out great!. I resized the table to make maximum use of the material, still within the same quantity you specified in your plans. I glued the legs along the lengths of the table, and kept the table top and shelf screwed in, for easy dismantling, if necessary.

Finally I added pop down heavy duty wheels allowing me to move the table (not shown in this pic) easily. When the wheels are not being used they pop up, making the table very stable. The height of the table is about 1/2” lower than the table saw, making it an ideal outfeed table as well.

Great design, and fun build.

Estimated Cost
Cn$148 (went with a finished 3/4” 4x8’ ply board)
Estimated Time Investment
Day Project (6-9 Hours)
Finish Used
None
Recommended Skill Level
Intermediate

Comments

snowflake and Christmas tree from scrap wood

Submitted by CSaintD on Tue, 12/16/2014 - 13:21

I made a couple of decorations from my scrap wood.   On the snowflake, I had some extra parts of 1x2s laying around so sized this down to 20" and used those.  The tree is just a bunch of different types of wood I had left over.  This was really fun to do. 

It took me a little over a day as I had to paint and wait for it to dry before I could assemble.

Thank you for the ideas and plans.

Estimated Cost
Free as I used scrap wood
Estimated Time Investment
Day Project (6-9 Hours)
Finish Used
Tree - most wood left unfinished, a few painted with craft paint.
snowflake, main body white craft paint with metallic silver on top.
Recommended Skill Level
Starter Project

Comments

Loft Bed with Desk & Bookcase

Submitted by Anonymous (not verified) on Tue, 04/04/2017 - 12:47

Created but Modified from the plans found on here, my daughter has a great new bed. This bed saved a ton of space in her very small room. PLUS it allowed her to have an area to do her homework and all the art projects she does! Very easy build. Took a day to build and another to paint. 

Estimated Cost
$250.00 CDN
Estimated Time Investment
Weekend Project (10-20 Hours)
Finish Used
Behr Marquee Paint
Recommended Skill Level
Beginner

Modified Fancy Hall Tree

Modified the dimensions to 13 inches deep, 40 inches wide and a lower clearance of 4 inches to accommodate a vent diverter for an exsisting heat vent.

I used Maple Plywood (3/4 inch) for the bench, and 1/2 inch for the back (to allow maximum seating depth on the bench).  The paint was leftover Valspar reserve paint from a recent bathroom project... and the paint dipped baskets were found at a local store called "the christmas tree shops" for under 25 dollars for both!


The project came in at just under $150 - well below our budget if we had purchased something in store. It was mounted to the wall for safety, as we have a dare devil toddler! 

Built from Plan(s)
Estimated Cost
$140
Estimated Time Investment
Weekend Project (10-20 Hours)
Finish Used
Valspar Satin in Fragile Blue
Recommended Skill Level
Beginner

Comments

rosesrred24

Mon, 05/25/2015 - 18:04

It looks awesome! I need the exact same measurements! Unfortunately I'm not smart as you :p , by any chance do you still have the measurements I would need, if so please share. Thanks

Counter height bar stools

Love my new bar stool, now to build 3 more.    I think it turned out great.

Built from Plan(s)
Estimated Time Investment
Afternoon Project (3-6 Hours)
Finish Used
I used dark walnut for the stain for the seat and painted the rest.
Recommended Skill Level
Beginner

Comments

Large porch bench

Submitted by Lukilla on Mon, 09/27/2021 - 13:51

What a fun project, and great bench. We had someone ask us if we could make this for them, and we decided to make 2 while we were at it.....now we just need to find a spot big enough for the second one at our house. Loved this build, and look forward to sipping coffee on it on a cool morming.

Comments

Seasonal And Holiday

Cat Tree/Condo

Submitted by Joni on Sat, 05/11/2013 - 07:22

I always wanted a cabin-type cat tree where my cats could crawl in and feel safe, but still have a great view of the birds out of a window. I tried to draw my vision on paper, but that had a hideous result. Learning Google SketchUp (at least the basics) was an absolute necessity. I could never have built this without drawing it in 3D first, and seeing how the boards would connect, etc.

For the scratch pad, I built a frame out of 2x4s on top of plywood, covered it with carpet, and dropped the standard size scratch pad in place. This is the cat's favorite feature. I put barn doors on the window with tiny hinges so that I can close for added privacy. The tree sits against a window so that the back side is totally open. I made cozy zippered cushions for the platforms (that can be taken off and washed). I covered the carpeted areas with spare carpeting.

Estimated Cost
Approx. $30 for can of paint, varnish and a 4x4 (all other was scrap material)
Estimated Time Investment
Weekend Project (10-20 Hours)
Finish Used
Combination of Minwax Water-based stains: 6 parts Colonial Pine: 1 part American Walnut, followed 3-4 coats Minwax Polycrylic
Recommended Skill Level
Intermediate

Comments

bhoppy

Fri, 07/12/2013 - 09:36

Would you mind sharing your dimensions for this? It is absolutely beautiful!

Jodi W

Sun, 08/25/2013 - 08:10

Do you have the plans somewhere? I really want to build this (even got the okay from the hubby!) but I don't think I could do it without some serious guidelines...

Joni

Fri, 08/30/2013 - 15:55

First, sorry for the late notice; I just happened to look and saw the comments/questions.

I don't have plans...all I have is a google sketchup diagram that I created as a guideline for my construction (which is included in the photos), which is not to scale. Actual measurements are:

* Base (green carpeted base): 33.5" x 19"
* 4x4 legs: 35" tall
* 'Mezzanine' scratch pad level: 22" x 17.5"
* Mid-level base: 18" x 32"
* Enclosed cabin: 18.25" x 22.5" x 17" high
* Highest point: 56"

This has turned out to be a fantastic hit with the cats. They use all 5 levels, but the scratch pad and cabin are their favorite spots. If you need anything else or additional pics, please contact me.

Jodi W

Fri, 08/30/2013 - 18:15

Thanks for the dimensions, Joni! I'm trying to learn SketchUp so I can draw up my own plans, also. If I can't figure it out, I'll hand it off to my 12 year old, who is a pro at it (go figure). I know my cats will love it if I can manage to get it built!

Joni

Thu, 10/31/2013 - 14:30

Bhoppy -- I looked at your cat tree on facebook. It's awesome! The sturdiness of it shocked me too. And I was initially worried that my cats might knock it down!!

The worst part of building it was getting that lower scratch pad level on straight with the 3 posts. I'd never want to do that again!
Thanks for sharing, Joni

gregmasciola

Fri, 01/02/2015 - 01:18

Funny, almost every time I'm looking for ideas or inspiration when I want to build something, I end up back on this site. I was searching for pictures of cat trees and this was the only one that made me say "Holy crap, that's EXACTLY what I want!" My cat will love it!

M0710NM4N

Mon, 04/27/2020 - 20:41

Not sure if anyone is still around to see this, but I fell in love with this tree the second I saw it. Wondering if anyone created a detailed plan and might have it handy or possibly a detailed sketchup and wouldn't mind sharing the save file?

In the event nobody has either... I'm planning on having someone else build this for me as I don't have the tools nor skill to do it myself. I have a few questions:

1. The tree base/platform, what's a good recommended thickness?
2. The platform for the scratchpad... is there any certain reason it's so much thicker compared to the other platforms?

Thanks.

whiteroses9

Sun, 09/12/2021 - 11:51

Reverse engineering this project, using just 2x4s. None of the photos show the undersides. How are the plywood pillow bases attached for the top and bottom of the cabin? and the base of the top viewing platform?

Farmhouse Dining Table & Rustic Bench

With a couple of projects under our belts, my husband and I decided to tackle the Farmhouse Table. We shortened it to 6' to better fit our dining room, and also chose 1x6's instead of 2x6's to give it a lighter look. We also nixed the stretcher, and opted for 3x3 poplar table legs, that made the overall cost jump quite a bit. I absolutely love how it turned out, and the bench really fits well. It's stained and painted to match.

Estimated Cost
$120 for table, $15 for bench
Estimated Time Investment
Week Long Project (20 Hours or More)
Finish Used
Minwax gel stain in Dark Mahogany, semi-gloss white paint. I sanded the table within an inch of it's life with 60 grit, then upped it to 150, then 220. Used 220 between three coats of white paint for the legs. Sealed with 3 coats of polycrylic.
Recommended Skill Level
Advanced

2x4 sofa and chairs

Submitted by Anonymous (not verified) on Mon, 10/04/2021 - 15:08

Well, I had just bought a house. We had no furniture for our sunroom, so I took it upon myself to build some while materials were still cheap.
Hindsight, the chairs rear end should have been a level seat instead of trying to build an Adirondack style club chair. I modified the ends to match the modern style so they would match the chairs.
The sofa turned out great, all are solid and built with pocket screws. Sealed with redwood deck sealer, should last forever!
For the covers, we had them made from covers and all, and went to the local Joann and bought 4" thick foam.and wrapped it with with polyfill. Can't tell that they were made in a backyard, but they've been great for 18 months so far!

Comments

Doll Crib

Built for my daughters 2nd birthday. 

Estimated Time Investment
Day Project (6-9 Hours)
Finish Used
Chalk paint, and white spray paint sprayed over lace. Distressed and dry brushed the blue chalk paint back over for a worn look.
Recommended Skill Level
Beginner

Used 2X2s to support the wings.

I essentially stuck to the main plan - except to support the wings I used 2X2 boards and standard hinges.

I was worried that there may not be enough space for my Ryobi 10" sliding miter saw because of the slide however, it fits nicely and there is plenty of space.

Thank you for the wonderful plan. This was my first project of this size and I am very happy with the results!

Built from Plan(s)
Estimated Cost
More than I expected. $39 for the plywood (sanded), $16 for the 4 hinges, $17 for the 4 caster wheels. The boards I already had.
Finish Used
None
Recommended Skill Level
Intermediate

Comments

jennibee

Fri, 05/01/2015 - 08:10

This is great. I am currently getting my Dad's help to turn an old kitchen cabinet into a miter saw cabinet with wings like this. (it was a 1940's solid wood kitchen cabinet we took out of the house when we remodeled). I really like your 2x2 support struts. Have you considered putting a shelf in the middle of your box? It would add extra support and also more room to store stuff.

richsessums

Sat, 05/02/2015 - 09:09

Good idea. I did consider adding a shelf however I have now decided to use the lower area to store my small router table. I discovered that it would fit in the spot however it leaves not enough room for a shelf.

DIY Potting Bench

I’ve been wanting a potting bench for a while now - something by the back door to display some decor, use as an outdoor work station, and double as a place for UPS to leave packages. After looking around online and at local stores, I couldn’t find anything that I liked that fit the narrow space - so I did what any #woodworkingmom would do, I decided to build it myself. Please see my blog post for additional photos and lessons learned during this project.

Built from Plan(s)

Comments

Seasonal And Holiday

DIY Rustic Sideboard

I worked on this project over the course of a few months, and I absolutely love the result! I posted all the info at my blog: http://www.designatedspacedesign.com/2017/10/01/a-rustic-sideboard/


Built from Plan(s)
Estimated Cost
Around $400
Estimated Time Investment
Week Long Project (20 Hours or More)
Finish Used
I painted it repose gray by sherwin williams. The top is a mixture of dark walnut and weathered gray stains.
Recommended Skill Level
Intermediate

Garage shelving unit to inside shelving unit with barn door

Submitted by Anonymous (not verified) on Mon, 12/27/2021 - 12:08

We too you’re 2x4 shelving unit with some small tweaking of measurements and added a barn door!

Comments