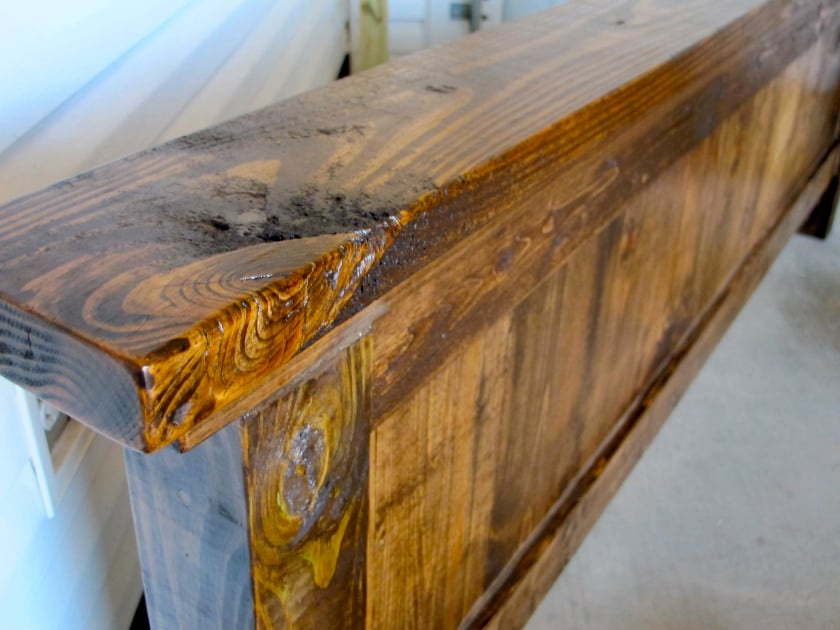
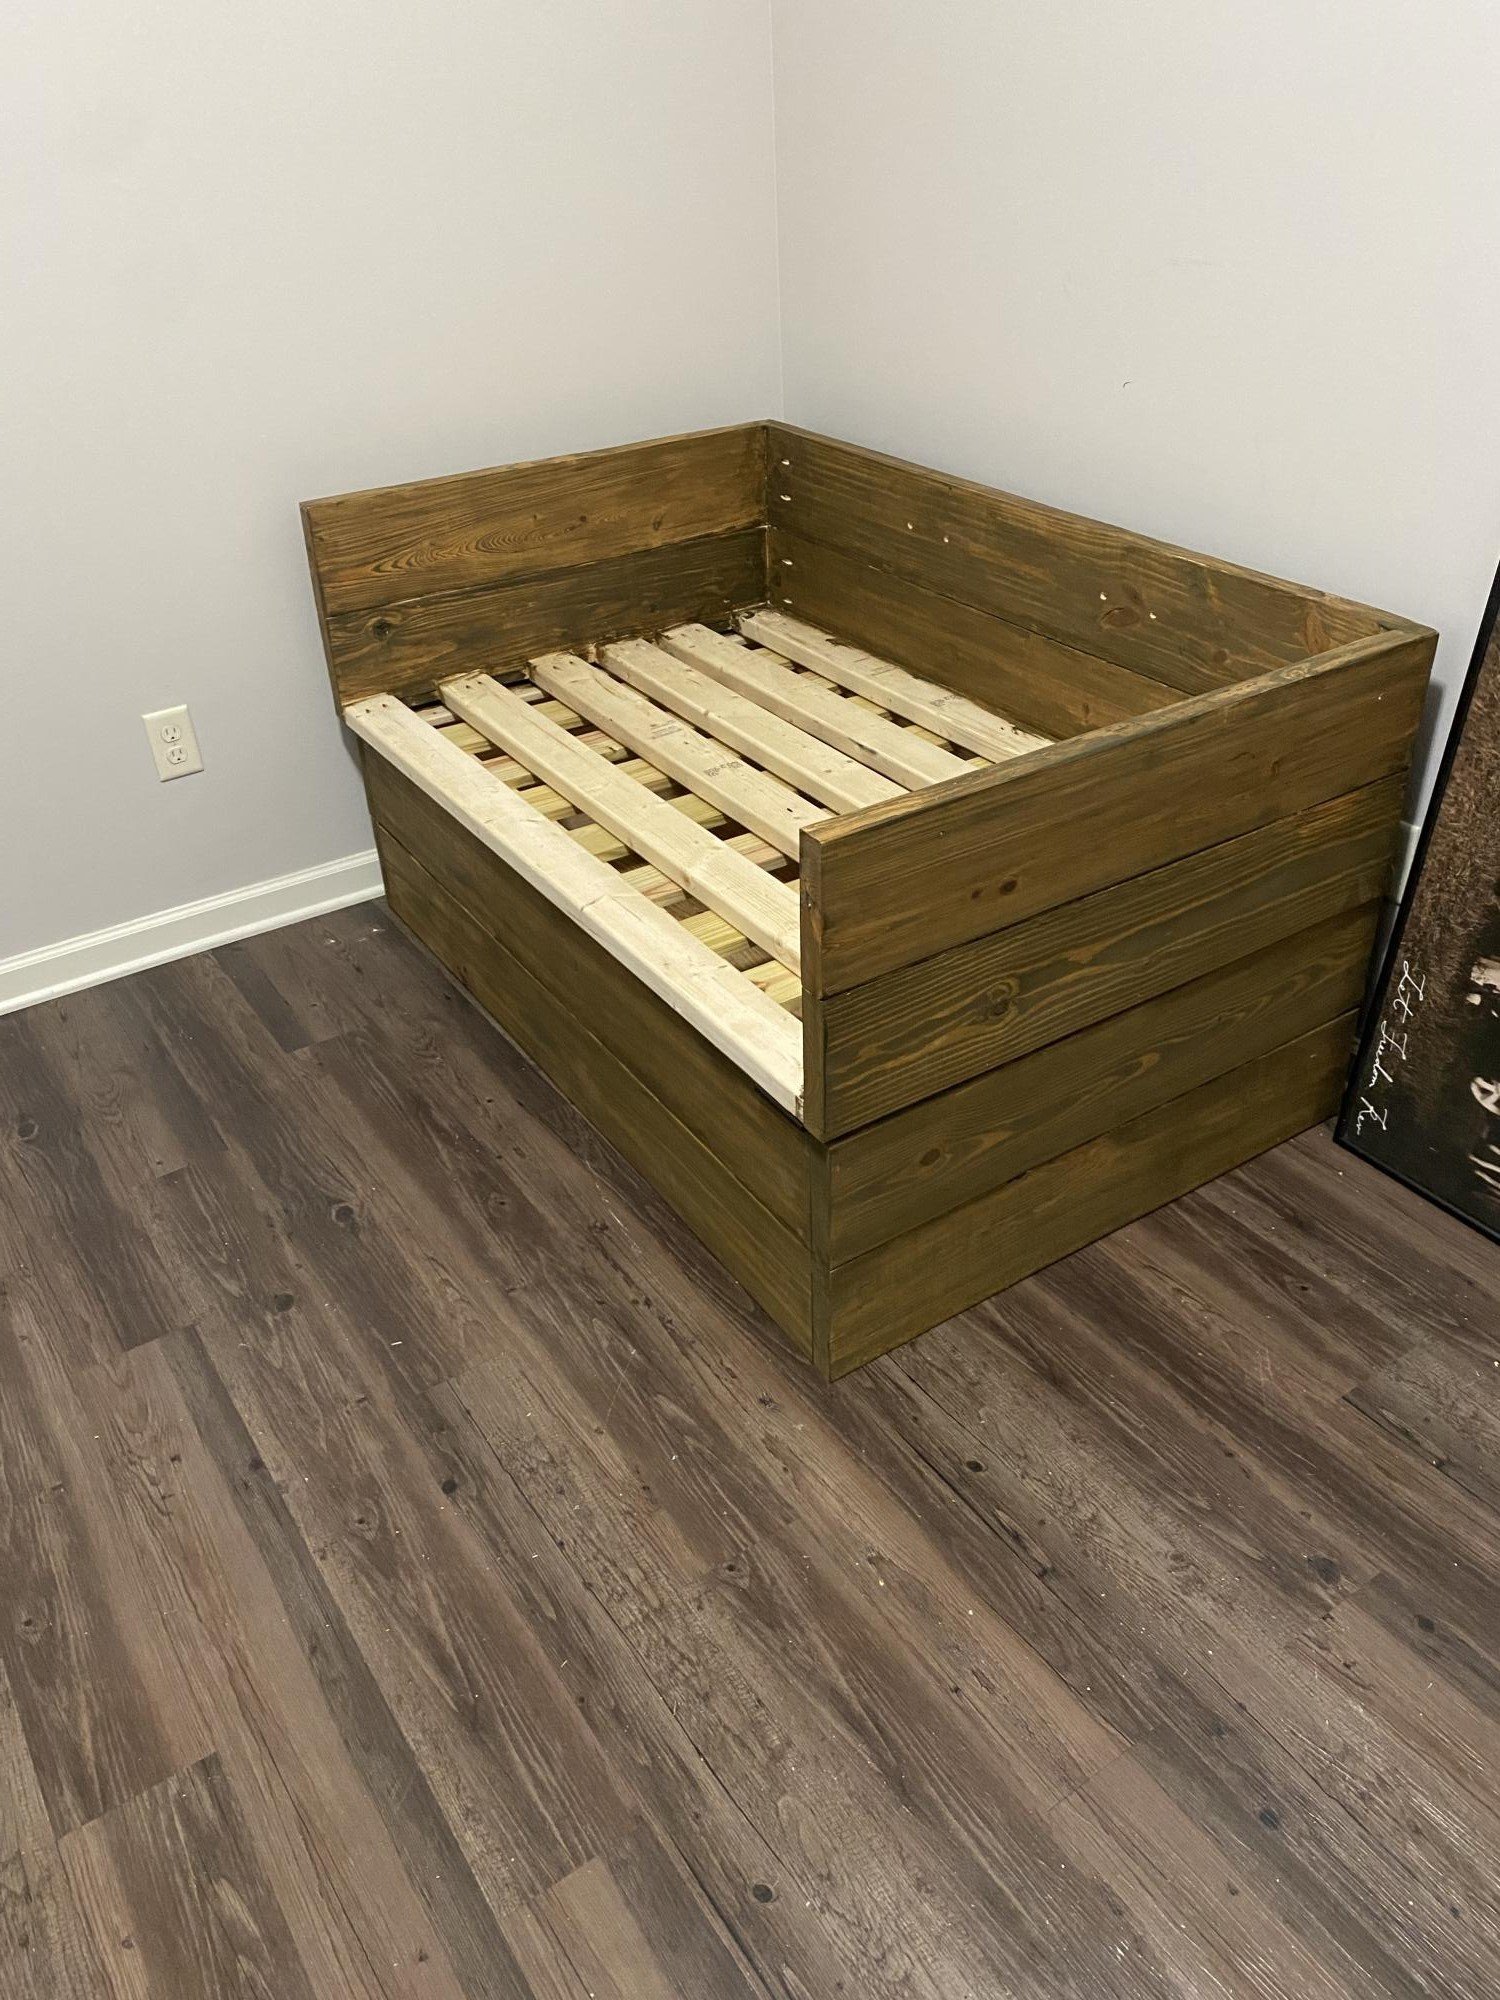
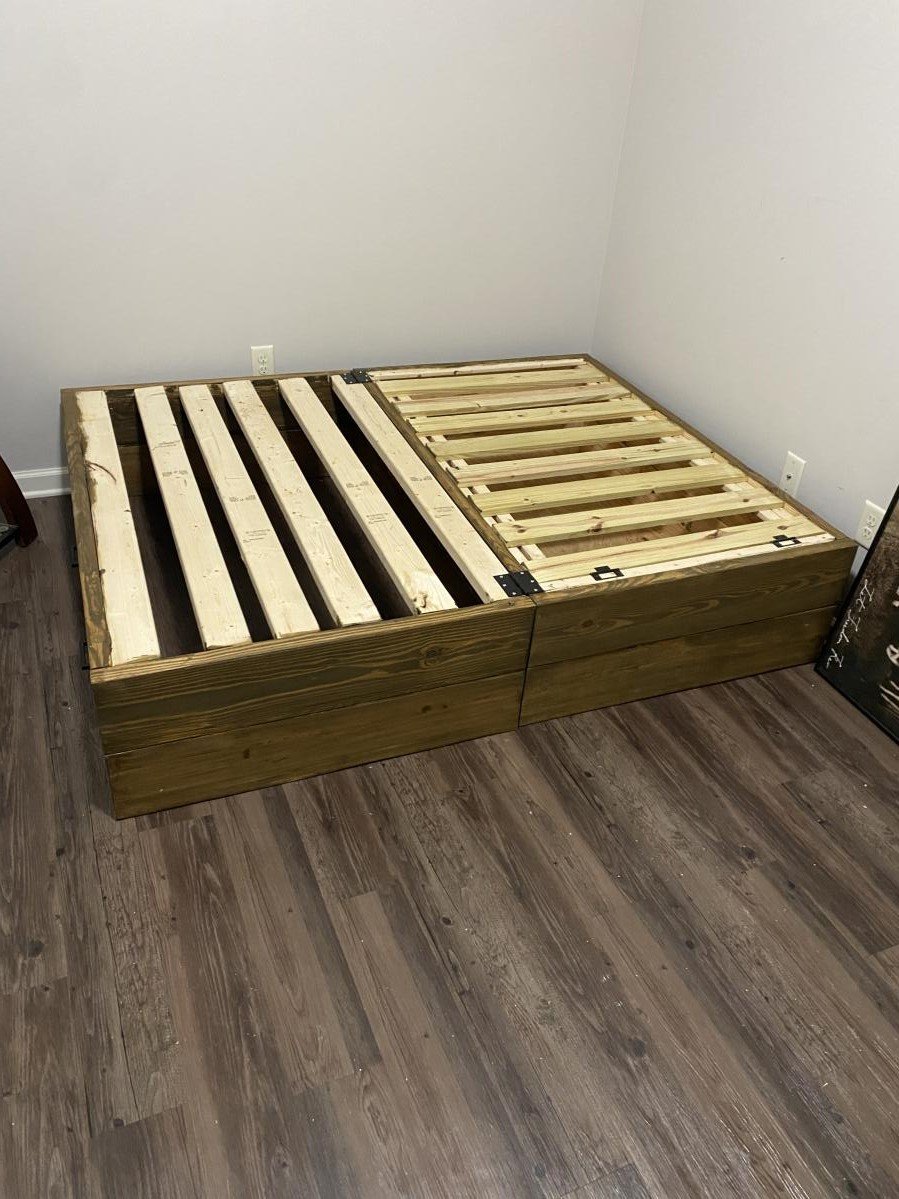
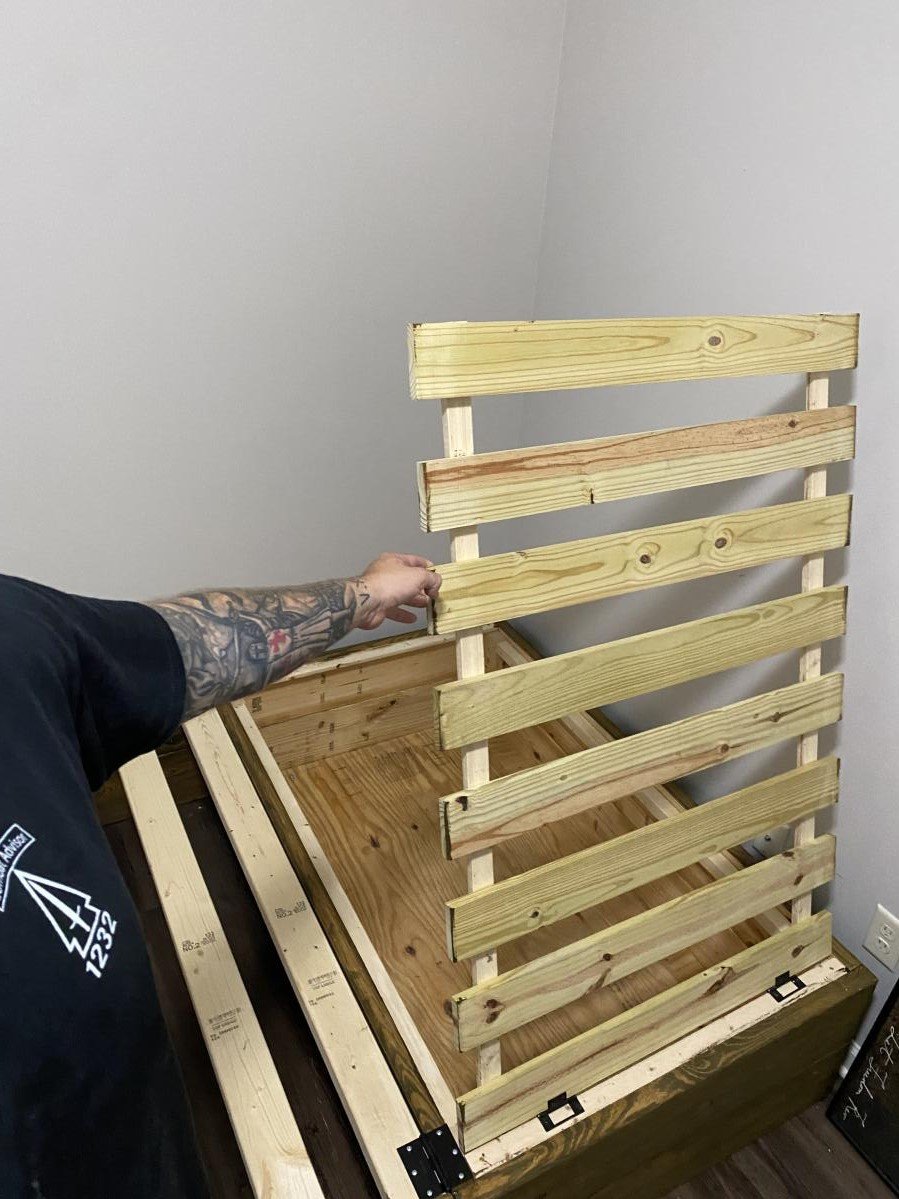
Master Bedroom Update with New Bed!
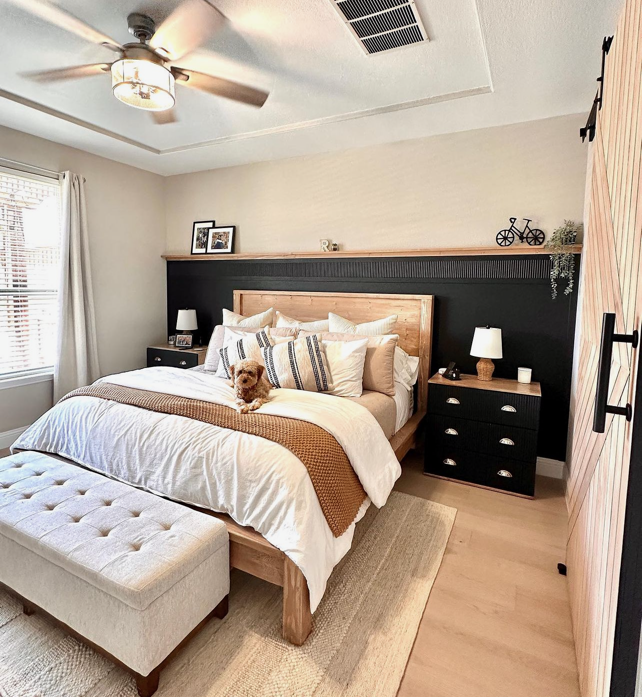
Master bedroom makeover ❤️ bed plans are from Ana White
Built from Plan(s)
Master bedroom makeover ❤️ bed plans are from Ana White
I love these plans, and my son loves his new bed!
Adam

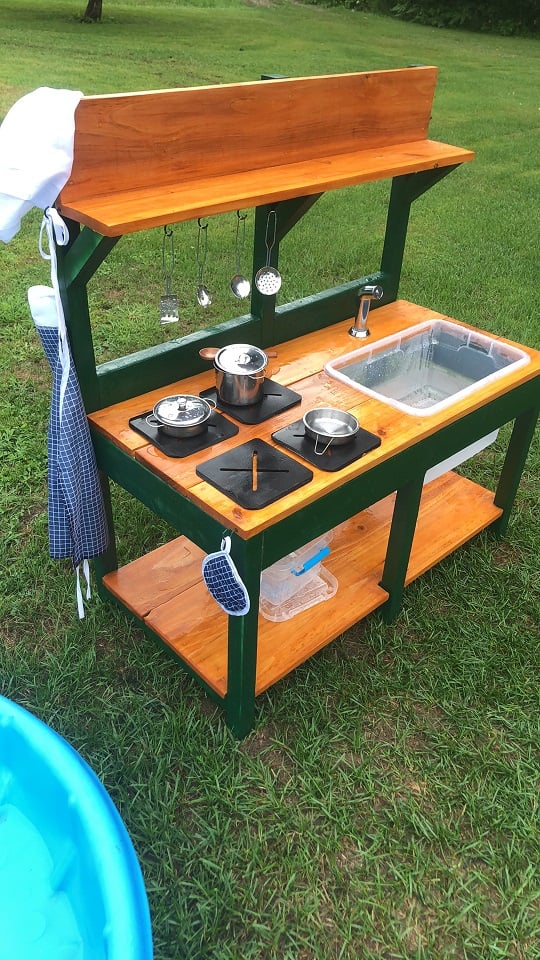
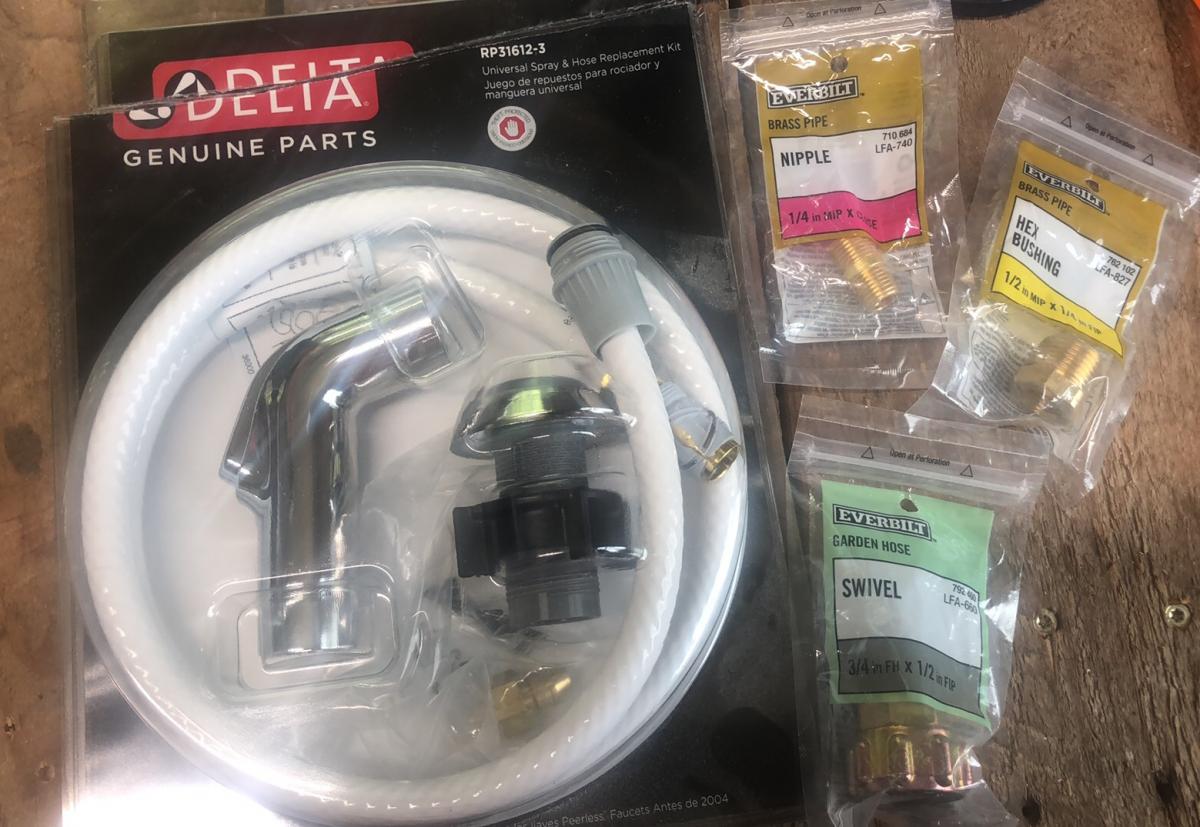
This was my first build, like ever. I am very proud! Props given to my hubby who is a carpenter by trade. I went back and forth on stains and paint colors at home depot. He didn't rush me and was awesome the entire time! He actually picked up the supplies, and is now a fan of the self tap screws! He thought he knew where everything in home depot was, but he had to ask to find those LOL. He wanted to use his new nail gun, but I wanted to follow the plans. The plans are awesome! We decided not to add an oven door just yet. Likely will soon. (Avoiding pinched fingers for now) I also have the knobs for the front, but it was hot and since I had only just stained them, they needed time to dry and second coat yet. (I kind of forgot about them once I finished them with my new dremel) We purchased the hose kit from the kitchen section at home depot. It came with everything, I searched market place and even posted asking if anyone had a used one for sale. No luck. This was $20 and came with everything, the guys at home depot showed me what adapters to get to ensure that it would hook up to our garden hose, and we grabbed those too and they worked perfectly! I messed up cutting one of the angles for the shelf the wrong way, but there was enough scraps for my husband to help me fix it. It was a fun build, and so rewarding to see our kids playing with it! I used my dremel 4300 and it wasn't powerful enough for the thicker wood, so my stove tops are thinner, but he actually enjoys setting them up and spraying them off the table with his hose! I painted the brass hooks green when we were painting the kitchen so they would match. The pots and pans came with the little tote and the apron chef hat and pot holder. It was a perfect finishing touch. *Edit to add photos kitchen hose kit from home depot, reading comments, others had a hard time finding adapters. I suggest taking what you have with you to home depot so they can show you what adapters you need. We needed three because we have a quick attachment on the end of our garden hose, (for our sprayer) now little mans mud kitchen can be connected and disconnected easily!

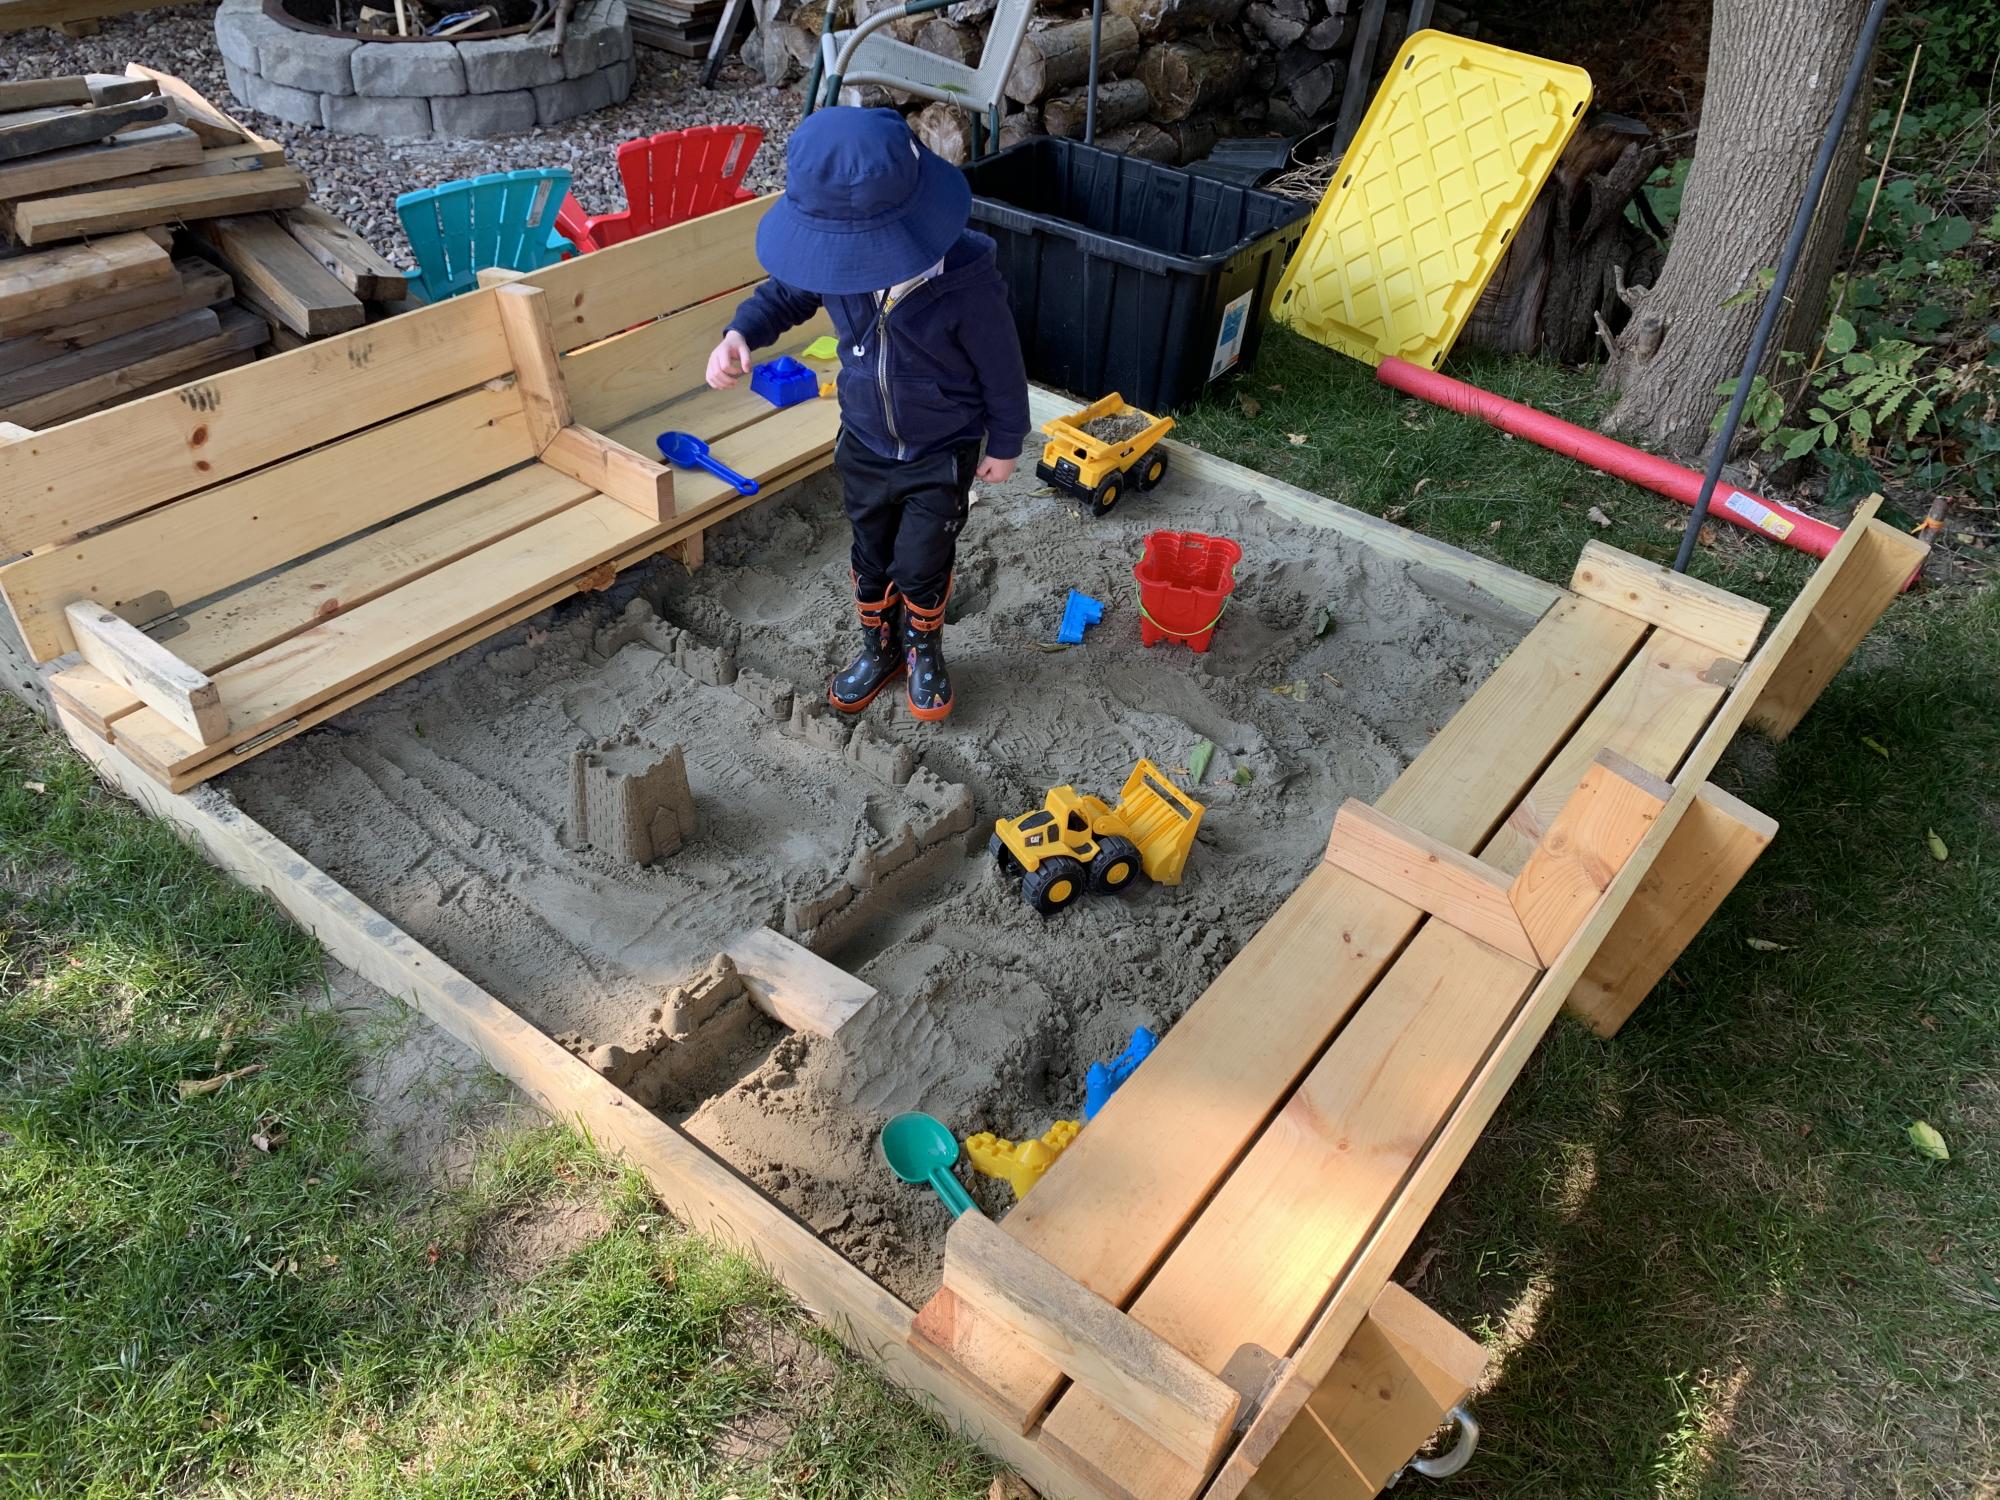
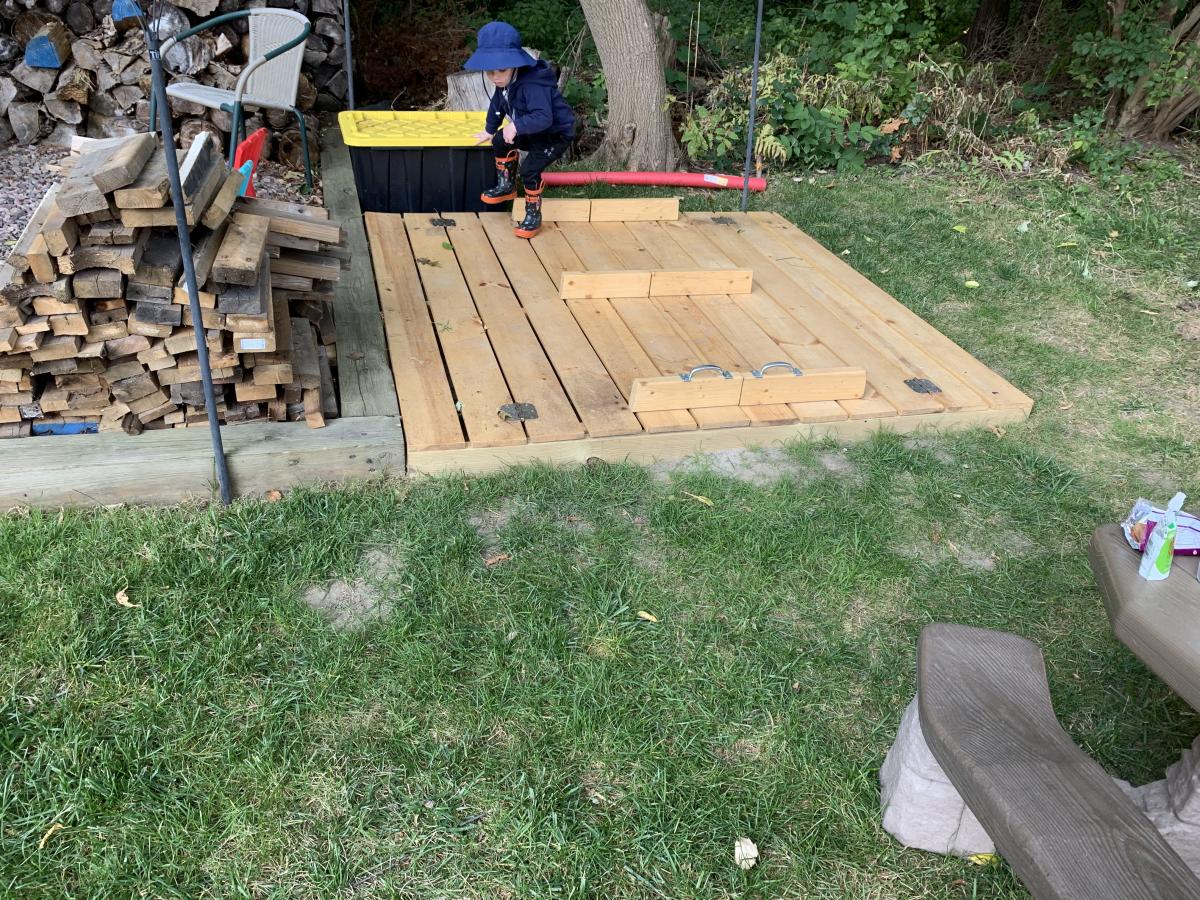
Made the sandbox 6x6. Recessed it so it sits flush with the timber’s around our fire pit area. I added extra armrests in the middle that double as supports when the lid is closed in case anyone wants to walk on it. Filled the sandbox full enough that the armrests sit on the sand when closed. It’s very sturdy now for walking on and the kids have tons of room to play. Thanks for a great plan to work from.
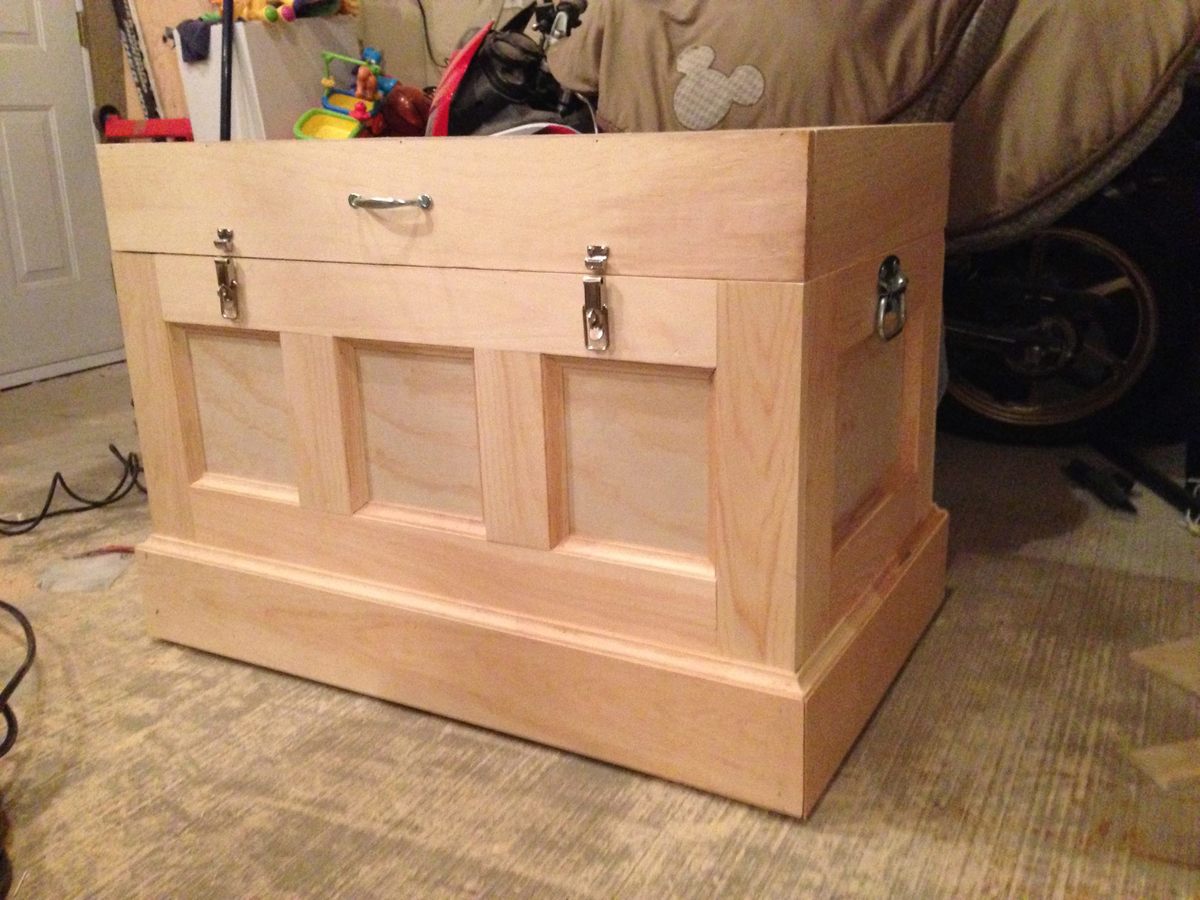
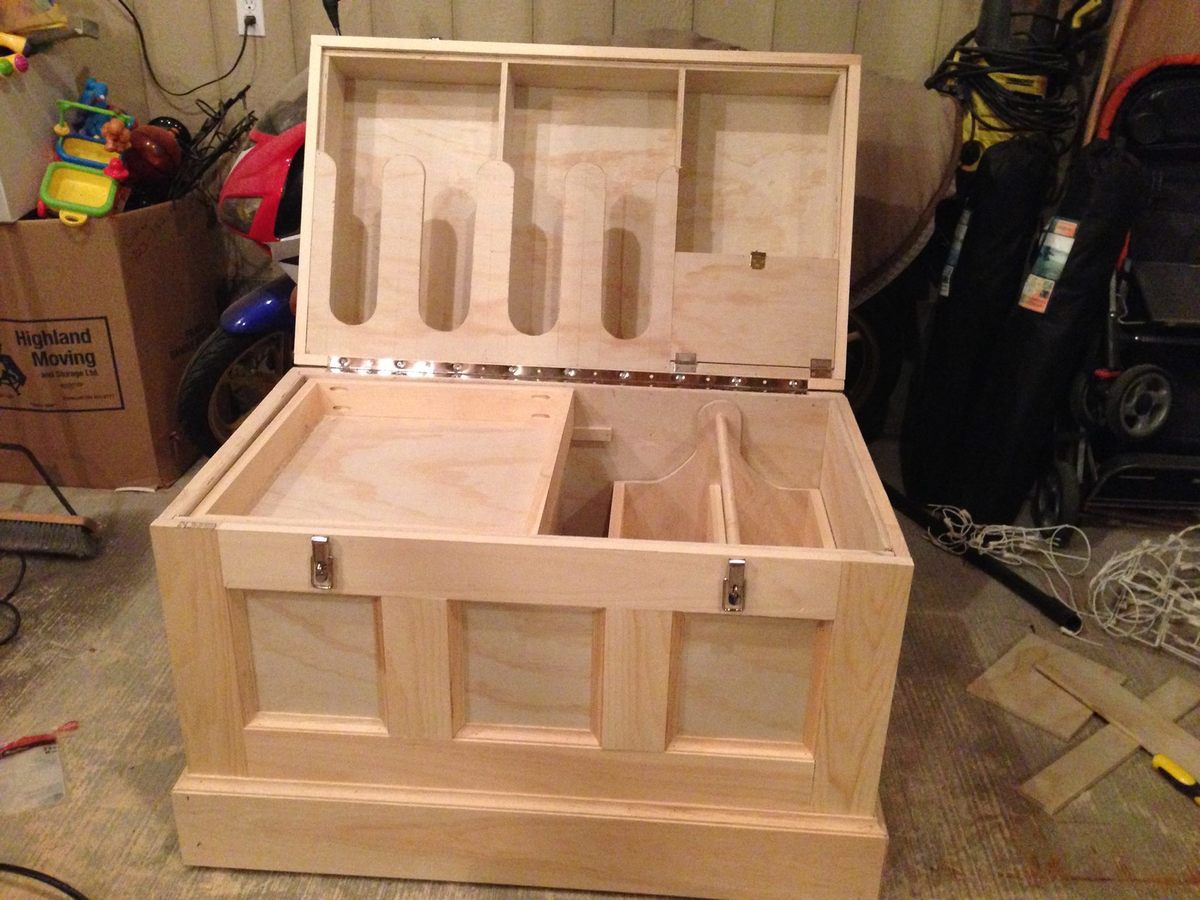
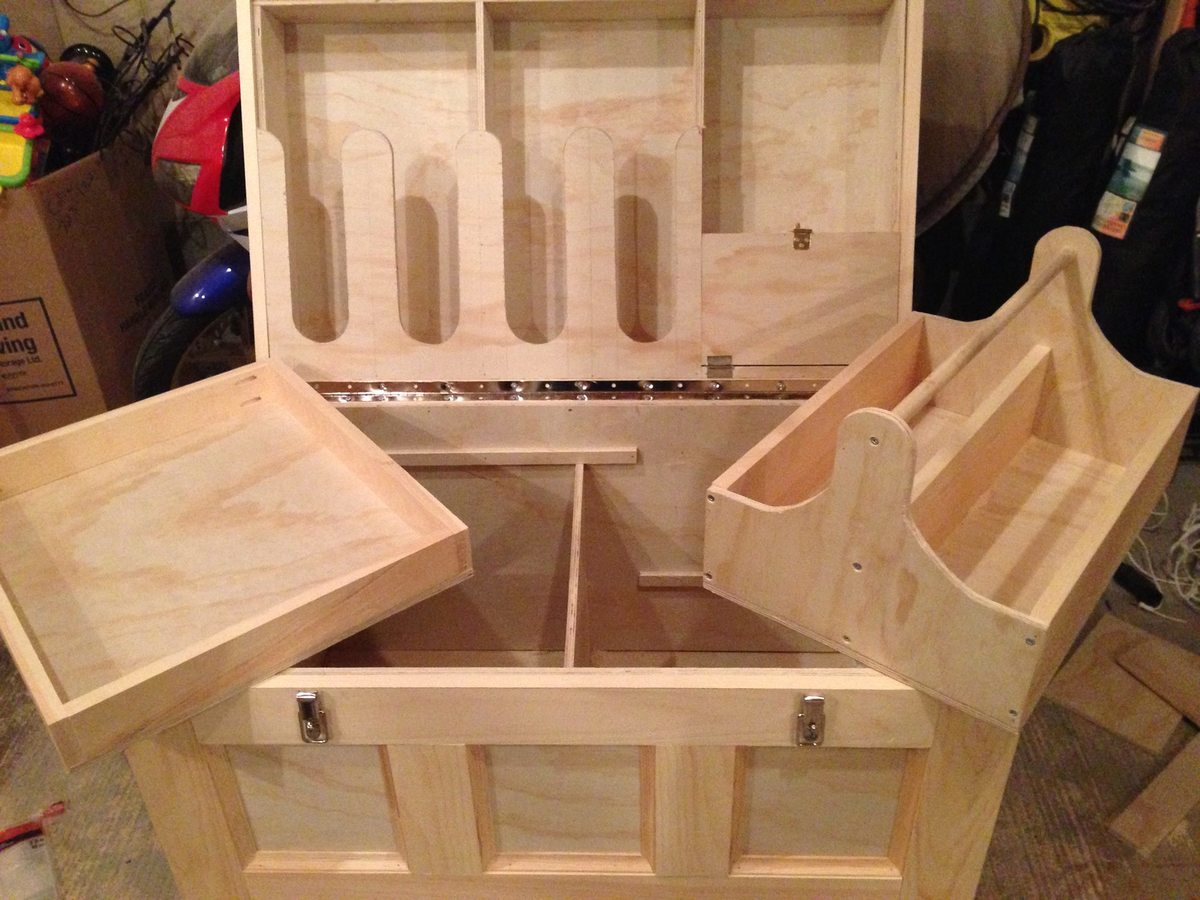
I made this box for my wifes christmas present. She has been riding horses for sometime and is planning on doing some shows. I built this box from Mimi's storage bench design, made it bigger, added a deeper box top and created the rest from looking at pictures online. Its all made of pine plywood and pine boards to keep it light. I added 4 castors to the bottom to make it easily moveable and hid them with the moulding around the bottom. Still has to be sanded and stained before it hits the barn. Its 39W X 24D X 29H. I used a piano hinge and routered the back to set the hing in. Added cove moulding around the bottom and to all the boxes around the front and side. Used a lot of pocket holes and finsh nails. Took me longer than it could have, because I planned everything as I went. I will add more pictures when its finsihed. I would rate it intermediate to advanced depending on your skills with certain tools.

Wed, 12/31/2014 - 09:02
Wow - that's a lot of work and well done. Great job! I'm sure your wife adores it.
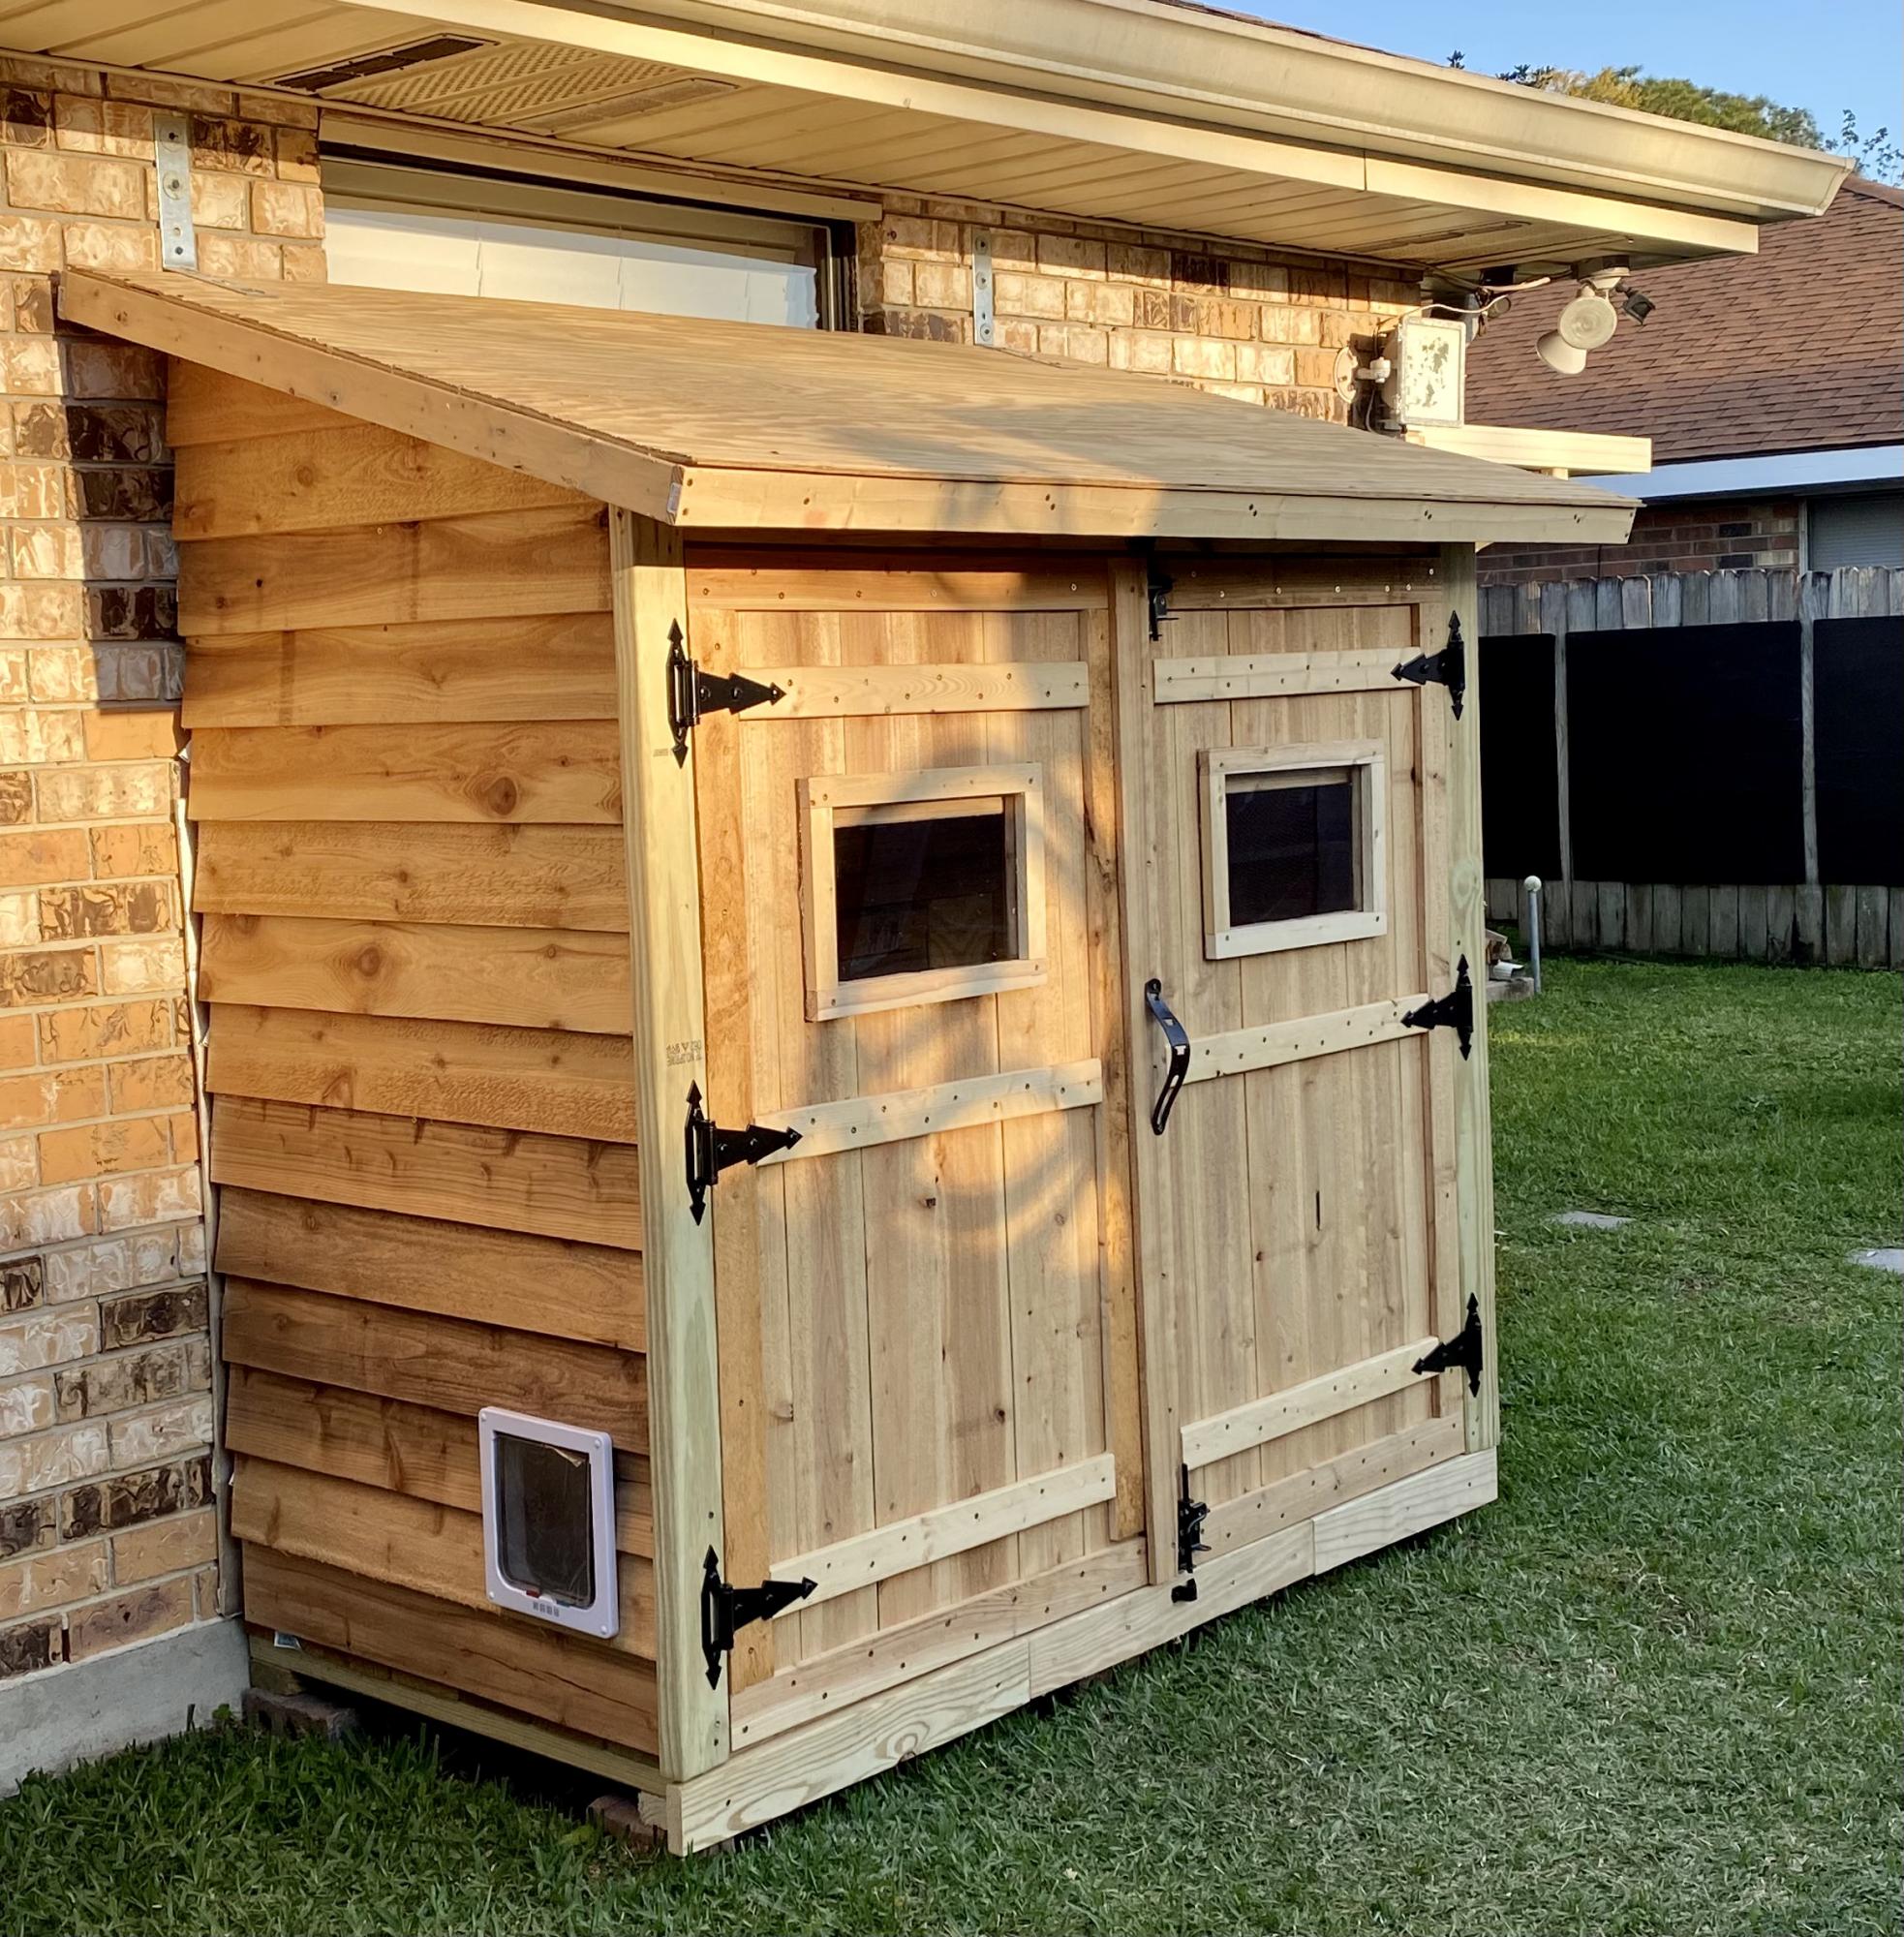
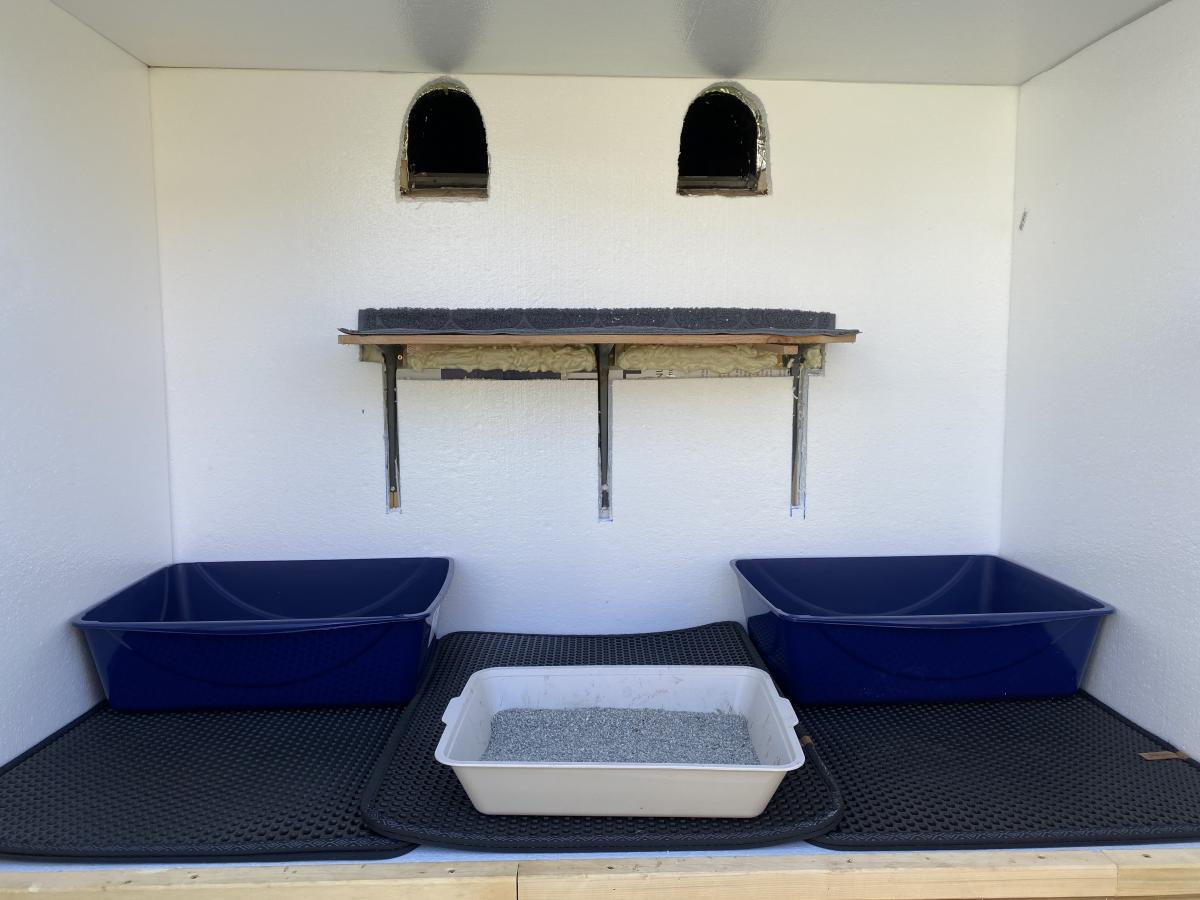
My first Ana White project. Built Ana’s awesome small cedar shed as an outhouse for our many cats. The have access to it from inside the house. Great way to keep litter boxes and the mess out of the house. It is stand alone, and attached to the house, in front of a bedroom window. There are two ‘entrances’ as well as two, one-way, escape hatches, if a cat in the outhouse is interrupted by another cat (I.e. a male cat comes in and the female feels trapped) they can exit to the outside (one way so no critters can come inside!). Ana has easy to build plans, great site! I plan on making the square table just posted today for my newly refurbished deck. Keep in mind, my estimated costs and time reflect a LOT of additional features on the inside. The shed itself, very easy, simple, inexpensive. Very little waste with Ana’s projects as well.
Thu, 04/29/2021 - 09:06
Thank you for sharing, what a cool project!
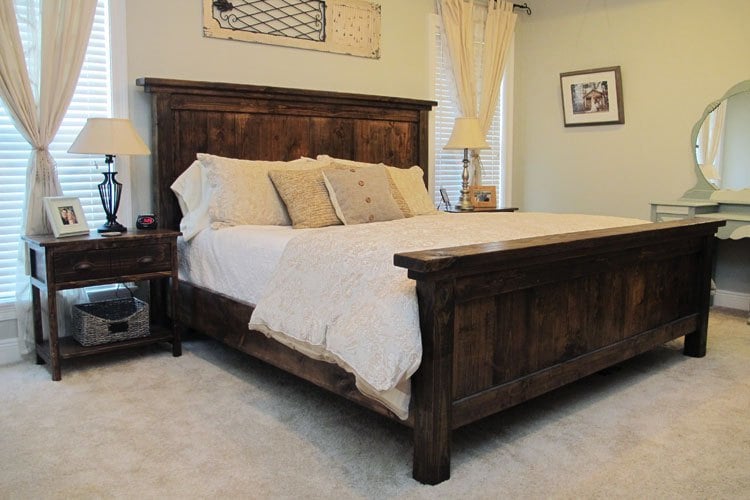
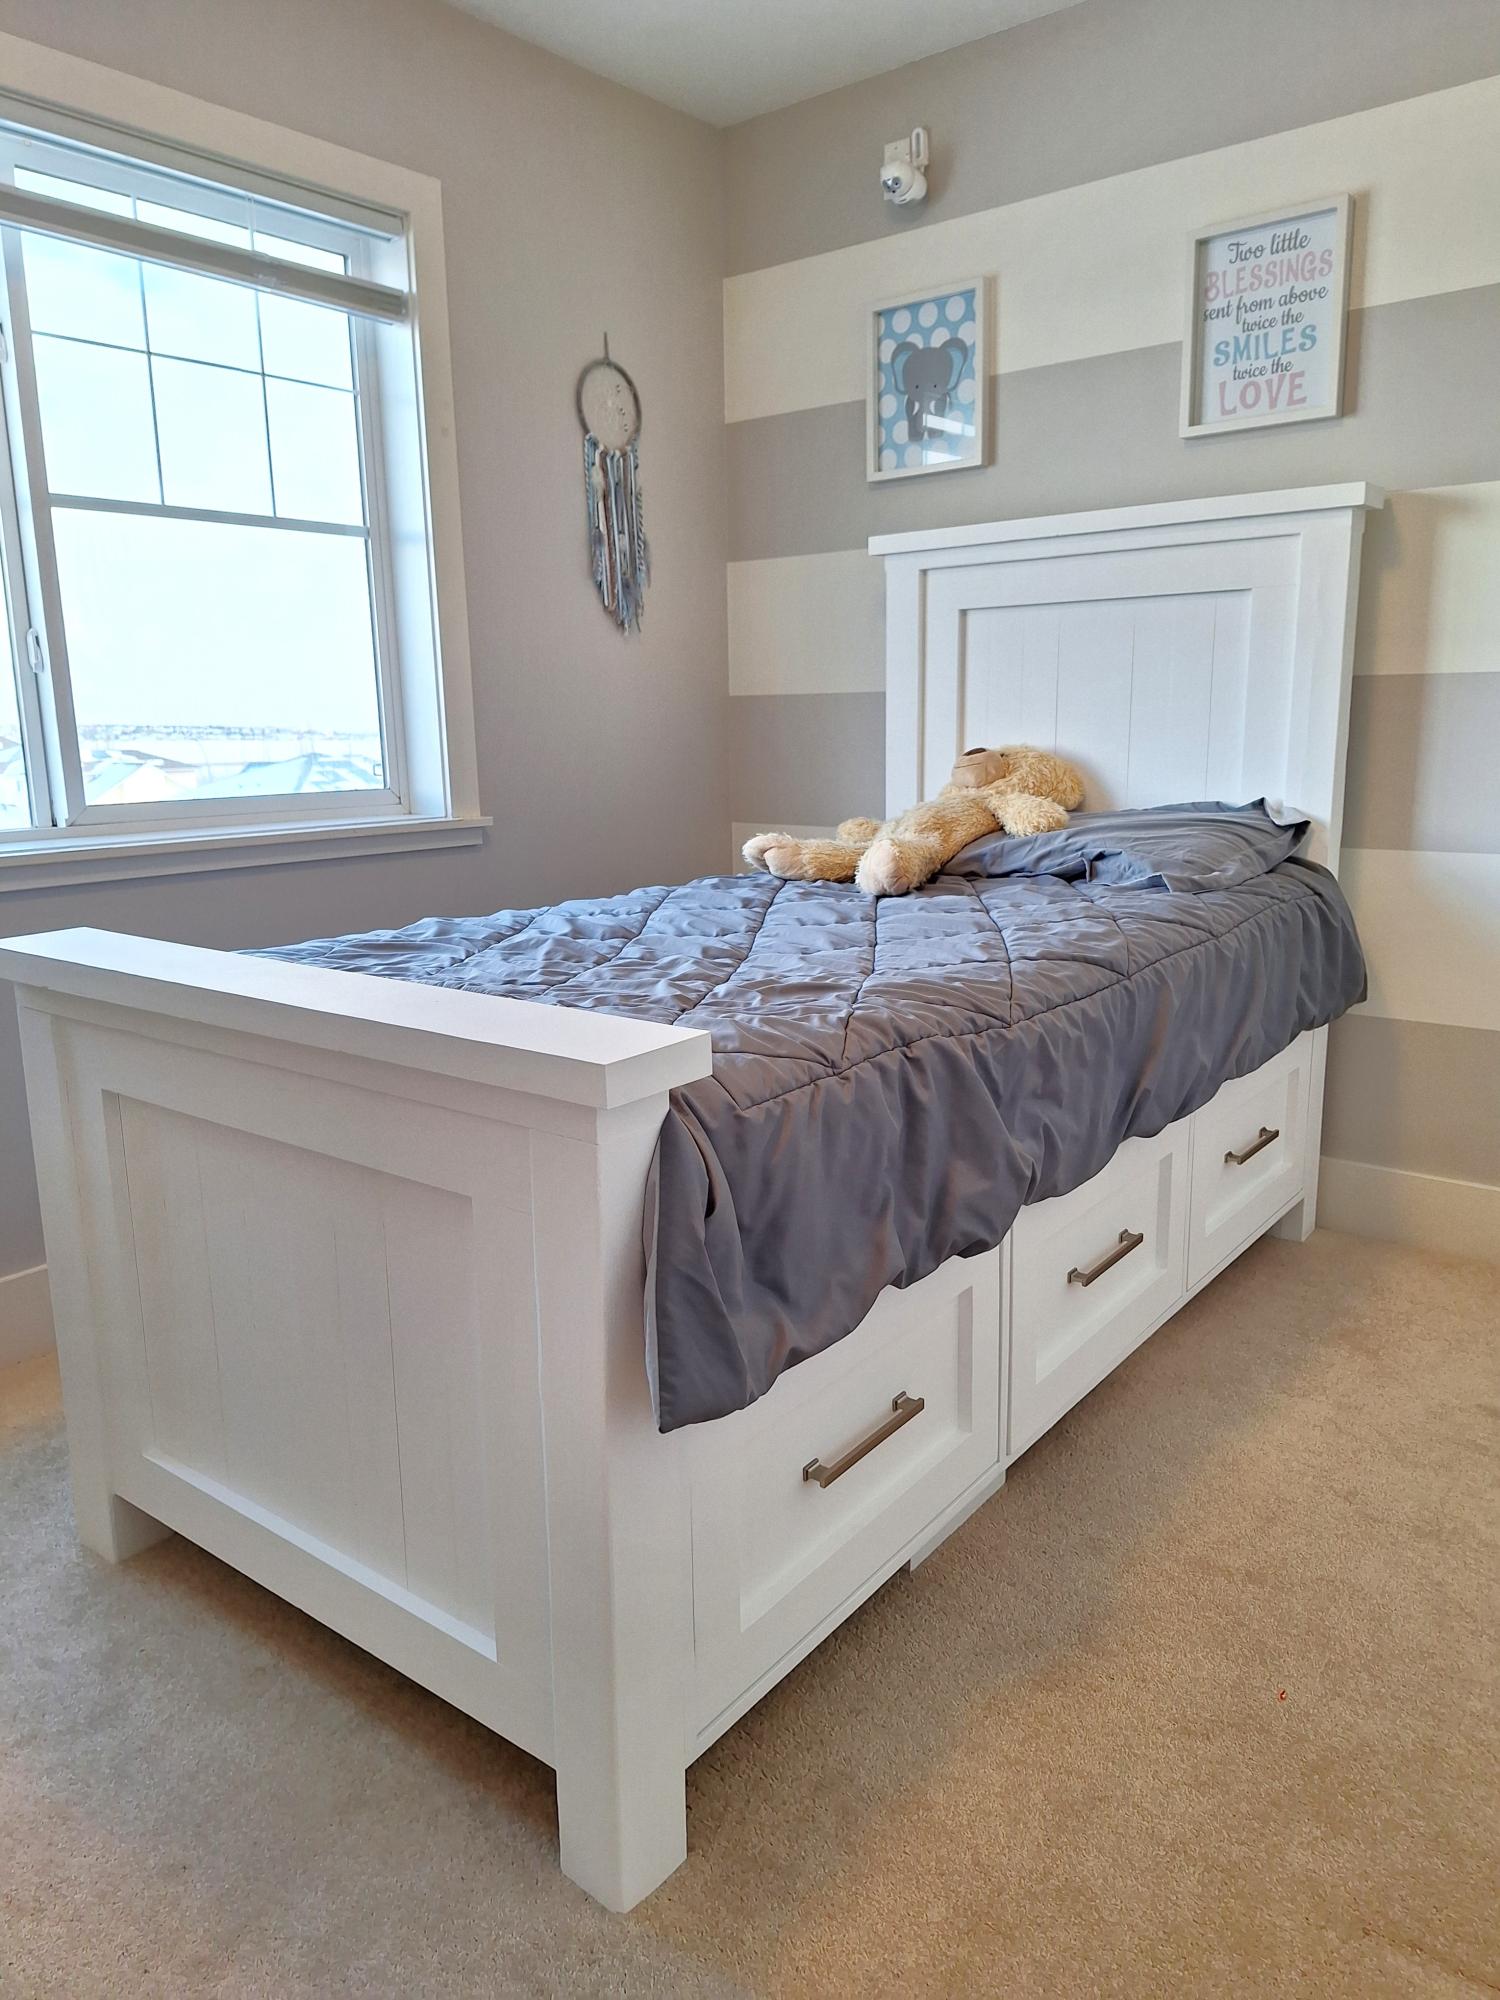
We built this Farmhouse Bed in 1 weekend for less than $200!

Fri, 02/20/2015 - 19:26
Beautiful! Both the bed and bedside table turned out great!
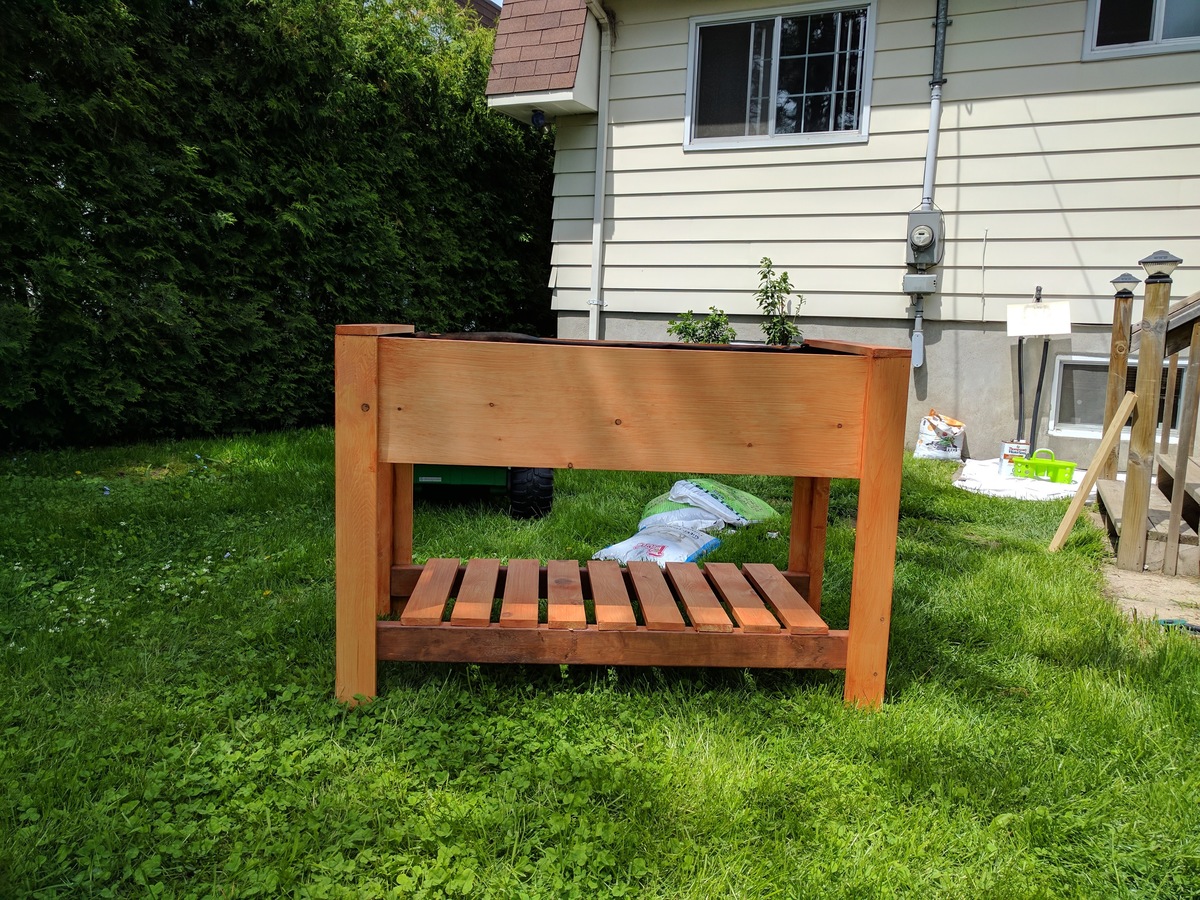
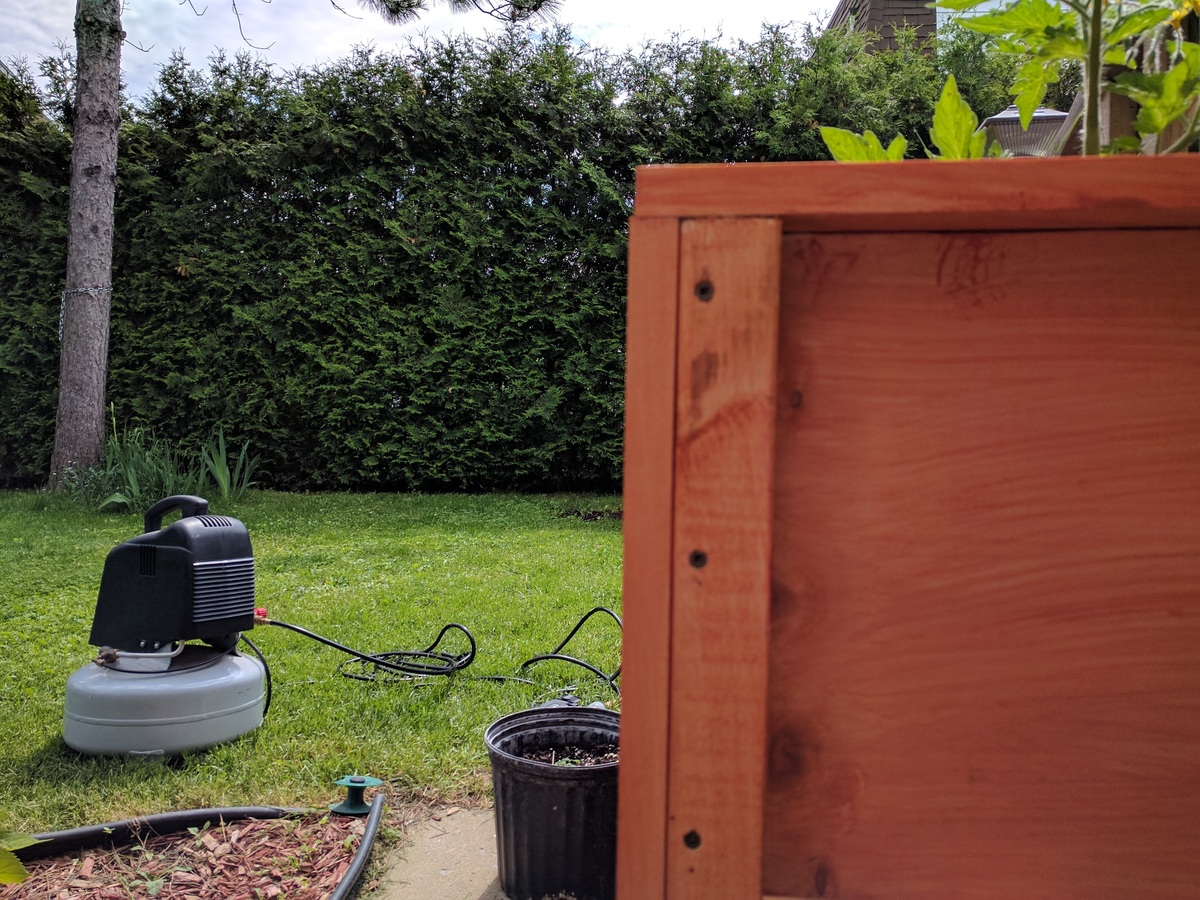
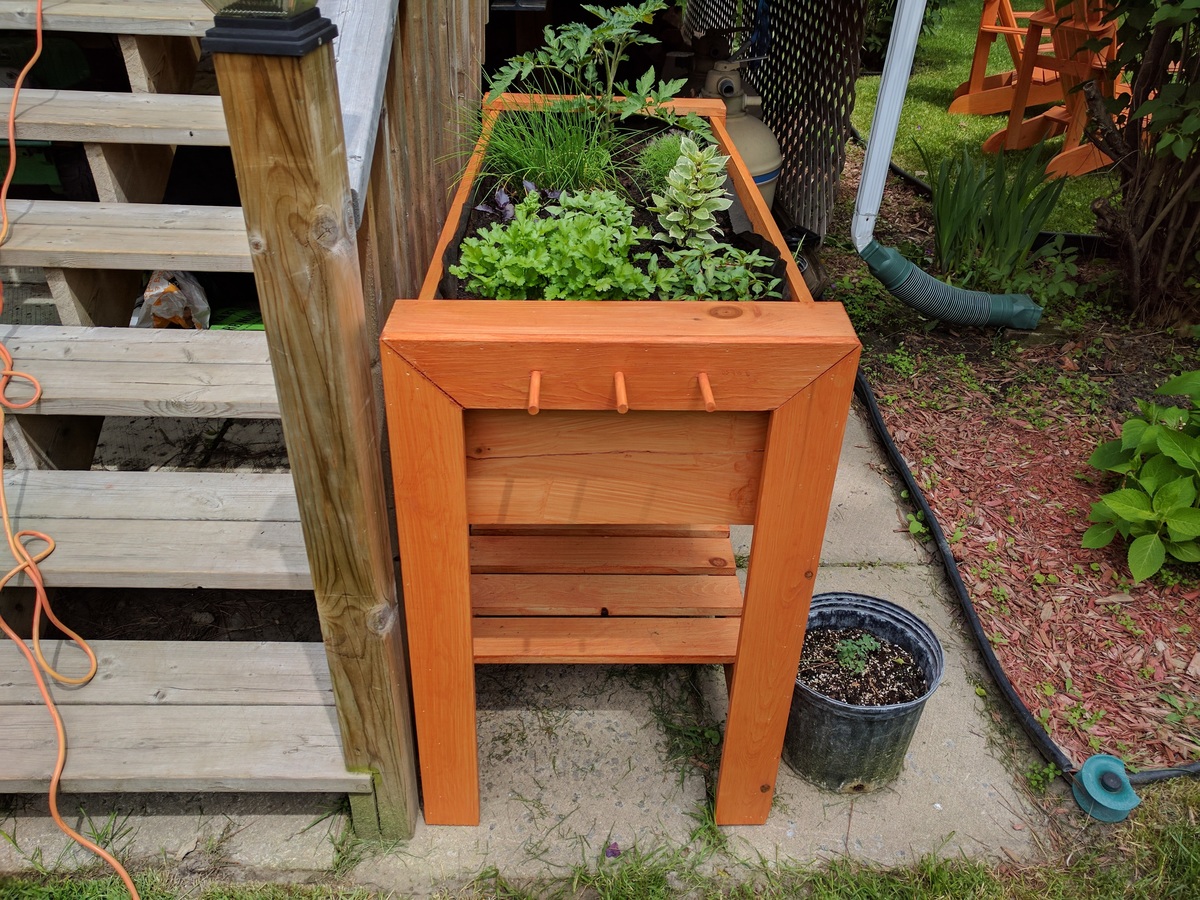
Completed the project in about 4 hours including pre-staining the cut lumber (Thompson's water seal). I made a few changes on the fly.
1: I assembled the front and back panels by tacking them together with a nail gun using 2 1/4 inch finishing nails. This allowed me to forego the drilling of pocket screw holes and instead drill pilot holes through the 2x2's and into the 1x12 panels then securing them with 2 1/2 inch deck screws (see the second picture).
2: after completing assembly I found that I did not like seeing the 2x2 legs from the side. I cut some more 1x4's at 45 degree angles and nailed them to the sides in order to conceal the legs (see third picture).
3: I decided to add some pegs to one of the sides to hang garden implements (third picture). I used 7/16 round dowel stock, drilled holes for them using 3/8 bit with some tape wrapped around it at 1/2 inch mark in order to avoid drilling completely through the board. I slightly whittled the first 1/8 inch at one end of the pegs which I had cut to 3 inch lenghts. Applied some wood glue to the holes and gently hammered the pegs into the holes.
All in all a good looking planter.


Been wanting to build this for awhile. Now I know why the plan pics are all unfinished! I modified the plans slightly to allow for 2 slightly larger trays on the bottom and allow for robotic vacuum to clean underneath.

This was my take on your Twin Sleeper Chair. I made it into a full. I used 2x4’s where there was suppose to be 1x4’s because I changed the width. This was a very fun project, my first project actually. Thank you for the plans and idea.
I'm so happy to have found your site! I've been wanting a potting bench for a while. Today the Hubs and I built this one in Daffodil Yellow! It is only partially painted, but I already love it! The hubs wants to build a modified one for his heavy electronics equipment. Thanks a Bunch!
Used a clear cedar stain and mostly used jig holes
On the chairs added a 6 inch screw to hold the chair arms securely to the back in case someone sat on the arms.
Matt
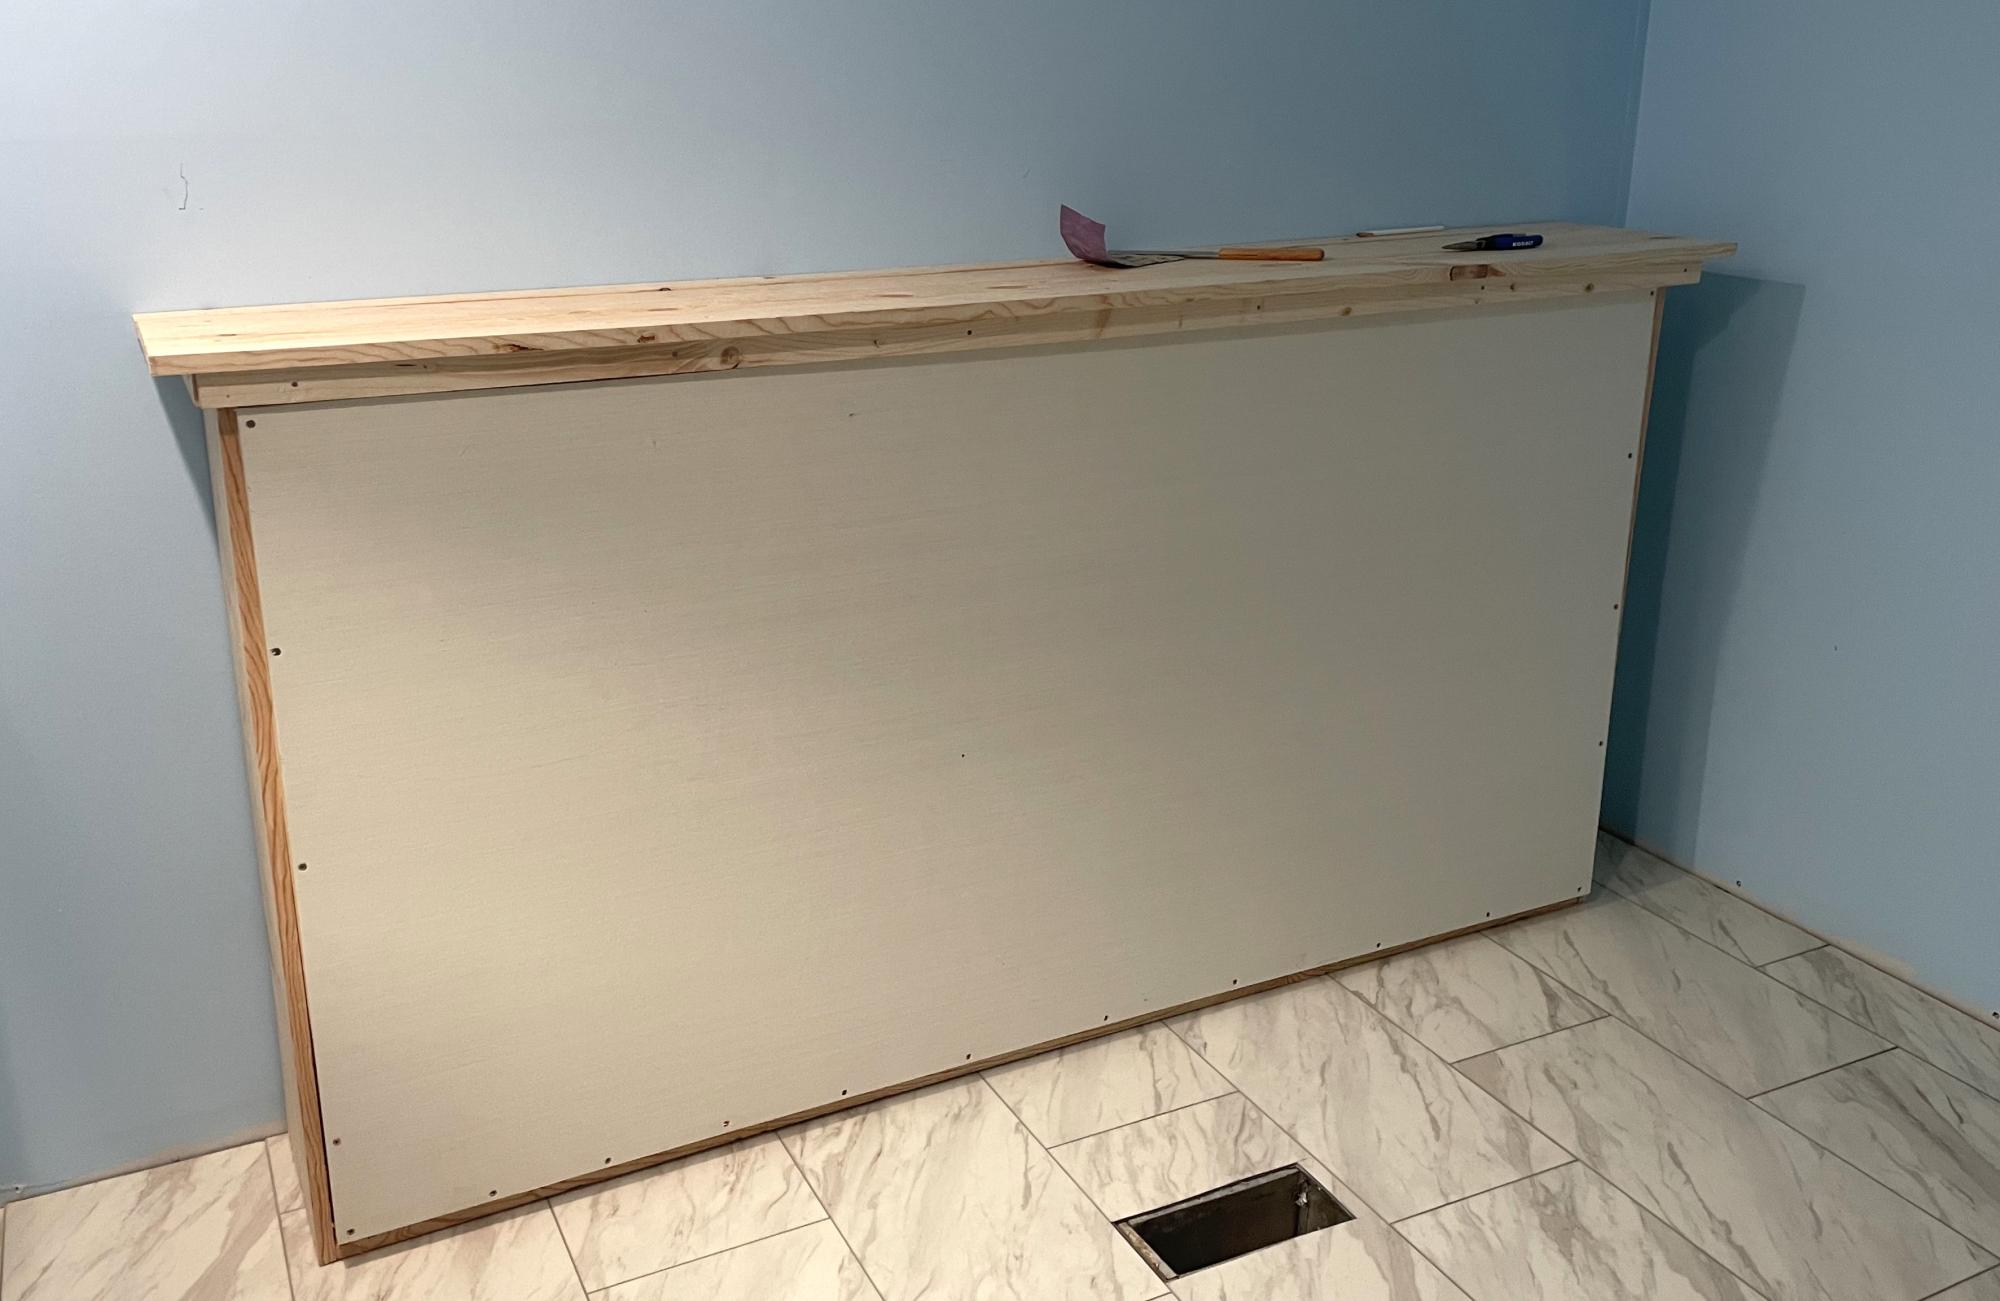
We are remodeling our 3 bedroom house into a 4 bedroom. In doing so, my youngest is getting the smaller room. We decided to go with a Murphy bed to allow more play time space. I do not particularly like the fact that this bed doesn’t sit off the ground but overall love the simplicity of making it. We turned it horizontal and just love the overall product. I can mot wait to make something else from this site!
Tams
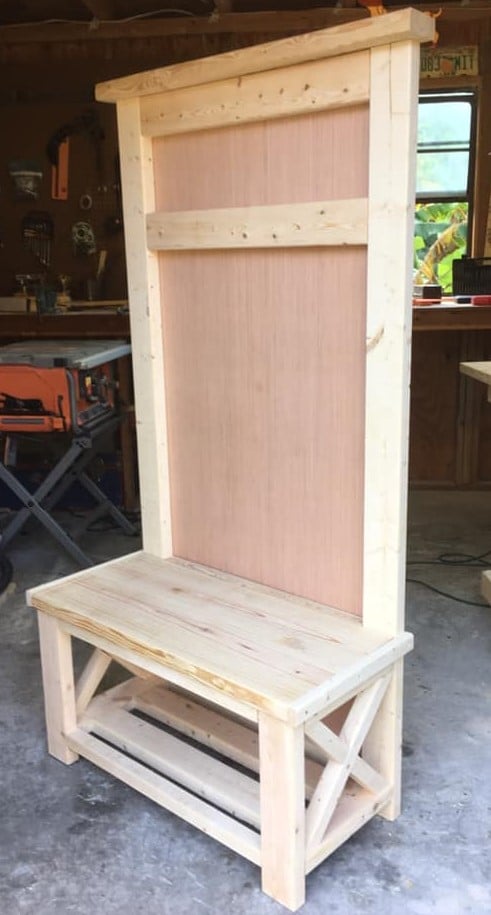
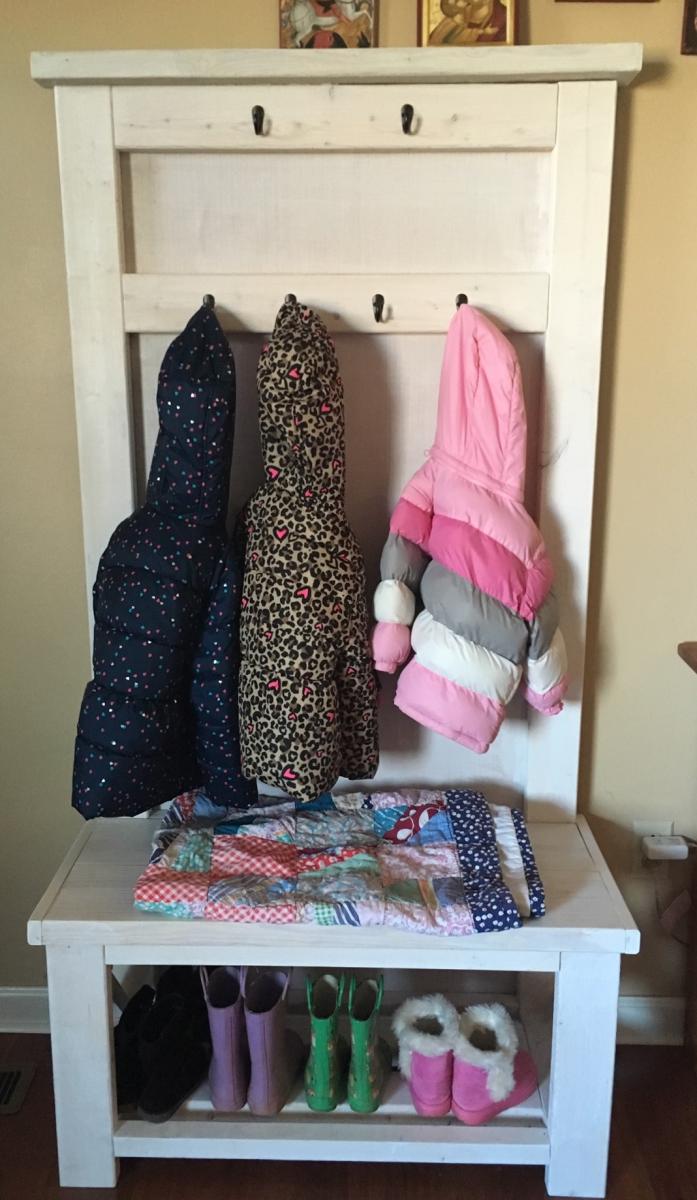
I built this scaled down version of Ana's Hall Tree to fit into a 3 foot wide space in my daughter's living room.

Combined two plans found on this wonderful site with our own revisions to provide a larger desk work area (20" deep). I also added a small shelf to allow for setting a book, water, whatever on it without getting out of the bed. As my first "indoor" project there were several lessons learned - one is to buy the higher grade lumber for the primary components including legs and beams. I did not do this and I had to spend more time than I should've finding good square, straight wood. Another lesson was that staining and polyurethane coating are a skill that requires a lot of practice and time. I and my daughter are thrilled with the final result but choosing to stain/poly it likely doubled the overall build time. Still no regrets, though. My 12 yo daughter just loves her new bed and thanks to this site for the spectacular ideas.

Very quick and easy! We did 6 in. boards and weathered the boards with stain, paint, and sanding. Looking for other places in the house to use this plan!


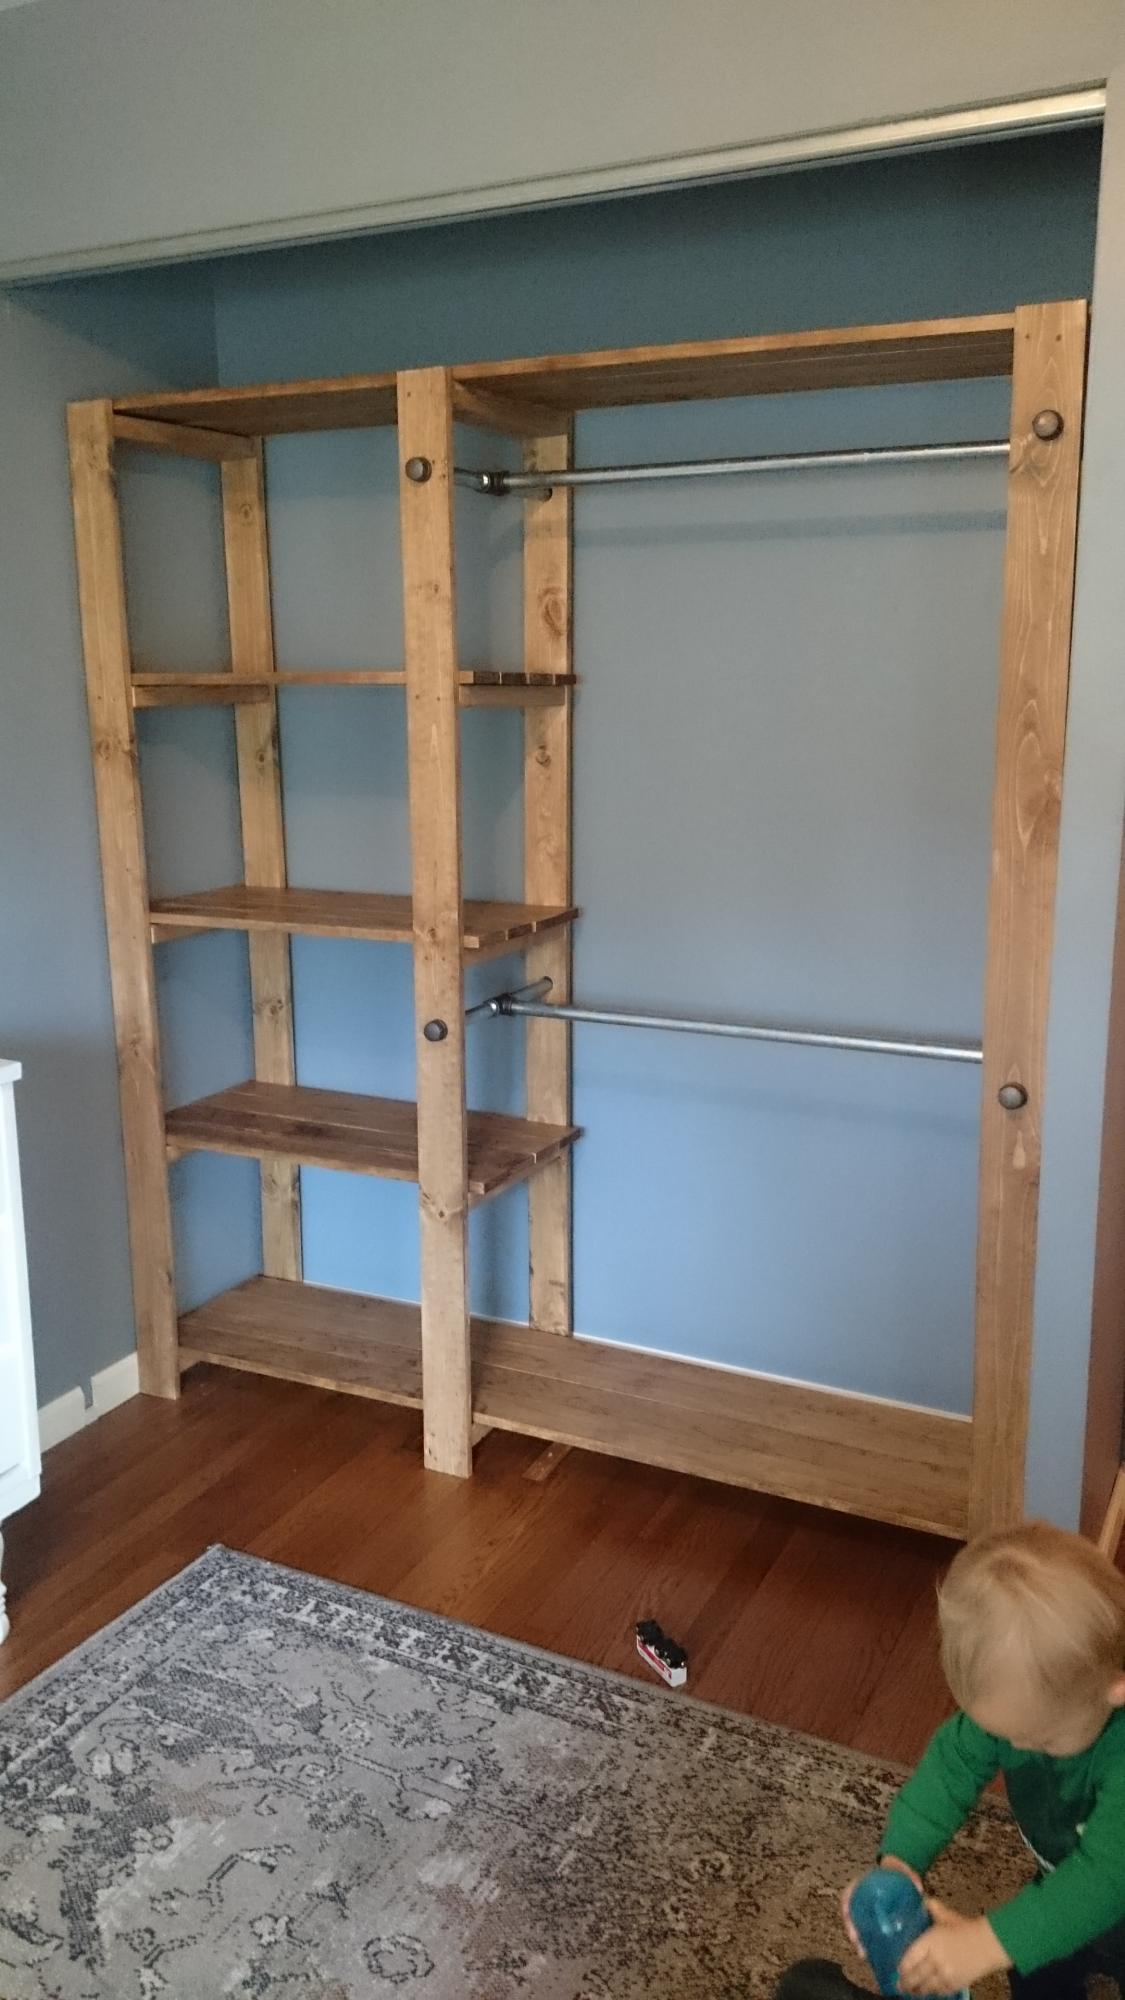
This was the second building project I've ever completed. I had to make a few adjustments to make it fit the size of ray's closet, but it was totally worth it. most of the work was in the measuring, sanding, and sealing of the wood. Ftting the frames can be a little tricky if your planks aren't perfectly straight. Otherwise, this project was pretty straight forward and can be done in just a few days depending on how much time you have to dedicate to it. Thanks Ana!

Hi Ana!
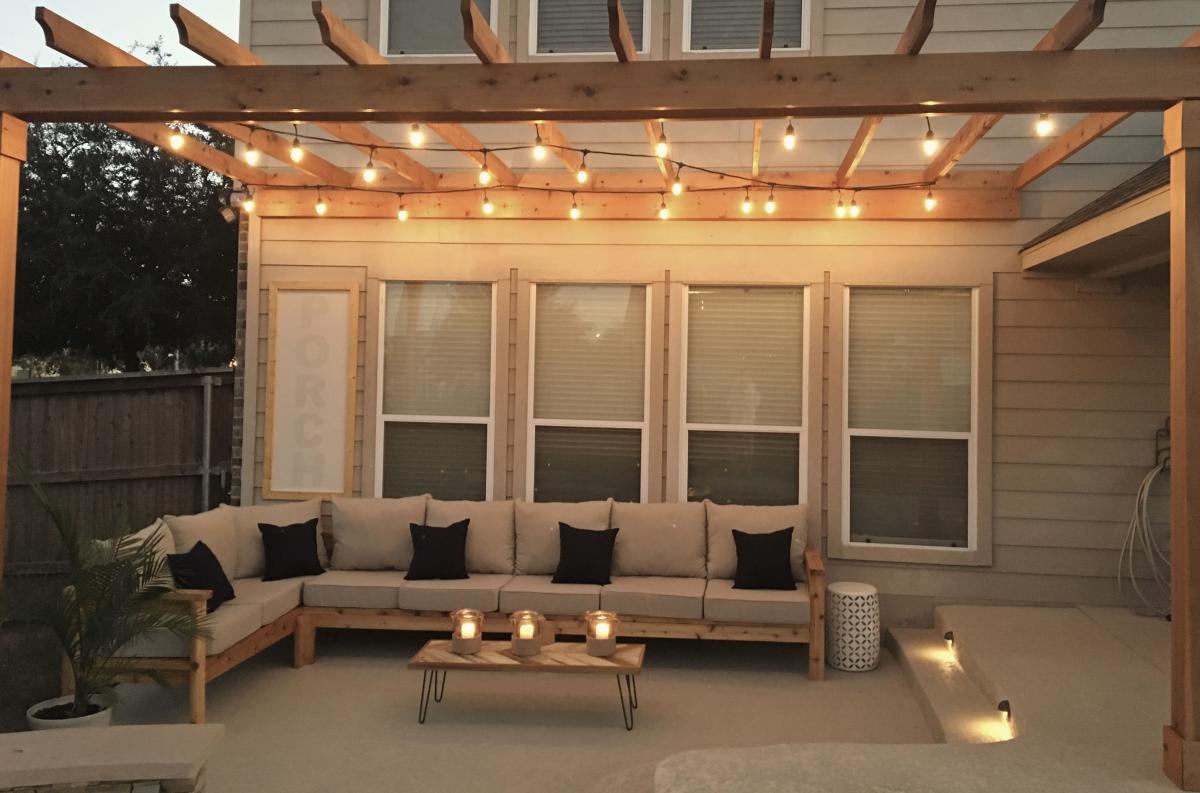
My husband used your plans to build the 2x4 outdoor cedar sectional :) He did it in 1 day and it couldn't have been easier! He even tried first time working with pallets to make a small table and it came out perfectly too! Can't wait to enjoy family time on our new back porch.
Thanks Again & Love From Austin ❤️
Kathleen
Thu, 10/24/2019 - 16:35
Hi, your furniture is beautiful. May I ask: Where did you find your cushions? And what color/ brand stain did you use? Lovely job.
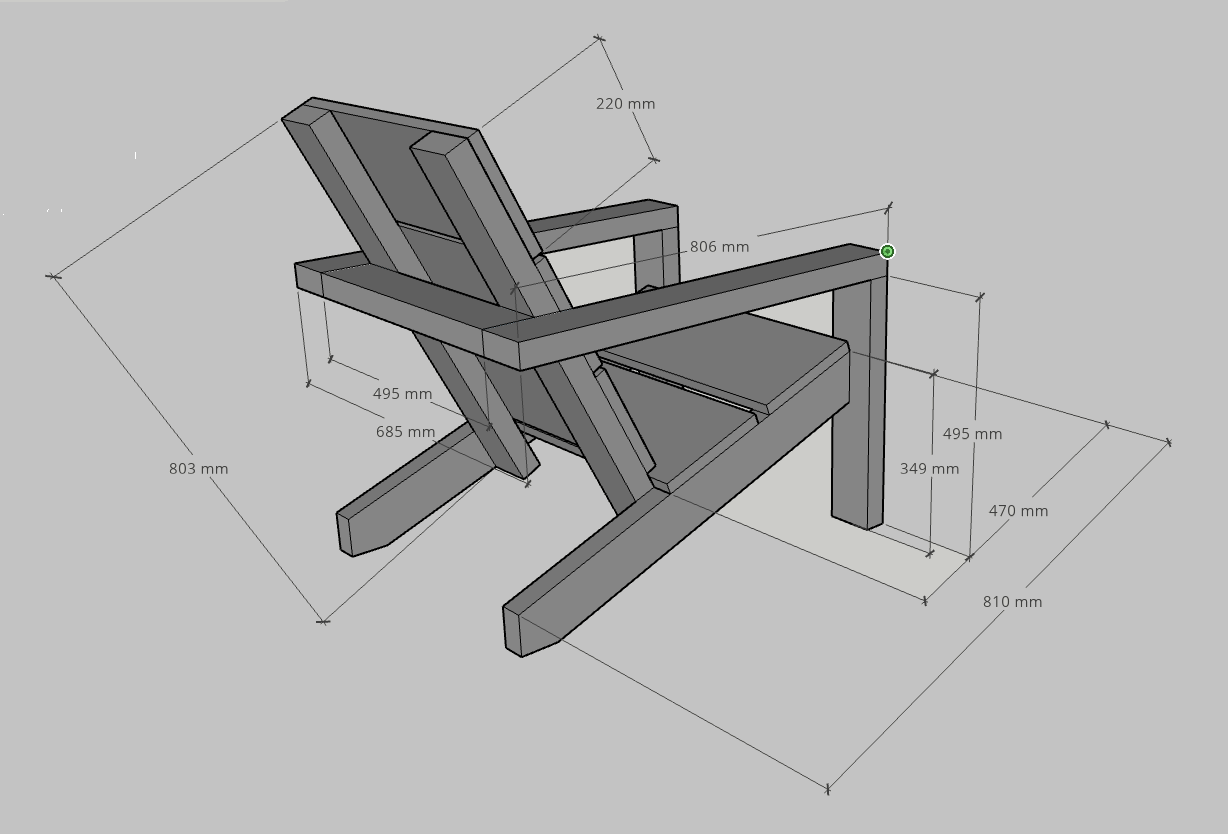
Unfortunately I didn't have the chance yet to build these amazing chairs, but in preparation I figured out what the measurements would be in mm's so I thought maybe other people would like to use it as well :-)
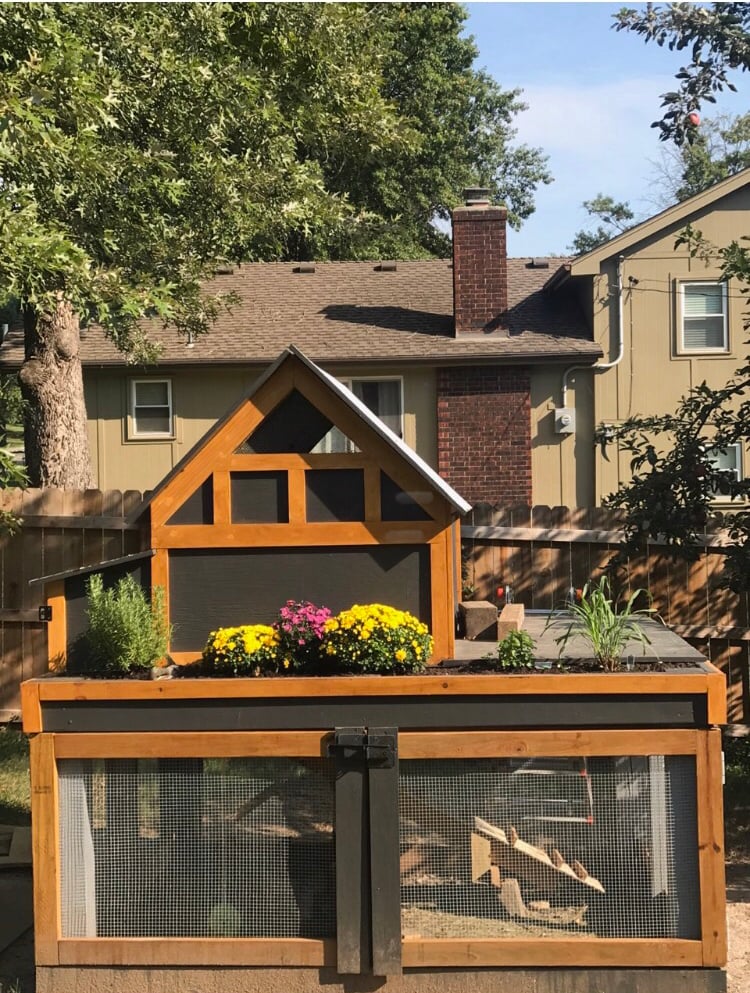
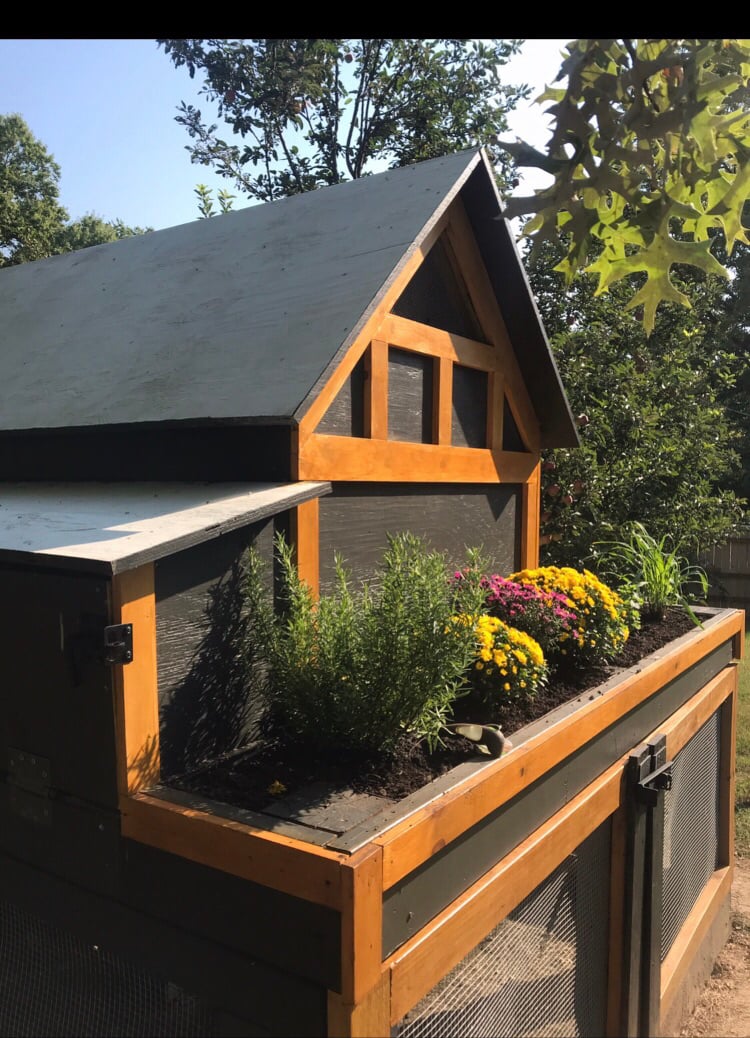
We made this Chicken Coop this summer , with lots of help. We doubled the coop and the chicken run is 8x8 . We used the base of a previous clubhouse!! Thanks so much for the plans
Mon, 10/04/2021 - 16:40
Beautiful, love the finish, thank you for sharing!
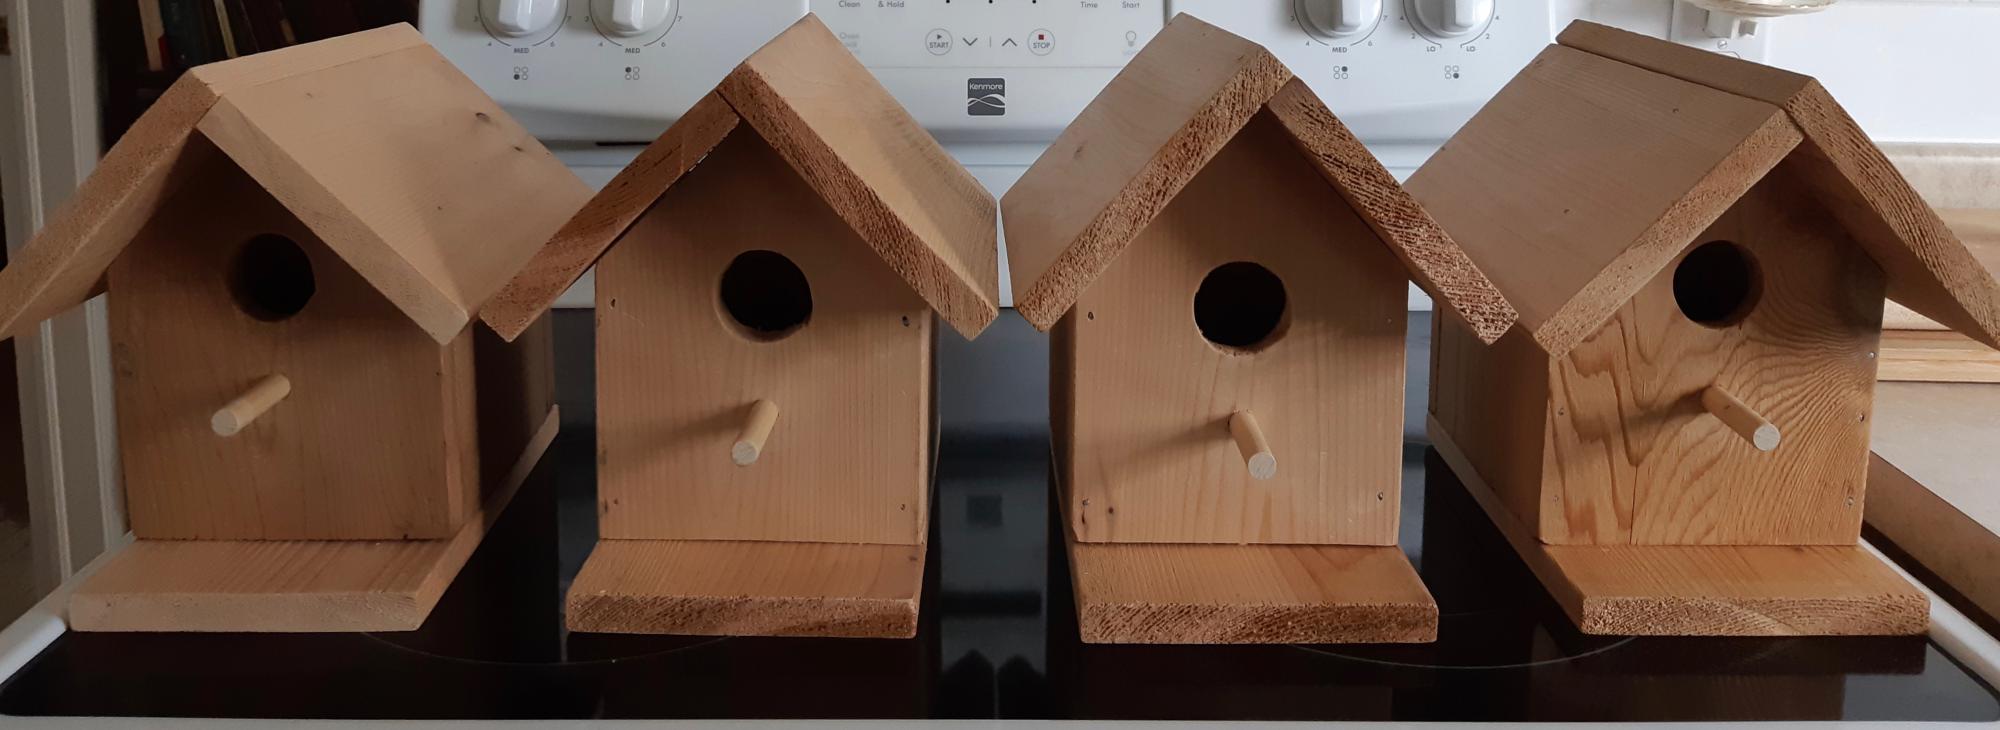
I love this pattern of Ana's! My husband and I made these together. We have 3 very tall pine trees close together, planted by my Mum 50 years ago; one for each child. Now a cedar bird house for each tree. An extra for our cottage in Garden of Eden, Nova Scotia.
Thank you for sharing this pattern Ana.
Darlene & Garry

Comments
Ana White Admin
Wed, 08/02/2023 - 15:35
Stunning upgrade!
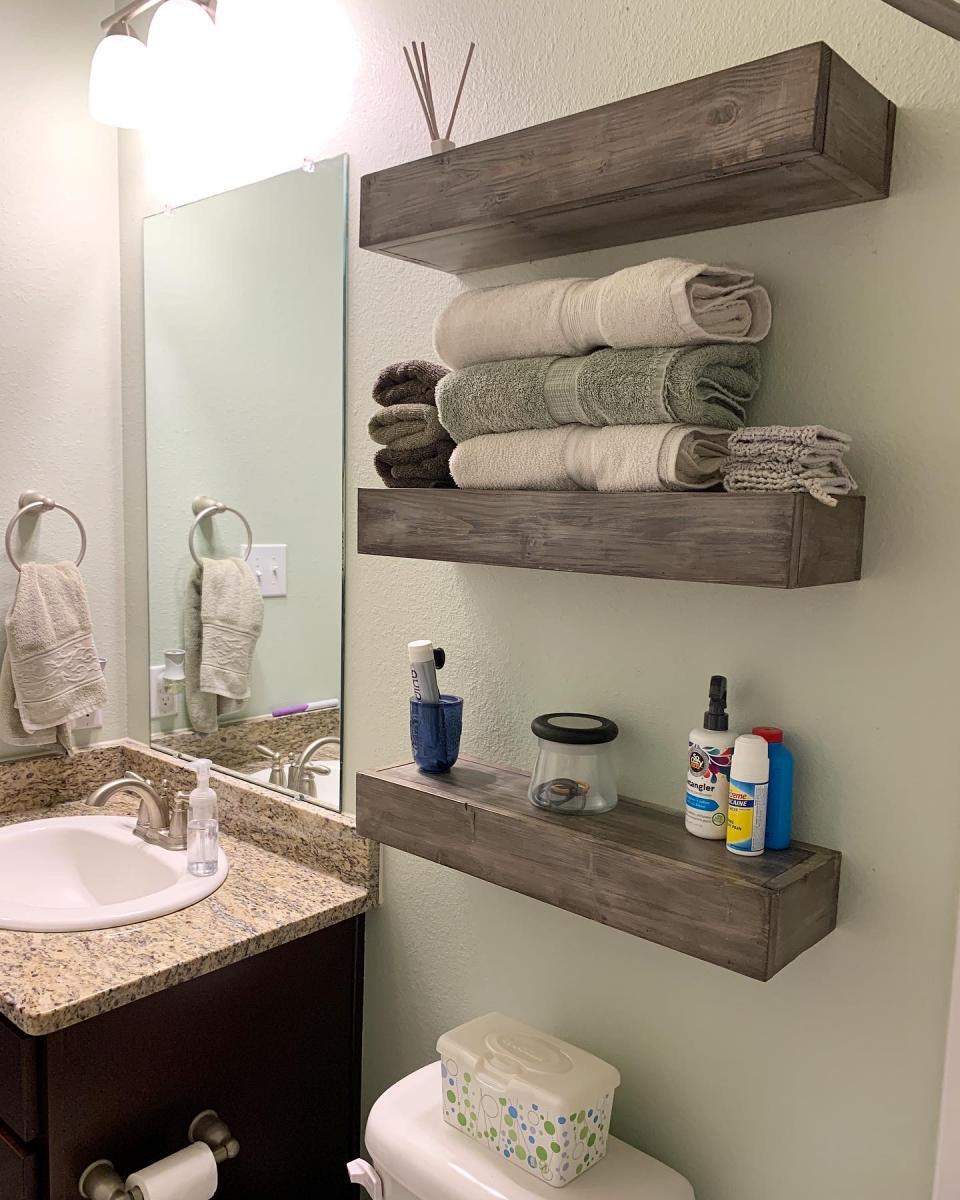
This looks amazing, love that wall too!!!