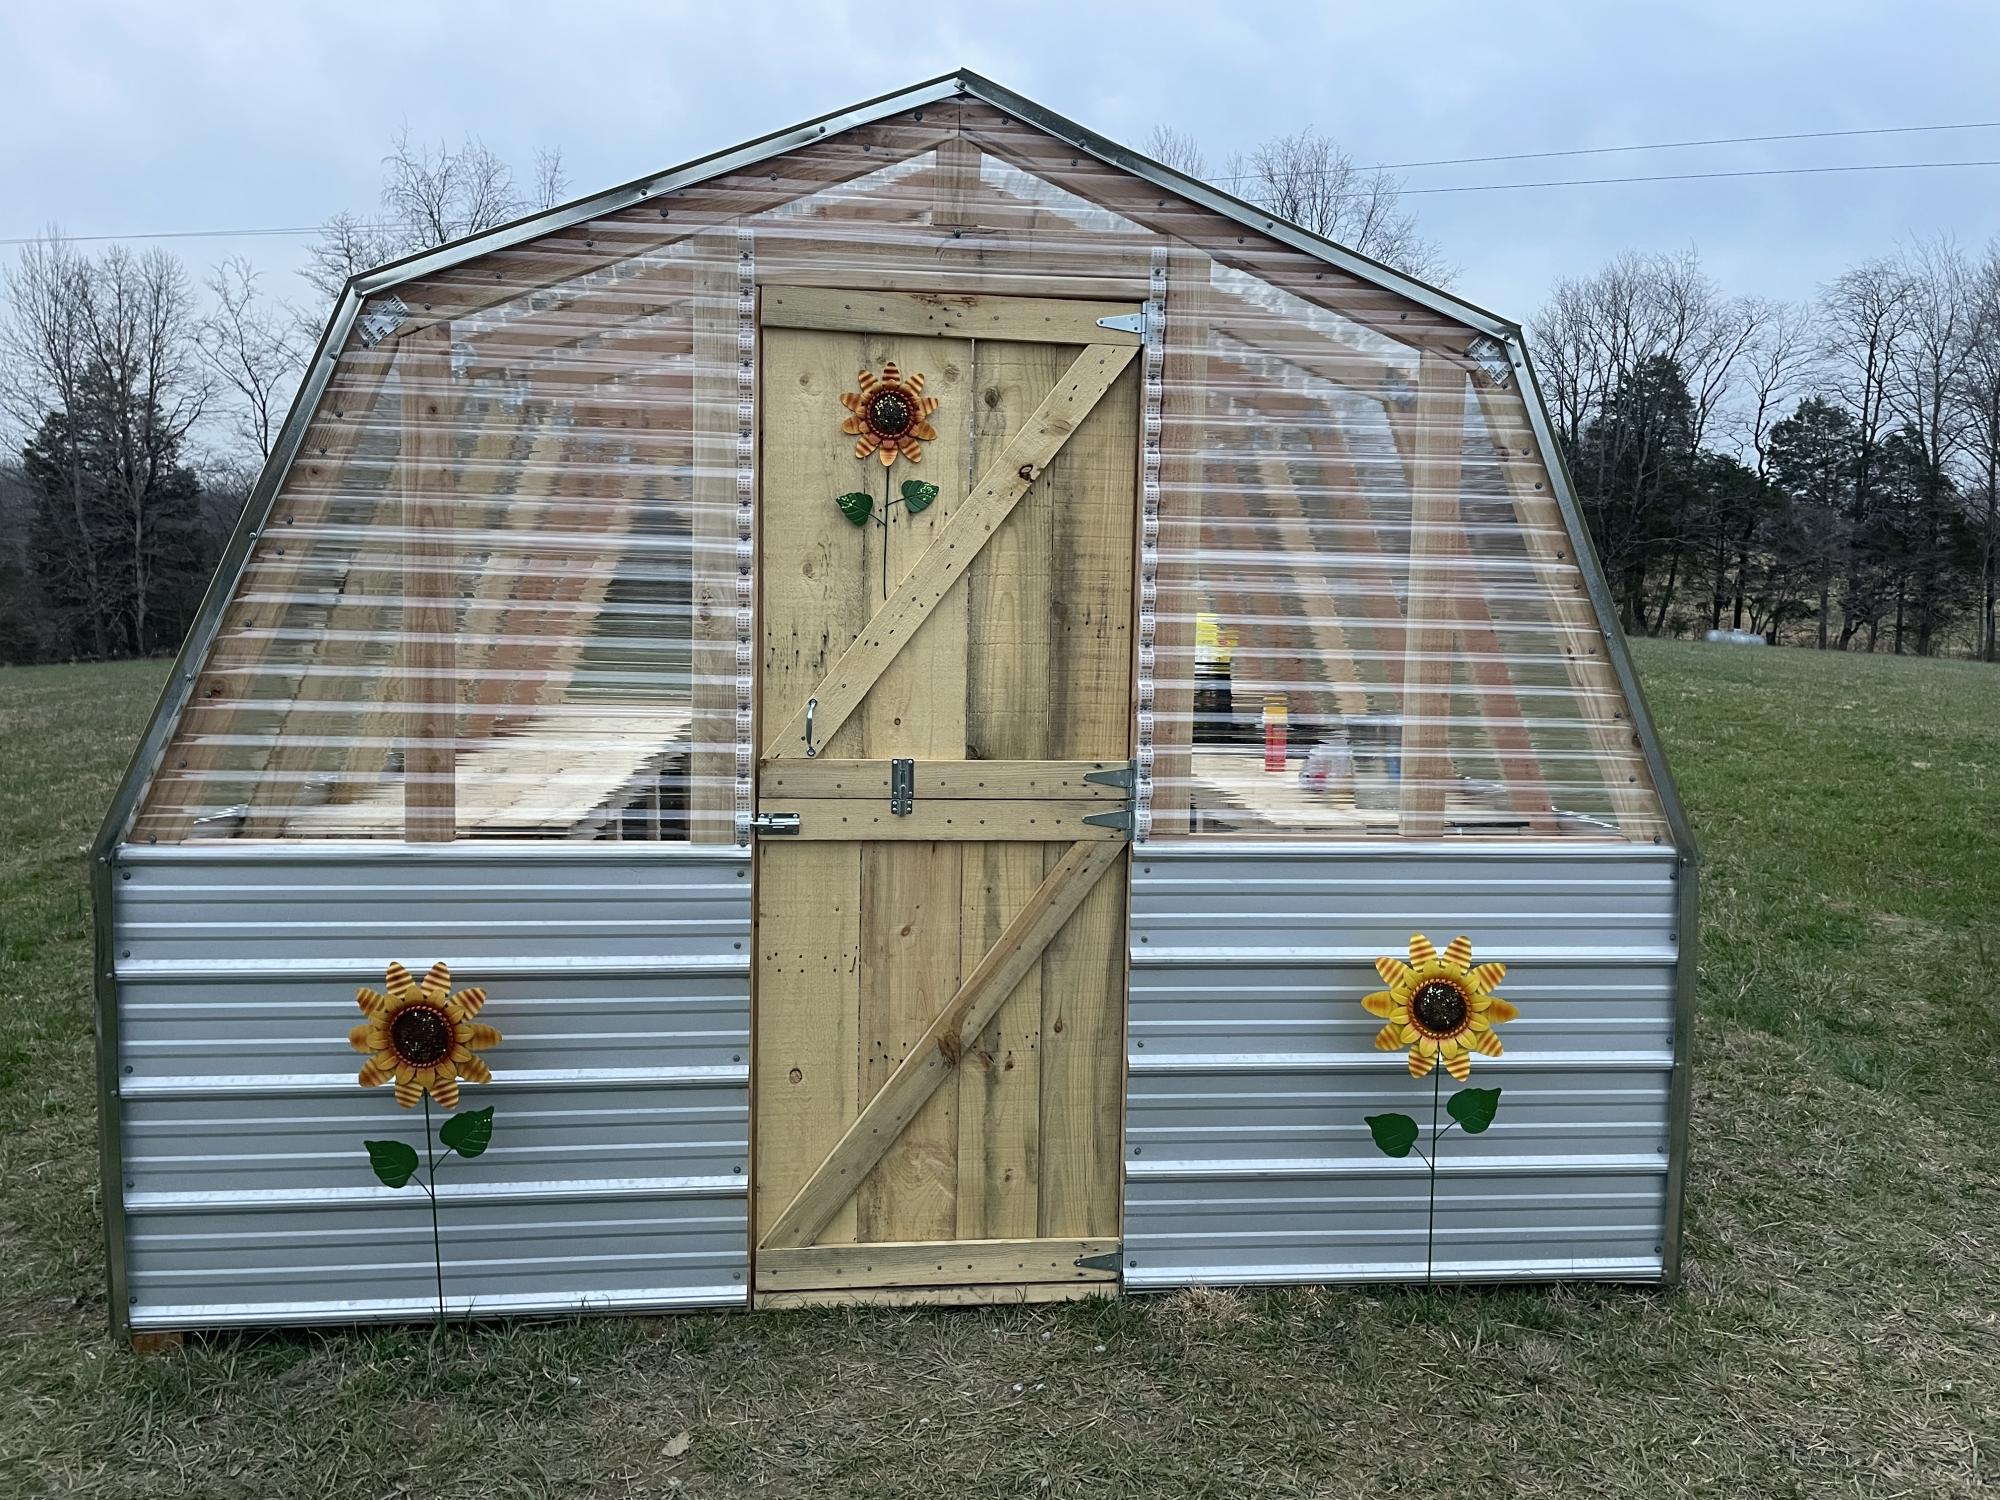
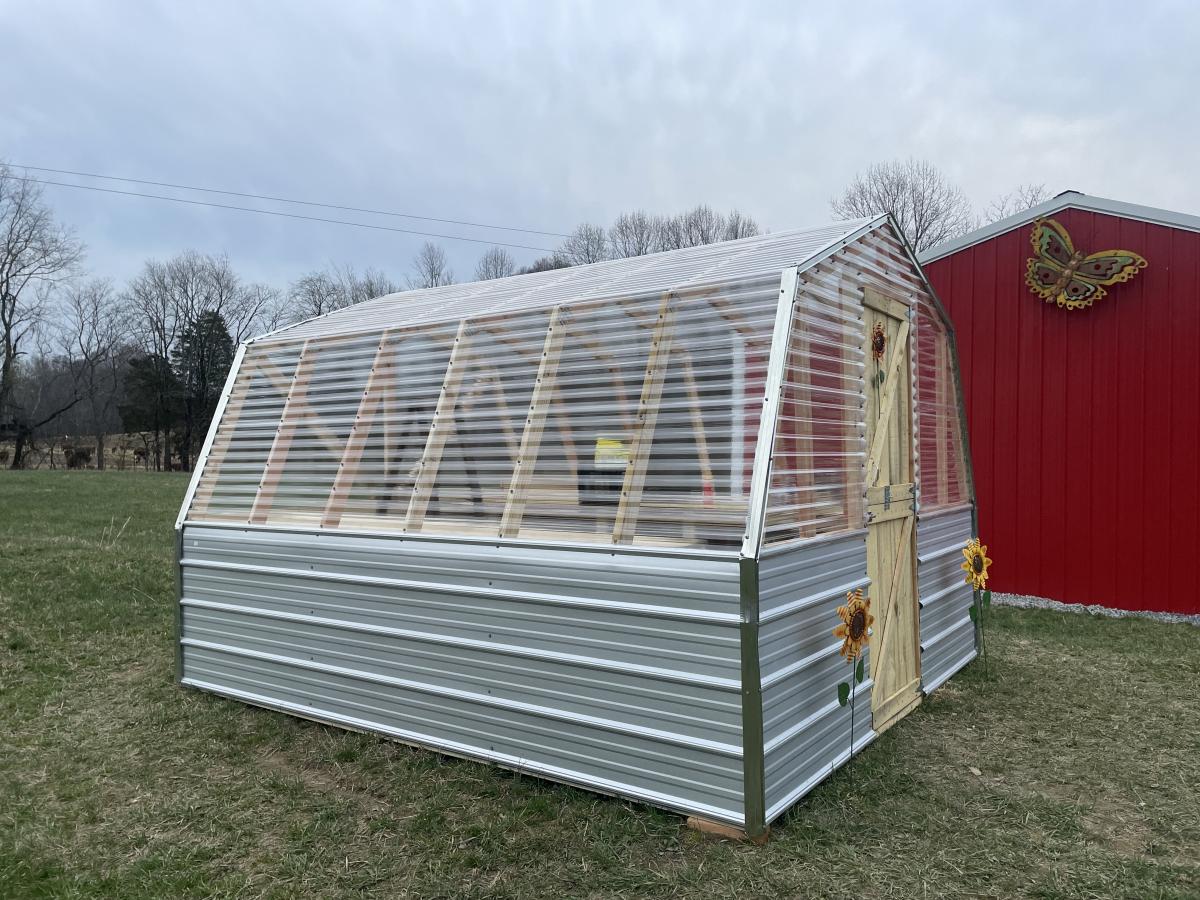
DIY Greenhouse
Thank you so much for the plans. We enjoyed building it. We love it!!!
Built from Plan(s)
Thank you so much for the plans. We enjoyed building it. We love it!!!
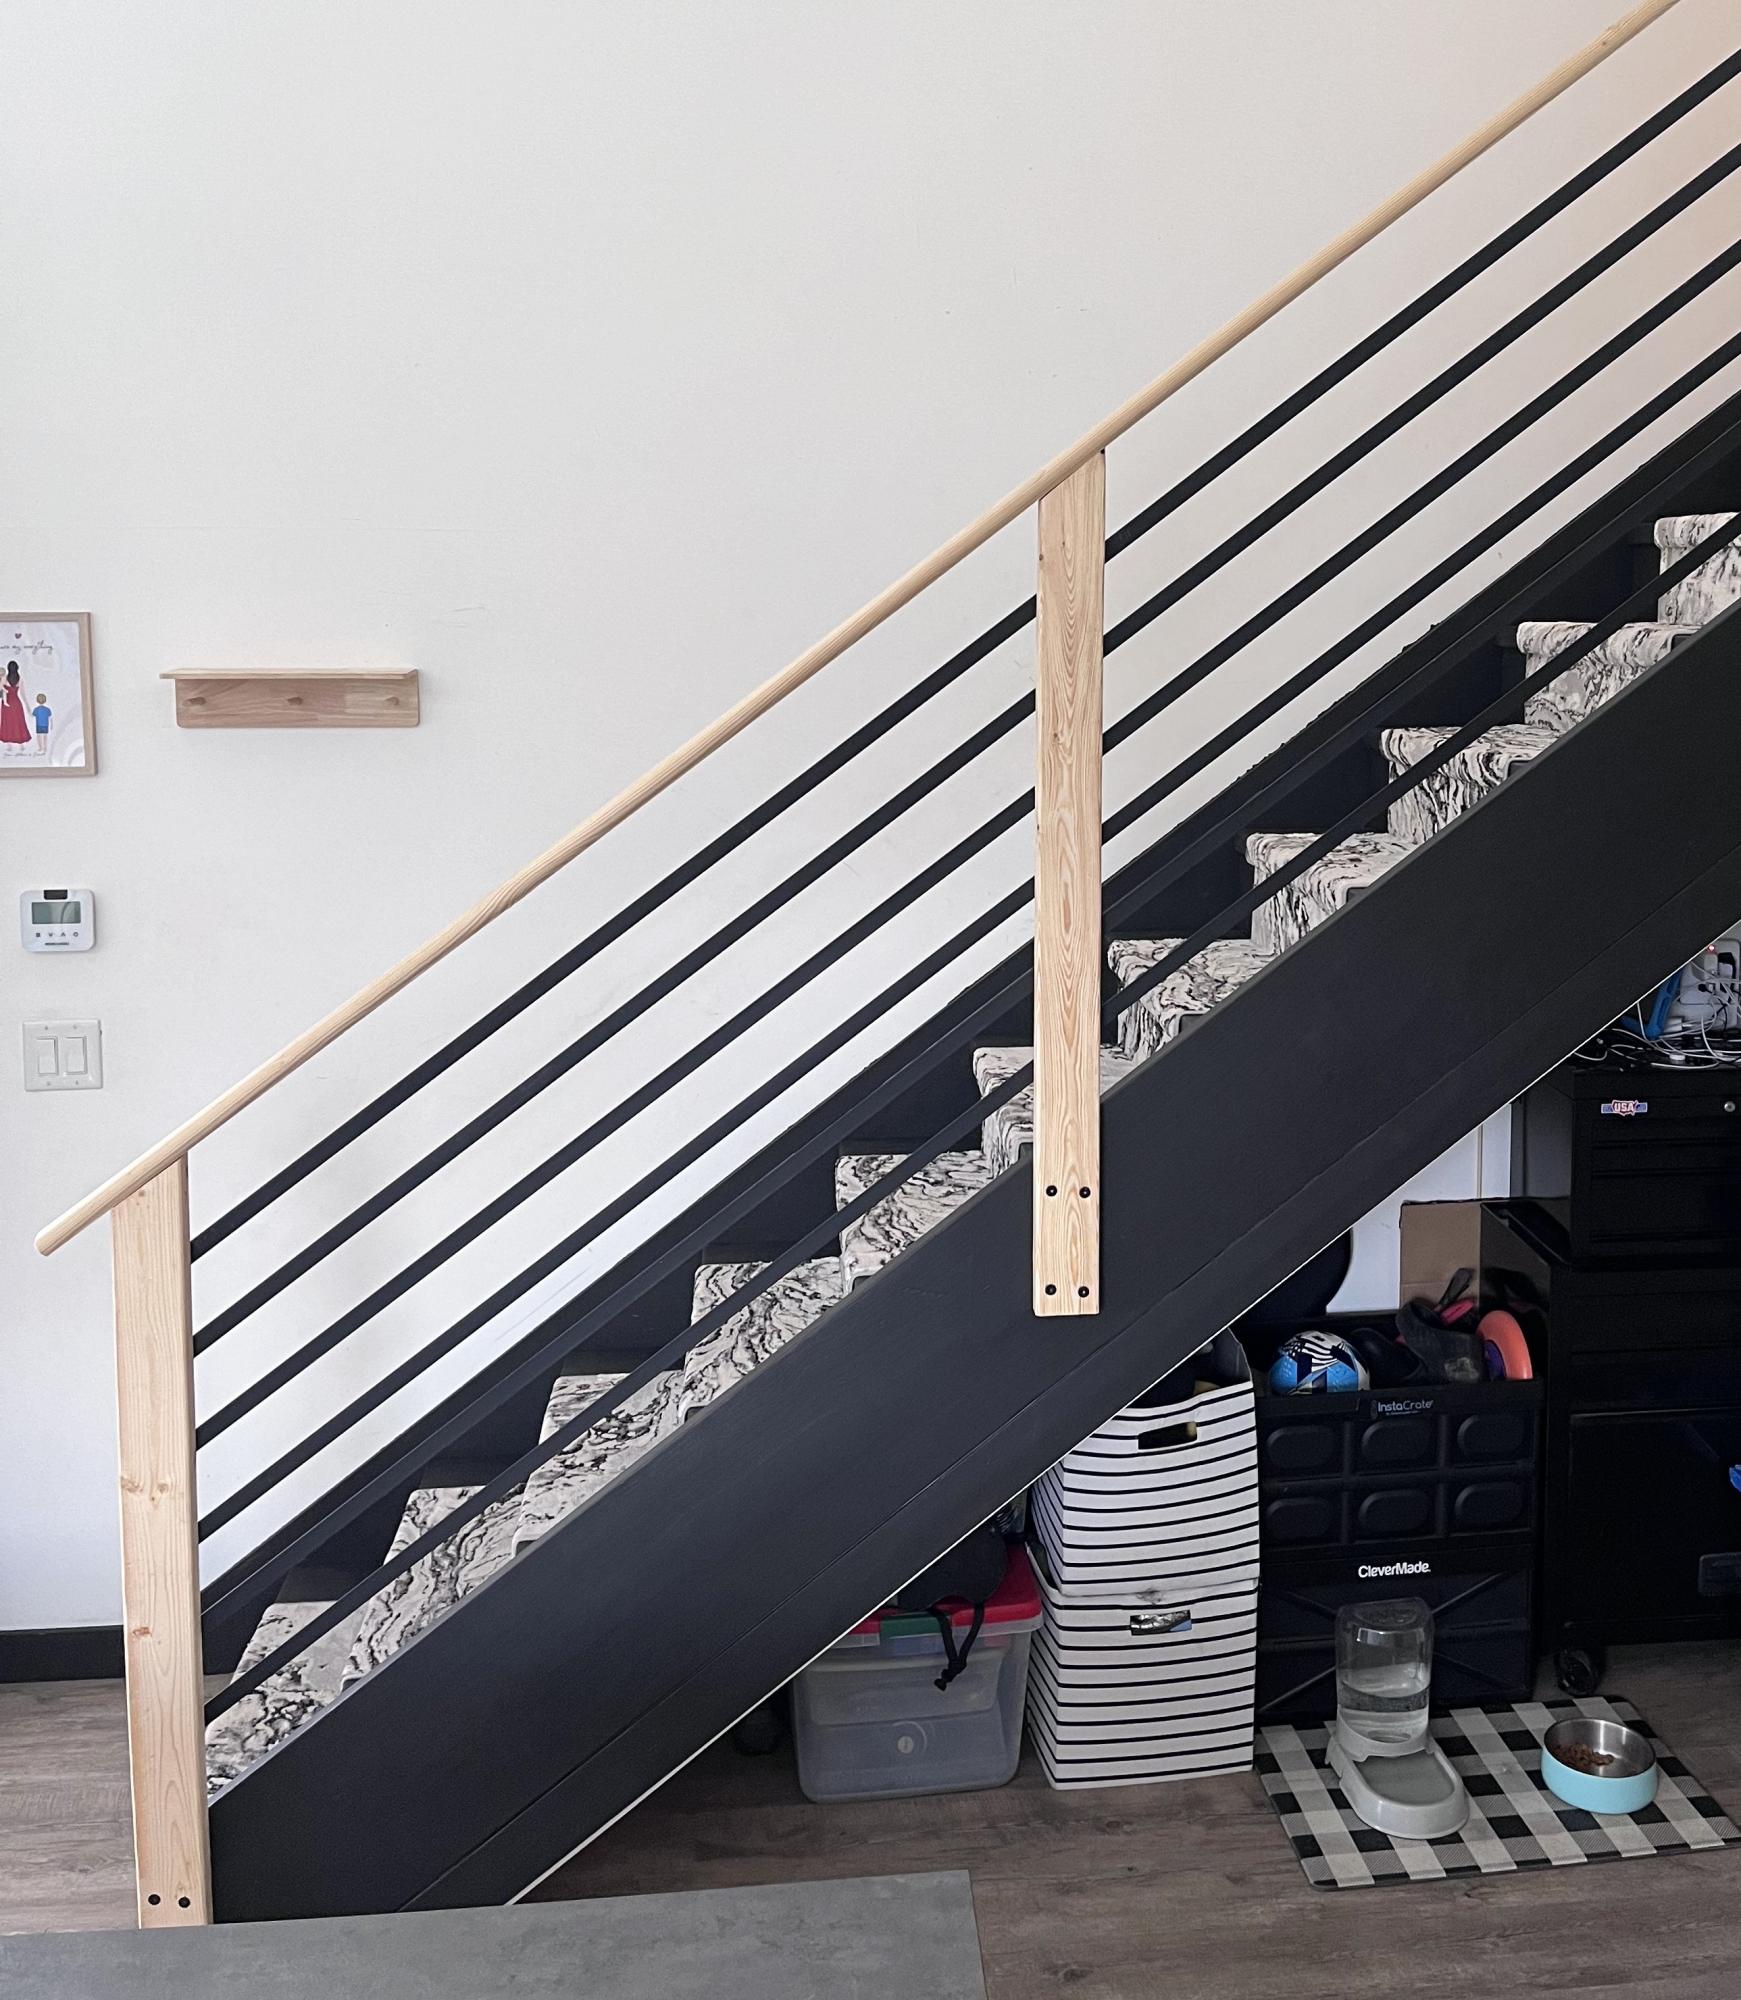
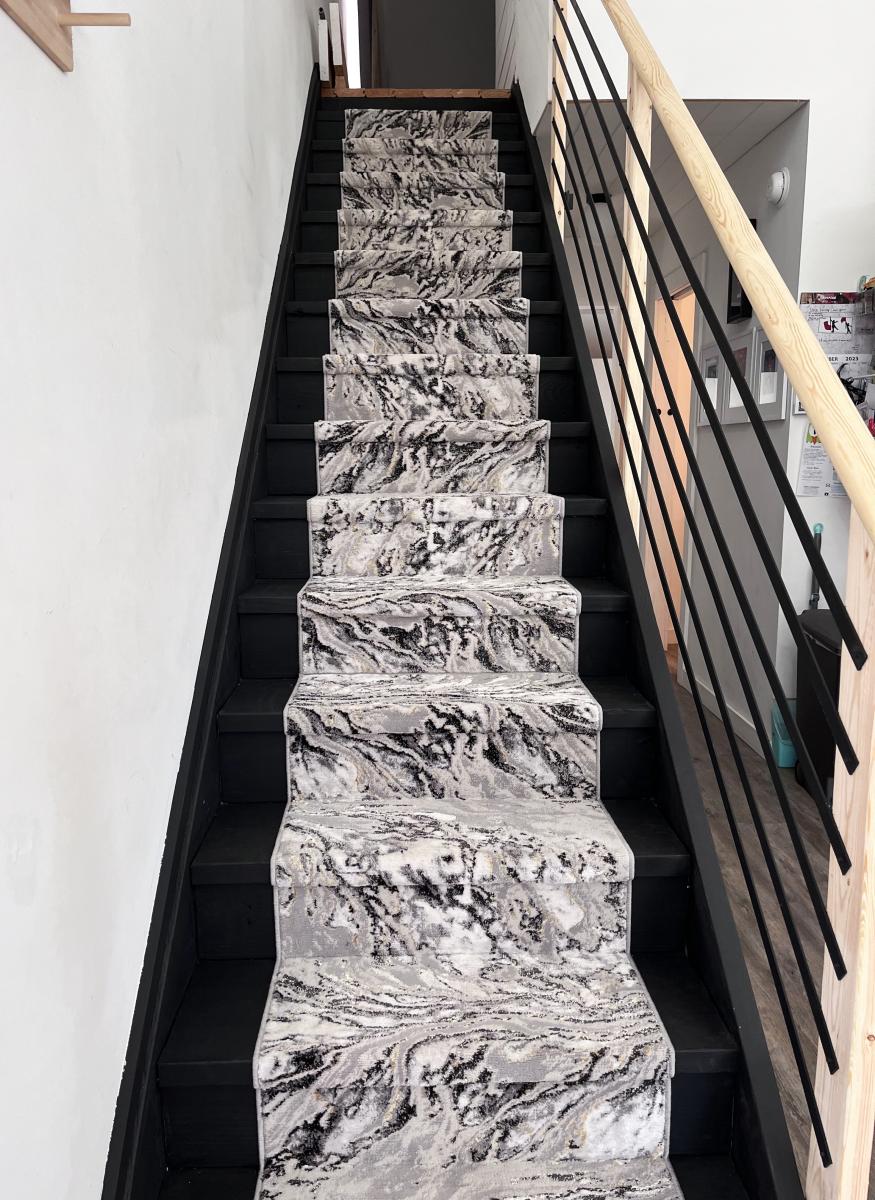
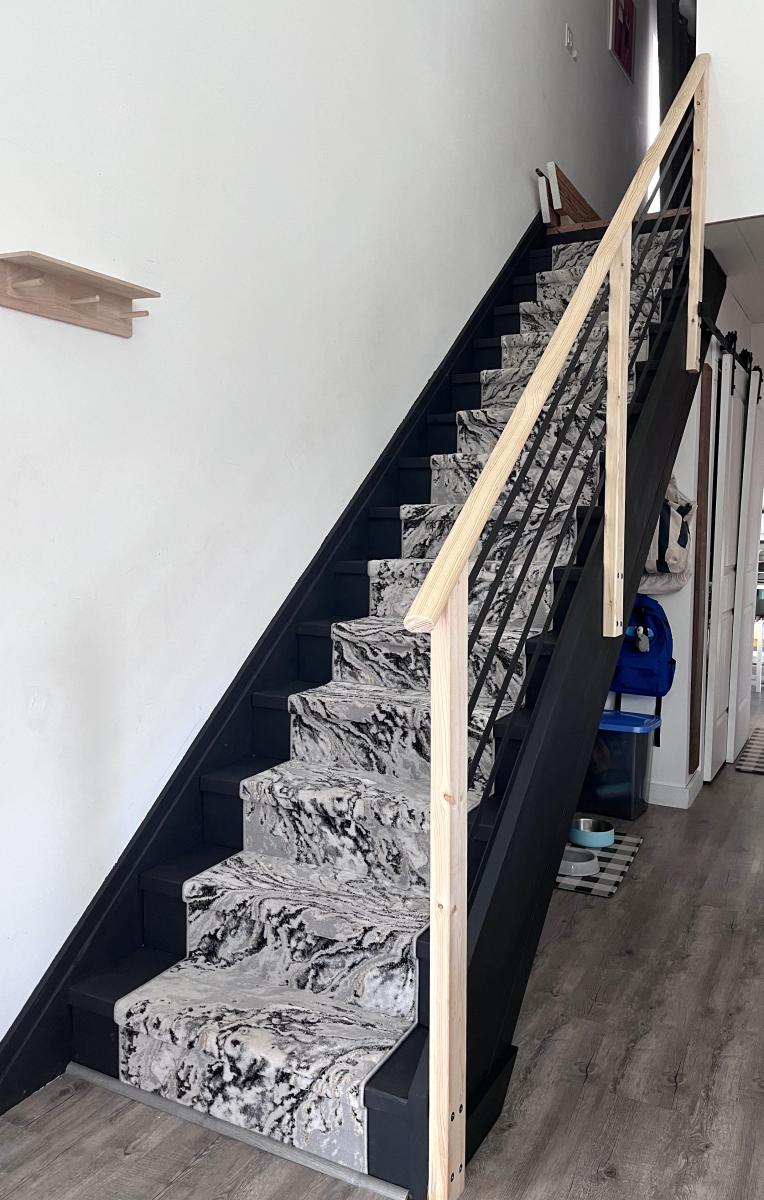
We built our house 5 years ago and I’ve disliked our stairs since then. They were never finished and were big and bulky compared to the rest of the house. These plans were the perfect fit. We switched the top 2x4 for an actual handrail, purchased from a big box store. We used pocket holes to install it and I couldn’t be happier. It’s now my favorite thing in the house. We plan on adding a loft and will use these plans for the railing.
@livingsmallerintheholler
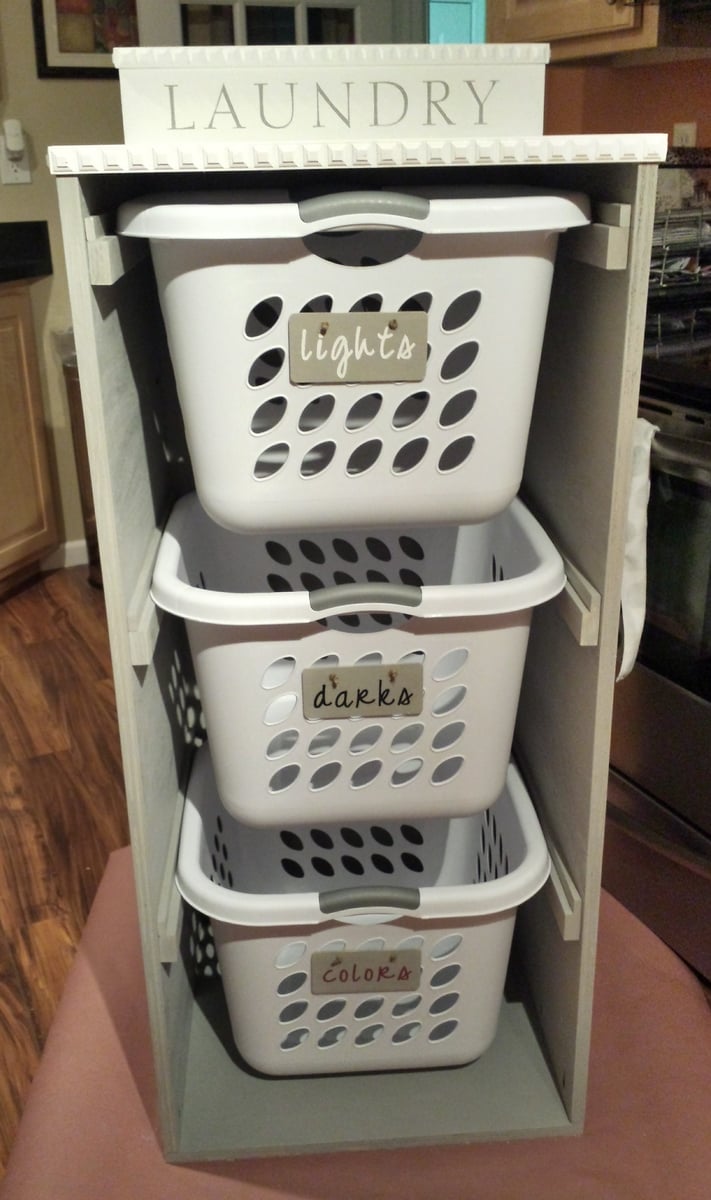
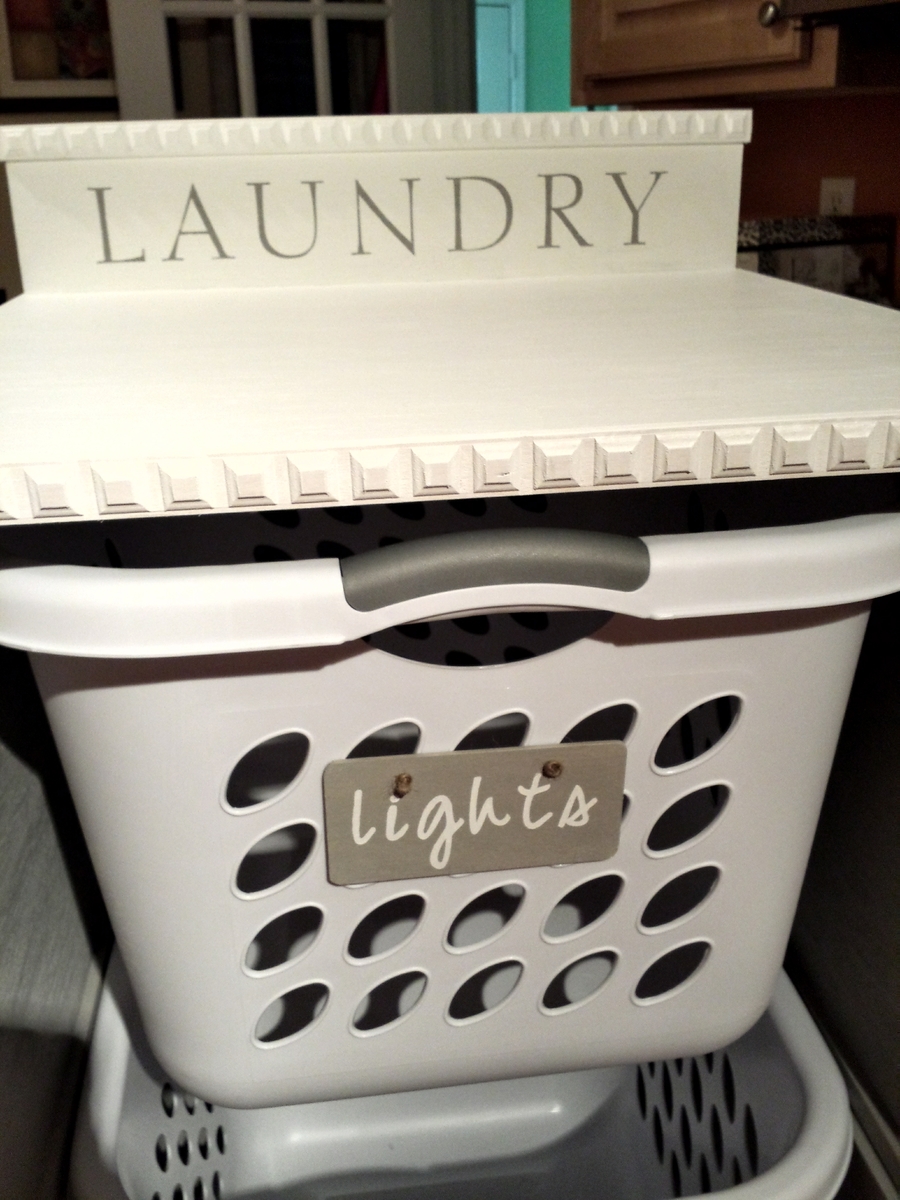
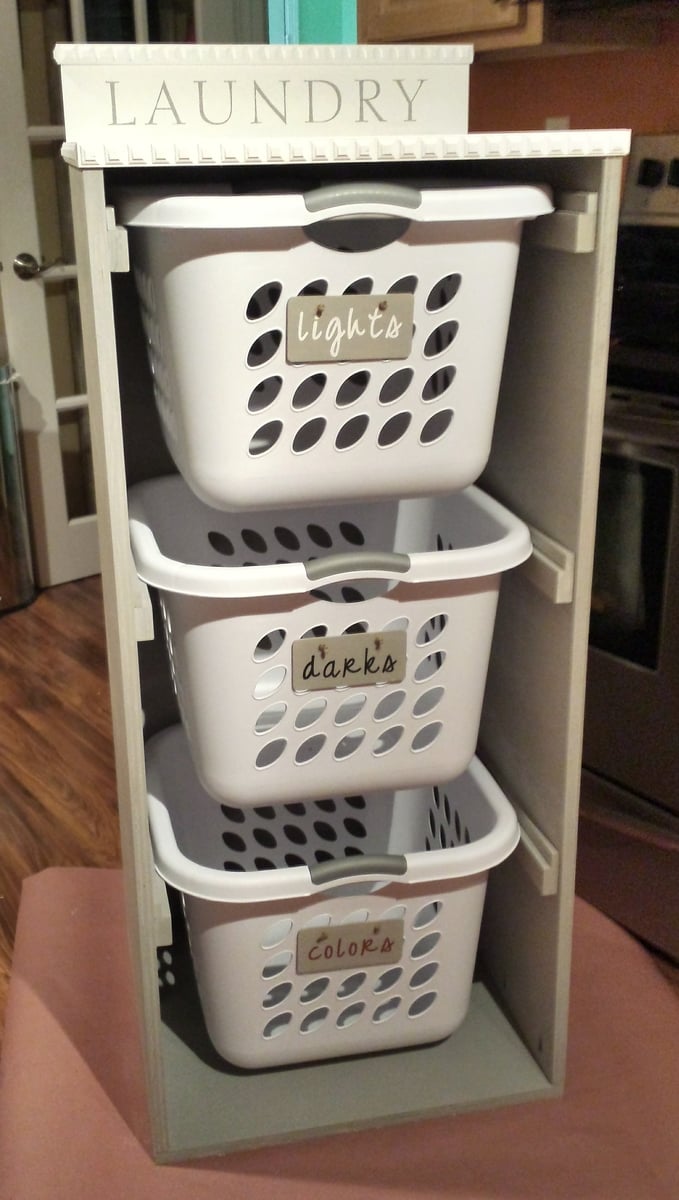
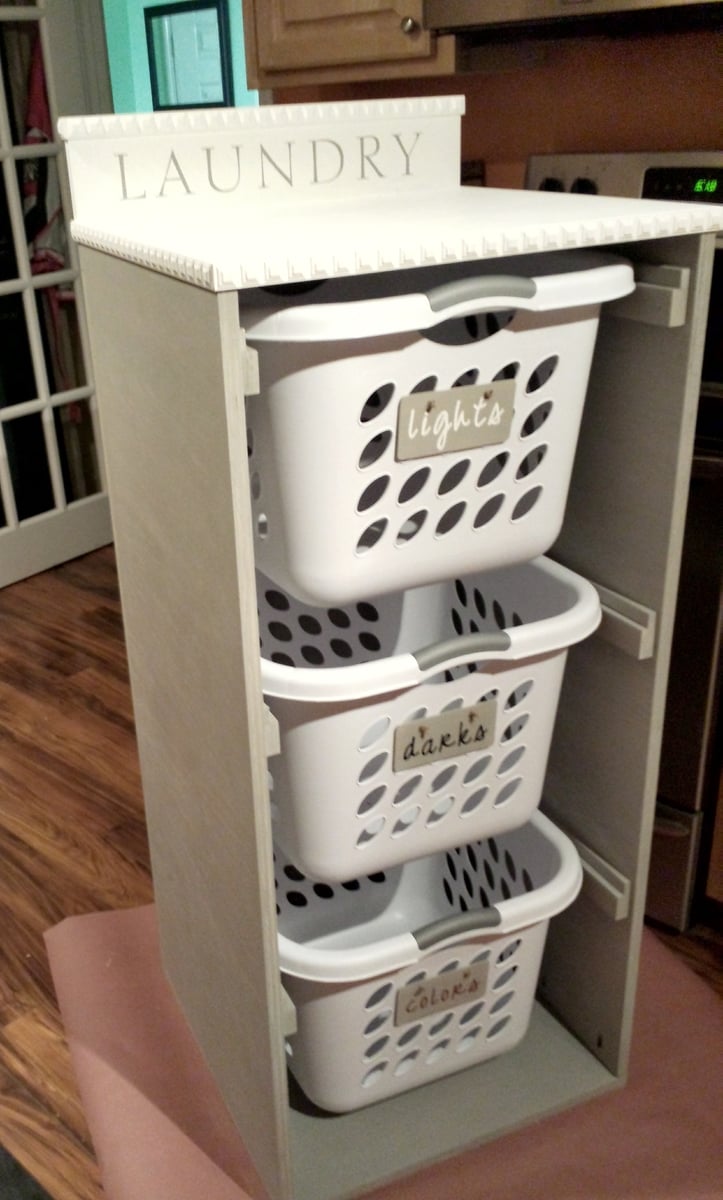
Used square laundry baskets instead of regular rectangular baskets. The square ones aren't as deep but are a bit taller so I had to modify the plans. I added a backsplash and some wooden tags to the baskets to designate them for certain colors. I also added some decorative trim and finished the bottom in a gray stain and used white chalk paint for the top.

The Big Kid and her friend were standing behind me when I pulled up Ana's birdhouse kit plans and they begged to build one, too. Initially, I wasn't wanting them to use my nail gun, so I predrilled the holes for all the brad nails. Details are on my blog.
I was able to get three birdhouses from two 6' fence pickets (had to make one about a half inch smaller all around, but it's barely noticeable!)
Thanks, Ana!


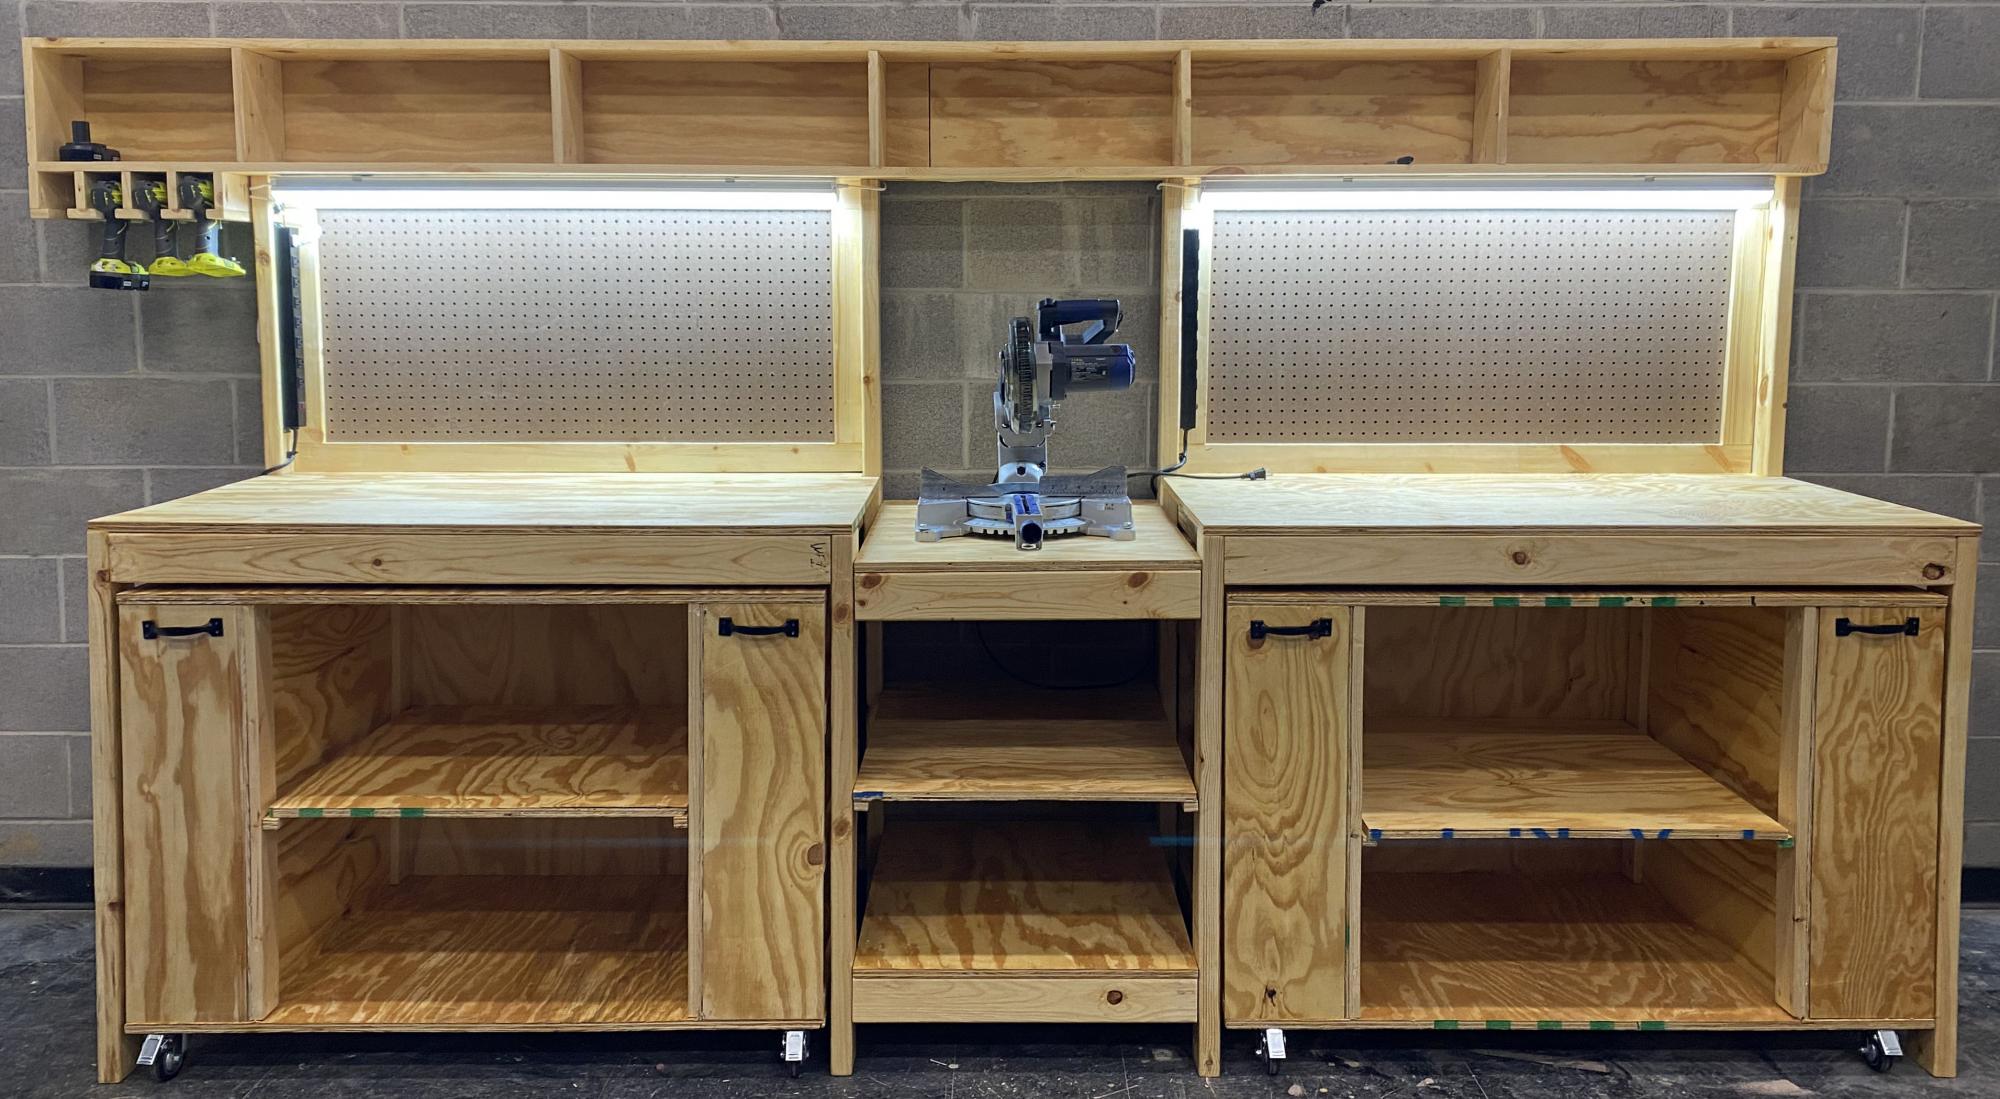
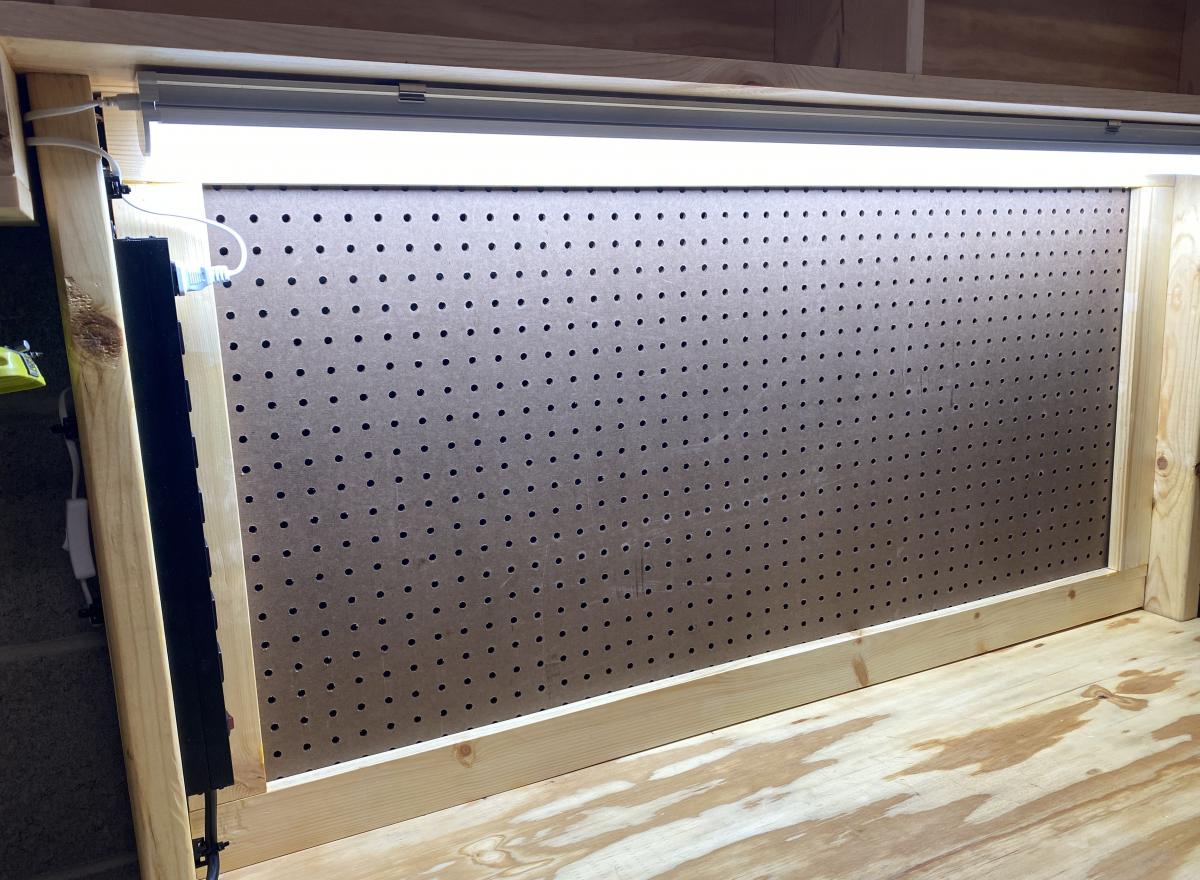
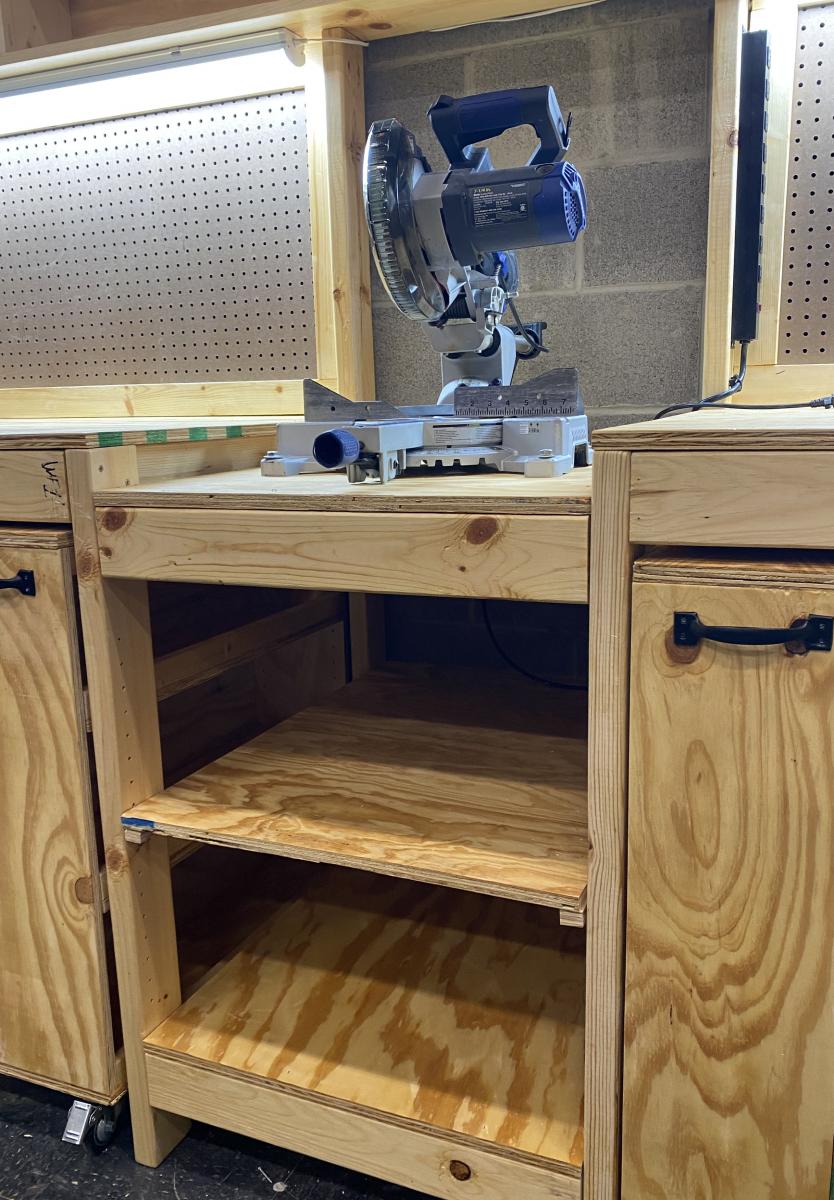
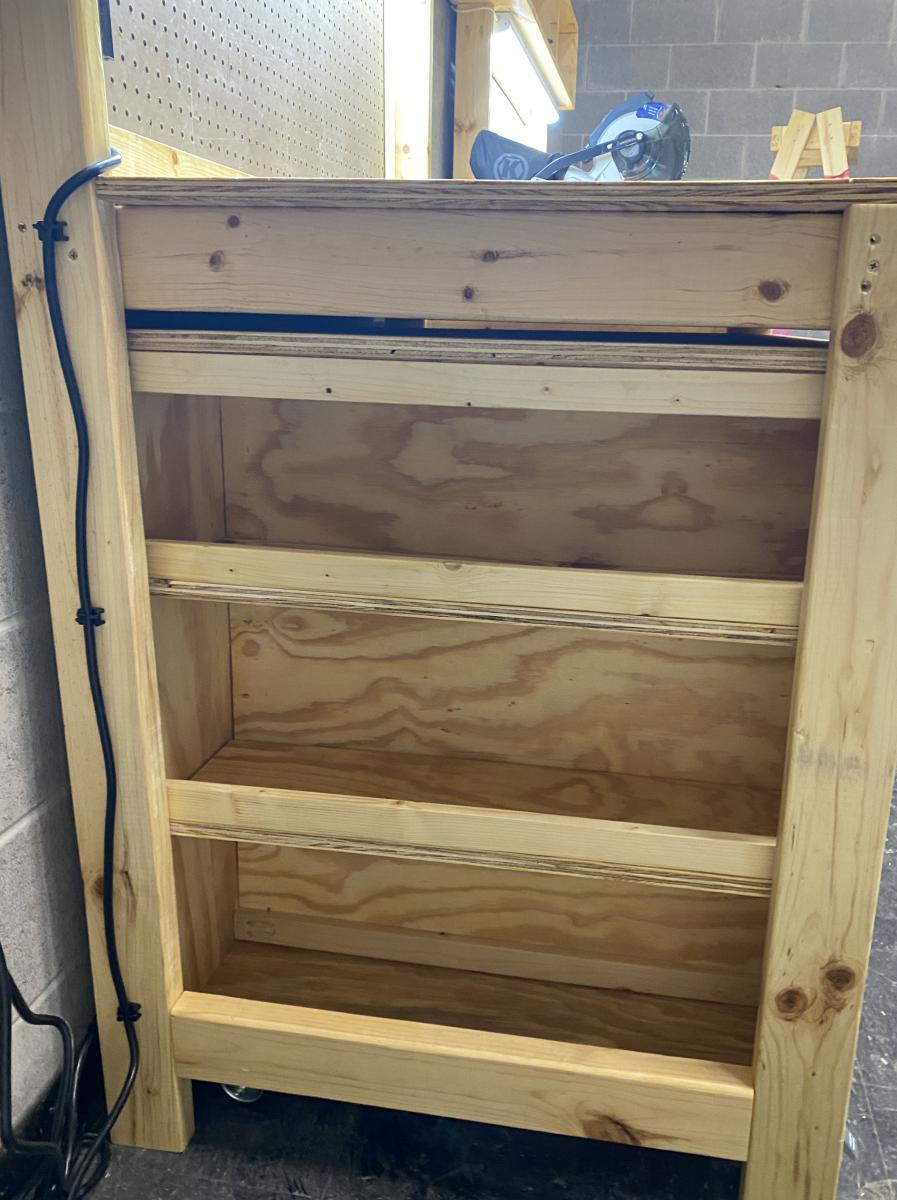
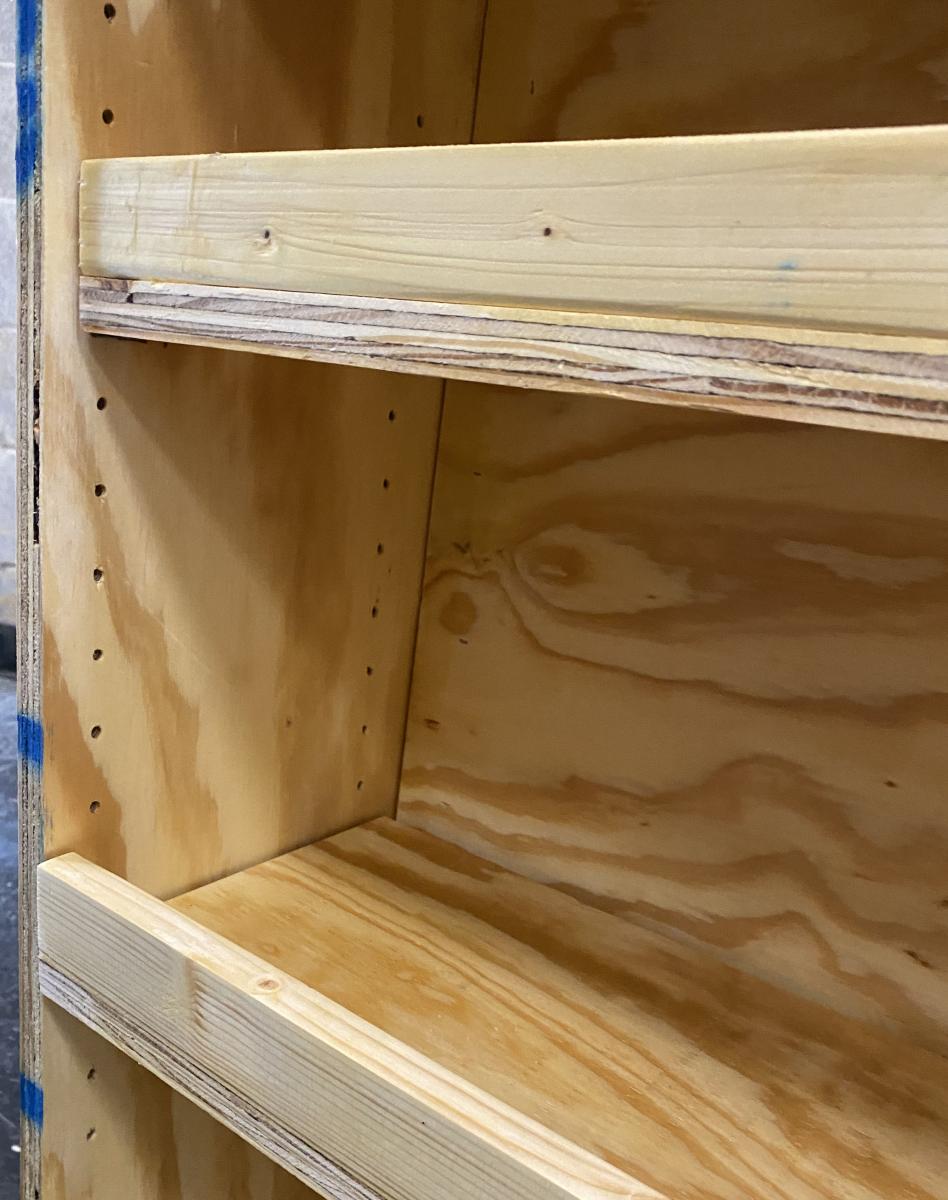
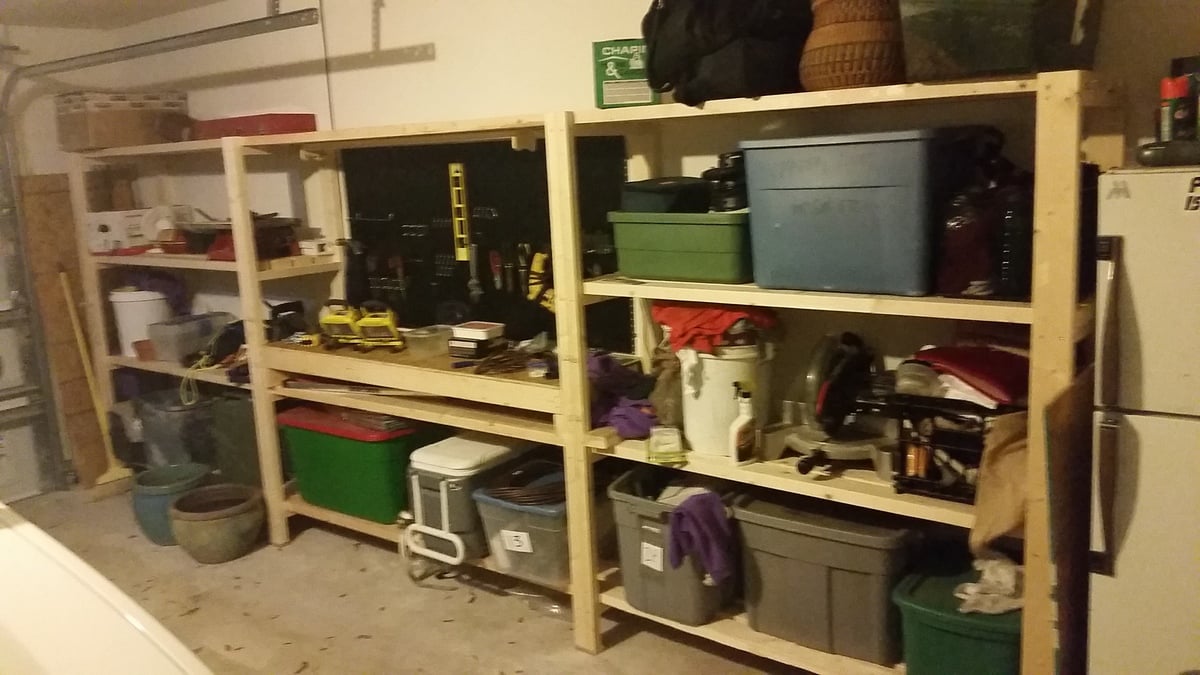
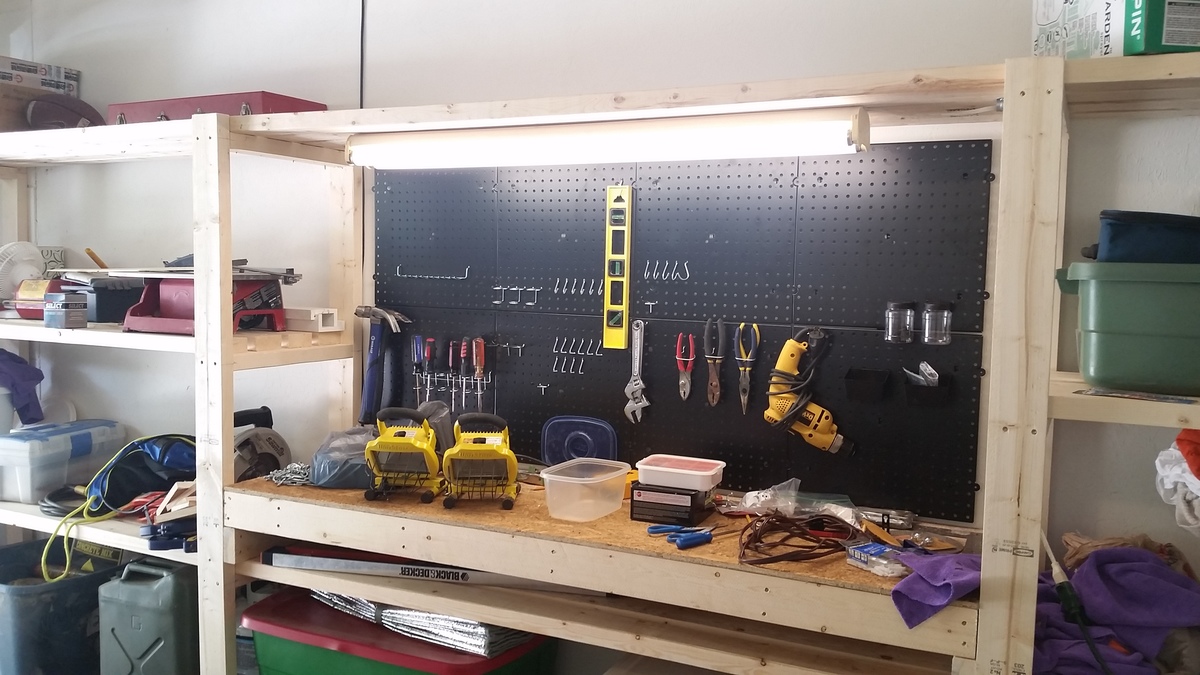
My son chose to make a workbench for his high school theater for his Eagle Scout project, and selected the Ultimate Roll Away Workbench with Miter Saw Stand as the basis for the project. The theater teacher wanted pegboard for tool storage, so we extended the rear legs on each workbench and notched the top to allow them to pass through. We built two frames from 1x3s to fit inside the rear legs, then put a pegboard inside each one.
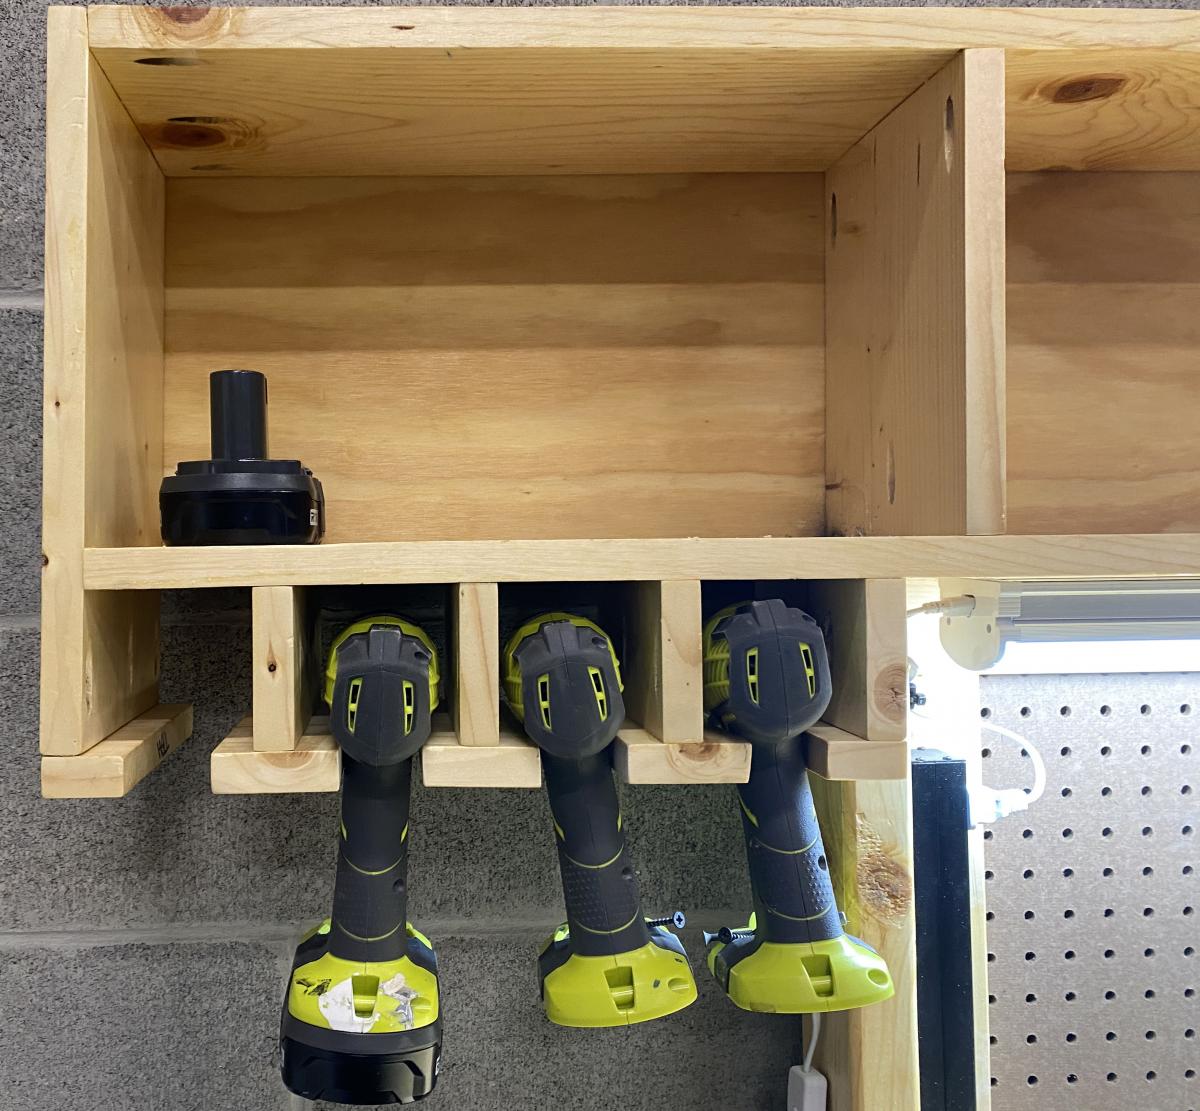
To secure the extended legs, we added a riser shelf from 1x8s. We put a storage station for drills at one end of the riser shelf.
We also made all the cart shelves adjustable and added an adjustable shelf under the miter saw, and added lighting and power strips.
We left out the panels at the end of the workbench to allow access to the shelves there without having to remove the carts. Once we had constructed it, we added a brace at each end of the workbench to better support the outside front legs.
This plan was the perfect one for the theater, giving a stable work area for the miter saw and allowing for tool and materials storage. The carts can be rolled around to where a work surface is needed. This will come in handy for years of set construction in the theater. So proud of my son and all the leadership and hard work he put into this project!
Mon, 10/18/2021 - 11:54
WOW, that is absolutely amazing, thank you so much for sharing this story!
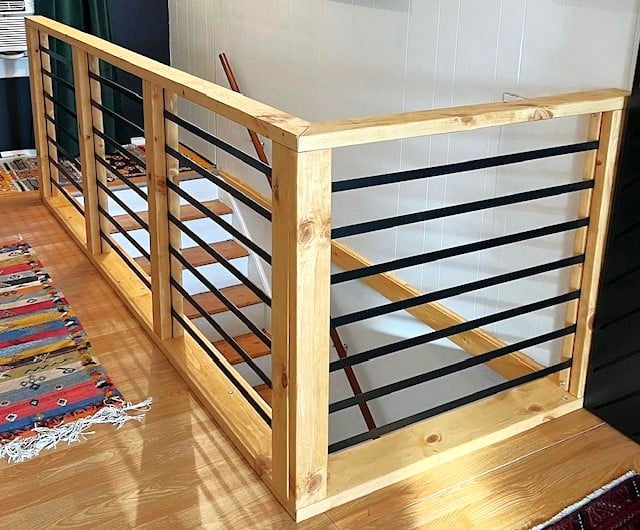
Amazing stair railing upgrade shared by Sara and Chris!

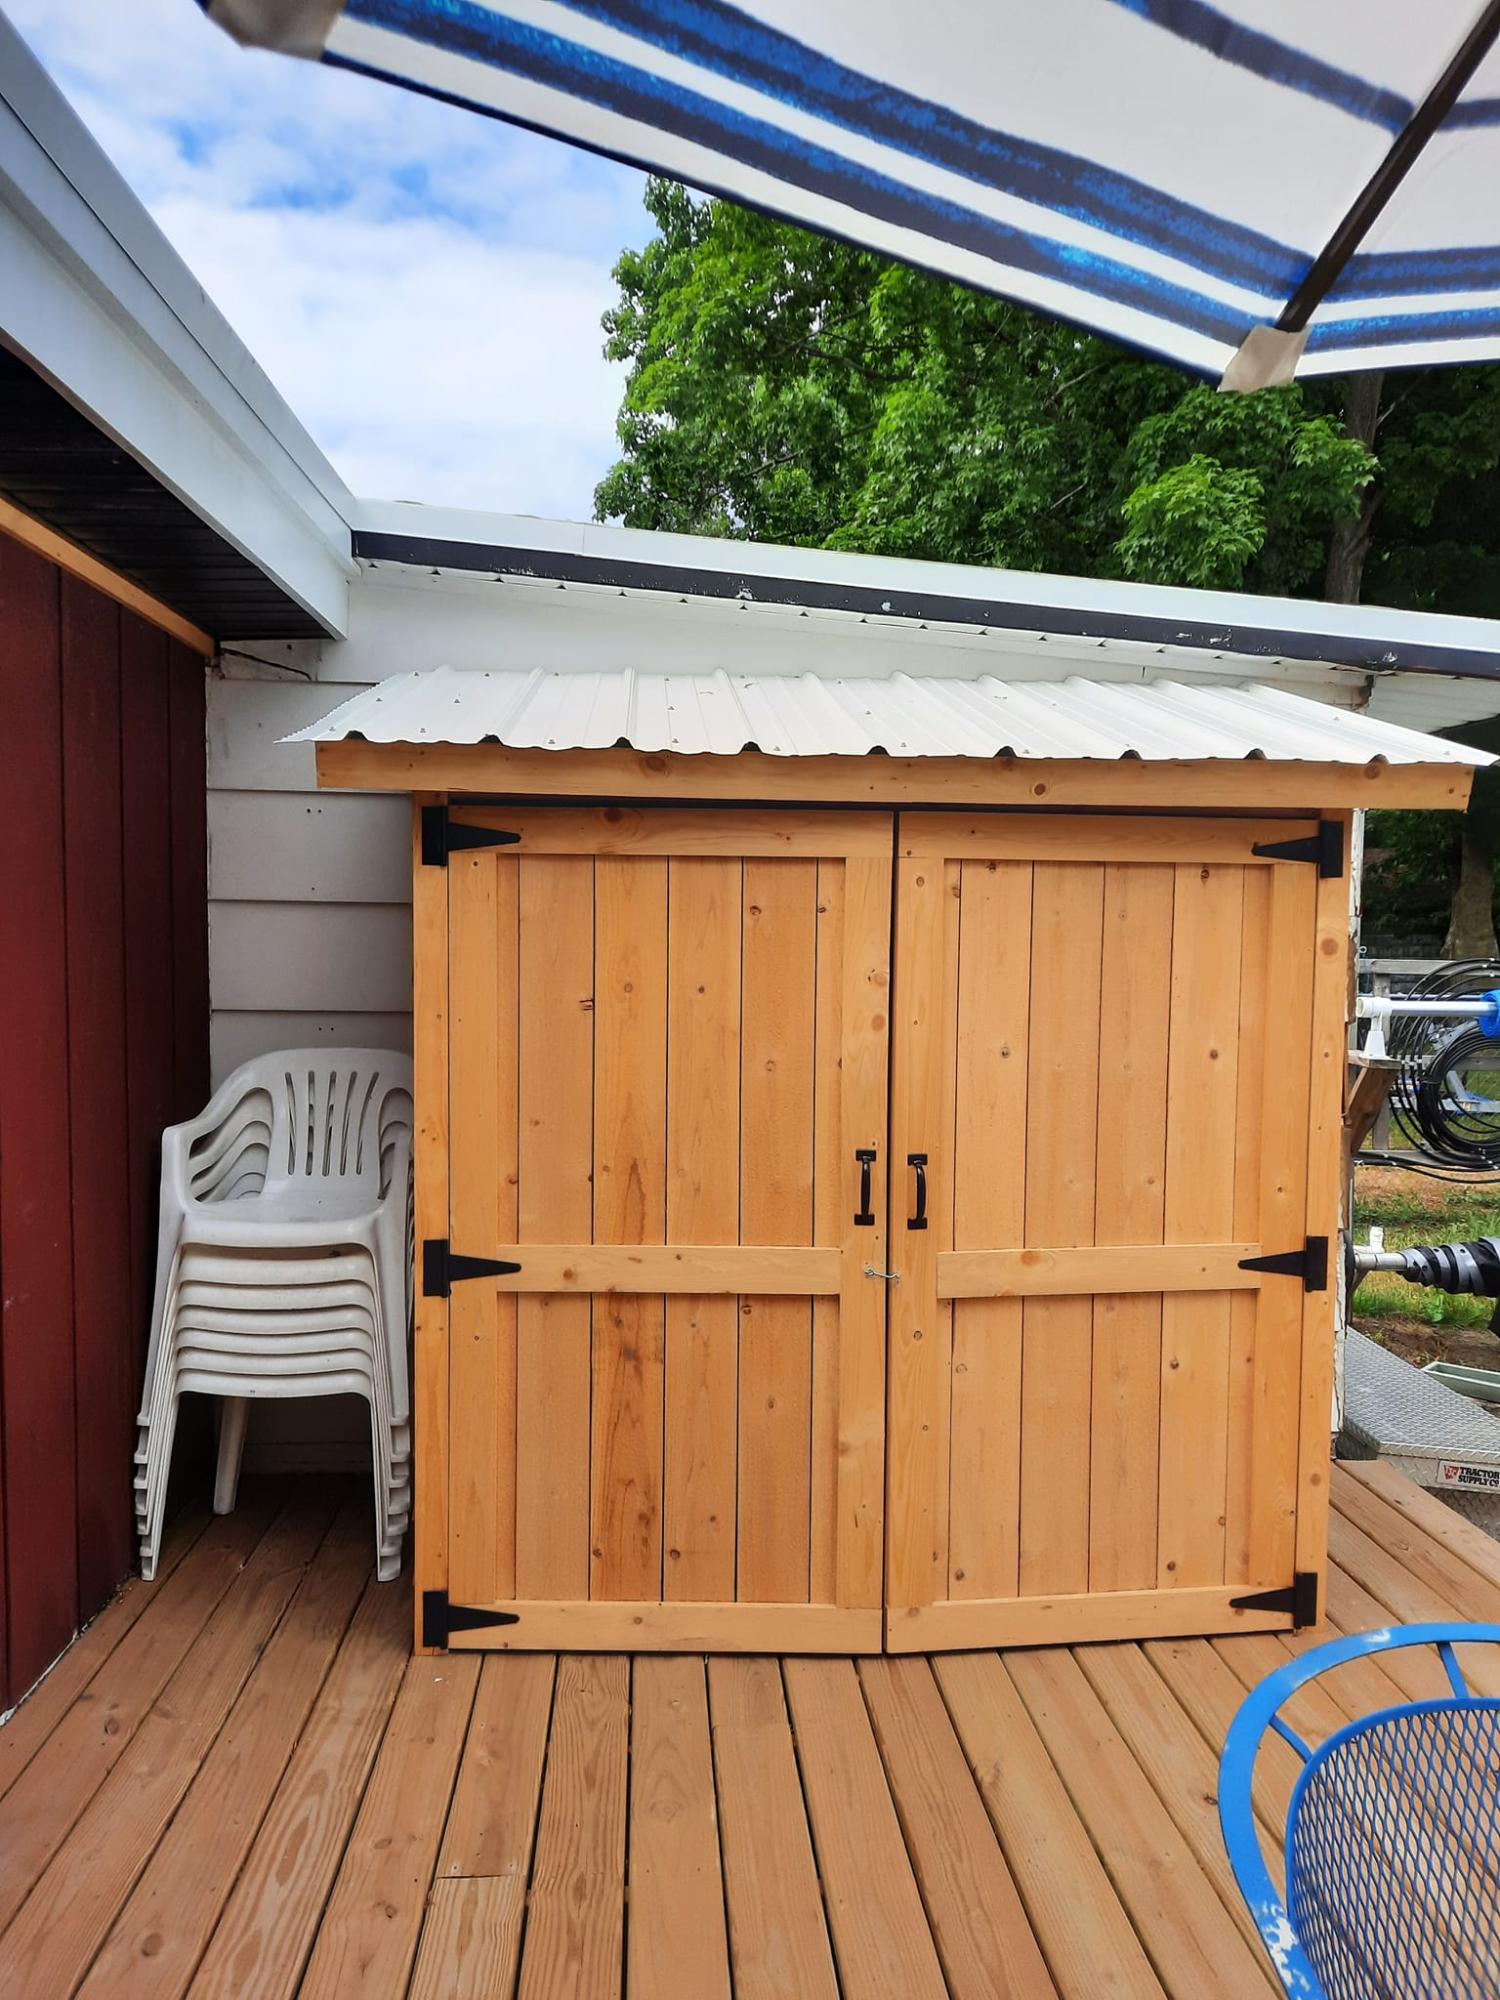
I was looking for a shed to keep pool towels and other deck and pool items. This shed hit every feature I was looking
for. My husband loved the plans. He's always saying he can build anything with a measured drawing and a
cut list. The only thing we changed was the roofing material. we were given some metal roofing by a friend.
Mon, 06/26/2023 - 12:20
Fabulous, so glad you found our plans helpful! It looks great.
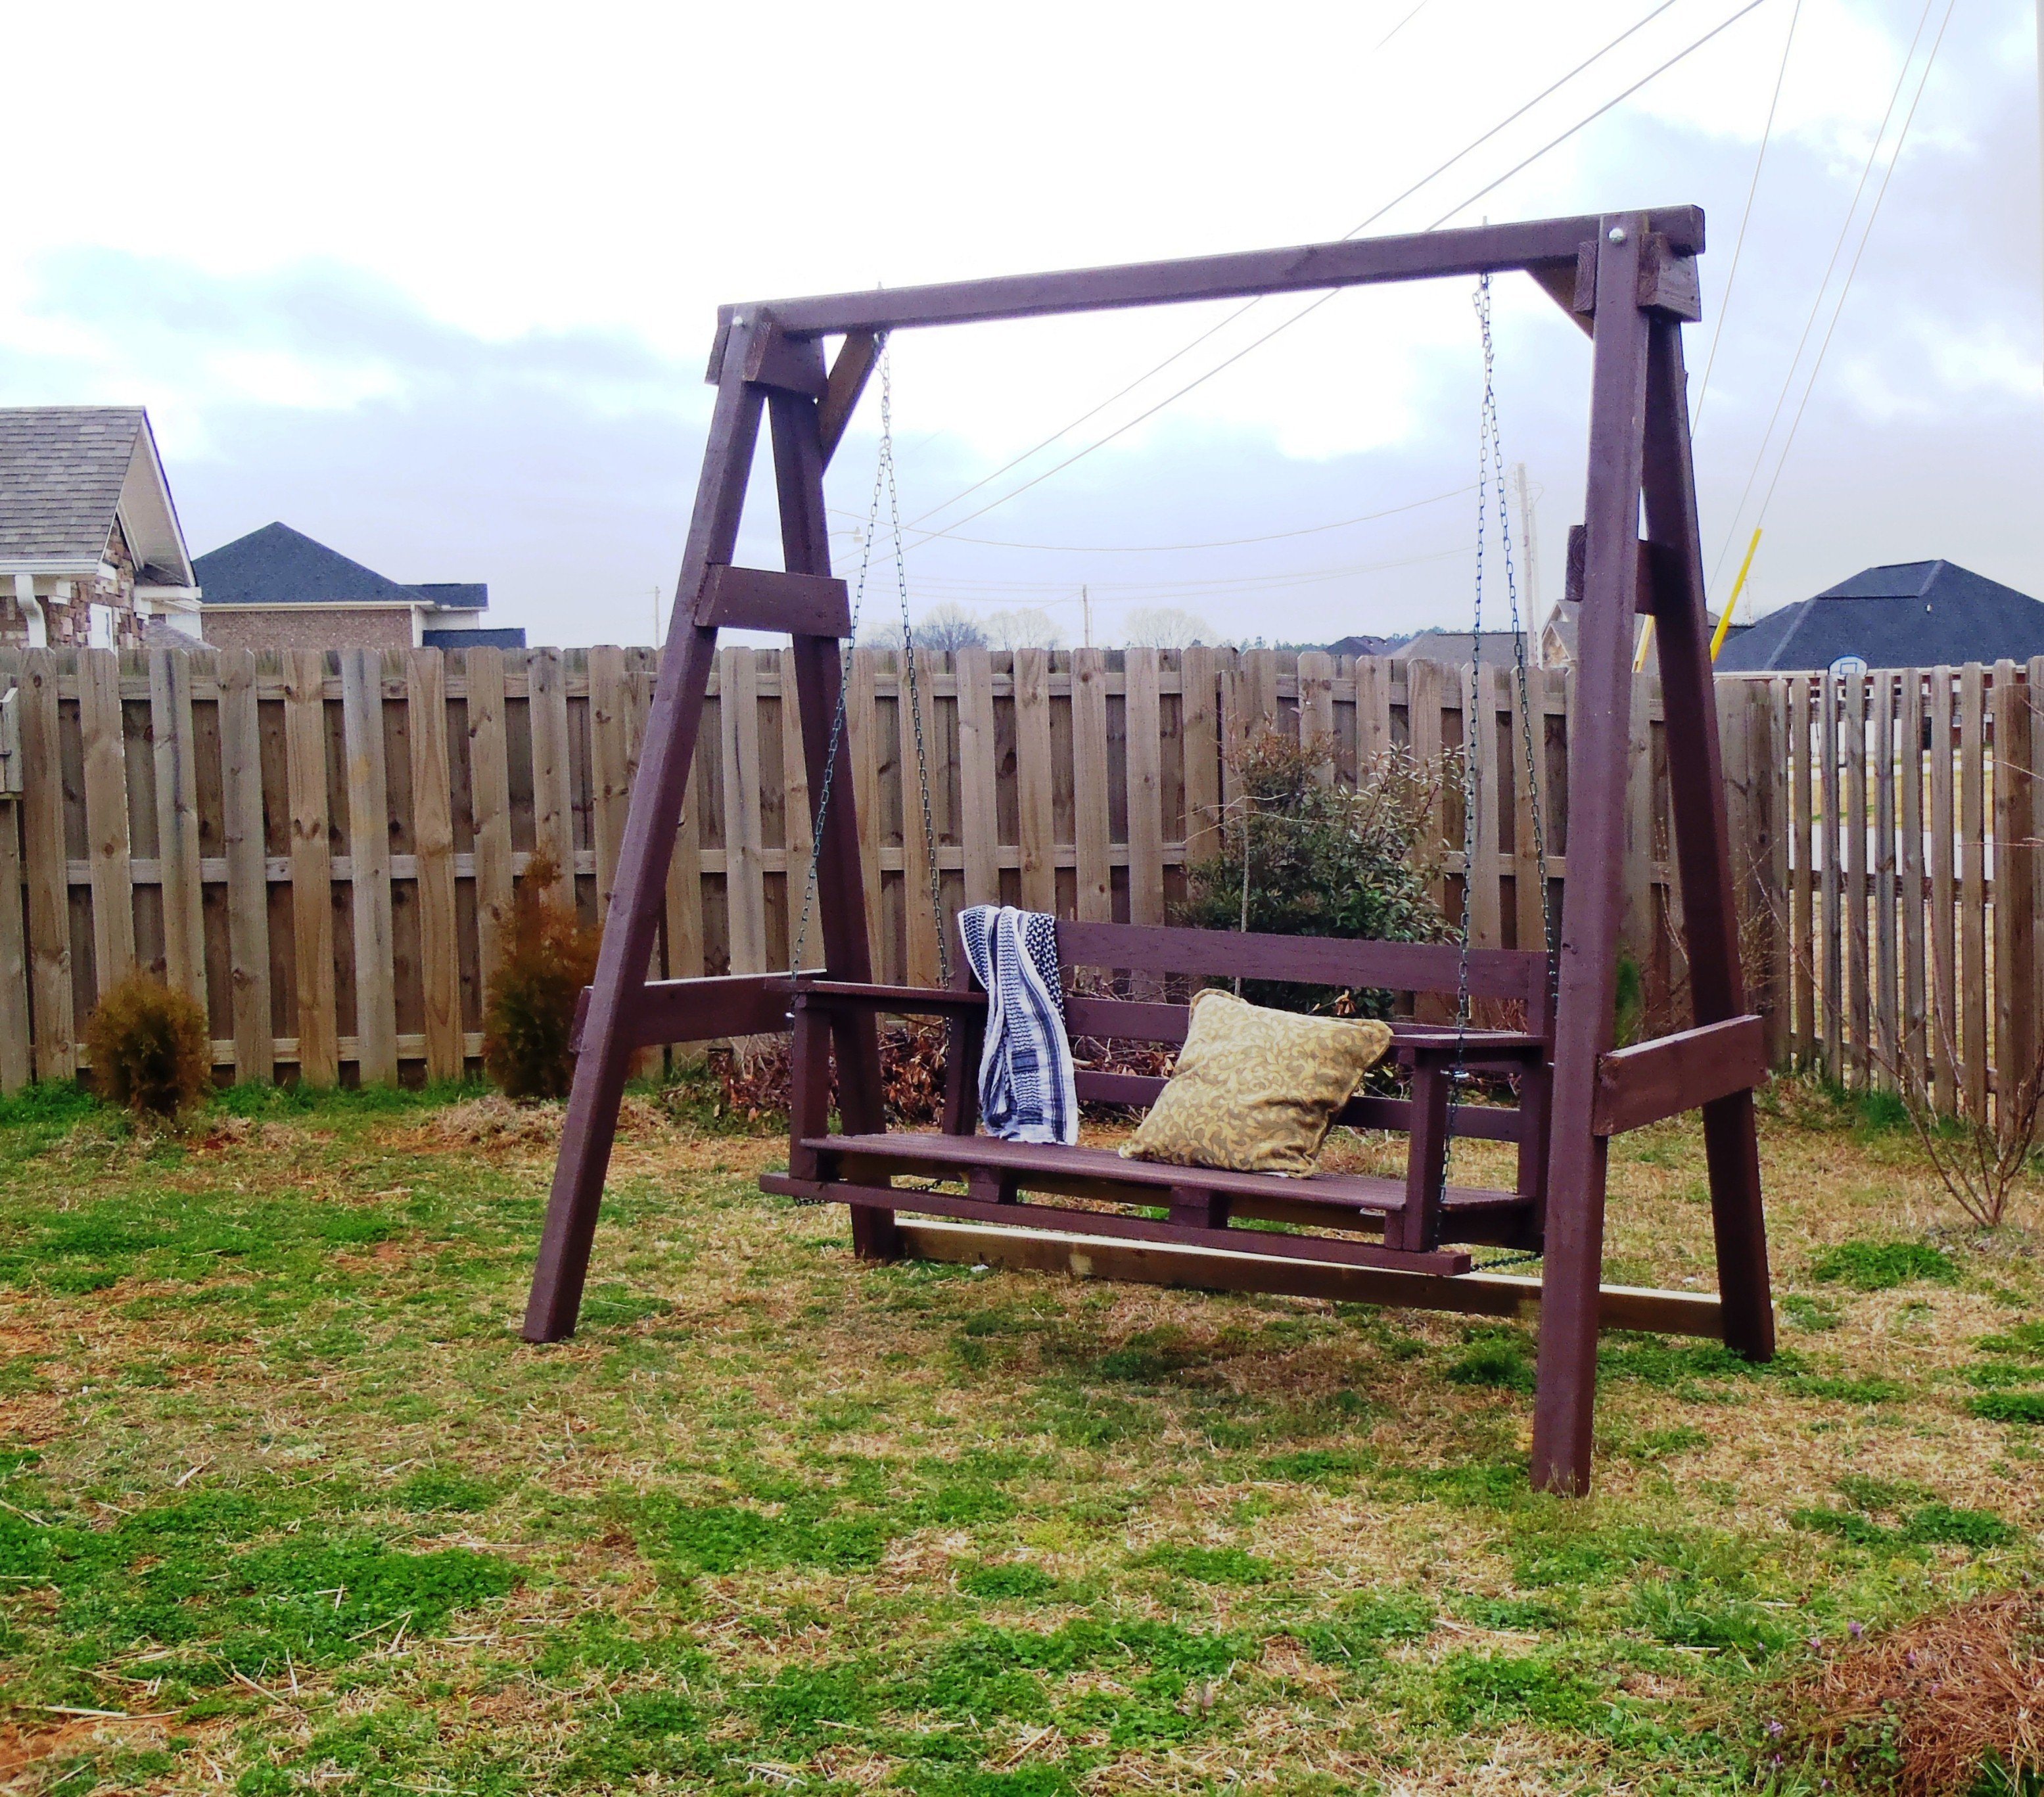
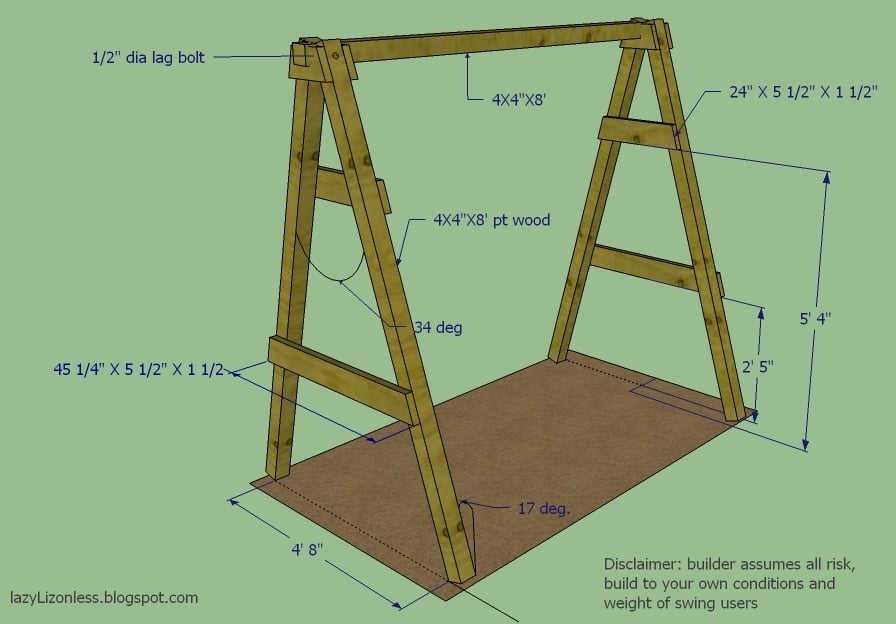
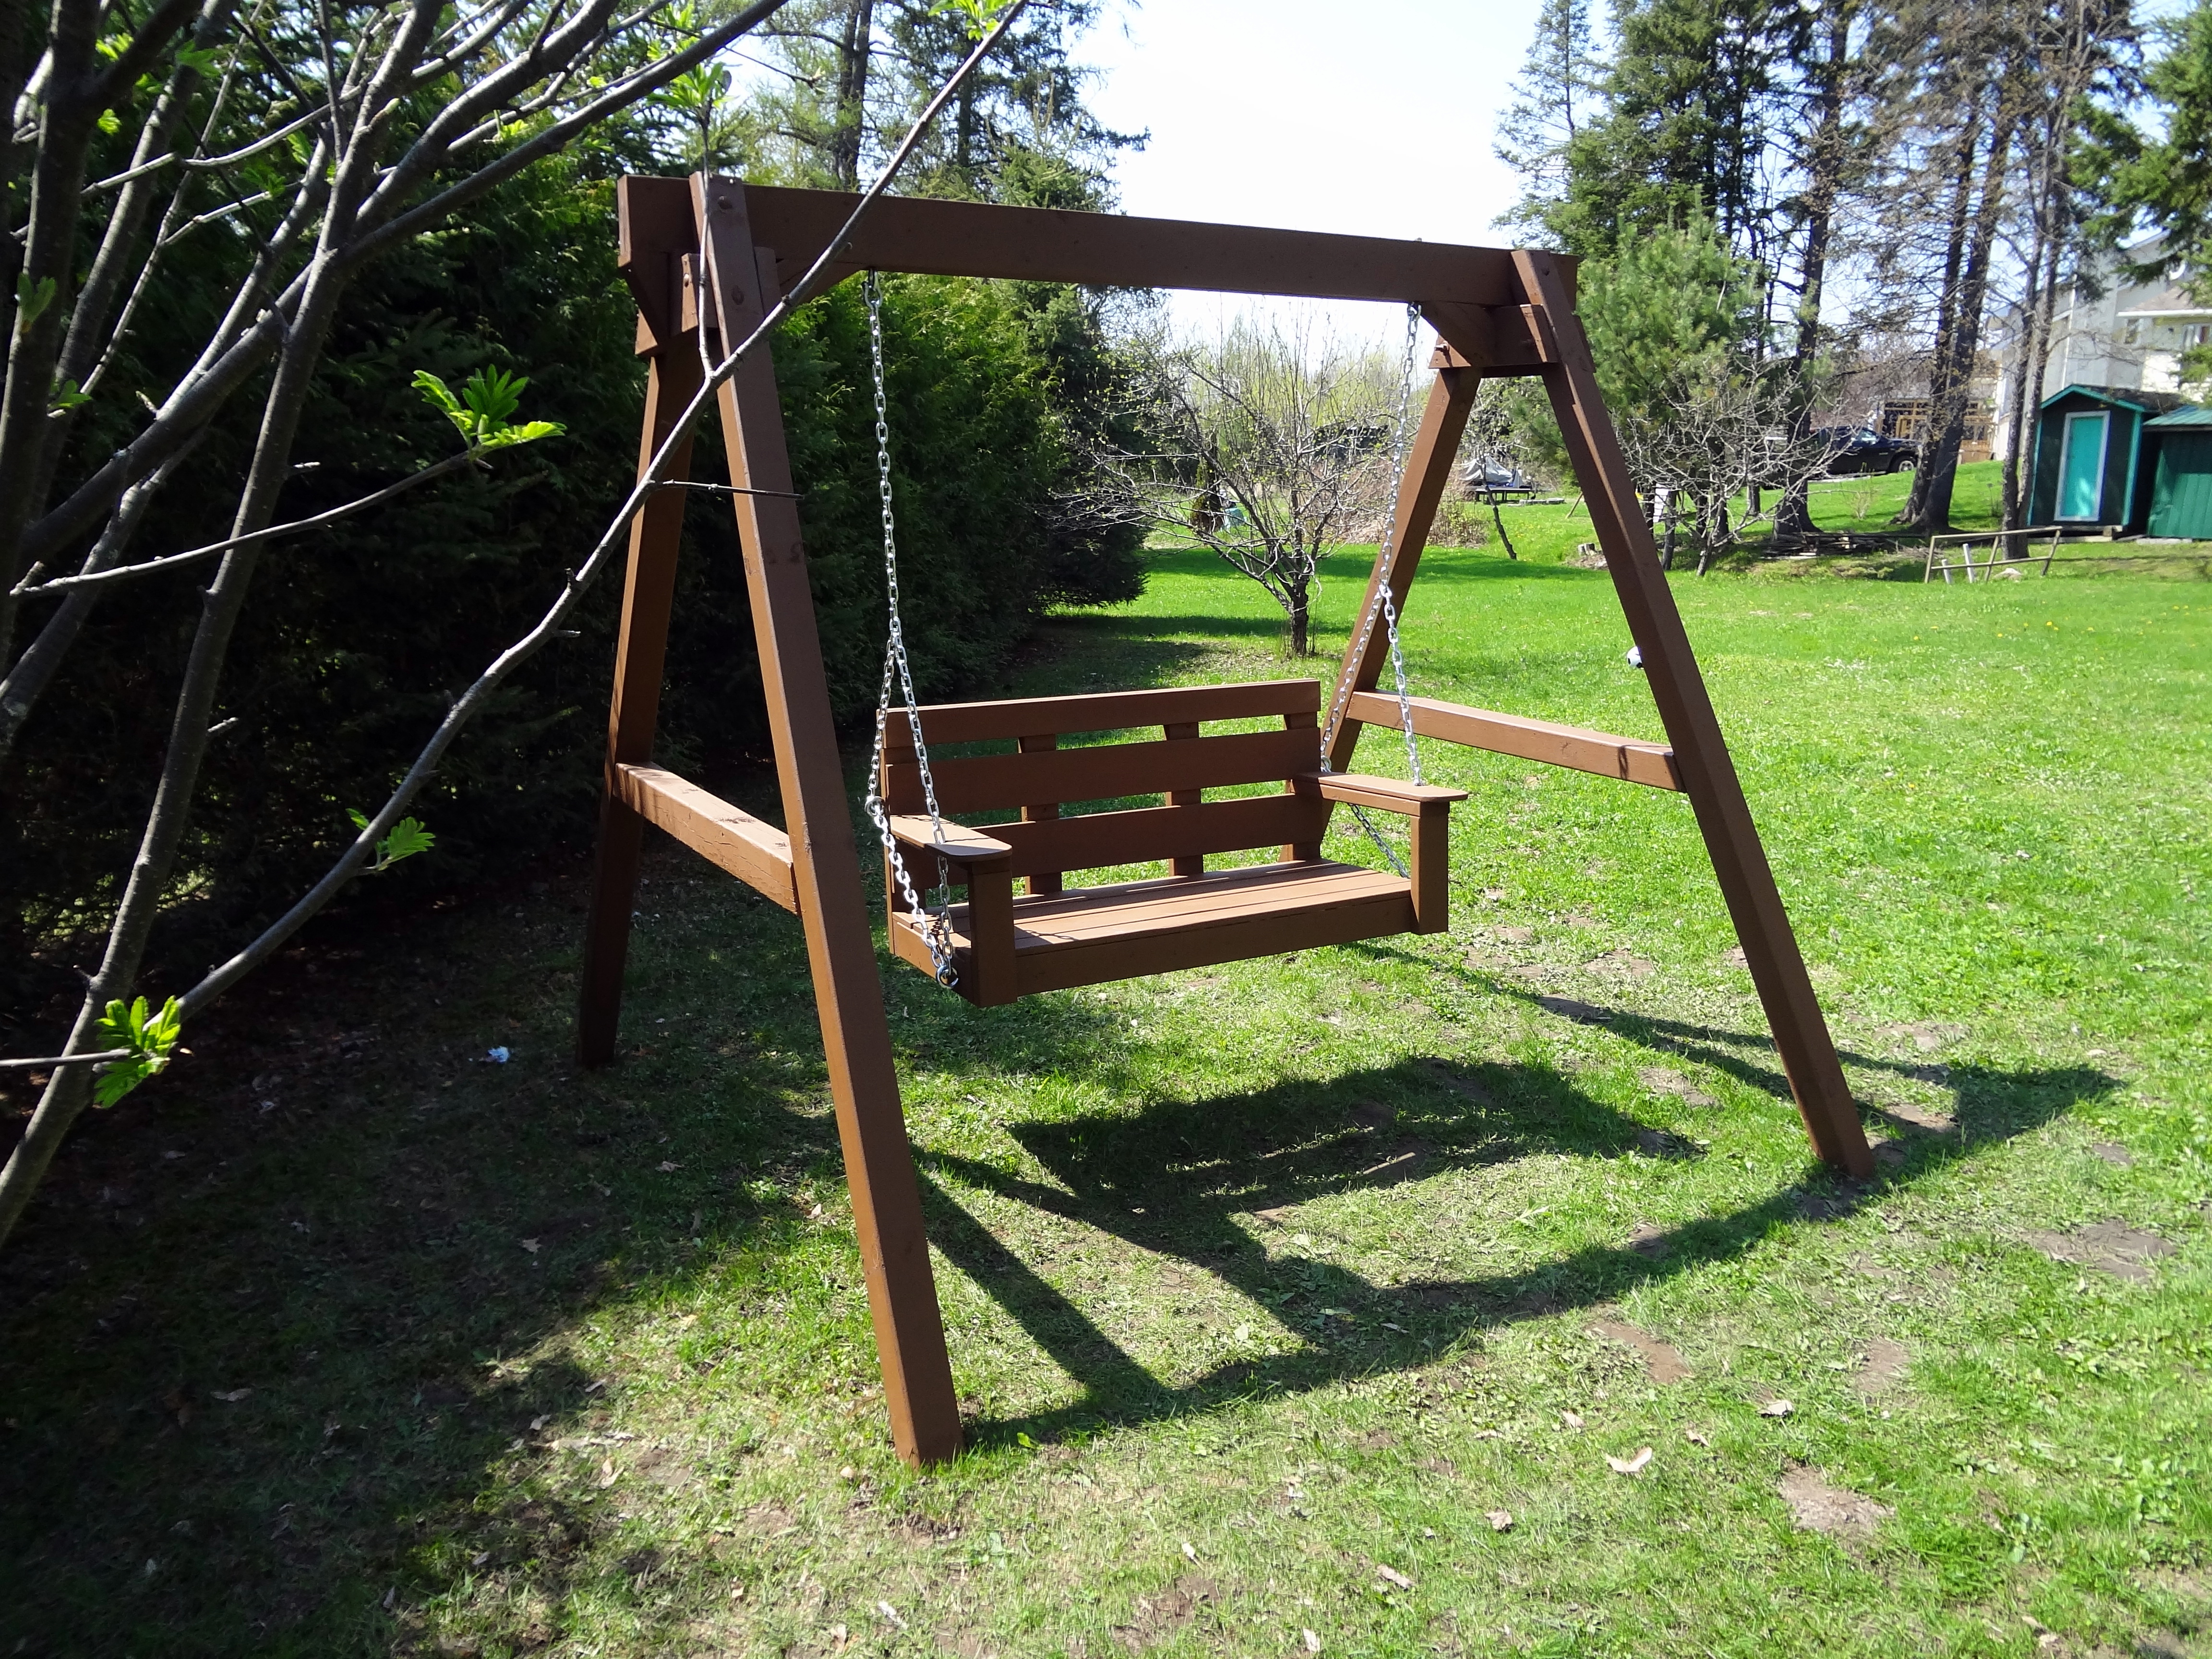
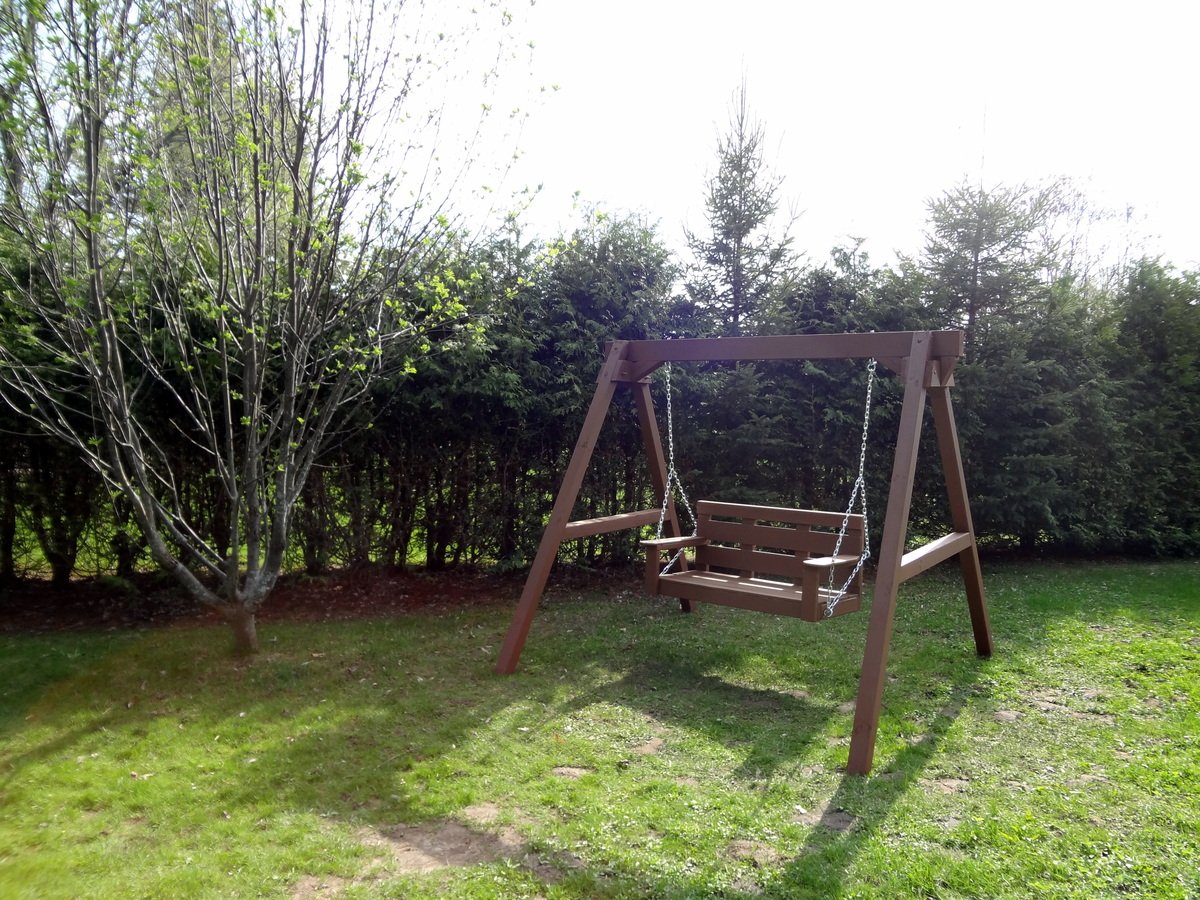
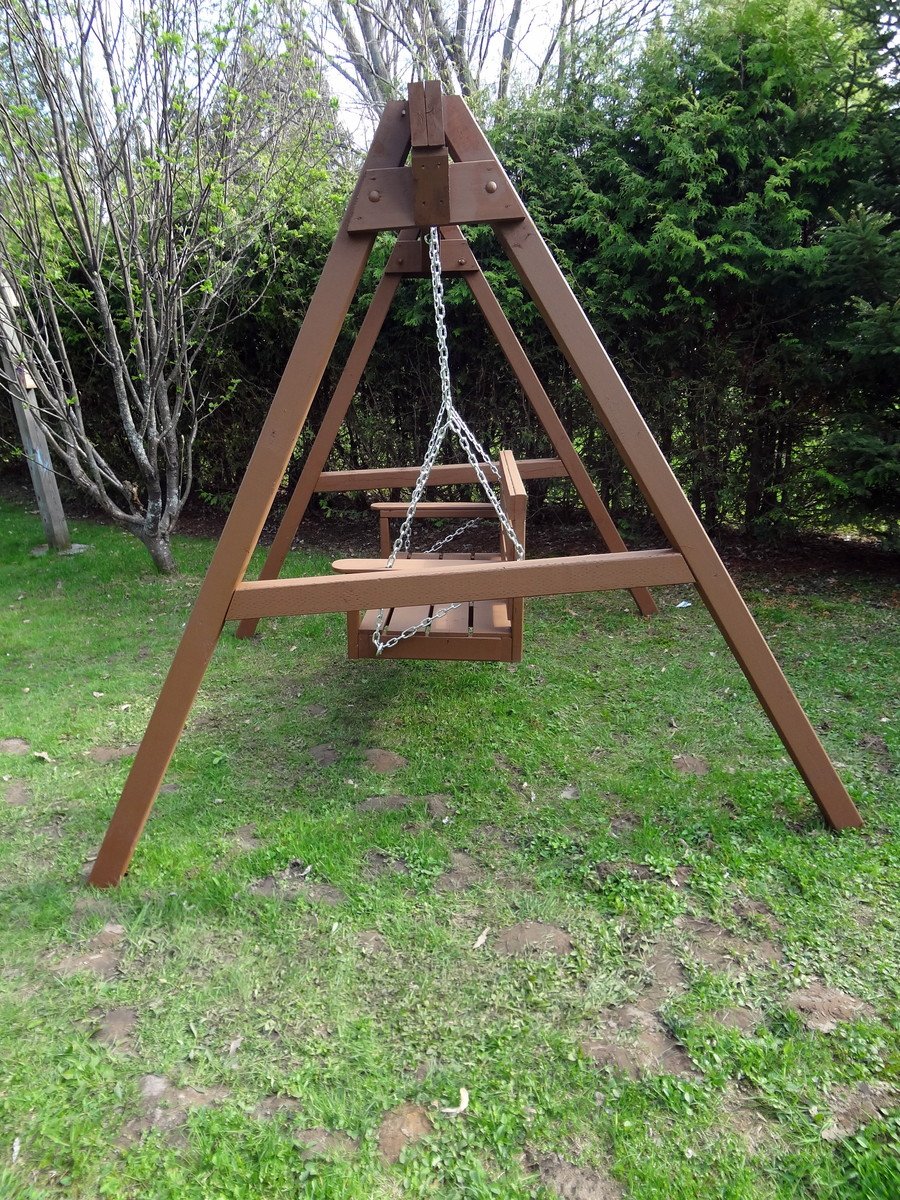
I've finished my swing but my porch don't have enough clearance so I built A frame stand for it.
Fri, 03/02/2012 - 07:09
You did such a great job on your swing! I hope I can build up to making one someday.

In reply to I love this swing! by beachmama79
Thu, 05/10/2012 - 14:02
Thanks and you will. I just added the dimensions in case
Fri, 04/19/2013 - 15:37
I love the idea of adding the A-frame considering that where i live there are no real trees to hang it on and building a porch where one doesn't already exist is a pain in the butt! Lol. How wide do you think we could go before it starts compromising the frames integrity? And how much weight can it hold?
Made 2 changes to the plans which was using a 2 x 4 as a center top board to add some variety to the board width and also decided to go with breadboard ends which also used 2x4
Thanks for the plans!


I modified this chair with 2x4's as the base and 2x2 for decoration on arms, this is prior to sanding and finishing


The console is tall, perfect as a serving comsole or for a portable BBQ. I used straight stair baulsters for the feet at 34". Fun, quick project. This was my third Furniture project from the Ana White site.
Clair
woodpaintcreate.com
A great weekend project...the "love swing"! I used the plan from Ana for the swing seat and added two arm rests from left over 1x6, rounded them off and sanded.
I cobbled together an A-frame to hang everything, made from five 8 foot 4x4s and two 8 foot 2x6s laminated together for the stretcher. Assembled with 1/2" galvanized carriage bolts and hung with 1/4" chain.
Definitely going to want a good miter saw for the A-Frame angles (the top ones are a bit tricky to get everything lined up)
Love it! Thanks for another great plan Ana..and of course..Shanty2Chic!
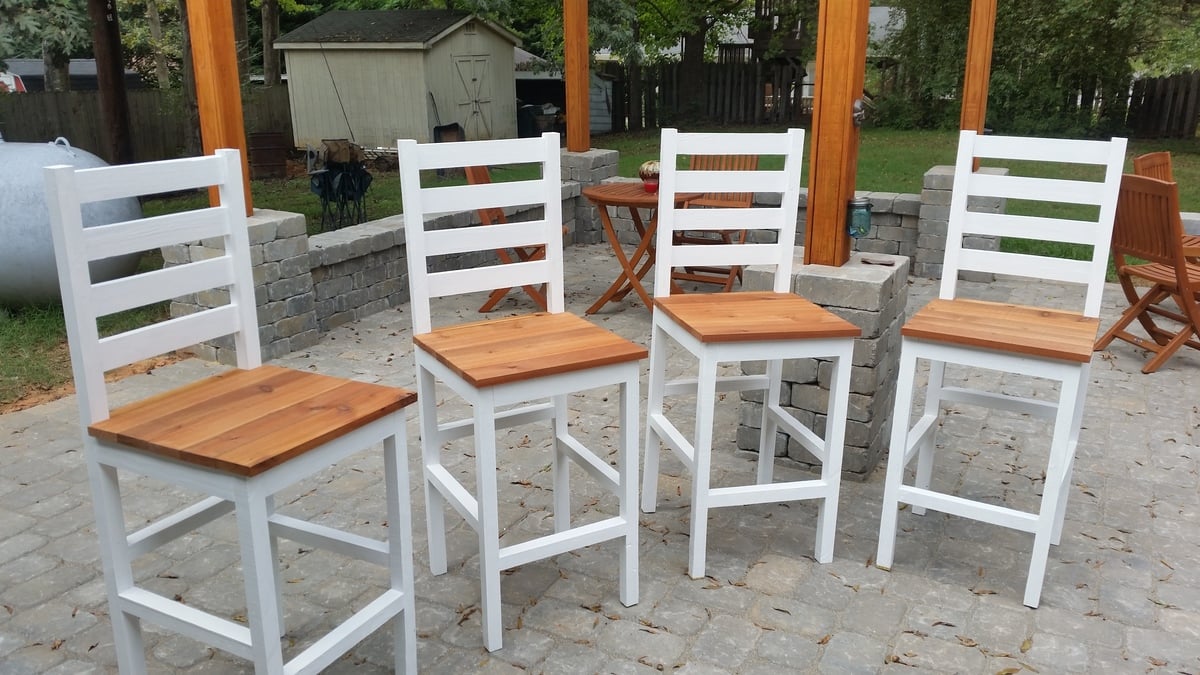
These turned out AMAZING, for more minor details see my blog Link. But in a nutshell i needed some chairs for a pub table i built and these plans worked like a charm!
I did use PT lumber for the frames, as these are meant for my patio, so i had to use stainless steel hardware which is a bit pricy, but well worth it unless you want to fall on your butt in 2 years when the normal screws corrode away. Modern PT wood is no joke on hardware!

Thu, 10/06/2016 - 08:57
Awesome pub chairs! Love the stained seats and good advice on hardware.
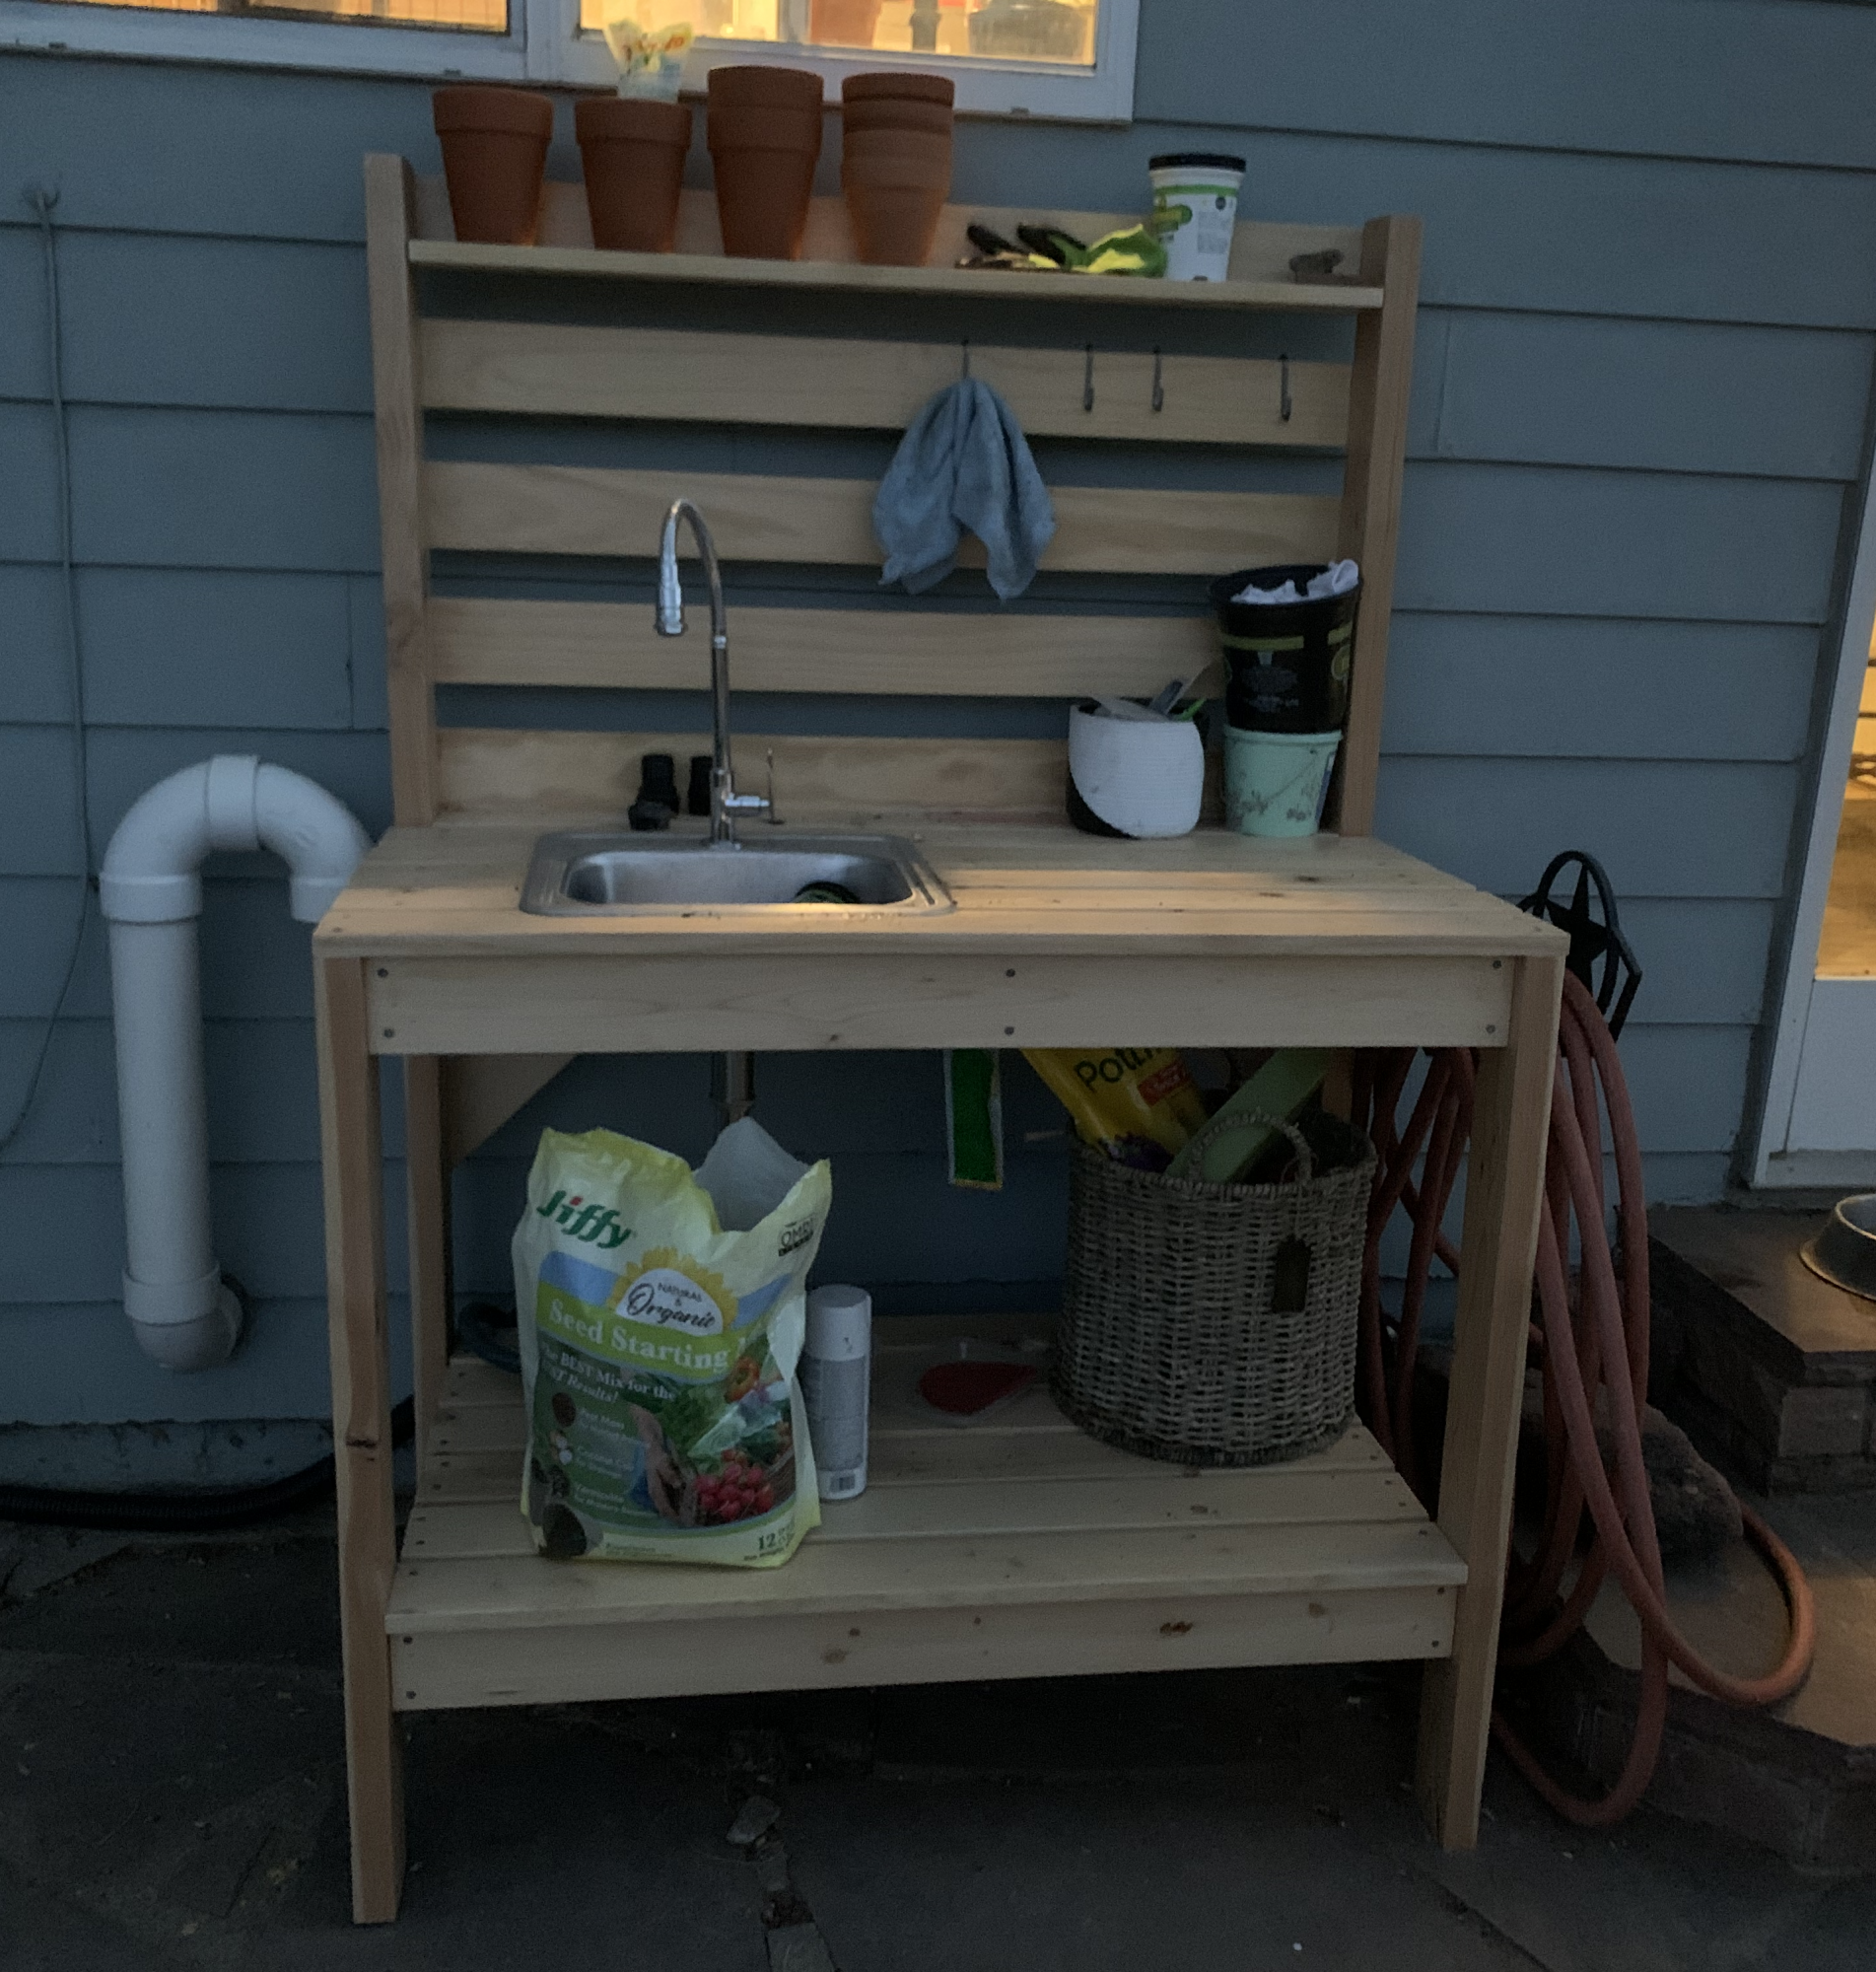
One of my first bigger projects. Added a sink by framing it out with 2x4s before adding the top on.
We wanted this beautiful bed for a guest room, but the room was a little small to have the large four posts so I modified it to make all 4 posts shorter - but otherwise the plans are the same. I used miniwax dark walnut stain and 2 coats spray polyurethane, followed by light 220 sanding and then 1 coat paint on semi-gloss polyurethane. I also lightly distressed the wood prior to staining with chisels, screws, hammering etc.


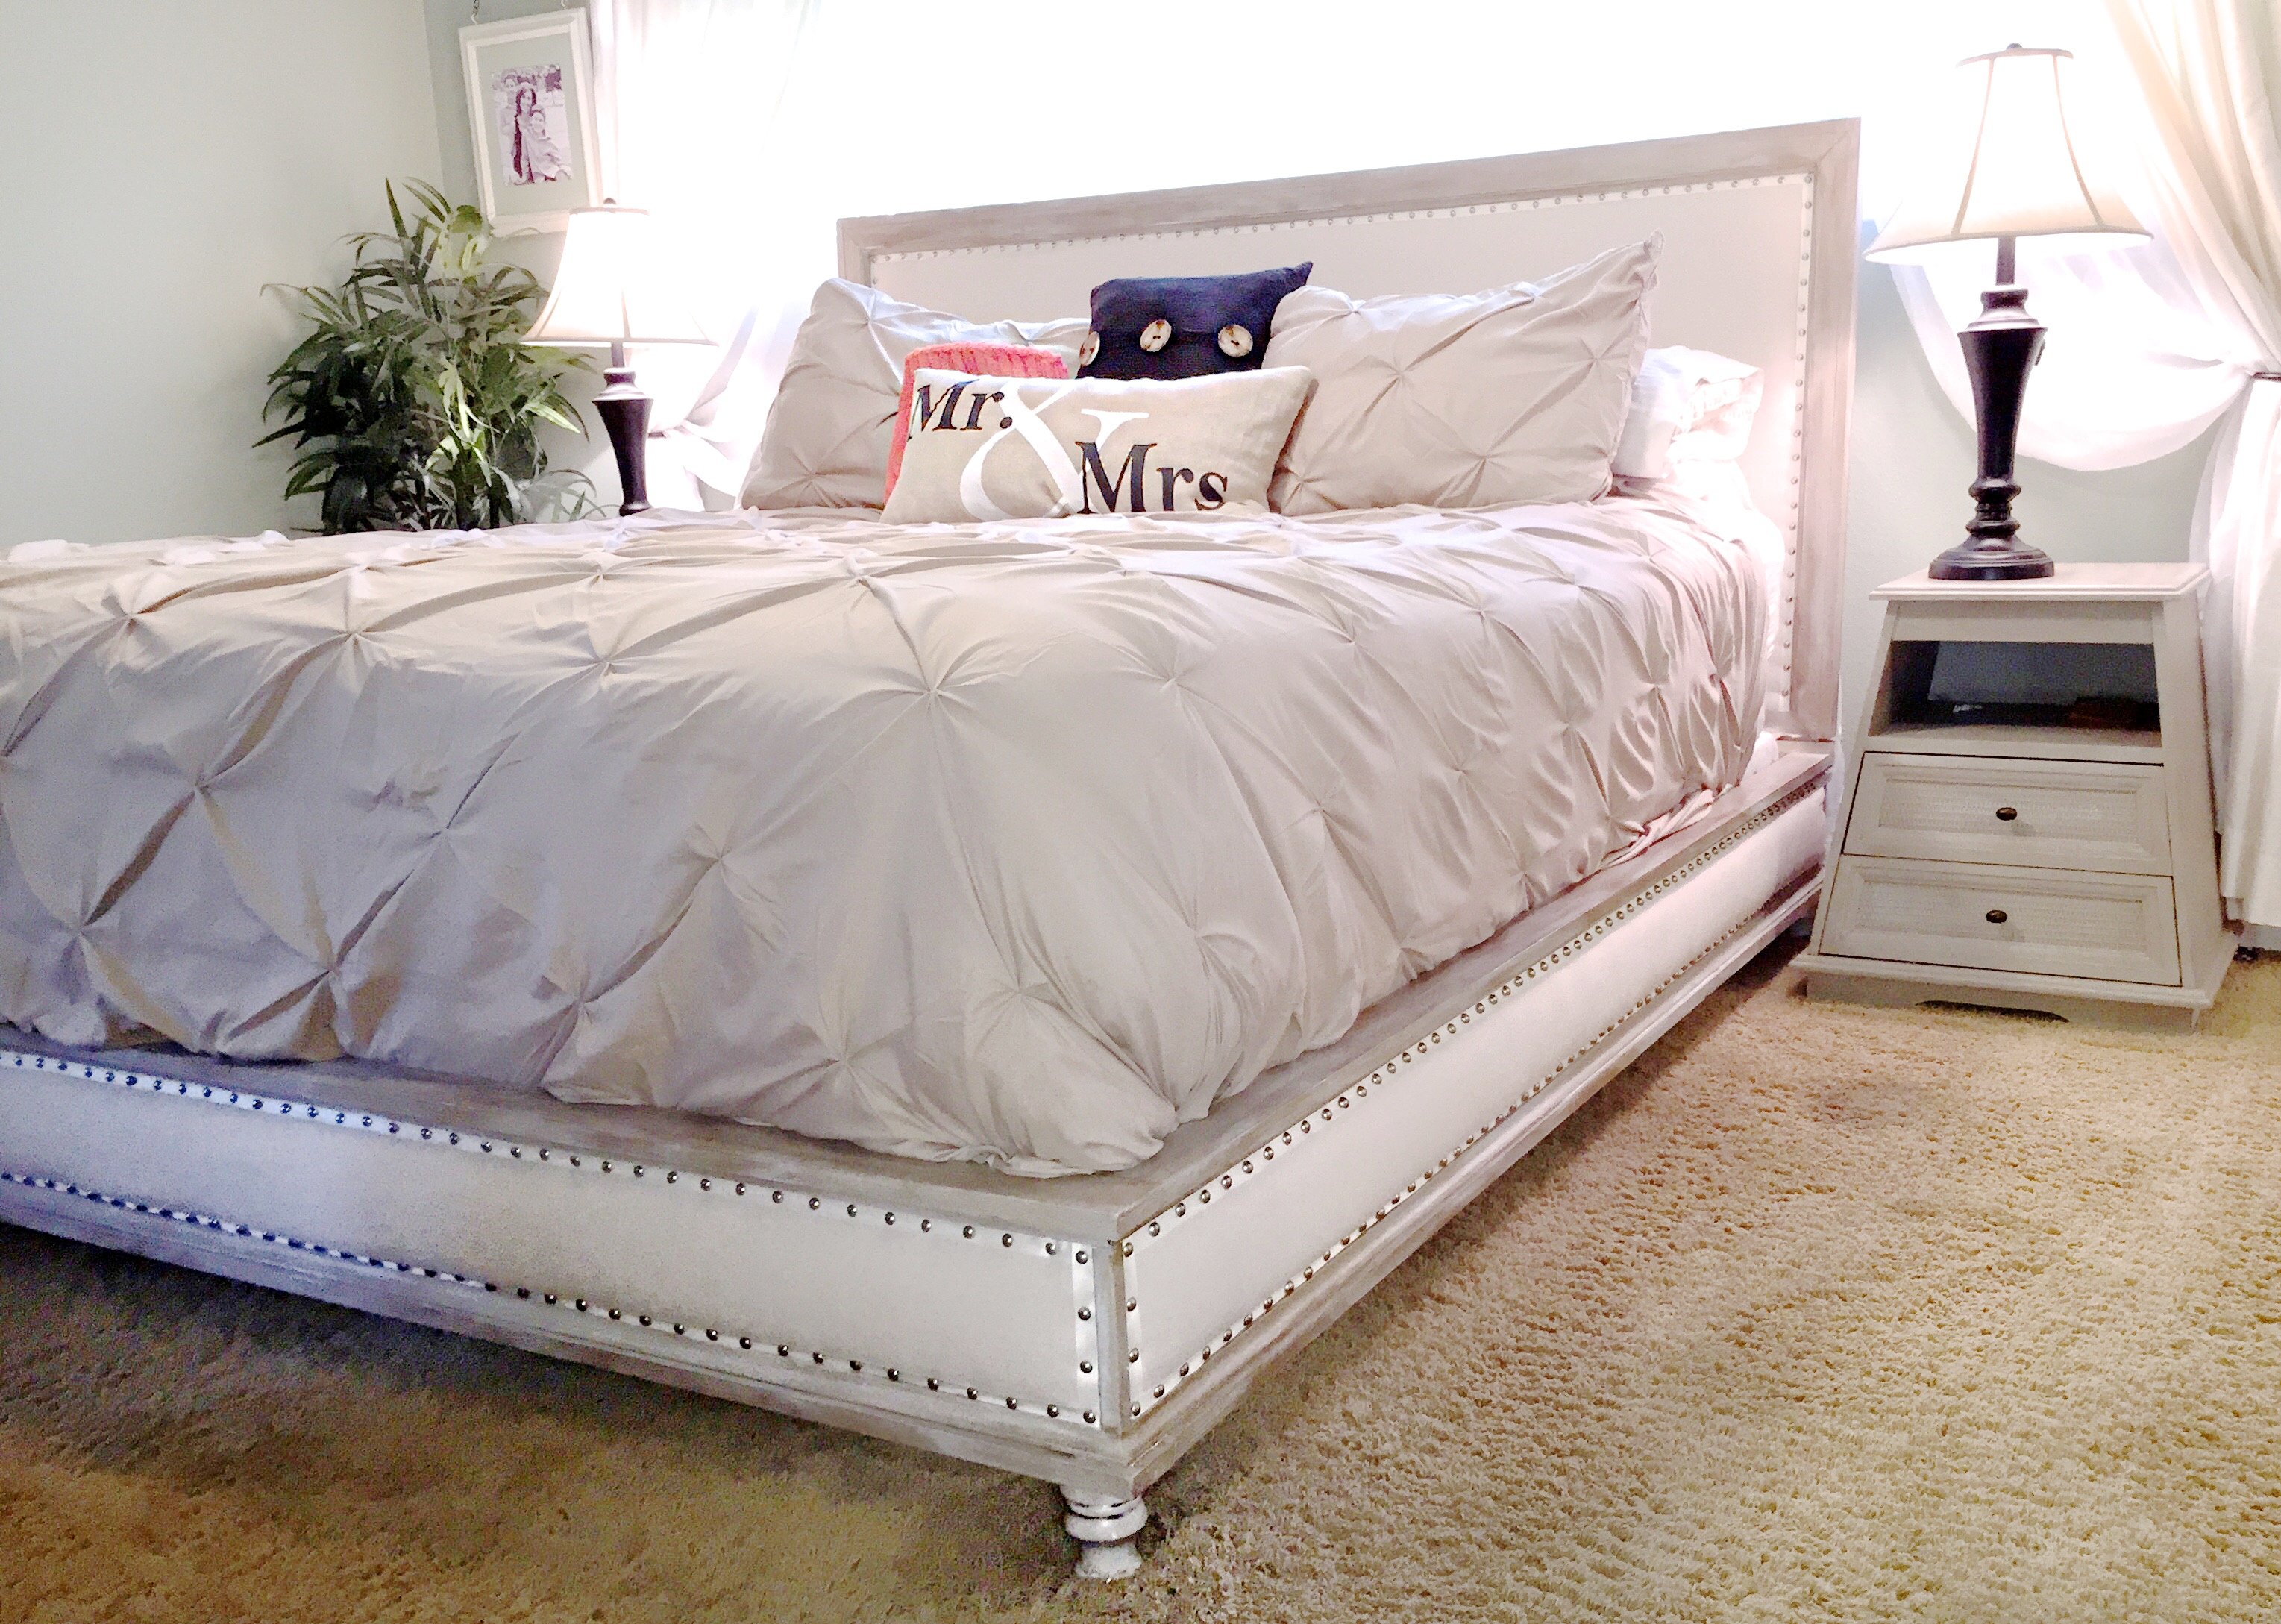
My dream bed is finally done. Blood, sweat and tears.....not really, but after making a few mistakes along the way, I can finally say it's done. I am happy to report that it only cost $300 -- a whooping $ 1895 savings from Restoration Hardware's Maison Bed Collection. I am in love with my new chic bed. I will be posting my tutorial for the Chestwick Bed - King size - very soon. In the meantime, thanks for looking.


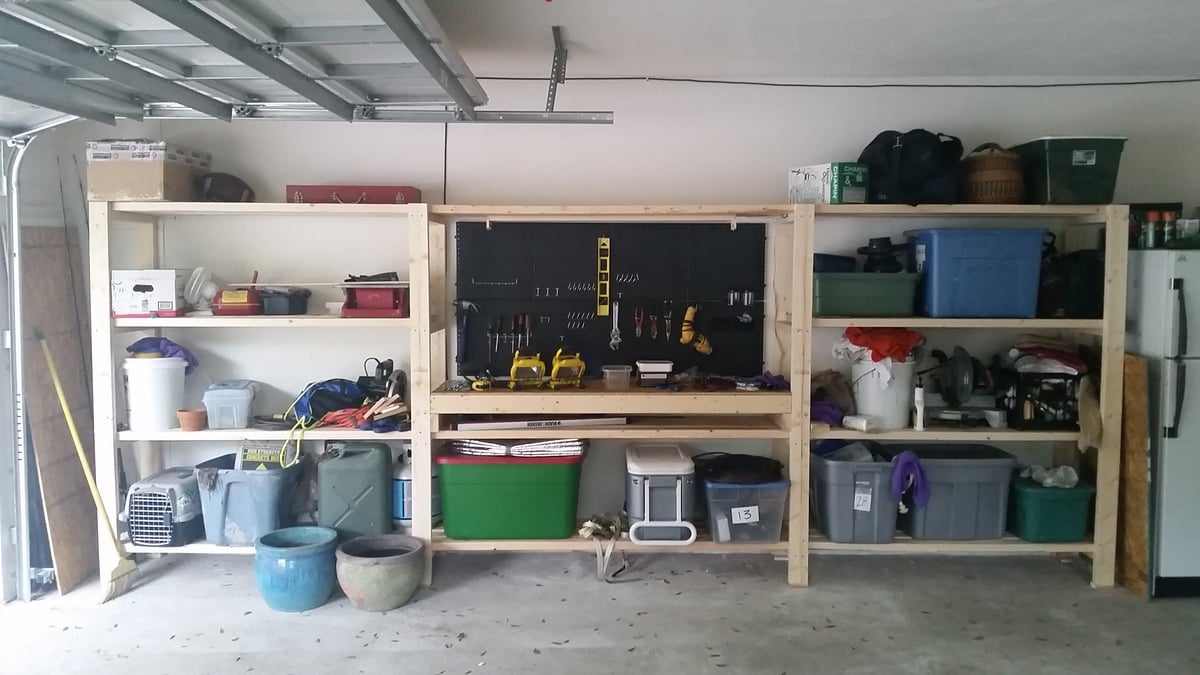
Great plans allow for versatility and easy customization. Put the whole thing together in a day w/ one other person. My set up is 16' long - 5' on the side shelves and 6' for the workbench. Added a pegboard and fluorescent light under the top middle shelves. I'm also designing a slim drawer to go under the workbencheck area. Thanks a bunch!

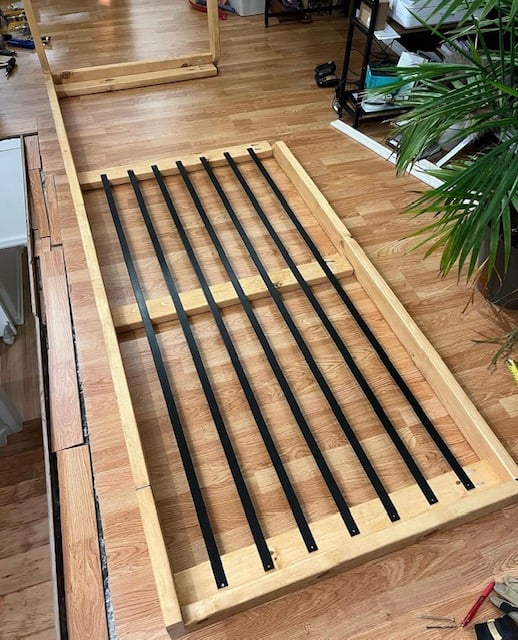
I built this bed for my (adult) son. The instructions were easy to follow. I left off the 2 x 2" cleats on the headboard to make it easier to attach the tongue and groove headboard pieces with pocket hole screws (I did lay two 2 x 2's underneath the tongue & groove pieces for spacing as I attached the boards). Since I made this as a platform bed I added a 6th tongue & groove headboard piece and the optional center cleat underneath. I used the suggested Varathane Weathered Wood Accelerator for the finish; mine came out much more grey than the bed pictured with the plans and my son liked the finish (I did too). Finding non-pressure treated 4x4's and semi-straight 2x4's was the hardest part. I used pine wood and bought all the lumber for about $175 (purchased at peak COVID lumber prices). This bed is definitely solid and I'm looking forward to making the matching nightstand! Thank you Ana for the bed plans!
Sun, 09/05/2021 - 11:13
Wonderful job, it looks amazing, can't wait to see it with the matching night stands!

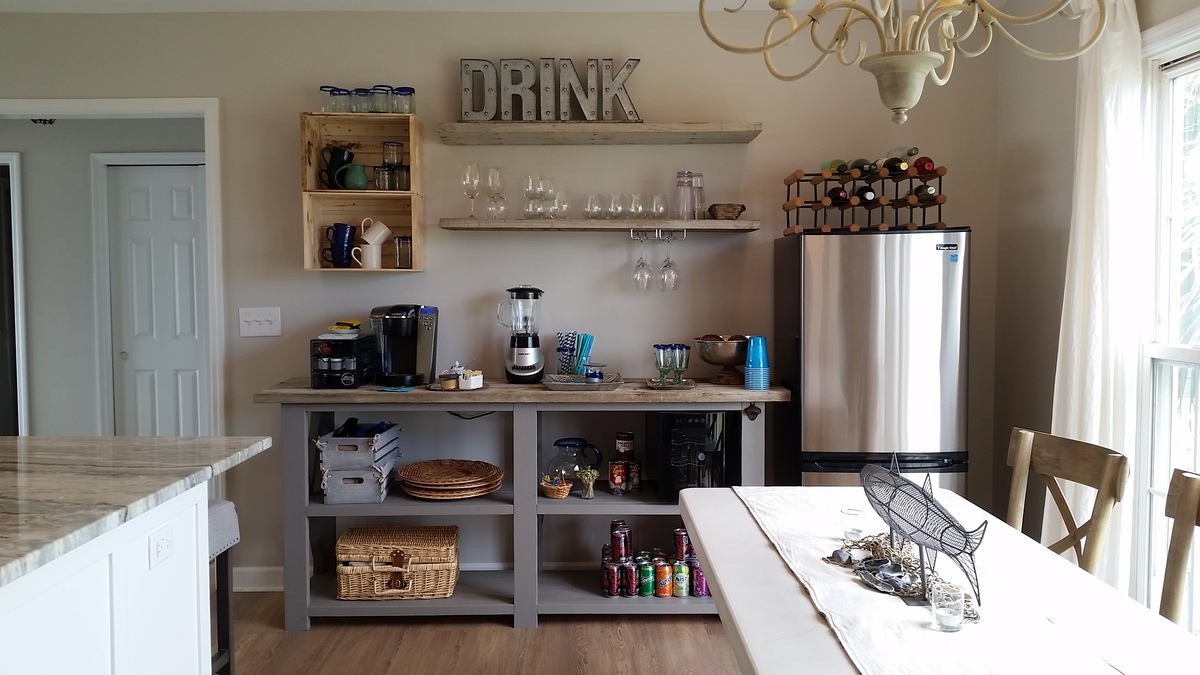
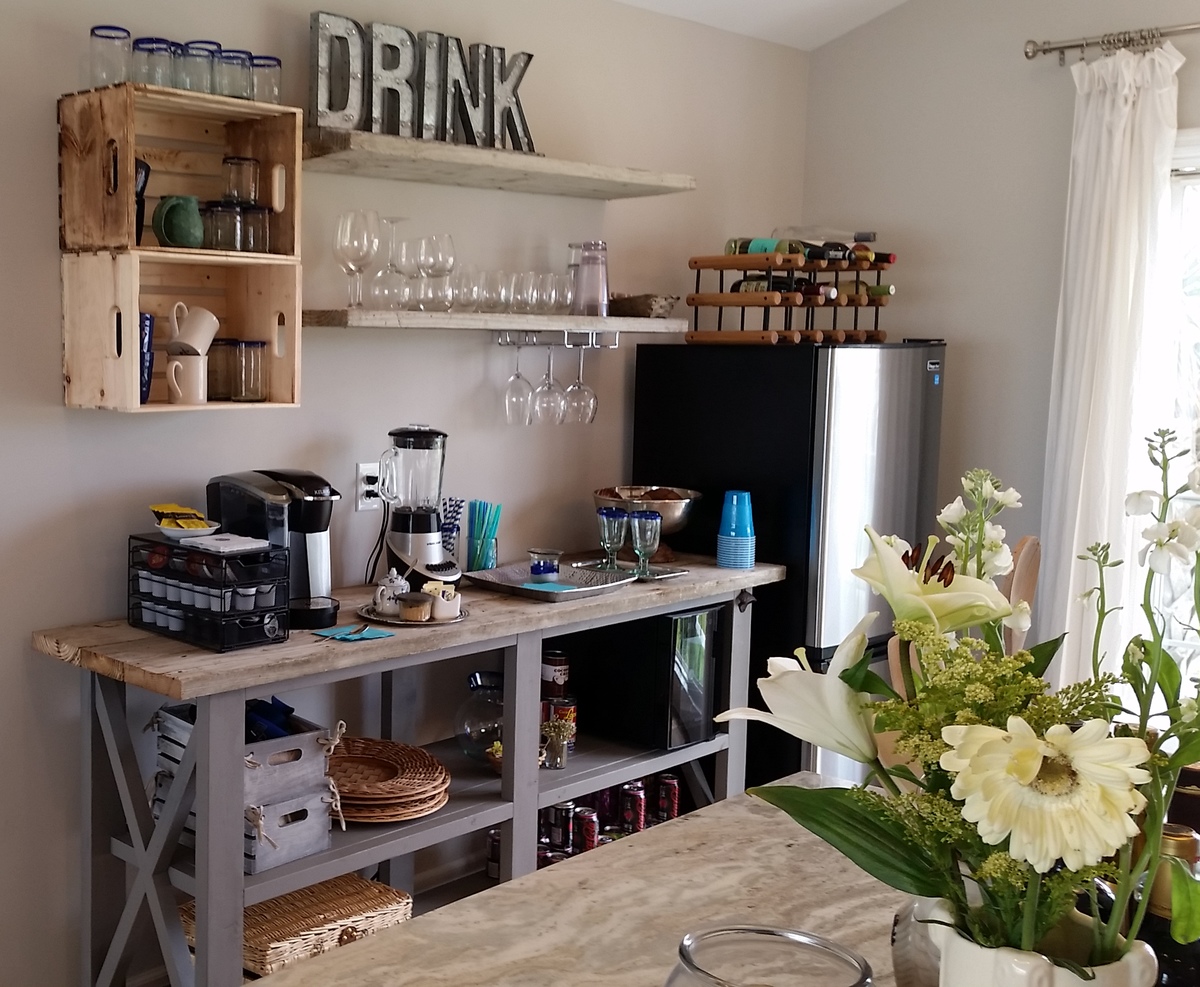
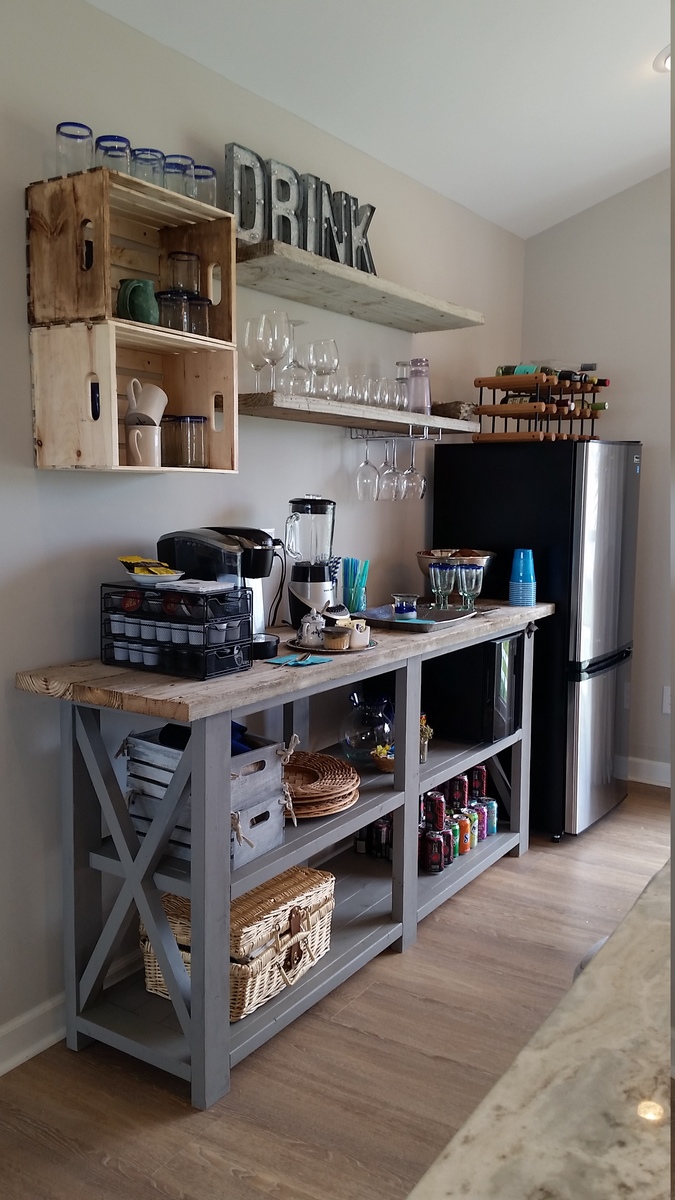
We used old dock wood for the surface of our X table for a nice beach house beverage center (sand bar!). We adjusted the size to fit our space (a little longer and wider) and used additional studs for the shelves instead of 1" shelving, glued and PH/PS together. To cut the X pieces I just held the 1x1 on the end of the table where it goes and marked the lines. Then I clamped a guide board at the correct angle on the table saw to make all the cuts, starting a bit long and shaving off until it just fit.
With all the pocket holes and screws I wouldn't consider this a beginner project. Some additional steps and pictures in your description would help also. End result is really nice.

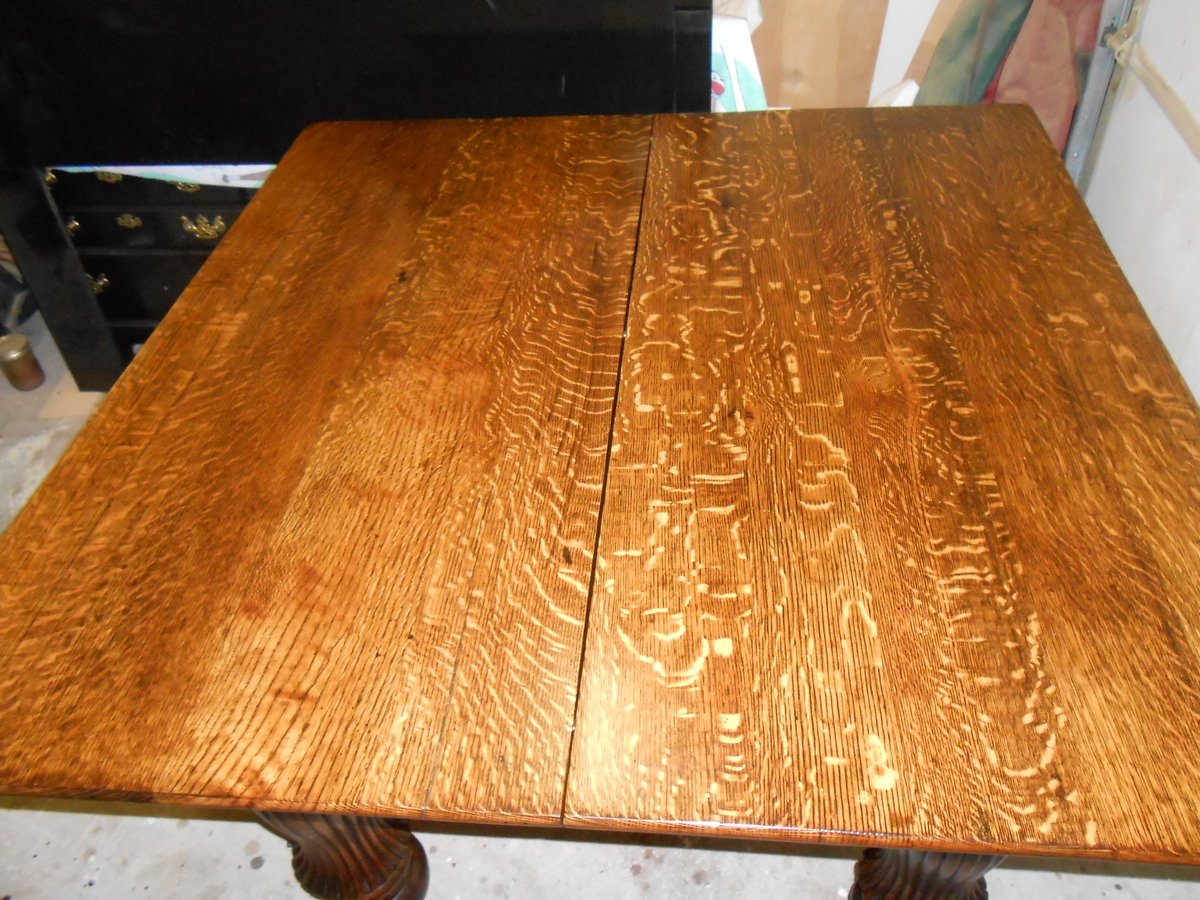
This is a solid, quartersawn white oak 5-legged dining table. It was originally built in the late 19th or early 20th century. The table was in need of a refinish. The massive turned and fluted legs were full of cracks, chips, and splits.
I took the table completely apart and began stripping and sanding. The legs were re-glued where needed and clamped. I filled the cracks, splits, and and chips with wood filler, sanded, and repeated until I was happy with the results. I replaced some bracing and replaced the screws where needed. Heavy duty casters were added. They have brakes/stops that can be locked to keep the table from rolling on a hardwood or tile floor.
Once the final sanding was completed, I applied 2 coats of Minwax Dark Walnut stain with a foam brush. I wiped down after each coat after waiting 10-15 minutes or so. After drying I began applying Minwax Fast Drying (oil based) polyurethane. The table received 3 coats and the top received 6 coats. I hand sanded with 220 grit sandpaper between coats.
After applying the final coat of poly to the top, I allowed it to cure 48 hours. I then hand sanded the top very lightly using 400 grit paper. I did the same using 0000 steel wool. I then added a few drops of dish soap to a cup of water and wet sanded with the 0000 steel wool. I used a circular motion to remove any scratches. I then wiped down the table and buffed out two coats of Johnson Past Wax with an orbital buffer. It resulted in a super smooth finish.
I am very happy with the results. By the way the table if for sale ($600) and is located in Evansville, Indiana.


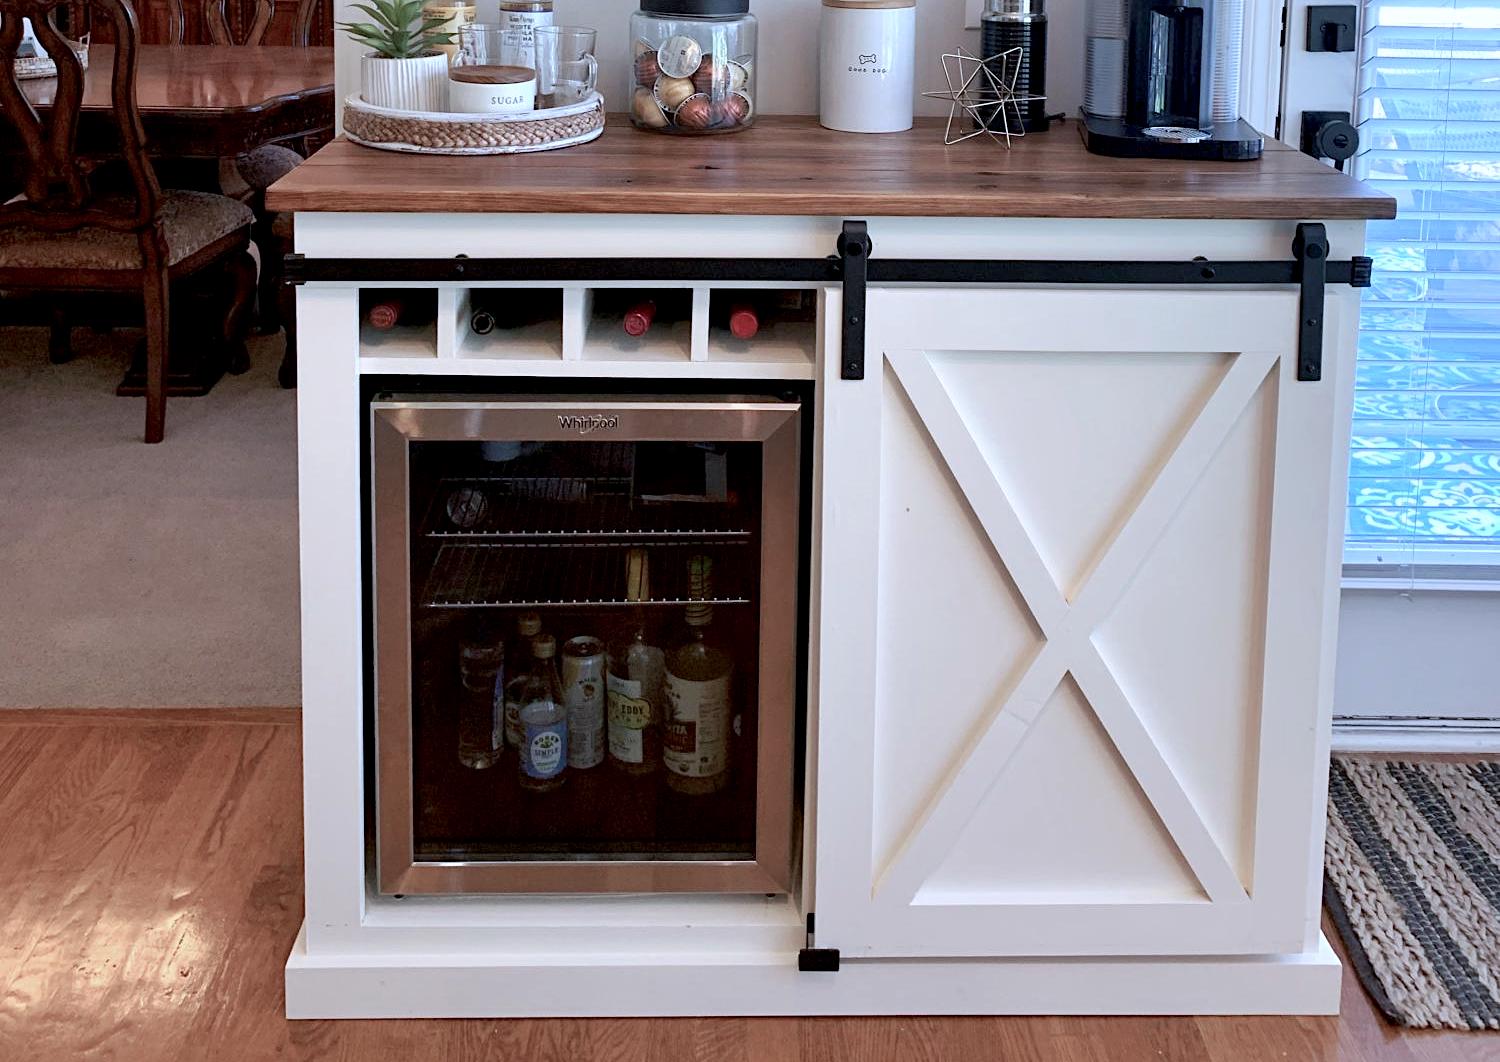
My wife wanted a coffee bar and I wanted a fridge for wine and beer. So we compromised on this.
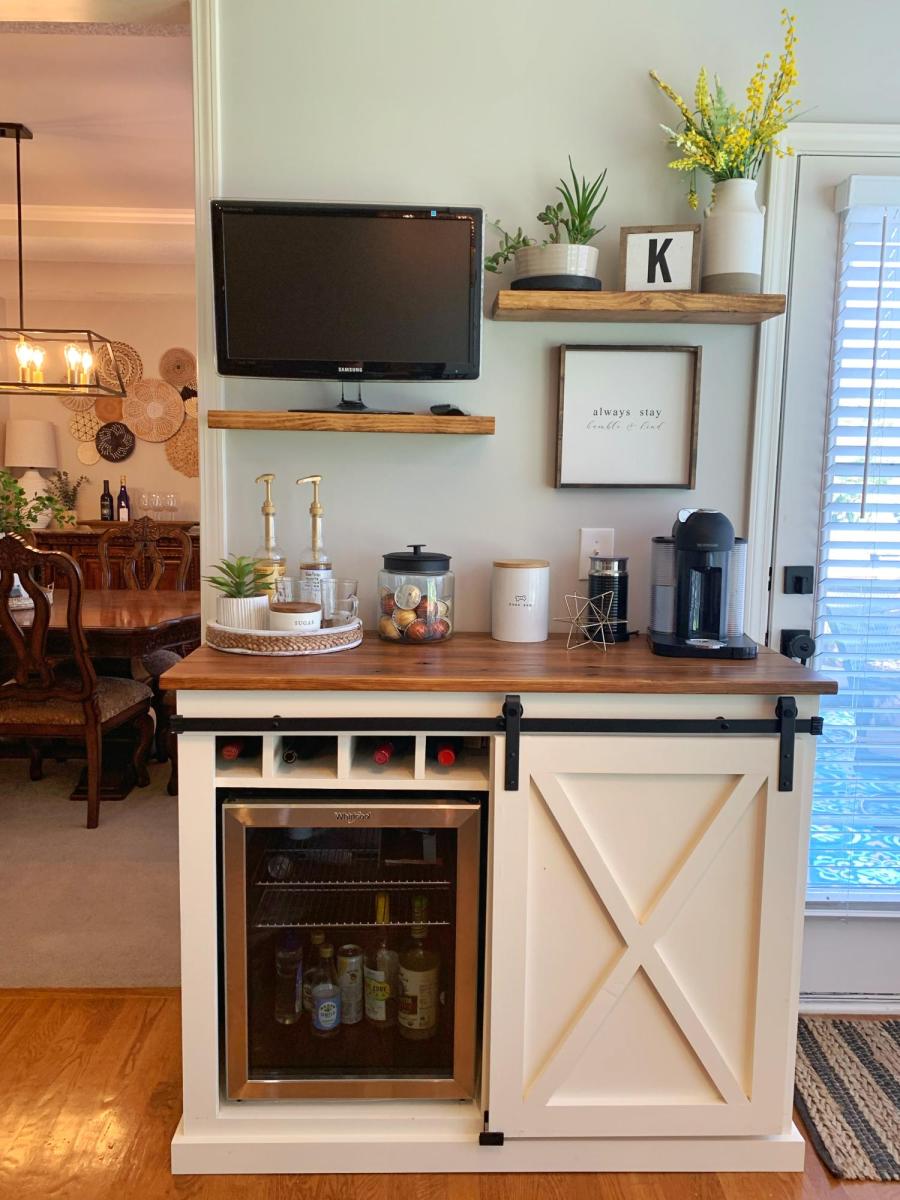
Thu, 12/29/2022 - 10:02
Pretty much everything you ned in one place! Thank you for sharing, amazing build! Sharing to social media, please email [email protected] if you'd like us to tag you!


Comments
Ana White Admin
Sat, 03/04/2023 - 07:55
Beautiful greenhouse!
Love it! Thank you for sharing, it looks amazing.