Community Brag Posts

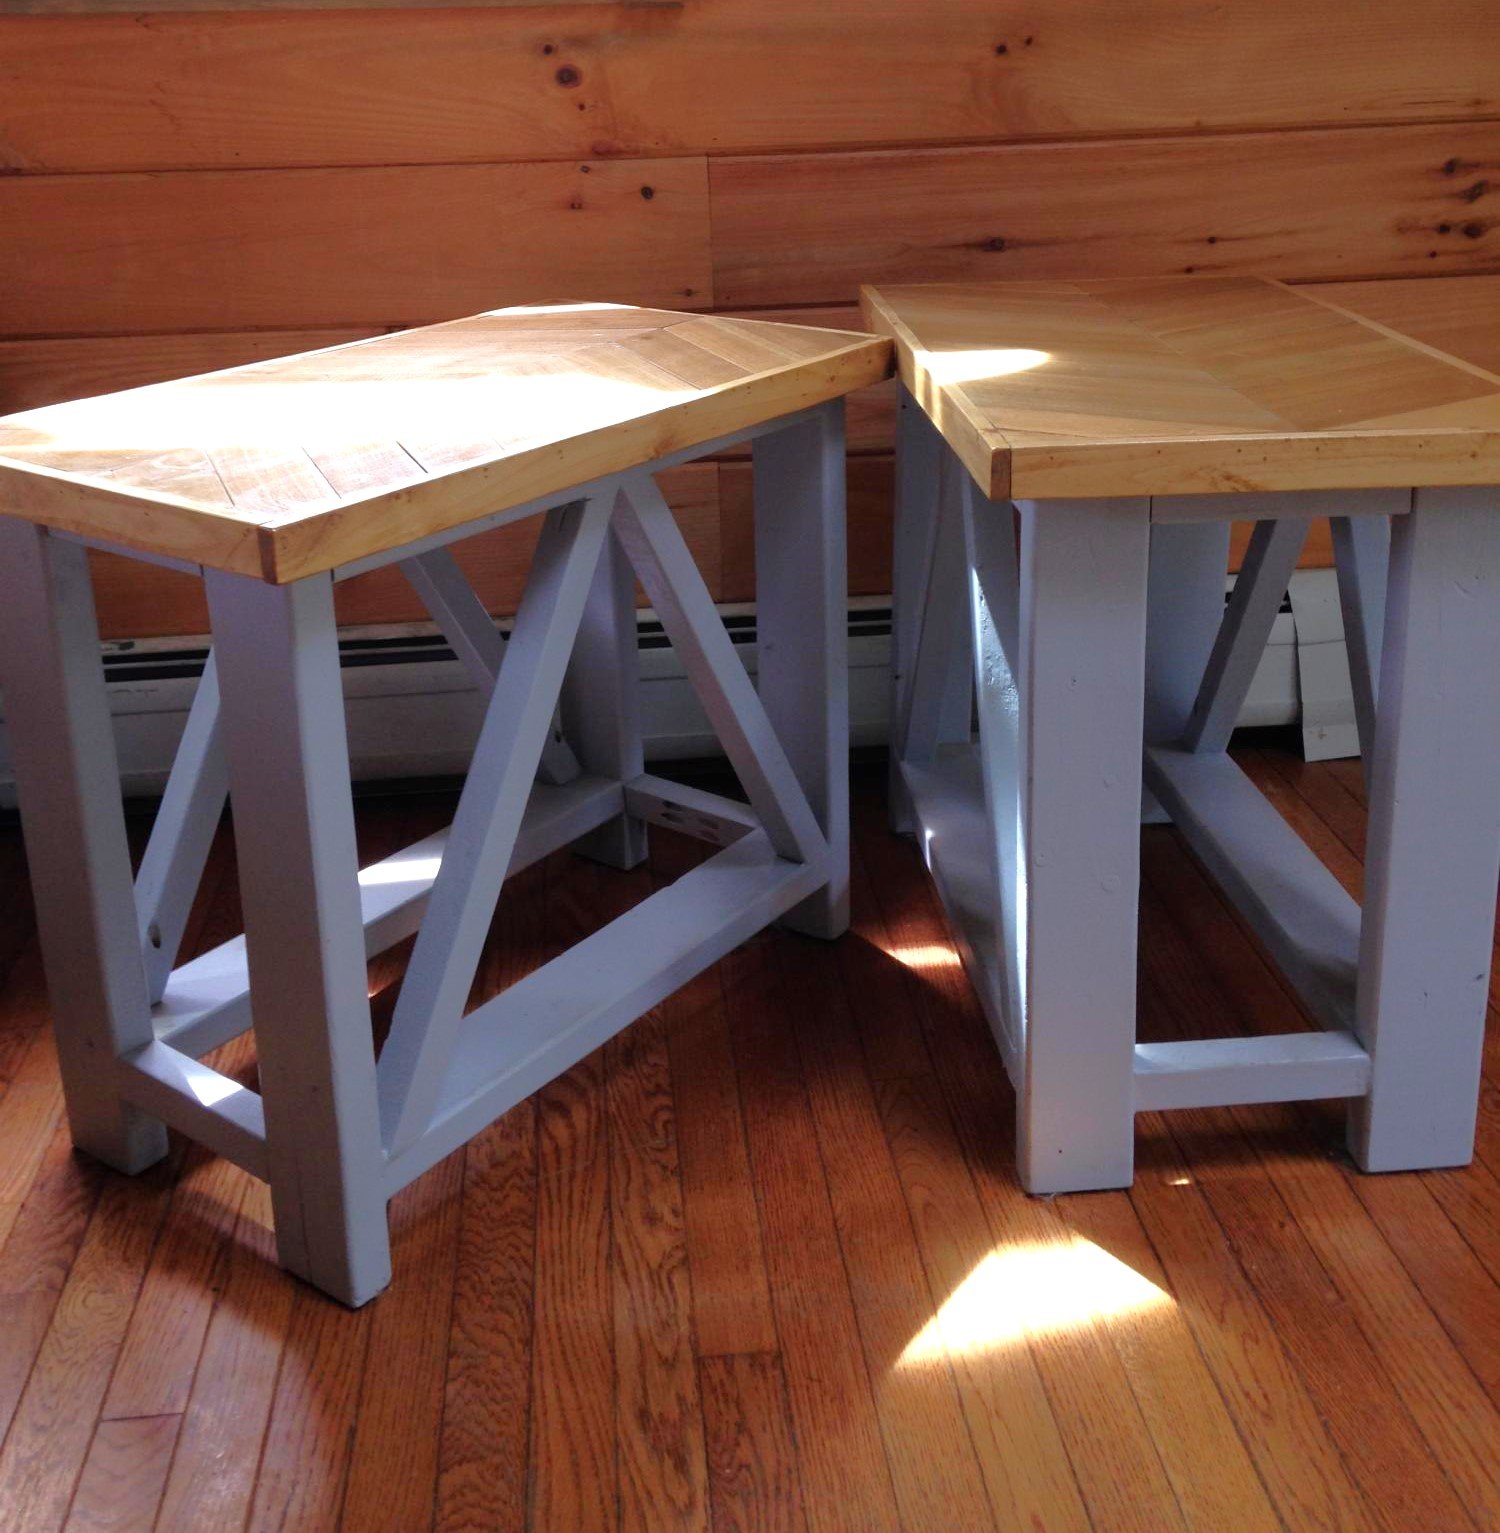
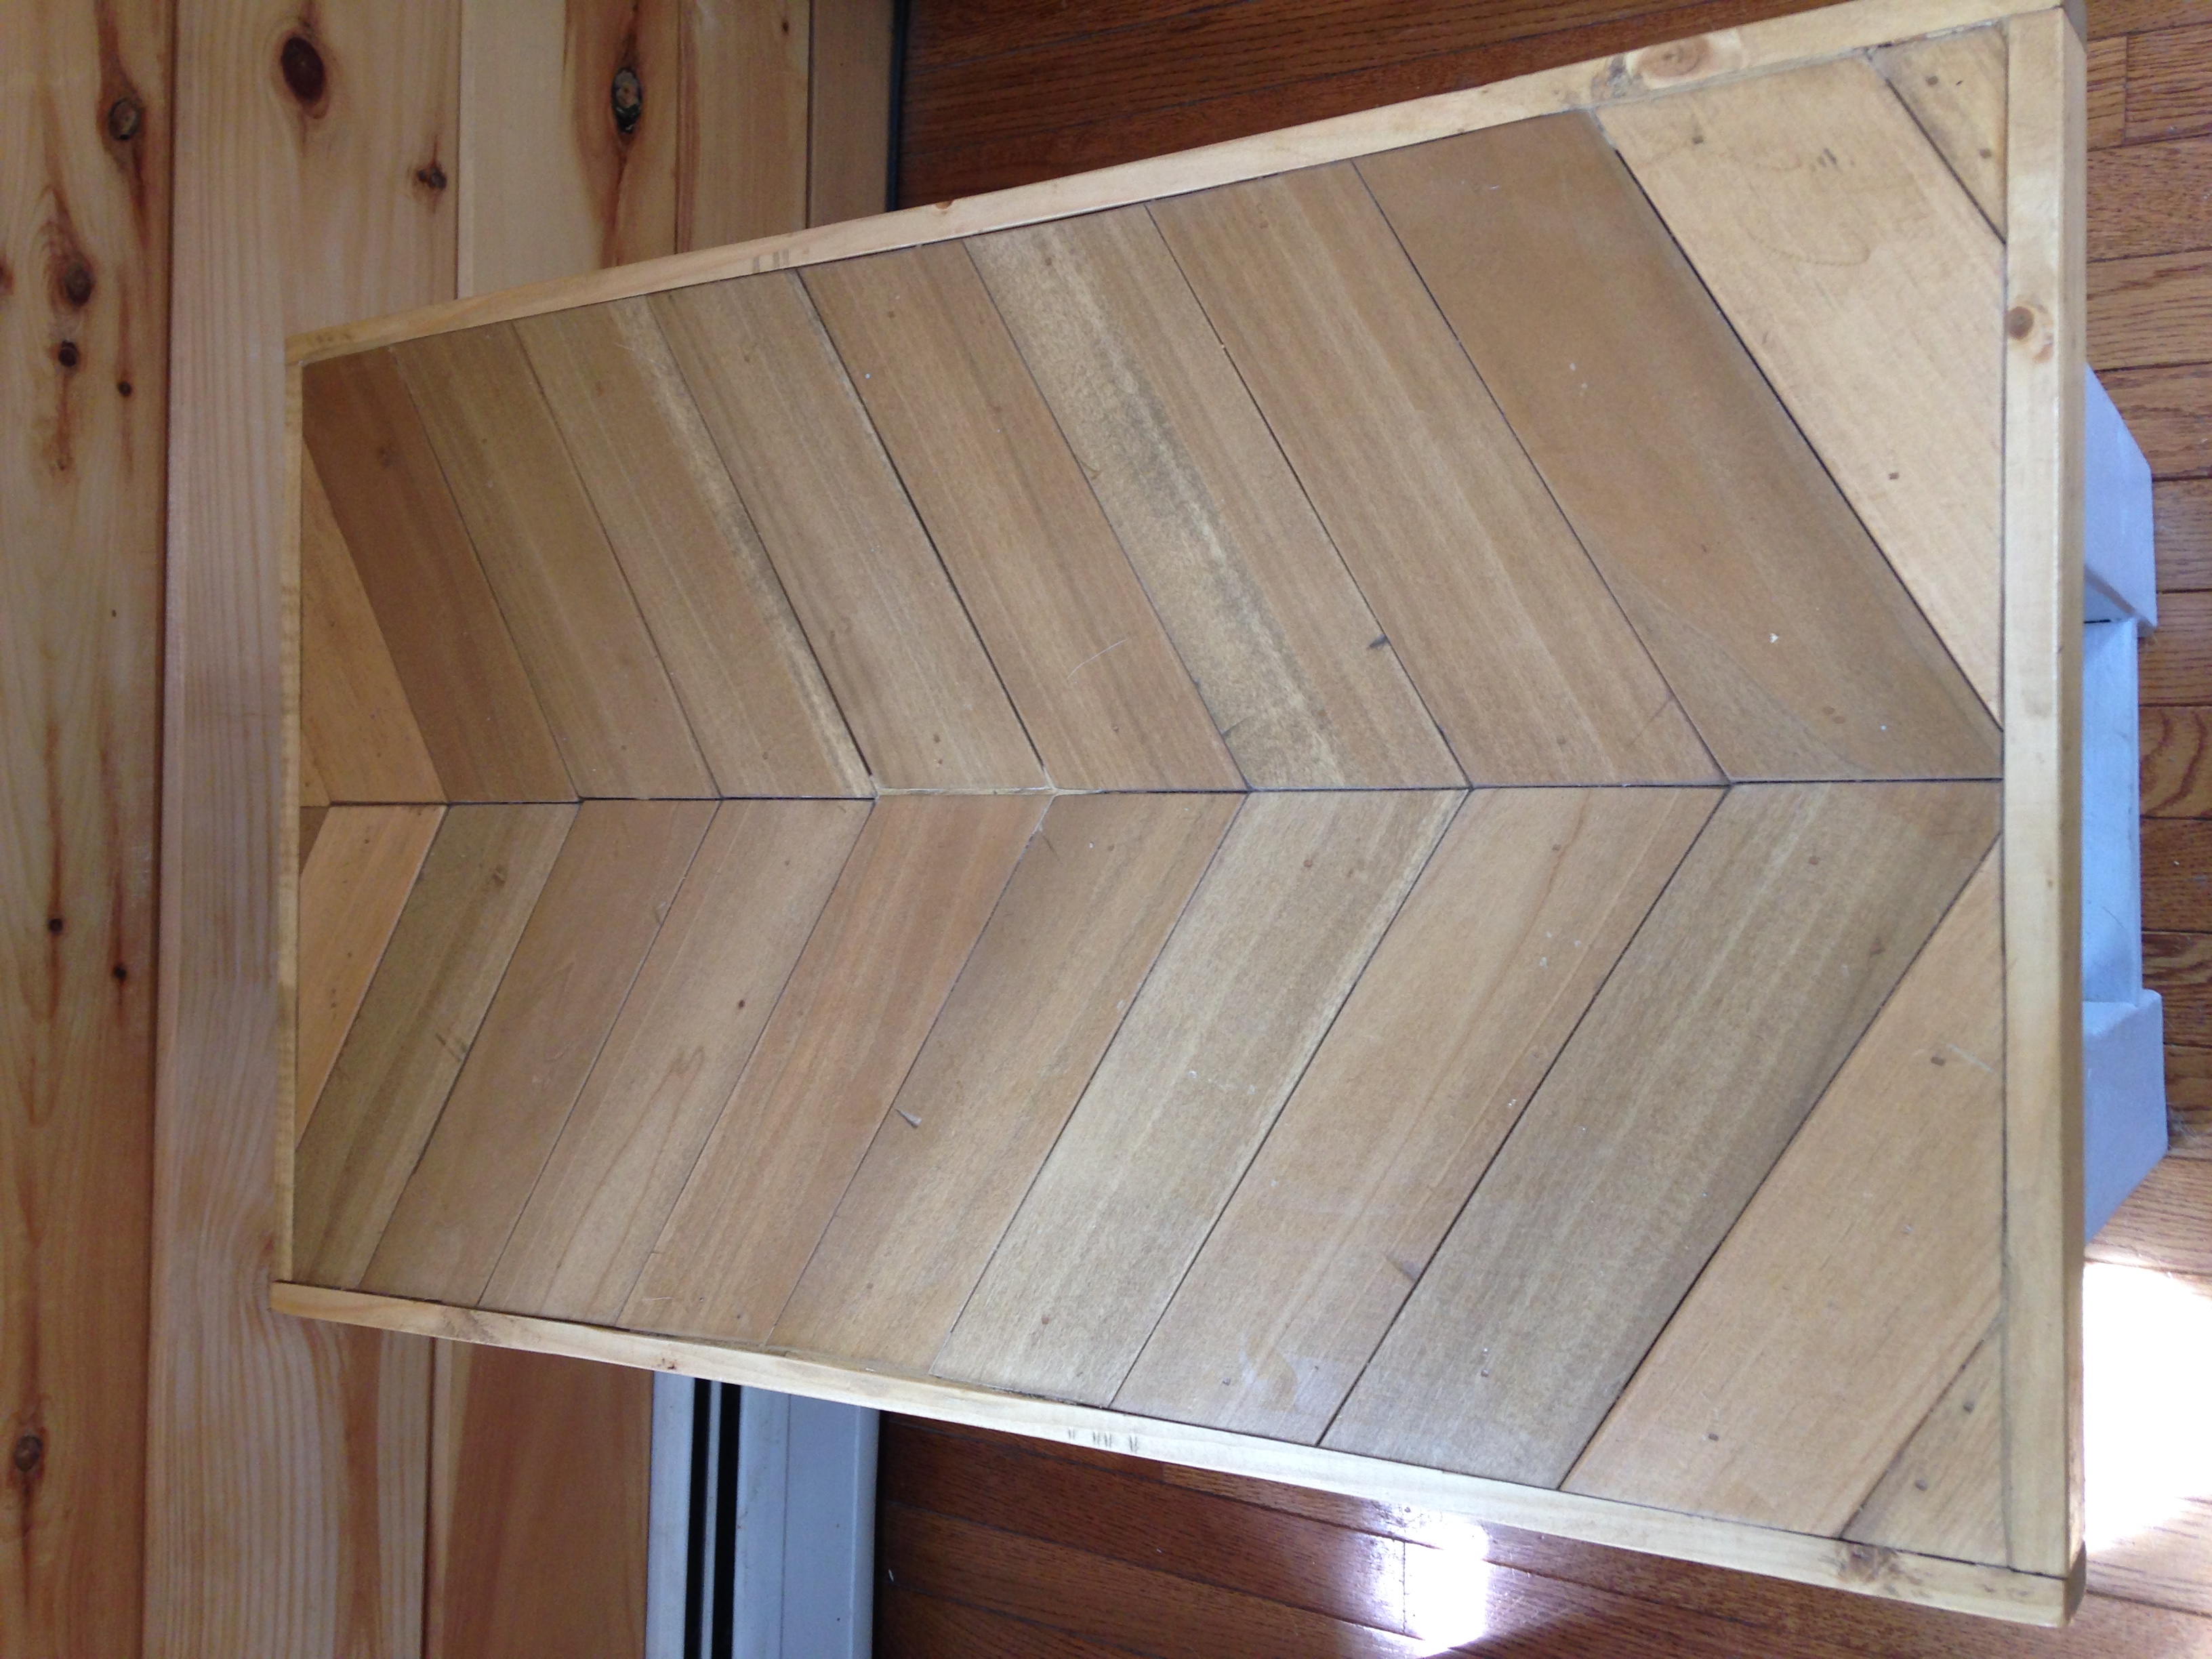
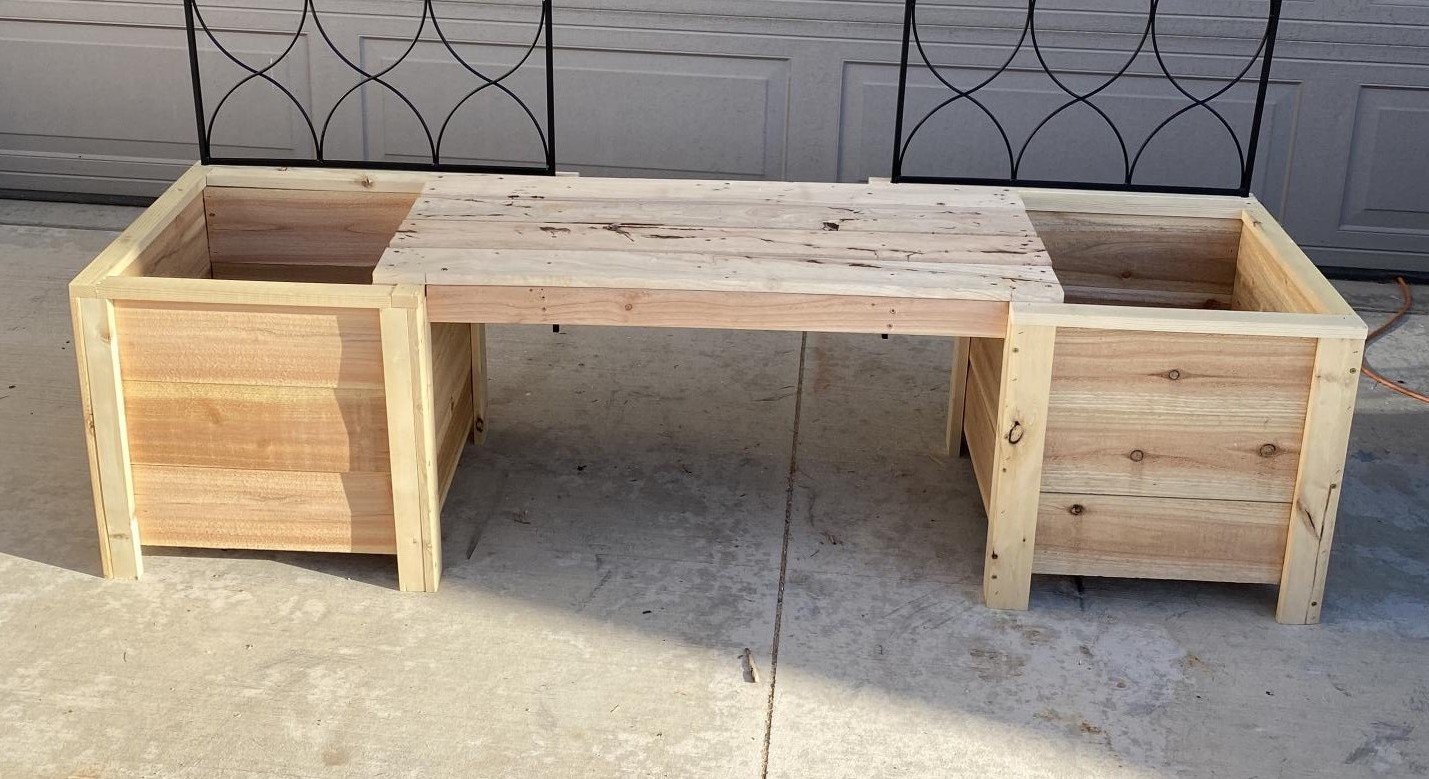
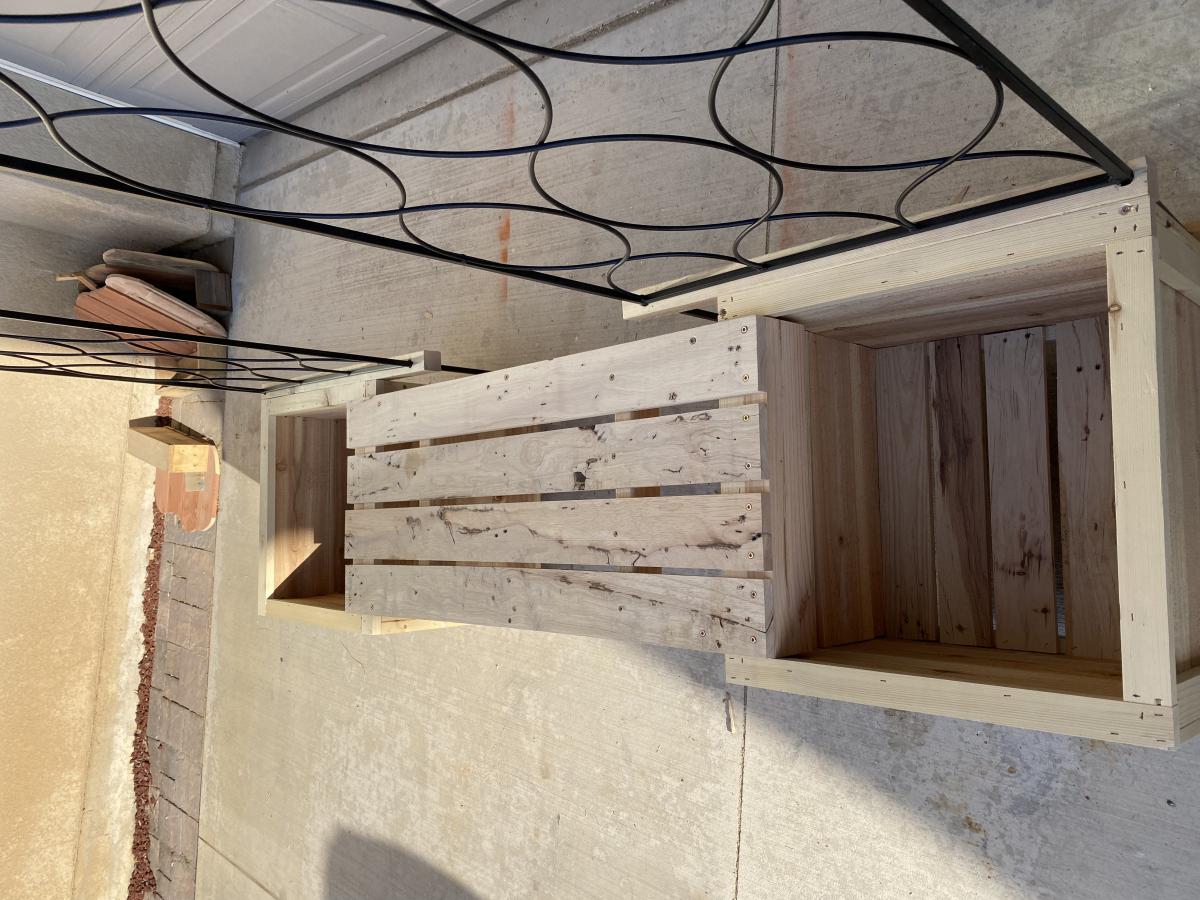
Nesting Grill Station

I was tired of seeing my propane bottle on the porch and this project was a perfect blending of camouflaged storage with lots of potential countertop workspace. My grill station is smaller and shorter than the original plans to better fit our family size and the porch space we have available. My husband has a bandsaw mill. When he was milling boards this fall, I asked for some 1/2" thick planks just for this project. I also had the knobs and wheels leftover from past salvaging work. I have been trying my best to use up "stock on hand" during this pandemic. Though I spent some time sanding the rough cut lumber, it still absorbed lots of stain. I wanted two tones of color, so that's good, but I still had to mix two stains together to have enough for the lighter parts.

Now we are looking forward to some cold weather BBQ meals!

Estimated Cost
$10 for screws, all else salvaged.
Estimated Time Investment
Weekend Project (10-20 Hours)
Finish Used
I stained the wood before joining it together so the two shades of stain wouldn't run together. For the darker parts I used Minwax Red Mahogany. On the lighter parts I mixed Minwax Early American with Natural (because I was running out). After staining I put the table together and finished it with Minwax Polycrylic, until that ran out, then Bona Mega satin floor finish. I put three coats of finish, sanding between coats.
Recommended Skill Level
Intermediate

Comments

mamasue72

Tue, 07/04/2023 - 08:38

Love this size. My deck is small so this is perfect. Thank you for posting the brag😊👌

Deck swing

Submitted by Anonymous (not verified) on Wed, 04/05/2017 - 03:24

Used left over deck boards

Built from Plan(s)
Estimated Cost
20.00
Estimated Time Investment
Day Project (6-9 Hours)
Recommended Skill Level
Beginner

Anna's Bedside tables

Made these for my niece as a wedding gift. These were one of the first of many of these I have made.

Built from Plan(s)

Comments

Backyard Bliss!

Submitted by kdins31 on Mon, 01/12/2015 - 09:26

I built this outdoor play area for my kids this past summer.  The area under that portion of the deck was always messy and muddy and so I wanted to make use of it.  I built the deck and anchored it with lag bolts to the deck supports.  On the one side I used rubber mulch and on the other there is play sand.  I dug holes in various locations and filled with gravel to allow for drainage under the sand and mulch.  For the awning I used plain cedar shingles.  I added a shower that is just regular 1/2" metal pipe with a hose adaptor.  The shower wall and fence are just old pallets that I had for a while, cut to size, which was pretty much random but they came out great.  I added a misting system under the awning that works great, the kids love the cool mist on the hot days. Overall, a heavy job ripping up the grass, moving the wood, gravel, stones, sand and mulch, but a fun deck build and even better experience doing this with my kids by my side!  

Estimated Time Investment
Week Long Project (20 Hours or More)
Recommended Skill Level
Intermediate

Comments

Einman10

Tue, 12/29/2015 - 17:10

I'm extremely interested in the plans for the bathroom vanity with the step stool that pulls out for kids to be able to reach the sink.  Is there a way I can get those plans?

Our Daughter's Playhouse

Submitted by jhedlund on Fri, 03/22/2013 - 06:17

We built this in early 2013. We ended up turning the house 90 degrees on the deck, because the slide worked best off the backside of the deck due to the various heights around the deck. The sloped back yard caused some challenges, but in the end it's a very sturdy deck with the cross beams attached. Thanks for posting these plans online for us, our 3 daughters are loving the playhouse and swingset! Here are some more pics of the project: http://www.flickr.com/photos/11031534@N00/sets/72157633009259873/

Estimated Time Investment
Week Long Project (20 Hours or More)
Recommended Skill Level
Intermediate

Comments

sgilly

Fri, 03/22/2013 - 15:07

Of course your girls love it - it's fantastic! Great job.

Robinwood

Fri, 03/22/2013 - 16:39

Love this - my grandson's back yard is too small to build something like this; which is why we had to settle for his loft bed airport/clubhouse.

slug

Thu, 06/27/2013 - 05:24

I'm planning on building two A-Frames and no playhouse, so my questions are focused there.

Did you do any modifications to swing portion of the plans?
Is it sturdy enough for an adult to swing on as well?
It looks like you put the posts in the ground, did you cement them in too?
How high off the ground is the bottom of the support beam for the swing?
Is there any issue side-to-side swaying?

Seasonal And Holiday

I'm pretty proud of myself

Submitted by Anonymous (not verified) on Mon, 05/01/2017 - 10:17

Pretty straight forward plans.

Built from Plan(s)
Estimated Cost
$350
Estimated Time Investment
Weekend Project (10-20 Hours)
Finish Used
Shou Sugi Ban/ Tung oil
Recommended Skill Level
Beginner

Modern Adirondack Chairs

Submitted by frmoody on Mon, 05/03/2021 - 17:35

This was a nice simple build. The only problem where I live (near Edmonton, Alberta) is that the price of lumber has gone crazy. I think it is the same everywhere. 2 x 4's are running about $8.50 (CAD) each. I can see myself building a few more of these as the neighbours like them. Chose to go with a funky magenta colour to add some colour to the backyard. Very comfortable to sit in but I think I will add some cushions. I should have taken Ana's advice and painted the boards (especially back and seat) first. Once assembled I had to go in with a small brush to get the sides.

Estimated Cost
$40 each
Estimated Time Investment
Day Project (6-9 Hours)
Finish Used
Exterior semi gloss paint.
Recommended Skill Level
Beginner

Comments

Simple 2x4 Potting Bench - Modified

I was intrigued by Ana’s Simple 2x4 Potting Bench. The project seemed simple enough and it would be used as a means to clean up clutter in the garage. My main focus was to make it semi-portable and weather resistant. Instead of using 2x4’s for the corner posts, I used 4x4’s to accommodate casters. I also shorted the length of the posts by 4 inches to compensate for the height of the casters. To provide extra rigidity I did a dado for the 2x4’s that connect the front and rear legs. In retrospect, I wish that I did not dado the legs because it made it more difficult to attach some of the shelf planks. I painted the frame green and left the shelves and backboards clear for beautiful contrast. My wife is ecstatic with the result.

Estimated Time Investment
Weekend Project (10-20 Hours)
Finish Used
Benjamin Moore Environ Green paint for the frame and Minwax Polycrylic for the poplar shelves and backboards.
Recommended Skill Level
Intermediate

Comments

Seasonal And Holiday

Zach's new desk

Submitted by dinifam on Sat, 04/13/2013 - 13:28

I built this desk so my son would have a place for his old school tv and to do his homework! It was super easy and I love how the finish came out! His room is a huge work in progress but this is the first step:)

Built from Plan(s)
Estimated Cost
20.00 as I had scraps and finish supplies
Estimated Time Investment
Afternoon Project (3-6 Hours)
Finish Used
I sprayed the bottom with satin black paint The top I painted white then sanded it down with 80 grit and rubbed on then rubbed and wiped minwax poly espresso stain until I got the look desired. Easy!!!
Recommended Skill Level
Beginner

Oversized X end tables

Submitted by Anonymous (not verified) on Thu, 06/01/2017 - 13:12

From the rustic X end table plan, I made mine slightly taller and a little more narrow to fit my space.  Also decided to do a chevron top

Built from Plan(s)
Estimated Time Investment
Weekend Project (10-20 Hours)
Finish Used
grey paint (Anonymous from Behr) on the bottom, fruitwood stain on the wood top
Recommended Skill Level
Intermediate

Entertainment Center for 60" Flat Screen LED TV

I used the plans from JRLwoodworking and the pictures from AZCA33 and combined them to create an entertainment center to hold my new 60" flat screen tv. I priced new entertainment centers at furniture stores for a nice entertainment center to hold a large tv and the price was around $2000. I looked around online and found a couple of websites of handmade entertainment centers and decided to give it a try. I had never made anything remotely his large or detailed, but with the plans and some patience, I was able to bring this thing to life. I couldn't have done it without the help of this website or jrlwoodworking. I am very proud of this piece of furniture and plan to cherish it for a long time....

Estimated Time Investment
Week Long Project (20 Hours or More)
Finish Used
Black latex paint (satin), white latex paint (satin), and Polyacrylic (satin)

We painted the bare wood with the white latex paint first. After a couple of coats, my wife used the black paint on the areas that she planned to look distressed. We painted over the black with the white until fully covered. She sanded the white until the black came through like she wanted and then we coated the entire thing with a polyacrylic coat.
Recommended Skill Level
Intermediate

Comments

NimbleShopper

Mon, 04/22/2013 - 13:51

Wait a moment, that is a super WOW!

Really nice work. The piece is worthy of a magazine cover. Very well done.

kristenlotz

Sat, 06/01/2013 - 19:21

Hi RAZORBACKFAN, I am so excited to see this build from our plans at jrlwoodworking.com! This is absolutely beautiful. It looks like a very difficult project, but with the step by step instructions and going through it a few times, it really can be done by a handy do-it-yourselfer. I hope you enjoy yours as much as we enjoy ours. The best part of it is telling everyone you built it. Nobody would believe it unless we had the pictures to prove it.

Ultimate work bench

Submitted by markmart74 on Fri, 06/16/2017 - 18:44

Tablesaw, router, fliptop mitersaw, and dust collection workbench. 

Recommended Skill Level
Intermediate

Comments

Fancy Farmhouse Bed

Submitted by henryholub on Tue, 05/07/2013 - 13:16

With a child on the way, our house has been undergoing some changes. We were in need of a guest bedroom for family members and needing to store my wife's childhood twin bed with a hidaway twin underneath that was set up in the room that would become the nursery. We also needed to clean all the backpacking gear out of the closet in the nursery room to get ready for it to be taken over by all the baby stuff. I decided a "King-sized" bed out of the two twin mattresses would be a good solution as it would keep us from "storing" the two mattresses and meet the guest bed need. After I came across the plans for the fancy farmhouse bed, I knew if i just added some height to it, I could meet the storage need too! There's 14'' on my version of the fancy farmhouse bed between the carpet and the rails, plenty of room for medium sized plastic tubs to slide in and out (as seen with the "test tub" in the picture. Under my bed there are currently 9 tubs, two large suit cases, a PA speaker, Power speaker head, a large double sleeping bag, and a little room for more. I'll try to add pictures when I finish the room out with night stands (wine crates mounted to the wall), a bedskirt, lamps, and a headboard. Once I got the wood home, it was a fast build. The slowest part was painting

Built from Plan(s)
Estimated Cost
$75
Estimated Time Investment
Afternoon Project (3-6 Hours)
Finish Used
Flat white valspar paint
Recommended Skill Level
Intermediate

Comments

Planter Boxes

Submitted by Anonymous (not verified) on Mon, 10/04/2021 - 12:53

I made the boxes from plans, but added bench and trellis from my own design.

Built from Plan(s)

Comments

Seasonal And Holiday

My take on the Becca Truck

Submitted by jeverett1 on Sat, 05/11/2013 - 10:33

My wife and I have a 2 year old, 85lb, golden retriever named Lily. She has a tough time jumping up on our bed and has hurt herself on a few occasions. I was inspired to build her a step, but also wanted some storage. When I saw the Becca Trunk I knew I had to build it!

I used oak ply and solid oak for the trim, including some decorative leaf inscribed trim for the top and bottom. My wife and I picked out some outdoor furniture fabric that was stylish and would hold up to a big dog jumping on it. She used some firm padding and staple gunned the fabric to create a really neat and clean look (I am lost when it comes to that stuff, but she is a genius with scissors).

Built from Plan(s)
Estimated Time Investment
Week Long Project (20 Hours or More)
Finish Used
Minwax Polyshades Antique Walnut Gloss
Recommended Skill Level
Beginner

Comments

Martha Jones DW

Sun, 06/16/2013 - 18:43

As soon as I saw Lily, I just knew you built it for her. Love that you added a a cushion top on the trunk. It's amazing how we take care of our fur Babies.

3 sided square picnic table

Submitted by Anonymous (not verified) on Mon, 10/04/2021 - 13:08

We built 2 of these tables for the McDonald’s in our area for the front of their building. With a few modifications to fit the space. We made the top of the table a foot smaller so it’s 3 x 4 feet. We also put extra bracing on the legs so the table would not tip over if one person was to sit on it. I love this table and will be making one for myself

Built from Plan(s)

Comments

Outdoor Chairs

Submitted by Anonymous (not verified) on Wed, 07/12/2017 - 09:04

These were a fun build and pretty easy to put together.  Certainly need to pre-drill pilot holes or risk splitting your boards.

I contemplated putting a back rest on the chairs but didn't end up needing them due to close proximity to the walls.  Having the cut-list on hand was super handy as I just set a stop on my miter saw and was able to cruise through the cuts quickly.  

Estimated Cost
60 dollars for materials, not counting cushions and pillows.
Estimated Time Investment
Day Project (6-9 Hours)
Finish Used
Olympic Deck Stain (709 in color) semi-transparent. Likely will seal with a clear coat later.
Recommended Skill Level
Beginner

Entry way bench and storage

Submitted by seesaw on Sat, 03/12/2011 - 11:19

This is perfect for our front room- (most) shoes fit in the storage baskets, and the hooks are perfect for scarves and coats in the winter, towels and life jackets in the summer. The top cubbies hold gloves and hats, as well as sunglasses, umbrellas and sun screen.

Estimated Cost
$30
Estimated Time Investment
Afternoon Project (3-6 Hours)
Finish Used
Early American
Recommended Skill Level
Beginner

Toilet shelf

Submitted by Lukilla on Fri, 10/22/2021 - 17:54

We had someone ask us to make one of these for them, and we couldn't resist making one for ourselves. Fun easy build and adds some style to our bathroom.

Minwax early American stain on the finish

Comments