Community Brag Posts

Restaurant High Chair

Submitted by mplauger on Mon, 03/21/2011 - 15:32

highchair is finished! I used mostly 1x3's instead of the 1x2's and had to adjust the measurements accordingly. This project talked me into buying that pocket jig.. and I LOVE it! This is only my 3rd project but it took longer than "20 minutes to assemble". I have to build after my son goes to bed so I completed it over two evenings.

Built from Plan(s)
Estimated Cost
$38
Estimated Time Investment
Afternoon Project (3-6 Hours)
Finish Used
Ipswich Pine stain by Minwax
Recommended Skill Level
Beginner

Church Pulpit

Submitted by BBLinda on Sat, 06/08/2013 - 10:34

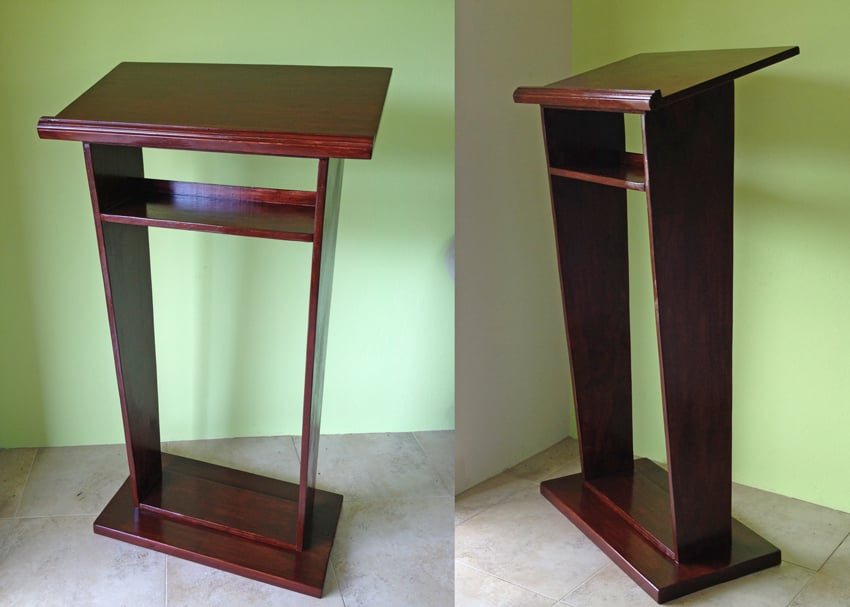
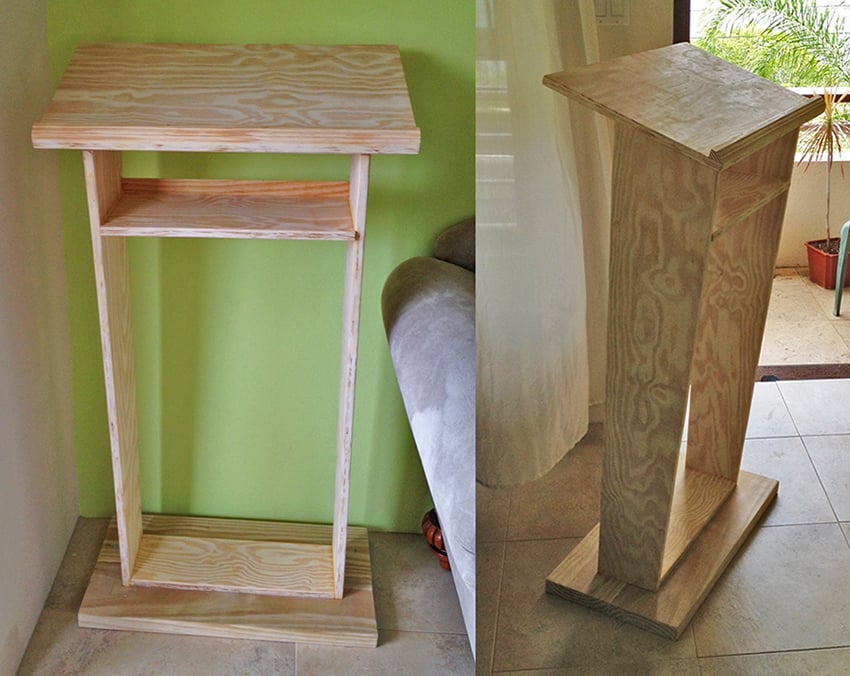
A good friend of mine, a pastor of a local church, asked me to build a pulpit for their recently finished church up in the countryside of Grenada. She showed me a picture of what she had in mind and based on that, I drew my own plan in SketchUp, and then built it out of Yellow Pine boards and Plywood.

Note to the dimensions:
After I drew the plan, and just when I was at the lumberyard to have the plywood and boards cut, I thought I might have had it estimated not wide enough, so I decided on the spot to make it 2" wider and the top panel 2" wider and deeper too. So if you'd like to build based on my plans, please consider if it's wide enough for your purposes.

This is what I used (corrected measurements here):

2x 2x8 26" long YP Boards (Base)
1x 18 1/2" x 6 1/2" Plywood (Base Support Panel)
1x 26" x 16" Plywood (Top)
1x 18 1/2" x 9" Plywood (Shelf Panel)
2x 45" x 9 1/2" Plywood (Side Panels ) - these are cut angled, see plans
1x 44 1/2" Wood Moulding (for the "stopper" on the top panel, and the "back" of the top shelf.

Estimated Cost
~ US$ 115 (material is very expensive here on the island, and I guess you could build it for about half or 2/3 of this in the USA)
Estimated Time Investment
Weekend Project (10-20 Hours)
Finish Used
MINWAX Polyshades / American Chestnut Satin (375)
Recommended Skill Level
Beginner

DIY Convertible Bar / Pub Table

Submitted by susanshamp on Thu, 07/30/2015 - 16:38

This rustic modern version of a pub table has multiple uses - it can rest along a wall to make a 16 foot long bar, or rolled together to form an 8 foot long pub table. It is standard counter height 36" and will accomodate seating for 8-10 counter stools. If you don't have live edge wood slabs, you can also use construction lumber (2x8s or 2x12s) to achieve similar dimensions and versatile use in a more cost effective way.

Estimated Cost
Using construction lumber, approx. cost is $50 per table
Estimated Time Investment
Afternoon Project (3-6 Hours)
Finish Used
Poly on slabs, distressed black paint on base
Recommended Skill Level
Beginner

Comments

kev117s

Fri, 07/31/2015 - 04:10

Awesome idea! I think I will have to try for a dining table version of this table. Do you happen to have a way to lock the 2 pieces together? 

Outdoor sofas

Submitted by Anonymous (not verified) on Fri, 06/09/2023 - 11:24

These were inspired from a few different projects of Ana’s, great fun to build and have transformed our patio area

Comments

Board & Batten Inspired Headboard

Our guest room finally has a headboard! I put together this queen size headboard using what I had learned building my daughter's headboard (and consulting the plans for the Reclaimed Wood Headboard) using the remainder of the plywood sheet from her headboard project, 2x3s for the legs, a 2x4 to join the legs (and connect to the metal bed frame), furring strips, and a 1x3 to top it off.

Our plywood had been cut to fit our car, so the first vertical furring strip was placed to hide the seam where I joined the two pieces back together. Then we evenly placed them from center as just looked right to us.

We had a great time seeing this come together as we didn't follow a specific plan, but were able to be a bit more creative inspired by various plans.

Estimated Cost
$45 including hardware & paint
Estimated Time Investment
Afternoon Project (3-6 Hours)
Finish Used
We painted with Martha Stewart's Stratosphere in a flat finish, distressed and rubbed on Minwax Provencial stain. Unfortunately, the stain gave the headboard a very green tint, so after a lot more sanding, we were able to finish the project with two quick coats of Minwax water based Poly.
Recommended Skill Level
Beginner

Comments

Modern Adirondack Chairs. Thanks

Submitted by Anonymous (not verified) on Sun, 07/19/2020 - 16:16

Ana,

Thanks for making the plans available. Was looking for a simple plan and here is it. Needed to replace 4 aging chairs to match a pine table and a bar. Looking forward to another project in the fall. You definitely made a good choice on the pitch of that chairs. Very comfortable.

Estimated Cost
$50
Estimated Time Investment
Afternoon Project (3-6 Hours)
Finish Used
Spar urethane
Recommended Skill Level
Intermediate
Seasonal And Holiday

2x4 (and 2x6) Modern Adirondack Chair

Submitted by HR Dad on Mon, 12/28/2020 - 15:43

Been wanting to make some Adirondack chairs for years; have about 10 different plans saved that one day I could get to. These 2x4 modern plans made getting them done quickly possible due to simplicity of the cut list and cheap cost of materials. The only real change I made was to use 2x6 for the arms; I cut a taper along outside edge and increased the length of the arms by about an inch and a half to overhang the front legs a bit. Since I just used basic framing lumber, I milled all of the boards first with table saw and planer to make square consistent edges. And, I chose to use pocket screws in as many joints as I could so I wouldn't have screw holes on any visible faces. Add in a lucky find at the big box store paint return; scored this blue exterior paint for $2.00 a quart, and my weekend project turned out pretty good. Now I've got two neighbors that want 'em.

Estimated Time Investment
Weekend Project (10-20 Hours)
Finish Used
1 qrt Glidden Exterior Semi-Gloss; got it so cheap, I used the whole quart. Multiple coats.
Recommended Skill Level
Beginner

Patio Table w/Built in Beer/Wine Cooler

Submitted by RoyBoy on Sat, 05/18/2013 - 06:58

After seeing the patio table with beer/wine cooler, I wanted to build this for my brother and wife who recently bought a house. I asked them if they were interested and of course they said yes. I modified the original plans by adding a 2x4 on each side of the cooler to make the table wider. I also made the legs out of 4x4 vs the 2x4s that were originally called for. I used redwood and then stained it and used a varnish for the final coating. I probably wouldn't use the varnish again for an outdoor table, because it looks like it should be an indoor table vs outdoor. Overall, I'm pleased with the results and the best part about it, I get to enjoy it every time I go over for a BBQ.

Estimated Cost
$225-250
Estimated Time Investment
Week Long Project (20 Hours or More)
Finish Used
Olympic Redwood Naturaltone Toner Exterior Stain
Cabot Spar Varnish Semi-Gloss
Recommended Skill Level
Beginner

Comments

Msharp1211

Wed, 07/03/2013 - 13:04

Awesome table, do you happen to have the measurements you used. I'd like to make the same table but I need the lumber yard to make the cuts.

King Farmhouse Bed

Submitted by boxermum on Wed, 04/13/2011 - 14:17

Classic king farmhouse bed build

Estimated Cost
$150
Estimated Time Investment
Day Project (6-9 Hours)
Finish Used
Antique White Finish:
*Primed with white primer
*Painted with Behr Silk Pillow - Satin finish
*Sanded edges to expose wood (rotary palm sander and palm block sander)
*Applied Minwax English Chestnut Stain over whole surface using foam brush being sure to saturate exposed wood areas
*Used old T-shirts to wipe away excess stain
*Sprayed with matte clear sealer (Krylon)
Recommended Skill Level
Beginner

Storage Bed

We used the plans for a six drawer storage bed to build this with a custom headboard and footboard. We used plywood to build these boxes but have since switched to using MDF. We use a pine laminate for the drawer faces.

Estimated Time Investment
Weekend Project (10-20 Hours)
Finish Used
Custom mix
Recommended Skill Level
Intermediate

Comments

leftysgirl

Sat, 09/26/2020 - 05:51

I absolutely love this style. I am trying to figure out your modifications.
What size pine planks are those for the foot and head board? 6”?

Thanks!

Simple Outdoor Sectional

This was the never-ending project!! Started off as going to be a 5-piece sectional that turned into a 6-piece sectional that was modified into 2 couches. We found it to be much easier for cushions to make 2 couches rather than having an odd number of back cushions or needing pillows that will constantly move around. Although more expensive, we really like the look of using 1" wood and they are definitely sturdy enough. The table was made by basically taking the bottom part of a side piece and doubling it to make the table 48". The project was half making the pieces and half staining, and once a coat of sealant is put on, the project will turn into more time finishing than building. I would recommend for anyone to find cushions before they start to build. 24" cushions are significantly more expensive than 22" cushions. Luckily the plans are simple enough that they can be easily modified to accommodate the smaller seat size.

Estimated Cost
$300 without cushions, $650 with cushions
Estimated Time Investment
Week Long Project (20 Hours or More)
Finish Used
Cabot Semi-Solid Ebony
Recommended Skill Level
Beginner

Comments

JoanneS

Tue, 07/09/2013 - 16:26

These look gorgeous! Love the finish. I like how you added some extra supports around the sides, that's a very good look! The curve top on the back cushions looks great too - where did you find them? ($350 for all 12 cushions is an awesome price!)

dbh

Sat, 07/19/2014 - 08:05

Are the cushions comfortable? I have read mixed reviews, what is your opinion?

Seasonal And Holiday

My First Project: Spinning DVD Rack

Submitted by Dan Y. on Sat, 07/13/2013 - 20:19

I was looking online for a spinning DVD rack to buy when I stumbled across a picture of a custom built rack. I decided to give it a try and this is the result. This is the first project I've done outside of basic shelves and it was a great learning experience. The overall fit and finish isn't quite where I'd like it to be but overall I think it turned out pretty well. I was able to find a 12" lazy Susan at a hardware store that supports over 300lbs and worked perfectly for this project.

I used pocket holes for the shelves, finishing nails for the top and screws for the bottom and lazy Susan. I also used pocket holes to attach the shelf backs and hid them behind the shelves. One thing I definitely won't use next time is spray paint/enamel. The finish isn't nearly as nice as I wanted and it cost far more than I was expecting.

This is also my first time using SketchUp and I'm really impressed with it. I've uploaded a copy of the plans.

Criticism and suggestions are appreciated.

-Dan

Estimated Cost
$170
Estimated Time Investment
Weekend Project (10-20 Hours)
Finish Used
Rust-Oleum Universal Satin Spray Paint - Espresso Brown
Rust-Oleum Crystal Clear Enamel
Recommended Skill Level
Starter Project

Comments

Val Manchuk

Sun, 07/14/2013 - 11:35

I like this spinning DVD unit! Coincidentally, I just finished using spray enamel to redo some cupboard door handles. It's horrible stuff! I ended up sanding it off, and doing it over in flat black. I roughed up the edges with 180 grit to antique them a bit. Looks much better!

DIY Bathroom Vanities

Submitted by Anonymous (not verified) on Sun, 04/24/2022 - 11:18

Perfect vanities! When I couldn’t find exactly what I was looking for, I searched online for vanity plans and thankfully your site and these vanities popped up. I love all the storage with these, so much better than ANYTHING pre built we looked at online. We had seen vanities that I was going to settle for but they were around $3,000, and I didn’t love them, so my husband said he could build something and this was the result using your plans. I am so thankful and the whole project was a fraction of the cost! I stained them with a vinegar and steel wool stain with poly over it. I couldn’t be more grateful for you and your generosity of plan sharing. Thank you!

Built from Plan(s)

Comments

Laundry Dresser

Submitted by biffnderf on Sat, 07/02/2011 - 23:08

We had a very limited area for these to fit, so my hubby had to change the dimensions to fit these square baskets. We needed enough spots for our family of 10! I LOVE THEM, thanks; Ana!

Built from Plan(s)
Estimated Cost
$50 each
Estimated Time Investment
Afternoon Project (3-6 Hours)
Finish Used
Water based paint
Recommended Skill Level
Starter Project

Comments

Guest (not verified)

Wed, 01/11/2012 - 14:53

We are going to have to turn the baskets the same way due to the space in out laundry room. Do you happen to remember the dimensions of them? Thanks.

Guest (not verified)

Thu, 02/09/2012 - 07:08

Do you have the dimensions for the square baskets? These would work much better in my home.

Guest (not verified)

Tue, 02/14/2012 - 16:42

We did something similar when our family was 8 (6 foster children). We bought 4 baskets (2 people per room) and then just had them on regular shelves. I LOVE the look of these! Unfortunately baskets give out over time and I can't ever seem to find baskets that once again are the same size as previous baskets. Did you order the baskets on-line someplace that you can consistenly get the same size for when the baskets wear out?

Guest (not verified)

Wed, 02/22/2012 - 12:35

I have all the same laundry baskets that I bought at wal mart for like 3 or 4 bucks a piece. I would think that just meausring out the size according to the laundry baskets would work out fine! they have never stopped selling the ones that I buy, i find them at every wal mart I go to

Lindy Holcomb (not verified)

Fri, 03/02/2012 - 06:05

I would love the Dimensions for this shelf.

Lindy Holcomb (not verified)

Fri, 03/02/2012 - 06:19

I would love the Dimensions on this shelf.

Guest (not verified)

Thu, 03/08/2012 - 05:13

Seriously? $50 for these plans. Get real. Fine woodworking plans don't cost this much. Take some wood, make a box, and put slats in it to fit the baskets. The entire set wouldn't cost $50!

davidmac (not verified)

Thu, 03/08/2012 - 06:18

The plans are free. The build costs $50. See the plans on the link above the cost.

christine (not verified)

Sat, 03/17/2012 - 20:54

once again can anyone please give the measurements for this square basket design and the basket model number as well. i am very challenged when it comes to building things, but with the idea of home depot doing the cutting i think i could manage if i had the measurements. i need the square size to work for my space though. thanks in advance.

Guest (not verified)

Sun, 04/01/2012 - 09:18

I have tried clicking on the link above the cost to get the Plans...however it brings me back to the ORIGINAL Plan rather than YOUR plan (skinnier and taller)...Im sorry if I am being dense but I would really love to get the dimensions of YOUR plan but am having trouble accessing them?? Help please!!

Guest (not verified)

Fri, 04/13/2012 - 23:27

Where it says PS there is a link to the other dimensions.

Cari Downing (not verified)

Fri, 04/20/2012 - 14:05

If you use the large wire baskets made by elfa they would not break like the plastic. The initial investment would be more but would save money over time.

Sonya Chapin

Tue, 07/24/2012 - 04:34

Easy and awesome! My teenage children and I made these over the week-end! Super easy and great looking! Our first project was the laundry pedestal and these are a great compliment. We let Home Depot cut the wood due to time restraints and assembly was a snap! Thanks for the great family projects. My husband passed away in April and these projects have really helped us in the healing process (excellent for constructive bonding time).! Thanks again

Modified Shanty2Chic Rolling Rustic Wood Dresser

Submitted by gusnoll on Wed, 08/07/2013 - 21:47

I modified Whitney's (Shanty2Chic) Rolling Rustic Wood Dresser slightly because I didn't want to have mine on wheels. Other than that, I basically followed her plans and advice! I used Maple plywood with poplar boards. With a dark stain they are a good match. I did use 3/4 maple plywood for the dresser drawers instead of 1x8" boards to save money. My wife is happy and my boys love their new dresser--that's all that matters!

Thanks, Anna, for this great site!

Built from Plan(s)
Estimated Cost
$250
Estimated Time Investment
Week Long Project (20 Hours or More)
Finish Used
3 coats of Early American Stain & 2 coats of polyurethane.
Recommended Skill Level
Intermediate

Comments

Adam Colburn

Wed, 08/14/2013 - 06:07

Really love how this came out! How big are those legs? I'm thinking of copying this design for my new place!

In reply to by Adam Colburn

gusnoll

Mon, 08/19/2013 - 20:23

Thanks, Adam. The legs are 3x3 poplar you can get a piece at lowes or home depot (can't remember which) but they are actually 3 1x3s glued together but you'd never know it. Anyways, they are 3 1/2" tall and I put an additional piece of my 2x2s underneath to support them, then the strip of 1x2 between the legs on the side that are pockethole screwed into them as well--this is where the true strength comes in.
good luck!

thogg4

Sun, 03/09/2014 - 06:28

Do you have a photo of the underside where the legs attach?

Small Cedar Shed with Living Roof

Submitted by Anonymous (not verified) on Mon, 09/09/2019 - 12:46

I built the shed during the summer of 2018, following Ana's plans but with the addition of a green roof. After almost a year the vegetation -- a variety of native plants from the upper Midwest -- has started to fill in pretty well. My carpentry skills are rudimentary so the project took a long time but was worth the effort.

Built from Plan(s)
Estimated Time Investment
Week Long Project (20 Hours or More)
Finish Used
Wolman™ F&P Cedar Finish and Preservative, if I remember correctly.
Recommended Skill Level
Intermediate

Comments

Master Bedroom Update with New Bed!

Submitted by Anonymous (not verified) on Sun, 07/30/2023 - 15:07

Master bedroom makeover ❤️ bed plans are from Ana White


Built from Plan(s)

Comments

Mud Kitchen

Submitted by Noyehx4 on Mon, 07/20/2020 - 12:48

This was my first build, like ever. I am very proud! Props given to my hubby who is a carpenter by trade. I went back and forth on stains and paint colors at home depot. He didn't rush me and was awesome the entire time! He actually picked up the supplies, and is now a fan of the self tap screws! He thought he knew where everything in home depot was, but he had to ask to find those LOL. He wanted to use his new nail gun, but I wanted to follow the plans. The plans are awesome! We decided not to add an oven door just yet. Likely will soon. (Avoiding pinched fingers for now) I also have the knobs for the front, but it was hot and since I had only just stained them, they needed time to dry and second coat yet. (I kind of forgot about them once I finished them with my new dremel) We purchased the hose kit from the kitchen section at home depot. It came with everything, I searched market place and even posted asking if anyone had a used one for sale. No luck. This was $20 and came with everything, the guys at home depot showed me what adapters to get to ensure that it would hook up to our garden hose, and we grabbed those too and they worked perfectly! I messed up cutting one of the angles for the shelf the wrong way, but there was enough scraps for my husband to help me fix it. It was a fun build, and so rewarding to see our kids playing with it! I used my dremel 4300 and it wasn't powerful enough for the thicker wood, so my stove tops are thinner, but he actually enjoys setting them up and spraying them off the table with his hose! I painted the brass hooks green when we were painting the kitchen so they would match. The pots and pans came with the little tote and the apron chef hat and pot holder. It was a perfect finishing touch. *Edit to add photos kitchen hose kit from home depot, reading comments, others had a hard time finding adapters. I suggest taking what you have with you to home depot so they can show you what adapters you need. We needed three because we have a quick attachment on the end of our garden hose, (for our sprayer) now little mans mud kitchen can be connected and disconnected easily!

Built from Plan(s)
Estimated Cost
$75
Estimated Time Investment
Weekend Project (10-20 Hours)
Finish Used
Rust-Oleum Ultra Cover 2X Enamel Spray Paint and Behr Semi-Transparent Waterproofing Exterior Wood Stain and Sealer
Recommended Skill Level
Starter Project