Happy ladies~ Great EGGS!
My 7 week old chicks love thier new home
Using the Farmhouse Table plans I just modified them to the dimensions I thought would be best for my space. Tried mortise/tenon joinery on the legs and that took a lot of time since it was my first time. The table top is put together with pocket hole joinery. I love my Kreg Jig.
We built this lumber rack for about 20$ of 2x4s. It was an easy build and uncluttered our garage.
This was one of my first projects. I just used a circular saw but a mitre saw would be better. I’ll look for one soon. It was rewarding, fun and we love how it looks on our back patio.
My wife had begged and begged for something like this, so I took the plunge. This was my first build and I’m getting the itch to try other things! We built the ship lap wall and sign together as well!
DIY outdoor couch, reader build
Daybed cushions and pillows, modified depth
I have been dreaming about building so many things featured on this website, and I finally buckled down and built something. I figured that an outside garden shed would be a bit more forgiving than a project requiring a bit more precision, and from the picture, you can see that it's not perfect! I'm still working on trimming the shingles and I still have to stain/seal it. I've got to admit, when I first picked up the wood for the project at the store, I wondered what I had gotten myself into. But I just jumped in, and here it is.
Thu, 10/11/2012 - 10:45
What a perfect spot for it as well! Really good job with your first project.
Thanks to Ana's plans for the attached garage shelves, we've managed to change 12' of garage space into 60! A quick trip to the local Home Depot and following the included instructions, these SUPER easy shelves were perfect for our needs. Thanks, Ana!
Made this desk custom for a friend and I am so happy with how it came out. Took around 4 days with finishing. I didn't put a back on it because drilling those holes for cords always goes rather splintery. If he wants a back we can easily put it on. The top ended up having strange coloring with the Dark Walnut stain, I think because of the wood filler, but I like it because it gives it a rustic old world kind of look. I saved a lot of money by hounding the scrap bin at Home Depot several times a week, looking for wood on Craigslist, and raiding my leftover stash. I modified the side so there was a tower partition and a shelf on shelf pins- courtesy of Kreg shelf pin jig. I used moulding I had sitting around to cover the exposed edges of plywood.
First table my husband and I have ever made, and it turned out beautifully!
I made this bed for my wife using the plans found on this side.
I worked out great and she loves it!!!! Very east project. It took one week end to complete. I altered it slightly and added decorative side panels.
Tue, 05/21/2013 - 03:59
The project looks good and perfect for the home and we always look for decking up our home in the most beautiful way possible and for that you can check out http://blog.decorplanet.com/2012/06/exploding-toilets-prompt-recall-of.html.
Diy farmhouse table
This bench is great! I was surprised how nicely it swings. I used rope with overhand loop knots to secure onto quick link hooks. Made it for my husband for his birthday but my whole family enjoys it daily!
This is my third project from Ana's website. I absolutely love to build and can't wait to do more!
This free standing banquette corner bench was fashioned from Ana's upholstered bench design. I made modifications to her design to fit my space and the 4" upholstery foam that I purchased on-line from Amazon in 4x30x72" sheets. Designing it to be 18" off the ground allowed for a multitude of play options from American Girl dolls to Barbies. The addition of rope lighting underneath held on with cable ties allows wonderful illumination and spurs creativity and desire to entertain imaginative play at night. The seating is wide and sturdy and even though it is housed in a play room it is very comfortable for adults. Of special note; the upholstered back rest and skirt were made with one queen sized quilt, eliminiating the need for sewing a hem by utilizing the hemmed edge. The cushions were made from one king sized duvet cover and no sewing was needed. To finish the look custom piping was added which required sewing. Confident that when it will inevitably be jumped on that it can take it and will not come crashing down. The back rest was attached to the wall with this bracket I purchased at Lowes for $10.00.
http://www.lowes.com/pd_56378-37672-122373_0__?productId=3058195&Ntt=
Great desk, easy build and very solid.
Only issue with the plans was not enough 2x4 (unless I cut it wrong).
I was tired of seeing my propane bottle on the porch and this project was a perfect blending of camouflaged storage with lots of potential countertop workspace. My grill station is smaller and shorter than the original plans to better fit our family size and the porch space we have available. My husband has a bandsaw mill. When he was milling boards this fall, I asked for some 1/2" thick planks just for this project. I also had the knobs and wheels leftover from past salvaging work. I have been trying my best to use up "stock on hand" during this pandemic. Though I spent some time sanding the rough cut lumber, it still absorbed lots of stain. I wanted two tones of color, so that's good, but I still had to mix two stains together to have enough for the lighter parts.
Now we are looking forward to some cold weather BBQ meals!
Sun, 11/22/2020 - 13:05
Fire up the barbie! Thanks for sharing, it looks perfect:)
After following Ana Whit and other bloggers for a long time i figured my skills were at a level to try an advanced build like the Kitchen Island.. But i also wanted to challenge myself even more and was determined to make it from as much reclaimed wood as i could, mainly pallet wood.
With a lot of modifications to make it work i think I got a good result from these plans.
While i used as much reclaimed wood as i could, i still needed some clean 2x4's , 2x2's
Used left over deck boards
Made these for my niece as a wedding gift. These were one of the first of many of these I have made.
Fri, 02/26/2021 - 09:54
Love this build and your finish! Great job, what a wonderful gift!
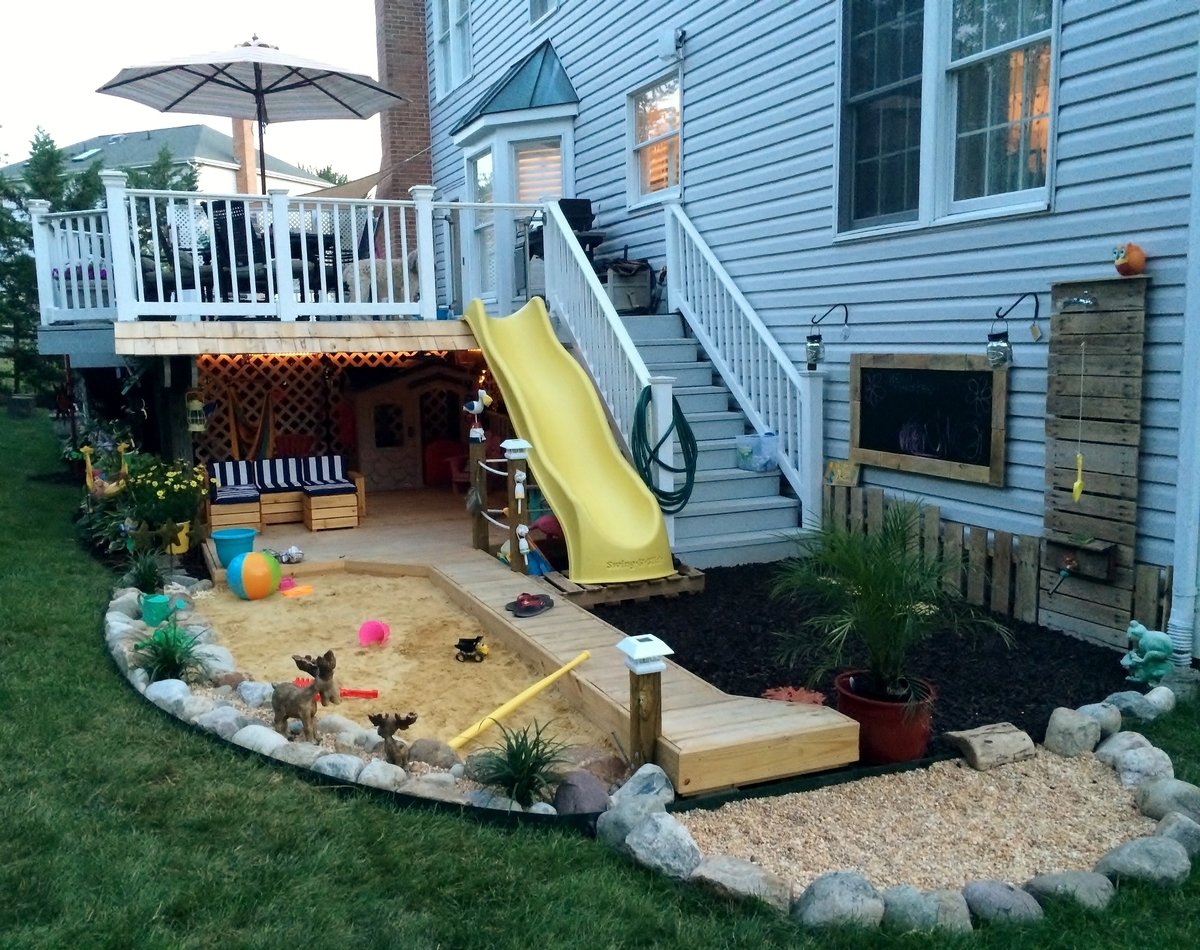
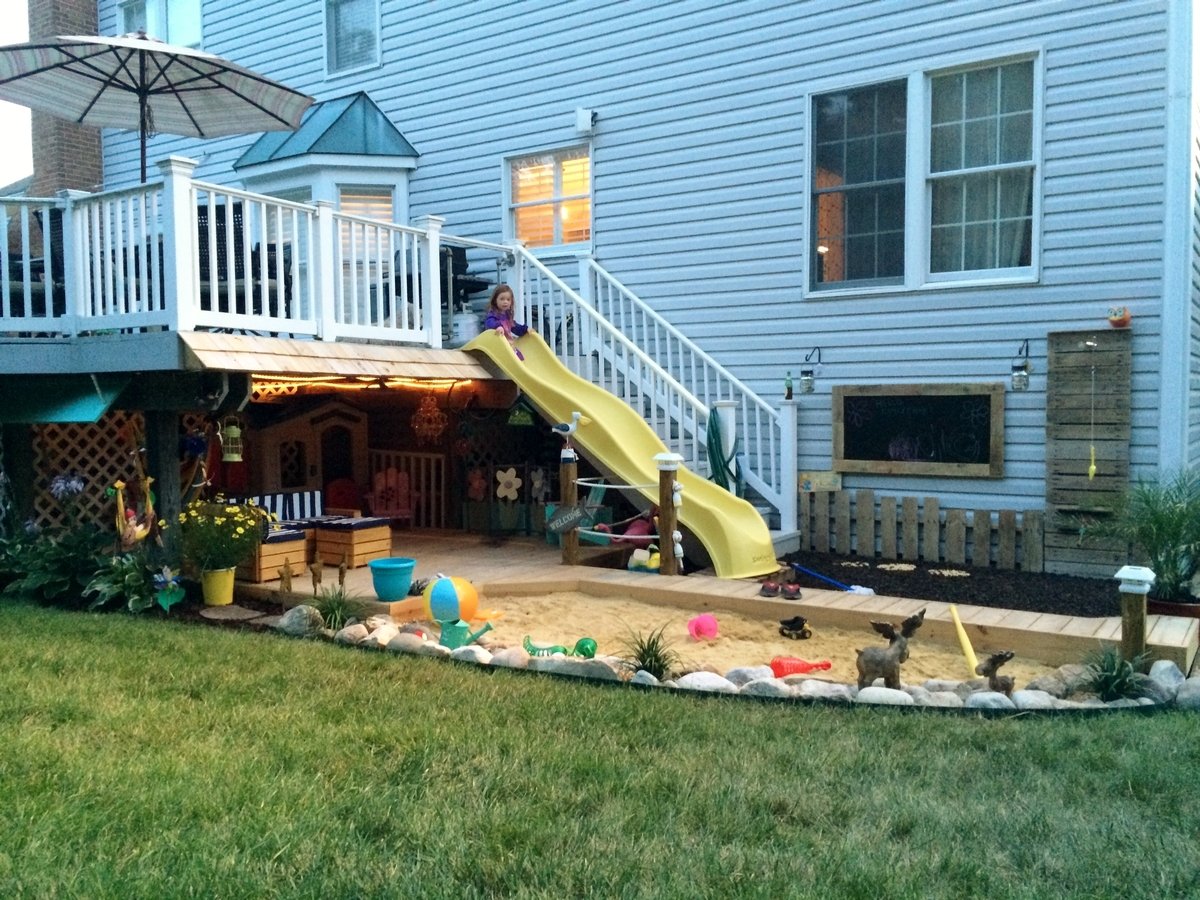
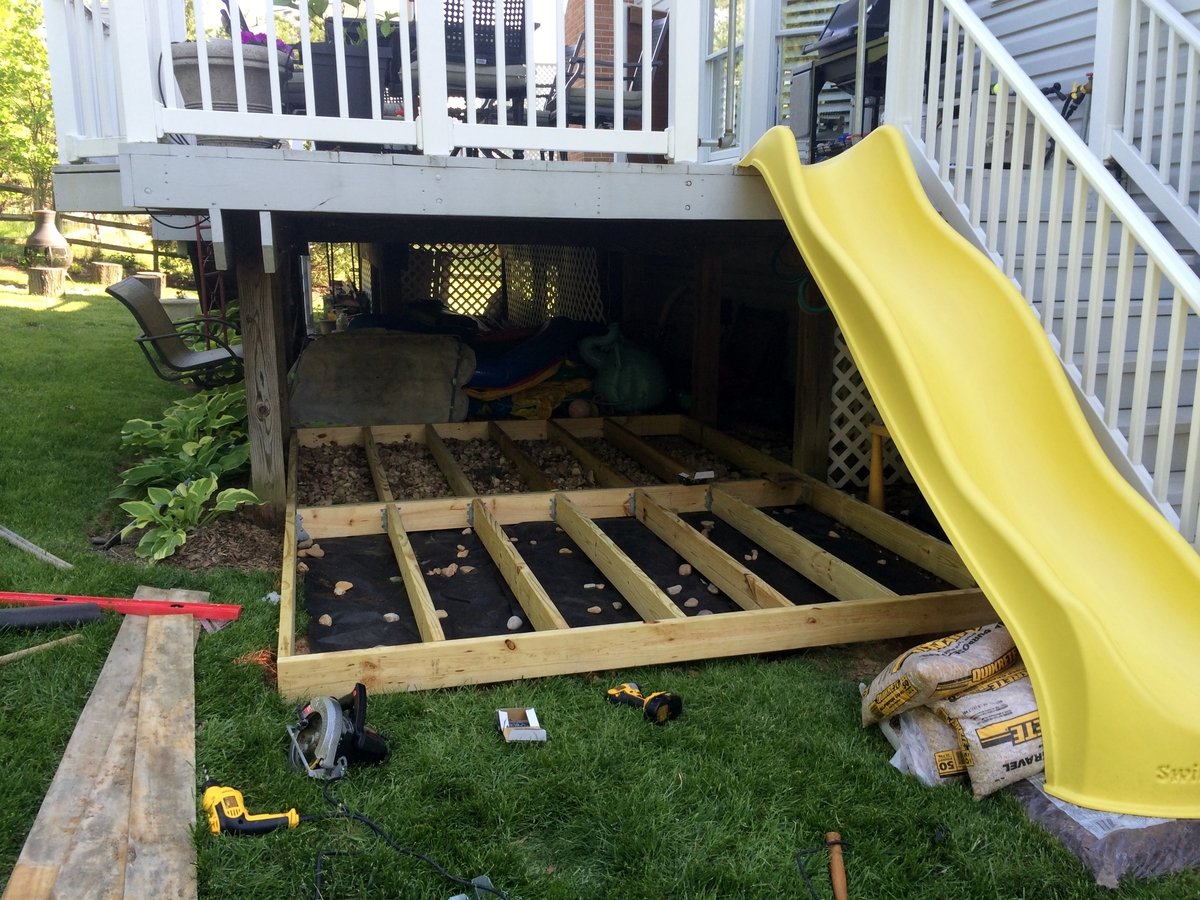
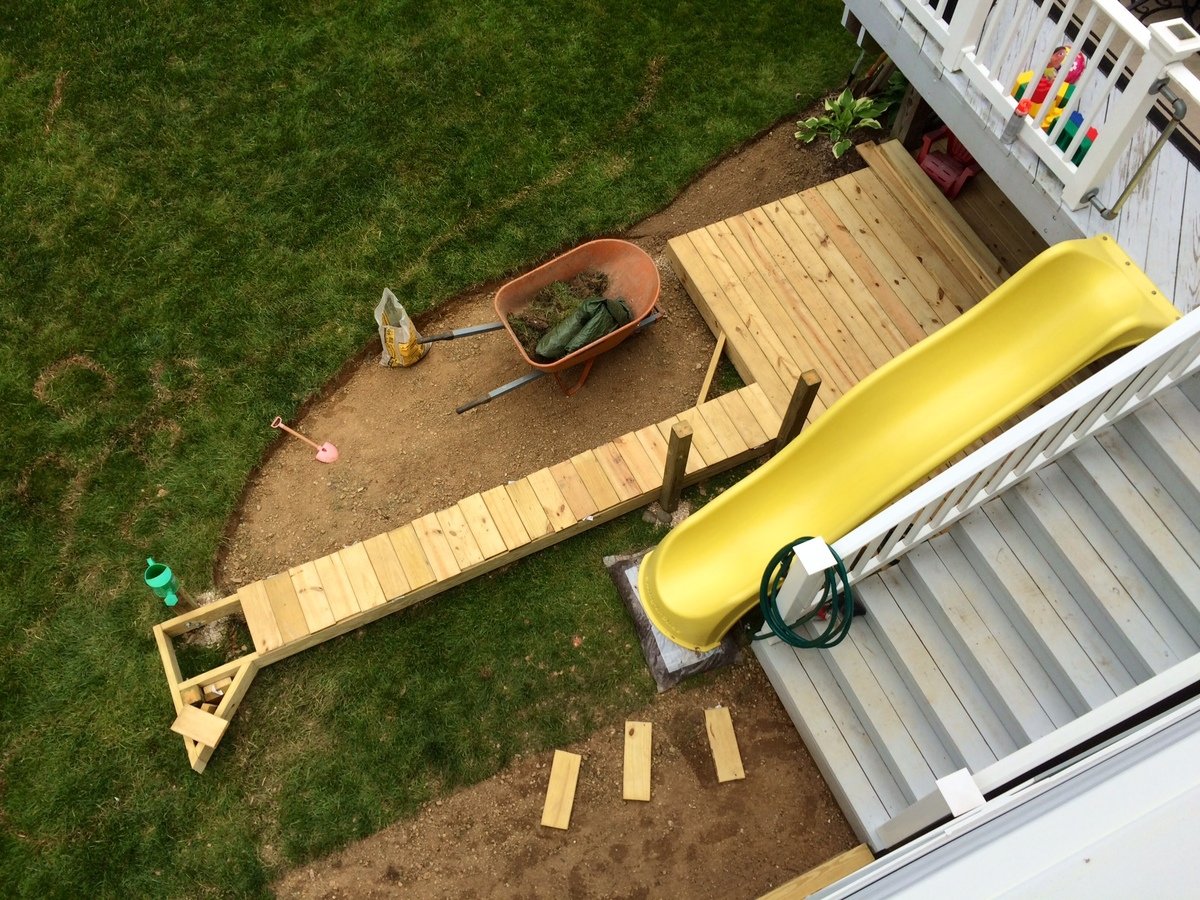
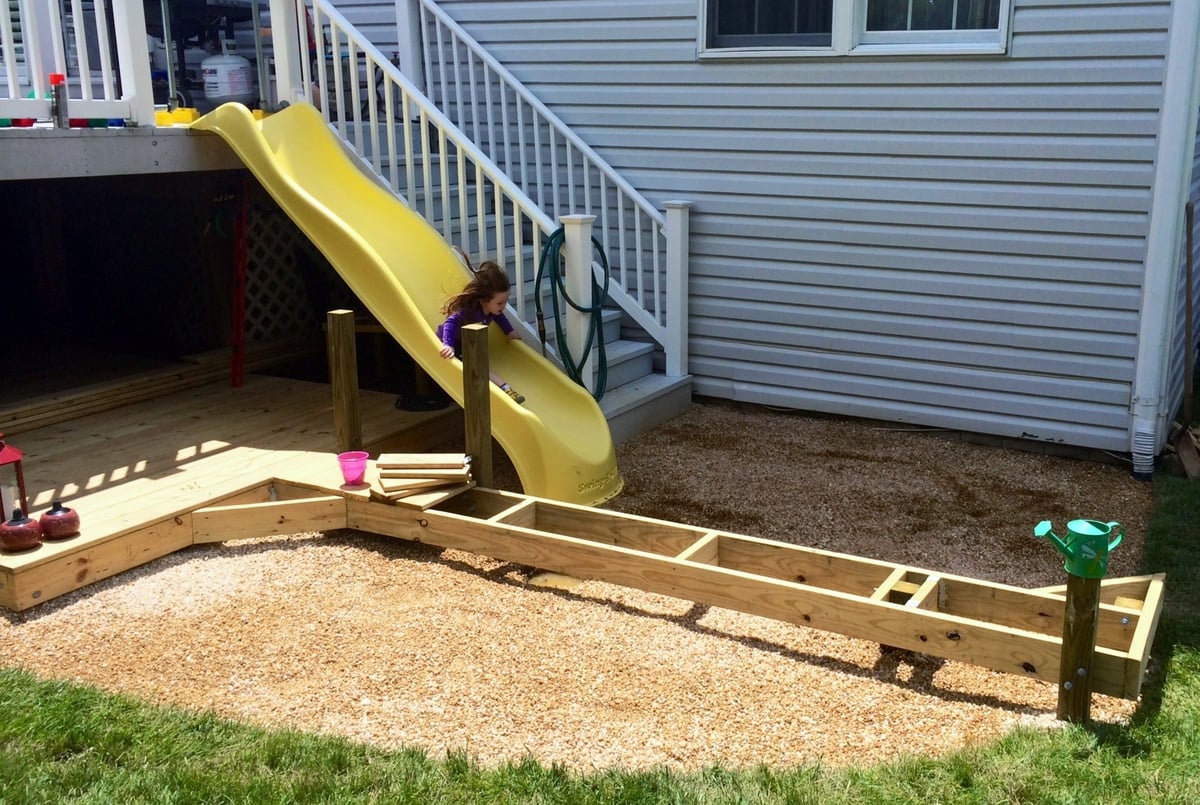
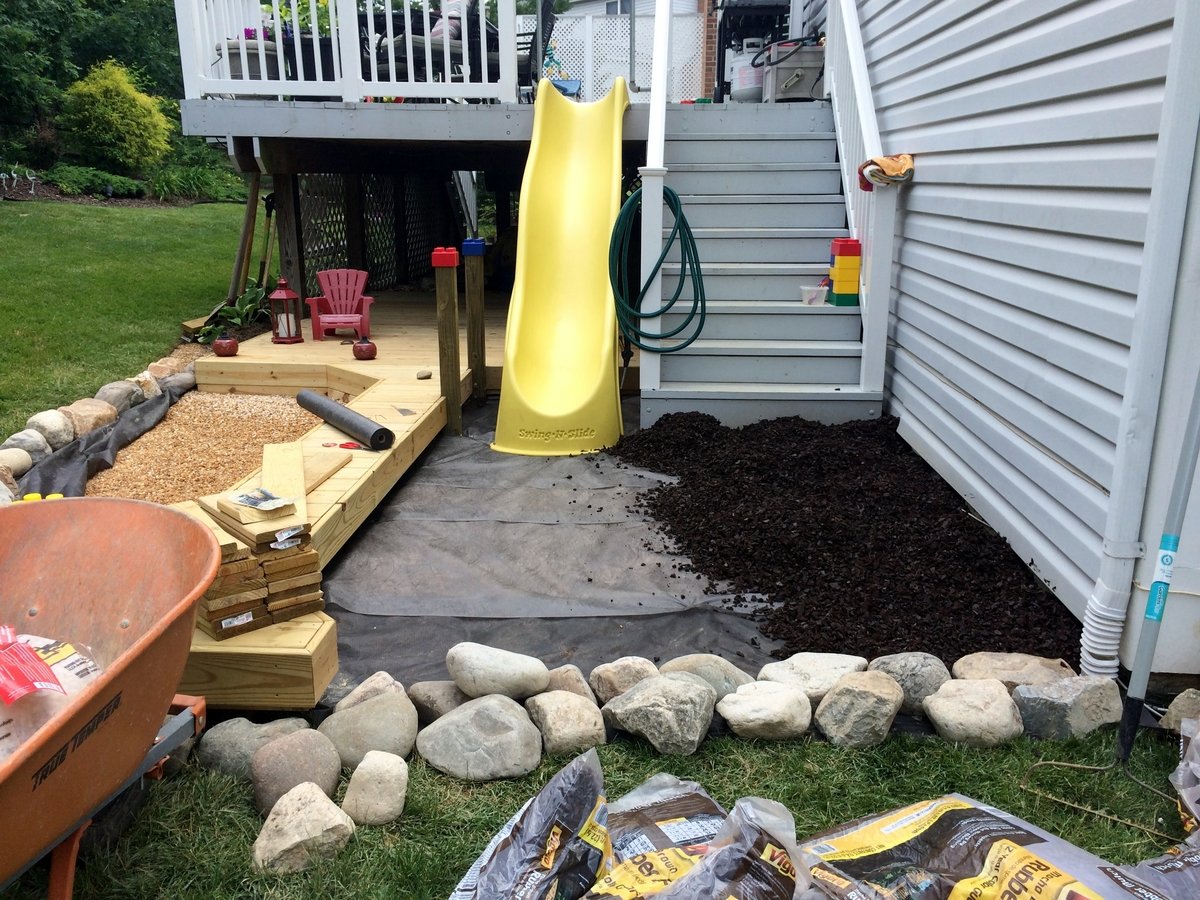
I built this outdoor play area for my kids this past summer. The area under that portion of the deck was always messy and muddy and so I wanted to make use of it. I built the deck and anchored it with lag bolts to the deck supports. On the one side I used rubber mulch and on the other there is play sand. I dug holes in various locations and filled with gravel to allow for drainage under the sand and mulch. For the awning I used plain cedar shingles. I added a shower that is just regular 1/2" metal pipe with a hose adaptor. The shower wall and fence are just old pallets that I had for a while, cut to size, which was pretty much random but they came out great. I added a misting system under the awning that works great, the kids love the cool mist on the hot days. Overall, a heavy job ripping up the grass, moving the wood, gravel, stones, sand and mulch, but a fun deck build and even better experience doing this with my kids by my side!
Tue, 01/13/2015 - 09:37
What an amazing use for a weird outdoor space ! You are genius !
Wed, 01/14/2015 - 06:21
I love it! I'm now trying to convince my husband to let me add a slide to the deck. Who wouldn't love that?!
We built this in early 2013. We ended up turning the house 90 degrees on the deck, because the slide worked best off the backside of the deck due to the various heights around the deck. The sloped back yard caused some challenges, but in the end it's a very sturdy deck with the cross beams attached. Thanks for posting these plans online for us, our 3 daughters are loving the playhouse and swingset! Here are some more pics of the project: http://www.flickr.com/photos/11031534@N00/sets/72157633009259873/
Fri, 03/22/2013 - 16:39
Love this - my grandson's back yard is too small to build something like this; which is why we had to settle for his loft bed airport/clubhouse.
Thu, 06/27/2013 - 05:24
I'm planning on building two A-Frames and no playhouse, so my questions are focused there.
Did you do any modifications to swing portion of the plans?
Is it sturdy enough for an adult to swing on as well?
It looks like you put the posts in the ground, did you cement them in too?
How high off the ground is the bottom of the support beam for the swing?
Is there any issue side-to-side swaying?