Community Brag Posts
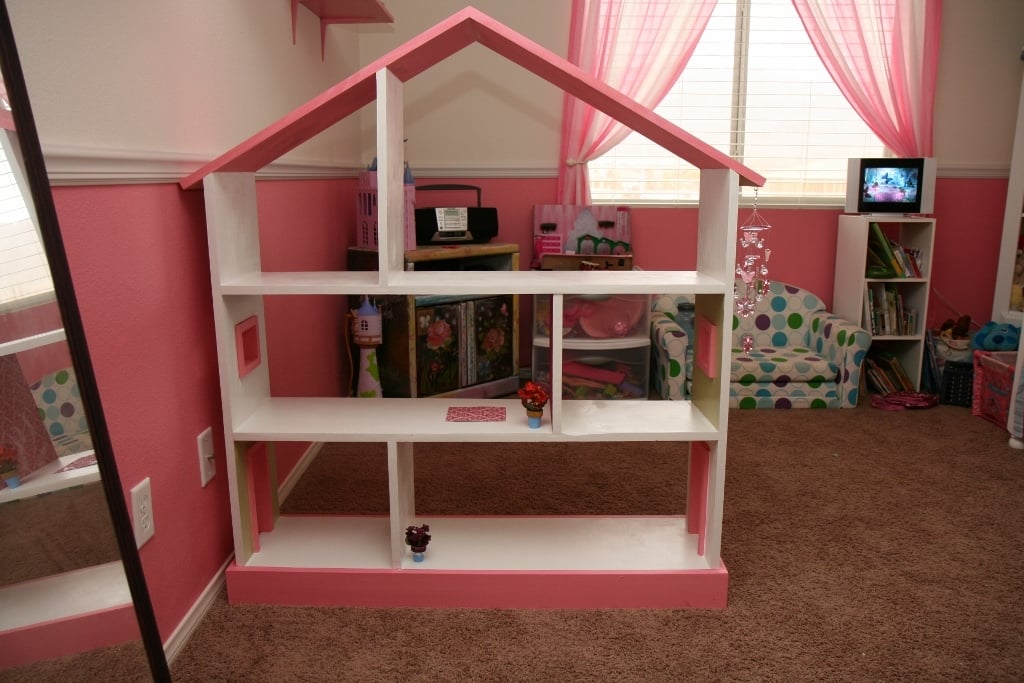
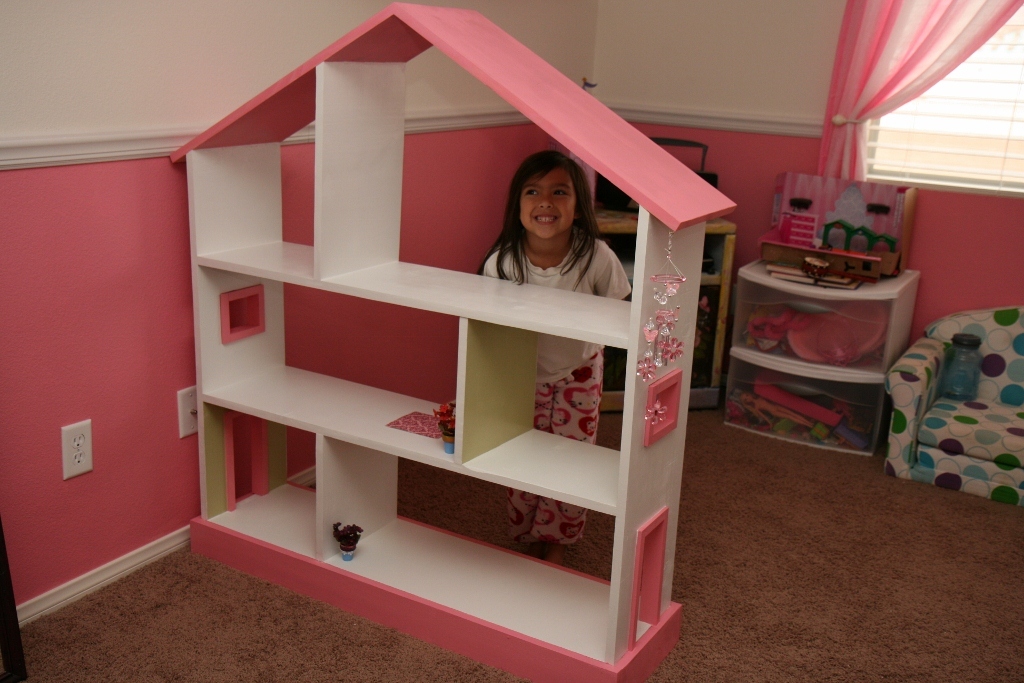
Bookcase Dollhouse

We built this for our daughter's 6th birthday! Love how it turned out :D As you can see we opted to leave the plywood backing off for the time being so she can use it as a doll house and play on both sides. When she grows out of the doll house phase we will either convert it to a book shelf, donate, or sell in a yard sale ... so many options!
Built from Plan(s)
Estimated Cost
$74 wood & white paint
Estimated Time Investment
Afternoon Project (3-6 Hours)
Finish Used
One quart semi-gloss white paint (2 coats) bought at Walmart. Pink and green colors were left over paints from when we painted the walls in our home.
Recommended Skill Level
Beginner
Comments
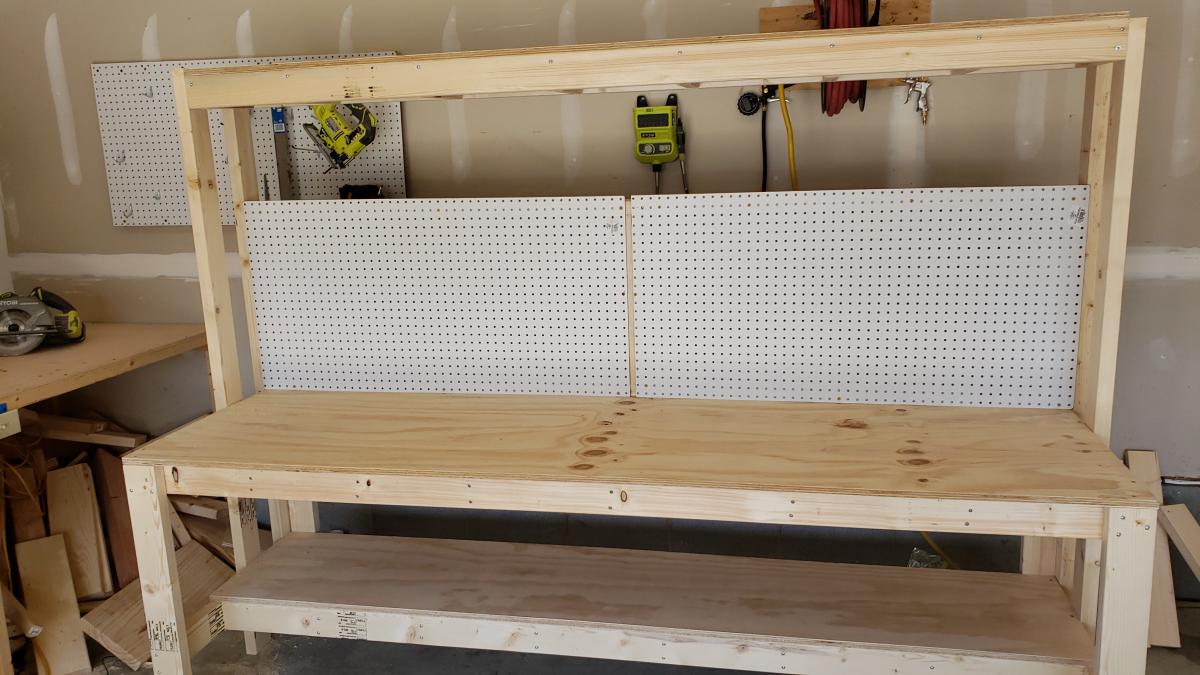
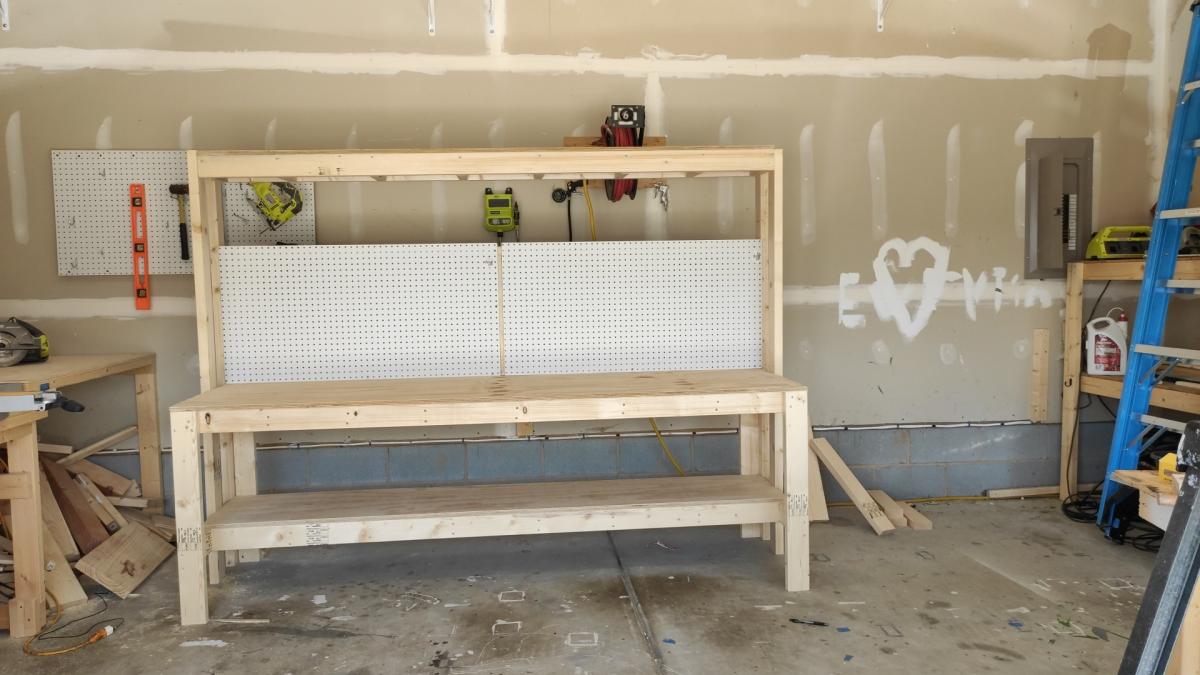
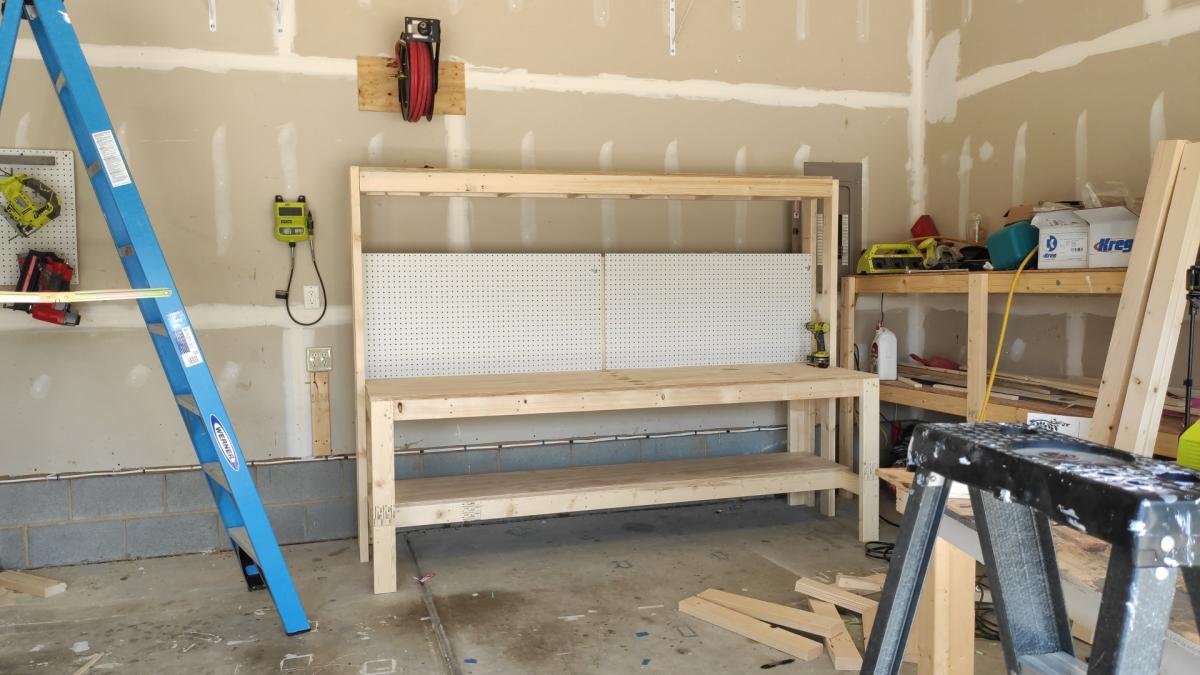
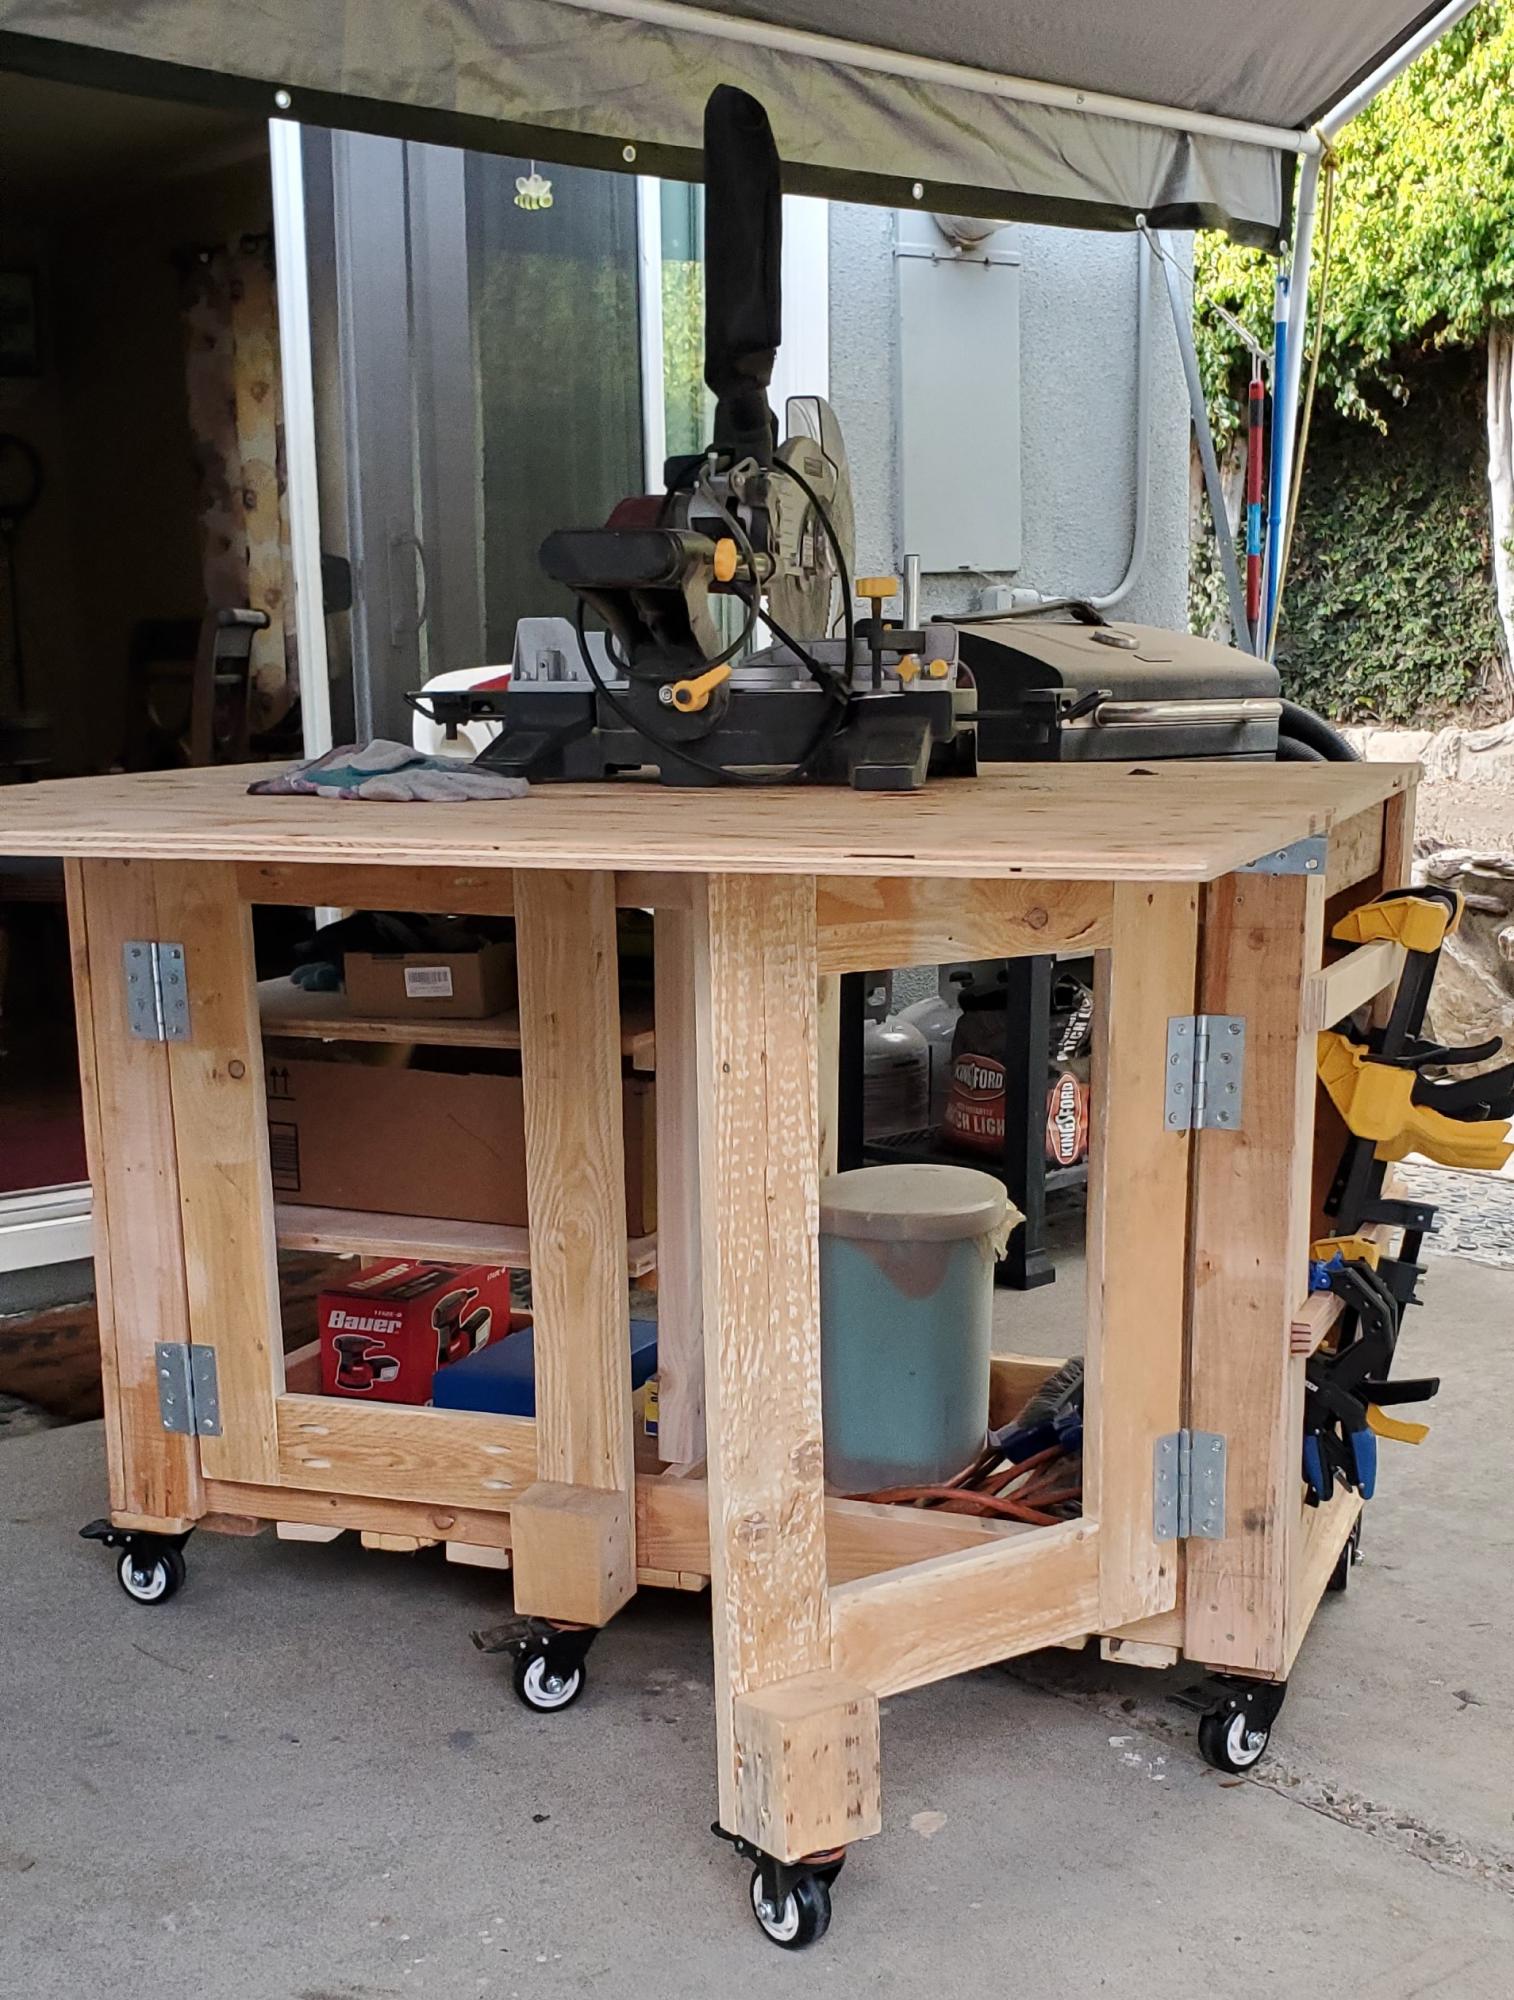
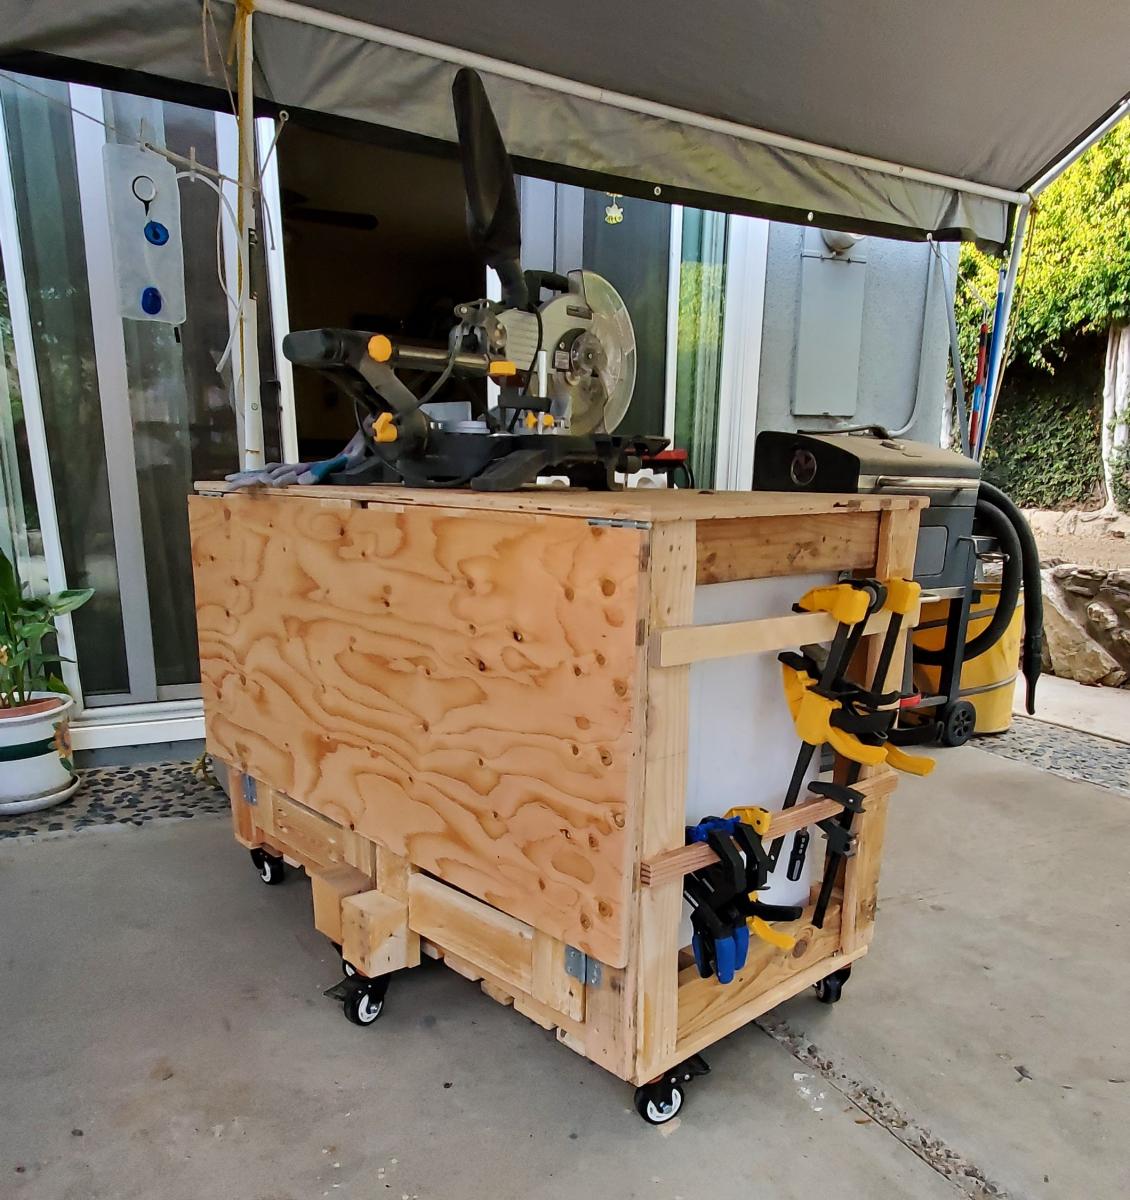
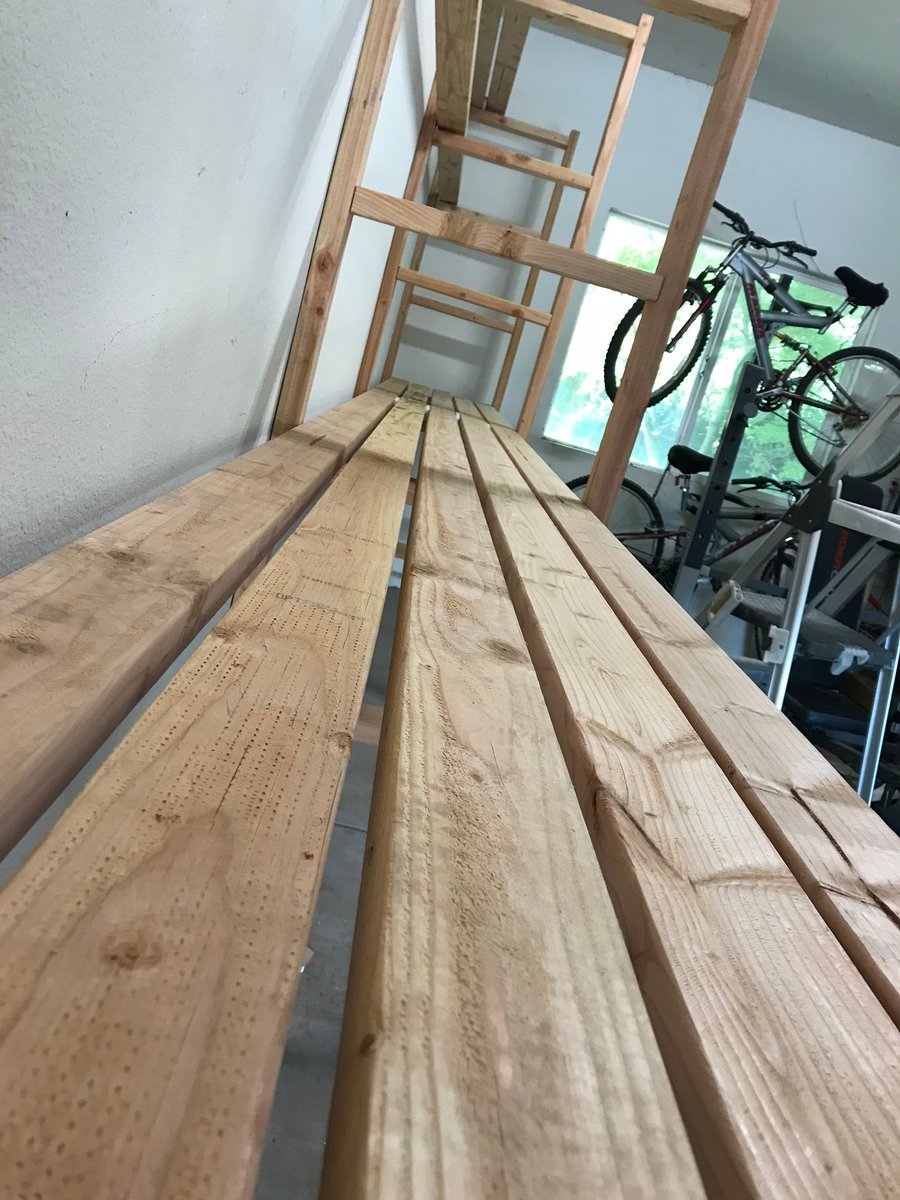
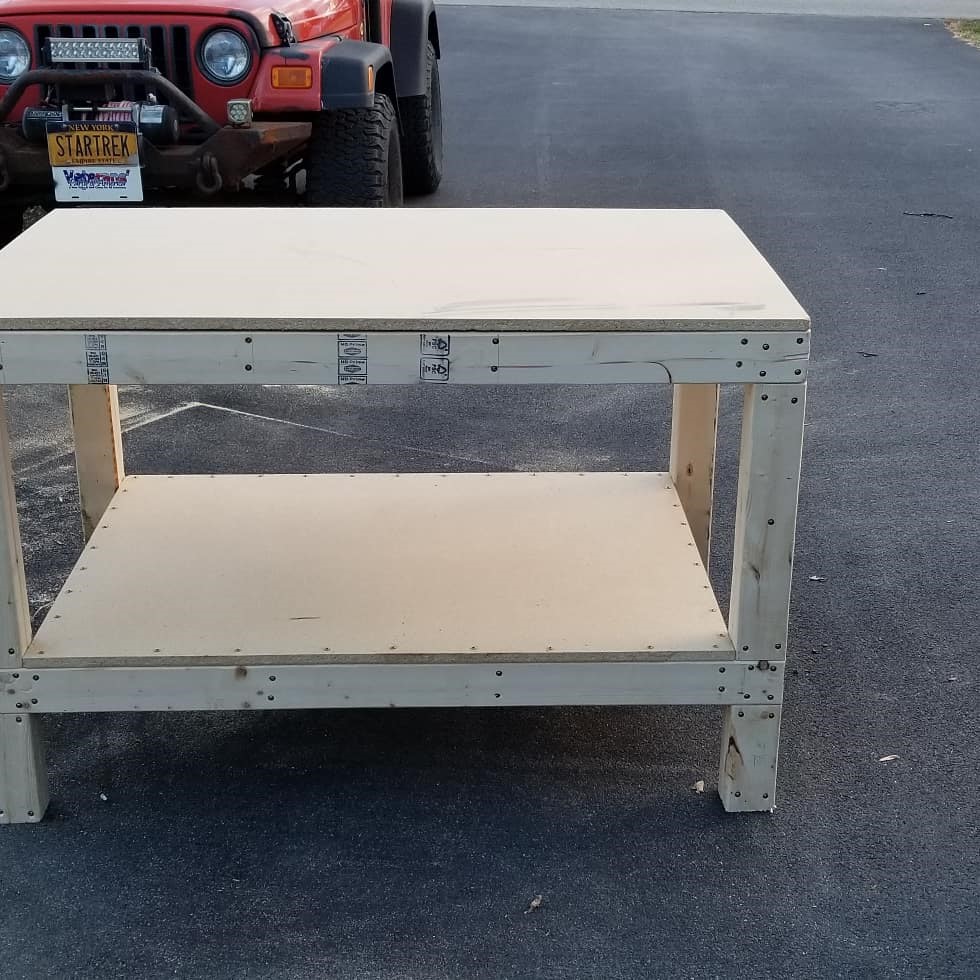
Workbench with pegboard
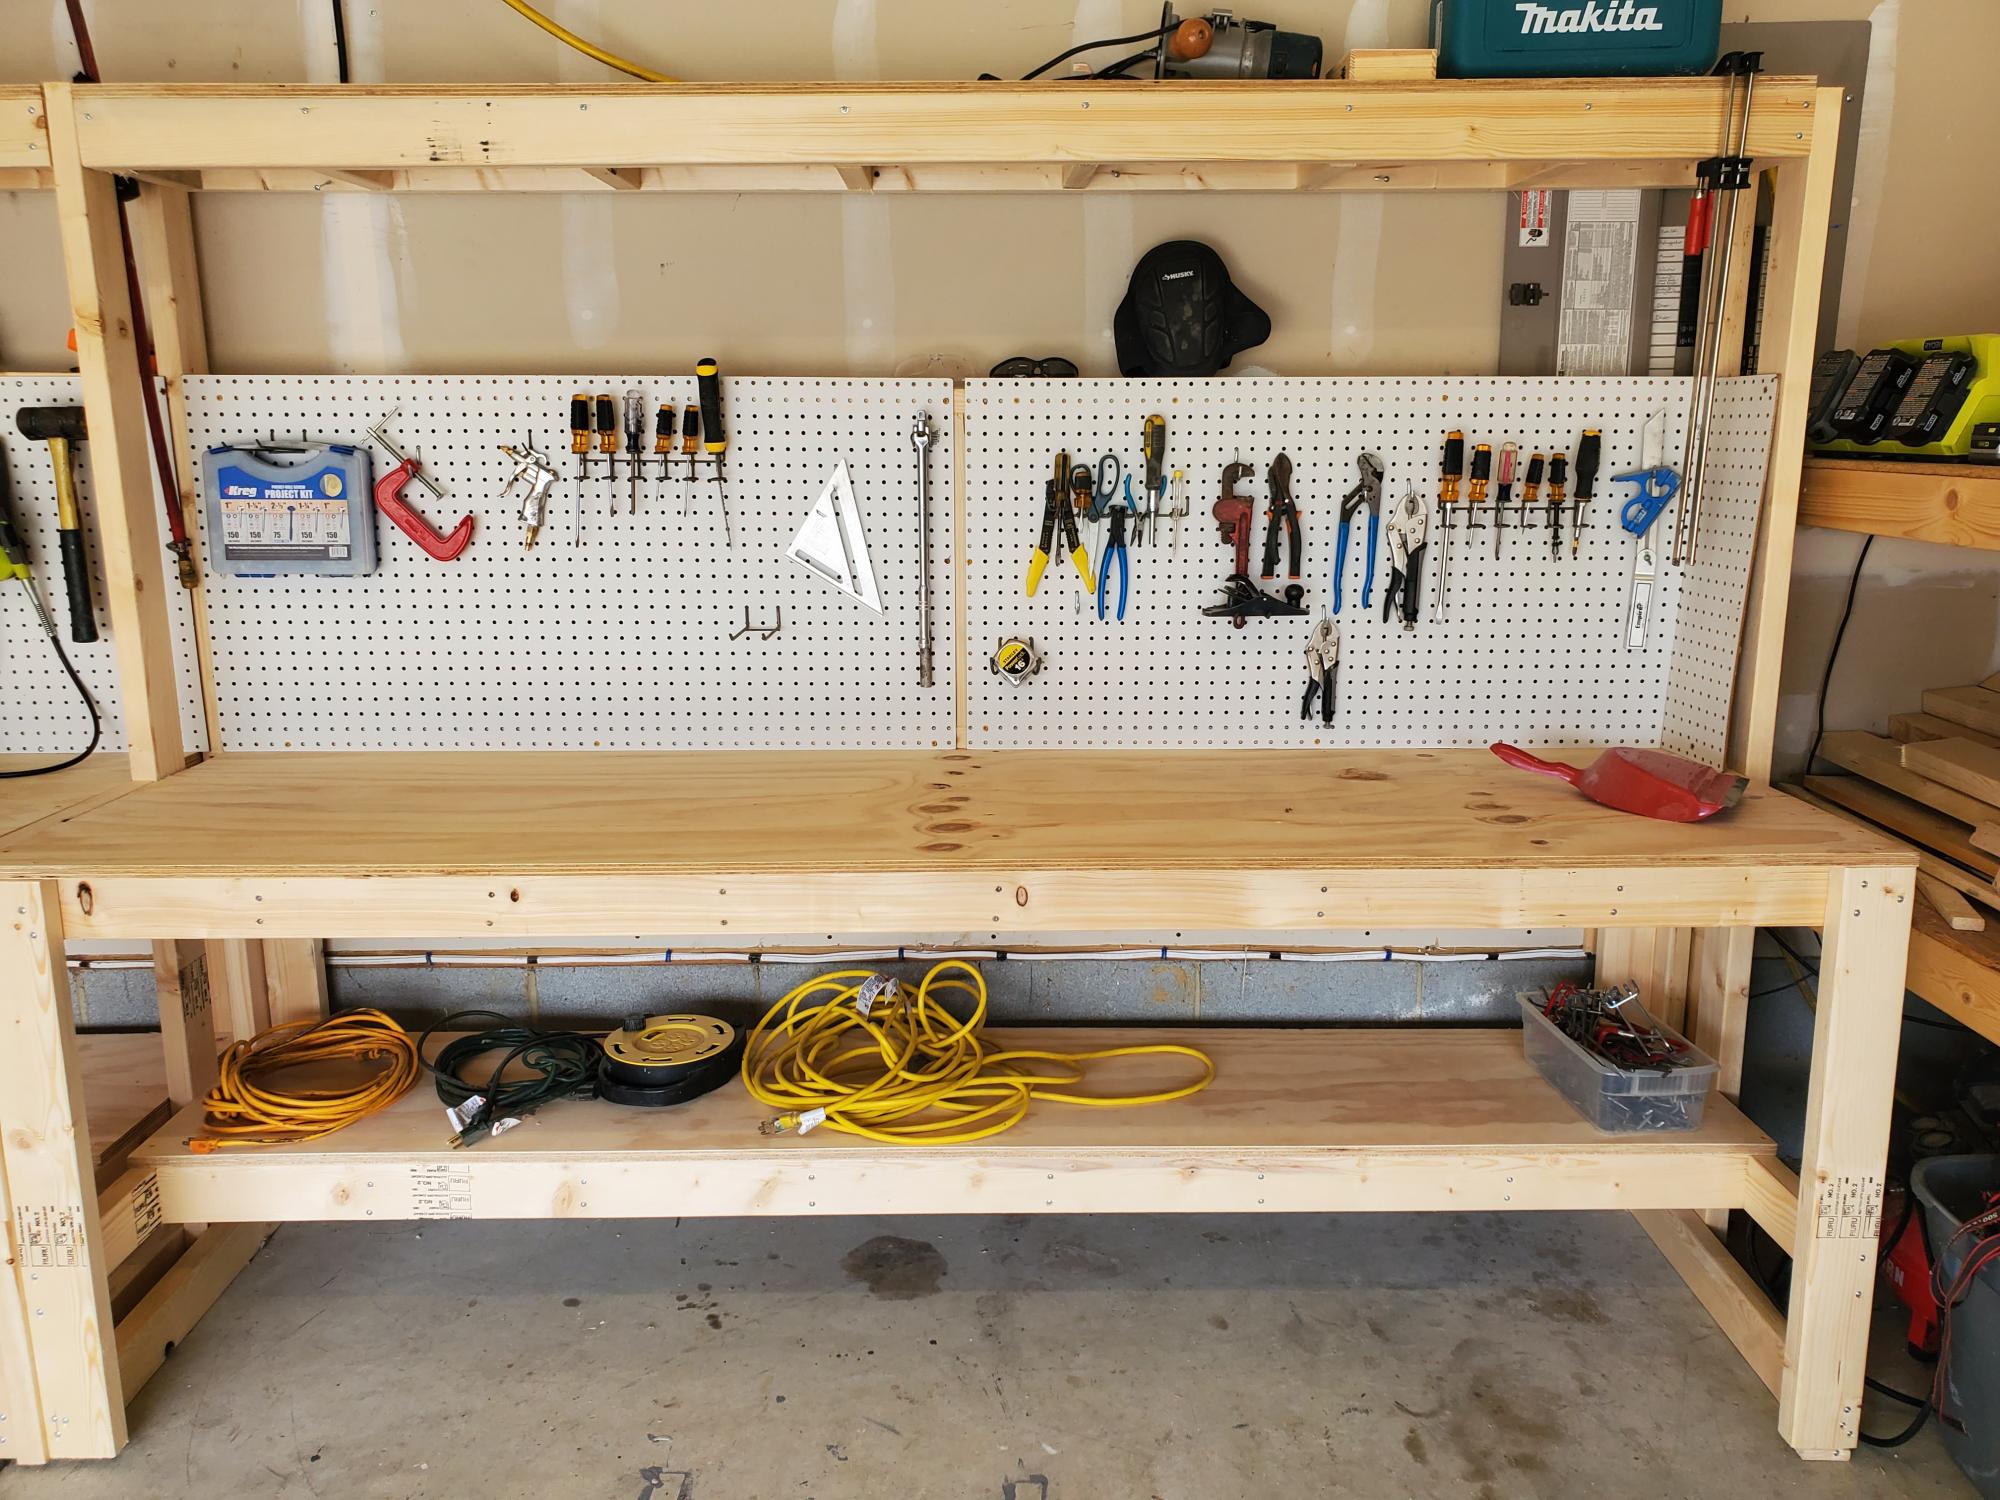
I made a workbench for my garage it was pretty easy. I also made an instructional youtube video if you want to learn how to make it. #diy #workbench #bench
Estimated Cost
125
Estimated Time Investment
Afternoon Project (3-6 Hours)
Finish Used
none
Recommended Skill Level
Beginner
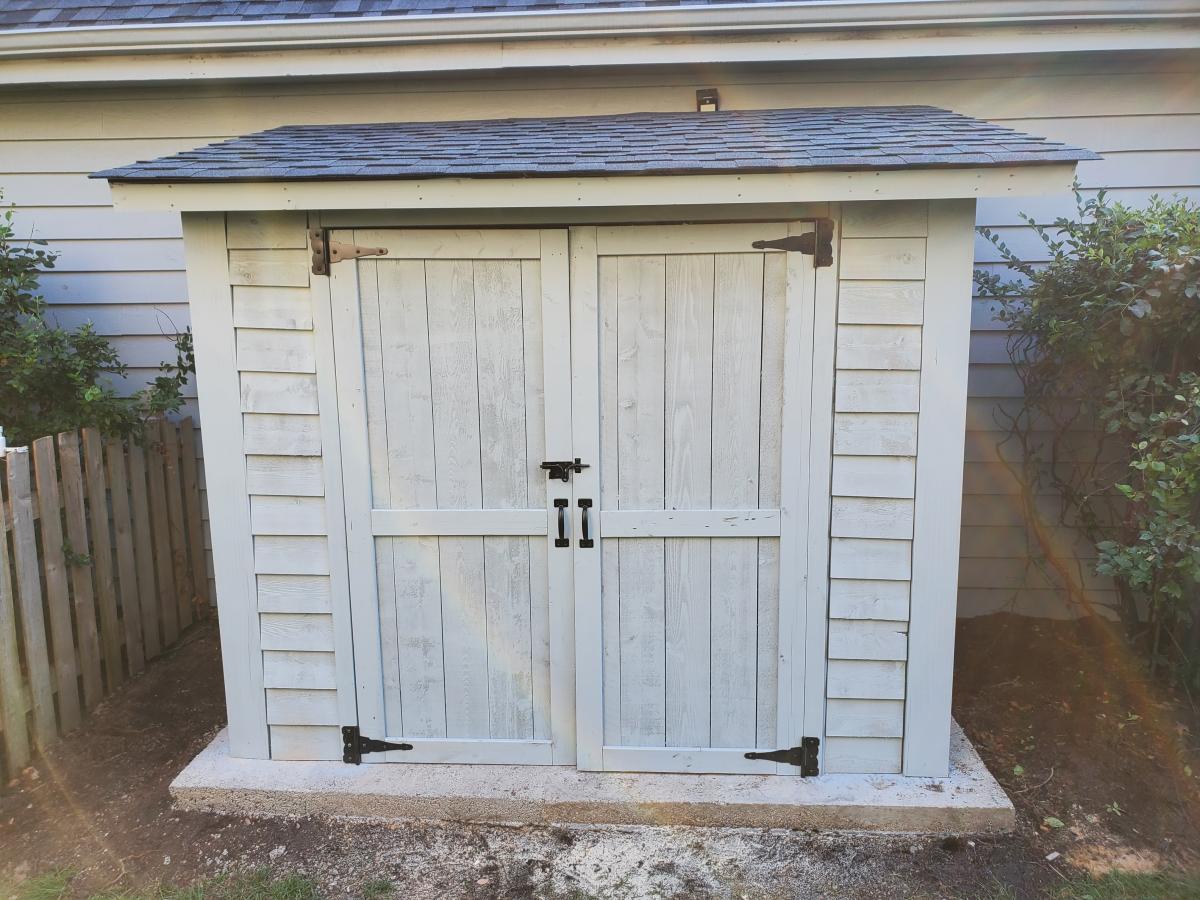
Eric's Cedar Shed!!
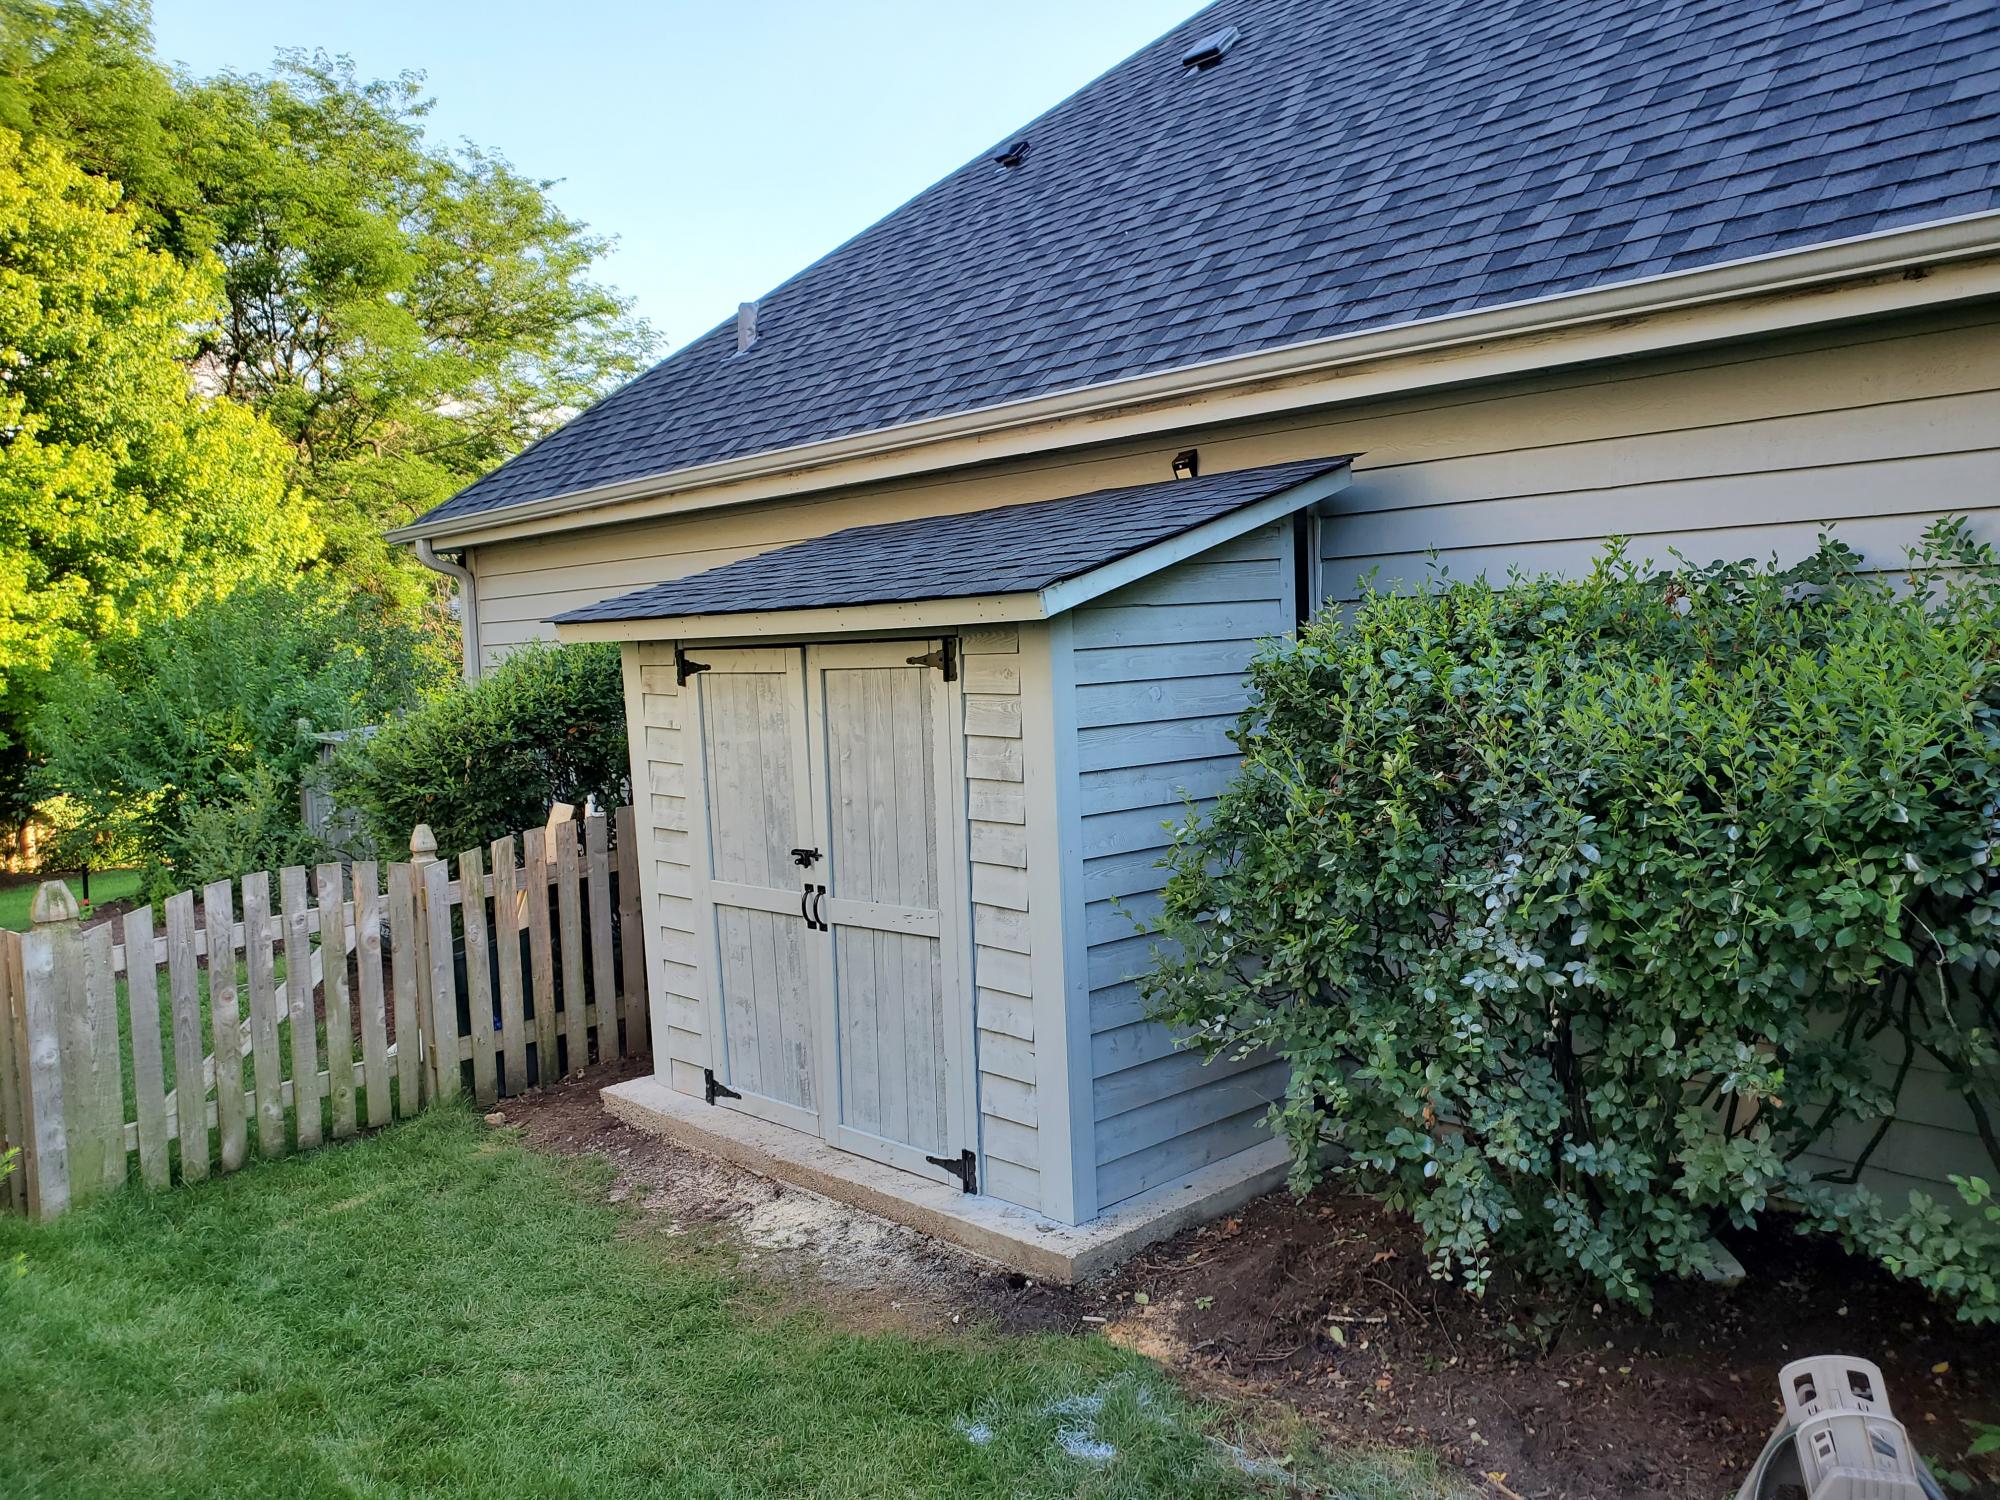
Thank you for the plans, shed turned out great! My association required me to match the siding color, roof color, and anchor to a concrete slab. So I poured 25 bags of 80lbs concrete to make a 9x5 slab. Redid the plans for an 8x4 shed, built the frame with 2x4s and not 2x2's, installed flashing, ice/water shield + felt + matching shingles since I'm near Chicago, and used a flexio finishing sprayer to paint the shed. Saved some $ by using 2 Redwood Grain Fiber siding panels for $22 each at HD.
All in all very happy with my shed and all my dangerous yard tools and woodworking tools can be put away from my toddler.
Built from Plan(s)
Estimated Cost
400
Estimated Time Investment
Weekend Project (10-20 Hours)
Finish Used
Behr Premium Plus exterior paint
Recommended Skill Level
Intermediate
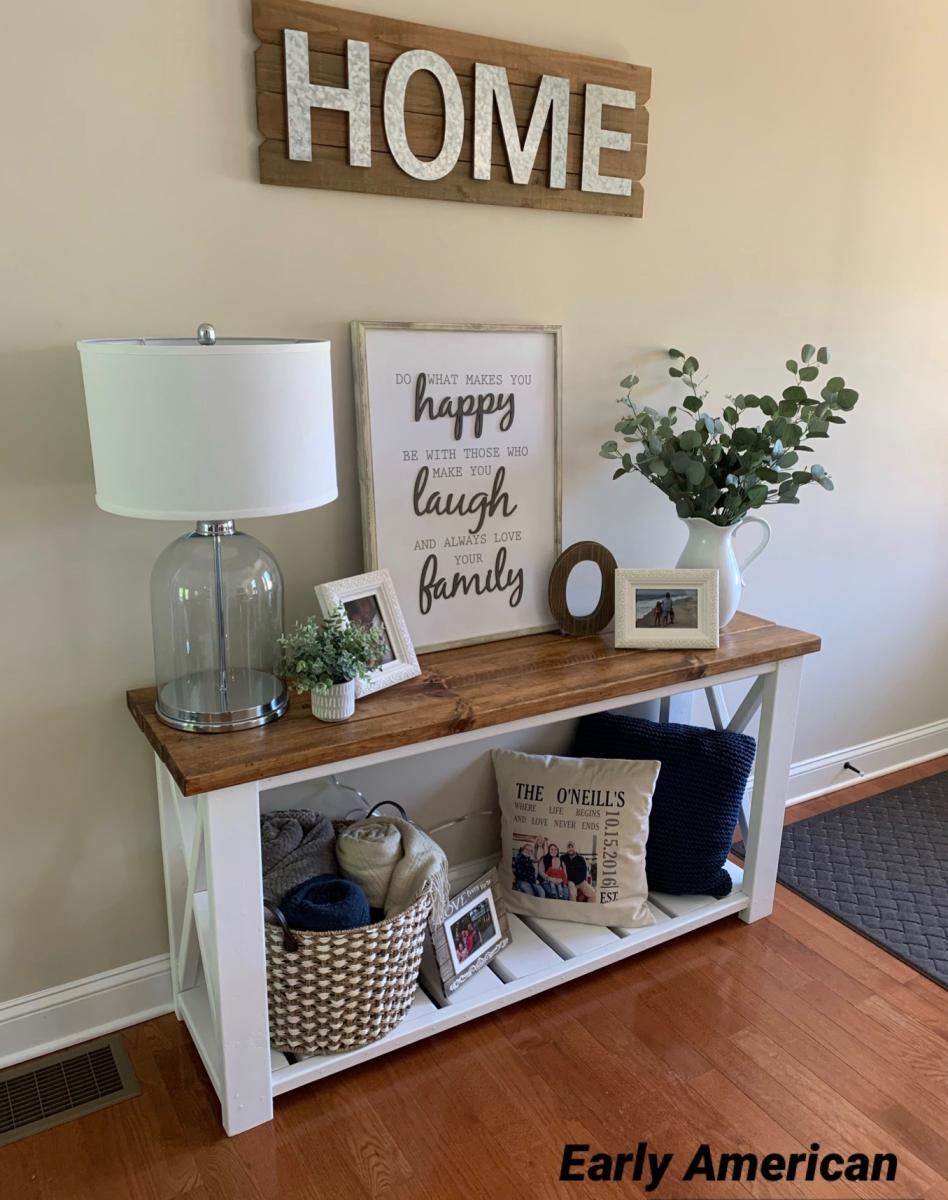
Farmhouse Console Table

16.5” depth, 60” length , 30” height. White Satin frame , Early American Minwax Stained Top/3 coats poly satin clear coat .

Built from Plan(s)
Estimated Cost
$45.00
Estimated Time Investment
Day Project (6-9 Hours)
Finish Used
Minwax early American , Minwax poly quick dry satin . Satin white paint
Recommended Skill Level
Intermediate
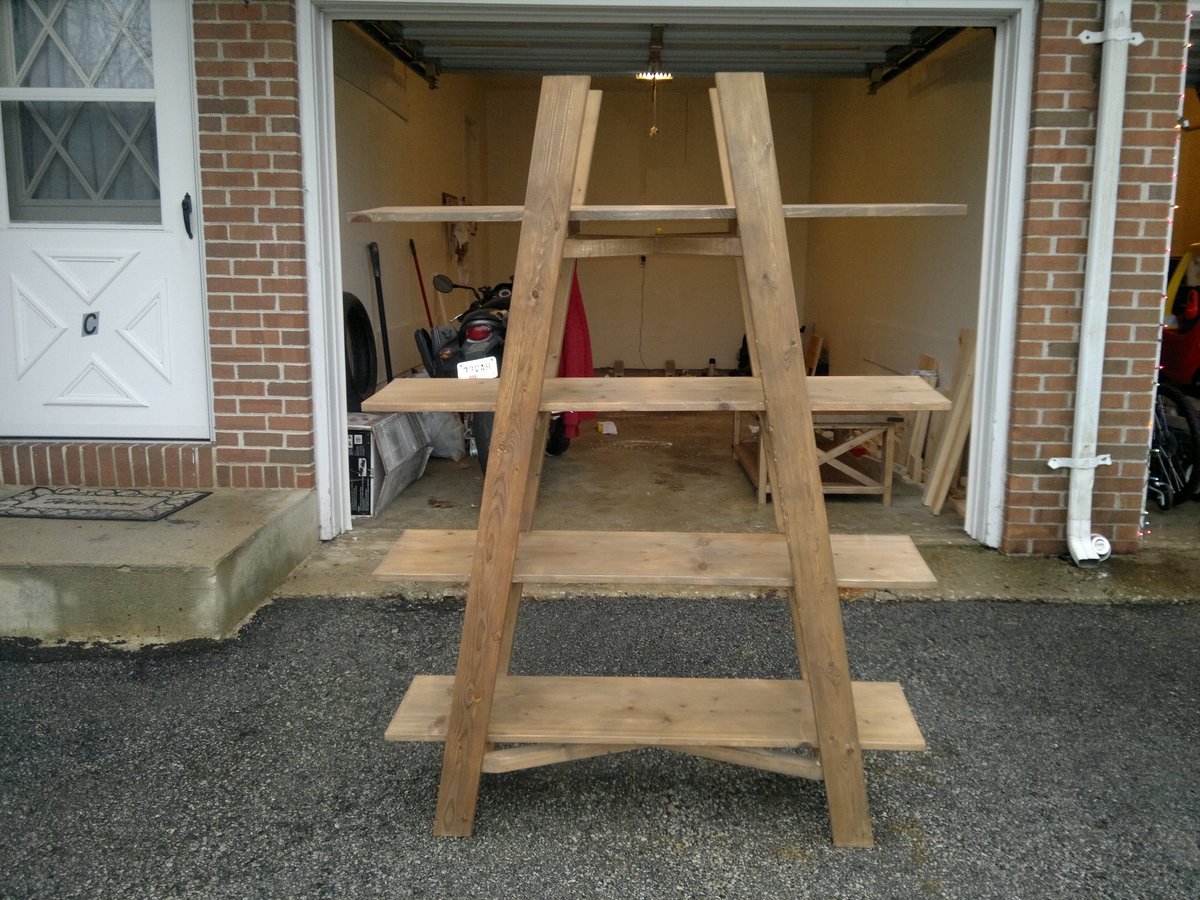
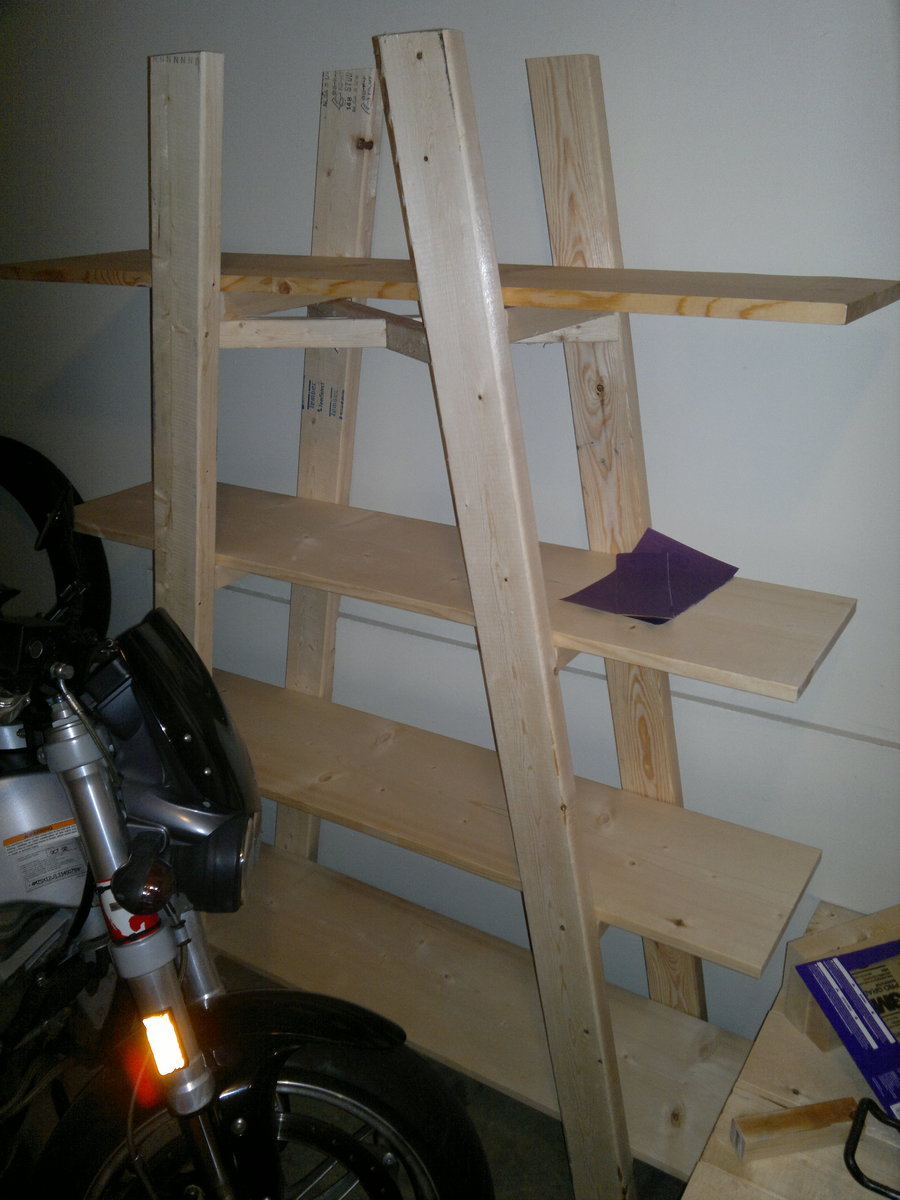
upside down V bookshelf
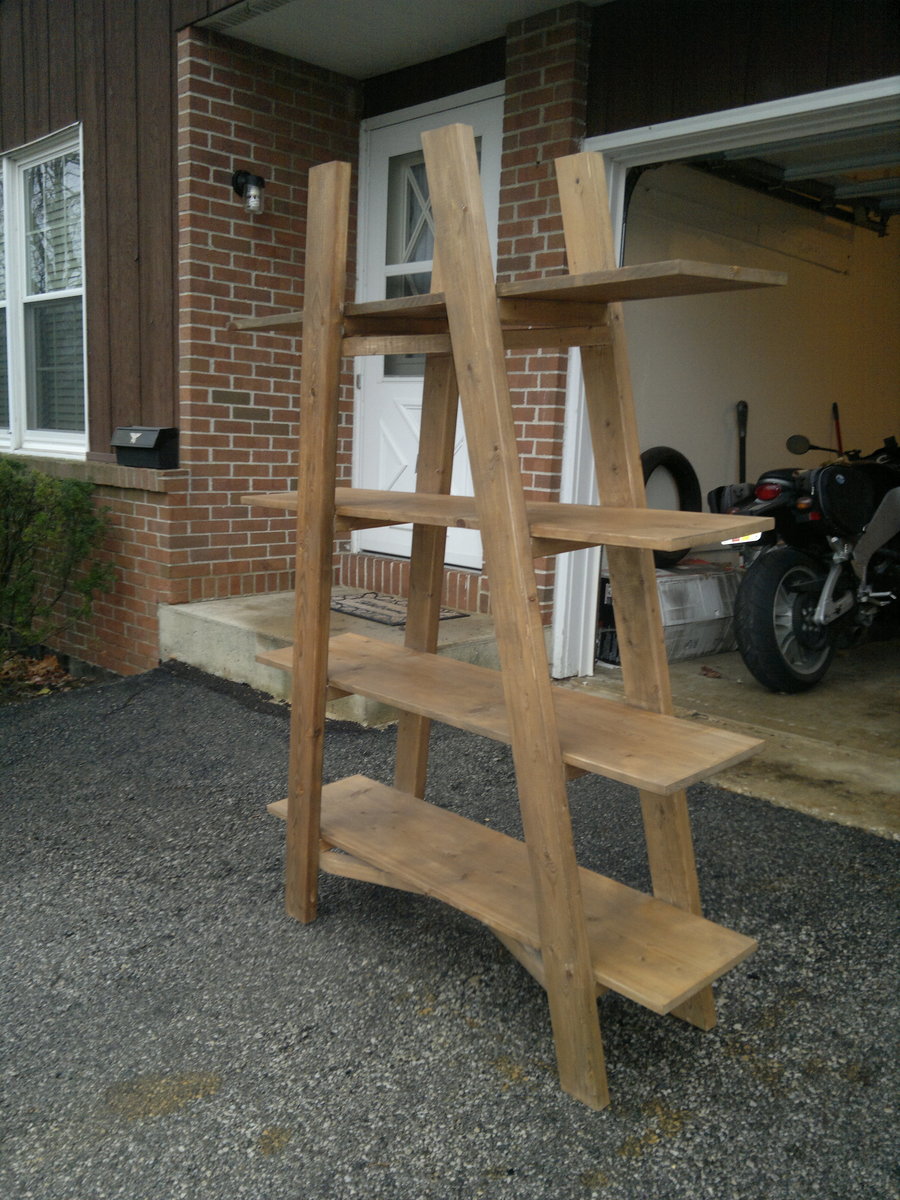
This project took several months of off and on work but I am very happy with the results. Followed the plans on this website and they were great. The only change I made was to add x cross braces for added support. They were necessary because this thing is wobbly as it is. Got the wood from the local lowes and the hardware from Ace Hardware. Used the Kreg Jig pocket hole system to hide the fasteners which makes a big difference.
I made some other furniture from plans on this website so I used the same rustic stain on this piece. The stain was great, really easy to make and stains really well. I covered the stain with the recommended wax which gives it a really nice shine and is very smooth.
Huge thanks to this website!
Estimated Time Investment
Week Long Project (20 Hours or More)
Finish Used
"Hillary's oxidized finish"
Recommended Skill Level
Beginner
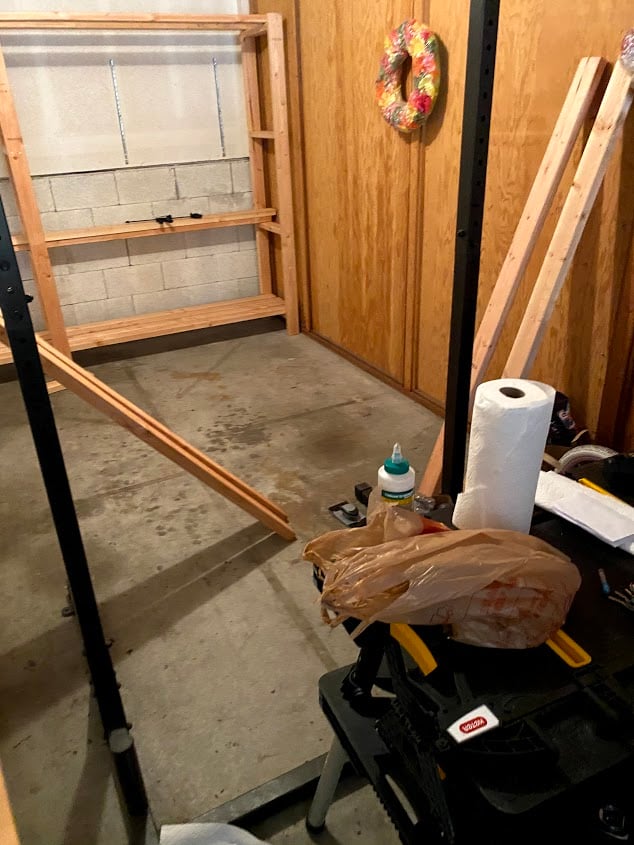
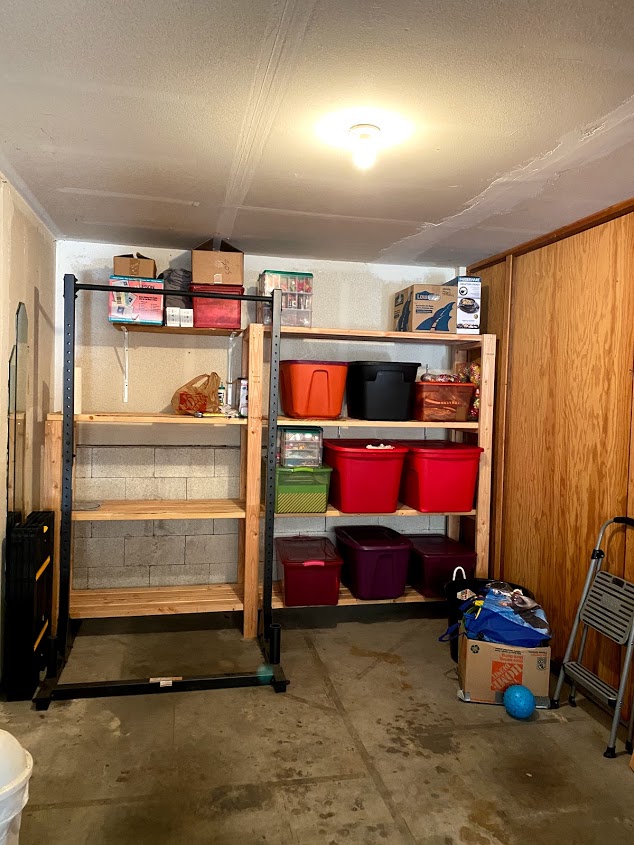
Garage Shelves - Freestanding (Modified)
First project ever! I have been planning to build this for at least a year, and I finally did it! I had to modify the plan to fit my space, but it worked out well. They cut the wood for me at the store, so I did not make any cuts myself, just assembled all of the pieces together. I used all 2x4s, 8' and 10', cut down to my measurements. I did not finish the shelves since it is just for the garage, but I did sand rough board edges and some of the faces. I just used an palm sander and coarse sandpaper (80 grit). Please double check all measurements and lists because I forgot to add my shorter shelf supports to the list and had to go back to the store. I also forgot to add the width of the top shelf to those two shorter supports, so the shelf boards are resting on the top instead of nestled into the supports. It turned out not to be a functional problem, but a good lesson to learn. I also learned to make sure my driver battery is charged fully before starting - that took a large chunk out of my first day building and I had to finish the next day. My husband helped with some lifting and holding, but I mostly did this on my own in one weekend, so you CAN do it! Don't wait like I did - it is soooooooo useful and it looks great! All of my friends are really impressed and it feels so good to have made something like this! Thank you Ana!!

Built from Plan(s)
Estimated Cost
$180
Estimated Time Investment
Weekend Project (10-20 Hours)
Finish Used
N/A
Recommended Skill Level
Beginner
Comments
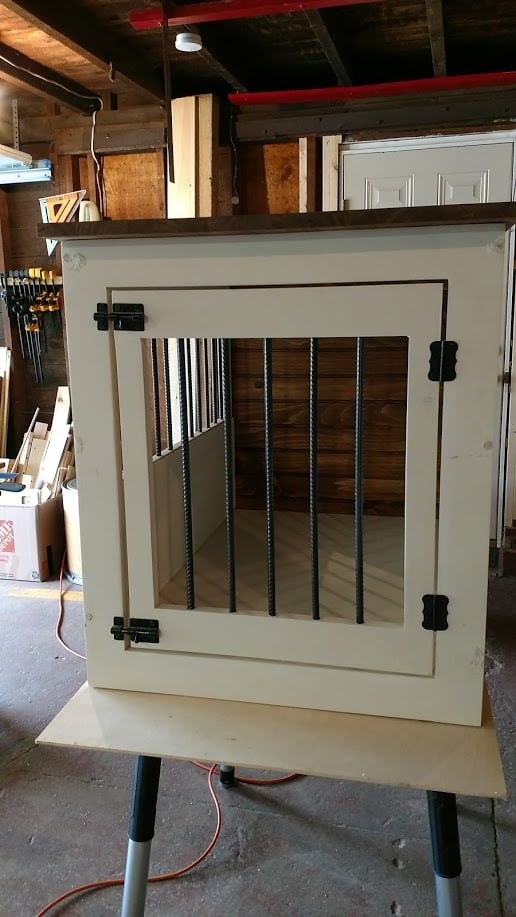
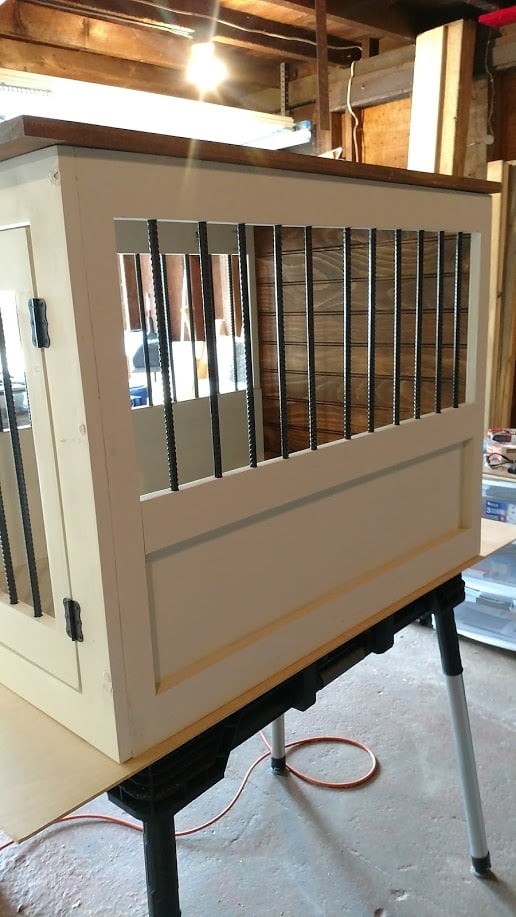
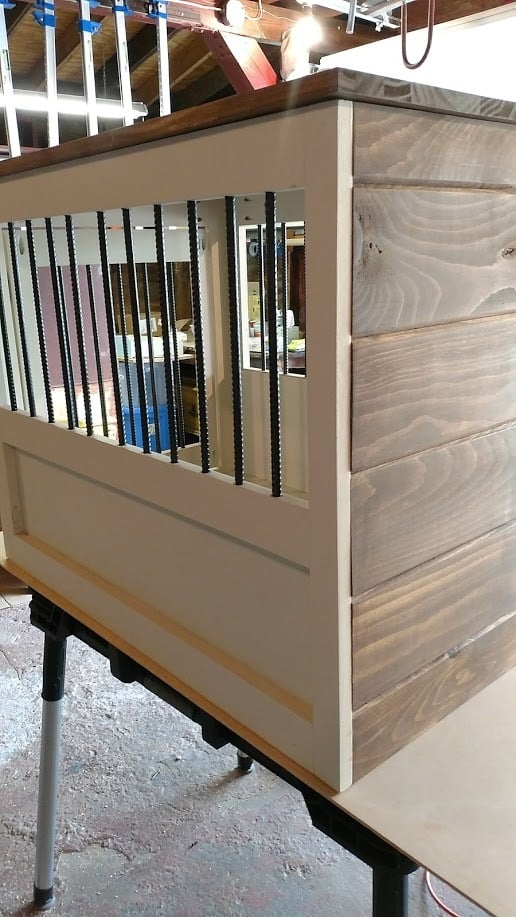
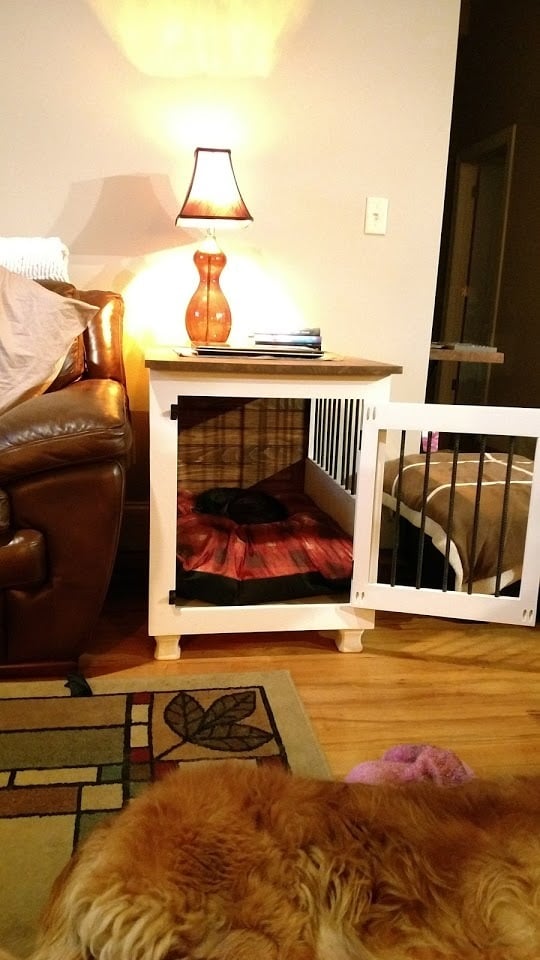
Dog Crate with a twist...
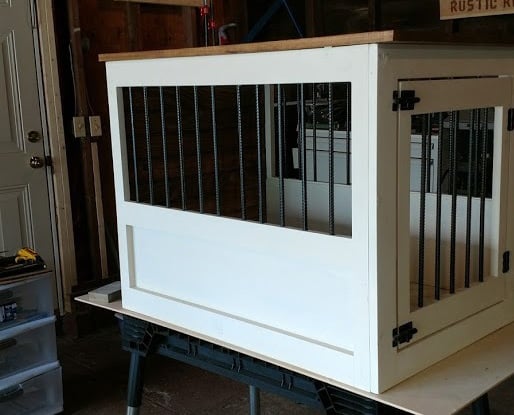
I really liked the Large Wooden Dog crate but wanted the sides to be lower and wanted to make sure there was no easy chew escape. Not sure if you can see from the photo but the cats have taken over... Will need to make a larger one for the dog!
I followed the plan pretty much other than lowering the panel on the side and replacing the wooden bars with rebar. The rebar was a bit of a learning curve getting the holes lined up perfectly but I figured it out and I think it came out pretty good!
Used all pine 1x3 and 1x2s. Picked up a pine panel for the top and the bottom is a 3/4 plywood. Made our own chalk paint for the finish and sealed it with wax.
Oh, forgot, added tongue and groove pine for the back and finished it and the top with Antiguing wax.
Lots of fun and I think I will make a double one next!

Built from Plan(s)
Estimated Cost
Around $100 if you don't count all the practice pieces for the rebar!
Estimated Time Investment
Week Long Project (20 Hours or More)
Finish Used
Chalk paint and antiquing wax
Recommended Skill Level
Intermediate
DIY Folding Workbench
I'm a beginner DIYer and I knew one day I was going to have to make a workbench. I made mine 24x48 so I wanted a little more support to hold up the drop down leaf. I searched your site and found another plan with these gatelegs and knew this is what I wanted. I love the way it came out. What do you think?
Built from Plan(s)
Comments
Potting Bench

The plans are great. This went together really fast. I am cheating a little here, it is not quite complete; I need to add the side blocks on top and my wife would like a another panel added to the front at work height level, just for looks. But the overall look won't be changed. I struggled some with finishing (I usually do). A couple spots have runs I didn't see. One will be covered by the front panel I'll add,but another needs sanding.
Just for fun I added a picture of the bench 3 years later. Its held up well to a lot of use and a lot of sitting out in the elements.

Built from Plan(s)
Estimated Cost
$100
Estimated Time Investment
Weekend Project (10-20 Hours)
Finish Used
General Finishes Cedar Exterior 450 Water based stain. I was going to add a spar varnish to extend the life. I decided against that because while it likely would extend the life, I would have to strip it to re-stain. After a couple years, I can simply re-stain without stripping if I don't varnish.
Recommended Skill Level
Beginner
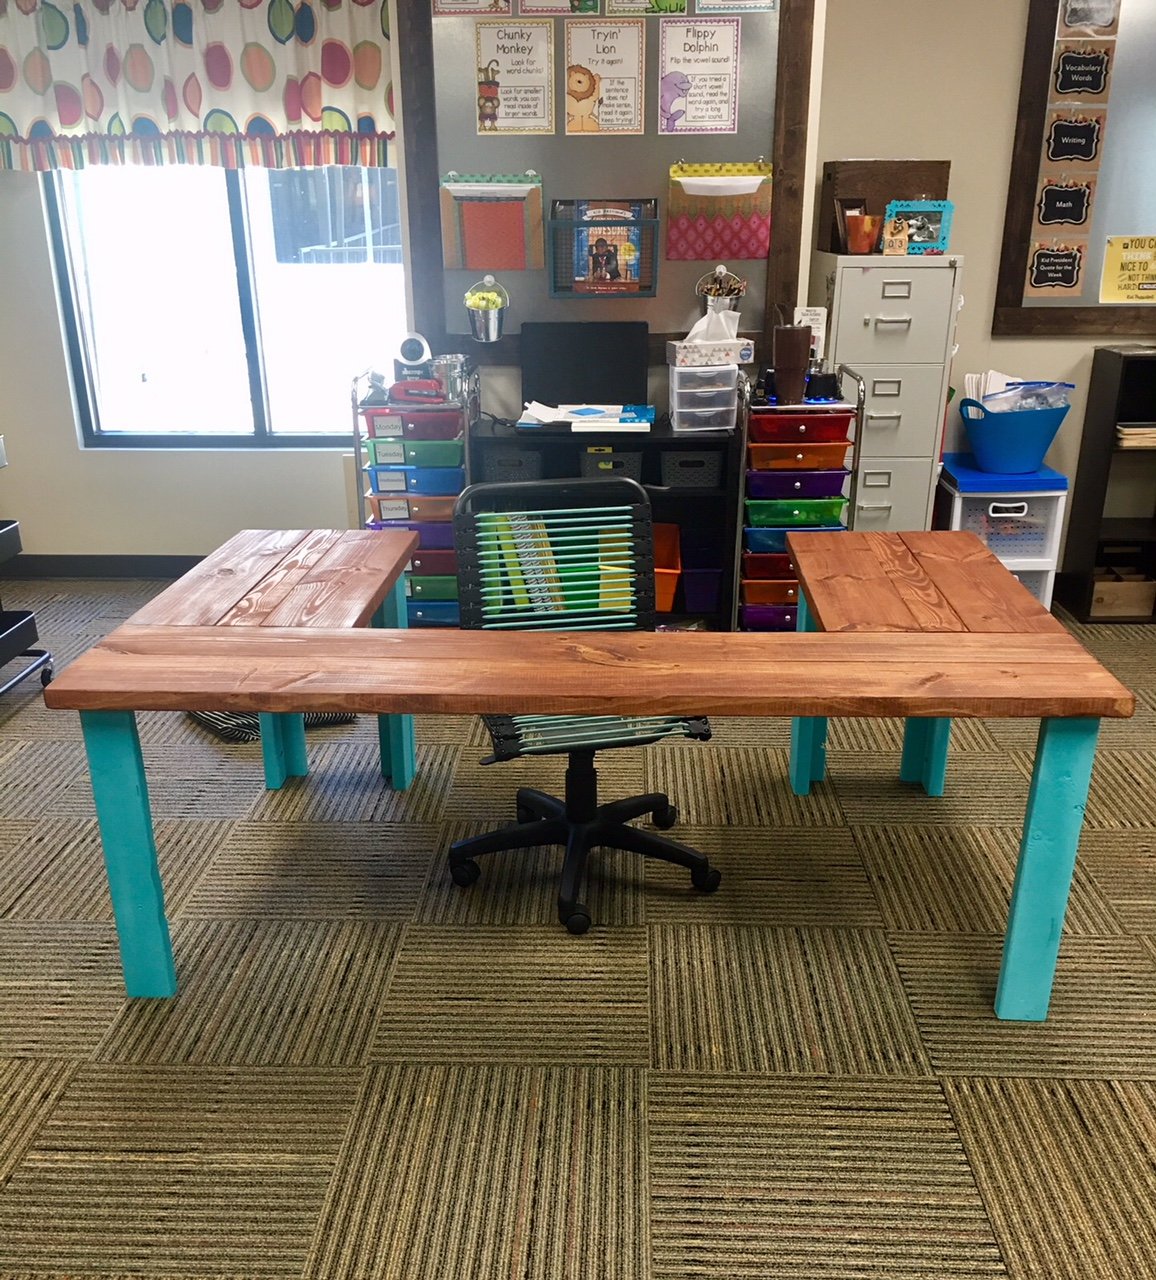
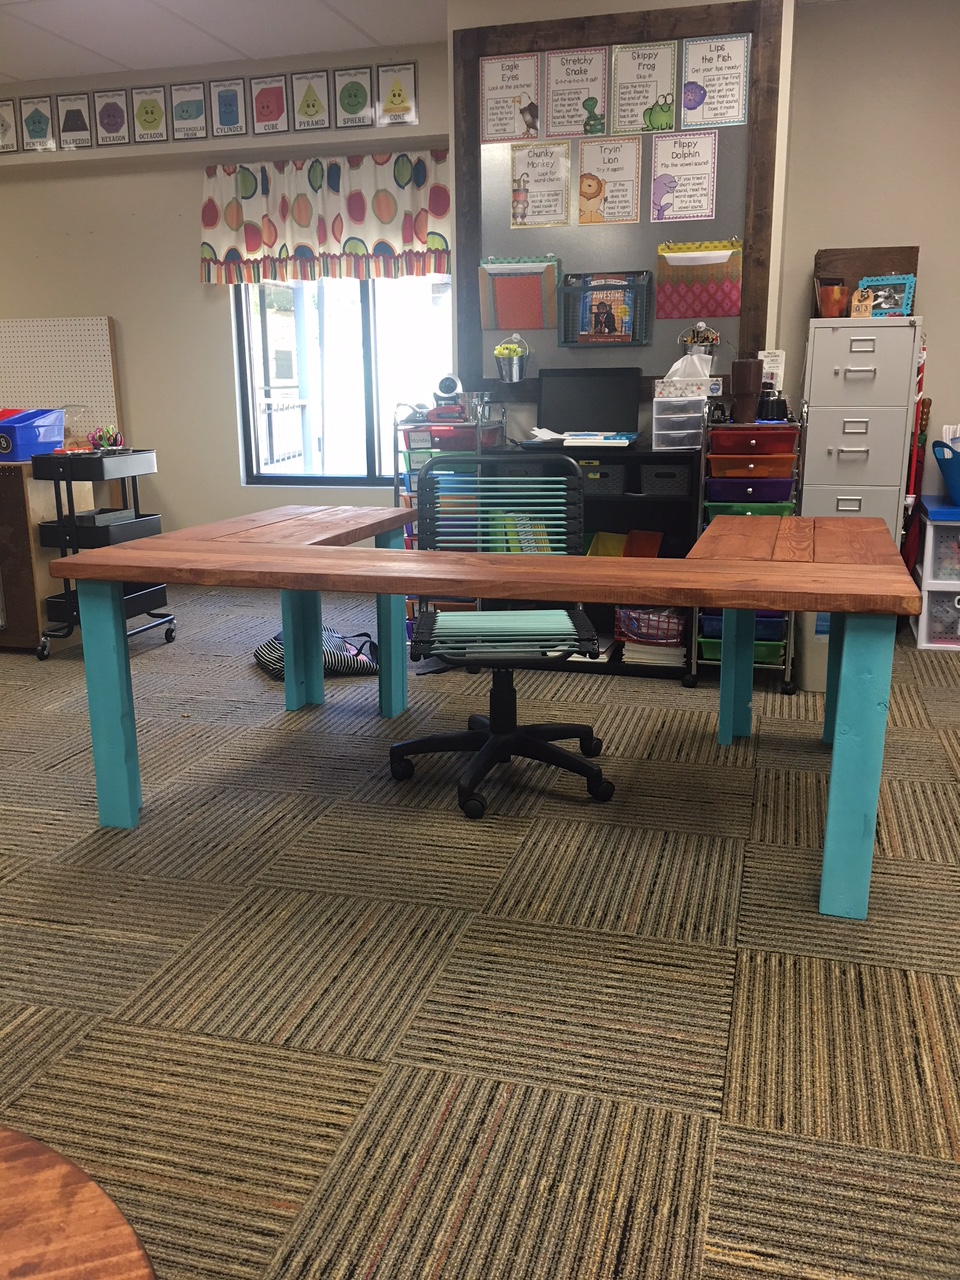
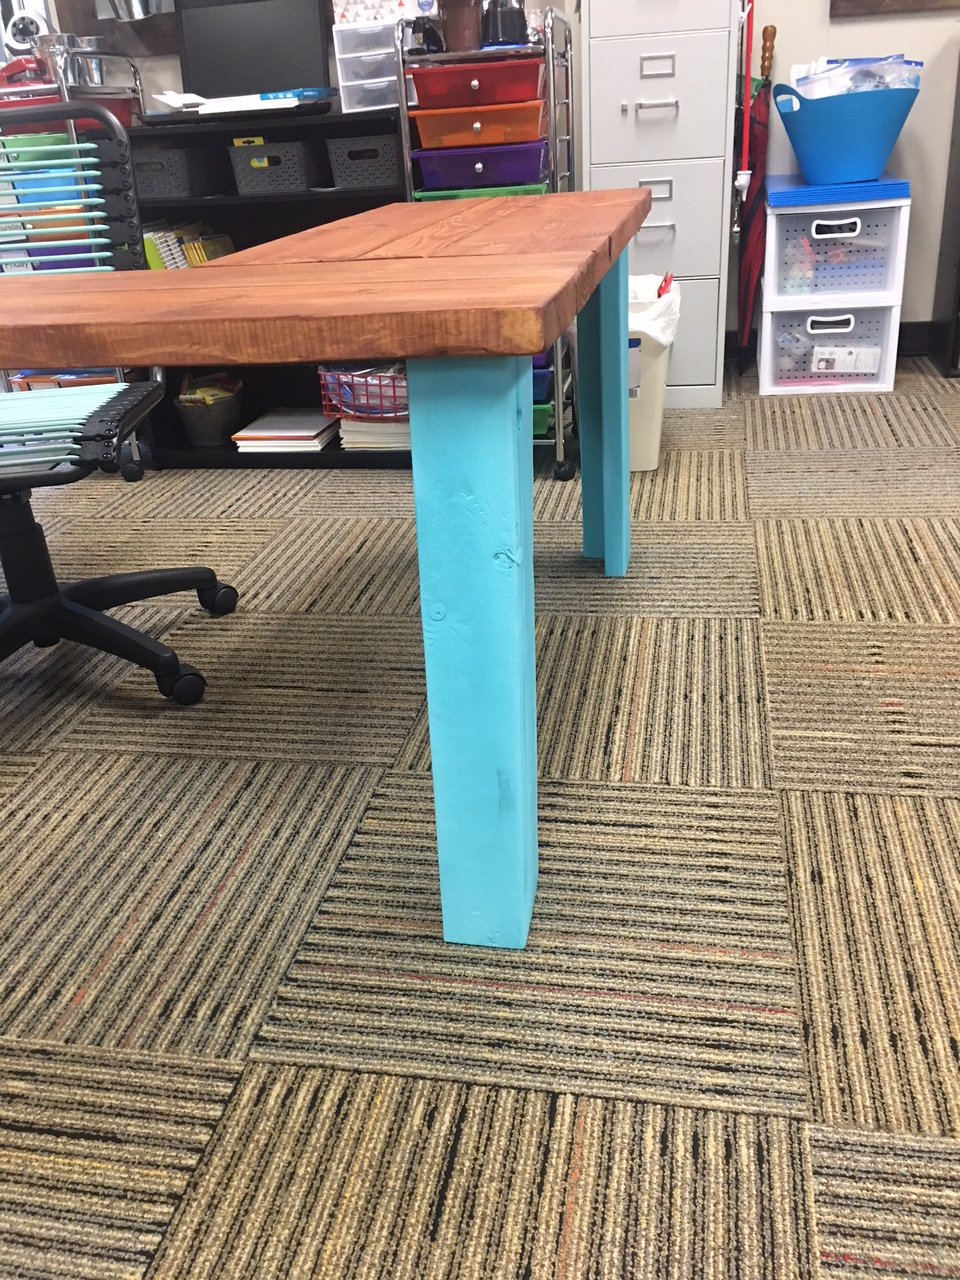
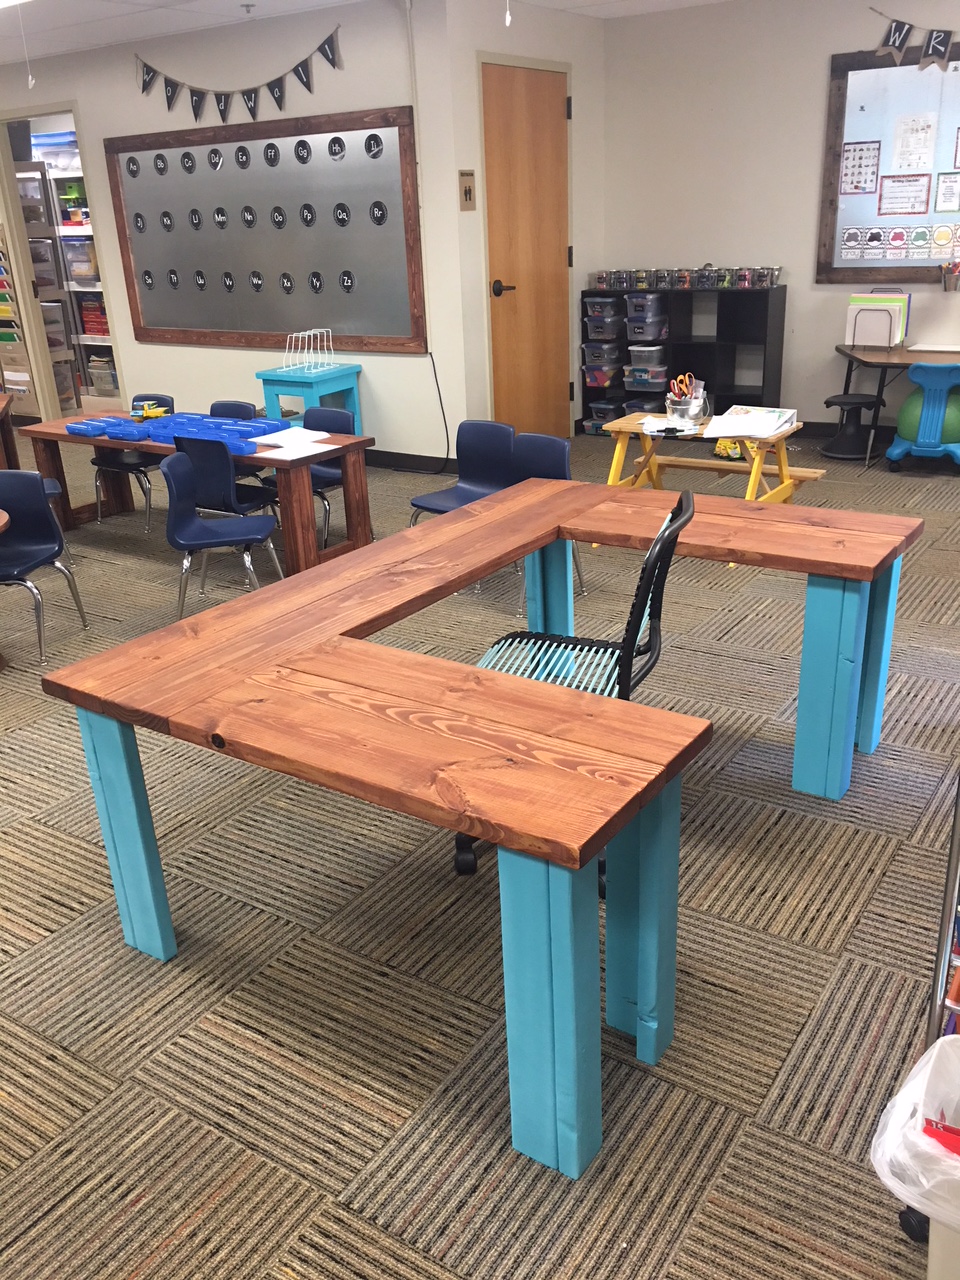
Wife's Kindergarten Classroom

Been a while since I had time to actually build anything worth posting about! My wife wanted some items for her Kindergarten classroom this year, so built several items, most inspired by the Farmhouse family.
Estimated Time Investment
Day Project (6-9 Hours)
Recommended Skill Level
Beginner
Comments
Sat, 06/29/2019 - 05:47
U-shaped table
I love this! Can you give me the plans and list of materials for constructing it?
Sun, 06/30/2019 - 12:33
I am also a teacher and…
I am also a teacher and would love to build this desk for my reading class. Do you have plans?
Mon, 07/01/2019 - 18:05
Classroom Table ❤️
I love this table for my classroom. Can you share the plans or the dimensions?
-Stephanie
Sun, 07/07/2019 - 09:46
Classroom Reading Table
I would love plans/dimensions for this! I was thinking I could also paint the top with wipe off board paint.
Sun, 07/07/2019 - 14:59
I would love to make one for…
I would love to make one for my classroom. Can you share the plans and materials list for this table?? Thanks!!
Mon, 07/08/2019 - 19:11
Dimensions? Love the table
I am looking to make this for my fourth grade classroom - can you provide the dimensions you used? Thank you so much.
Wed, 07/10/2019 - 11:59
Love this! I would love…
Love this!
I would love this for my classroom! Can you share the plans and materials.
Thank You!
Mon, 07/22/2019 - 18:25
Anyone have any luck with…
Anyone have any luck with figuring out the dimensions??
Thu, 07/25/2019 - 17:20
Has anyone gotten the plans…
Has anyone gotten the plans for this table? I have contacted Ana White and tried other ways also. I would love for someone to share.
Thank you
Teri
Mon, 08/19/2019 - 12:09
kindergarten classroom desk
I am guessing the corner posts are 2 x 4s, the top is 2 x 10s. It looks like the width is 6’ (looking at the floor carpet tiles being 24” square). So 2 - 2 x 10s side by side for the main part of the desk top and 2 - 2 x10s perpendicular on each side of the chair. I guess the height is subject to choice and the length of each side would also be subject to choice or to the length of the 2 x 10s to be economical.
an educated guess would be 4 - 8’ 2x10s for the top and 6 - 6’ 2 x 4s for the legs?
Anyone else have any input here? Open to suggestions.....
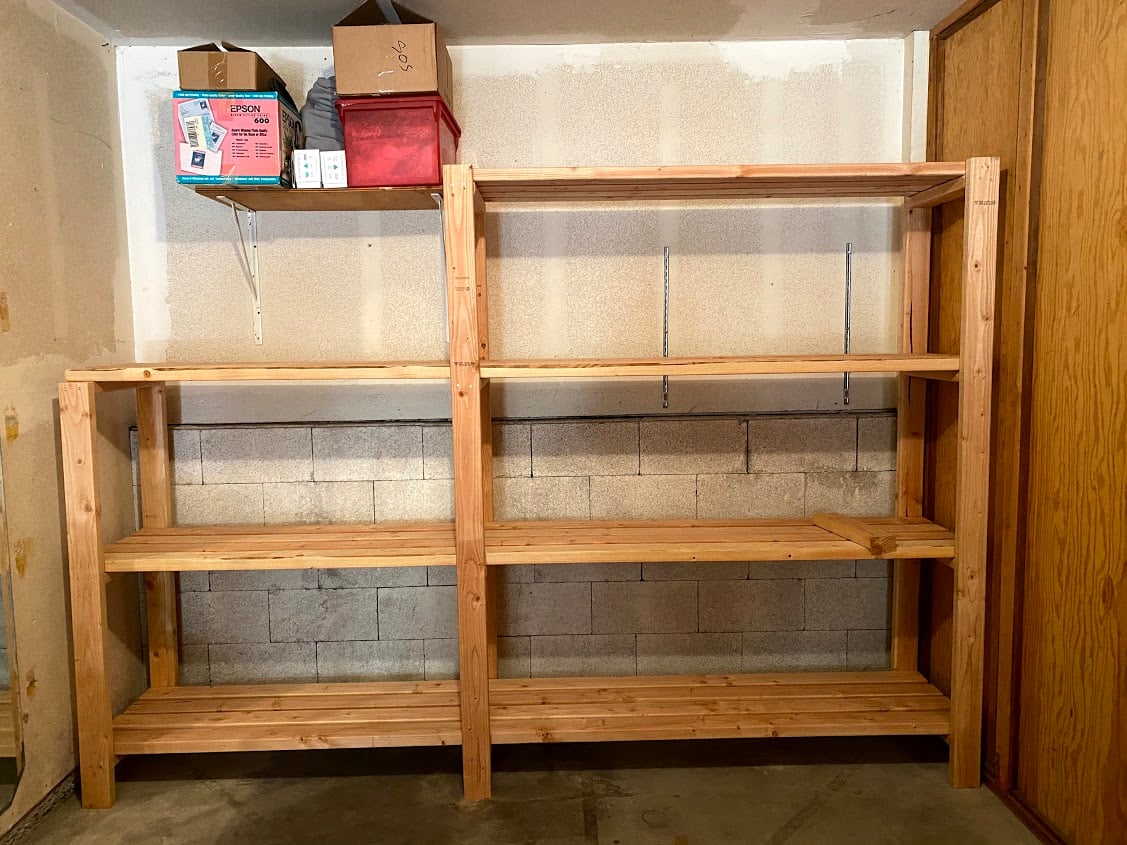
Garage shelves

Designed to store 56 qt clear sterilite totes. Spaced 17” apart and used 5 2x4s so 23” deep. We have a lip of our foundation that sticks out so we had to adjust for the difference in leg heights.

Built from Plan(s)
Estimated Cost
Lumber was $8.25 per board (2x4x16) and we used 32. 3 boxes of screws. 2 1/2 for the frame, 2” for screwing down the shelves and 3 1/2 to screw into the wall studs.
Estimated Time Investment
Afternoon Project (3-6 Hours)
Finish Used
None
Recommended Skill Level
Beginner
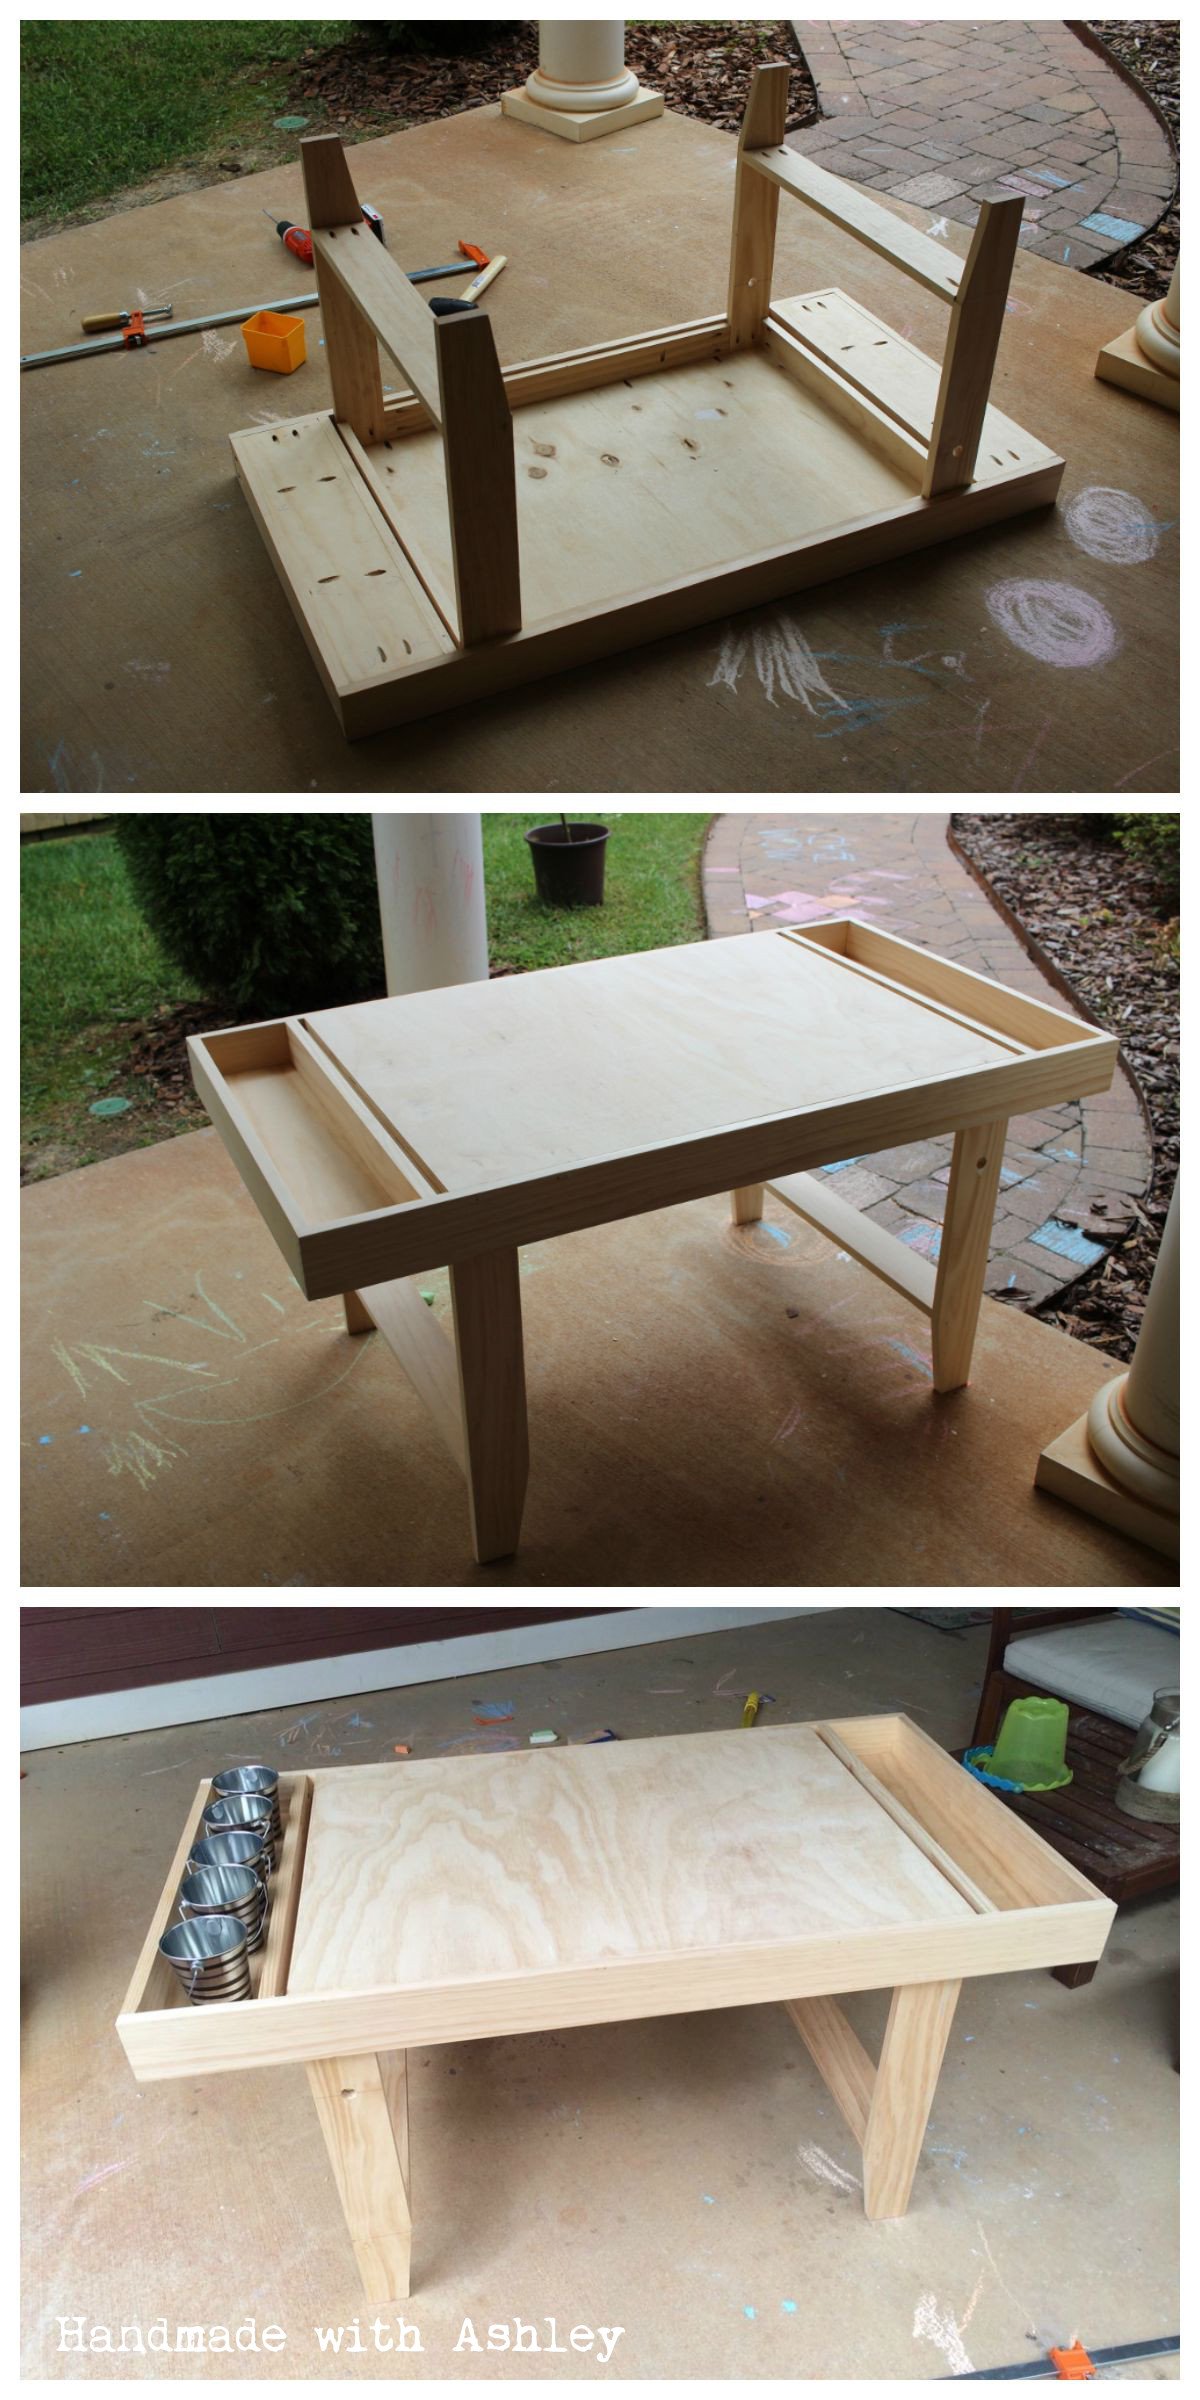
DIY Kids Art Table

I'm so excited Ana created plans for this table! When I first came across it on Pottery Barn Kids it was love at first sight. :D I built it over the weekend for my little toddler. Unfortunately, he's too short for it, but he'll grow into soon enough. :) (I secretly wished it was an art table appropriate for my height!)
It cost me about $75 to build. I splurged and bought select pine boards for the project. The art table was also my submission for September's Fab Furniture Flippin' Contest. September's sponsor is General Finishes and the theme was geometry!
Now, I just need to build matching seats! I love the little stools Ana built; maybe I'll do something sorta like that. :)
Thank you Ana for inspiring me to build!


Built from Plan(s)
Estimated Cost
$75
Estimated Time Investment
Weekend Project (10-20 Hours)
Finish Used
General Finishes Milk Paint (Snow White), Acrylic craft paints for the geometric pattern, ECOS Paints Woodshield in Pine Needles for the cubby stain, and ECOS Paints Gloss Varnish
Recommended Skill Level
Beginner
Comments
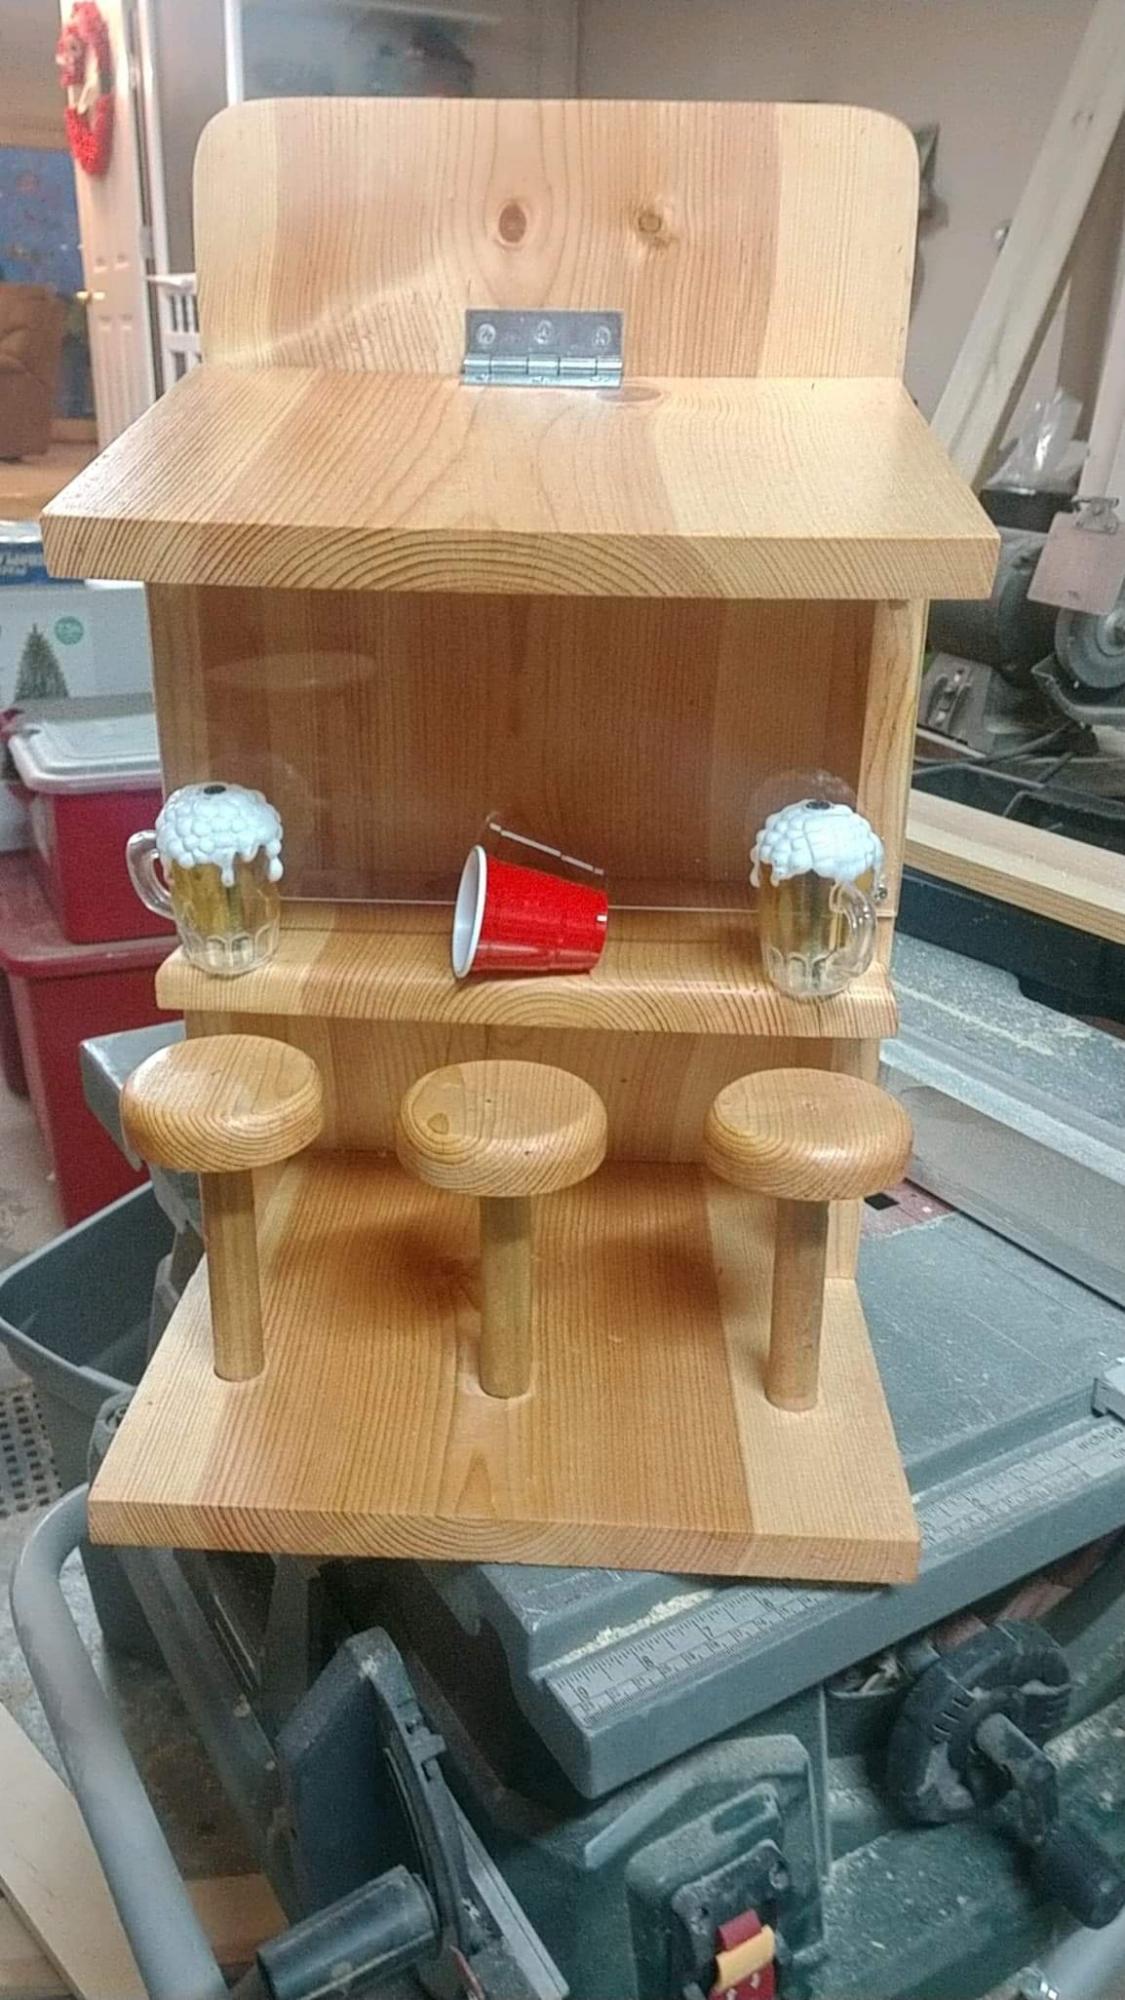
Dry Bar
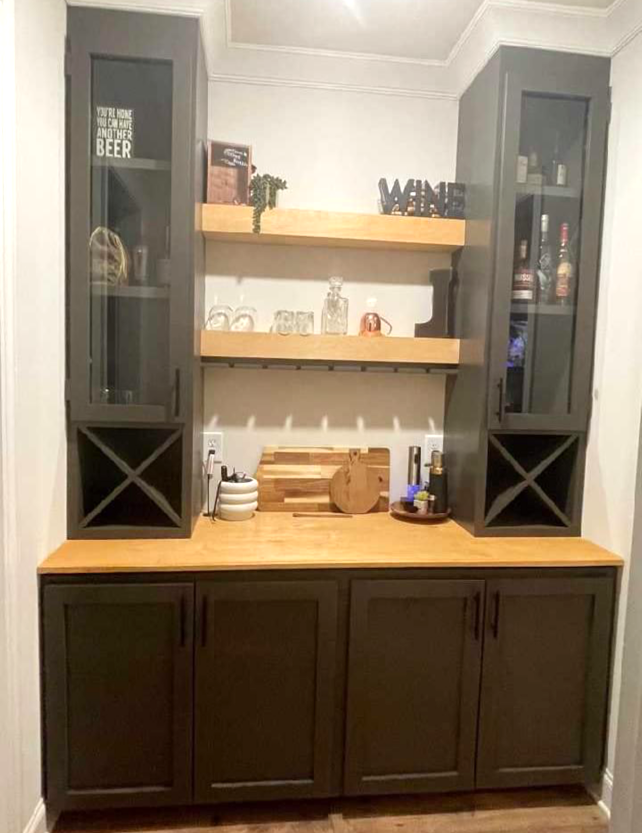
DIY Dry Bar by Brian Pettibone
Plans linked to help others achieve a similar build
Lemonade Stand with Top
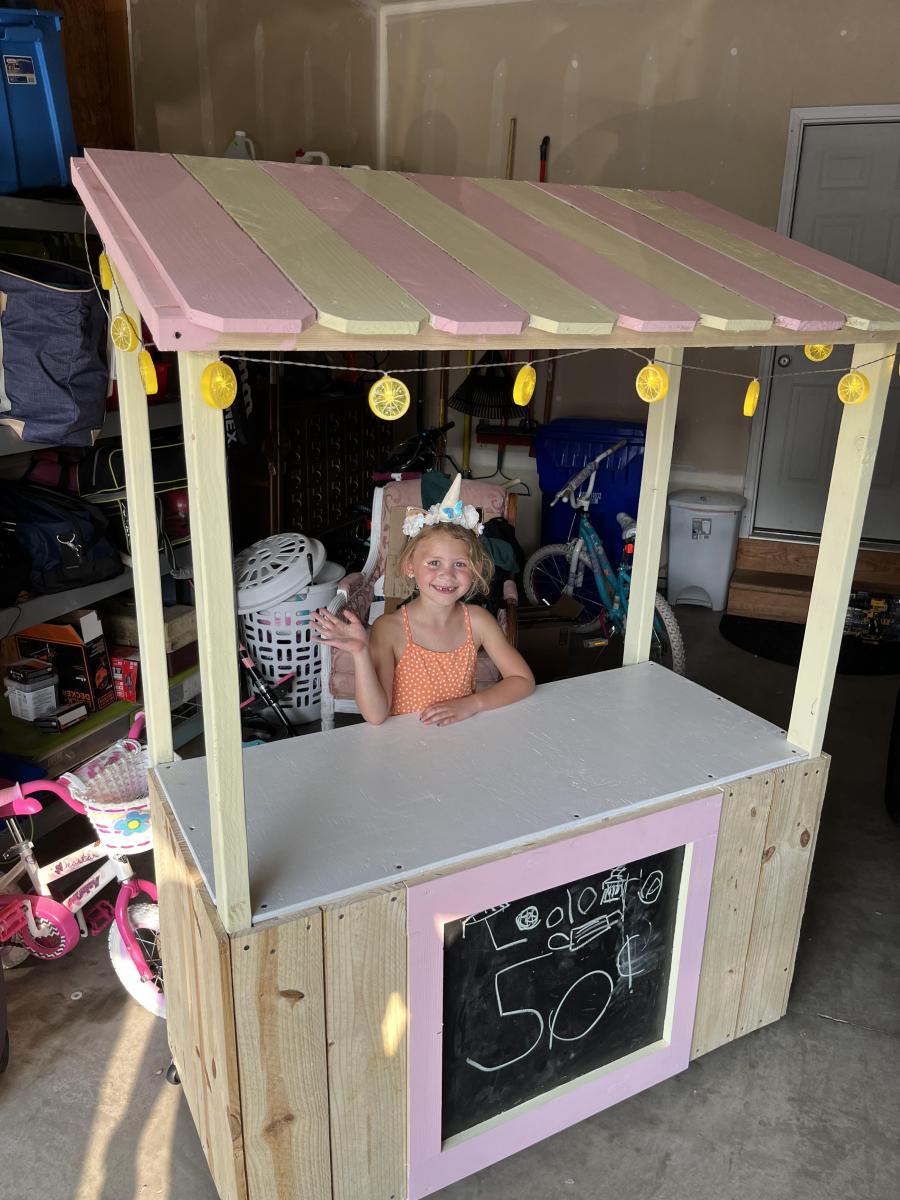
DIY lemonade stand with awning
Built from Plan(s)
My nephews toy box

My husband and I built a toy box for our nephew for Christmas. We were able to complete this project in a day and were very satisfied with how it turned out. We used rope for the handles. And for the lid we used a long hinge along with 2 shocks so the lid would not collapse on his little hands. Because the pine was so nice, neither of us wanted to cover it up. :)


Estimated Cost
$120.00
Estimated Time Investment
Day Project (6-9 Hours)
Finish Used
No finish
Recommended Skill Level
Beginner
Loft bed with platform

I modified a few things to fit my needs. I did a small ladder instead of steps to save room. I added a 2x4 down the middle with brackets to add extra strength for mattress area. I used my kreg drill bit to make holes for the 2x2 to also help with strength. I am a big guy and the bed was solid so no issues with weight. I added 8 inches to the main post to add height underneath for a doll house, book shelf and some other things my wife wanted under there. Excellent plans and my daughter loves it.
Built from Plan(s)
Estimated Cost
200.00
Estimated Time Investment
Weekend Project (10-20 Hours)
Finish Used
Nothing yet
Recommended Skill Level
Intermediate
Composite/Plastic Wood Little Kids Picnic Table

I used some leftover boards from our composite deck for the surface part of this picnic table. I used a lot of Kreg joints to screw up into the boards from underneath, so I didn't have many exposed screw heads. I did have to redesign this plan slightly for me because of my composite board width. Ended up costing $5 for the 1x3 spruce, and I finished it with primer and exterior latex paint leftover from painting our garage doors.


Built from Plan(s)
Estimated Cost
$5
Estimated Time Investment
Afternoon Project (3-6 Hours)
Finish Used
Primer and exterior latex paint.
Recommended Skill Level
Beginner
Comments

Wed, 03/21/2012 - 00:15
This is awesome! I love that
This is awesome! I love that you used scrap decking - no splinters! Thanks for sharing, love it! PS - what a cutie!!!
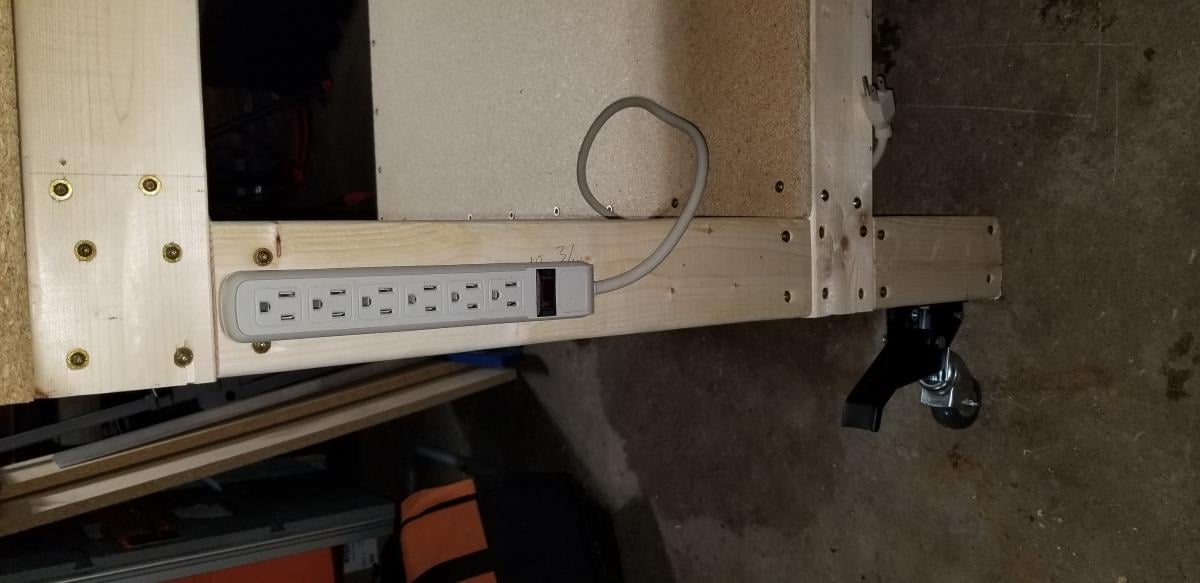
Simple, Strong Workbench
Built this for my garage shop in a day. Added a cutout for my Kreg Pocket Hole Jig, a power strip and casters for ease of movement.
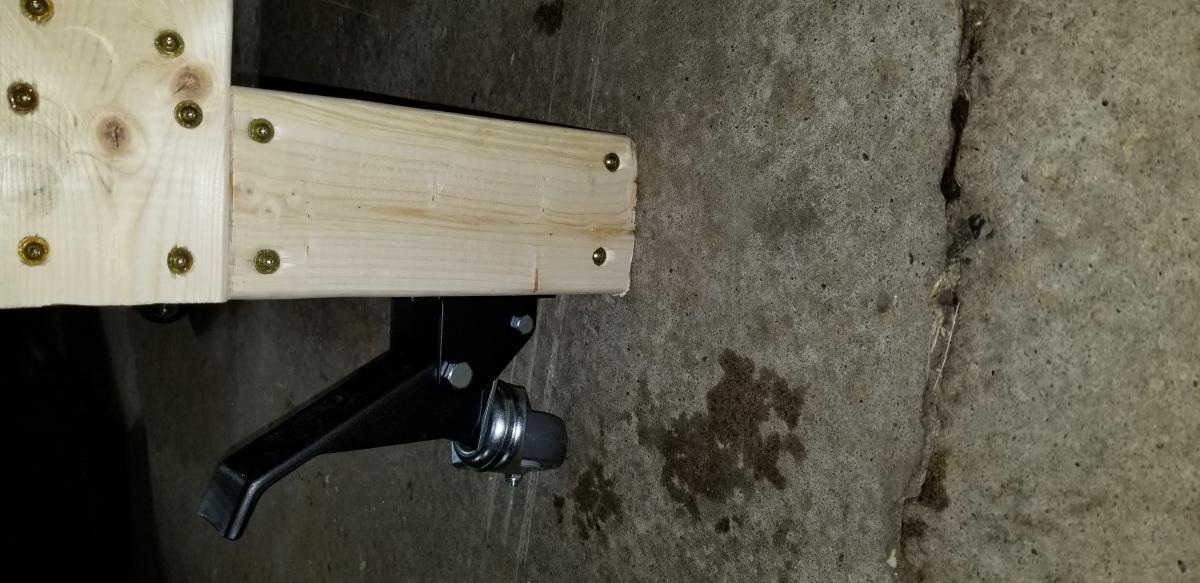
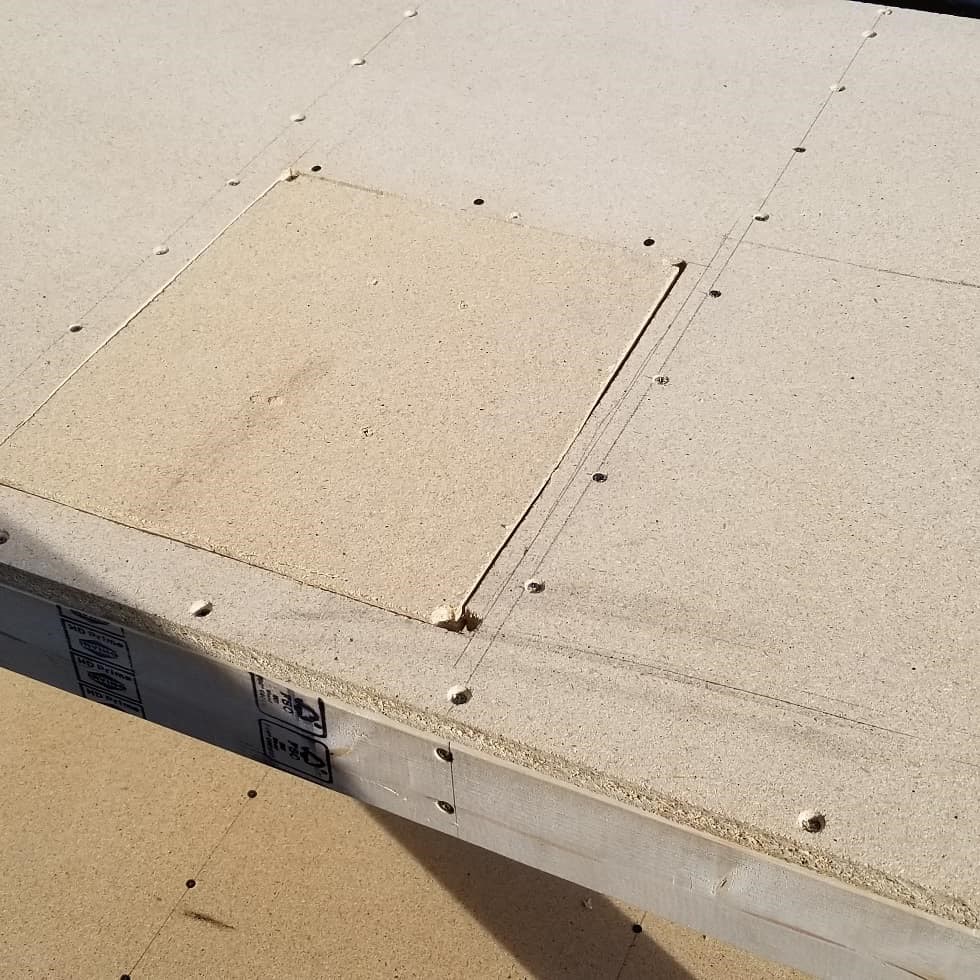
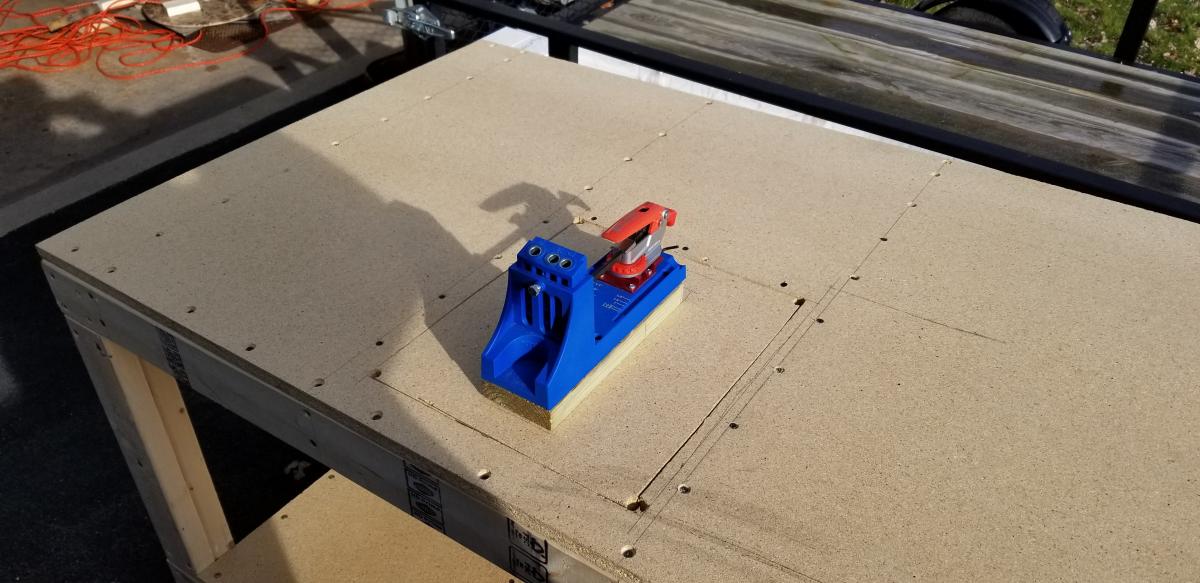
Built from Plan(s)
Estimated Cost
$100
Estimated Time Investment
Weekend Project (10-20 Hours)
Recommended Skill Level
Beginner
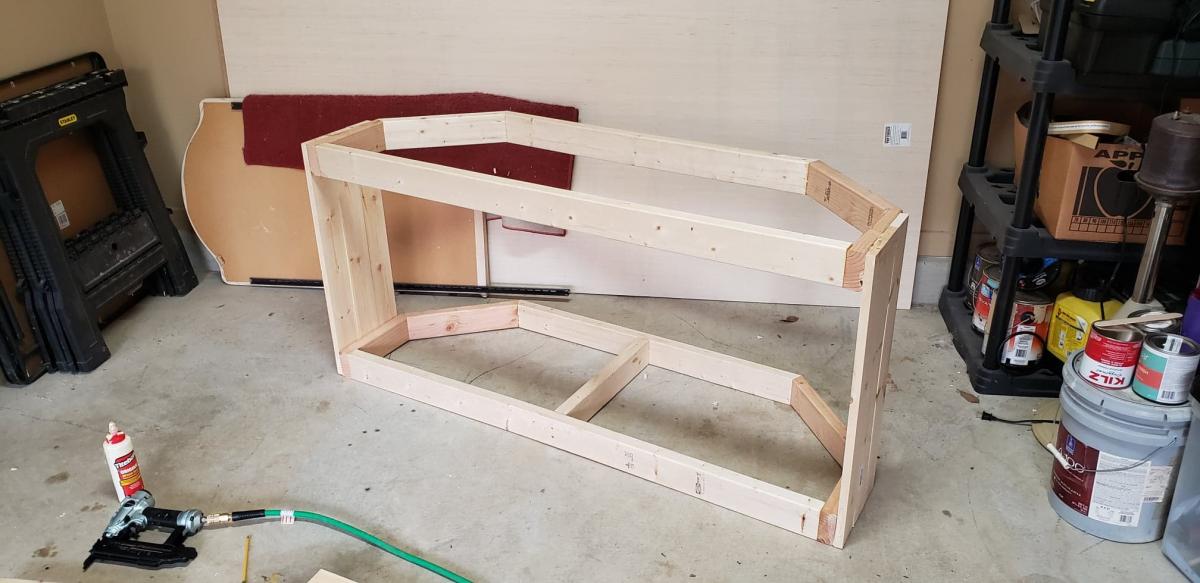
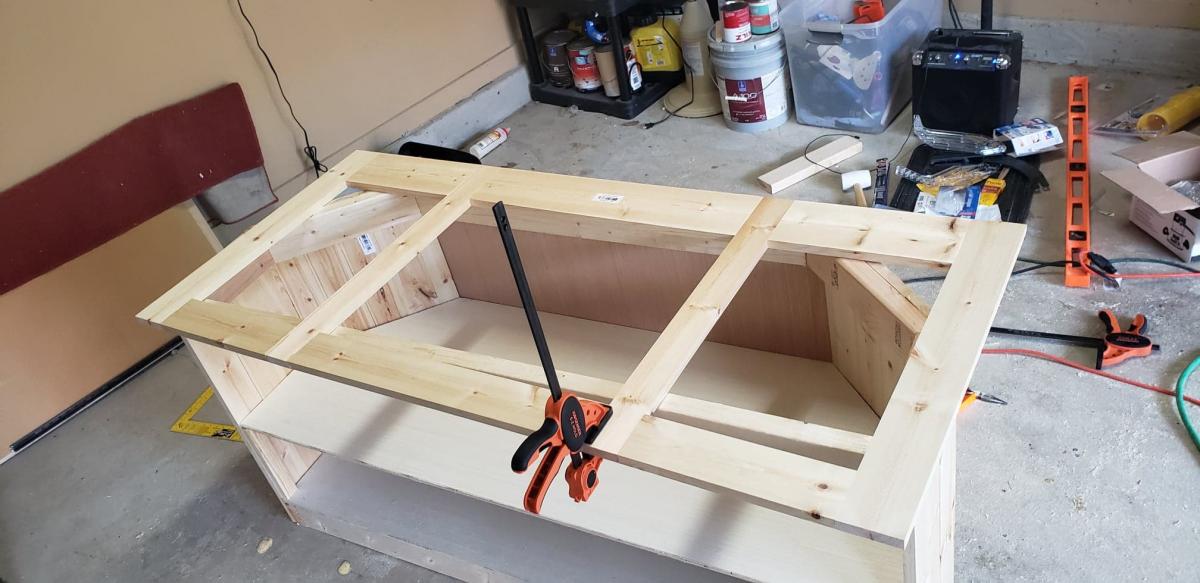
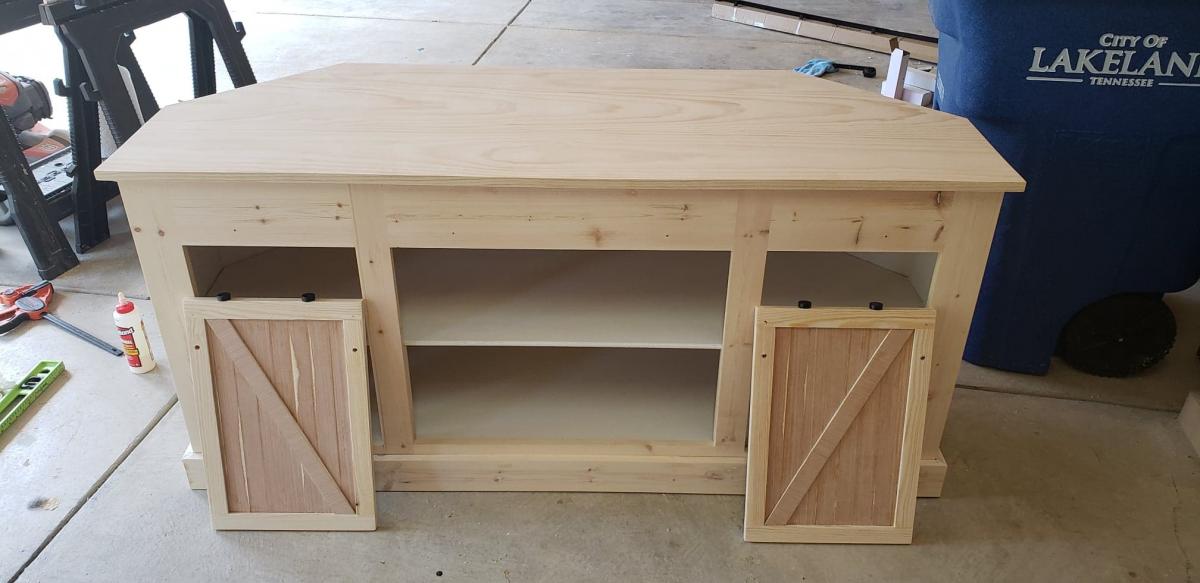
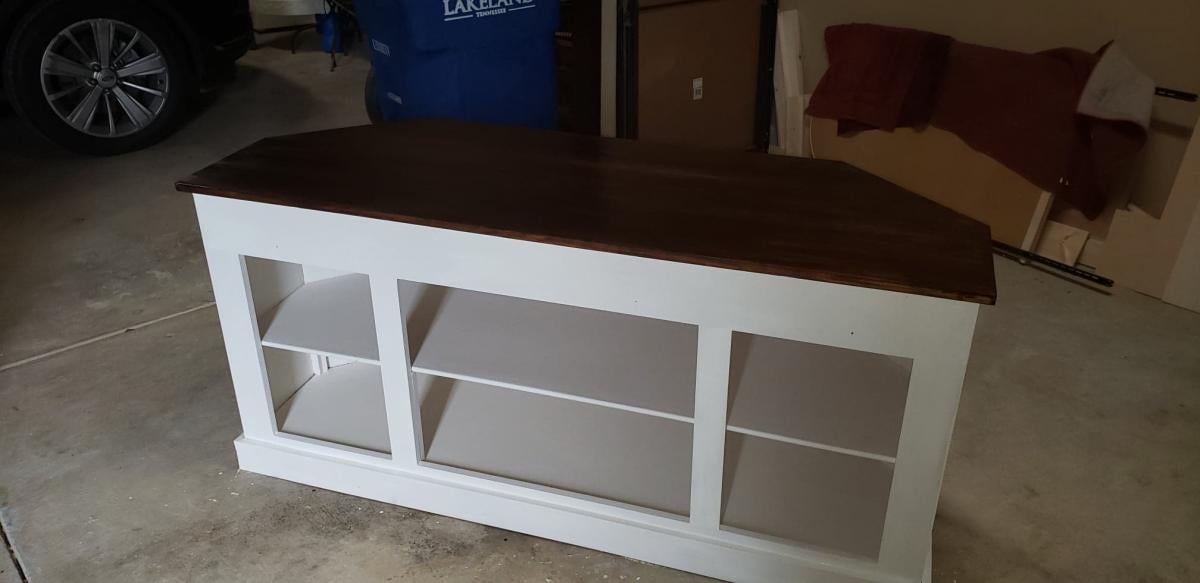
Grandy Barn Door Corner TV Stand
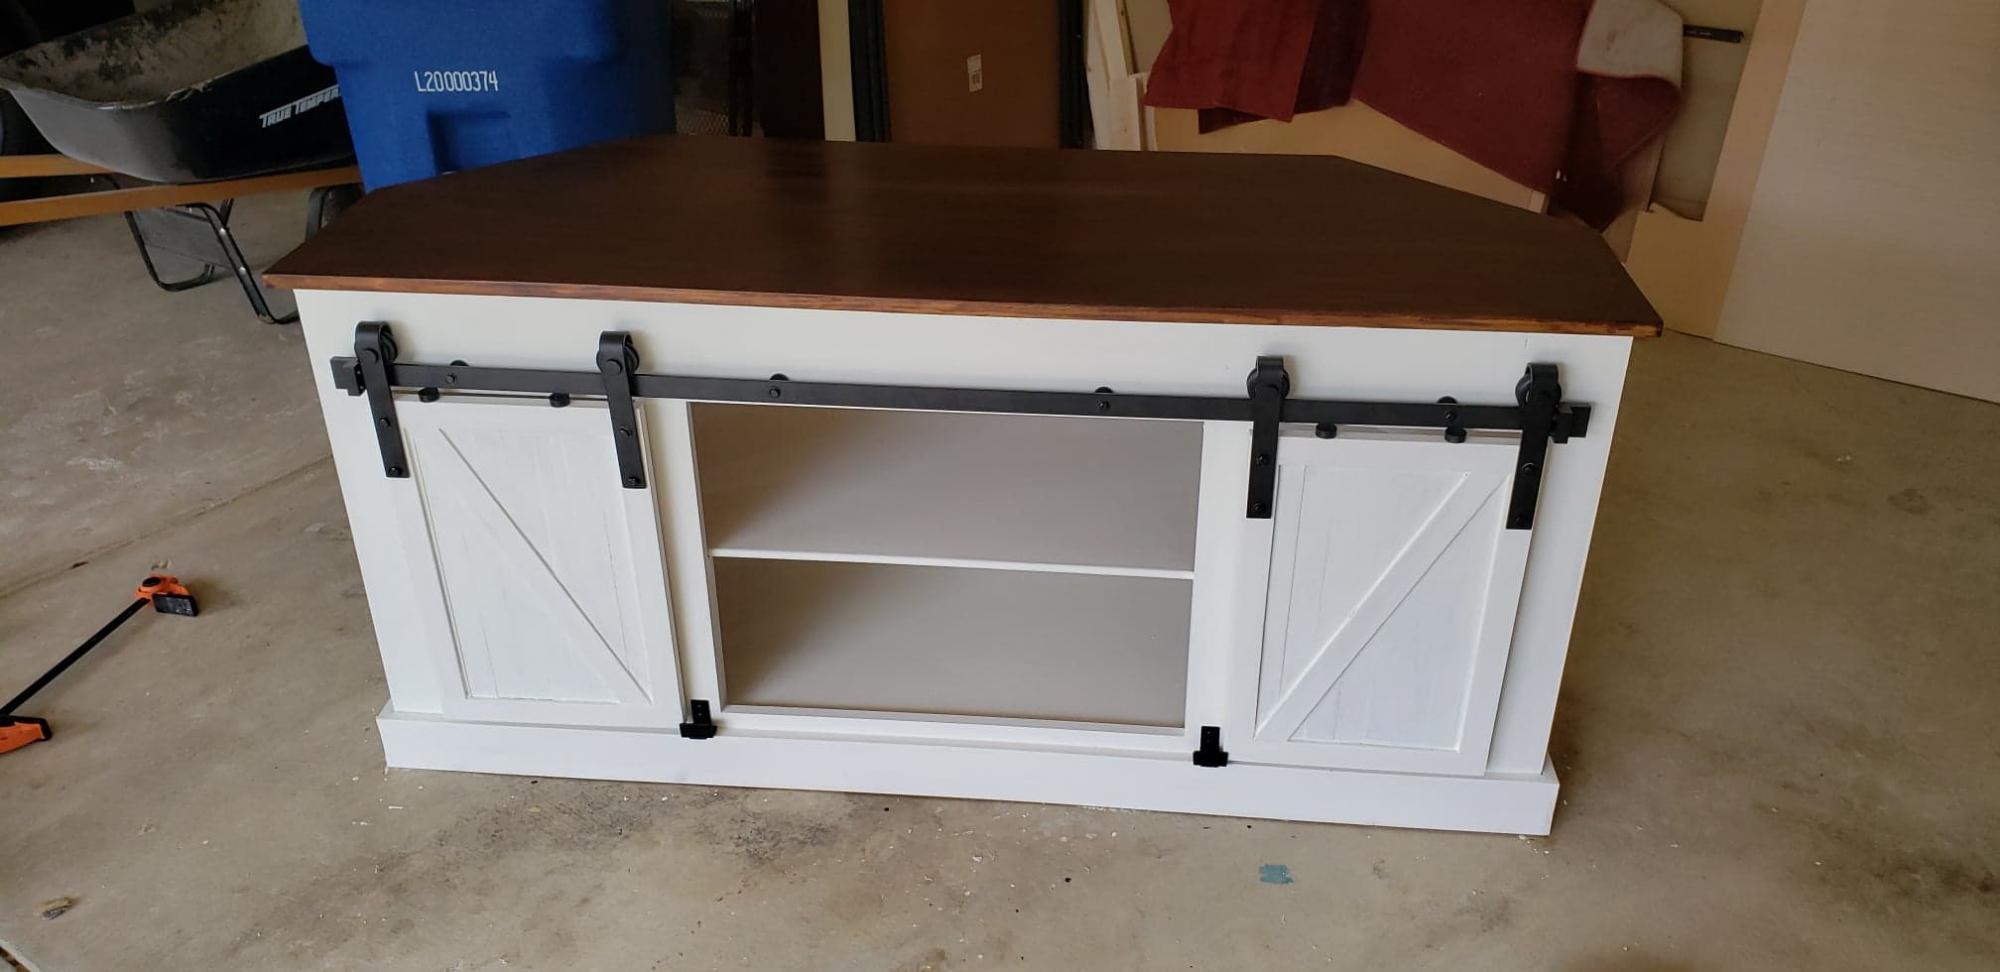
I couldn't find any corner TV stands with the barndoor style that were big enough, so I decided to design and make my own using the Grandy buffet design.
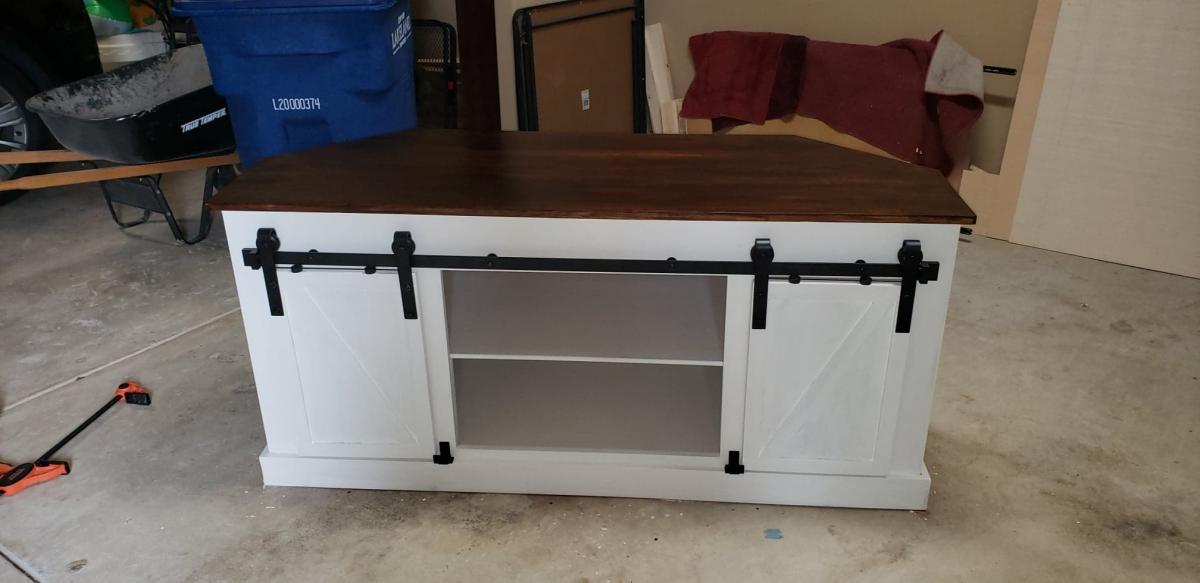
Built from Plan(s)
Estimated Cost
200-300
Estimated Time Investment
Week Long Project (20 Hours or More)
Finish Used
Minwax Polyshades Satin
Wax paint
Wax paint
Recommended Skill Level
Beginner
Comments

Sun, 05/03/2020 - 17:54
This would be perfect for my…
This would be perfect for my house, new look. Also like the idea of the Grandy Barn Door Console, dining room cabinet.
Fri, 03/19/2021 - 10:57
Plans for Grandy Corner
Did you save the measurements/plans? If so, I'd like to get them from you.
Tue, 01/04/2022 - 13:37
I will gladly pay for these…
I will gladly pay for these plans with the modifications, if someone can send them to me.
Tue, 01/04/2022 - 13:37
I will gladly pay for these…
I will gladly pay for these plans with the modifications, if someone can send them to me.
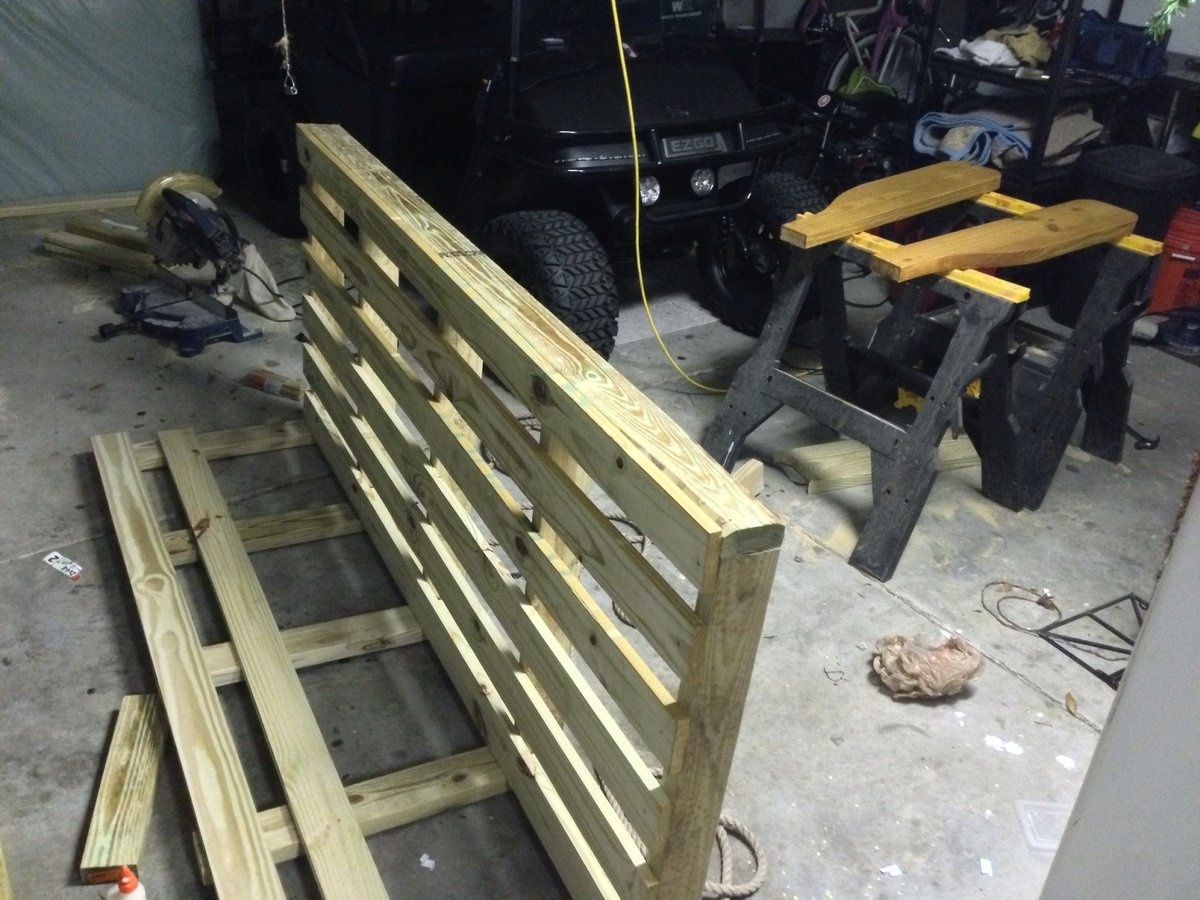
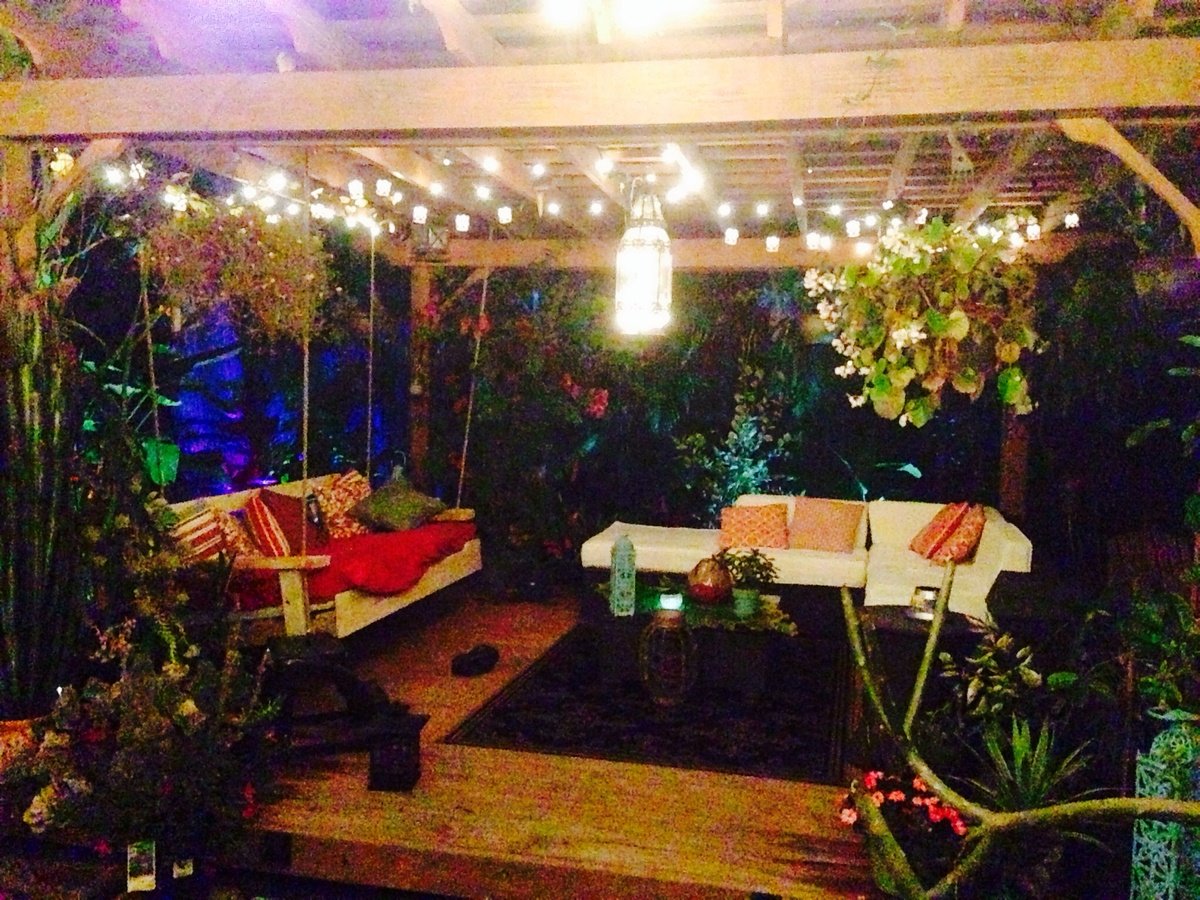
Porch swing bed
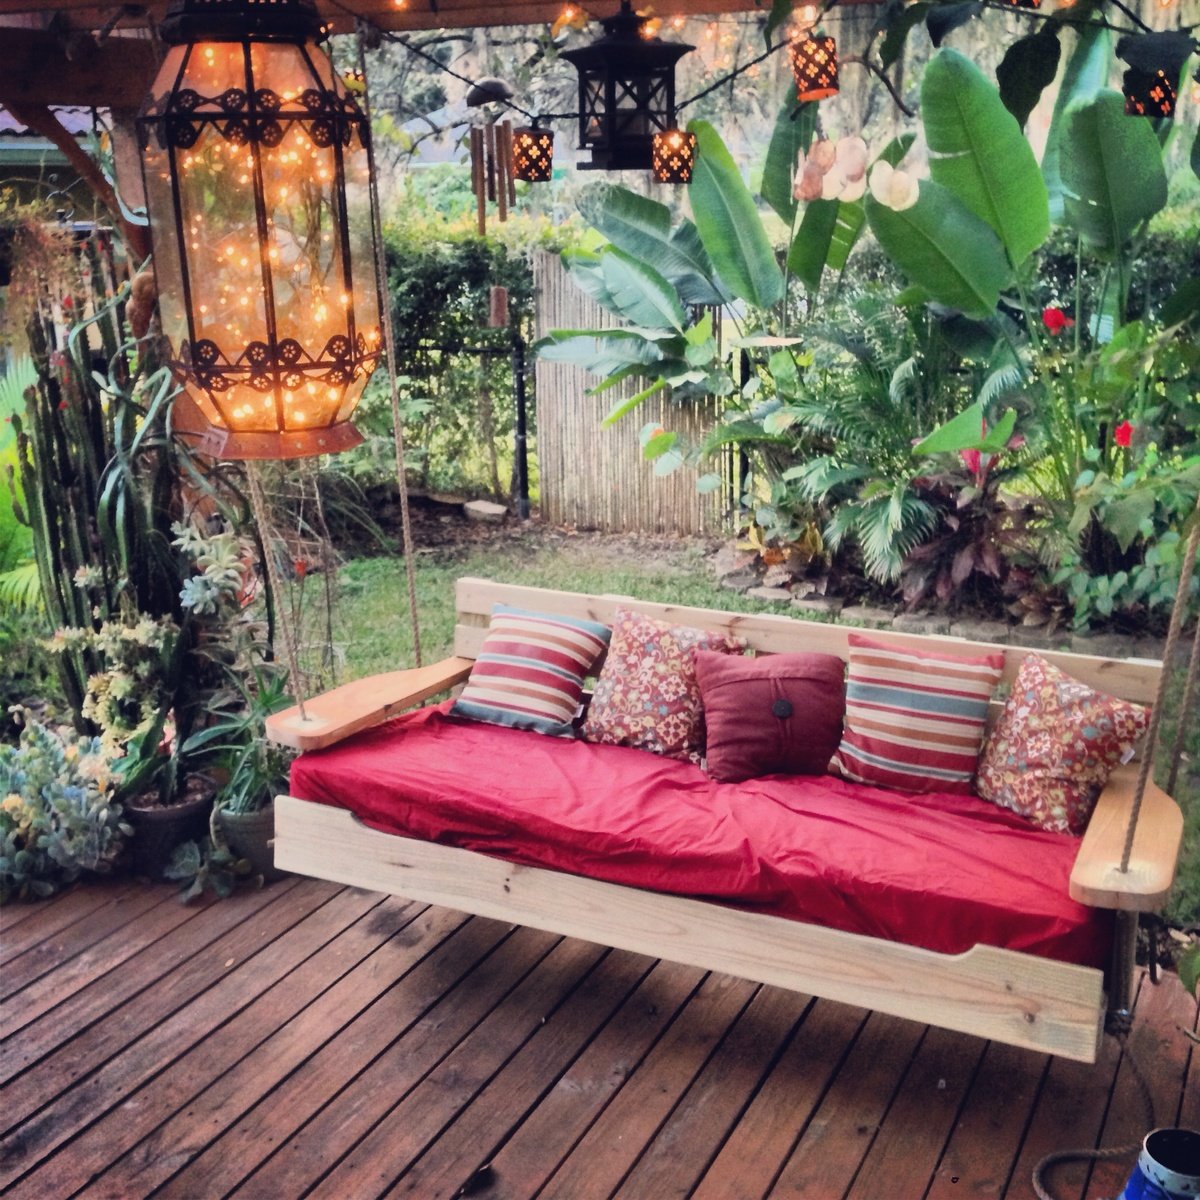
Started off with the original design but enlarged it to fit an oversize single mattress. The mattress cost me $35 from a local faith farm, while the materials came in around $200. I decided to hang under my backyard pergola. Fun and easy project.


Built from Plan(s)
Estimated Cost
$250
Estimated Time Investment
Day Project (6-9 Hours)
Finish Used
Cedar stain
Recommended Skill Level
Beginner
Comments
Tue, 01/28/2014 - 21:10
Porch swing
Wow this looks so inviting I might just have to make one too! Nice work-- it looks great!
Mon, 04/07/2014 - 22:49
So Inviting
Really lovely! Great job! This will be one of your favorites spots all summer long.
Mon, 07/27/2015 - 22:45
Swing bed
I want this! I just made a couple of plant stands for my front porch. My husband asked me what my next project was, why, a swing bed. (This was only my second project!) I want to put cup holders in those big ole arms! We have a house at the beach in South Alabama, so, you gotta "hydrate." This is an awesome swing. I can't wait to do mine...pillows to rest on, one foot on the concrete pushing me in a slow swing. Cold beverage in my hand or in my cup holder. Yep, southern girl has a new project. Love it!