Community Brag Posts

Pergola

Submitted by benfsu00 on Fri, 04/19/2013 - 01:30

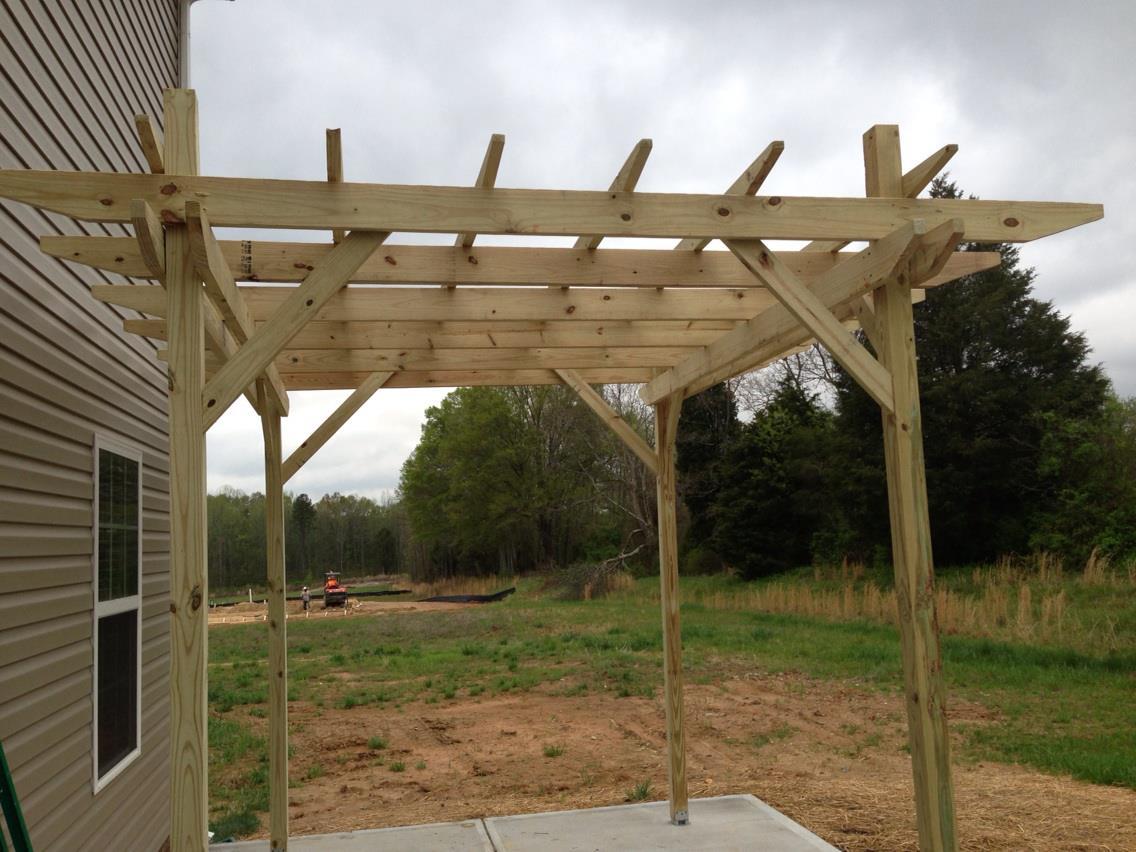
I have wanted a pergola for years and since we moved into our new construction in Dec. '12, I decided to finally go for it and add it to our new backyard plans. When I stumbled onto the plan on ana-white.com, I couldn't be more thrilled to see how simple of a project it was. I do not mean that it was an easy build by any means. I wanted a "beefier" look to it so I used 2x6 and 2x4's. The 4x4 posts are 10ft long (I was going to use 12 ft until I realized just how tall they were!). I stole the steel anchor post idea from the Popular Mechanics site and the "look" of the pergola from the Weatherly plan. I decided not to notch each beam due to time constraints and I just didn't think I need to. I did use zinc L brackets to secure the 2x6s to the support beams (also 2x6s). The top is stiff as can be but the bottom has a slight give to it since it is only four 4x4s sitting on post anchor brackets. I am planning on adding about 6 inches of concrete around the base of the posts (after my HOA "approves" the pergola) to stiffing the structure and then trim around the base for a more "custom" look to it. It will be similar style to the Weatherly except wider around the base so that I can set drinks on it. It took about 8 hours total and about an hour of that was setting the steel anchor posts (measuring and installing 2 1/4" red head screws into the 4" concrete slab patio).

I will stain it with a semi-transparent (BEHR brand) redwood-ish color in a few months after the PT pine dries.

Built from Plan(s)
Estimated Cost
$400
Estimated Time Investment
Weekend Project (10-20 Hours)
Recommended Skill Level
Intermediate

Trash / Recycling Cabinet

Submitted by Anonymous (not verified) on Tue, 07/27/2021 - 11:21

This was a build I was able to check off my Honey-do List. We use it as a Trash / Recycling Cabinet. Basic cabinet build with tray drawers for the trash cans.

Estimated Time Investment
Weekend Project (10-20 Hours)
Recommended Skill Level
Intermediate

Comments

Folding Sewing Table

Submitted by cchalifour on Wed, 11/24/2021 - 19:36

Built this Folding Sewing Table for my daughter.
- 18 mm Baltic Birch
- Birch leds

Built from Plan(s)

Comments

Bar Stool DIY

Submitted by Knathu121 on Fri, 01/05/2018 - 20:31

I used 2x4’s to make these bar stools and used Valspar weathered gray stain. I found the plans online by searching “chunky barstool”. It cost me around $85 to make all 4 of them.

Estimated Cost
$85.00
Estimated Time Investment
Weekend Project (10-20 Hours)
Finish Used
Valspar weathered gray
Recommended Skill Level
Beginner

Comments

Motorcycle Gear Locker

Submitted by abarbato82 on Sun, 02/27/2022 - 05:45

Had all my motorcycle gear throughout the garage and wanted to pull it all together. The single locker plan was a perfect blueprint with just some adjustments to height and width. Thank you!

Built from Plan(s)

Comments

Farm House Queen Bed

Made this bed using 4x4's and 2x4's from some large pallets we acquired. The rest of the wood I had to buy. I had to make some adjustments as our mattress was not a true queen. I loved making this project. This is a great plan.

Built from Plan(s)

Comments

Kitchen Island

The plans were easy to follow. I modified my island to fit my space and cut it down to 44 inches in length.

Built from Plan(s)
Estimated Cost
The entire project cost $47.00.
Estimated Time Investment
Day Project (6-9 Hours)
Finish Used
I stained the top and shelves with Watco Danish Oil in dark walnut and then used a satin finish varathane for only the top to protect it from spills, etc. The sides and legs were painted with an interior latex paint called "Sandbar" from Home Hardware.
Recommended Skill Level
Beginner

Comments

Emily Jo (not verified)

Mon, 10/31/2011 - 15:33

Your island is gorgeous, and I love the modification you made to the original plans on the shelving support! I would like to know what size the boards are that you used so that I can duplicate. Thank you!

Lisa Tamaye (not verified)

Sun, 02/05/2012 - 18:10

This is great! ANyone know how I could extend one side in order to put stools for an eating area?
Would love to do that!

Alice (not verified)

Tue, 02/07/2012 - 19:43

I would think it would be basically the same build, just add brackets to support the extra wood.

Guest (not verified)

Mon, 03/05/2012 - 15:20

I want to make this Kitchen Island but if can't find the Supply List. Would you mind posting it or emailing me please! This will work perfect in my Kitchen

Katia57

Mon, 03/05/2012 - 17:46

Wow! Just a wonderfully simple project! I can figure it out by looking at it. I have a piece of Rock Maple Counter Top 24"x6'that needs legs. I'll probably use 4x4' for legs, six of them. But the shelves will be just like this. Thank you!

Katia57

Mon, 03/05/2012 - 17:50

Wow! Just a wonderfully simple project! I can figure it out by looking at it. I have a piece of Rock Maple Counter Top, 24in.x6ft., that needs legs. I'll probably use 4x4s for legs, six of them. But the shelves will be just like this. Thank you!

Guest (not verified)

Wed, 04/04/2012 - 11:58

Just click on the link for the instructions. It's under the heading 'About This Project' titled as 'From Plan: Easy Kitchen Island Plans'.

Click where it says 'Easy Kitchen Island Plans'. When you hover your cursor over the words, you will see that is a hyperlink.

Lindsey Adams (not verified)

Sun, 05/20/2012 - 06:48

I love your island and I also have a small kitchen...would you happen to know the sizes of the boards you used? Thanks

??? (not verified)

Wed, 07/25/2012 - 14:31

Yours looks so different and so much better then the one that show how to make it, how did you do it? I really would love to build it but have no idea how...
Thanks so much!

CBsMama (not verified)

Wed, 08/15/2012 - 13:08

This island is perfect. I love the shelves and the size. Any chance you could send me the dimensions of this island and details on how you did the shelves? Great job!

lizzy1299

Mon, 02/04/2013 - 15:03

I'm SO glad I stumbled acrossed your website! I LOVE that island and getting ready to get all the stuff to make it. Did you use the Kreg Jig thing the original person used...? If not, how did you cover the screw heads?

Thanks!

ameliam

Wed, 12/31/2014 - 07:37

Hi, this is my first time building anything. I really like the modification made to the original plans. I like the legs facing the other way. I can't figure out how to modify the cuts on the sides and front and back supports for the top to adjust for turning the legs the other way. Are there modified plans. LOL I need instructions, I’m not quite there yet on doing it myself. Thank you

djbeenie

Wed, 02/04/2015 - 15:03

How did you mount the 1 x2s since its on the side of the 1 x 4s. Did you tac them in. I really like the way that looks. Thanks!

MBuckson

Mon, 03/16/2015 - 08:00

Amazing island! I am in the middle of building this and looking ahead to the finishing aspect of it and I have a question: What tool did you use to apply the oil on the counter top? A cloth or a certain type of brush?

wiri0302

Sat, 06/06/2015 - 18:33

Hello, i love this island but maybe i missed it. What kind of wood is everyone using? Frosting said $47 but that could only be for pine right? Are people using pine to build this? I would like it to look just like the picture. Any help would be appreciated! thanks!

Garage Storage

Submitted by wabilinski on Mon, 09/28/2015 - 10:48

My wife was needing some extra storage in the garage for seasonal decor totes.

So, of course, I first go to Ana White's website. Voila, I found the perfect plans for the space I had to work with.

- The final product ended up being 72"Hx54"Lx21"W

- I used a counter sink bit to pre-drill screw holes so the heads would be slightly below the surface of the boards. This way the totes would not get caught on or damaged by the screws.

Estimated Cost
$90 for wood and screws
Estimated Time Investment
Day Project (6-9 Hours)
Finish Used
N/A - left unfinished
Recommended Skill Level
Beginner

Cassidy Bed Works Well with a Sleep Number Platform

My husband and I bought our California king Sleep Number bed several years after we bought our solid wood bedroom furniture and it was too big to use with the bed that came with our dressers. After our most recent move, I decided I would have to finally part with the dressers in order to have a bedroom set that matches, which was hard because I love the simple, classic style of the dressers. Then I found this site and the plans for the Cassidy bed.

To make the Cassidy bed work for us, I extended height of the side rails and footboard to the floor so that our little dog could not hide under the bed when it was time for her to go into her kennel. That means I had to buy two sheets of plywood, one for the headboard to be cut from and one for the footboard to be cut from, and I bought 1x16s instead of 1x12s for the side rails. I also adapted the entire dimensions of the bed so that it fits around the plastic platform of our Sleep number bed, so we did not need to use the 2x4 slats. In fact, we did not use any of the 2x4s in the plan. The side rails are hung on the scrap lengths of the plywood. Finally, we did not decorate the headboard with door shims.

In the end, the bed is incredibly solid and beautiful. Afterword, I finished it to match our dressers, which I had stripped, as well.

Built from Plan(s)
Estimated Cost
$450
Estimated Time Investment
Week Long Project (20 Hours or More)
Finish Used
Three coats of Minwax Red Walnut and three coats of Minwax Polyurethane (Satin)
Recommended Skill Level
Intermediate

Comments

Adirondack chairs

Submitted by elfi on Sun, 05/05/2019 - 08:04

Adirondack chairs from your plans. My husband added some rounding on the arms and back. We wanted them to look like well weathered beach chairs. To get that effect we used milk paint which lets the grain show through.

The best addition are the two wooden wheels on the back leg of the chairs, I can now easily move them around my patio.

Estimated Cost
$ 30 per chair
Estimated Time Investment
Weekend Project (10-20 Hours)
Finish Used
Milk paint
Recommended Skill Level
Intermediate

Comments

Seasonal And Holiday

Mimi's Faux Mantle with bookshelves

Submitted by JoshuawG09 on Wed, 05/25/2016 - 18:15

Made from the modified Mimi's Faux Mantle design from another brag post.

Estimated Cost
$350
Estimated Time Investment
Week Long Project (20 Hours or More)
Finish Used
I used Valspar furniture paint. However, I will never buy it or use it again. It's just over priced paint.
Recommended Skill Level
Beginner

Comments

laurenwalker

Tue, 12/19/2017 - 22:01

Are you able to tell me how wide this is from the end of one bookcase to the other? I'm trying to find out if it will fit in my living room. Thanks!

Farm house queen/ crate storage

Submitted by Mathcky on Mon, 04/21/2014 - 10:50

Started with the farm house queen bed and changed the plans. I made the head/footboards 3 inches taller and took the panelling on the footboard all the way to the floor. I made storage underneath the bed and night stands. I'm using old apple crates for the storage. I made the night stands with the crate in it too to match the bed. I used a single piece of 18x18 ceramic tile for the top of the nightstand. The set is stained Minwax classic grey. I used a mixture of wood. Oak and pine, surprisingly it stained good and matched up. The crates aren't in the pictures yet. We have an older house with small rooms so the storage is perfect. The grey finish looks good for the old wood look with newer wood used

Estimated Cost
$100.00
Estimated Time Investment
Weekend Project (10-20 Hours)
Finish Used
Minwax classic grey
Some pieces were stained more then once to get an even,matching color
Recommended Skill Level
Intermediate

Simple Potting Bench Modified

Submitted by Anonymous (not verified) on Wed, 05/29/2024 - 08:13

Slight variation on Ana’s Potting Bench. I lowered the bottom shelf and added a middle shelf with wood from a gate we removed. I’ve received many compliments. Thanks, Ana!

Kathy Joy

Built from Plan(s)
Seasonal And Holiday

Sand Box with Built-In Seats using Cedar Wood and 1 Seat

Followed the original plan except below changes:
- Only one seat to make it more spacious
- Made 2 groups of 3 planks each and connected both using hinges so it can cover the end without seat
- Stapled Hardware Cloth with landscape fabric

Cedar wood was the most expensive thing in this project, since I would want it to last long.

Built from Plan(s)
Estimated Cost
150
Estimated Time Investment
Weekend Project (10-20 Hours)
Finish Used
Thompson's WaterSeal Stain & Sealer
Recommended Skill Level
Starter Project

Modern Adirondack Chairs & Outdoor Side Table

Submitted by j_bowman on Sun, 04/11/2021 - 11:35

These modern Adirondack chairs were my first wood working project ever and they turned out awesome! I wanted to build a small table to complete the set and Ana’s new side table plans were exactly what I was looking for. I am truly amazed at how easy these projects were to make and how great they look on our front patio. Ana’s step-by-step plans make it so simple. My wife and I can’t wait to build some more of these projects for our backyard lanai and pool area.

Finish Used
General Finishes Red Mahogany stain
Spar Urethane

Comments

Seasonal And Holiday

Woven Back Bench, Chairs, plus a table

Adapted the woven back bench plan into two chairs. Talk about a ton of pocket holes!

Table with a small propane gas fixture.

Built from Plan(s)
Estimated Cost
$110
Estimated Time Investment
Weekend Project (10-20 Hours)
Finish Used
Olympia Elite Rustic Cedar outdoor stain, single coat so far.
Recommended Skill Level
Intermediate

Comments

Garage Storage

Submitted by Smokeydog on Fri, 03/20/2015 - 08:59

Thanks to Ana's 2x4 storage plan and a neighbor's discarded kitchen cabinets we now have a very clean and convenient storage area  in our garage.  It even features a work bench and sorting area.

Estimated Cost
40-50 dollars
Estimated Time Investment
Afternoon Project (3-6 Hours)
Finish Used
None
Recommended Skill Level
Starter Project

Comments

Reclaimed Wood Night Stand

Love these night stands! I spent $40 on lumber for two night stands and $30 on the hardware! You can see more pics of my finished night stands at www.shanty-2-chic.com

Estimated Cost
$50 - $70
Estimated Time Investment
Day Project (6-9 Hours)
Finish Used
Minwax Dark Walnut Stain and Minwax Polycrylic
Recommended Skill Level
Intermediate

Comments

acgosiger

Mon, 08/29/2011 - 09:56

I am going to be making these for our master bedroom (hubby and I currently do not have matching night stands). NOw that i see them finished i am even more excited! You did a fantastic job on them!

takahler (not verified)

Mon, 08/29/2011 - 20:10

We made two of these same night stands earlier this month. I haven't taken a good enough picture to post on here. I need to do that. Great job!

Guest (not verified)

Wed, 09/28/2011 - 22:17

This is wonderful. I'm looking for something similar to build in the next couple weeks. Could you share the plans for it please?

Toni (not verified)

Mon, 05/28/2012 - 06:25

My hubby made these for my daughter and they turned out awesome.So now I have to have them too. He is working on them now, but we are making them out of some oak we already had. Can't wait. Now I need a matching headboard!! Looking for plans...

Sarah's Room

Submitted by scokenour on Sun, 09/22/2013 - 19:45

I actually made this bed for my daughter about a year ago, but recently finished a few other projects in my daughter's room, so I wanted to share. Bed is Ana's "Mom's Fancy Headboard" and end tables are Farmhouse Bedside Tables (modified) and then I made a dresser, loosely based on the Hudson dresser, but utilizing as many scraps and free wood as I could.

Finish Used
Paint and slightly distressed
Recommended Skill Level
Intermediate

Comments

spiceylg

Mon, 09/23/2013 - 08:23

Beautiful room. Lucky daughter. Really nice job on the builds!

Back