Community Brag Posts

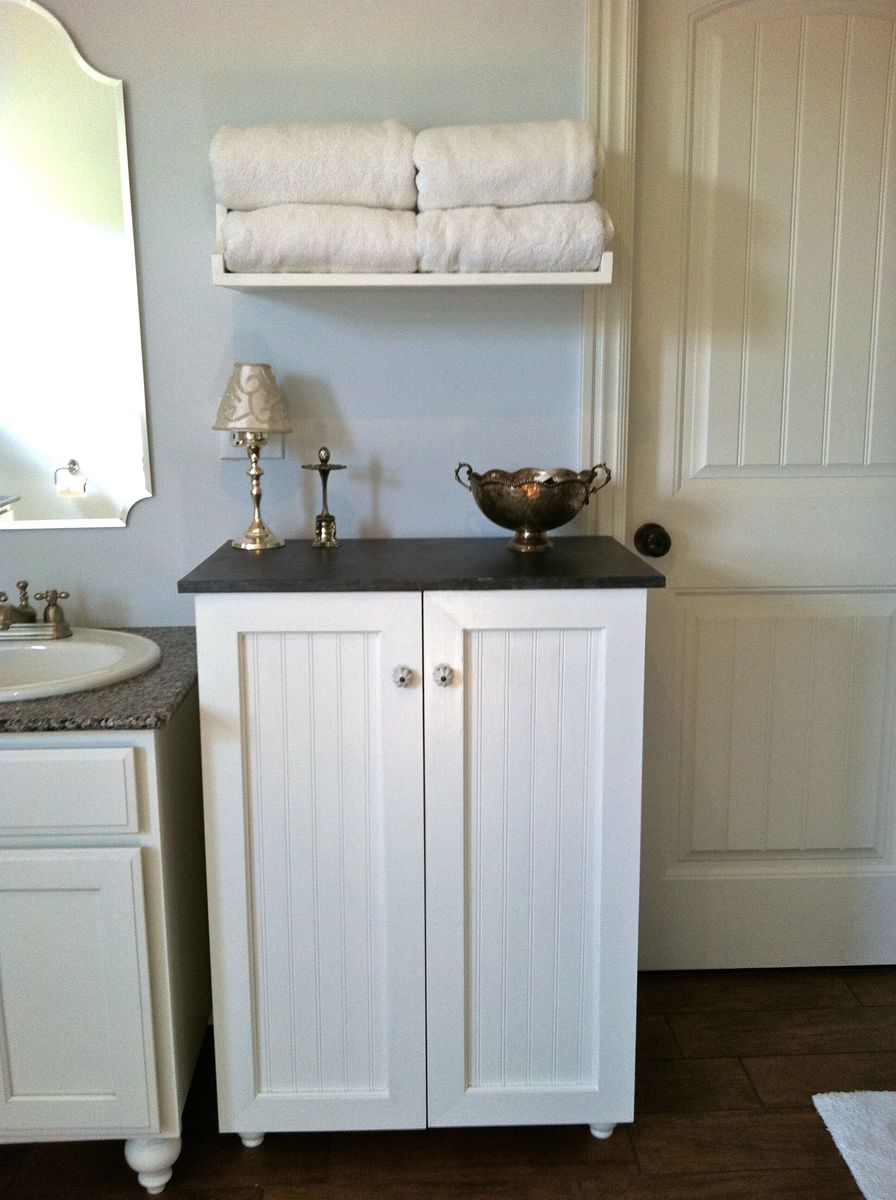
My laundry basket dresser with doors

Submitted by jensimmons on Sun, 07/03/2011 - 20:19

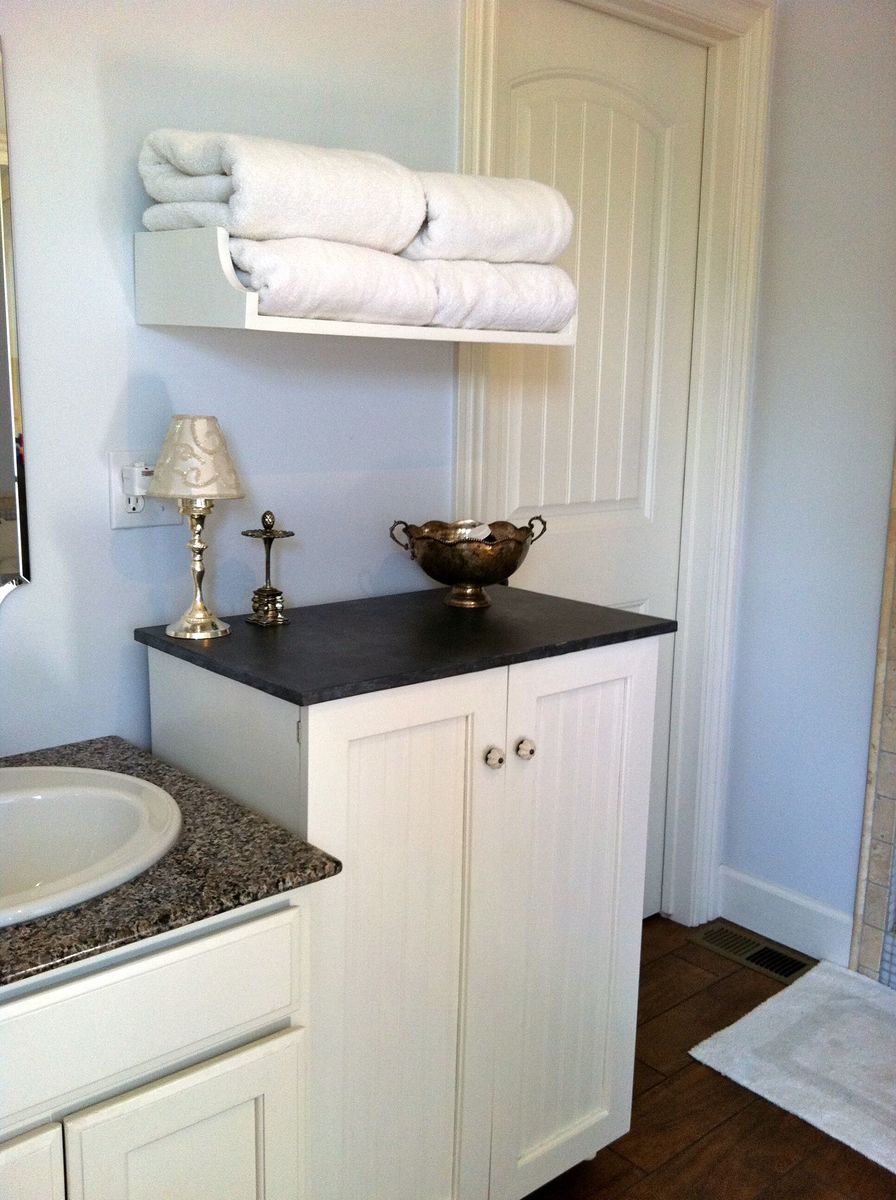
I wanted to use our laundry basket dresser as a collector for dirty laundry in our bathroom, and wanted it to have doors so it would blend in better. I also made the shelf above for our towels. It is painted white with a faux-zinc finish on the top. I made the top slightly larger so it would overhang and added cute little bun feet. My talented friend Carli helped me build the doors (and by helped I mean I handed her things while she impressed me with all her tools and skills!) and frame.

Built from Plan(s)
Estimated Cost
$75-100 (can't remember exactly)
Estimated Time Investment
Weekend Project (10-20 Hours)
Finish Used
white semi-gloss paint, zinc faux finish: layer 1 dark charcoal paint, layer 2 dark pewter metallic glaze, layer 3 white paint thinned with water & rubbed on/off.
Recommended Skill Level
Intermediate

Comments

Guest (not verified)

Fri, 07/29/2011 - 23:37

this is perfect! i totally need a bunch just like this! I love the added doors!

Pam in Colorado (not verified)

Sat, 09/17/2011 - 12:48

This is the look I'd like, fit the baskets and hide them behind doors until you are ready to do the laundry. These could be made for bedrooms, bathrooms, toy rooms (okay, toys instead of dirty laundry)...

Guest (not verified)

Fri, 11/11/2011 - 08:05

I absolutely love this! Could you please add instructions on how to make/paint and install the doors? I am a newbie to making my own furniture. Thanks!

Guest (not verified)

Wed, 01/11/2012 - 08:29

I love this idea! I will have a new bathroom soon and I think this will get used! What are the dimensions, or what style cabinet would you suggest to look for? TIA!

Jennifer Simmons (not verified)

Fri, 02/17/2012 - 05:57

The dimensions are the same as Ana's plan: http://ana-white.com/2010/11/laundry-basket-dresser except that the top is slightly bigger (3/4" overhang on front/sides) to look more like a countertop. On the doors we just made a frame w/ angled pieces, routed a notched line on the back & glued/nailed some beadboard in from the back. Sorry I can't be much more detailed on that, a friend did most of the doors for me!

Guest (not verified)

Sun, 02/19/2012 - 07:42

I actually got the plywood to do this project and I was going to add doors. I looked at the baskets suggested but it seems they would stick out the front. I was just curious, did you use different baskets that would fit inside the cabinet or did you make the cabinet slightly deeper?

Jennifer Simmons (not verified)

Sat, 02/25/2012 - 05:36

Actually I discovered the same problem after it was built. I just didn't put a back on and they stick out a tiny bit in the back. I actually kind of like it that way because it lets some air in (being in the bathroom and putting towels in I could see it getting mildewy without much circulation). But if I had gotten the baskets first I probably would have made it about 2" deeper, then leave some open space, but not all, on the back.

Twin Sleeper Chair

Submitted by Hoff7.62 on Sat, 06/04/2022 - 15:20

This was my take on your Twin Sleeper Chair. I made it into a full. I used 2x4’s where there was suppose to be 1x4’s because I changed the width. This was a very fun project, my first project actually. Thank you for the plans and idea.

Built from Plan(s)

Comments

Homemade DIY Kitchen Island inspired by Williams-Sonoma "Cooper Double Kitchen Island"

Submitted by LN2014 on Mon, 04/29/2019 - 22:26

My latest furniture build, custom kitchen island inspired by Williams-Sonoma "Cooper Double Kitchen Island. The workers there weren't too happy when I was at their store taking measurements and me telling them, I'm going to build one myself. The most expensive part was the matching quartz top on it. Here is my start to finish pictures. It's a great addition to my complete home renovation project, which is now on the market for sale. If anyone wants specs and build info, to build it yourself let me know! Thank you Ana-White for inspiring in 2013 to start wood working and building, I have learned so much from your DIYs from the first x console table to now building anything my mind can imagine. https://www.zillow.com/homedetails/8707-Braun-Path-San-Antonio-TX-78254…

diy kitchen island

Built from Plan(s)
Estimated Cost
$600
Estimated Time Investment
Week Long Project (20 Hours or More)
Finish Used
Rust-Oleum Cabinet Transformations black
Recommended Skill Level
Advanced

Comments

Daffodil Yellow Potting Bench

Submitted by CathyS on Sun, 10/27/2013 - 18:53

I'm so happy to have found your site! I've been wanting a potting bench for a while. Today the Hubs and I built this one in Daffodil Yellow! It is only partially painted, but I already love it! The hubs wants to build a modified one for his heavy electronics equipment. Thanks a Bunch!

Built from Plan(s)
Estimated Cost
$40
Estimated Time Investment
Afternoon Project (3-6 Hours)
Finish Used
Daffodil Yellow paint
Recommended Skill Level
Beginner

Horizontal Murphy Bed

Submitted by Anonymous (not verified) on Sun, 07/09/2023 - 17:49

We are remodeling our 3 bedroom house into a 4 bedroom. In doing so, my youngest is getting the smaller room. We decided to go with a Murphy bed to allow more play time space. I do not particularly like the fact that this bed doesn’t sit off the ground but overall love the simplicity of making it. We turned it horizontal and just love the overall product. I can mot wait to make something else from this site!

Tams

Rustic X Hall Tree

Submitted by Anonymous (not verified) on Mon, 01/27/2020 - 14:22

I built this scaled down version of Ana's Hall Tree to fit into a 3 foot wide space in my daughter's living room.

Built from Plan(s)
Estimated Cost
$55
Estimated Time Investment
Afternoon Project (3-6 Hours)
Finish Used
Whitewash
Recommended Skill Level
Starter Project

Modern slatted bench

Submitted by Whimwhams on Mon, 06/27/2016 - 11:51

I made this for my sister the day before her house warming party. It was a pretty easy build. I used wood glue and 2" nails. Using a nail gun, this came together pretty quickly. I do wish that I had wide enough clamps to hold everything in place while it dried, because there were a few gaps due to some imperfect boards. I used 104" stud length boards, so I only need to purchase 7 instead of 9. this was enough to make the cuts for the top and both leg pieces from each board. the price was the same and we had limited space in our van for boards, so this was a better option for us. I used a sprayer hooked up to an air compressor to apply the stain and was able to get in between the slats fine with this method, brushing over it as I sprayed. Luckily I chose the same color as her deck not knowing, so it matches great. Now I need to make one for myself! :)

Estimated Cost
$40
Estimated Time Investment
Afternoon Project (3-6 Hours)
Recommended Skill Level
Starter Project

Teen loft bed

Submitted by Anonymous (not verified) on Mon, 06/22/2020 - 20:34

Combined two plans found on this wonderful site with our own revisions to provide a larger desk work area (20" deep). I also added a small shelf to allow for setting a book, water, whatever on it without getting out of the bed. As my first "indoor" project there were several lessons learned - one is to buy the higher grade lumber for the primary components including legs and beams. I did not do this and I had to spend more time than I should've finding good square, straight wood. Another lesson was that staining and polyurethane coating are a skill that requires a lot of practice and time. I and my daughter are thrilled with the final result but choosing to stain/poly it likely doubled the overall build time. Still no regrets, though. My 12 yo daughter just loves her new bed and thanks to this site for the spectacular ideas.

Estimated Cost
$600?
Estimated Time Investment
Week Long Project (20 Hours or More)
Finish Used
I used Minwax Cherrywood gel stain (2 coats) and Minwax Fast Drying Polyurethane (3 coats). For the gel stain, apply with cotton rag and do NOT let it sit on the wood for more than 10 minutes before wiping it off. Before applying first coat, vacuum the wood especially the knots, wipe all with white cloth, wipe with cloth dampened with mineral spirits and let dry, then wipe with tack cloth, then apply stain. AFTER the first coat and between all subsequent stain coats, let fully dry and wipe with tack cloth before applying poly. For the first poly coat, wipe with white cloth, then wipe with tack cloth, and apply poly using a china brush (specific for finishing). Submerge your brush in mineral spirits and press down to eliminate bubbles, then wipe it along newspaper until mineral spirits are nearly gone from the brush. Cut the first coat of poly 25% with mineral spirits and brush on in even strokes. AFTER the first coat, sand lightly with 220 or 320 sand paper, vacuum all dust, wipe with white cloth, then with cloth dampened with mineral spirits and let wood dry, then wipe with tack cloth, then apply second coat with full strength poly using the same process of first eliminating the bubbles from the brush. Repeat that process for all subsequent coats. Then let dry for several days before assembling the bed.
Recommended Skill Level
Intermediate

Floating Bathroom Shelves

Submitted by Kamoanui on Mon, 06/29/2020 - 15:58

Very quick and easy! We did 6 in. boards and weathered the boards with stain, paint, and sanding. Looking for other places in the house to use this plan!

Built from Plan(s)
Estimated Cost
$25
Estimated Time Investment
Afternoon Project (3-6 Hours)
Finish Used
To get the weathered look, I used pre-stain, then Jacobean stain, then chalk paint. Let it dry overnight, then sanded it with a hand sander and applied another coat of the Jacobean stain. To finish and protect it, I used polycrylic clear matte sealer.
Recommended Skill Level
Beginner

5 foot picnic table with pocket holes

Submitted by milleall on Thu, 07/02/2020 - 08:56

We built from the plan with green treated lumber. We also joined the top and the seat with pocket holes and outdoor blue Kreg screws so there are no screw holes exposed on the tops. Easy build. Great compact picnic table.

Estimated Cost
$90
Estimated Time Investment
Afternoon Project (3-6 Hours)
Finish Used
None
Recommended Skill Level
Beginner

Drop down murphy bar

Submitted by nick_h on Tue, 12/06/2016 - 10:54

My attempt at the murphy bar featured on this site. Still have to add the sash locks. Added pallet crossmembers at the back, an x in the leg, and a french cleat to mount to the wall. 

Estimated Cost
$45
Estimated Time Investment
Day Project (6-9 Hours)
Finish Used
Special Walnut Minwax on the bar top and shelves, crisp linen matte latex and dry brushed casual gray for accents/aging. 2 coats of polycrylic for protection. If built again would pre stain and base coat all the wood before build time, then assemble, add accent brushing and spray the polycrylic.
Recommended Skill Level
Beginner

Comments

zannej

Tue, 12/31/2019 - 11:49

This looks awesome! I want to help my friend build this for his kitchen. I've looked at the plans in the link & I'm wondering what modifications you made for the X pattern-- how much did it alter the material & cut list?

Would you please share your material & cut list for this?

Poolside Towel Cabinet from Benchmark Cabinet Plan

Submitted by Anonymous (not verified) on Thu, 03/23/2017 - 11:21

My father and I made this awesome poolside towel cabinet using the Benchmark Cabinet plans. A super easy 1 day build and it looks amazing on the patio. Bring on the pool weather! 

Estimated Cost
$60
Estimated Time Investment
Day Project (6-9 Hours)
Finish Used
Chalk paint/Poly topcoat
Recommended Skill Level
Beginner

Chicken Coop

Submitted by Anonymous (not verified) on Mon, 10/04/2021 - 15:53

We made this Chicken Coop this summer , with lots of help. We doubled the coop and the chicken run is 8x8 . We used the base of a previous clubhouse!! Thanks so much for the plans

Comments

A Simple Modern Doll House x 2!

I spent a couple of weekends making the knockoff West Elm Doll Houses using these free plans, as Christmas gifts for my 3 year old honorary nieces. The plans made building the doll houses quite easy! I opted to add trim pieces on the door and window openings, which saved me some headache, since they didn't need to be cut perfectly straight, and I also decided to cut the door and window openings out before attaching the front side to the rest of the house, just in case I messed up. The furniture was a bit harder without any plans (it's noted that the plans will be available soon, but they weren't when I did this build), but I just looked at the photos and made things up as I went along, using scrap wood and wood glue, which was pretty fun. Total cost was about $75 for both of these doll houses, the furniture and spray paint. For the finishing, I used Minwax Wood Finish Oil-Based in Ebony for the roofs and exterior window and door trim, which I stained before attaching. The rest of the house is Benjamin Moore Advance in Chantilly Lace, since that's what I had on hand, followed by two coats of Rust-Oleum spray paint in Satin Clear Enamel. For the furniture I opted to spray paint it all in satin white or black, also followed by two coats of the enamel spray. I used acrylic craft paint on the faucets, to give them a pop of silver. And I added some scrapbook paper for wallpaper and some cut up rug samples, for a little color! Both of my friends' 3 year olds are a little on the young side for these, but they've been enjoying learning how to play with them!

Built from Plan(s)

Comments

Bird Houses

I love this pattern of Ana's! My husband and I made these together. We have 3 very tall pine trees close together, planted by my Mum 50 years ago; one for each child. Now a cedar bird house for each tree. An extra for our cottage in Garden of Eden, Nova Scotia.

Thank you for sharing this pattern Ana.

Darlene & Garry

Estimated Time Investment
Day Project (6-9 Hours)
Recommended Skill Level
Starter Project

Entryway Table Shoe Rack Bench

Submitted by robinles on Tue, 05/16/2023 - 10:17

I adapted the plan for the Shoe Rack Bench to give it multiple levels and allow it to serve as an entryway table in addition to a shoe rack. I used 2 x 10's for the project.

Built from Plan(s)

Comments

Small End Table from 2X4's

Submitted by jbknakal on Sun, 04/10/2016 - 11:55

I made a smaller version of the Tryde End Table with Shelf. I made 2 of them from 6 2X4's

Estimated Cost
$30
Estimated Time Investment
Afternoon Project (3-6 Hours)
Finish Used
Black Paint
Recommended Skill Level
Beginner

Comments

Farmhouse Bed with Storage and Bookshelf footboard

Submitted by rbgreene04 on Sat, 05/21/2016 - 15:50

I altered the plans just a bit so that I could make use of the drawer closest to the headboard, while using bedside tables as well (not the ugly ones in the pictures, but some that only exist in my mind as of now). With the plan as is, I didn't think that first drawer would be able to open if you have a nightstand. So I left about a 17" gap that can be used as an open shelf for storage, and still had room for 3 drawers. I also wanted to include a bookshelf as the footboard to make it multifunctional. We have a ton of books and no place to store them (fear not, a large bookshelf/media center is coming soon!) I also altered the top of the headboard just a bit to give it more texture and visual appeal (hopefully, but beauty is in the eye of the beholder so I've been told). Lastly, I did not put the 1/4" plywood backing on the drawer carcasses. They were pretty sturdy as is, and only got more sturdy as they were attached to the headboard and footboard; I'm not worried about racking at all. Leaving the back off also allows me to pull the drawers out and access some hidden storage in between the two drawer carcasses. 

I wanted a simple finish, so I rubbed it with dark walnut Danish oil. Super simple finish and I think it'll hold up as the bed is not like a desk that needs poly or something. 

Estimated Cost
Cost? Great question! I build things, but don't keep track of receipts. Whoops! It's a major flaw of mine, and I'm working on it. I'd estimate just shy of $300.
Estimated Time Investment
Week Long Project (20 Hours or More)
Finish Used
I sanded to 120 and then lathered on Dark walnut Danish oil. I let it soak into the wood, and boy was the wood thirsty. Then reapplied after about 30 minutes and wiped off the excess, which there wasn't much excess--did I mention the wood was thirsty?
Recommended Skill Level
Intermediate

Comments

ciara5545

Sun, 08/28/2016 - 19:50

This bed turned out amazing.  I love the modifications and agree the first drawer will be more usable.

Toddler Bunk Beds

Submitted by Anonymous (not verified) on Sat, 07/16/2016 - 22:13

Modified the classic bunk bed plans to fit crib size matresses for our 1.5 & 2 year old girls, loved how my toddler bunk beds turned out! 


Estimated Cost
$200
Estimated Time Investment
Day Project (6-9 Hours)
Finish Used
Behr 'Rainwater' paint in satin
Recommended Skill Level
Intermediate

Comments

em01024

Mon, 08/01/2016 - 17:27

Hi,

Could you email me the change in measurements you used for the crib mattress? 

It would help me out so much. I want to build a similar one for my boys. 

Thank you.

Danielle S. 

Daughters blue Playhouse

Submitted by rysos81 on Thu, 07/23/2020 - 08:55

I used the basic framing plan for the project, but extended roof overhangs, added engineered siding / trim and cedar shake roofing. I put 2x4 bracing on for the platform.

Estimated Time Investment
Week Long Project (20 Hours or More)
Recommended Skill Level
Intermediate
Seasonal And Holiday