Community Brag Posts
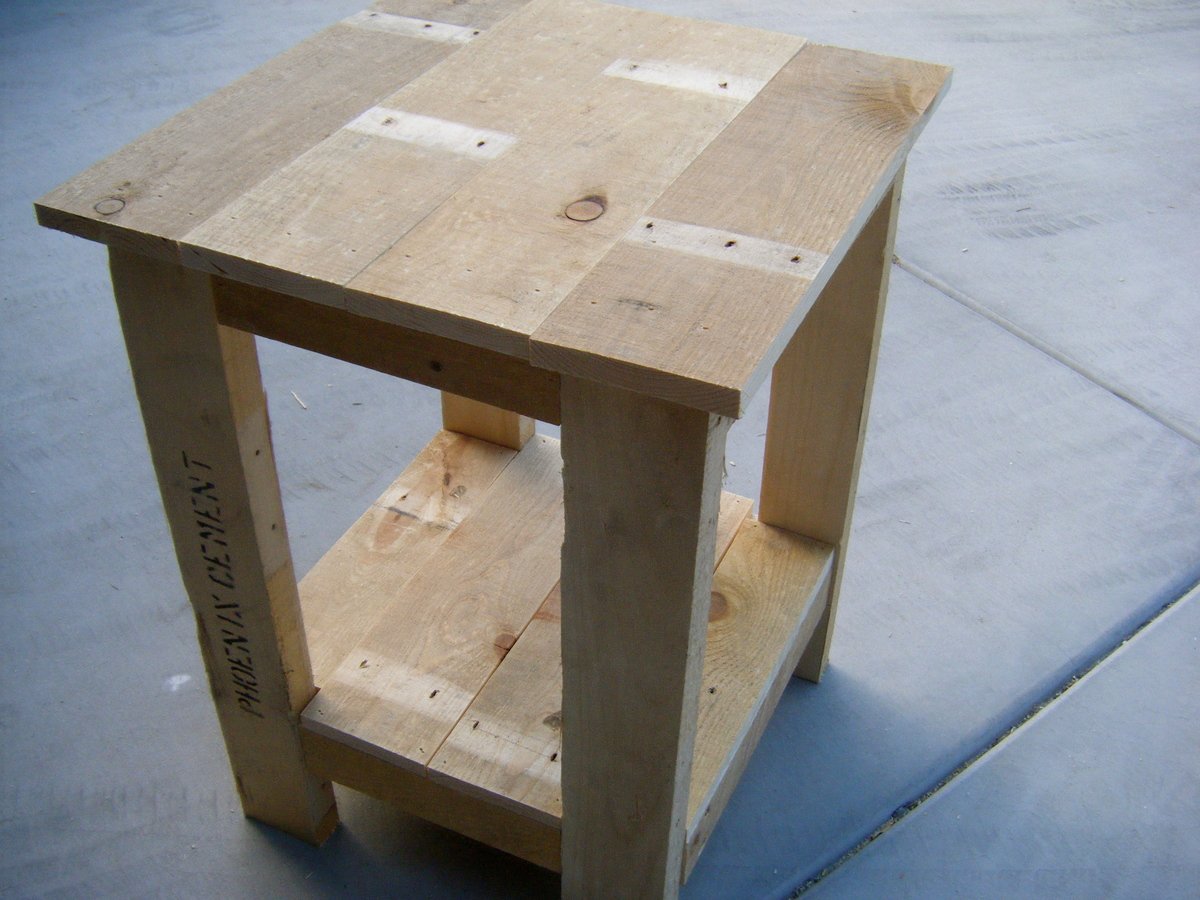
Tryed Side Table- Pallet Redux

Made these side tables for our master bedroom using the wood from 3 wooden pallets. The pallets took about 45 minutes each to disassemble and the plank sizing required us to ripped the boards to 3 different uniform widths.


Estimated Time Investment
Day Project (6-9 Hours)
Recommended Skill Level
Beginner
Comments
Fri, 09/14/2012 - 15:06
Do you have a blog? I
Do you have a blog? I commented on someone's blog and they sent me to this site, but now I cannot find their blog!!
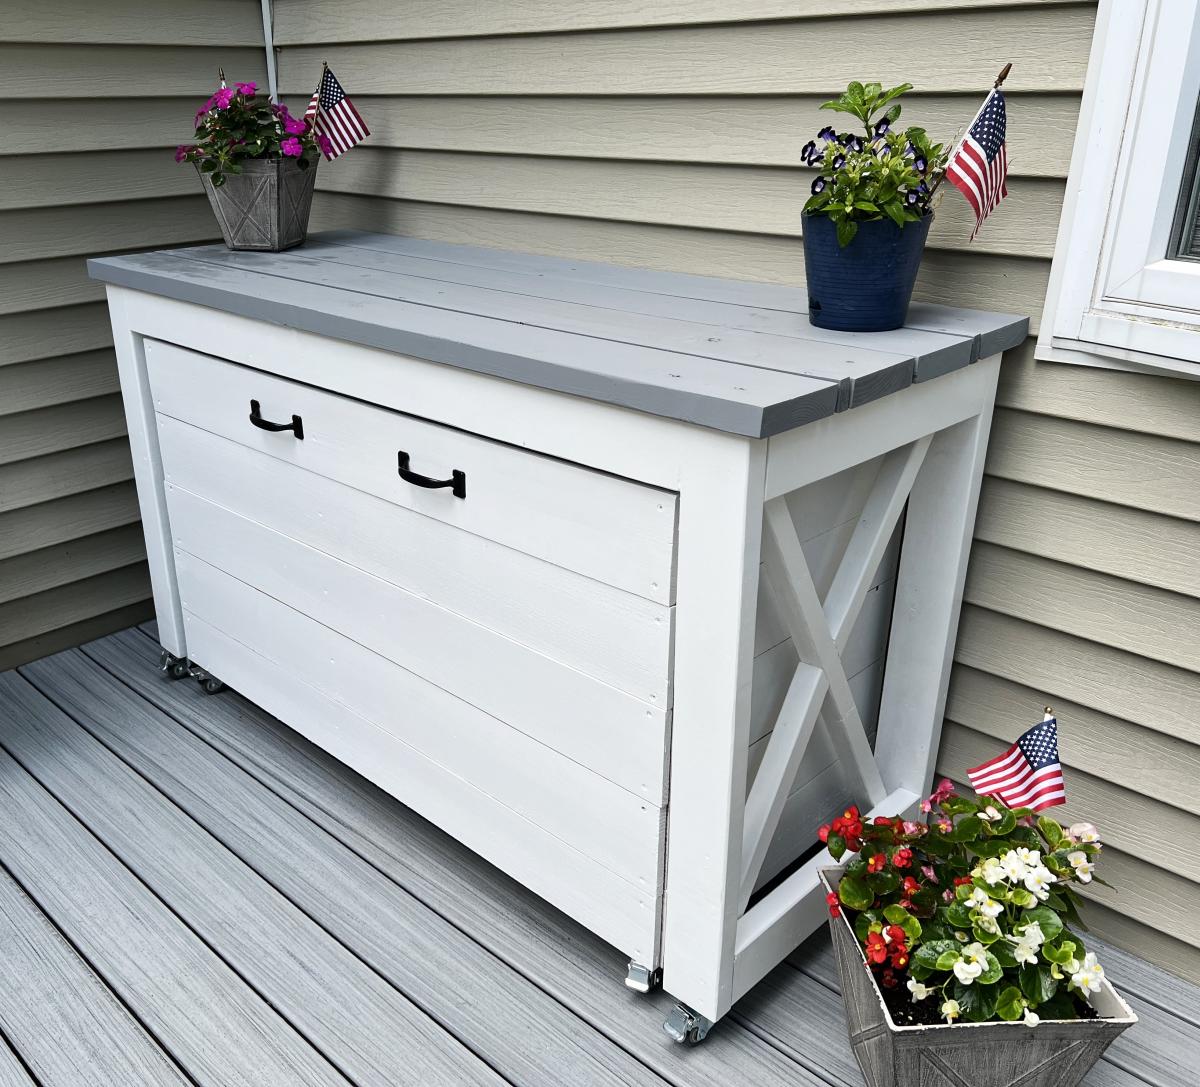
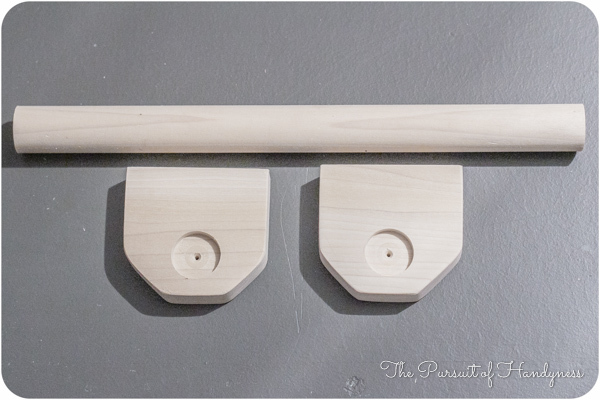
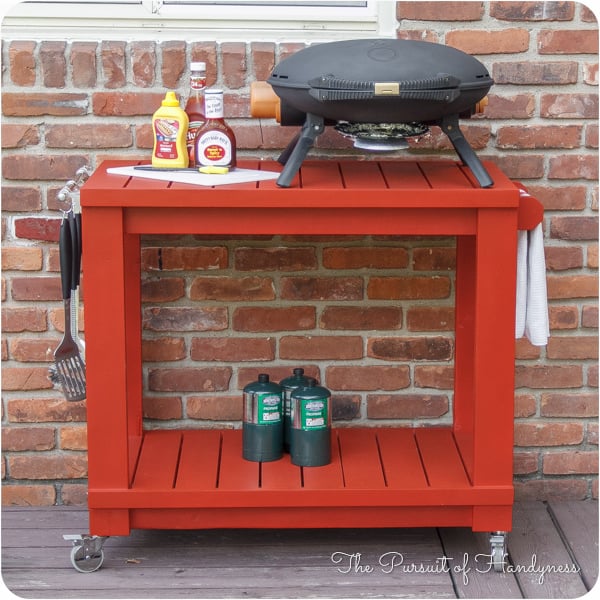
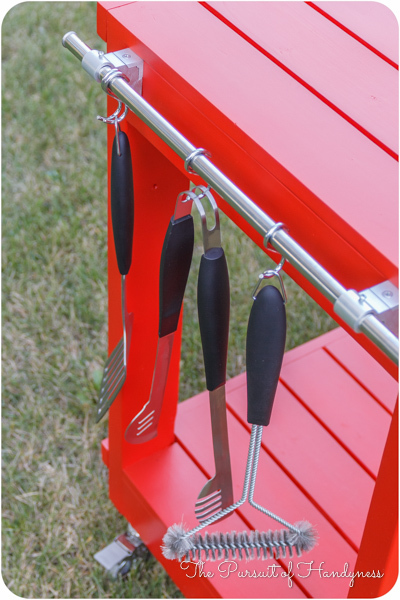
Grill Station
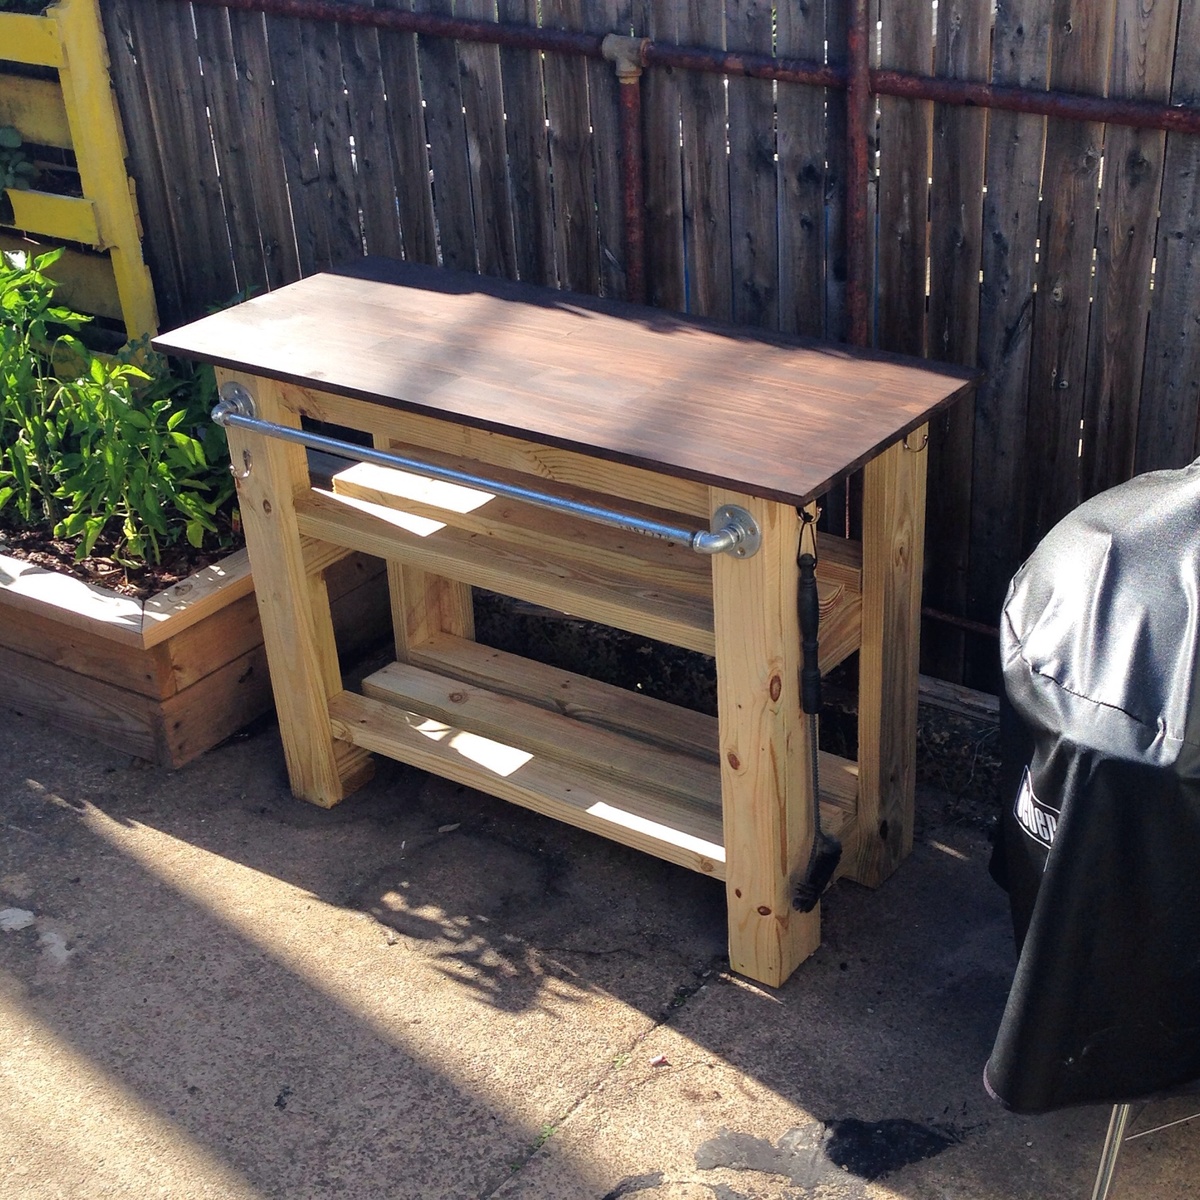
Grill station
Built from Plan(s)
Estimated Cost
100
Estimated Time Investment
Afternoon Project (3-6 Hours)
Finish Used
Rustoleum Kona
Recommended Skill Level
Beginner
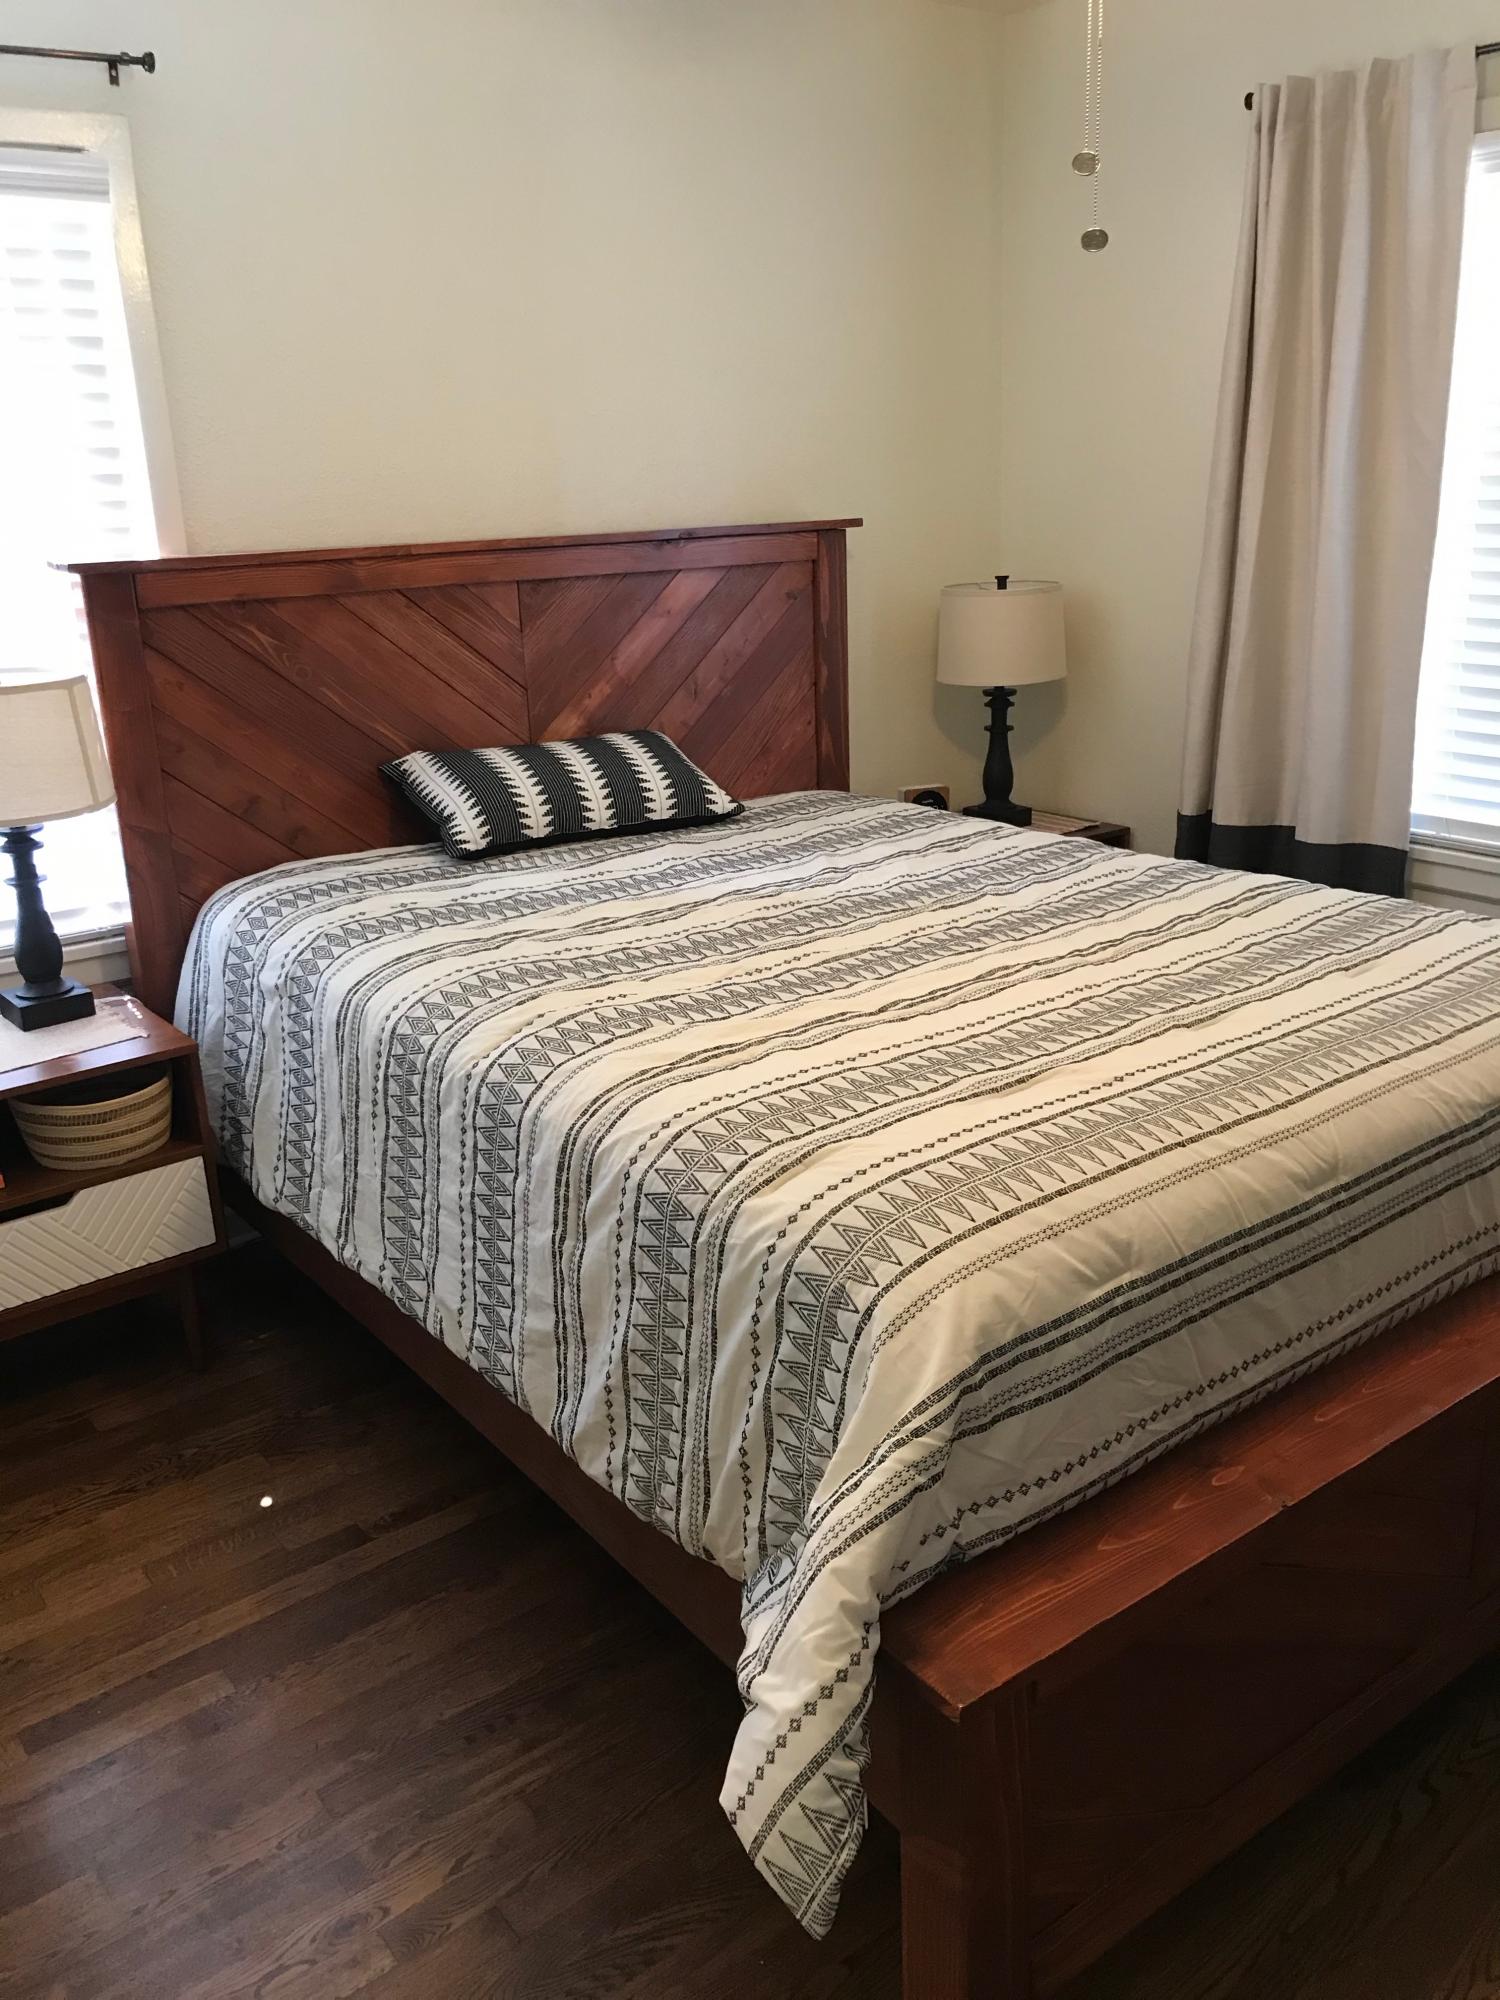
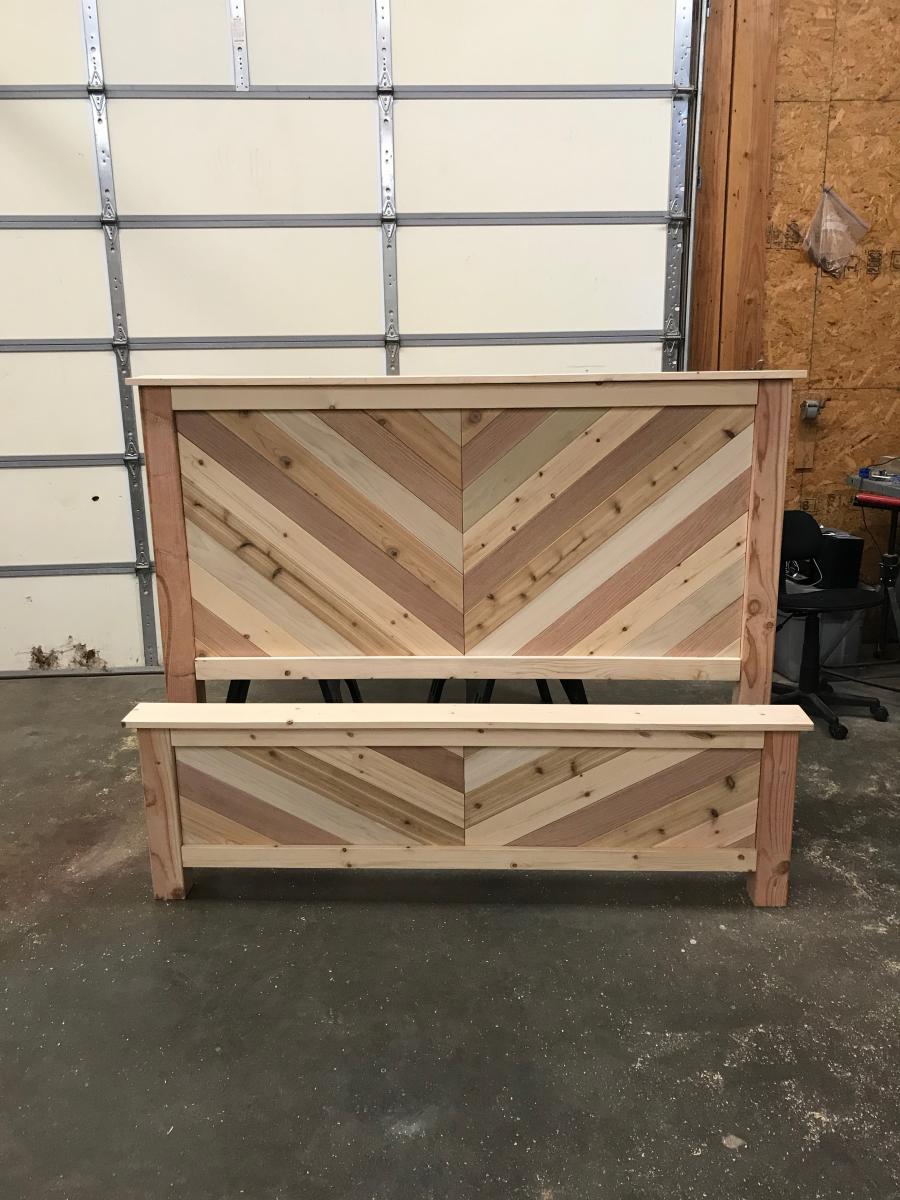

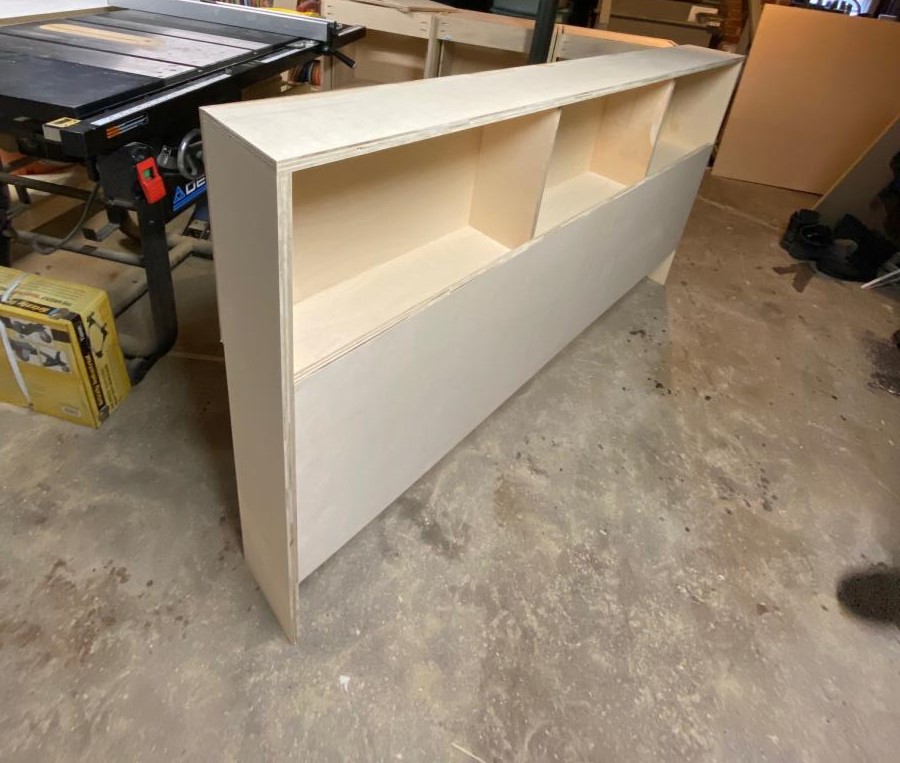
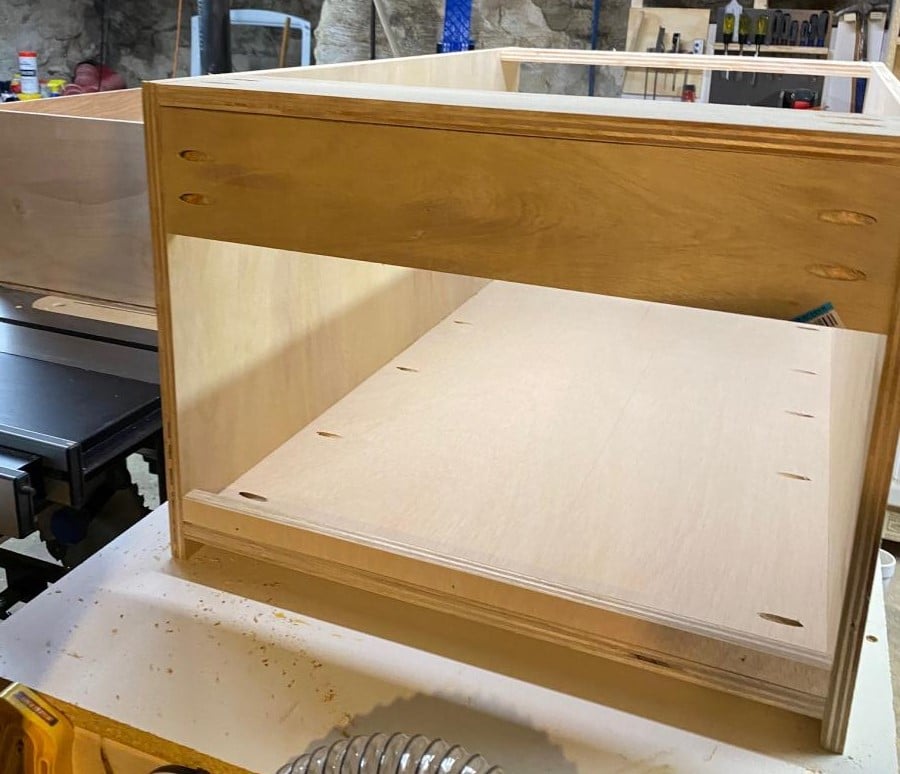
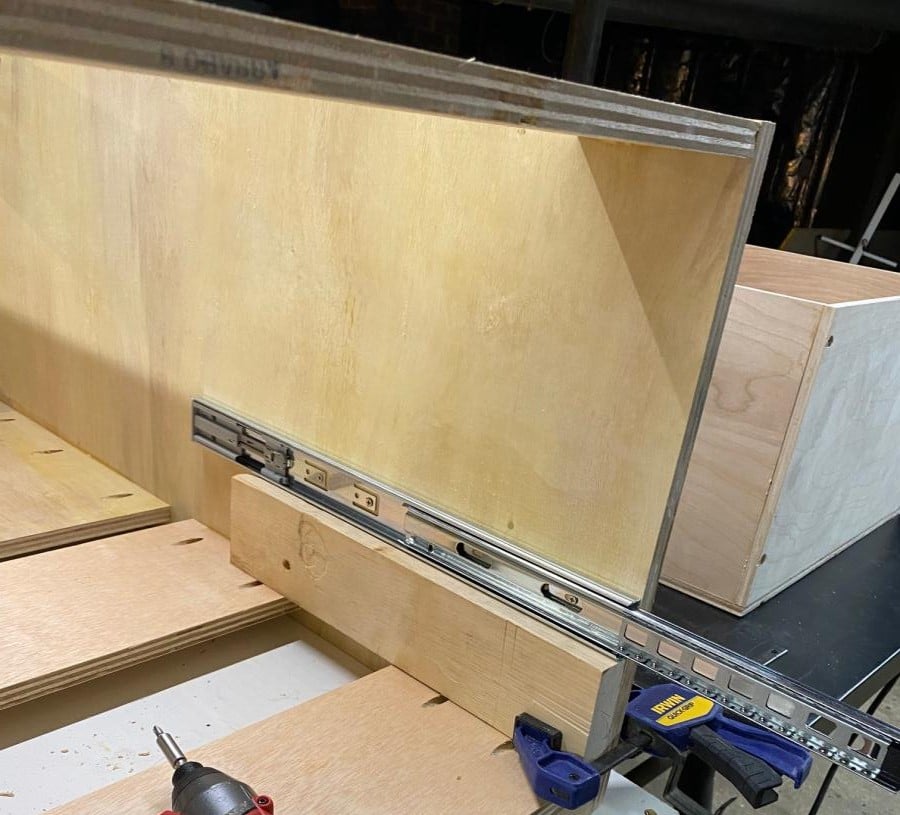
Storage Captains Bed
So this was a really fun project from start to finish, I wanted a storage bed with a place for my son to showcase his Super Hero collection!
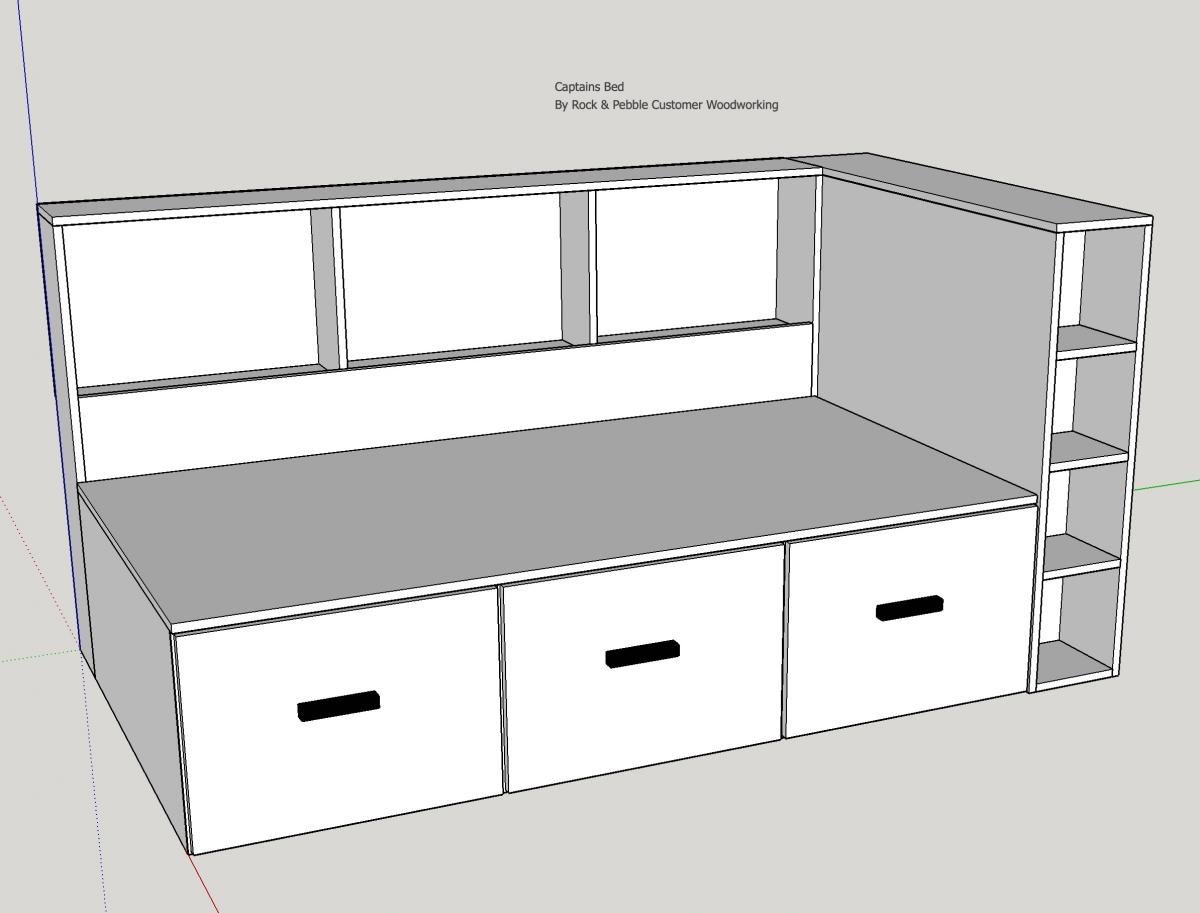
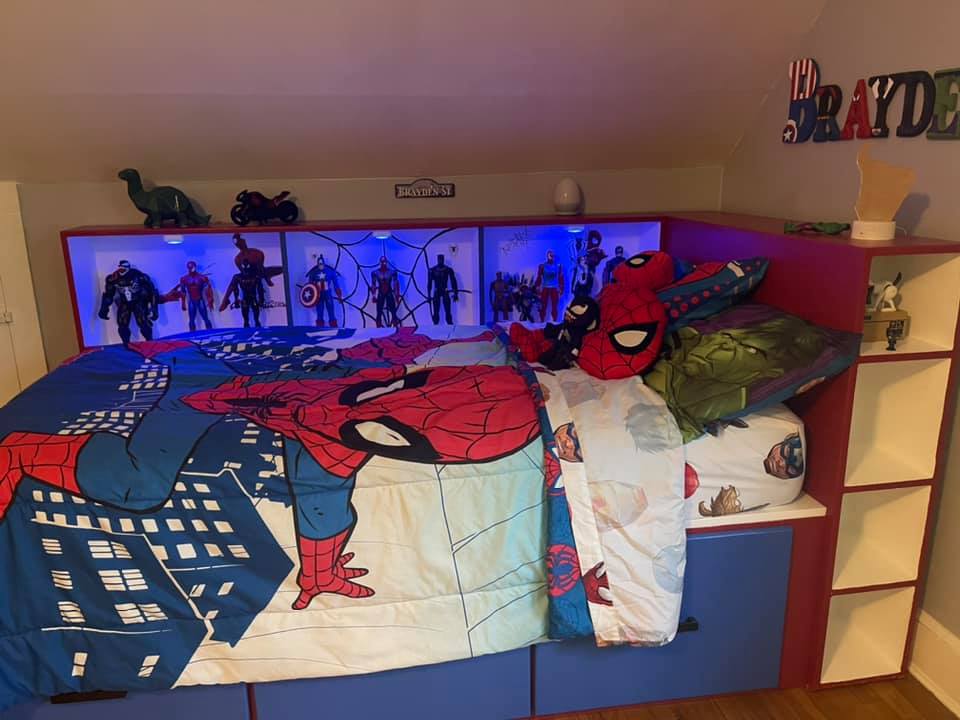
Estimated Cost
300
Estimated Time Investment
Week Long Project (20 Hours or More)
Finish Used
Paint
Recommended Skill Level
Intermediate
Comments
Gate-Leg Sewing Table

My husband and I built this table as our first project. We followed all of the dimensions from Ana's "Small Sewing Table" project here: http://ana-white.com/2010/10/plans/sewing-table-small-spaces?page=1 The only thing we changed was the size of the table top and the legs. We were worried about putting my heavy sewing machine on top of the leaf called for in the plan, so we created gate legs to support the leaves. Since the legs were going to be folded up in between the base and each leaf, we extended the center portion of the table top to accommodate the change. After it was assembled and stained, I decided that I didn't like the solid color, so I stenciled on a pattern with white latex enamel paint (what I had on hand) and continued to paint the base. After lightly scuffing it up with the sander, I layered 3 coats of poly on top. It has held up well, even after many large quilt projects! I just LOVE my sewing table!
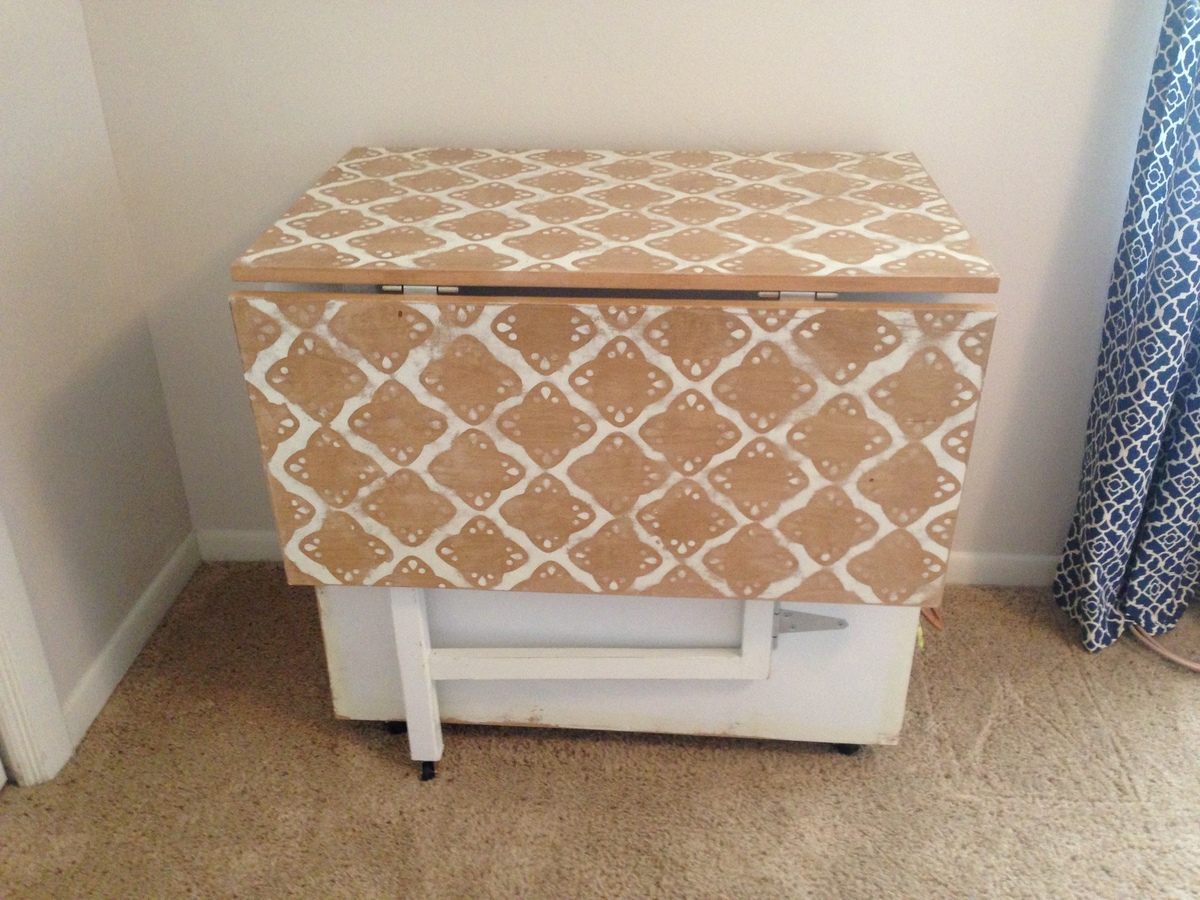
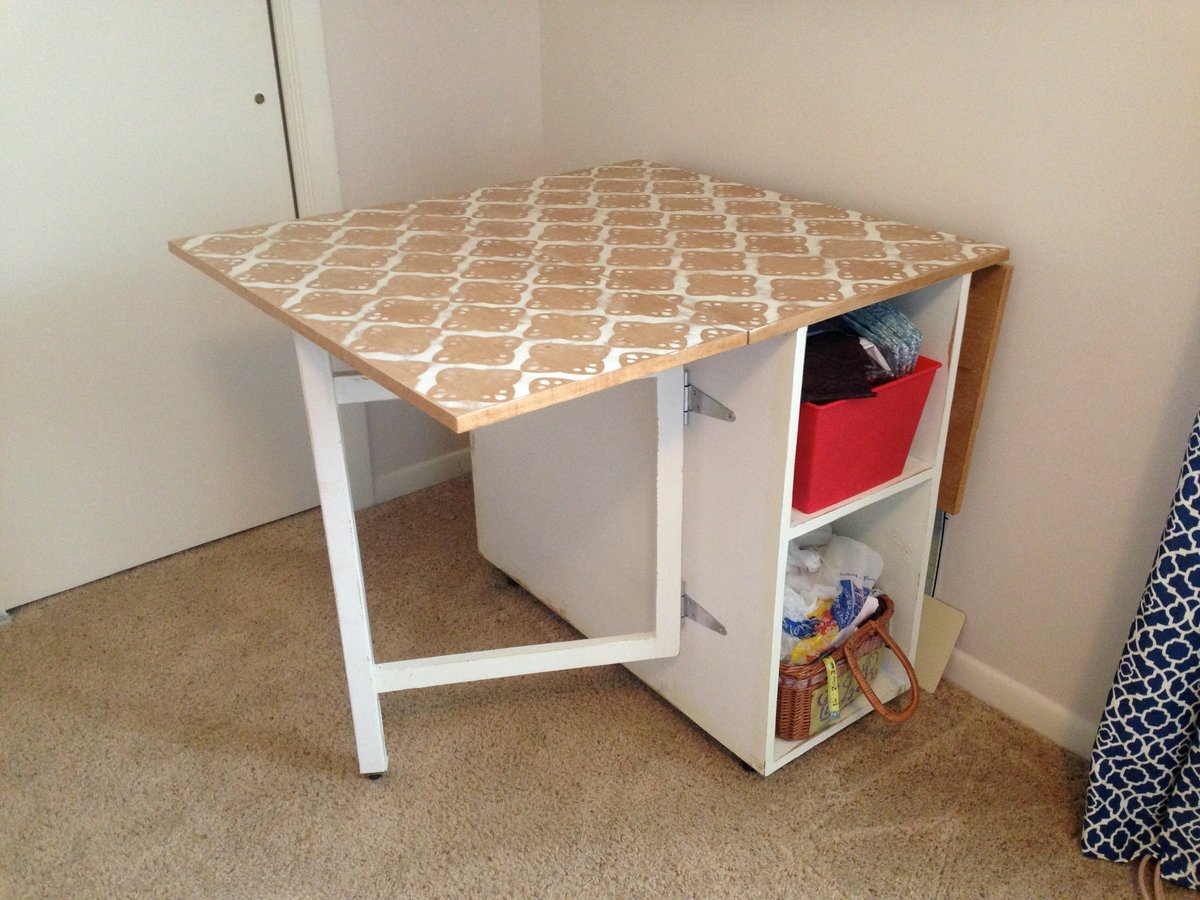
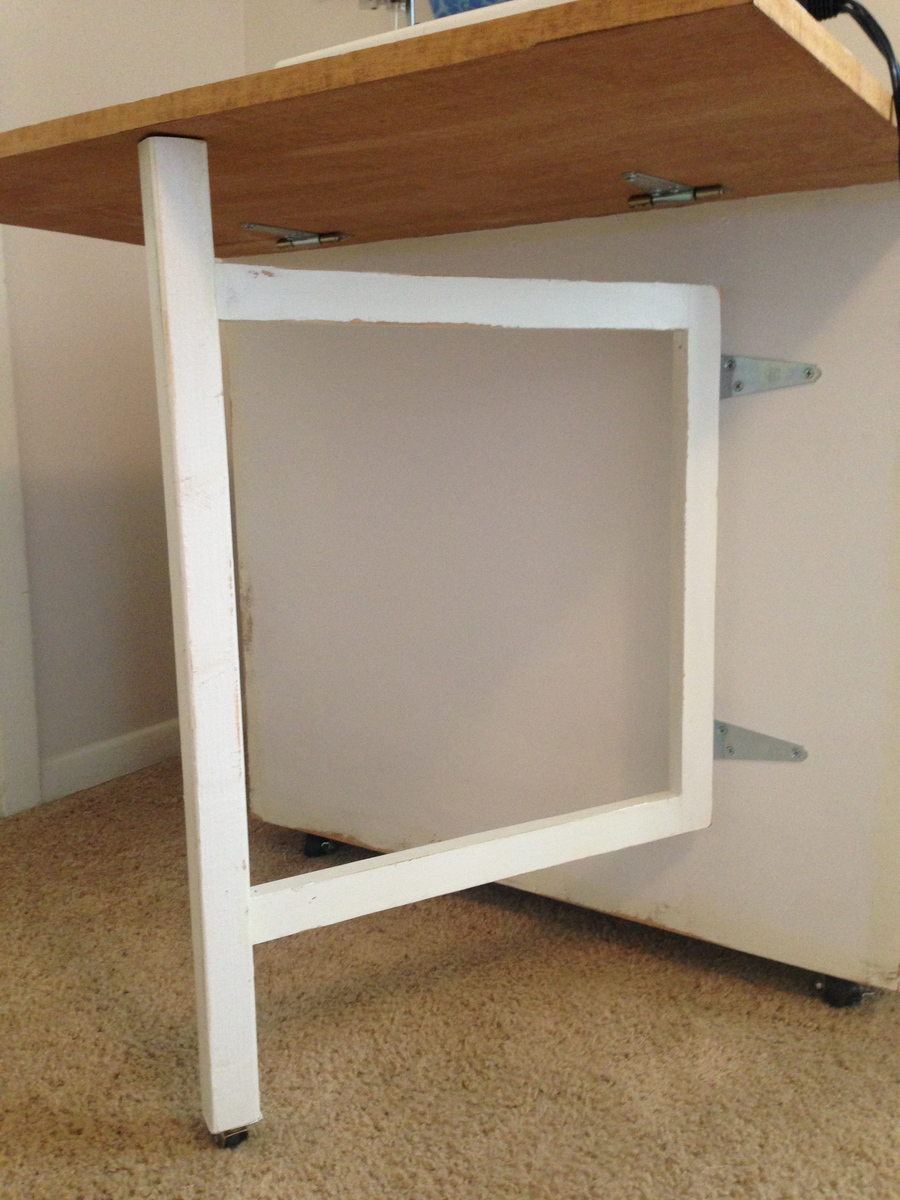
Built from Plan(s)
Estimated Cost
$120
Estimated Time Investment
Weekend Project (10-20 Hours)
Finish Used
Golden Oak Minwax Stain
Polycrilic
Valspa Latex Enamel in Satin White
Polycrilic
Valspa Latex Enamel in Satin White
Recommended Skill Level
Beginner
Comments
Fri, 08/05/2016 - 13:41
Brackets for leg(s)
Hi there. Could you please tell me what the brackets are you used with the gateleg? Do you remember where you got them? Thank you!!!
Fri, 05/26/2023 - 16:59
Gate-Legs Construction
Hello I was wanting to know how to make the Gate-Legs for this project? Like the measurements and such. Thank you.
Sun, 05/12/2024 - 08:40
How much can it hold
How heavy of sewing machine can this hold? My machine is 32 lbs. Would it be able to sit and be used on the “leaf” side of the table ?
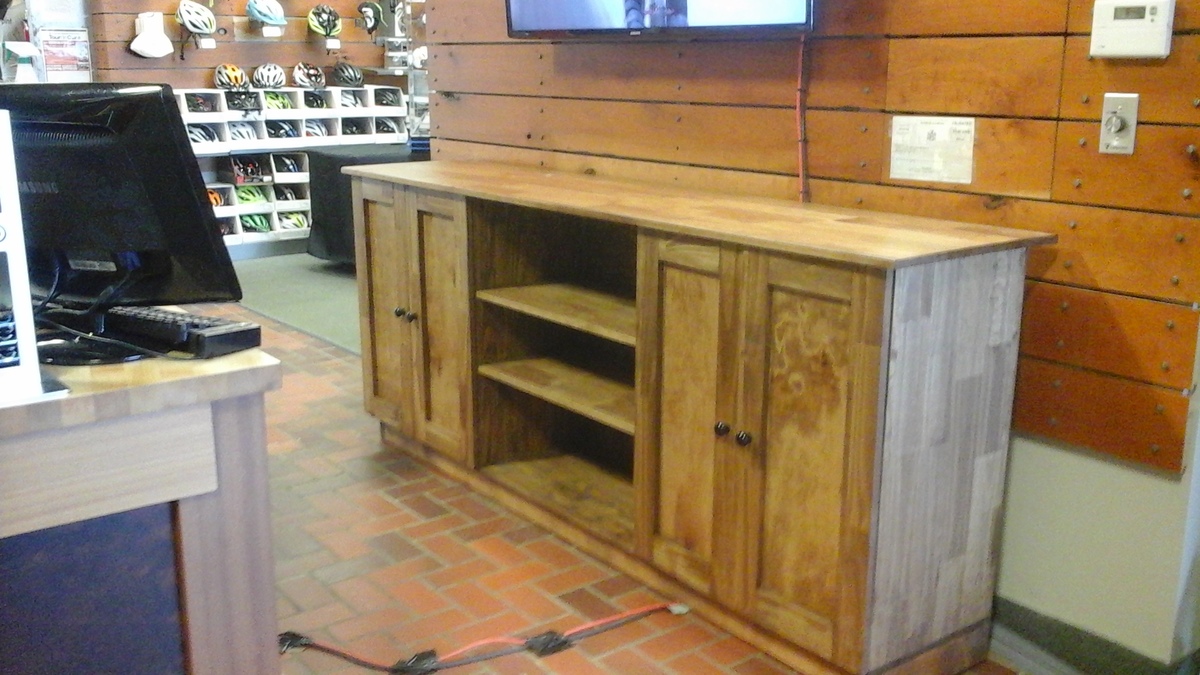
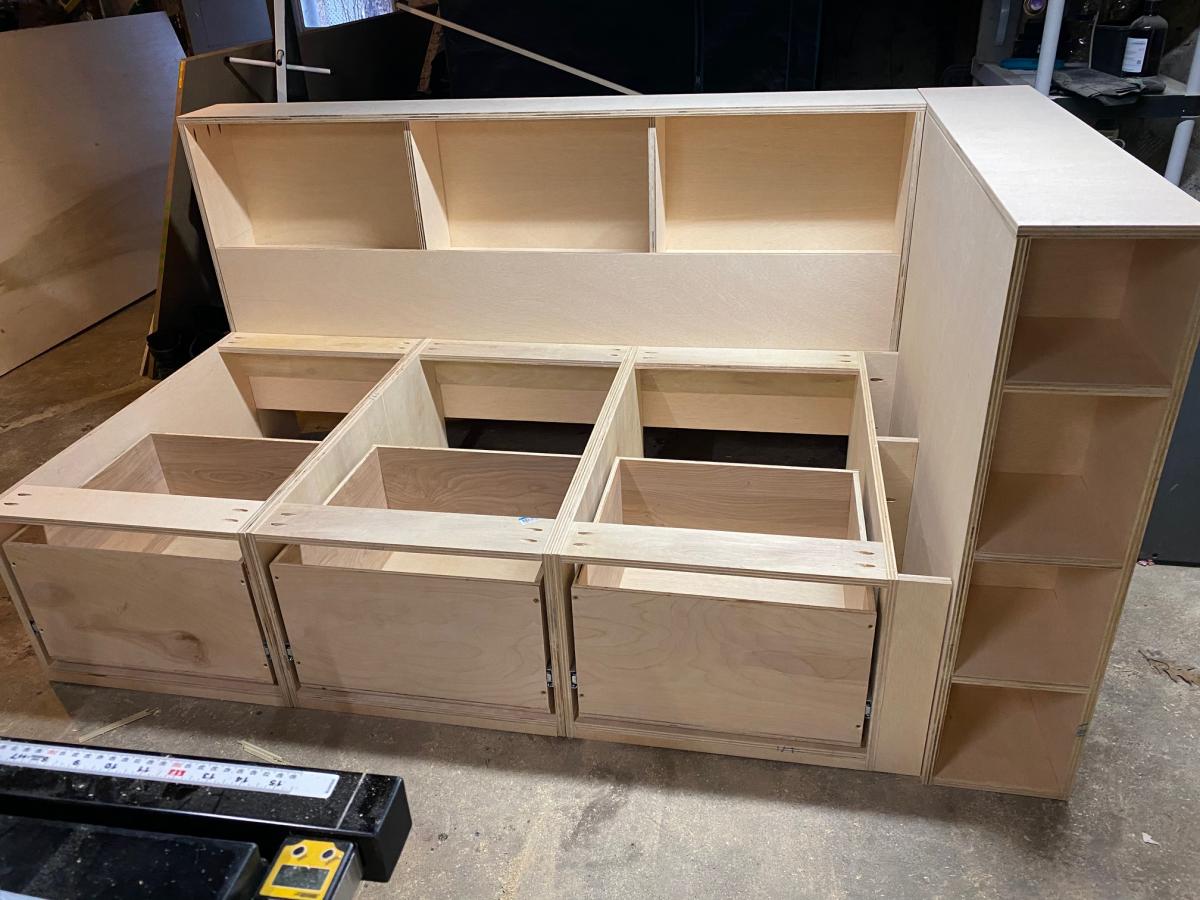
Cubby Storage System

This was my first building project ever! Even though it took longer than I expected to complete (I have four tiny kids and snagged an hour here and there during nap time over the course of many months), it was absolutely worth the time investment (and wait)! Hanging the doors was tricky (my awesome husband tackled that part), but other than that it was easy to put together. Finishing it was the hardest part by far. If I were to do it again, I'd probably do some preliminary sanding of the boards before putting them together and I would most certainly not use oak (I was talked into it by the HD guys) especially since I ended up painting it. I think it would have turned out just as great if I'd used a cheaper wood or MDF. Thanks for the plans Ana!
Built from Plan(s)
Estimated Time Investment
Week Long Project (20 Hours or More)
Finish Used
Started with two coats of Behr Ultra Interior Satin (paint w/primer) color matched to Martha Stewart Barn Red (sanded between coats). After one final (light) sanding to distress, I finished with one coat of Ralph Lauren Glaze in Tobacco that I had on hand (brush on one side of surface and then quickly wipe away excess with an old rag--moving the rag in the direction of the wood grain). The glaze brought out the wood grain more and helped tone down the exposed wood.
Recommended Skill Level
Beginner
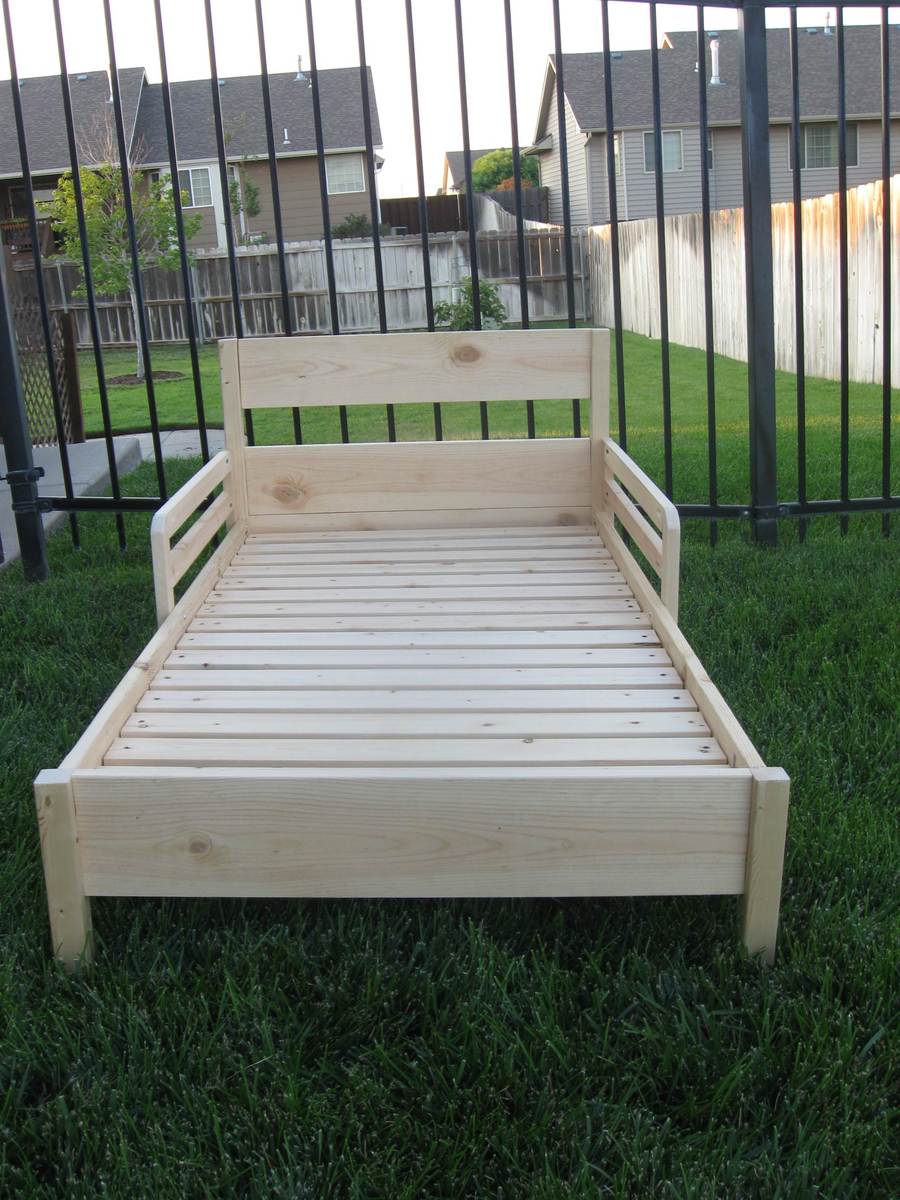
Traditional Toddler Bed with a few changes
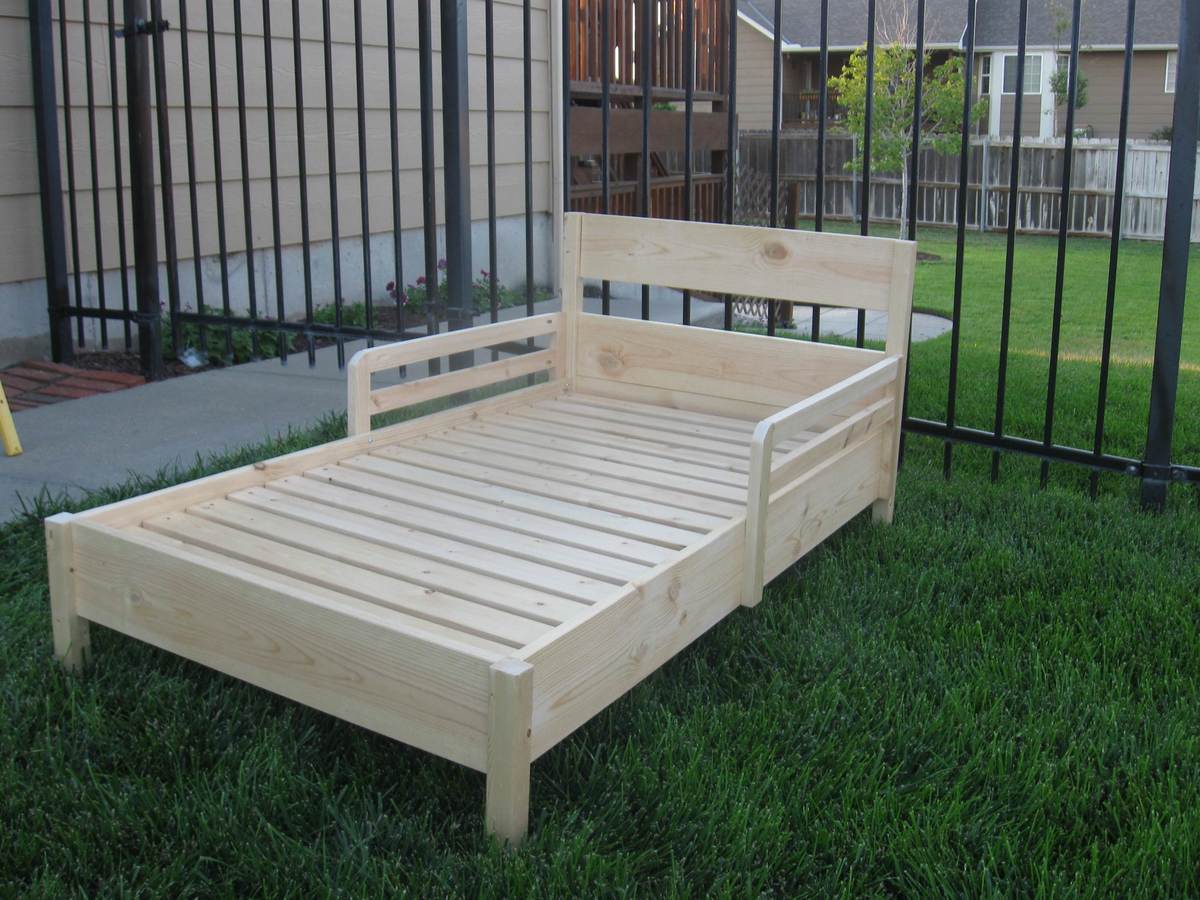
This was basically my first ever wood working project. It didn't turn out perfect but I had fun doing it and my daughter likes it too! It isn't done yet, still need to figure out the color of paint I'm going to use.
Built from Plan(s)
Estimated Cost
~35 for lumber, Kreg jig, screws, paint additional
Finish Used
Not finished yet.
Recommended Skill Level
Beginner
Comments
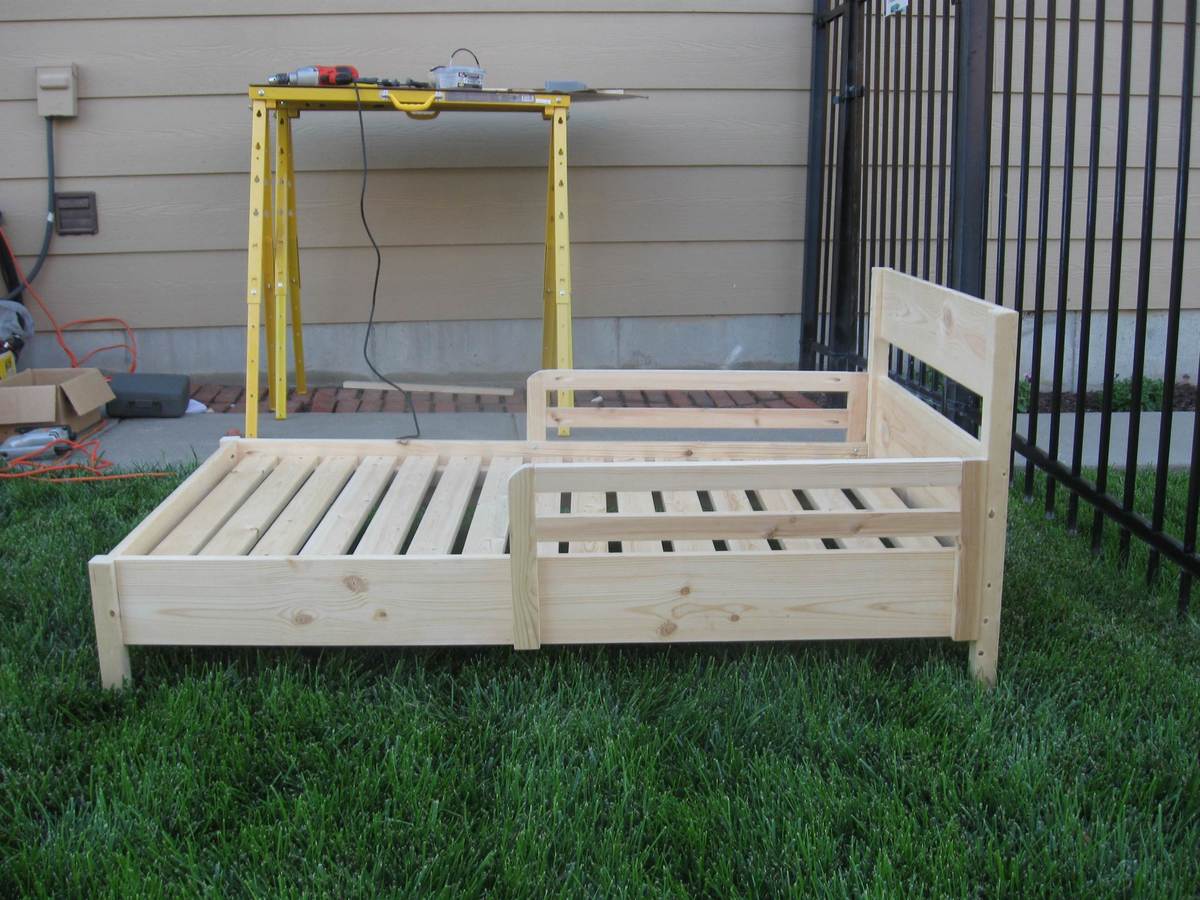
Trundle Bed For Grandma and Grandpa

Built a twin bed trundle for visits from grandma and grandpa. Thrown together when we realized our setup was not going to work, we are planning to paint or stain once this visit comes to an end.

Built from Plan(s)
Estimated Time Investment
Day Project (6-9 Hours)
Recommended Skill Level
Beginner
Double Inset Bookshelf Doors
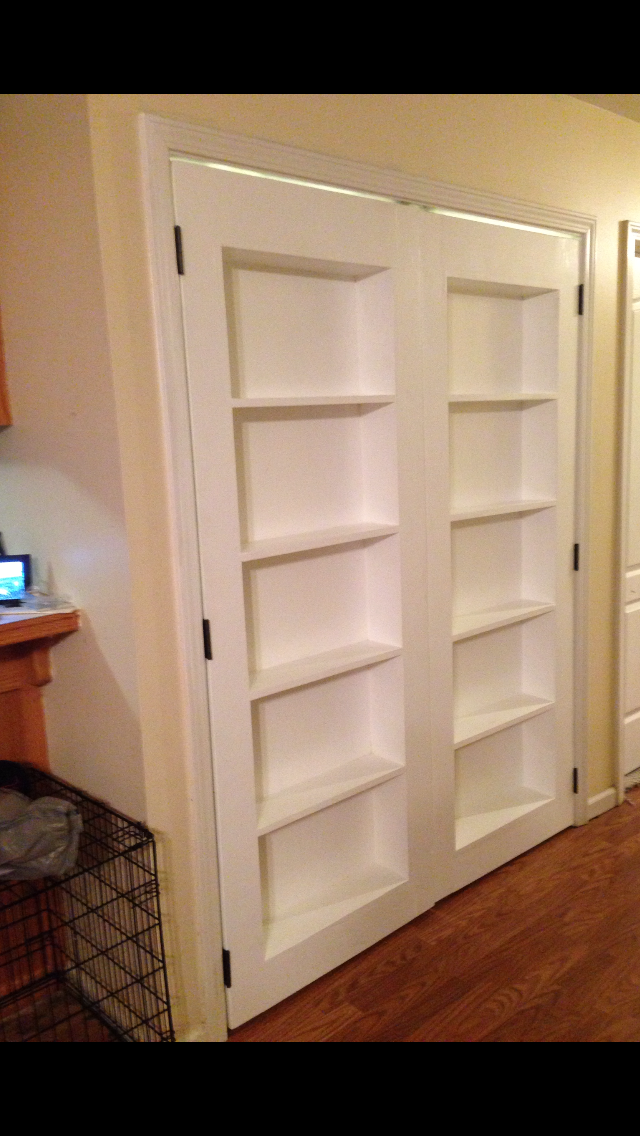
You made this project look so simple that I just had to try it. However, to suit my needs I had to make a few alterations to the plans. I had a set of bi-fold doors that were in need of replacement and I thought inset bookshelf doors would be the perfect way to replace them. This project was easy enough for me to do it myself and I am really new to the DIY game but I did have some help. I really love the way they turned out. You can read all about my my adventure at http://heresalittletmi.blogspot.com/2013/08/bookshelf-doors.html
Camp Loft Bed with Stairs
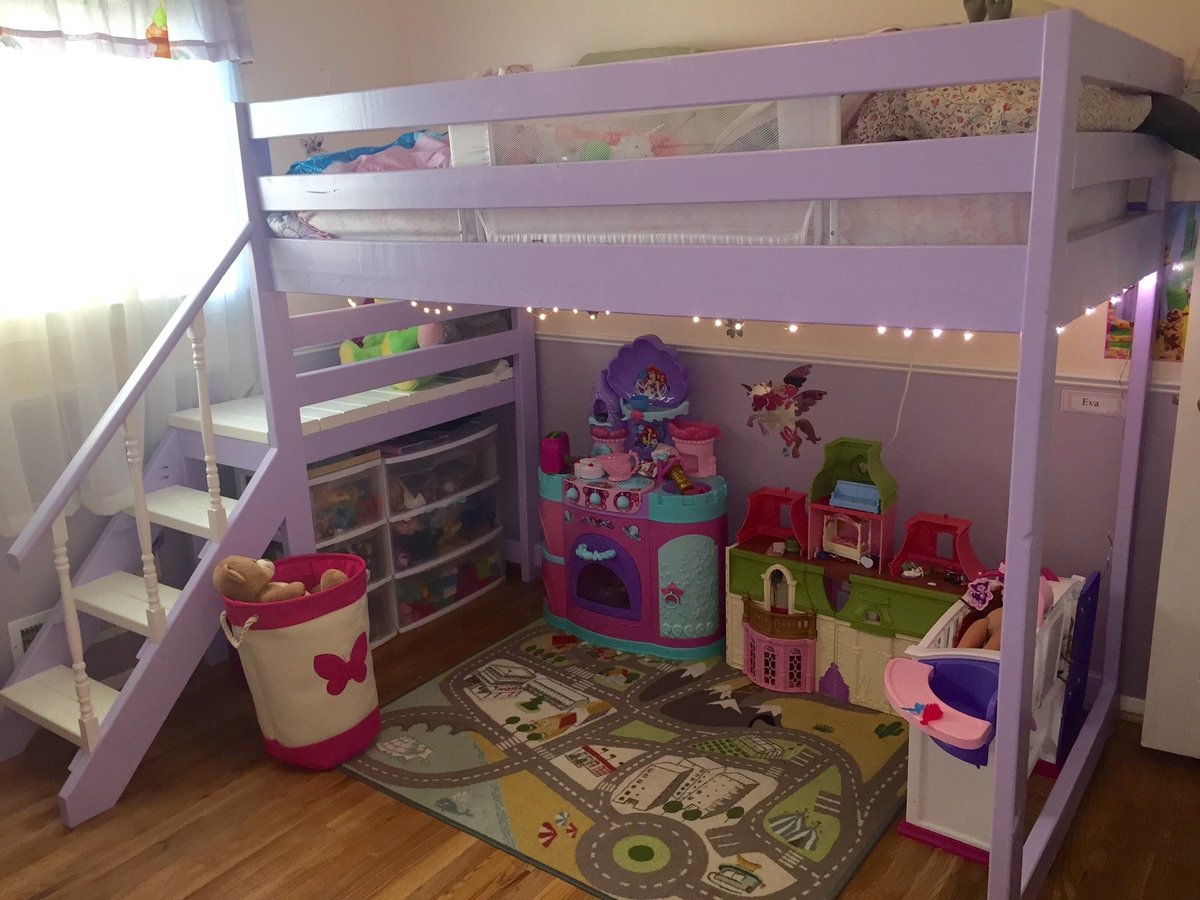
I wanted to create a loft bed for my daughter so that she could have space underneath to play since her room is small. This was the perfect solution! I went ahead and added a stair rail so she could feel a little safer coming down the stairs (she is 4 yrs old). She loves her princess bed and what's best she wants to sleep in it instead of with mommy and daddy! This was my first wood working project.
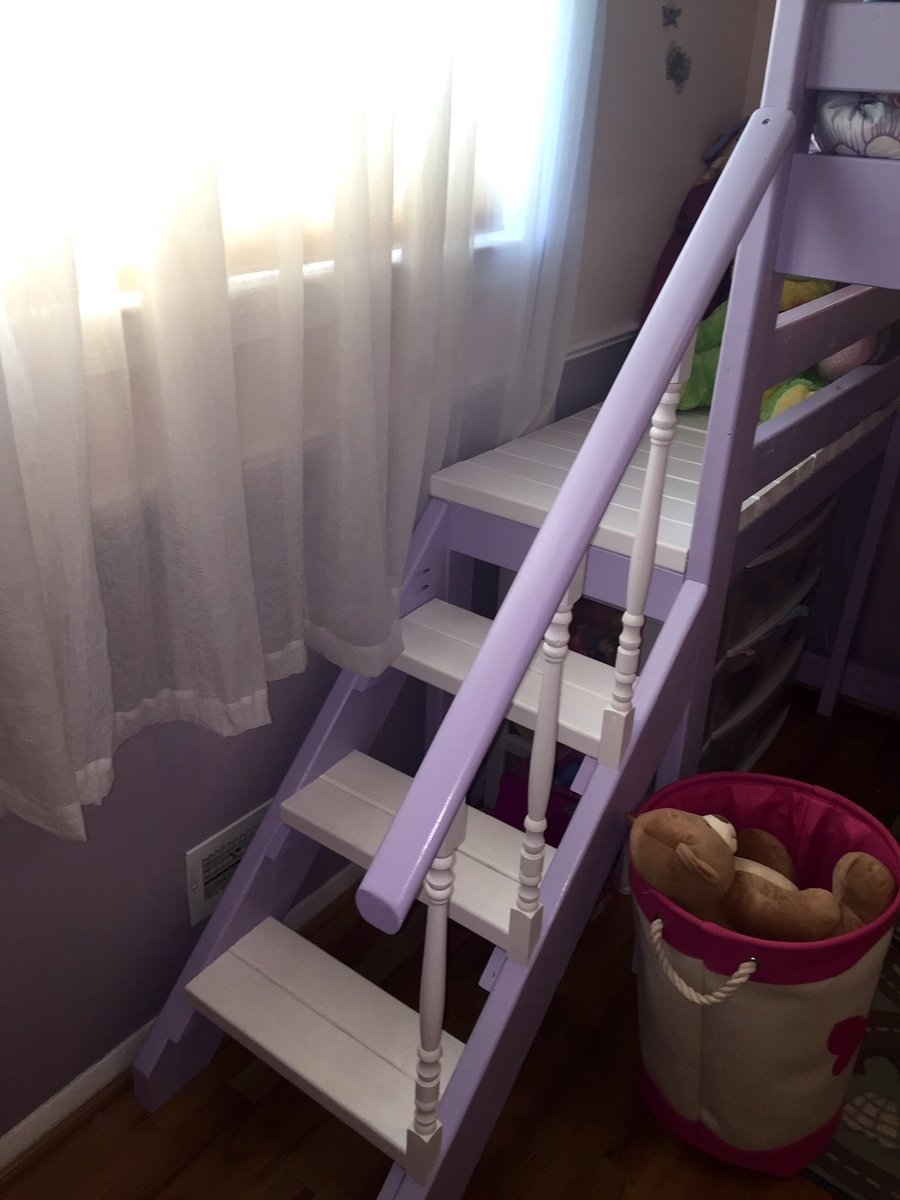
Built from Plan(s)
Estimated Time Investment
Weekend Project (10-20 Hours)
Recommended Skill Level
Beginner
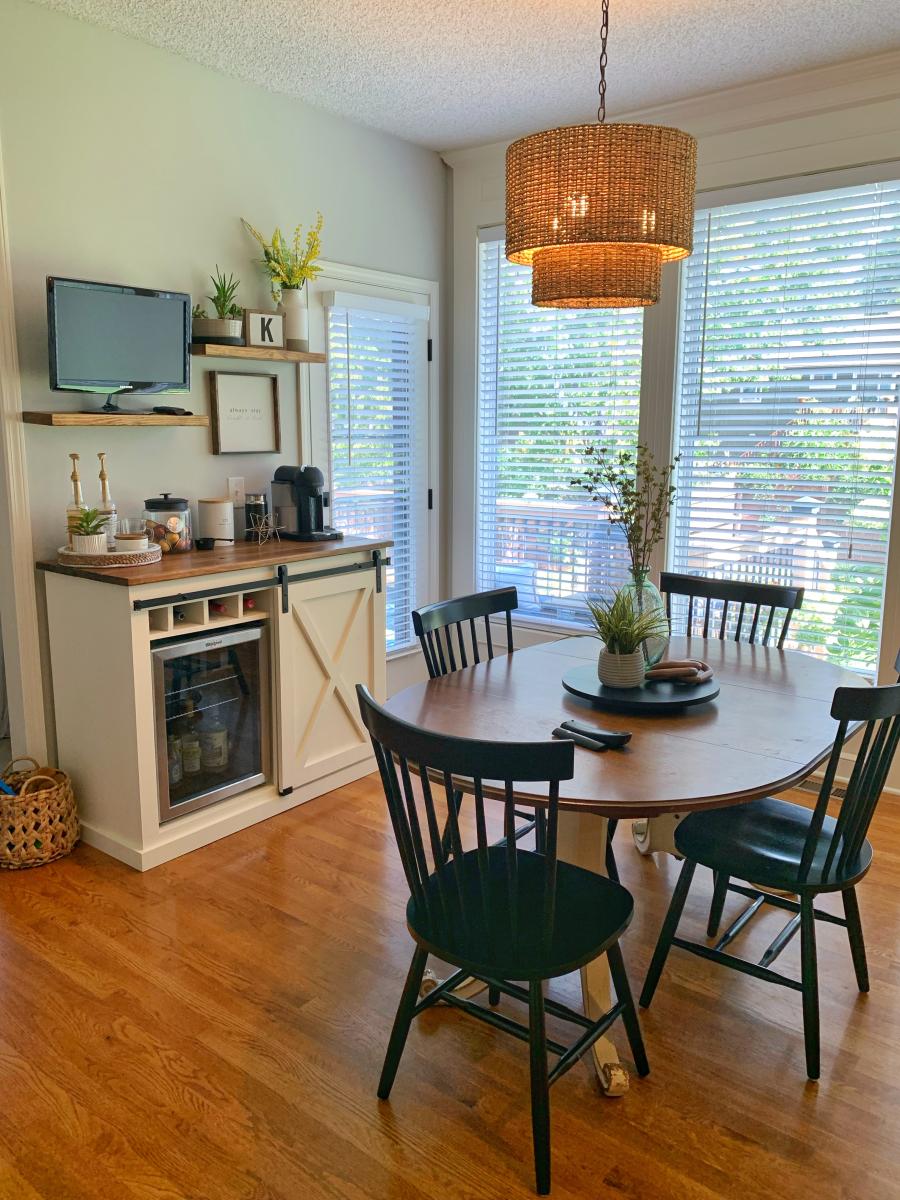
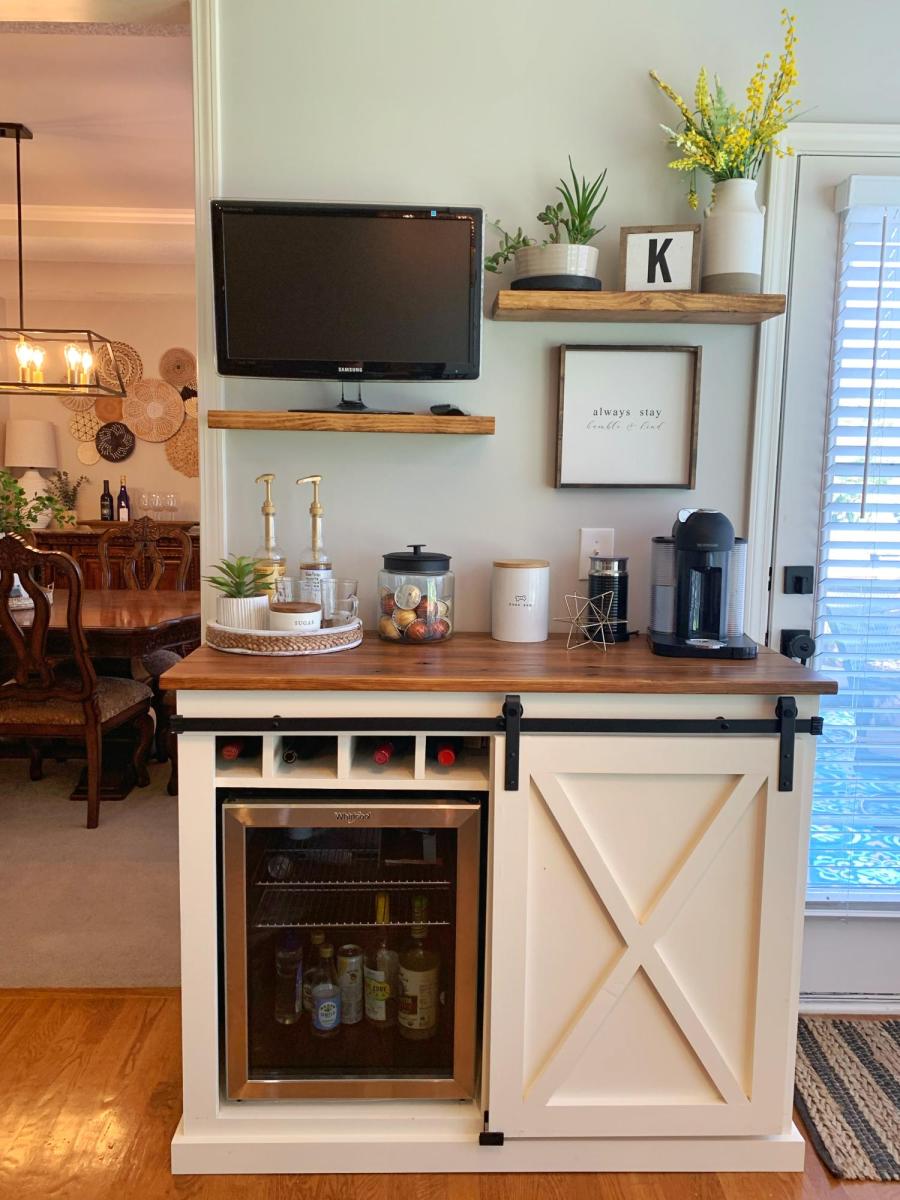
Coffee Bar
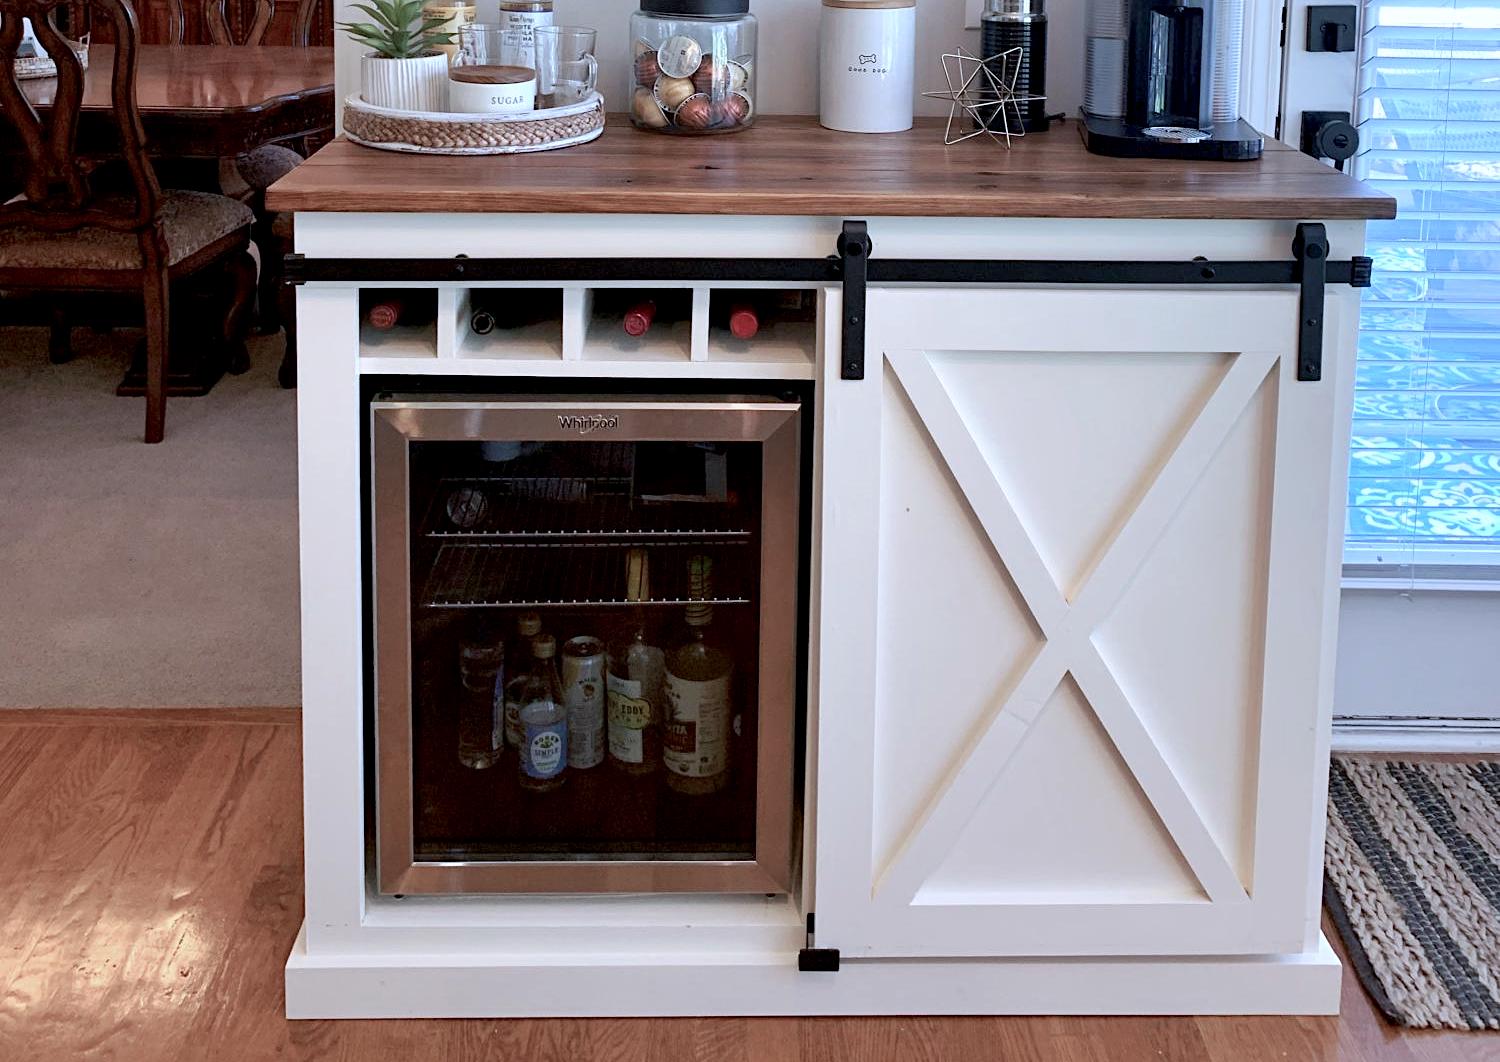
My wife wanted a coffee bar and I wanted a fridge for wine and beer. So we compromised on this.
Built from Plan(s)
Comments
Thu, 12/29/2022 - 10:02
Stunning Coffee Bar!
Pretty much everything you ned in one place! Thank you for sharing, amazing build! Sharing to social media, please email [email protected] if you'd like us to tag you!
Weekend project
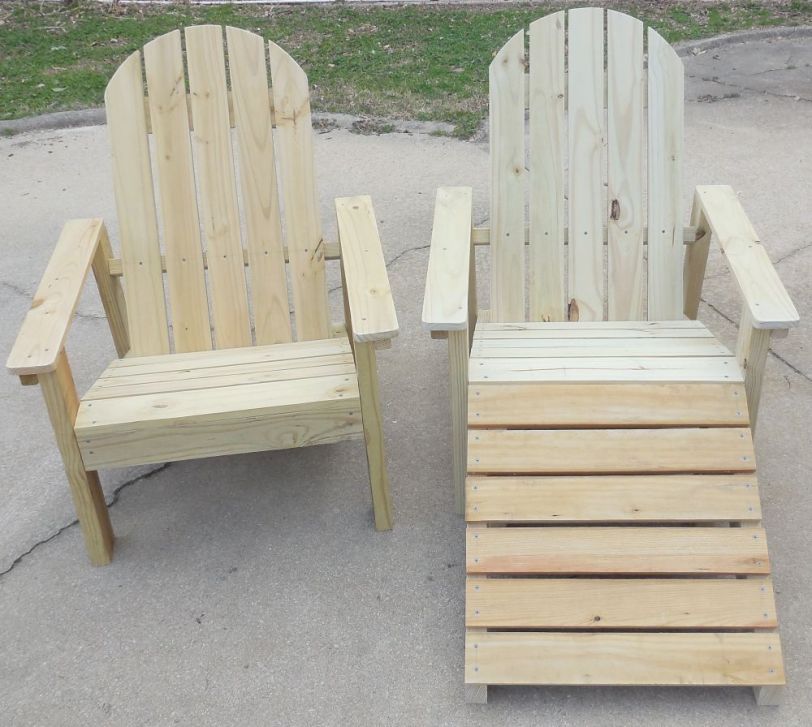
Tips on building the Home Depot Adirondack chair.
Built from Plan(s)
Estimated Cost
$40
Estimated Time Investment
Weekend Project (10-20 Hours)
Recommended Skill Level
Beginner
Nesting Grill Station
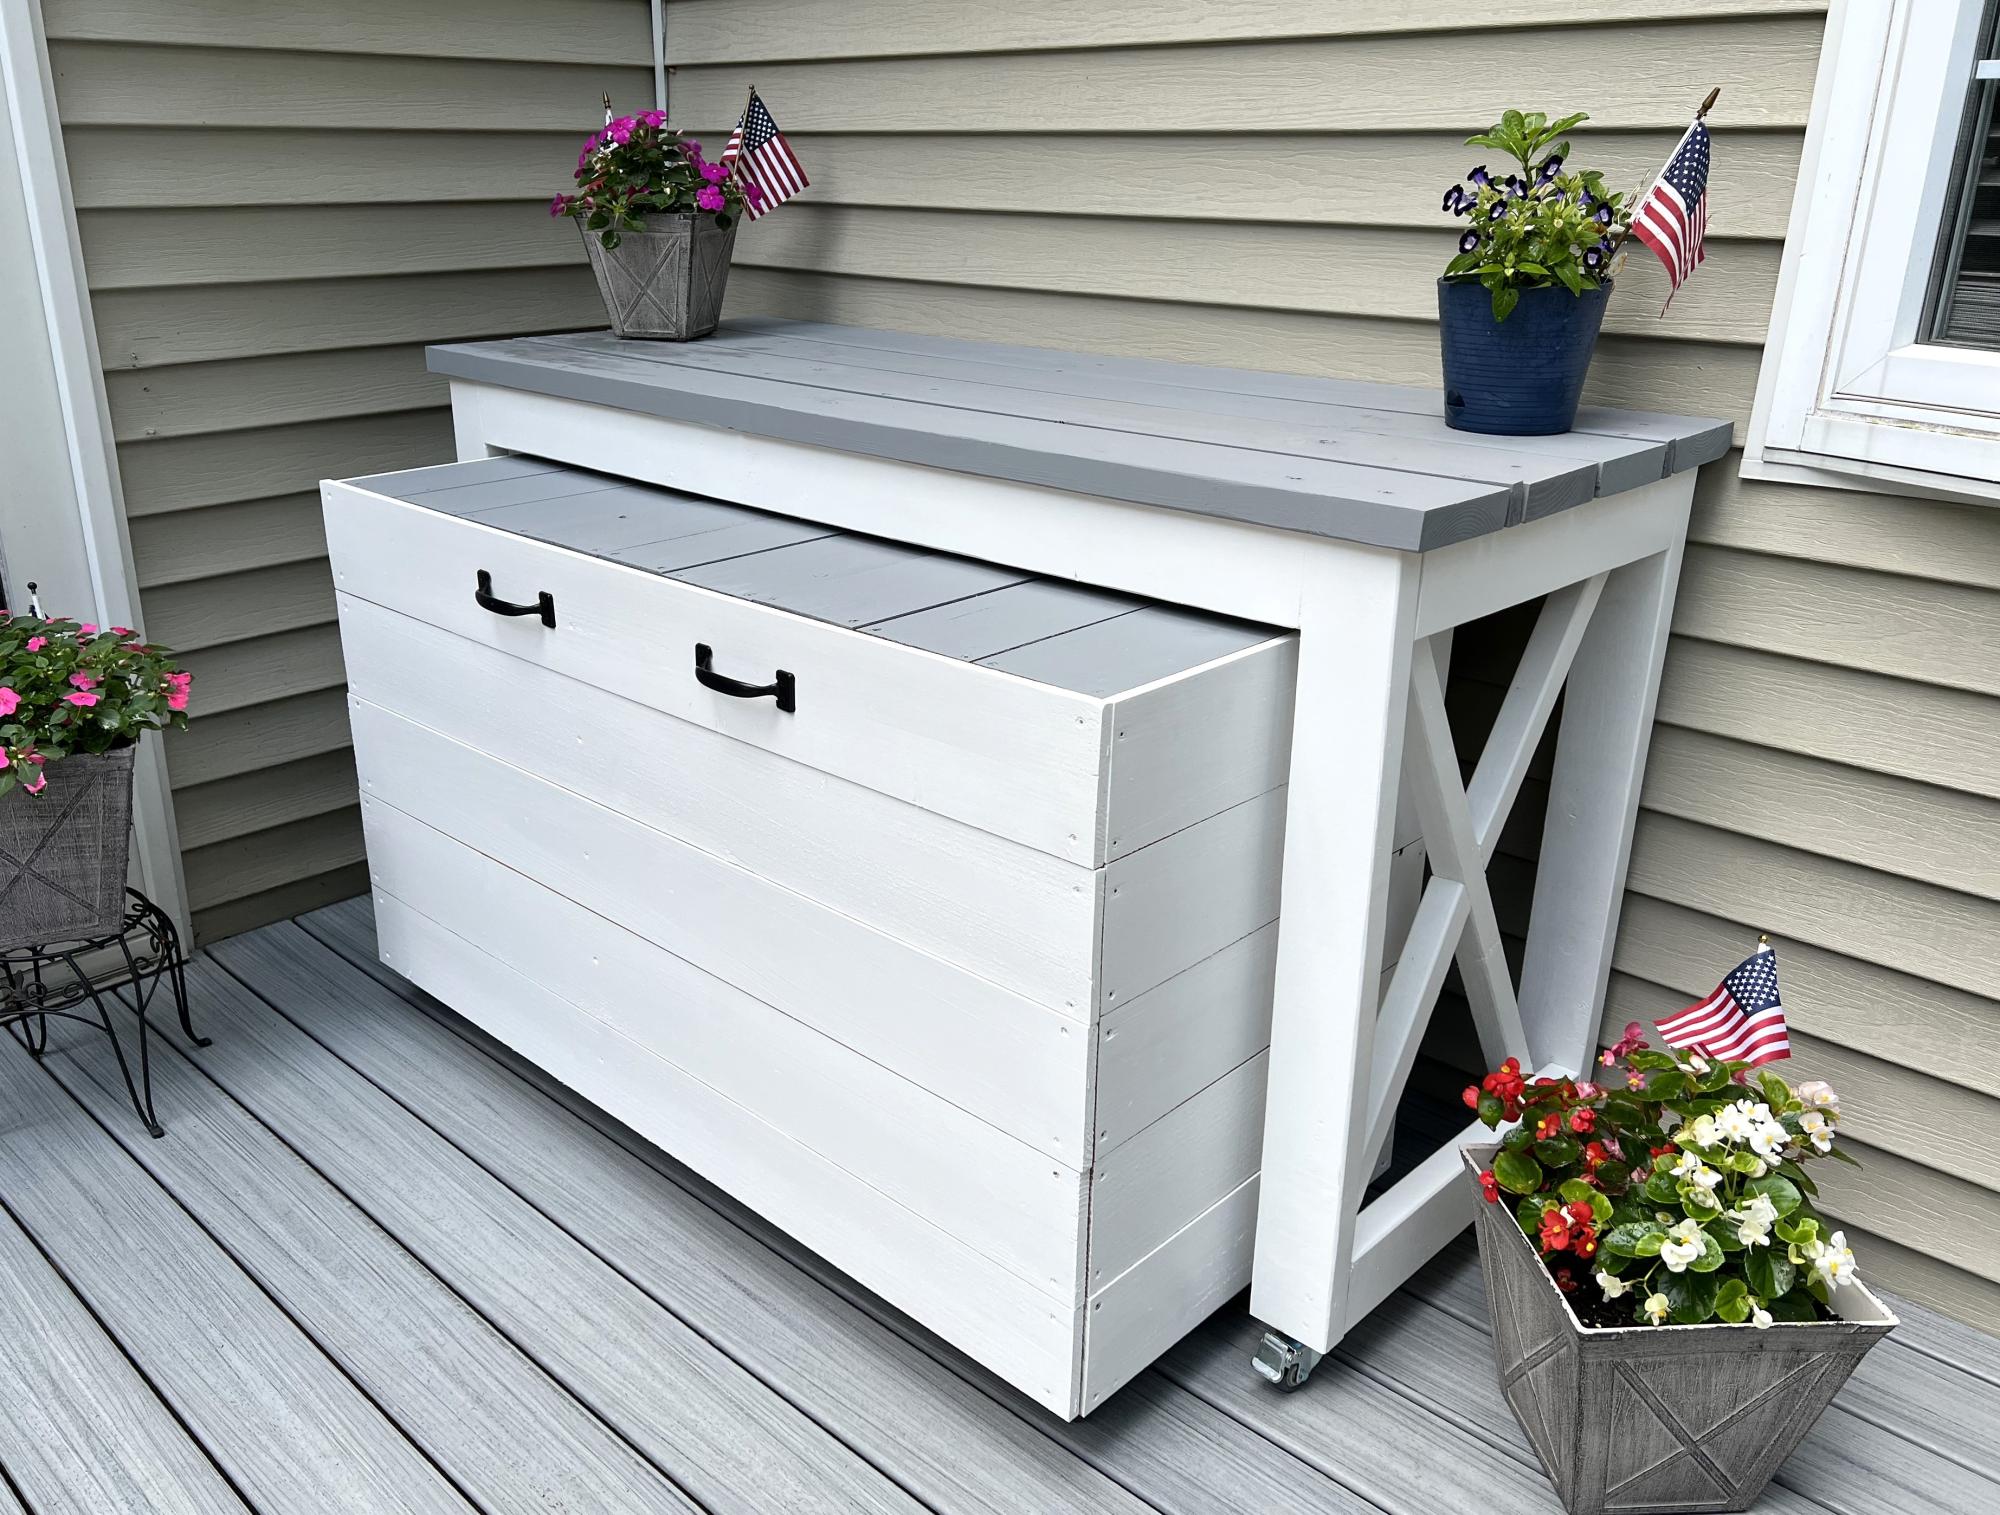
Built the nested grill station just in time for the 4th. So much fun building this, thanks Ana so much for the inspiration! Chris
Built from Plan(s)
Small Planter Stand
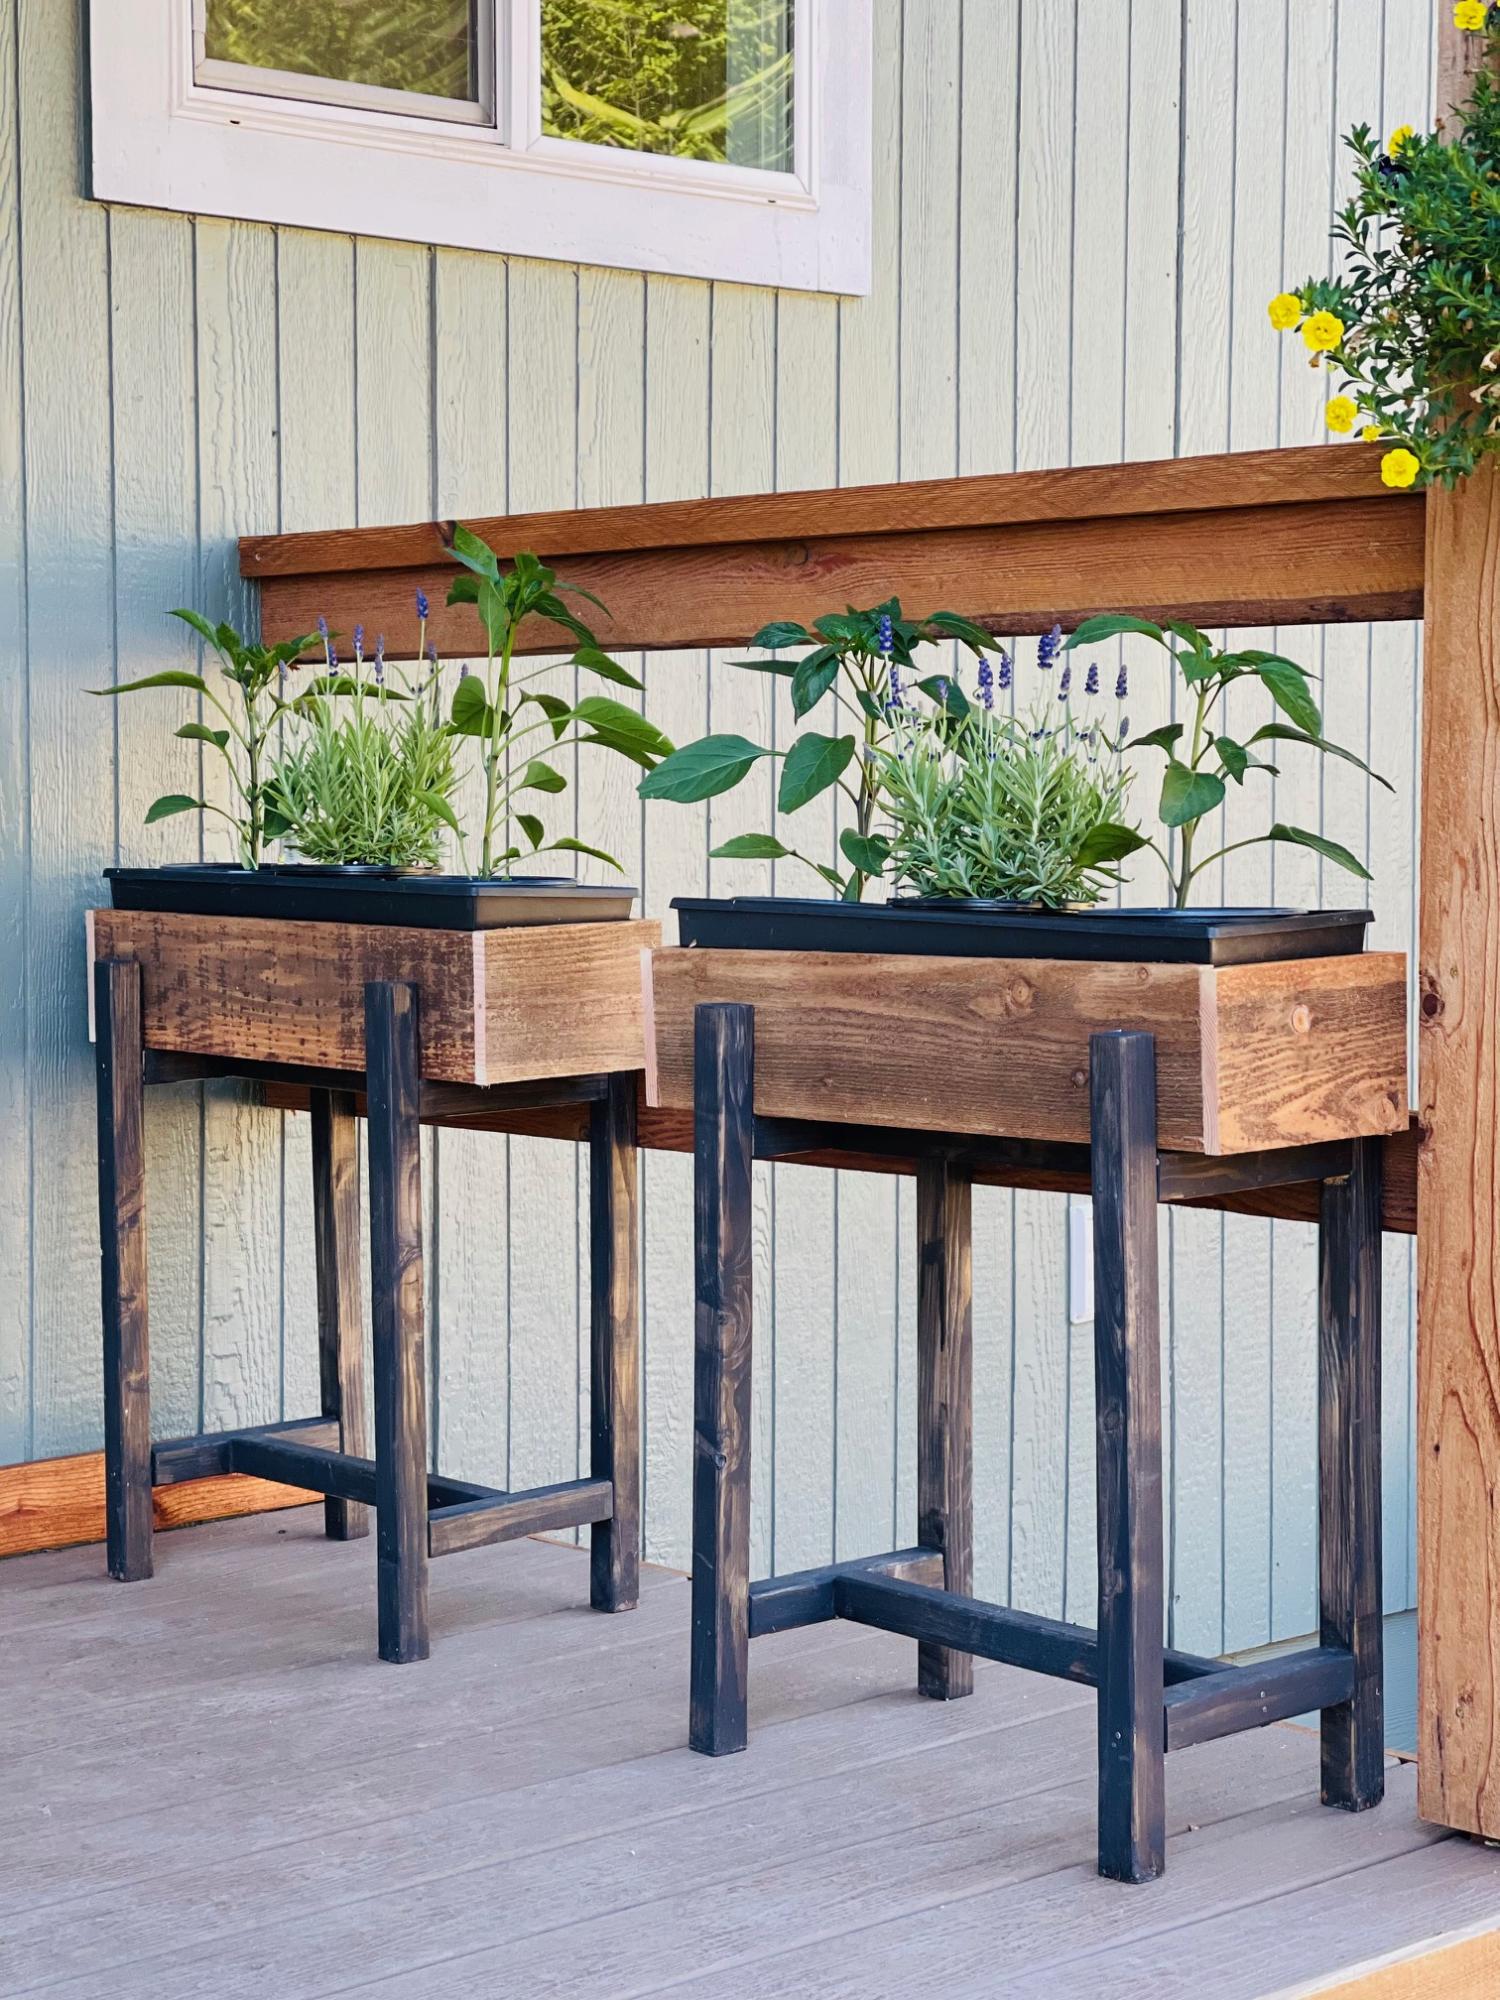
Easy build and I like how I can just set planters inside the top box and change out easily!
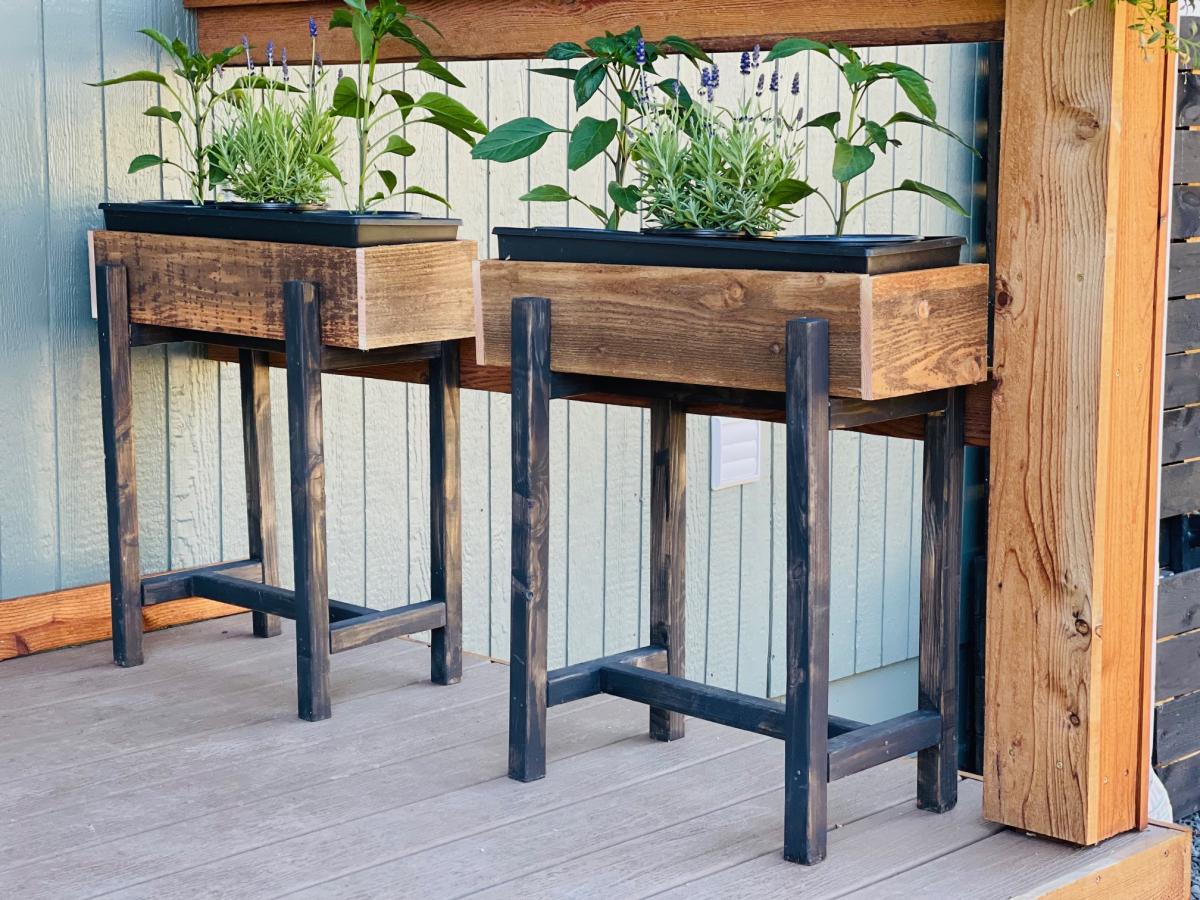
Built from Plan(s)
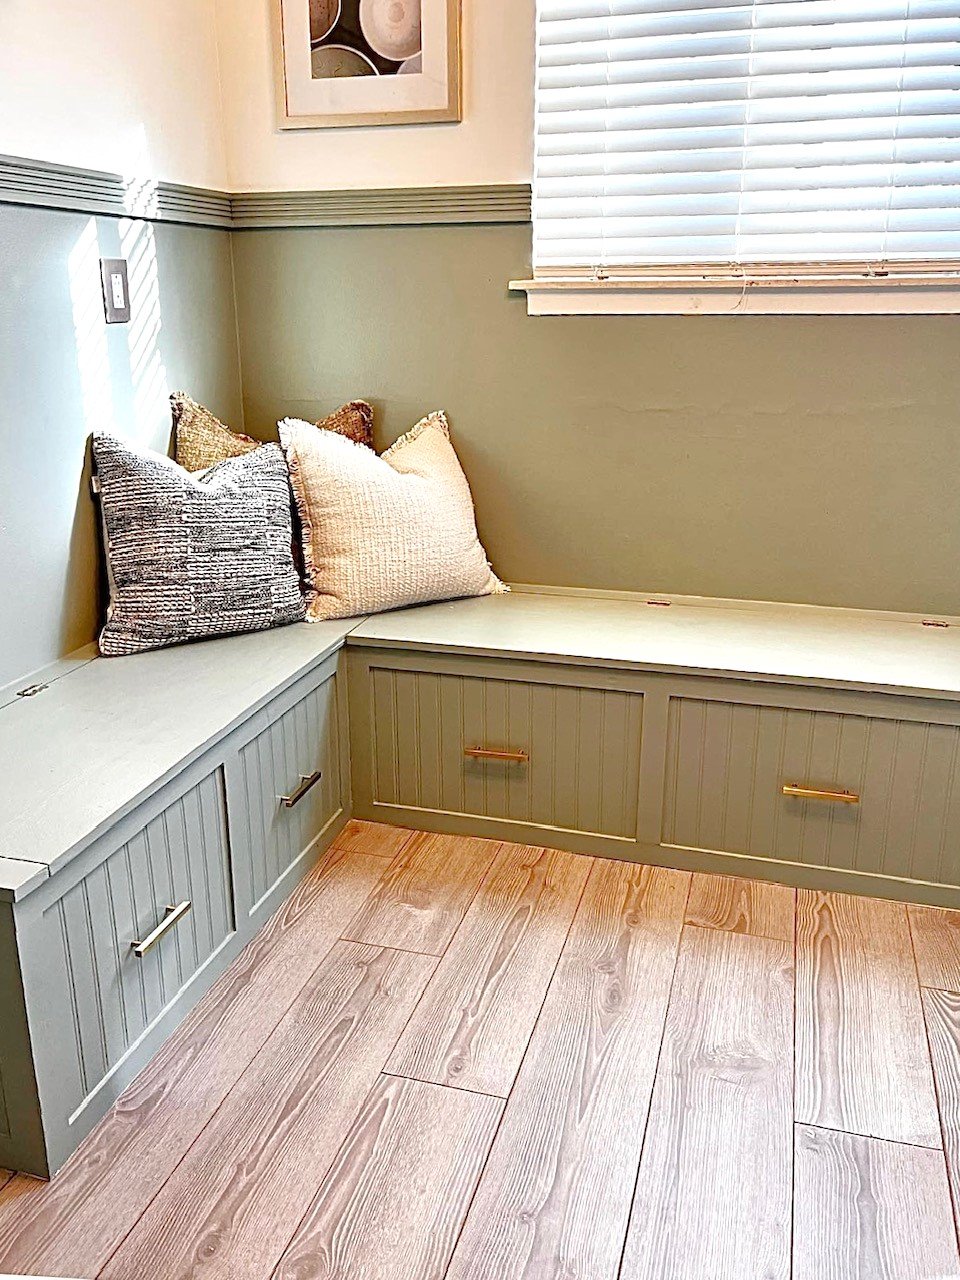
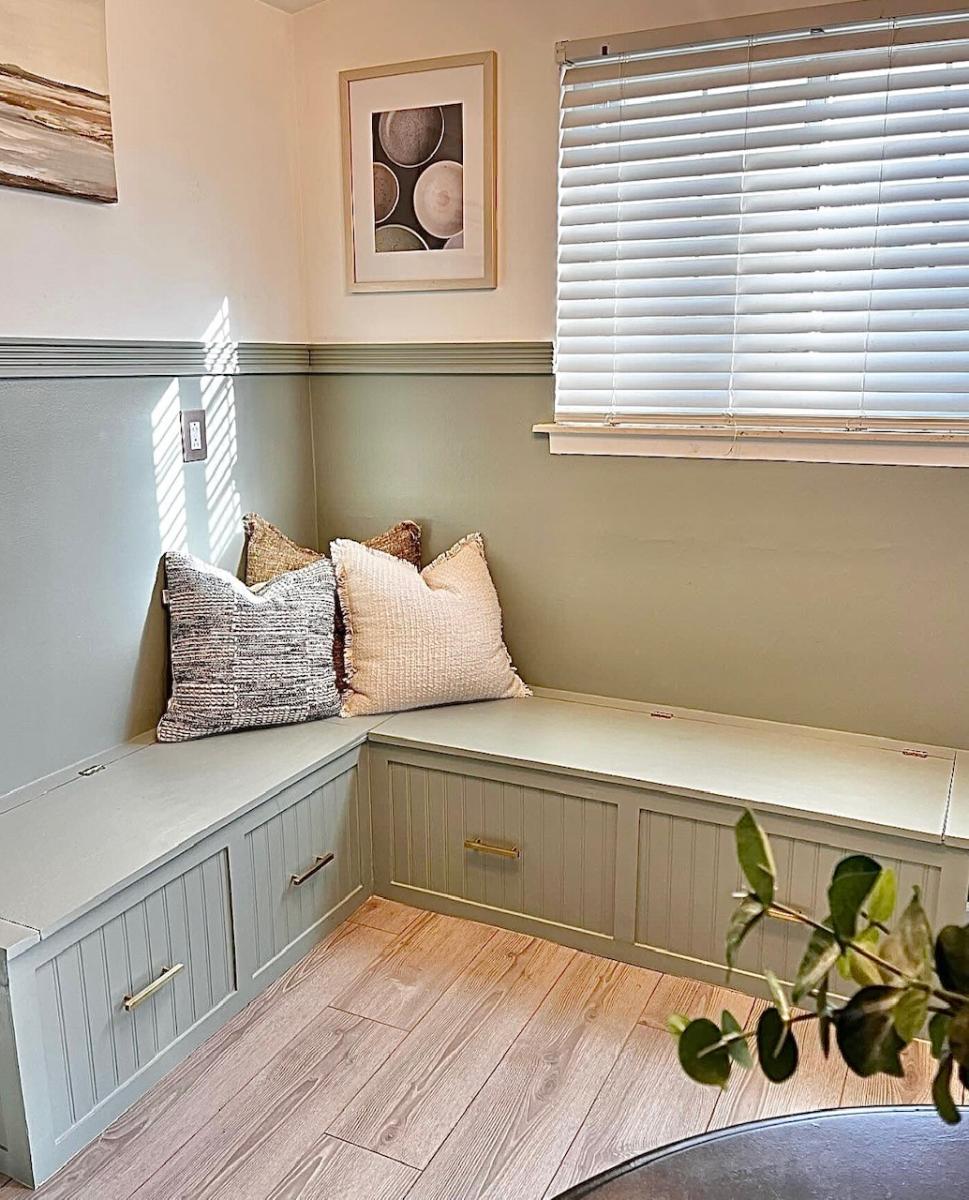
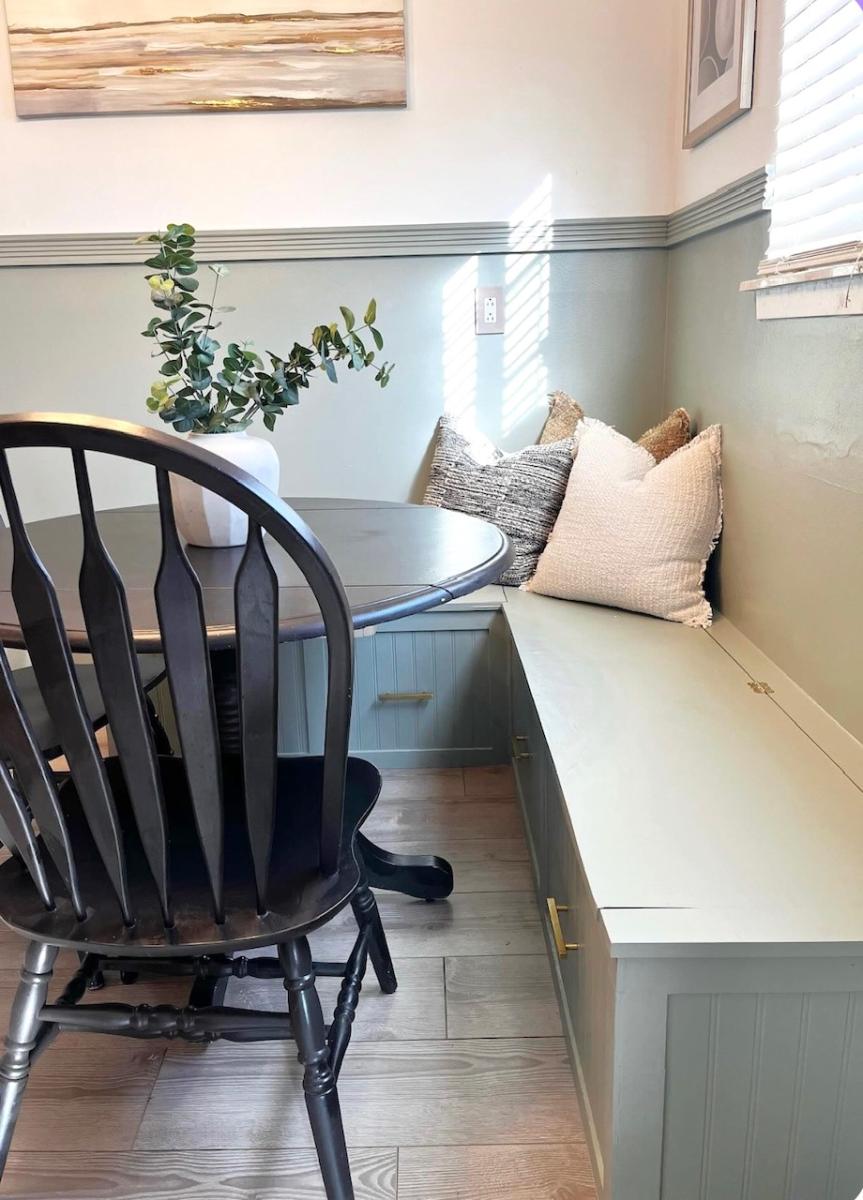
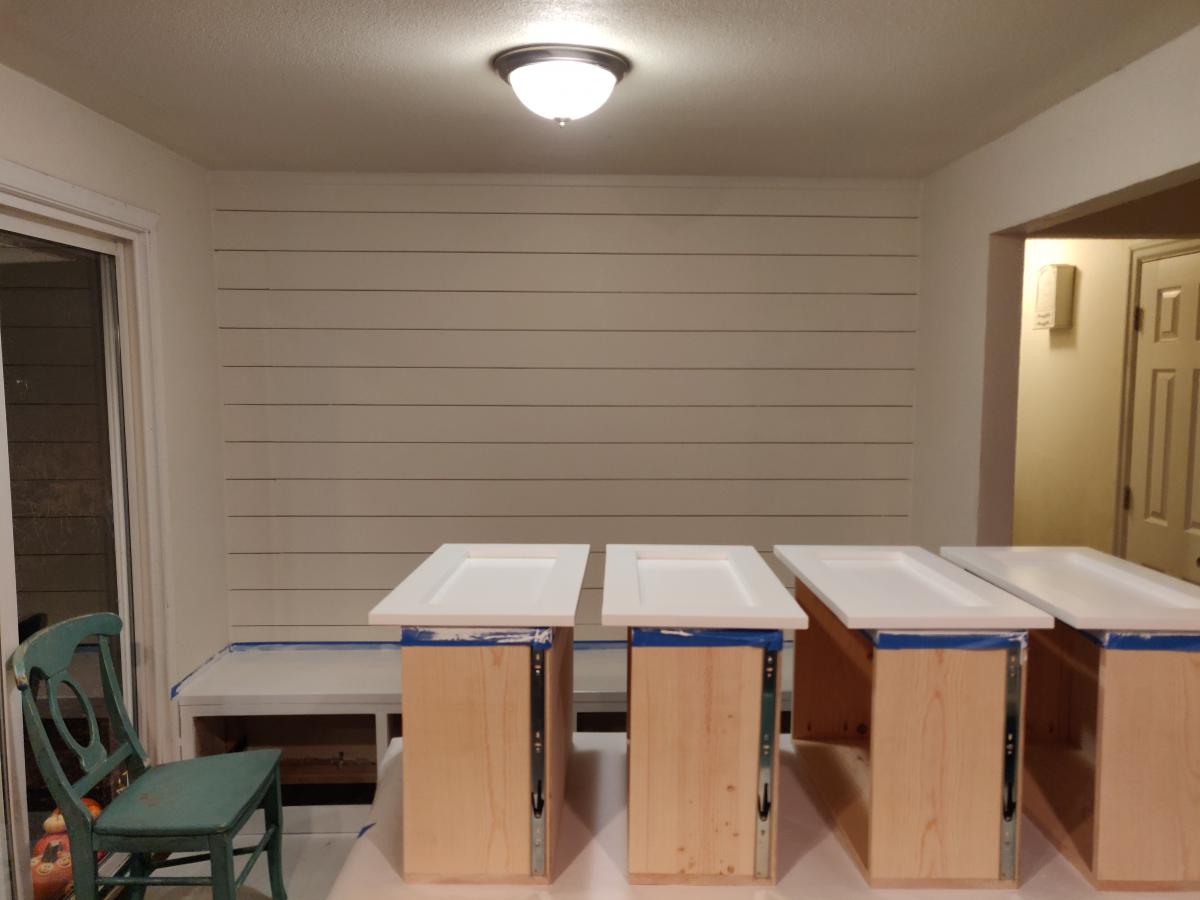
Mudroom Bench with Easy Drawers
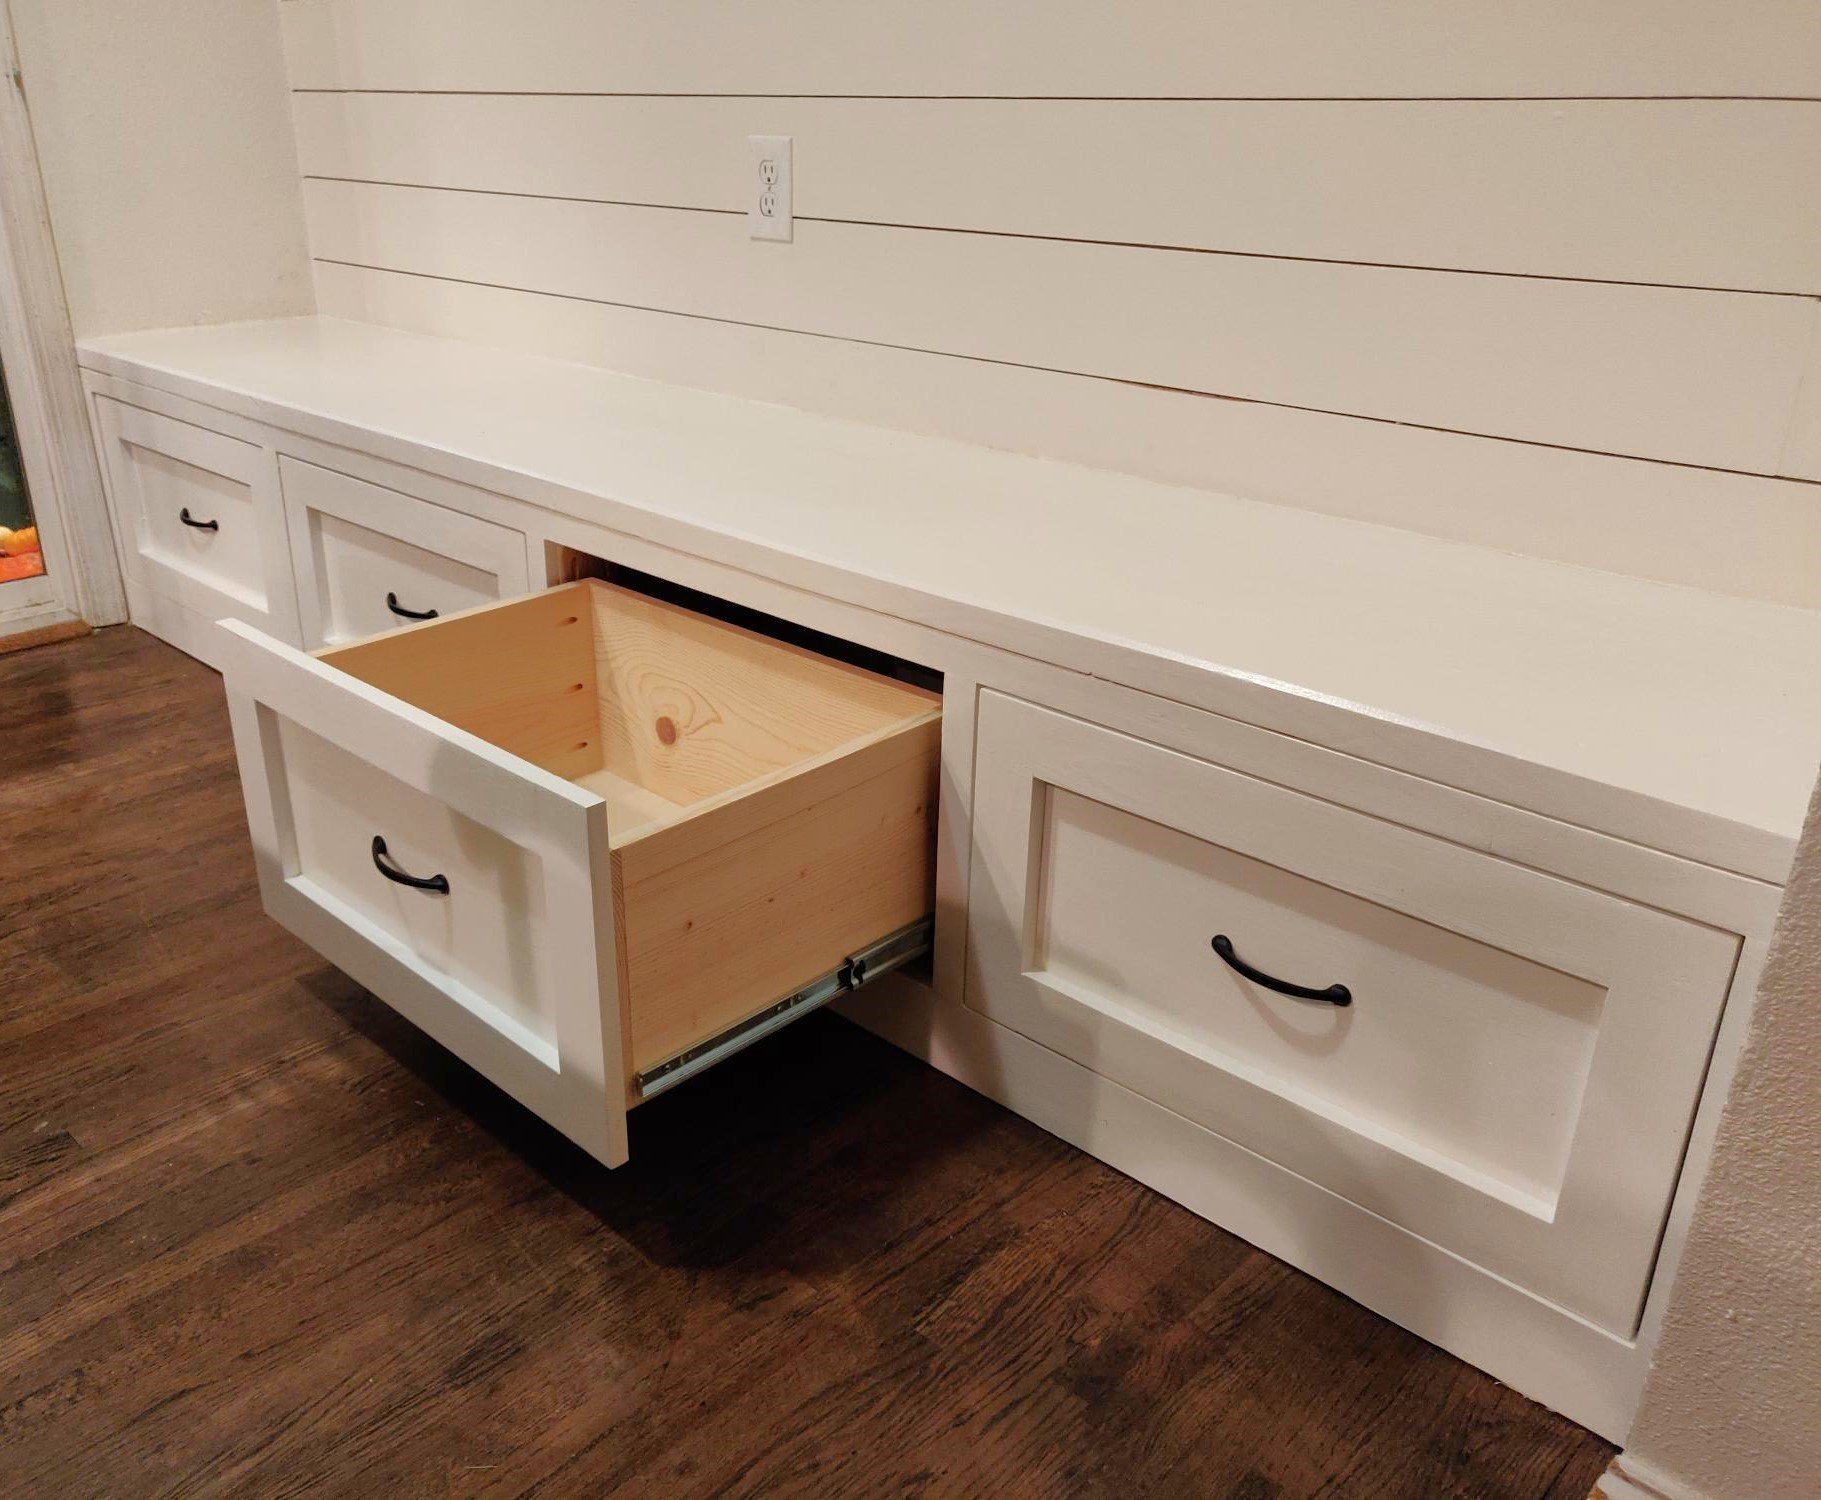
We've been desperate for more storage in our little house and this build really helped. The whole bench is 103“ wide and each drawer gives us 24"x17" of usable space. We had to do some custom shaping for the benchtop (two joined fir 2x12's) fit as the walls are not square but in the end we were really pleased.
The hardest part of the project was getting all of this built and in place while working around a busy family as this is our only meal space and the majority of cutting/forming was done either on the weekends or after bedtimes. If I were to do this again I'd prioritize sending the kids to grandparents for the weekend and know king everything except for paint out in one go.
We could have spent less time with the benchtop by using plywood like in the plans but we wanted the look of a separate benchtop. We may replace the fir with stained oak down the line but this should be plenty sturdy for the next several years.
Built from Plan(s)
Estimated Cost
$300
Estimated Time Investment
Week Long Project (20 Hours or More)
Finish Used
Valspar paint, minwax clear poly
Recommended Skill Level
Intermediate
Comments

Herb Planter
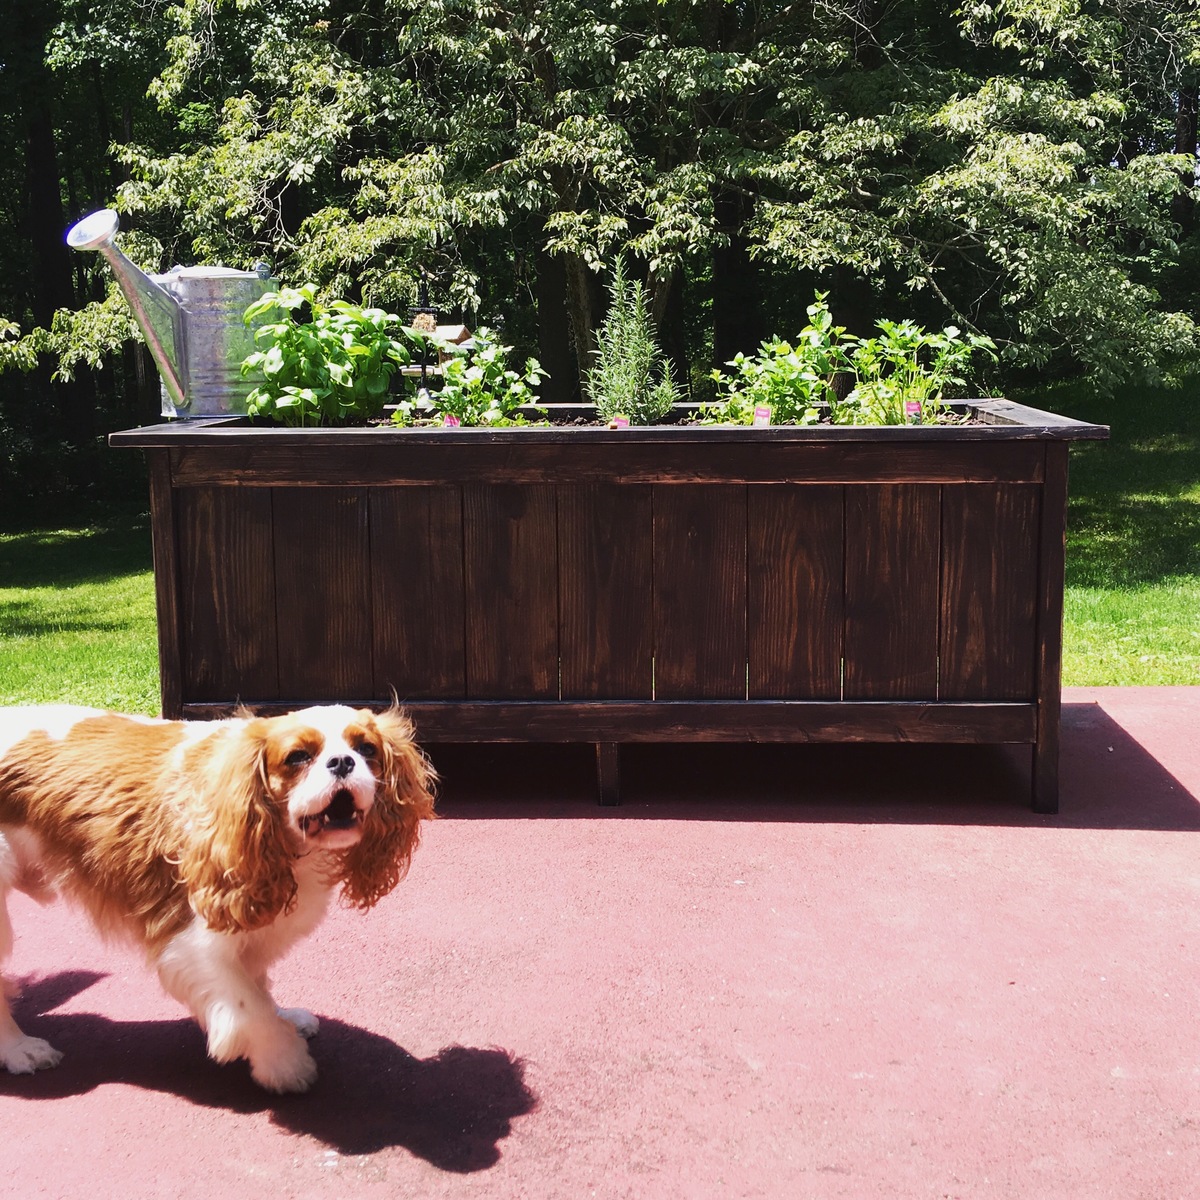
Modified the dimensions to make a good sized planter for patio herb garden :)
Built from Plan(s)
Estimated Cost
~$50 for lumber and supplies
Estimated Time Investment
Day Project (6-9 Hours)
Finish Used
Minwax polyshades in classic black satin applied, then distressed with sander
Recommended Skill Level
Beginner
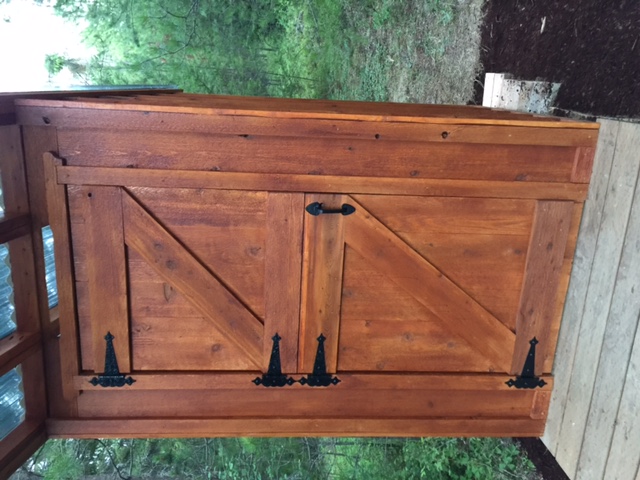
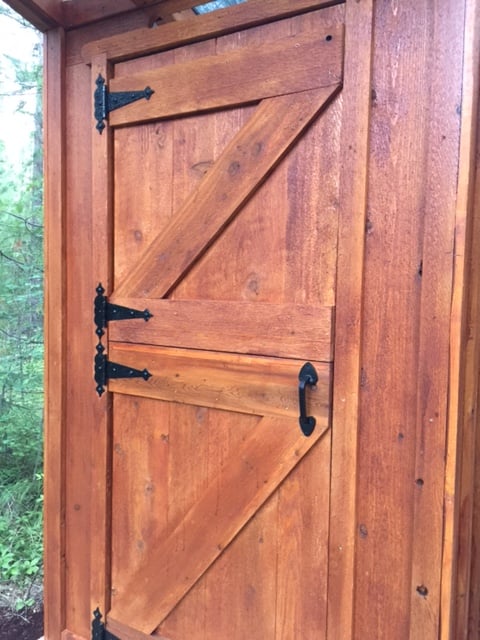
Our Pacific Northwest Privy

We have a small rustic cabin that needed a clean, functional outhouse. We followed Ana's plans, but with a few modifications to include a Solar gray polycarbonate roof to let in light. We also decided on cedar board & batten for the siding. We look forward to many years of use.

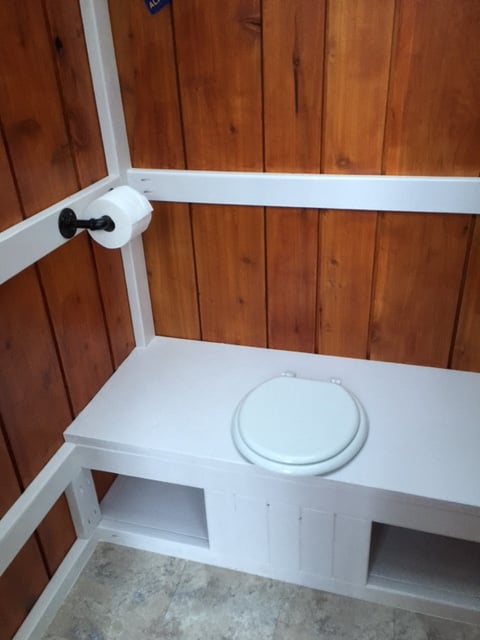
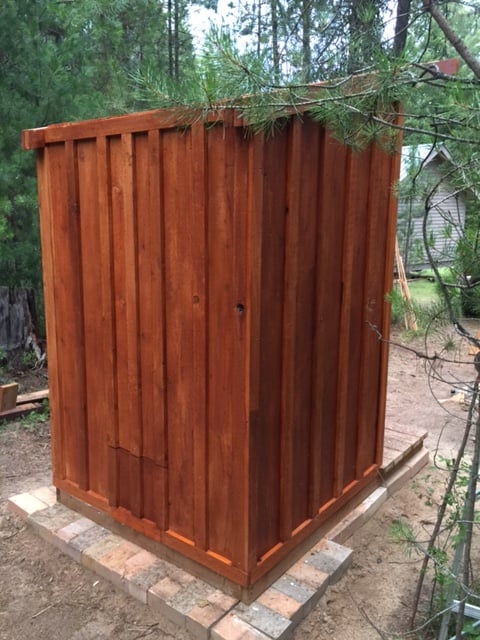
Built from Plan(s)
Estimated Cost
$800
Estimated Time Investment
Week Long Project (20 Hours or More)
Finish Used
Behr - Cedar naturaltone Weatherproofing. All boards were cut to size and then stained with 3 coats.
Recommended Skill Level
Advanced
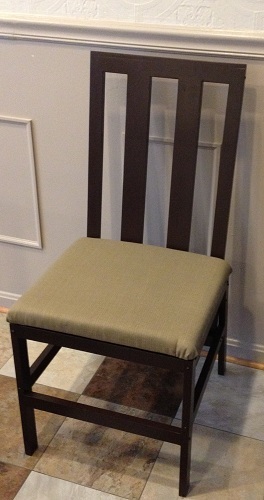
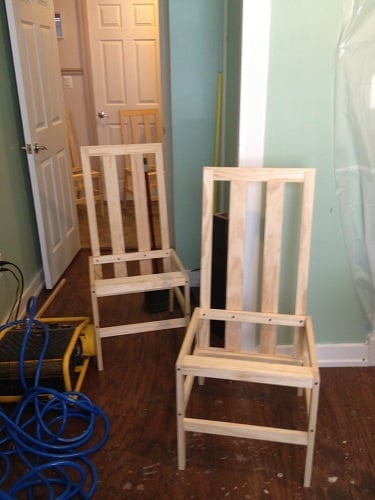
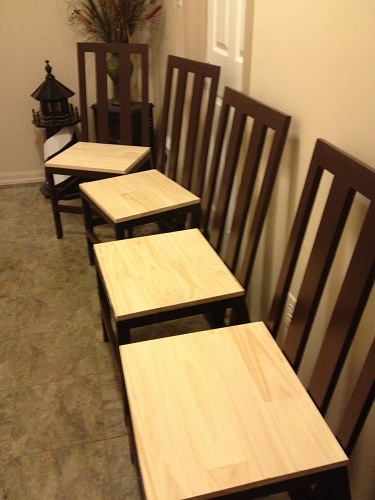
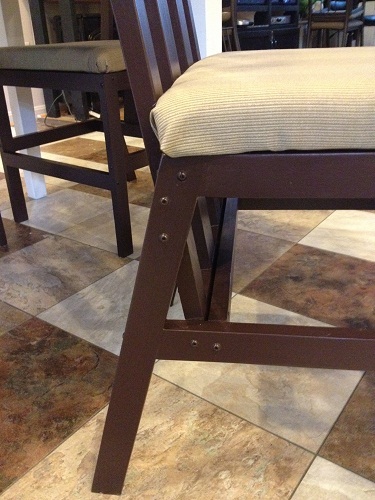
Harriet Chairs
Finally I was able to replace my wobbly little dining chairs with solid wood chairs, thanks to Ana’s Harriet Chair plan. For this build, I made a few mods from Ana’s plan: added a padded seat, made the chair 2” wider, and substituted a slatted back. Used select pine 1x2 instead of 2x2 (really liked that look in the inspiration chair) and used 1x3 for the 2 inner slats on the backs. Also added a few more cross supports. Instead of predrilling pocket holes and hiding the screws, I chose to use the round washer head self-tapping screws and left them visible. This saved time on having to pre-drill and fill screw holes, but also thought the exposed screw heads made a nice decorative element. The seats are covered with 1” thick high density foam, batting, and outdoor fabric. The first of the 4 chairs took longest to make (I made and corrected all my mistakes on that one). The remaining 3 went a lot faster (took about 11 hours total for building the 4 chairs, and 12 hrs total for finishing them). The changes/steps I used are documented in a .pdf file in the second plan post linked above. Ana, thank you for all your wonderful plans. You rock!!!
Built from Plan(s)
Estimated Cost
Cost: $230 for 4 chairs, which came to about $58 per chair. For 4 chairs: $127 for lumber & screws, $28 for paint, and $70 for chair fabric and foam. (fasteners, glue and sandpaper not included in cost, those were already on hand). I was able to build all 4 chairs for the price it would have cost for just one from the furniture store.
Estimated Time Investment
Week Long Project (20 Hours or More)
Finish Used
Finished with Benjamin Moore Aura satin, in Wenge, 3 coats . Rubbed down all the chairs with Pledge after the paint dried. (I had attempted waxing one of them, but that took way too long for me!) The seat is covered in outdoor fabric (all the fabric and the foam were on sale for half-price @ Joann fabrics – score!!!).
Recommended Skill Level
Intermediate
Comments
Sun, 07/15/2012 - 11:15
Well Done!!
Very nice. Your chairs are very beautiful. I love the modifications. Well done!
Sun, 07/15/2012 - 16:00
I would be interested in pdf
I would be interested in pdf file if you wouldn't mind posting it!!! The chairs look awesome.

Sun, 07/15/2012 - 17:26
Thank you! I just posted
Thank you so much! I just posted a plan of the modifications, which includes a .pdf file of the full plan with the steps and photos (still haven't learned sketchup yet). I sure hope it worked! The .pdf file is located about 2/3 of the way down through the plan post, right below General Instructions. Let me know if the .pdf opens for you? :)

Mon, 07/16/2012 - 08:22
These are GORGEOUS!
You did a great job on these - the modifications you made, the fabric and the paint are all wonderful.
Mon, 11/26/2012 - 14:57
Thanks very much!
Colsen, thanks very much for the comment! Happy Holidays! :)

Wed, 07/10/2013 - 02:31
Thank you!
Thank you! We still love them and they are holding up great! I made a storage bench to go with these, but it still needs a few tweaks before blogging that one.
Mon, 11/11/2013 - 08:50
Love the chairs but...
Did you also make the table? If so how/which plan did you use? The whole set together looks fantastic!
Mon, 11/11/2013 - 10:58
Thank you!
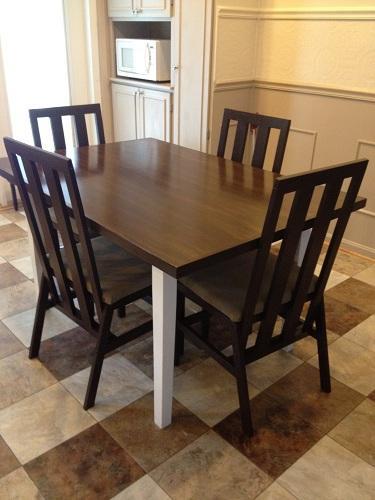
Hi AdamR, Thank you very much for the nice comment! Yes, we did the table also. Here's the brag post:
http://ana-white.com/2011/05/my-new-almost-farmhouse-table
This was done under my original username JES. I had locked myself out of that username and had to create a new one ;)
We used our existing table and painted the legs, and added a new top. The tabletop finished dimensions are 56" long x 38 1/2" wide.
Joanne
Mon, 11/11/2013 - 19:38
Perfect!
This is what I have been looking for. I know my wife doesn't want any indents or grooves but it seems like everyone build tables out of boards. I don't have a jointer or planer to even the boards out.
Question 1 - the 1x2 trim...to be clear you attached the 1 inch side to the table right?
Question 2 - how has the 3/4 thickness working out? Thick enough?
Question 3 - anything you would have done differently?
Thank you so much for your help. I build some small custom shelves for my son's room, found this site and now got a major bug to build stuff we have been looking for. I actually joined the site just to ask you about the table so thanks again!
Adam
Tue, 11/12/2013 - 07:07
Thank you!
Thanks again for the nice comments, Adam!
On the 1x2 for trim, I attached with the 2" side to the edges of the plywood (the 1x2's were actually 1 1/2" wide and 3/4" thick). This gives the illusion that the table is 1 1/2" thick. On this one I used finish nails and glue to attach the trim. If I had it to do over again, I'd have attached the trim boards to the plywood edges with pocket holes from under the table, so there would be no nail holes to fill.
3/4" thickness for the table top works fine. Our original table had a top thinner than 3/4", so we attached this new top directly on top of it. I didn't think I could get the leg assembly off that old table without damaging it.
If you wanted a more 'beefy' feel to the whole table top, you could stack 2 pieces of plywood, glued and fastened together from the bottom with screws. The 1x2 for the edges would still cover it.
Once you catch the wood working bug, you'll want to build everything you see! :) I hope you post a brag picture when you build this. I'd love to see pictures! :)
Joanne
Wed, 11/13/2013 - 06:02
Thank You!
First off thank you for all the info! I see now why you picked the larger trim, I didn't catch it the first time around that you put the new wood right on top of the old table. My kitchen table has the exact opposite problem the legs are weak (plus my wife hates the top too) hence why I will be doing both top and legs. Still debating on one 3/4, two 1/2 or two 3/4 inches for table thickness.
I am going to build the kids trestle table this weekend first. Just the get a project under my belt besides some book shelves. lol
http://ana-white.com/2011/09/kids-trestle-style-play-table
My Kreg Jig will be here Friday, picking up wood on Sat....hopefully I will have a unfinished kids craft table ready to roll by Sunday then the Kitchen table will be my Thanksgiving weekend project.
Thanks again for all of your help.
Adam
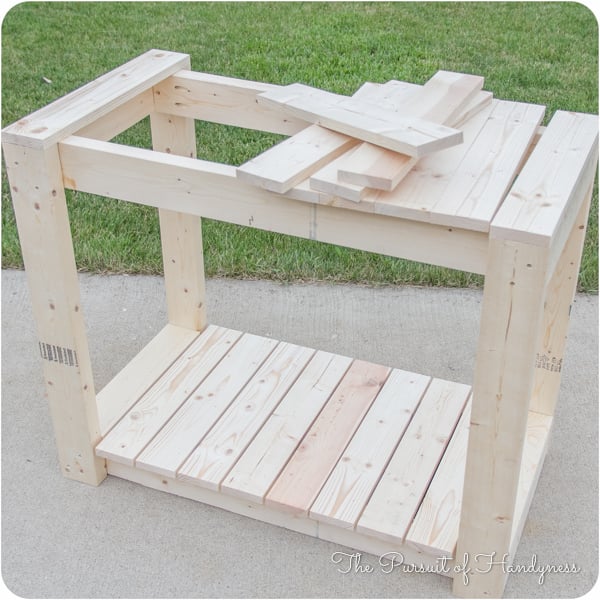
Modified Simple Rolling Bar Cart

I honestly think Ana is a mind reader. Whenever I need plans for a particular piece of furniture, they magically appear on her site. Of course if she was a true mind reader, everything will be exactly as I need it requiring no modifications. That's what makes her plans so amazing. I can build bigger and better because I've learned to modify her plans to fit my current needs.
This Cart was no exception. I had to make mine a few inches deeper and change the height of the legs and it was a piece of cake. I put this together in less than 2 hours and finishing was easy too.
I did a blog post all about what I did differently including how I constructed a towel bar instead of the pipe. Check it out at www.thepursuitofhandyness.com

Built from Plan(s)
Estimated Cost
$25 Depending upon the type of casters used
Estimated Time Investment
Afternoon Project (3-6 Hours)
Finish Used
Oil Based Primer & Rustoleum Painters Touch Spray Paint in Paprika Satin
Recommended Skill Level
Starter Project