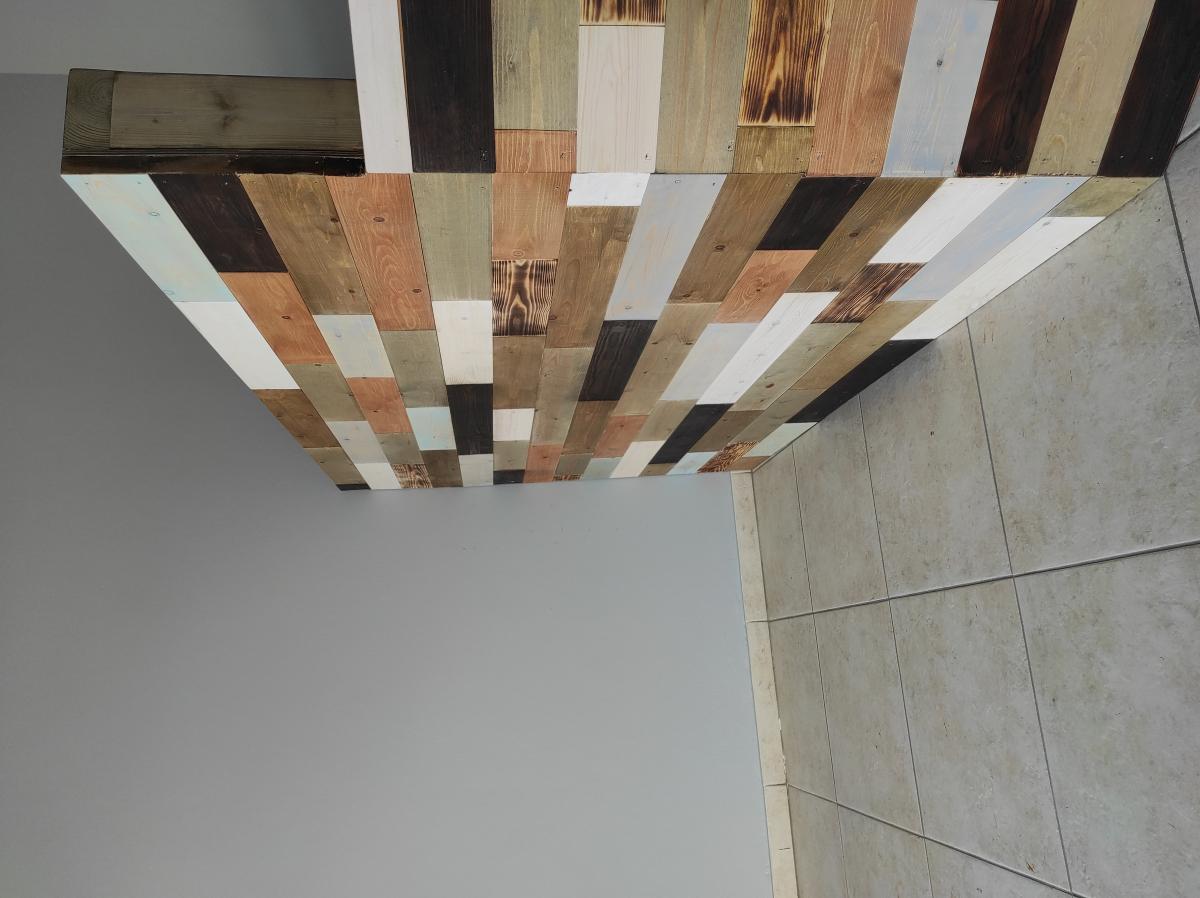
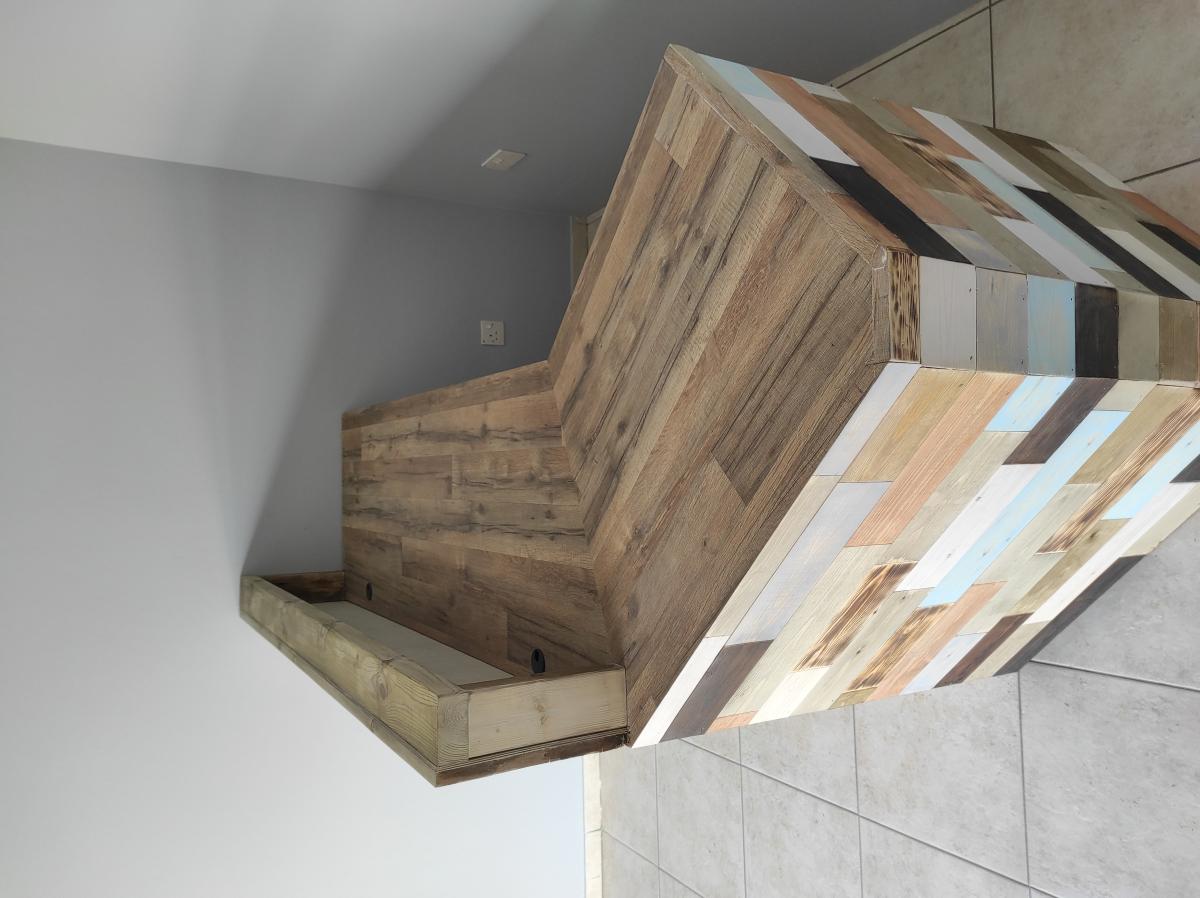
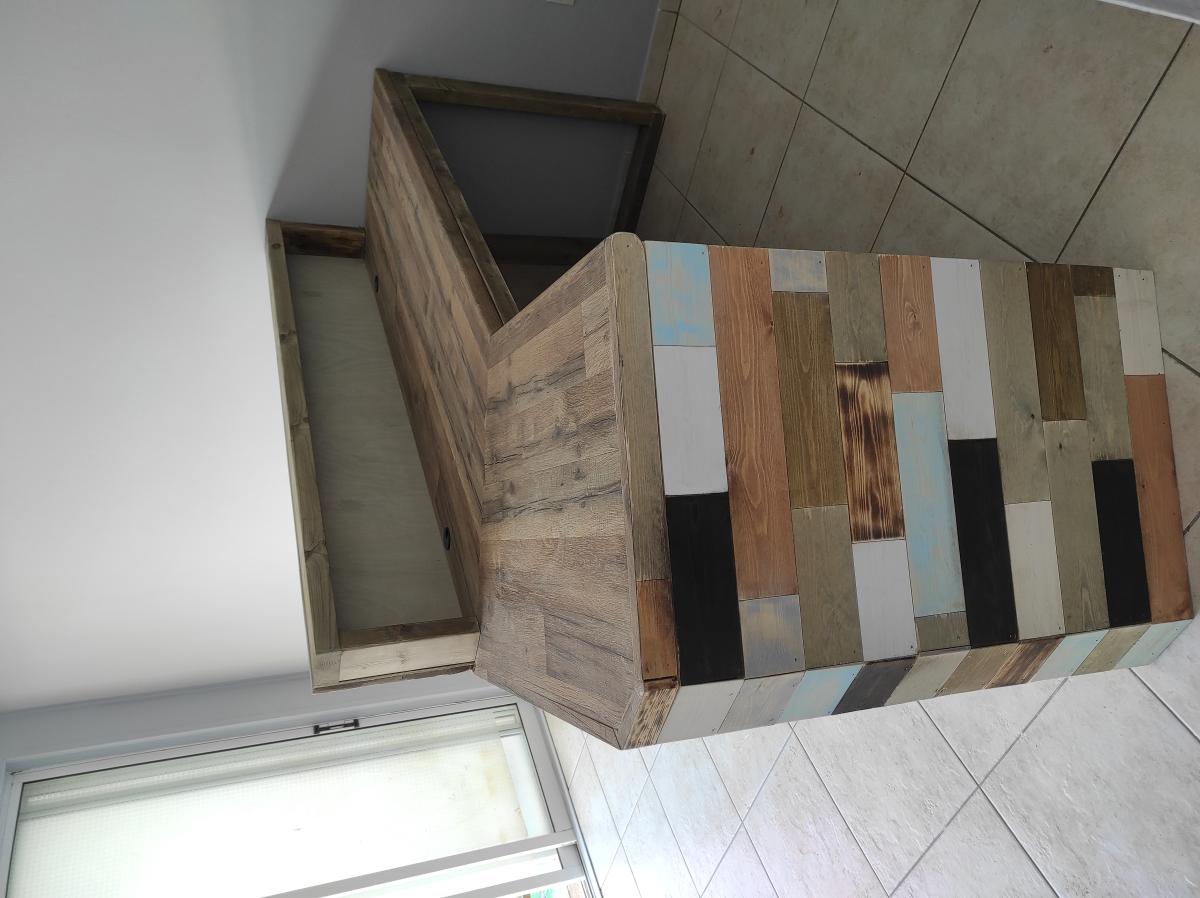
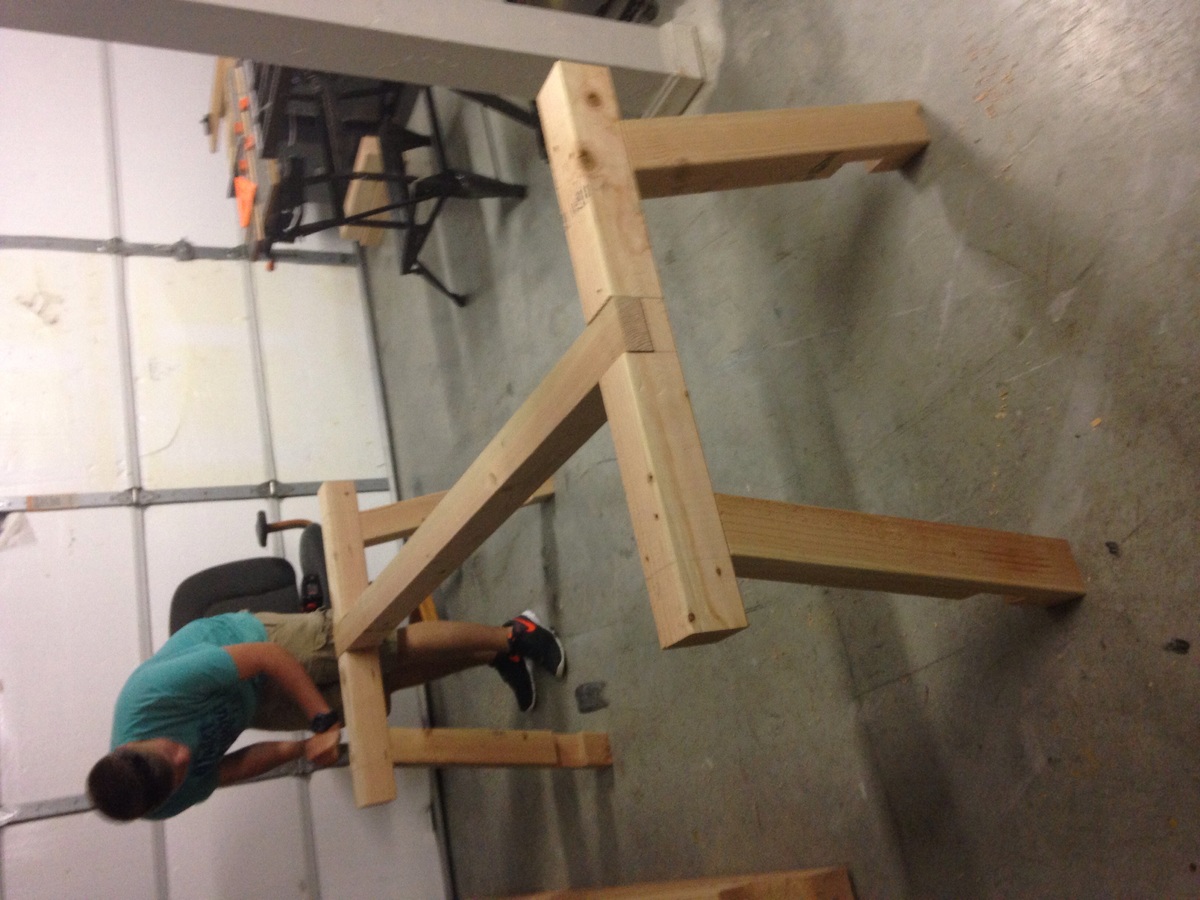
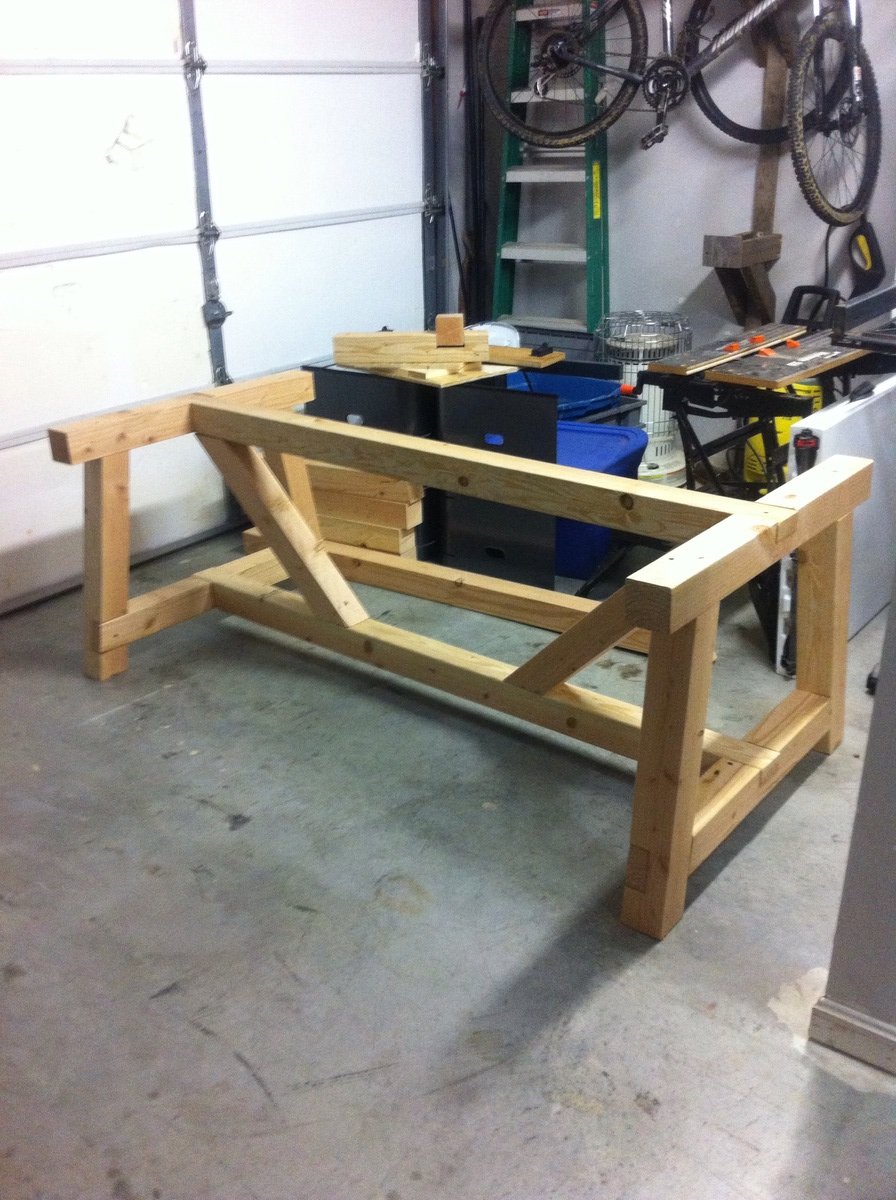
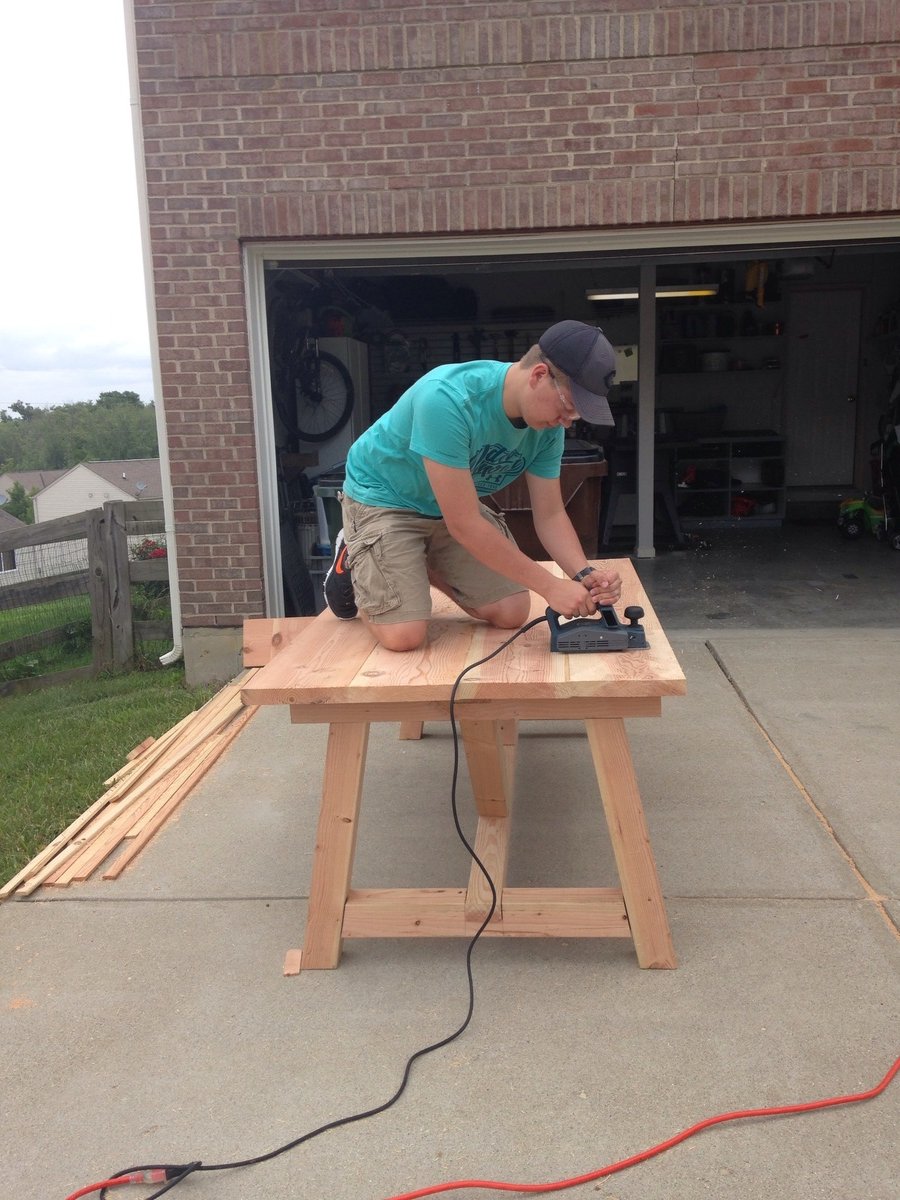
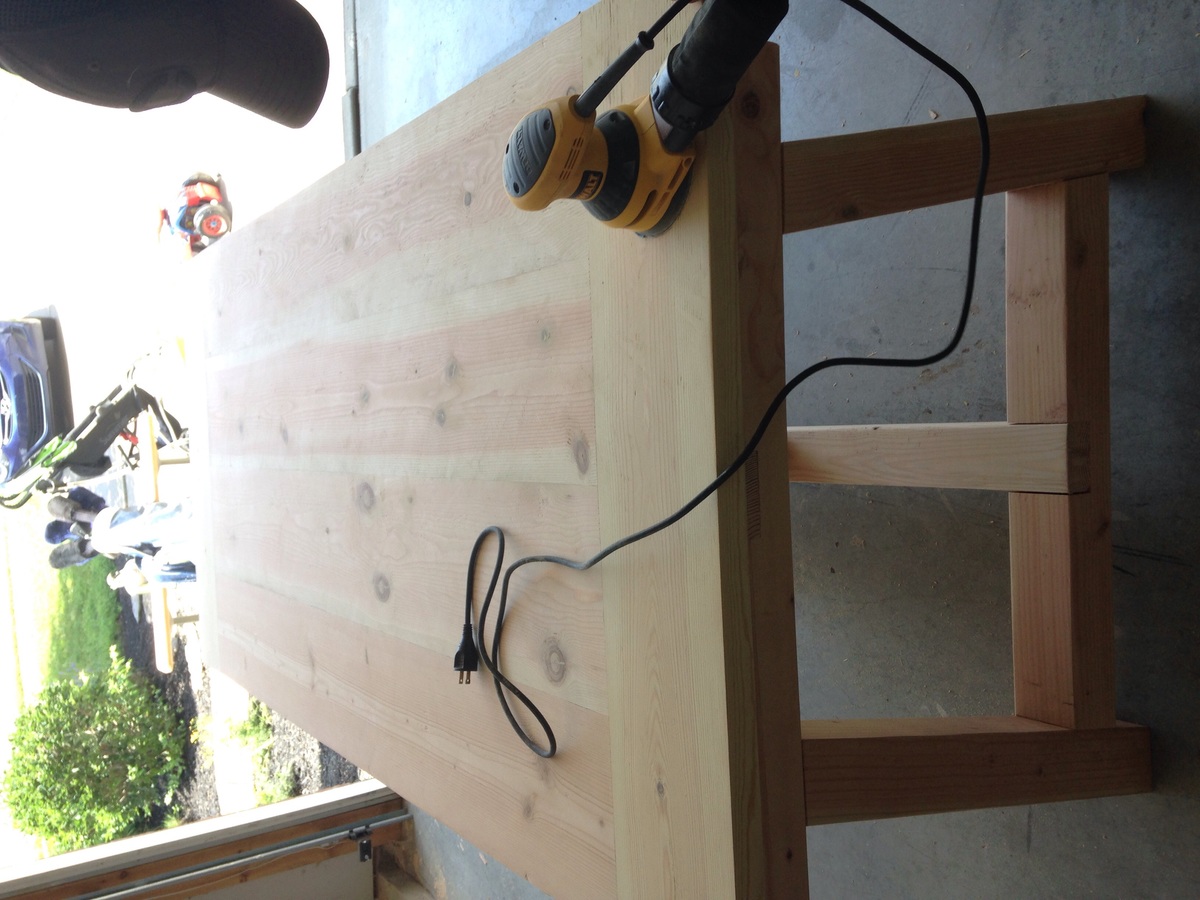
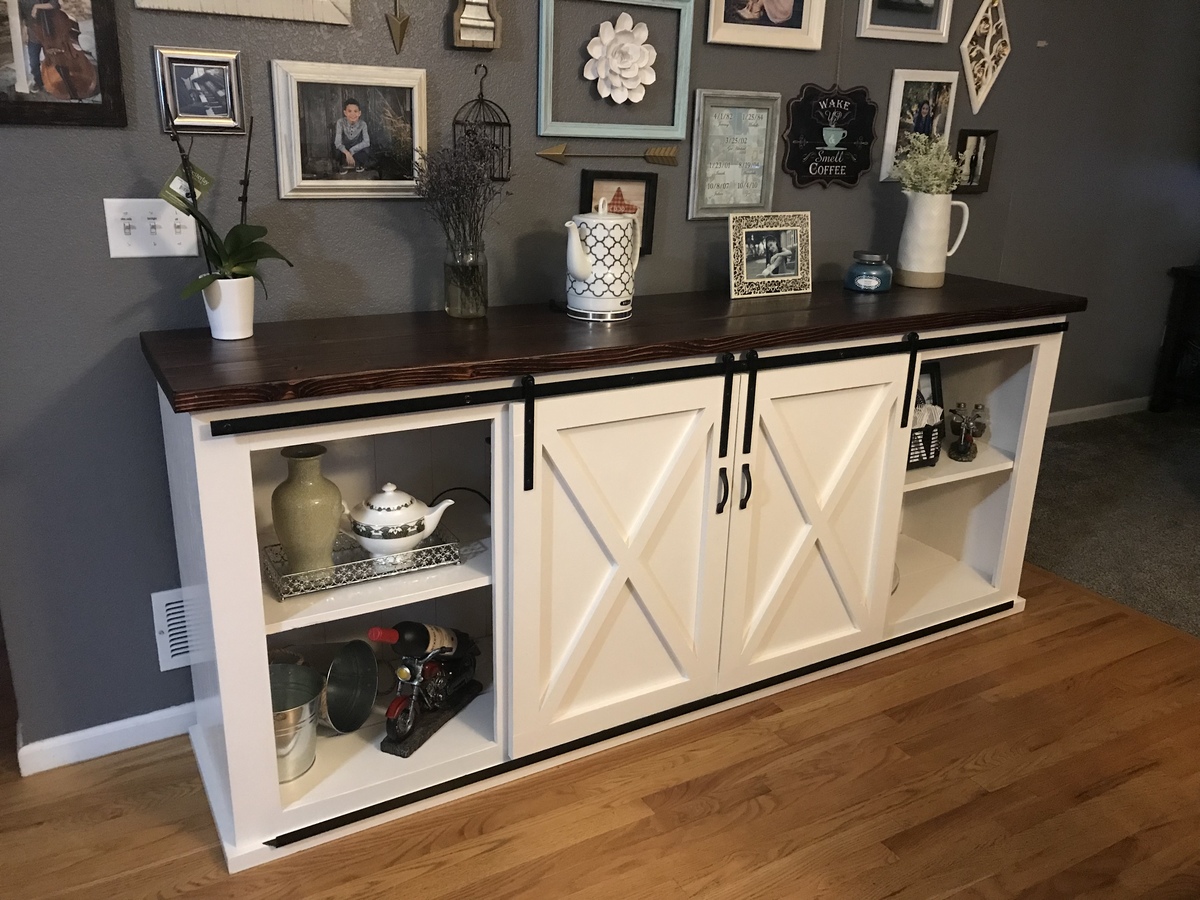
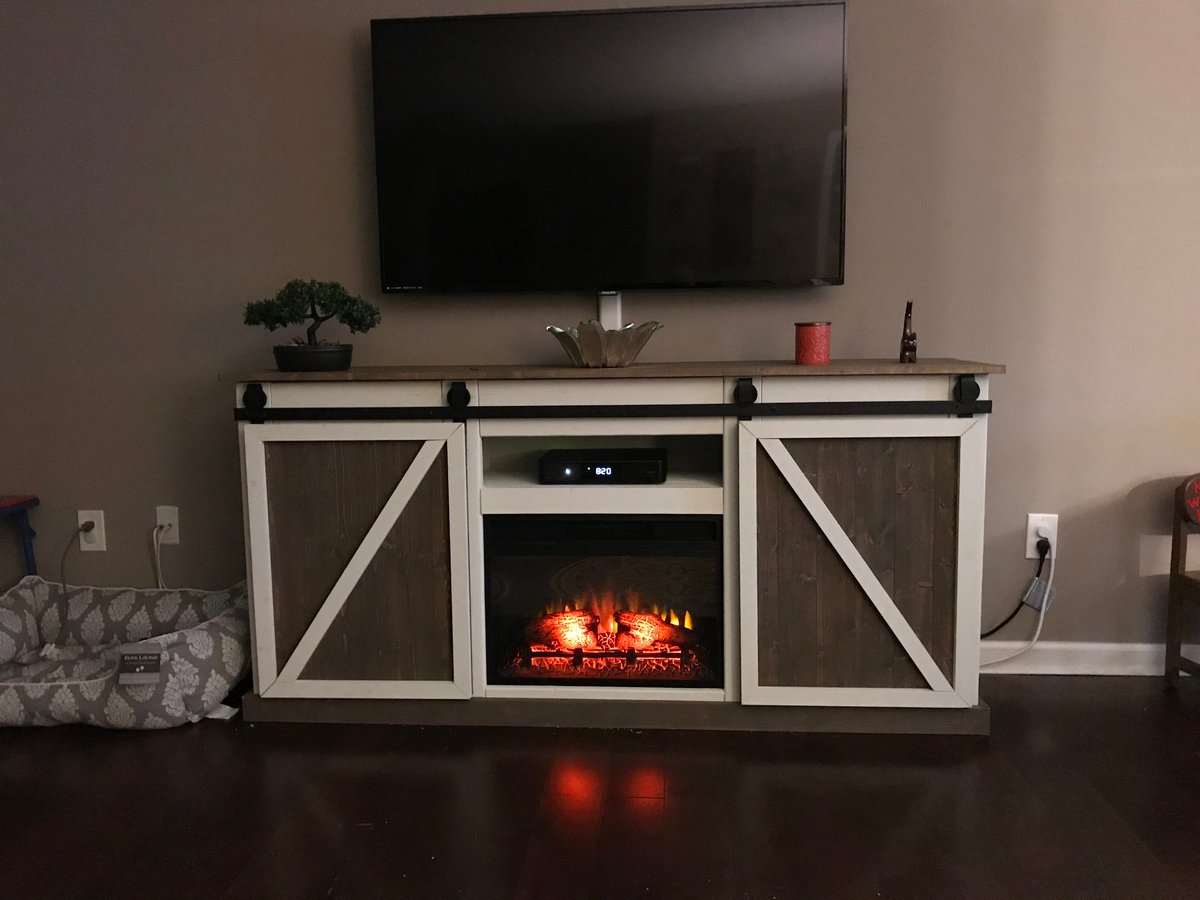
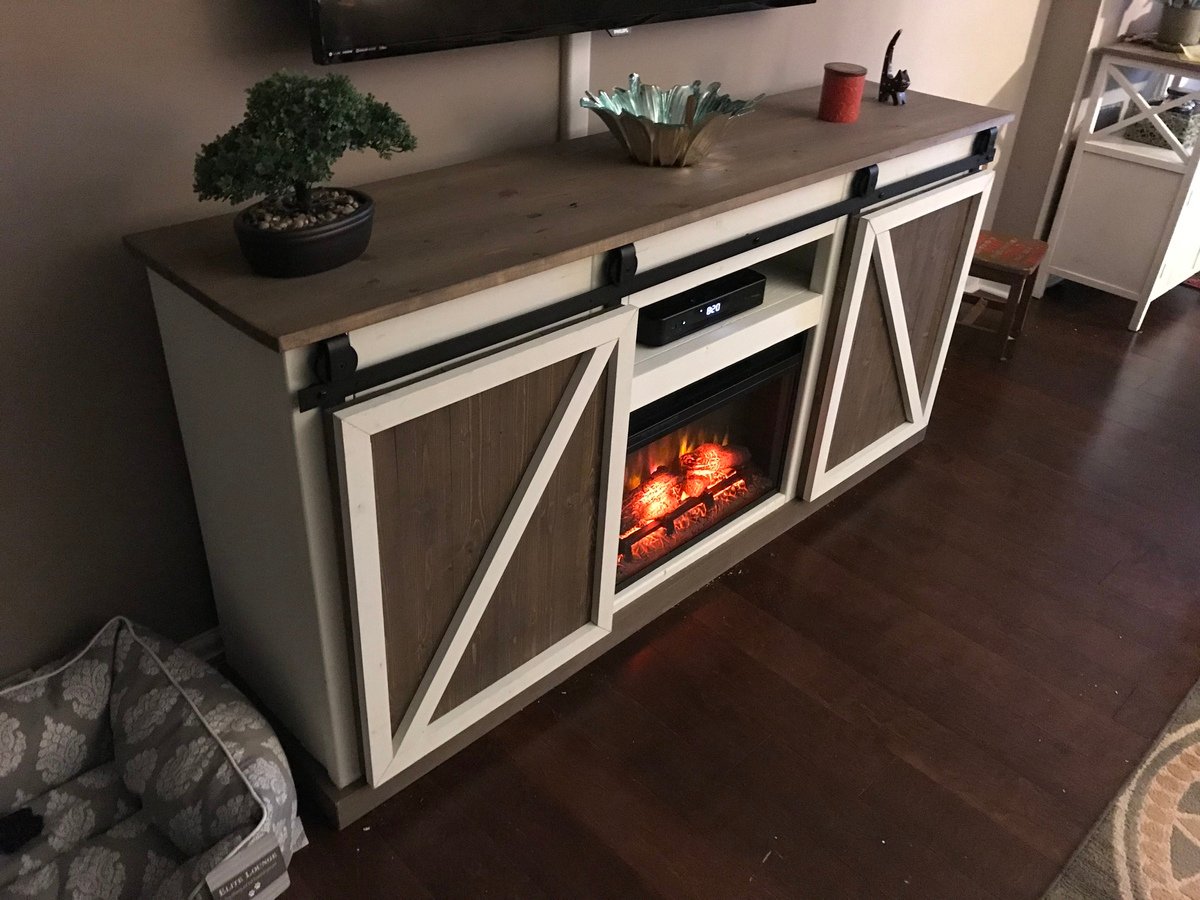
Farmhouse Kitchen Island
We modified the plan and made many changes along the way and here’s our finished island. We’re thrilled!
A friend is opening a new tattoo parlor up and wanted a rustic looking reception desk making up.
Using reclaimed wood wasn't an option so we opted for 25mm t&g boards and randomly cut 1/4 way through it to give the appearance of individual boards. The main carcas is made with 2x4's clad with Baltic birch ply to give it a cleaner appearance from behind and, to give additional surface area to attach the boards to.
To finish inised a combination of forced aging with a solution of WWV, iron sulphate and black tea + coffee, varying degrees of Charing, the walnut and oak stains were by V33 and the whites and greys by French chic.
Tue, 02/08/2022 - 15:12
Awesome build, I am sure it will get many compliments! Thank you for sharing!
Very easy to make, and not too expensive. I'm not that great with a lathe. I tried it a couple times but not too good. So I buy my table legs online through osborne wood company. These legs however, came from an old table that I got for free from an antique store. The rest of the table got cut up and used for 2 night stands, and this is what I used the legs for. I used pocket holes to attach everything. Support the middle with cross supports and there you have it. The benches are just 1x12x8's cut into shape and supported by 2 1x4's on either side.
This project was on the honey-do list. My wife was looking for antiques and had a pretty specific look she wanted this one fit. It was a fun and relatively fast build. I choose Oak as that is the most regular wood I use and had some on hand.
I modified the dimensions a bit making the hutch a foot taller and the buffet a little larger in width and smaller in depth. I used full extension ball bearing drawer slides for the drawers.
I rabbeted the back in and put a middle brace in for support and so that I could hide the back seam. I don't like to face nail face frames, but for this it turned out pretty nice nonetheless.
I beefed up the table top supports by double stacking 2x6's and used 2x4 around the edges. My wife painted the base with valspar chaulk paint and antique gel. The table top she stained with miniwax waterbased stain, coffee color.
Thanks for another great plan! We wanted to replace our King sleigh bed with a Panel Headbord to free up some room in our master. Off to Pinterest I went to find a picture of what I wanted Hubby to build. I was excited to find that Ana-White had tackled this project because I knew there would be a great, well written plan to follow!
Using your simplified 8’ barn door console plans I was able to make my dream wall come true. I made 2 of the consoles, added a center piece and shelves in either side. Your plans were so easy to follow, even a beginner like myself pulled it off. Thank you for sharing your talent!!!!
This was my very first "Ana project"! It was a special Christmas treat for my boys and their expanding train collection. This table has had many, many hours of entertainment and enjoyment. It is a great beginner project and has very easy plans to follow! I didn't do the storage carts at the time. I may go back and do them later though...for now they like playing under the table as well. My obsession began :)
This wasn't my first build job, but it was the first one where I needed an extra pair of hands. My daughter loves it and so does everyone I know! Thank you for the plans!
My take on Ana's table that I made with my son over Summer Break.
Wed, 03/30/2016 - 01:07
I really like how you made half cuts so that the beams were more supported!
On the legs did you attached with pocket holes or where did you attach so that the screws were hidden?
Followed Ana’s plans except added custom bottom rail for door stability and handles to guide the doors. Top rail was made rather than purchased.
We bought a new house that didn't have a Fireplace and we didn't want an entertainment center, so I built this for the best of both worlds. Electric fireplace insert, side panels open for additional storage, and left the nook above the fireplace open for the wifi router and other decorations.
When I saw this table I knew it would be perfect for this space! I was so excited I copied "Sweet T" Table and added a faux handle (which is now my husband's new favorite word) I primed and painted it and then put a coat of poly on it. Was a fun project
This project was a whole lot easier than it looked I think that it took me three days from wood in the back of my truck to the finished project. I think that I spent about $200 on this whole bed and headboard. It is sturdy and I really love it.
I've built a few bookshelves and cubbies before, but nothing on this scale. I built this in my basement this past December as a Christmas present for my three-year-old son. The plans were easy to follow. I believe I spent about $150 on lumber. The bed is very sturdy. My kids love it! Now the the other kids want their own special daddy-made bed :)
Built from full size bed plans from Jen Woodhouse. Very happy how this turned out.
I rnjoy your post and the things you create. Very practical furniture to be used. Hung these barn doors over a closet I built in a bonus room. They worked out great. Thanks Anna.
Don't mind all the mismatched furniture in the room, isn't the master always the last to get paid attention to?
My husband had a birthday on Monday and I had drawn up the plans for this a couple months ago hoping to surprise him. Building it then didn't happen....Day of his birthday rolls around and I looked at the clock at about 11, thinking what could I really surprise him with but didn't want to break the budget. I thought to myself, "I could probably get that built by the time he gets home" And I DID!!!
I sandwiched together two 2x4's puttied and painted to make the chunky leg here.
FYI- My husband is really into selling things on craigslist right now so he told me to see what I could sell it for. I sold this within a few hours for $135. That is a pretty amazing profit while still being way more affordable than any store!!! I LOVE that.
So this was my first project copying the plans for my simple outdoor sink and sturdy work bench. I used the same wood and measurements.
The sink was purchased about 5 years ago in Mexico. Faucet and drain at Lowe's. I took the sink to Lowe's to have them color match the bowl and used the same paint.
I decided to use four boards for the bottom shelf plus one as a back stop. I also had to space the top two bracers farther apart because the sink was 17 inches deep ( make sure you measure the sink first. I made the mistake of assembling the base and finding out afterwards that the sink wouldnt fit.
Sun, 07/21/2013 - 18:33
Oh I used the cut out from the sink and added a fold down handle. It is used as a cover for the sink and doubles as a cutting board/ serving tray.
This project took a day to build and about four days to stain with a day of drying in between each coat. Great plans! I love my new couches!
I changed the dimensions and design slightly but used the grandy plans as a starting point. Some changes had to be made due to wood choices. I had to flip the rollers behind the doors as they came out too thick, but I like the look of seeing the whole door. Overall, I’m very pleased with how this turned out.
72”x34”x16.5”