
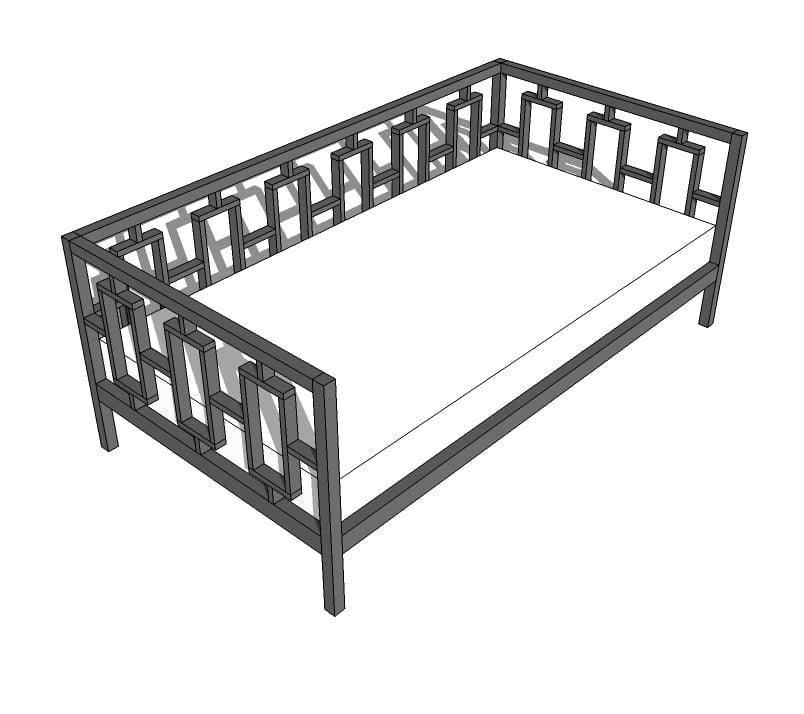

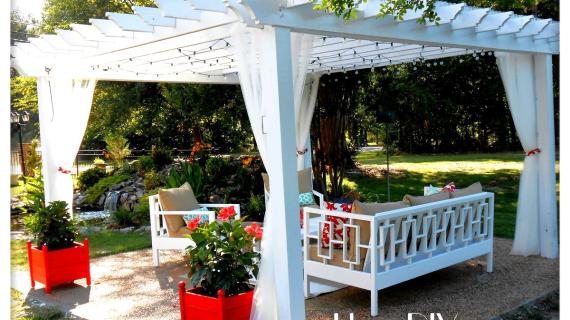
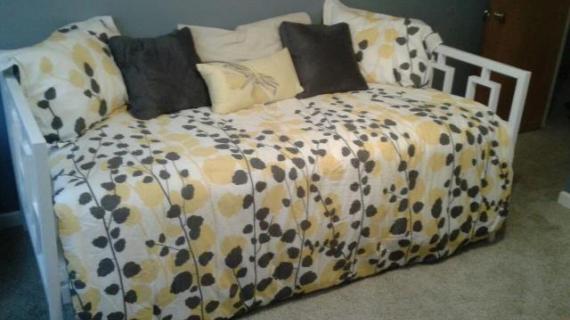
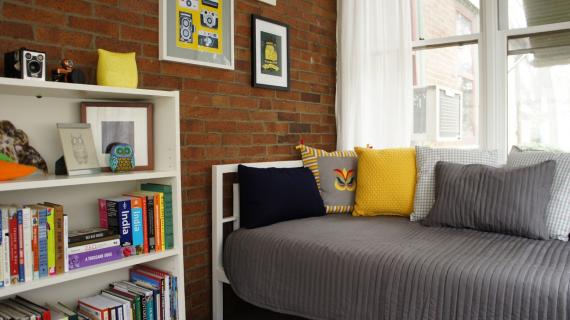
A modern style daybed, featuring a modern pattern on back and arms. Free easy step by step plans to save you money off West Elm furniture.

Preparation
3 - 2x3 @ 8 feet long
7 - 1x2 @ 8 feet long
6 - 2x2 @ 8 feet long
Use either pocket hole screw or regular screws
24 - 1x2 @ 12" (Sides of Rectangles)
9 - 1x2 @ 5 1/2" (Rectangle to Rectangle Joiners)
6 - 1x2 @ 4 1/4" (End Joiners)
24 - 1x2 @ 6 1/2" (Tops and Bottoms)
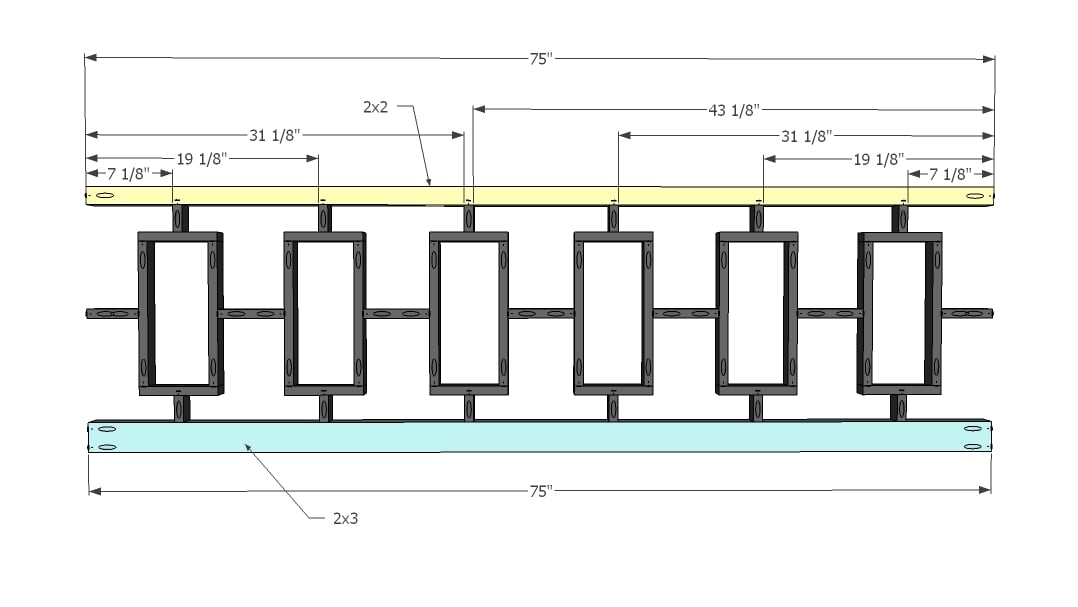
3 - 2x2 @ 75" (Back Top and Cleats)
2 - 2x3 @ 75" (Aprons)
4 - 2x2 @ 30" (Legs)
2 - 2x2 @ 39" (Arm Top)
2 - 2x3 @ 39" (Arm Aprons)


Please read through the entire plan and all comments before beginning this project. It is also advisable to review the Getting Started Section. Take all necessary precautions to build safely and smartly. Work on a clean level surface, free of imperfections or debris. Always use straight boards. Check for square after each step. Always predrill holes before attaching with screws. Use glue with finish nails for a stronger hold. Wipe excess glue off bare wood for stained projects, as dried glue will not take stain. Be safe, have fun, and ask for help if you need it. Good luck!
Instructions
Step 1
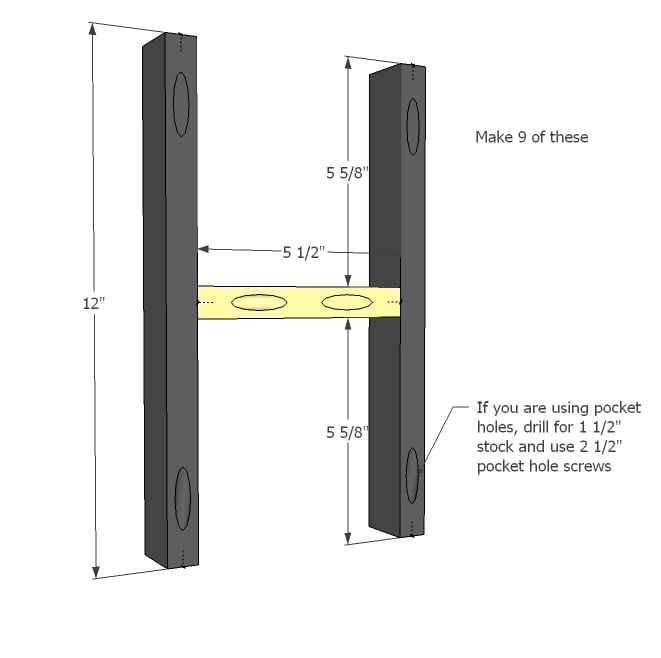
You are probably wondering why in the H are we starting by building an H? Why not start by building the rectangles? Well, there's good reason (unless you own a Kreg Jig, and then you can do whatever the H you want - or rectangle for the matter).
Step 2
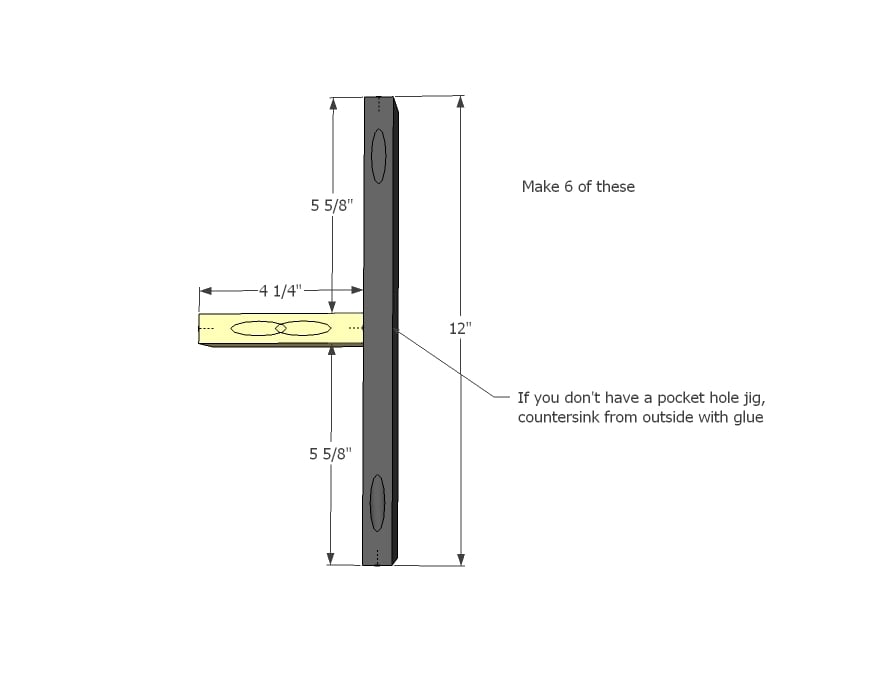
Now we are going to build some sideways Ts. Six of them.
Step 3
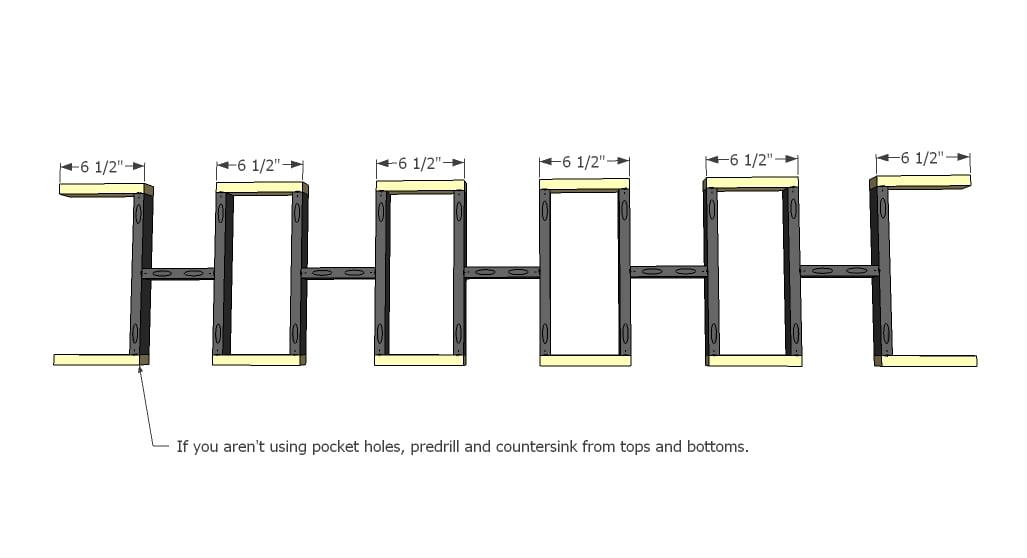
Now add the tops and bottoms as shown in diagram above. See what I mean about being able to get your drill in there to predrill holes and drive screws? Make sure you are working on a flat, level surface, and DEFINITELY check for square (or rectangle) in this case.
Step 4
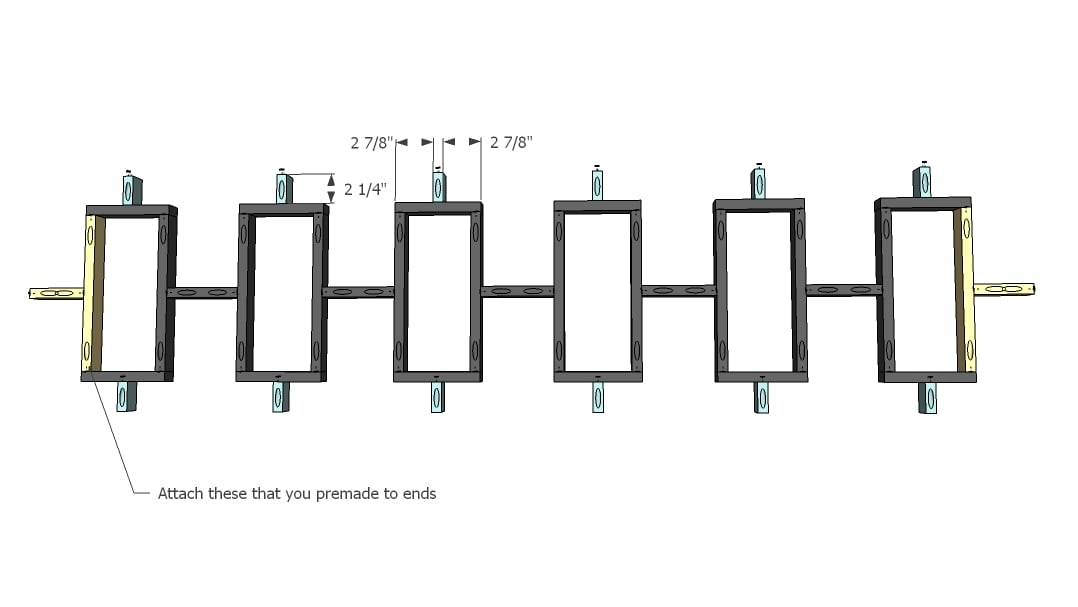
Now add the Ts to the ends.
Step 5
Step 6
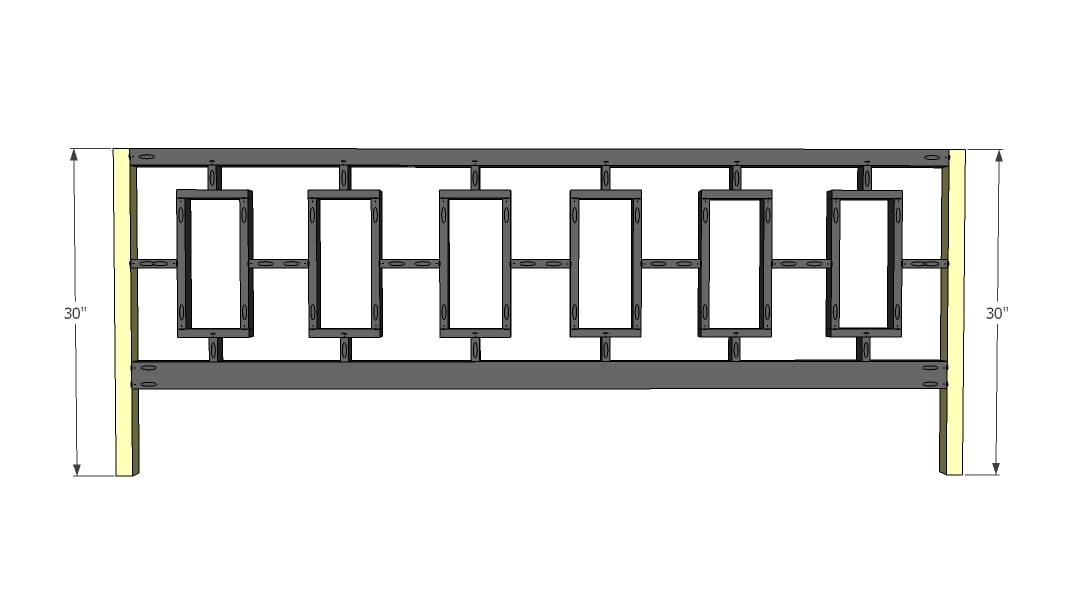
Now the legs.
Step 7
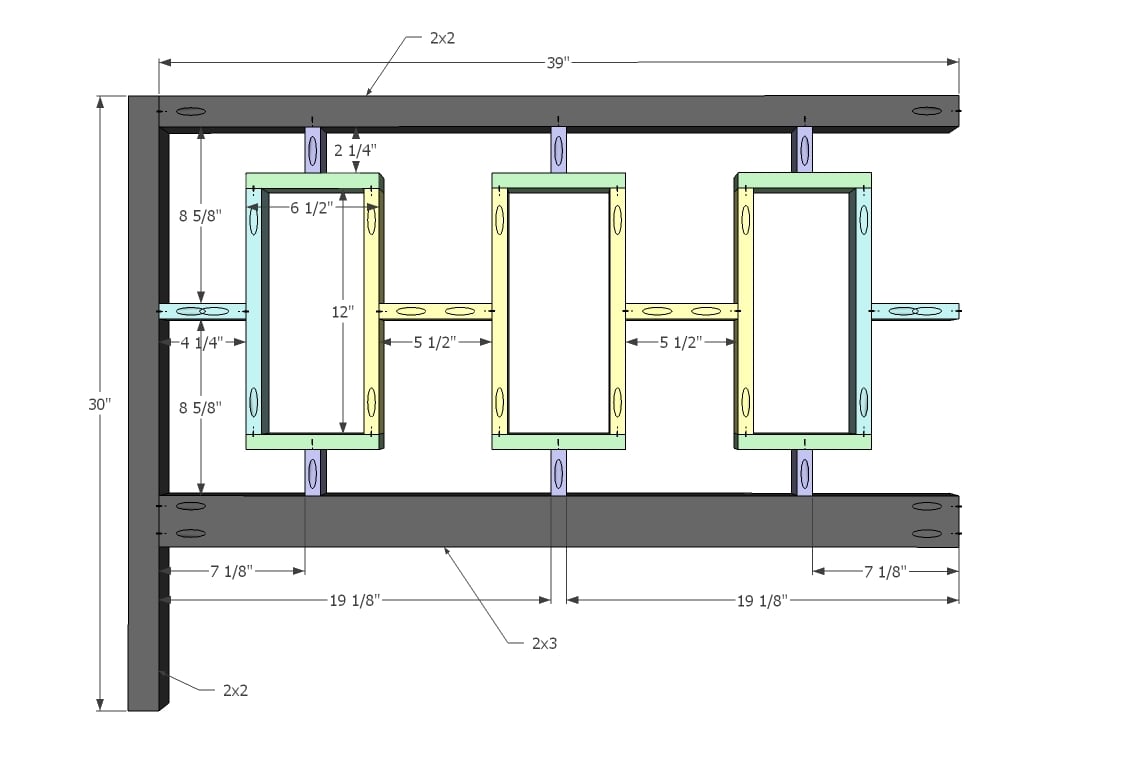
By now, you are a pro, rock star builder, whippin' this thing out! One thing to consider, especially if you are using pocket holes, is to mirror the two ends so your pocket holes are on the outsides for both arms.
Step 8
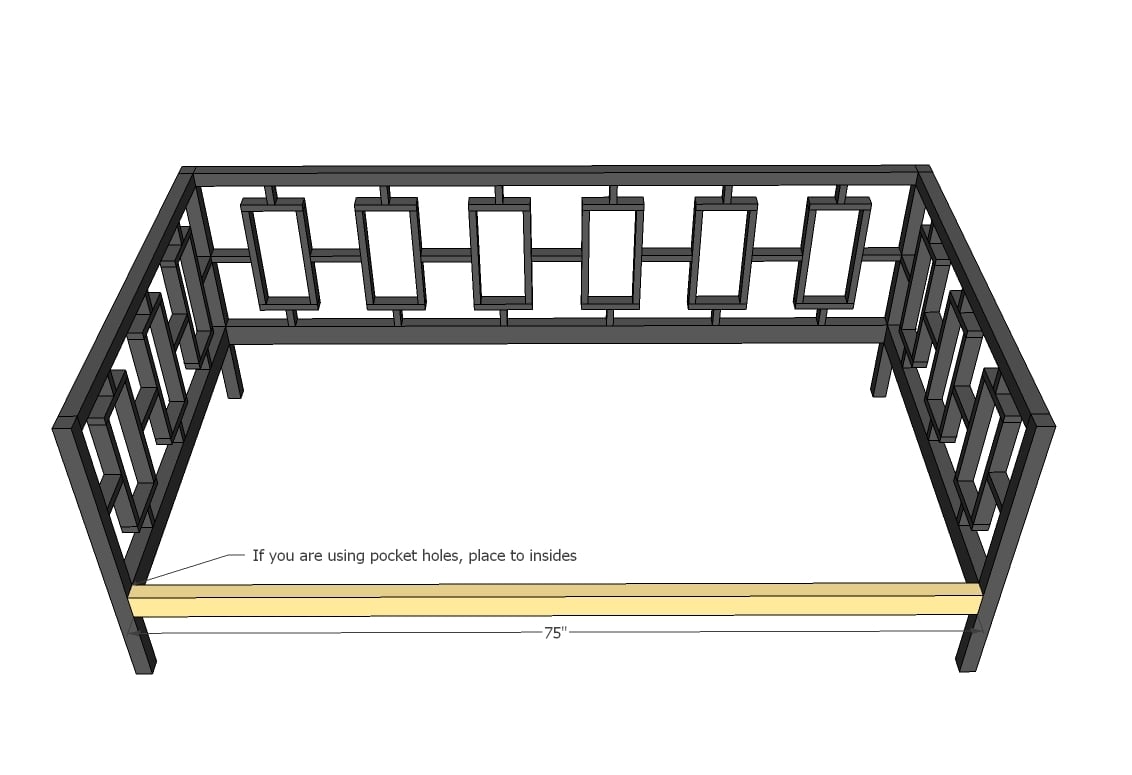
Front apron should be an easy step.
Step 9
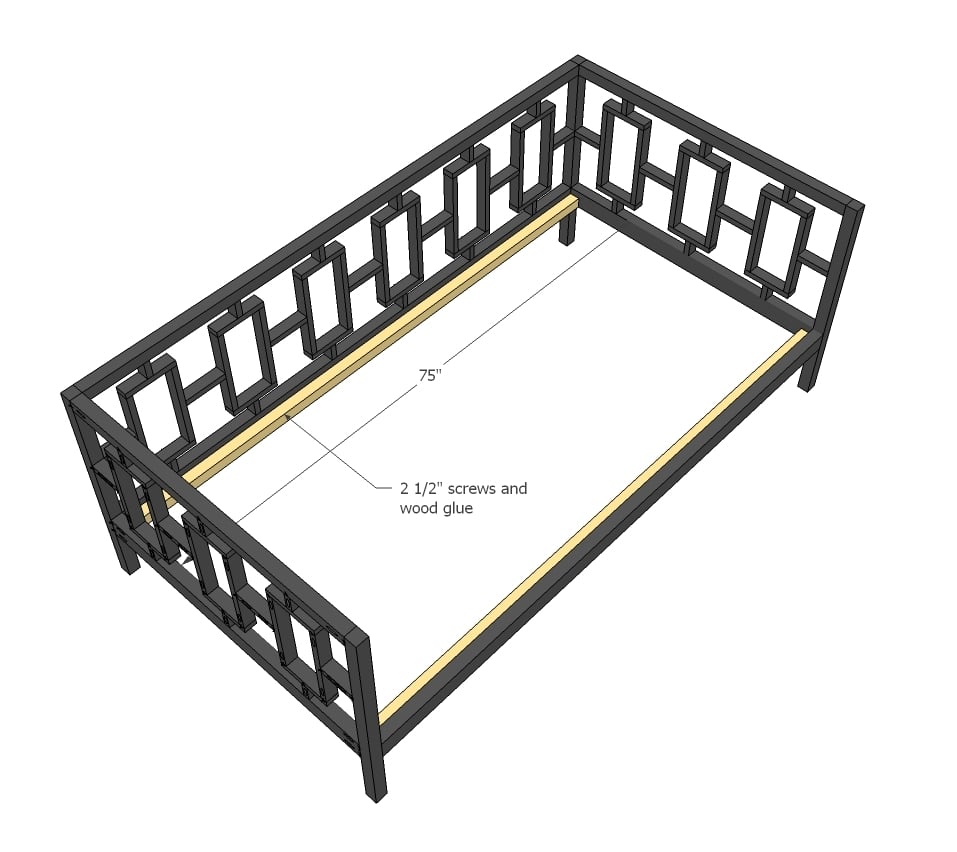
Use 2 1/2" screws and wood glue to attach cleats to aprons, flush to the bottoms.
Step 10
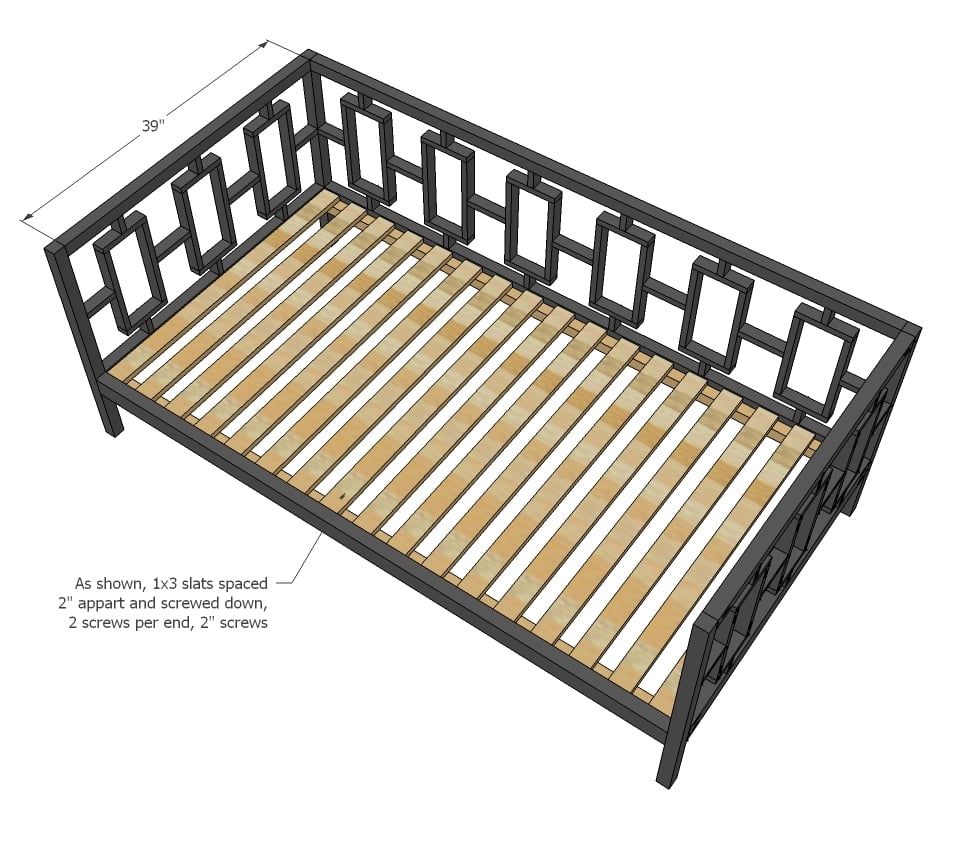
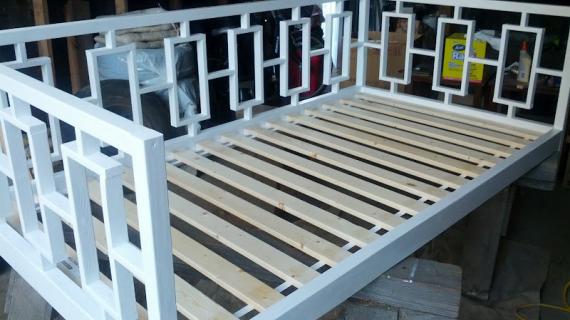
You can either use a bunkie board, metal bed spring, or a box spring, or slats as shown above. Always refer to the recommendation of your mattress for slat spacings.
Step 11
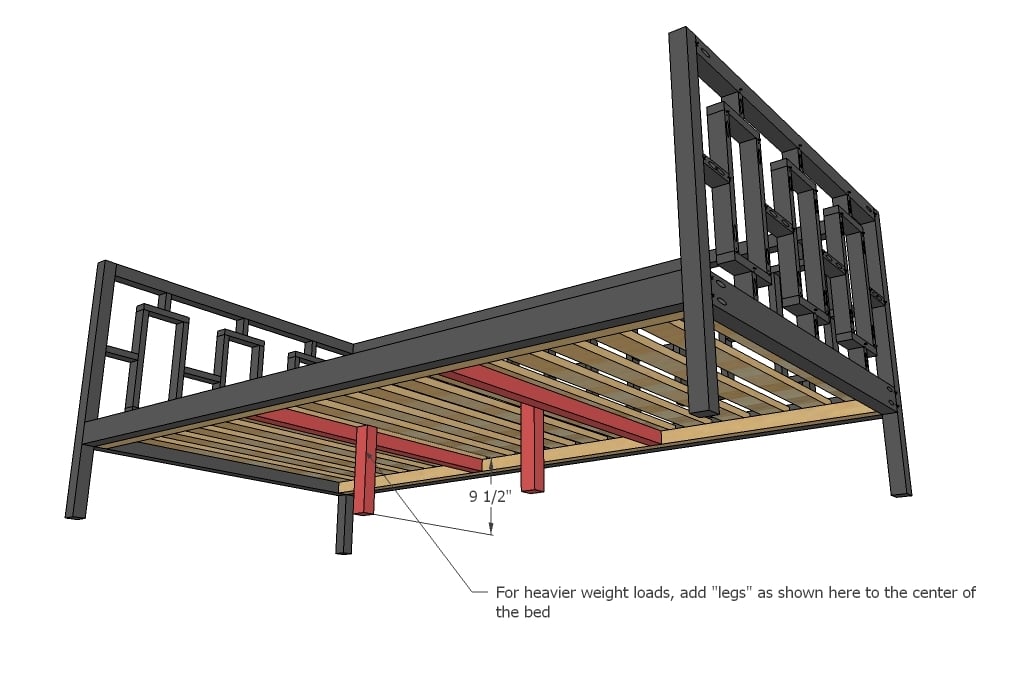
And if you expect a heavier load, this is how you would "beef up" the bed.
It is always recommended to apply a test coat on a hidden area or scrap piece to ensure color evenness and adhesion. Use primer or wood conditioner as needed.

Comments
Leah
Thu, 08/11/2011 - 10:37
beautiful!
I love this~
I'm in the process of finishing a twin-sized headboard modeled after the community contributor (who are you?) who made an over-lapping squared daybed.
I beefed up one side panel and made it taller. I assume the same could be done with this!
If I may make a suggestion, paint the inside pieces first! Then assemble. It has cut down my finishing time tremendously~
(I plan on posting my plans as soon as I can access my sketch-up files again. Oh laptop, why hast thou died on me?)
April McCoid (not verified)
Thu, 08/11/2011 - 11:21
Dis-assembly
Ana,
You mentioned the fact that it will be difficult to get this thing through a doorway... and I wondered if maybe it could be assembled in such a way that it can be taken apart and put back together. Could you glue/screw each of the 3 sides without gluing them together at the corners so that the back and 2 sides are separate pieces without it being unstable? I would love to make this but it's scary to think that once it's in the room I'd have to demo the thing to get it back.
Also, do the pocket holes fill easily? Or is it really noticeable?
Thanks!
In reply to Dis-assembly by April McCoid (not verified)
Ana White
Thu, 08/11/2011 - 11:53
April, thank YOU for
April, thank YOU for mentioning this. There's two ways you could do this.
1) If you have a little space around your doorways, you will be able to stand the daybed on it's arm (so it's tall) and rotate the bed to get two legs through the doorway. Once you get two legs through, rotate the daybed until the entire daybed is in the room.
2) You guessed it, build back and arms separately, then assemble in the room.
Guest (not verified)
Fri, 08/12/2011 - 06:04
Love this! I am a big fan of
Love this! I am a big fan of daybeds. I like the detail that's added to this one.
Teresa A (not verified)
Sun, 08/14/2011 - 18:12
missing info
Thank you so much for this instruction guide - I'm in the middle of this project and notice there is no information for the spacers that connect the rectangles with the aprons -shown in step 4... well at least the information is missing from the cut list -just confirming they are 2 1/4" spacers? I guess I will just count how many are needed.....
Ana White
Sun, 08/14/2011 - 18:54
2 1/4" is correct - see step
2 1/4" is correct - see step 7. Just center the spacers on the rectangles, then attach to bed. Good luck, can't wait to see your daybed!
Guest (not verified)
Thu, 08/18/2011 - 10:06
Buying the wood
I love that you made plans for the new style west elm daybed, it's what I was planning on purchasing for one of my daughters. Now I can save a ton and learn something too. I have one question- where do you buy the sizes of wood for this project- I went to HD and they didn't have all the sizes. I live in Texas- the DFW area. Any suggestions? Do I need to go to a lumber type store? One more thing, may I ask how much this project cost you? I'm new to this but love your site! Thanks!
In reply to Buying the wood by Guest (not verified)
Ana White
Thu, 08/18/2011 - 17:49
Hi - it's the 2x3's right?
Hi - it's the 2x3's right? If you can't find them, go with a 2x4 :) Costs can vary depending on where you live and what type of wood you use, so can't give you exacts there. Good luck and welcome!
Guest (not verified)
Sat, 08/20/2011 - 11:48
is this to complex to convert
is this to complex to convert into a full size by adding the 15" on widths you always mention?
In reply to is this to complex to convert by Guest (not verified)
Ana White
Sat, 08/20/2011 - 12:26
Converting to Full Size
You might have to do a little math to figure out the arms, but yes, a twin is 39" wide and a full is 54" wide - so a 15" difference. Same lengths. I would use the same size rectangles (probably add one more to each arm) and just alter the rectangle/leg connector length to fit the new dimensions.
The most important part is to add the center legs - a full size bed needs extra support because your slats can't span 54" without support. I would just do a third "apron" running parallel to the front of the daybed, centered, from a 2x2, and attach legs from it. That way your slats are getting fully supported.
Good luck, would love to see a full daybed completed!
princesskarebear
Sun, 08/21/2011 - 18:28
question about back top and cleats
Ok so in the cut list is says you need two 2X2's cut to 75in for the back top and cleats. The question is aren't there three 75in pieces needed since there are two cleats and one back top? Am I missing something somewhere?
In reply to question about back top and cleats by princesskarebear
Ana White
Sun, 08/21/2011 - 18:44
You are absolutely right -
You are absolutely right - you will need two cleats and one top. I apologize and will update the cut list right now. Thanks for taking your time to let us know. Ana
kyleesdad
Fri, 08/26/2011 - 11:47
Converting to a bed...
Ana, we love the look of this for our guest bedroom / office / play / all around put it in there room. Because we occasionally have family staying with us, we need a bed big enough for 2 adults and a blow up mattress isn't cutting it for the older generation that loves to visit the kids. Therefore, I was wondering what your thoughts were on converting this to some sort of slide out / trundle bed kind of situation. My daughter has a bed from IKEA that converts from a twin to a queen size bed by sliding out the bottom half (there's a photo here to see what I mean: http://farm3.static.flickr.com/2461/3927816653_0e539c8c6b.jpg)
Would that be feasible to add to this? Basically an addition that would have alternating slats, so when slid out would still have support, but when put together as a sofa / day bed, would be solid enough to handle kids jumping and what not.
Would love to hear your thoughts before I attempt to tackle this idea.
Thanks!
Jaguwar (not verified)
Tue, 01/03/2012 - 13:05
That's pretty darned brilliant!
I'm loving that Ikea bed, actually, that's pretty brilliant! I know it's several months since you posted this, but I think you probably have the right idea. However, I'm thinking because this bed has a support bracket in the middle, I'd think the trundle would not have storage under it? Or if it did, the drawers would be narrower than they look from the front in order to leave room for said bracket which, incidentally, should be doubled (one for the daybed portion, and one for when the trundle bed is exended)?
Guest (not verified)
Fri, 08/26/2011 - 12:47
Wood
What type of wood is used for this daybed to cost $20-$50? We just built this with paint-grade poplar and spent over $200. Everything at Home Depot was "stud" quality, dinged up and not straight. We had to go to a lumber yard.
Guest (not verified)
Fri, 08/26/2011 - 13:39
I used standard white
I used standard white wood....aka 2x4 stud. Just have to go through alot of the wood to find the straight ones. they are there. After that alot of sanding. Belt sander to get rid of all of the rough edges, smooth our the rough edges. Then primer it with white paint before, or you can use a dark colored stain to give it a natural board look. I spent less then 50 dollars for bed and slats. Just have to give alot of elbow work in the end to smooth up the wood.
chika
Fri, 09/02/2011 - 14:59
converting to a corner unit
Hi Ana,
I can't say enough about this site. This is such a life saver!!! You really are making a difference. Being a laid off mom i've been doing everything diy from drapes to furniture to repurposing items just to be able to manage after we downsized from a 4 bedroom house to a 2bedrrom apt. All of this is really to say that your work is incredibly meaningful and is truly changing lives!!!
ok.. so i really like this unit for my boys. I now have to squeeze 3 into one small bedroom. Being young teens makes it that much more difficult.
How can i turn this into a corner unit with trundles so that it sleeps 4 beds, but doubles as 'sofa' during the day? i looked at several plans and tried mesh them but i dont think its going to work :( need expert advice desperately!!
thanks for your help!
kenm09 (not verified)
Thu, 09/08/2011 - 16:05
Kreg Screws
Hi Ana,
I have all of my pieces cut and am starting to assemble the bed. However, I did a few test pieces to start putting the "H"'s together and the 2 1/2" screws seem to be too long.
I did a little research and found this chart:
http://api.ning.com/files/kkaG0viVHkNd-SfGSpTRmBlgsvBZqmEnccRShdqRBBSBc…
2 1/2" screws are only recommended for screwing 1 1/2" into 1 1/2" pieces of wood. Since we are technically screwing 1 1/2" wood into 3/4" wood for the majority of the rectangles, should we use 2" screws at a 3/4" jig setting or 1 1/2" screws at an 1 1/4" jig setting.
I hope this isn't too confusing. I'm just trying to get this figured out before I buy anymore screws. I appreciate your help.
Thanks,
Ken
claydowling
Fri, 09/09/2011 - 06:47
Screws & Depth
Ken,
Set the depth gauge on the jig and the depth collar for the thickness of the wood you're drilling into. Buy the screws for the thickness of the wood you're screwing that to.
You can also pick up pocket hole screws pretty inexpensively from Rockler via mail order, or you can buy smaller quantities from Lowes. You don't need to buy the Kreg-specific screws, any pocket hole screws will work.
To complicate the matter, there's also this pocket hole system: http://www.leevalley.com/US/wood/page.aspx?p=42329&cat=1,180,42311
It's chief advantage is that it is designed to work with regular wood screws, which are widely available and very inexpensive. I don't think that it's as convenient as the Kreg system.
Mary Middleton (not verified)
Sun, 09/11/2011 - 10:34
Hemnes Daybed from Ikea
I have been perusing your site for hours! Thank you so much for taking the time to share all of your plans with us (for FREE!). I would love, love, love to see plans for the Ikea Hemnes Daybed. It is a twin daybed that can be pulled out to turn into a full-size. I really want this bed but I really don't want to pay that much. Isn't that how it usually is? :)
http://www.ikea.com/us/en/catalog/products/20162888
kenm09 (not verified)
Tue, 09/27/2011 - 17:32
2 1/4" Pieces Pocket Holes
Hi Ana,
I cut the 2 1/4" pieces of wood (mentioned as spacers above) to connect the rectangles to the bed. How are you supposed to fit two pocket holes on such a small piece of wood? Am I missing something here?
Thanks
Ken
tgilstrap
Tue, 10/18/2011 - 11:47
Missing from Cut list
I started this Daybed on Saturday and realized that the 24-2 1/4 1X2 were not on the cut list. I had more wood left over than I should have. I was worried until I flipped through the instructions again and spotted them. Just thought you should know.
cjay (not verified)
Mon, 11/14/2011 - 07:55
Height
I have a trundel bed that I would like to be able to put under this bed that requires 13" of clearance rather than the 8" that is shown here. Would you anticipate any stability issues from lengthening the legs by 5"? Perhaps if I were to add another board on the bottom on both sides and the back it would be okay, or do you think that is necessary? Thanks.
Cory
KSchmalz (not verified)
Sat, 12/17/2011 - 16:12
lumber dimensions
Love this, going to make it next month and am about to go buy lumber. I have a question regarding lumber sizing- are the lumber dimensions true to size (ex, 1x2 is actually 1" by 2"), or are they the slightly-smaller-than-advertised size (ex, 1x2 is actually 3/4" by 1 3/4")? Thanks!
claydowling
Sun, 12/18/2011 - 07:02
Lumber sizing
You can't count on the sizing of dimensional lumber. It's typically 1/4" undersized, but sometimes it's more. You will need to adjust cuts for the material you actually have.
Melissa in Kentucky (not verified)
Mon, 07/30/2012 - 05:31
Fun project and my daughter is loving it so far
We worked on this project this weekend. I would definitely add to the cutlist the 24 2 1/4" pieces missing, and if you don't have a jig I would make the Ts like the ends with the 6 1/2" pieces to make for easier assembly.
We are in the painting stages and we found fairly good wood and with paint, screws, and wood we are at about $75 or so.
This is part of my daughter's 13th birthday room redocorating and I can't wait to get it finished. One because I can't wait to see it with her new bedding and if she likes it.
Two, because I can't wait to pick out our next project!
bswail
Mon, 07/22/2013 - 06:27
My first piece of furniture
Ana,
Love your stuff and have your book! This is the first piece of furniture for me and it was my first time using pocket hole screws (borrowed Kreg unit from my brother). Pocket hole screws rock!
I agree with some of the other posters that pocket hole screws for the rectangles seems like a big challenge and is probably over kill for a decorative element. I chose to put them together using wood glue and brad nails. It seems solid but only time will tell. If I had to do it again, I would probably have put them together using glue and wood screws (pre-drilling the holes of course).
I also agree with the recommendation to make top and bottom T's just like the side T's.
I also agree with Ken and you will have to play around with your pocket hole jig to get it to work with the little 2-1/4" pieces - just not enough wood to use a 2-1/2" pocket hole screw.
I still have sanding and painting to do - but everyone is already impressed with my progress so far.