
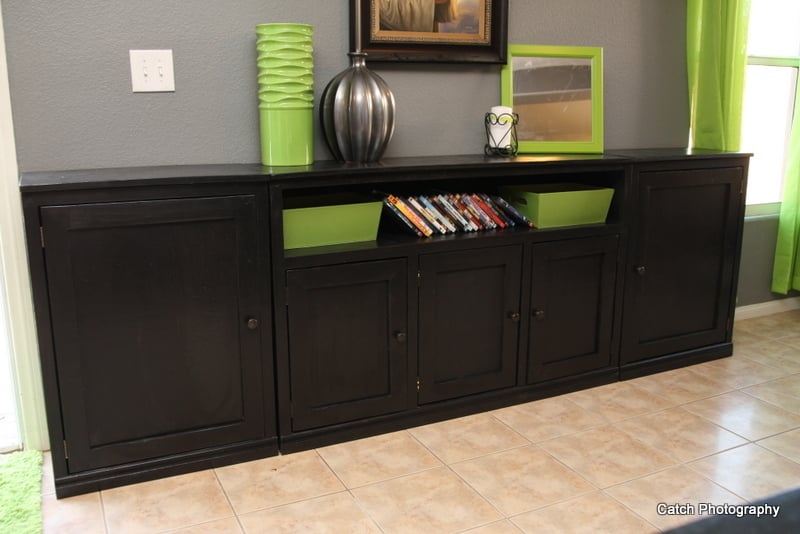

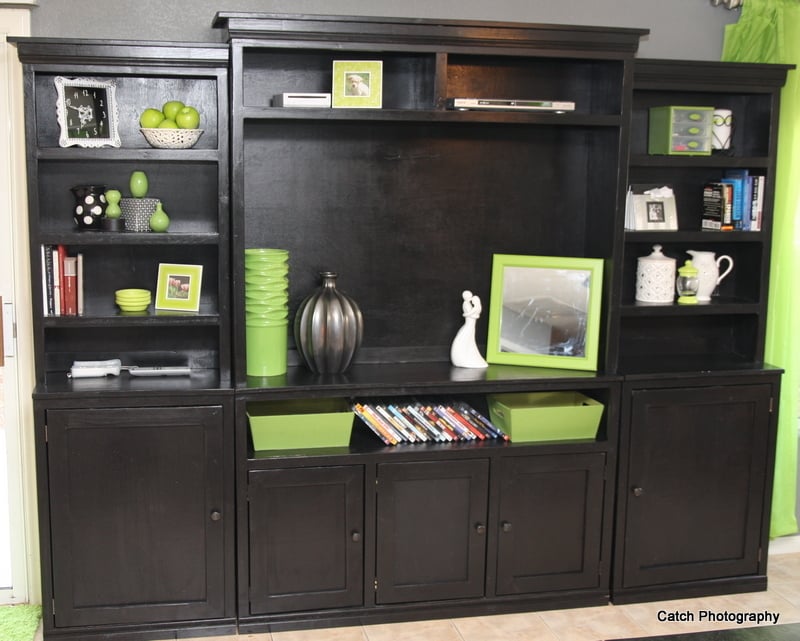
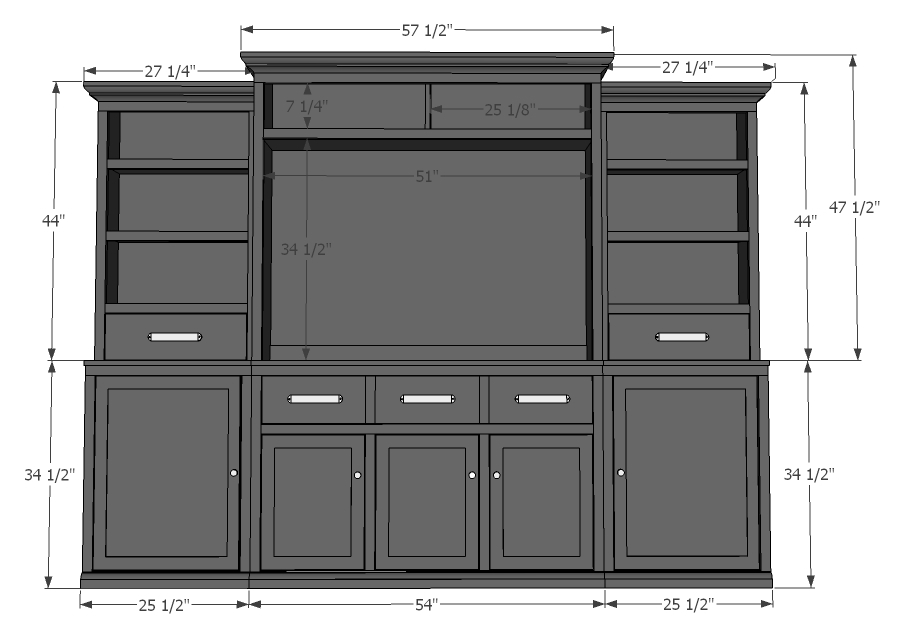
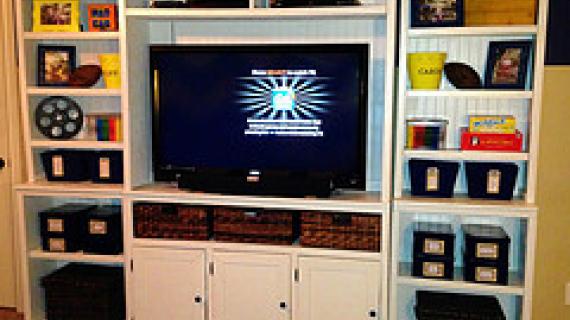
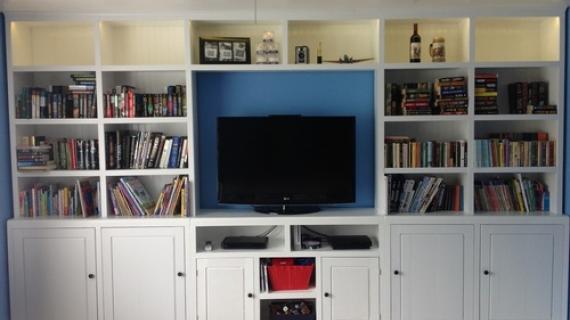
Build your own media wall with our Rebecca Media Suite collection of plans. In this plan, you can build your own side cabinets, shown on either side of the center console plans. Adjust the width to fit your space and needs.
Our step by step plans with full diagrams make it easy.
This project was built in collaboration with Rebecca:
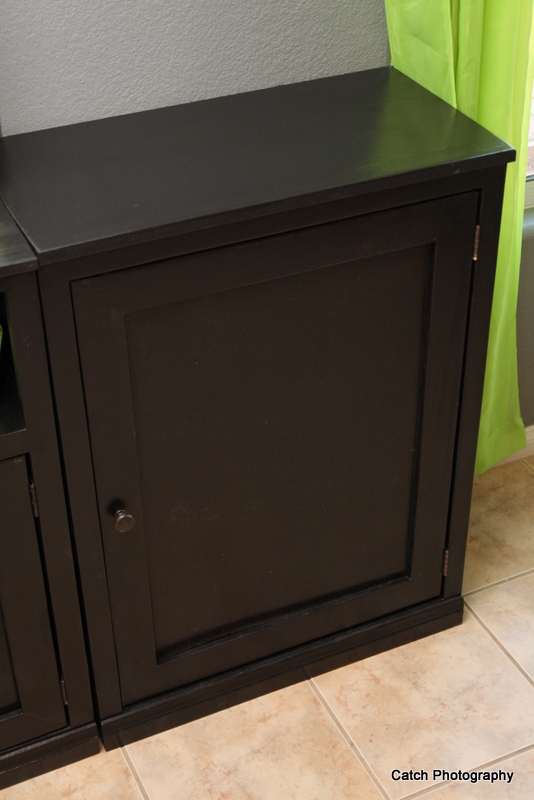
These are a source of great storage. I love that the console piece cupboards and these ones are different sizes so that you really could fit what you need. * If you are building the entire media suite: This plan uses every available piece of wood for what it needs. If you want to add additional shelves you will need to purchase more wood. Actually I had to piece two scrap pieces together (using glue and a Kreg jig) to get enough wood for one of these side pieces. I put that piece at the base to one of the units. It should be strong enough on it's own, but the base is supported by two 1x2's on the ends so I figured that was the strongest place for it (see step 2) Please see cut layout at the end of the plan.
Thank you Rebecca! Make sure you stop over and visit Rebecca for lots more photos and details!
You can build all the pieces in this media suite.
NOTE: This plan is for TWO side bases.
Preparation
- 1- sheet 3/4" plywood
- 1- sheet 1/4" plywood
- 4- 8ft 1x2's
- 3- 8ft 1x3's
- 52" of 2" tall base molding
3/4" Plywood
- 4 @ 11 3/4" x 33 3/4"
- 2 @ 11 3/4" x 25 1/2"
- 2 @ 11/3/4" x 24"
1/4" Plywood
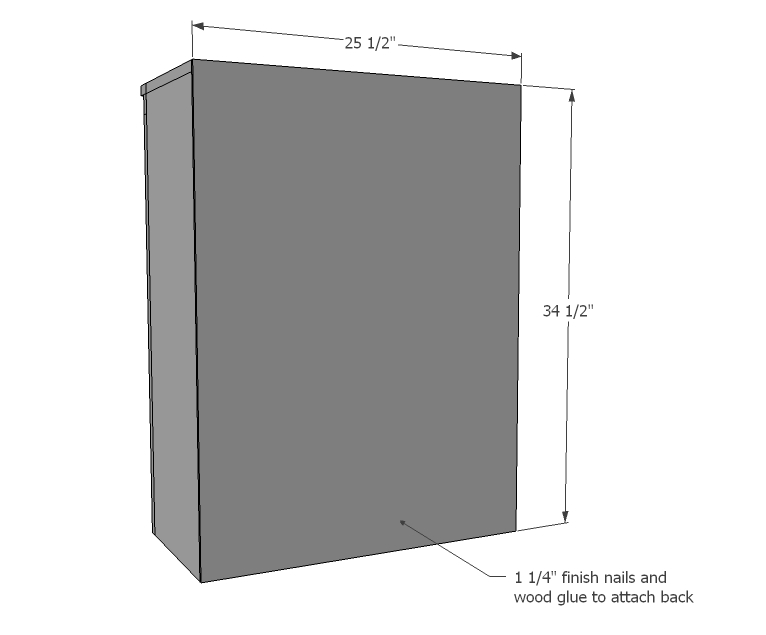
- 2 @ 25 1/2" x 34 1/2"
- 2 @ 18 1/4" x 25 1/2" (these are your door fronts, your measurements might be different)
1x2's
- 2 @ 32 1/4"
- 4 @ 25 1/2" (These are your door frames cut for a mitered angle. Your measurements will be different if you are doing a butt joint)
- 4 @ 24" (These are your door frames cut for a mitered angle. Your measurements will be different if you are doing a butt joint)
- We recommend ripping the plywood into strips 11-3/4" wide x 8 feet long. Then just cross cut the strips to create the pieces needed in the cut list.
- If you are only making one of these units, you could buy a 10 ft 1x12 instead of the 3/4" plywood and it would be enough for the box. Just remember that sometimes a 1x12 is only 11-1/4" not 11 3/4"
- If you would like to add a shelf inside the cupboards you will need to purchase extra wood - we recommend 1x12s for the shelves.


Please read through the entire plan and all comments before beginning this project. It is also advisable to review the Getting Started Section. Take all necessary precautions to build safely and smartly. Work on a clean level surface, free of imperfections or debris. Always use straight boards. Check for square after each step. Always predrill holes before attaching with screws. Use glue with finish nails for a stronger hold. Wipe excess glue off bare wood for stained projects, as dried glue will not take stain. Be safe, have fun, and ask for help if you need it. Good luck!
Instructions
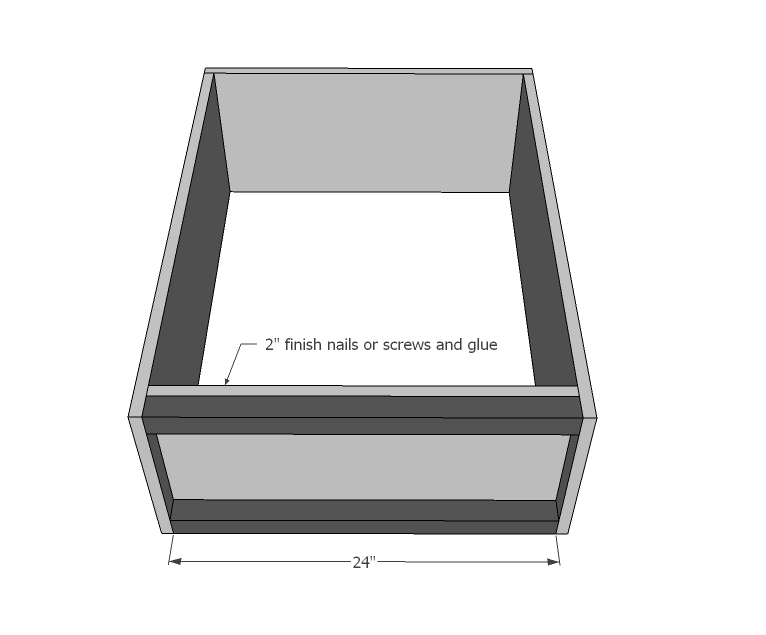
Step 1
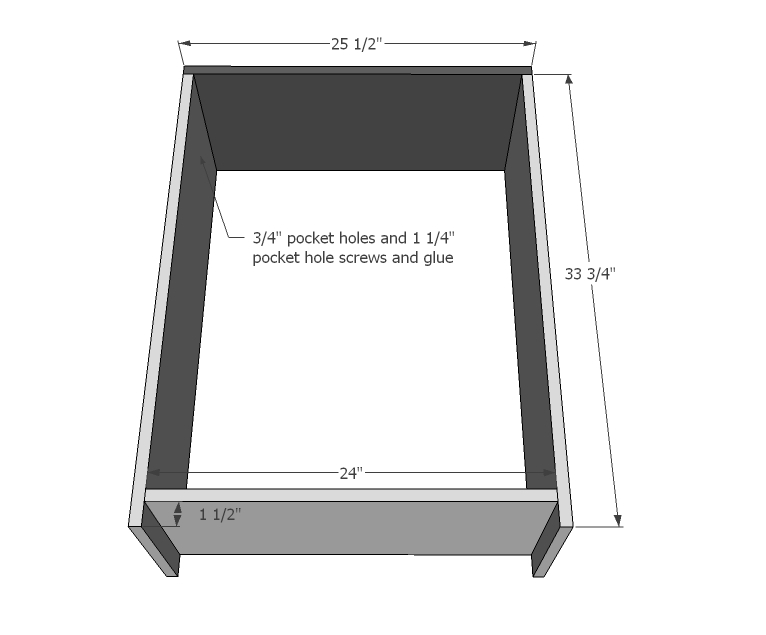
Build the box.
Step 2
Add bottom supports.
Step 3
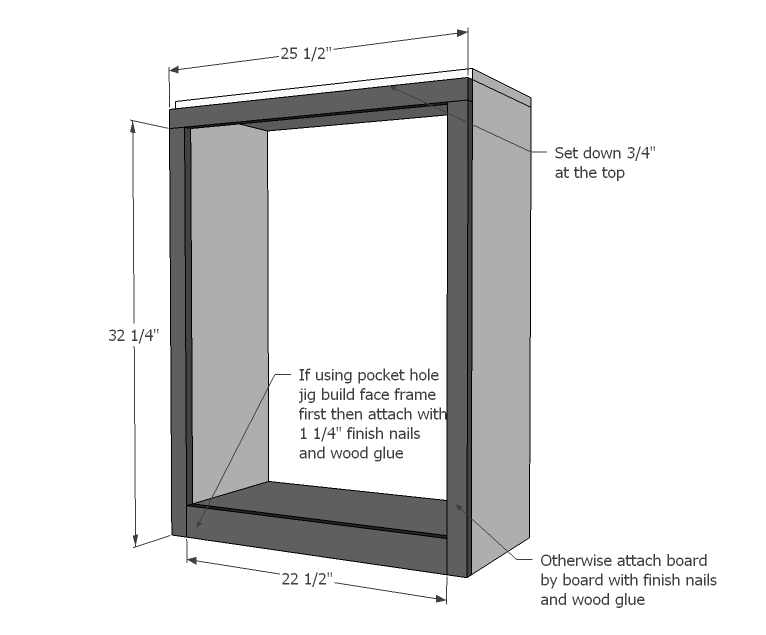
If you have a pocket hole jig, build face frame first and attach with finish nails and glue.
Step 4
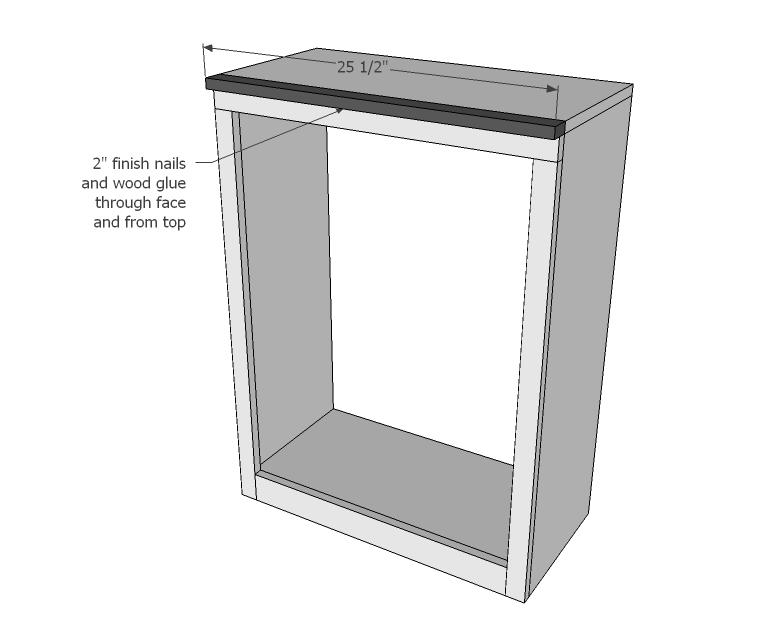
Then add top header.
Step 5
Step 6
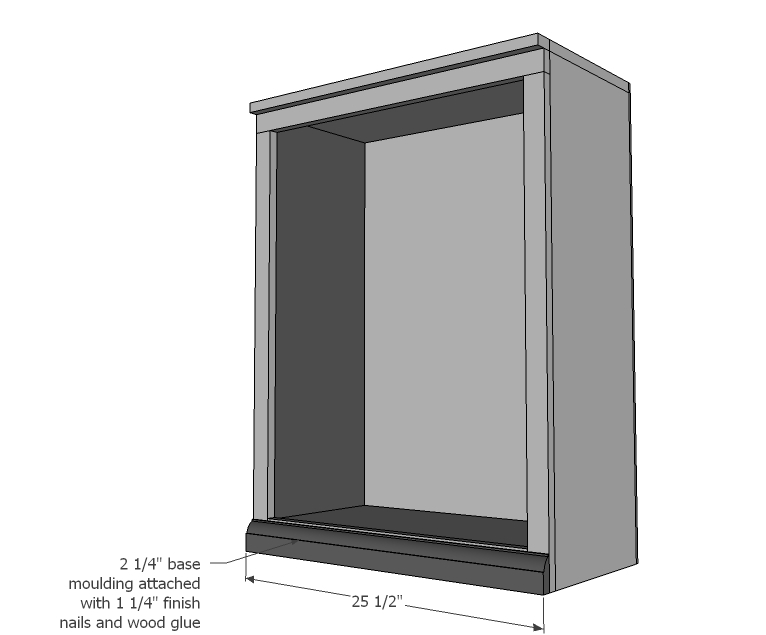
Add moulding to front.
Step 7

And finally the doors!
Step 8
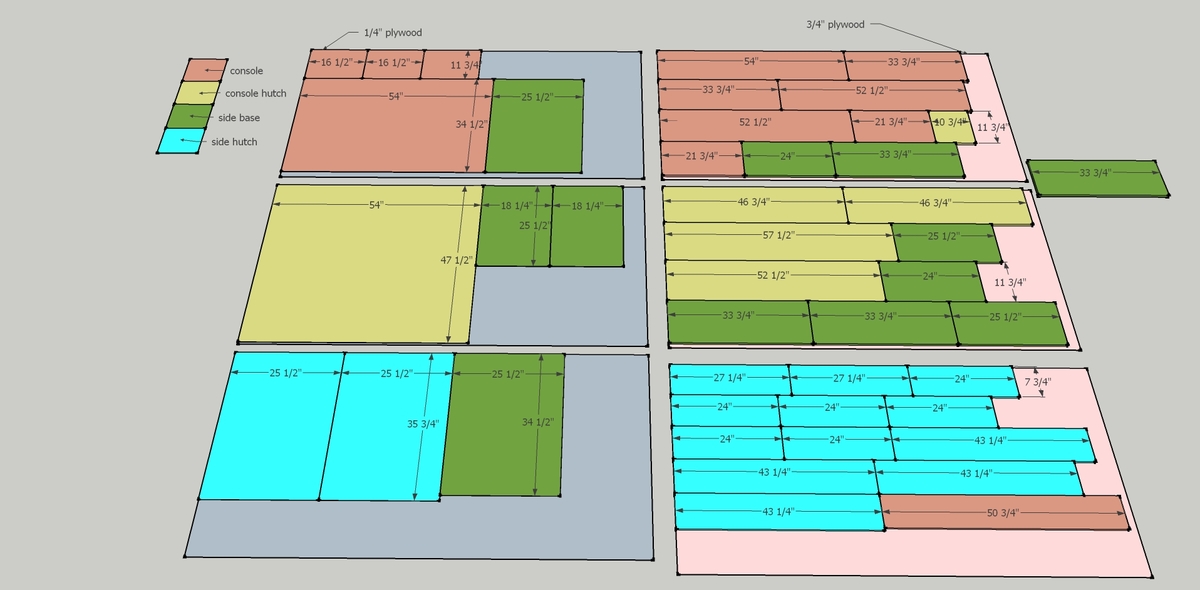
Rebecca was kind enough to put together a cutting layout too.
Step 9

It is always recommended to apply a test coat on a hidden area or scrap piece to ensure color evenness and adhesion. Use primer or wood conditioner as needed.


Comments
Handygirl
Wed, 04/18/2012 - 07:48
Doors
This looks awesome!!! I'm so proud of you, especially doing this with 2 kids and pregnant! :-) I was curious about the doors, but I went to your blog and you answered my questions. Thanks!
redhead_61
Thu, 04/19/2012 - 14:42
NOTE!!!
Hey everyone it just occurred to me that I wrote this plan, mainly the shopping and cut list as if you were building TWO of these units!!!!! Please refer to the cut list for a better look at what you will need. That 3D image is of everything and it helps to see how it all can be cut the most effectively. If you only want one, then half all the required pieces. SO SORRY. Reply to this comment and I can email you a bigger file of the cut list, you can't see the text very well.
jaime6891
Thu, 04/19/2012 - 17:59
Please email me the cut list
Hi, I love this plan! Can you please email the cut list to [email protected]? Thanks!
Mckenzie (not verified)
Fri, 05/11/2012 - 12:22
Hi! I love this entertainment
Hi! I love this entertainment center and plan on building it! That'd be great if you could e-mail the cut list! Thanks
[email protected]
Shasta (not verified)
Thu, 06/14/2012 - 20:20
cut list
I would also love to build this. :) Would you please email me the cut list as well. [email protected] Thanks so much!!
Shasta (not verified)
Sat, 06/16/2012 - 05:51
another random question
In the cut list above the 1x3 cuts aren't labeled. Are they for the doors? That is what I am assuming anyway. I am pricing out this lovely entertainment center (thank you so much, by the way) and am trying to figure it all out before I go and purchase a heavy load of wood. :) I am using cherry plywood and cherry moulding for this though. We have an awesome lumber yard that only specializes in hard woods, and is unbelievably affordable.
My other question....since I will be using moulding in place of some of the 1x2's, could I not add the 1x2 and just put moulding in place of it? I will use the 1x2's for the support, but the front pieces that act as moulding, could I just replace it with only moulding? I hope I am making sense. I also hope that you or Anna or anyone else can answer this for me. Thank you so much for these plans....now I will attempt to build this with my 4 kiddos here (two of which are 2.5 years old). :)
In reply to another random question by Shasta (not verified)
redhead_61
Fri, 10/19/2012 - 12:10
Sorry the title to the 1x3's
Sorry the title to the 1x3's is off to the side in the cut list. Just read through each plan. Most of them are for doors, but there are a few places that a 1x3 is used for support and framing.
If you wanted to add a rounded molding instead of the 1x2's that is totally doable. I attached the 1x2's using a kreg jig, so if you wanted to do molding you would use a finish nail or you could just glue and clamp all the pieces, but a nail makes it all a little easier.
Good luck!
peter (not verified)
Tue, 08/07/2012 - 15:17
Cut List
This looks awesome and I plan to start working on this immediately. Would you mind sending me the cut list as well? [email protected]. Thank you so much.
Peter
step02
Tue, 02/11/2014 - 09:34
Text Cut List at top of page has mislabeled 1x2's
I believe the text 1x2's cut list found at the top of the page is mislabeled. The parts that are currently stated for the mitered door trim is instead parts for the face frame and bottom shelf supports. The 1x2 section should read:
1x2's
4 @ 24" --------> Bottom Shelf Supports
4 @ 32 1/4" ---> Face Sides
4 @ 25 1/2" ---> Face Top and Top Front Edge
Depending if you built them mitered as in the plans should read under 1x3's:
6 @ 29 1/2" (These are your door frames cut for a mitered angle. Your measurements will be different if you are doing a butt joint)
6 @ 22 1/8" (These are your door frames cut for a mitered angle. Your measurements will be different if you are doing a butt joint)
These would be the long measurements for the mitered frame pieces.
Final 1 x 3 piece would be 1 @ 22 1/2" for the face bottom.
Medickep
Mon, 03/03/2014 - 19:35
1x2 or 1x3
Another reason I'm not a fan of cutting everything ahead of time. if you use a 1x2 on the bottom portion of the frame you will have an exposed edge from the bottom of the box. Mind ended up needing to be 2 1/4" wide. It may have been my bad but the directions don't reflect the width of it!