
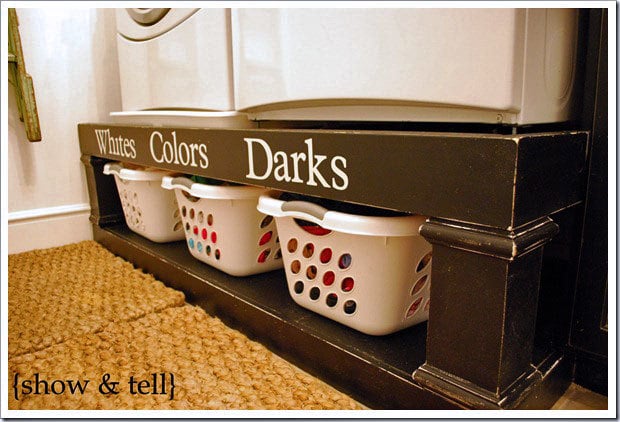

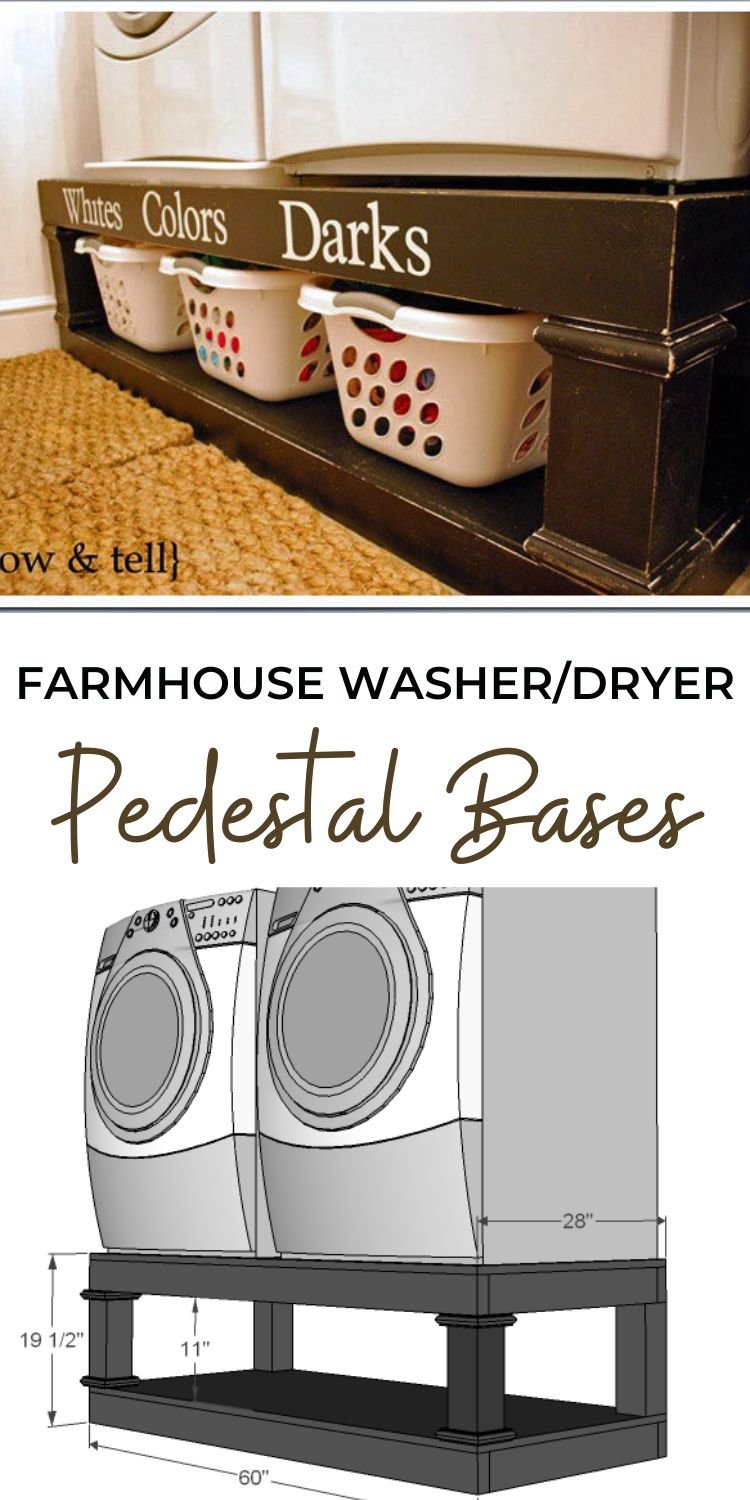
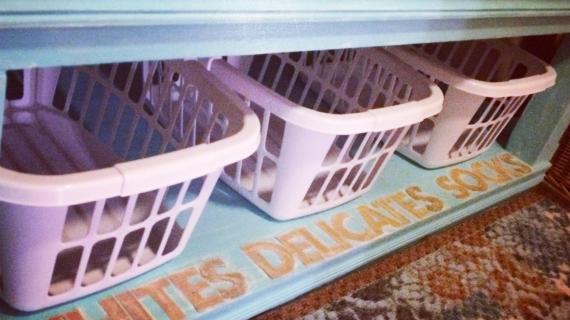
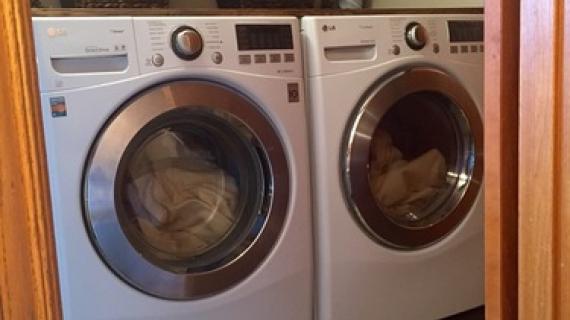
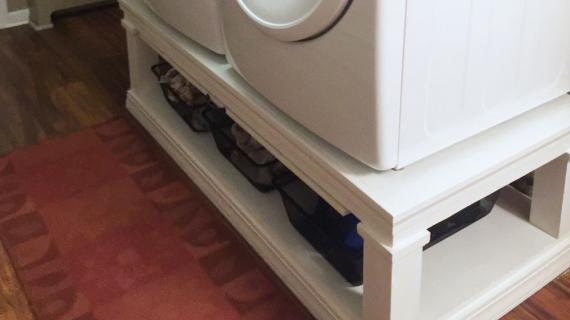
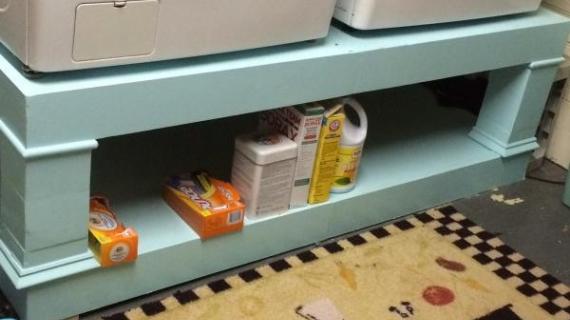
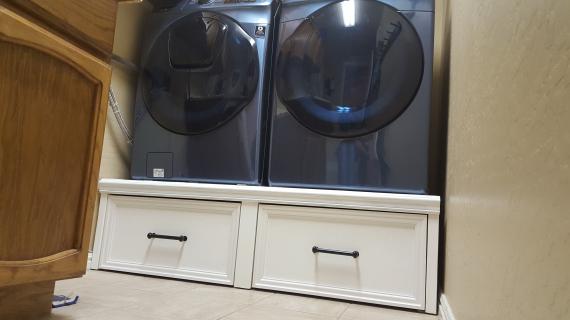
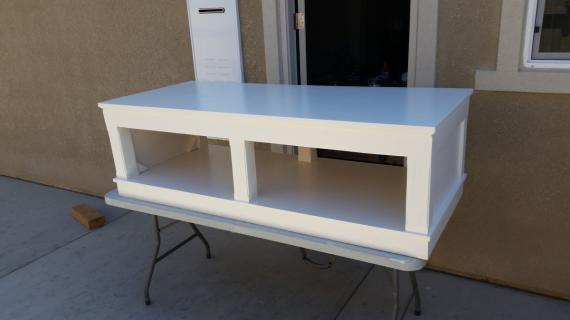
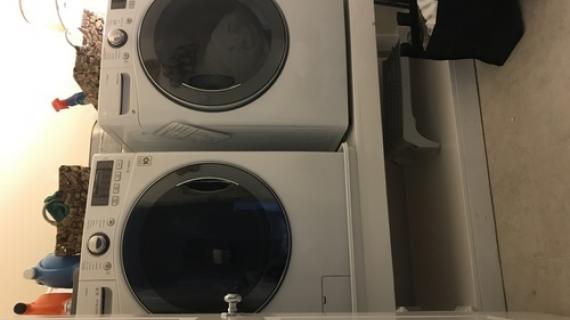
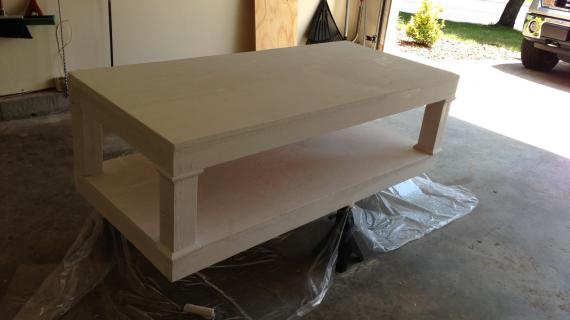
Build your own washer and dryer pedestal bases to bring your laundry up in height. Also includes storage for baskets. You'll love the step by step diagrams and cut list.
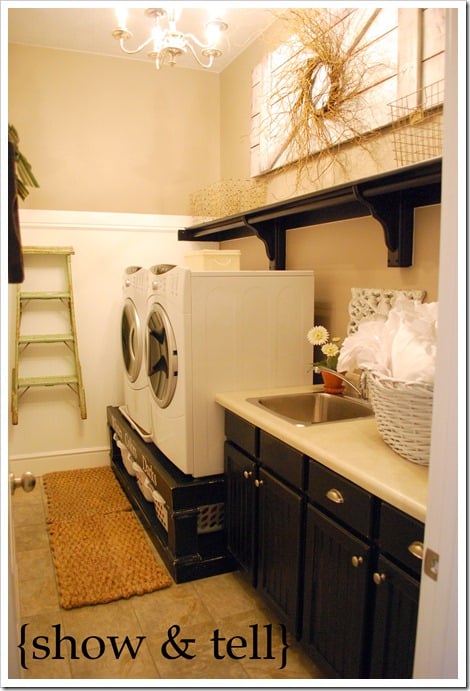
Special thanks to Sausha for letting us create this tutorial from her laundry room bases.

Pin For Later!
Preparation
- 2 – sheet of 3/4″ MDF or Plywood
- 5 – 2×4 @ 8 feet long
- 1 – 4×4 post @ 4 feet long (you can also use 2x4s laminated together – just add another 2×4 to your list)
- 1 – stick of base cap moulding like this @ 6 feet long and 1" brad nails for attaching
- 4 – Angle Brackets (like these)
- 3″ self tapping wood screws
- 2″ self tapping wood screws
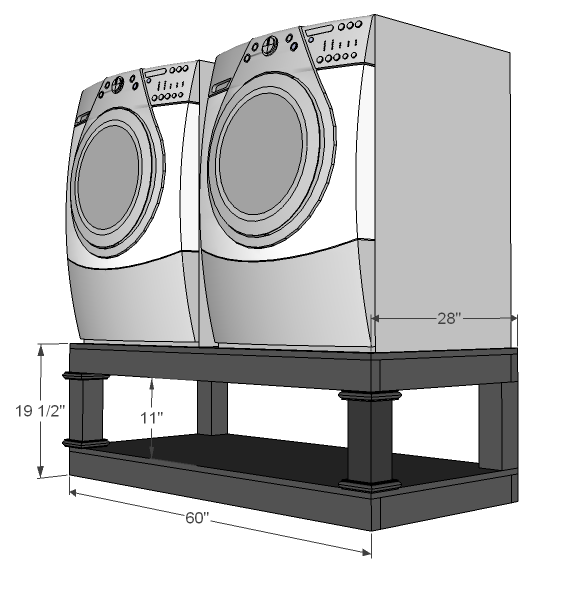
- 10 – 2×4 @ 25″ (Joists)
- 4 – 2×4 @ 60″ (Sides of Floor)
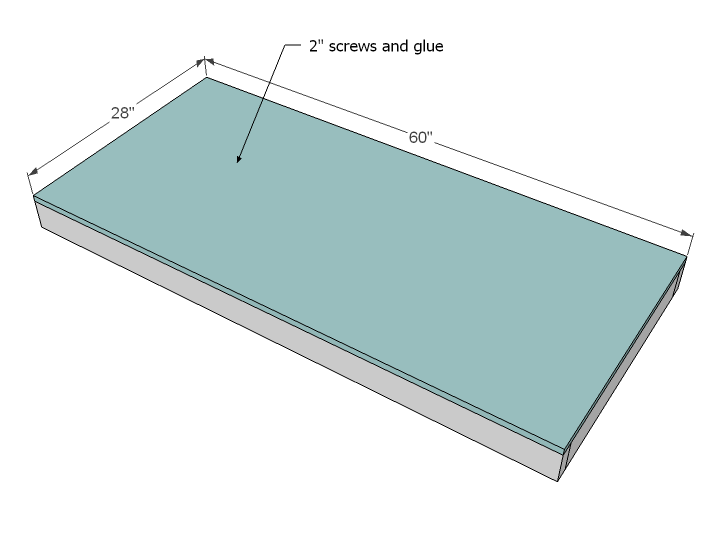
- 2 – 3/4″ Plywood or MDF @ 28″ x 60″ (Decking)
- 4 – 4×4 Posts (or 8 2x4s) @ 11″ (Posts)
- Moulding cut to fit


Instructions
Step 1

Floors
You are basically going to build two mini floors for this project. The top floor need to be built as shown above.
The bottom floor you can skip the center joists (minimal weight on bottom shelf)
Use glue and 3″ self tapping screws to build the framing. You can also use pocket holes if you have a Kreg Jig, on the 1-1/2" setting with 2-1/2" pocket hole screws.
Step 2
Decking
Screw the plywood to the top of the 2x4s with glue.
Step 3

Corner Angles
This step is just because I have an old school washer and dryer that stomps out of the laundry room whenever I overloaded it. But the angles are cheap and will make your life easier. Screw down with 2″ screws.
Step 4
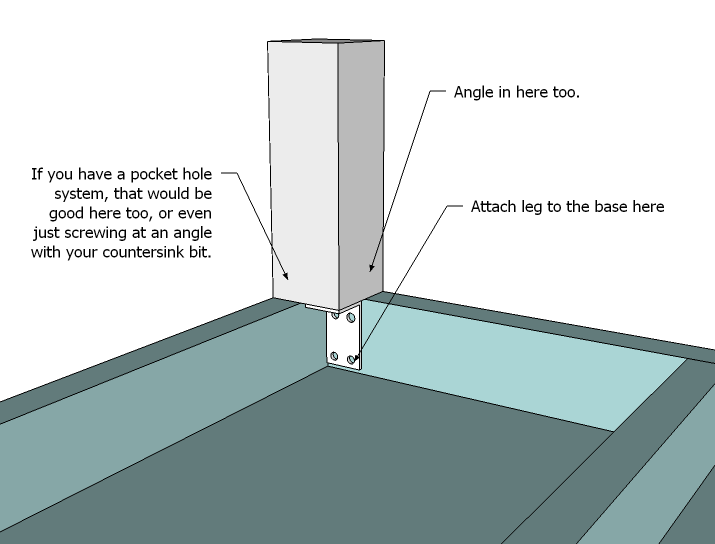
Attach Legs
Attach the legs to the top (the floor with the center supports) and screw down. If you can, add a few screws at an angle in as well.
Step 5
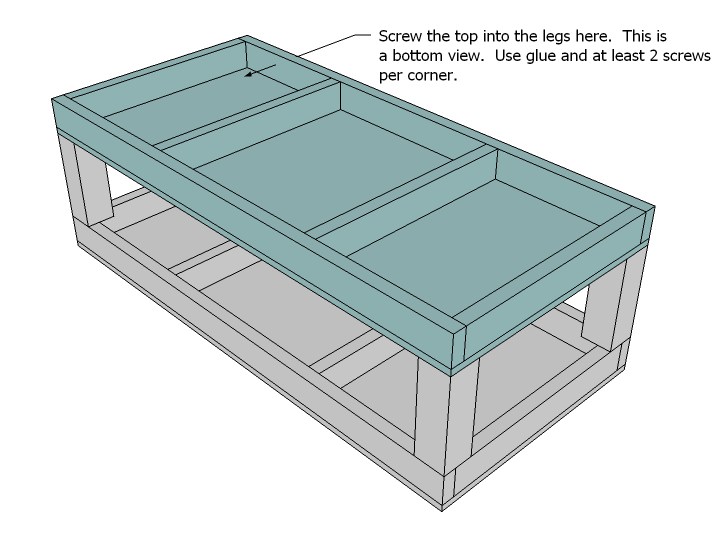
Place the second "floor" on the 4x4s and screw through the 3/4" plywood into the undersides of the 4x4 legs. At least three screws per leg is recommended.
Step 6
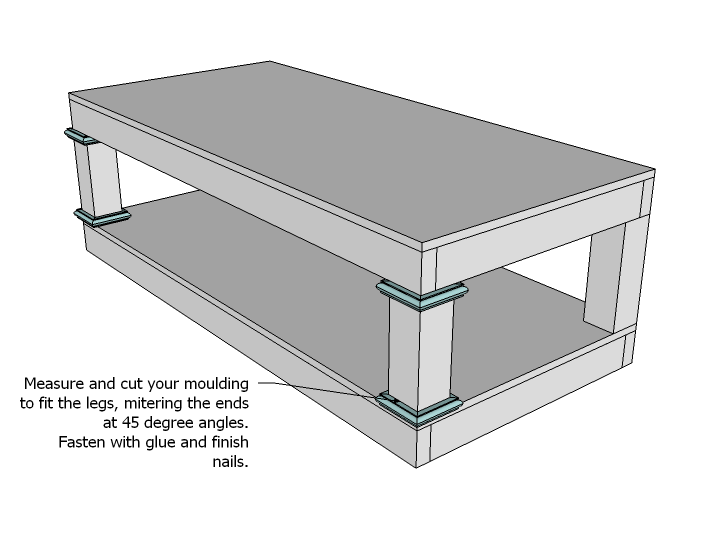
Trim
Cut trim to fit and attach around legs to fancy up the base (optional)
Step 7
Additional Bracing
If you find your base needs more support here are a few quick fixes -
- Cover the entire back in 3/4" plywood or MDF scraps from the build, glue and screw every 4" approximately to the 4x4 legs and the 2x4 framing with 3" self tapping screws.
- Attach the 2x4s framing to studs in the walls
Thanks Sausha!


Comments
Gates (not verified)
Thu, 04/05/2012 - 08:47
Drain Pan
Where did you find the drain pan that you show sitting under your washer in the show&tell pictures? What at the dimension? Where can I buy one?
Mel redford (not verified)
Sun, 04/22/2012 - 12:06
washer platform
Thank you I made one kinda like yours thank you for the ideal i love it
Laurie Y (not verified)
Thu, 05/03/2012 - 19:01
Built it!
I used these plans as the basis for mine, and I love it!
http://www.clickinmoms.com/cmprodaily/stage-one-complete/
chibbe (not verified)
Mon, 05/14/2012 - 15:04
ANYONE ELSE HAD THIS PROBLEM?
We Loved this idea and built our own and are very pleased with them. However, we're VERY limited to baskets. I had two very standard baskets here and they did not fit. They ware just a bit too big for the opening. The only baskets I can find to fit that are still functional are the plain basic, cheap-o's from walmart. It works but not what was desired. SOOOOO, the only thing I would do is make the columns (legs) 12" instead of 11. Other than that...was a great project! :)
philsep36 (not verified)
Tue, 06/05/2012 - 20:36
Done and done!
Washer and dryer died so my wife went and bought front end loading machines. We did not want to pay $250 for each base due to it being a complete rip off, so i did a little search and came across this site. Went ahead and built it out in a day with no trouble, but I do have proper tools so made for an easy job. Did make a few changes in the assembly to make a little more rigid but great plans overall. My wife is in love with the pedestal, definately more attractive than the lame bases at the appliance store. Thanks for posting this!
jason west (not verified)
Sat, 07/07/2012 - 07:51
we love our pedestal. i was
we love our pedestal. i was able to build for next to nothing using materials that were left over from a remodel. we almost used it as a coffee table but it was too long.
Elizabeth Folberg (not verified)
Wed, 08/15/2012 - 07:41
pedestal
I built this pedestal, and the washing machine vibrated way too much! The appliance repair person we asked to come look at it told us it was like building a trampoline or a teeter totter for the machines. You need to have the 4X4s going all the way from the foot of each corner of the washer all the way to the floor, with additional braces. The dryer pedestal needs to be separate. Don't waste your time and money building this thing, even though it looks cool!!!
Brian b (not verified)
Sun, 11/04/2012 - 20:45
I agree
I didn't like the idea of using brackets either. It seemed that it might not be enough. I used 4 4x4s, one for each corner then I used 2 4x6 posts, one in the middle front and one n the middle back. I ran only 2 joists across the middle along each side of the 4x6s. I also used 1 inch plywood sheet for the top deck. All of the posts go from the floor to the under side of the decking. I just have 2 openings underneath. I am thinking about making 2 drawers next weekend and having them slide in and out from there. I didn't build a lower deck either. I just used 2x4s around the bottom. I also used 6 skid proof feet screwed into the bottom of each leg. I'm going to see if I can post pictures on here. It will make a lot more sense.
Brian b (not verified)
Sun, 11/04/2012 - 20:36
Uh oh
Just wanted to pass on a problem I ran into today when I built these in our laundry room. I modified the plan some to accommodate our room. The problem I ran into was my 4 wire power cord wasn't long enough to reach the plug in on top of a 20 inch tall pedestal. I had to go purchase another 4 ft cord and splice them together.
5 tator tots (not verified)
Tue, 11/20/2012 - 08:10
Love this!
My husband just made the pedestal and two laundry basket dressers for me over the weekend. I implemented my system for the first time today and am in laundry heaven! With a small house and baby#6 on the way this will make our lives so much easier and neater. Prior to this dirty clothes were in baskets on the floor and clean clothes were dumped on our bed to be folded and carried to be put away. Now, all dirty clothes are under the washer and dryer and clean clothes go straight from dryer to the assigned basket, then back to the dresser for the owners to bring to their room.
Only one glitch, I didn't pick out our front loading washer/dryer and the controls are placed in the back as for top loaders. Why LG did this?! Being just under 5'5" I have to stand on my tip toes to reach the controls. Oh well, small sacrifice for such a wonderful improvement. Entering into my 9th month of pregnancy, not bending at all to put clothes into the washer or switch to the dryer is lovely.
This is our 4th Ana White project and each one has allowed us to improve our quality of life on a very small budget. Hanging beds, storage armoire, Christmas gifts for our girls, and now an awesome laundry room! Thank you Ana!!!
5 tator tots (not verified)
Wed, 11/21/2012 - 07:34
Amazing
My husband built this and two laundry basket dressers for me this weekend. Not only do they look fantastic but I am in laundry heaven! With a small house and baby #6 on the way our laundry system ( or lack of one) had to be revamped. Prior to this the dirty clothes went in baskets on the floor-very messy. Clean clothes were dumped on our bed to be folded and put away. This meant that our bedroom was always full of piles of clothes. Now, dirty clothes are under the washer/dryer and clean clothes are put right into assigned baskets then back in dresser until the owners can put them away. WooHoo!!
These projects have made the saddest room in the house into my favorite. The other side of the laundry/mud room has to wait until spring for the Smiling Mudroom cubbies. One more long winter with just a few hooks for piles of coats, snowpants and other winter gear. I can make it just knowing that the next Ana White project will once again add order and beauty to our home.
Thank you Ana and God Bless you and your family!
Daniel Przybylski (not verified)
Tue, 12/18/2012 - 16:59
Thanks
I used this plan as a start for mine. I mostly followed, but tried a couple of different things.
Cory (not verified)
Tue, 12/18/2012 - 19:31
Not very stable
I built this pedestal and I have to say that it required some significant fortification to withstand 300 pounds of washer and dryer and a 1200rpm spin cycle. While the top and bottom platforms may be solid, the 4x4s are far from solid. There is only one 4x4 at each corner attached by a single L bracket. The top part of the 4x4 doesn't even sit flush on the plywood, it's resting on the 90 degree angle created by the 2x4s. Long story short: it is seriously lacking in lateral stability. I placed extra 4x4s in the middle and angled some screws in the top and bottom of the 4x4s which provided some improvement.
susanboger
Sat, 04/19/2014 - 18:11
Thank you
You answered my question. I don't see how the L bracket system is stable or strong enough to hold the weight. I know how I'm going to modify this. If you make the 4x4's longer and eliminate the L bracket you can put the 4x4 inside the "pedestal" floor and get more stability. (I think). I'm no engineer.
Annierae (not verified)
Sat, 12/29/2012 - 18:12
WOW!
My husband was so excited when I showed him these plans. We had talked about doing something (sort of) like this but he said it was so much easier having all the dimensions right there! Thank you! Thank you! Thank you!
Jungyun (not verified)
Tue, 01/01/2013 - 13:21
I love it. That is just what
I love it. That is just what I want. I must do it soon. Thanks.
Tina13125 (not verified)
Mon, 01/07/2013 - 20:09
:-( didn't work due to vibration
Like some comments posted my husband built the pedestal only to have the machines vibrate so bad that we feared it would damage them after 2 loads of wash. The machines are level, the pedestal is level, the machine feet were adjusted & nothing fixed it. Prior to this they sat on our tile floor and made zero vibration or noise. I loved the pedestal too!! :-( so very sad...wish there was a fix.
James (not verified)
Tue, 01/08/2013 - 04:33
i wonder is a hard rubber mat
i wonder is a hard rubber mat wold help. It seams you issue would be the inflexability of the the platofrm and the heavy vibration from the washer.
floors have give enough that a vibration would be minimal from the floating of the subfloor and the joists. then insert a hard and solidly constructed platform that negates the floors ability to flex and poof, vibration. thats why most engines are mounted with bushings. so get a firm, hard rubber mat place on your pedestal. I'd say shock mount with heavy equipment springs but that more than likely over kill.
jennt6
Tue, 01/22/2013 - 11:37
Soooo sad...
I'm having the same vibration issues as above. I absolutely love the pedestal. It has created a real functional laundry room for me and I don't want to move it out. But I've levelled, and levelled and levelled again. I just can't seem to keep it from vibrating. I'll have to do a counter over the top of them or something.
scgirl29720
Sun, 03/10/2013 - 20:13
Modify
When I saw this I was so excited until I went to measure the space that holds my washer and dryer. The space was wide enough but I have this cabinet that is 6 inches in the way for the height. So I decide I was not giving up. I am going to build 3 different pieces. 1 is the washing machine that will be following this plan but only 36 inches long. I should be able to get 2 basket to fit.Then the dryer will be 30 inch long but only 11 1/2 tall. Not enough room for a basket to fit :(. So I am building a corner pedestal to fit the 3 rd basket. And use the top for the vacuum cleaner and steam cleaner. Will post pictures when done. In the meantime does this sound like a good idea?
Owensby2327
Fri, 05/10/2013 - 06:38
Sealing MDF?
So this is the first woodworking project my husband and I have done. We are in the last stages of the pedestal, and now regretting using MDF for fear of it warping from being exposed to moisture/water. We've searched the Internet and have found everyone's "opinion" of what they think would work, we want to know what WILL work. Any suggestions Ana or anyone else?? Thank you in advance!
susanm
Sat, 09/07/2013 - 18:06
washer and dryer
Can't wait for them to by higher and easier to access.
susanm
Sat, 09/07/2013 - 18:07
washer and dryer
Can't wait for them to by higher and easier to access.
jrmurphyrn414
Wed, 11/13/2013 - 11:22
shaking
I really don't want to buy pedestals for my new front loaders. But im concerned my friend said when she made pedestals it was really shaky and noisy she wound up caving in and buying the ones from the store.
glc
Wed, 12/04/2013 - 15:57
pedestal
if washer shakes on home made pedestals then it will shake on store bought pedestals from what i read of your post the first problem was that a woman built it
glc
Wed, 12/04/2013 - 15:52
pedestal
where you wrote about old washer being better because you could fix the old washer are you saying you could not fix a new washer or dryer? if you were able to fix older models you would be able to fix newer models but i do agree the only advantage of a front loader is that it uses 1/3 the water of top loader the only one
susanboger
Sat, 04/19/2014 - 18:06
question
In step 4, why are L brackets used to attach the 4x4 to the pedestal? Would it be more sturdy if the 4x4 was sunk into the "platform" into the corner and attached on two sides? I want to make this, but need it to be as sturdy as possible. This seems like the weight of the washer and dryer as well as the platform are resting on 4 L brackets.
Medickep
Wed, 08/27/2014 - 15:47
One Question...
I plan on building this as my next project. If I follow the plans it seems a lot of edges of plywood would be exposed, but looking at Sasha's, it looks perfectly trimmed out. Does anyone know if she built it differently than the plans submitted by Ana?
Thanks,
JohnPate
Thu, 01/15/2015 - 08:12
Next project
Next project
pooch511
Wed, 01/21/2015 - 10:09
Not Enough Space!
My wife really wants me to make this soon but I noticed that it measures 19.5" in height. I only have 16" between washer/dryer and cabinets. Do you think it would be okay to make this without the bottom decking, and just have the top and 4 posts, or maybe still have the ply on bottom but not the 2x4 flooring? Thanks in advance!
MxChris
Sat, 01/24/2015 - 09:15
You can change the plans to
You can change the plans to suit your needs. I just finished building 2 sets of these, one for my mother in law and one for us. I changed the plans to make them work for what I wanted in both spaces.
For you I'd suggest using 1x2's on the bottom and keeping the rest of the materials the same. The bottom platform adds quite a bit of lateral stability that you will lose if you went with just the posts. You can and may need to also shorten up the posts a little, you need at least 12" if you want to fit a laundry basket on the bottom shelf. I made mine 13" so I could fit a total of 6 laundry baskets under there and hopefully never have to see them sitting on the floor of my kids rooms again.
dosjomanmen2
Mon, 08/03/2015 - 05:43
I cannot locate the brackets
I cannot locate the brackets for this pedestal in my area Houston TX, can someone tell me where can I get them?
Thank you in advance.
nikkiat14
Mon, 11/16/2015 - 09:43
Finishing the look
This is just what we have been looking for! We are going to start making this next weekend. One question - in the directions it mentions Sausha's finish with MDF but there is no link to the details. Do you still have that available? We would rather do that than use the wood filler.
Shleegee
Sat, 12/30/2017 - 10:53
Wrong supply list?
Maybe I’m missing something, but 5- 2”x4”’s aren’t enough for 10- 25” and 4- 60” cuts. It’s short by 10”. We had to go back and get another 2x4. Excited to get started though! Less bending down low to do laundry...