

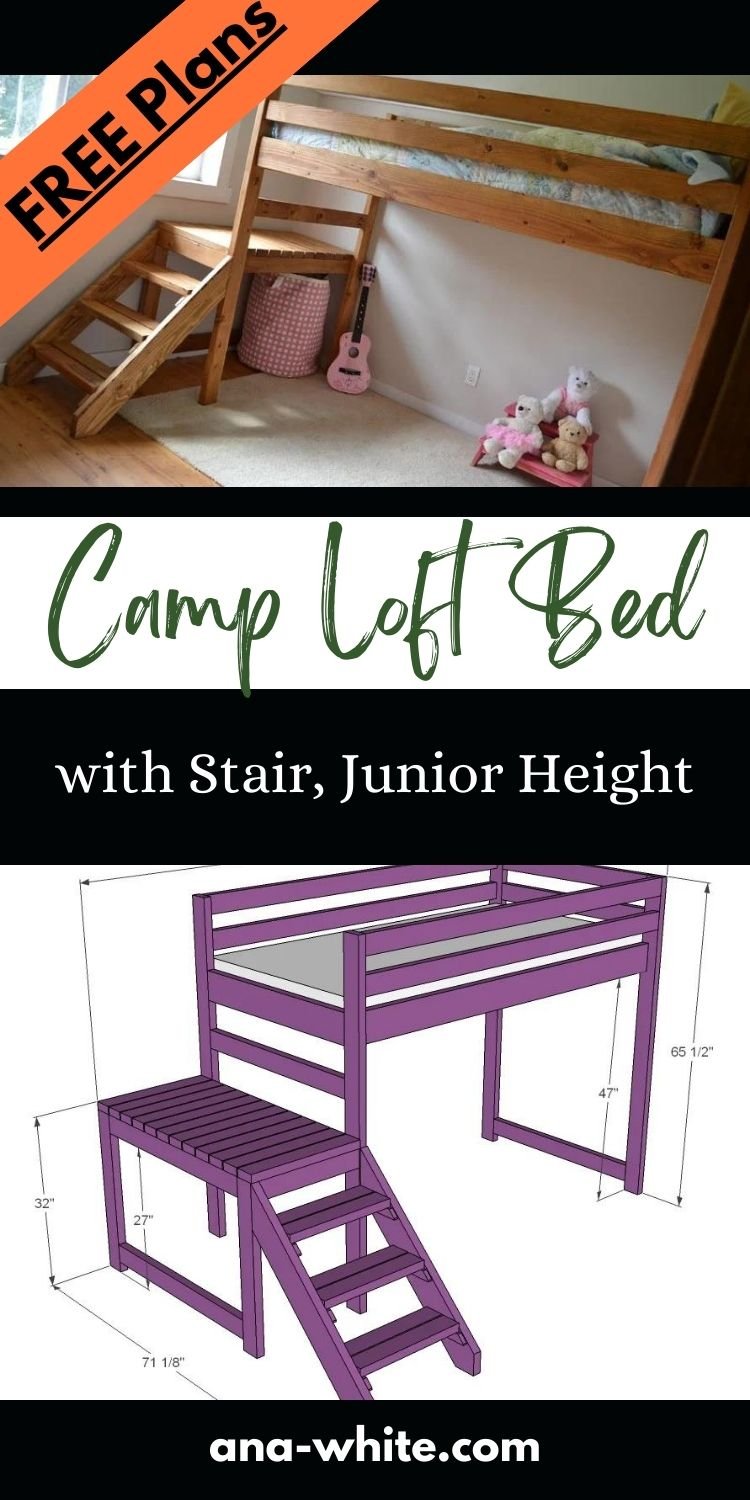
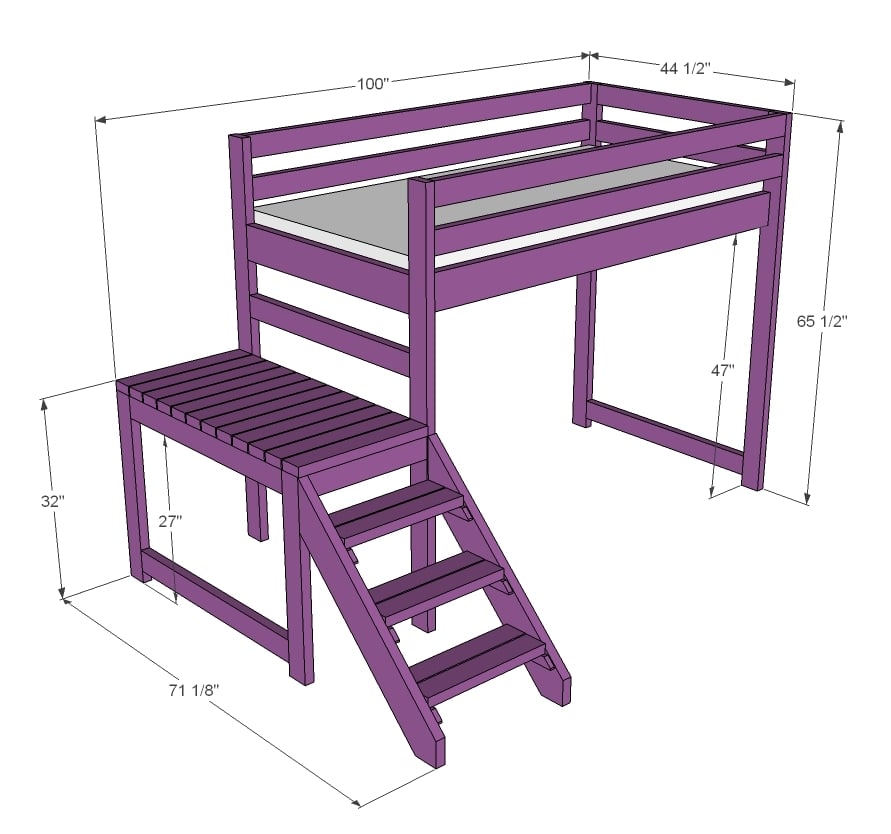
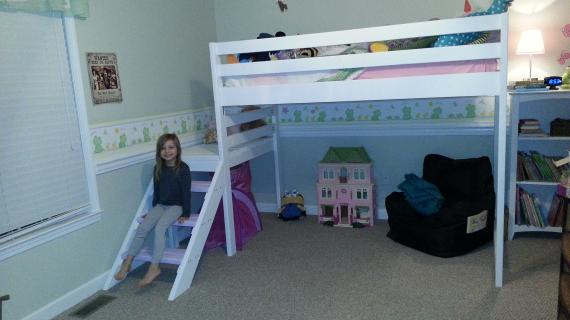
Build your own loft bed plans with stairs all from 2x4 and 2x6 lumber! This super sturdy and beautiful design features a platform for easy access, junior height loft bed plans free from Ana-White.com
This loft bed has been built and cherished the world over for almost a decade. Here's why-
- It's inexpensive to make - about $50-$100 in materials
- It's super sturdy and strong because of the 2x4 and 2x6 materials - the same materials we build houses out of
- It's an easy to build design that is fairly quick to tackle
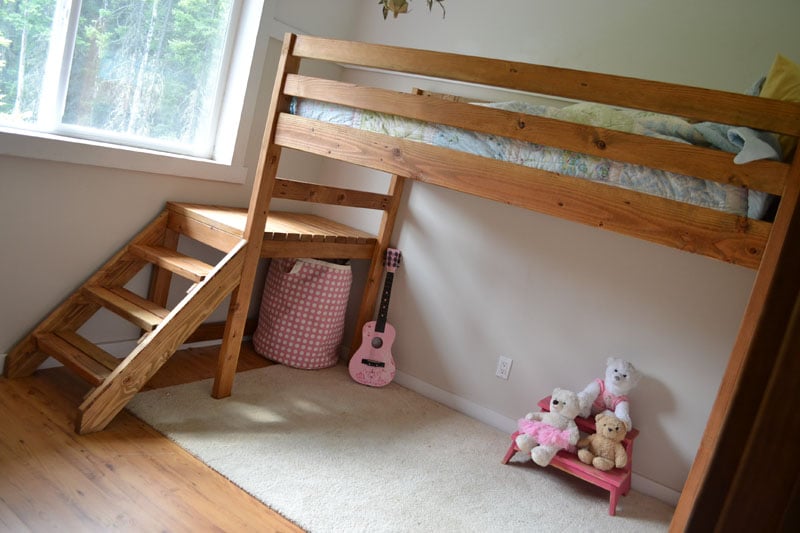
- The platform with stairs make it very easy to access the loft. The lower platform is at about the same height as a floor to mattress, so it's a very natural and easy process to go from the bed to the platform
- This loft bed is a very beautiful piece that can go with just about any decor
I built this loft bed for my then four year old daughter. At four years old, a loft bed seemed like a bad idea. But with the stairs, it's really not that different than a regular bed - just the access is at the bottom.
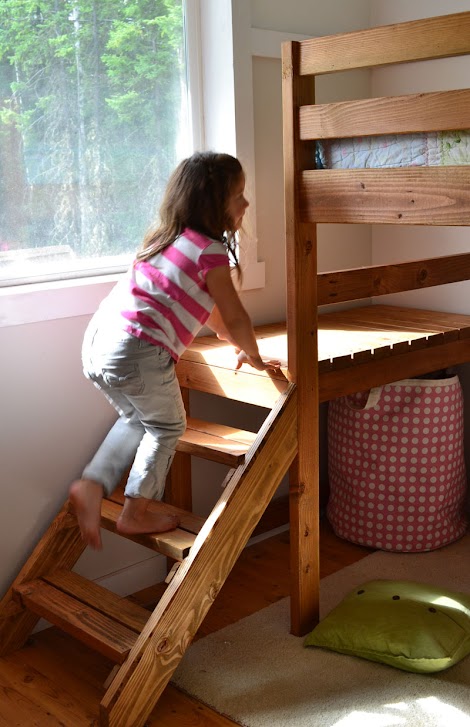
The stairs are so much easier to use than a ladder. And the platform is just right. Instead of having to crawl down a ladder, you simply swing your legs off the bed (just like a normal bed) and they rest on the platfrom. Then you stand up (with good headroom) and walk down the stairs.
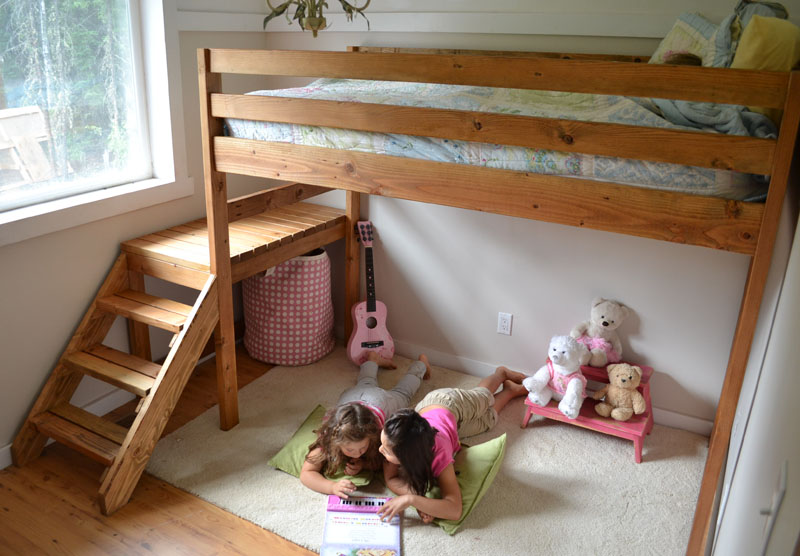
The goal was to create a loft bed that mom and dad could easily crawl into and snuggle and read bedtime stories - and easily sneak out when the child drifted off to sleep.

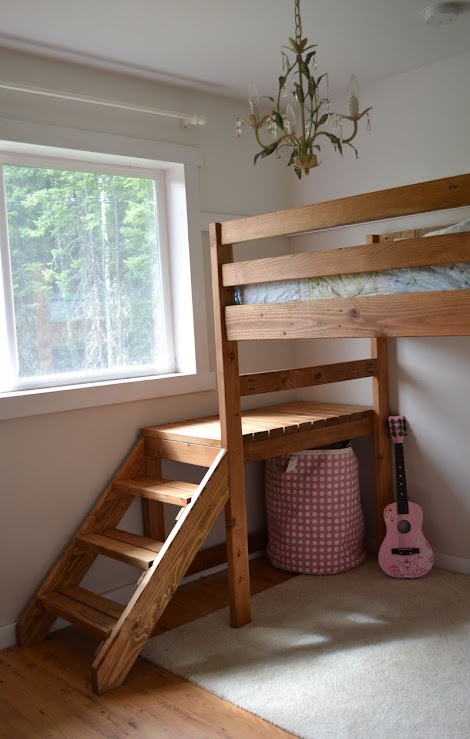
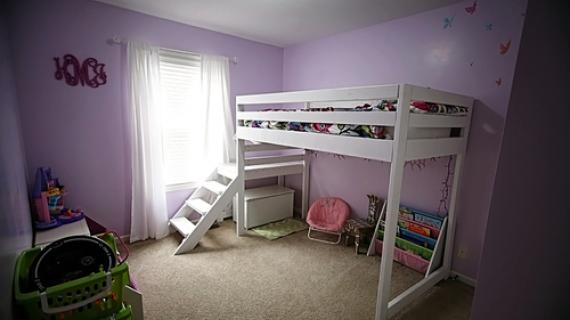
We designed this bed to fit inside a room just bigger than 8x8. Yes, 8x8. It gave the room so much more useable space!
The window was previously the obstacle in the way of building stairs. But with the lower platform, we were able to not cover the window. Now it's entertainment for the kids as they use it as a stage, and look out the window from it.
Under the loft bed stair platform, no storage is lost. It's a great spot for a toybox or bin.

The best part about this bed is how easy and inexpensive it is to make. That's all 2x4s and 2x6s (I'll share my finishing technique with you later this week) bringing the total cost of lumber up to about $50!!!
Convert to Bunk Bed with Stairs Option
We also love this bed with a second bed under it to create a bunk system. We have plans for a matching twin bed frame here.
NOTE: You may wish to increase the leg length by about 6" to give more headroom to the lower bunk - depending on how tall you make your lower bed height.
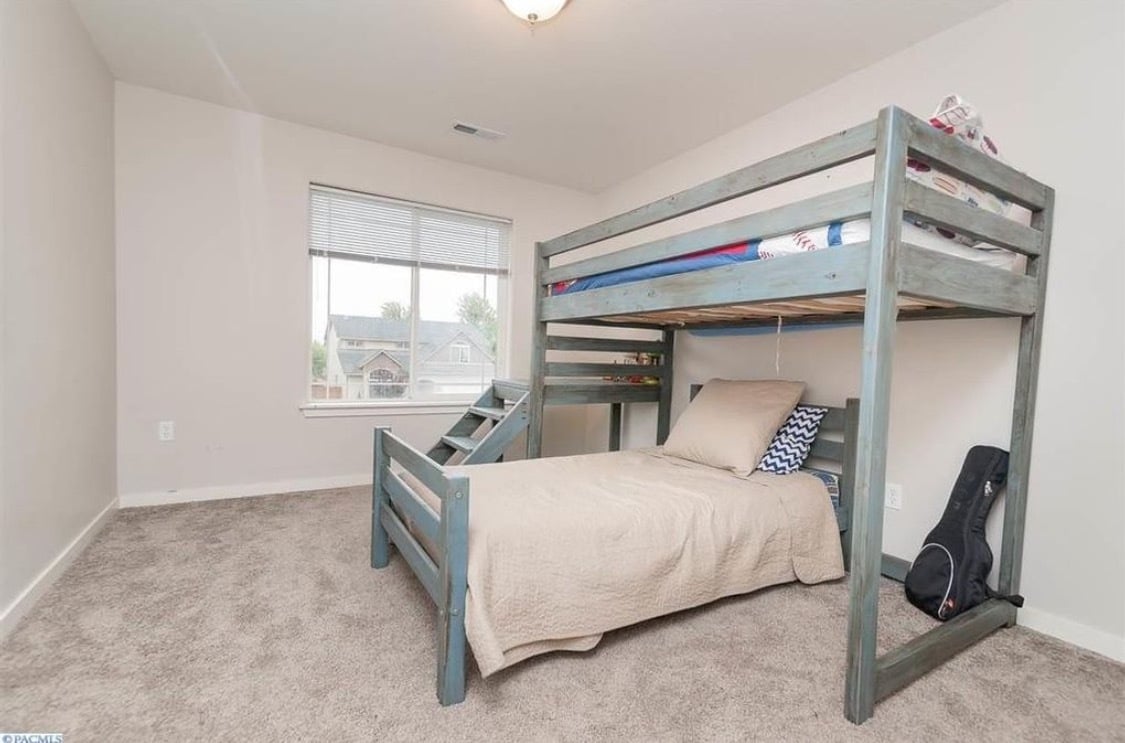
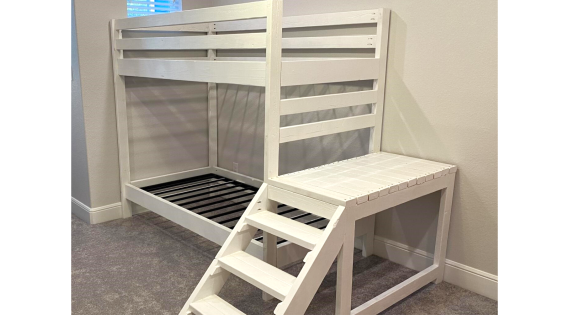
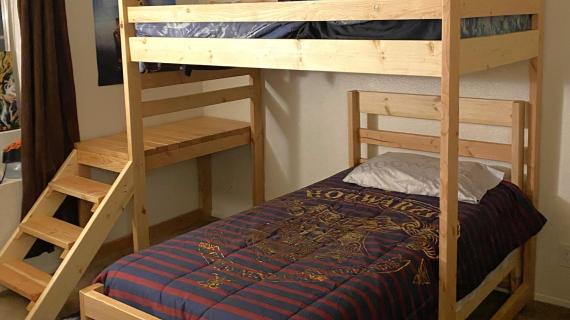
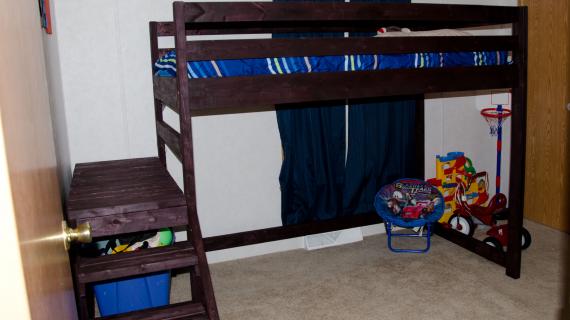
Photo SUBMITTED BY CAJSAWALLWORK
Loft Bed with Stairs Plans
Pin for Later!

Preparation
- 15 – 2x4 @ 8 feet long
- 4 – 2x6 @ 8 feet long
- 2 – 2x2 @ 8 feet long
- 1 – 1x2 @ 8 feet long
- 2 ½” pocket hole screws
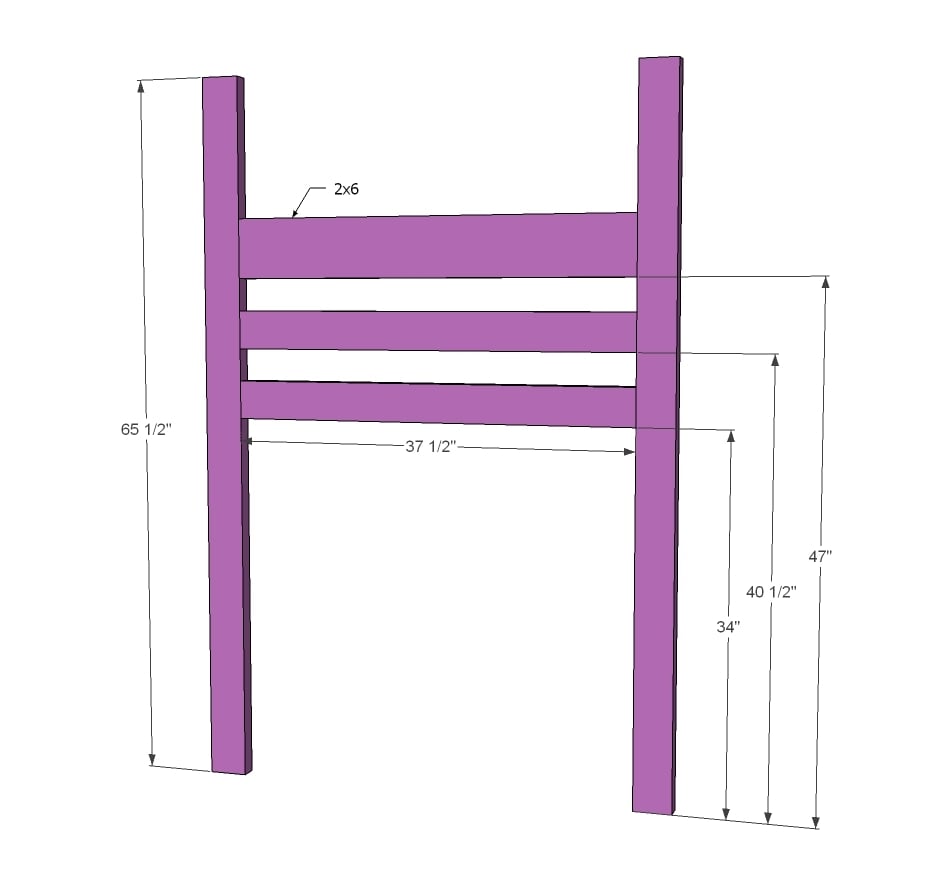
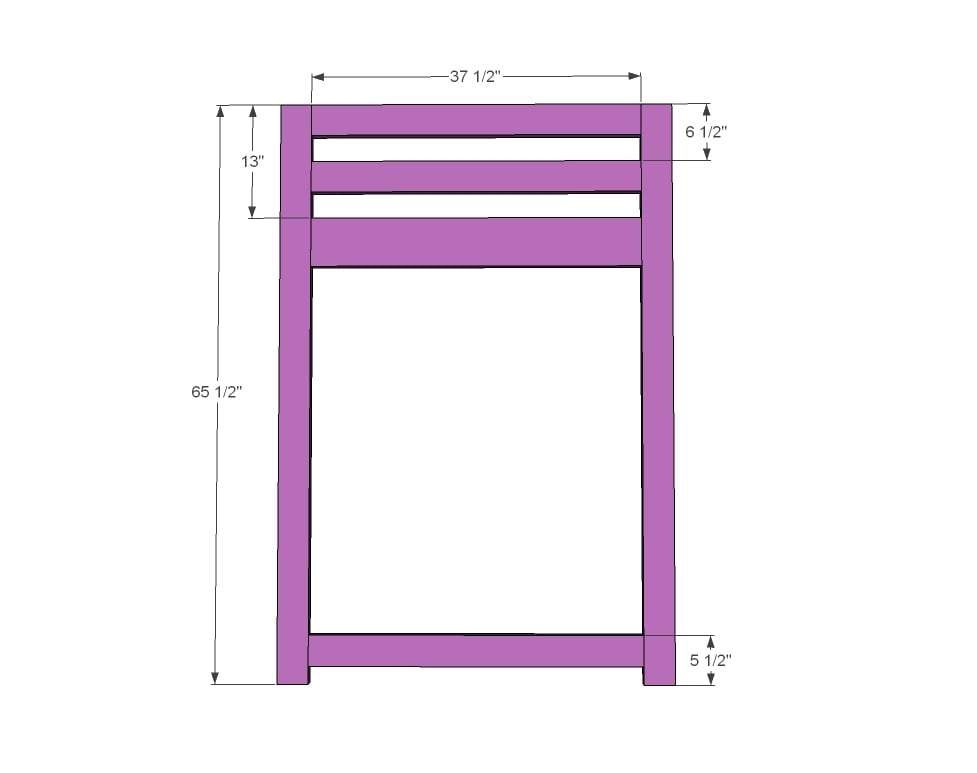
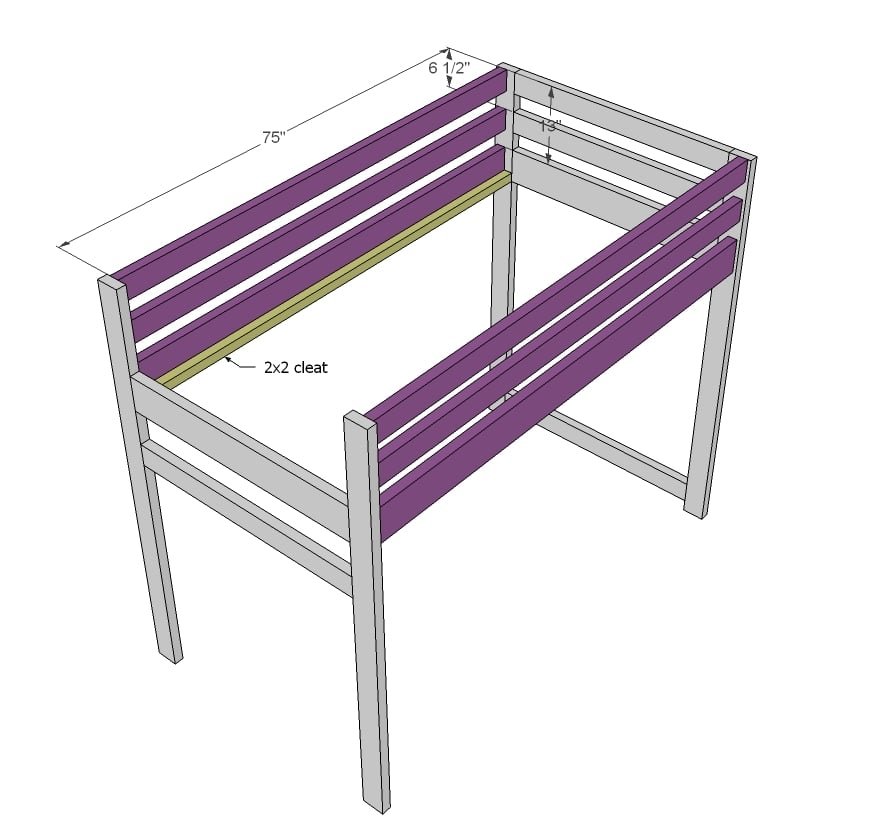
- 4 – 2x4 @ 65 ½” - legs
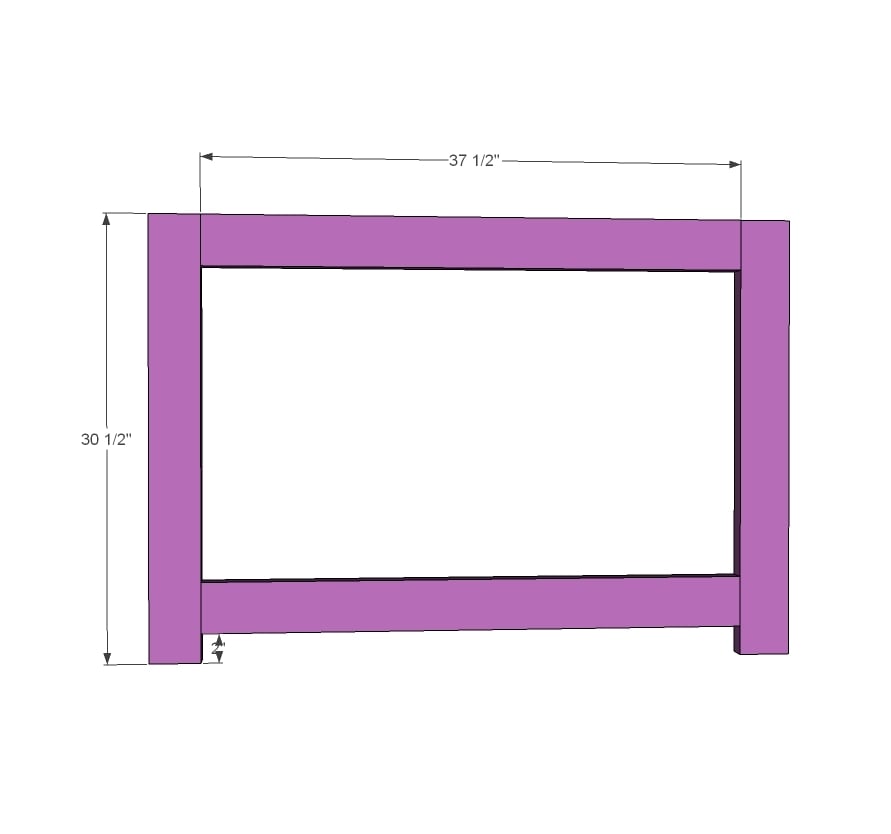
- 2 – 2x6 @ 37 ½” -bed siderails on ends
- 5 – 2x4 @ 37 ½” - guardrails on ends
- 5 – 2x4 @ 75” - guardrails and base support
- 2 – 2x6 @ 75” - bed siderails
- 2 – 2x2 @ 75” - cleats
- 2 – 2x4 @ 30 ½” - platform
- 2 – 2x4 @ 37 ½” - platform
- 1 – 2x4 @ 41 ½” - platform
- 2 – 2x4 @ 20 ½” - platform
- 12 – 2x4 @ 22” - decking
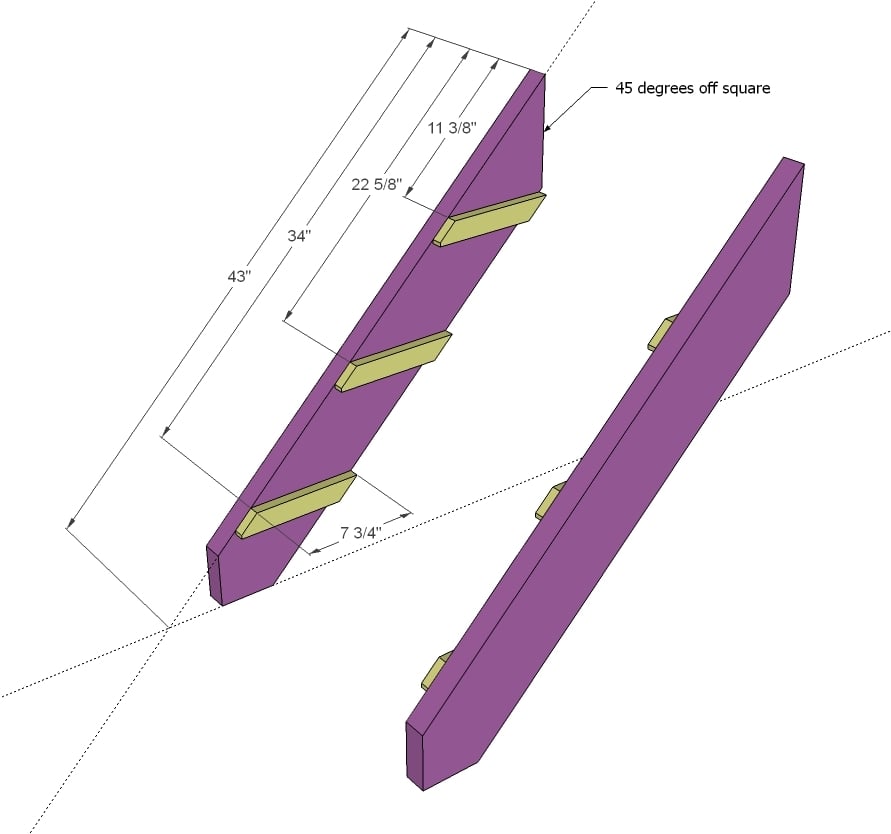
- 2 – 2x6 @ 43” (both ends cut 45 degrees off square, ends NOT parallel) – to be trimmed down in later steps
- 6 – 1x2 @ 7 ¾” (both ends cut at 45 degrees off square)
- 6 – 2x4 @ 20 ½” - stair treads
This bed requires a slat system (1x3s, 1x4s or 2x4s or similar) or a bunkie board mattress to complete


Please read through the entire plan and all comments before beginning this project. It is also advisable to review the Getting Started Section. Take all necessary precautions to build safely and smartly. Work on a clean level surface, free of imperfections or debris. Always use straight boards. Check for square after each step. Always predrill holes before attaching with screws. Use glue with finish nails for a stronger hold. Wipe excess glue off bare wood for stained projects, as dried glue will not take stain. Be safe, have fun, and ask for help if you need it. Good luck!
Instructions
Step 1
Build the ladder end as shown in diagram with 1 1/2" PHs and 2 1/2" PH screws. Use glue to fasten - these joints are permanent. If you are building this loft bed without the stair platform, add 2x4s all the way down to make a "ladder" for the kids to climb up.
Step 2
Build front end of loft bed same as ladder end.
Step 3
Now here's where we skip the glue. To make this loft bed easy to disassemble, I did not use glue here. The inside width for the mattress area should be 39", insetting the side rails 1 1/4" from outsides. I did this so your PH screws have lots of board to grab into. This bed has NOT been weight tested or guaranteed. If you feel you need extra support - add metal brackets under the 2x6s. An alternative method is to attach metal bed brackets directly to the ends if you have those. Notice the cleat is added in this step to. I used 2 1/2" screws and glue to attach, screws every 6-8" all the way down. This bed is designed to work with a bunkie board, but we just used 2x6s cut to length as the bed slats.
NOT SHOWN: Add the fifth 2x4 @ 75" at the back base of the bed to support the legs at the bottom.
Step 4
Now we'll start building the stair platform for the loft bed with stairs.
Step 5
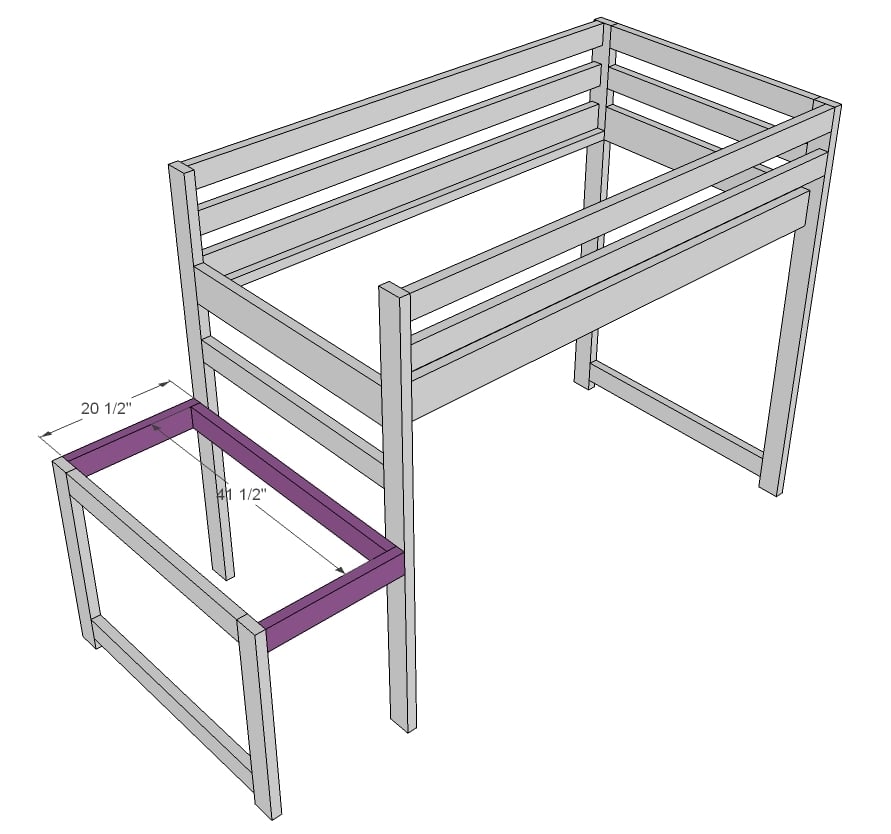
Attach stair framing to the loft bed legs.
Step 6
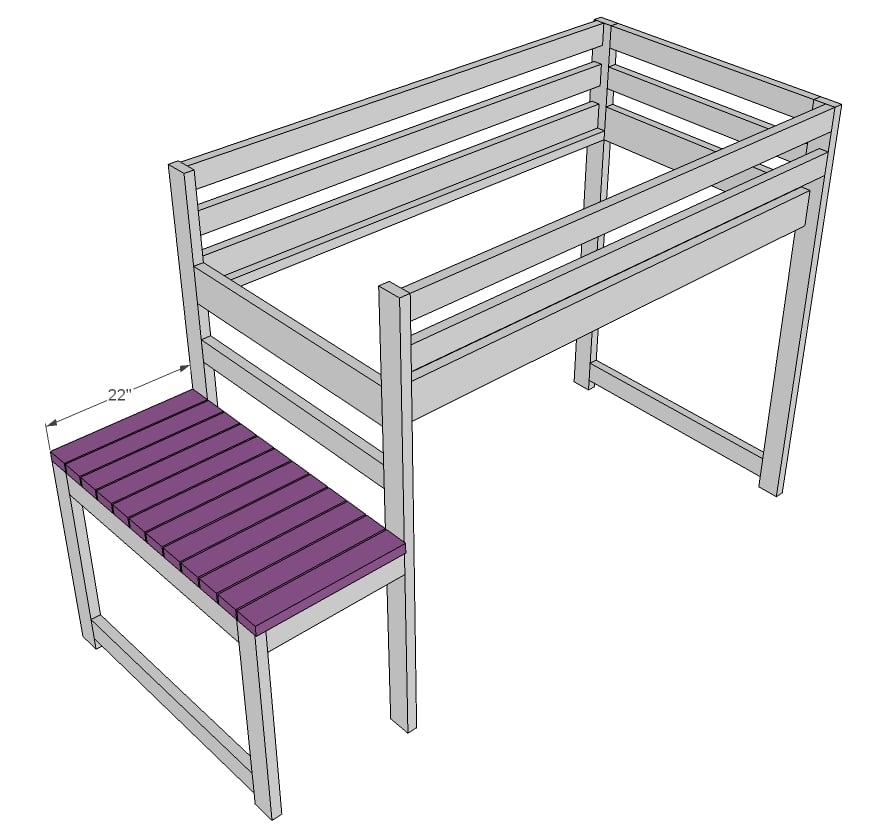
And then the decking is placed on top of the stair platform.
Step 7
The stairs are easy to build - just 45 degree angles! We went ahead and drilled 1 1/2" PHs along top edge of the stairs to connect the stairs to the bed later on.
Step 8
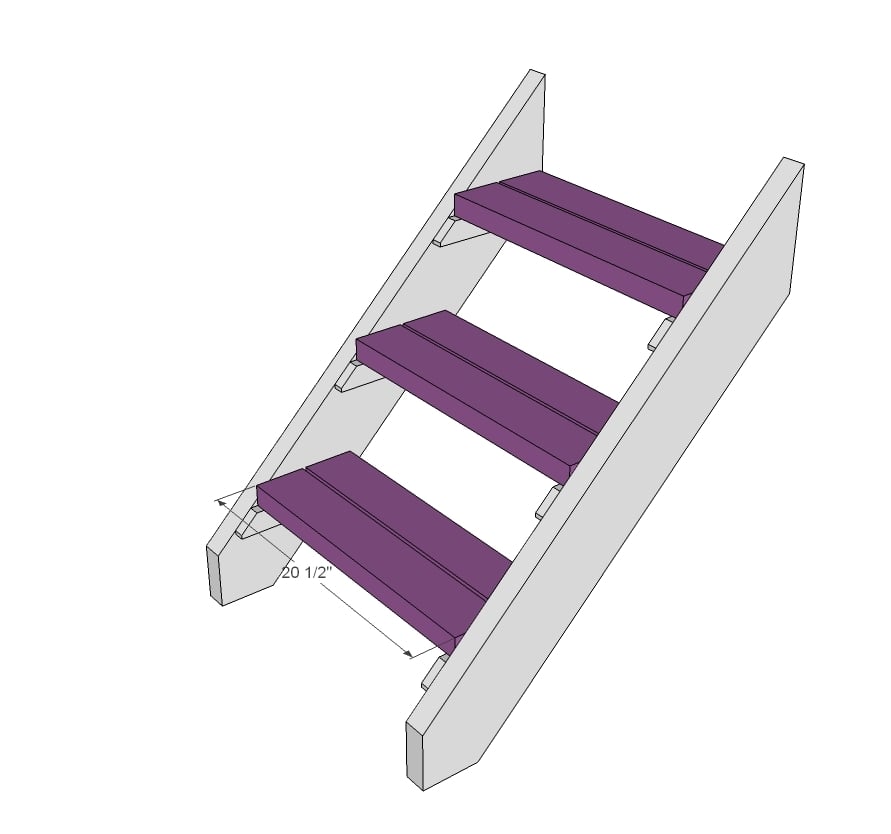
Then we added the stair treads. We also drilled 1 1/2" PHs along ends of the stair treads and attached with 2 1/2" PH screws just for extra strength. Everything gets glued.
Step 9
The bed was finished outside and then assembled in the room. TIP: We haven't found our bed needs it, but for extra support, you could add another 2x4 @ 75" (at $2 a 2x4, cheap insurance) to the base of the bed to further support the bottoms.
It is always recommended to apply a test coat on a hidden area or scrap piece to ensure color evenness and adhesion. Use primer or wood conditioner as needed.


Comments
Candace (not verified)
Wed, 07/18/2012 - 09:57
Is there room?
Is there enough clearance to put another twin bed coming straight out underneath this? Hope that makes sense.
In reply to Is there room? by Candace (not verified)
Ana White
Wed, 07/18/2012 - 10:28
Bunk Underneath
Hi Candace, there would be room, but I'd suggest making the legs a tad longer for a little more headroom. This bed is really a junior loft bed height.
You could just leave the platform at the same height, or add another tread to the stairs.
sands_mary
Tue, 05/21/2013 - 03:27
About iMacLand
I made this for my daughter and she just loves it! I have been looking for what seems forever to find something like this for her and was beyond excited when I saw this! My boys even love it and want one for their rooms! Thanks so much for sharing!!!!
About iMacLand
Andrew Harkness (not verified)
Wed, 07/18/2012 - 09:59
One Question
I really like this bed, just one question though, it doesnt seem clear to me, what does the mattress sit on, wood slats, plywood, or is this planned for a box spring mattress on the bottom?
In reply to One Question by Andrew Harkness (not verified)
Ana White
Wed, 07/18/2012 - 10:32
Slat System
Hi Andrew, what we did for the wood slats is cut 2x6s (had scraps, but you could also use 2x4s or even 1x material - just space closer together) to the inside dimension of the bed (for us it ended up being 39 1/2") and screwing down. We have a firm mattress and found spacing every 6" was fine, but every mattress is different so space your slats as necessary for your mattress.
They also sell what is called a bunkie board and also sell bunkie board mattresses - or mattresses with an included bunkie board.
Andrew Harkness (not verified)
Wed, 07/18/2012 - 11:19
Slat System
I was thinking that was the idea, but wanted to make sure I wasnt missing something. Thank you !
Woodworking Chemist (not verified)
Wed, 07/18/2012 - 10:16
This is a great plan. I was
This is a great plan. I was planning to do the one with stair storage, but with parallel rails instead of perpendicular ones. I should easily be able to wrap it up in a few hours with this plan. Also, have you thought about adding a shelf or two under the mid platform to add some storage space. I think I may add that and use some cloth boxes to make a small dresser/storage area.
Great plan overall.
Theresa W (not verified)
Wed, 07/18/2012 - 11:40
Meld with fort bed
I was going to the lumber yard to get the materials to make my daughter the fort bed TODAY, then I saw this was just posted. I love the sturdiness of the 2x4s and the overall look. I am nervous that with the stair landing it will be too long for the space. Do you think I could meld the two together and basically make this bed but build in the ladder in the same side fashion as the fort bed? Her room would be better suited to the side ladder verses just building up the ladder on the end, though that would be tremendously easier. I've never built anything like this before but your detailed plans definitely make me feel like I can tackle this job.
Jaime Costiglio (not verified)
Wed, 07/18/2012 - 12:37
pure genius
Ana this just might top the clubhouse bed, love how Grace can play underneath in her new 'fort' just like my kids do under the clubhouse bed. Who knew we were making another playspace AND a cool bed all in one. Love your design, you truly are a building genius.
Paik (not verified)
Wed, 07/18/2012 - 13:49
Only one concern
This looks great, Ana. My only concern is the exposed corners on the stairs but other than that, it looks like something my son would love!
Keri
Wed, 07/18/2012 - 15:40
NOOO!!!!
This is exactly what I needed - I have exactly the same space problem with the stupid window in the same inconvenient spot, and I needed to stick a toddler bed underneath. Only I just finished a modified version of the loft bed (shorter with side entrance instead of front) and (taking the idea from the playhouse loft bed) made storage stairs to fit alongside. I like mine fine and all, but, but, but. This looks like a great bed, just wish I'd procrastinated on the one for my boys a little longer =D.
ahoy (not verified)
Wed, 07/18/2012 - 15:56
Question about plans...
are these plans downloadable with the google sketch up file? so we can tweak? or this not an option? sorry... first time attempting anything from your amazing site!
ahoy (not verified)
Wed, 07/18/2012 - 16:00
Question about plans...
are these plans downloadable with the google sketch up file? so we can tweak? or this not an option? sorry... first time attempting anything from your amazing site!
Apron Appeal (not verified)
Thu, 07/19/2012 - 05:26
where to place the stretcher?
Oh my word! just when I think I've got everything chosen and figured out with which plans I'm going to use, you come out with something better and exactly what I need. I love how this loft bed has high stretchers v. low ones.
We are going to be building an "L" loft bed with the reading loft in the corner connecting the two beds because we want the entire space under the bed to be accessed and I've been worrying about the stretchers on the floor and kids tripping over them.
Will a stretcher on the long (wall) wall side of the bed compensate if one is missing on an end?
Apron Appeal (not verified)
Thu, 07/19/2012 - 05:53
braces v. stretcher
OR....do you think I could brace the bed with wood braces that are on cut at an angle that shim(?) up into the corner (from leg to end side rails)?
RZ (not verified)
Thu, 07/19/2012 - 11:19
Headroom required
How much headroom is required for the bed? I have 8 foot ceilings and I would like to have 5 feet underneath, but 3 foot minus mattress height seems dicey.
In reply to Headroom required by RZ (not verified)
Ana White
Thu, 07/19/2012 - 11:55
Junior Height Loft Bed
Hi RZ, this definitely is more of a junior height loft bed. The kids that use it are 3, 5, and 8 and it works perfect for them. You can easily increase height by adding more length to legs. However, I highly recommend if you do go any higher to add a bottom support stretcher across the back. You'll want all but the front side connected at the bottom to prevent legs splaying or sway. Another option is cross bracing. Hope this all makes sense!
Jason Paul
Tue, 03/04/2014 - 07:21
Wobble
Great plans. I love the site. I just finished building this bed with out the stairs and the platform. I used 2X4 to create a ladder to the foot of the bed. I also attached at a 2X4 at the bottom of the legs from the head board to the foot board. All the the corners on the bed are square and tight. When my daughter climbs up the bed, it slightly wobbles from head board to the foot of the bed. After examining the bed it looks as the though the legs wobble even the joints are tight. Would another horizontal 2X4 higher up on the legs stop the wobble or would I have to create a cross brace from the head board to the foot of the bed.
Robohead
Thu, 07/19/2012 - 11:44
You guys are about the
You guys are about the coolest parents ever. Seriously.
RZ (not verified)
Thu, 07/19/2012 - 13:23
Re: Headroom
Thanks. I was planning on a desk across the back made like a large $10 shelf with a leg or two with pegboard and maybe a shoe shelf. My son is 8 and will be at least 6 feet tall, so I was also thinking about increasing the length by 5 inches for an XL mattress (his room is 10x10). I am ordering the locking safety bed brackets, http://www.rockler.com/product.cfm?page=10230.
Angie Overton
Thu, 07/19/2012 - 18:24
So... Here is what I don't
So... Here is what I don't like about this bed...
My husband and I have a blended family... "your's, mine and... what the heck were we thinking" LOL.. anyways... we have 7 children and a 4 bedroom house. The ages and the sexes of the kids don't really line up very well so we have three girls (10, 12, 13) in one room, one boy (16) in his own room (don't know how he managed that) and then we have two boys (4, 8) and one girl (5) in the other room. The fiver year old girl and the 10 13 year old don't live here. I have been looking for plans for the younger kids rooms. I'd thought about bunks for the boys and a separate bed/area for the girl.
The problem.... This bed is so cool they are all gonna fight over who gets to sleep in it.
In reply to So... Here is what I don't by Angie Overton
Phanessa
Sun, 08/04/2013 - 06:50
Awesome
You had me going there :-)
In reply to So... Here is what I don't by Angie Overton
Phanessa
Sun, 08/04/2013 - 06:50
Awesome
You had me going there :-)
Phaedra's Mom (not verified)
Fri, 07/20/2012 - 12:44
Using different lumber dimensions
This bed is amazing! I've been planning on building some beds for my kids, and have purchased 1x6s and 1x3s for the side rails. Would it be a problem to use them for this bed instead of the 2x6 and 2x4s? I would still use the 2x4s for the legs and platform, and end bracing.
Phaedra's Mom (not verified)
Sat, 07/21/2012 - 16:59
Well, we decided to go with
Well, we decided to go with the 2x4s and 2x6s. Bought them this morning - only $40 for all the lumber! After doing the first dozen cuts with a circular saw, we are considering renting a mitre saw to do the rest tomorrow!
Phaedra's Mom (not verified)
Fri, 07/20/2012 - 12:53
Using different lumber dimensions
I should also mention, though I don't know if it will make any difference, that I plan on using this hardware from Lee Valley: http://www.leevalley.com/en/hardware/page.aspx?p=50302&cat=3,40842,4126…
Lindsey Billen (not verified)
Mon, 07/23/2012 - 06:37
screws
What size screws did you use to put together the bed ends. We were thinking 4.5" screws to go through the boards?
Kerri M. (not verified)
Mon, 07/23/2012 - 17:51
Can't Wait
This is exactly what I had in mind! Can't wait to tackle this project this weekend!
Theresa W (not verified)
Wed, 07/25/2012 - 14:08
Decking
How exactly did you attach the decking to the platform? This is my first big wood project and I am not quite seeing how to do that part. While I was cutting and sanding I was assuming that it was just more pocket holes, but in reading the the plans over and over, I don't know how to do that with the platform upright. I'm not very big, but it seems too cozy under there. Thank you! I am getting so excited to put this together.
Rita WIll (not verified)
Wed, 07/25/2012 - 20:32
Hey Anna, Absolutely love
Hey Anna,
Absolutely love this bed. I was just at the IKEA site looking at one similar. I am in awe... something told me to come on over to your site! I have a daughter and a son 14 months apart and although only 2 and 1 this will be perfect for when they are a bit older and sharing a room. I am thinking of throwing a mattress underneath and having one sleep down there.
Great work!
Rayana (not verified)
Sun, 07/29/2012 - 13:12
Just finished mine :)
Just finished building this bed following Ana"s plans!!! Will upload pics soon.
Shari Bruce (not verified)
Mon, 07/30/2012 - 16:51
width?
We just finished this, and went to put the box spring in...it's too wide. The box spring fell right thru. It is an older box spring that we're pairing with a new top mattress. Are the older ones narrower?
JenK12 (not verified)
Wed, 08/01/2012 - 21:37
A box spring should not be
A box spring should not be used on an elevated bed like this. It will raise the mattress up too high, making it unsafe for a child. (The height of the side rails won't be sufficient to keep the child from falling out easily.)
Either use a slat system across the width of the bed or buy a bunky board for beneath the mattress.
ademasters
Tue, 07/31/2012 - 05:52
Yay!
This is EXACTLY what we were looking for, I can't begin to thank you enough!!!! Can't WAIT to get started!
Jay Dee (not verified)
Fri, 08/03/2012 - 11:05
Starting this project today.
Starting this project today. Was a little mislead though, by the cost estimate. Lumber and screws were right at $100. 14 2x4's at $3.97ea is $50 alone!
In reply to Starting this project today. by Jay Dee (not verified)
Ana White
Fri, 08/03/2012 - 11:31
Hi Jay Dee - so sorry to hear
Hi Jay Dee - so sorry to hear the cost ended up being higher for you. We can get 2x4s for $2 each up here in Alaska :( Good luck with building!
Pammylaine
Fri, 08/03/2012 - 13:39
Lumber Cost
I just purchased the wood for this project (increasing the size to a full size mattress) and the lumber cost right at $57.00. BUT, we went to our local lumber yard with the best prices and then took the quote to Lowe's. They matched the price and gave us a 10% extra discount. It cut the price of 2X6's from $4.50 to a bit over $2.55 a piece and 2X4's ended up being $1.88 a piece. If you have the option of different suppliers, call around and find the best price and then take it to some where else...we chose Lowe's because you can pick the wood so you know yet get straight pieces.
Kristinemomof3boys (not verified)
Mon, 11/12/2012 - 16:47
Full size
Please tell me the modifications to make this a full size bed....I am a beginner to say the least and I would love to make this for my son who has a bed on the top of his Christmas list!!
Sheri reichard (not verified)
Fri, 08/03/2012 - 13:23
Full size?
I've been looking for something like this, but with a full size mattress. Do you think it would work and do you know what measurement adjustments I would need?
Pammylaine
Fri, 08/03/2012 - 13:34
Doing this...
I'm doing this bed as a full size bed...should be starting (and hopefully finishing) it this weekend. I'll let you know what are measurements are if you want.
Amberann (not verified)
Fri, 08/03/2012 - 21:52
Yay! Pammylaine, I want to
Yay! Pammylaine, I want to make this bed in a full as well! If you wouldn't mind sharing your measurements I would really appreciate it!
Thanks!
Pammylaine
Mon, 08/06/2012 - 06:55
Full Size Measurements
Well, I managed (with lots of help from my parents) to get the bed built this weekend. What we did to get the measurements was to measure the mattress and then, just to be sure we were pretty accurate, we measured the actual bed that we were replacing (which was a full size antique bed that belonged to my great grandmother). The overall length stayed the same (the bed portion at 75 inches) however, obviously the width changed.
Everything that was measured to be cut at 37 1/2inches was changed to 55 inches.
The board that was to be cut 40 1/2 inches was changed to 58 1/2 inches. This was due to the width of the bed changing to 62 inches over all. This accounted for centering the board on both end posts with the other two 2X4's sitting flush with the edge of the boards (this is for the stair case).
The added inches also changed the required number of boards. We went with:
--------6-2X6's instead of 4 (we used an extra to brace the back of the bed instead of a 2X4)
-------20-2X4's instead of 14 (this gave us a few extra that we used to cut bed slats with...they were 56 inches perfectly from one end to the other)
All the other lumber stayed the same.
The only changes we made to the number of cuts was for the landing of the steps. We ended up using 15-2X4's cut at 22 inches and slightly spaced so that it covered the entire end of the bed. I wasn't comfortable with leaving the end open and not having something all the way across.
Oh, we also changed where the side boards were set on the end posts. The plans call for it to be 1 1/4 inches from the edge of the board. We clamped a 1X2 to the edge of the bed which was easier on us. That put it about 1 1/2 inches from the edge. It worked great for us.
On a personal note, make sure you measure to make sure the stairs won't prevent doors from closing. I didn't and we had to modify the stair case some to accommodate for the door. Have fun! We did...just make sure you take the weather into account. If I do it again, it won't be during the beginning of August in East Texas (typically the hottest time of the year) when the temperature is over 90 with a heat index rising to triple digits. I hope this helps some of y'all. I'll post a picture of it when I finish filling holes and touch up painting.
Julie Russell (not verified)
Thu, 08/16/2012 - 19:09
full size measurements
Would you be able to give me a list of all of the measurements that you've done. As well as a picture ?
I'd appreciate it !
Thanks
Pammylaine
Fri, 08/17/2012 - 10:40
Sure......
Would you like me to email it to you?
Pammylaine
Fri, 08/17/2012 - 11:09
Full Size
So, I'll break it down into our cut list and our step by step measurements. If you would like I can still email them to you though. If you click on my name you should be able to go to my brag post where a few pictures are of the bed.
Cut List-
4-2X4 @ 65 1/2 inches
2-2X6 @ 55 inches
4-2X4 @ 55 inches
2-2X4 @ 75 inches
3-2X6 @ 75 inches (the extra is for additional frame bracing)
2-2X2 @ 75 inches
2-2X4 @ 30 1/2 inches
2-2X4 @ 20 1/2 inches
16-2X4 @ 22 inches
2-2X6 @ 43 inches
6-1X2 @ 7 3/4 inches
6-2X4 @ 20 1/2 inches
1-2X4 @ 58 1/2 inches
Step 1-Center boards between legs
1-2X6 @ 55 inches
1-2X4 @ 55 inches
Step 2-Center boards between legs
Top-
2-2X4 @ 55 inches
1-2X6 @ 55 inches
Bottom-
1-2X4 @ 55 inches
Step 3-Side Rails
4-2X4 @ 75 inches
2-2X6 @ 75 inches
2-2X2 @ 75 inches (Cleats)
Step 4-Stair Platform
2-2X4 @ 30 1/2 inches
2-2X4 @ 55 inches
Step 5-Stair Platform Framing
2-2X4 @ 20 1/2 inches
1-2X4 @ 58 1/2 inches
Step 6-Remains the same as original plans
Step 7-Remains the same as original plans
Step 8-Remains the same as original plans
Step 9-Additional framing support
1-2X6 @ 75 inches long---this was just to give me the feeling of additional sturdiness (is that even a word?) since my 4 year old is using it.
fdfdfd (not verified)
Fri, 09/14/2012 - 18:10
Thank you so much! We
Thank you so much! We already have a full size mattress and wanted to upgrade these plans for that. Did you have to add any extra supports to make sure it stayed sturdy?
Pammylaine
Mon, 09/17/2012 - 07:10
Hi-- We just added an extra
Hi--
We just added an extra 2X6 as a brace between the back legs on the bottom. We also made sure it was directly against a wall on one end...that helps as well with the sturdiness thing. I really do feel like the bed is sturdy enough. I'm up there with my son at bed time reading books, and he likes to be a bit daring and do flips (it makes my heart stop when he does them!!) and we haven't had ANY issues...I see this bed lasting him a good long time.
Pammylaine
Fri, 08/03/2012 - 13:35
Typo..
That should say I can let you know what our measurements are. I should really read what I type before I push send.
j trujillo (not verified)
Sat, 08/04/2012 - 17:45
cost
I'm just curious to know how much this bed is to make if you did it yourself? With the brackets and all. We are hiring someone to make this for us. We will be needing it to be about 5 inches taller as this bed will be what our son uses through High School, at least that is what we are planning for. I dont know anything about building and for the life of me I couldnt figure out how we were going to get it into his room (thought it would need to be built in his room) but then I saw the brackets which I cant figure out how many of those would be needed for this bed.
Thank you Ana!