

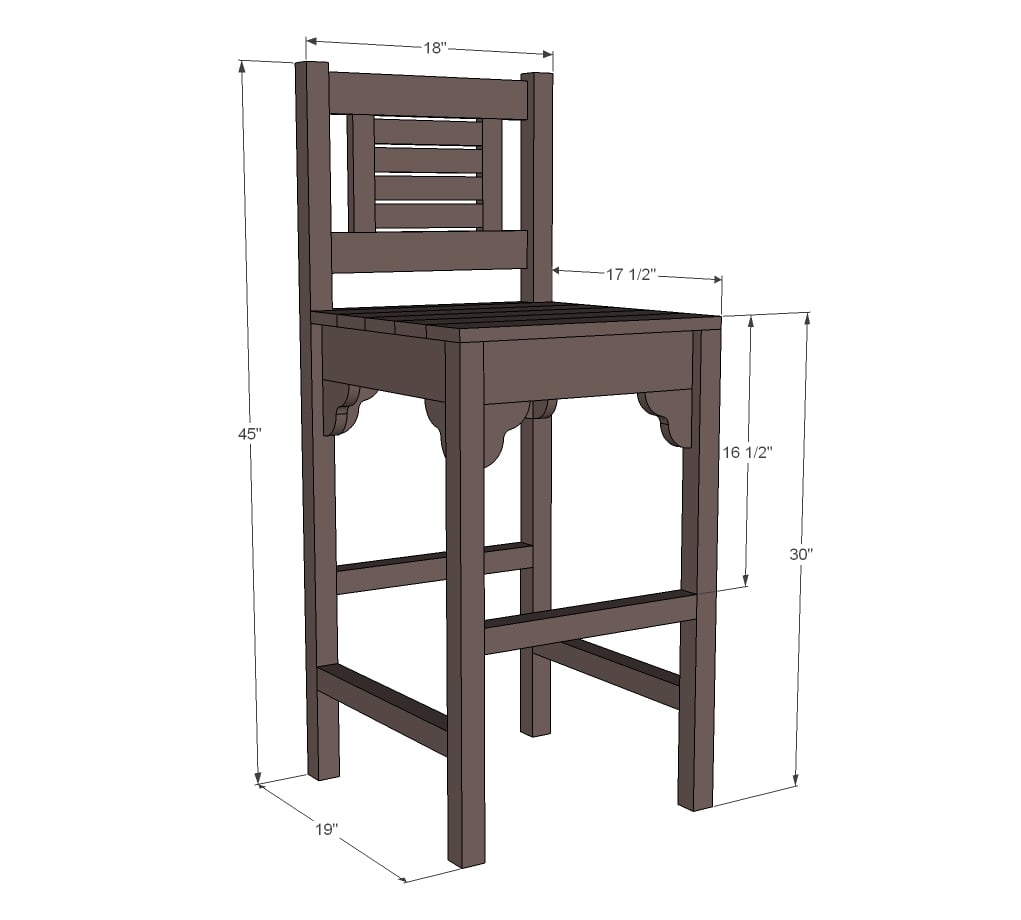
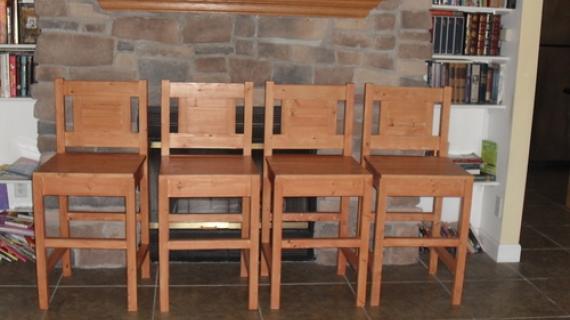
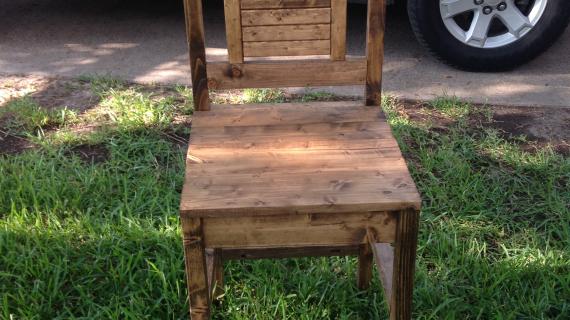
Free plans to build vintage bar stools!

Well hello there!!!!
Are you needing barstools, but not willing to pay hundreds of dollars for each ... and you need several?
Well, we can help you out there!
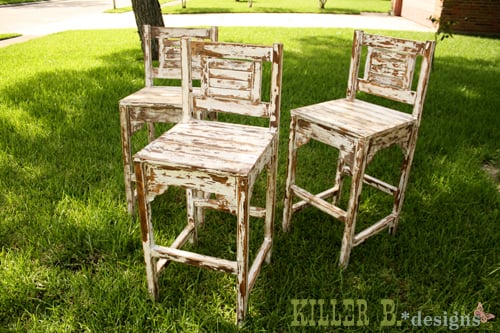
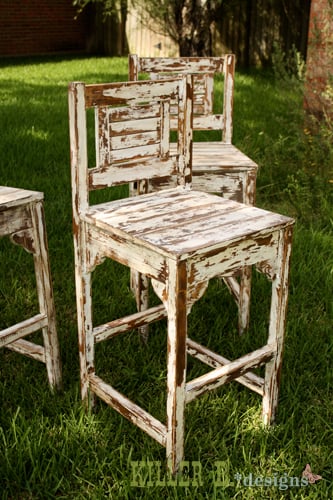
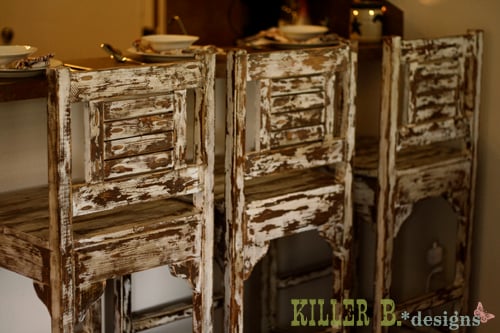
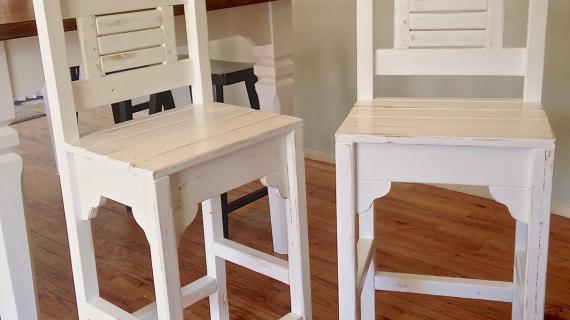
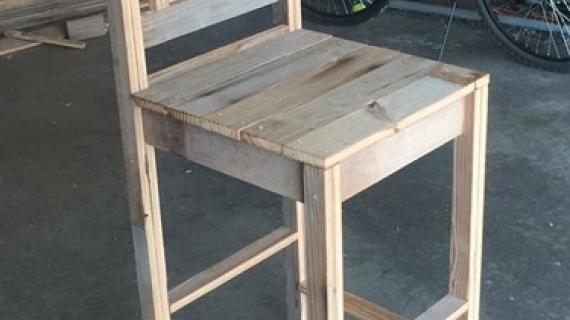
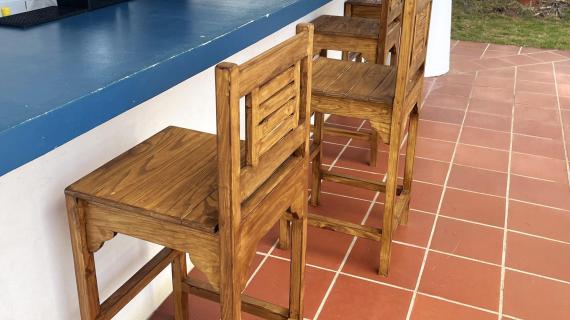
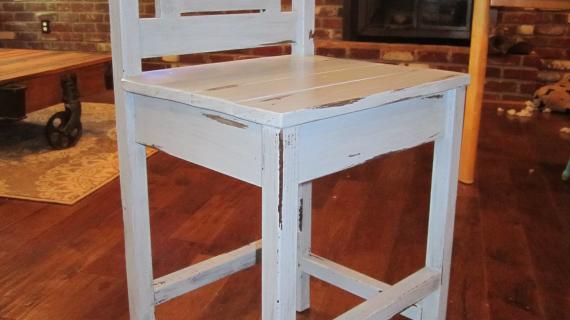
For just about $20 each, Brooke built these barstools from plans we worked on together!

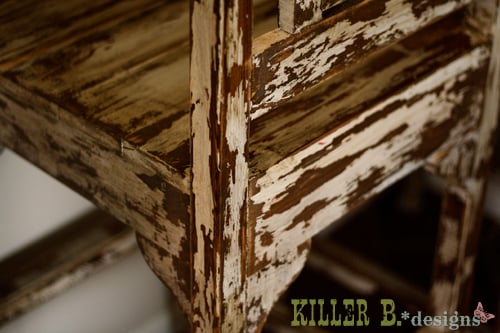
Complete with a white chippy finish, all this vintage charm is handbuilt from solid wood!!!!
I hope you take a second to stop over and read Brooke's building post - she's a very inspiring lady! - and get all the details on this stool. And OF COURSE we got you covered as always with the free step by step plans!
Preparation
1 – 1x2 @ 8 feet long
2 – 2x2 @ 8 feet long
1 – 1x3 @ 3 feet long
2 – 1x4 @ 8 feet long
1 ¼” PH screws
2 ½” PH screws (8)
Wood glue
4 – 1x2 @ 8”
2 – 1x2 @ 7 ¼”
2 – 1x3 @ 15”
1 – 1x2 @ 15”
2 – 1x4 @ 15”
2 – 2x2 @ 45”
2 – 1x4 @ 16”
2 – 2x2 @ 29 ¼”
2 – 2x2 @ 15”
2 – 2x2 @ 16”
5 – 1x4 @ 18”
8 – 1x4 @ 3 ½”


Please read through the entire plan and all comments before beginning this project. It is also advisable to review the Getting Started Section. Take all necessary precautions to build safely and smartly. Work on a clean level surface, free of imperfections or debris. Always use straight boards. Check for square after each step. Always predrill holes before attaching with screws. Use glue with finish nails for a stronger hold. Wipe excess glue off bare wood for stained projects, as dried glue will not take stain. Be safe, have fun, and ask for help if you need it. Good luck!
Instructions
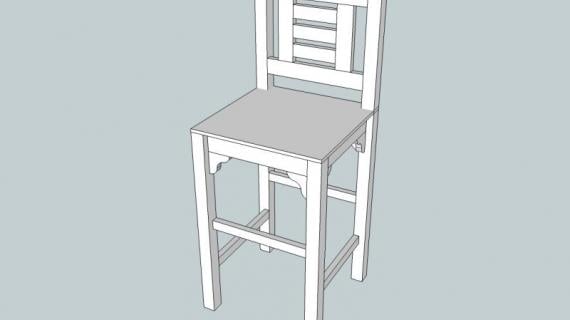
Step 1
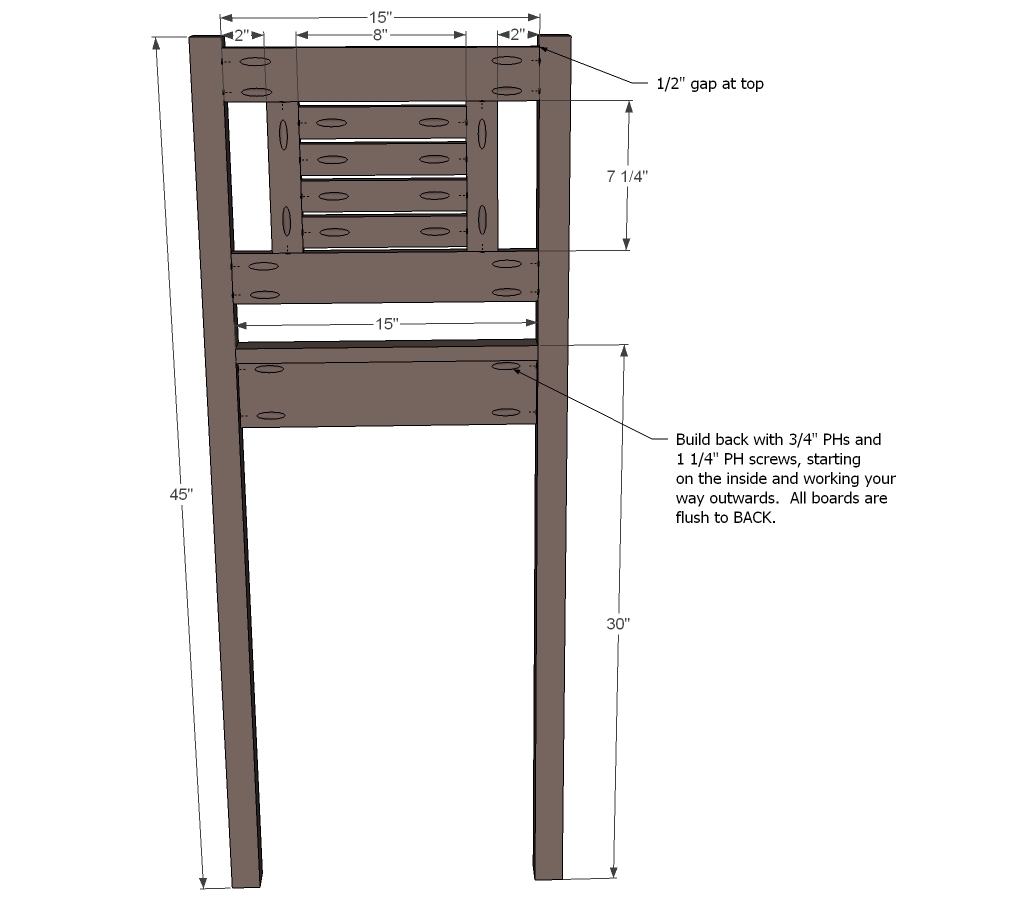
Build the back as shown above.
Step 2
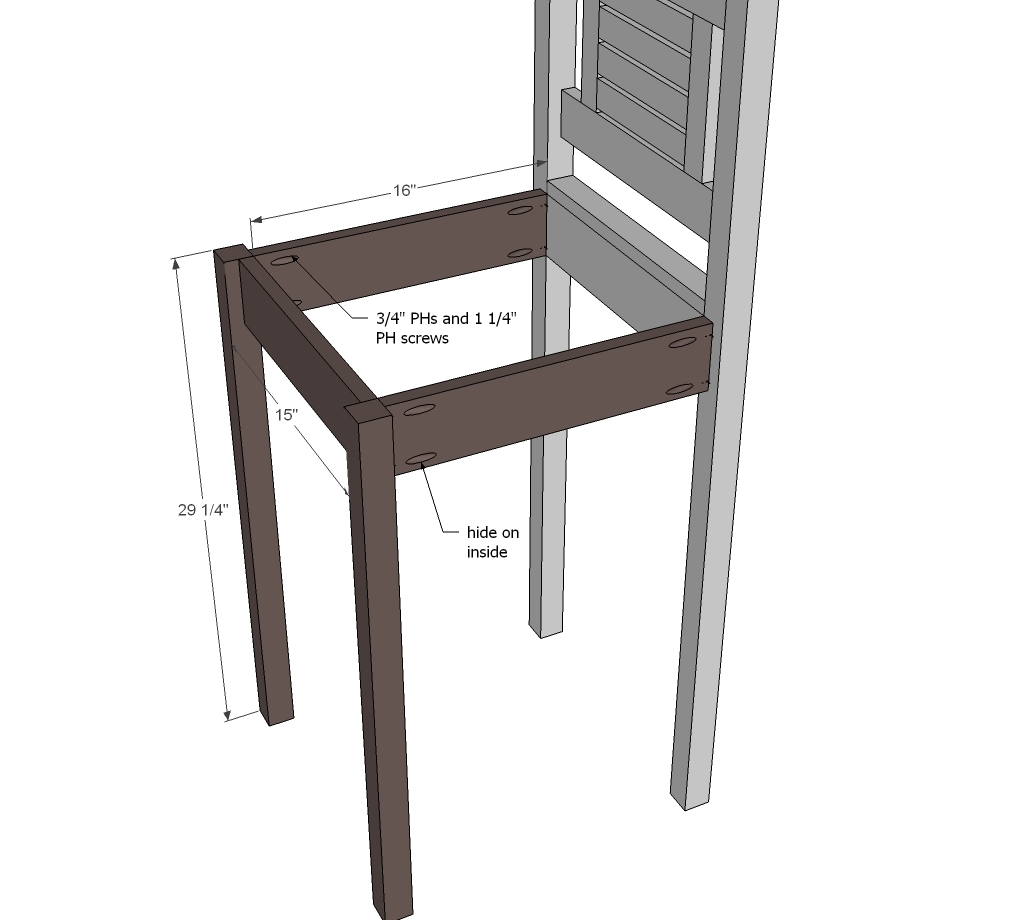
TIP: If you drill ¾” PHs facing UPWARD on inside of aprons, you can use those PHs later on to attach seat. Also, if you feel the stool needs it, you can add corner bracing at this step.
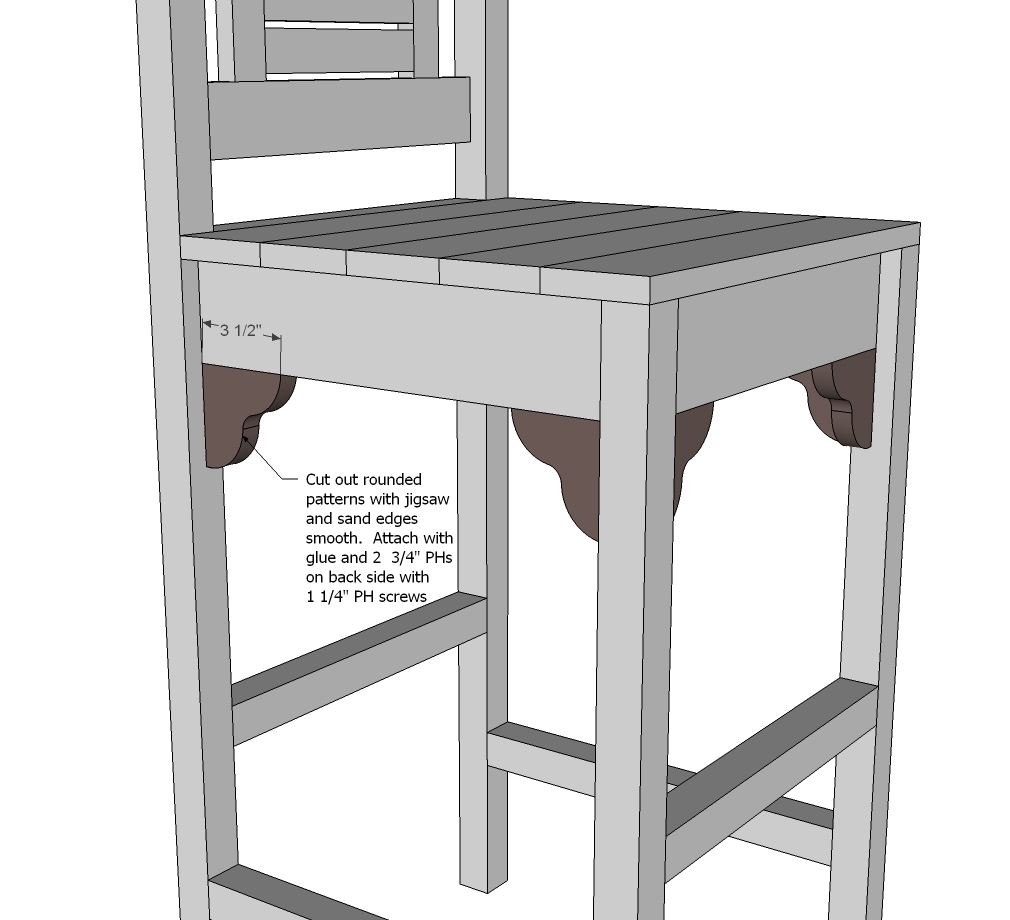
Step 3
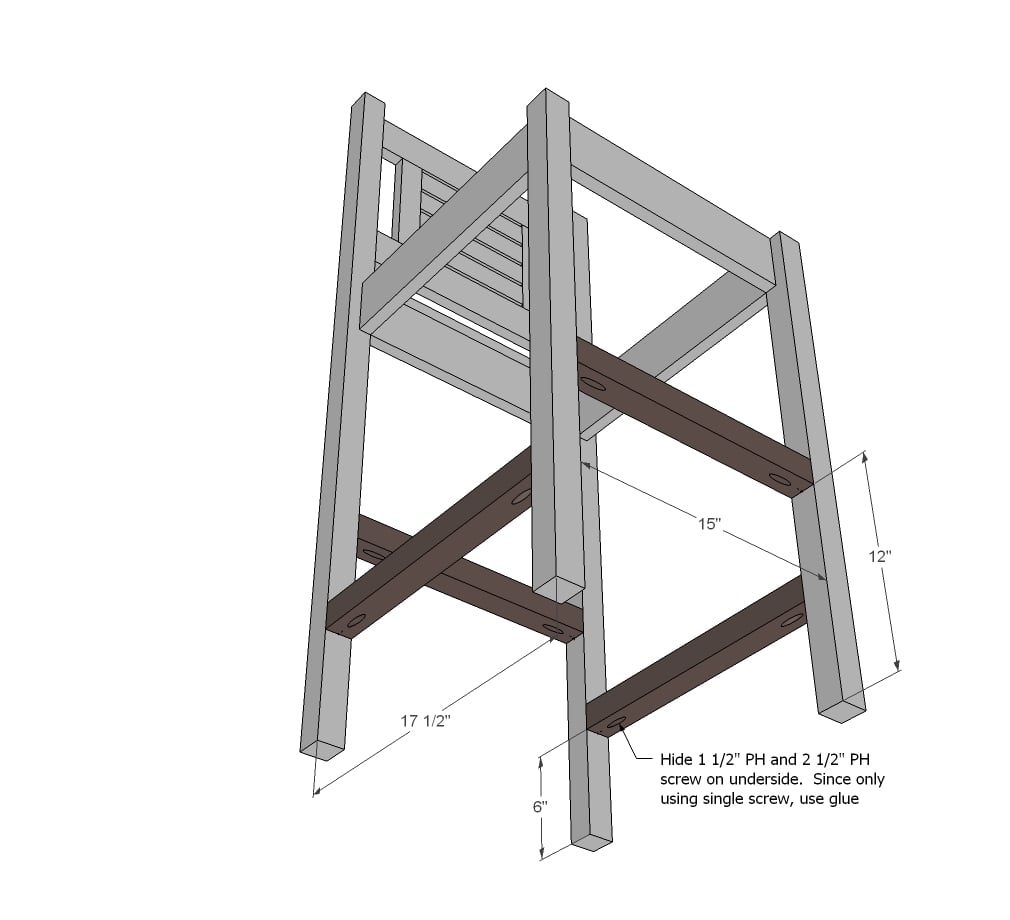
Add the stretchers. A tip I learned from Patrick Hosey is to drill a PH on two different sides to create the best joint on a 2x2 :)
Step 4
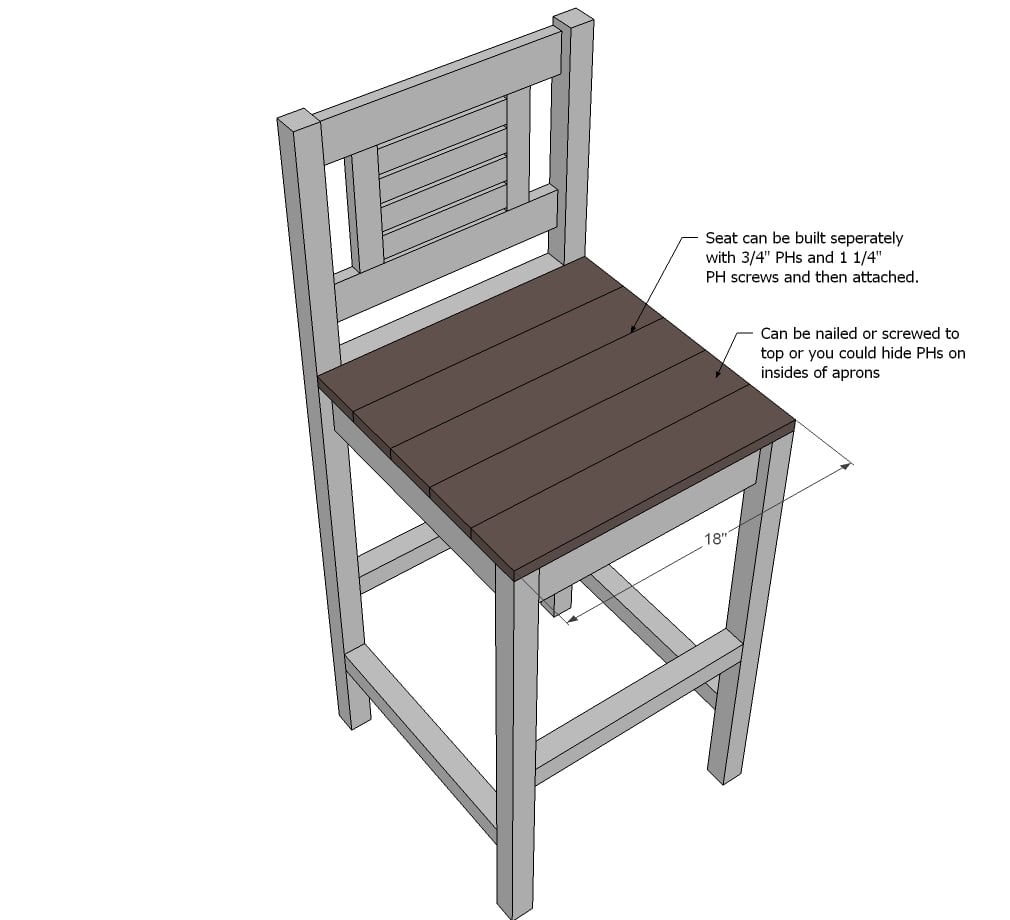
Now add the seat. If you followed along and drilled the PHs in the aprons in step 2, attach with 1 1/4" PH screws from underneath.
Step 5
Step 6

It is always recommended to apply a test coat on a hidden area or scrap piece to ensure color evenness and adhesion. Use primer or wood conditioner as needed.

Comments
little stuf
Thu, 08/02/2012 - 10:13
So Excited!
My sister is going to LOVE these!!! Her house is decorated in vintage EVERYTHING! Her floors are from an old barn, her stove is even a vintage gas stove. I am going to build these for her Christmas gift! I cannot wait to see her face! Thanks sooooo much Ana and Brooke!
rachel0383
Thu, 08/02/2012 - 13:07
Question on Kreg Jig
I've read in previous projects that a Countersink Drill Bit can be used in place of a Kreg Jig, but I notice in this post that it calls for PH Screws. Does that refer to Pocket Hole Screws, and if so, is a Kreg Jig required for this project? I'm still trying to get a grasp on the whole Kreg Jig thing! Thanks in advance!!
brookifer86
Thu, 08/02/2012 - 14:43
No Jig Required
You can definitely do this with a countersink bit and regular screws. You can even find 3/8" wood plugs at Hobby Lobby, 30 for $2, which is a lot cheaper than Lowe's or Home Depot. Or if you're paining, just fill with filler and sand it smooth
kmwood13 (not verified)
Tue, 08/14/2012 - 20:48
new to this
I LOVE these stools and I really want to make them. I am totally new to building things, but I really want to learn. This might be a silly question, but does it matter what type of wood you use? Any advice would be much appreciated!!
kmwood13 (not verified)
Tue, 08/14/2012 - 20:54
new to this
I LOVE these stools and I really want to make them. I am new to building, but I really want to learn. This might be a silly question, but what type of wood did you use? Any advice would be much appreciated!!
angeleyes
Wed, 10/10/2012 - 17:24
well done
Did you end up bracing these as noted in step 2 or not? if so what do i use a 2x2 in each corner?
mary b (not verified)
Wed, 11/07/2012 - 20:42
may be a problem with the plans
So when I started measuring for my cuts, I ran out of 2X2's and have to either go back to lowes for the last 2 16" ers or attempt to rip a set from a 2X4 and my skil saw :( yikes. Unless I goofed and should have marked them out differently. I lined them up and marked them together with my square. Also I'm now marking for my PH's and I can't figure out where the 1X2 that is 15" is supposed to go.
Joey Moore (not verified)
Wed, 01/09/2013 - 04:51
Not enough 2x2
Just wanted to comment, built one of these last night. Love the plan, but the buy list does not call for enough 2x2's. I ran out making the last two runners last night. No big deal, but wanted to let you know in case anyone else was getting ready to build. (P.S. We just saw these exact chairs at a local furniture dealer in FL for $130 a piece. I spent approx. $25 for mine).
Jen McMillan (not verified)
Mon, 01/14/2013 - 09:10
Couple of Questions
I have decided to make my own dining table and distress it because I need something that holds up to 2 five year olds. I have never made anything like this before and I wanted to make the pub table that seats 8. Before I make these chairs also (with my father in laws help, of course), do these chairs work with that table? Also, do you have plans for benches for that table as well? I would like to add one bench for the kids. It wouldbe prefect when the family comes around.
Soozan (not verified)
Wed, 01/16/2013 - 11:31
Use with Pub Table?
I thought maybe you could use these with the Pub Table Plans posted, however, I think they might be too tall. Can someone comment on this if they can? Thanks!
new girl
Sat, 02/23/2013 - 16:54
use with farm house table
what would the measurements be for the legs to make it shorter to use with the farm house table?
jere7782
Tue, 04/30/2013 - 16:37
curious about better wood or support?
I built two of these. They are nice peices. I went to sell them and someone went to sit on the chair and the front support post broke. I tried killerb, kreg jig pocket holes on alternate sides for the 2x2.. very strong joint but I could not believe me eyes when she broke it. The rest of the seat is fine. But I want to get this resolved asap. Thank you
Kris60
Fri, 07/05/2013 - 17:59
we used tite bond wood glue
we used tite bond wood glue along with the ph screws.
Oma2three
Sun, 06/30/2013 - 09:09
Materials
I am assuming that the list of materials is for making one. Is this correct?
Love your site!
Oma2three
Sun, 06/30/2013 - 09:09
Materials
I am assuming that the list of materials is for making one. Is this correct?
Love your site!
Kris60
Fri, 07/05/2013 - 17:58
yes, for making 1ea stool.
yes, for making 1ea stool. but you will end up short on the 2x2's. we bought an extra 3ft piece.
Kris60
Fri, 07/05/2013 - 17:55
One down three to go
I love love love these stools. My question is, are you sure your shopping list on the 2x2's is correct? We could not get everything out of the 2ea 8 footers. We had to buy an extra 3 ft piece. But now we're pretty awesome at using a kreg jig after a couple booboo's. I'm going to try to upload our pictures. Not done yet though! Thank you very much.
blaidd_drwg
Fri, 08/16/2013 - 06:58
Just what I've been looking for!
The counter in my apartment is 48" high and I haven't been able to find tall enough stools anywhere, so I started looking online for info on making my own. These plans look simple enough that I could probably make two stools with little error.
I do have some questions, can these plans be adjusted to account for a higher seat? I'm thinking about putting the seat between 35"-39". What type of wood do you recommend?
Thanks!
pondrider
Sat, 04/04/2015 - 14:42
counter sinking and pocket holes are different
Ph = pocket hole. One great advantage of ph over just counter sinking is guiding the screw in at a good angle. The angle is another element which makes ph great. Just learn the ph. I started with and am still useing the basic two hole clap on version of the kreg jig. I used an Irwin squeeze clamp for a long time. You do need to clamp it on.