
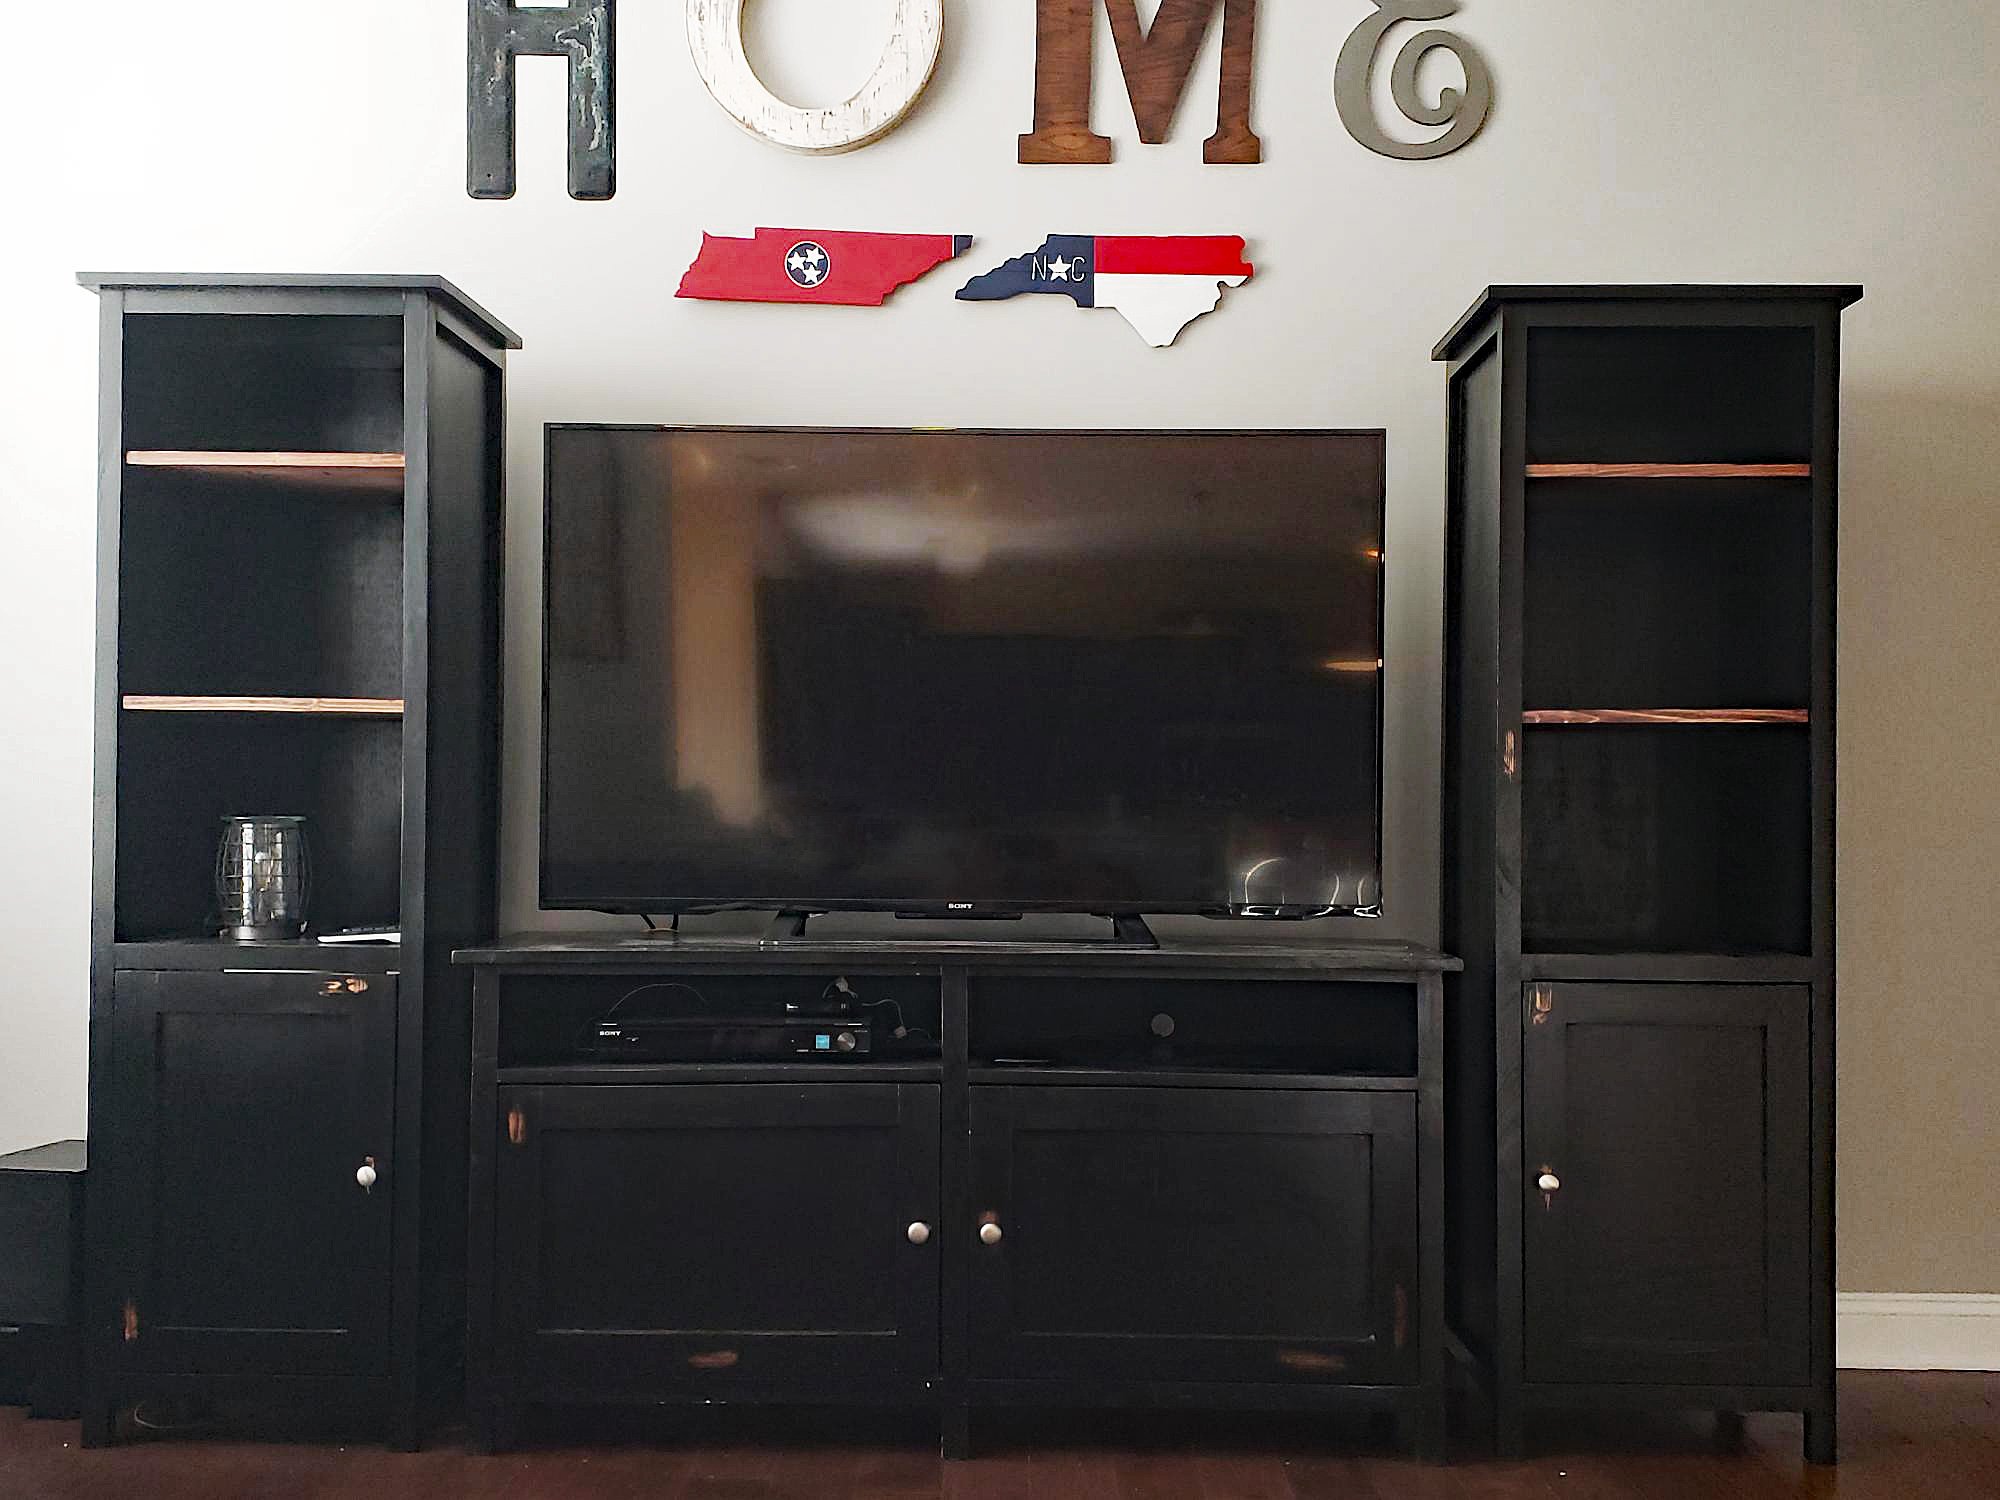

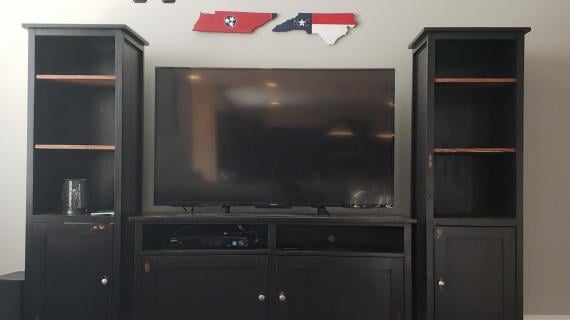
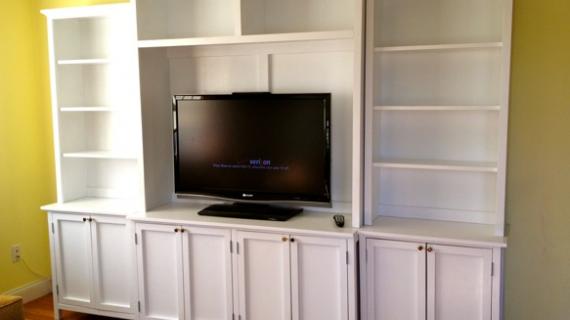
Create a gorgeous media wall by adding towers on either side of the matching center console. Or use it as a linen cabinet or even a nightstand! Free plans by Ana-White.com
Pin for Later!

Preparation
Shopping list is per one tower.
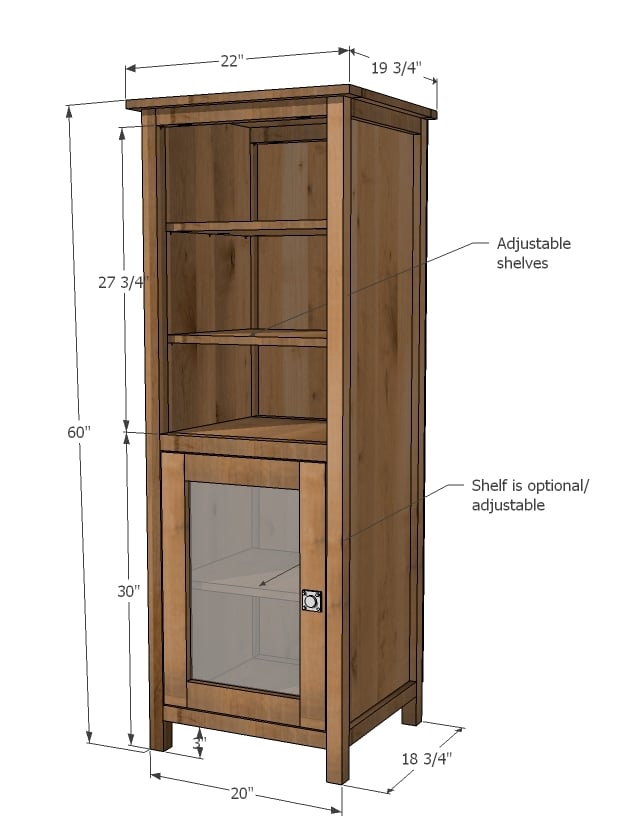
1 - Sheet 3/4" Plywood cut into strips 15 3/4" wide, 8 feet long
- 2 - 3/4" plywood @ 15-3/4" x 56 1/4" (Sides)
- 4 - 1x2 @ 15 3/4" (Side Trim)
- 4 - 2x2 @ 59 1/4" (Legs)
- 6 - 2x2 @ 17" (Front/Back Trim)
- 5 - 3/4" plywood @ 15-3/4" x 17" (Shelves)
- 1 - 3/4" plywood @ 15-3/4" x 22" (Top)
- 1 - 1x3 @ 22" (Top)
- 1 - 1x2 @ 22" (Top)
- 1 - 1/4" plywood @ 20" x 55 1/4" (Back)
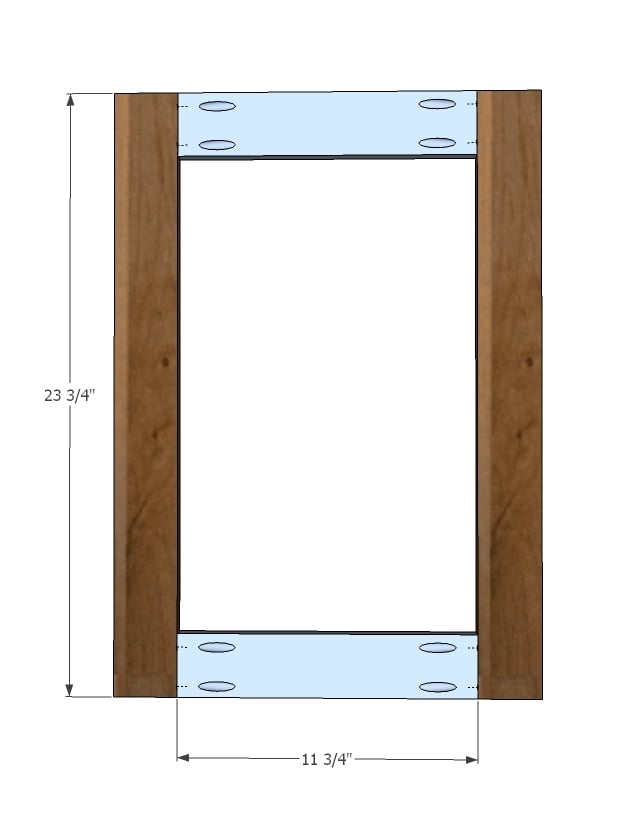
- 2 - 1x3 @ 11 3/4" (Door)
- 2 - 1x3 @ 23 3/4" (Door)
Have your hardware store cut the 3/4" plywood into 15 3/4" wide strips, 8 feet long. Ask to run the plywood through horizontally so the widths are exactly the same - that's the most important thing! If your hardware store says no, either use a table saw or a circular saw to cut your plywood into 1x16 boards. If you are using a circular saw, clamp a board to the top of your plywood and use it as a guide when cutting - will help you cut straighter.


Please read through the entire plan and all comments before beginning this project. It is also advisable to review the Getting Started Section. Take all necessary precautions to build safely and smartly. Work on a clean level surface, free of imperfections or debris. Always use straight boards. Check for square after each step. Always predrill holes before attaching with screws. Use glue with finish nails for a stronger hold. Wipe excess glue off bare wood for stained projects, as dried glue will not take stain. Be safe, have fun, and ask for help if you need it. Good luck!
Instructions
Step 1
Before any assembly, go through the plan and diagrams and mark and drill all pocket holes.
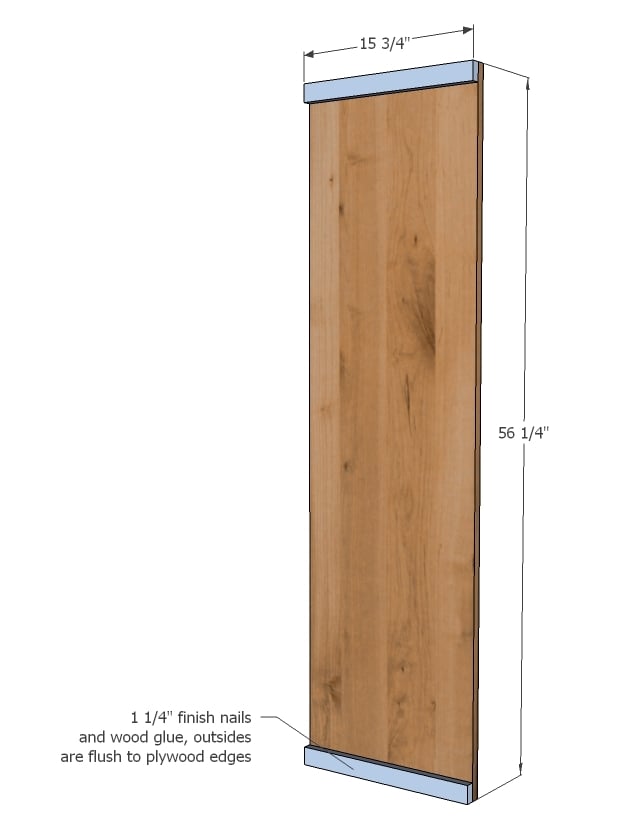
On each side, on the outsides where no pocket holes are drilled, attach side trim to top and bottom with 1 1/4" finish nails and wood glue. Outside edges are flush.
You will need to build two.
Step 2
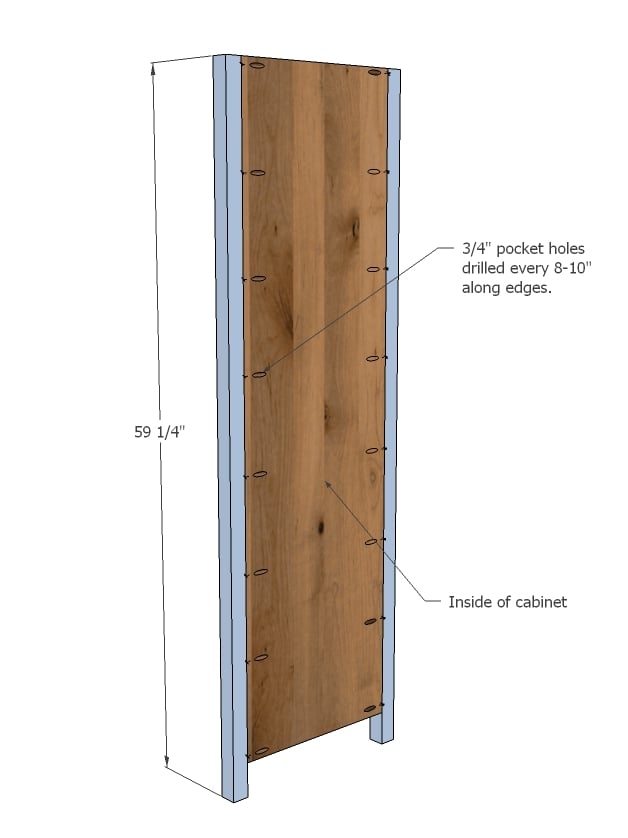
With top edges flush, attach legs using 1 1/4" pocket hole screws and glue. Do this on both sides.
Step 3

Measure and mark the placement of front/back trim boards as shown in diagram. Then attach with 2 1/2" pocket hole screws and wood glue.
Step 4
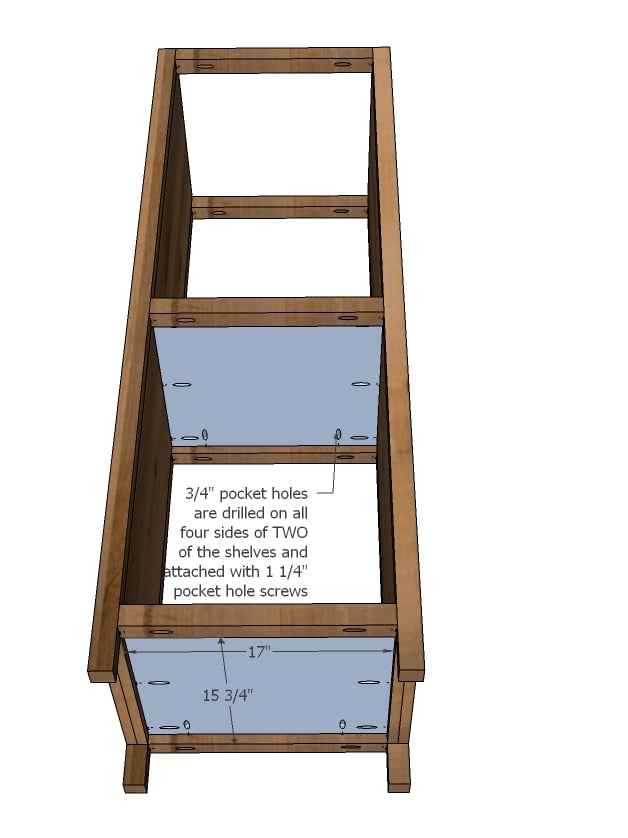
For the fixed shelves, drill 3/4" pocket holes on all sides. Place inside trim and sides and attach with 1 1/4" pocket holes and glue. Tops are flush.
Step 5
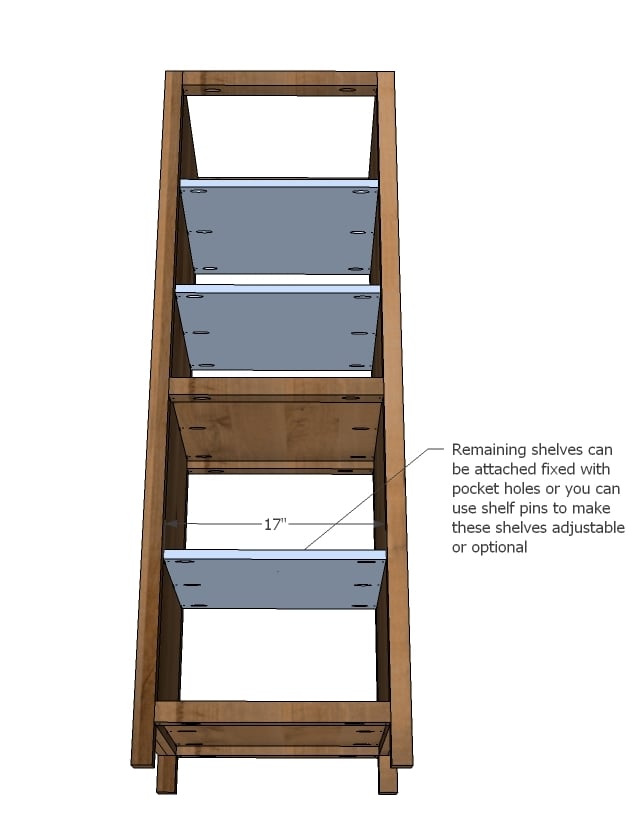
Step 6
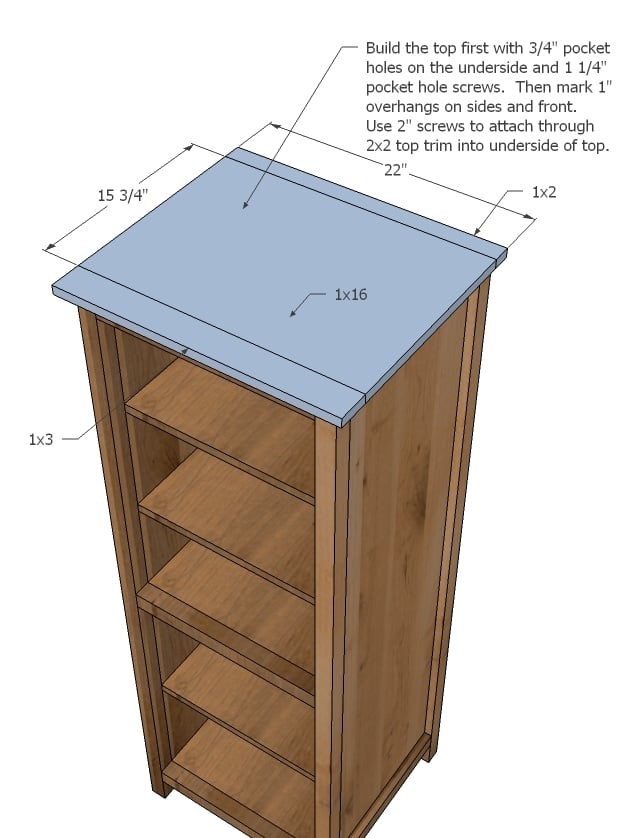
Build the top first with 3/4" pocket holes and 1 1/4" pocket hole screws. Then screw on from the underside with 2" screws and glue.
Step 7
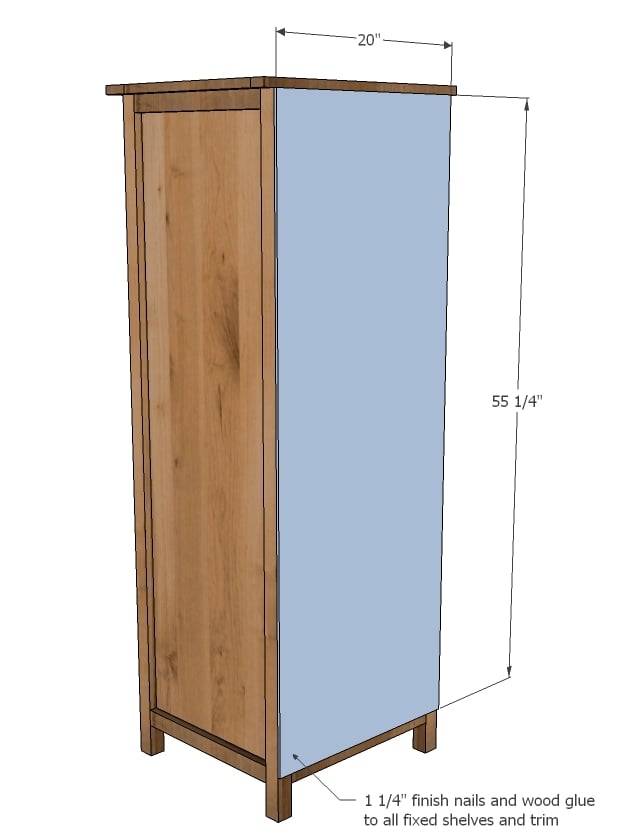
Back is easy step - cut your plywood and attach with glue and 1 1/4" finish nails. Just make sure you hit all fixed shelves.
It would be a good idea to cut holes for cords at this stage.
Step 8
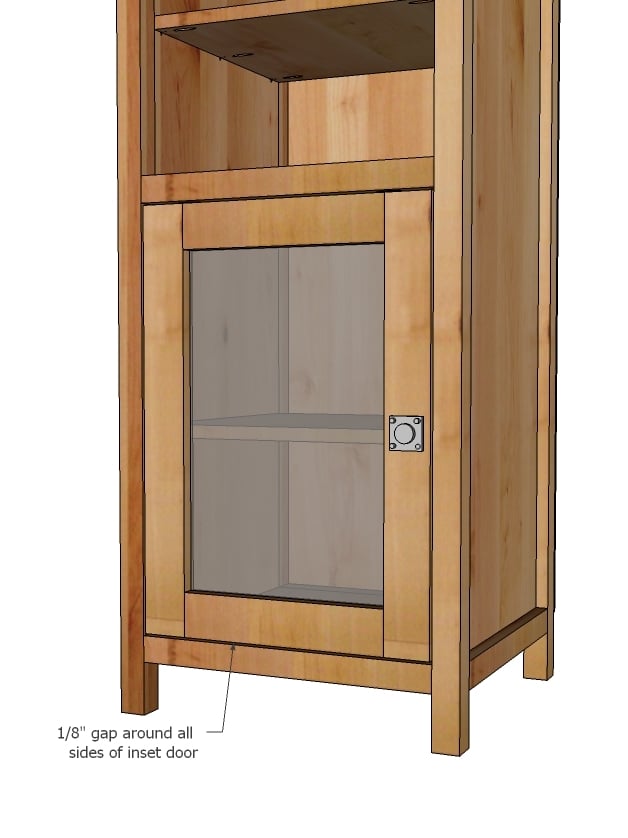
Drill 3/4" pocket holes on each end of the shorter door pieces and build your doors with glue and 1 1/4" pocket hole screws.
Step 9
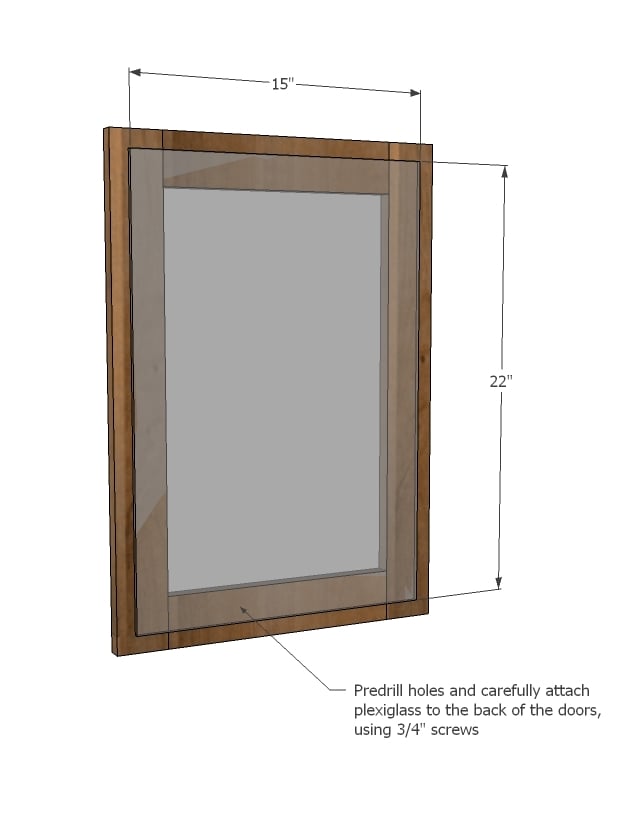
Predrill holes in the acrylic glass and attach to back side of door frames. This acrylic glass should significantly strengthen your door.
NOTE: You may wish to mark the location of your hinges (next step) and notch out a spot for the hinges so you have a nice flat spot to attach hinges - or you could just cut your acrylic glass shorter on the hinge side. This will depend on what type of hinge you use.
Step 10
The hinge I recommend are these ones:

It is always recommended to apply a test coat on a hidden area or scrap piece to ensure color evenness and adhesion. Use primer or wood conditioner as needed.


Comments
benfoldsfivealive
Wed, 10/05/2011 - 13:59
So exciting!
Can't wait for the console plans, I'm ready to build! Thanks, Ana!!!
Guest (not verified)
Wed, 10/05/2011 - 17:33
Beautiful shelf! Is it
Beautiful shelf! Is it possible to build it without using a Kreg Jig or would it be structurally unsound? Looking forward to the rest of the collection!
In reply to Beautiful shelf! Is it by Guest (not verified)
Ana White
Wed, 10/05/2011 - 18:06
Definitely possible, but I
Definitely possible, but I highly recommend the pocket hole jig - it really makes your projects easier to build, stronger, squarer, and less holes to hide.
The two areas that really require a pocket hole jig are joining the legs to the sides, though certainly predrilled holes and screws could work, and building the doors. You could purchase metal 90 brackets to hold the doors together on the back side, coupled with the acrylic glass to make your doors.
I'm excited to share the media console plans! Thanks everyone!
In reply to Beautiful shelf! Is it by Guest (not verified)
claydowling
Thu, 10/06/2011 - 11:41
Pocket holes for the win
It's not especially hard to build this entire cabinet without pocket holes. Mortise and tenon joinery would be strong and look very nice. A dowel joint would actually be pretty easy to do, and before pocket hole jigs became commonly available, would be the recommended route for beginners.
But the pocket hole joint is fast, easy, and strong enough for the task at hand.
You don't need to buy the most expensive Kreg jig on the market. There are less expensive kits available from Kreg, like this one: http://www.rockler.com/product.cfm?page=5985
You can pick up pocket hole screws from Lowes, they don't need to be special ones from Kreg. You'd also want a quick-release clamp, which is generally useful anyway.
Guest (not verified)
Wed, 10/05/2011 - 20:05
Love it!
I've been playing around & designing a media centre similar to this one ... love this plan and so happy to see I've been on the right track with my design!! Thanks for all your amazing plans ... love using them and love gaining the confidence to start designing myself!!
kristen
Thu, 10/06/2011 - 09:00
I didn't know PureBond
I didn't know PureBond plywood came in other species than oak and birch. Good to know!
In reply to I didn't know PureBond by kristen
Ana White
Thu, 10/06/2011 - 10:53
Thank you, really excited
Thank you, really excited about these plans!
The PureBond Plywood comes in many different species! You can get walnut, bamboo, and much more - just ask for it at the Pro Desk at Home Depot. I have swatches, the grains are just beautiful - like kitchen cabinet samples!
In reply to Thank you, really excited by Ana White
kristen
Thu, 10/06/2011 - 14:36
Wow--I am going to check that
Wow--I am going to check that out next visit! My store didn't even know what I was talking about when I requested PureBond the first time. A guy took my number to look into it and when he called, he said they had it on the shelf :) I'm excited to see the other choices.
Looking forward to the coming plans!
melehes
Sat, 10/08/2011 - 07:54
Just What I Have Been Waiting For
This is definitely moving to the top of my to build list. I have been wanting something to put on both sides of the fireplace and then wall mount the tv. I think this will be perfect. Thank you so much!
BigRed (not verified)
Mon, 10/10/2011 - 13:17
Awesome Job
Ana what type of wood should be used? Unsure if pine or something else would be better
Polysoup
Wed, 10/12/2011 - 21:50
Same question here . . what woods to use?
Have you found good plywood/hardwood combinations? I'm just starting out and am having a hard time finding plywood and lumber that will match. I don't want to always paint the wood (though if I do it would be nice to know which ones go together). But someday I'd like to try my hand at staining. I got a hold of a lot of birch for cheap but have nothing to go with it. Some lumber stores sell birch but not in all the sizes I need. So then I stained a piece of poplar to see if that'll work but I still can't find it in the lengths required here. :(.
Thanks! Love your site.
Guest (not verified)
Fri, 11/04/2011 - 17:02
I built a set of coffee and
I built a set of coffee and end tables for my living room using birch plywood and poplar edging with a mahogany stain, and you can't tell the difference. Not sure if you could tell with a lighter stain.
In reply to Awesome Job by BigRed (not verified)
claydowling
Thu, 10/13/2011 - 05:48
Materials
In general you can build a project from whatever woods strike your fancy. This project would look good made from any close grained hardwood like maple or walnut.
The deciding factor would be can you get the materials, and are you capable of working with them? Hardwoods aren't sold as dimensional number, so you don't buy 2x2s. You'd buy 8/4 stock, mill it, and rip it to size.
None of that stuff is very hard. There are a few books that will tell you how to do it. Hand Tool Essentials is one that I really like, and Tage Frid Teached Woodworking, Volumn 1, is another. Both are well written and heavy with pictures, which does a lot to make it easier to learn. Both are great books to read if you want to advance your woodworking skills.
Polysoup
Thu, 10/13/2011 - 10:58
Materials
I was hoping I could just walk into a place and just pick out what I needed like a grocery store and easily match up plywoods with hardwoods :) I guess I'm overly anxious to start and have a huge list of todo items.
I got some nice birch plywood and I'll start calling around to find birch hardwoods. Though it's not too easy. I thought saving up for the tools was going to be the hard part . . silly me :) I suppose if I don't want this stained but painted instead I can be less picky with the types of woods I mix/match so long as the grains are close. Though I'd prefer staining. I'd love to do this as a linen cabinet and a farmhouse vanity next to it so getting all that lumber to match is being a pain.
claydowling
Thu, 10/13/2011 - 18:48
Buying materials
There's no reason you can't use dimensional lumber from the lumber yard, which will be pine, hemlock, spruce or fir. Those woods take stain well, and they aren't too shabby even with a clear finish. White pine looks especially nice under a gloss polyurethane.
Most projects here are intended to be built with the dimensional lumber you can pick up at the lumber yard, and that's a great place to start because when you make mistakes (and you will), it's a lot cheaper to replace material and correct the problem.
As for where to get the materials, I strongly recommend finding a local lumber yard with good customer service. They'll have better materials and your projects will go better. You can pick up wood at a home center, but you'll have to dig through a lot of scrap wood to find decent. Definitely read Ana's article about selecting a straight board and be very fussy. Theoretically you can also buy plywood there, but Ive never seen a Lowes or Home Depot store their sheet goods correctly, so it tends to be crazy warped.
Polysoup
Tue, 10/18/2011 - 20:37
Came out great!
No photos yet since it's in the ugly "being primed" state but I just wanted to drop a note and say building this went very smoothly. The directions were spot on! Thanks so much. I am however leaving off the back and attaching the doors until I have everything painted. That way it's easier to get to all the little corners. I need to make two more! One to match this one since they will be matching linen cabinets and one that I'll modify for a media/dvd cabinet. I used a combination of birch plywood and thanks to the suggestions here I found a great lumber company nearby where they helped me pick out the best poplar for the job.
claydowling
Wed, 10/19/2011 - 14:24
Glad to hear your success
Hopefully you'll have a very good relationship with them for years to come. Getting the right materials for the job can really make a difference in how you feel about it.
Guest (not verified)
Sat, 02/11/2012 - 14:21
Materials Question
Great project! I am in planning mode and getting ready to start this. Are you doing anything to hide the plywood edges for things like the front edge of the shelves (step 5) and the side edges of the 1x16 top piece that are not covered by the 1 x pieces (step 6)? Thanks!
Rah (not verified)
Fri, 01/18/2013 - 07:53
I built this!
Thanks for the detailed drawings and how-to. I bought a kreg jig after reading how you raved about it and I love it too! I still have to put a top coat on to make it smooth, and then I'll have to come back and visit the "brag" board :)
Chettaman
Tue, 10/25/2016 - 03:25
Need some help
Trying to figure this out. Firs time attempting a DIY like this. I'm trying to understand the wood sizes being used for everything here. Also, I'm having a hard time locating the samentyoe of wood for everything. For example the plywood may be one type but, the wood for the legs may end up being a different type of wood because I can't get the same type of wood to match because of the sizes they come in. I would like to stain this project and I'm not sure it will,look good with different types of wood being put together. Also, can someone confirm if this is right from how I'm reading it on this DIY:
Sides = 3/4" plywood
Side trim = 3/4" plywood
Legs = 2x2 dimensional board
Front and back trim = 2x2 dimensional board
Shelves = 3/4" plywood
Top 1 = 3/4" plywood
Top 2 = 3/4" plywood or dimensional board ???
Top 3 = 3/4" plywood or dimensional board ???
As typing this it seems that majority of this build is using plywood and the only dimensional board are the legs and front/back trim. An I correct? If so then what wood combination can I use that will look good when using a wood stain? I don't think I can get birch or maple or oak in a 2x2 dimensional board for the legs and front/back trim. I went to a lumber store yesterday to look at some material. I may try taking a look at Home Depot tonight and ask around also.
jbouchard
Tue, 07/21/2020 - 05:58
Pay close attention to step 2
I built this over the weekend.
I want to emphasize the absolute need for step 2 to be as FLUSH as you can possible get it. It greatly reduces stability of the whole unit if the middle boards are even a bit off from the complete edge of the legs. If I were to do it again i would put the three pieces (7 really, including the trim) on the flattest floor in the house, apply serious weight to the middle of the board, and then clamp the legs and screw it together. Good looking piece of furniture overall.