


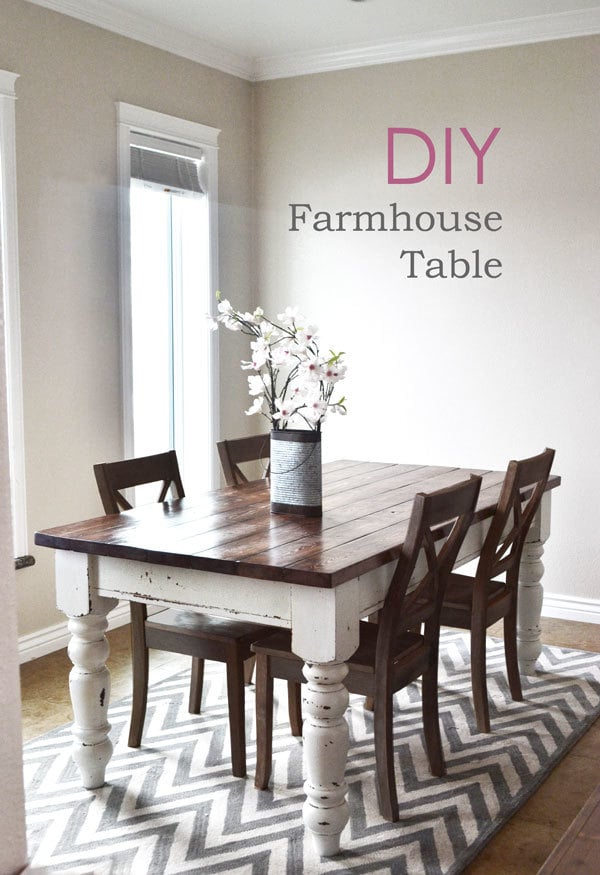
Free plans to DIY a farmhouse table with store bought table legs. Plans from Ana-White.com

Hello DIY Friends!
I hope you had a wonderful weekend! Can you believe it is still snowing up here in Alaska? I can't either, and I tell you what, I am ready to be working outdoors on projects. If you get a second, point your fans north and blow some of your hot weather toward us, will you?
We have been busy getting the odds and ends complete on the downstairs of the Momplex (I'll be posting an update for you later this week) and then finishing up the drywall downstairs. I've been told to order flooring, doors and moulding - how crazy is that? I know we aren't getting Mom moved in by this weekend (sorry Mom!), but we are feeling so great about how things are moving along (haha I'm not trying to be punny!).
You know we've been working double time now, right? That's right, we took on another job. Darn little nieces are just too cute!
Well, of course, I'm going to be building (or helping build - my sister wants to build her own furniture too!) furniture for my nieces as well. And I've already been working on projects in my spare time.
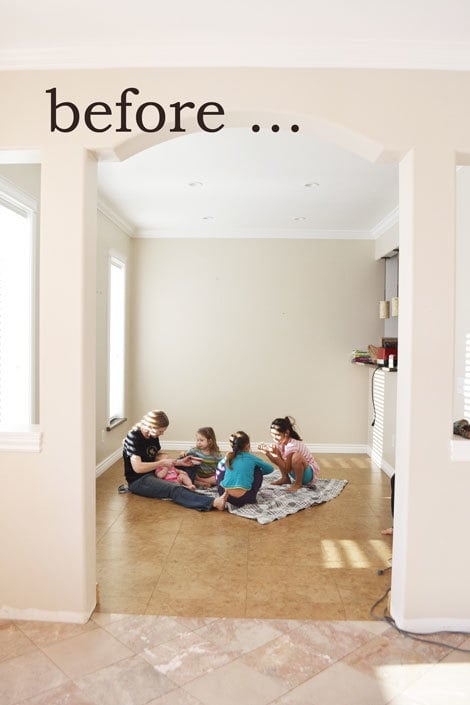
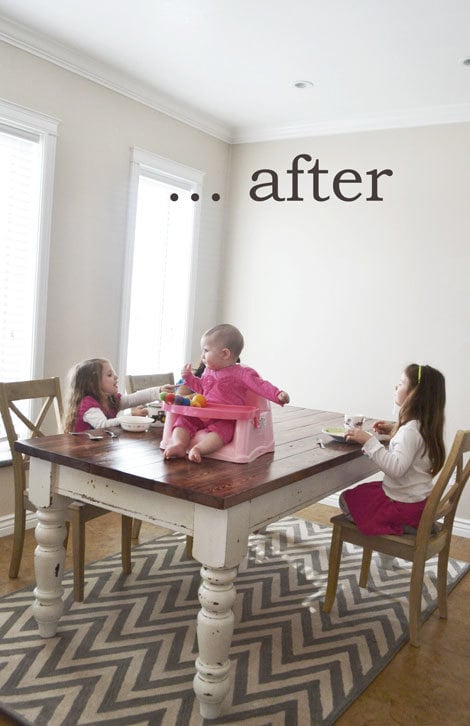
I was just thinking about something as I was putting together these photos. I often get magazines asking for "amazing before and after photos" to showcase my work, and I kinda give them a funny look and say, "but my before photos are a pile of 2x4s."
When we build furniture, it's not always about dramatic room transformations. It's not always about magazine-worthy after photos.
It's about this:


Our befores-and-afters are about making our lives better. Having a place to eat dinner. Getting mattresses off floors, corralling toys into toyboxes, books into shelves ....

But I won't tell you a lie ... making something pretty doesn't hurt either :)
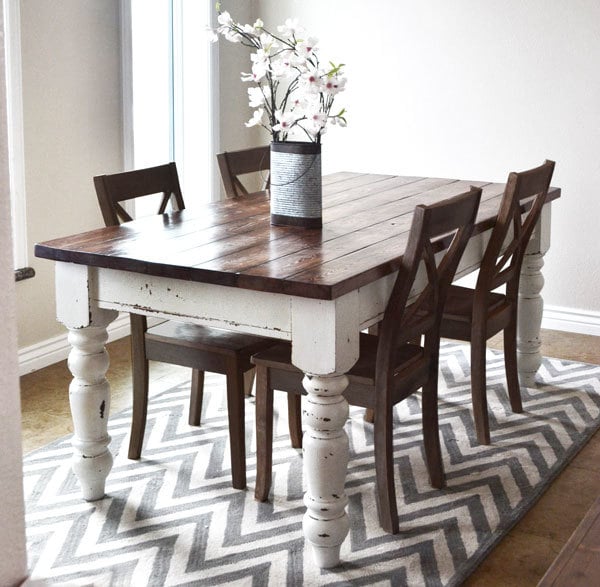
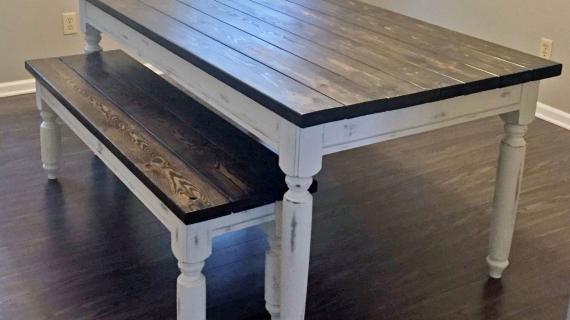
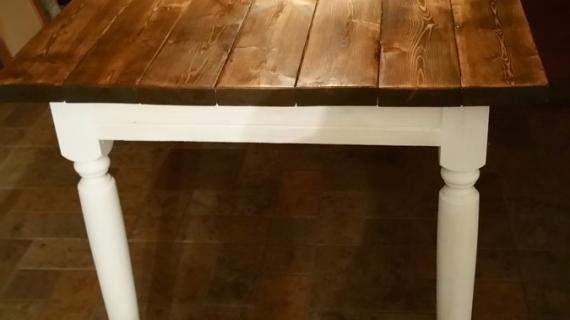
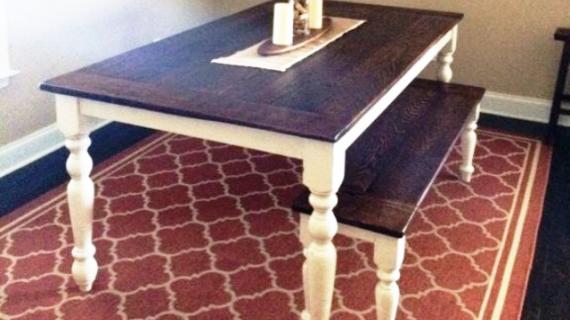
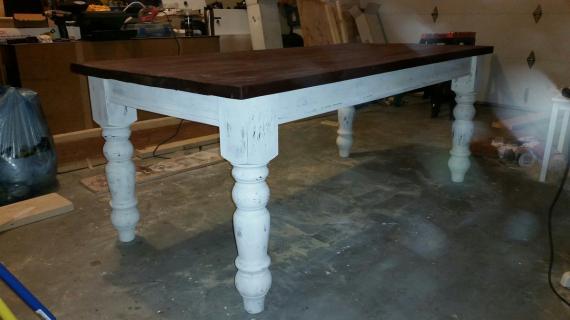
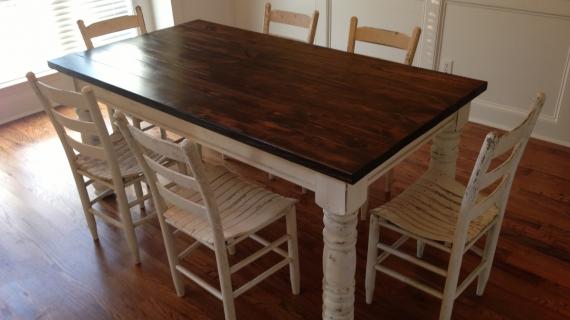
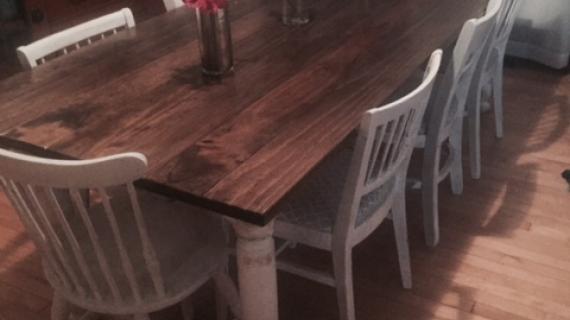
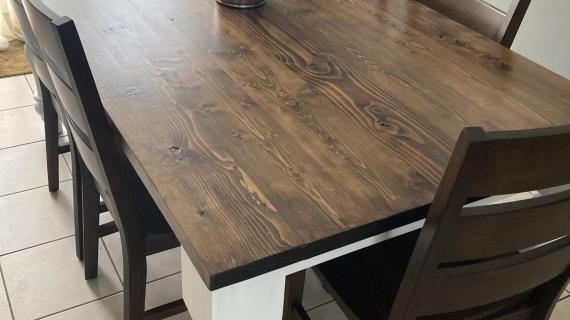
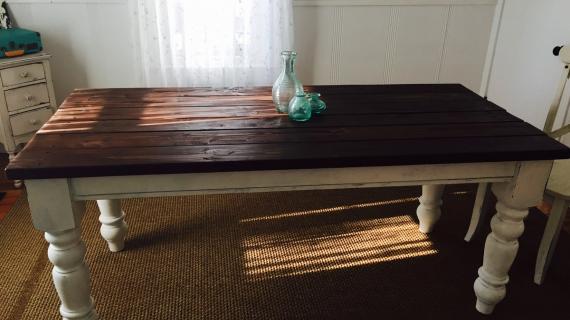
My sister and I put this table together surprisingly quick - in just a few hours. She wanted a "planked top" look made of 2x6s, so that took a little longer to get the top really flat and level (no rocking plates on this tabletop!). We love you belt sander. You could be smarter than us and use tongue and groove for the top. But I promise you, you won't get an arm workout like we did.
I gave the legs an authentic old world finish and will be sharing that tutorial with you next week - it's actually a pretty easy finish to achieve!
And of course, we got you covered with the free Farmhouse Table plans following!
Also giving a shout-out to the folks at Osborne Wood for providing the legs for this table. The legs are just massive, and retail for about $50 a leg for the legs shown. You will be shocked at how giant these legs are! Thank you Osborne Wood!
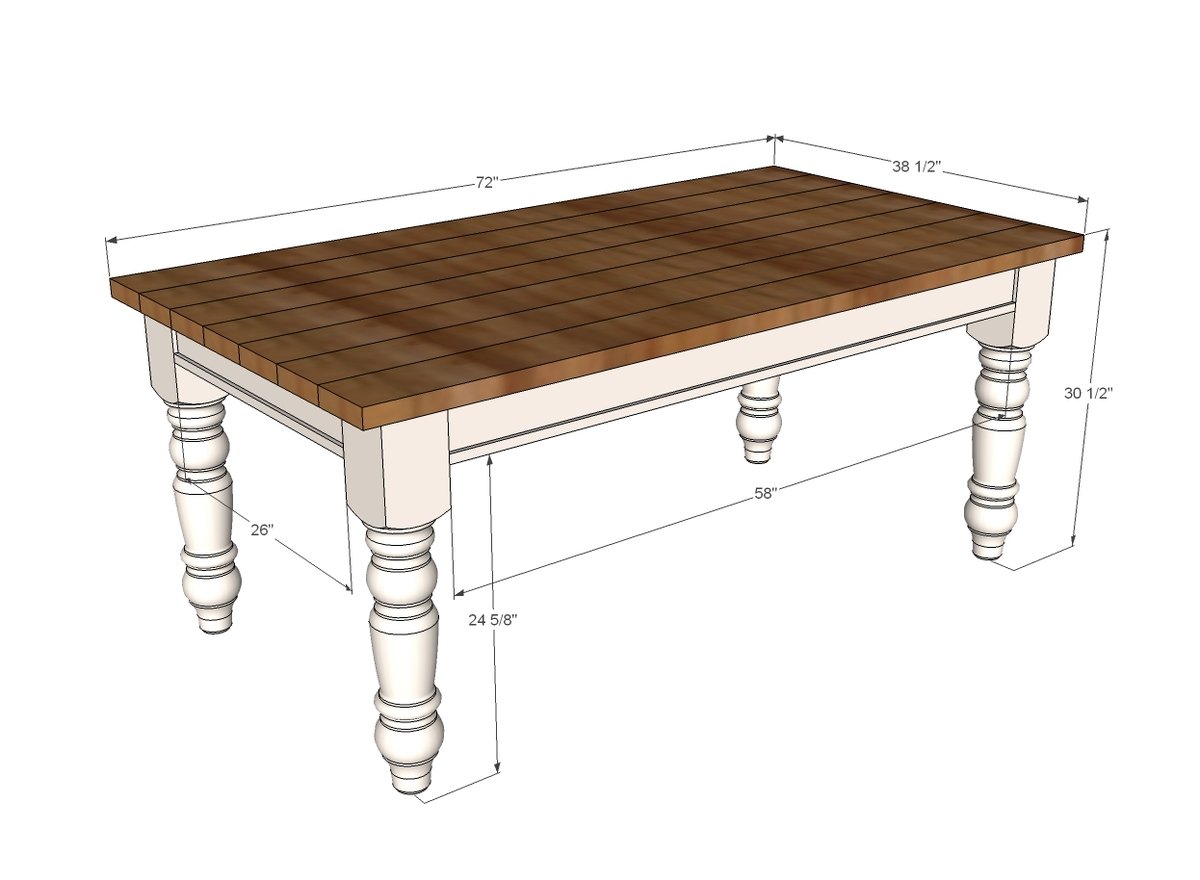
Preparation
4 - Osborne Wood Husky Dining Table Legs
2 - 2x4 @ 8 feet long
2 - 1x2 @ 8 feet long
7 - 2x6 @ 72" long (you may consider using 2x6 tongue and groove for a easier finishing option but as shown in photos, I used 2x6s kreg jigged together and then sanded flat on top with a belt sander)
2 1/2" pocket hole screws
2" finish nails
wood glue
2 - 2x4 @ 58" (side aprons)
2 - 2x4 @ 26" (end aprons)
2 - 1x2 @ 26" (end apron trim)
2 - 1x2 @ 58" (side apron trim)
7 - 2x6 @ 72" (tabletop boards)


Please read through the entire plan and all comments before beginning this project. It is also advisable to review the Getting Started Section. Take all necessary precautions to build safely and smartly. Work on a clean level surface, free of imperfections or debris. Always use straight boards. Check for square after each step. Always predrill holes before attaching with screws. Use glue with finish nails for a stronger hold. Wipe excess glue off bare wood for stained projects, as dried glue will not take stain. Be safe, have fun, and ask for help if you need it. Good luck!
Instructions
Step 1
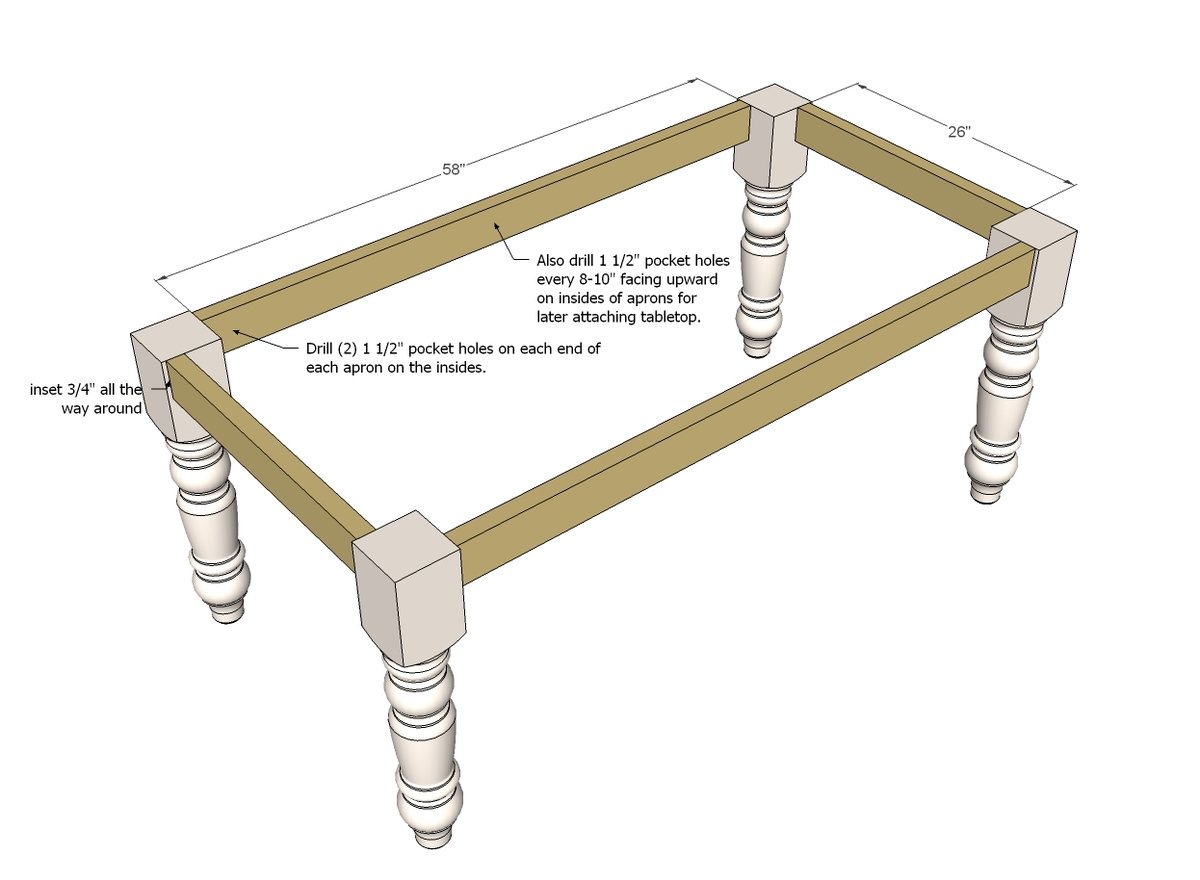
First things first, drill all the pocket holes in the aprons. You'll need two per apron end, and then ever 8" or so, a 1 1/2" pocket hole facing upward for attaching the tabletop later on.
When you go to attach the legs to the aprons, make sure you have the pocket holes pointing upward - I make this mistake all the time - doh! - but you are probably way smarter than me!
Step 2
This is really just to add that decorative touch to the underside.
Another option for those of you with a table saw is to use 2x6s for the aprons and then cut a small groove with the tablesaw at the base of the aprons to give the look of multiple boards.
NOTE: You can also add corner cross supports, but we found the table really didn't need it. It's up to you!
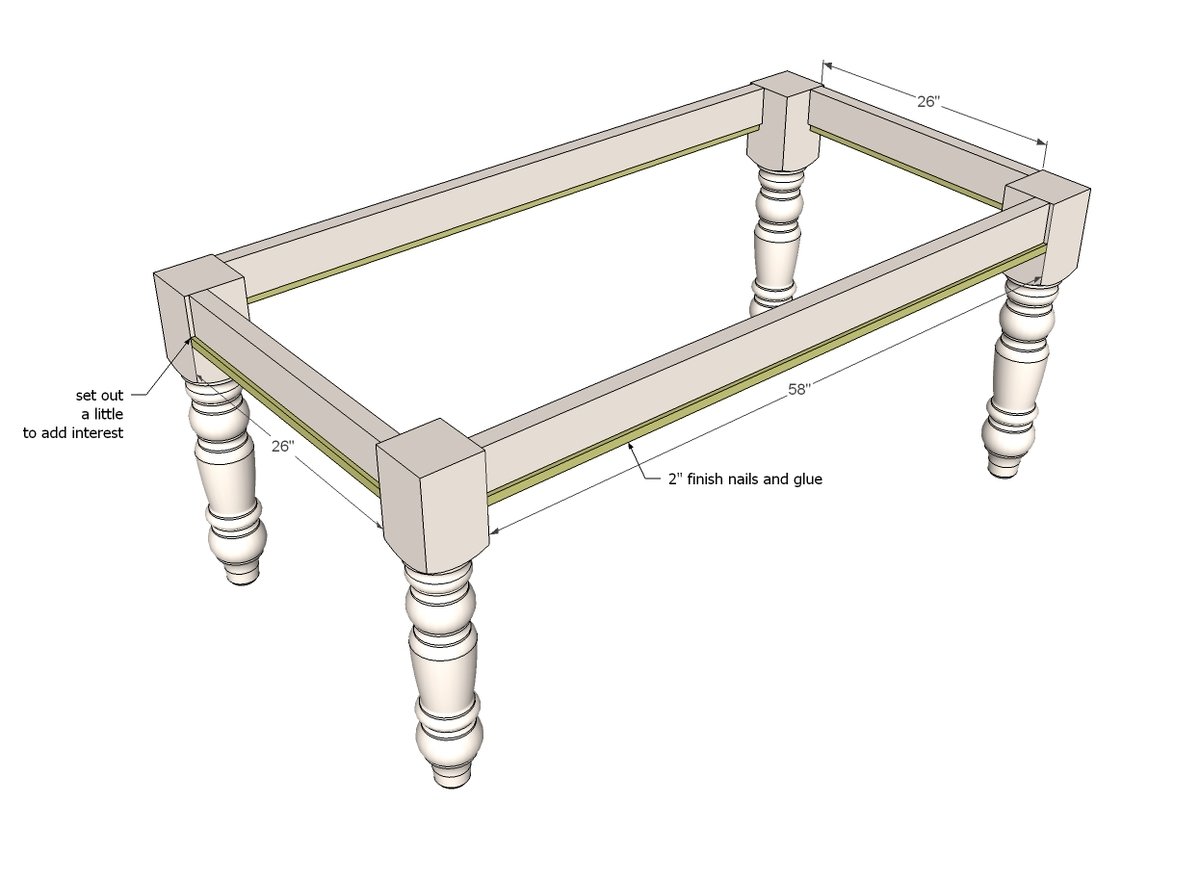
Step 3

Now build the top. If I can say anything about this top it's this: GET STRAIGHT BOARDS. Mine were a little crooked and so I ended up having to use long bar clamps to pull everything together tight as I attached pocket holes.
Clamp, clamp and clamp!
If your ends end up a little off, no bigge there, just run a circular saw down the ends to clean them up.
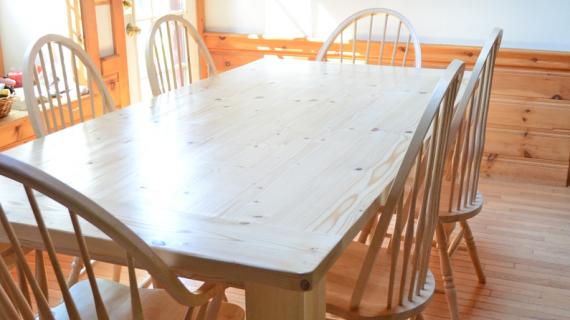
I think part of this table's charm is the planked top, but to make it more functional, we belt sanded the top flat, and then silicone any gaps to prevent food from sticking in cracks.
Not trying to scare you - this wasn't hard - it's just my sister's got kids between 6 months and 9, and we are preparing this table for real life use and abuse.
Step 4

Now flip the tabletop over so all the pocket holes are facing up and place the base on it. Then just start attaching through those predrilled pocket holes into the tabletop.
Flip it over (it's gonna be heavy!) and the building part is done!
It is always recommended to apply a test coat on a hidden area or scrap piece to ensure color evenness and adhesion. Use primer or wood conditioner as needed.


Comments
danceintherain
Mon, 05/06/2013 - 11:37
Love it!
Now I have to decide whether I want to do the original type farmhouse table, or go with something more like this.
The before and after thing is totally true! I have so much empty space in my house, and I'm so anxious to fill that space with life!
TatafuFam
Mon, 05/06/2013 - 12:03
Silicone, just solved my problem!
Love the silicone in the gaps idea! I too have little ones and am just about finished with the rustic table in your plans. I was wondering what I would do to keep those clean!
avaldezhuizar
Wed, 12/30/2015 - 15:31
Did you do the silicone
Did you do the silicone before or after staining? Can you stain silicone? Thanks!
In reply to Did you do the silicone by avaldezhuizar
veronnie0705
Wed, 06/15/2016 - 10:06
Silicone
I have the same question about the silicone... please let me know if you figured it out =)
Tsu Dho Nimh
Mon, 05/06/2013 - 14:28
Before and after pics
"I often get magazines asking for "amazing before and after photos" to showcase my work, and I kinda give them a funny look and say, "but my before photos are a pile of 2x4s.""
I'd send them some ... a messy pile of lumber and a table or a loft bed or whatever.
They might actually print it.
birdsandsoap
Mon, 05/06/2013 - 16:00
I love those turned legs!
I love those turned legs! They look so nice, I think this is one time I would say that I prefer my legs chunky!
In reply to I love those turned legs! by birdsandsoap
Daisies and Crazies
Tue, 05/07/2013 - 08:40
Haha! Agreed.
Haha! Agreed.
dakotatransplant
Mon, 05/06/2013 - 16:13
This is tough! Every time you
This is tough! Every time you post a new table, I want it! I just finished belt sanding my tabletop (made with 2 2x12s and 2 2x10s and 2x8s for the breadboard ends), with the intention of make the table legs from The Handbuilt Home. But I'm realizing maybe I'm not coordinated enough to get my faux 4x4 legs straight. I started them over a month ago (then got busy with basement finishing), and two halves are sitting around looking wonky. This looks a million times easier and I think the really chippy finish on the legs is selling me. Wonder how a bench with straight legs will look with a turned leg table...? Those chairs look great with them? Where did she get them? Would love to see a close up of your finished top! :) hint hint.
LTaylor
Thu, 03/12/2015 - 09:55
Bench Legs
Hey! Just wanted to let you know that Osborne Wood Products (maker of the table legs for this design) just released a matching Bench Leg! That may be a great help for a project like this.
http://www.osbornewood.com/1329.aspx
Hope that helps! Happy Building!
Daisies and Crazies
Tue, 05/07/2013 - 08:40
She's got legs
I cannot tell you how much I love this piece. I could marry those chunky turned legs. Gorgeous. xo
dragonkatt
Wed, 05/08/2013 - 08:13
Love those chairs
Love this table! Those chairs are exactly what Ive been looking for. Did she make them or buy them?
skseibel
Mon, 05/20/2013 - 11:39
type of wood for top
Love your site and all the different projects. My Honey-do list just multiplied!
I was just curious what type of wood you used for the top of this table? I really like the 'beefier' look of the 2inch but can't find any good 2inch lumber at any of my local stores. Everything they have poplar, oak, pine, etc is 1inch. The only thing I can find anywhere that is 2 inch is the framing douglas fir.
the only other thing I can think of is to use the 1 inch and trim it with 2 inch but still not going to be as bulky/strong.
thanks!
P.S. I also loved the silicone tip!!!!
jacsatduke
Sat, 06/01/2013 - 19:55
chairs
Love, Love, Love this table! Just wondering where you got your chairs from? And then did you just stain them the same as the table top? Thanks!
jacsatduke
Sat, 06/01/2013 - 19:55
chairs
Love, Love, Love this table! Just wondering where you got your chairs from? And then did you just stain them the same as the table top? Thanks!
MinionMaster4
Mon, 07/22/2013 - 15:22
Help!
I made this table and Kreg jigged the planks together for the table top. I got boards that were as straight as possible (I thought). Now one corner of the top is pulling up so much that the leg is about 2 inches off the ground! Could I run a plank crossways underneath and countersink screws along it to pull it down so it's level? Other ideas??
Jennabot
Sun, 05/24/2015 - 16:15
I'm having this same problem.
I'm having this same problem. How did you solve this issue?
Thanks,
Jenna
Gladysbaby
Thu, 09/12/2013 - 05:42
Wish I had known!
I bought a table at a junk shop 13 years ago exactly like yours except the top was a mess, the legs were loose, and it was 10 feet long. I thought it might have been used as a display table in a department store since the junk shop had lots of items from store displays. I hired a guy to fix the legs and he took FOREVER and he really messed up my top. I used it for 12 years in my dining room and then had my son sand it down completely. I used Sickens sealer and it now is used on my covered porch.
miss_kristi_lynn
Wed, 10/09/2013 - 17:33
This is AMAZING!!
This is next up on my to do list. I am in love!
cryjr1
Sat, 10/19/2013 - 06:31
wood type
Love the table!! Like others, I was wondering the wood typed used for the table. Also, how did your sisters table hold up with her kids? THANKS!
Tinyscrafts
Wed, 11/27/2013 - 08:59
Silicone didn't work with polycrylic!
I followed the instructions and siliconed the cracks. I'm so sad, it looked great before. Then I put polycrylic over it. It didn't stick to it right and the crappy GE silicone (check reviews) didn't dry. It also wasn't clear like it said it would be. What a mess! I'm now picking/smooshing/ rolling it out and re sanding. OMG! Was I supposed to silicone after the poly??
Don't use GE silicone!!
ugafan
Thu, 11/28/2013 - 19:06
wood used and dimension help to seat 8!?
LOVE LOVE this table!!! I have been looking for a table like this for a while without success. What type of wood is used for the top? Also, do you have the dimensions to change this table from seating 6 to 8? Can't wait to make this table!!!
Laura35
Mon, 01/13/2014 - 00:50
Wood suggestions
Hello, I'm having a hard time finding the 2x4 and 2x6 in the nicer types of lumber. I've been only finding the 1x4 and 1x6. Is it ok to use the 1" rather than the 2"? Also, what type of wood do you recommend using?
tnkrise2
Sun, 01/26/2014 - 16:56
Love it
This table is great! I posted pics of mine in the brag section under DIY farmhouse table
jcafarchio
Tue, 02/18/2014 - 06:26
Chairs??
Absolutely love this whole dining area and trying to replicate. Where did you get the chairs? I found similar ones on Wayfair.com but they don't look quite the same. Thanks!
KMister14
Thu, 02/20/2014 - 13:43
Detachable Table Top?
I LOVE this table! I already found perfect legs and i've been dying to make this. I was wondering if there was a way to make the table top and frame as a whole detachable from the legs. I ask because we plan on moving and i just feel like it is a really big piece to move, and would be much easier if I were able to seperate the top from the legs. Thank you!
Cheralees
Fri, 05/02/2014 - 05:44
Altering the length
I. Am. In. Love. We are making this table with a black walnut top, and I had a question about making it longer. We need to seat 8 and had a local mill create a black walnut top for us that is 84" long. We chose less-chunky legs from Osborne because our chairs have a mission leg (http://www.osbornewood.com/1119.cfm), but my question is: Because our legs are not as low and as thick as the 29"x5" chunky leg, would we need an additional 5th leg in the middle? Osborne suggests a fifth leg for anything longer than 6' lengths, but the lower center of gravity and 5" base for each of the husky legs would be more than enough for an additional foot in length. I suppose I am already convinced I need an additional leg, but I wanted to hear from someone else. Thoughts?
Cheralees
Fri, 05/02/2014 - 05:59
Oops
Oops
Cheralees
Fri, 05/02/2014 - 05:58
Sorry
iPad+new member= multiple posts
Allens1108
Wed, 05/21/2014 - 20:05
Detachable legs??
We are a military family so we move every few years. Is there a way to make the legs detachable? Also, what wood type do you suggest to use for the legs and what do you not suggest. We don't want to spend too much $$ but want it sturdy still. Thanks!
mmacedonia
Wed, 07/16/2014 - 16:28
silicone
Hello! Could you please explain the silicone process to fill in the gaps between boards? What brand did you use? We are very worried about spaces trapping crumbs. Thanks!
Scutler
Tue, 07/22/2014 - 05:40
How do you suggest finishing
How do you suggest finishing the edges if using tongue and groove for the top?
dfally
Sun, 10/26/2014 - 17:15
Wood
My wife and I love this table! I'm going to buy the wood next weekend, but I'm not sure what type works / looks best. Suggestions?
Jasmin10
Sun, 12/21/2014 - 13:29
RUG
I would love to know where you got the rug? Been looking for one like this for a long time! Building this table this week!!! Gonna be our Xmas present :)
In reply to RUG by Jasmin10
Ana White
Mon, 12/22/2014 - 11:45
Take a look herehttp://www
Take a look here
http://www.potterybarnkids.com/products/185215/?catalogId=73&sku=185215…
celinaaa
Tue, 01/20/2015 - 01:59
distressed look
Where is the tutorial for the distressed "old world finish" look??
Ana White Admin
Tue, 01/20/2015 - 11:24
Finish
http://ana-white.com/2013/05/old-world-chippy-distressed-paint-finish
Rjcross
Mon, 02/16/2015 - 11:58
PLEASE SHARE THE SILICONE INFO
Please share how and what type/brand silicone was used to fill the gaps! Been searching everywhere and still can't find anything! Thank you!
jleigh333
Wed, 03/11/2015 - 13:18
Next project!!!!
I absolutely LOVE this table! I just ordered the legs and can't wait to get started! I will use your tutorial for the old-world paint too. It adds the perfect touch. Beautiful!
Gigi.
Thu, 03/26/2015 - 08:34
Wooden Legs
How did you get the legs for $50? The website lists options from $100 and up depending on the wood.
ChelseaBatch25
Sat, 08/22/2015 - 15:24
Stain Color
What is the stain used for this table top? I'm refinishing a table and this is the exact color I want! It's gorgeous!
In reply to Stain Color by ChelseaBatch25
Ana White
Mon, 08/24/2015 - 11:00
http://ana-white.com/2013/05
http://ana-white.com/2013/05/staining-and-finishing-tabletops take a look
at this post
ChelseaBatch25
Sat, 08/22/2015 - 15:25
Stain Color
What is the stain used for this table top? I'm refinishing a table and this is the exact color I want! It's gorgeous!
michaelramsgate
Sun, 09/20/2015 - 12:24
Whats the trick for finding straight boards
I've been to 3 different locations of Home Depot and Lowes, and all the 2x6 are crooked. Is there a trick for finding straight pieces of wood?
ayork2
Tue, 10/06/2015 - 12:14
Charis
Where are the chairs from? My wife loves this table and chair setup and I hae looked everywhere and cannot seem to find these exact chairs. All of the chairs I find have the bars across the legs.
avaldezhuizar
Wed, 12/30/2015 - 15:33
Ana - What is the best wood
Ana - What is the best wood to use for a table?
jackpax
Mon, 01/18/2016 - 07:00
1X6's?
Is there any downside to using 1X6s for the tabletop instead of 2X6s? I'm in an apartment and I'm already thinking about how heavy the table will be when I move again.
Jlehman84
Tue, 01/26/2016 - 10:19
Finish on tabletop
Hi! Big fan of your stuff. What did you use to finish the tabletop? I dont see a mention in your notes of stain or finish. Thanks!
Ana White Admin
Wed, 01/27/2016 - 14:04
Top
http://www.ana-white.com/2013/05/staining-and-finishing-tabletops
Ana White Admin
Wed, 01/27/2016 - 14:05
Top
http://www.ana-white.com/2013/05/staining-and-finishing-tabletops
Snibley
Wed, 01/27/2016 - 07:24
stain
I would also like to know what type of Stain was used, it's pretty much exactly what Im looking for on my project, is that a Satin poly on it as well?