
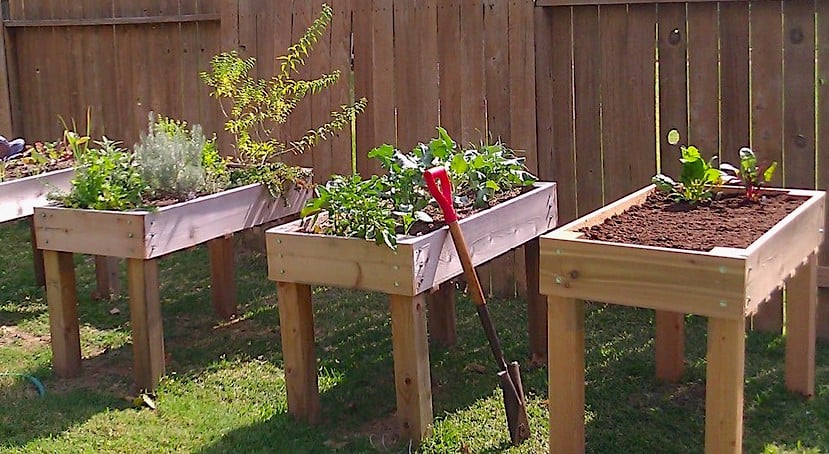

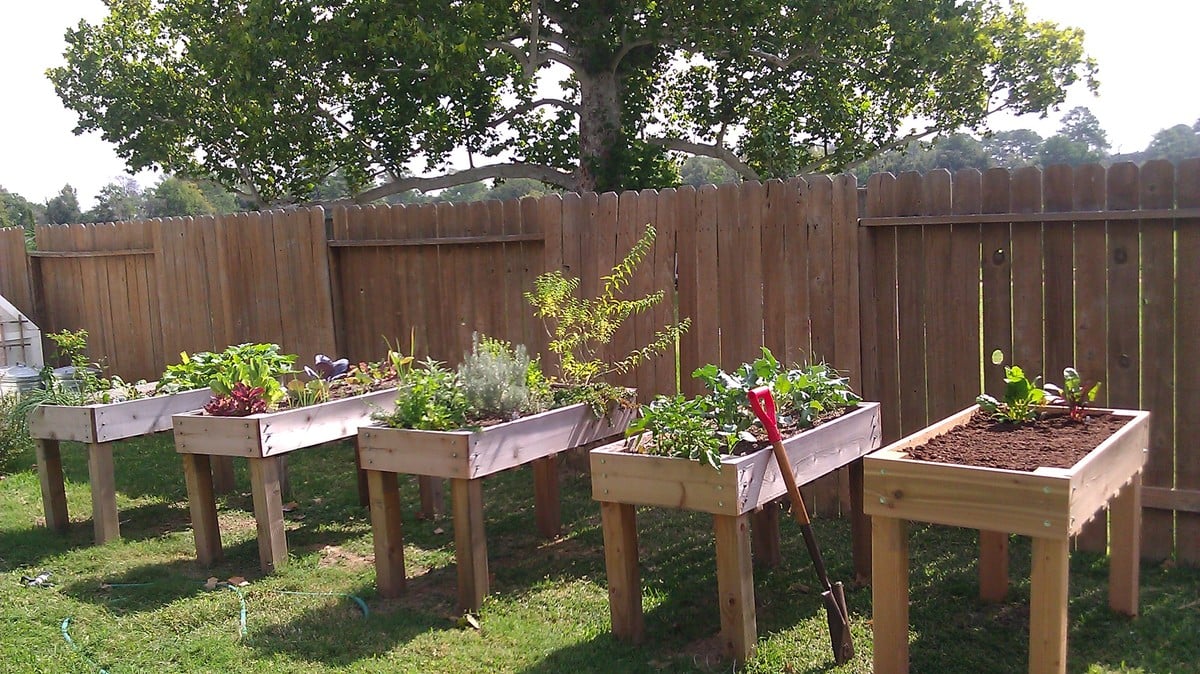
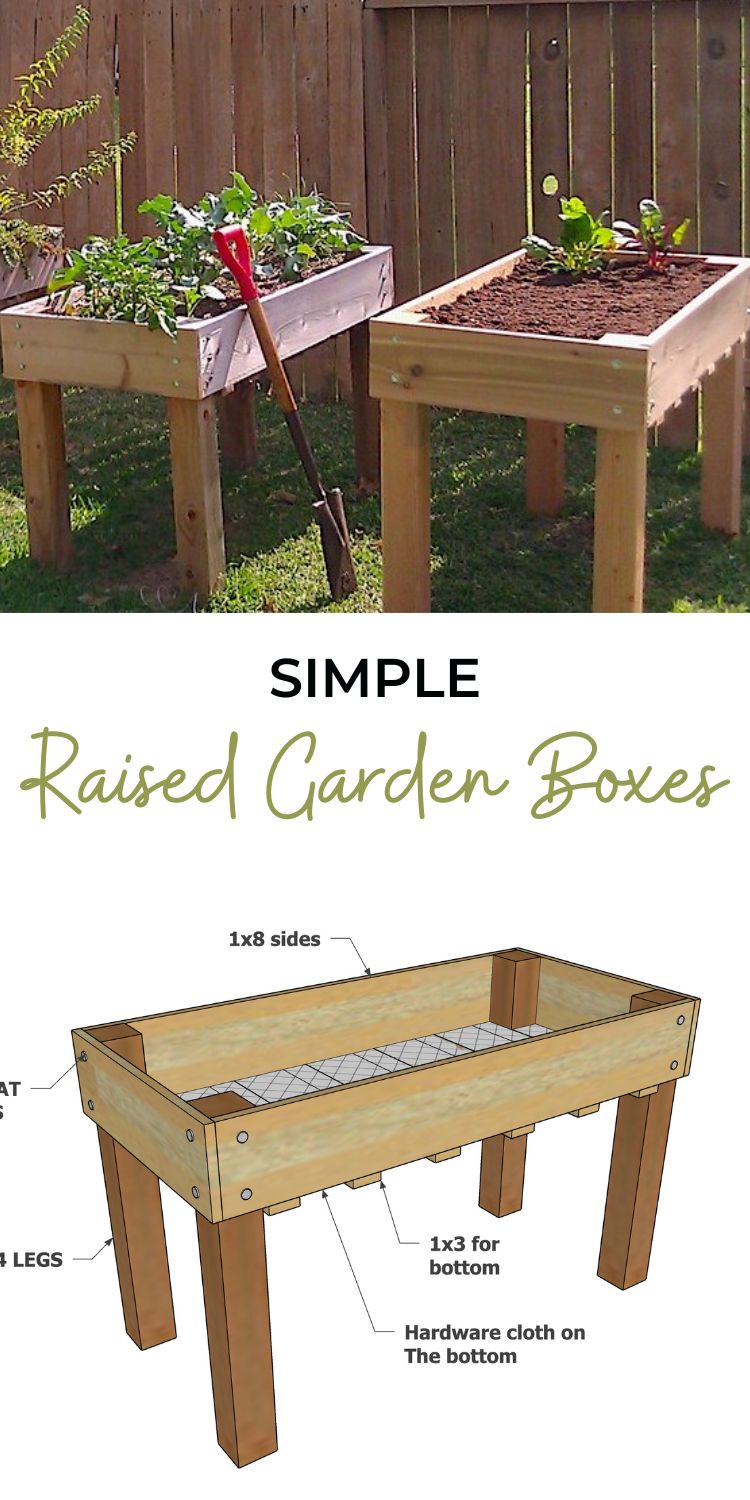
These raised Garden boxes are easy to build and great for those of us that just can't get down on the ground any longer. These would make a wonderful present for your mother or grandmother. You can build three for nearly the price of one, I have 6 for myself and absolutely love them.
Do not us Treated Lumber. This will defeat the purpose of having a healthy garden and healthy vegetable. So don't skimp here.
You can follow my adventures at www.handywomanshop.blogspot.com
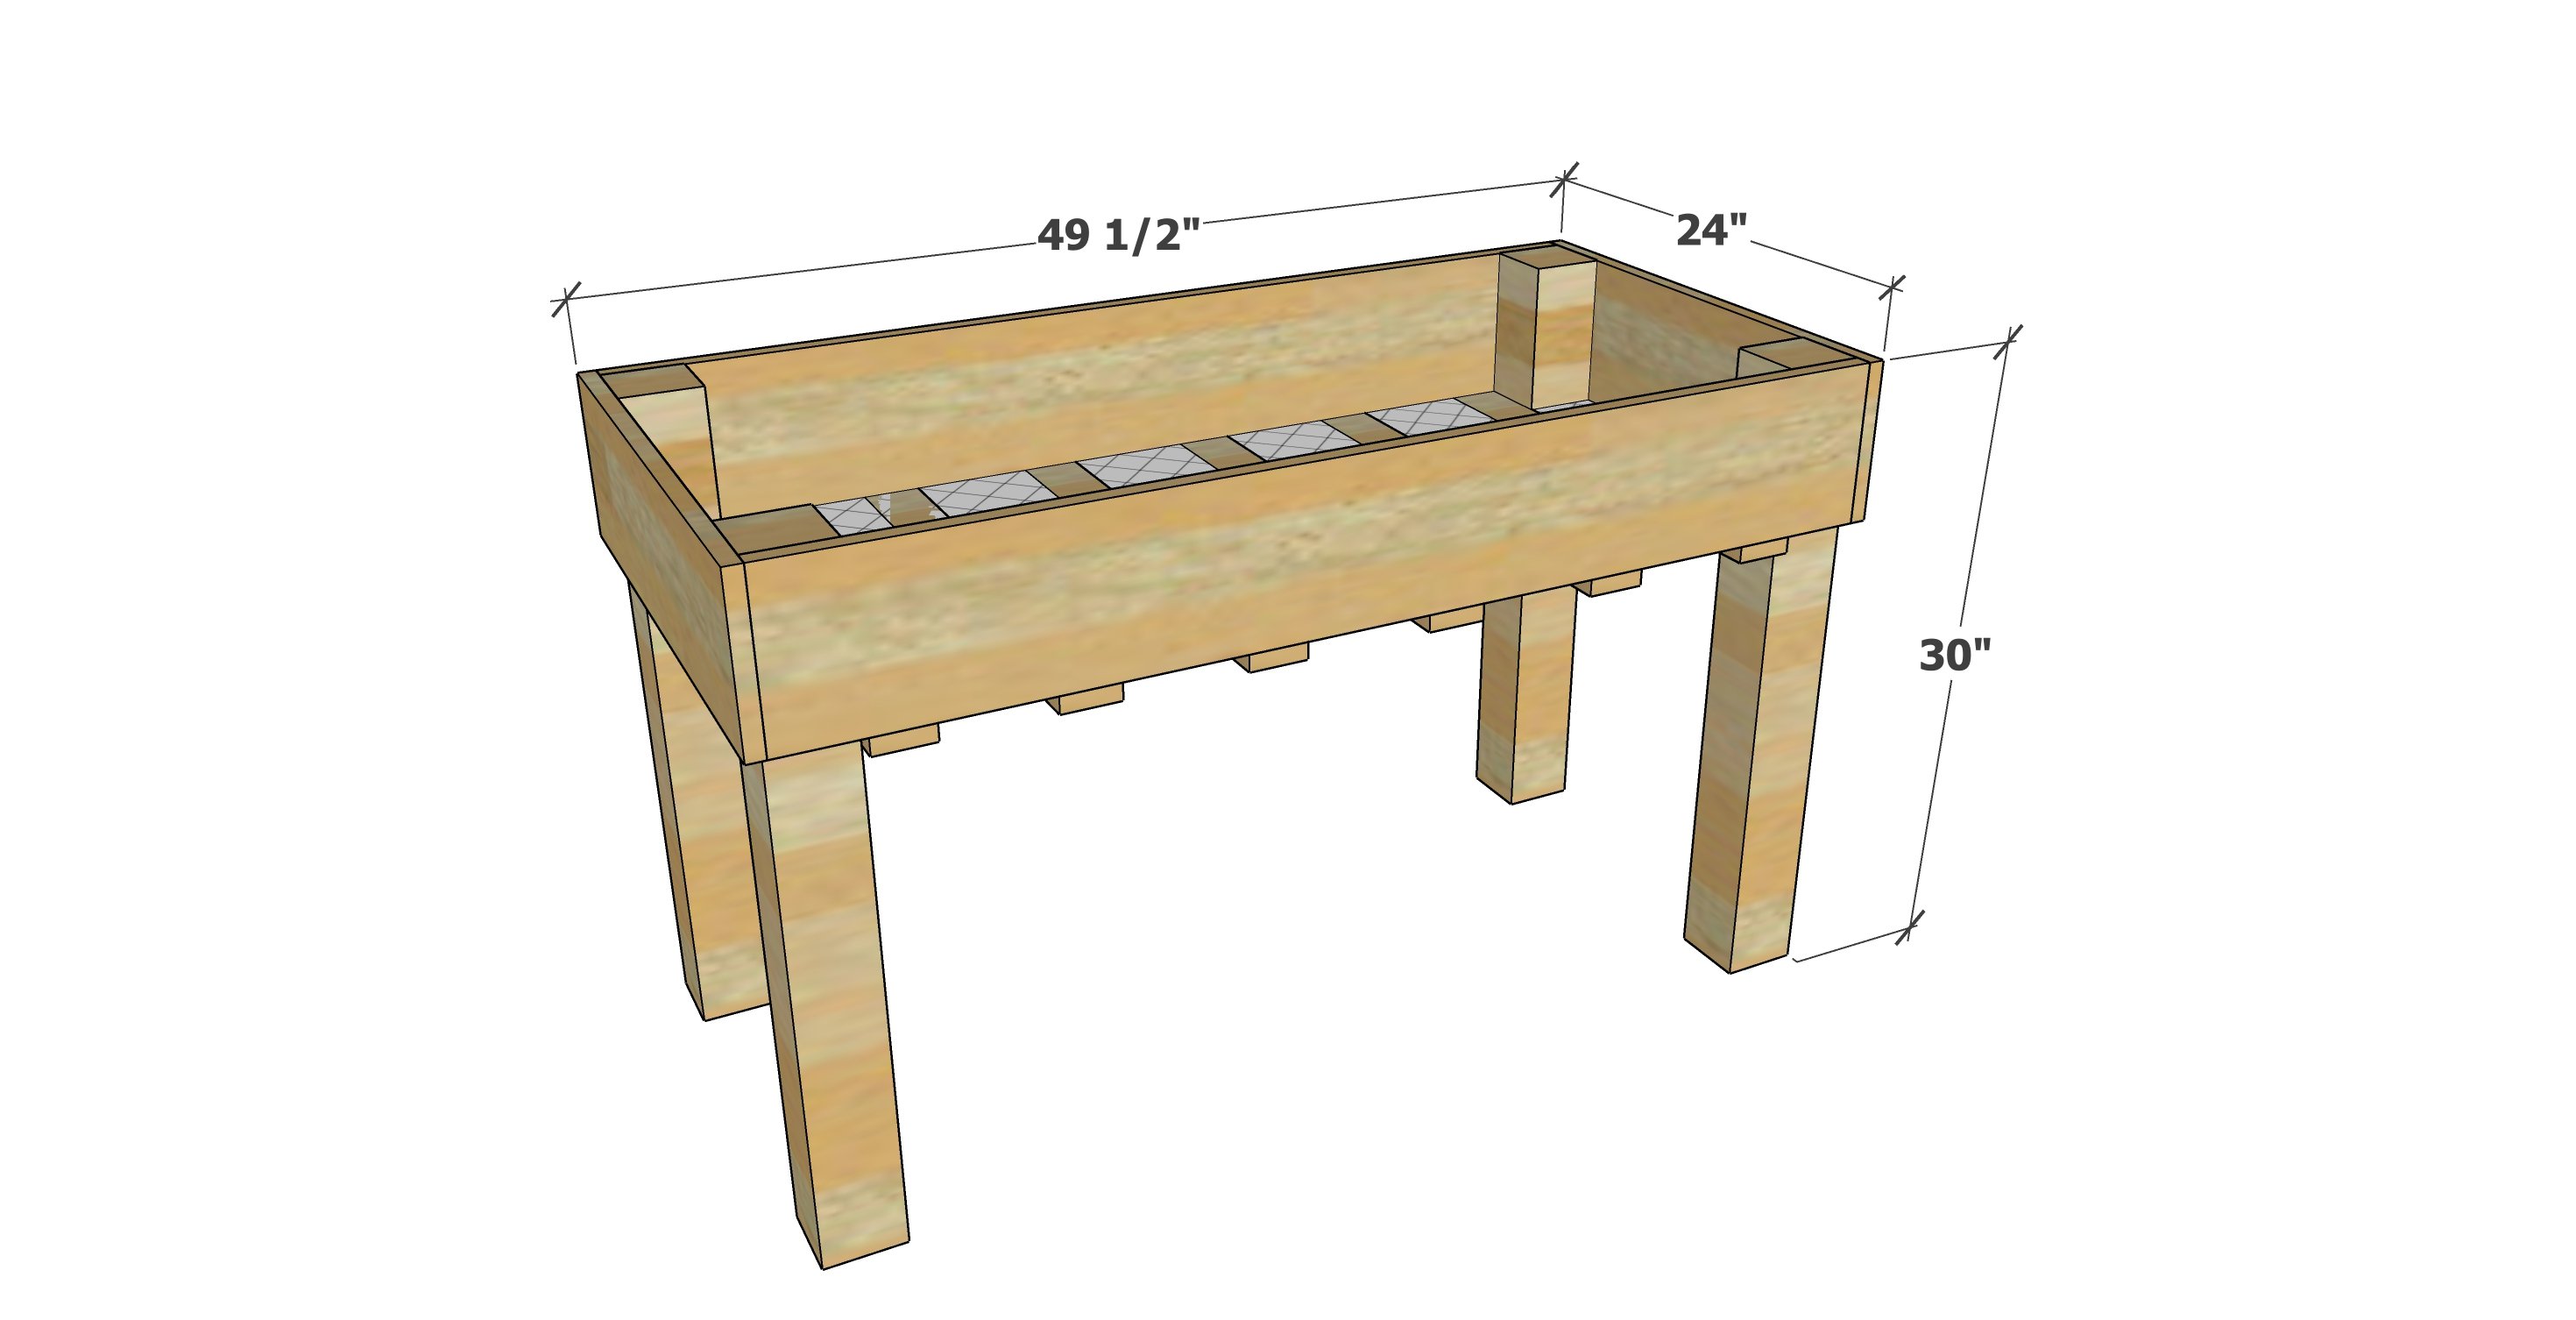
Counter Height Garden Box by Janet Fox
I was inspired to make this project because I love to garden but have neuropathy in my extremities making it very difficult to get off the ground once there. I have made myself 6 of these and am so pleased that I thought I'd share the pattern. Perfect cuts are unnecessary as long as you are within 1/4 inch you will be okay.
Pin For Later!
Preparation
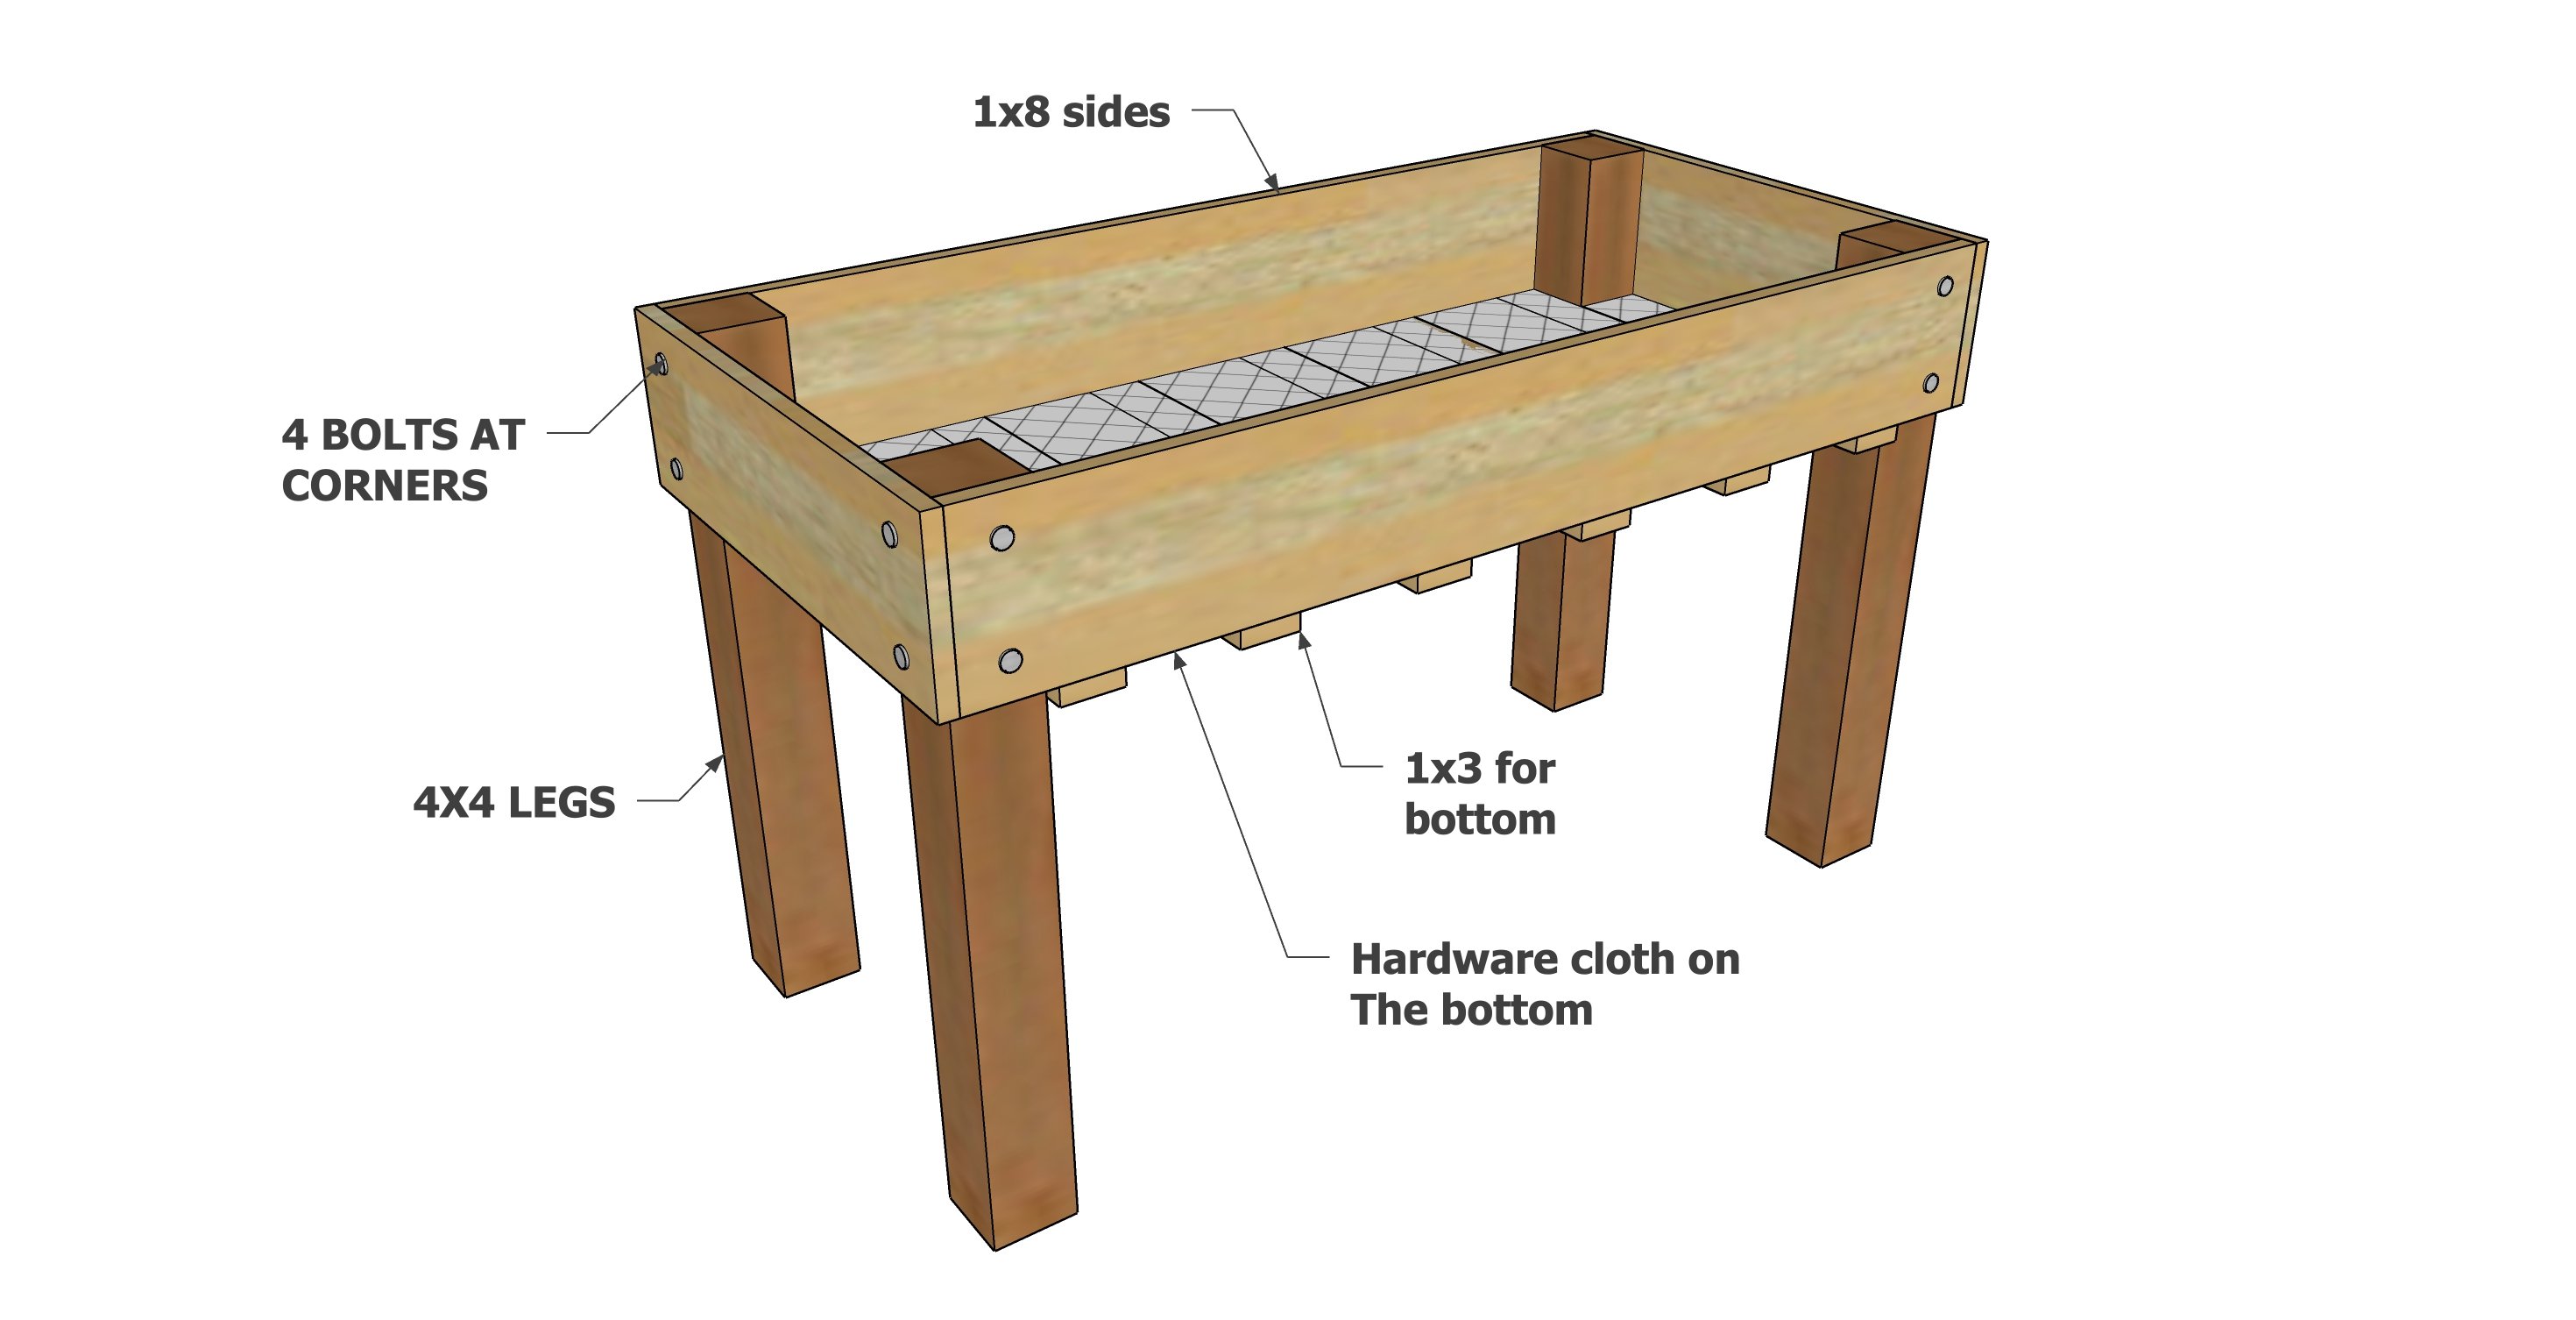
- 1 - 4x4 @ 10 feet long - fir or cedar post (fir is cheaper and lasts nearly as long)
- 1 - 1x8 @ 12 feet long - cedar boards
- 1 - 1x3 @ 12 feet long - cedar boards
- 1 - roll of 1/4" hardware cloth, 50x24" (make sure to get hardware cloth with 1/4" holes, 1/2 inch is too large and all your dirt will fall through)
- 16 - 2 inch 14-20 hex bolts
- 16 - washers
- 16 - Threaded inserts (http://www.grainger.com/Grainger/Hex-Drive-Threaded-Insert-4ZU78)
- 12 - 1 1/2 inch exterior self tapping star bit wood screws
- 4 - 4x4 @ 30" long (legs)
- 2 - 1x8 @ 48" long (sides
- 2 - 1x8 @ 24" long (ends)
- 6 - 1x3 @ 24" long (slats)
- Bottom hardware cloth: cut the hardware cloth into a 24x50 inch rectangle.
NOTE: The shopping list is exactly enough wood for the project. If you need to cut your boards 1/8" shorter to allow for the saw blade width (kerf) it will all work out, but the cuts do need to match - i.e. all side boards cut at 47-7/8"
Counter Height Garden Boxes by Janet Fox


Please read through the entire plan and all comments before beginning this project. It is also advisable to review the Getting Started Section. Take all necessary precautions to build safely and smartly. Work on a clean level surface, free of imperfections or debris. Always use straight boards. Check for square after each step. Always predrill holes before attaching with screws. Use glue with finish nails for a stronger hold. Wipe excess glue off bare wood for stained projects, as dried glue will not take stain. Be safe, have fun, and ask for help if you need it. Good luck!
Instructions
Step 1
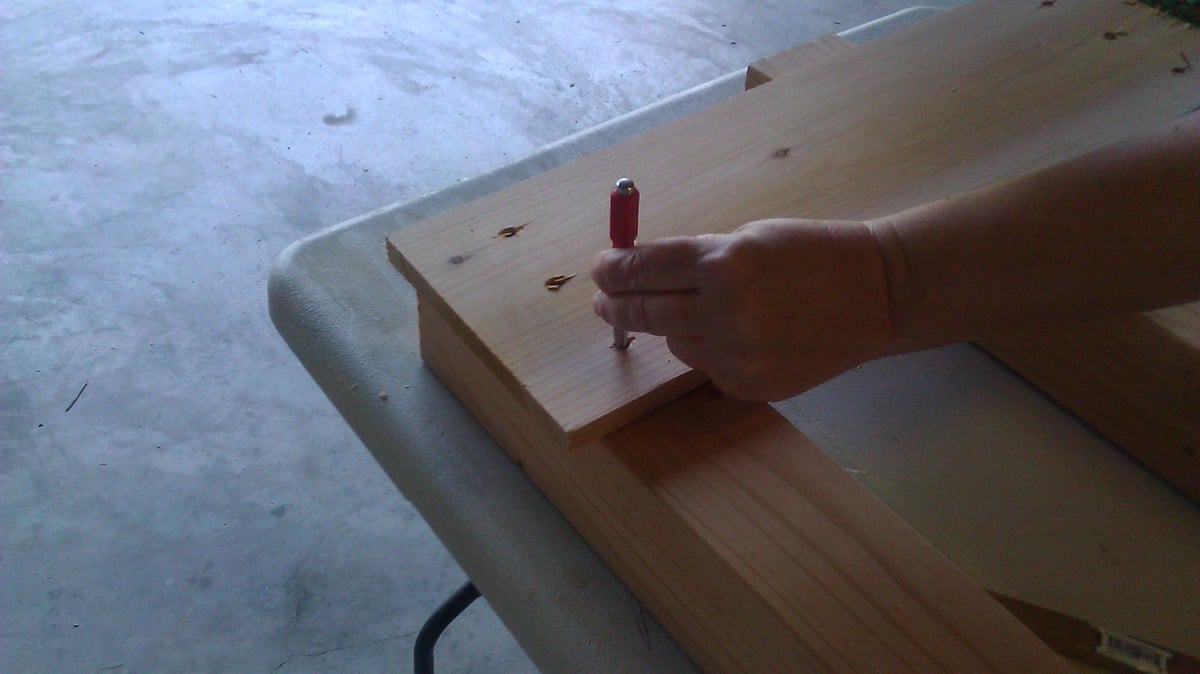
the picture above is just so you can see me marking the 4x4 legs. I actually mark them in the standing position. update: I cut all pieces out and assembled the bed using one or two pin nails on each side of the leg to hold together...I then used a hand drill to drill the three or two holes(which ever you decide on) onto each side piece only going through the the side piece and only marking the legs. The leg holes really need to be drilled as straight as possible and at the depth you need for your bolts. I used a drill press to make sure of the depth and that the holes are very straight to except the thread inserts. You can read the bit below for other info but I would definitely use the hand drill for marking the legs. Drill your three holes in the 1x8 pieces then place them against the 4x4 pieces in the location they need to be(I set up all the pieces and number the legs and the boards and draw arrow for the top on the boards for later reference then using one pin nail on each side to hold it all together I mark where the holes will go on the legs) and using a center punch hammer into each hole marking the 4x4 so you can drill the corresponding holes. I used all 1/4-20 screws and I used E-Z LOK threaded inserts instead of drilling all the way through the 4x4. I made sure that I drilled the hole deep enough in the 4x4 so that when I inserted the thread and bolted the sides on I would be able to screw them on tight.
Step 2
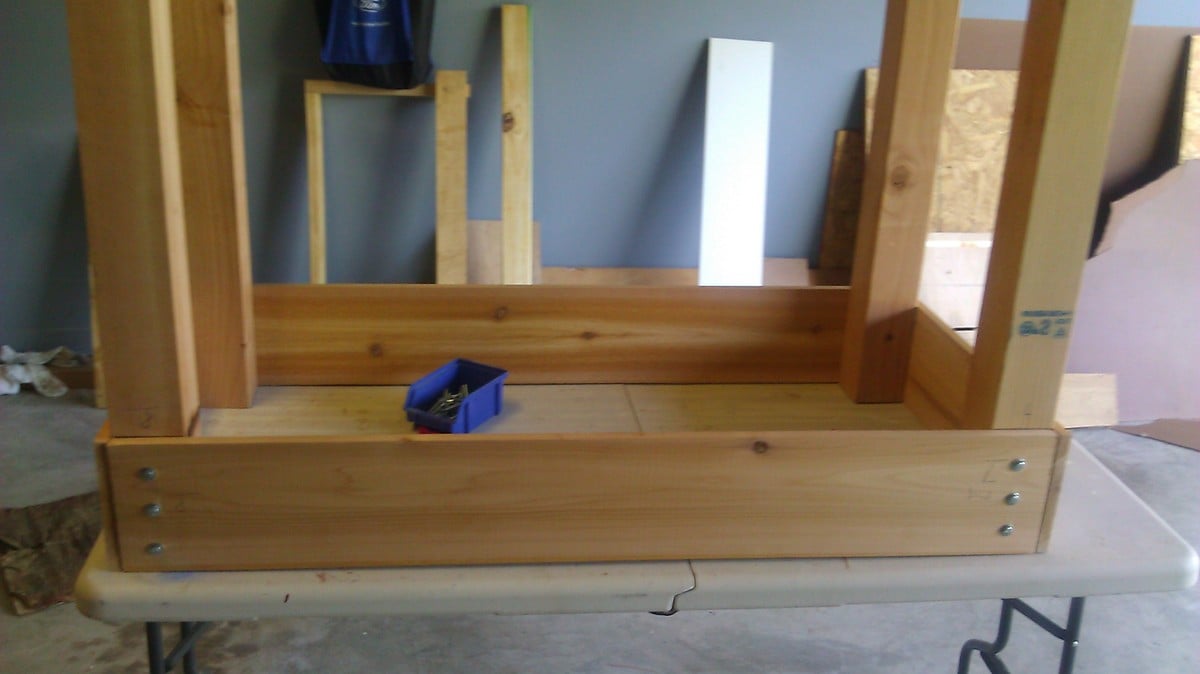
He is an image of the planter upside down with the 1x8 bolted into place
Step 3
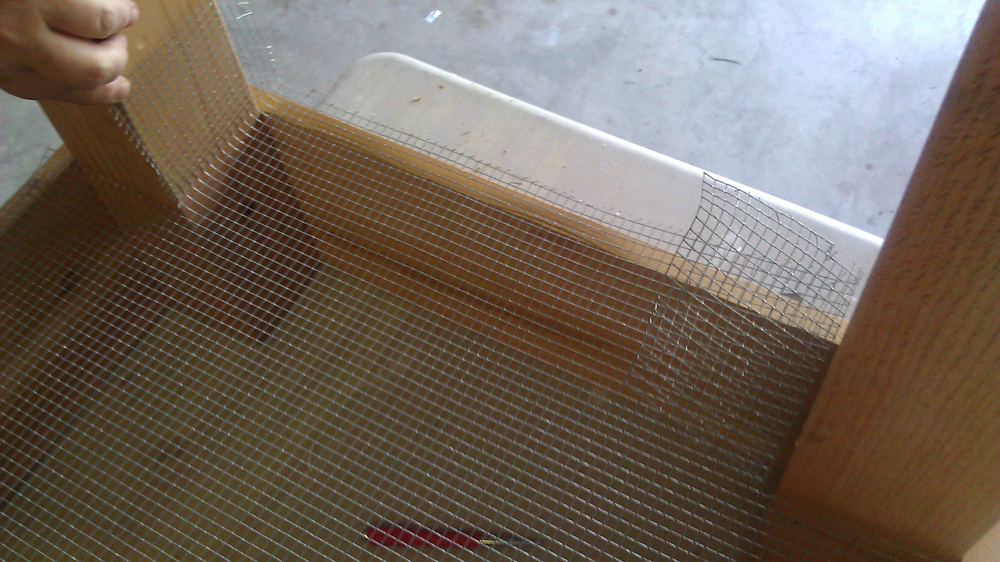
Attaching the hardware cloth. I made sure that when the planter was together that it was no more then 24 inch wide this way the hardware cloth would fit the width without me having to sew together or cutting down the width. I only had to cut the length because I purchase hardware wire that was 24 inches wide by 25 feet long. I can make 6 planters with this one roll of hardware wire.
Step 4
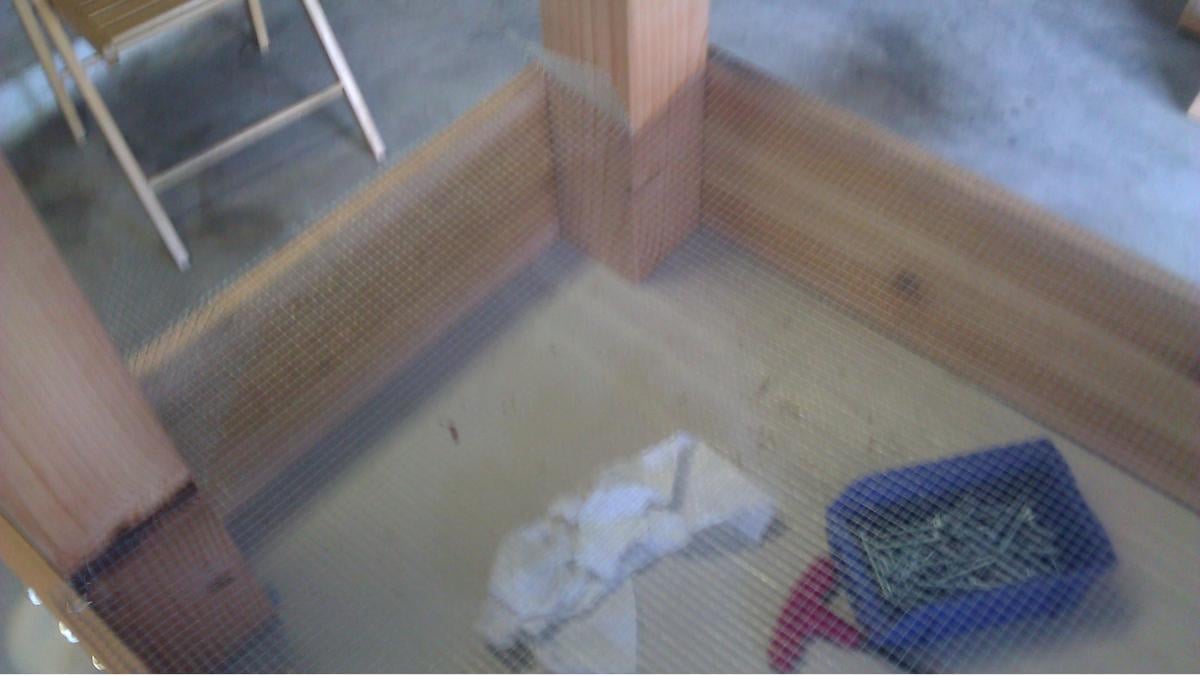
close up of how staple the hardware cloth around the legs.
Step 5
Step 6
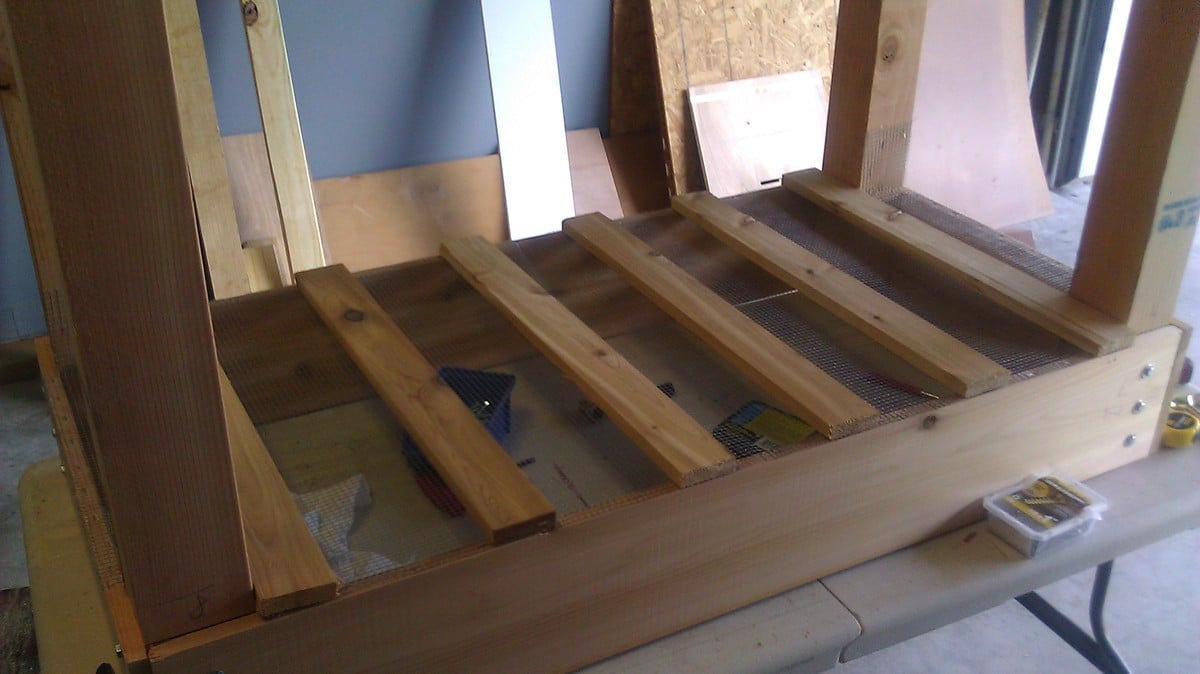
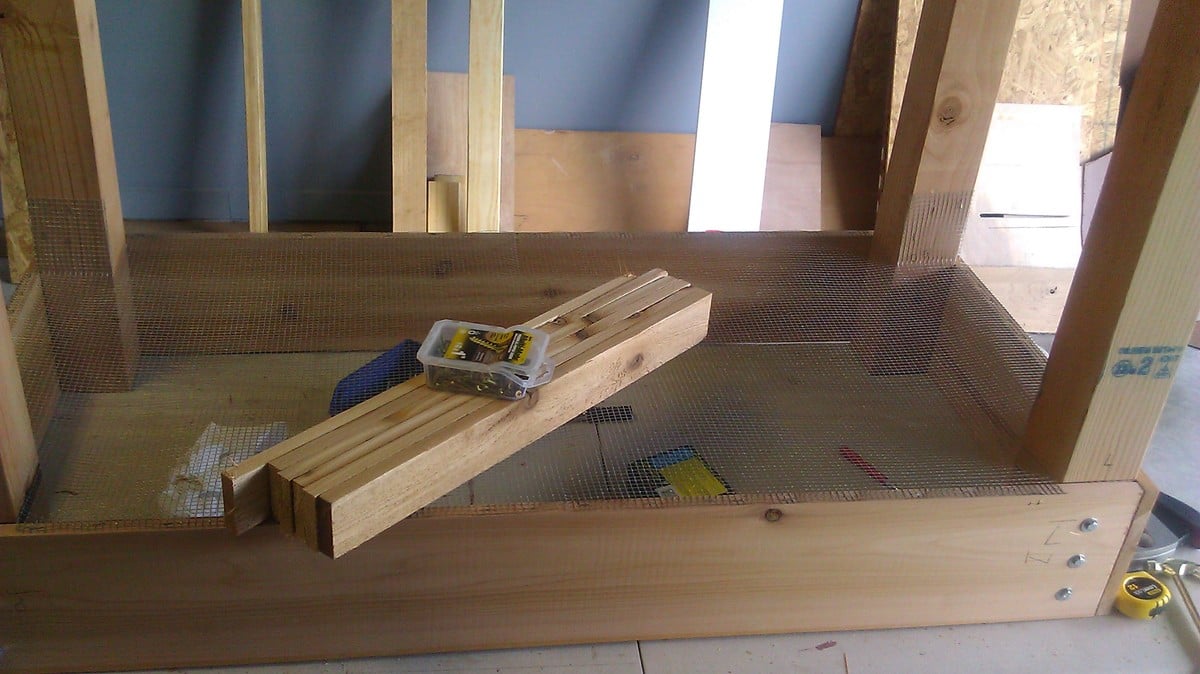
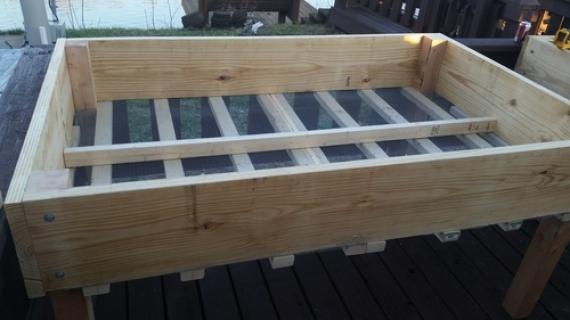
placing the slats equal distances apart and screwing into the bottom using two screws in each end of each slat.
Step 7
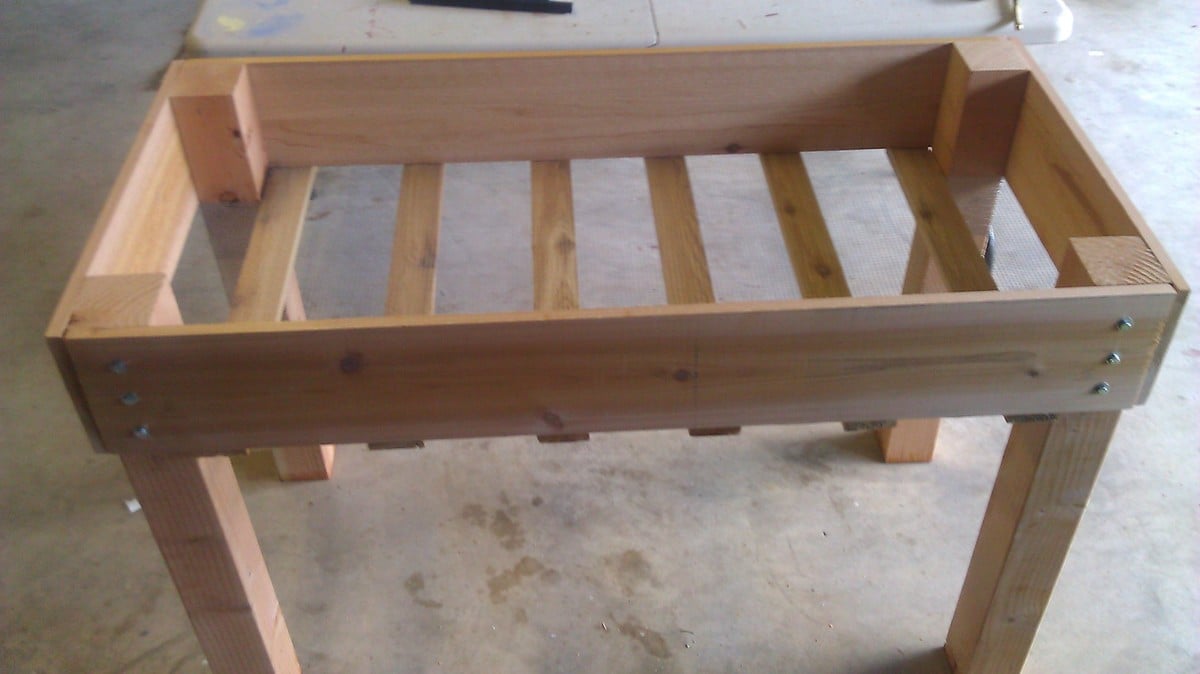
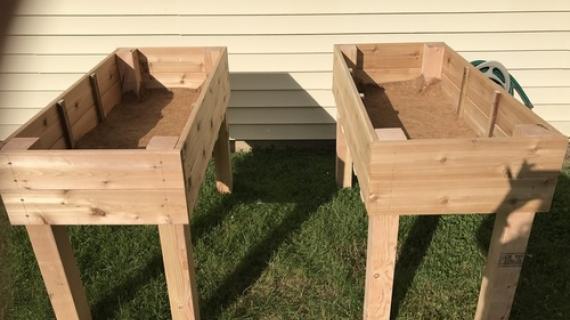
The planter turned right side up
Step 8

another close up
Step 9
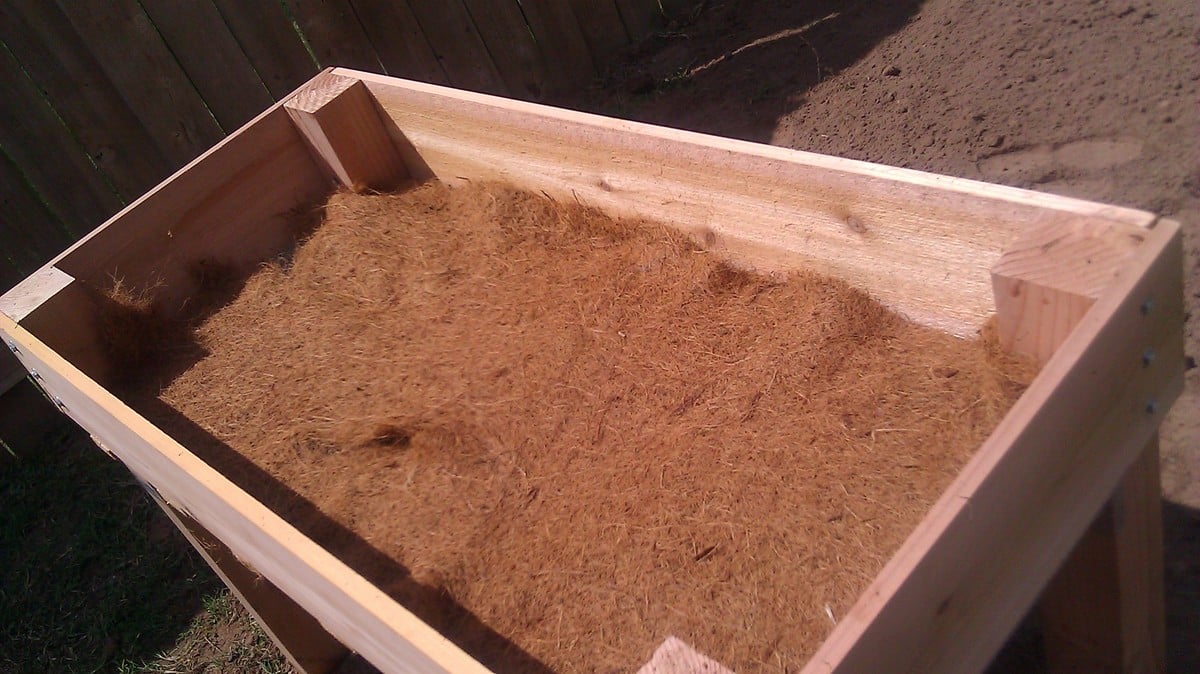
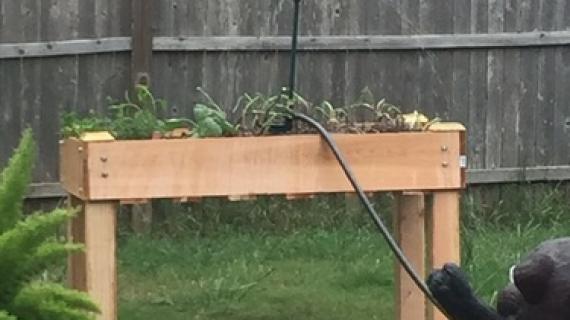
used coconut cloth in the bottom however you could use newspaper, compost or anything that isn't harmful to the soil and your plants to keep the dirt in.
Step 10

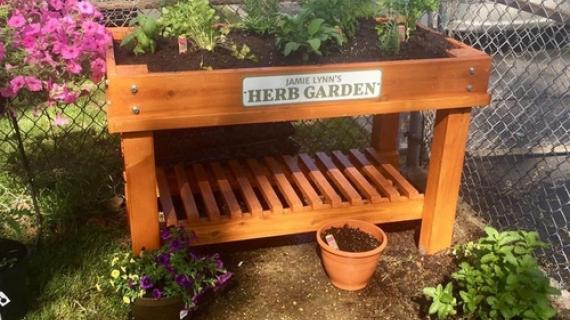
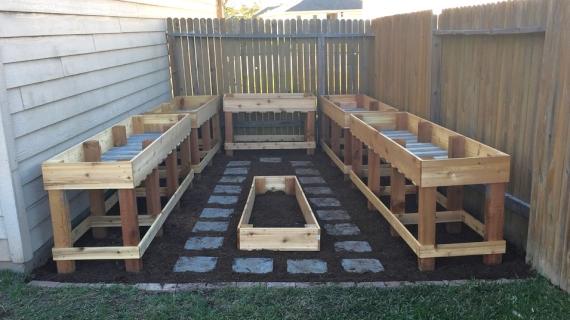
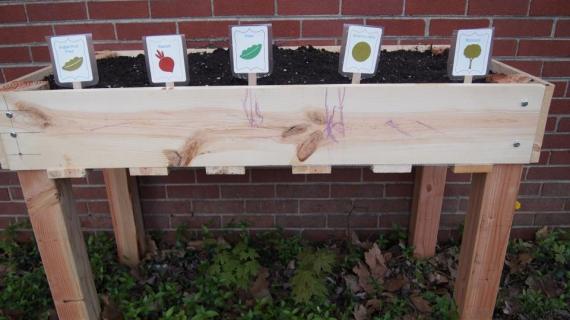
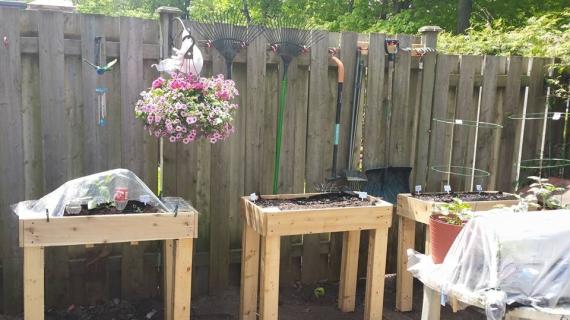
And this is how my garden grows.


Comments
Anonymous Coward (not verified)
Thu, 11/29/2012 - 06:16
Substitute for hardware cloth
If you use the wider cloth sold as weed control for under mulches you can make wider beds. It also holds dirt in better than hardware cloth.
With these beds, you really HAVE TO have a good watering system and use potting soil mix that holds water, because they are shallow and exposed top and bottom.
In reply to Substitute for hardware cloth by Anonymous Coward (not verified)
Janettx
Thu, 11/29/2012 - 06:27
hardware cloth
Making these larger would probably not be a good idea...the dirt is very heavy and the boxes will not last as long. You would somehow have to add more legs to hold all the dirt. So bigger isn't better. Hardware cloth is the best solution because it is galvanized and will last as long as the cedar will last. weed control cloth is not strong enough to support the dirt and will only last a couple years. Use hardware cloth...if you did want to make bigger it comes in all different widths and sizes. I have 6 of these and have make about 10 for other people. Mine are holding up wonderfully and I do not have any watering system. Good drainage is best with beds...so I am getting a wonderful abundance of vegetables directly related to the fact these have great drainage and the plants are not sitting in water after a good rain. I'm sorry but with all due respect I do not suggest any change in size or the hardware cloth. I have lost no dirt at all....on the last garden I didn't even use compost as a first layer, I just added garden soil and lost very little when installed. The soil compacts it's self. These are wonderful gardens for elderly people.
Tiggergramma
Mon, 04/27/2020 - 11:30
I don't agree that making…
I don't agree that making these larger is not a good idea. I have made 8 of these beds (6 for our local elementary school garden and 2 as gifts) that are 8' x 4' and they are holding up very well, even out here at the coast. I make mine with 6 legs, 32" tall, so it takes more slats and more bolts, hardware cloth and screws, but having the larger size makes gardening a breeze for folks of all ages and abilities. These generally take me 2 hours to make, once all my cuts are made. Since the cuts are mostly cutting 8' lengths in half, that part goes pretty quickly as well. The legs take the longest, but this is a great, simple plan for a few hours work that will last several years. I did change one thing on the original, besides the size: I do not put the bolt guides in, that was a disaster my first time out. I just drill and bolt the legs on. With those large bolts, the guides really aren't necessary.
Carmxo (not verified)
Fri, 11/30/2012 - 09:36
Awesome Thx! Great winter project.
Thx for the plans! I've been planning to create something similar once we've settled into our new place. I suspect the soil here is fairly heavily contaminated from pesticide use so raised beds with controlled soil is definitely the way to go. Also this avoids hungry bunnies and other critters too :-).
I had considered using tote-type bins in similar stands but I love your hardware cloth idea. Do you cover them in the winter to preserve the soil? Have you had any problems with high winds? These are things I've been wondering about as I plan.
Thx again and I'll post again when I've built some - definitely before spring!
In reply to Awesome Thx! Great winter project. by Carmxo (not verified)
Janettx
Fri, 11/30/2012 - 20:07
Covering for the winter
I only cover mine when I do not have anything growing, I cover with black trash bags opened up and tucked down the sides, a bit like you would water bed sheets. I do this so weeds do not grow in my beds. Because of the weight of the soil I have not had any problems with wind knocking them over. These things are really sturdy with those 4x4 legs. I absolutely love mine and will be making more...I'm getting more vegetables than I ever have in any other garden box. Good luck. I will tell you that it cost me about the same to make 3 as it did to make one. I made sure to buy the hardware cloth large enough for three this made it cheaper. You can get 3 legs from one 4x4 post so if you buy 4 posts you have 12 legs.
In reply to Awesome Thx! Great winter project. by Carmxo (not verified)
Janettx
Fri, 11/30/2012 - 11:05
cutting the hardware cloth
I found some really heavy duty scissors to cut the hardware cloth, this was so much faster than wire cutters....I got some great ones at home depot for about $14.99.
In reply to Awesome Thx! Great winter project. by Carmxo (not verified)
Janettx
Mon, 09/20/2021 - 13:31
Yes, when I'm not using them…
Yes, when I'm not using them I cover them with black garbage bags so that weeds don't develop :)
Debbie Mmm (not verified)
Tue, 01/22/2013 - 06:20
How many of these boxes can
How many of these boxes can be made with the materials listed? Thanks!
In reply to How many of these boxes can by Debbie Mmm (not verified)
Janettx
Mon, 02/25/2013 - 15:56
How many will these supplies make
These supplies only make one. However you will end up with 3 extra legs. It is more economical to make 3 because you only need 4 - 4x4 cedar/fir post and these are the most expensive supply. increase all the other supplies by 3 and only purchase 4 posts.
trisharjackson
Sun, 04/10/2016 - 13:42
How long were your original 4x4s?
My husband and I are trying to make these. We could only find 4x4x8s which wouldn't leave us with 4 extra legs. The instructions weren't clear on the length.
Richmond5411
Mon, 02/25/2013 - 12:48
post material
Cedar and fir are really not widely available here in the mid Atlantic. What else should I look to use?
In reply to post material by Richmond5411
Janettx
Fri, 05/31/2013 - 04:34
types of wood
There is a new product out there called TimberSil, I haven't seen it but it might be available there. You want to stay away from treated lumber unless you can find something treated in an eco friendly manor. You can use pine but for garden sides I would use 2 inch thick material. It will not last as long as one made using cedar or fir but it might give you a few years. Or you could use what you can find then line the whole garden with something so that the wood chemicals are not seeping into your soil.
widget43
Wed, 03/27/2013 - 14:59
Watering
We live in the desert SW where we get hardly any rain. How would you recommend we water our counter height garden beds? We currently have a system running along the ground, not buried. Should we just raise these hoses to the height of the beds?
In reply to Watering by widget43
Janettx
Wed, 03/27/2013 - 15:55
watering
You could run a drip hose up one of the legs but I just go out and water everyday or every other day depending on the heat. I generally do it in the morning before work. It's a great way to use left over bath water if you're trying to conserve water. If you have a window near the tub use a siphon hose and just siphon the water into your gardens.
Sticks in the Mud
Wed, 04/03/2013 - 17:18
Threaded inserts
Hi! Great plans. We are going to make these this weekend. I was just curious as to why you used the threaded inserts vs. just screws. I have never used them so just wondering about the benefits.
Cheers.
In reply to Threaded inserts by Sticks in the Mud
Janettx
Wed, 04/03/2013 - 17:29
threaded inserts
First is because it is cheaper than purchasing long bolts and nuts, and then it was easier to drill holes the length of my 2 inch bolts versus drilling all the way through (takes a long drill bit) and also since most of the bolt is hidden I felt they would last longer. I did first start with the long bolts until I found these thread inserts. Your bolts and threads need to be 1/4-20's. Screws would be a poor option, since you are spending so much on cedar so that they will last for about 8 years screws tend to work their way out of wood and get stripped out eventually and with bolts you can just give a check up at the beginning of each year and tighten if necessary where screws will loose this ability after a few years. My gardens are a couple years old now and I've not had to tighten them yet. Grainger is the cheapest place to get these threads otherwise you pay for a pack of 8 and that's just not cheap. So if you can't order from Grainger I'd go with longer bolts 4" and use lock washers behind the nut and flat washer in front of the nut. Good luck! I hope you post a picture!
In reply to Threaded inserts by Sticks in the Mud
Janettx
Mon, 09/20/2021 - 13:33
screws will not last as long…
screws will not last as long. You could drill all the way through and use longer lag bolts and guide the bolts from the inside to the outside so the nuts are on the outside. You do need to tighten the bolts every now and again.
Mama2Three
Fri, 04/05/2013 - 08:58
wood question
Are you using 1x6 boards? Or 1x8 boards. Both the shopping & cut lists say 1x6, but the directions list 1x8. Also, have you thought about adding wheels? We have limited yard space, it would be very helpful to be able to move these into storage during the off season.
In reply to wood question by Mama2Three
Janettx
Fri, 05/31/2013 - 04:38
board sizes
Sorry to be confusing. The beds can be with 1x8's or 1x12's and even 1x6's. I have both 1x12 deep and 1x8 deep. Wheels would be a good addition if your yard isn't too bumpy :)
You can get those furniture movers that have wheels on them cheaper than you can purchase the wheels. Harbor Freight has these on sale for 7.99 this week and they hold up to 250 lbs. if you have a harbor freight around. Good luck with your garden!
In reply to wood question by Mama2Three
Janettx
Mon, 09/20/2021 - 13:34
I've made them using both. …
I've made them using both. Depends on how deep you want your bed. I like the 1x6 for general planting and 1x8 for root veggies.
J Stasney
Mon, 04/15/2013 - 11:37
Dimensional Lumber and drip irrigation
Some tricks for pinching pennies on this lumber.
Treated lumber is easier had.
Decking lumber is cheaper and stronger than 1x's
Instead of 2 - 1x6x8 cedar boards,
I'd double the height to 12'' with 2 - $7.37 WeatherShield 5/4 x 6 x 12 Pressure-Treated Standard Decking Boards and
2- $4.37 WeatherShield 5/4 x 6 x 8 Pressure-Treated Standard Decking Board cut to 4' lengths.
The slats??
8' Treated Fencing pickets ripped in half and split in two. Yielding 4 slats per picket of $2.00 ea.--$0.50 a slat.
Caulking Wood glue is your friend, especially in the holes/seams to seal them.
It's a very workable idea....early spring/summer easily covered for late frosts and soiled warmed with black plastic garbage bags in full sun. Easily moved (when wheeled) to broken shaded areas in mid to late summer so crops don't burn up. No moles or gophers to deal with and easily mulched to be weedless. No back strain bending over crops dealing with them. A wading pool would make a good water storage for a small drip irrigation pump on a timer using 1/4" plastic tubing with holes poked in it eva 12 inches layed say 1 foot off the sides length ways down the box. That'd be 2 - 8 ft. pieces of tubing plugged at one end and a 2' piece tee'd in with an inlet piece from the pump. Tooless ''push connector fittings'' would make it really simple to hook up the tubing. That way you can add liquid fertilizer and water conditioners if needed for ph and chlorine. TEE's $1.60 ea. ELL's if needed $1.10 ea.
http://www.automationdirect.com/adc/Shopping/Catalog/Pneumatic_Componen…
http://www.automationdirect.com/adc/Shopping/Catalog/Pneumatic_Componen…
UT14 | Push connect union tee air fitting for 1/4in. OD tubing, 5/pk.
www.automationdirect.com
UT14 - NITRA pneumatic push-to-connect union tee air fitting with thermoplastic ...See More
3 hours ago · Like · Remove Preview
Jeff Stasney http://www.amazon.com/EcoPlus-Submersible-Pump-396-gph/dp/B0018X2XT4/re…
EcoPlus Submersible Pump - 396 gph
24 hr multi-setting timer 1@ $5.00
Peat moss the bottom of the bed over the wire to support peat moss enriched soil, as well.
In reply to Dimensional Lumber and drip irrigation by J Stasney
Janettx
Tue, 04/16/2013 - 04:45
using treated lumber is not a good idea
Absolutely do not use treated lumber. People are growing food so that it is better for them if you are going to use treated lumber you might as well get your food from the grocery it would be healthier. Treated lumber is treated with chemicals that will seep into the soil and poison your crop. I have made the side taller (12 inch deep) but I'm having a bit of trouble keeping the bottom on because the soil is so heavy. I think to make the garden deeper you need to place 1x2 cedar strips inside the garden and add stats on top of this and then the hardware cloth over this. The problem with making the gardens bigger or deeper is the weight of the soil.
Irrigation could be nice but since the gardens are so convenient at this height I have no trouble going out every other day to water.
Again I can not stress enough DO NOT USE TREATED LUMBER, it is not safe and will not last as long as cedar. Also do not spray any sealers on your gardens. You can spray with vegetable oil to help maintain the color of the cedar but other than that you want your gardens to be free of any chemicals. If not then don't even bother.
J Stasney
Wed, 04/17/2013 - 11:04
Treated Lumber
Treated Lumber
Well, line the box with plastic to keep the treated chemicals from leaching in?? Staple gun it in. How's that??
On the soil, lighten it up with peat moss.
1/2 and 1/2 with potting soil.
I was going to use Spanish moss as the medium to hold the soil anyways.
Most craft stores have this cheap.
Ummmmm....A quote: Research on the use of CCA-treated lumber in gardens has shown that treatment chemicals do not affect the growth or safety of home-grown produce.
http://www.dhs.wisconsin.gov/eh/hlthhaz/fs/TrtdWood.htm
But, if your worried and wish to error on the side of caution, line the box with plastic to keep the treated chemicals from leaching in?? Staple gun it in.
In reply to Treated Lumber by J Stasney
Janettx
Mon, 04/22/2013 - 05:02
Treated lumber
I could post opposing links to documents that disagree however I will not bother. I grow my own food because I am health conscious, I prefer to error on the side of caution. I have listed in the comments that you could use treated lumber and line it however I have not found any BPA free liner so I would prefer not to do this. Since this is my post and I feel strongly about health and how long my gardens will last I prefer to use cedar and to give this as the best supply to use.
Since I have used treated lumber in the past for ground level as sides to my gardens when I didn't realize the health risk I found the treated lumber only lasts about 3 years before the bugs start to eat at the bottoms. I have cedar ground level gardens that are currently 6 years old and are still holding up well with no signs of bug infestation. I have made over 50 of these raised gardens now and now have 15 in my own back yard. I am very pleased with the results and the way cedar holds up. Anyone using my plans are welcome to change them as they see fit. I suggest using Cedar if you would like your gardens to last.
My suggestion to you is that you create your own plans and post them for everyone using your preferred method and supplies as I am sure there are many people who would enjoy them that are not gardening because they are health conscious but because they enjoy gardening. But I will kindly ask that you please respect my opinion on my plans.
Thanks so much for your understanding,
Janet
smacneil
Mon, 04/22/2013 - 09:03
Cedar is safer for pets and wildlife too
Janettx, I've also been keeping an eye out for BPA free liners here in Canada and found nothing. I'm with you on the cedar, especially considering I've got dogs and the occasional rabbits & squirrels who might chew on the wood and get sick from the chems anyway. disposing of treated lumber is a problem too.
Besides cedar looks awesome!
Love these boxes, I'm soooo making a bunch for my backyard! Thanks for posting!
In reply to Cedar is safer for pets and wildlife too by smacneil
Janettx
Mon, 04/22/2013 - 10:30
Good luck
hope to see brag posts when you get yours complete. If you have any questions please feel free to ask. :)
In reply to Good luck by Janettx
smacneil
Mon, 04/22/2013 - 11:27
Good luck
thanks! will do!
Jake
Mon, 04/22/2013 - 12:43
Dirt is the real cost
I really like these raised beds. I have a large raised bed and it does very well but I like the idea of separate crops in each small bed and the idea that you could make them movable. When you go to the nursery they always ask how much sun a particular location will get. This way you can follow the sun. A lot of work but we all need a little extra exercise.
I agree that using treated wood is like playing Russian Roulette. I build my beds from the cheapest pine and even the fact that they sit on the ground all are in good shape after five years.
As for cost the real cost is the dirt (aka soil) you need to buy to fill them up. It is amazing to me how much soil they hold.
Kabarie
Thu, 05/30/2013 - 13:34
controversy regarding use of treated wood
I could not find cedar 4x4's so used pressure treated...and to be on the safe side just used the leftover cedar to make a cover around the 4x4. Worked great and I'll never question it as a possibility of my kids failing their tests at school because they ate the veggies. Solution satisfied me..hope it helps others.
hfitz1
Sat, 06/08/2013 - 12:50
What are you growing?
I'm curious. What do you have growing in these boxes? I can't tell from the picture what is in yours, but it looks to be growing well!
In reply to What are you growing? by hfitz1
Janettx
Sat, 06/08/2013 - 14:19
what's growing in my gardens?
The pictures are a bit old...I have one full of herbs, but because these are so easy to cover for a freeze my herbs are now several years old. I have had luck with broccoli, cauliflower, parsnips, celery, bok choy, fennel, all sorts of peppers, cabbage, all sorts of greens, tomatoes, some root vegetables such as small carrot varieties and turnips. really I've had luck with everything except squash or anything that vines. I put my snap peas and beans as well as my squash, cantaloupe in a ground level raised gardens. I also now just put my tomatoes in pots rather than take up room in my garden for them since they grow so well in pots. I hope this helps. It does take a little bit to get a good soil mix. At first I wasn't planting my vegetables deep enough and I was getting trees...lol but now we are doing well. We are even trying for trash can potatoes. Good luck with your gardens...it takes a while to get the hang of growing in raised beds for some but don't give up. You too can grow a nice crop in your back yard!
In reply to What are you growing? by hfitz1
Janettx
Mon, 09/20/2021 - 13:38
I have one exclusively for…
I have one exclusively for herbs then the others it depends on the season. The deep ones I even planted carrots. You can plant anything in these. I found that the first year was a bit of a flop but each year after I got a better crop. They are still up and working great after all these years. I did place 12x12 pavers under the legs early on to help them last longer.
jrbdmb
Mon, 06/16/2014 - 12:49
First, thanks for the
First, thanks for the excellent plan. I built two of these for my wife and I to plant some herbs and vegetables, and they look wonderful and seem strong enough to hold 8" of high quality potting soil.
Two notes:
1. Cedar is a less common on the east coast (New Jersey), but I was able to find both 4x4s and planks at the local Lowe's. The wood cost was about $70 per box. Curious how this compares to other parts of the country; glad I didn't have to consider using pressure-treated lumber.
2. The threaded inserts were very expensive here ($1.60 each, not including the bolt/washer), so I ended up using 3/8" galvanized lag screws instead. So far so good, they are quite secure - I guess we'll see how they hold up over time.
Here's a pic of the finished project:
http://home.comcast.net/~jrbdmb/pwpimages/garden4.jpg
Janettx
Fri, 06/20/2014 - 05:49
Thanks for sharing
Wow, your gardens look great! Lag screws would be your best choice if using screws. Just keep and eye on them and tighten when necessary and all will be just fine. Your gardens look great and I have a feeling you will want more. One entire side of my yard is full with these gardens. They are getting very old now and I'm thinking of adding a deck platform for them to extend their life. I've also built a cold frame and potting bench with wheels since this post.
http://handywomanshop.blogspot.com/2013/04/my-cold-frame.html
http://handywomanshop.blogspot.com/2013/05/portable-potting-bench.html
and here are some clever plant markers
http://handywomanshop.blogspot.com/2013/03/clever-plant-markers.html
again thank you for posting your beautiful gardens!
ashlear
Tue, 04/21/2015 - 19:00
What length/size of lag
What length/size of lag screws and how many should I use? Do the replace all the hex bolts?
chrisdro
Sun, 02/08/2015 - 19:03
pest control
Hello,
Thank you so much for this wonderful raised garden. I'm going to build a couple this spring. Here in downtown Toronto where I live racoons are a major nuisance. Do you have any recommendations for 'racoon proofing" a raised garden like this one? It would be great to have a solution that could both keep pests out and easily be opened up or removed when gardening.
RAW0320
Sat, 04/25/2015 - 06:58
Burlap for the cloth?
At my hardware stores they have landscape fabric, which I am not super excited to use. I am unsure what kind of chemicals it will leach into the soil. Has anyone used burlap? That is available at my hardware store. Although, I am not sure what kind of chemicals they may use on it. Any help would be appreciated. Thank you.
Familyof8
Tue, 05/12/2015 - 23:21
Some help needed
So I have a few issues that I'm trying to work through on this project.
1. Cedar is sold no where in Arizona but I was told redwood was better. Is that true? Either way I bought it. It was terribly expensive in 1x so I bought everything 2x. 2x4 for the bottom slats, 2x8 for the side walls, and 4x4 for the legs. Would you recommend for me to use my table saw and cut the 2x4 in half to make 1x4s??? Since they are truly 1.5 inches when I cut them in half they will each be .75 inches minus the waste from the saw? Too skinny for support??? Then I have the same question for the 2x8 sides. Should I leave those alone at the current width or cut those in half as well to create 1x8s again assuming I'll lose some width from waste from the saw??? Obviously leaving the 4x4s alone.
2. The next question is about the hex bolts 1/4-20 - (I bought the threaded inserts from granger)- I bought these in galvanized finish (on the box it says harmful by state if California standards to cause cancer blah blah blah. Is it safe to use these or do you think i should steer clear and pony up for stainless?--- either way do you know any online stores that have these cheap? (I paid .37 each for galvanized at lowes) (note: I did buy 3 inch length because of the thicker boards as described in question 1) (also note: that I could buy cheaper stainless bolts if the boards were less thick in question 1).
3. I bought coated deck screws 3 inch in length due to the thicker boards in question 1. Would these be good?
4. Last question: I can't find coconut cloth here either. The guy at lowes recommended this green landscape fabric (recycled from plastic bottles) (says non-toxic and great for gardening) (and controls weeds without chemicals. Would this be a good alternative or not? If not do you have an online place that has the coconut cloth cheap?
Thank you and hope to hear back soon! Would love to start this project this weekend!
turbov6camaro
Sun, 02/28/2016 - 20:13
i would use 4 inch lags, not
i would use 4 inch lags, not deck screws, 5/16 4inch lags should work great
Jeremy.Builds
Mon, 05/18/2015 - 10:52
How much dirt to fill?
I am about to start building two of these and want to get them filled and planted as soon as possible as it is prime time for planting right now. About how much soil would I need to fill each one (or both if you want to multiply it times 2 :P )
CJ Spenser
Tue, 06/09/2015 - 10:09
Raised Garden Bed
Thank you so much for sharing these plans. I have been looking for a design for a long time and this is one of the best and easiest that I have found. Can't wait to get started.
lukeicd15
Wed, 07/15/2015 - 08:53
Untreated Wood
I used untreated wood (2x2's) for my garden frame and it is still doing well 2 years later. It will last even longer if it's elevated like the design above. You have to go with untreated in my mind, we already get enough chemicals through everything else we can't control. I am looking to set up an automatic watering system and found some pretty cool tools to use at http://www.industrialcontroldirect.com/. I will let you know how it turns out, if anyone cares :)
turbov6camaro
Sun, 02/28/2016 - 20:12
made this but simplified a bit
Hello,
Wanted to thank for for these plans, my wife has EDS and we hope to get great use out of these, as a wood worker i wanted to add a few tips to make it easier.
1. we made 2- 2'x4' box and one 4'x4'. we used 2x10x8 (small boxes) and 2x12x8 (large box) boards, and cedar 4x4 for legs, its only $1 more or so for these larger boards (didn't use cedar)
2. do not bother drilling holes and buying the treads and bolts. I just got 5/16 Lags with washers (some call them lag bolts but they are really screws, in the hardware section, i got the 4 inch long ones.
I bought the cheap 2x3 for the slats on the bottom with 3 inch wood screws to hold them, for the 4x4 box, I wasn't worried but thought the slats could bow over time, so i ran one inside the bottom of the box down the middle so the 4 foot long slats had support in the middle, i mounted this one so the 2 inch side touches the slats this leaves the thick 3 inch vertical to resist bowing.
so i use 2 lags per side on the boxes with washers. i thought about 3 but it was over kills, lags hold alot of weight, that is what they are for, and with 3 inches into the wood they are not going anywere anytime soon.
the 4x4 box is 11 inches deep now, it took 10- 40lb bags of tops soil, 5 50lb bags of manuer, 2 bags of compost and 2 bags of peat humus. !! there is no bow on the bottom of the box, ill check it weekly if it moves ill put a 4x4 in the middle as a 5th leg but with my knowleg of wood, i dont see needing it unless to much water is used and makes the wood soft.
hope this helps, Cedar prices are sky high in Missouri right now. so we didn't use it. exect the 4x4 becuase they only come untreaded as cedar lol.
turbov6camaro
Sun, 03/06/2016 - 21:15
forgot that you need and
forgot that you need and impact driver to get the lags in. see photos of the 6x4 box i just made.
In reply to made this but simplified a bit by turbov6camaro
Janettx
Sat, 03/18/2017 - 05:43
You are welcome
Sounds like you had fun making your boxes. I hope you post a brag post. I'm glad you loved my plans and you are welcome!
Janet Fox
wrengade
Sun, 03/06/2016 - 21:26
Ima newb
This may be a dumb question but seeing how I'm new to this I'll ask anyway...
Do I need to put anything on it to protect against weather? I understand the desire to keep it chemical free but isnt some sort of coating needed so it will last more than a year or so?
Thanks and be gentle...
mastory
Tue, 03/08/2016 - 07:45
Deep enough for tomato plants?
I'm already planning to use 2x12s instead of 2x8s for the sides. But I'm concerned that even that will not be deep enough for tomato plants. I was also going to shorten the legs to 24" for just the tomato beds to make it easier to reach the vines and cages. Your thoughts?
turbov6camaro
Thu, 03/10/2016 - 20:11
yes it will work but it takes
yes it will work but it takes up 4 squares with a cage. we are goign to try one as a test.
omcarroll71
Thu, 04/07/2016 - 17:25
Size of Garden
I found this post today and I absolutely love these. I was planning on raised gardens but these are even better since I tend to have back problems from when bending even at my young age. I understand you do not recommend for these to be any larger but if I were to add two more legs so six instead of 4 and 8 slats instead of 6 could I make them 4 x 8 instead?
plholsch
Mon, 04/18/2016 - 13:29
Garden and dogs
Do you suppose that the garden and dirt it holds would be heavy enough to withstand a 6 year old 150lb Mastiff and a 100lb 1 year old Saint Bernard puppy running around in the backyard, or should I go with my gut and cement them in place?