
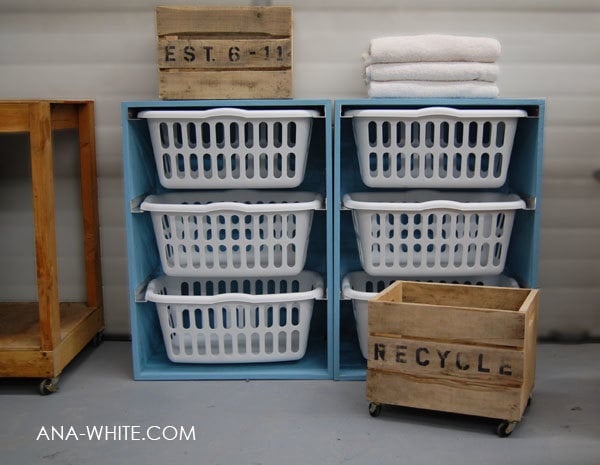

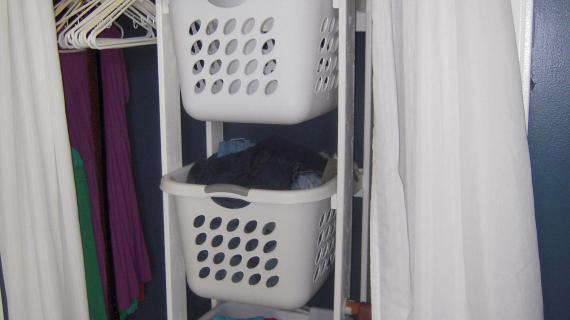
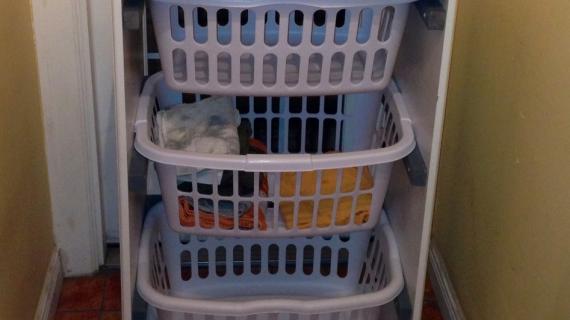
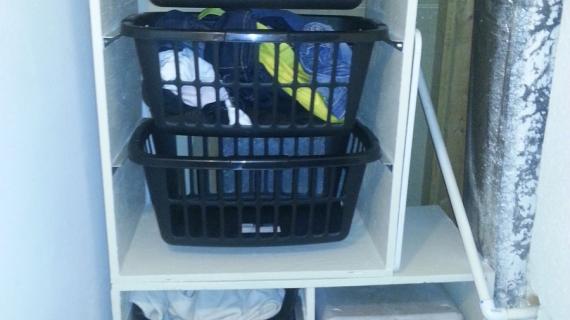
The Laundry Basket Dresser has taken my laundry room from the messiest room in my home to the tidiest. It's so easy to pull laundry out and put it directly into baskets. I then can take each basket to it's respective room and fold and put laundry away. For any busy home, these are a must.
This really wasn't my idea. I have some smart sisters. They looked at the piles of laundry in my tiny laundry room, and said, Ana, what if . . . 
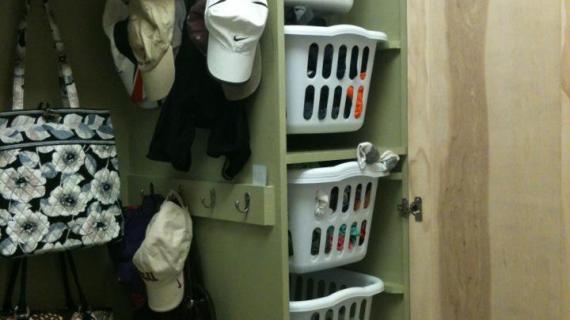
All your laundry baskets could be like drawers in a dresser . . .

And we didn't have to see your dirty - and clean - laundry every time we visit.
In my defense, most of the piles of laundry in my home are clean. They just rarely make it to the dresser.
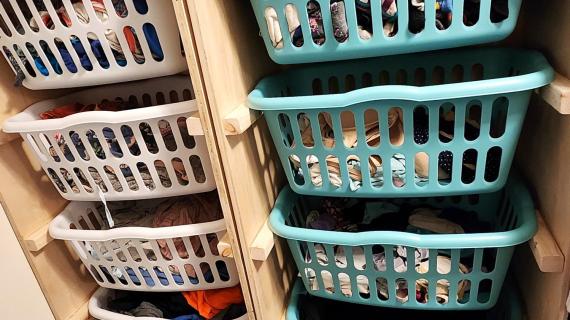
But this is one dresser that I can work with.
I can deal with stacks of laundry with this system! Do you have a laundry problem?

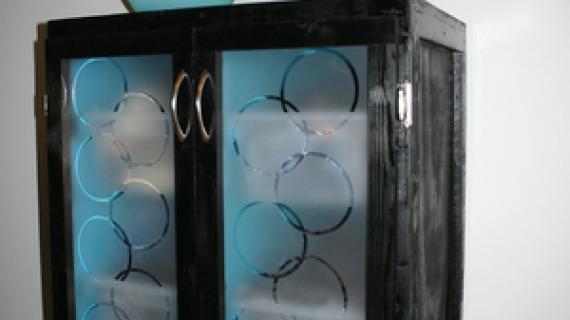
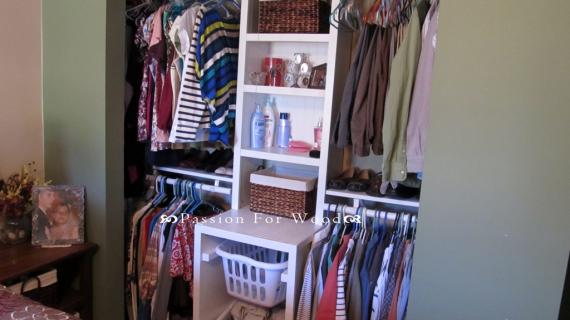
PS - If you are interested in a slightly different size/configuration, check out these plans as well!
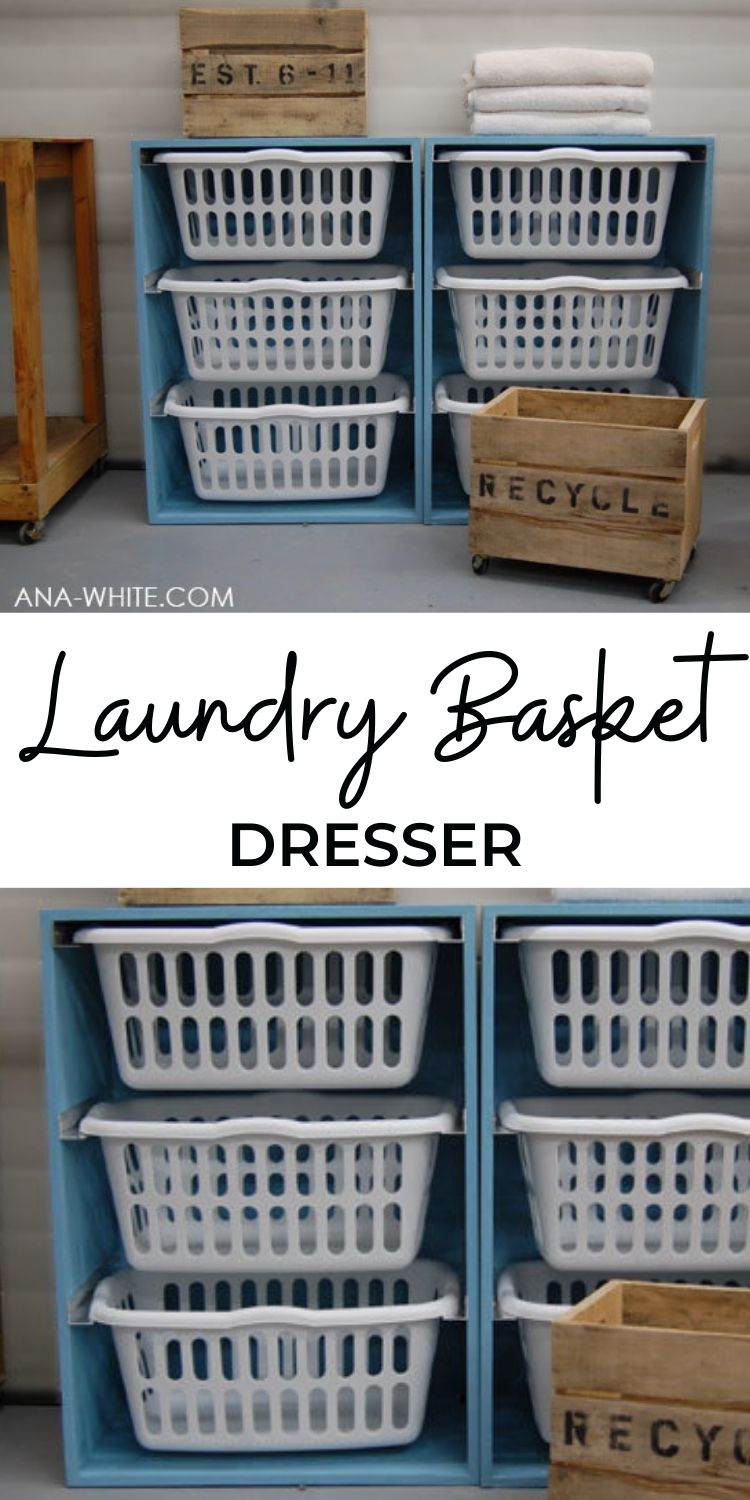
Pin For Later!
Preparation
3/4″ Plywood cut into 15 1/2″ wide x 8 feet long strips (referred to as 1x16s)
1/4″ Plywood for the backs
1 1/2″ x 1 1/2″ metal angle (ask for it at Blue or Orange)
2″ wood screws or 1 1/4″ pocket hole screws 3/4″ wood screws (to screw the metal angle to the insides of the boxes)
1 1/4″ wood screws
wood glue
wood filler finishing supplies
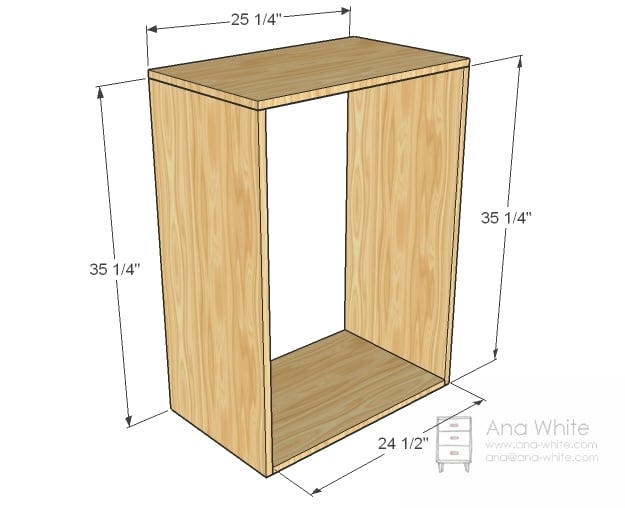
2 – 1×16 @ 35 1/4″ (Sides)
1 – 1×16 @ 24 1/2″ (Bottom)
1 – 1×16 @ 26″ (Top)
1 – 1/4″ Plywood @ 36″ x 25 3/4″ (Back)
6 – 1 1/2″ x 1 1/2″ Metal Angle 15 1/2″ long (ask hardware store to cut or cut with a hack saw)


Instructions
Step 1

Build the Box
I used pocket holes, but you can also use 2″ wood screws countersunk and screwed together to build the box.
NOTE: Top Measurement should be 26″
Step 2
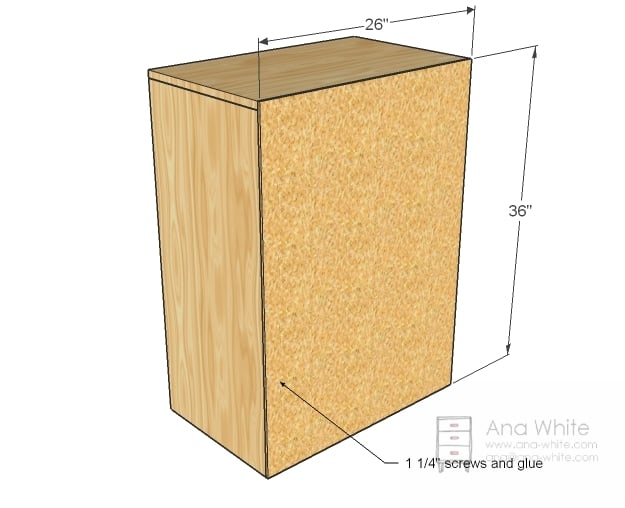
Back
Adjust for square then screw the back on with 1 1/4″ screws and glue. I finished mine at this stage by filling all holes with wood filler, all plywood edges, and any imperfections in the plywood. I then sanded with coarse sandpaper because the plywood was builder grade cheapo stuff, the finished with medium sandpaper. Finally, I primed and painted with ooops paint in semigloss from Valspar.
Step 3
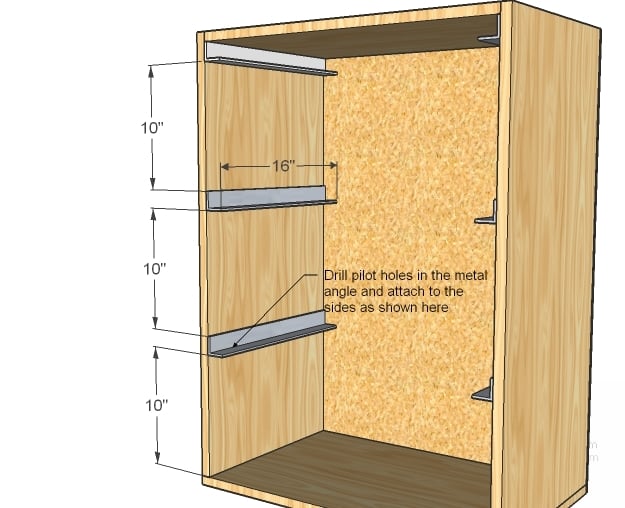
Metal Angle
If you are intimidated by metal angle, you can always use 2x2s glued and screwed here. Cut the metal angle with a hack saw and predrill holes (three per slide). Mark locations with a square and screw metal angle to the sides. TIP: Screw at a very slight downward angle to keep the baskets to the back of the box instead of sliding forward.
If you choose to stack, make sure you secure the top laundry basket dress to a stud in the wall.


Comments
Laura (not verified)
Tue, 11/16/2010 - 14:20
This would be fabulous for my
This would be fabulous for my method of madness. As everything comes out of the dryer, I pull out big things like sheets, long pants, and hubby's shirts. Then, I toss everything into one pile per person. This works especially well when you have lots of little kids and their clothes don't stay folded very well anyway. I tackle folding one pile at a time and then put it away (or have an older kid do it). Before this method, I would be constantly folding only to have toddlers trample piles. And now, Ana has made it so I don't have to have these piles all over the floor. My husband will thank you!!
amy the proble… (not verified)
Tue, 11/16/2010 - 14:44
Oh I love this!!!! I really
Oh I love this!!!! I really do! But I'll tell you what, loaded up it isn't stable. The Plastic will bow. Instead of sliding the baskets on metal guides, it should be sitting on pull out wood trays, or physical shelves.... Or at least the rim reinforced... but even that said, that's only a band-aid fix...
When they start using this, it will backfire, and someone could actually get hurt...
And there is no way anyone should be stacking these 6 high... I hope they are bolted together and to the wall.
Now if you are only piling scarves and knit hats... It will be stable, but actual towels, jeans, socks, ect.... time will prove not your friend with the current design.
MelindaH (not verified)
Tue, 11/16/2010 - 15:02
AWESOME! Yes, this would be
AWESOME! Yes, this would be great for recycling bins ... and for bins to store sporting goods in the entryway ... oh yes, this would rock! :) Thanks, Ana!
Jennifer (not verified)
Tue, 11/16/2010 - 15:09
Damn Ana, I've had this idea
Damn Ana,
I've had this idea rolling around in my head too. Here at my house our laundry room is in the basement and the bedrooms are on the 2nd floor. I hate doing stairs, so we have a community closet in the basement. I don't even use the closets in our bedrooms for clothing. I however will be constructing my system with full size baskets. Thanks for the visual. At least now I know I'm not as crazy as I thought I was for thinking about this! Too Cool, Rock on Sister!
Brittany Poquette (not verified)
Tue, 11/16/2010 - 18:09
I think most people with the
I think most people with the negative "the basket will break" comments must be using baskets from the 1980's.
I had a few flimsy old baskets when I first bought my house.
I finally replaced them with (still cheap) new baskets, and they aren't bending with double-loads placed in them.
Upgrade your baskets, dears, and quit worrying about it. Or just don't build them. Your choice.
;)
Aly Kat (not verified)
Tue, 11/16/2010 - 20:26
Now if I build a few of these
Now if I build a few of these for each bedroom I will never have to take laundry out of the basket to "put it away." The 4 baskets of clean laundry I already have are making that idea pretty nice! Let's make it a true dresser! lol Shucks, lets use one for toys in each room & another (or 2 ~ 7 people in the house) @ the door for shoes! 90+ yo house has no closets!!
Thanks for sharing, Ana!
fal (not verified)
Tue, 11/16/2010 - 21:40
Ummm... who wouldn't stack
Ummm... who wouldn't stack these on top of each other & secure them?? That's just asking for something to happen & it actually says in the plans that if you are to stack the units to make sure you secure them.....
fal (not verified)
Tue, 11/16/2010 - 21:42
Amen! My baskets are the
Amen! My baskets are the cheapos from Target & they are very sturdy.. plus when the basket gets full toss it in the washer. Don't just let them sit around filled to the rim.
fal (not verified)
Tue, 11/16/2010 - 21:50
I'm thinking your idea of a
I'm thinking your idea of a pretty fabric curtain and a tension rod would do the trick! Or you could always add shelving and find some cute wooden baskets :)
fal (not verified)
Tue, 11/16/2010 - 21:54
I my experience they hold up
I my experience they hold up very well. The handles are super strong (I have never had an issue with mine bending or breaking) & are made to take a load. Now, if you have older baskets they might not work so well... with all of our technological advances have come advances in laundry baskets too, lol. That other design is interesting too... but if using laundry baskets with that kind of design you might run into the sides of the basket giving under the weight after time. The rim of the basket is very sturdy and made to withstand a lot of pressure, but not so much the sides. They would most likely give & break.
fal (not verified)
Tue, 11/16/2010 - 21:57
I blame my clean laundry
I blame my clean laundry never making it to the putting away stage on lack of closet space :) There is no where to put it & I can see it better when it's on the bed spread out or in a basket with holes ;)
fal (not verified)
Tue, 11/16/2010 - 22:00
Wait.... your husband does
Wait.... your husband does laundry??? Teach me that trick please... pretty please ;) Mine was just catching on & then we had to go & upgrade to a front loading washer & dryer & he's suddenly clueless again!
AdronsCatherine (not verified)
Wed, 11/17/2010 - 05:16
Oh dear, I suspect I'm just
Oh dear, I suspect I'm just going to have to build a few of these to completely replace the kids' dressers! It's not like they put stuff up anyway, and I can just do one for each kid, with two baskets for clean clothes and one for dirty ;o)
I have a tiny laundry closet in my (already too small) eat-in kitchen. The laundry monster generally pukes right beside my dining chair, making it nearly impossible to sit down most nights. I'm thinking that, while I'd really rather not have one of these in my dining area, it just might be worth it! And I love the idea of putting a curtain over it, too!!!
Nikki (not verified)
Wed, 11/17/2010 - 10:16
I am so jealous I want
I am so jealous I want something like this. I have at my home Mt laundry my husband hates it, might have to tell him this is what I want for Christmas........
HammerTime (not verified)
Wed, 11/17/2010 - 12:25
This is awesome. I also love
This is awesome. I also love the idea, as someone else said, of using this for recycling.
Jess (not verified)
Wed, 11/17/2010 - 13:52
OK, I am always looking for
OK, I am always looking for something like this for my own laundry room (and toy storage and everything else storage) but refuse to pay for a ready-made shelf. I got excited when I found something similar at IKEA, but once I added up the cost of all the components I'd need, it actually got pretty pricey. So, thanks for the great tutorial!! By the way, how much did this entire shelf--baskets and all--cost you to make? And how long would you think a beginning woodworker would take to make one of these shelves? Thanks again!
Shannon (not verified)
Wed, 11/17/2010 - 16:26
This is a wonderful tutorial!
This is a wonderful tutorial! Thank you for sharing. My husband and I will probably be making these this month. We, too, have laundry problem! :)
Emily (not verified)
Wed, 11/17/2010 - 18:10
Or, you could put it on
Or, you could put it on casters and just turn it around when there are visitors.
Ana White (not verified)
Wed, 11/17/2010 - 18:16
Love this idea!
Love this idea!
seriouslyahomemaker (not verified)
Thu, 11/18/2010 - 04:55
i love you.
i love you.
Corinne (not verified)
Thu, 11/18/2010 - 07:29
Oh my gosh, you (ok, your
Oh my gosh, you (ok, your sisters too) are brilliant. I love this idea. Like you my laundry is mostly clean but never make it up the dresser. Instead, it's on the ironing board, top of the dryer, sometimes on the drying rack. ABSOLUTELY BRILLIANT. Thank you Ana. You are so awesome and even more awesome because you share your wealth of expertise. God bless your kind heart.
sugahtate (not verified)
Thu, 11/18/2010 - 10:18
Sweet! Thanks! I can totally
Sweet! Thanks! I can totally see 2 of these stacked in my living room right next to the door into the garage where the washer and dryer reside. I also like the idea of finishing out the back and putting them on casters so if company comes over, just flip it around. Anything would beat the numerous scattered round laundry baskets that divide my living and dining rooms. =P OOOH and the tension rod with a curtain idea rocks too. Too many options. lol
Heather (not verified)
Fri, 11/19/2010 - 11:59
This is exactly what I was
This is exactly what I was thinking!! What an awesome idea!
Farm Marm (not verified)
Sat, 11/20/2010 - 12:00
I just found an AWESOME deal
I just found an AWESOME deal on the laundry baskets!!! .50 cents a piece!.....if you buy all 1500 of them..LOL! Just a funny deal I found on Craigslist in Nashville...; )
Farm Marm (not verified)
Sat, 11/20/2010 - 12:06
Jennifer..I think you rock
Jennifer..I think you rock for having the whole comm. closet thing goin on! i would LOVE that, but don't think the hubster would like it. My pet peave is socks. I hate matching them and putting them away. I think a comm. laundry basket full of socks is a good idea...
mary johnson (not verified)
Sun, 11/21/2010 - 07:22
I'm going to put a set in
I'm going to put a set in each of our bedrooms and use as our actual dressers. It beats having baskets sprawled out all over our rooms...
amanda hale (not verified)
Sun, 11/21/2010 - 18:43
This awesome. You would be
This awesome. You would be able to see my sofa and loveseat and top of dryer (the corner of my bed lately)
Emily (not verified)
Sun, 11/21/2010 - 20:10
You are my hero! Thank you!
You are my hero! Thank you! I think me and one of my best pals are going to do this ASAP!
Savannah (not verified)
Mon, 11/22/2010 - 04:18
I love this plan. At the
I love this plan. At the moment I have 4 baskets in my hallway on the floor. Lights, whites, darks and towels. Its nasty to look at but is easy for the kids to sort. I would like to build two of these and would like to know how much two would cost me. And if I pit the 2x2 instead of the L metal pieces what would the measurements change to?
Thank you so much for posting this one. Its a wonderful idea on so many levels
AJ (not verified)
Mon, 11/22/2010 - 12:38
I just built these yesterday,
I just built these yesterday, because we have these baskets, and we also have piles of laundry like "delicates", "need to soak", "sports clothes", etc. No pictures, though because my units are ugly. Even though this is for our utility room, I wish I had spent a little more time on the details. I used 2x2 rather than angle iron. So, some detail to soften the front of the "supports" would have been nice. Also, some edge banding or hardwood edge would make this a little nicer. I've never added casters to anything before, but this would be a good place to start.
Nastya (not verified)
Wed, 11/24/2010 - 21:37
These are just what I've been
These are just what I've been looking for. Just finished.

verminiusrex (not verified)
Fri, 11/26/2010 - 08:13
This is exactly what I was
This is exactly what I was looking for! My wife thought I was silly for wanting laundry basket drawer dressers, until the kids climbed the modular ones we got from Target and destroyed them. Now I'm going to put 2x2's in their closet to make drawers like this (their closet is the perfect width for it), and make ones just like these for our room.
Beth (not verified)
Mon, 11/29/2010 - 09:04
Brilliant idea to add casters
Brilliant idea to add casters and finished backside. It wouldn't have to be plain, if you chose to trim it out with small molding, corkboard, or chalkboard paint for fun.
Lucy (not verified)
Fri, 12/03/2010 - 08:03
I have these same baskets for
I have these same baskets for laundry. I have the 36"W x 18"D 3 shelf heavy metal wire shelves from Target. Sometimes they are on sale. If you put the middle shelf halfway, it will hold 2 baskets per shelf, narrow end out. I have three of them in a row so it's 9' long and holds 12 baskets. I have an extra two baskets on the top of the end shelf and then a wooden top on the other two sets. Makes a great folding area. You can get a furniture grade piece of 6'x24" plywood for about $45 at Lowes or Home Depot. I think I am going to get DH to cut a piece of MDF a little deeper and wider so I can put a 2" lip that comes down around the shelf edge, to hold the top in place better and to have a place to staple on some velcro so I can attach a curtain for when we have company over. We got a tiny laundry room and then a big keeping room that is sort of redundant. I have this on one wall in the keeping room and so far I've been covering it with very large banquet tablecloths from Sam's Club. I think they are 120" long (the pack of 2 is about $28 - I got black). When it's covered, it makes a nice buffet server. I'm thinking about have two linked together and the third set of shelves be separate so I can make an L out of it for drinks and such - still have to think about the top for that one if you can see it from the back. My sewing armoire is also in that room and I've thought of getting another set and adding a wood top to it that has a piano hinge down the long side and another large panel that folds up as a get leg for more space. I'd probably have casters on that one. I'll have to talk DH into that one, but then I could have easy storage on that side of the room. Sams also has large metal shelving that is 48"x18". I'm not sure if two baskets would side side by side but they might got three across front to back. I'm guessing you could do quite a few baskets on one of those and with the big casters, roll it around too.
Lisa W (not verified)
Fri, 12/03/2010 - 12:36
I just made this as my first
I just made this as my first project and thank you so much, Ana! I learned A LOT along the way. It was a perfect beginner project to get my feet wet. :)
Elf (not verified)
Sat, 12/04/2010 - 16:34
Could I adjust this to have
Could I adjust this to have the 16 inch wide as the opening?
Isabel Jenson (not verified)
Sun, 12/05/2010 - 19:09
Ana, I cant wait to make
Ana, I cant wait to make these! I will have a 4-week school break for the holidays and I have decided I want to make them then! I love this idea, it will make my life so much easier and our clothes will stop getting lost, THANK YOU SO MUCH!! I linked these post to my little craft blog! I just had to tell the world how amazing you are and plus I know so many people that have the same laundry problem. Thank you again! http://idreamcrafts.blogspot.com/2010/12/ok-accept-it.html
Ana White (not verified)
Sun, 12/05/2010 - 20:40
Absolutely!
Absolutely!
Elf (not verified)
Mon, 12/06/2010 - 08:54
Oh, awesome. I'm going to
Oh, awesome. I'm going to make four of them for above my washer and dryer and have two for dirty and two for clean and space for a basket on top of each of them for the sheets/towels/linens.
We have five children so that would give each of them one basket and the adults each one basket for dirty/clean.
Kindel (not verified)
Sun, 12/19/2010 - 11:55
Ana~ Thanks for the
Ana~
Thanks for the wonderful plans! My husband and I are about to screw the metal angles to the inside and then we'll be done! Other than a few curse words that slipped out while sawing the metal with our dull hack saw (our local store would not cut them for us), we had a fun time making this and it is a relatively easy project! I have my eye on a few more plans on your site and as soon as my husband forgets about the metal angles, we'll be tackling those soon! Thanks again!
Stephanie (not verified)
Mon, 12/20/2010 - 19:20
Okay, so I made these, but
Okay, so I made these, but not for my laundry room - for our closet! We don't have a lot a drawer space, and truthfully, putting clothes away is my laundry glitch. I can get them washed, folded and sorted, but putting away seems to elude me. So I made three of these, only two baskets tall and put them across the bottom of our closet. Now, when it's laundry day, I drag all the baskets to the living room, where I usually fold and sort while the kiddos nap, and then when I'm finished, the baskets go back in their place. It's the easiest way I've ever found to "put away" laundry! I am getting ready to make more for my kids closet...
Kim (not verified)
Sun, 12/26/2010 - 08:15
This would make Fantastic
This would make Fantastic storage for kids toys too!
MamaLaundry (not verified)
Mon, 12/27/2010 - 09:00
Wow! I am so impressed!
Wow! I am so impressed!
I've researched a ton of laundry methods and this is one of my favorites! Not only is it extremely practical but beautiful too.
Very nice!
-Lauren
karin marie smith (not verified)
Mon, 12/27/2010 - 22:16
This is super cute & easy
This is super cute & easy idea! I love it for laundry & for my daughters toys! You got me thinking! I'm trying to find easy/cheap ways to organize on a budget but still look cute too! Ana I love you girl! Keep up the awesome work! :)
aimee (not verified)
Tue, 12/28/2010 - 08:28
Hi Ana - would this be just
Hi Ana - would this be just as stable if I left off the back? I would like to use it in a closet that can be opened from 2 rooms allowing the drawers (baskets) to be pulled out in both directions.
Thanks!
Emily S (not verified)
Wed, 12/29/2010 - 18:15
That's exactly my plan for
That's exactly my plan for the glorious day when we finally have a playroom! Can't wait... I may have to test-run it for my laundry room though.
Ana White (not verified)
Thu, 12/30/2010 - 13:03
Aimee the only thing is there
Aimee the only thing is there is no face frame, so it would be hard to keep the boxes from swaying from side to side. The back plywood helps so much. If you braced the corners with metal, that would do the trick.
Karlee (not verified)
Fri, 12/31/2010 - 02:55
My worst problem is laundry!!
My worst problem is laundry!! This has to be the most awesome idea I have ever seen!
onedeepblue (not verified)
Sat, 01/01/2011 - 17:11
This would be perfect for my
This would be perfect for my fabric and crafting stash!
AmyALotsaMom (not verified)
Sun, 01/02/2011 - 15:48
My husband and I are thinking
My husband and I are thinking of making this to hold our kids crayons, coloring books and other craft stuff they have stacked up in the dining room. To "hide" the plastic bins, I think I will put some coordinating fabric over the openings.