
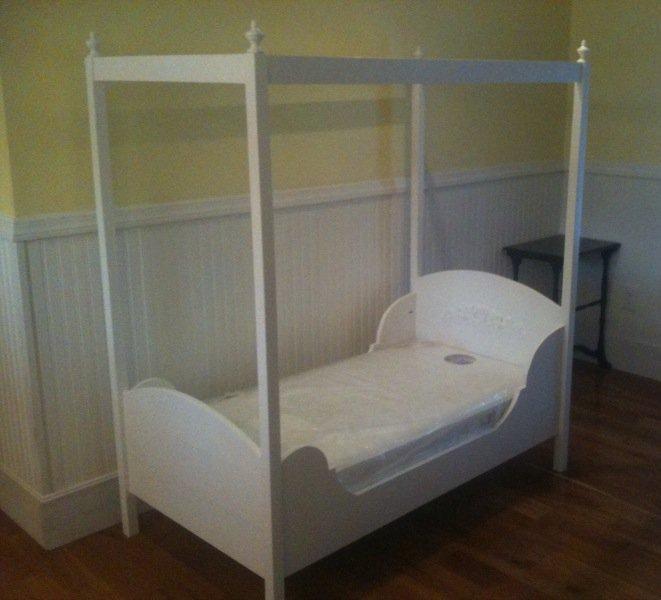

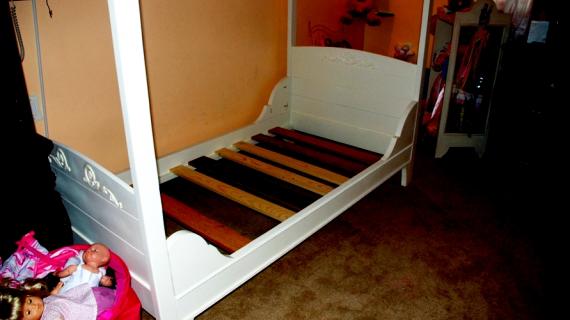
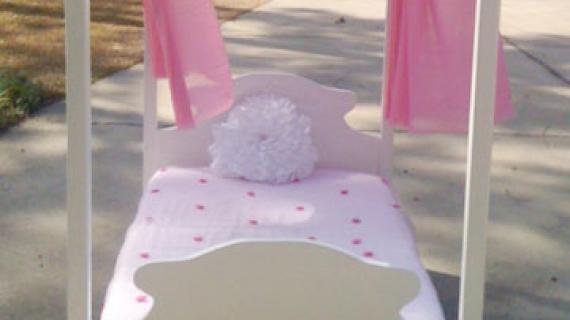
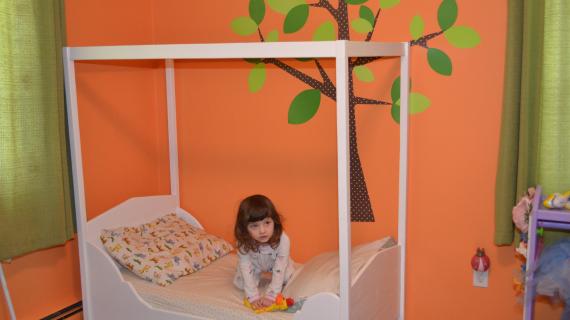
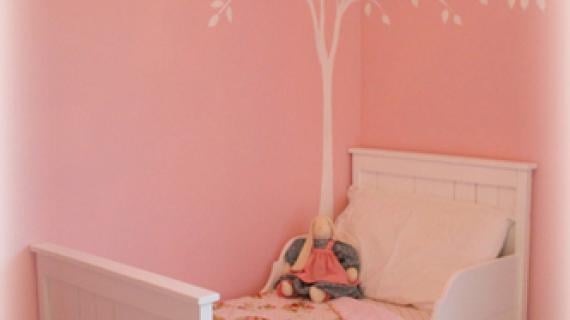
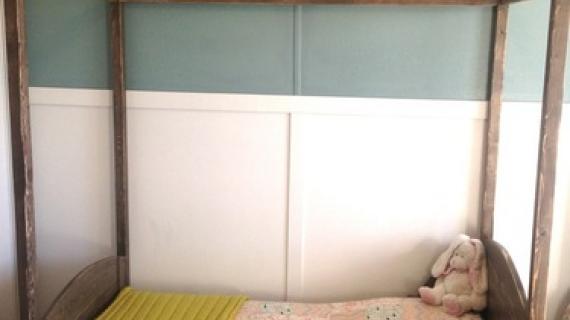
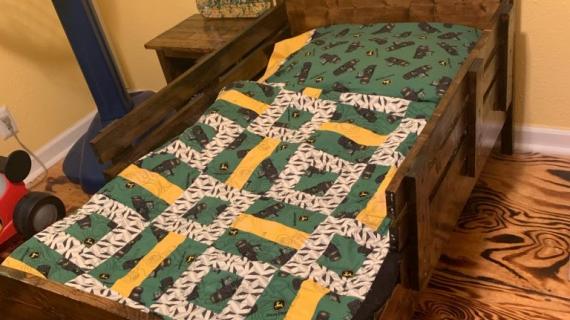
A toddler bed with canopy option for little ones. Special thanks to Barbara for sharing her photos.
Oh, it was so so so difficult to restrain myself from building this one.
 This is pure torture. Give me a second to reason with myself.
1. Grace is outgrowing a toddler mattress
2. Grace needs storage, not fancy.
3. You have too many projects already going on.
This is STILL torture.

For those of you who have less space or a child that perhaps wants something a little more on the handsome side, don't despair. This bed can be easily modified for any prince. Check out what Restoration Hardware Baby & Child does with a fancy sleigh bed here. Just cut the legs at 22 1/2" and make the headboard symmetrical to the footboard.
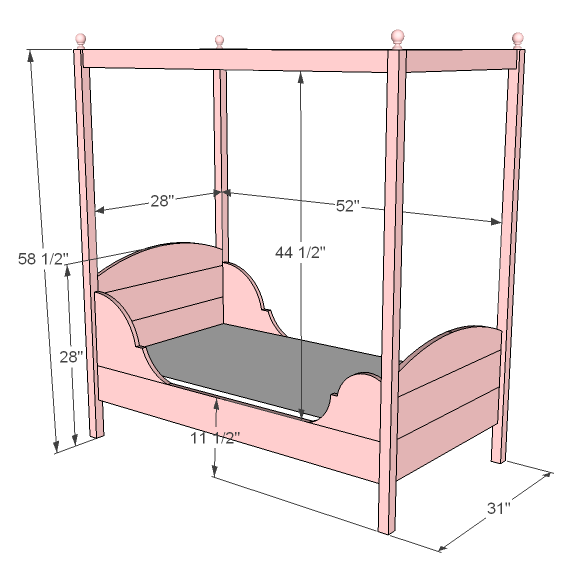
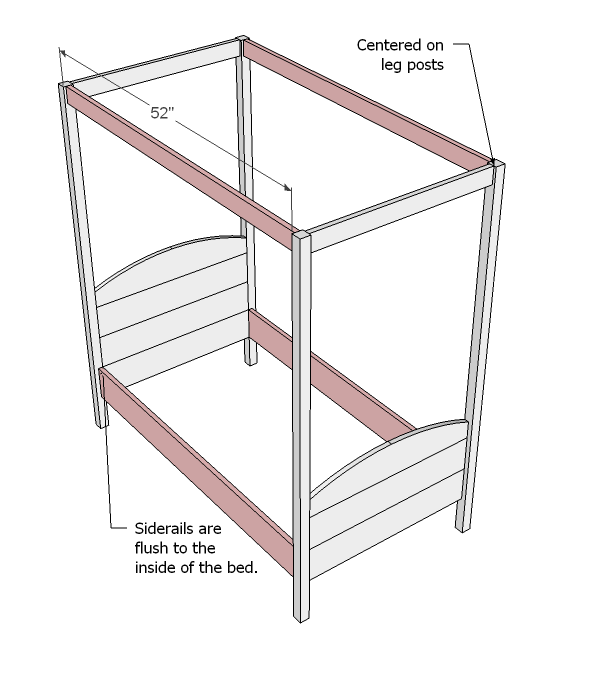
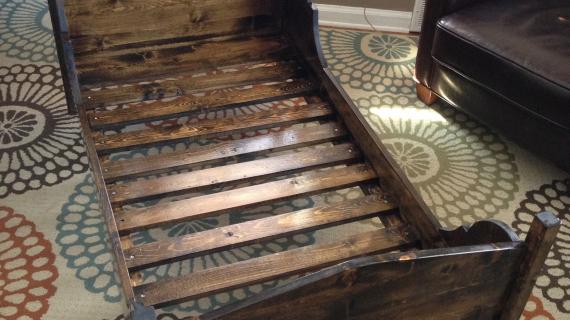
 Dimensions are shown above. Make sure you measure your mattress (designed for a 28" x 52" crib mattress) and also, be aware of the height of the canopy. You can make yours taller if you would like.
Preparation
4 – 1×6 @ 8 feet long
1 – 1×12 @ 4 feet long
6 – 2×2 @ 8 feet long
2 – 1×3 @ 8 feet long
More 1x3s (4) or 1/2″ plywood for the mattress supports
1 1/4″ pocket hole screws
7 – 1×6 @ 28″ (Headboard and Footboard Planks)
4 – 2×2 @ 58 1/2″ (Legs)
2 – 1×3 @ 28″ (Canopy Top/Bottom)
2 – 1×6 @ 52″ (Siderails)
2 – 1×3 @ 52″ (Canopy Sides)
2 – 2×2 @ 52″ (Cleats)
2 – 1×12 @ 15″ (Decorative Side, Top)
2 – 1×12 @ 8 1/2″ (Decorative Side, Bottom)
12 – 1×3 @ 28″ OR 1/2″ plywood 28″ x 52″ (Mattress Bottom)


It is highly recommended for this bed that you use a Kreg Jig™ to predrill all holes. This will make the bed stronger and easier to build, and keep your decorative sides in place. Mark and drill all pocket holes before beginning to build. Be safe, work smart, and have fun.
Instructions
Step 1
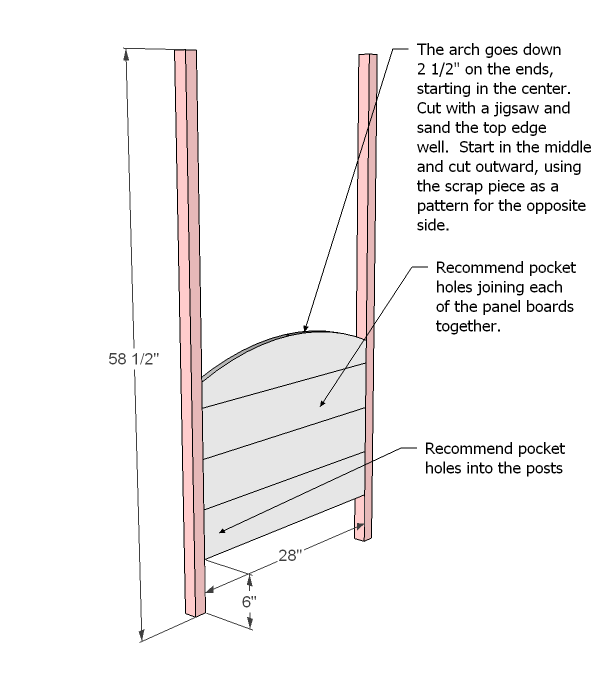
Headboard
Begin by attaching all the headboard boards together as shown above with pocket hole screws and glue. Make sure you rotate the grain of the wood (bark side out, bark side in and so on) so that the panel won’t warp in one direction over time as you attach the planks. Cut the arch out of the top board. Then attach the planks to two of the legs as shown above.
Step 2

Footboard
Build the footboard as you did the footboard, but use one less plank.
Step 3
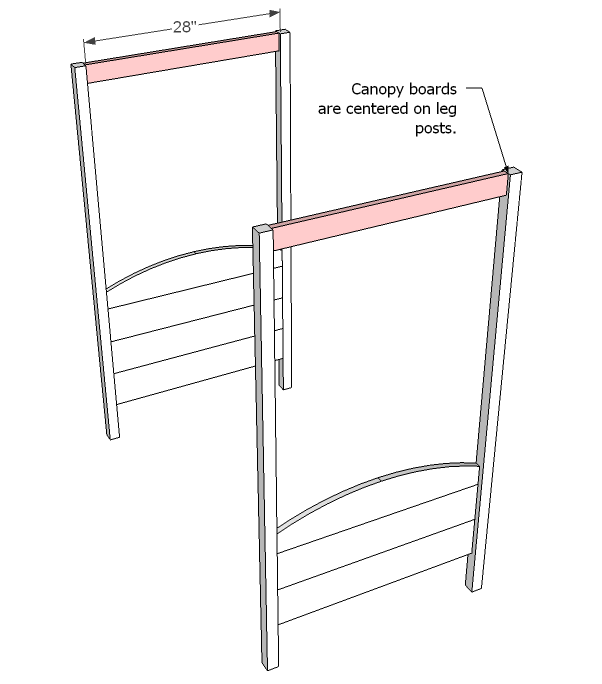
Canopy
Add the canopy tops with pocket holes and glue.
Step 4
Joining Headboard/Footboard
You may wish to do this inside your room as the size of the bed is getting quite large at this stage. Pocket holes will do the trick, but you could also opt for metal brackets.
Step 5
Step 6
Top Side
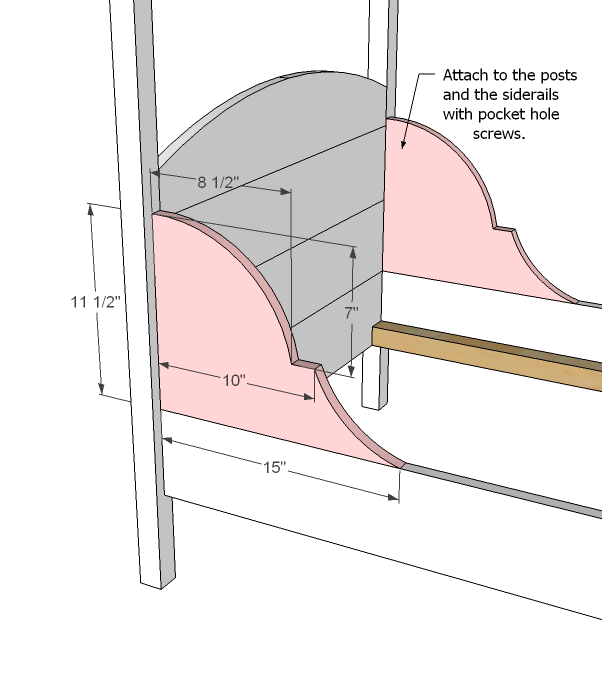
Now take the longer 1×12 pieces and mark out a pattern as shown above, using the measurements in the diagram to guide you. Carefully cut out with the jigsaw. Once one is cut, use it as a pattern for the other. Sand your cut well. Attach the side to the headboard and siderail with pocket hole screws. Avoid glue on the headboard joint so that you can disassemble the bed if needed.
Step 7
Bottom Sides
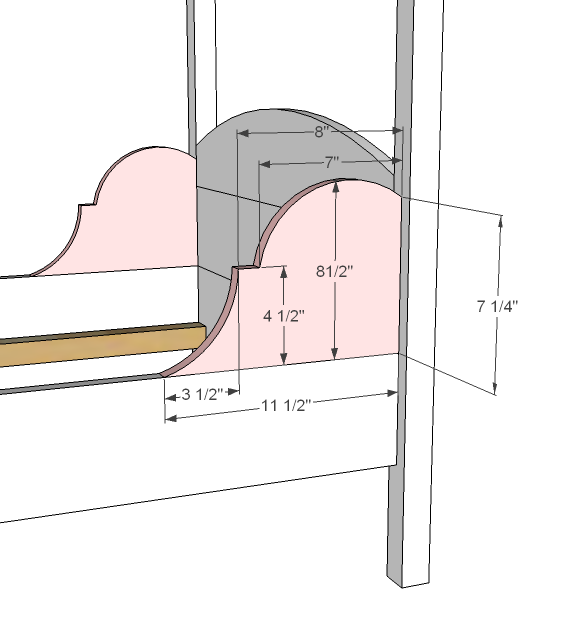
Same thing on the bottom as the top. Use the shorter 1x12s and measure and cut out. Sand well and attach to the siderails and the legs.
Step 8
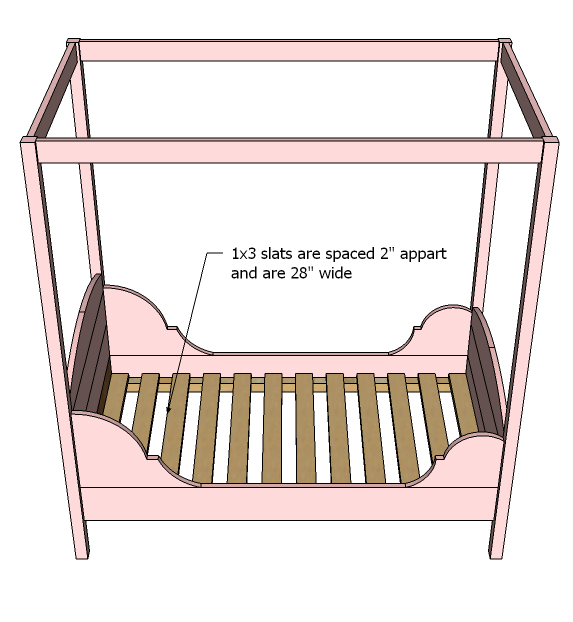
Slats
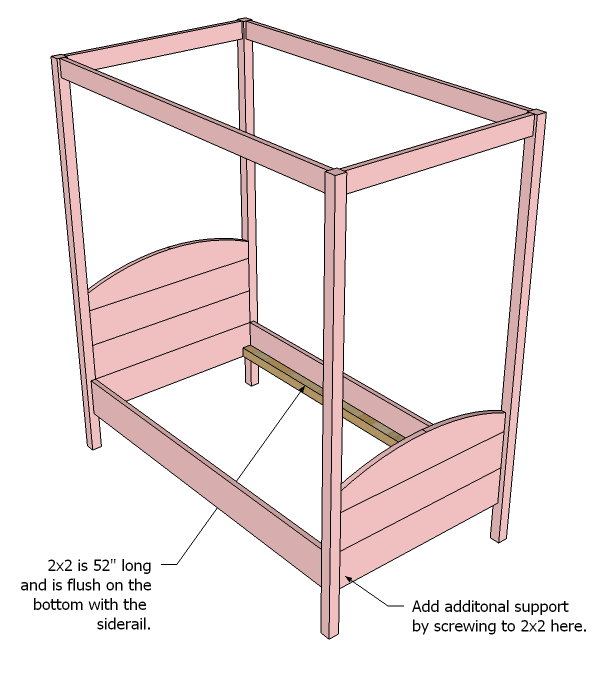
I’m so torn on this one. My daughter loves to jump, and the crib mattresses are so flimsy. But a full sheet of plywood instead of slats doesn’t give much air movement for accidents. Do what works for your child and your mattress. You could use 1×3 slats as shown above or 1/2″ plywood over the cleats (use scrap 2x2s to build joists – you will have enough 2x2s in scraps for this).
Step 9
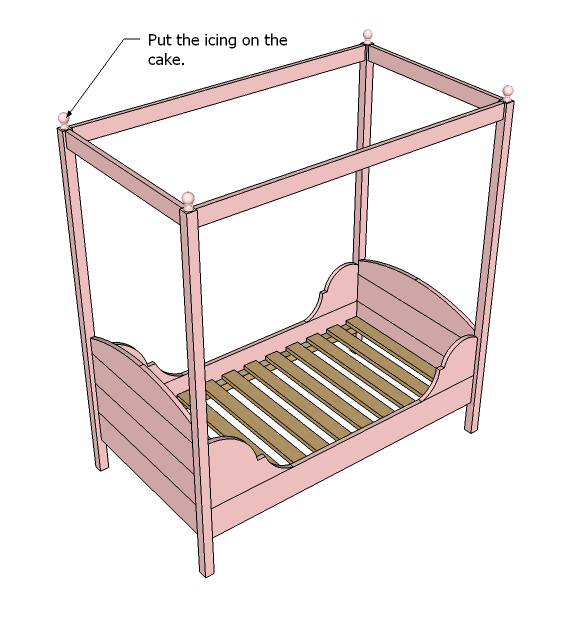
Icing
Doesn’t need it, but would be cute! Look in the curtain aisle or the craft wood section for unfinished wood finials. They should be relatively cheap, and need to be less than 1 1/2″ diameter at the base.


Comments
Holly E (not verified)
Tue, 01/25/2011 - 20:07
I am soooo going to build
I am soooo going to build this bed. I think it's my favorite! And just in time as my daughters bed just broke!
Jill (not verified)
Tue, 01/25/2011 - 20:14
PERFECTION! Getting ready to
PERFECTION! Getting ready to make a farmhouse twin, and was going to make a matching farmhouse toddler...but this is SO lovely! Maybe I'll do both and decide which one I love more lol!
kate (not verified)
Tue, 01/25/2011 - 20:19
oh no you di-n't!!!!!! this
oh no you di-n't!!!!!! this is gorgous!!!!!!! I love the regular bed. this is awesome.
Lindsay (not verified)
Tue, 01/25/2011 - 20:22
I just discovered your site
I just discovered your site via my sister-in-law, and haven't stopped looking through it since. My to-do list is very long! I'm not entering this contest as we don't need a toddler bed (we cosleep and my older daughter has a twin bed already when she isn't with us), but for the future, I'm wondering if the Home Depot ecards will work in Canada?
Thanks!
Janice (not verified)
Tue, 01/25/2011 - 21:11
I would love to make this bed
I would love to make this bed for my sweet little one!
Anneke (not verified)
Tue, 01/25/2011 - 21:59
This is SO cute! I think I'd
This is SO cute! I think I'd either modify it for my son or build the girly one for my friend! LOVE IT!
Devon (not verified)
Wed, 01/26/2011 - 00:12
Totally digging this bed, I
Totally digging this bed, I haven't yet got the nerve to build anything from your site, but I have a bookmark folder full of dream furniture I want to build! If I win this giftcard I will have to grow a pair and build something! **Crossing my fingers!!**
Janine (not verified)
Wed, 01/26/2011 - 00:49
Love this because it's so
Love this because it's so easy. Just replace the curves by battlements and there it is: your boy's bed!
Janine (not verified)
Wed, 01/26/2011 - 00:56
Love this one because it's so
Love this one because it's so easy... just replace the curves with battlements and there it is: your boy's bed!
peever (not verified)
Wed, 01/26/2011 - 02:48
I so wish this was a twin
I so wish this was a twin bed! We're building our daughter a bed this spring and I love this!
Erin (not verified)
Wed, 01/26/2011 - 03:03
When I saw the name, I fell
When I saw the name, I fell in love... Lydia's my daughters name. :)
Laura (not verified)
Wed, 01/26/2011 - 03:09
this is too cute ;) makes me
this is too cute ;) makes me wish I had one to build it for! My daughter and step daughter are 9 and 6 soo umm don't think they'd fit LOL I do have cousins with kids that just might need a toddler bed now just to cinvince them they need to let me build it! This and the kitchen! I've been going crazy trying to come up with someone to build the kitchen for as my girls just aren't into it anymore. The 6 yr old maybe but she isn't here enough to use it.
Reina LeGrand (not verified)
Wed, 01/26/2011 - 03:53
I hope I win!
I hope I win!
Nat's mom (not verified)
Wed, 01/26/2011 - 04:20
Just as my daughter is
Just as my daughter is outgrowing her toddler bed you post this? Aw man!
Sarah Hammond (not verified)
Wed, 01/26/2011 - 04:20
Fantastic! Our crib turns
Fantastic! Our crib turns into a toddler bed, but this is sooo much better! I just hope that I can find wood/stain to make it match the other pieces in her room! They are a warm pine sort of color from Bonavita, the Peyton collection.
Treva (not verified)
Wed, 01/26/2011 - 04:52
My daughter really wants a
My daughter really wants a canopy bed, but she is 10. Would the canopy be strong enough if I combined these canopy plans with the twin Lydia daybed? I think this would be perfect for her.
Laree @ Ever H… (not verified)
Wed, 01/26/2011 - 05:06
L.O.V.E it! But I also
L.O.V.E it!
But I also don't have a need for a toddler bed. Sigh. But I can still drool over your skills!
Emily W. (not verified)
Wed, 01/26/2011 - 05:28
My son just outgrew his
My son just outgrew his toddler bed, too. But I'd love to make this for my niece who just turned one.
lianatempera (not verified)
Wed, 01/26/2011 - 06:08
This is beautiful! I would
This is beautiful! I would totally build the little man version for my little boy, for when the baby comes, but unfortunately, we already have a toddler bed for him :(
Mairanellis (not verified)
Wed, 01/26/2011 - 07:45
Make it a twin size bed and
Make it a twin size bed and Grace won't outgrow it any time soon!
Leslie in RI (not verified)
Wed, 01/26/2011 - 07:47
Oh my word! Forget the
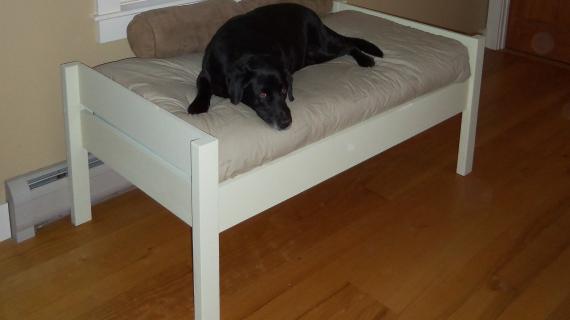
Oh my word! Forget the toddler! I want this for the 14 yo pit I just rescued. Humphrey has wobbly back legs and I think this bed is just the ticket! Of course, the pugs might have to join him as well. Thanks for this amazing design!
shelley (not verified)
Wed, 01/26/2011 - 09:13
I have 18 mo old twin girls.
I have 18 mo old twin girls. Can you imagine two little matching beds? So much cuteness!!! :)
Janelle (not verified)
Wed, 01/26/2011 - 09:46
This bed is so adorable.
This bed is so adorable. Just in time for my little girl. She is going to be kicked out of her crib to make room for the baby. She will be so excited to switch to this beautiful bed. Thank you for all of your wonderful plans. We are almost done with our 8 kitchen chairs. We just need to give them a protective coating. Thanks.
Leanne (not verified)
Wed, 01/26/2011 - 10:04
I have a little girl who is
I have a little girl who is getting ready to move out of her crib!
Sara (not verified)
Wed, 01/26/2011 - 10:55
wow...i love this so much...i
wow...i love this so much...i have a toddler farmhouse bed in the works...but this is out of control adorable...i might have to do this instead...think i could add the canopy to the farmhouse bed? or is that crazy talk?
JeNae Clegg (not verified)
Wed, 01/26/2011 - 15:14
What a cute little bed! I
What a cute little bed! I usually put my kids in a twin after the crib, but I've been looking at all your toddler beds & I'm reconsidering. Thanks for all your hard work!
Jessica (not verified)
Wed, 01/26/2011 - 15:53
I've had a Kreg pocket jig
I've had a Kreg pocket jig for 8 months now.. and have not been able to find a chance to use it. By golly I'm going to make time to use it this weekend on this bed. My toddler has been sharing a twin-size bed on the floor with her 3 year old sis for a month now... We had to give up the crib due to the same 3 year old helping her out (and she got several large goose eggs in the process...) She will have this bed. She will have her own bed now. (And then I'll have to modify it later for her sister's twin size.) lol
Janette (not verified)
Wed, 01/26/2011 - 22:00
Oh, this is perfect! Our
Oh, this is perfect! Our little angel is moving to a new room soon (her twin baby brothers are moving in), and needs a new "big girl" bed. We have older boys too, and she's the only girl of the whole bunch. I think a wee little canopy bed would be a much-needed bit of pink in this blue house! We'd have to wait to build it until we come home from our trip to Alaska, but I'm already excited. Thank you, Ana!
michelle (not verified)
Wed, 01/26/2011 - 22:02
This is perfect for my little
This is perfect for my little girl! Thank you for all of your hard work.
Olivia (not verified)
Thu, 01/27/2011 - 10:35
I think I need another
I think I need another project like a hole in the head, but I would love to get going on this adorable bed!
Christin (not verified)
Fri, 01/28/2011 - 06:12
Sara, someone else has
Sara, someone else has already made the toddler farmhouse into a canopy bed! Sooo cute! http://ana-white.com/2011/01/toddler-farmhouse-bed-with-canopy.html
Ana White (not verified)
Sun, 01/30/2011 - 18:18
Congrats to entry #165
Congrats to entry #165 (choosen by Random.org) Catreese for winning this giveaway. Thanks to everyone that enters and all of our loyal readers, and especially the Home Depot! Catreese, your gift card is on it's way. Everyone else, keep checking back . . . I love helping out our readers!
cjrogers (not verified)
Mon, 01/31/2011 - 11:20
I just got the gift card via
I just got the gift card via email and I'm still shocked that I won! Can't wait to build my little girl a big girl bed. Thanks for all your great plans and giveaways!!
Ana White (not verified)
Mon, 01/31/2011 - 12:14
Awesome! Good luck, can't
Awesome! Good luck, can't wait to see your bed!
Crystal Williams (not verified)
Fri, 02/11/2011 - 09:49
I can't wait to get started
I can't wait to get started on this one.
Eric (not verified)
Sun, 02/27/2011 - 08:47
Does anyone have this plan
Does anyone have this plan resized to a Twin mattress? Or are the sketchup files available? First time at this site and really impressed with the selection and detail.
Ana White (not verified)
Sun, 02/27/2011 - 10:36
Welcome, Eric! Here you go:
Welcome, Eric! Here you go: http://ana-white.com/2010/05/furniture-plans-lydia-daybed.html
Eric (not verified)
Sun, 02/27/2011 - 15:05
Thanks! going to put together
Thanks! going to put together a list to go shopping.
eruji
Mon, 04/04/2011 - 14:22
Update on the twin sized toddler beds
Here is a set of photos of the construction and final put together twin beds. I ended up drawing the plans in sketchup using the dimensions for the toddler bed and increasing the size of the posts to 2 x 3's and the sides to 1 x 10 and the head board and foot board 1 x 6. My wife made the panels for the bed and the girls grandmother made the matching quilts. It took roughly 3 weekends to put together. Thanks for the website Ana and the fantastic plans!
In reply to Update on the twin sized toddler beds by eruji
tracysmith
Mon, 04/04/2011 - 16:10
Saw your pics!
Those are gorgeous beds! You did a great job and I'm sure your little girls will love them for many years to come! Wow is all I can say!!!
eruji
Mon, 04/04/2011 - 21:27
thank you so much
The girls love the new room.
Guest (not verified)
Tue, 05/03/2011 - 20:20
Toddler Bed
I had been looking for a great plan for a toddler bed and came across this one. It is beautiful and I intend to attempt this!
cdswhite
Mon, 06/27/2011 - 19:34
Headboard/Footboard Questtion
I want to make this for my 18 month old daughter and I think it might be nice to make the headboard/footboard out of a solid piece of material, instead of several different boards - any suggestions on how to pull this off without sacrificing quality/sturdiness?
We have only done a small project with cheaper plywood otherwise we have always used solid wood boards. What about a nicer plywood or mdf? Not sure and would appreciate any suggestions.
On the other hand, if you do use several boards, is it possible to sand and fill enough between the boards that it would look like one solid piece?
Guest (not verified)
Wed, 07/27/2011 - 15:24
lydia twin canopy trundle
Hi, I would like instructions (shopping list, cut list, and instructions) on a twin size, Lydia canopy trundle bed if anyone has them. I saw Eric's post earlier, and I've tried to figure it out on my own, too, by combining what exists currently from 3 plans. But since I'm new at this, it is proving too difficult for me to draw up the plans. Can anyone help? Thanks so much!
eruji
Wed, 07/27/2011 - 15:54
hope this helps.
I used the dimensions from link Ana posted for the twin sized bed, but used the construction from the toddler bed, So i increased the posts to 2x3's, side rails / bottom of footboard and headboard to 1 x 10's, then the rest of the foot/ head board with 1x6, with an extra one at the head.
I found my old spreadsheet with my cutlist and buylist.
https://spreadsheets.google.com/spreadsheet/ccc?key=0Au7xg-4Gxq94dEdlc0…
I would advise that you draw the plans out as if you were building it on paper to make sure you have the right dimensions. For me sketchup is an invaluable tool for this, but it does take quite a bit of learning to get the hang of it.
Also note that i raised the bed quite a bit to fit some storage and made the canopy much taller too.
Dont forget the bedknobs, and decorative molding.
let me know if you have any questions.
Guest (not verified)
Sat, 07/30/2011 - 15:44
Thanks so much! Your
Thanks so much! Your spreadsheet is wonderful--you even priced it out for me! Thanks so much, and I'll post photos when I'm done.