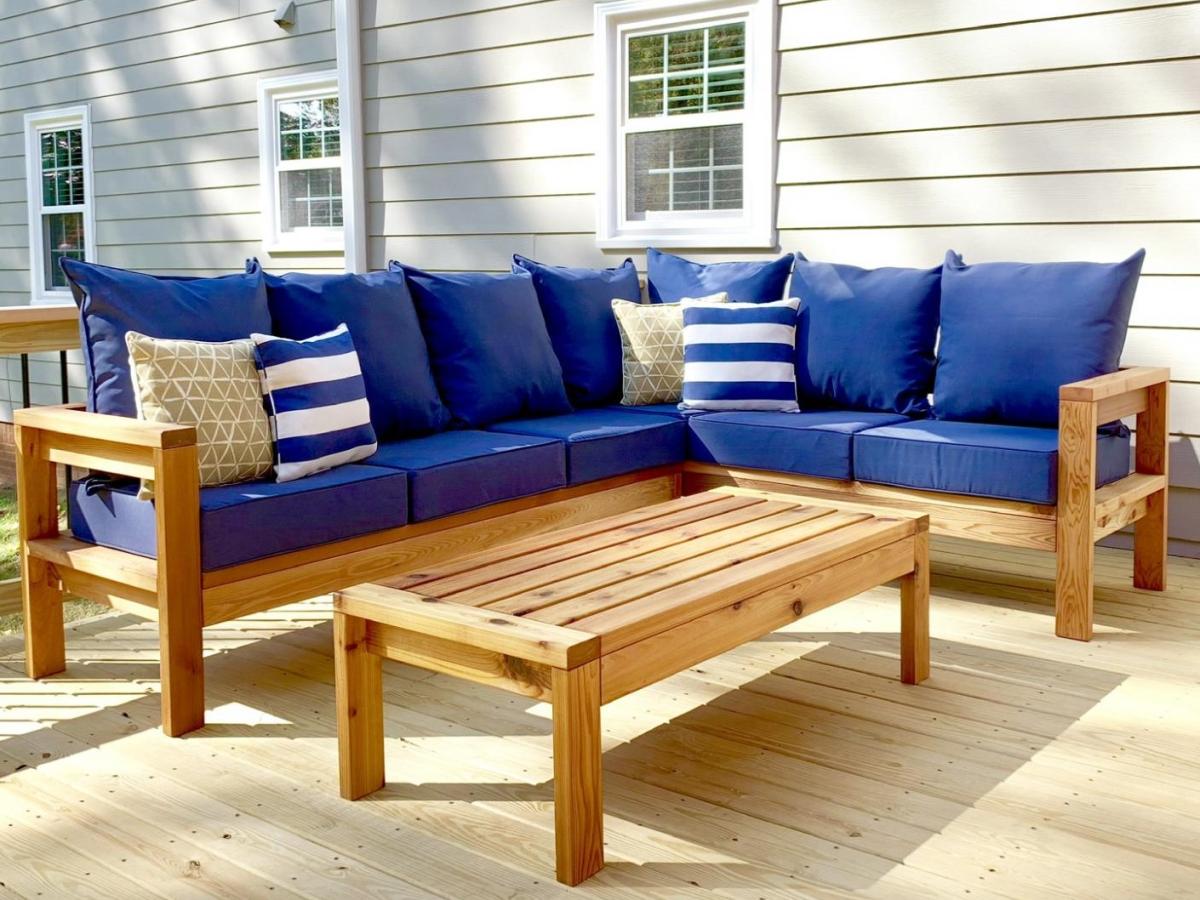
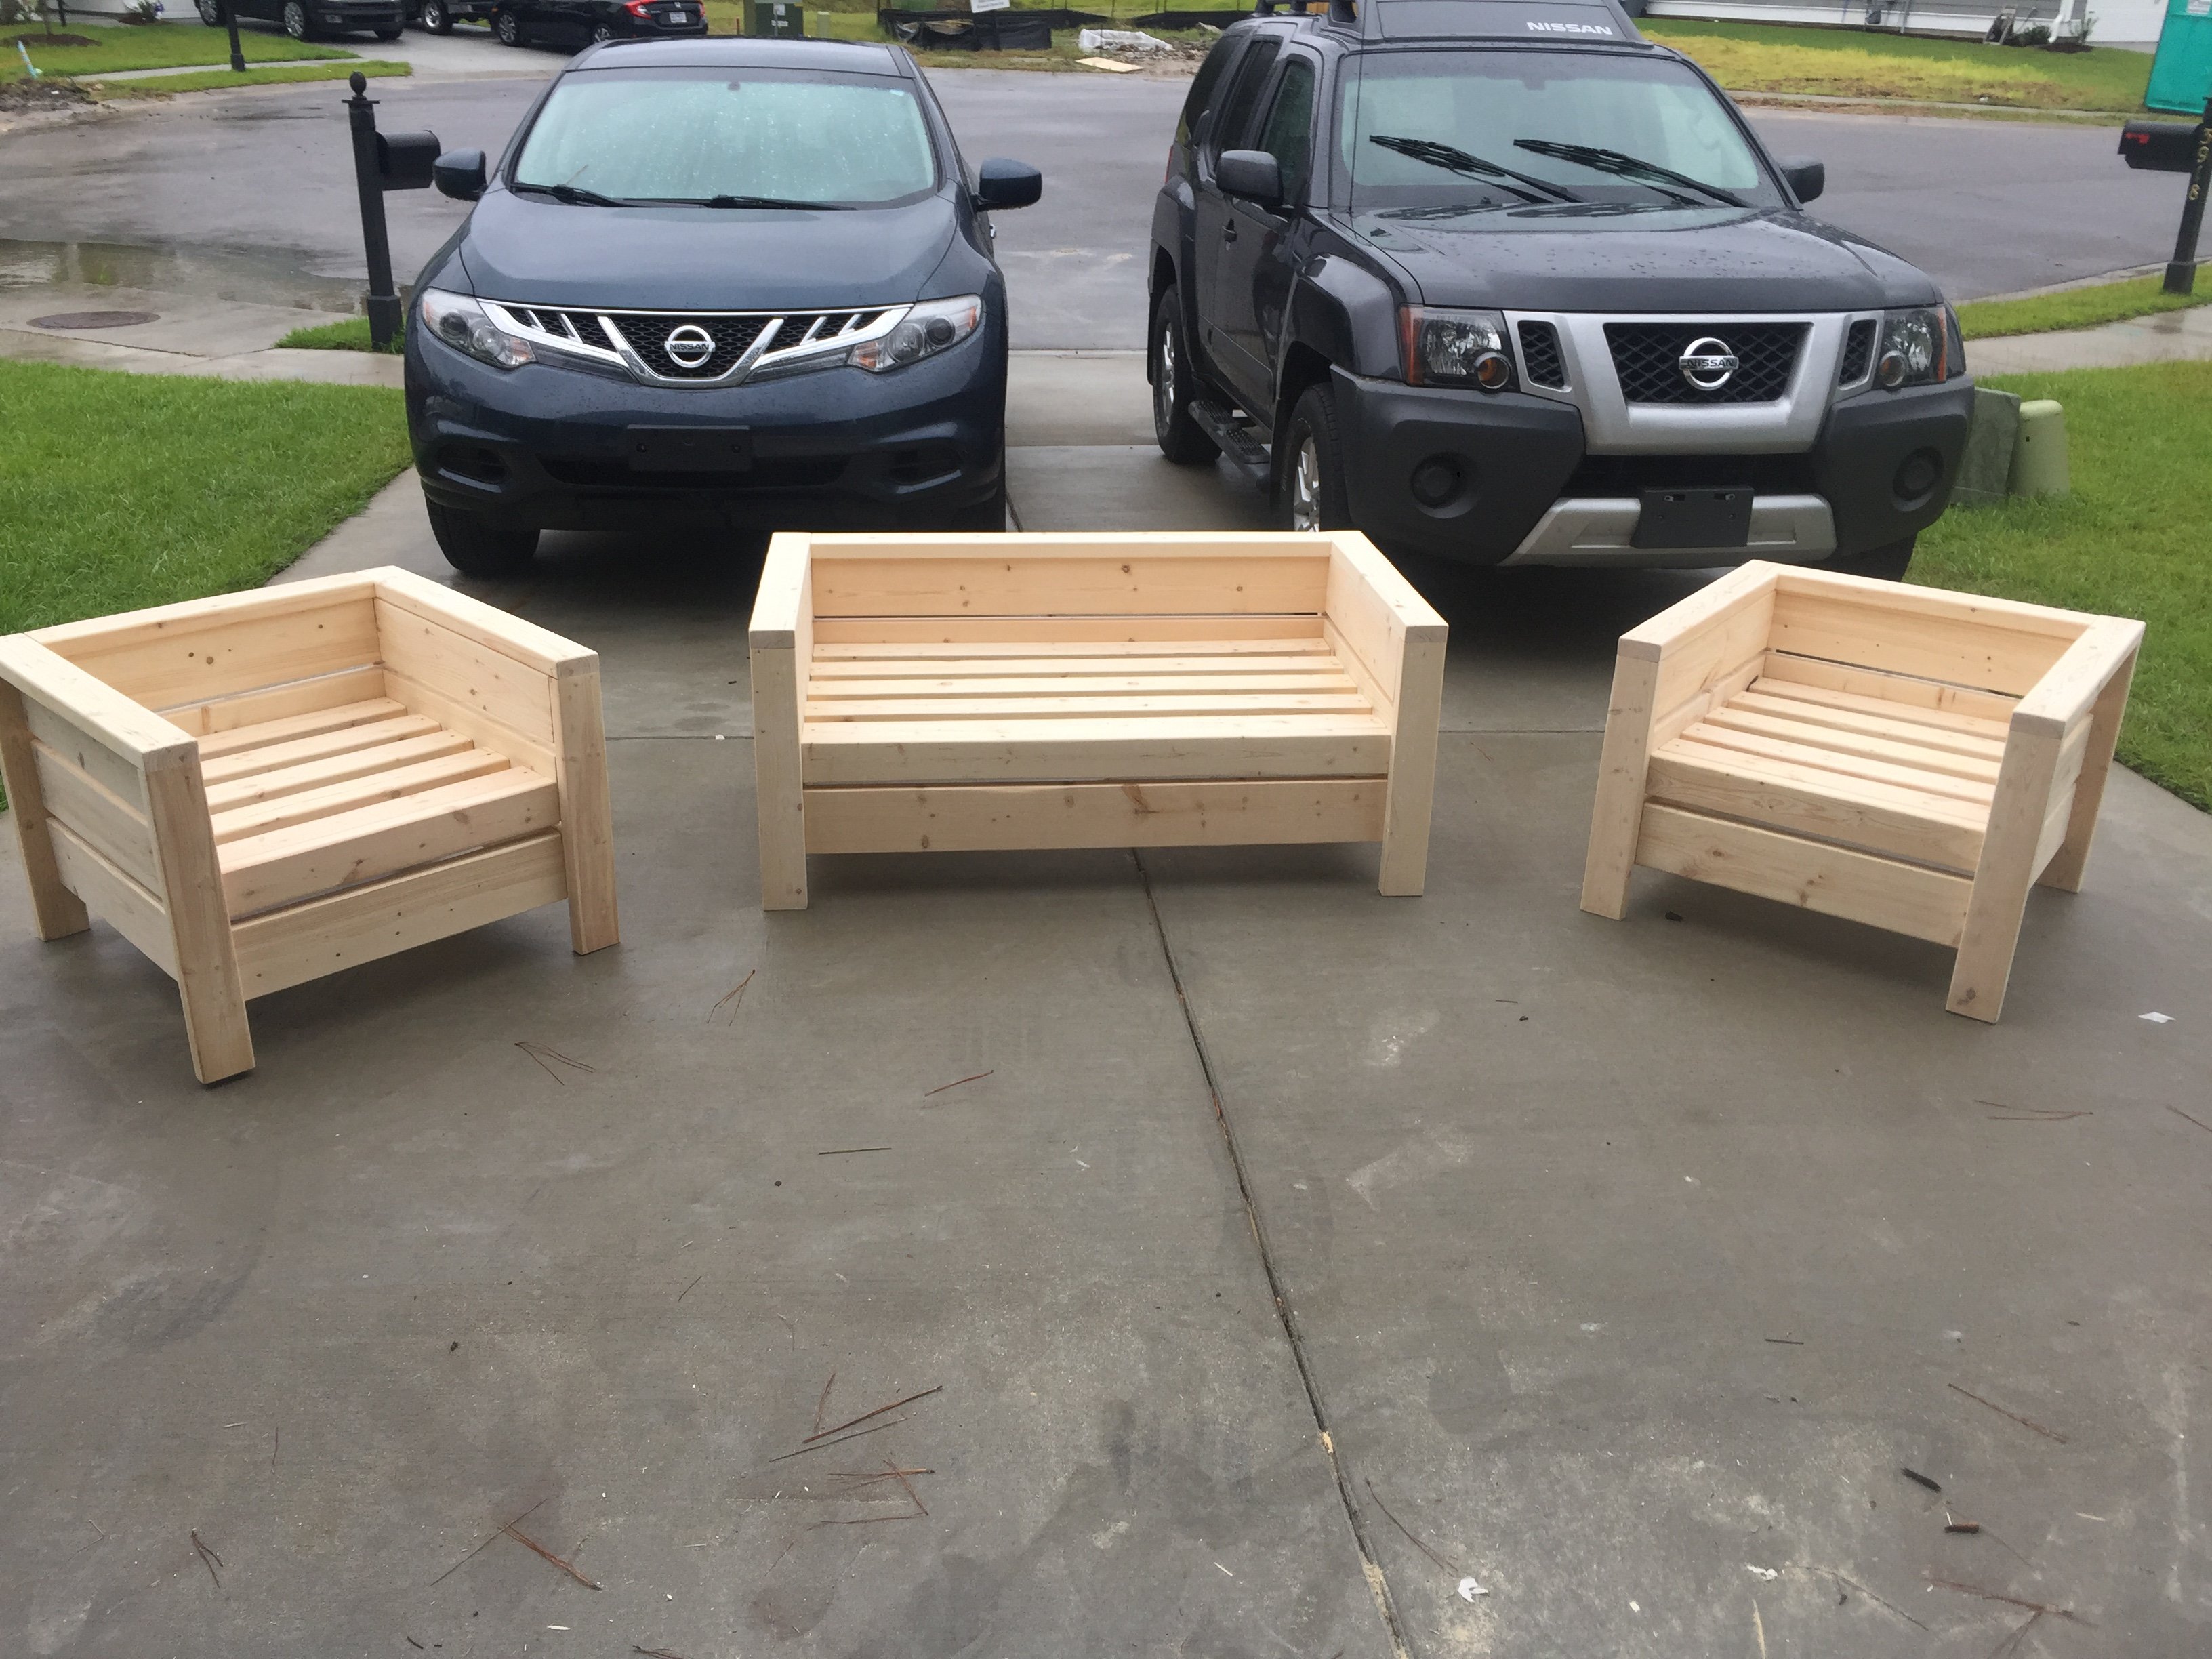
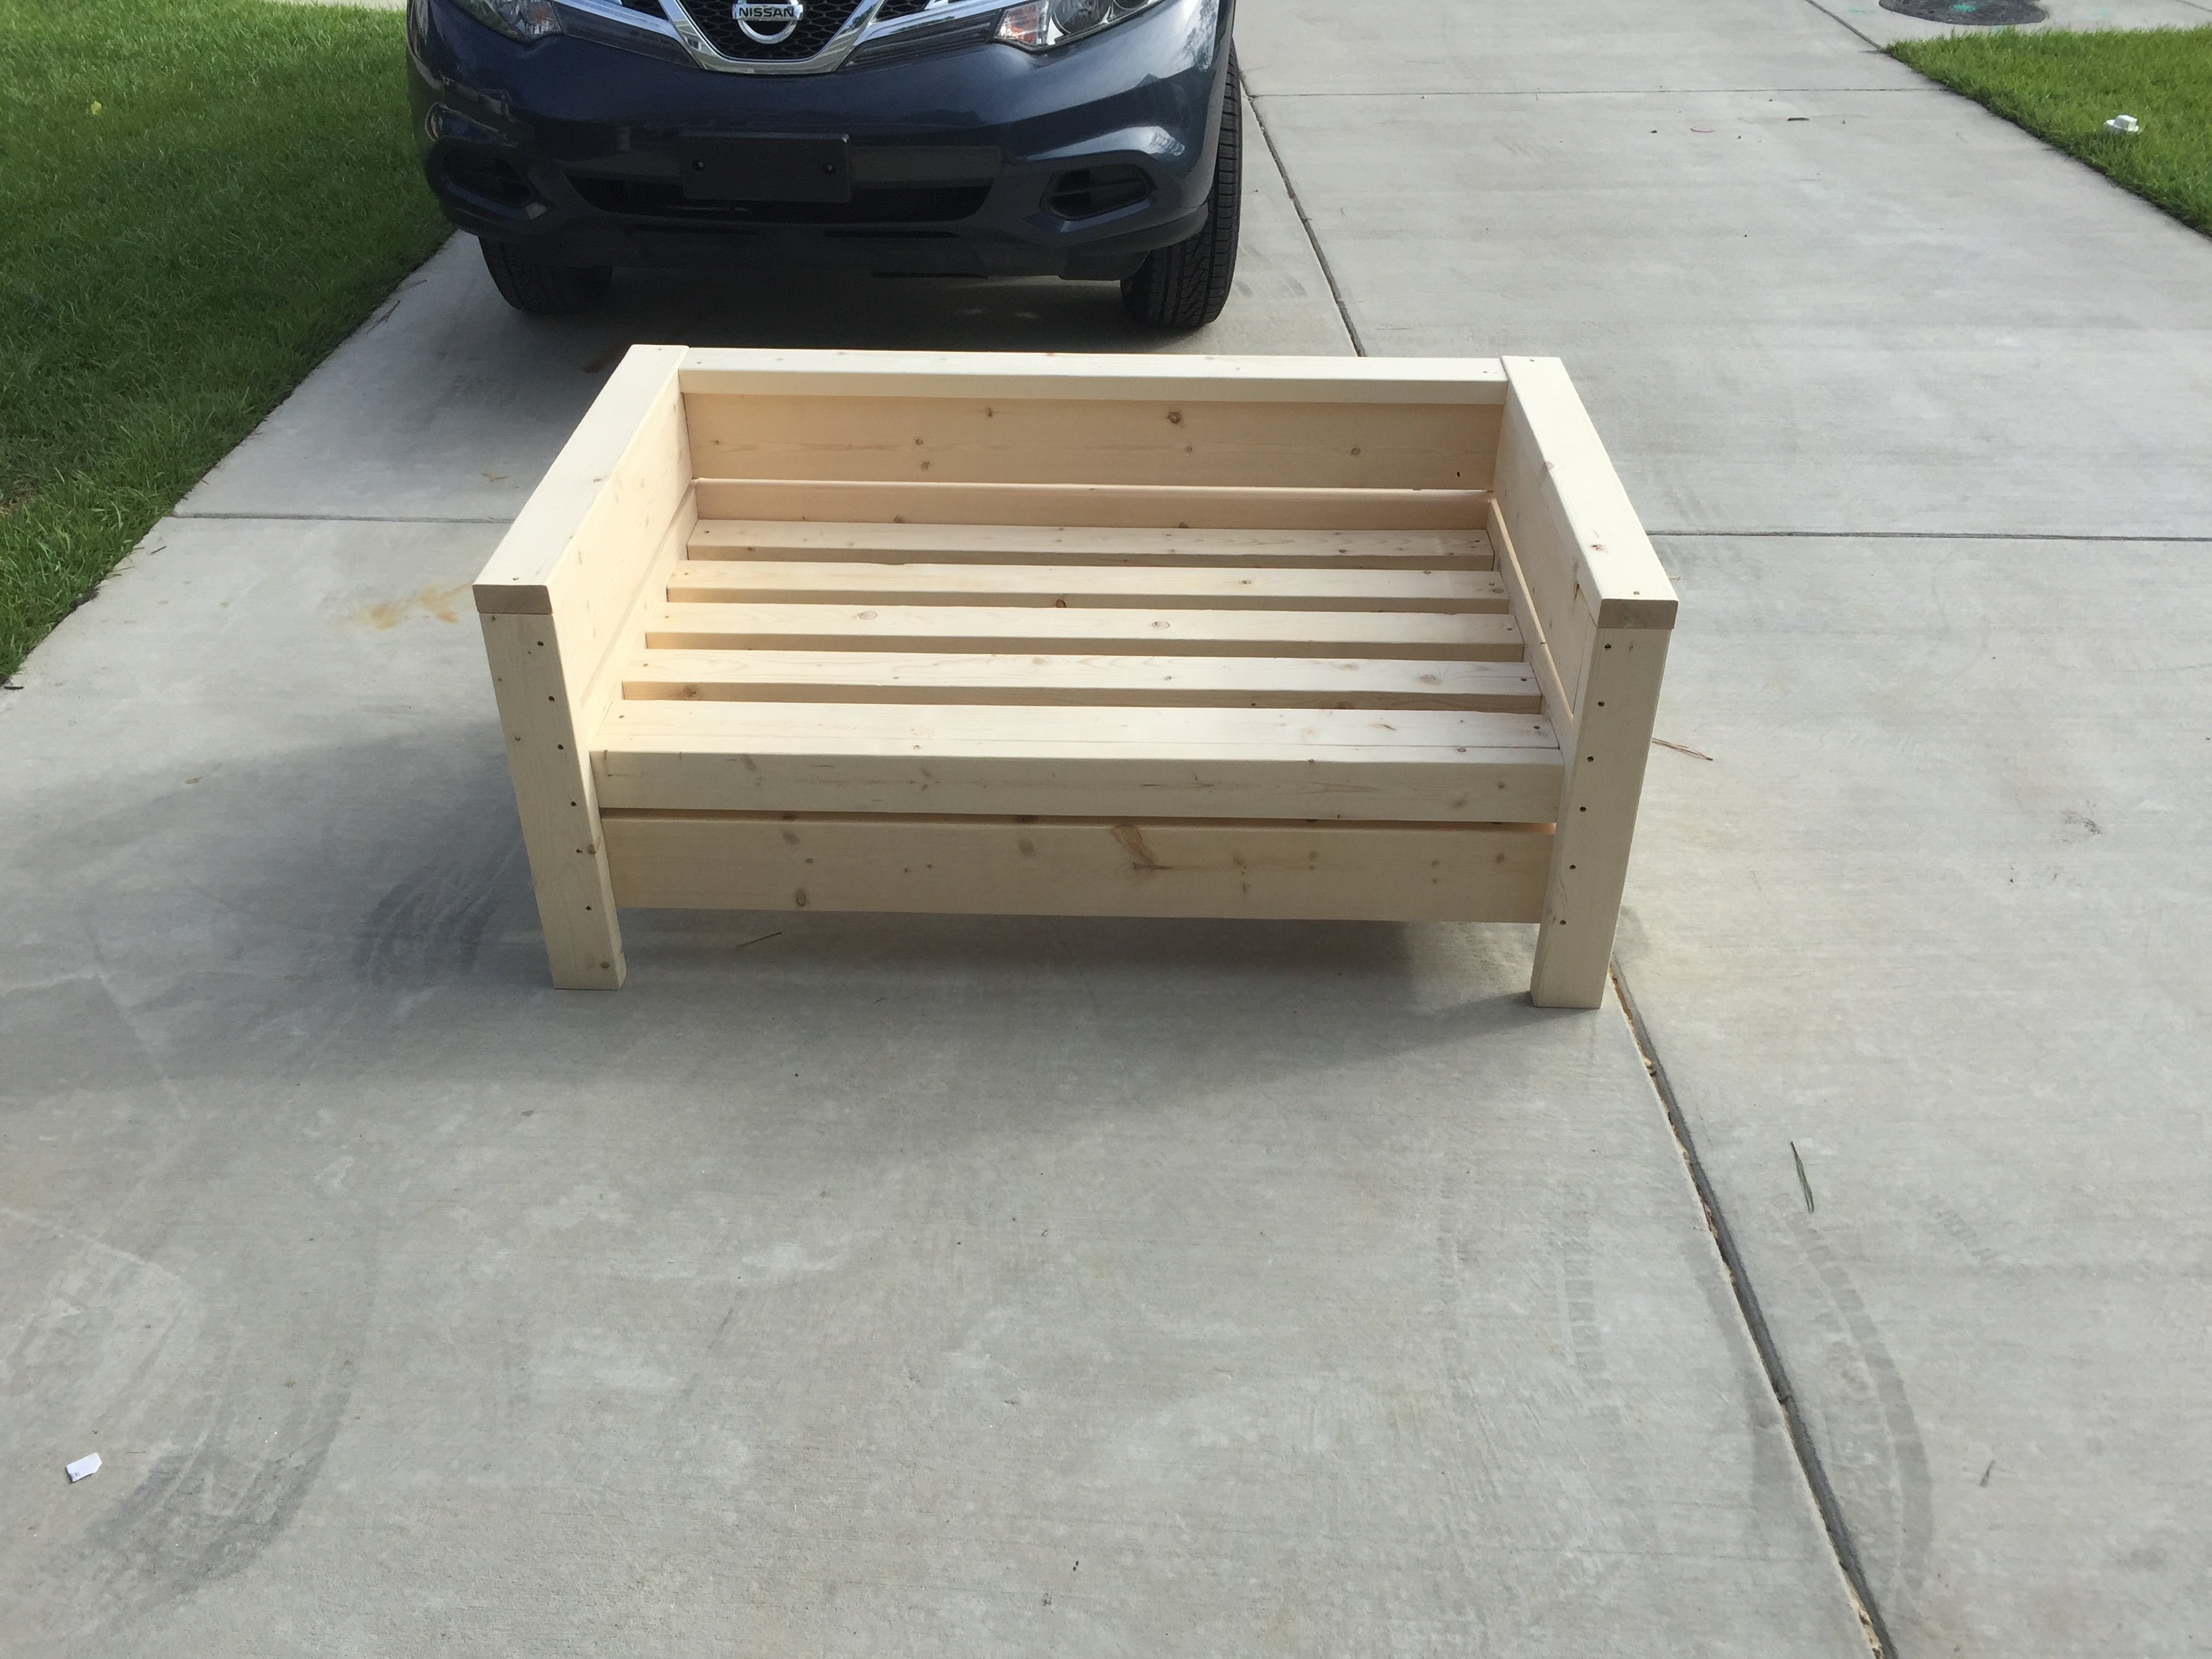
2x4 Sectional , table, and chairs
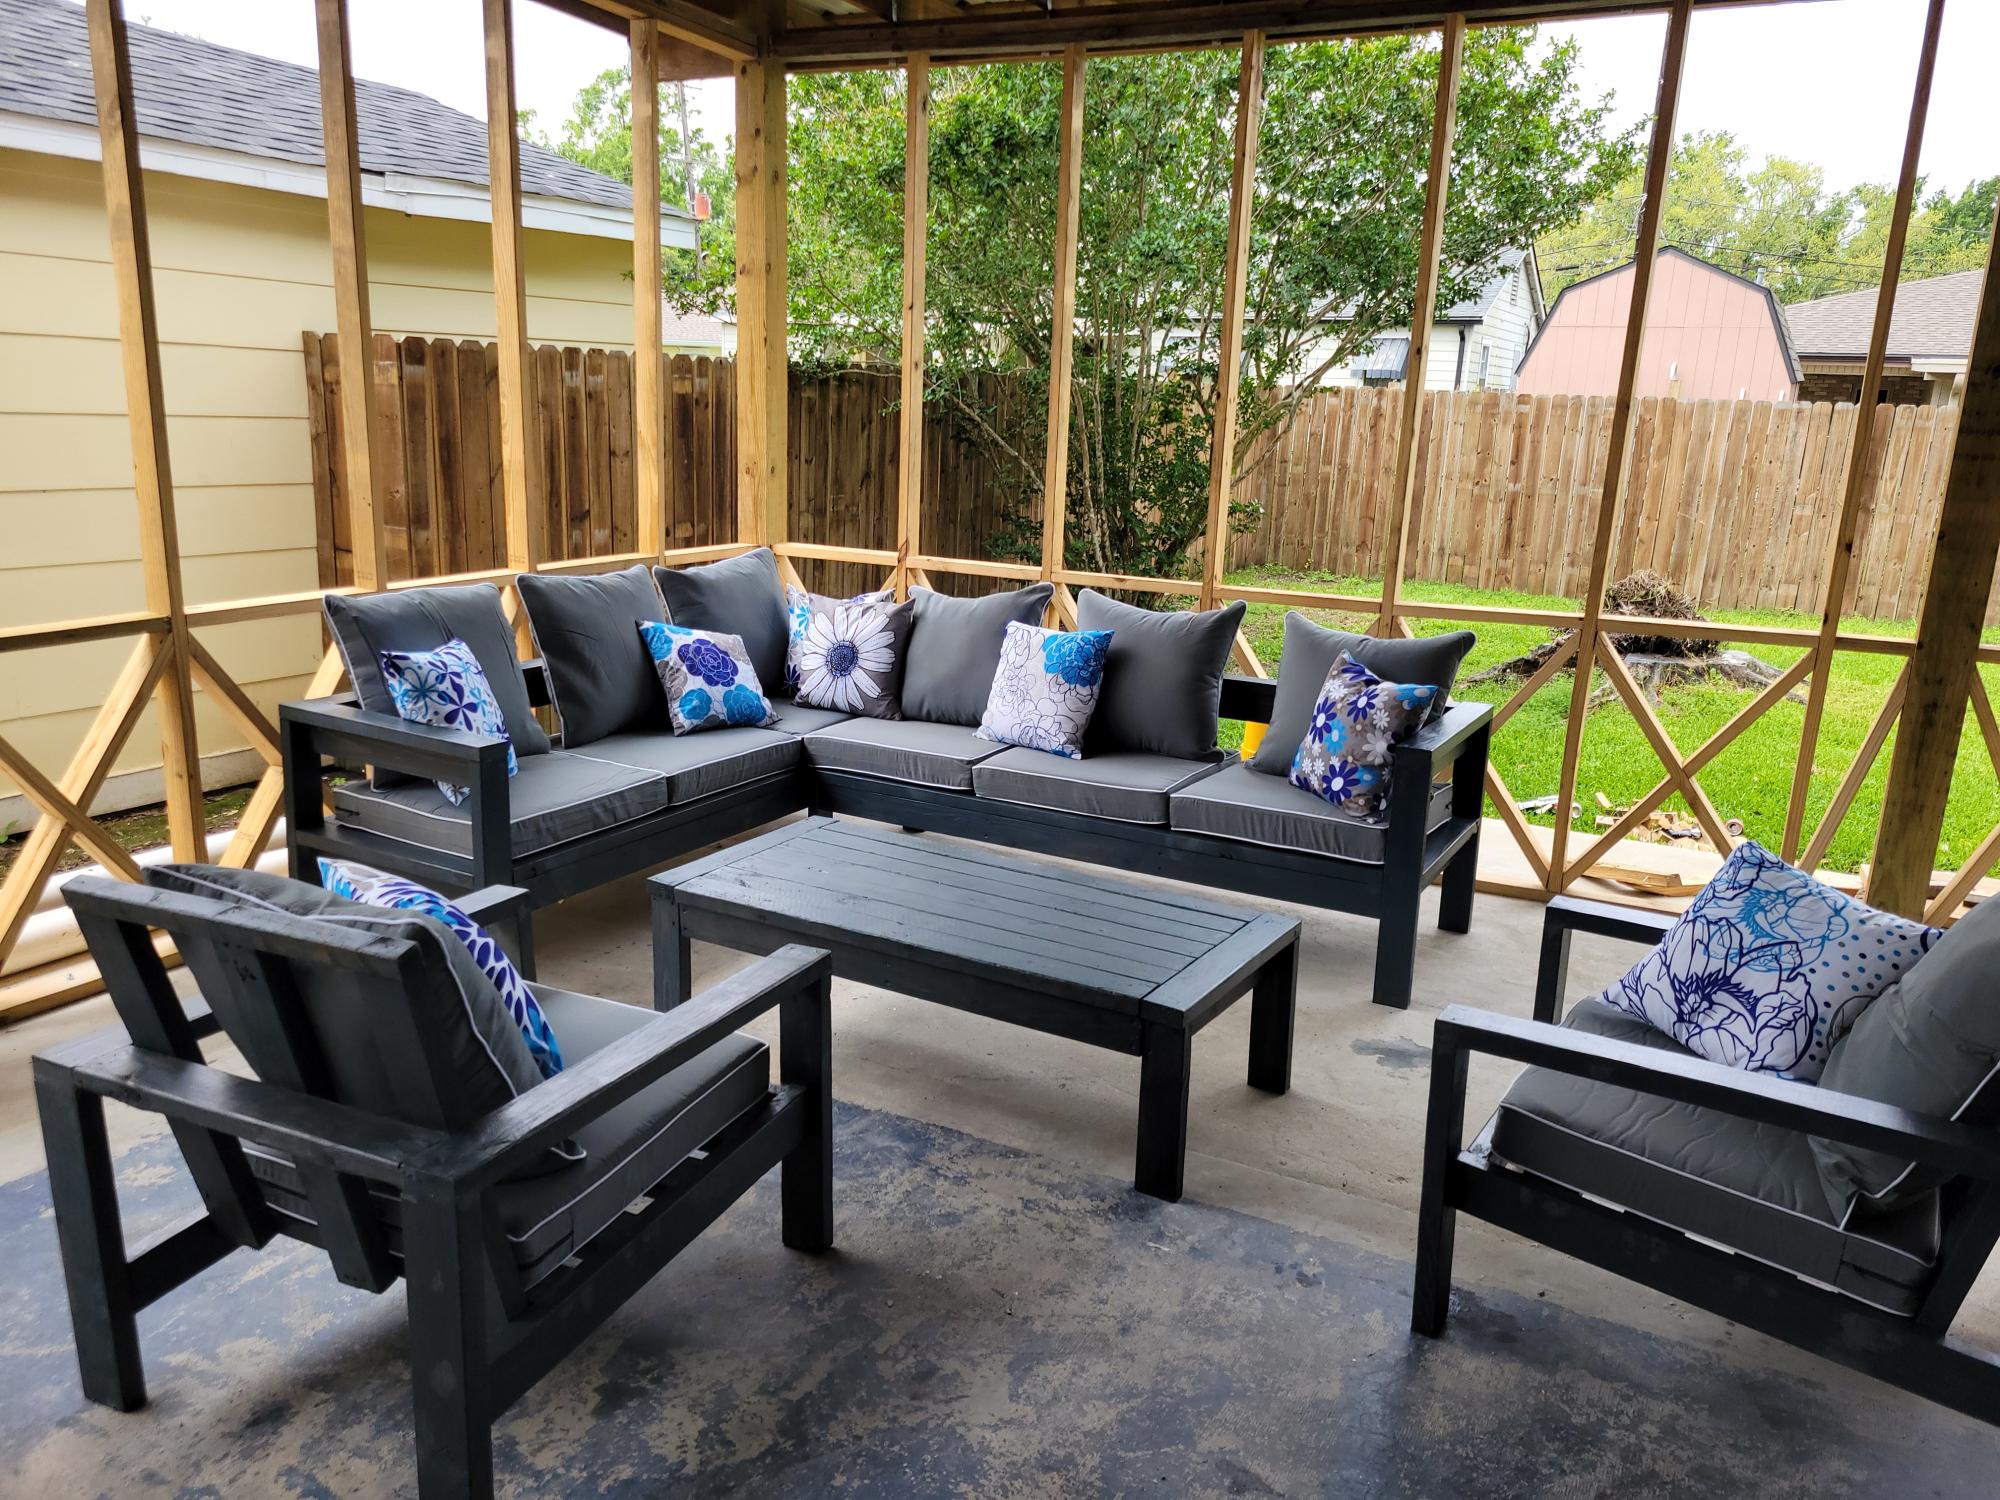
Your easy to follow 2x4 proje ts turned out amazing. My outdoor set is complete. The chairs, also, came from your plans. I built all of it by myself in one weekend. Thank you
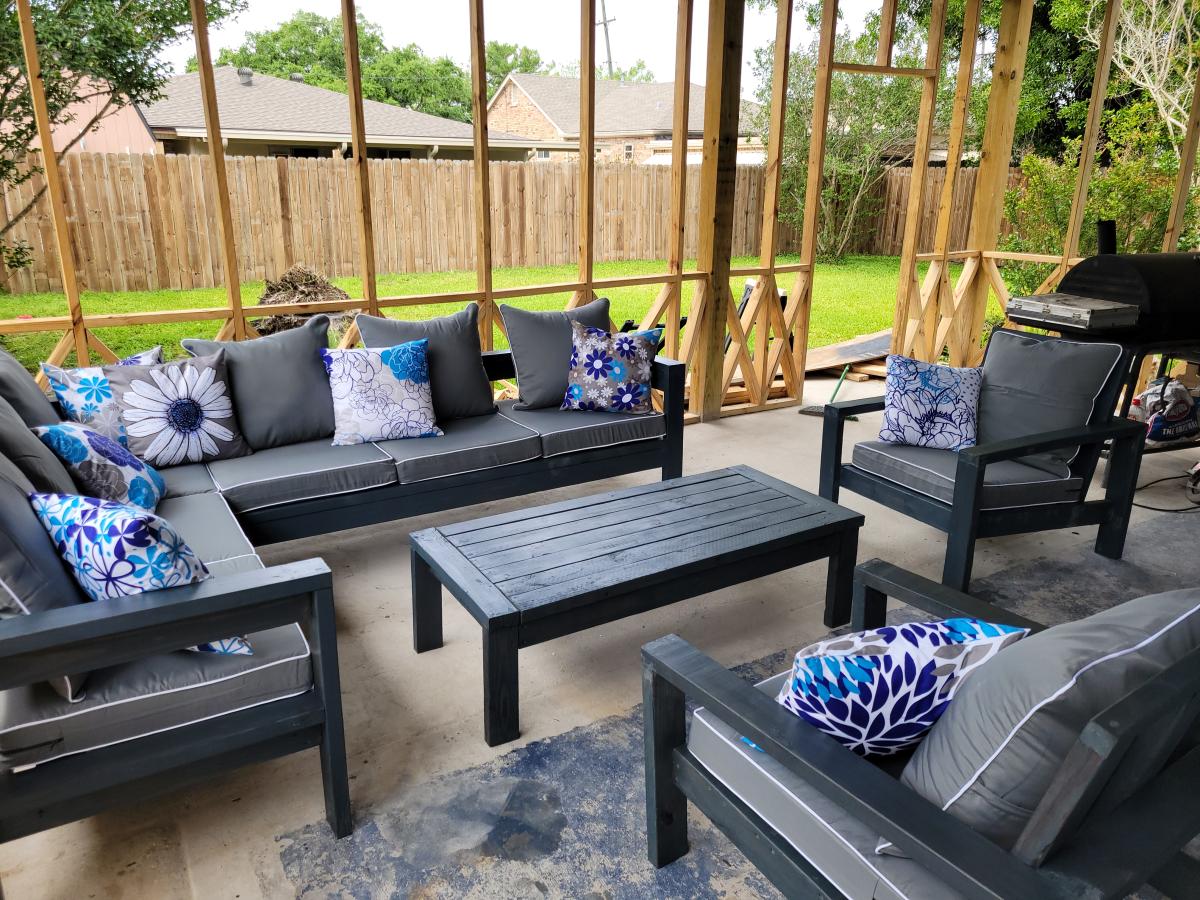
Your easy to follow 2x4 proje ts turned out amazing. My outdoor set is complete. The chairs, also, came from your plans. I built all of it by myself in one weekend. Thank you

This was so super easy. We are so in love with this. Thank you Ana for making DIY so much fun!
Thu, 05/18/2023 - 09:22
Way to go, so happy you enjoy it! Thanks for sharing.
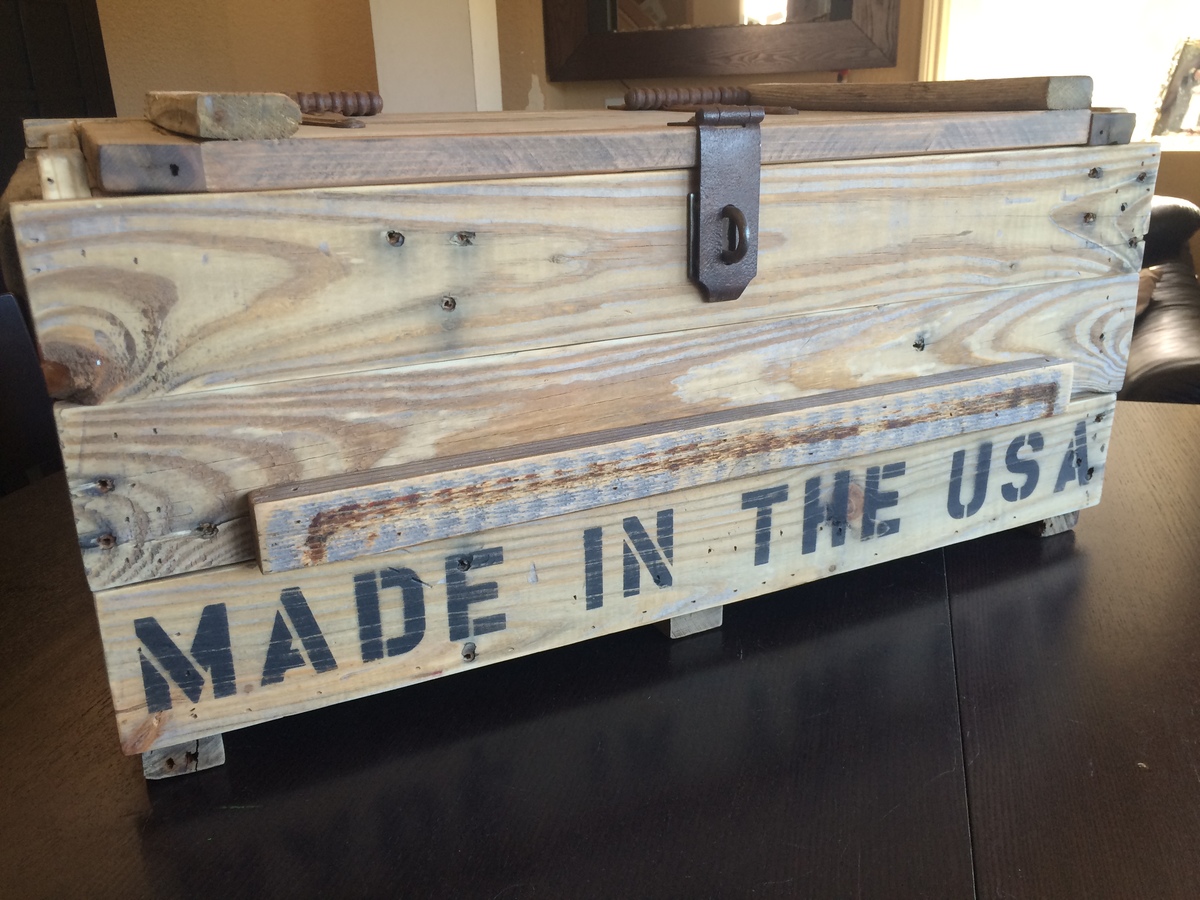
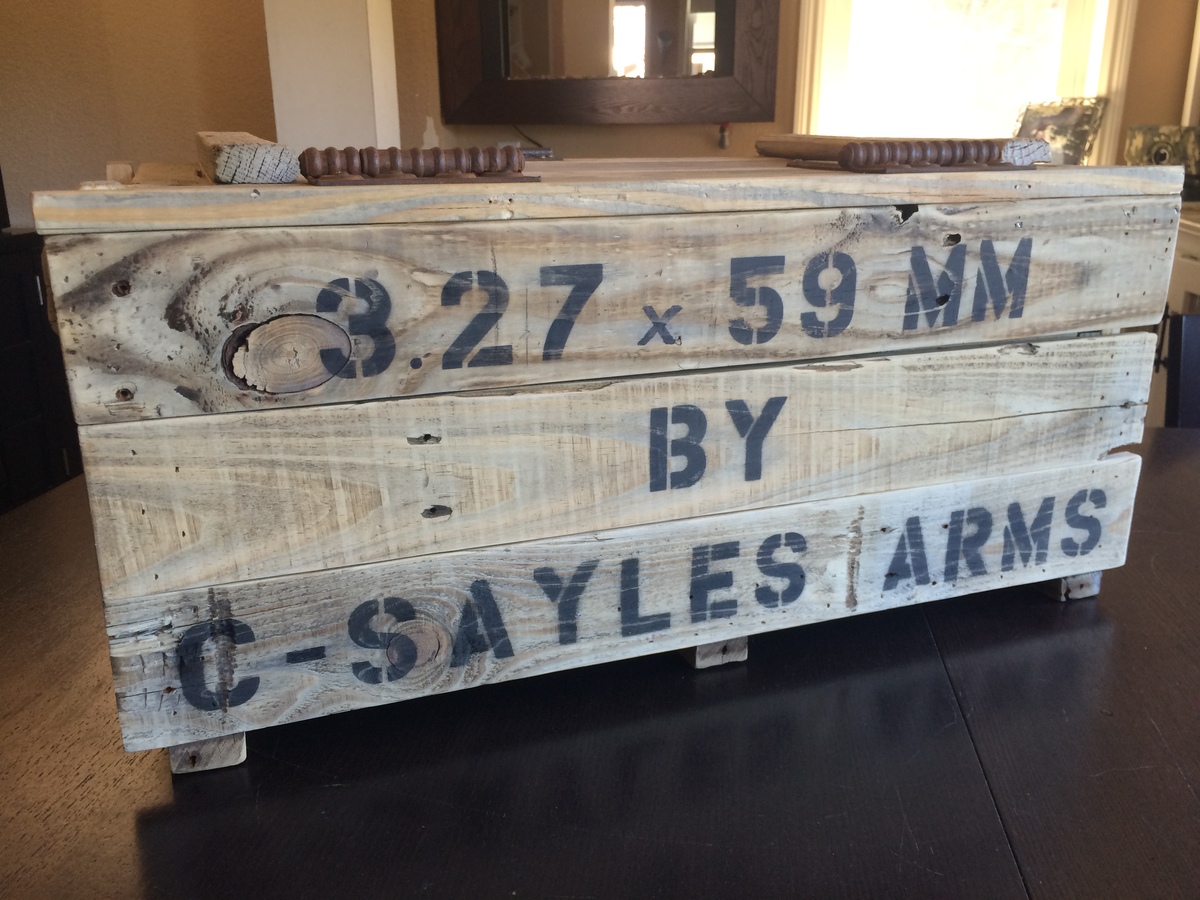
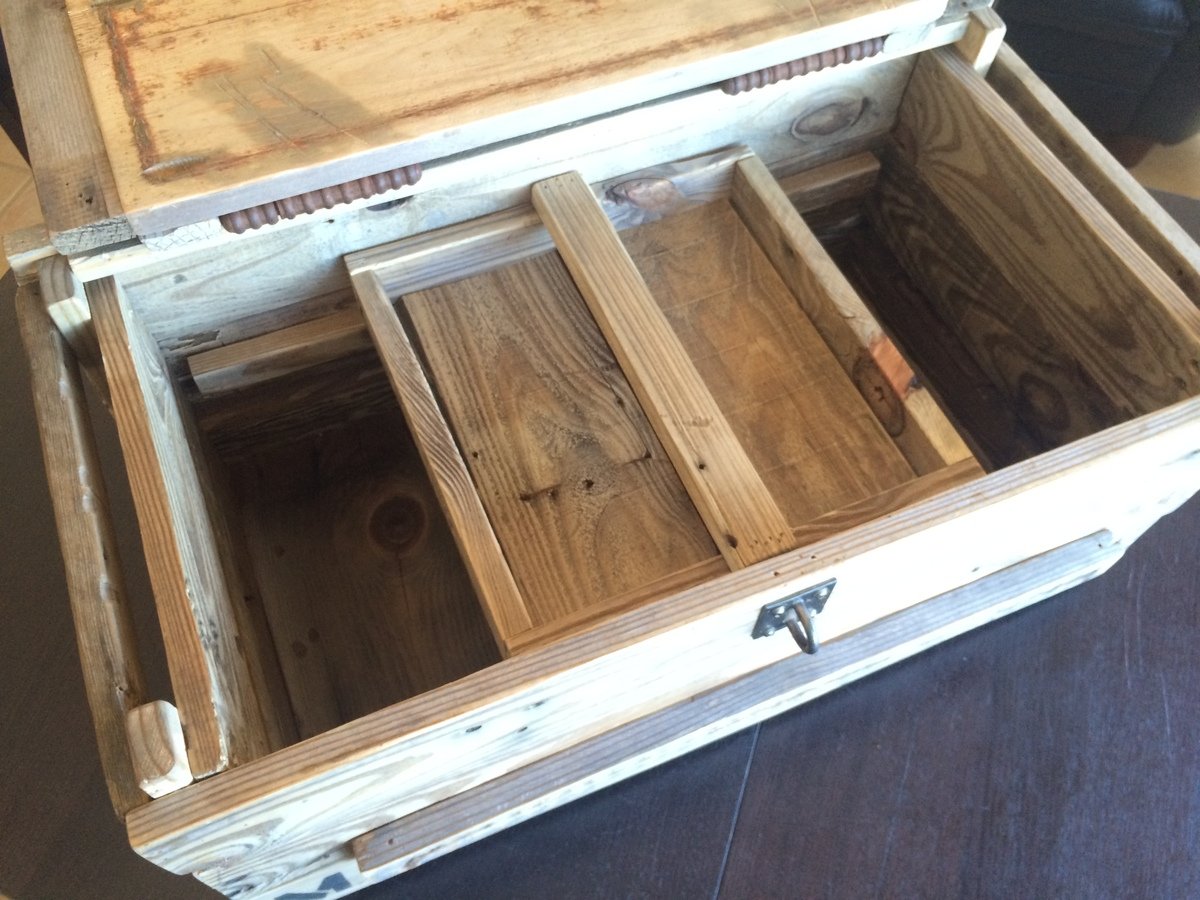
Created this as a gift for my uncle. I recycled an old pallet for the material. I used his birth date to create the ammunition shell specs and his name as the manufacturing company. I found the vintage hardware on eBay and added a sliding shelf inside. Lettering was created with stensils and spray paint. I distressed the lettering to match the vintage feel of the piece.


Sun, 01/12/2020 - 15:33
Hiw can i see instructions or dimensions for this crate . id like to try it
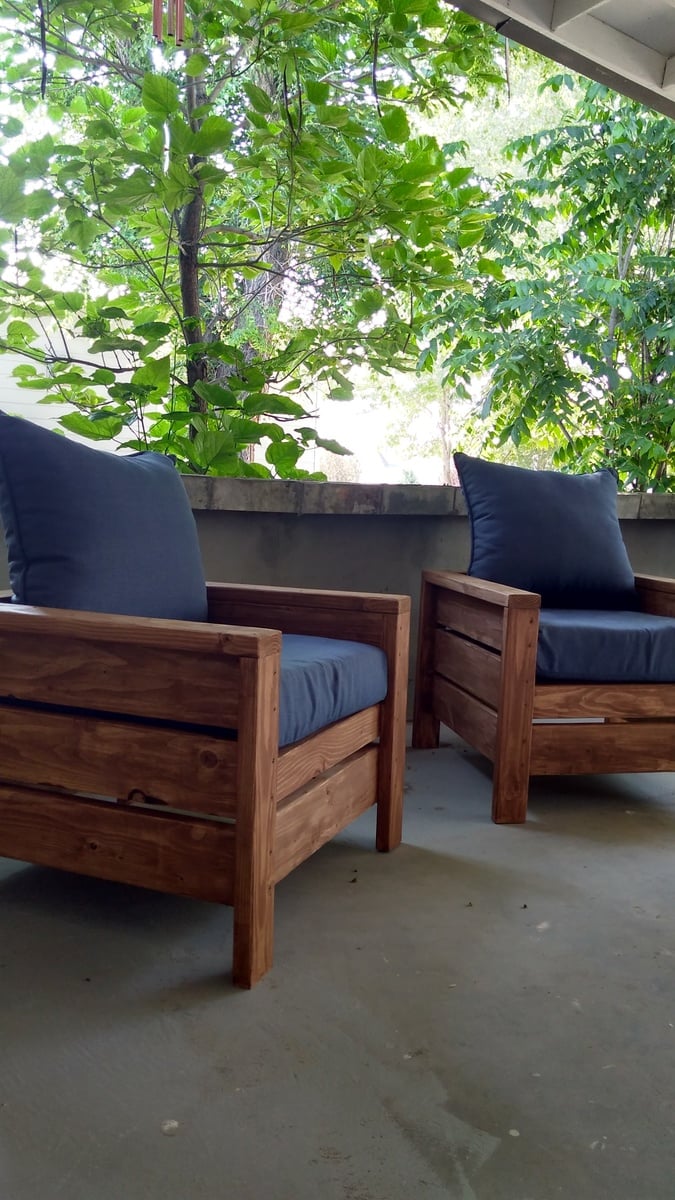
Chairs turned out nicely! Adjusted for cushions from home Depot (24x24)
Will also make a little table to set between soon. Thanks for the plans.

Reader submitted photo
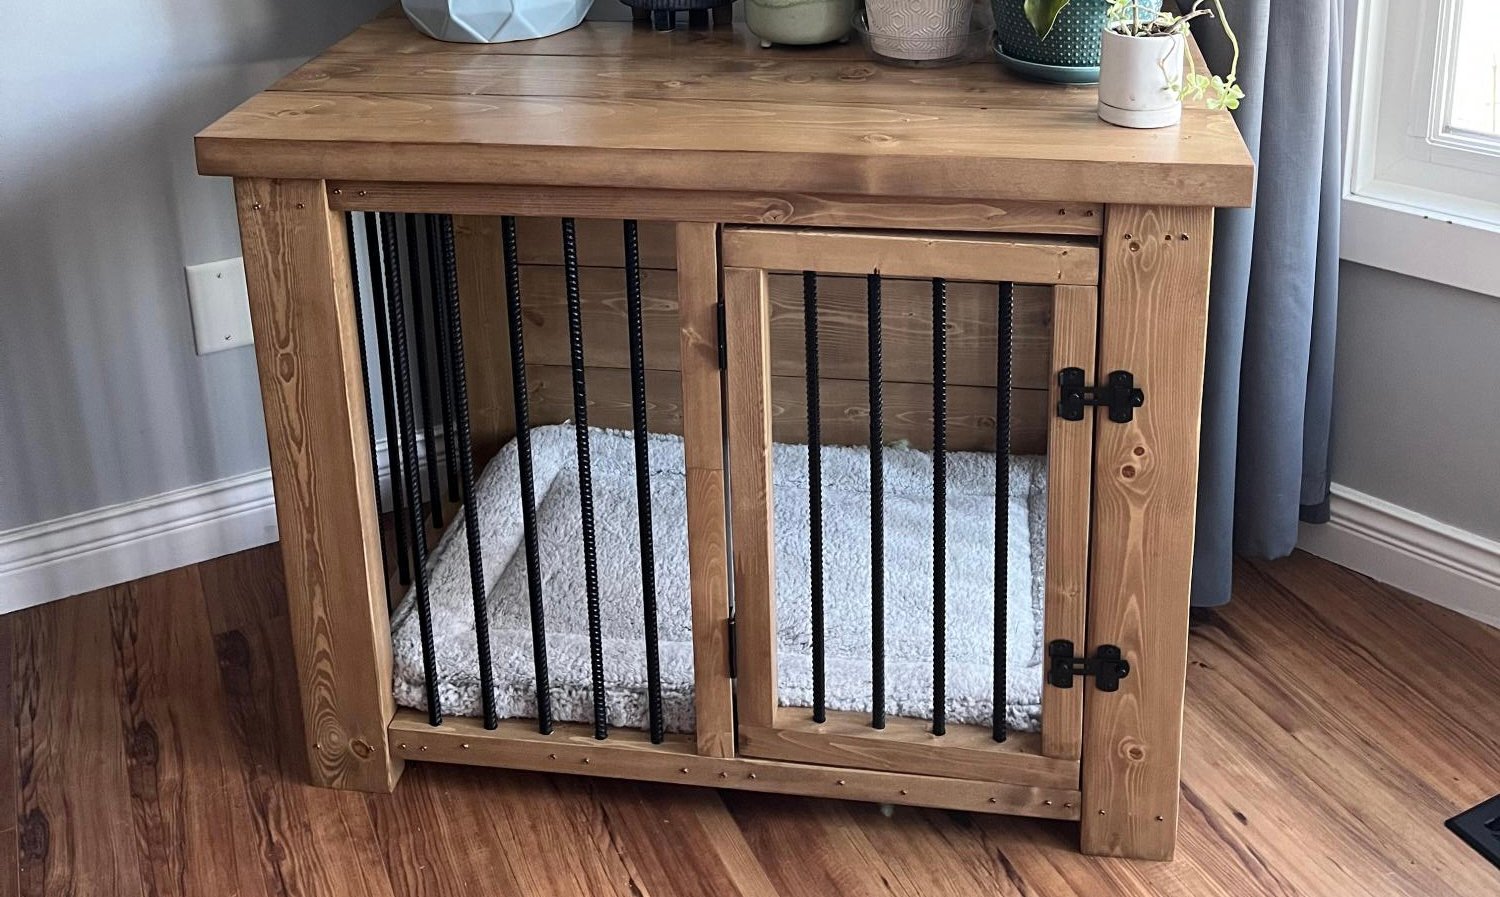
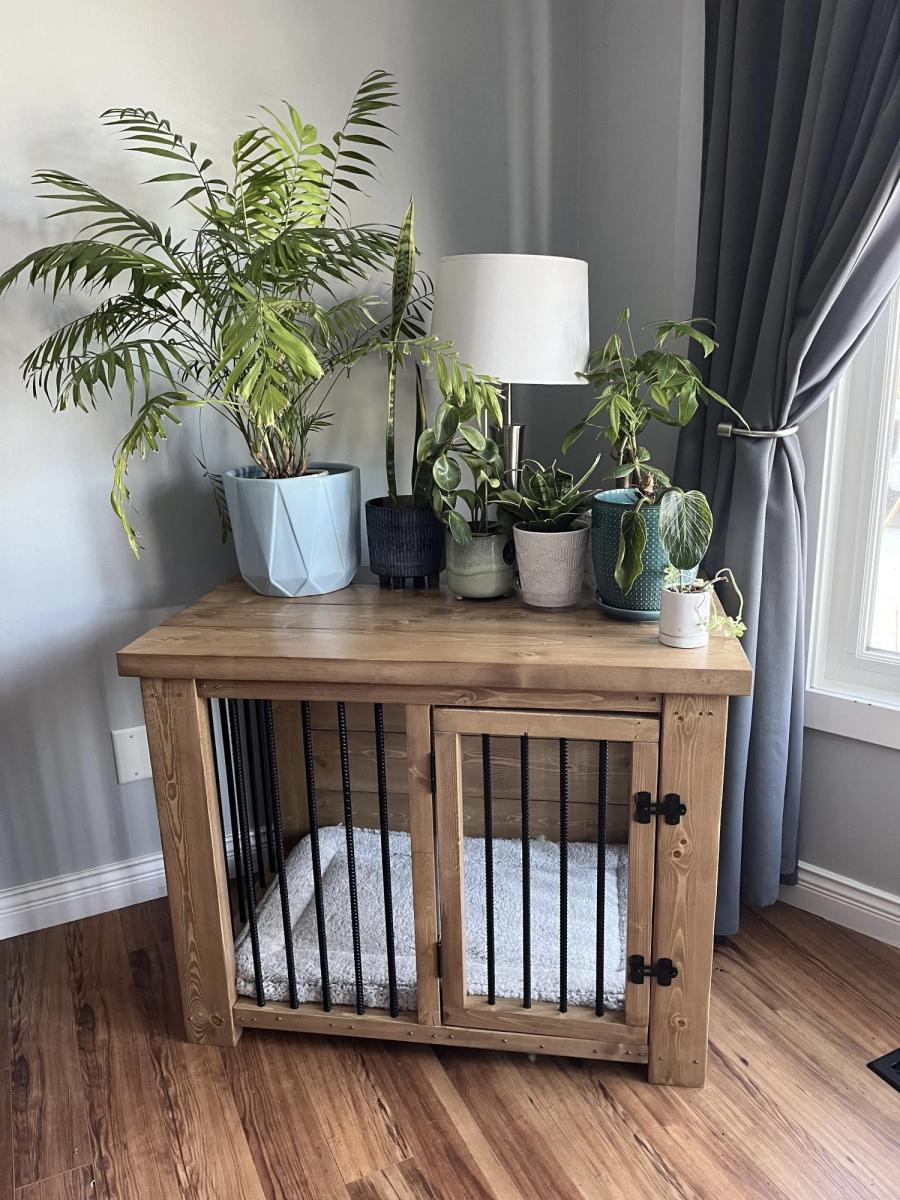
In January, I came across your plans for the farmhouse, coffee table. I made it, and loved it! I had been wanting a new spin on kennels for our dogs. And thought your coffee table transformed into a dog kennel would be perfect, and they are!!
Fri, 03/03/2023 - 11:53
Love the look, thank you so much for sharing!
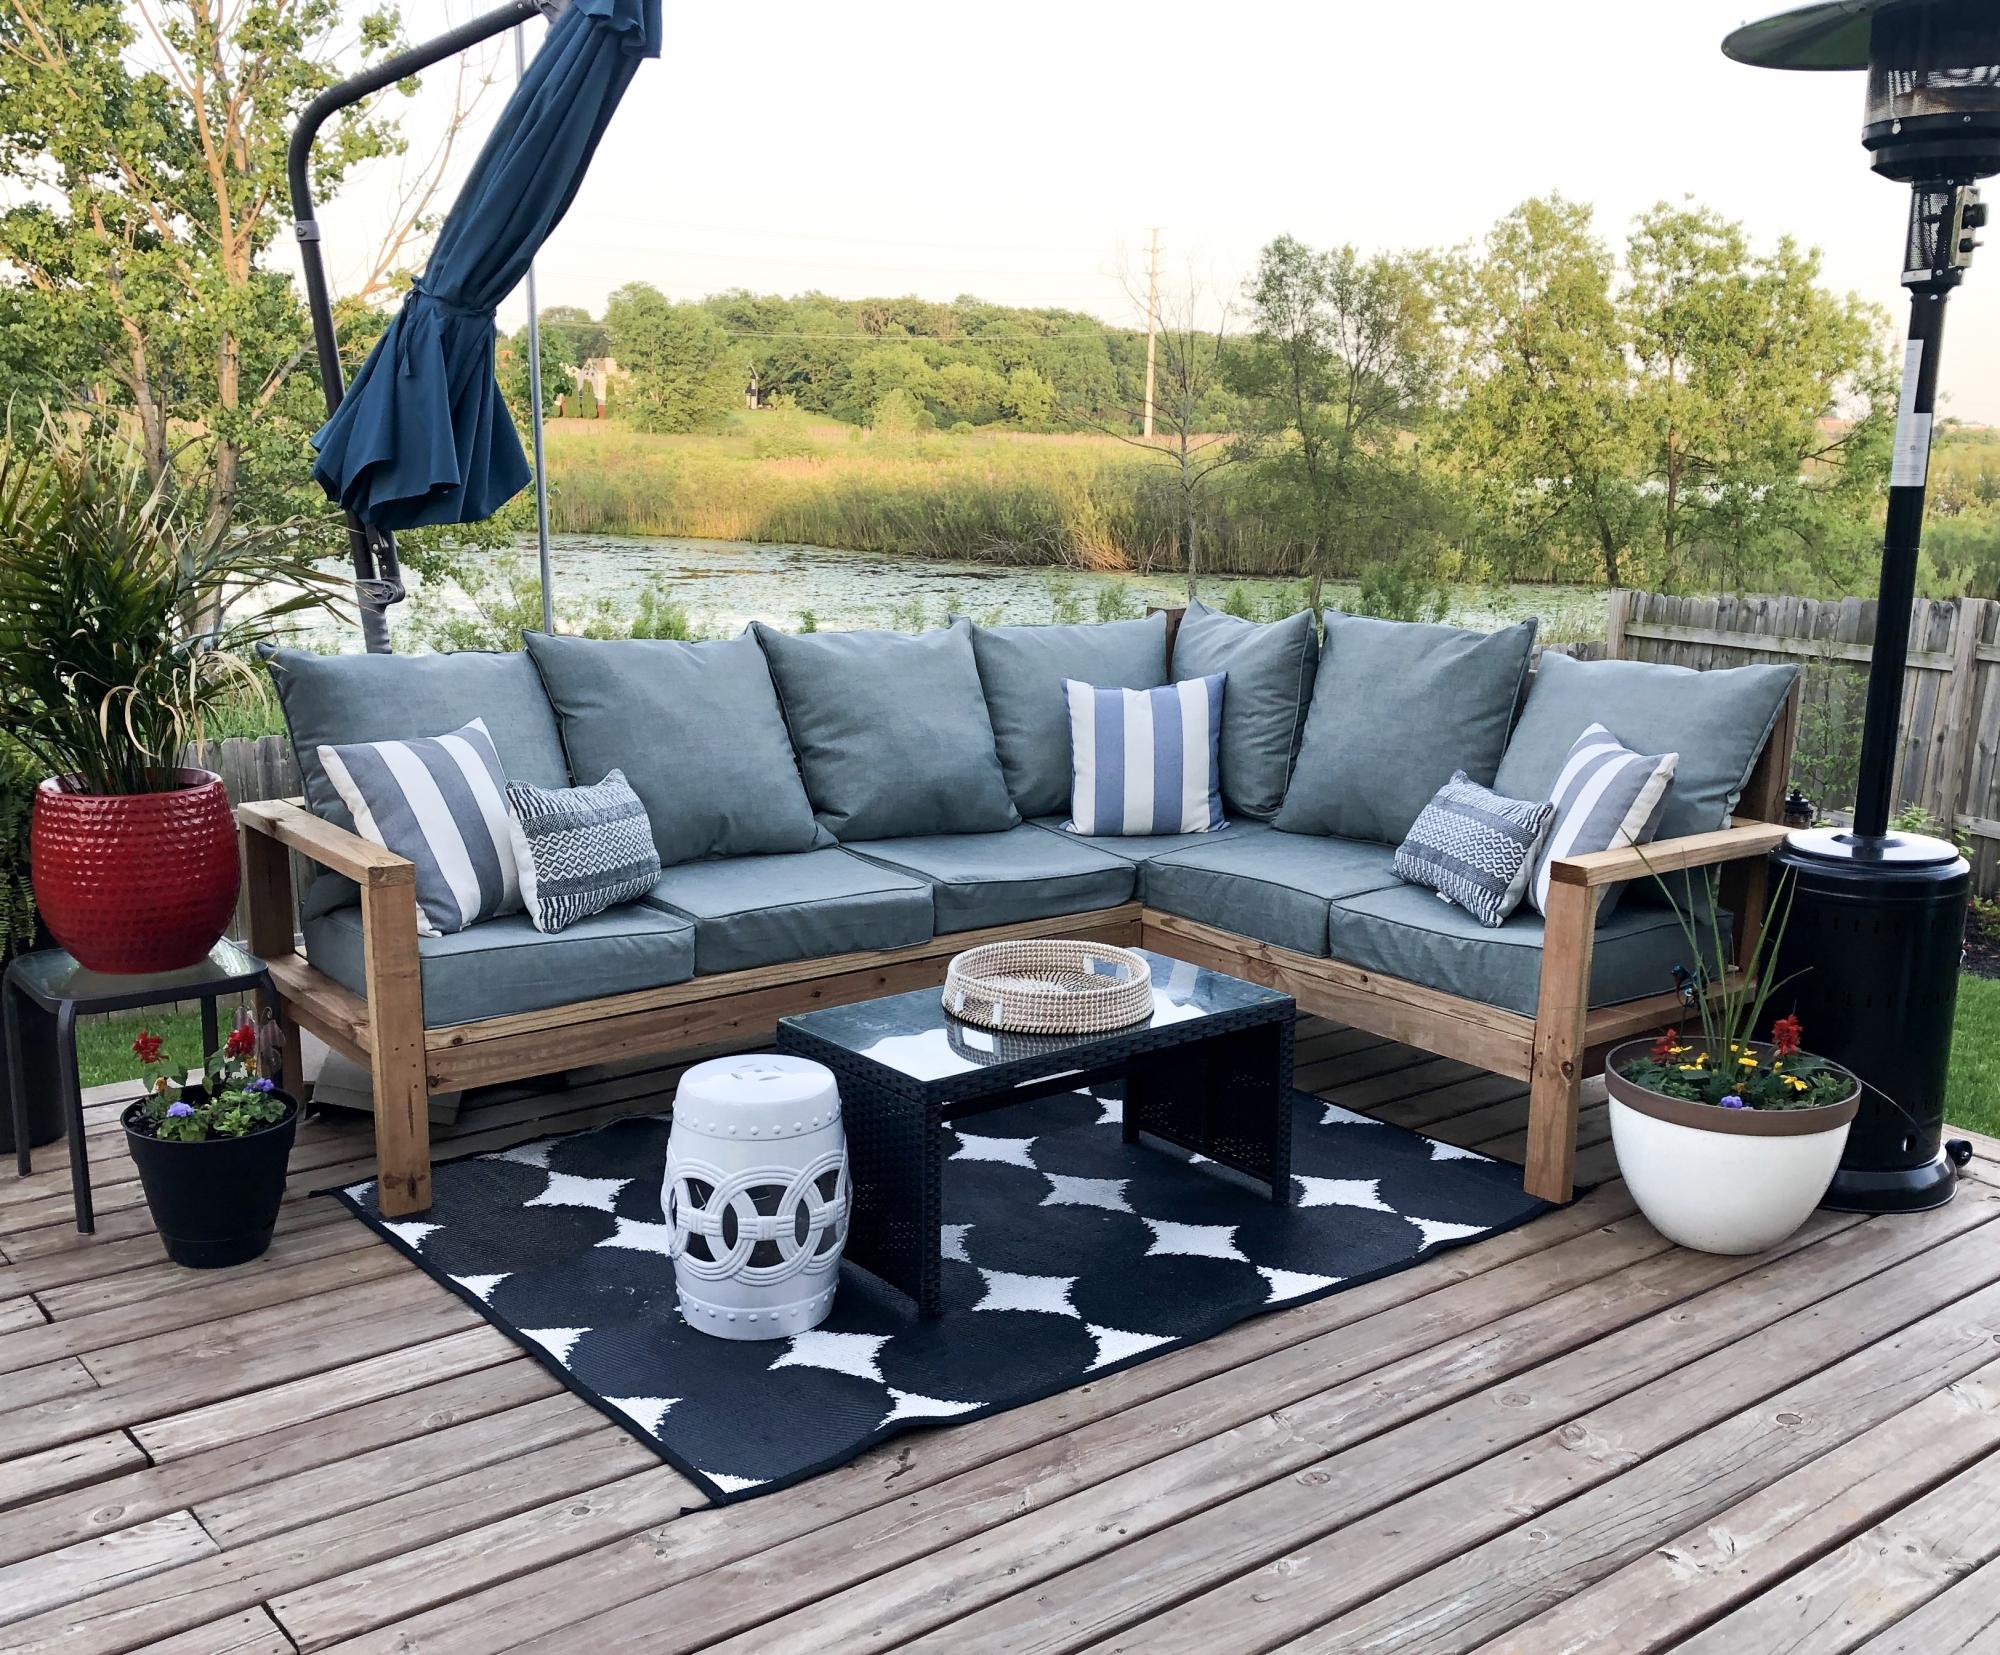
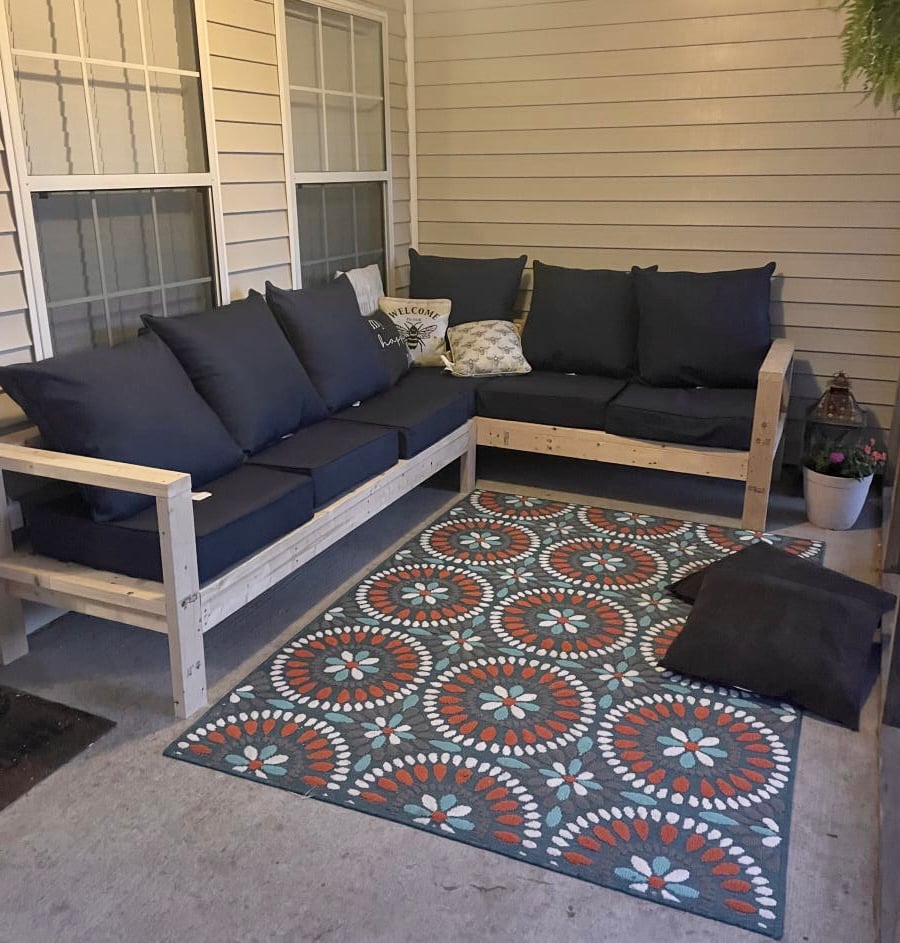
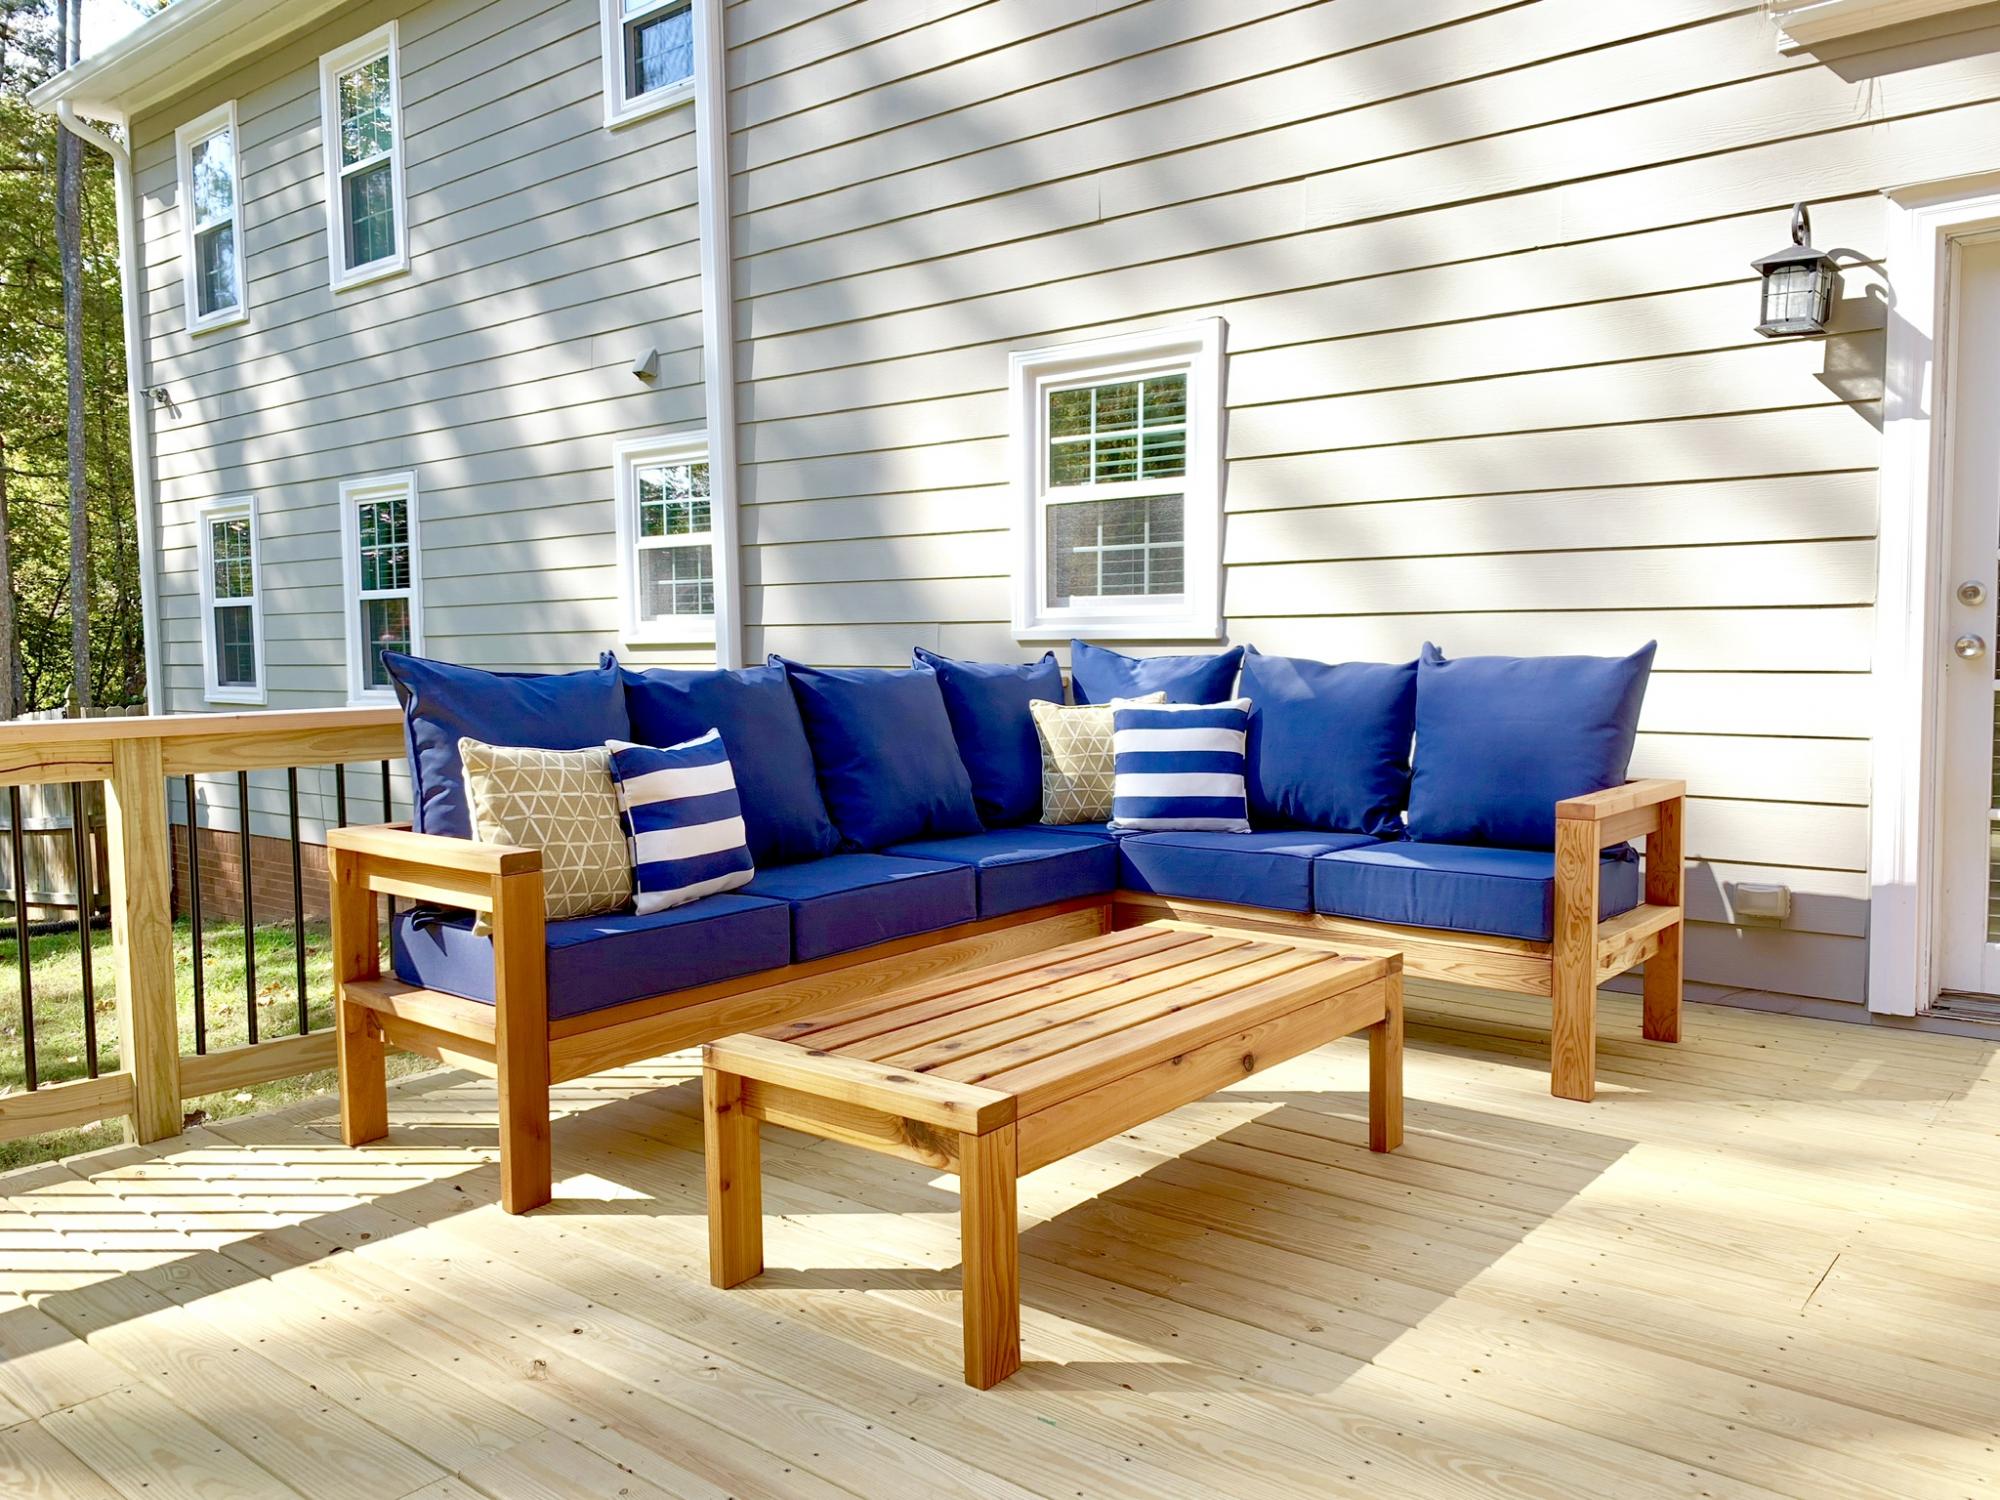
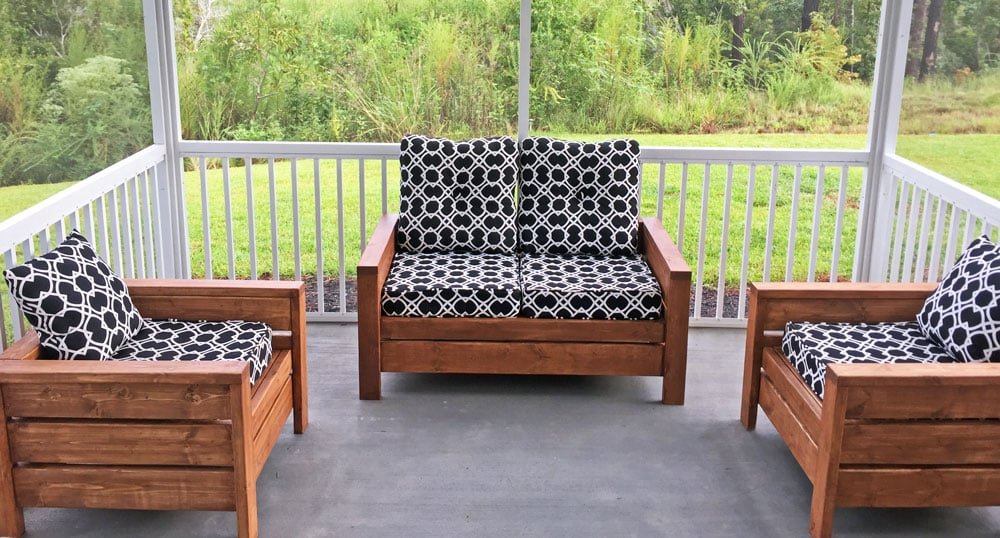
We built Ana’s outdoor sectional in a few hours and it’s made a huge impact on our deck! It saved us so much money but looks like a high end piece! Thank you for the simple and structured plans!

Fri, 06/07/2019 - 10:53
This is gorgeous! You really have an eye for putting different colors, textures and patterns together! Thank you so much for sharing a brag post.
I followed the instructions on the Ana White website, and followed a few of the commenters ideas to reduce the size slightly to minimize the wood costs. I used pocket holes wherever I could to try and reduce the amount of visible screw heads. The cushions were purchased at Big Lots and the cedar was purchased at the big home improvement store. My 5 year old and I worked on this and are so proud of how it turned out.
I built this for my second son who was tired of "being in jail", he's almost 3. His older brother is now jealous!
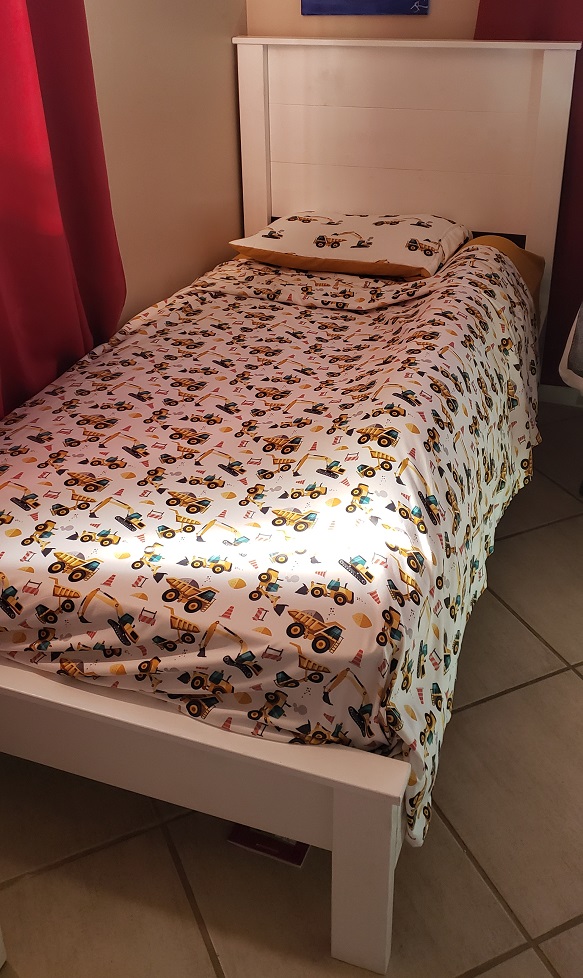
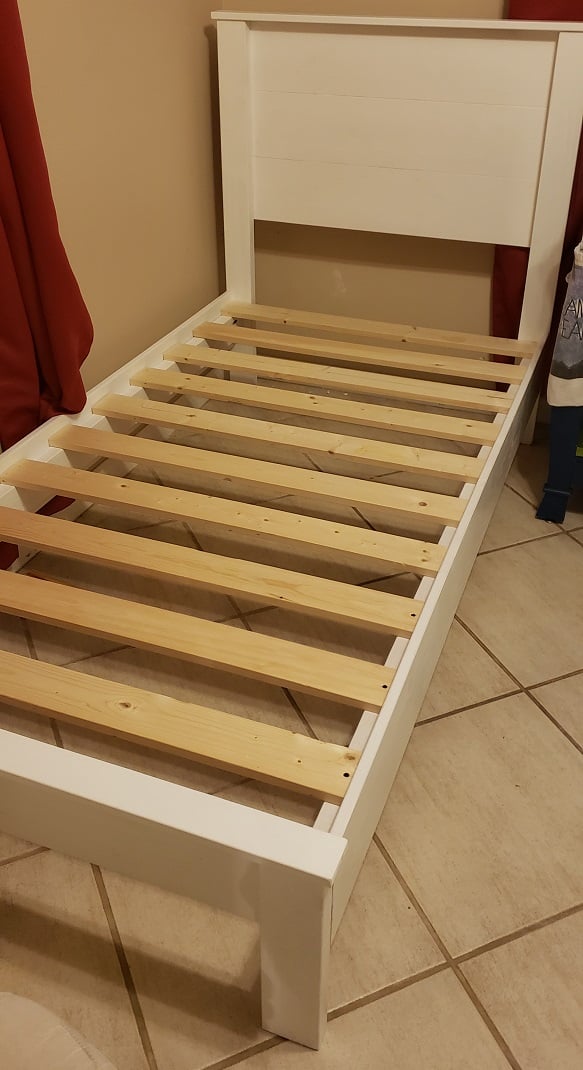
Was a nice easy build - the hardest part was paint spraying for the first time! I would cut the slats pieces about 1/4" smaller to give a bit more wiggle room when lining up the pieces, and make sure to keep the headboard and footboard square when lining up.
The cost was higher for me being in the Bahamas. I used fir for the frame and spruce for the planks, why, I thought it would save some money but didn't really.
I used pocket holes to attach the bed rails to the headboard and footboard.

Well this was first project my hubby and I tackled together. He actually let me use the power tools. The plans were great! Loved having a shopping list! I made the cushion s myself. I have to say, I wish I had made the couch and chairs the size of cushions available at Lowes . AFt e r you buy foam batting fabric and chording I found set at lowes for a lot less but I am so happy how it all turned out . Thks for providing plNz!
Built the 2 chairs according to the plans, and then modified it for a bench that's 48" (our cushions are 23.5 x 23.5). Worked really well!
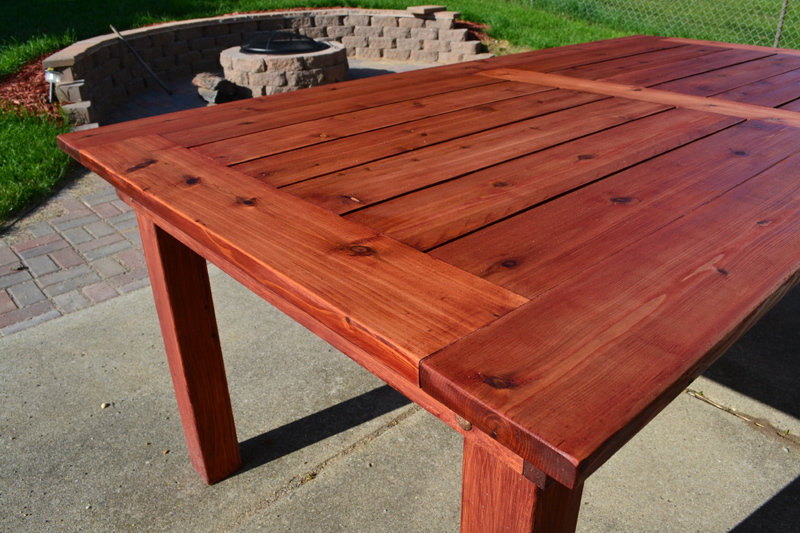
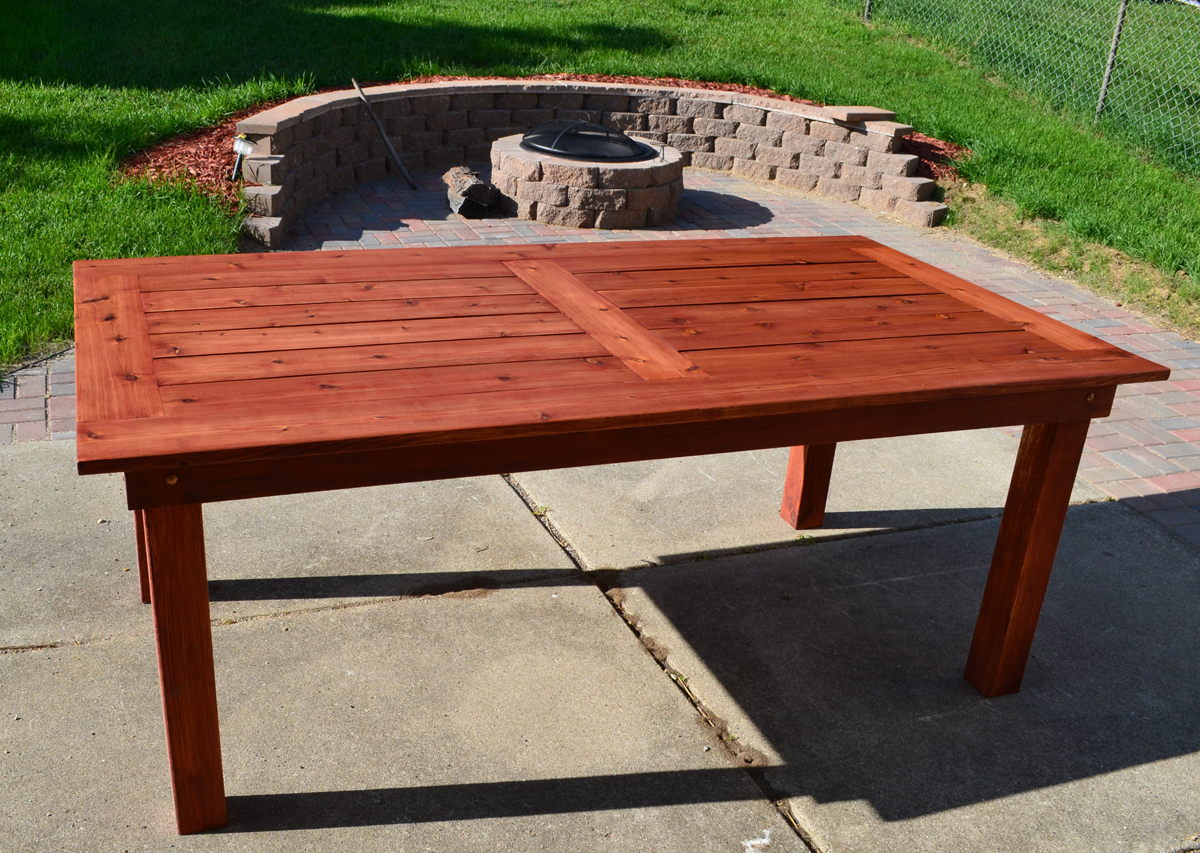
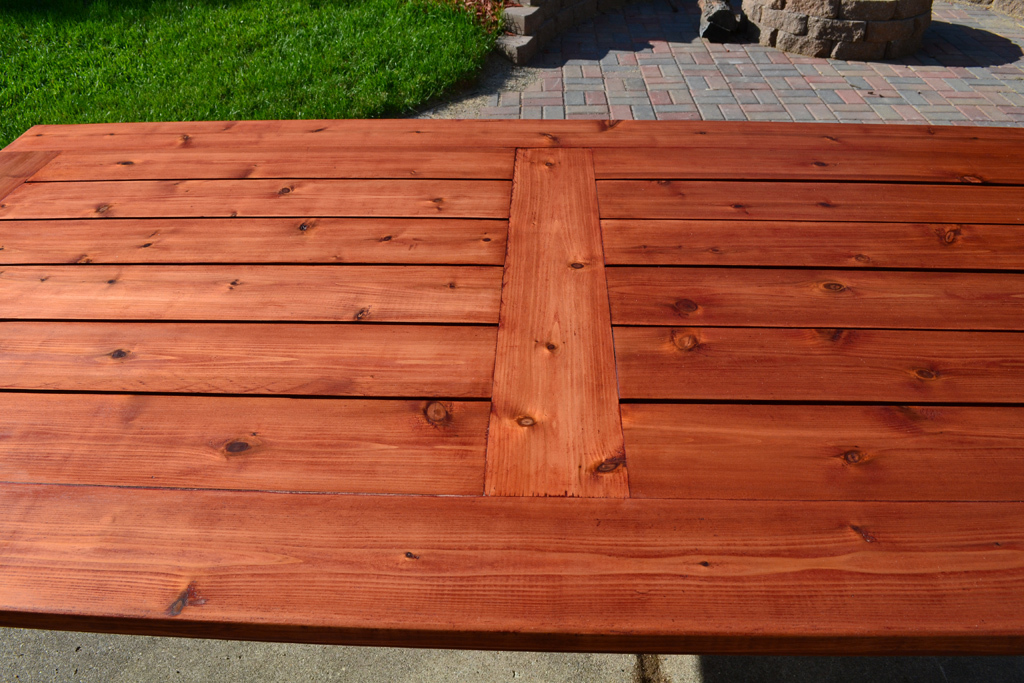
Slightly more elegant version of an outdoor cedar patio table. This is made from 100% cedar and joined using Kreg pocket hole screws. The finish is 2 coats of Sikkens Cetol MRD that has been hand rubbed on using a cloth, with 24 hours of dry time between coats.
Wed, 06/19/2013 - 23:22
I really like the way you modified this design and I would like to duplicate it. I am curious about how you changed to framework to accommodate table top with the boards running lengthwise. The original design has the framework running lengthwise, so I am assuming you added framing that runs perpendicular. Is there any way you could include pictures and measurements of the framework under the tabletop? Thanks. Great work!
Thu, 06/20/2013 - 07:13
Hi odpdxo, you should check out my website:
http://www.bryanpryor.com/2013/05/22/diy-cedar-patio-table/
I have a lot more details, including a full sketchup model for the build of this table posted. I think it will answer all of your questions.
Fri, 06/21/2013 - 14:58
Wow that's beautiful! Are you going to make benches to go with it?
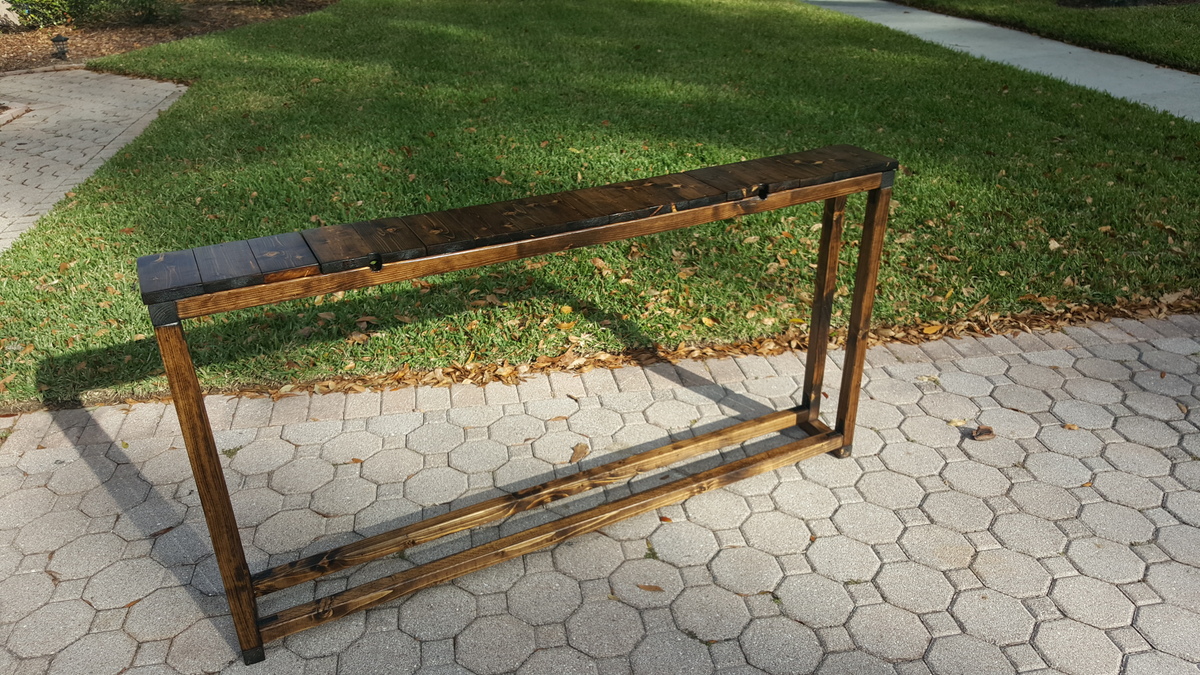
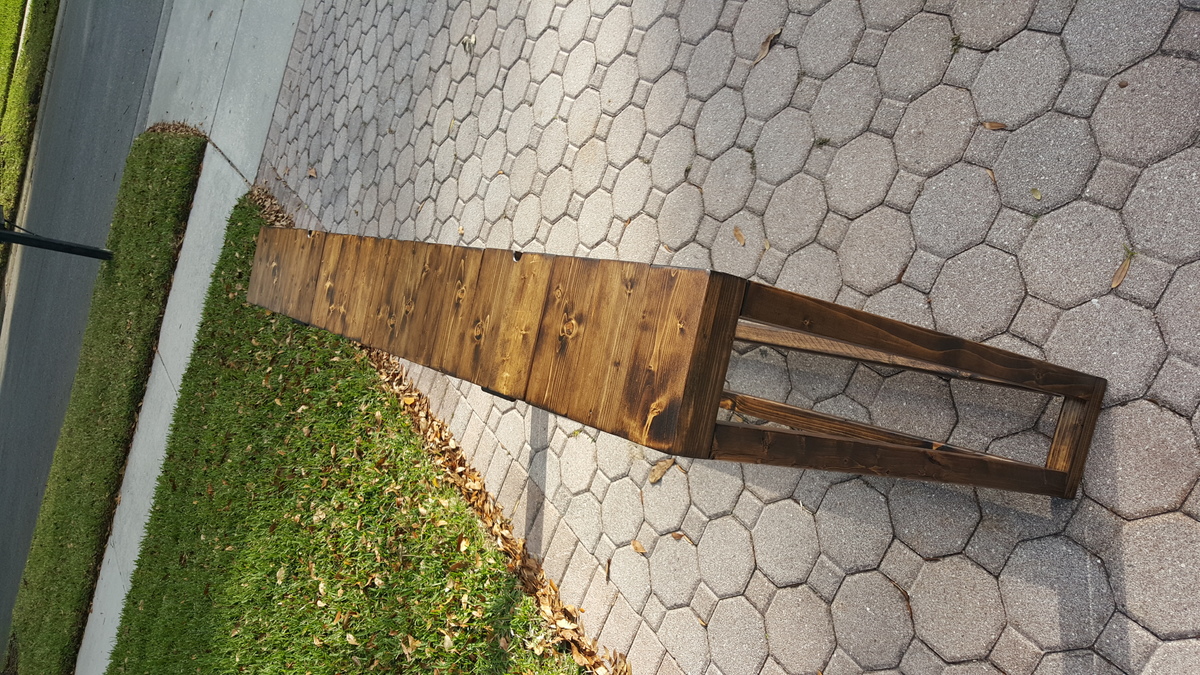
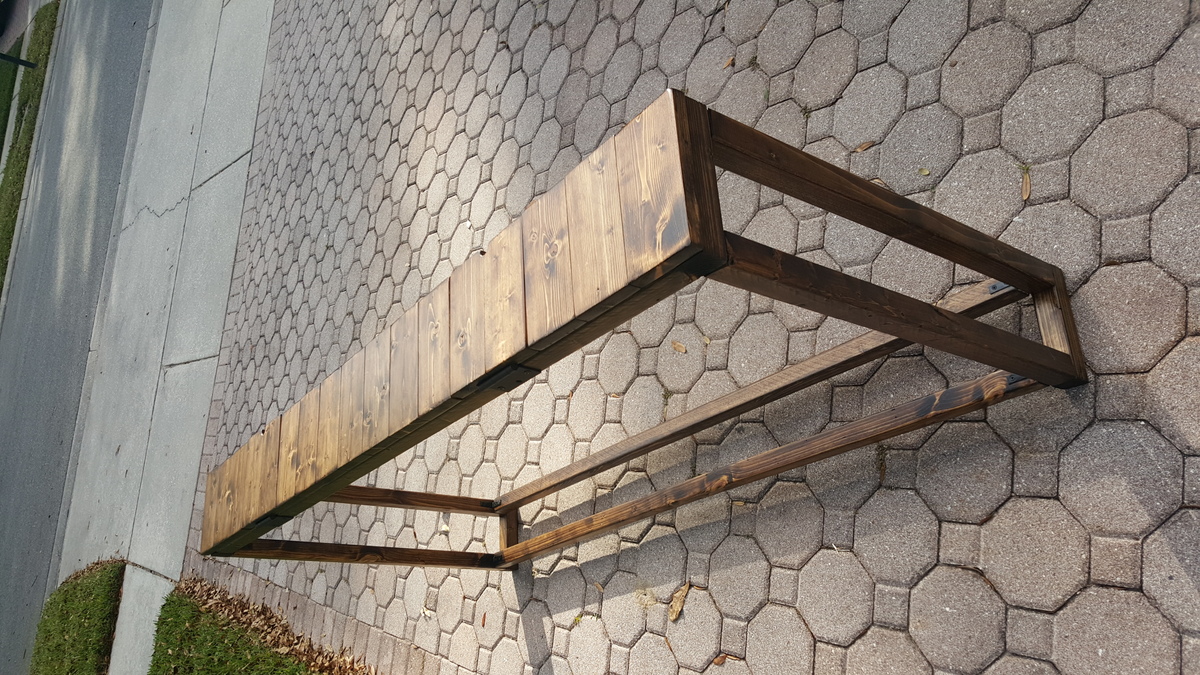
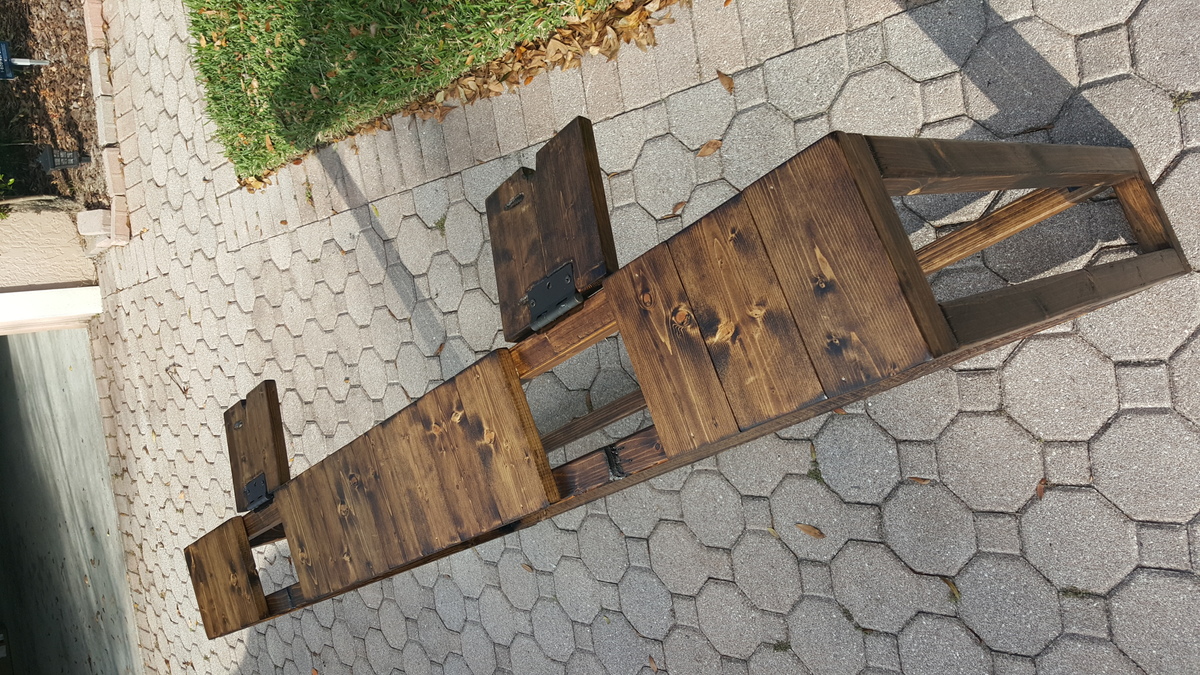
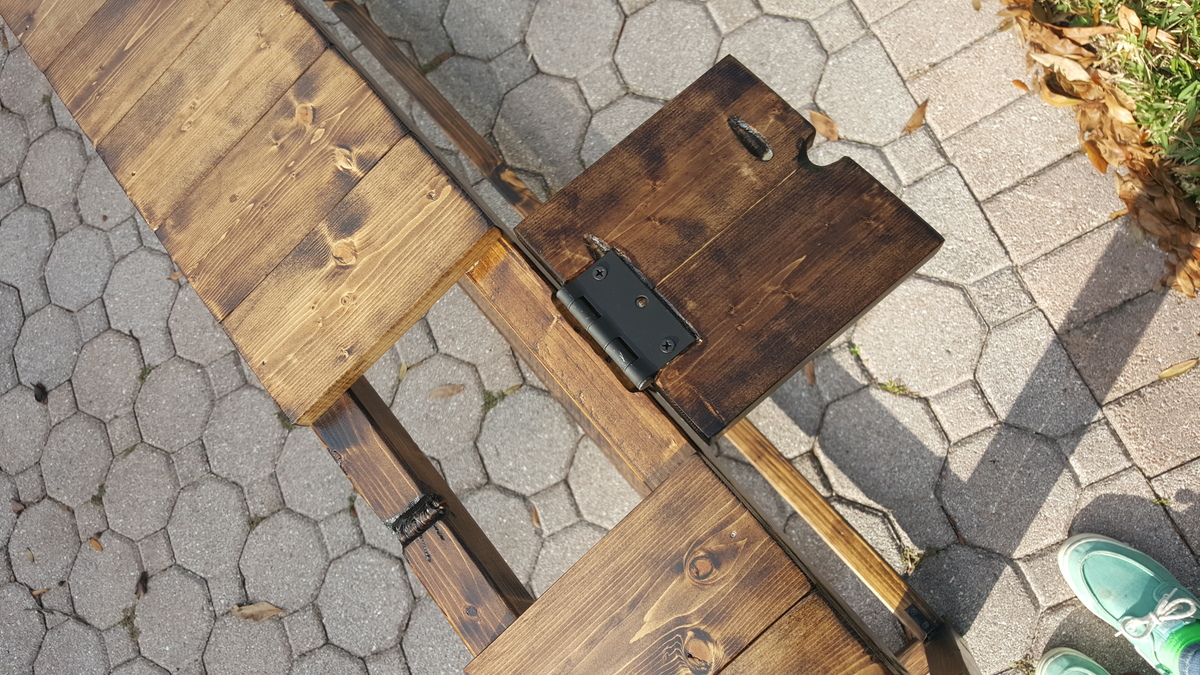
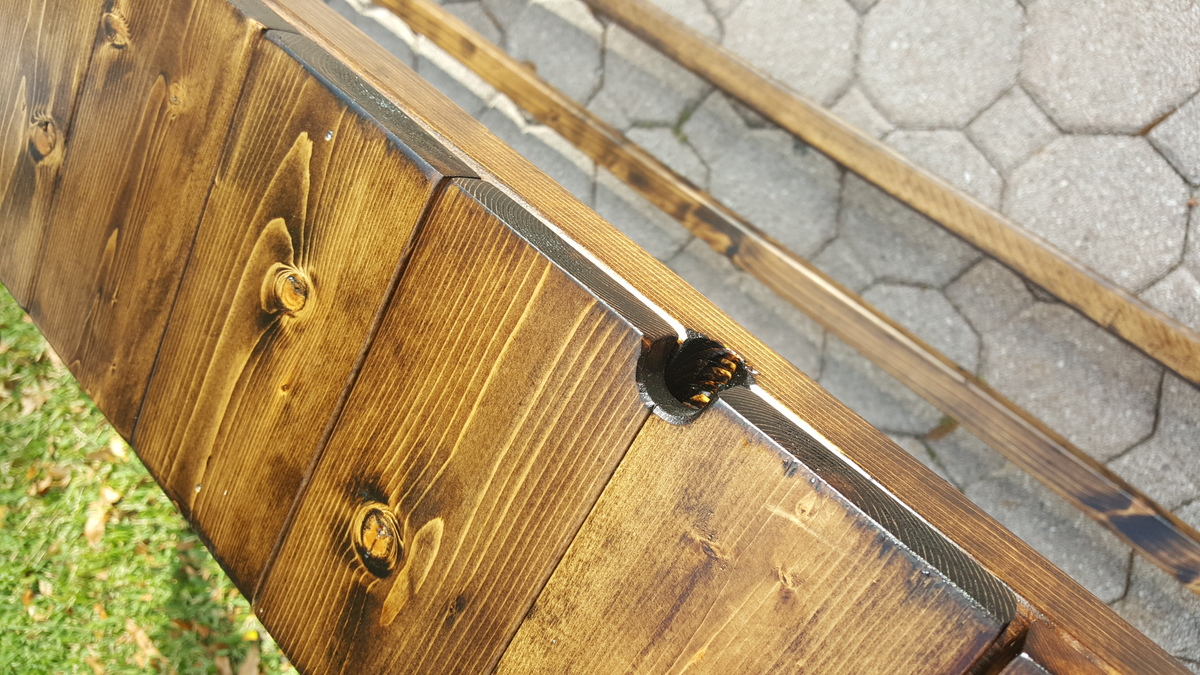
I based this design of the simple Sofa Table by Jenna Sue. Instead of a 2x8 across the top, I opted to use 1x4s side by side. This slatted look matched some of the other items in the house and to allowed me to create two hinged sections. These sections allow for easy access to wall plugs and include small notch for the cables to come through.

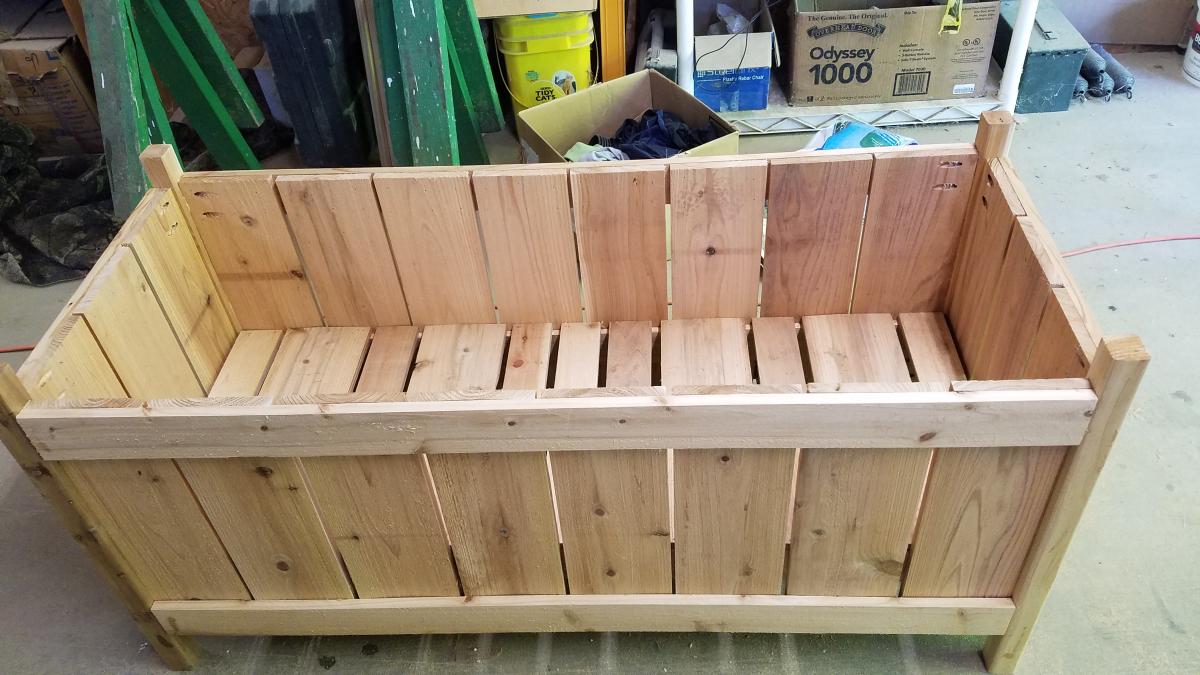
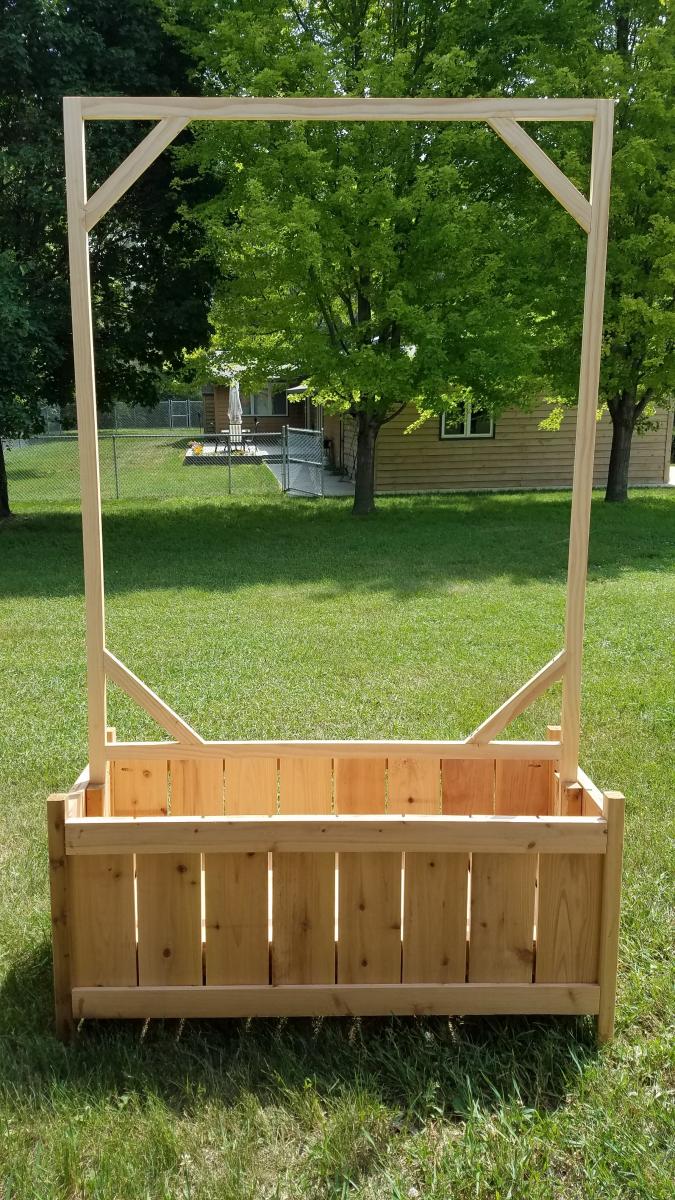
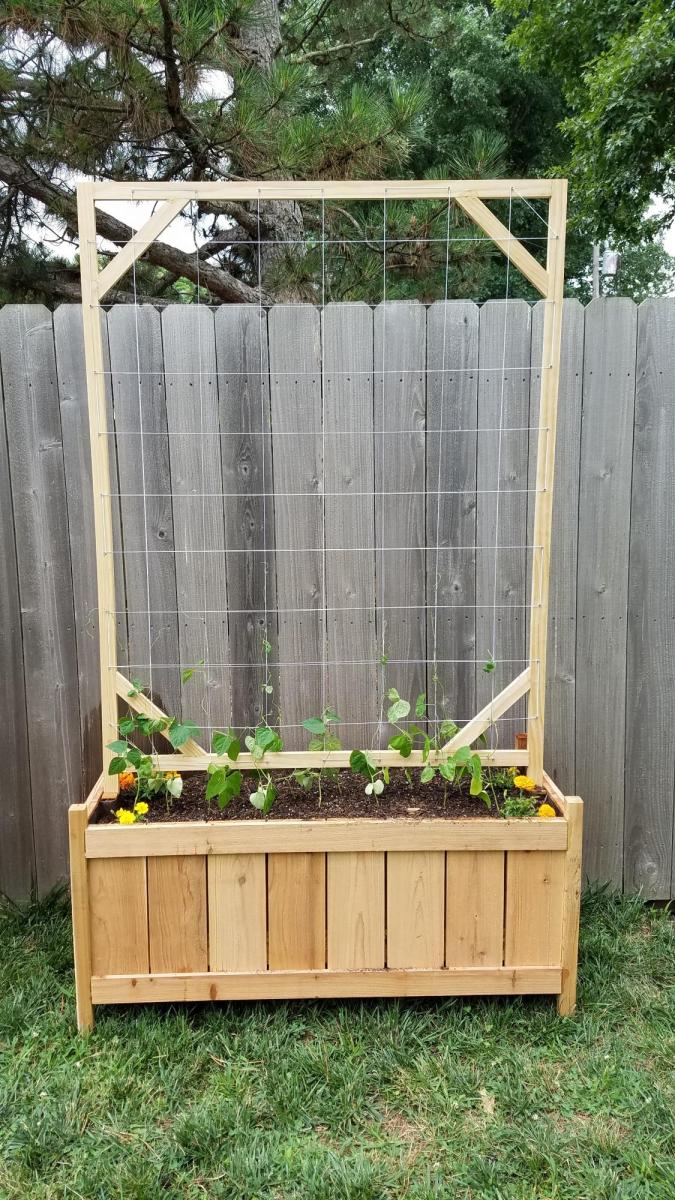
Increased width of box to 46" by using 8 fence boards instead of 3. put base at 12" down, lined box with landscaping fabric to hold dirt. Created trellis with 1x2 boards with 10" long corner braces, spaced screws 6" apart around edges and weaved cotton thread to create the trellis. Used 12" scraps of 2x2 to create a "slot" inside the center of the planter to support the trellis. Added container mix and green pole beans started in egg cartons earlier in the spring.
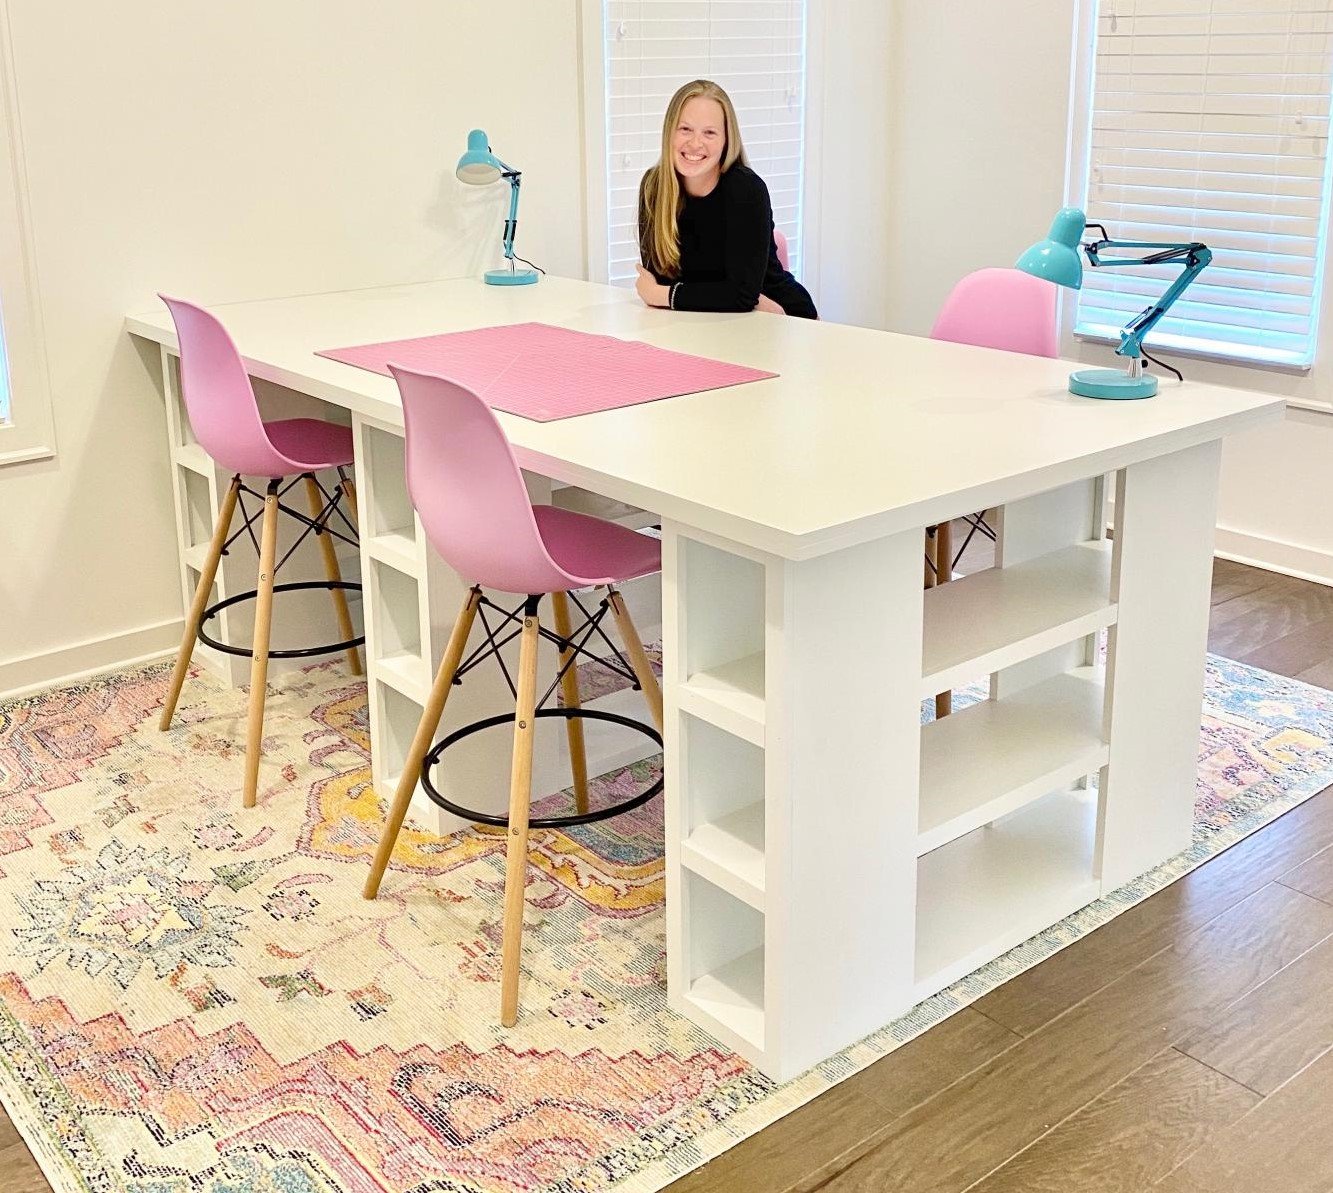
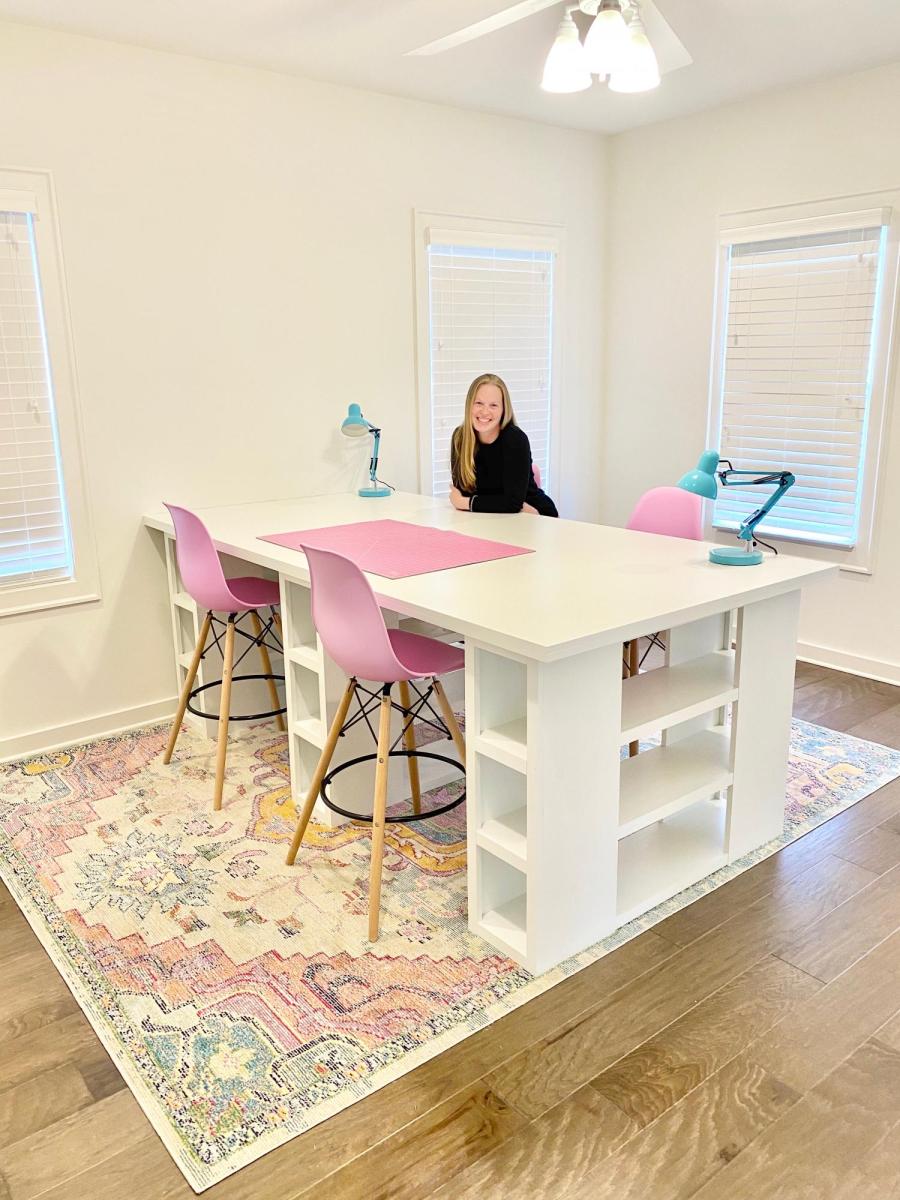
I modified this plan so I could have 4 total work areas. Total Size: 48" x 96"
Tue, 09/08/2020 - 19:42
Is there anyway you can share these plans with me!? I drew out some plans for an identical table but I think my cuts may be off! It would be so helpful.
Fri, 11/06/2020 - 12:47
Is there a full update post with instructions for the table shown?
Tue, 12/20/2022 - 22:03
LOVE this! Just what I'm looking for! Can you tell me what you used for the top?
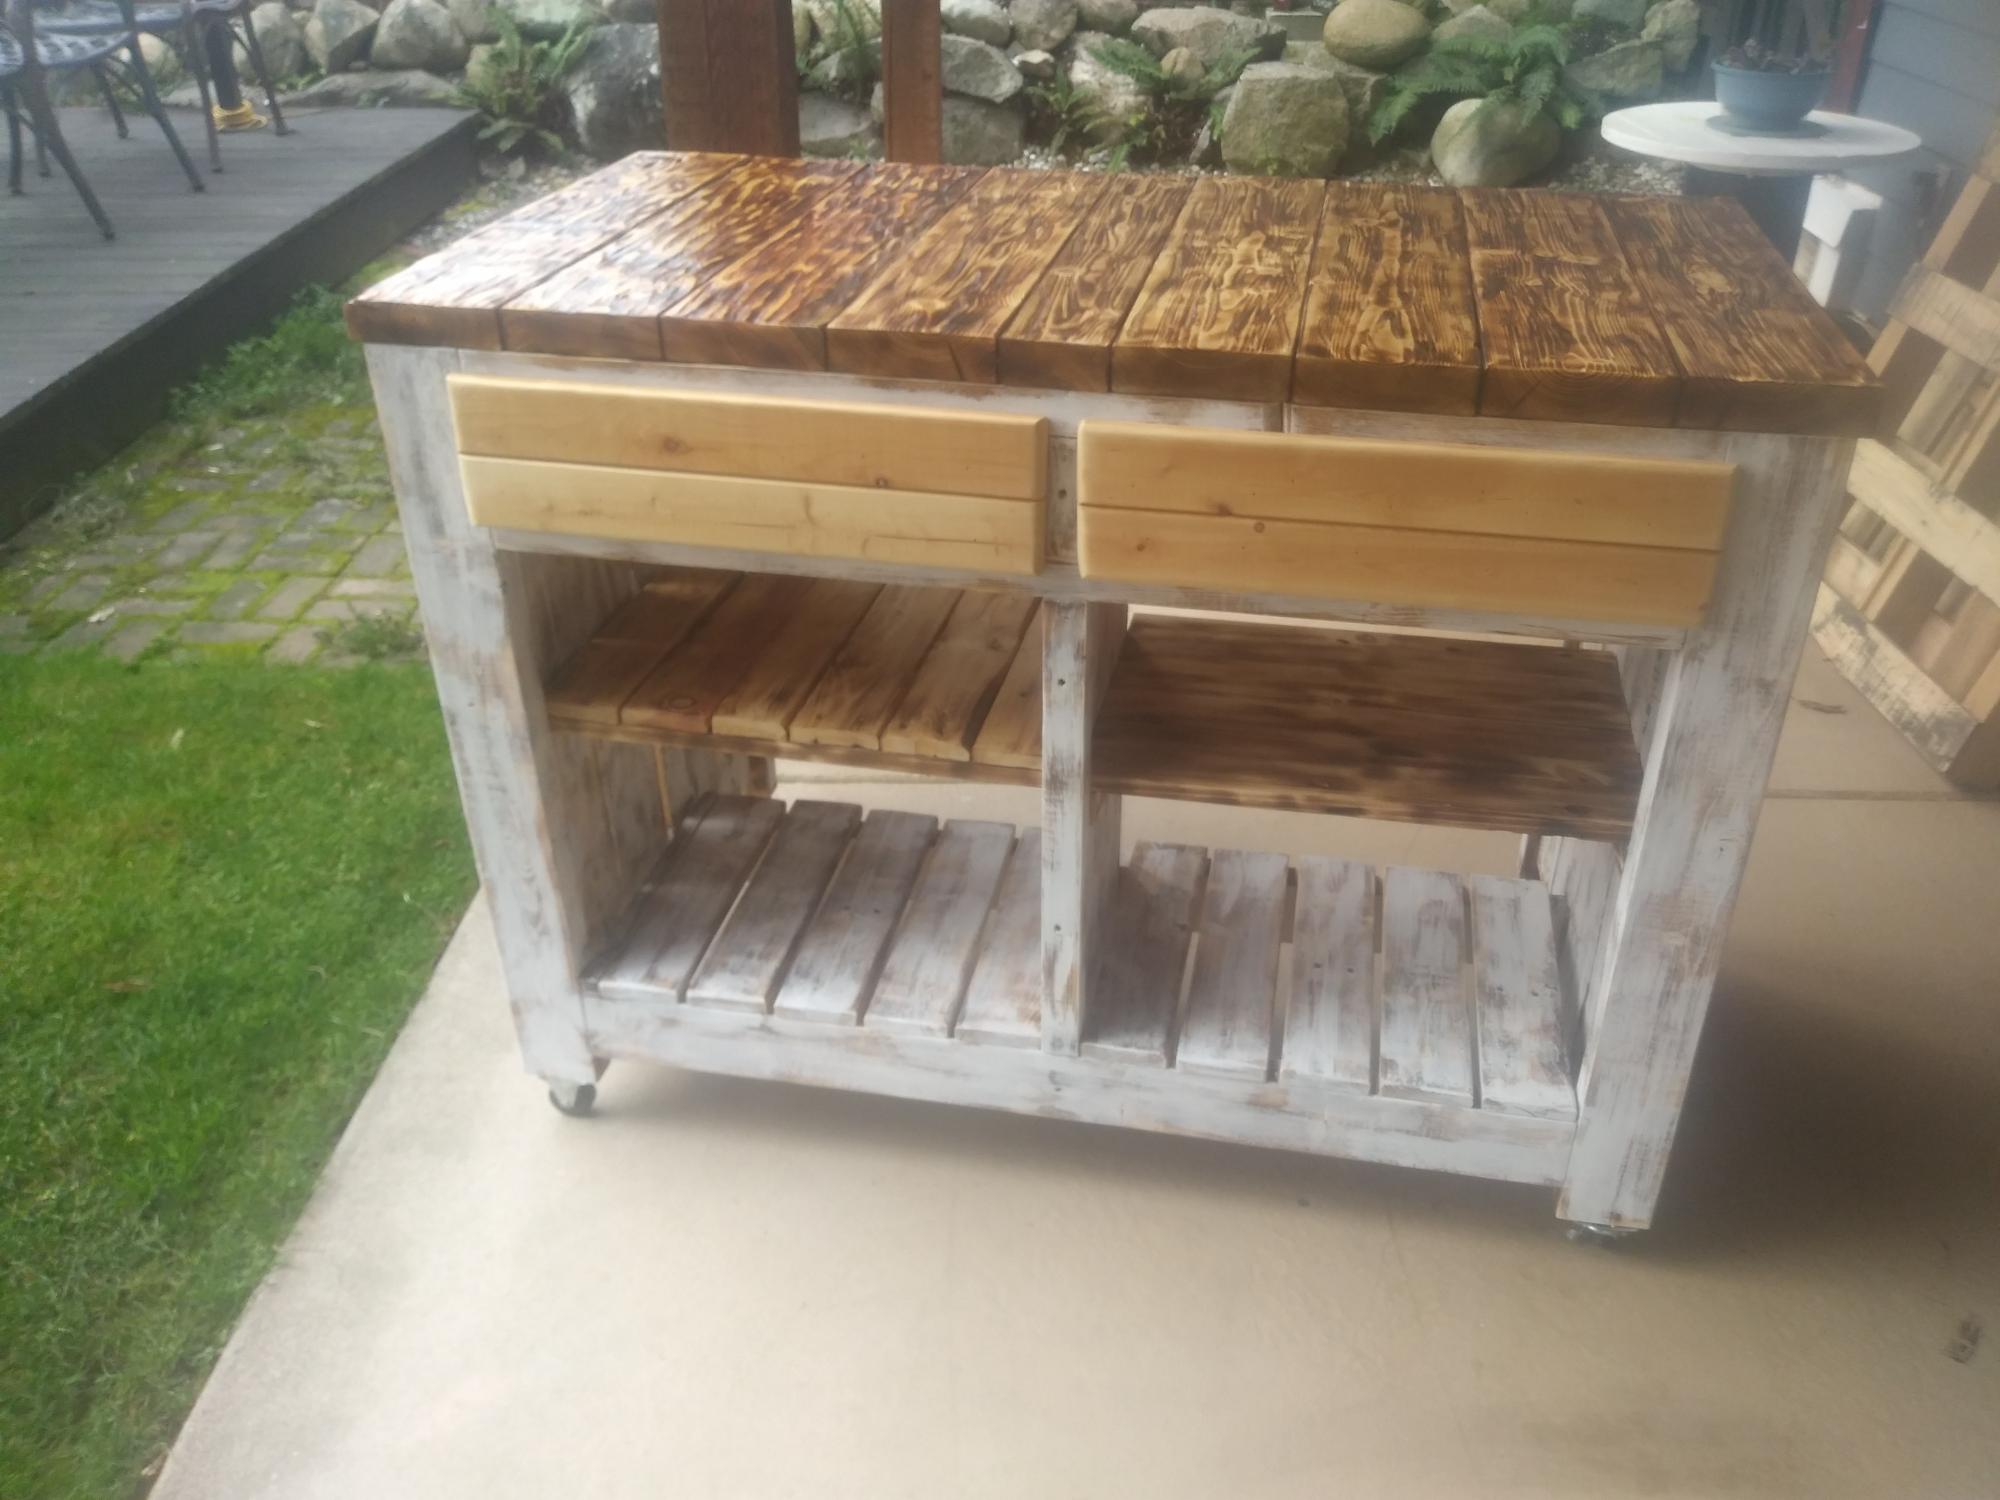
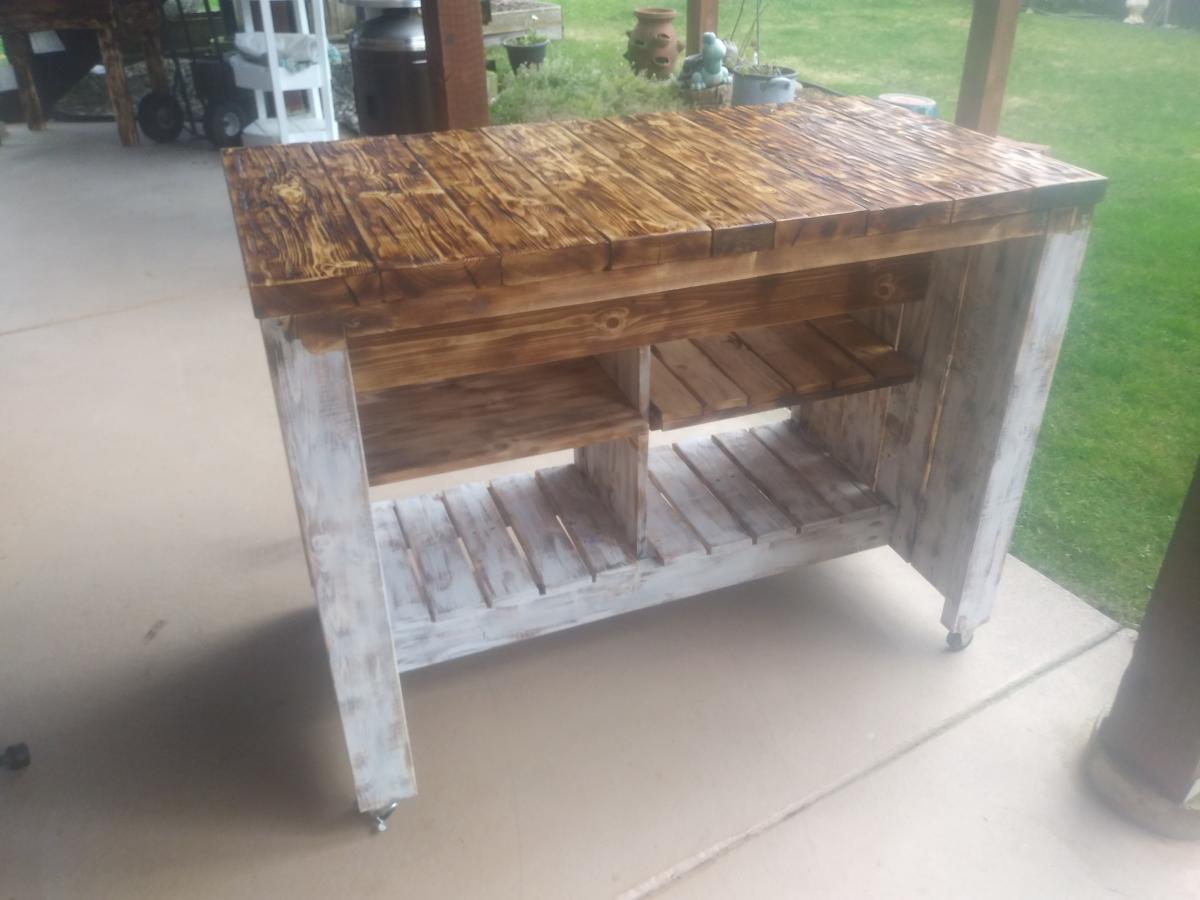
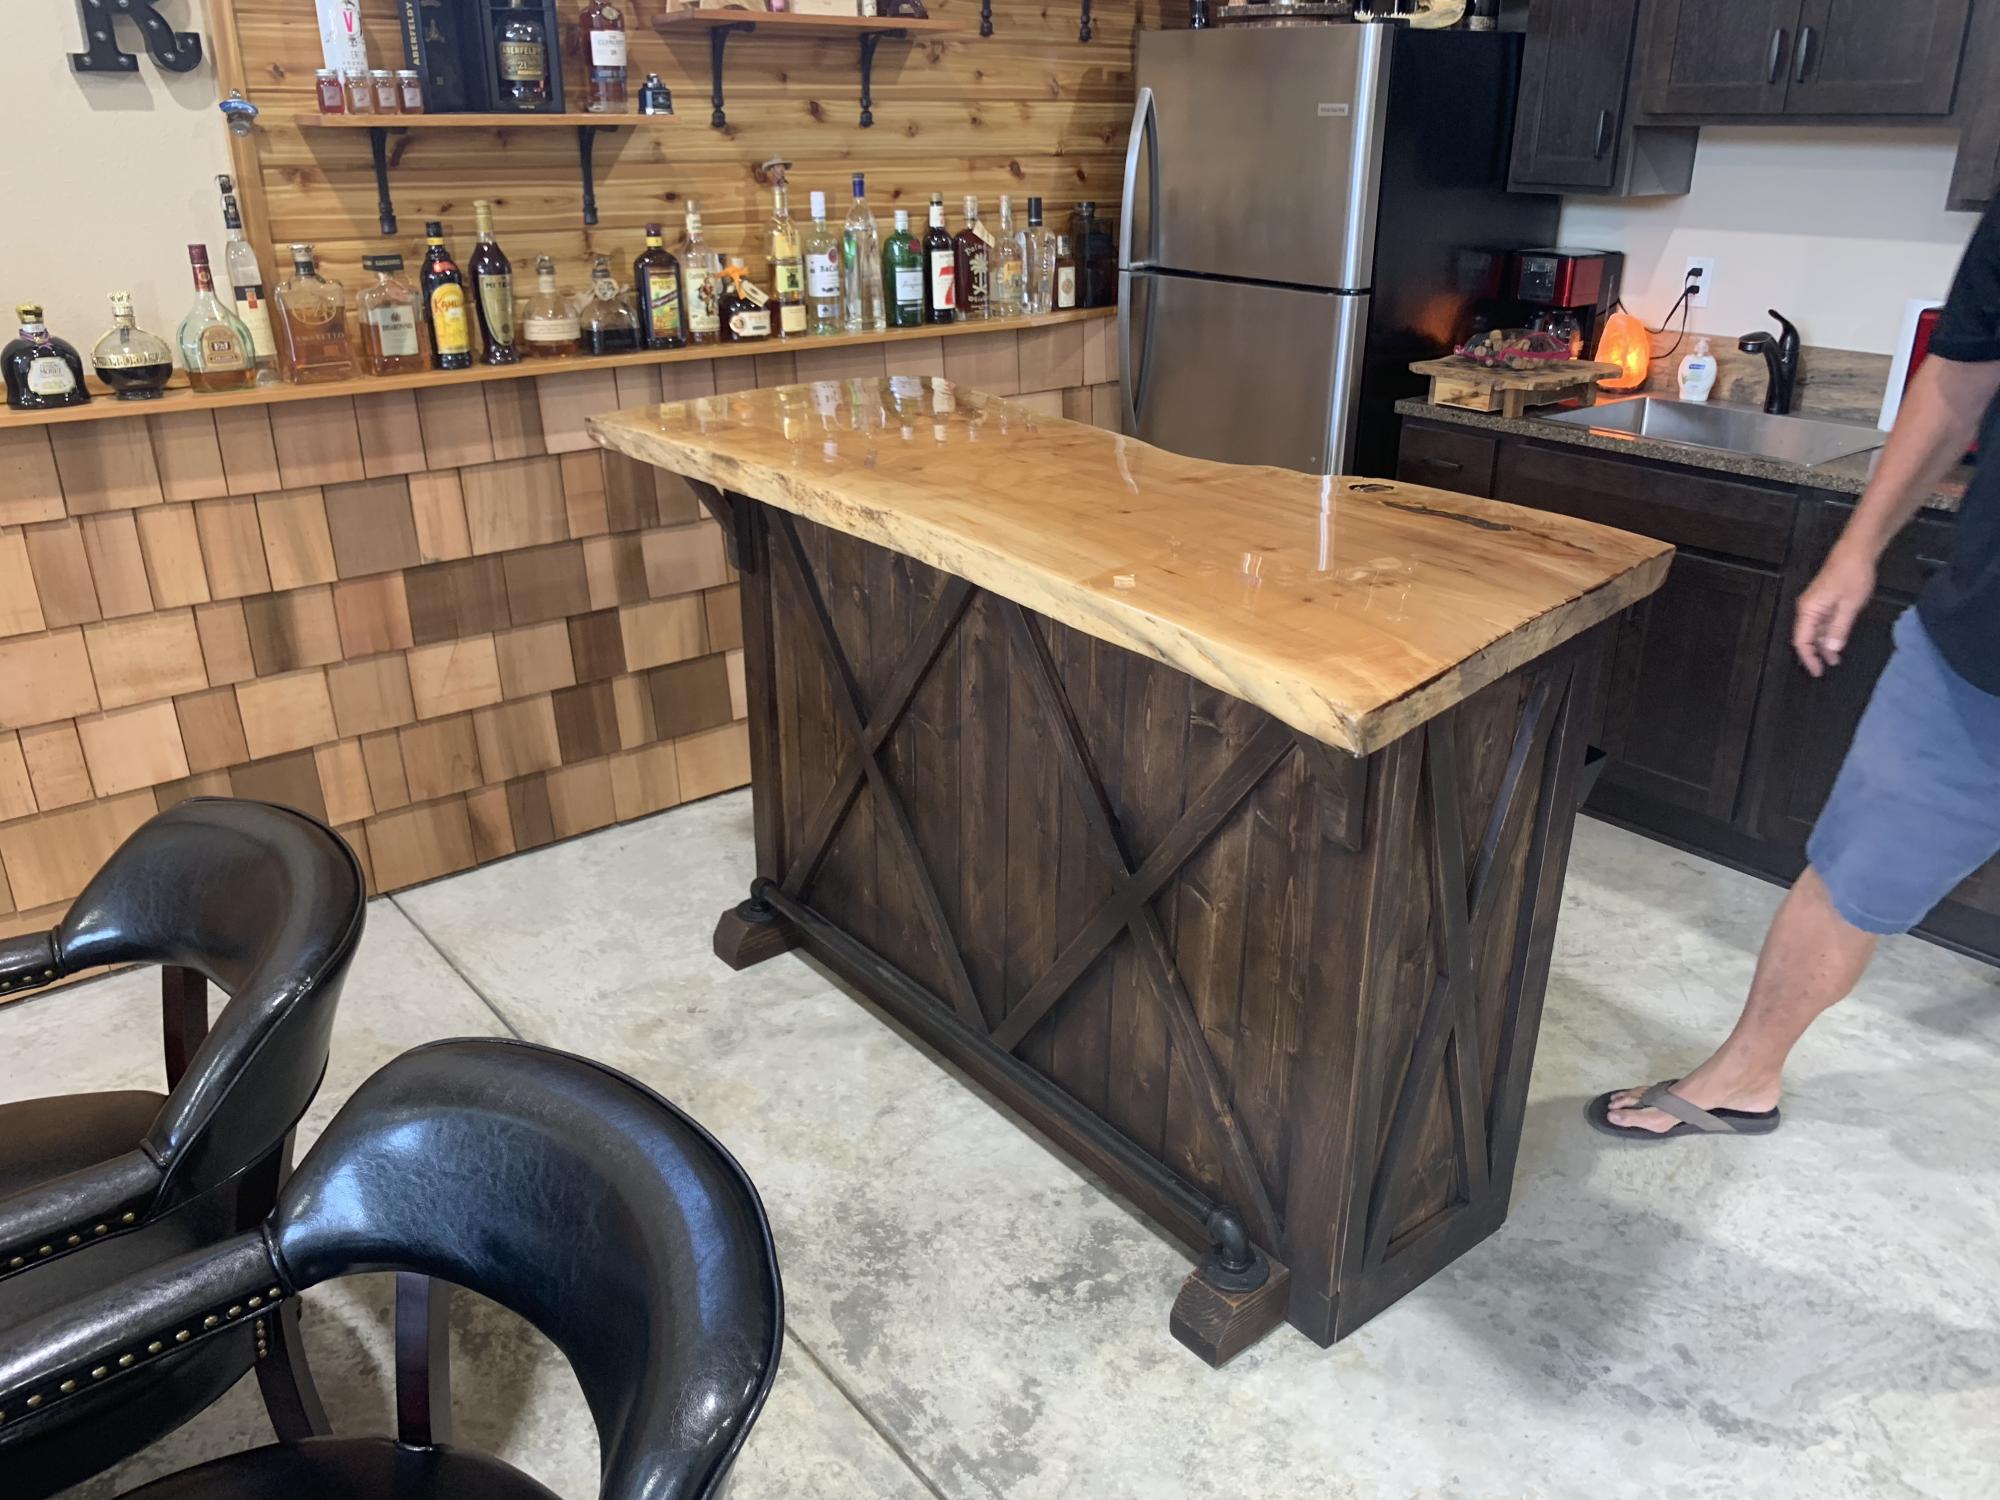
After following Ana Whit and other bloggers for a long time i figured my skills were at a level to try an advanced build like the Kitchen Island.. But i also wanted to challenge myself even more and was determined to make it from as much reclaimed wood as i could, mainly pallet wood.
With a lot of modifications to make it work i think I got a good result from these plans.
While i used as much reclaimed wood as i could, i still needed some clean 2x4's , 2x2's
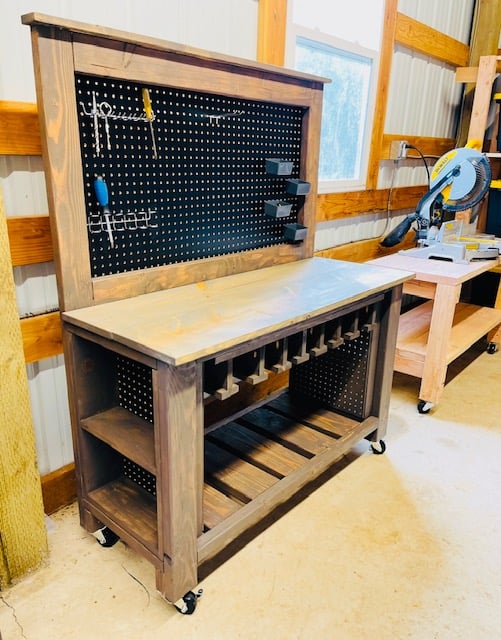
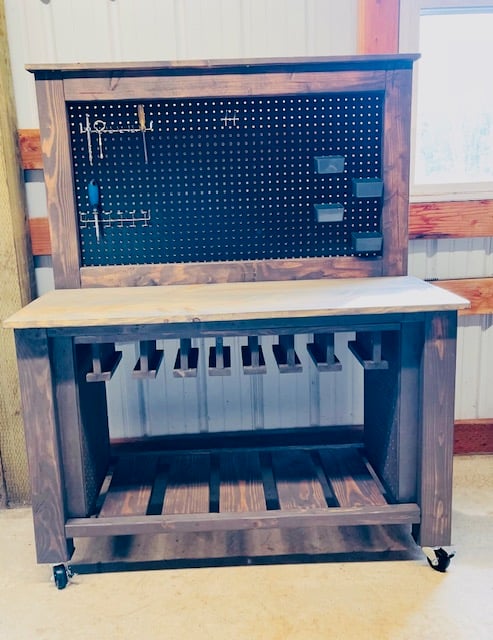
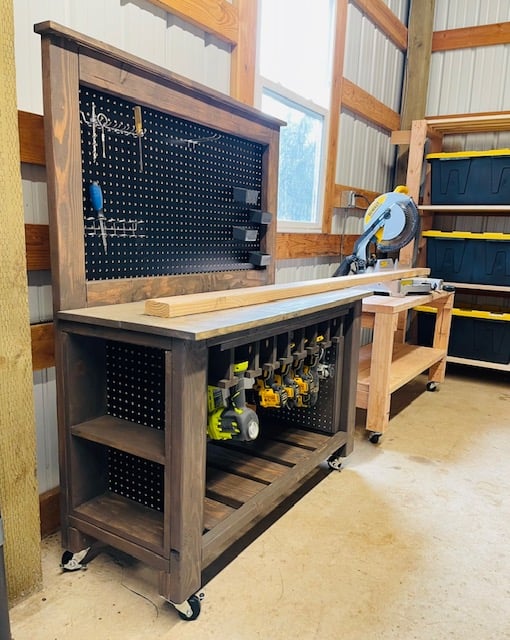
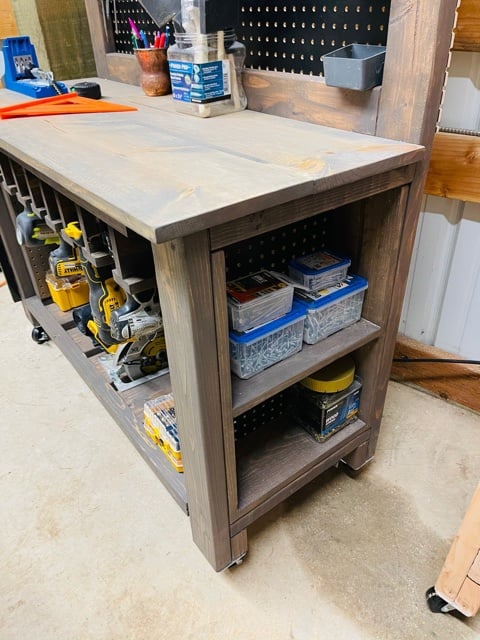
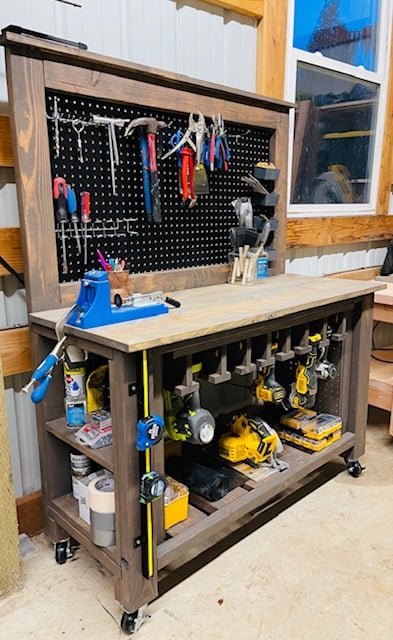
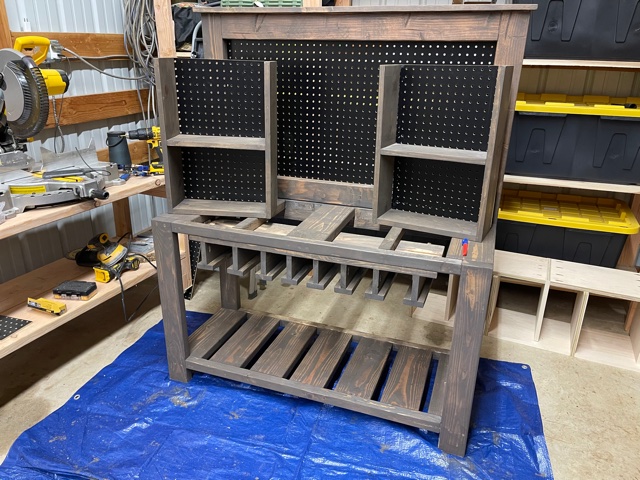
I took Ana's Farmhouse potting bench plan and made it a workbench with some mods. I added the tool storage and adjusted it for different widths depending on the tools. I added some support under the tabletop to attach the tool storage piece. On the ends, instead of the X detail I built shelves for each end for added storage for screws and paint. Finally the pegboard back allows for more storage! The height is consistent with the height of my chop saw on my other workbench for when I need to chop longer boards. I am very happy with how this project turned out and it is now full and in use!
Fri, 01/29/2021 - 10:28
Nice job on this! I think the mods really are great and practical, you're a genius!
Mon, 05/09/2022 - 07:21
True inspiration! Love love love it and stealing it for my garage!!
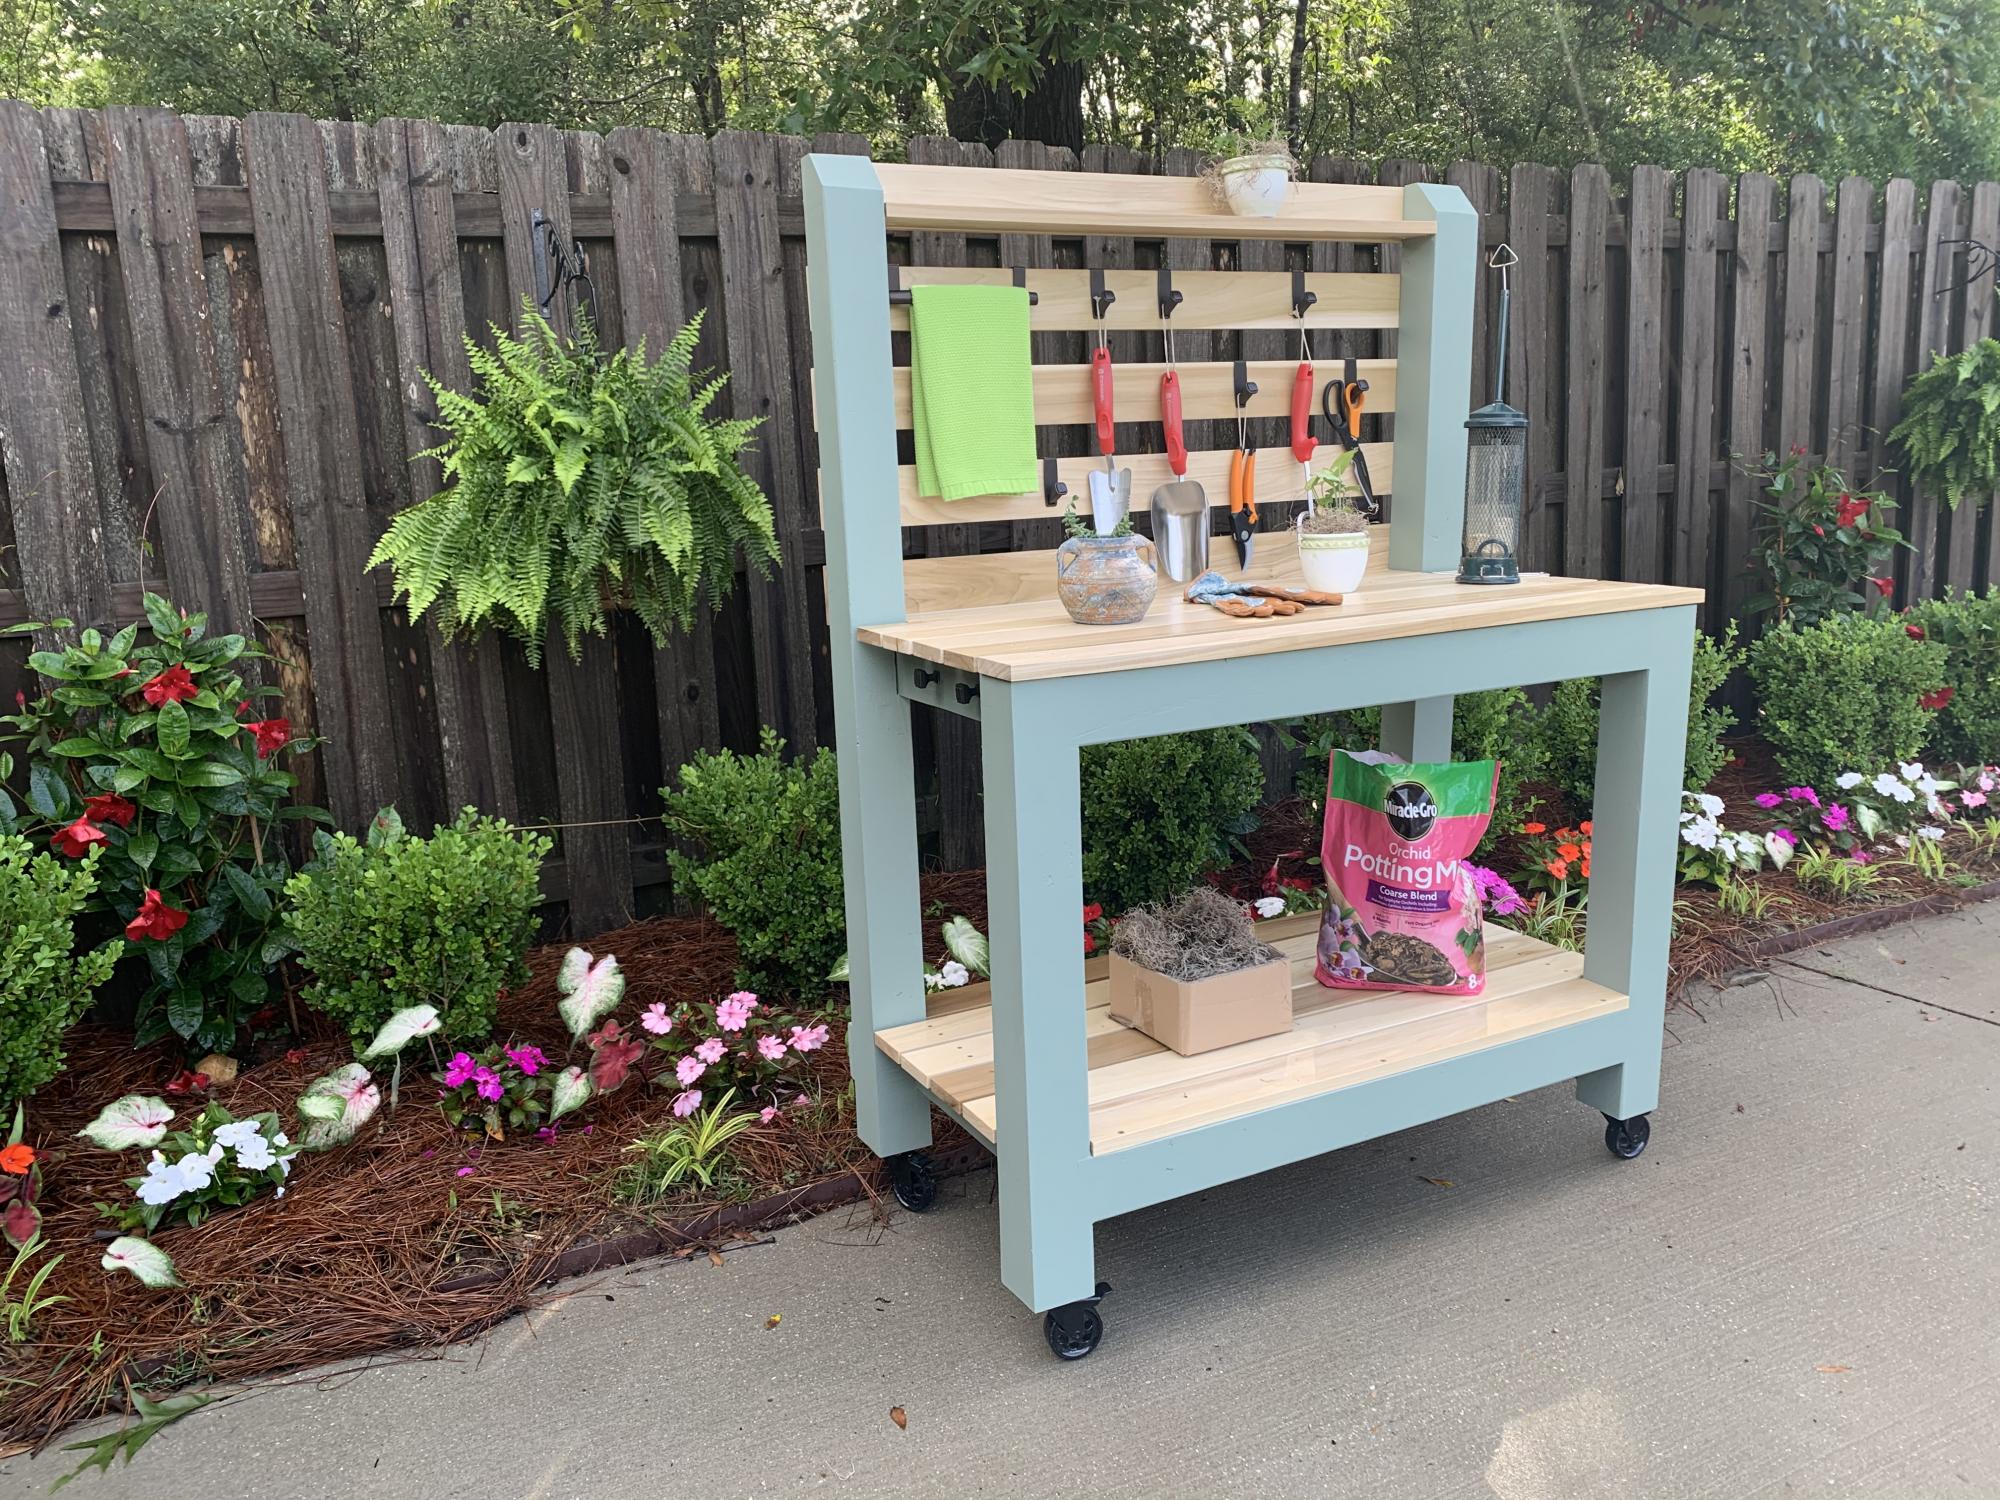
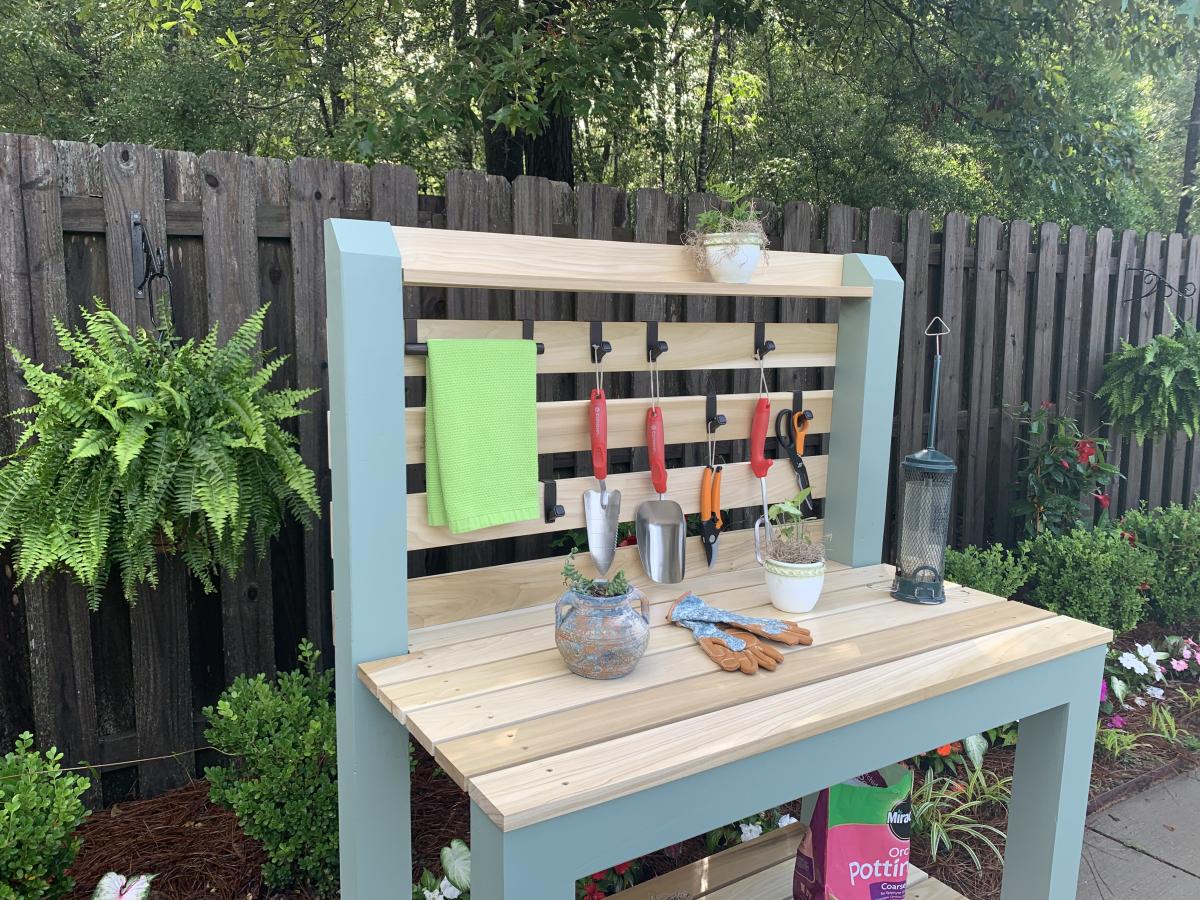
I was intrigued by Ana’s Simple 2x4 Potting Bench. The project seemed simple enough and it would be used as a means to clean up clutter in the garage. My main focus was to make it semi-portable and weather resistant. Instead of using 2x4’s for the corner posts, I used 4x4’s to accommodate casters. I also shorted the length of the posts by 4 inches to compensate for the height of the casters. To provide extra rigidity I did a dado for the 2x4’s that connect the front and rear legs. In retrospect, I wish that I did not dado the legs because it made it more difficult to attach some of the shelf planks. I painted the frame green and left the shelves and backboards clear for beautiful contrast. My wife is ecstatic with the result.
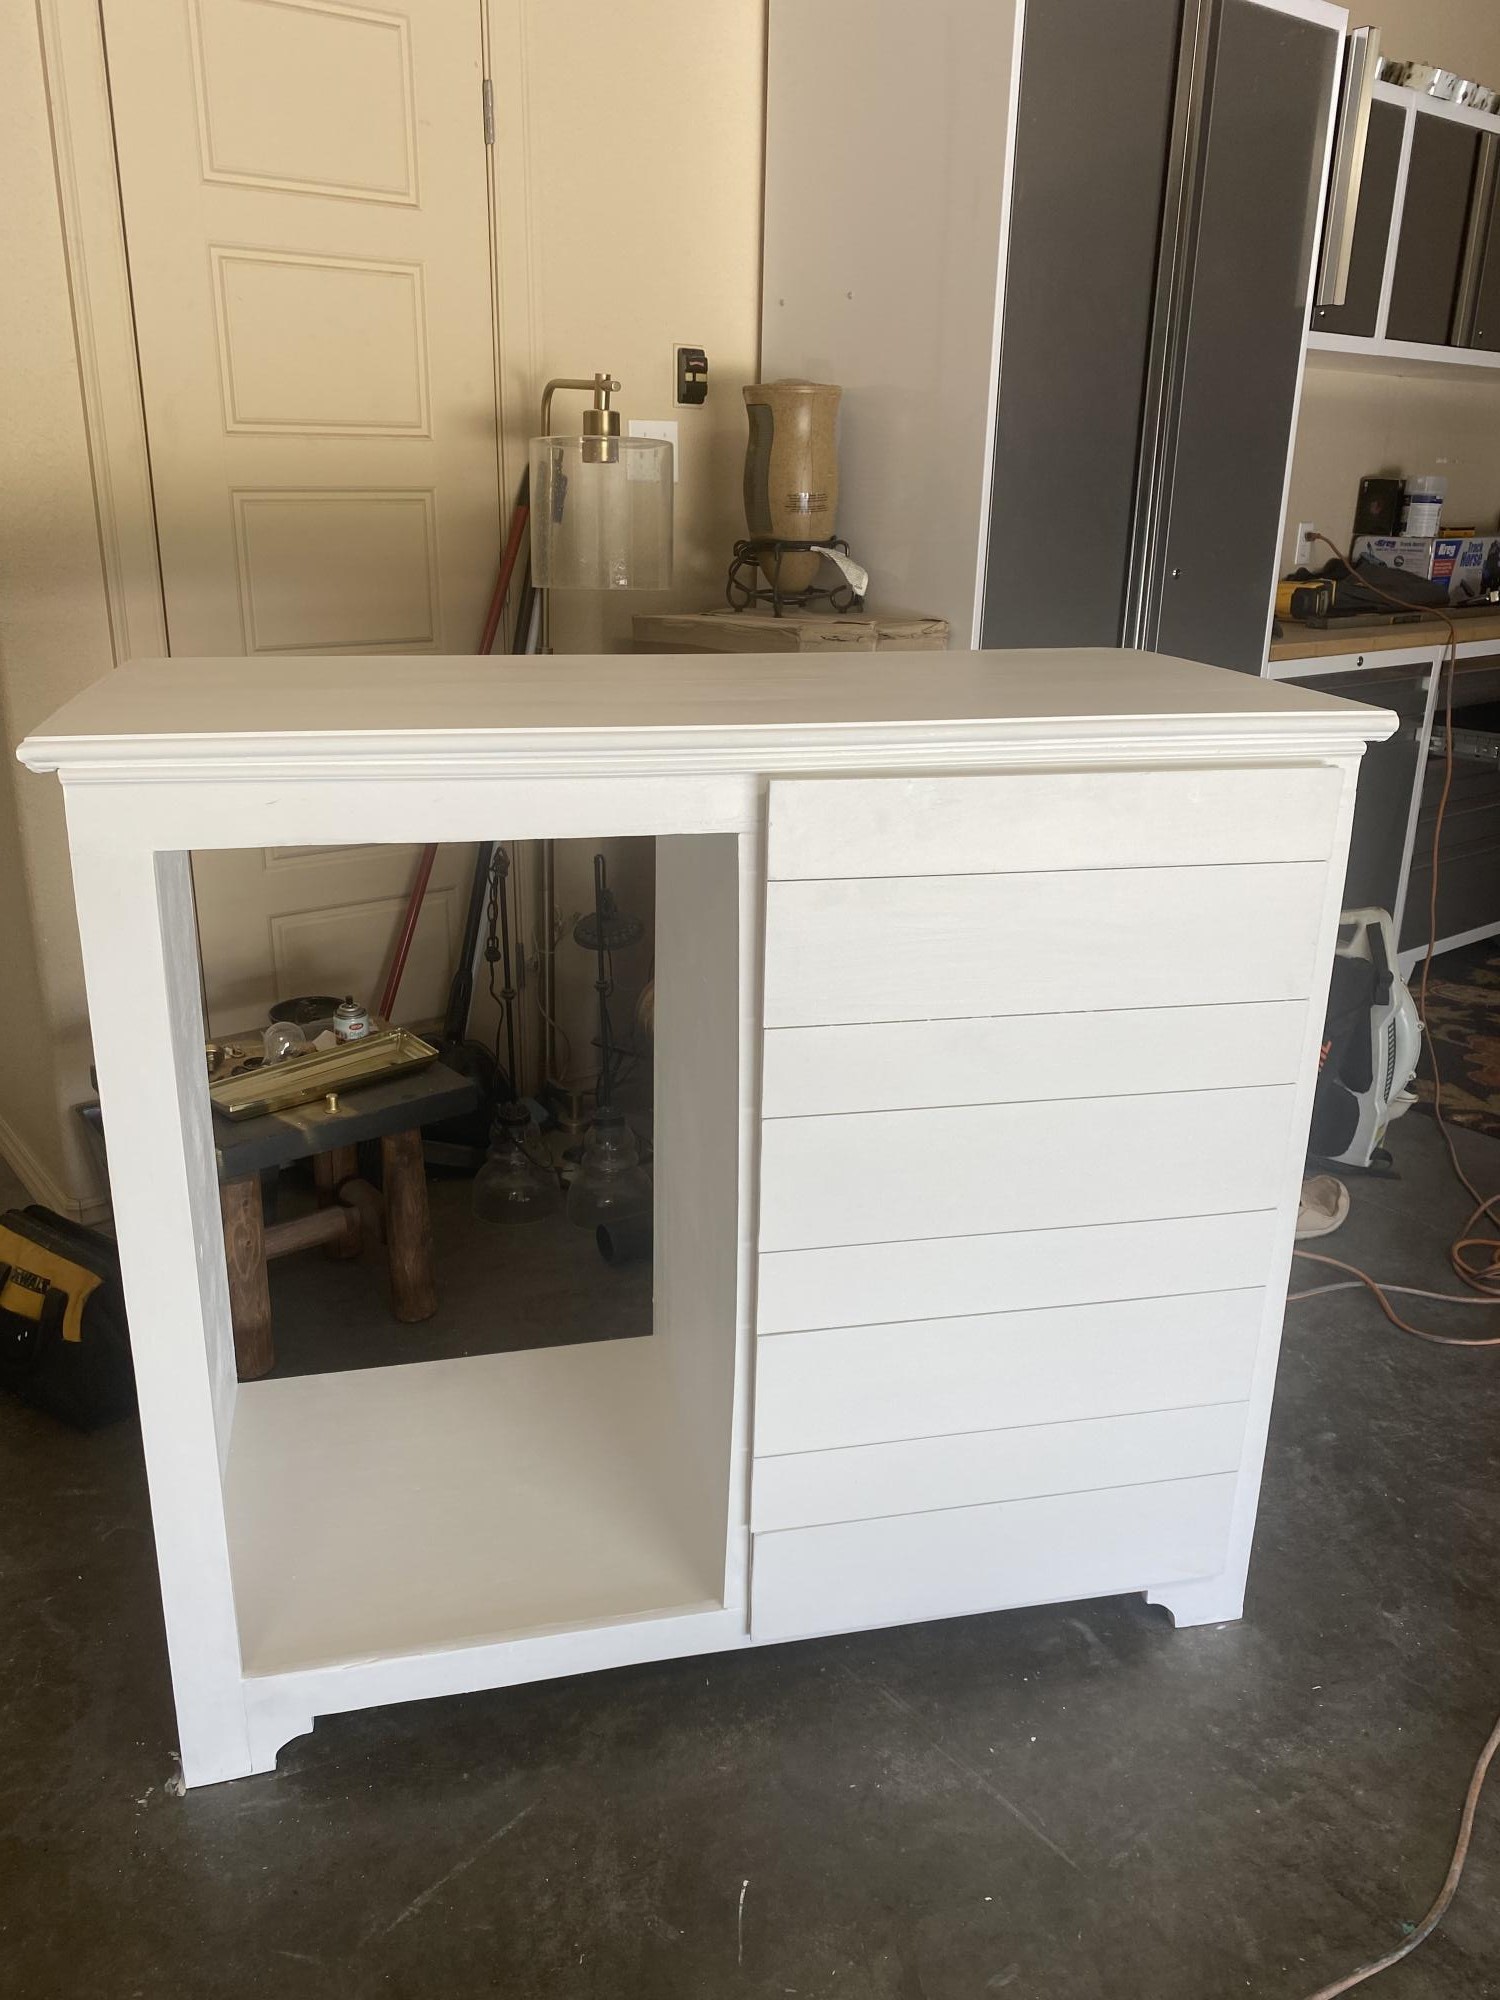
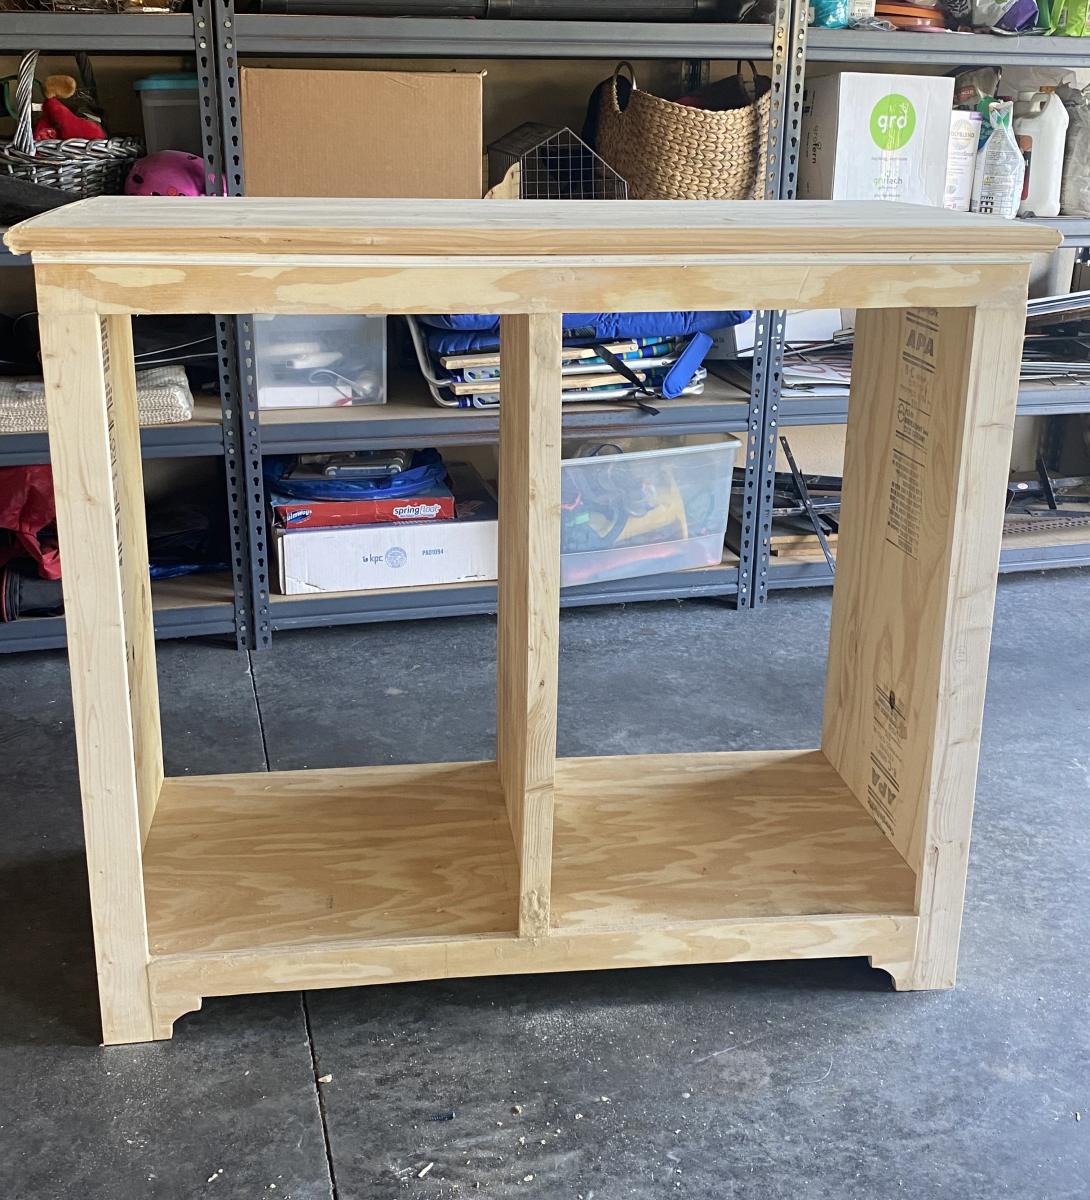
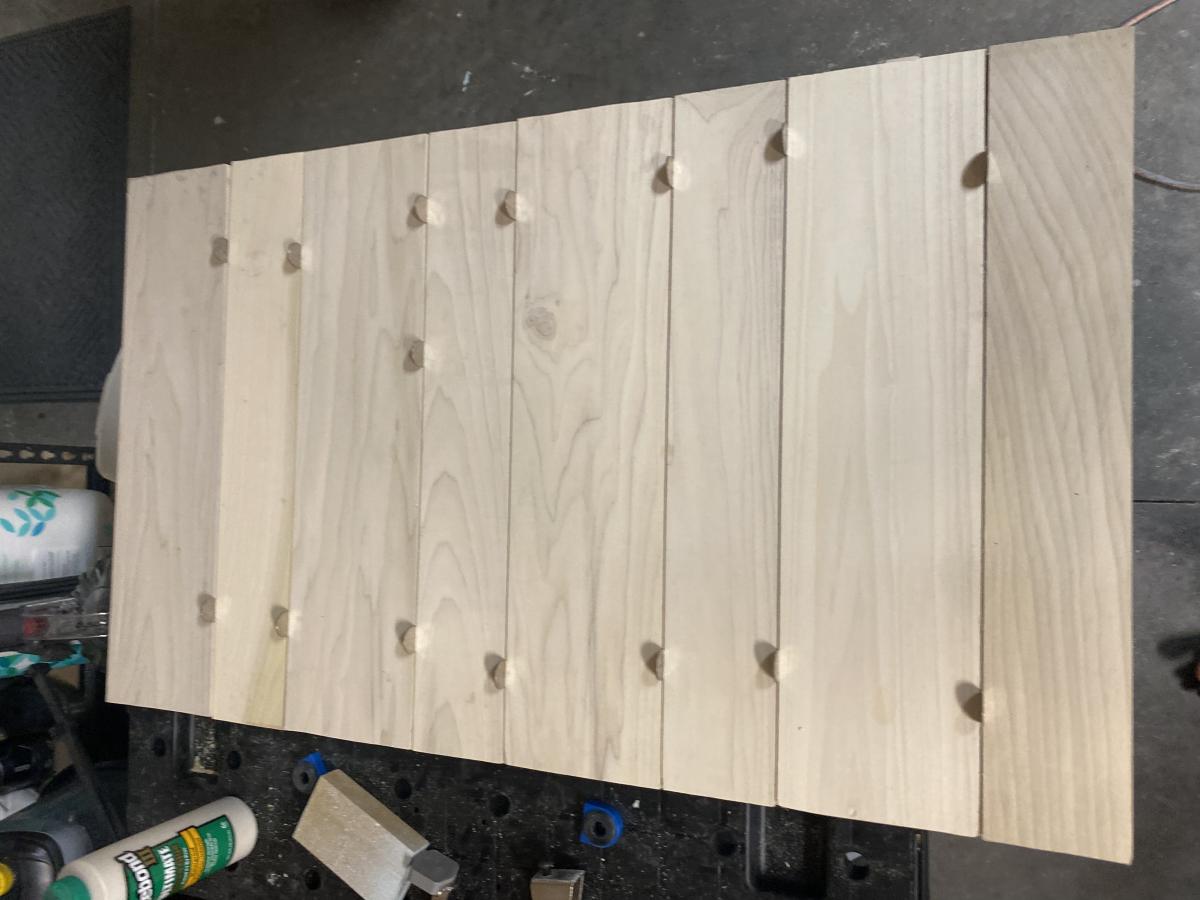
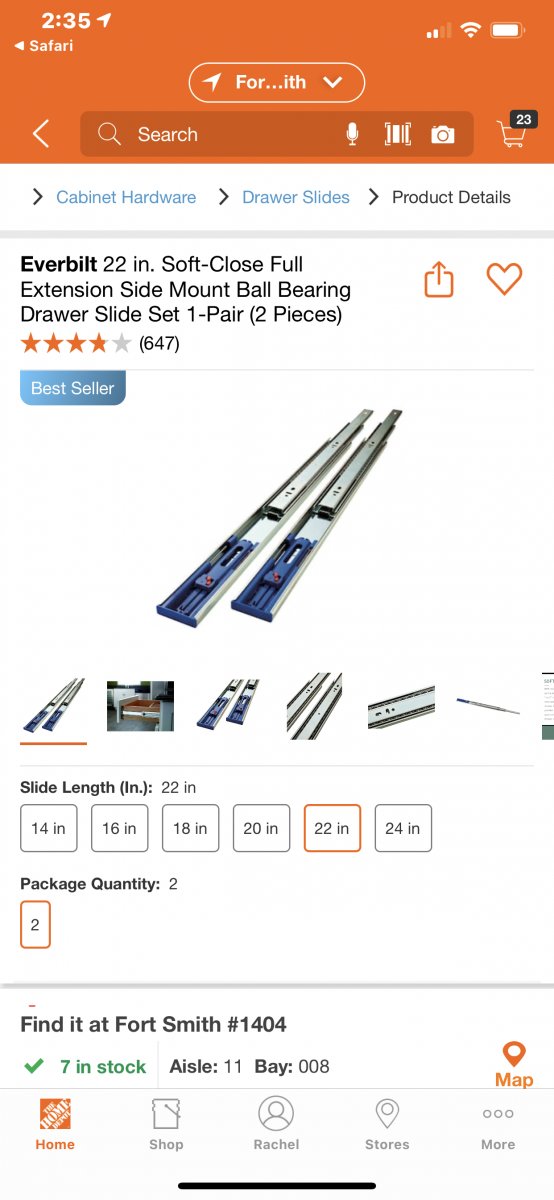
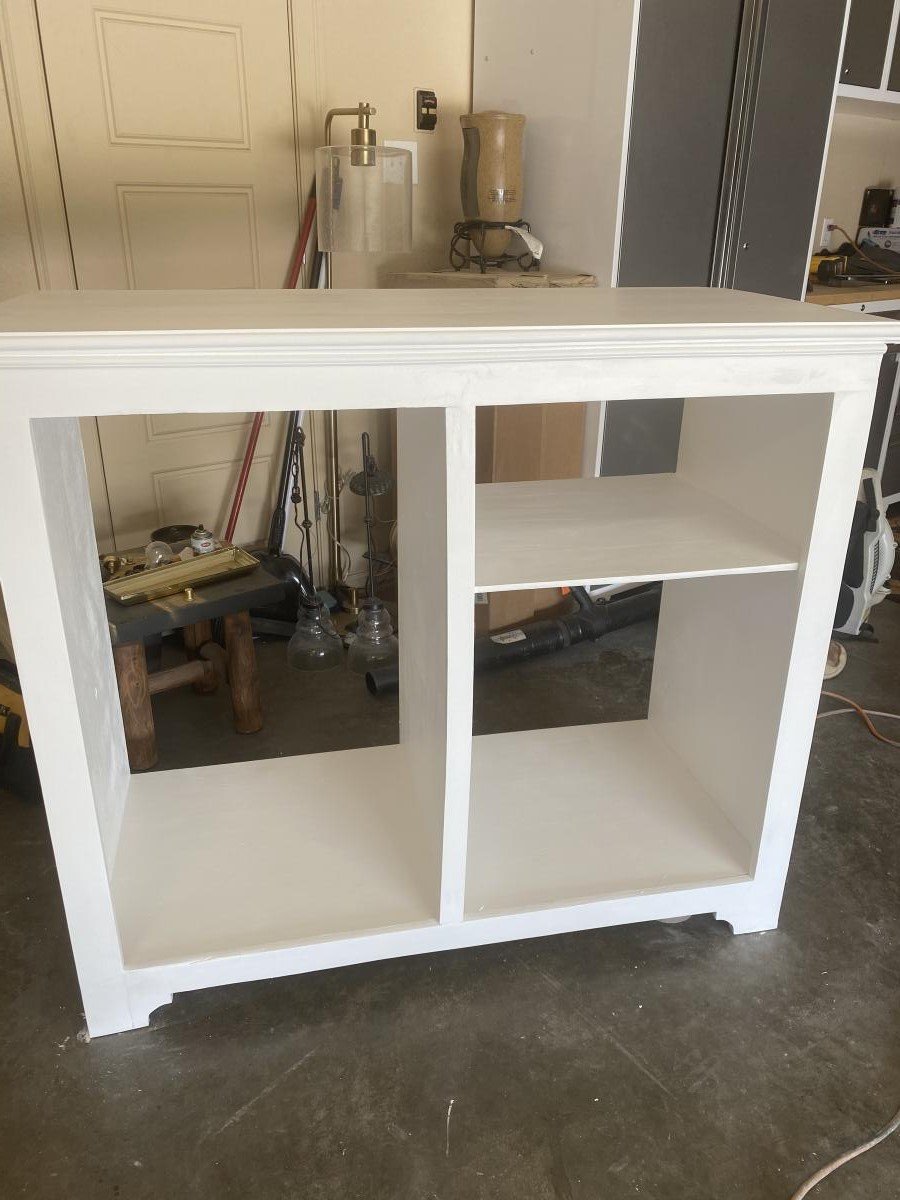
I changed plan to make deeper. I also modified the bottom trim and top. I put a ball bearing soft door drawer guide on modern door so it can slide back and forth. I feel we need more modern plans on here but with a bit of creativity and using plans you can make anything. I have never built anything before. I love General Finishes Milk Paint in Snow White and I brushed rolled it on (sanded between 3 coats). It’s basically self leveling and leaves a nice matte finish. Used door glide in picture bought from homedepot in the 24 inch and that’s how wide door was and it was 36” tall. Door glide I only used one on top of the door not on bottom as well. Door piece of fiberboard with just strips glued on and quarters spacing them correct.
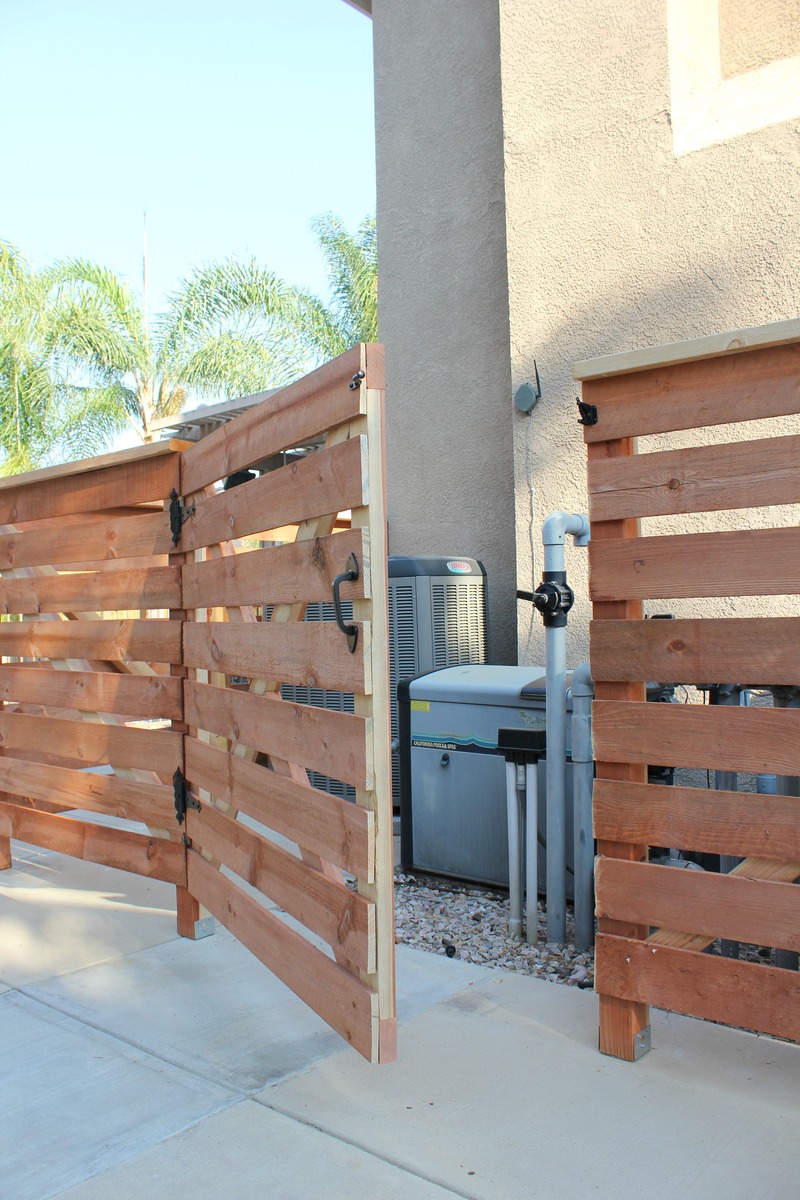
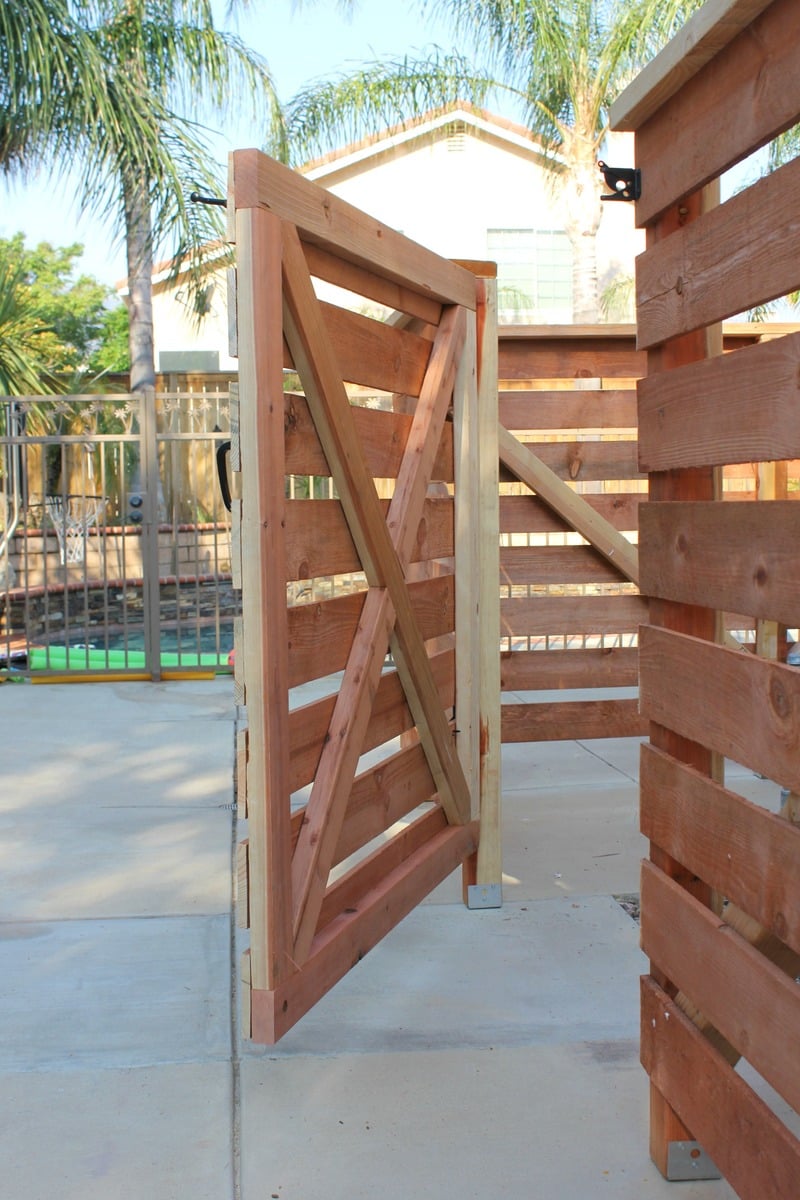
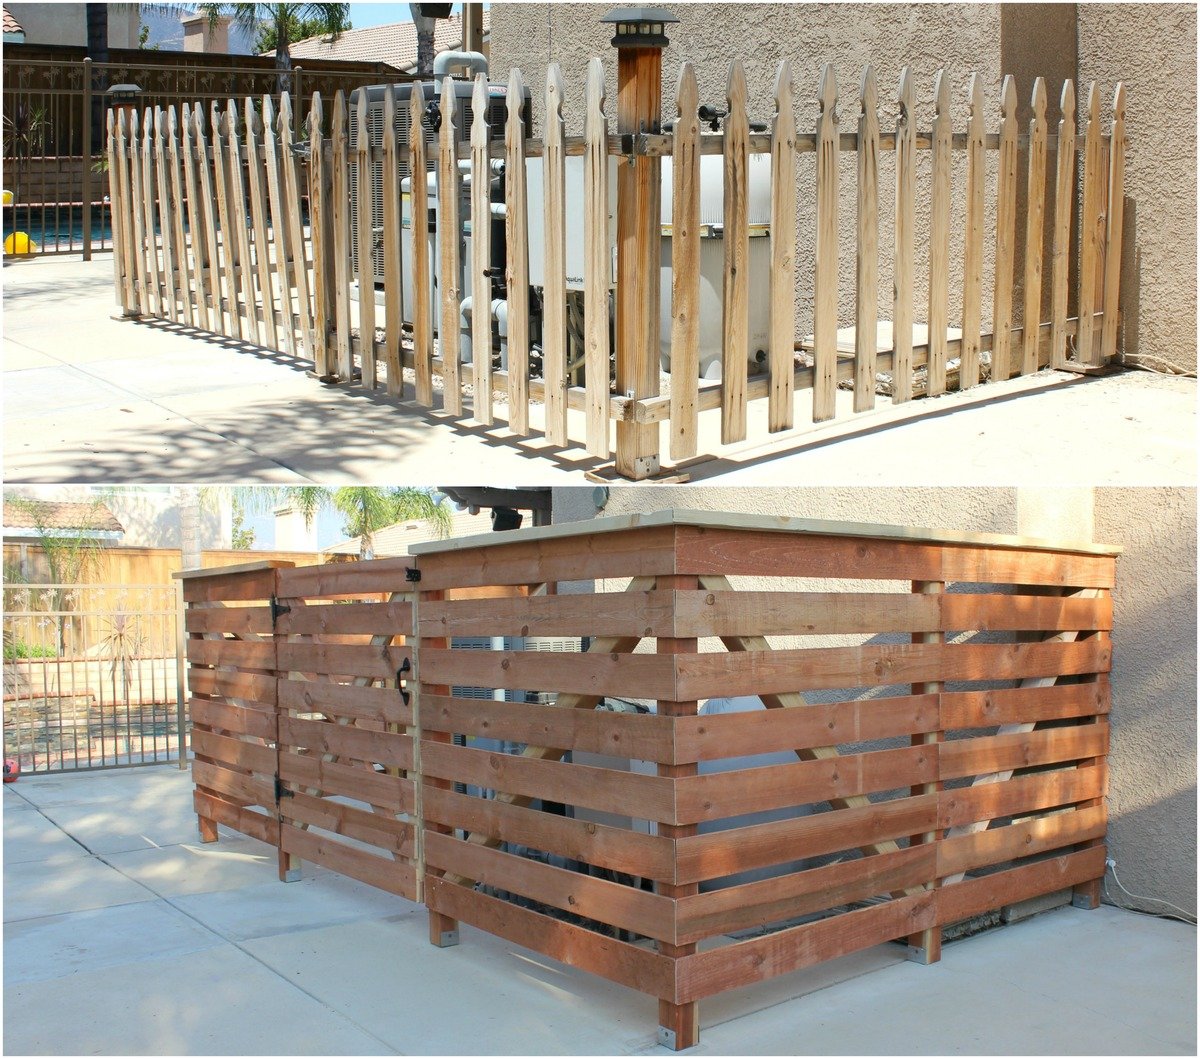
We love this fence refresh from the previous owner's solution to enclosing the pool equipment and a/c unit! It was the first time we fastened something to our house - drilling through stucco in the process. That was a big deal for us diy-ers! We made the frame out of 4x4's (which ended up being the most challenging part to the whole thing), applied the horizontal fencing boards and then used one of those $15 fence hardware kits - it was a great project that has made a huge difference in our backyard. Yay!


Comments
Ana White Admin
Fri, 04/14/2023 - 13:35
Built in one weekend!
This looks fabulous!!! Thank you for sharing.:)