
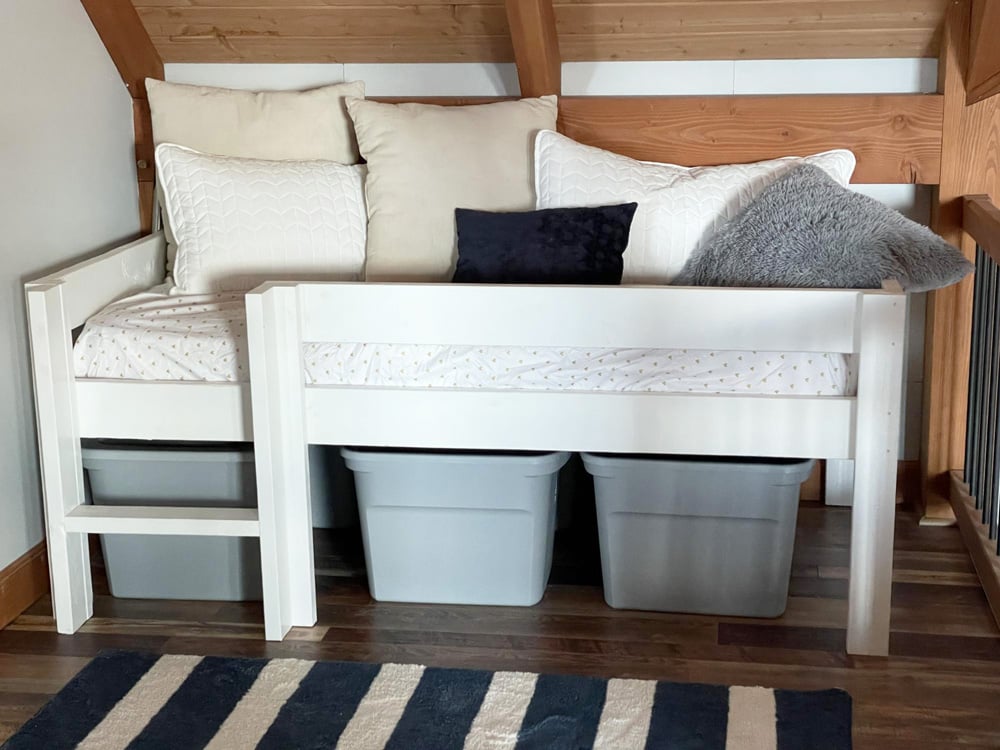

Build your own loft bed with free plans from Ana-White.com. Build this loft bed in your desired height, add storage or a play area underneath!
This is a very simple build, no pocket holes required! The bed is sturdy and solid, and you can add storage underneath. We love it with totes for inexpensive, easy storage! Cost about $100 . Plan includes step by step diagrams, build video, cut lists and shopping lists.
Related: Bunk Bed Plans
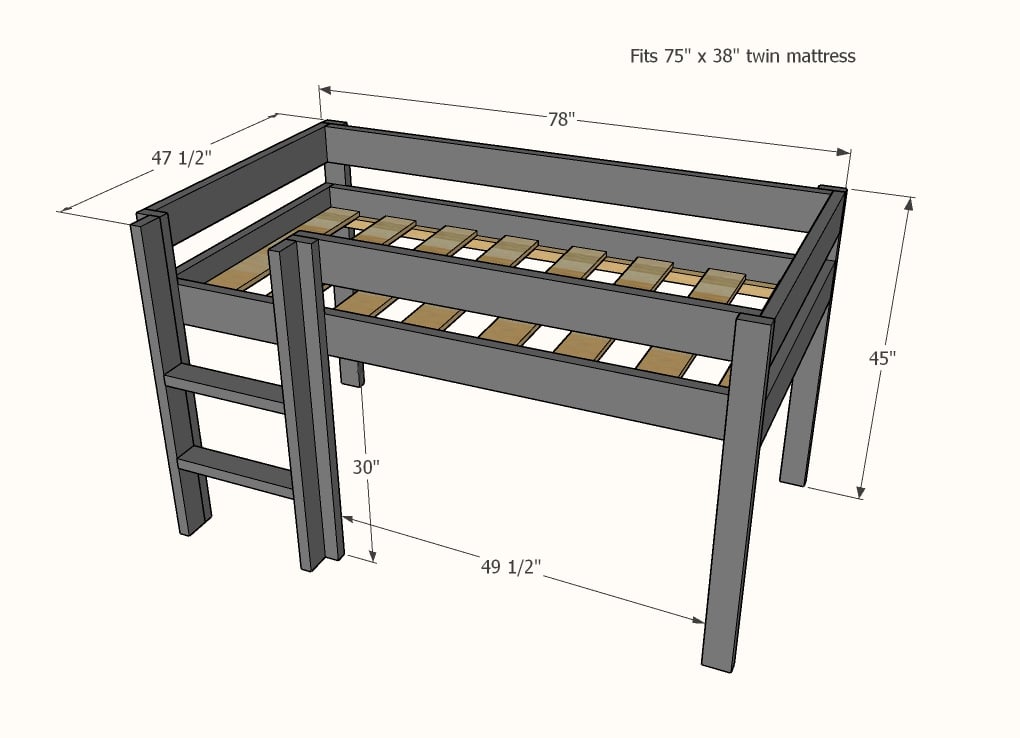
The best loft bed plans on the internet in three sizes!
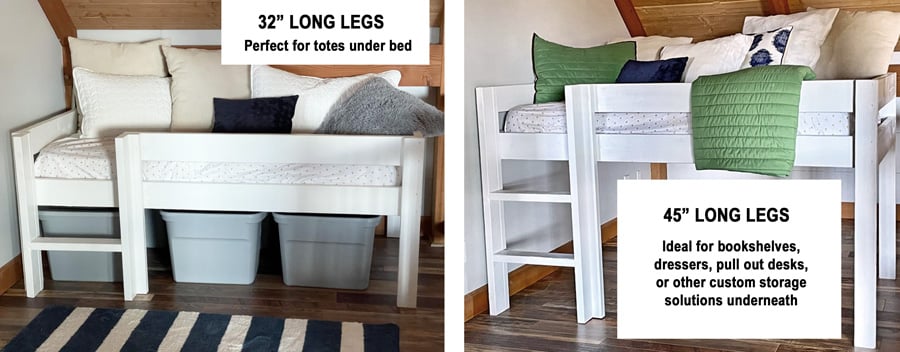
This plan is available in three height options - Low, Mid, or Tall
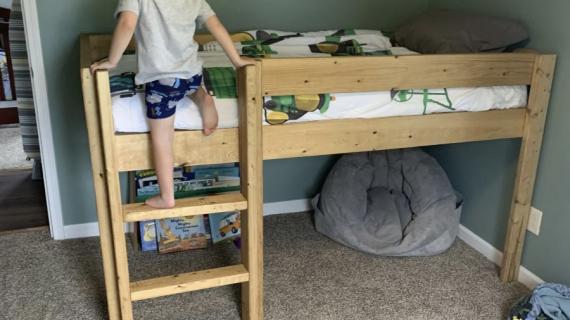
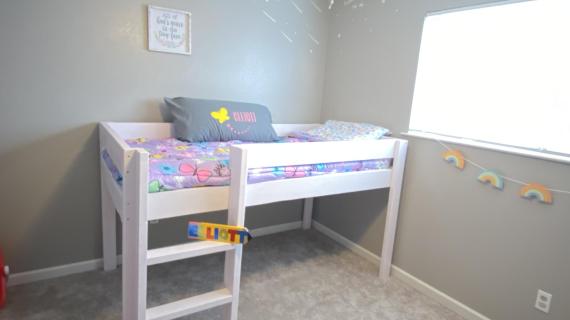
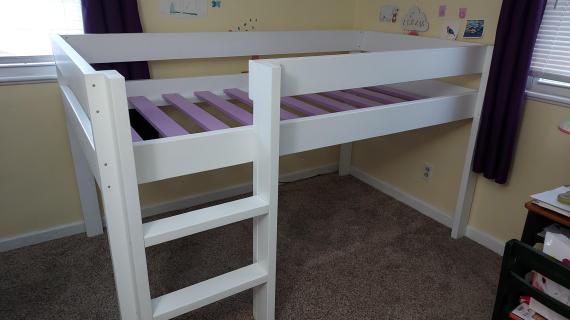
- Low - 32" Legs - Great toddler bed with the enclosed siderails. The siderails also keep bedding and pillows on the bed. Add a tent on top or a slide. Perfect for storing totes underneath or build roll out toy bins or drawers.
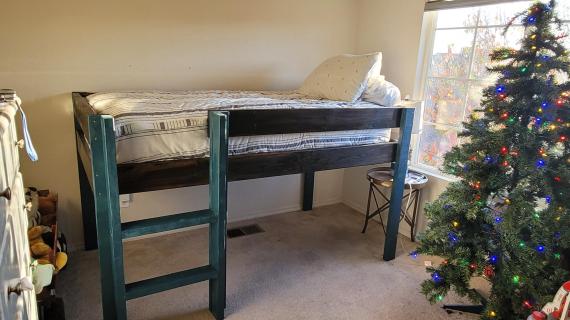
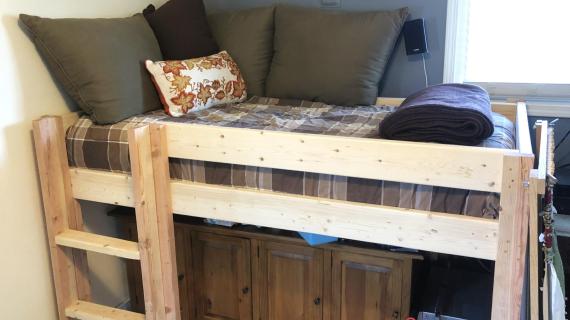
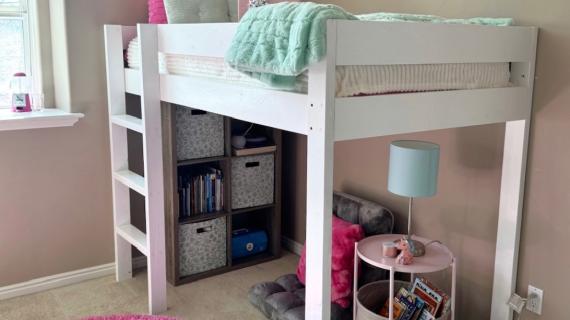
- Mid - 45" Legs - perfect for adding storage solutions underneath, the lower height is easier to access than a full height. Great option for a pull out desk, dresser, or bookshelf.
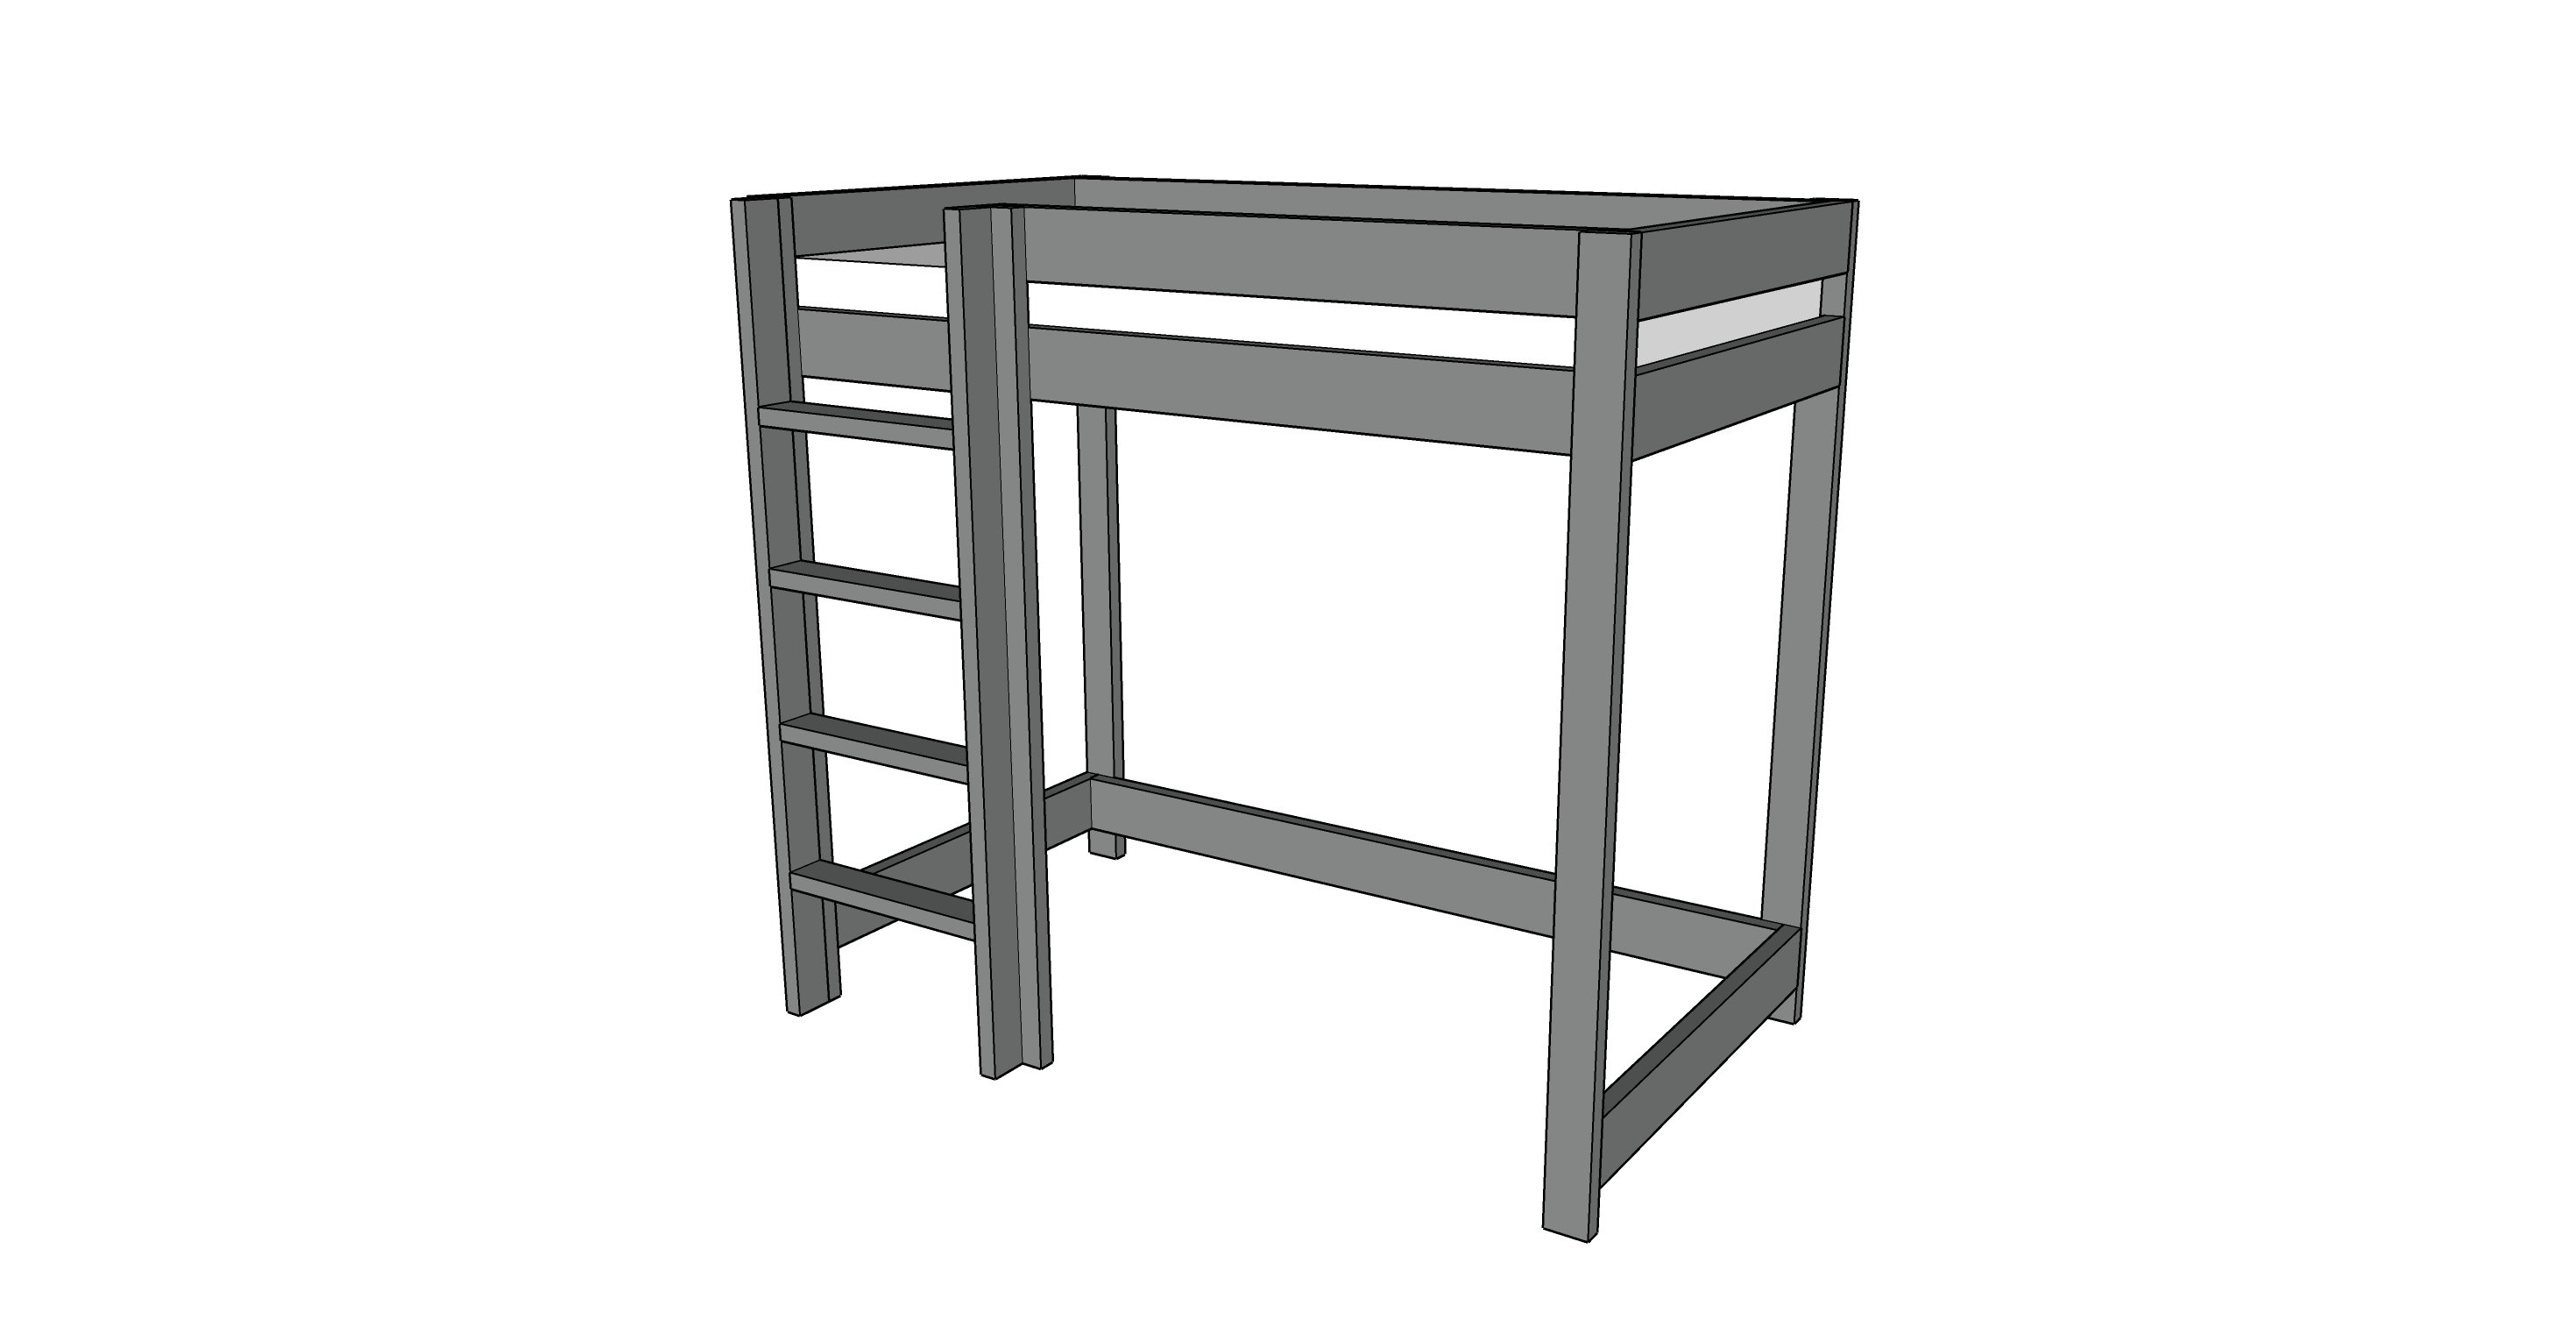
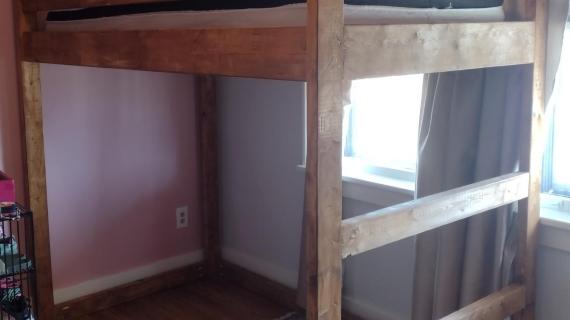
- Tall - 71" Legs - a full height loft bed, the space underneath could be used for storage or added floor space. Add a desk, closet, hang out area or even another bed underneath.
Why a Loft Bed?
Loft beds are gaining in popularity because they create more floor space for storage or utility underneath
The low loft bed for toddlers is a great choice to add fun to the room, but creates a nest like feel with the enclosed side rails. My kids loved this option because it kept blankets and pillows on the bed.
Why Build a Loft Bed?
Building a loft bed is a great opportunity to furnish a bedroom!
- Cost - You can save money. There are many options for buying a low loft bed, but by building your own you can save hundreds (even thousands!) of dollars. This low loft bed cost about $50 in lumber to make.
- Sturdy - You'll get a more durable end product. Our homebuilt option is VERY sturdy, suitable for even young adults.
- Custom - You get to customize it. We love that by building it yourself you get to choose your finish and can easily customize the storage options underneath.
- DIY Friendly - And it's pretty easy to build. Most store bought options you'd have to assemble anyway. In this well thought out and tested plan, we make it as easy as possible to build your own low loft bed.
Watch! Build Video for DIY Loft Bed
Don't just take my word for it - watch me build this low loft bed! It took me about two hours to cut and build this bed. Painting is definitely the hardest part, but if you prefinish your boards, you'll save a ton of time. This video is for the taller (45") version, but it follows the same steps as the 32" version.
Add on Plans and Customizations
The big benefit of a low loft bed is the added storage space underneath. We will be adding plans for storage underneath, as well as a bunk bed option.
You can make this bed into a regular height loft bed, but the bottom of the legs will need some supports at the bottom of the legs.
UPDATE: Bunk Bed Plans Here
Pin For Later!
Preparation
Shopping List for Low Loft Bed
- 3 - 2x4 @ 8 feet long
- 4 - 2x6 @ 10 feet long
- 2 - 2x2 @ 8 feet long
- 5 - 1x4 @ 8 feet long (for bed slats)
- About 70 - 2-1/2" long self tapping wood screws (star bit #8 recommended) - for main construction, can be as long as 3"
- 40 - 1-5/8" long self tapping wood screws (star bit #7 or #8 recommended) - for screwing slats down only
Shopping List for Mid Loft Bed
- 4 - 2x4 @ 8 feet long
- 4 - 2x6 @ 10 feet long
- 2 - 2x2 @ 8 feet long
- 5 - 1x4 @ 8 feet long (for bed slats)
- About 70 - 2-1/2" long self tapping wood screws (star bit #8 recommended) - for main construction, can be as long as 3"
- 40 - 1-5/8" long self tapping wood screws (star bit #7 or #8 recommended) - for screwing slats down only
Shopping List for Standard Height Loft Bed
- 7 - 2x4 @ 8 feet long
- 6 - 2x6 @ 10 feet long
- 2 - 2x2 @ 8 feet long
- 5 - 1x4 @ 8 feet long (for bed slats)
- About 100 - 2-1/2" long self tapping wood screws (star bit #8 recommended) - for main construction, can be as long as 3"
- 40 - 1-5/8" long self tapping wood screws (star bit #7 or #8 recommended) - for screwing slats down only
TIP: Prefinish all 2x4 and 2x6 boards before cutting.
Cut List for Low Loft Bed
- 3 - 2x6 @ 75" - cut first
- 4 - 2x6 @ 41" - cut from leftovers after cutting the 75" pieces
- 1 - 2x6 @ about 55" measure and cut to fit - cut from leftovers after cutting the 75" pieces
- 7 - 2x4 @ 31-3/4" - legs, ladder sides (cut is 31-3/4" to fit all cuts on boards, instead of 32" as shown in diagrams)
- 2 - 2x4 @ 18" - ladder rungs
- 2 - 2x2 @ 75" - cleats for slat system
- 10 - 1x4 @ 38" - slats
Cut List for Mid Loft Bed
- 3 - 2x6 @ 75" - cut first
- 4 - 2x6 @ 41" - cut from leftovers after cutting the 75" pieces
- 1 - 2x6 @ about 55" measure and cut to fit - cut from leftovers after cutting the 75" pieces
- 7 - 2x4 @ 45" - legs, ladder sides
- 2 - 2x4 @ 18" - ladder rungs
- 2 - 2x2 @ 75" - cleats for slat system
- 10 - 1x4 @ 38" - slats
Cut List for Standard Height Loft Bed
- 4 - 2x6 @ 75" - cut first
- 6 - 2x6 @ 41" -
- 1 - 2x6 @ about 55" measure and cut to fit - cut from leftovers after cutting the 75" pieces
- 7 - 2x4 @ 70-1/2" - legs, ladder sides
- 4 - 2x4 @ 18" - ladder rungs
- 2 - 2x2 @ 75" - cleats for slat system
- 10 - 1x4 @ 38" - slats
Cut boards according to cut list using a chop saw or miter saw.
A circular saw can be used instead, but straight cuts are very important to the overall success of this project, and it is hard to get straight cuts with a circular saw. If you have to use a circular saw, a square cutting guide is highly recommended.


Once this bed is finished it will be too large to fit through standard doorways. You can either assemble in the room and paint in the room, or assemble in a workshop/outdoors and paint, and then partially disassemble to bring into the room.
Another option is to prefinish all the 2x4s and 2x6s before cutting, and then cut and bring the pieces into the room and build in the room. A final touch up coat of paint will be needed, but it will be minimal.
Instructions
Step 1

Build two of the ends by attach the legs (either the 45" long legs or the 32" long legs) to the 41" 2x6 boards. Leave a 4" space between the two horizontal slats.
These screws will be removed if dismantling later on.
Step 2
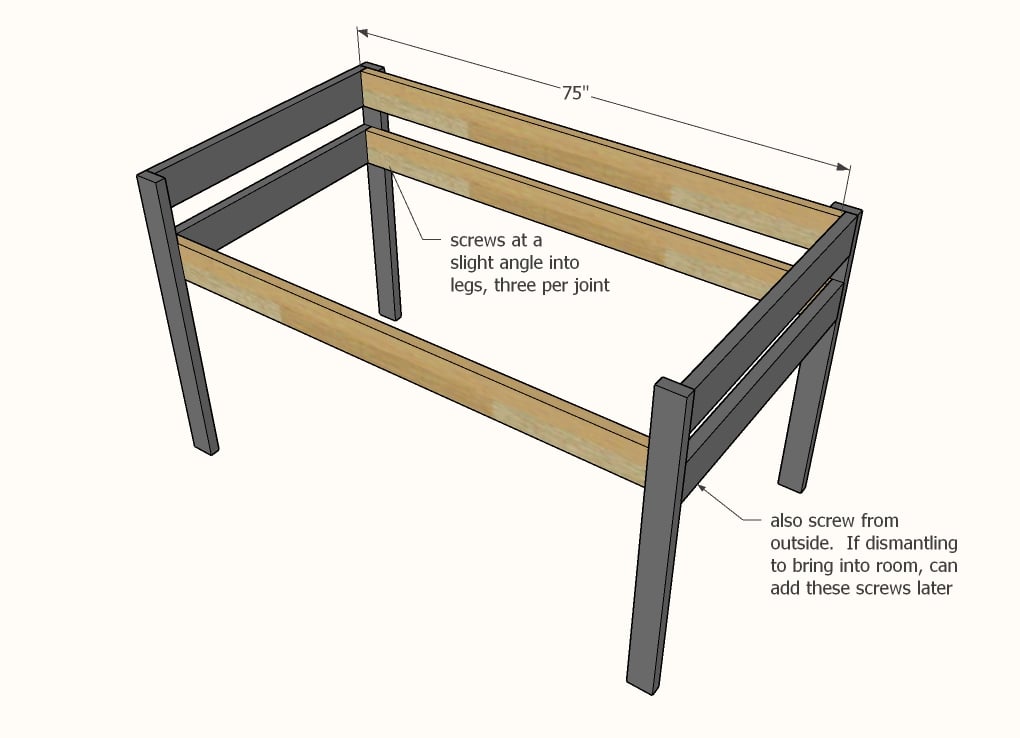
Attach the longer 2x6s to the two leg sets, with screws on the inside at a slight angle into the back side of the leg.
Leave a 3-1/2" gap in between the 2x6s.
I recommend three screws for the lower boards that will support the mattress. Only two are needed for the upper 2x6 as it does not support the mattress.
Additional screws from outside are recommended, but can be added on final assembly.
Step 3
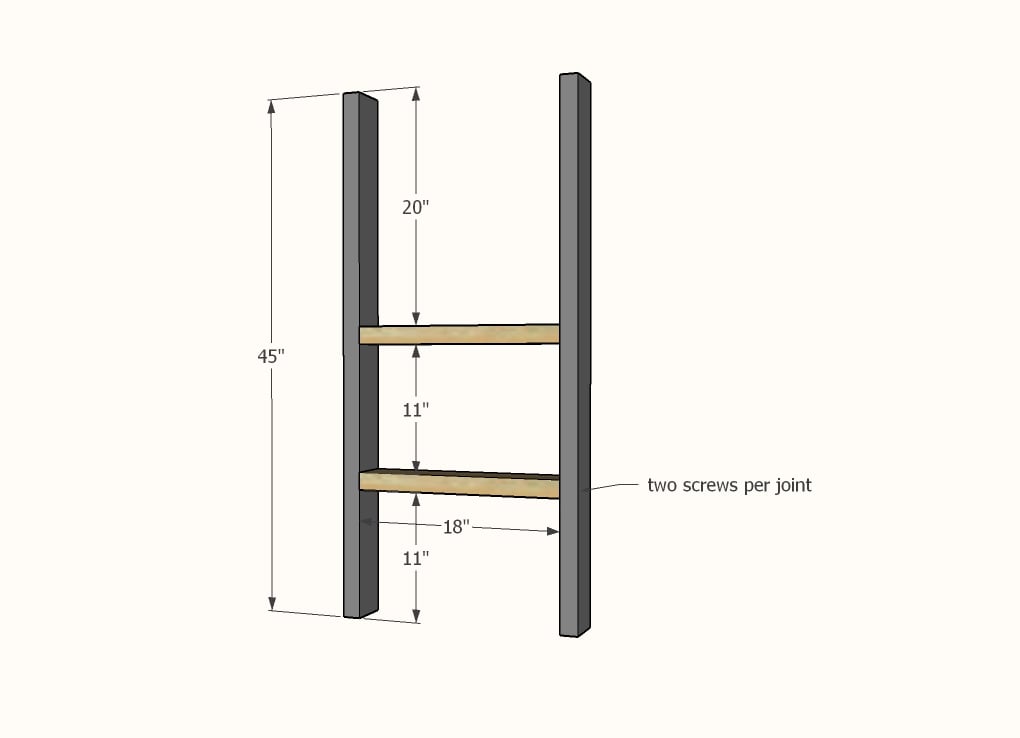
Build the ladder as shown with the longer screws.
Step 4

Determine what side the ladder should be placed on the bed.
Attach the remaining 2x4 leg to the back of the ladder on the side that will not be attached to a bed leg.
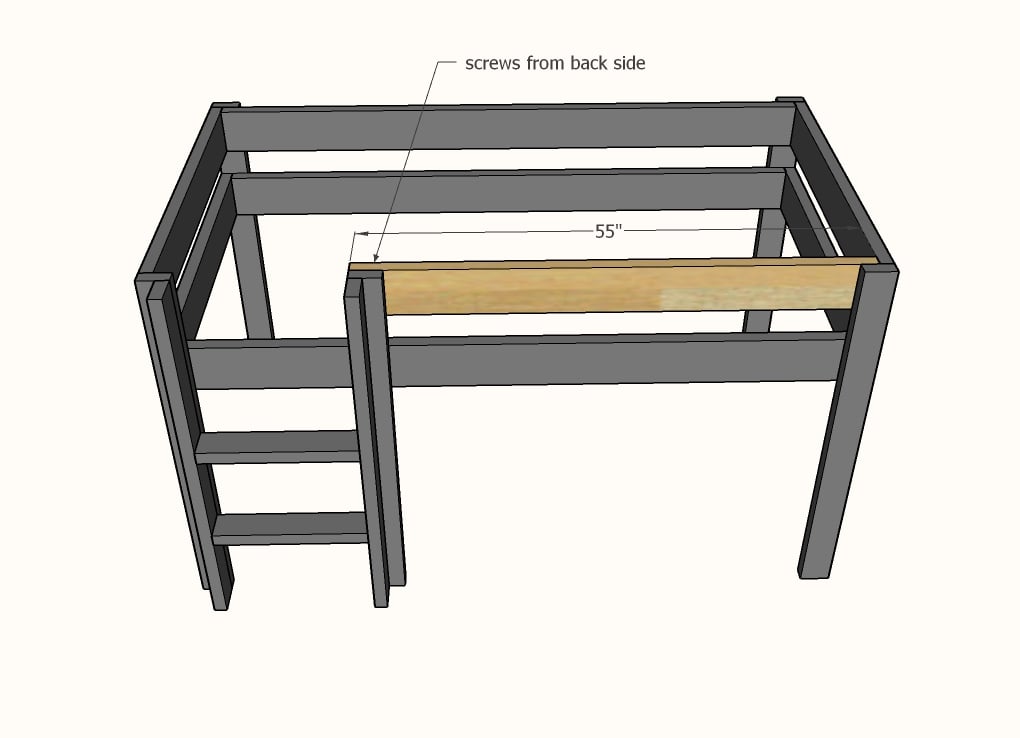
Step 5
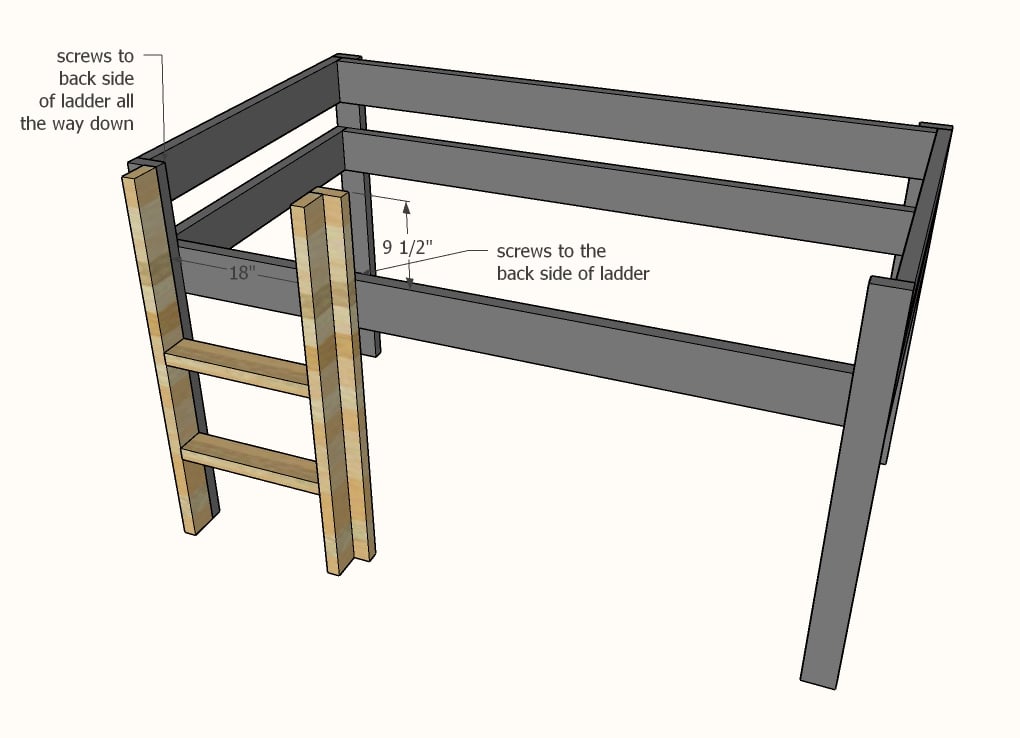
Attach the ladder to the bed with screws from the back side.
The double legs on the ladder are designed to increase strength and durability of the ladder and bed.
Step 6
Attach the remaining 2x6 at the top from the inside.
Step 7
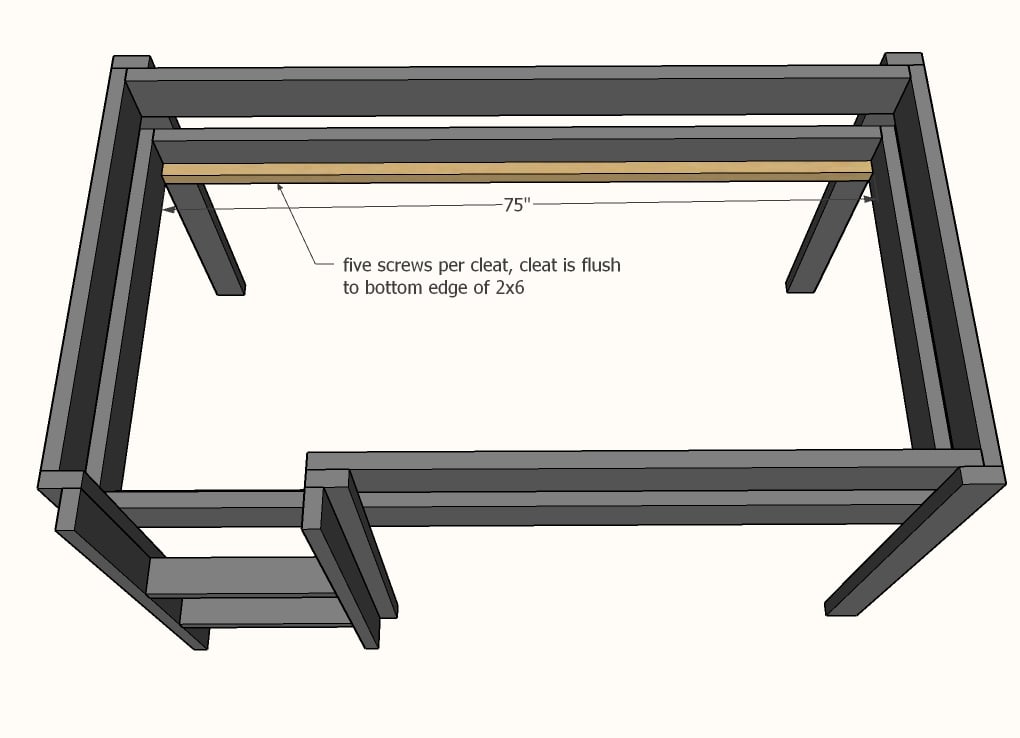
Attach 2x2 cleats to the inside of the bed, flush to the bottom of the bottom 2x6s.
Step 8
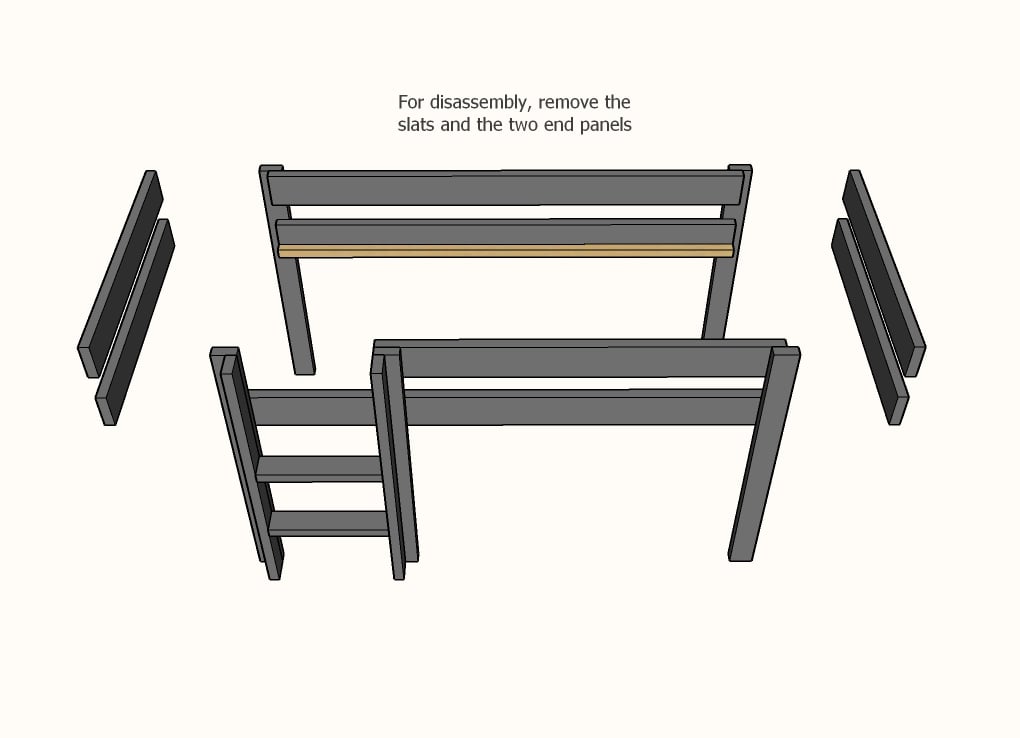
The shorter legged bed may be able to be moved into a room without disassembly. The taller bed will most likely need to be disassembled and reassembled.
To disassemble, remove only the end 2x6 boards. This will break the bed down into two main flat panels, and four end pieces.
Step 9

On final assembly add the cleats to the insides of the bed. Screw down with the shorter screws, two screws per end.
Step 10
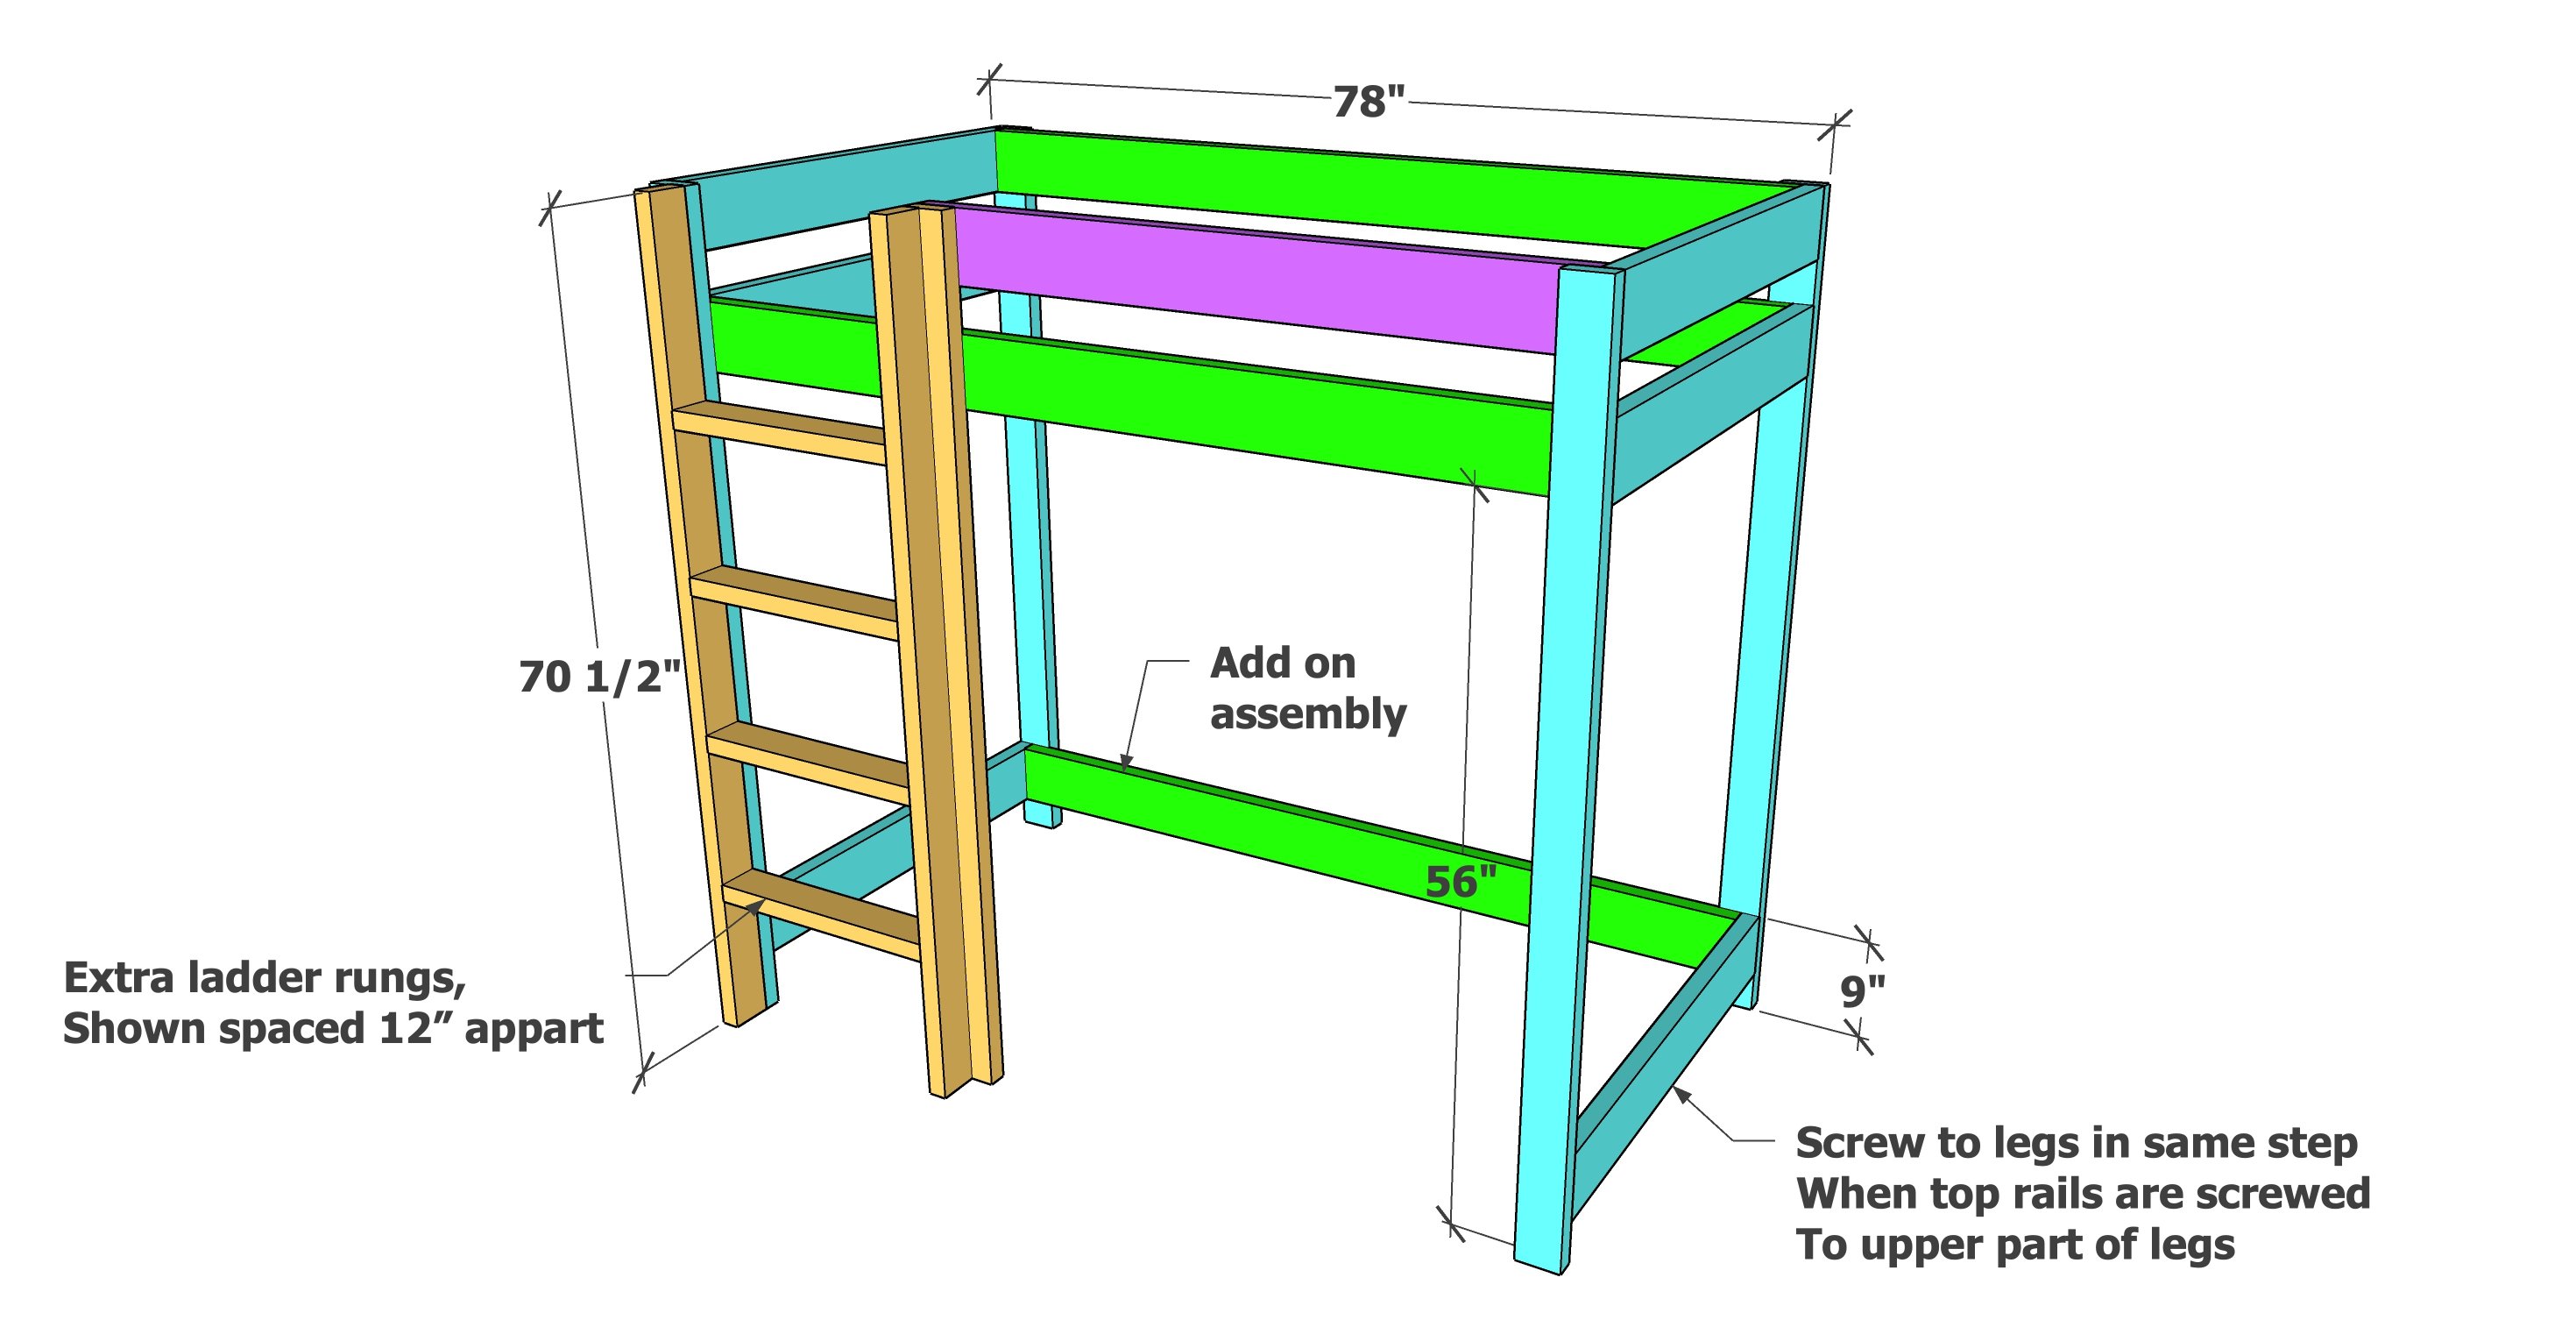
For the standard height loft bed, a few modifications will be necessary to support the bottom of the legs. The cut list and shopping list are correct, add as shown in this diagram.
You can also pre-paint or stain.


Comments
se
Mon, 09/20/2021 - 12:02
low loft bed
nice project, would like to see plans for a higher loft twin bed. thanks
Redamer21
Mon, 09/20/2021 - 20:30
This is great love to see…
This is great love to see what the storage will be like
melrose77
Fri, 10/29/2021 - 20:19
Full size option
Would like to see in a full size option. :)
meadams9182
Fri, 11/05/2021 - 05:08
Full size please
Yes, please add in the alternate dimensions for a full size at 45"
katiebabie
Wed, 02/16/2022 - 04:44
HI, Might be an obvious…
HI,
Might be an obvious questions but what is the exact type of wood you use?
Thank you
amolina23
Mon, 07/18/2022 - 10:40
Full size option
Full size option