
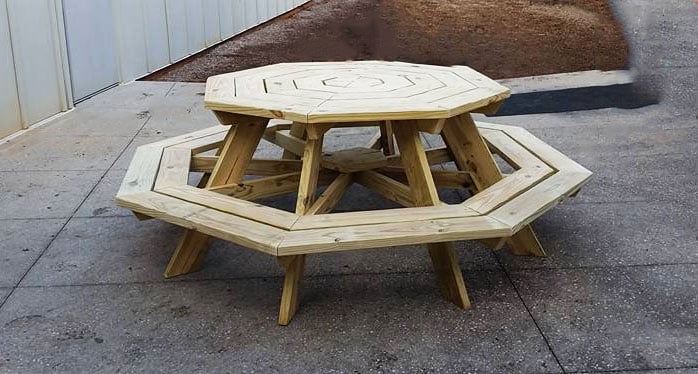

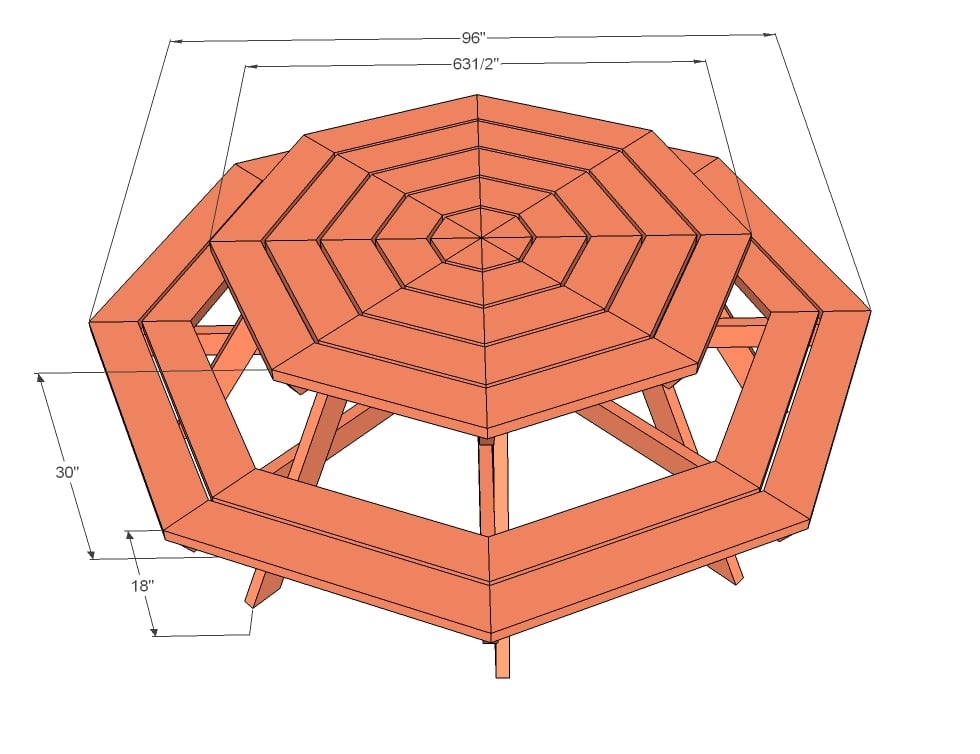
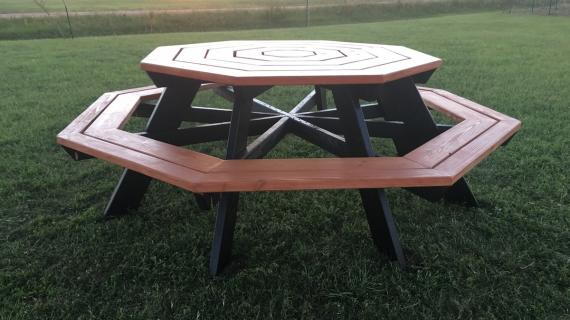
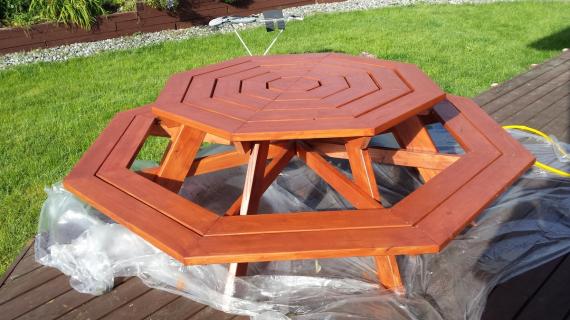
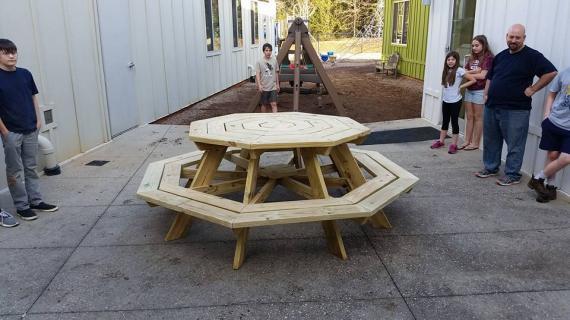
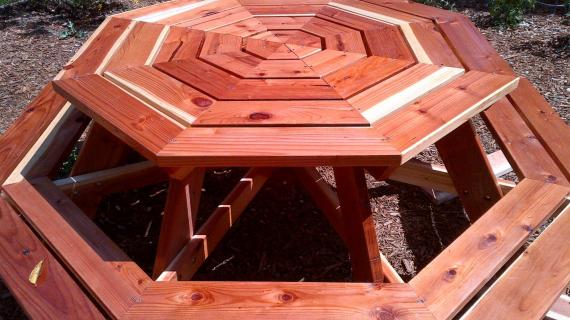
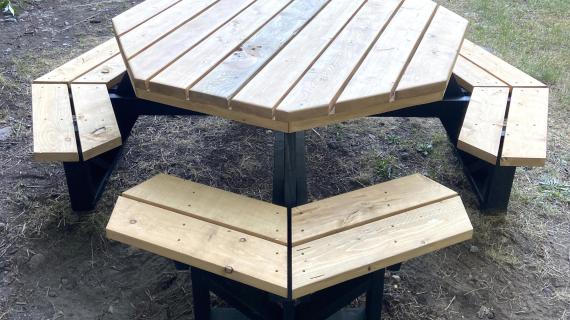
Our octagon picnic table plans are free and easy to follow. Extending to eight feed wide, perfect for a large backyard BBQ. Tabletop is 64" wide. It's a big one!
We also have an easy to build classic picnic table, a kids picnic table and a converting bench picnic table plan.
Thank you to everyone that requested this picnic table, the 8 sided or octagon picnic table plans. This is a large table, eight feet in diameter at it's widest, so be aware of that before you get your saw out.
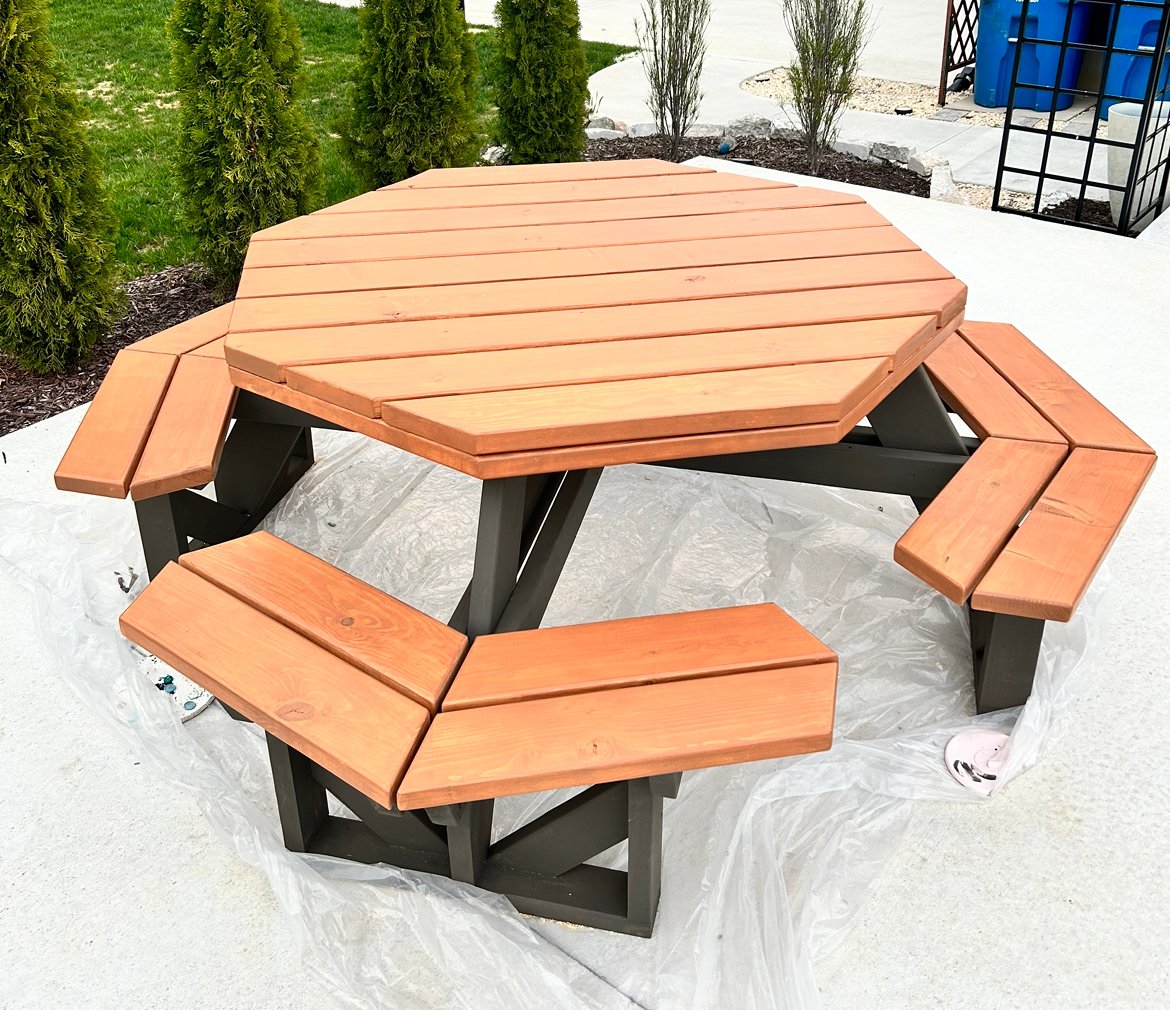
Thank you to our readers for submitting photos.
See Also - Octagon Picnic Table with Open Seats
I also made plans for an octagon picnic table with step in seats here.
Preparation
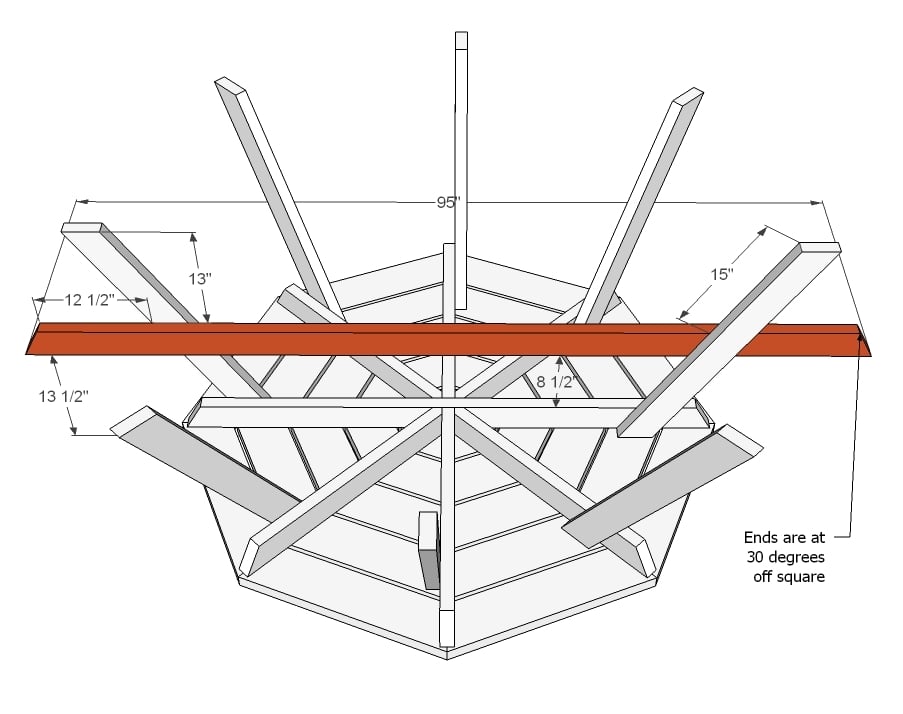
- 1 - 2x4 @ 62" (Longest Point - Both ends tapered back at 30 degrees off square, NOT parallel to each other)
- 2 - 2x4 @ 30 1/2" (Longest Point - One end at 30 degrees off square)
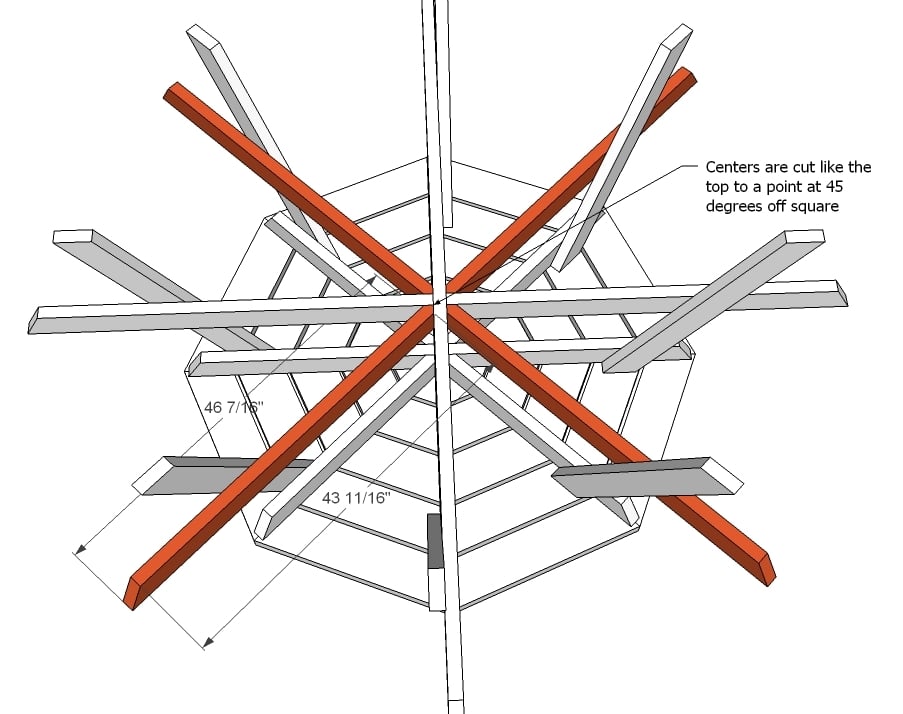
- 4 - 2x4 @ 29 15/16" (Longest Point - One end at 30 degrees off square, other end at a point, 45 degrees off square)
- 8 - 2x6 @ 4 9/16" (Longest Point - Both ends at 22 1/2 degrees off square)
- 8 - 2x6 @ 9 1/2" (Longest Point - Both ends at 22 1/2 degrees off square)
- 8 - 2x6 @ 14 7/16" (Longest Point - Both ends at 22 1/2 degrees off square)
- 8 - 2x6 @ 19 5/16" (Longest Point - Both ends at 22 1/2 degrees off square)
- 8 - 2x6 @ 24 1/4" (Longest Point - Both ends at 22 1/2 degrees off square)
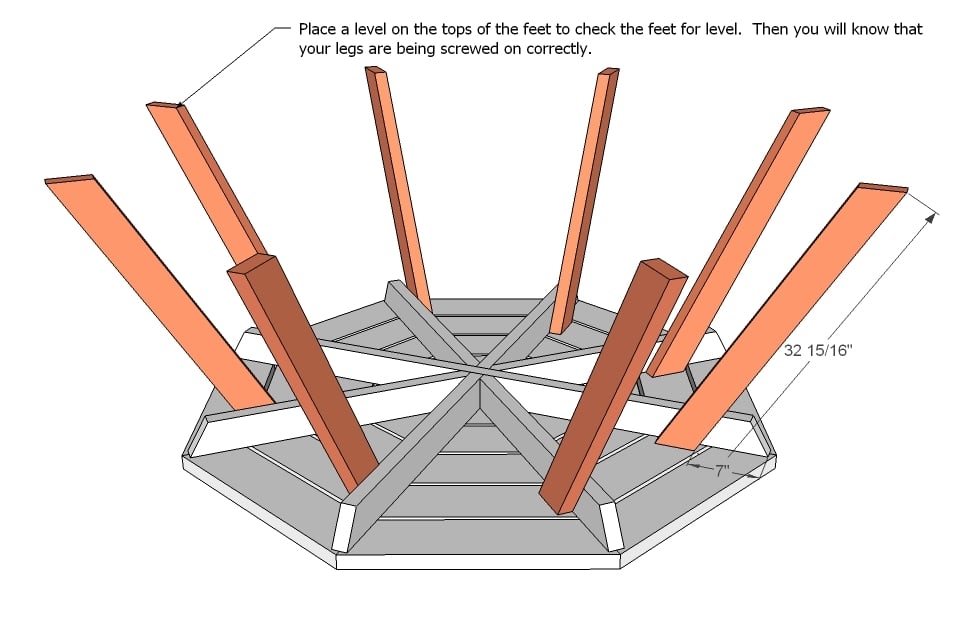
- 8 - 2x6 @ 32 15/16" (Both ends at 30 degrees off square, parallel to each other)
- 1 - 2x4 @ 95" (Longest Point - Both ends tapered in at 30 degrees off square)
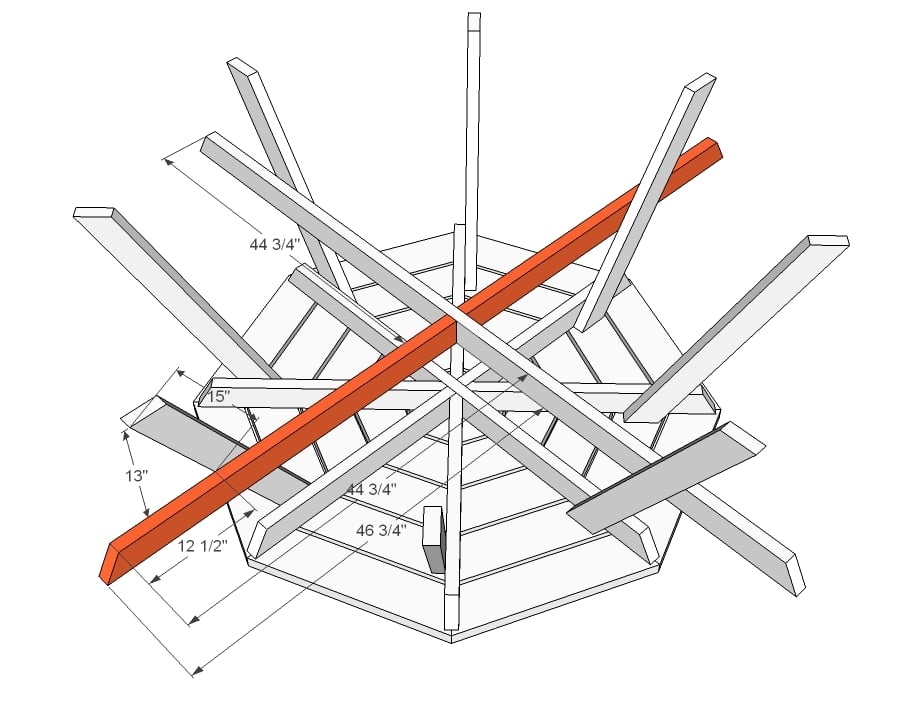
- 2 - 2x4 @ 46 3/4" (Longest Point - One end at 30 degrees off square)
- 4 - 2x4 @ 46 7/16" (Longest Point - One end at 30 degrees off square, other end at a point, 45 degrees off square)
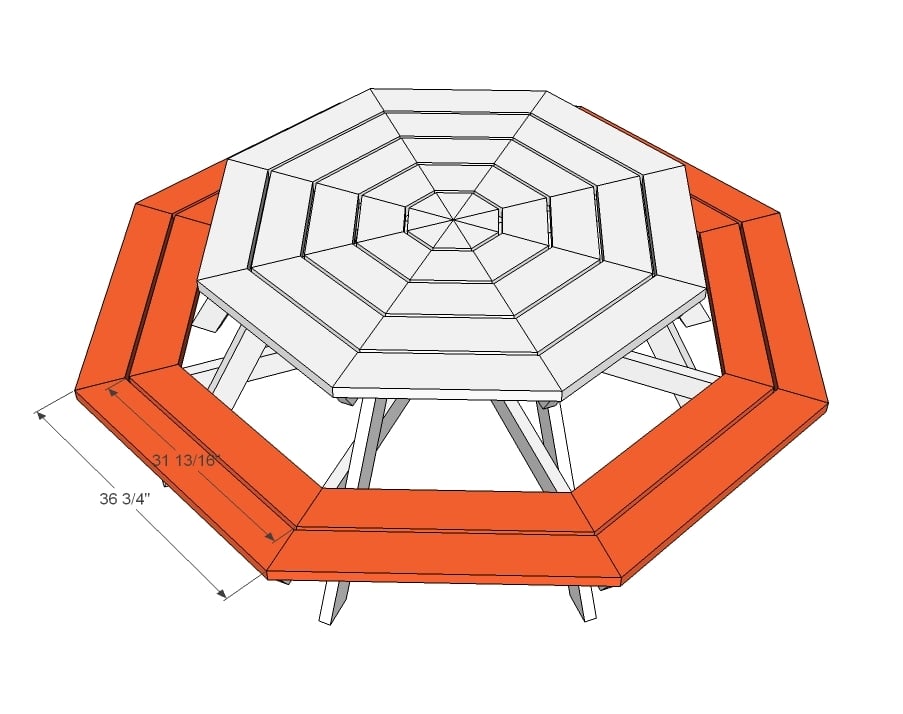
- 8 - 2x6 @ 31 13/16" (Longest Point - Both ends at 22 1/2 degrees off square)
- 8 - 2x6 @ 36 3/4" (Both ends at 30 degrees off square, parallel to each other)
UPDATE: One of our readers built this table and felt it could use a little more leg room. He suggested extending out the seat boards by 4" all the way around, and removing the inner seat board and adding a seat board to the outside to increase leg room. It is recommended that you cut as you go, as boards can vary in width - especially the tabletop and seat boards. As you cut your boards, make every effort to reuse angled cuts when possible to minimize waste. Try when possible to cut the longest cuts first. You may need more or less boards depending on how you lay your cuts out.


Please read through the entire plan and all comments before beginning this project. It is also advisable to review the Getting Started Section. Take all necessary precautions to build safely and smartly. Work on a clean level surface, free of imperfections or debris. Always use straight boards. Check for square after each step. Always predrill holes before attaching with screws. Use glue with finish nails for a stronger hold. Wipe excess glue off bare wood for stained projects, as dried glue will not take stain. Be safe, have fun, and ask for help if you need it. Good luck!
Instructions
Step 1
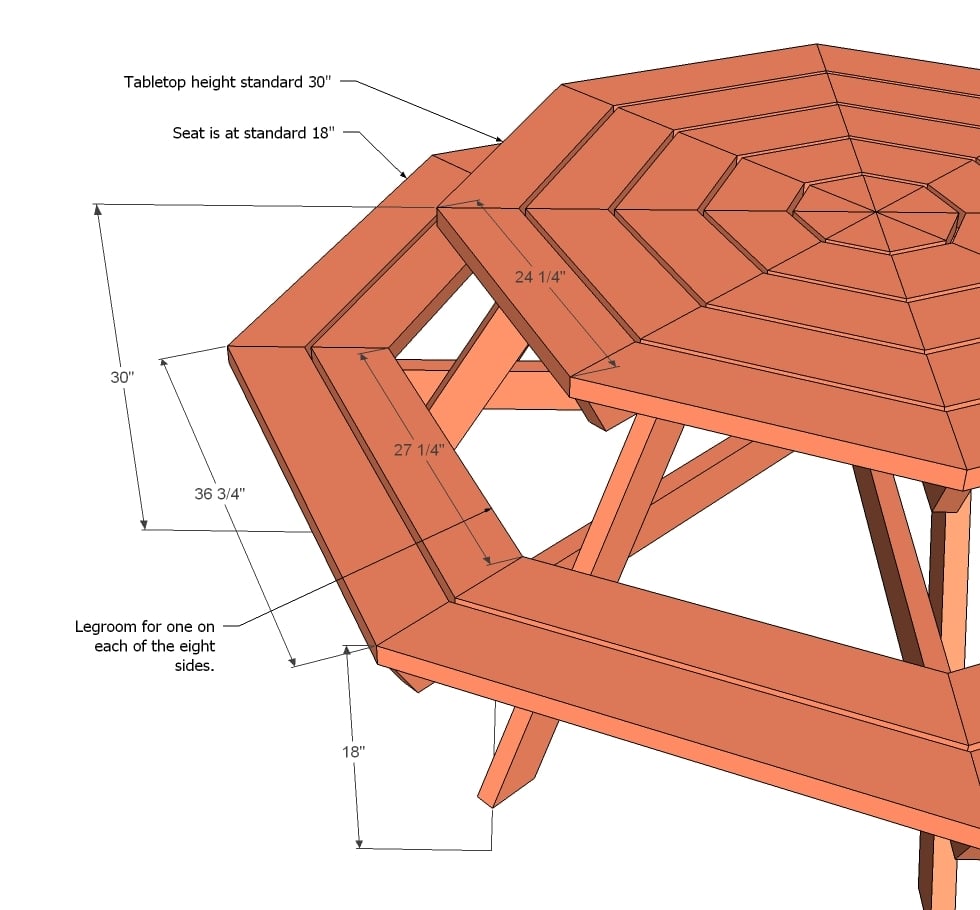
I wanted to add a diagram so that you can take measurements of the leg room.
Step 2
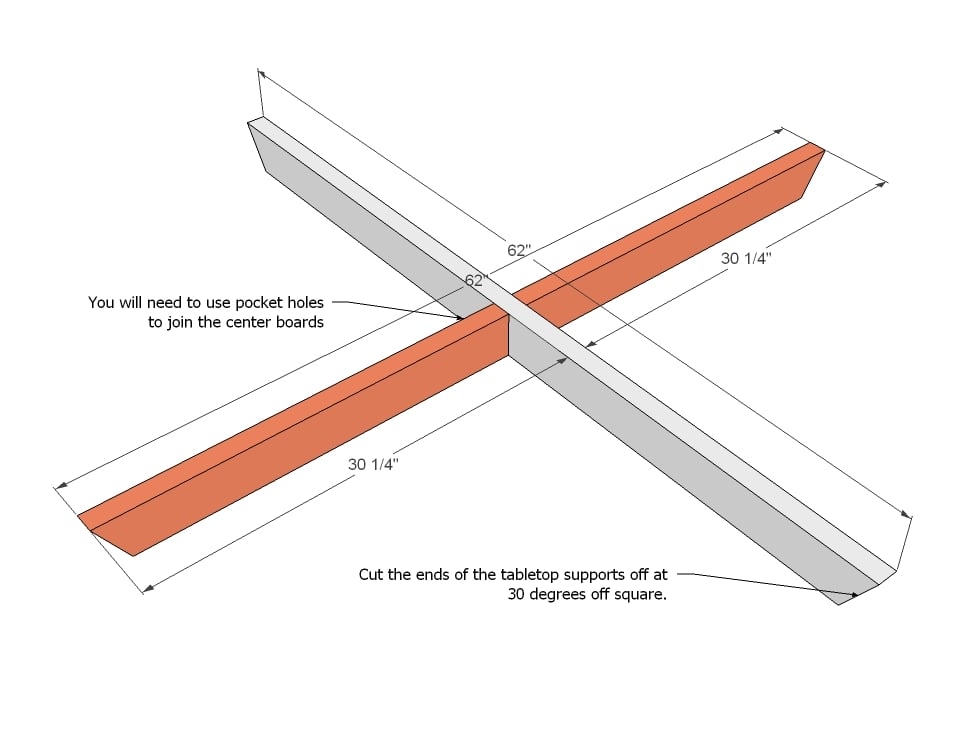
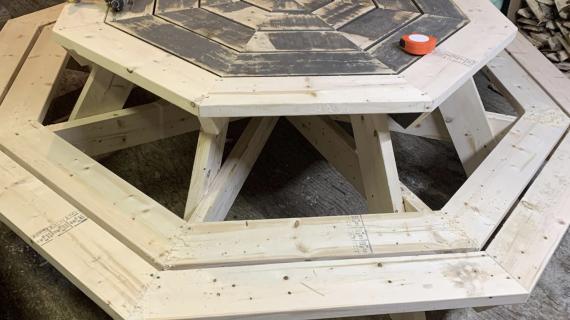
It starts with a big X. Be sure you are working on a very flat, level surface. Use pocket hole screws and glue to joint in the center as shown above. You could also use metal straps or plates but you can only place the metal plates on the bottom side.
Step 3
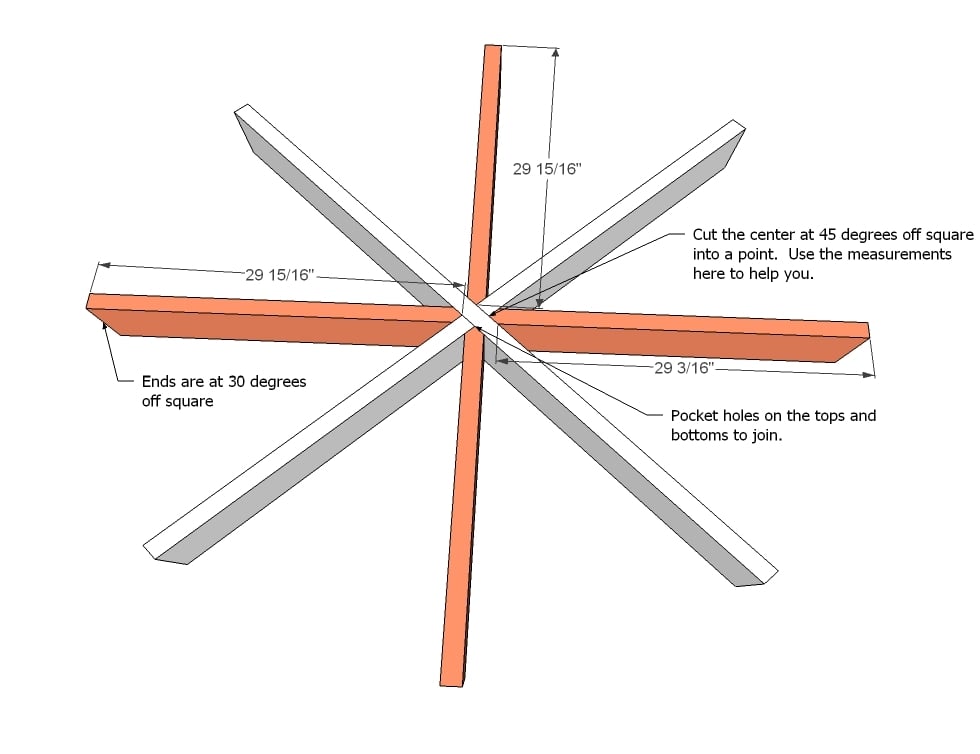
You will then need to carefully cut the remaining supports as shown above (click for a larger view) and add, with 22 1/2 degree angles between the "spokes". Pocket holes or metal brackets.
Step 4
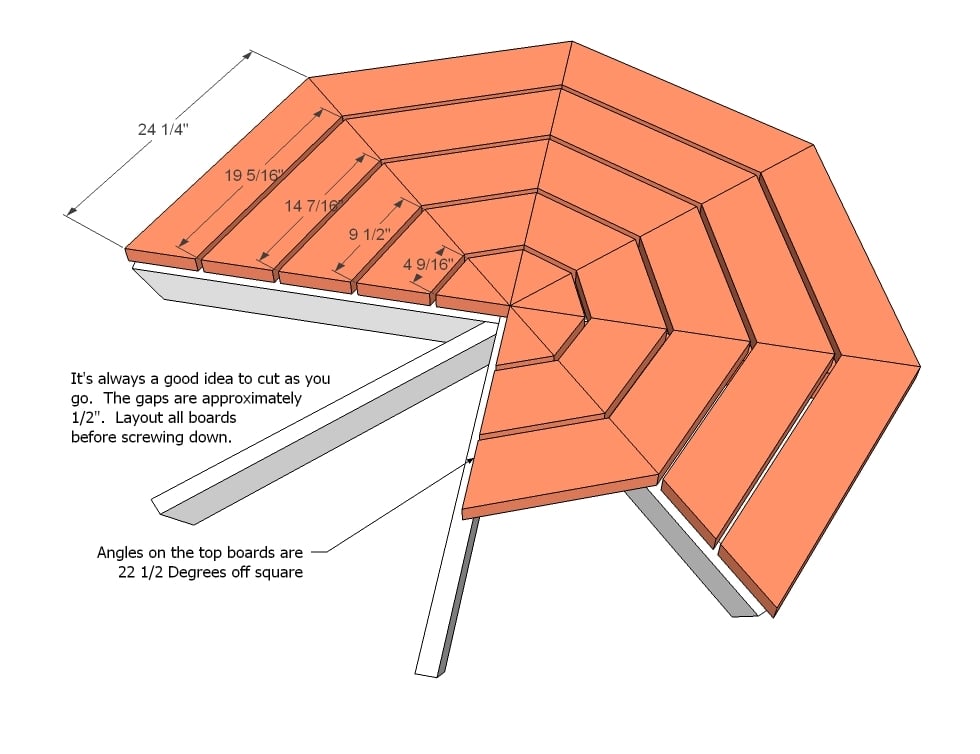
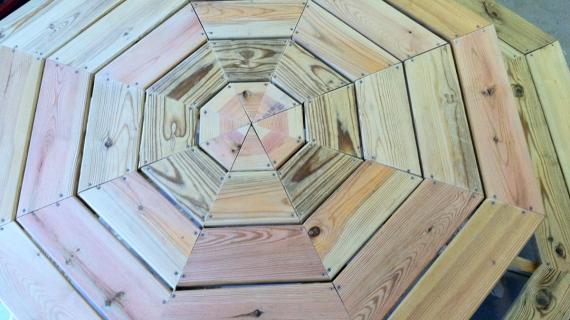
Layout all of the tabletop boards first and adjust as necessary. The tabletop boards should meet in the center of the "spokes". Screw down, two screws per board, predrilled.
Step 5
Step 6
Mark all of your legs as shown above. Start by adding the longest remaining support as shown above. TIP: For added strength, rotate the full length support to 90 degrees from the full length tabletop support. This is shown incorrectly above.
Step 7
Then add the two supports cut straight on one end as shown above.
Step 8
As you did the tabletop, add the remaining lower supports.
Step 9
Flip the table back over and screw down the seat boards as shown above. This time, start to the outside and work your way inward.
It is always recommended to apply a test coat on a hidden area or scrap piece to ensure color evenness and adhesion. Use primer or wood conditioner as needed.


Comments
deanna_g
Tue, 03/15/2011 - 06:44
How many do you think it'll seat?
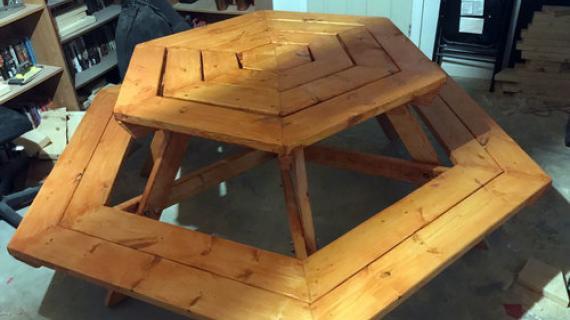
So I'm trying to figure out whether to make the hexagon or octagon tables. The way I figure, at almost 41" long seats on the hexagon table, I can probably fit 1-2 adults per "seat". With the octagon, at almost 37", maybe one adult on each seat and one on each corner?
Rachelle (not verified)
Tue, 03/15/2011 - 06:57
Thanks so much for this
Thanks so much for this plan. I was also rooting for the larger table. When there are already 5 people living at your house and you invite someone over, it's nice to be able to seat more than 6.
Marley and Me
Mon, 05/02/2011 - 17:21
On-Time Plan
Not two weeks before this plan posted, my friend commented that she REALLY wanted a "round" picnic table, but that all the octagonal tables she saw were priced from $400 ~ $800. My reply was that we should build one. Then, this plan popped up on my Facebook page. Talk about good timing!
We had absolutely no trouble following this plan. However, in the very last cut on the list, 8 - 2x6 @ 36 3/4" (Both ends at 30 degrees off square, parallel to each other) are called for. We found that this angle didn't line up with the angle for the cut listed above it. For us, both boards had to be cut at 22 1/2. (And, the angles should be NOT parallel). Is anyone else having the same issue? Thanks in advance!
Jeremy Hill (not verified)
Tue, 05/08/2012 - 16:42
I agree
After looking into your problem, I agree. The 36 3/4" boards for the outer layer of the seat should have angles of 22 1/2" on each end NOT parallel. Good catch. That will save me some wood and a little headache when I make mine. Thanks
Zee (not verified)
Fri, 05/06/2011 - 05:07
scaling down...
I want to build this table for my daughters American Girl Dolls, 16" in height, any idea's on what "size" of person this table would be considered average for? or what % reduction i'd need to apply for use with 16" dolls?
Thanks.
Ladybrinx (not verified)
Fri, 06/10/2011 - 14:56
LOVE IT!
I want to build one of these too! Love the table, thanks for the plans.. I too would like to build one American girl size...that would be AWESOME!
Guest (not verified)
Thu, 10/27/2011 - 14:50
Umbrella?
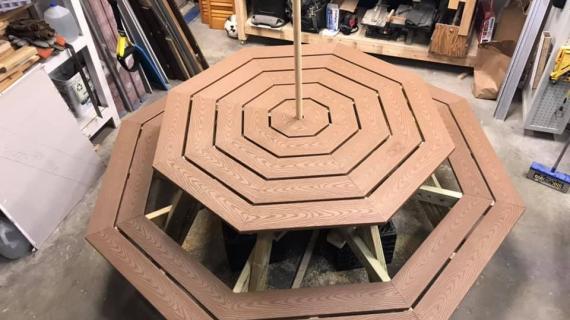
Any ideas how to add an umbrella without compromising the strength of this?
jsaltzy
Sat, 05/07/2016 - 14:38
Umbralla Hole for Octagon Picnic Table
Anybody have any ideas about how to add an umbrella hole?
Guest (not verified)
Thu, 03/29/2012 - 09:02
step # 6 question
In step 6 whys is the support on one side of the table set at 15 inches from the bottom of the leg and the other is set at 13 inches from the bottom of the leg? Is that correct?
Guest (not verified)
Thu, 03/29/2012 - 17:47
Step 6
The 15 inch is the measurement of the angle up to the bottom of the leg and the 13 inch is straight up from the support to the bottom of the leg
Guest (not verified)
Tue, 04/10/2012 - 16:55
leg room
To get more leg room an option would be to overhang the outer seat board 2x6 by 1 inch and use a 2x4 for the inner seat board. you would gain 3 inches or more depending on how much you overhang the outer 2x6.
Jeremy Hill (not verified)
Tue, 05/08/2012 - 16:47
Any alteratives to the Kreg joint?
I don't have a Kreg jig. Don't really want to buy one either. Is there another way to join the cross members with out having to buy the Kreg jig? Thanks
Kurt (not verified)
Wed, 07/11/2012 - 04:54
Alternative
You can do what I did...I was in the same position and did not have a Kreg Jig.
I used a square piece of plywood (if you're feeling ambitious, you can cut it into a circle which may actually work better) and attach the cross members to it. Make sure it's not too big so you have room for the legs and put it on the underside of the table though.
jcavuotisr (not verified)
Wed, 07/04/2012 - 14:28
Umbrella
I noticed someone else asked this question but no replies yet... I want to include a 2" center hole for a large "sidewalk cafe" type umbrella. Can this modification be incorporated in the plans??
Thanks you.
Mrbuildit (not verified)
Sun, 07/22/2012 - 12:00
leveling the legs
As a carpenter that loves his job and takes too much pride in his work i feel it is necessary to point out that yes you can level the legs by putting a level on the 30 degree cut, however that will only work if the table top is leveled out or on a level surface. Otherwise the legs will read level to the slope of where ever you build the table but when you move it they will be on a different slope and thus out of level. My advice build the top and level it with scrap wood and or whatever you have lying around. If you cant do that then build it as close to its final destination as you possibly can.
Kandis (not verified)
Tue, 08/07/2012 - 11:41
Umbrella
I love this table and we have regular BBQs at my house that would make this table a staple in our backyard. However I live in west Texas where we have 100+ degree days for about 4-6 months of the year. Is there a way to adjust this so that you can add an umbrella over the top for shade?
James (not verified)
Thu, 09/06/2012 - 08:24
Fitting an umbrella
To make the table accept an umbrella, what I would do is make a plywood donut and use that to attach the table top supports to. Would be a plywood circle with a hole in the center big enough to fit the umbrella pole. Then you could cut a hole in the tabletop and let the umbrella pole rest on the bottom cross braces. I don't think this would lose much strength since you have the tabletop slats holding things together also.
JF Woodcraft
Fri, 03/29/2013 - 12:46
Improvements to Octagon Picnic Table Plans
I first built this style of table about 27 years ago and have built at least one hundred since then. There are a couple of things about the plan as shown that can be changed. First of all, every second leg should be set back about ten inches. In other words, they should be staggered. This makes it easier to get in and out of the table. The table top can be made of 5/4 x 6" deck boards. This will reduce the weight of the table by almost half. Use 2" x 6" for the seats only. The pieces to form the rings can be laid out on the frame and clamped with ratchet straps in order to attach each ring to the frame. Joints should be glued with an industrial type adhesive such as Gorilla Premium Glue. This glue is 100% water proof and will not break down in the heat or cold. To make the frame stronger and allow a hole to be drilled for an umbrella, without creating a weak spot in the table, install a 3/4" thick plywood disc (14" dia. ) on the bottom of the top frame. Also add two additional plywood discs on the top and bottom of the lower frame. Be sure not to place any nails or screws in the pathway of where the hole will be drilled for the umbrella hole. This table should be stored at an angle during the winter so water can not form in to ice in the joints and force them apart.
christyinla
Tue, 05/13/2014 - 07:18
Kids Table
Hi and thanks for the plans for this table! This is the first project I have attempted, just getting started but table came out perfect! I am now attempting a kids version for my grandkids and have reduced the table top to 36". I am stuck at the leg supports. I know I want the seats 10" off the ground and the table top 20" off the ground but I haven't figured out how long to cut the leg supports with the angle to make sure the table lands at 20". Any help anyone can give me would be most appreciated! Thanks!
camgauthier
Sat, 05/09/2020 - 12:46
Adding boards in Step 3 and 8
Hello All
Just trying to figure out a step with my Kreg Jig that not too sure about. In steo 3 and 8 you will connect the pointed 45 degree angle braces to the center brace using PH but how would you attach to Kreg jig in order to make the PH. Aftere connecting to make the X I am seeing integrity issues for strength and with 16 screws going into the same area not sure if this would be wise.
If someone can give me a tip on this that would be greatly appreciated