Headboard
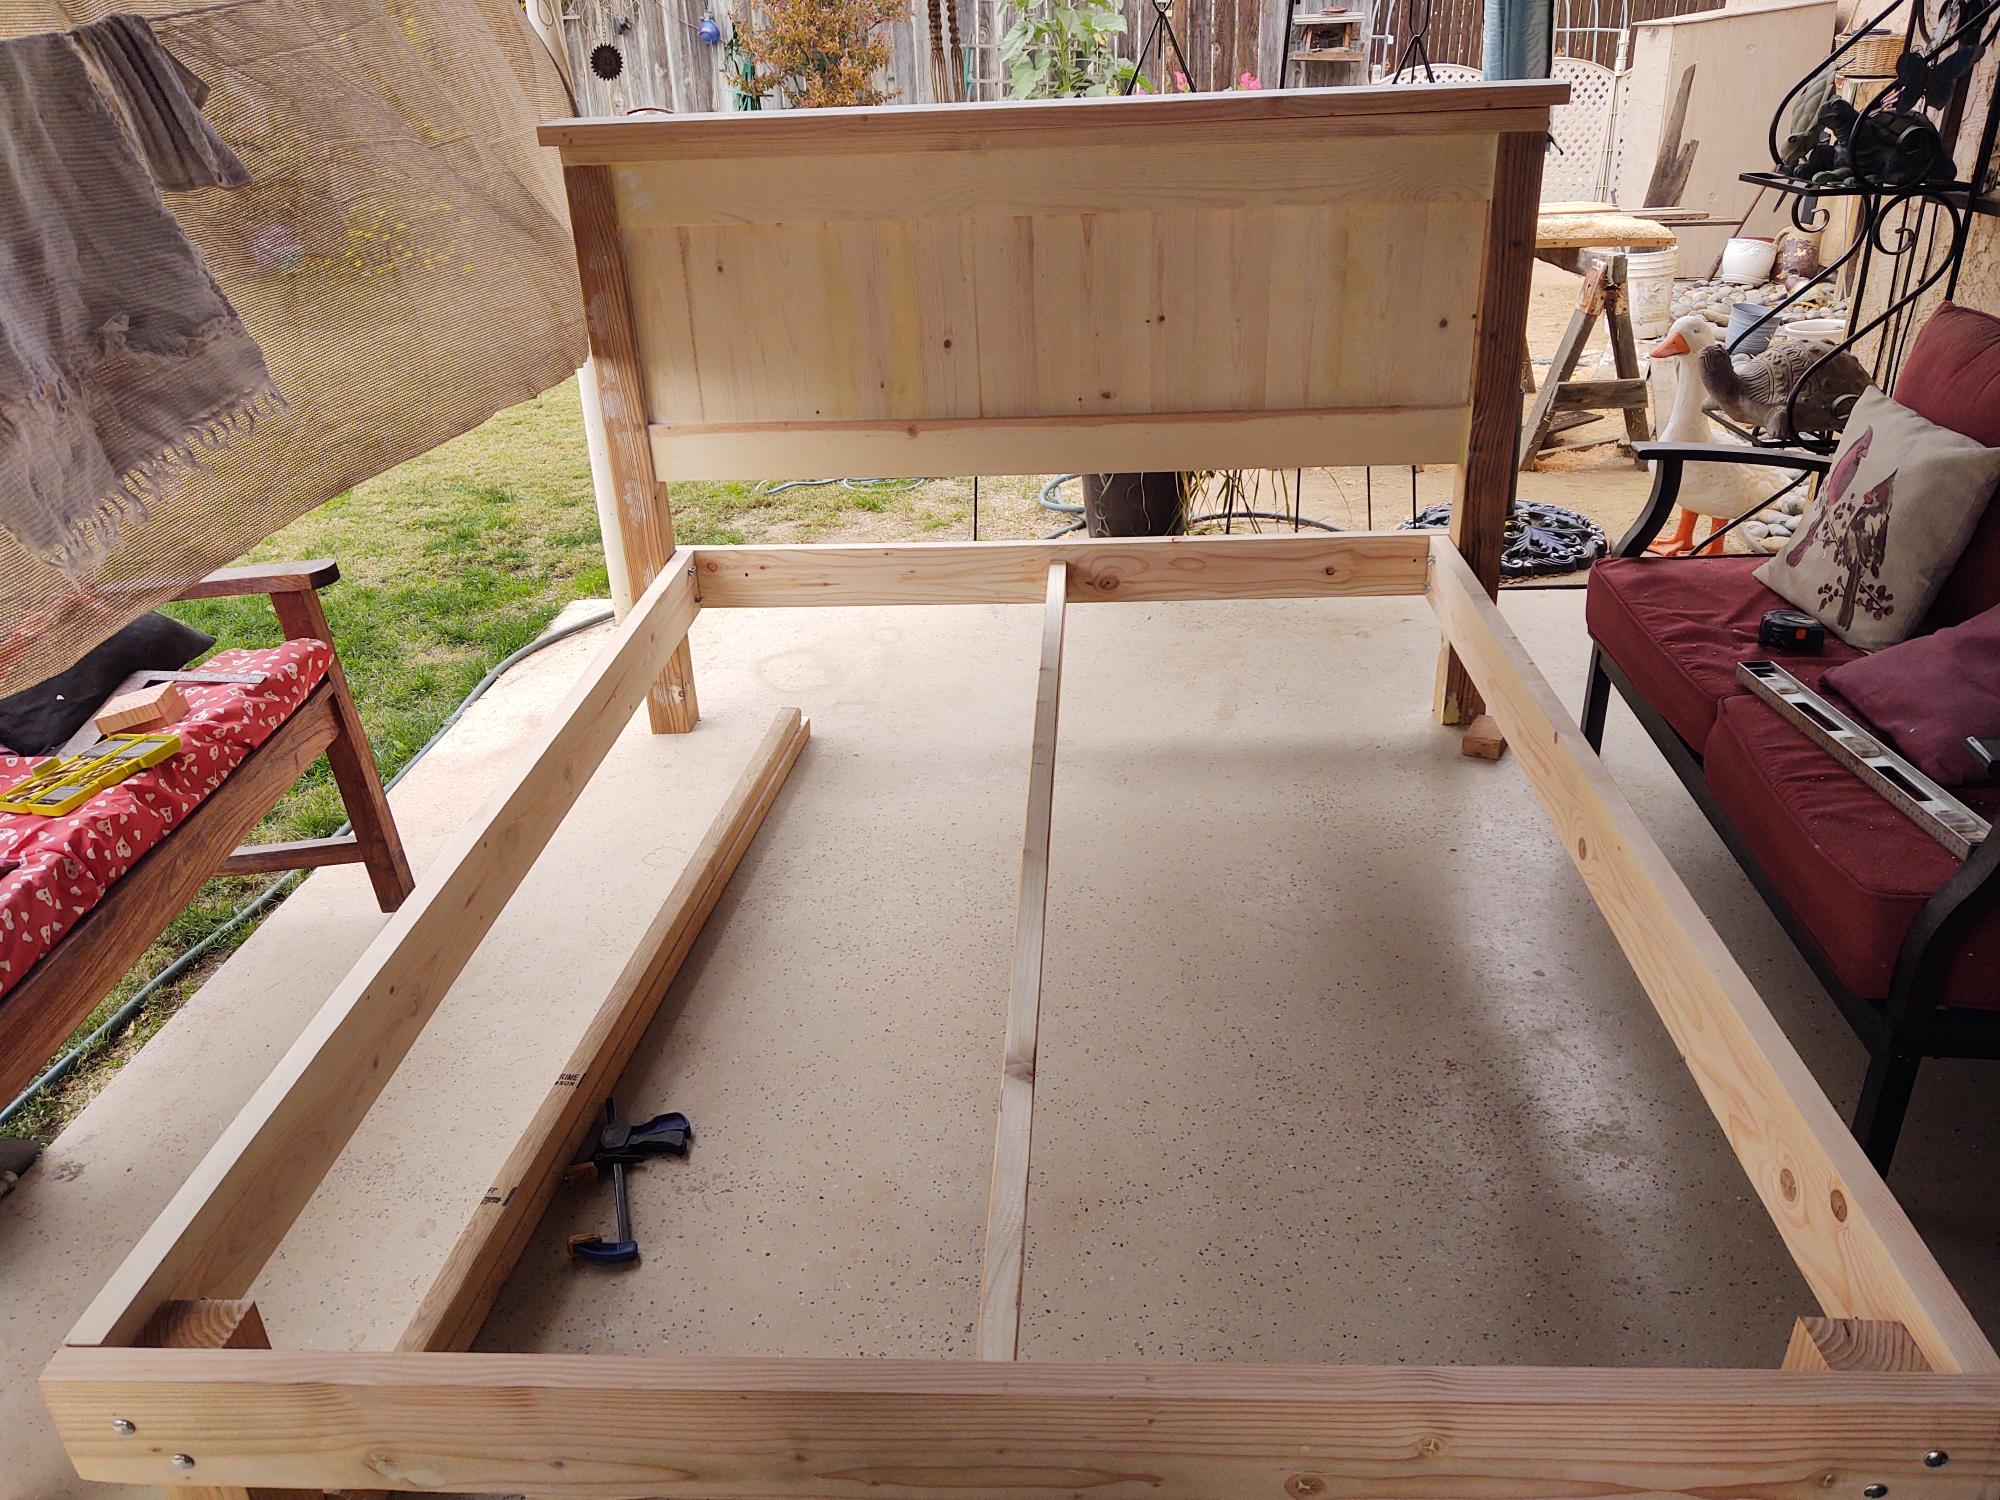
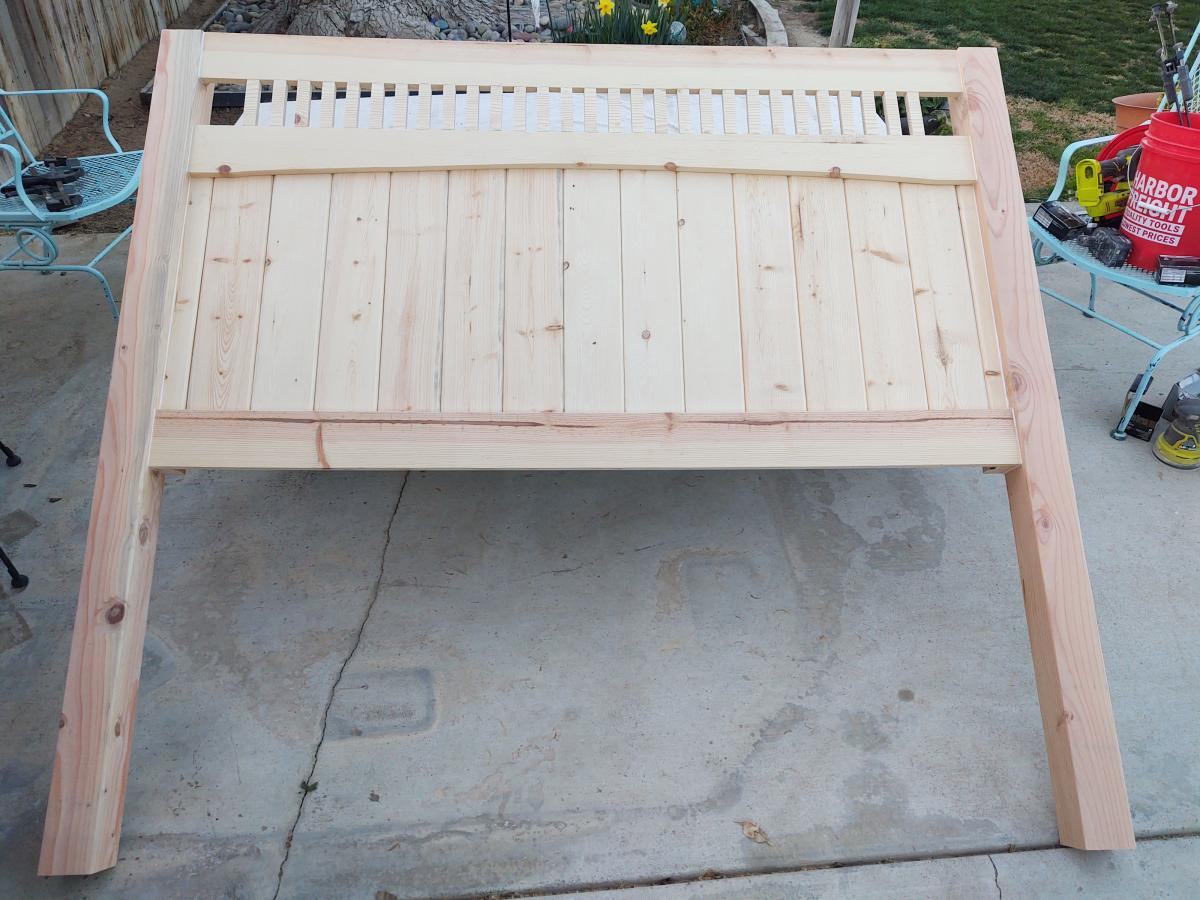
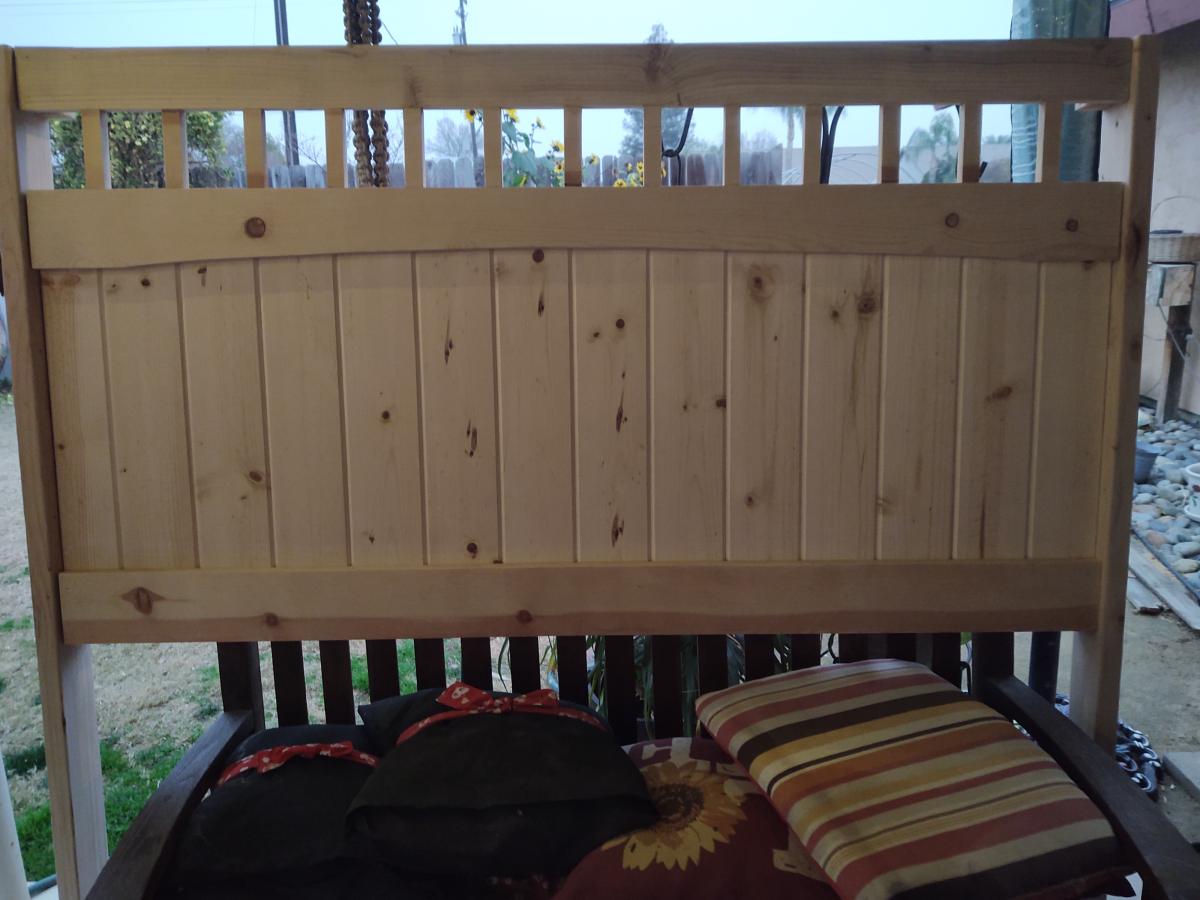
I followed your basic farmhouse bed plans and modified them. I have made three headboards now. Each time someone sees them, they want me to build one for them!
Built from Plan(s)
I followed your basic farmhouse bed plans and modified them. I have made three headboards now. Each time someone sees them, they want me to build one for them!
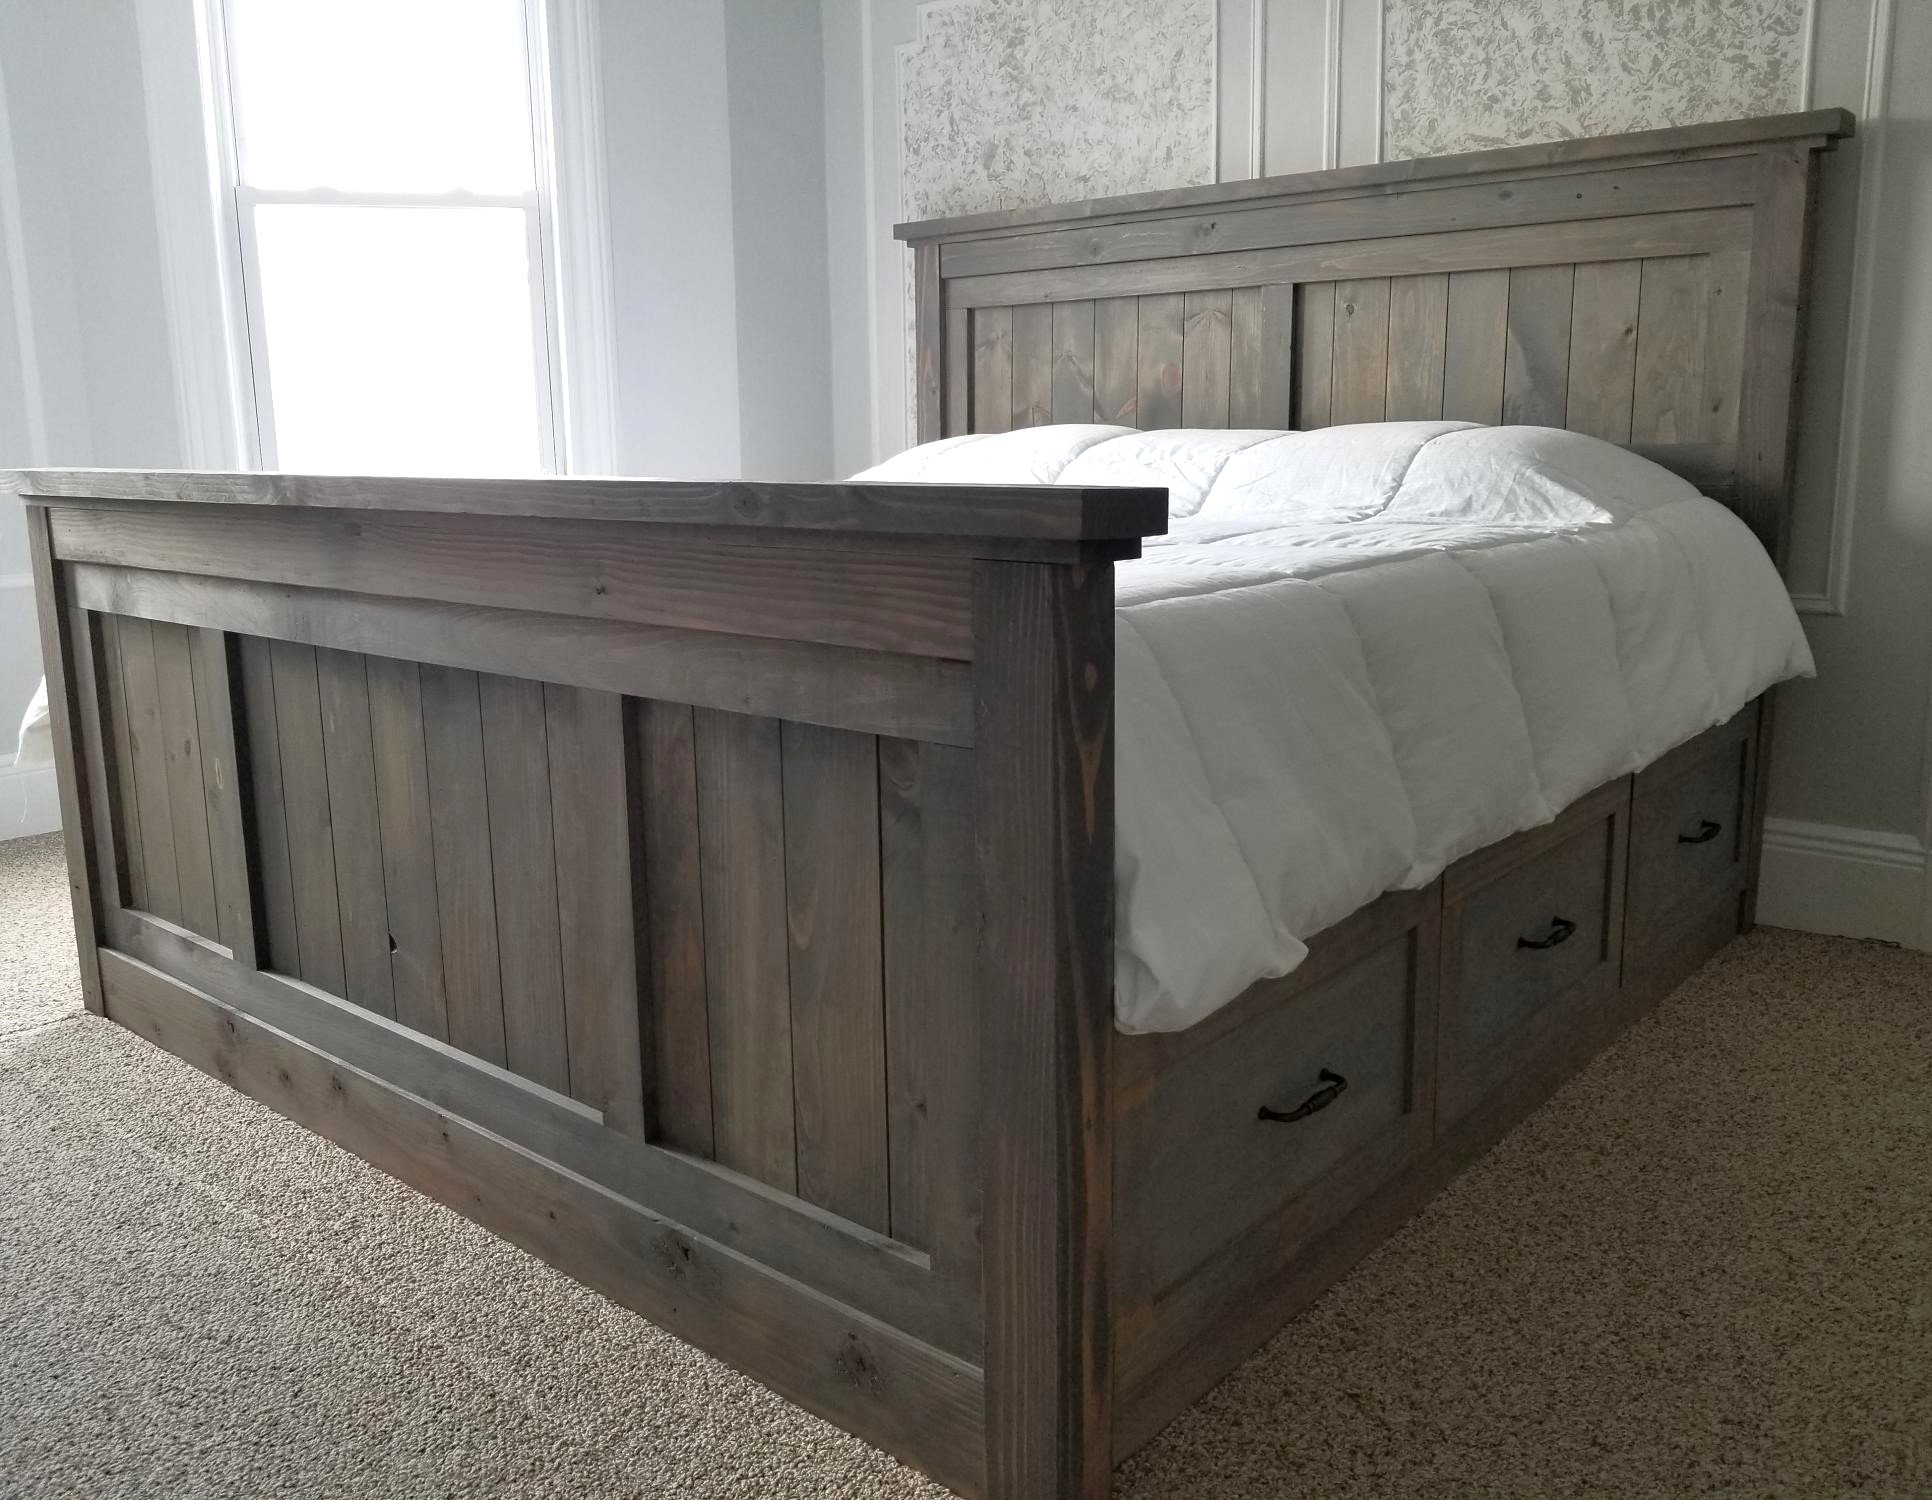
Seen this awesome plan on Anas site and had to build it in KING SIZE. The drawers are enormous, the bed is rock solid. I love it

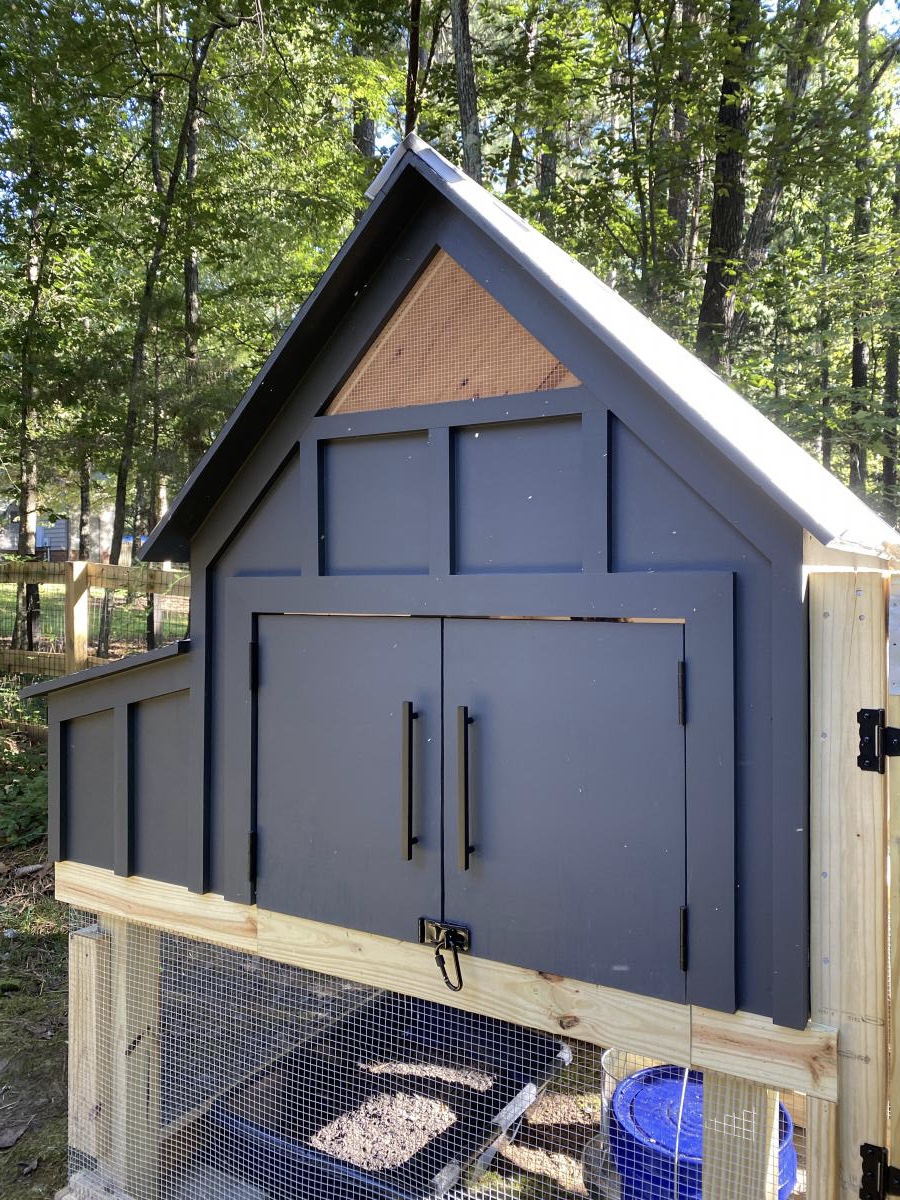
We took some creative liberties on the Williams Sonoma inspired coop posted here. Because we don’t get a whole ton of sun in our backyard, we eliminated the herb garden planter and instead built a longer run. We also made the coop a bit wider to accommodate for the inevitable chicken math. And, you’ll notice the vent both shaped differently and is a bit higher. This was to increase air flow, avoid the dreaded draft, and to lend a more Scandinavian vibe. We also decided to place the chicken exit on the outside wall to allow for more living space under the coop itself. The project took about a month to complete, dedicated to only working weekends. And, it was very much over budget! Who knew wood is so expensive?! But overall, the outcome was even better than I expected. The chickens love it and I don’t mind looking at it!
P.S. this was a pretty advanced project. The fractions alone had me yelling “uncle!” Thankfully my husband is pretty handy, and my father-in-law (career in the construction industry) had a few pointers, so they took the lead in executing. I chose the paint colors and suggested the deviations from the original blue print. ;-)

Wed, 11/18/2020 - 12:55
Thank you! Yes, I suppose everyone is wanting wood for home improvement projects now that we're not leaving the house! Also, I didn't mean to post a picture of my son and his friends. Am I able to delete?
Thu, 01/14/2021 - 07:43
does this roof have the same angle as the 'Small Chicken Coop with Plans'? It seems to be 'less steep'. Wanting to start this project next weekend and trying to get my mind wrapped around everything!. Thanks.
Wed, 03/16/2022 - 09:53
Do you have a run side photo? I am thinking about adding more run onto mine.....

I wanted to make a large porch swing but just couldn't find the exact design. I wanted to be able to stretch out and take a nap but also be able to have a back to lean against. Most plans that I found were just basically a box you could put a mattress in and then hang. So I found Ana's plan for a basic daybed and chopped off the legs and raised the back just a little. It's perfect!! Thanks Ana. The plans were very simple to follow. This is my first project and I think it turned out great.
Sat, 07/26/2014 - 07:37
Looking forward to do one like this !
Do you still have the measurement for the back you have raised ?
Really nice !
Thanks :-)
Sat, 09/20/2014 - 16:33
Thanks! The height of the back and sides is 28 inches.
Tue, 11/18/2014 - 17:38
We made the bed and it looks awesome! Thanks for making the plans easy to follow and providing the picture, which was a fantastic reference. I do have a question for you in regard to how you hung the beg. We would like to hang this from our porch, but can see that we simply have 2x4 roof trusses. We are concerned that the weight of the bed (pretty heavy) plus mattress and support plus a person may be too much. Any additional information you could provide on how you hung the swing would be greatly appreciated! Thanks!

Hooray! I recently finished building a dining room bench. For this project, I used the Providence Bench plans by Ana White. I started this project in May, and two months later it is finally complete! I am really happy with how the bench turned out! It is pretty sturdy and makes for a nice addition to the dining room!


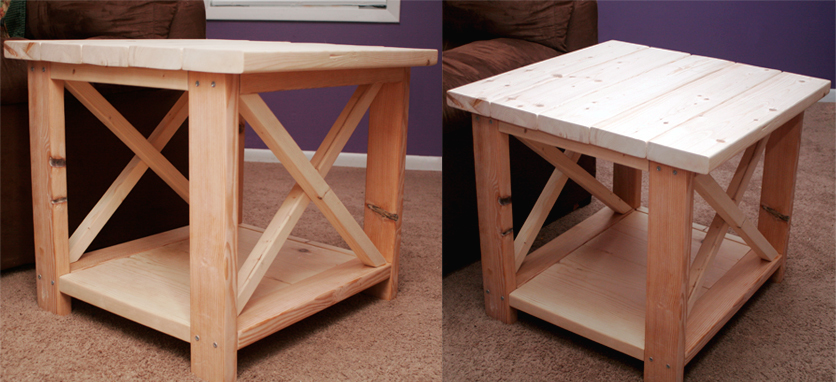
Saw this clever side table on Pinterest. It's made out of 1 1x8x8. I was able to figure out how to build a jig for the table saw to suit the project and then it was easy peasy lemon squeezy from there.
Mon, 12/21/2015 - 09:41
This is so clever and would make an inexpensive yet first-rate gift! I love it...thanks for sharing.
Fri, 10/28/2016 - 08:40
I would love to build this unique table, but can't seem to find some actual plans with dimensions and jigs
Fri, 10/28/2016 - 08:45
Would you please email me the plans for this table. Thanks so much
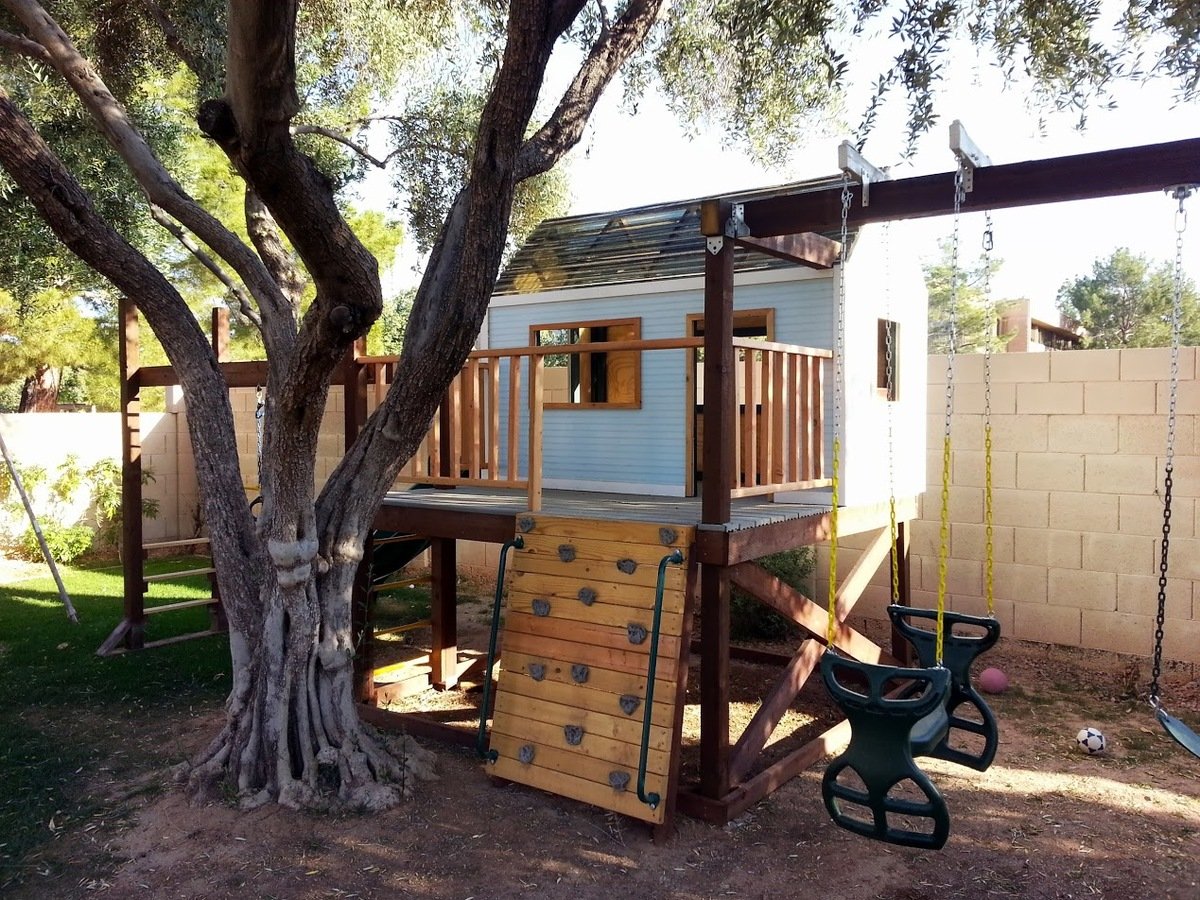
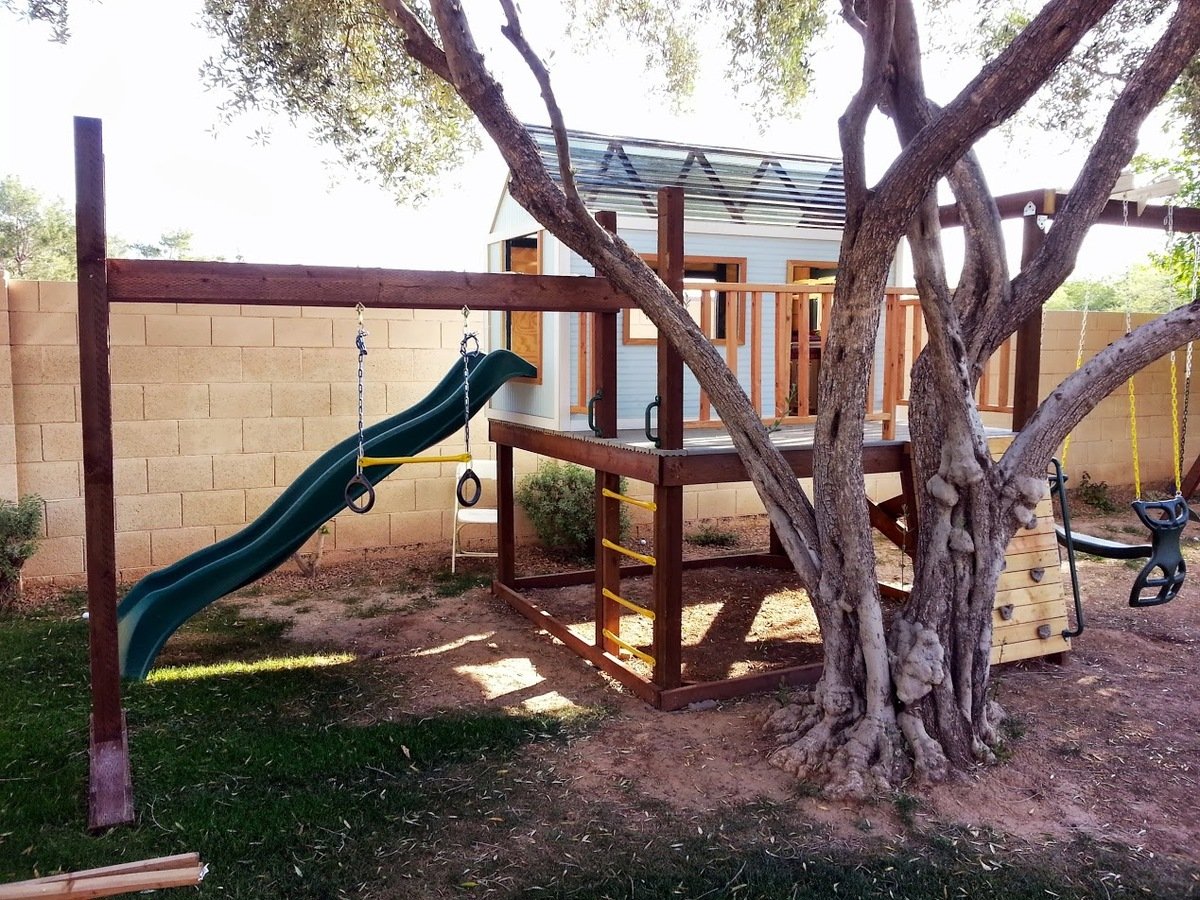
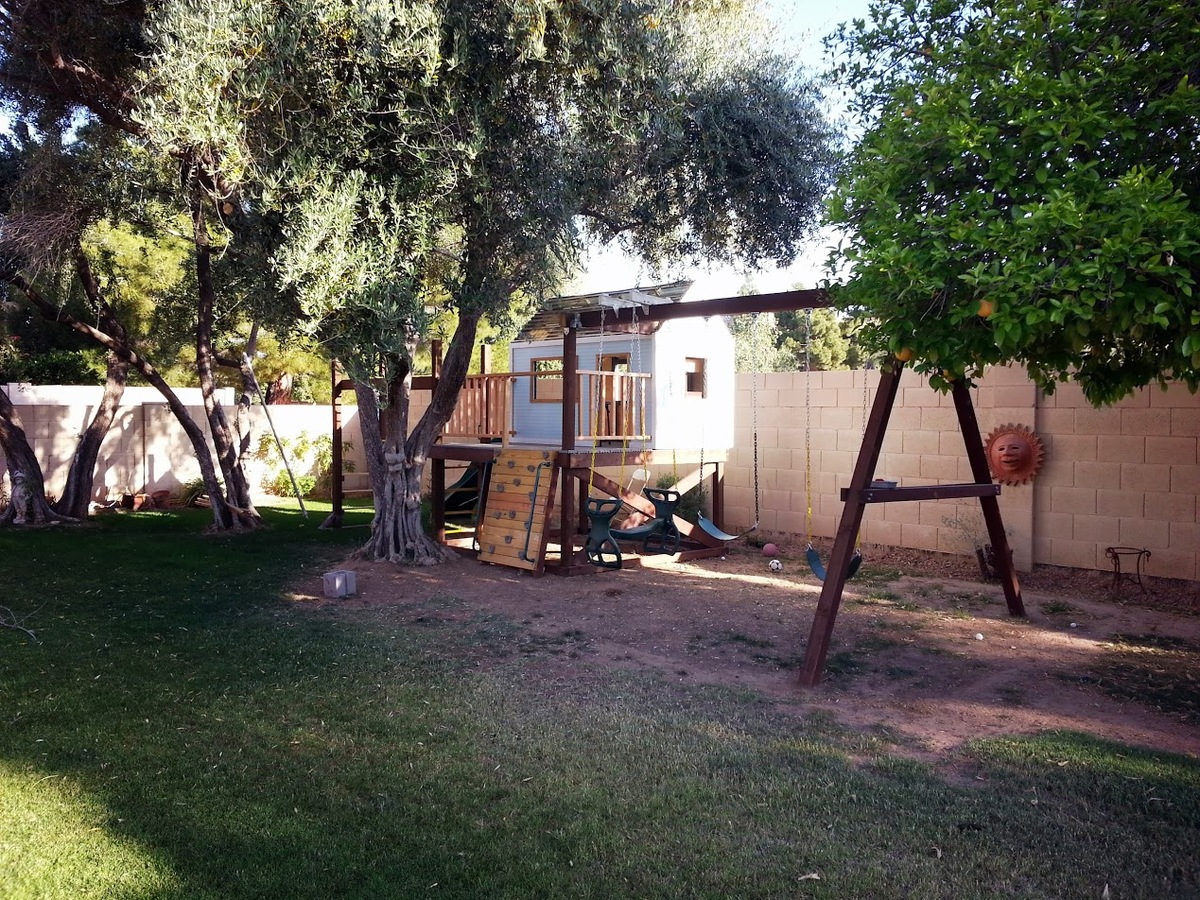
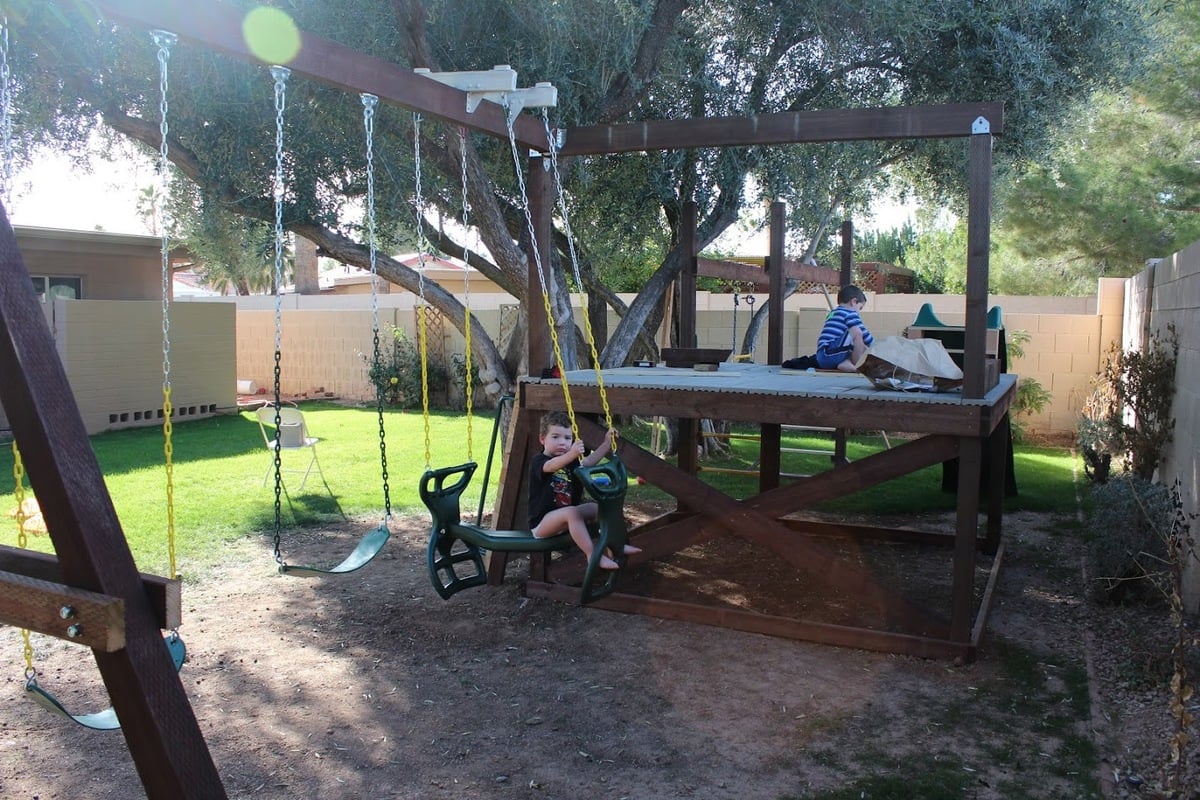
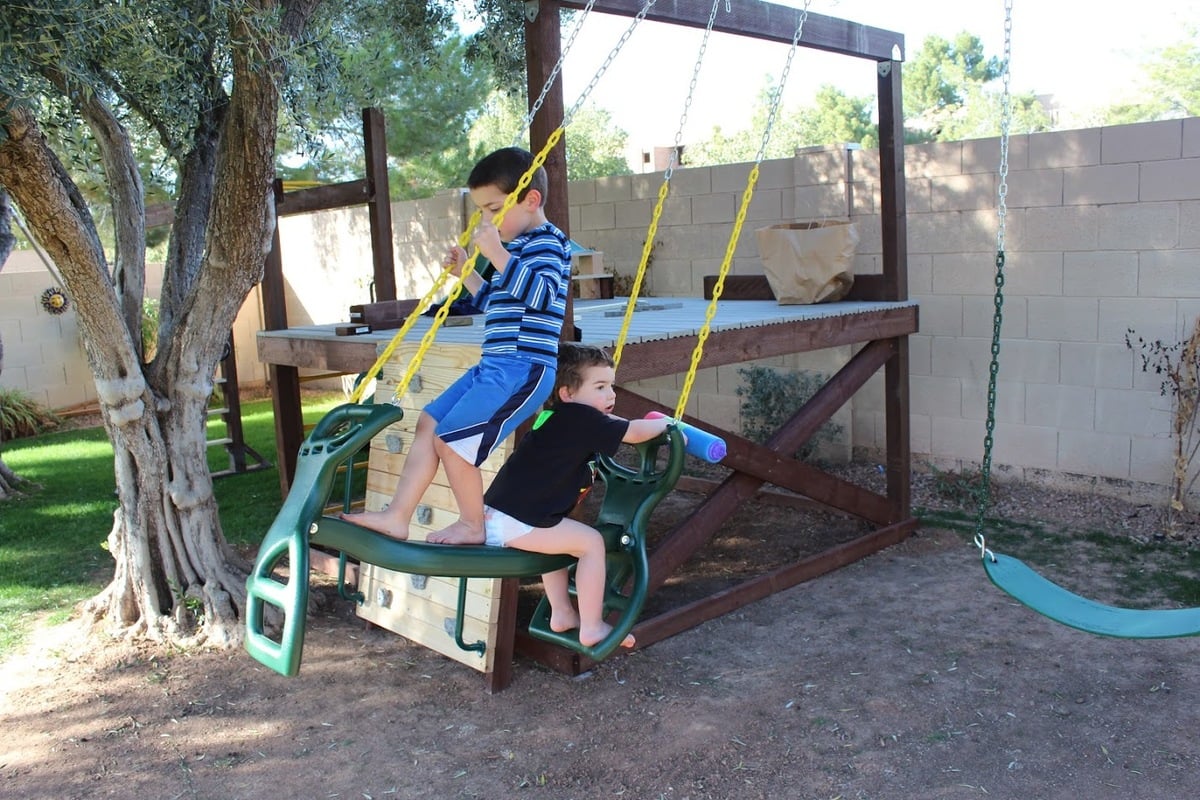
My second building project... this one took quite a while, building in the evenings after the kids went to bed.
The playhouse is based off of Ana's Playhouse Building series, with some modifications to fit the space in my backyard and accommodate climbing wall, monkey bars, and slide.
To put the main deck structure into the ground for sturdiness while protecting from moisture, I dug out 5 holes to fit single hole cinder blocks (4 corners plus an extra 4x4 for the monkey bars; you can see an leftover block on the ground in one of the pictures). I placed some brick in the holes, then the cinder blocks on top. I then partially filled the cinder blocks with sand, put the pre-built deck in the cinder block holes (with help - it's heavy!), and then filled the rest of the cinder block holes with sand. It's worked remarkably well - the deck has been up for about a year now. I also sprayed some clear waterproof sealant on the bottom part of each beam near the ground for extra protection (deck, monkey bars, climbing walls, and swingset A-frame). This has allowed me to still run sprinklers near/around the playset and even grow grass underneath the swings!
Materials used:
* Playhouse: pine, plywood, Suntuf solar grey polycarbonate corrugated roofing panels (I live in Arizona, so little rain to worry about but lots of heat - the sheeting lets light in but blocks most of the UV rays, corrugated shape also provides venting at top when placed sideways)
* Deck/Swingset/Monkey bars: treated lumber, composite decking, pine for railings, monkey bars purchased from Amazon
* Climbing wall: pine, treated lumber, handholds/railing bought off ebay/Amazon
* Swings/slide/bongos/wheel, telescope: purchased from Amazon
Modifications:
* Turned playhouse 90 degrees to be in back of the deck, with swingset coming off the side. This meant the support beam for the swingset had to pass through the playhouse - modified the frame for that wall slightly and created a notch for the beam to pass through.
* Slide comes out one end of playhouse - made the "window" on that end larger than the plans called for in order to give room for the slide.
* Monkey bars come off one side of the deck - used extra 4x4 here to create support for the bars, and used extra bars to make a ladder on this side
* Climbing wall instead of ladder for main entrance
* Put large window in back wall of the playhouse
* Added cross bracing to side of decking on swingset end to make it more solid/cut down on sway when swinging

Tue, 04/29/2014 - 20:41
This is phenomenal - just the plan & design we've been looking for. Can you upload a few more pictures? Any sketches you can provide? Shopping list? Really great job - I hope your kids love it. It looks awesome.
Wed, 09/10/2014 - 14:03
Thanks! It's certainly nestled in right behind that tree - I originally was going to place it in between that tree and another one but then decided to just place it behind them in order to take better advantage of shade (critical in AZ) and fit in everything I wanted to put on it (monkey bars, swings, slide, climbing wall)

Mon, 07/08/2019 - 00:48
We've been looking at these type of players for our son, and good grief! Prices are astronomical for playsets that are NOTHING like this. This absolutely an amazing place for those boys to make memories. You're amazing! Do you mind if I ask what it cost once it was finished? I never imagined that it would cause a tic in my eye to look at the kids from Lowe's or anywhere else for that matter.
Tue, 08/20/2019 - 10:14
I don't remember how much it cost in the end... but probably around $900? That may include getting some tools that I needed but didn't have at the time. The slide was the most expensive single piece I bought - I think I got it from Amazon.
When it was all done, I remember thinking that what I got for my money was *way* beyond what I would have gotten by purchasing a kit or a pre-built play structure. Plus, by going my own way, I was able to build it to fit my space and the needs/abilities of my kids.
While the whole thing is big and looks like an intimidating build, it really isn't bad - the platform is a fairly blank base to design everything else off of, and is incredibly sturdy. Everything else is a discrete part that branches off of the platform and can be planned out as you need. Adding the monkey bars required putting in a 5th upright (the first 4 are the corners), but that was an easy modification since I knew I wanted it before building the platform. The playhouse just sat on top of the platform (screwed down, of course).
Sat, 08/01/2020 - 20:40
Hello. This is pretty cool, probably the best modification that I am looking for from Ana's default plans. Could you please add some more detail on the right side wall, and how you incorporated the support beam through the playhouse? (with maybe a picture from inside of that wall). And secondly, if you can add the dimensions for the monkey bar setup on the left side of the deck? Thanks, much appreciated

I loved this design. I couldn't believe that they wanted to charge me almost $600 for the pedestals for the washer/dryer set that I bought on black friday, so I decided to give this project a go. I basically used the same construction plans from Sausha's project, but I dressed mine up a bit. First, I chose a bit larger trim for the tops and bottoms of the posts. Then, I bought some 2" baseboards and did the top and bottom with baseboards. On the bottom, I had to use my tablesaw to trim off about 1/2" because I used 1x1" boards on the bottom so that I could have more space for baskets. Then, on the top, I inverted the baseboard and allowed it to overlap a bit so that if it were to vibrate, the washer/dryer could not fall off the edge. I also added some fabric on the top (stuff that I use to cover the bunk boards on my boat trailer...kind of like a very thick and durable felt material) to cut down on vibration and also keep the units in place. Finally, I added sides by using wedge trusses on the inside of my side posts and then I put a 1/8" piece of plywood over top and nailed/glued it to the trusses.
It turned out great. Thanks for the plans Sausha!


In reply to Nice Detail by earthbybike
Mon, 12/08/2014 - 11:42
Thanks. Yeah, I thought that it did really dress things up. I really like the way it turned out.
Mon, 12/21/2015 - 17:38
Did you use sanded plywood? Did you use any veneers for the exposed 2x4's to get a smooth finish or did you paint right on it?
lastly, what is the name of the trim you put on the 4x4s? I've hard a hard time finding it. Thank you!
Mon, 12/21/2015 - 17:44
Did you plane the 2x4s? Because they look really straight.
In reply to Question... by Zlk200
Wed, 06/29/2016 - 13:59
Sorry for the super delayed response. I didn't realize this question was here. I did not plane anything. I did sand the surfaces a bit, but I didn't get too crazy. I put 3 thick coats of paint on it which made it pretty smooth. If you look very closely in person, you can still see a bit of wood grain, but it is only noticable if you really get down and look. I did use a lot of wood putty to fill all of the gaps and crevaces and then I sanded those parts pretty well.
With regard to the trim, the top literally just standard baseboard material turned upside down, and then the little trim on the tops and bottoms of the 4x4s is just another standard strip of moulding that I got from Lowes. I think they call it "Chair Rail" moulding. Its the stuff that you put down if you are doing some sort of paint separation or wainscoting.
http://www.lowes.com/pd/1-625-in-x-12-ft-Mdf-Chair-Rail/3403018
I used woodglue on all of the moulding and tacked it on with a nail gun. Then I filled all of the nail holes with wood putty and also use the putty to fill gaps where the corners came together to make that look smooth.
I hope that helps...you are probably already done with your project by now, but I figured that I would answer anyway. :)

I changed the plans a little bit to add on the extra shelf on top as well as making the shelves an inch narrower than the plans. The project was actually pretty easy and really only took me about a days worth of work.


The project went relatively well. Had to readjust in order to fit our king. I used 2x4s and 2x4 joist hangers to support the mattres.


We did some conversions to the smokehouse plans to make a locker for all of my horse tack! :)


I worked on this project over the course of a few months, and I absolutely love the result! I posted all the info at my blog: http://www.designatedspacedesign.com/2017/10/01/a-rustic-sideboard/


When we first bought our house, one of the things that appealed to me was the walk in closet off the upstairs foyer. A walk in closet in a house from the 20′s? That’s unheard of! I know I could have designed this in a way that fit more, but I switch out my shoes seasonally, and I personally wanted slanted shelves. Come on, they’re so much prettier! Shopping List 1 – sheet of 1/2″ plywood (4 x 8′ sheet) 2- Primed 1×2′s @ 8′ 1 – 1/2″ Square Wood Dowel (like this) 2- Chair Rail @ 8′ (like this) Kilz Paint Primer Behr Semi Gloss White Paint Indoor Caulk Wood Putty 2″ Screws 2″ Nails Cuts Plywood- 5 pieces at 23″ wide and 12″ deep. Cut either of the 23″ end at a 45 degree angle. Plywood- 1 piece at 23″ wide and 12″ deep 1×2′s- 10 pieces at 12″ with ends cut at 45 degree angle. Then measure 1″ down from the top of the front piece, and cut it straight across. 1×2′s- 2 pieces at 12″ 1×2′s- 1 piece at 21.5″ Wooden Square Dowel- 3pcs at 23″ Chair Rail- 6 pieces at 23″ How To Build 1. I first figured out how far apart I wanted my shelves to be. I don’t have particularly tall shoes, so I had the first shelf 17″ off the ground in the front, and then they were set approximately 12″ apart after that. I located the studs, and screwed in the 1×2′s on the walls directly into the studs. 2. I then added the wooden dowels to the tops of 3 of the shelves. I didn’t even nail these down, just used wood glue and caulk. I set the wooden dowel 2.5″ from the back of the shelf. 3. After that I dry fit the actual shelf on top of the 1×2′s. This was probably the hardest part because of course this house doesn’t have even walls. Why would anyone ever need even walls? What a silly concept. I ended up having to sand a lot of the edges to make them fit. Caulking will help fill in those gaps! I then nailed in the shelves to the 1×2′s from above. 4. I slowly worked my way up the wall. When I got to the top shelf, I knew that I wanted a flat shelf to store boxes of shoes. I also added an extra 1×2″ to the back wall just in case I really decided to stack those shoes high. I followed the same process as I did for other 1×2′s, and screwed this into the stud. Closet 1x2 All Shelves 5. Then I used the chair rail and aligned it at the bottom of the 1×2″ and nailed it to the front of the shelf. It sticks up higher than the front of the shelf, which is great for catching shoes that tend to slip down. 6. After this I, I ended up using wood putty and caulk to fill any gaps. They work miracles on wood. 7. Finally I just painted everything and viola! Budget 1 – sheet of 1/2″ plywood (4 x 8′ sheet) – $28.97 2- Primed 1×2′s @ 8′- $5.98 1 – 1/2″ Square Wood Dowel - $1.75 Chair Rail - $16.00 Kilz Paint Primer- already owned Behr Semi Gloss White Paint- already owned Indoor Caulk- already owned Wood Putty- already owned Screws- already owned Nails- already owned TOTAL: $52.70


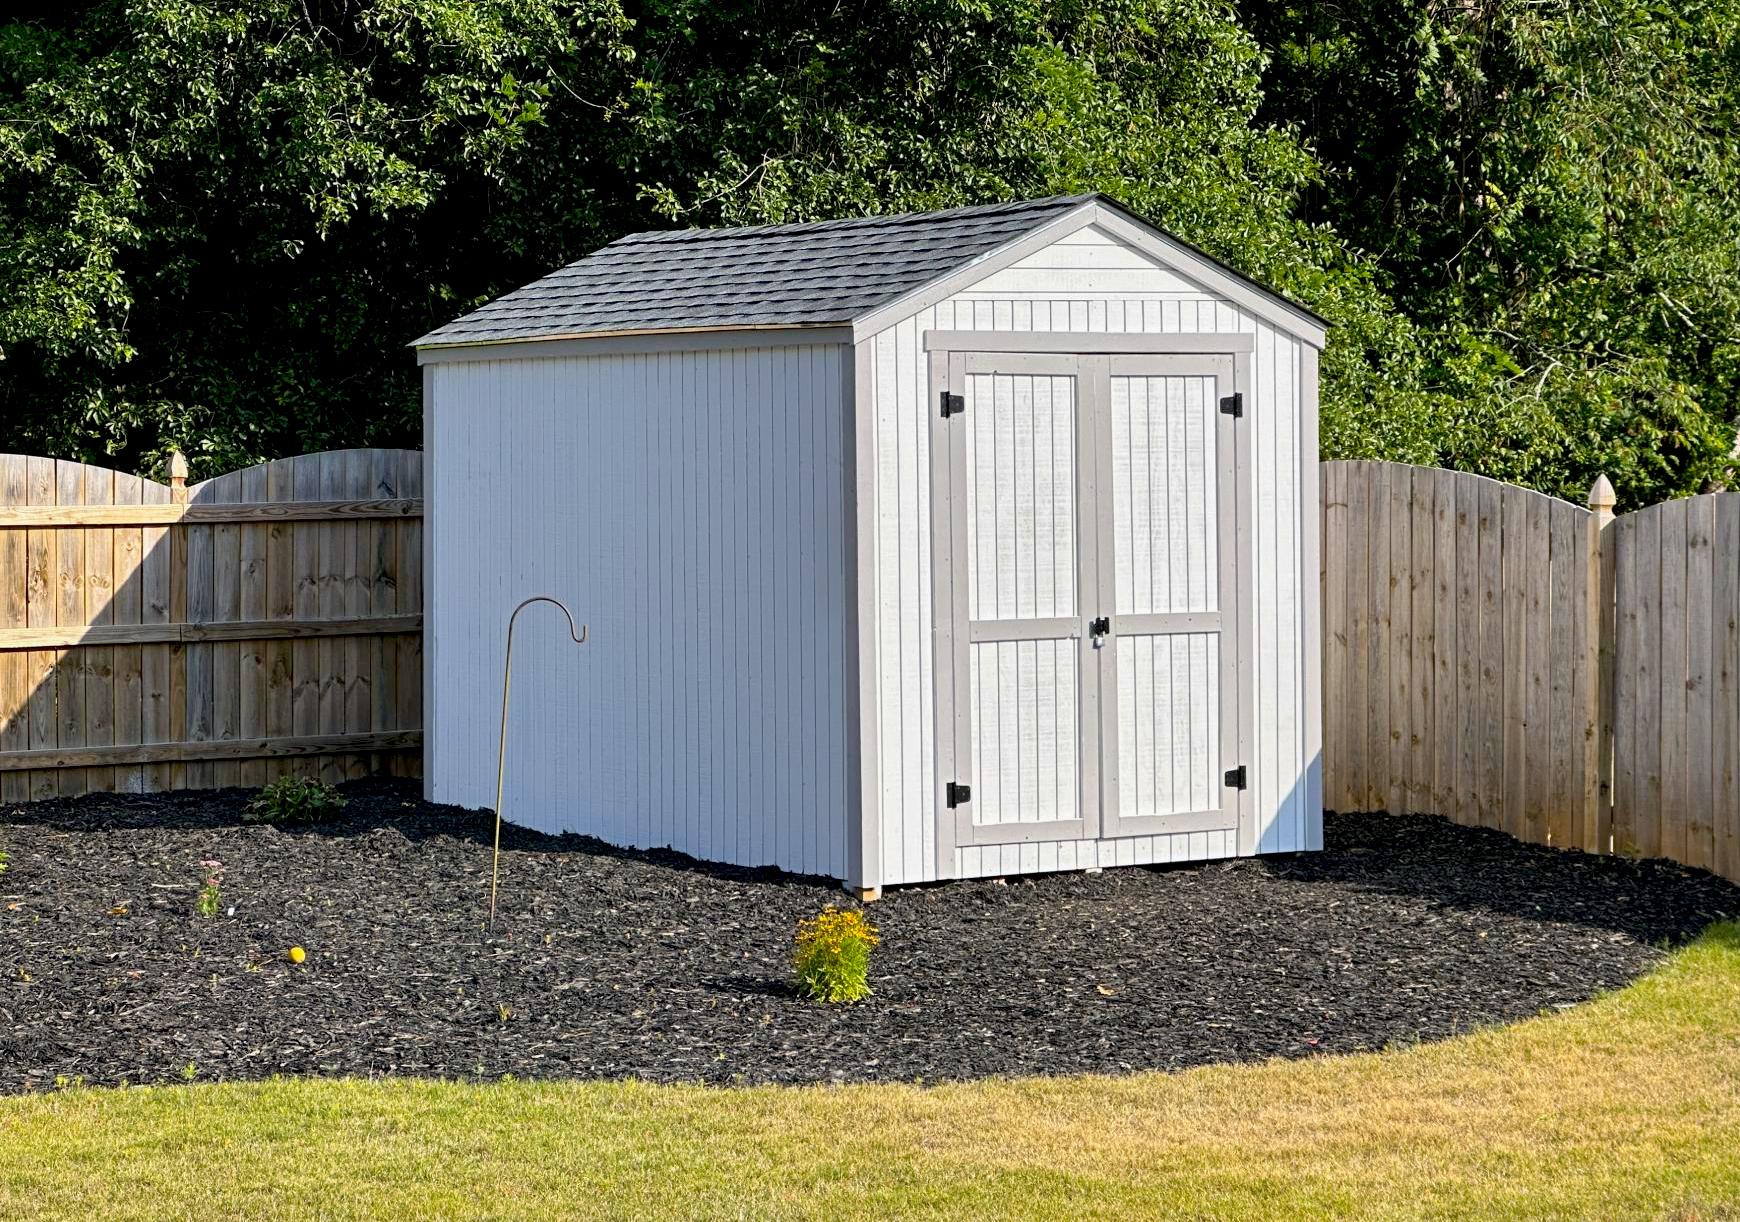
My new garden shed built from your premium plans! I'm 62, never built a shed before, and worked mostly alone. My sons helped with some of the wall and roof sheathing. In the end, I did everything except for the shingling. I painted it to match my house main color and trim.
The video is very helpful - I watched it several times. My major change to the plans was using Simpson Strong Ties and hurricane ties to secure the rafters to the ridge pole and the top plates. Otherwise, I used all other methods. I recommend cutting the front wall sheathing before cutting the panels for the doors. I do not have a trim saw and thought my standard circular saw was too heavy for me to make the cuts like Jacob did.
Tue, 06/13/2023 - 13:57
Really impressive, thank you so much for sharing and good for you to just go for it!!!

My mom was looking for a new outdoor table, and asked me to come up with something. I found the link for these plans (http://www.thedesignconfidential.com/2011/04/free-diy-furniture-plans-t…) to knock off Restoration Hardware's $4000 Provence Beam outdoor table. Overall I liked the plan, with the chunkier look of the 4x4's. But there were a lot of errors in the diagrams, and the finished height is 34" which is ridiculously tall for a table. So we took it apart and cut the legs back down to change the finished height to 30". We chose rough-cut cedar for it's look and outdoor properties, not wanting to use treated lumber for a dining table. We couldn't find 2x10's like the plan, so we substituted seven 2x6's just like Ana's plan, but left a 1/2" gap in between so water can drain and not pool on top and rot the wood. Also, since we were working with 4x4's for the legs, we chose heavy duty lag bolts instead of screws to join them together. I love the finished look they give. Overall it's a sturdy, yet lightweight table that my mom loves and has already used for entertaining!


Wed, 04/25/2012 - 10:02
Thanks Brook! It was so much fun to build. I put my dad and husband to work while I was the "project manager" ;)
Building is turning into such a blast for my husband and I. This is our second project and let me tell you, with a few extra tools and practice, it's getting easier! We will be finishing up the second one of these this weekend then starting on the X Coffee Table, to be followed by the X Console Table. We are due to buy our first home in January so we are waiting til we get our home to decide on a stain.

My husband and I made the table and chairs for our screened porch. We really like how the project turned out. Many more Ana White projects on the our list!

A friend of mine has issues with her knees but loves gardening so I built this to allow her to continue gardening. She loved it.
I didnt follow any particular set of plans I watched several you tube videos and combined different ideas from the videos to develop my own plan.


During a home renovation we found out part of our stair rail would need to be replaced and the quote from the contractor floored us. We were searching for an economical way to DIY the stairs and come across your idea. I immediately loved it and we worked to figure out how we could put it together with our limited construction knowledge. The end result exceeded my expectations. I totally love it!

Our tiny cottage pantry is complete! We followed Ana-White's 2x4 Storage Shelving modified to fit.
Materials:
Paint: Behr Whisper White
Vinyl tile: Armstrong Terracotta Clay
Ceiling: Beadboard
Plans: Ana-White 2x4 Storage Shelving (modified)


My cousin recently got married and wanted a beer wall at her wedding. I quickly searched Ana's site for the perfect plan and chose the Tall Panel Headboard for my starting point. With a few modifications it became a beer wall in no time at all. I love how Ana's plans can be easily modified to make a totally different project.
No fancy wood was used here. Just regular wood from the big box store. A jockey box was attached to the back side of the wall. It worked awesome!
Since I discovered this site in January, I've made close to 30 items from her plans. I'm ridiculously addicted and not just with Ana's site but also with her blog friends. For Valentine's Day I asked for a Air Strike gun and got it. It was better than jewelry and chocolates! I'm well on my way to collecting my own tools and learning how to save money by making it myself. Oh, and I can't even begin to tell you how impressed everyone is with my finished products.

