Community Brag Posts

2x4 Modern Adirondack Chair

Submitted by Anonymous (not verified) on Sat, 05/16/2020 - 06:52

This was my first project.....my husband does woodworking projects all of the time but this one I picked out and he helped me. I really love how it turned out. We love the darker stain and can’t wait to do our second one!! We only had to purchase the wood for seat and back. We already had screws and 2x4’s.

Estimated Cost
$22
Estimated Time Investment
Afternoon Project (3-6 Hours)
Finish Used
Red Mahogany
Recommended Skill Level
Beginner

Modified Simple Outdoor Dining Table

Submitted by DD5.1 on Sat, 04/26/2014 - 20:00

I didn't make any changes , his orginal design was great. Hope these pictures help others. I tried to link to the modified-simple-outdoor-dining-table but wasn't able too.

Built from Plan(s)
Estimated Cost
120
Estimated Time Investment
Weekend Project (10-20 Hours)
Finish Used
make sure you stain as you go
Recommended Skill Level
Beginner

Comments

DD5.1

Sun, 04/27/2014 - 14:06

Found the plans "modified-simple-outdoor-dining-table" and I built it. Very nice table, I posted more pcitures to help others

DD5.1

Sun, 04/27/2014 - 14:06

Found the plans "modified-simple-outdoor-dining-table" and I built it. Very nice table, I posted more pcitures to help others

Wood Entryway Bench with Cubbies

Submitted by Anonymous (not verified) on Mon, 01/29/2024 - 11:58

We followed the Essential Entryway Bench plan and modified it slightly to fit our home. We used a 35 degree miter cut at the corners of the trim, and finished the top with a dark walnut wood stain. The accent between the two colors is our favorite part!

Built from Plan(s)

Harriet Chairs

Submitted by JoanneS on Sun, 07/15/2012 - 07:44

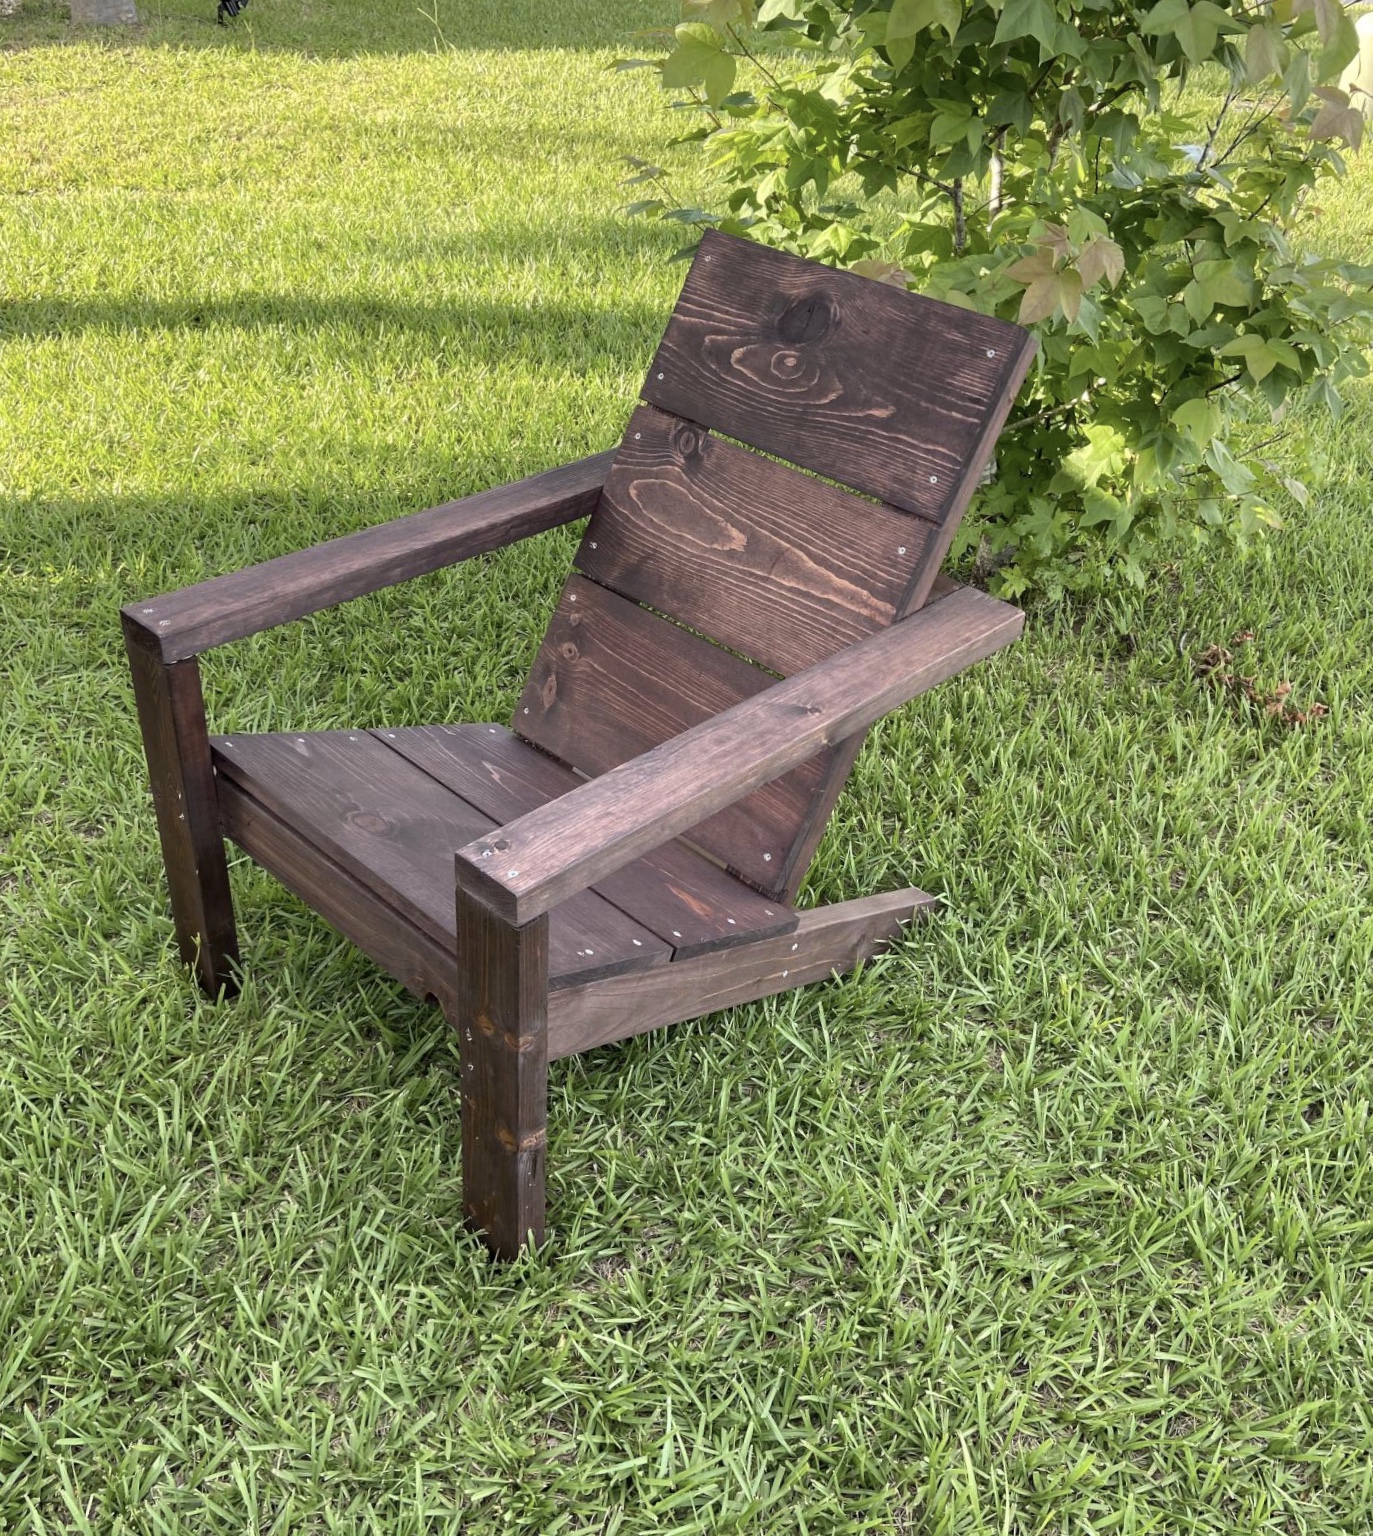
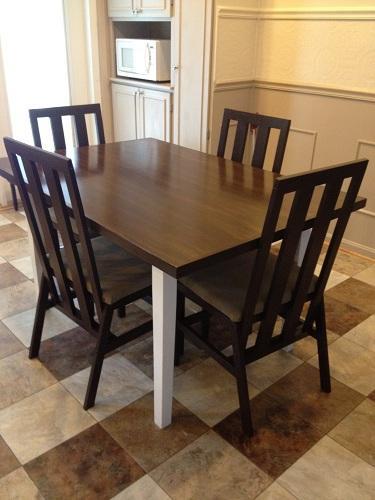
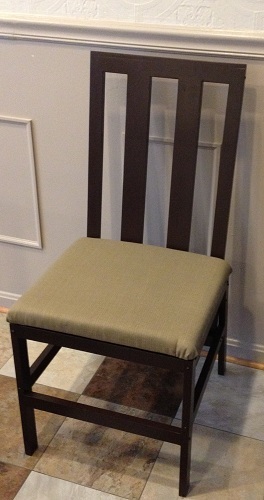
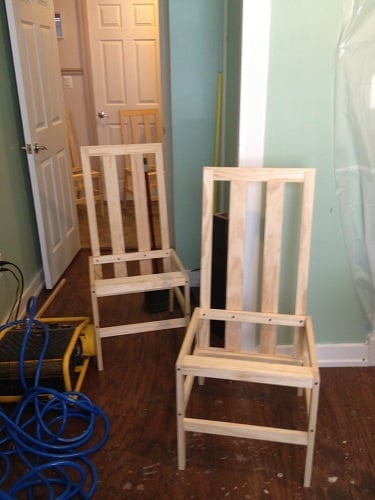
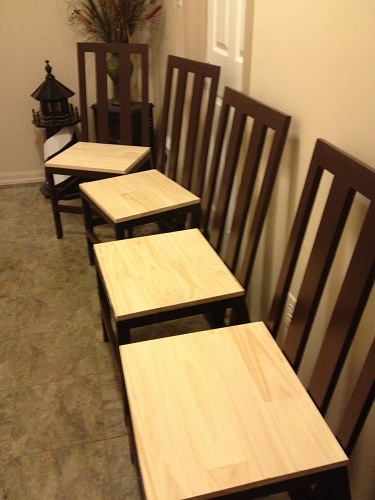
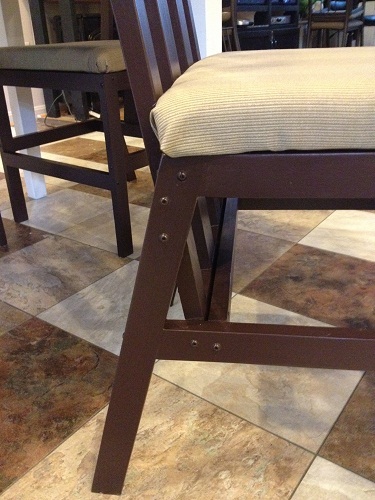
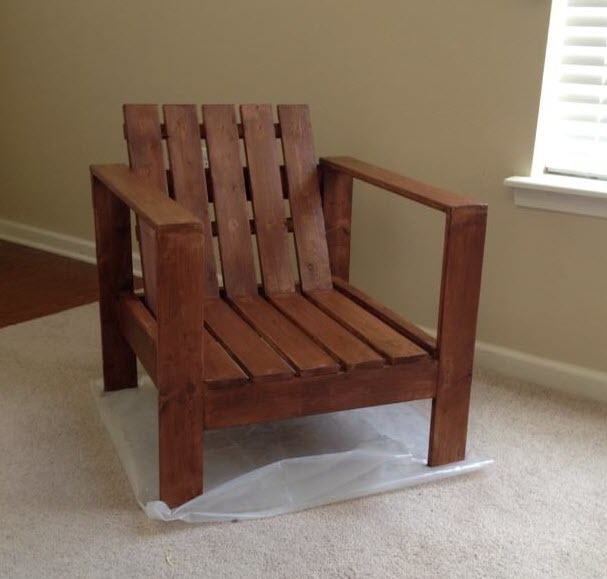
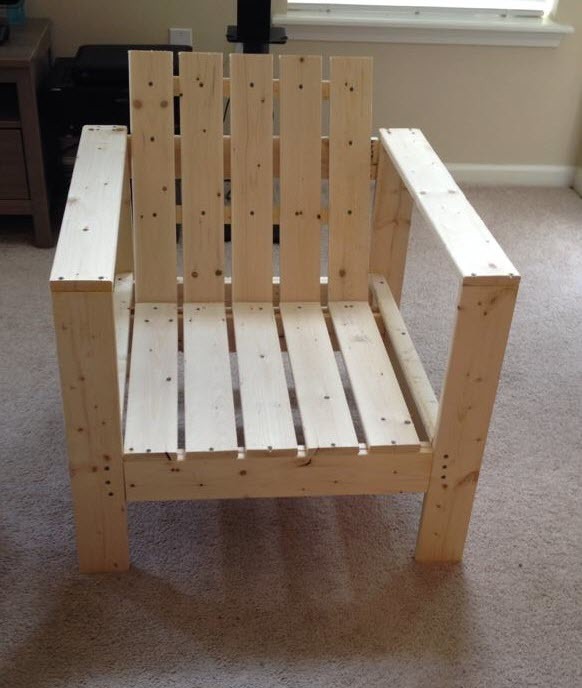
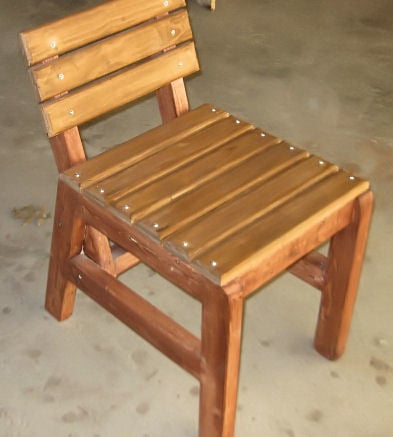
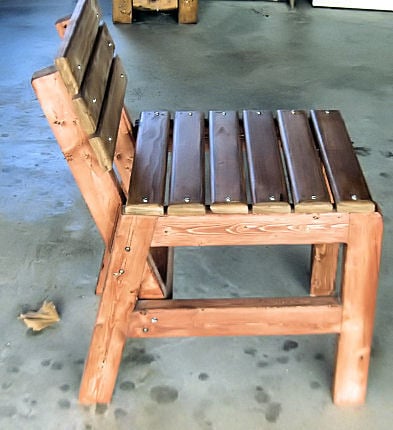
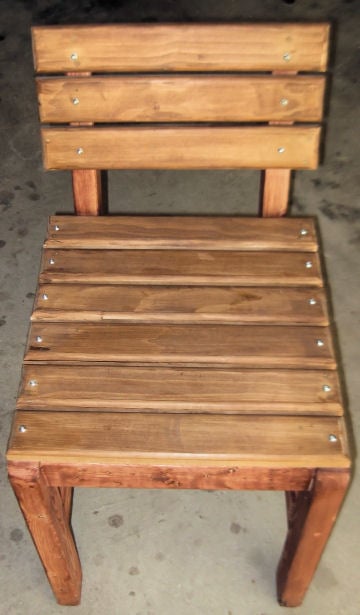
Finally I was able to replace my wobbly little dining chairs with solid wood chairs, thanks to Ana’s Harriet Chair plan. For this build, I made a few mods from Ana’s plan: added a padded seat, made the chair 2” wider, and substituted a slatted back. Used select pine 1x2 instead of 2x2 (really liked that look in the inspiration chair) and used 1x3 for the 2 inner slats on the backs. Also added a few more cross supports. Instead of predrilling pocket holes and hiding the screws, I chose to use the round washer head self-tapping screws and left them visible. This saved time on having to pre-drill and fill screw holes, but also thought the exposed screw heads made a nice decorative element. The seats are covered with 1” thick high density foam, batting, and outdoor fabric. The first of the 4 chairs took longest to make (I made and corrected all my mistakes on that one). The remaining 3 went a lot faster (took about 11 hours total for building the 4 chairs, and 12 hrs total for finishing them). The changes/steps I used are documented in a .pdf file in the second plan post linked above. Ana, thank you for all your wonderful plans. You rock!!!

Estimated Cost
Cost: $230 for 4 chairs, which came to about $58 per chair. For 4 chairs: $127 for lumber & screws, $28 for paint, and $70 for chair fabric and foam. (fasteners, glue and sandpaper not included in cost, those were already on hand). I was able to build all 4 chairs for the price it would have cost for just one from the furniture store.
Estimated Time Investment
Week Long Project (20 Hours or More)
Finish Used
Finished with Benjamin Moore Aura satin, in Wenge, 3 coats . Rubbed down all the chairs with Pledge after the paint dried. (I had attempted waxing one of them, but that took way too long for me!) The seat is covered in outdoor fabric (all the fabric and the foam were on sale for half-price @ Joann fabrics – score!!!).
Recommended Skill Level
Intermediate

Comments

JoanneS

Sun, 07/15/2012 - 17:26

Thank you so much! I just posted a plan of the modifications, which includes a .pdf file of the full plan with the steps and photos (still haven't learned sketchup yet). I sure hope it worked! The .pdf file is located about 2/3 of the way down through the plan post, right below General Instructions. Let me know if the .pdf opens for you? :)

JoanneS

Wed, 07/10/2013 - 02:31

Thank you! We still love them and they are holding up great! I made a storage bench to go with these, but it still needs a few tweaks before blogging that one.

JoanneS

Mon, 11/11/2013 - 10:58

Hi AdamR, Thank you very much for the nice comment! Yes, we did the table also. Here's the brag post:

http://ana-white.com/2011/05/my-new-almost-farmhouse-table

This was done under my original username JES. I had locked myself out of that username and had to create a new one ;)

We used our existing table and painted the legs, and added a new top. The tabletop finished dimensions are 56" long x 38 1/2" wide.

Joanne

AdamR

Mon, 11/11/2013 - 19:38

This is what I have been looking for. I know my wife doesn't want any indents or grooves but it seems like everyone build tables out of boards. I don't have a jointer or planer to even the boards out.

Question 1 - the 1x2 trim...to be clear you attached the 1 inch side to the table right?
Question 2 - how has the 3/4 thickness working out? Thick enough?
Question 3 - anything you would have done differently?

Thank you so much for your help. I build some small custom shelves for my son's room, found this site and now got a major bug to build stuff we have been looking for. I actually joined the site just to ask you about the table so thanks again!

Adam

JoanneS

Tue, 11/12/2013 - 07:07

Thanks again for the nice comments, Adam!

On the 1x2 for trim, I attached with the 2" side to the edges of the plywood (the 1x2's were actually 1 1/2" wide and 3/4" thick). This gives the illusion that the table is 1 1/2" thick. On this one I used finish nails and glue to attach the trim. If I had it to do over again, I'd have attached the trim boards to the plywood edges with pocket holes from under the table, so there would be no nail holes to fill.

3/4" thickness for the table top works fine. Our original table had a top thinner than 3/4", so we attached this new top directly on top of it. I didn't think I could get the leg assembly off that old table without damaging it.

If you wanted a more 'beefy' feel to the whole table top, you could stack 2 pieces of plywood, glued and fastened together from the bottom with screws. The 1x2 for the edges would still cover it.

Once you catch the wood working bug, you'll want to build everything you see! :) I hope you post a brag picture when you build this. I'd love to see pictures! :)

Joanne

AdamR

Wed, 11/13/2013 - 06:02

First off thank you for all the info! I see now why you picked the larger trim, I didn't catch it the first time around that you put the new wood right on top of the old table. My kitchen table has the exact opposite problem the legs are weak (plus my wife hates the top too) hence why I will be doing both top and legs. Still debating on one 3/4, two 1/2 or two 3/4 inches for table thickness.

I am going to build the kids trestle table this weekend first. Just the get a project under my belt besides some book shelves. lol

http://ana-white.com/2011/09/kids-trestle-style-play-table

My Kreg Jig will be here Friday, picking up wood on Sat....hopefully I will have a unfinished kids craft table ready to roll by Sunday then the Kitchen table will be my Thanksgiving weekend project.

Thanks again for all of your help.

Adam

Grandy Barn Door Console

Submitted by RGWood on Sun, 05/24/2020 - 07:48

I built this unit based on the Grandy Barn Door Console plans. I adjusted it down to 66”. The top is Dark Walnut with Satin Poly. All lumber was purchased at Menards.

Built from Plan(s)
Estimated Cost
$350.00
Estimated Time Investment
Week Long Project (20 Hours or More)
Finish Used
Satin oil based polyurethane
Dark Walnut Stain
White paint
Recommended Skill Level
Intermediate

Potting Bench

Submitted by fifi_momo on Mon, 05/12/2014 - 19:45

I adjusted the depth of the bench to accomodate a bath vanity top with sink (from the Habitat reStore). The width was adjusted to allow for 2 feet of workspace to the left of the sink. The overall height was adjusted to my wife's height. The front legs were made longer than the rear to account for the slope of the yard location.

Built from Plan(s)
Estimated Cost
$200
Estimated Time Investment
Weekend Project (10-20 Hours)
Finish Used
Deck oil
Recommended Skill Level
Beginner

AP - Play Kitchen

Submitted by Anonymous (not verified) on Sun, 05/31/2020 - 19:20

Loved the plans from the site Ana! I got inspired seeing all the lovely play kitchens that everyone had created! Thought I'd share the one I've made for my little one as well, she loves it!

Mario Bunk bed Castle

Submitted by tdee on Wed, 05/28/2014 - 16:31

My son is a big Mario nut. And when it came down thinking about a new bed for him we sat down online and started searching for ideas. When we found this bed we both loved it right away. And when i found it was made from plans on Ana- white i was so excited as i have made a few projects already. My son was so happy the whole time this was being made. He was going to have his own castle. Once we finished the build he decided that he had to have a door so i made some curtains and embroidered Mario characters on each one. I let him decorate the inside with Mario stickers and he loves being able to have a Mario level right where he sleeps.

Built from Plan(s)
Estimated Cost
600
Estimated Time Investment
Week Long Project (20 Hours or More)
Finish Used
Paint in various colours to replicate a Mario castle.
Recommended Skill Level
Intermediate

Comments

Modern Sectional Sofa

Submitted by reinkense on Fri, 05/30/2014 - 17:22

I looked all around my town for a sofa that meet my needs. I wanted something with tall legs, modern lines and fit my living room. I did not have $3,000 to buy one online so I said to myself why not???


Estimated Cost
$400
Estimated Time Investment
Week Long Project (20 Hours or More)
Recommended Skill Level
Intermediate

Comments

reinkense

Sat, 05/31/2014 - 15:58

Thank you! I am really proud of it. I was thinking of putting together some plans.

Samigdal

Fri, 12/25/2015 - 17:48

Are there step-by-step instructions for building this posted anywhere?

walthoca

Fri, 01/06/2017 - 11:06

I am so impressed. We recently spent a small fortune on a sectional, but yours looks equally beautiful. You are incredibly talented! 

Garden Tool Storage

Submitted by Anonymous (not verified) on Sat, 06/13/2020 - 13:36

Great project and super easy! Made such a difference in organizing our tool shed. I modified one of the handles because several of my tools would not fit over the 2x4. I also had a challenge hanging it in my shed due to the metal sheeting for walls, but the build itself was very easy. No more messy tool shed! :) As an organization freak, like Ana, this makes me so happy!!!!

Built from Plan(s)
Estimated Cost
None - had all the materials on hand
Estimated Time Investment
An Hour or Two (0-2 Hours)
Finish Used
none
Recommended Skill Level
Starter Project

Queen storage bed modified

Submitted by Anonymous (not verified) on Thu, 06/18/2020 - 19:11

I used wood from an older Ana white project of a loft bed my daughter had out grown. I liked the look of Ana's Mom bed but wanted storage so I modified the plans slightly. I will add drawers later.

Estimated Cost
200
Estimated Time Investment
Weekend Project (10-20 Hours)
Finish Used
Sweet coconut easy flow paint in Matte
Recommended Skill Level
Intermediate

Outdoor sectional and coffee table

Submitted by Rynhffr on Mon, 07/06/2020 - 21:06

Loved these plans! Was my first project I tackled trying my hand with a new hobby of wood working to stave off quarantine craziness :-) finished project looked awesome and got me started working on other plans on the site.

**note**
Side table was just sanded and refinished, wasn't built just tried to match.

Estimated Cost
400
Estimated Time Investment
Weekend Project (10-20 Hours)
Recommended Skill Level
Beginner

Simple Patio Chair

Submitted by keltik on Tue, 07/08/2014 - 11:04

This was my first project from Ana's site. I wanted something simple and cheap to make, so all in all, this project was very simple.
I think I will paint instead of stain next time though as the quality of the wood I purchased from Home Depot wasn't the best.
Very happy with it though, and I'm planning on making more.

Built from Plan(s)
Estimated Cost
50
Estimated Time Investment
Afternoon Project (3-6 Hours)
Finish Used
Behr Weatherproofing Wood Stain - Russet Brown
Recommended Skill Level
Starter Project

Modified Simple Rolling Bar Cart

I honestly think Ana is a mind reader. Whenever I need plans for a particular piece of furniture, they magically appear on her site. Of course if she was a true mind reader, everything will be exactly as I need it requiring no modifications. That's what makes her plans so amazing. I can build bigger and better because I've learned to modify her plans to fit my current needs.

This Cart was no exception. I had to make mine a few inches deeper and change the height of the legs and it was a piece of cake. I put this together in less than 2 hours and finishing was easy too.

I did a blog post all about what I did differently including how I constructed a towel bar instead of the pipe. Check it out at www.thepursuitofhandyness.com

Built from Plan(s)
Estimated Cost
$25 Depending upon the type of casters used
Estimated Time Investment
Afternoon Project (3-6 Hours)
Finish Used
Oil Based Primer & Rustoleum Painters Touch Spray Paint in Paprika Satin
Recommended Skill Level
Starter Project

Do-It-All Mobile Workbench

Submitted by JL Hurst on Wed, 11/28/2012 - 11:02

The need for a proper workbench in my garage/shop is a must, but. So is space! I already have a fold down workbench I’ve made with ¾ inch pipe & a door, but. I just need something that can handle all my tools. So, I stumbled upon these plans from the Family Handyman & couldn’t find a reason why this wouldn’t work in my shop. It has room for storage, can easily accommodate my tools & most importantly fold up to store. Easy to build too! Make sure you read all the plans first as some of the materials could be pricey, but well worth it. Technically it’s taken 2 months to build this bench, as I operate on a firefighter/teacher’s budget & during the holiday season no doubt. I ordered all the shelf standards & brackets through Amazon, $210.00 for those alone, but they hold so much weight to support your tools I figure it’s worth it. The rest materials (wood, screws) were purchased at Home Depot for around $150.00. The plans called for ¾ inch ply & it was $45.00 per sheet. However they did have a smaller thickness for $22.00 per sheet & was only a 1/32 inch thinner. I plan on topping all my surfaces with some ¼ inch tempered hardboard later on so I knew it would work. That also left me adjusting my screw size to mount my brackets. Due to the reduction in thickness of the plywood all my #8-1 inch screws needed to be adjusted to ¾ inch so to not screw through the ply. I also hit the molding isle to nab some pieces to use as furring strips to use under the shelves before attaching the brackets. This way I can sand each strip to match before mounting to make sure it lined up flat with the center top. One more thing; where it says “drill 1/8 inch hole in brackets make sure you use 1/8 inch pop rivets. I barrowed a pop rivet gun & was handed some rivets as well. Popped two & they had to be trashed because the rivet size turned out to be 5/32. So I stepped up in drill bit size & it all worked out. As I said, I’ll be topping it with some ¼ inch hardboard. I also plan to run it’s own electrical with an outlet on each post. I hope you all enjoy & this can help!

Estimated Cost
$350.00
Estimated Time Investment
Weekend Project (10-20 Hours)
Recommended Skill Level
Beginner

Comments

Rusty Cottage

Thu, 11/29/2012 - 07:03

This is by far the best workbench I have ever seen!!! Thanks for sharing. And excellent choice of table saw and miter saw.

JL Hurst

Thu, 11/29/2012 - 14:59

If I had it to do over I'd had gotten the contractor grade portable saw from Dewalt. The smaller version I have is the same 10" saw, but. It's maximum rip capasity is only 16. The other will at least rip a sheet of ply in 1/2.

Thanks for the kind words on the bench! I hope everyone that may find this valuable will. The plans came out of a 2005 issue & were hard to find on the internet.

uniquetrio2000

Thu, 07/04/2013 - 18:28

I love this work bench and would love to build it but i cant find them. Could you post them or email them to me please. uniquetrio2000 [at] gmail [dot] com

phantom1

Tue, 06/02/2015 - 05:39

I built this bench 3 years ago and I couldn't be happier. The portability, space savings and functionality make it wonderful!

StepFar

Mon, 01/08/2018 - 14:44

Am I missing the actual plans for this. I downloaded the pdf but it doesn't have the build plans apart of it.

Farmhouse Counter Stools

Submitted by wbengle77 on Wed, 09/23/2020 - 09:09

This was a pretty strait forward project, the only change i made was the wood used. I did not use the 2x2 furring strips i opted for the upgraded Select Pine Boards. So it changed from 3 bucks to 12 a board. I also used metal nylon feet.

Built from Plan(s)
Estimated Cost
depends on wood and finish
Estimated Time Investment
Afternoon Project (3-6 Hours)
Finish Used
I used an antiquing wax, then I used butcher block oil and wax to finish.
Recommended Skill Level
Starter Project

Comments

Coffee Table with X

Submitted by Anonymous (not verified) on Fri, 01/27/2017 - 11:01

This was my FIRST DIY piece of furniture and I am thrilled with the outcome!

Since I am not really one to go for the rustic cottage look I wanted this DIY coffee table to have a bit more of a modern feel. I chose a grey gel stain to do the job. It gave the table a thicker stain but I am still able to see some of the wood grain beneath it.

Ana White has the best tutorials & free plans to get a crafter to switch to the dark side and become a DIYer! 

I did a full blog post on my progress throughout with a lot more pictures.

Built from Plan(s)
Estimated Cost
$50

For Materials I didn’t want to spend too much on a first attempt build. Thankfully we had some extra fence boards for the top enough 2×4’s hanging out in the garage so I only had to buy 2×2’s, the bottom board for the table, Screws, Stain & Polyurethane.

Estimated Time Investment
Weekend Project (10-20 Hours)
Finish Used
Varathane Gel Stain in Weathered Grey
Non Yellowing Poly, three coats as I have two boys that are eager to play on this thing!
Recommended Skill Level
Beginner

Potting Bench

I am a complete newbie to anything woodworking. I just turned 60 and used a drill for the first time about 9 months ago. Thanks to Anna and her plans and videos, I have developed some some self confidence in this art and absolutely loving it.

Farmhouse coffee table and king size bed is next.

Thank YOU Anna!!! You totally rock!!!!!!!!

Estimated Time Investment
Day Project (6-9 Hours)
Recommended Skill Level
Beginner

Comments

Harriet Outdoor Dining Chair

Submitted by Jamaunzie on Sun, 03/31/2013 - 10:03

I saw this chair and was looking for something for back yard BBQ's I just beefed it up by using 2X3's instead of 2X2's left the measurements the same. I was playing around with Minwax Express Color to see how well it does and I like it helps control Blotching very easy to use except be careful when squeezing the tube or you like me will have a permanent shirt for staining

Built from Plan(s)
Estimated Time Investment
An Hour or Two (0-2 Hours)
Finish Used
Pine
Recommended Skill Level
Beginner

Small cedar shed

Submitted by sarusso82 on Sun, 08/08/2021 - 05:41

First shot at using plans from Ana, and thought it was great! Can’t wait to try another!

Built from Plan(s)
Estimated Cost
500
Estimated Time Investment
Weekend Project (10-20 Hours)
Recommended Skill Level
Beginner

Comments