
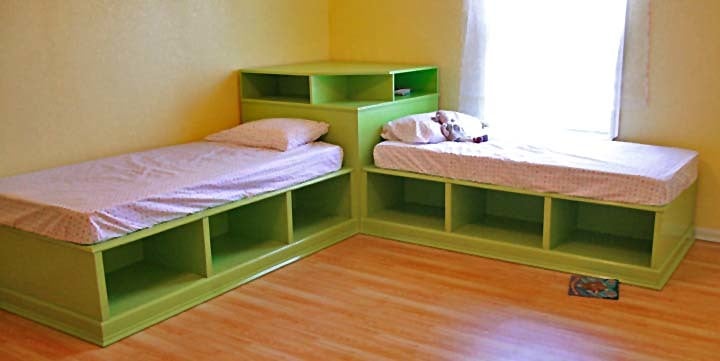

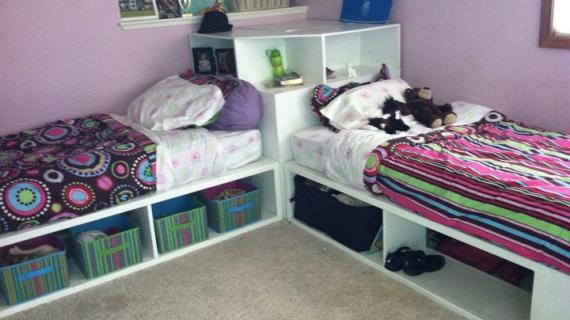
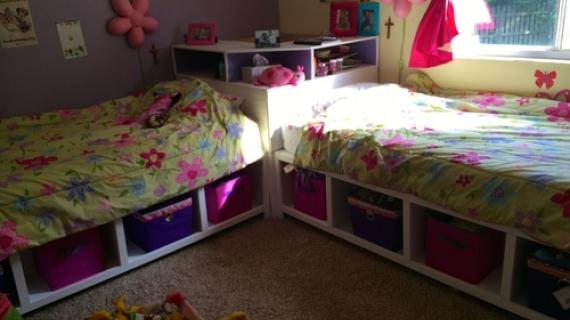
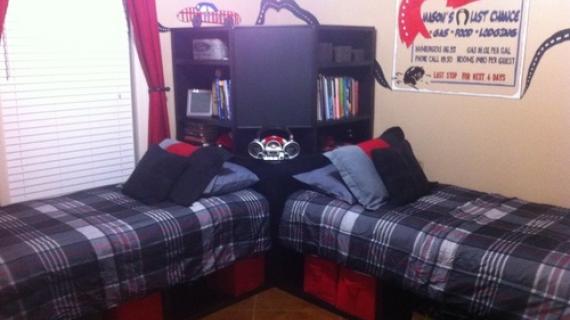
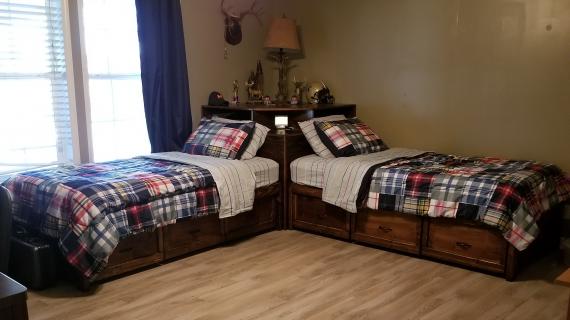
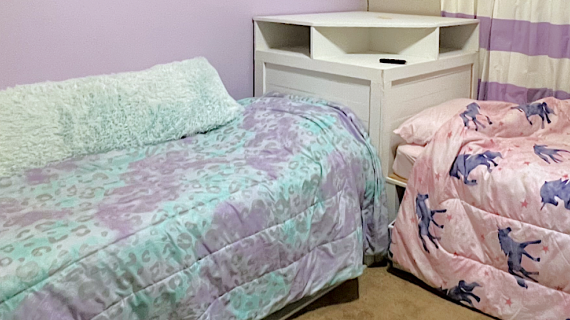
Shared rooms can be more creative than the awkward bunk bed or loft bed situation. If you have the space, twin corner beds might be the perfect solution. It acts as a headboard for both beds and contain storage, and a surface - much like a built-in table or nightstand for resting a book or water bottle.
This is a space saving design compared with twin beds placed headboard to the wall - consuming the entire room! This solution can work even in a room with limited space.
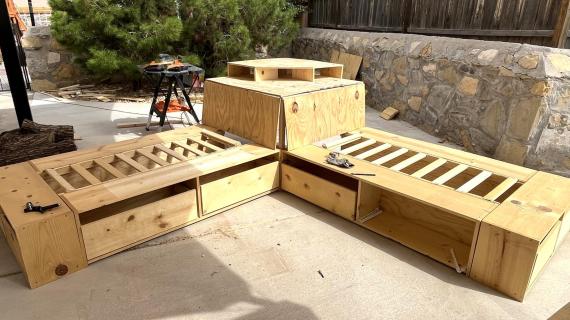
This is a DIY project with free step by step plans from Ana-White.com
We also have plans for twin storage or captains beds here, this is the perfect pairing with platform beds or beds with drawers, so you can build the entire set!
How to Build a Twin Corner Bed System


How Much Space Do You Need?
To make this twin corner bed solution work, you'll need a room at least 10' x 10', considering doors and closets etc.

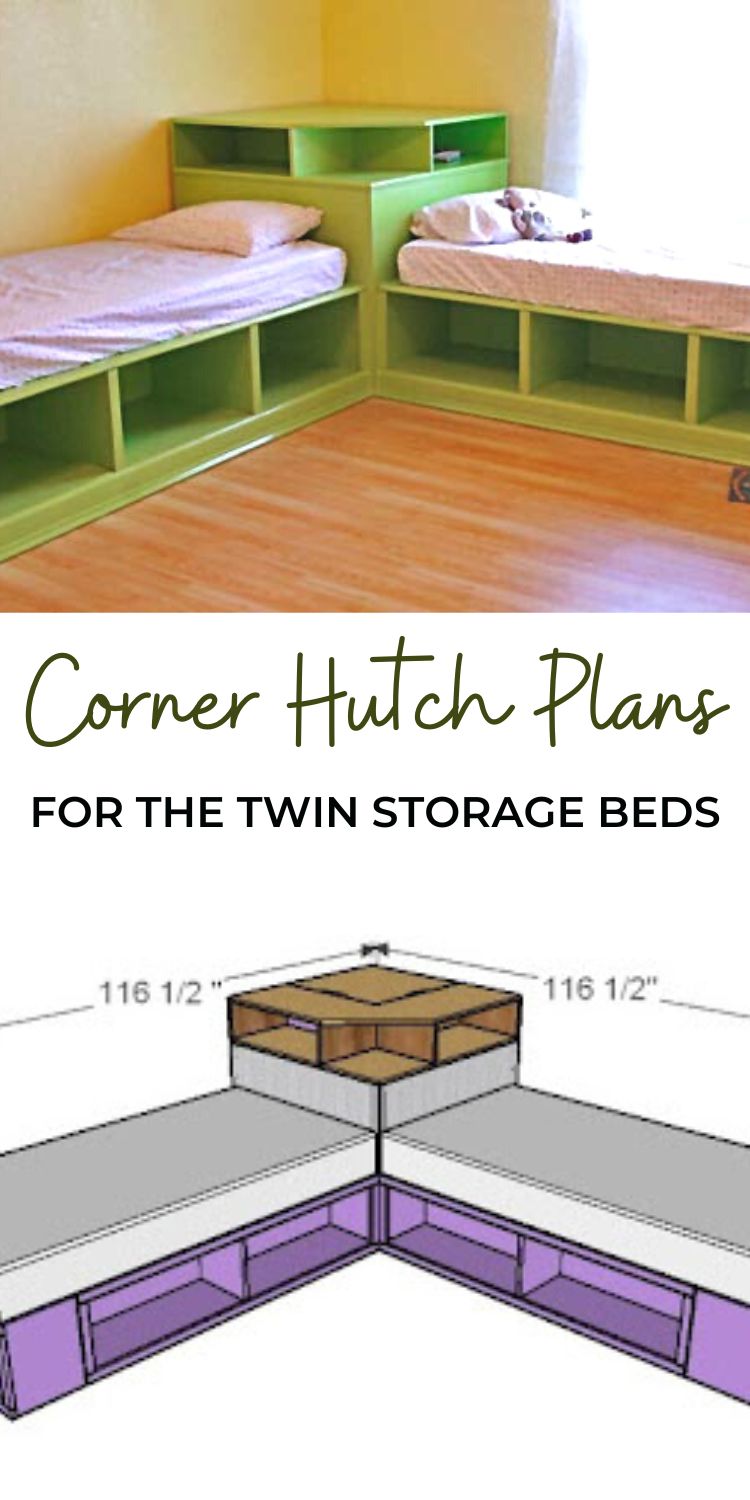
Ready to build it? Go measure your room and make sure you've got 116-1/2" of space in two directions in a corner.
Pin For Later!
Preparation
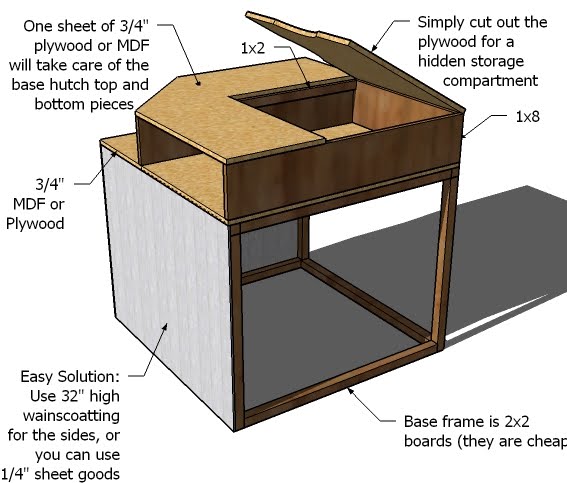
- 7 – 2×2, 8′ Long, Furring Strips
- 2 – 32″ High x 40 1/2″ Long (or longer) Wainscoting Panels OR 1 sheet of 1/4″ plywood or MDF
- 2 – 1×8 Boards, 8′ Length (Pine is cheapest)
- 1 – sheet of 3/4″ plywood or MDF
- Edge Banding (if you are using plywood and staining the bed)
- Wood Filler
- Wood Glue
CUT LIST FOR THE BOX
- 4 – 2×2 @ 40 1/4″ (Tops and Bottoms Box Ends)
- 4 – 2×2 @ 29″ (Legs for the Box Ends)
- 6 – 2×2 @ 37 1/4″ (Supports)
- 2 – 32″ High Wainscoting @ 40 1/2″ (Panels)
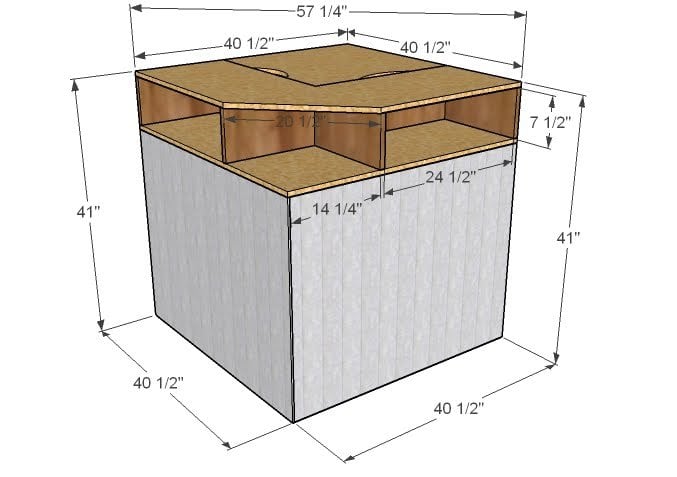
CUT LIST FOR THE TOP UNIT
- 1 – 1×8 @ 40 1/2″ (End)
- 2 – 1×8 @ 39 3/4″ (Long Dividers)
- 1 – 1×8 @ 14 1/2″ (Short Divider)
- 1 – 1×8 @ 24 1/2″ (Final Divider)
- 1 -1×2 @ 24 1/2″ (Cleat for Support Lid, 1st one installed)
- 1 – 1×2 @ 23 3/4″ (Cleat for Support Lid, 2nd one installed)


Work on a clean level surface with straight boards and check for square after each step. Always predrill and countersink every screw. If you are working with MDF, use Drywall screws and be sure to predrill the entire length of your screw. Use glue. Be safe and have fun.
Instructions
Step 1
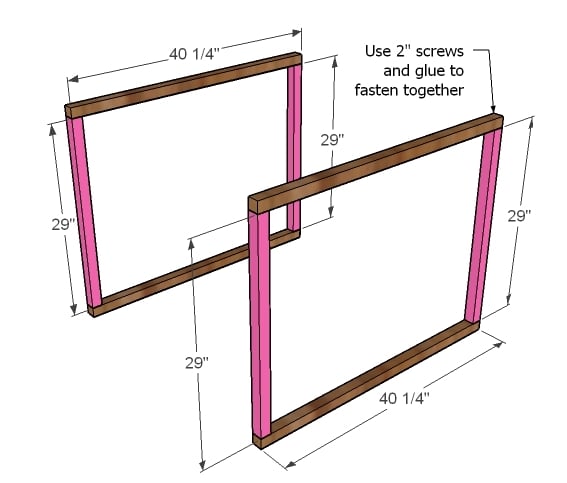
BOX ENDS Build the box ends as shown above using 2″ screws and glue.
Step 2
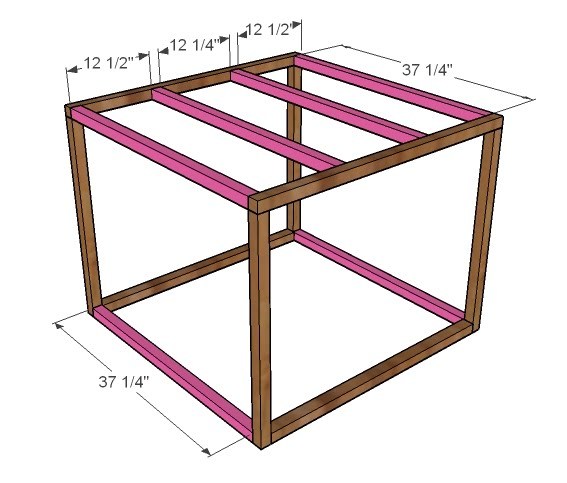
SUPPORTS FOR THE BOX Add the box supports using 2″ screws and DO NOT GLUE. Make sure your project is square at this point. To relocate the bed, you can simply unscrew, disassemble, and then reassemble.
Step 3
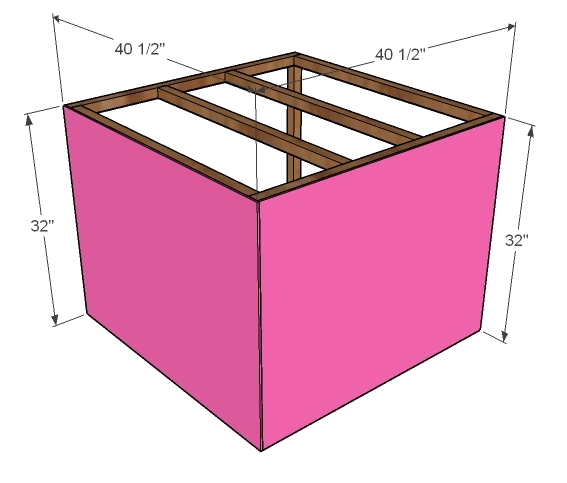
WAINSCOTING Measure and cut your wainscoting to fit one side of the box. Then add the second piece. Attach with 1 1/4″ screws and DO NOT GLUE on all four edges. You want these pieces removeable so that you can move it in and out of a room. NOTE: If your doorways are larger than 32″ you can move this unit without disassembling, but just in case you move to a different home, I would still not glue this step.
Step 4
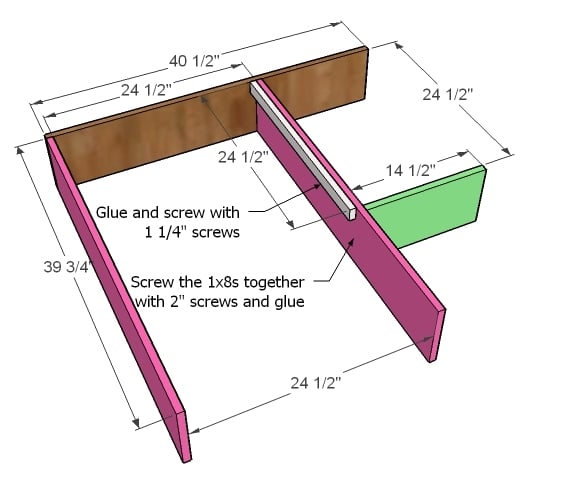
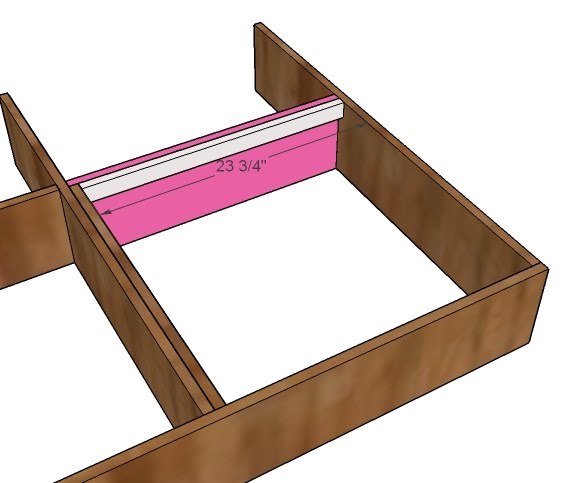
DIVIDERS Use 2″ screws and glue to build your dividers as shown above. Then add the 1×2 cleat (shown above in white) with 1 1/4″ screws and glue.
Step 5

Step 6
FINAL CLEAT Add the final cleat, using 1 1/4″ screws and glue. Then also attach from the outside of the project using 2″ screws and glue.
Step 7
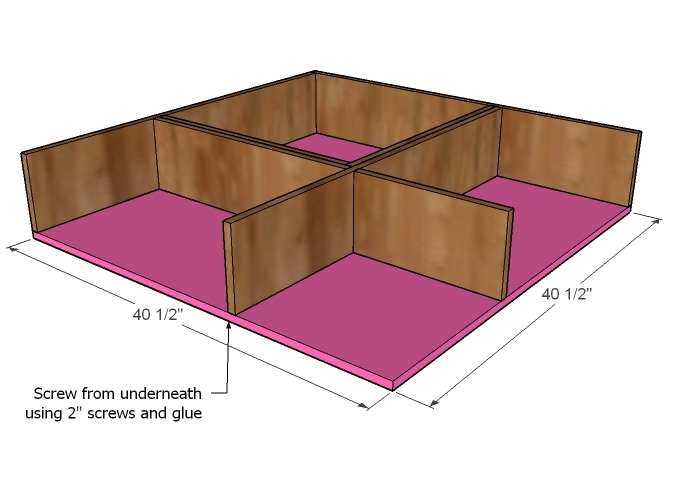
BOTTOM Cut your bottom plywood and attach it to the bottom of your unit (cleats are on the top) as shown above. Use 2″ screws and glue. This is just like attaching a back to a bookcase.
Step 8
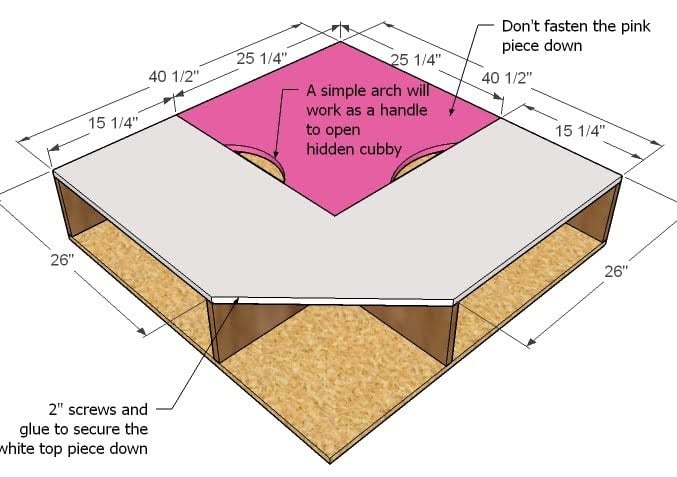
TOP Cut your top, as directed above. Attach only the white piece to the top of your project. The pink piece is removable for storage (might be scary in a teens room
Step 9
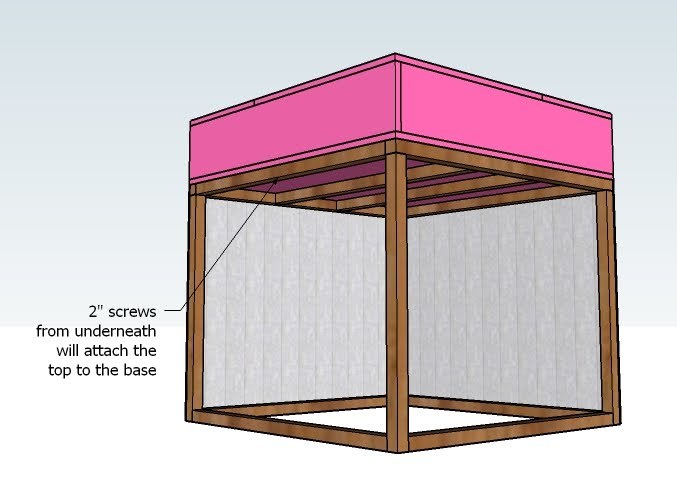
ASSEMBLY Attach from underneath the top unit to the base unit using 2″ screws. Don’t glue so that removal is easy to do. You may also wish at this point to drill holes in certain point to create a “Smart” storage unit. You could hide cords in the “secret compartment” and keep cell phone chargers, laptop cords, or cords for media units tucked away neatly.

Comments
Teresa Pomerantz (not verified)
Mon, 06/21/2010 - 03:07
That was a great story to
That was a great story to wake up to today Ana. Thank you for featuring my girlies beds and all the nice compliments- but don't forget to take credit because I couldn't have done it without your plans! I love your site and really appreciate your hard work. I should mention this was my first but not last woodworking project- Thanks for the Inspiration!
Barbara (not verified)
Mon, 06/21/2010 - 06:27
If I could make one
If I could make one suggestion:
My friend growing up had beds like these (they were common in the "old days") but one slid under the middle piece so the room could be "bigger". I think if you could make one slide under, it would be a nice option!!
Guest (not verified)
Wed, 04/06/2011 - 05:20
Thanks for that idea...
... one sliding under the other. I was thinking, with the space limitations in my boys' room, I had better think of another way to make this happen, as i love this plan and layout. and then i read your post. that is an awesome idea.
MomBrose (not verified)
Mon, 06/21/2010 - 06:57
Do you think a piece of
Do you think a piece of molding added to the top of the platform would help the mattress stay in place?? I would be concerned about it slipping off the slick surface. Those are so beautiful though!!
Sarah (not verified)
Mon, 06/21/2010 - 09:59
I love that you can have a
I love that you can have a little storage compartment in the corner that is hidden away. Good place to put a bunch of blankets and bedding!
Teresa Pomerantz (not verified)
Mon, 06/21/2010 - 16:07
MomBrose- the mattresses
MomBrose- the mattresses haven't slid at all, which surprised me with 2 active 3 year olds. It hasn't been a problem- but someone suggested putting the nonslip rug mats under them, if it becomes a problem, that is what I will do.
bec (not verified)
Mon, 06/21/2010 - 17:34
I love your blog! There's
I love your blog! There's something great about women using powertools!
I just wanted to add my two cents. We just finished making the storage day bed and we love it! But it would be sooo much easier if it was built like Teresa's green bed. If we had made two long rows of cubbies with long strips of trim, instead of three horizontal sets with individual trim (that has to match the one next to it!) it would have save us oh so much time!
Anyway thanks so much for all the great plans, we love them!!
Adriane (not verified)
Mon, 06/28/2010 - 23:55
Careful with the non-slip
Careful with the non-slip mats. We used the foam ones from Wally World and they are permanently stuck to the bed! I tried to pull one up when we moved and gave up- the foam was just tearing off. I guess it's okay, since it's still doing it's job, but I kinda wish we hadn't opted for black on an oak colored bed. :)
Brett (not verified)
Tue, 06/29/2010 - 04:51
How hard would it be to make
How hard would it be to make the other headboard for this bed? The one that's not a corner unit
http://www.pbteen.com/products/stuff-your-stuff-headboard-and-store-it-…
My 2 year old daughter loves to sit in bed and "read", and insists on having a pile of books in bed with her. I'd like to make her a bed that has some storage by her head so the books wouldn't constantly fall out.
Thanks. I'm hoping to start on those open toy boxes soon!
Ontwerpduo Sha… (not verified)
Fri, 09/10/2010 - 18:29
[...] White’s Twin Bed with
[...] White’s Twin Bed with Storage, Corner Hutch for Twin Storage Beds tweetmeme_url = 'http://aperfectplayroom.com/?p=1553';tweetmeme_source = [...]
Beth (not verified)
Wed, 09/29/2010 - 06:46
Woohoo!!! Thank you for
Woohoo!!! Thank you for these plans! I had requested them on your facebook page awhile ago and am beyond thrilled that you did them.
Shawn (not verified)
Sat, 12/11/2010 - 01:21
Teresa, I want to make
Teresa,
I want to make your exact beds, do you have plans for them?
Thanks
Shawn
Lynn (not verified)
Mon, 12/20/2010 - 19:09
I grew up with beds similar
I grew up with beds similar to these except ours had one big drawer under each bed. My sister and I shared a stereo that sat on the corner unit and since it opened, we had tons of space to stuff things when we were supposed to clean our room :) Thanks for sharing - these are really useful and easy to change colors when kids get bored.
Paige (not verified)
Thu, 01/13/2011 - 21:42
I can only see the plans for
I can only see the plans for the corner unit.....are the bed plans no longer available? Thanks!!!
Jenna (not verified)
Wed, 01/19/2011 - 06:00
I WOULD love these plans!
I WOULD love these plans! Where can I find the plans for the bed?? Is it really hard? I've never built anything before and thinking this may eb my first project!
Could someone please email the plans? [email protected]
Thanks! :)
Kimberly Carroll (not verified)
Mon, 01/24/2011 - 20:01
Yes yes yes.. Please tell me
Yes yes yes.. Please tell me where to find plans for these beds!!! LOVE IT!!
Paul & Rachel … (not verified)
Wed, 01/26/2011 - 08:43
If someone could email or
If someone could email or post the bed plan up that would be great.
Thanks
[email protected]
Theresa Rondinaro (not verified)
Mon, 01/31/2011 - 15:20
I would love to see the plans
I would love to see the plans for the storage beds... just perfect for my boys bedroom!!
Heather W (not verified)
Wed, 02/16/2011 - 03:46
Yes, please add me to the
Yes, please add me to the list of people who'd love to see these plans, it would be perfect in my daughters' new room! Thanks so much.
Guest (not verified)
Sat, 04/02/2011 - 10:22
I would love the bed plans
I would love the bed plans for the storage bed can someone send them to me
[email protected]
thanks,
angelajade1984
Sat, 05/14/2011 - 09:59
Need the bed plans
I am building my daughter and stepdaughter this bed when we move in a few weeks...but need the plans for the bed :( Can someone PLEASE email them to me? It would be greatly appreciated! I thank you in advance!
[email protected]
Thanks again
raajlss
Sun, 05/29/2011 - 10:10
Bed Plans
I, too, would love to get the bed plans. We are expecting child #3 and the first two boys are going to start sharing a room. Expecting in August. Would love to get this project done asap. Please email me the plans for the bed construction...
Thanks a bunch!
Rebecca
Guest (not verified)
Sat, 06/18/2011 - 14:12
Yes, bed plans
Please share the link to the plans to the beds shown in the photos.:-)
saramd
Sun, 05/29/2011 - 10:27
What a great bed. I will have
What a great bed. I will have to add that to my list.
mkkayla
Sun, 08/07/2011 - 10:48
CRAFTING NEWBIE NEEDS HELP!!!
I have never built anything in my life. The storage beds with the corner hutch will be my first project. I was wondering if the corner hutch would fit if I made 2 full size storage beds. Can someone help me please? Thanks in advance.
Teresa M Pomerantz (not verified)
Tue, 08/30/2011 - 07:19
The Plans for the Bed
Hi everyone- this is Teresa who built the green beds- I used the storage daybed plans- although it certainly works with the storage bed plans too.
Sorry so late in posting- didn't see your comments until now.
EmileeA (not verified)
Fri, 11/04/2011 - 12:48
Green Storage Daybed
Teresa,
I love the look of your beds, Did you use 1 solid piece of trim along the bottom or is it on each of the 3 individual pieces of the bed. Are there any changes that you made to the Storage Daybed Plan? Your beds look great and I would like to make mine look as close to yours as possible.
Thanks ~ Emilee
LBad (not verified)
Wed, 10/12/2011 - 13:34
Question for Teresa
I am also looking for the plans for these green beds. Teresa, you mention you use the dayced storage plans but in the picture it looks like your storage goes all the way to the wall, is that the case or is it only ~12" deep like the storage beds? I am trying to figure out structurally if I can make the storage bed but with storage cubbies running the entire width of the bed as ours are also up against the wall.
thanks!
p.s. LOVE the look of these beds!
Teresa M Pomerantz (not verified)
Fri, 11/04/2011 - 14:56
Responding to questions-
Emilie- the trim is actually two layered pieces of trim along the bottom- one on each bed. Then the top also has a piece of long trim on each bed- I hope that makes sense.
I used the storage daybed plans- and I did make the middle piece so it is 12" deep as the plans show- but the cubbies are huge. You could probably leave the middle piece out to make cubbies that go all the way to the wall- but you will want to use like a 1x2 spanning across the top as support for the weight of the mattress/kid. These boxes are super strong- my girls take the mattresses off sometimes and dance on them like they are a stage :)
If you want the same green- they are spring green from Benjamin Moore :)
Guest (not verified)
Tue, 12/13/2011 - 12:55
Bed plans
I love this bed! I need the bed plans asap. I am moving into a new house and want to build this in there before we get everything else moved in. Please email it to me ASAP! Thank you!
Guest (not verified)
Mon, 01/09/2012 - 16:51
Cost
I was curious as to what the cost of this bed plan was?
Kacie (not verified)
Tue, 01/17/2012 - 12:21
Can u send me plans too
Can u send me plans too please? I absolutely love this bed!
[email protected]
Kacie (not verified)
Tue, 01/17/2012 - 12:21
Can u send me plans too
Can u send me plans too please? I absolutely love this bed!
[email protected]
emcgraw16 (not verified)
Tue, 02/14/2012 - 09:20
Same bed idea w/ trundle
We plan to make these beds with a trundle bed under one of the beds. Wonderful bed plans! Thank you for sharing!
Guest (not verified)
Fri, 02/17/2012 - 08:50
twin storage bed plans
Hi,
I am newbie to this site. I love the twin storage bed with corner hutch. Are there plans for the twin storage bed? I couldn't find it.
Thanks
spiceylg
Fri, 02/17/2012 - 10:19
Here ya go!
http://ana-white.com/2009/12/plan-stratton-daybed-as-request-by-you.html
Welcome to the community and happy building!
Stephanie (not verified)
Fri, 02/17/2012 - 11:35
WOW......
I love this so much! i cannot wait to show this to my husband so that we can make it for my boys room!! We were going to bunk beds but these offer so much more! Love you stuff! Thank you!
Kandis (not verified)
Tue, 08/07/2012 - 10:29
I was looking at these and
I was looking at these and thinking why not add about a 4-6 inch head/foot board so the kids could orient themselves or if you were to put a tv on the middle they could have their pillows opposite so they could lay in bed and watch.
Tiff (not verified)
Sun, 10/14/2012 - 18:53
I would love this as a double bunk!
I love this bed and would like to make it into a double bunk. Can you help me figure out a way to hang a second bed above the first? Thanks so much!
AllyH (not verified)
Fri, 11/16/2012 - 14:32
Full size beds
Hi - I love this corner unit and storage beds but I am wondering if you can make the same for two full size beds instead of twins. My girl already have the full size beds and I don't want to have to buy new mattresses too.
Thanks!
Candacer28
Fri, 05/23/2014 - 08:32
Help
Hi. My name is Candace and I love this project. I am a soon to be new step mom to 2girls ages 5 and 7. I saw this bed at pottery barn and feel in love but I knew paying $3000 was not going to happen. So I started searching online and I found this site. I would love to have the beds, corner unit and the hutch but I know I can not build this. I understand that it's easy but I am city girl and I wouldn't even know where to begin!!!!!!! Are there any builders in NC. Raleigh Durham Cary area that you know of? Thanks so much
abarbee
Sun, 01/17/2016 - 08:14
Plans for the beds it self not the corner unit
what are the plans for what the beds on. I only see the plans for the corner units. I was wondering how to make the what the beds go With the storage units under
Ana White Admin
Mon, 01/18/2016 - 11:12
plans
http://www.ana-white.com/2010/05/twin-storage-captains-bed
Shenagh
Fri, 06/10/2016 - 01:16
Help
Hiya i love this idea but what plans do you use for the beds cant seem to find it??
In reply to Help by Shenagh
Ana White
Mon, 06/13/2016 - 16:30
http://www.ana-white.com/2010
http://www.ana-white.com/2010/05/twin-storage-captains-bed
trishapro90
Fri, 07/29/2016 - 11:36
please helpppp!!!
I'll start by saying I LOVEE THESE PLANS!!!! I started about a year ago, when my husband an i discovered the loft bed with the desk an shelfs underneath... that was the first thing we have ever built, an it came out AWESOME!!! However, now we would like to build the storage unit/ twin bed collection with the open spaces below the bed for more storage an the corner unit.... The problem is, i've searched all over the website and i still can't find the orginial plans for the twin beds, and the corner shelf... I printed the 20 pages out of the plan thinking it was the corner shelf and both of the twin beds... An it was just the corner shelf... COULD SOMEONE PLEASE HELP ME with the plans for the beds??? thank you so much..
In reply to please helpppp!!! by trishapro90
Ana White
Fri, 07/29/2016 - 12:30
http://www.ana-white.com/2010
http://www.ana-white.com/2010/05/twin-storage-captains-bed
go_eli
Thu, 04/05/2018 - 16:11
Plans for Bed?
Hi, we are really enjoying your website! Your creations are beautiful! I particularly love this bed with corner hutch. Where can I can find the plans for the exact one in the picture (the green bed with the 3 cubbies in the bottom)? I seem to only be able to find the plans for the bed with two cubbies in the bottom and then the other two cubbies at the the end of the bed. I prefer the look of this green bed. I'd really appreciate it if you'd let me know if the plans for this exact bed are available.
Cheers!