


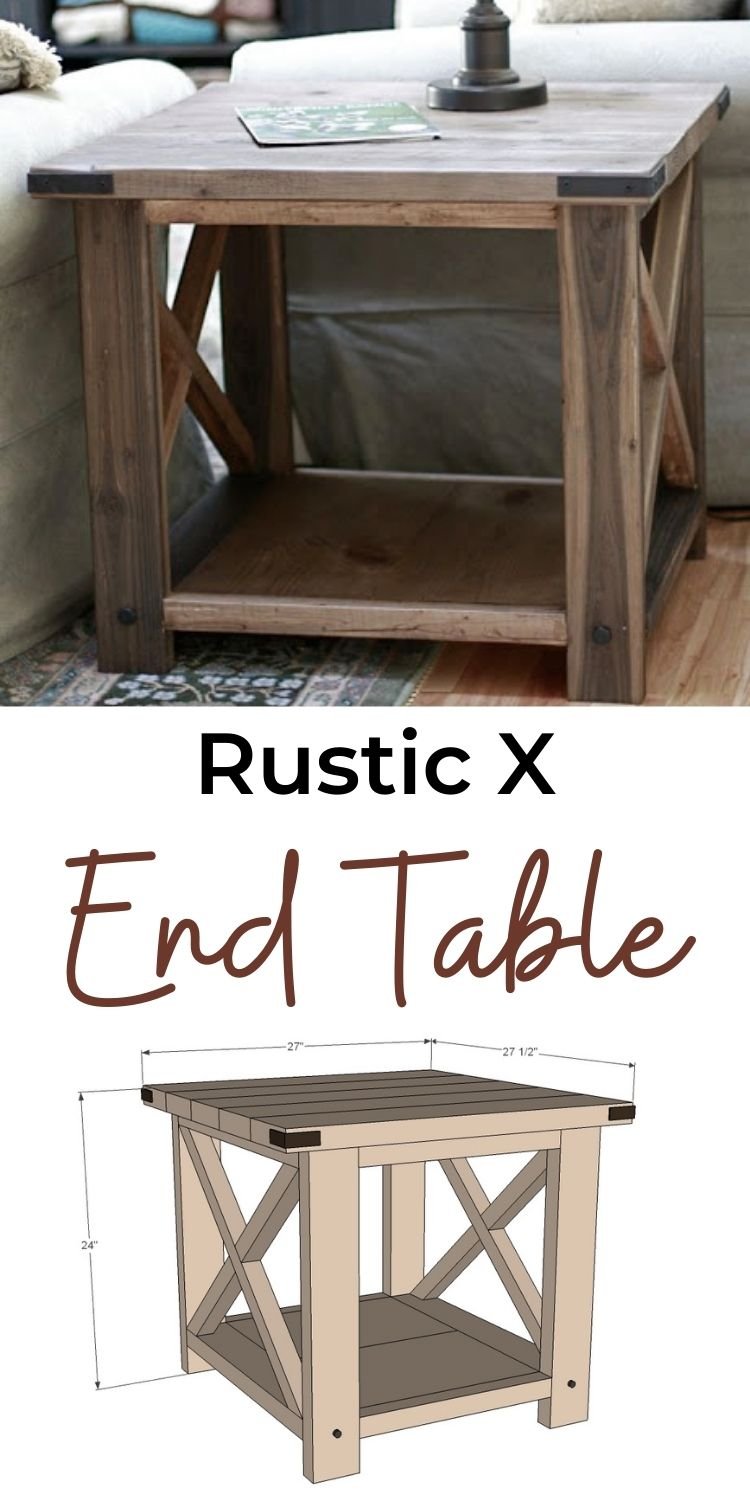
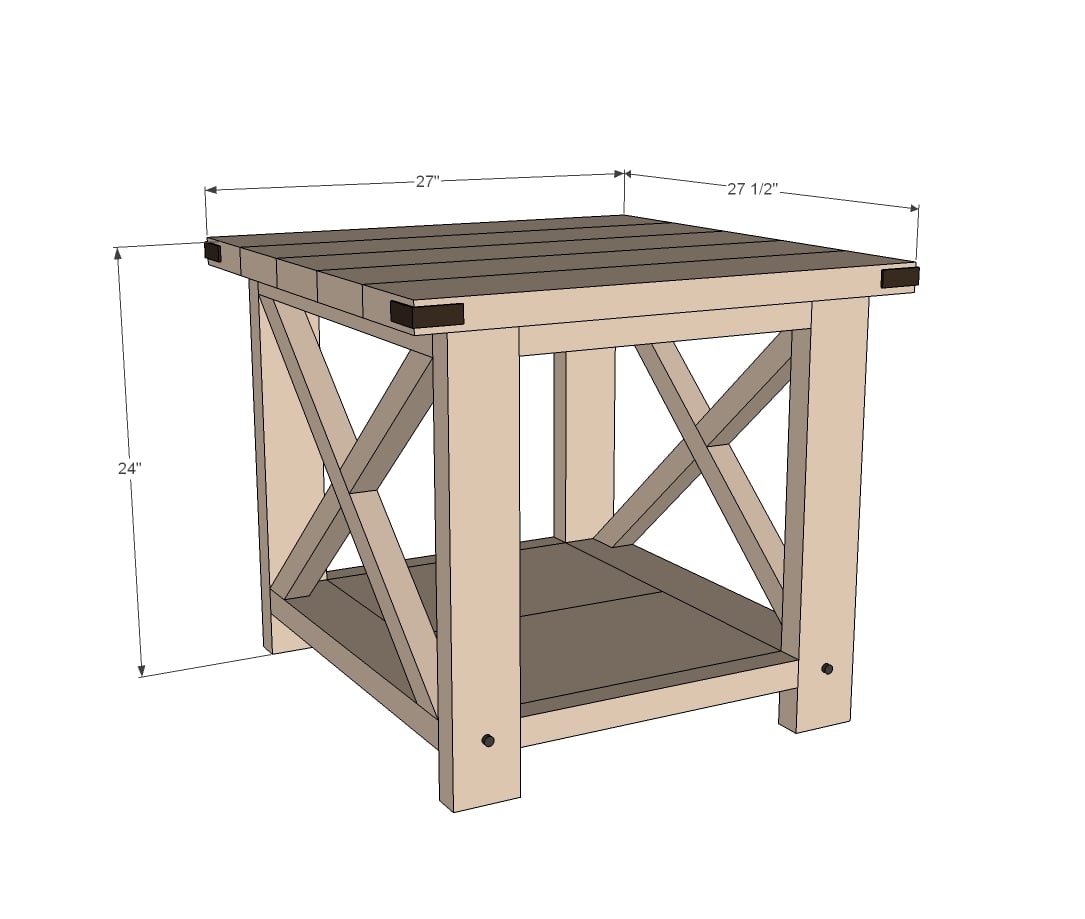
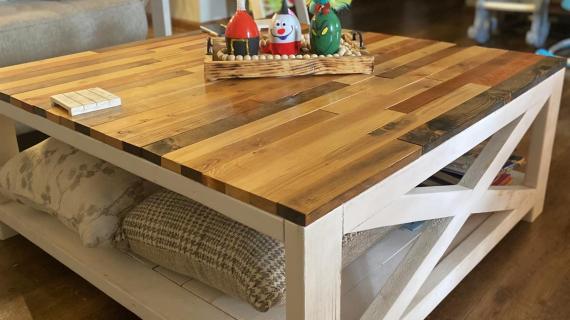
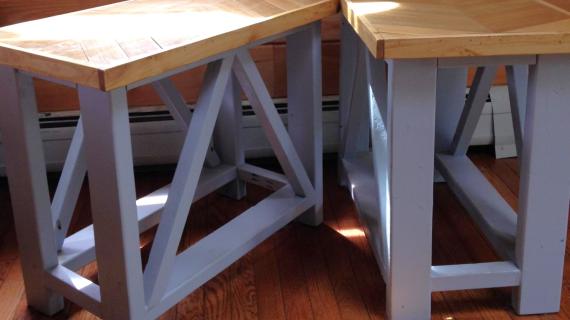
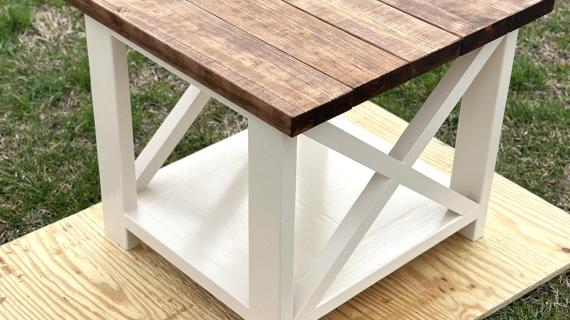
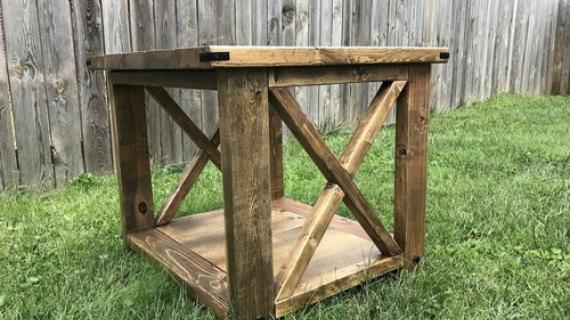
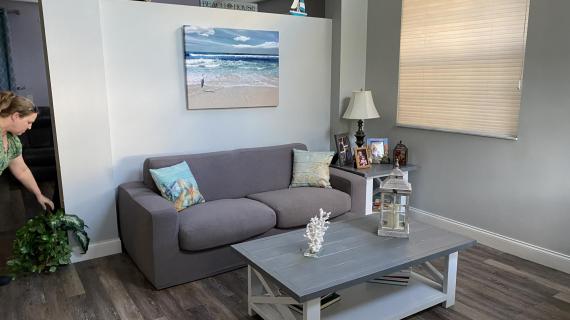
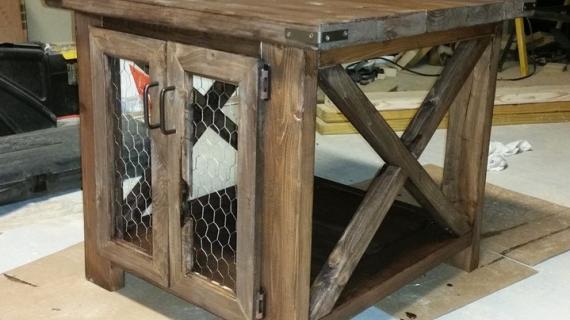
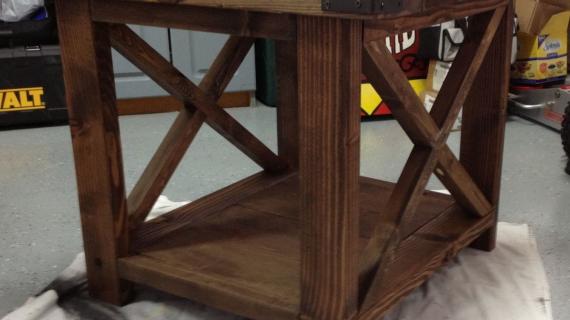
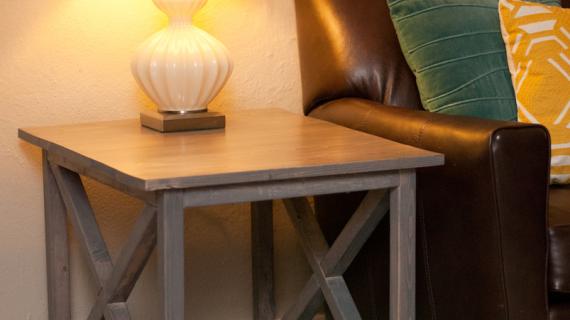
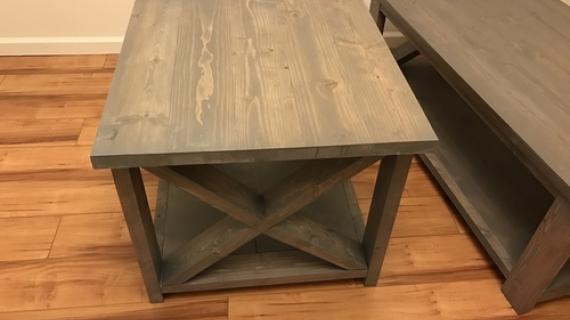
Build your own end tables! These gorgeous rustic style end tables are built from 2x4s and lumber. We love the large size and the open bottom shelf. Stain or paint any color. Our beginner friendly plans make it easy with step by step diagrams, shopping list and cut list.
Also in this Collection: Rustic X Console Table, Rustic X Coffee Table and Rustic X Bench Plans
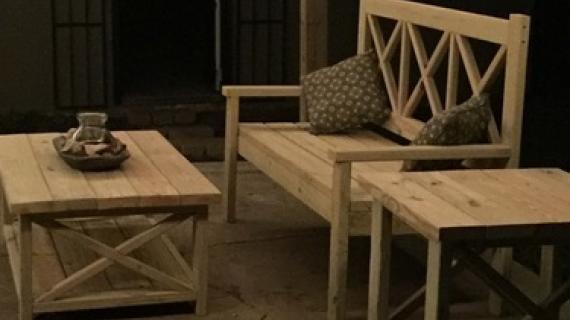
Rustic X Living Room Table Collection
This end table is part of a collection of living room furniture that you can build. All the plans are available for free for your use.
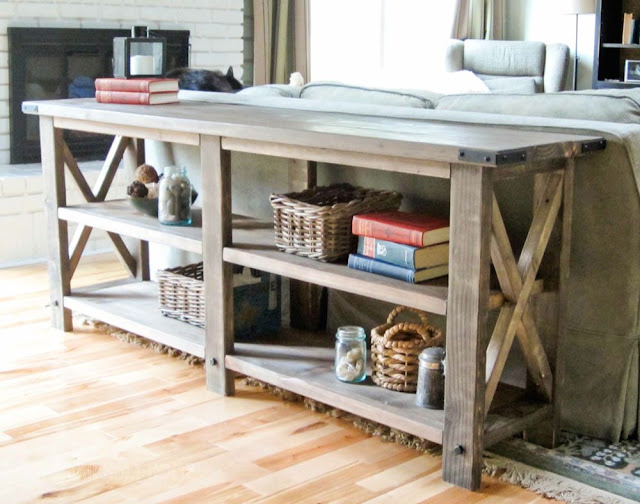
It all started with this beautiful X Console Table, built by Hillary from The Friendly Home.
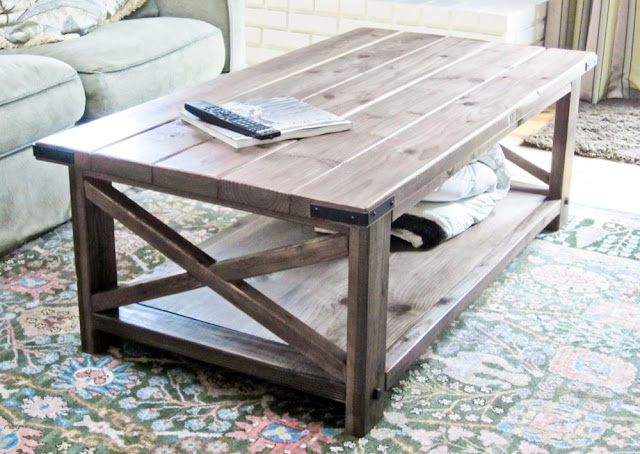
And then we added this beautiful Rustic X Coffee Table, also built by Hillary.
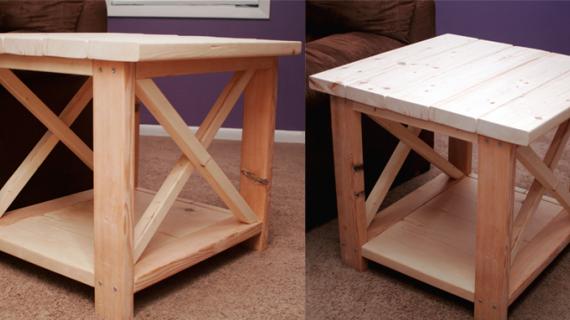
Now, Hillary used up her scraps and built X End Tables!

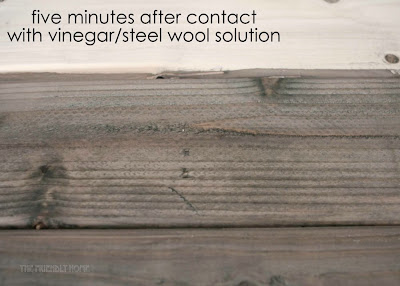
DIY Wood Finish
Hillary used a steel wool and vinegar solution to age her end table. Want the same finish? Get the step by step tutorial here.
Pin For Later!
Preparation
- 2 - 2x4 @ 8 feet long
- 1 - 1x12 @ 3 feet long
- 2 - 2x2 @ 8 feet long
- 2 - 2x6 @ 8 feet long corner bracket hardware decorative bolts
- 2 1/2" and 1 1/4" Pocket Hole screws
- wood glue
- 8 - 2X4 @ 22 1/2" - Legs
- 4 - 2X2 @ 16" - Trim
- 2 - 1X12 @ 16" - Bottom shelf
- 2 - 2X2 @ 26 1/2" (LONG POINT TO SHORT POINT, ENDS ARE PARALLEL, 50 DEGREES OFF SQUARE) *
- 4 - 2x2 @ 13 1/4" (Longest edge, one end cut at 50 degrees off square, other end cut at 10 degrees off square, see diagram) *
- 5 - 2x6 @ 27" - Top
*You may wish to trace and cut these in place


Please read through the entire plan and all comments before beginning this project. It is also advisable to review the Getting Started Section. Take all necessary precautions to build safely and smartly. Work on a clean level surface, free of imperfections or debris. Always use straight boards. Check for square after each step. Always predrill holes before attaching with screws. Use glue with finish nails for a stronger hold. Wipe excess glue off bare wood for stained projects, as dried glue will not take stain. Be safe, have fun, and ask for help if you need it. Good luck!
Instructions
Step 1
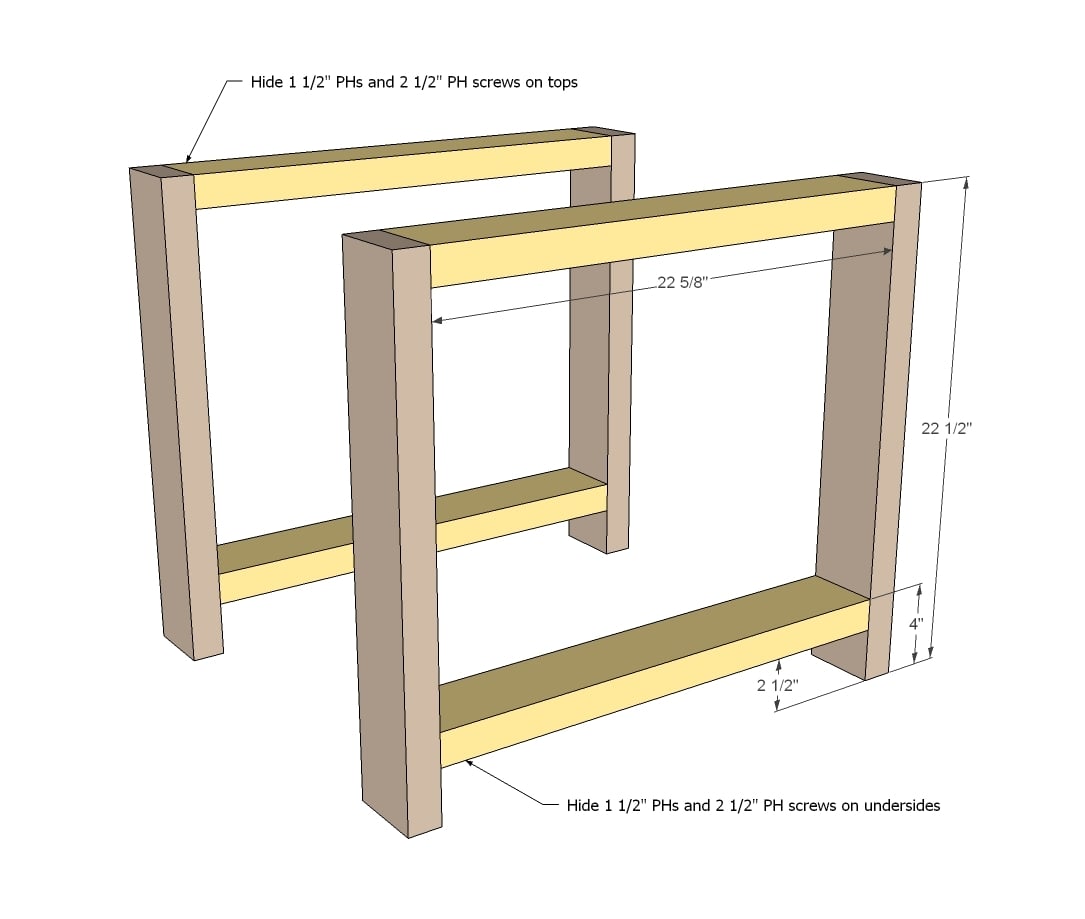
Start by building two ends as depicted in diagrams. You can also attach with countersunk 2 1/2" screws and glue.
NOTE: Yellow board width should be 22 1/2"
Step 2
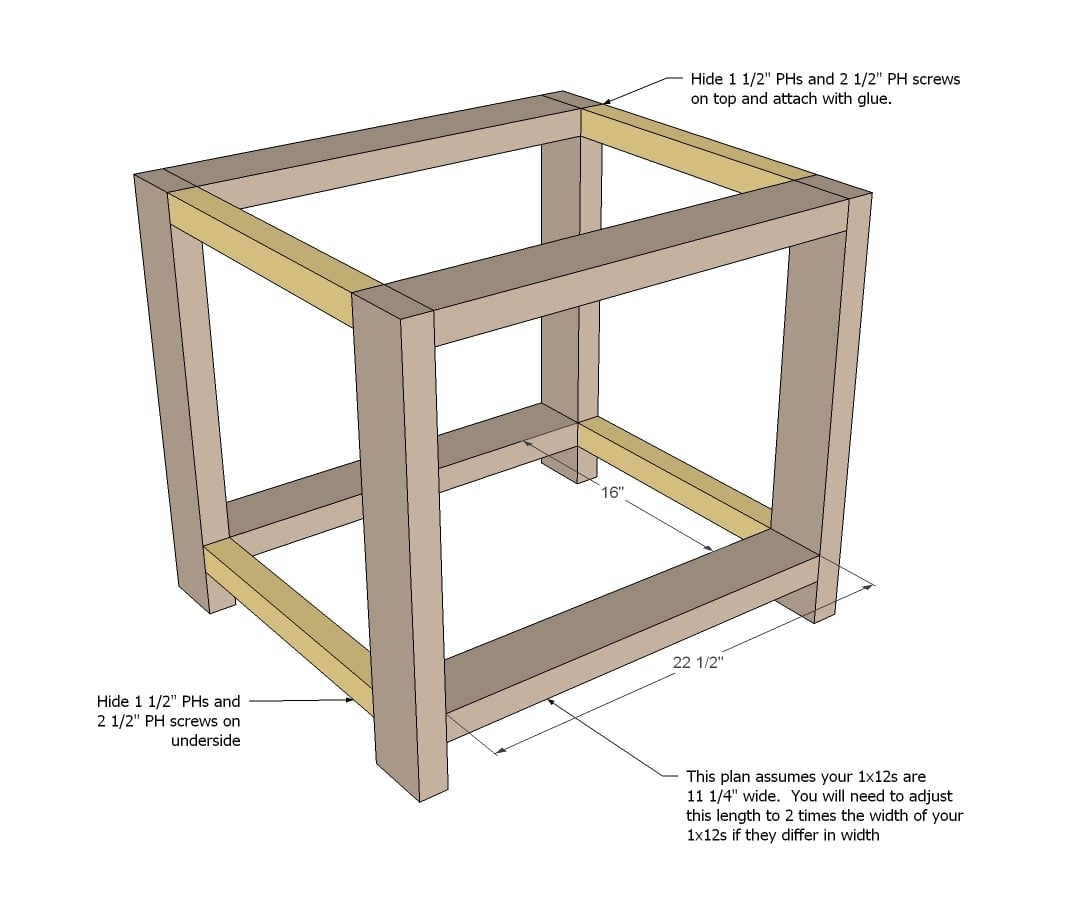
Next attach the 2x2 sides.
Step 3
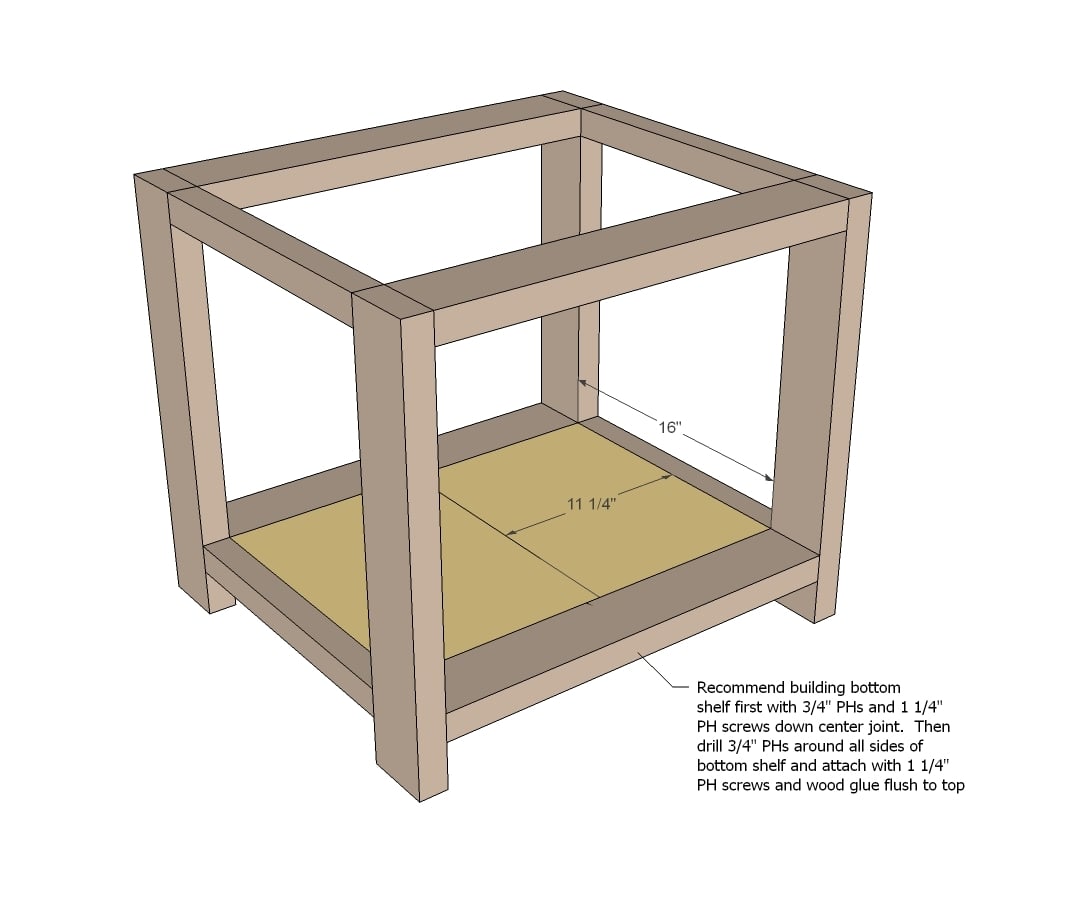
And then build your bottom shelf and attach to bottom of console.
Step 4
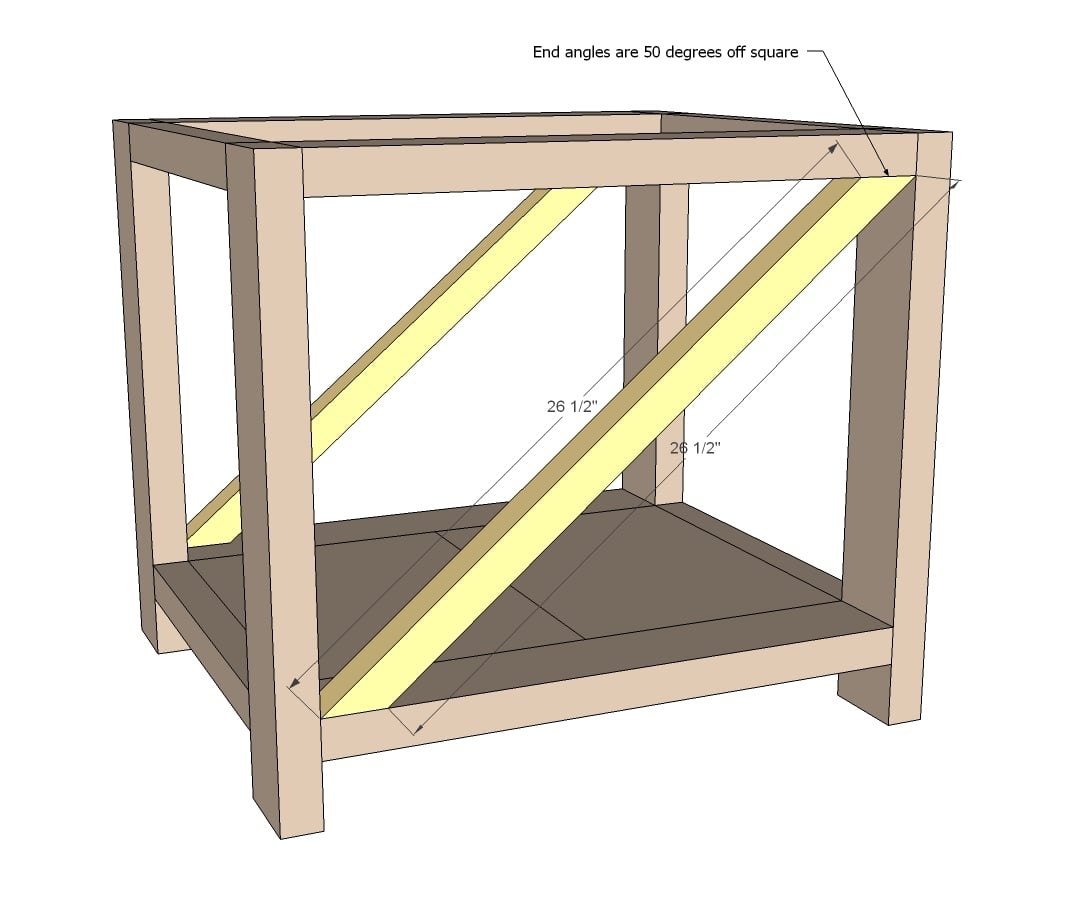
Now it's time to fit your cross braces. A standard miter saw should cut a 50 degree angle off square. If not, you will need to mark it with a square (remember 50 degrees is off square, so that means the angle off the board edge would be 40 degrees.
Another trick is to just hold the board in place, mark the angles, and cut. These aren't support boards or anything like that, so some glue and a few nails or countersunk screws from top/bottom will do the trick.
TIP: We recommend building the entire X first, the attaching the complete X inside the end table.
Step 5
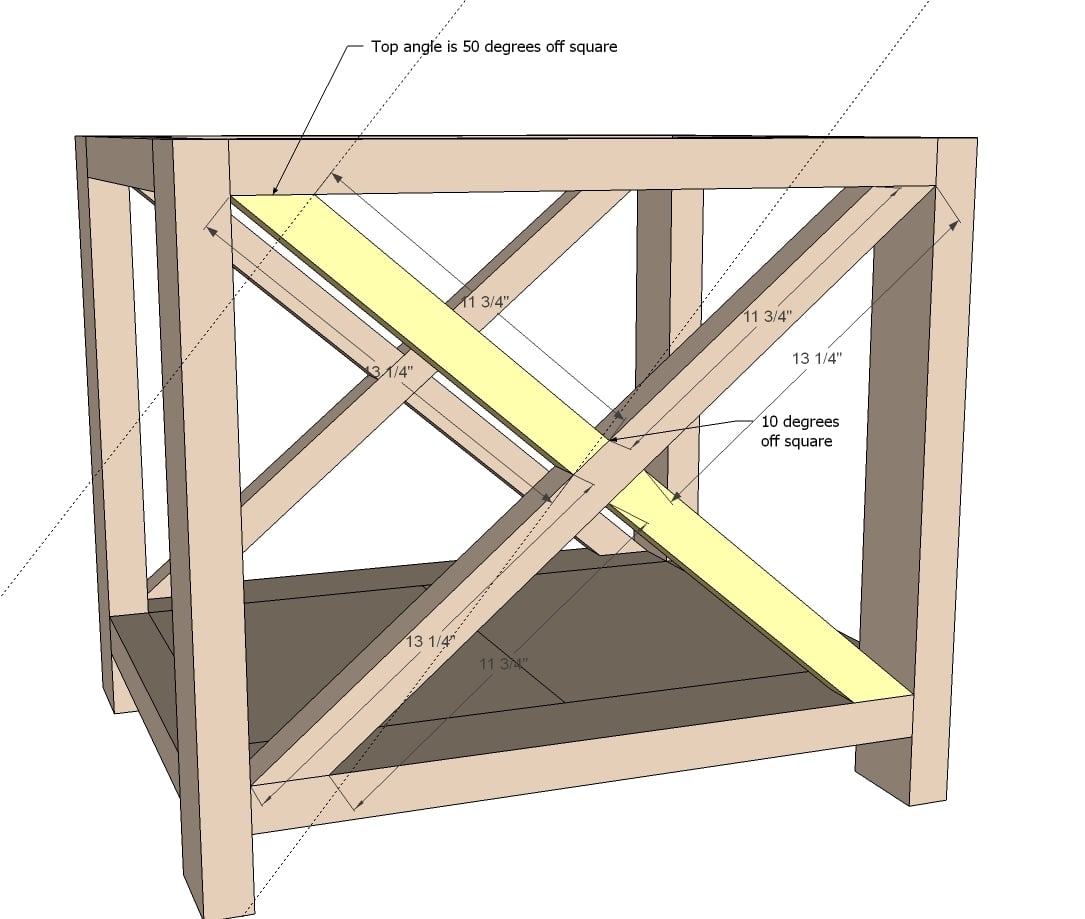
The smaller X pieces can be cut to fit. Attach with a 1-1/2" pocket hole and 2-1/2" pocket hole screw, one screw per joint.
Step 6
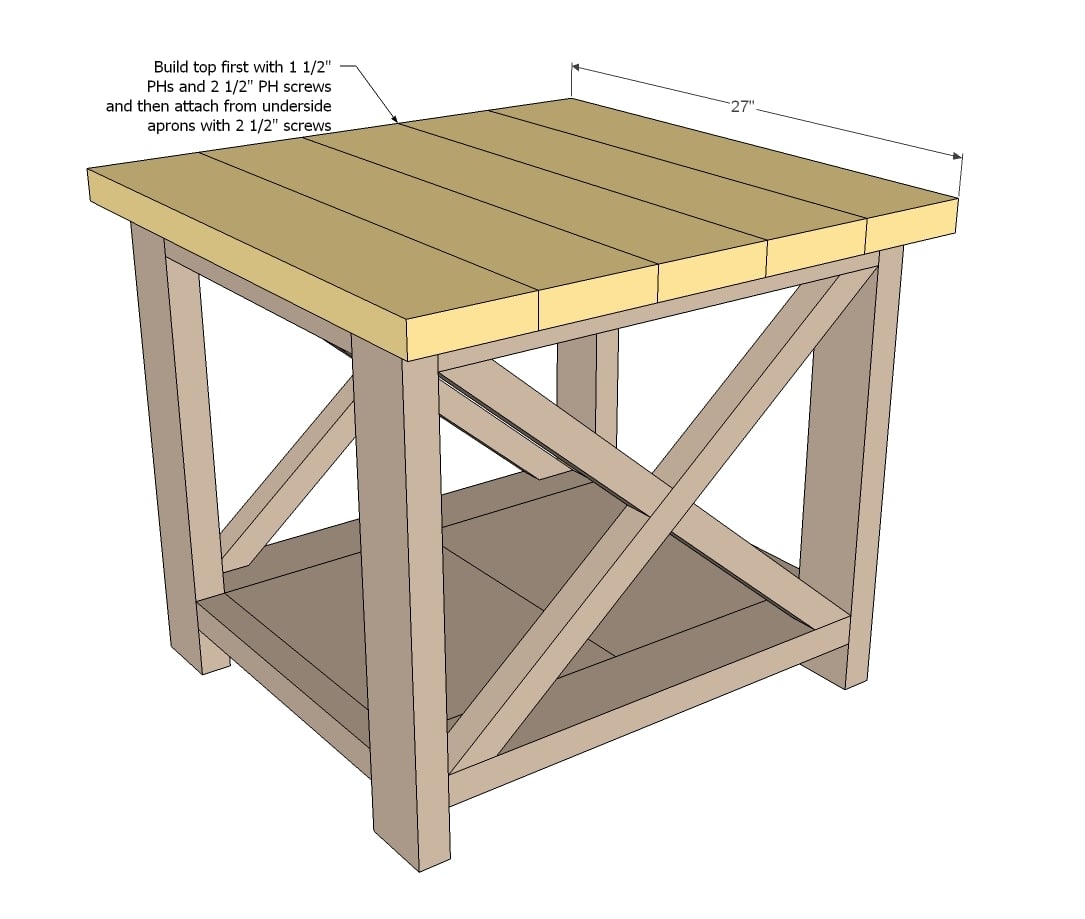
Next build your top ... and attach in place with countersunk 2 1/2" screws. If you have the PH screws on hand, I just use a few of those!
Step 7
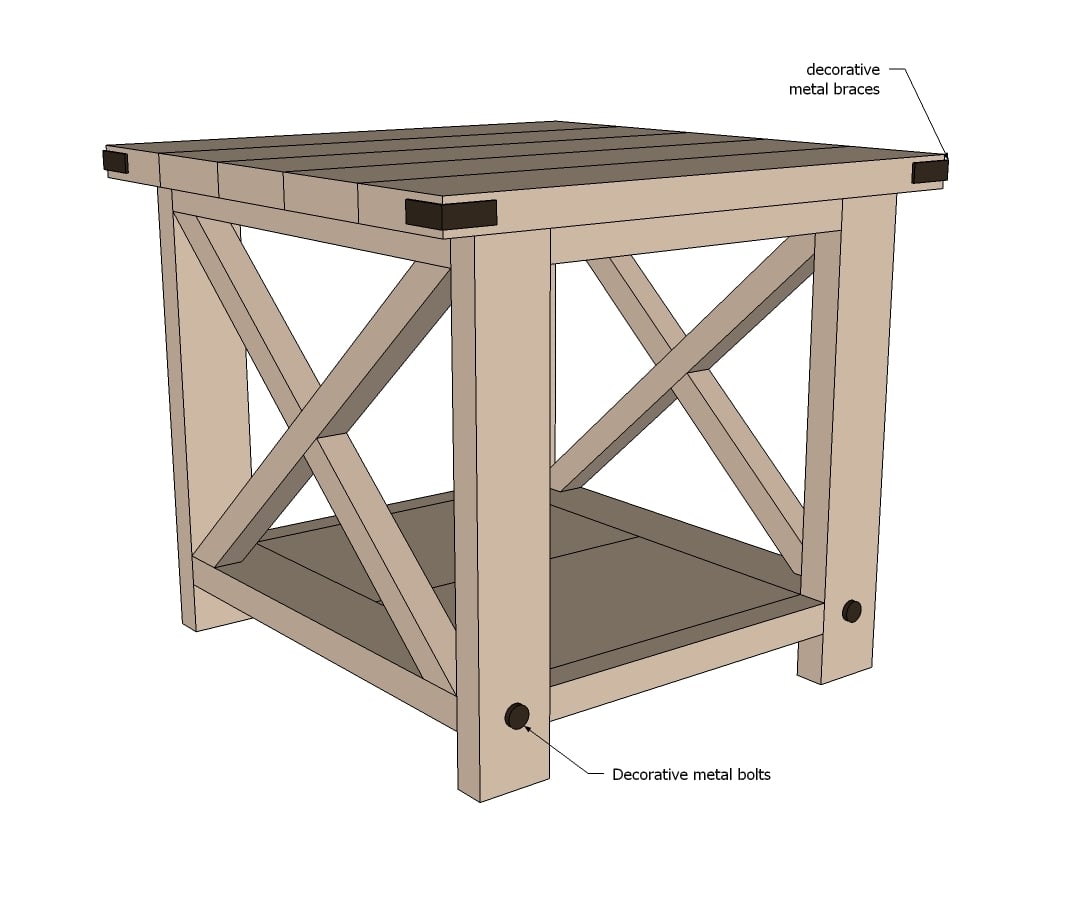
And then add the decorative hardware!
It is always recommended to apply a test coat on a hidden area or scrap piece to ensure color evenness and adhesion. Use primer or wood conditioner as needed.


Comments
brookifer86
Wed, 08/15/2012 - 13:33
Dying
I am DYING for your book! It feels like forever away. I'm so eager to get my hands on it so I can go lumber shopping ;) Just a few days ago I was musing, "I really need to get some nails." My husband quips, "You know, most girls mean a manicure. You're the only one I know who is talking about a nail gun!"
Richard6959
Sun, 06/14/2020 - 03:26
Looking for the DIY finish instructions.
The link to the DIY wood finish for this project no longer works, I have tried to use a steelwool and vinegar solution but keep getting inconsistent looks. Do you have the instructions for this finish?
brookifer86
Wed, 08/15/2012 - 13:39
Dining Table
While Hillary is at it, how about a dining table? ;)
Hillary (not verified)
Wed, 08/15/2012 - 15:38
That's a great idea! I'd love
That's a great idea! I'd love to do one!
In reply to That's a great idea! I'd love by Hillary (not verified)
brookifer86
Wed, 08/15/2012 - 15:41
Please DO!
I think we need to complete the set on this one ;) I've got no clue how this would translate into a dining table, but if anyone can do it, Ana can!
Hillary (not verified)
Wed, 08/15/2012 - 16:53
I agree! I can totally see it
I agree! I can totally see it -- with breadboards on the ends like a farmhouse table, 4x4 posts for legs with 2x4 Xs? And a stretcher.
Cheryl Lowery (not verified)
Thu, 08/16/2012 - 09:41
Whole Set??
And how about some lovely benches to go with that dining table...?
I would definitely build the whole Rustic X Collection!!
Darcy C
Sun, 07/28/2019 - 12:26
Hello
Hello!
I used the oxidizer finish, and was wondering how to seal it without darkening it. Any advice would be appreciated!
Darcy
Richard6959
Sun, 06/14/2020 - 03:27
Is there a new link to the DIY finish instructions?
The link to the DIY wood finish for this project no longer works, I have tried to use a steelwool and vinegar solution but keep getting inconsistent looks. Do you have the instructions for this finish?
Hillary (not verified)
Wed, 08/15/2012 - 14:02
Measure your sofa!
Just FYI for anyone thinking about building this to go next to a sofa...be sure to measure the height of the arms of your sofa first. I think my sofa arms might be abnormally high, and the table was designed to fit my sofa. You might need to take an inch or two off the legs to make it fit right. :)
Robohead
Wed, 08/15/2012 - 16:07
This is the one of the nicest
This is the one of the nicest end tables I've seen. Yet another item added to my to-do list.
Hillary (not verified)
Wed, 08/15/2012 - 16:54
Thank you! So kind.
Thank you! So kind.
Kate (not verified)
Wed, 08/15/2012 - 17:04
You're killing me with all of
You're killing me with all of the X furniture, I love it all so much! I'm actually considering modifying the design to create a changing table for my coming baby!
shastacoke
Wed, 08/15/2012 - 19:49
Oh my goodness!!!
I have been waiting for these side tables!!! Thank you, thank you, thank you!! I'm working on my farmhouse bed with the canopy. BUT, as soon as I am done with that I am totally starting on the X furniture. I just can't wait!! Thank you soooooo much!!!!
Anthonyjc
Wed, 08/15/2012 - 20:18
Looks amazing
I love this end table, I was wondering where you got the decorative corner bracket and decorative screws.
Hillary (not verified)
Thu, 08/16/2012 - 12:29
They're just regular
They're just regular L-brackets and hex bolts from Lowe's, spray painted black.
In reply to They're just regular by Hillary (not verified)
shastacoke
Fri, 08/17/2012 - 06:46
Nice!!
That is very clever. Thanks for dishing out the secret. :)
Sunny Espanet (not verified)
Wed, 08/15/2012 - 21:00
How about an X kitchen island!?!?!?!
Loving the X furniture! Keep up the beautiful work!
Hillary (not verified)
Thu, 08/16/2012 - 12:27
Great idea! I'd love to build
Great idea! I'd love to build one!
Michelle P (not verified)
Fri, 08/17/2012 - 20:22
I was hoping you would post this!
I recently started the coffee table. Its my first furniture project so I'm taking my time. I am planning on making the console table as well and now end tables! Very excited, thank you!
Dan rondo (not verified)
Sun, 08/19/2012 - 18:25
what type of wood to use for these X tables
hey just curious what type of lumber i should use for this? preasure treated, kiln dried, etc.?
Hillary (not verified)
Tue, 08/21/2012 - 22:57
Definitely not pressure
Definitely not pressure treated -- no need for that. The drier the better. You can tell the moisture content by how cool the wood is to the touch and/or by how heavy it is. Look for the straightest wood you can find, but the wood called for in these plans is pretty rough stuff so you may have to go through quite a few boards to find ones you're happy with. It's stud-grade wood, not wood that is meant to be made into furniture.
Clinton (not verified)
Sun, 09/09/2012 - 18:56
Step 6
This will be my very first furniture project. This design is awesome! In step 6 it says build top first with 1 1/2 Ph ( does ph mean phillips head?). What does build top first mean? Combine the 1x6's to themselves and then attach to table? If so what technique do you use to combine them to one another?
MrsGig
Sun, 09/09/2012 - 20:46
Step 6
PH = Pocket Holes. One great tool to add to your toolkit is a pocket hole jig. Kreg makes several nice sets, and I have the Kreg Jr., which has been very handy on a number of benches, odd jobs, and deer blinds. It has been well worth the money.
Where it refers to 1 1/2 PH - that is refering to the size screws for the pocket holes. You use the pocket holes and screws to join the 1x6's together.
Clinton (not verified)
Mon, 09/10/2012 - 08:50
Step 6
Thank you for the quick lesson. Looks like I will be picking up the kreg tool from lowes. The pocket holes for the 1x6. If I take two boards and lay them next to each other I will drill the pocket hole along the seam? Do that until all are joined and then attach to top by screwing along apron from underneath? Ok I believe last question. The bottom shelf you will join together by pocket holes along Sean similar to 1x6? Then pocket holes along outer from underneath?
Clinton (not verified)
Mon, 09/10/2012 - 08:55
Step 6
Thank you for the quick lesson. Looks like I will be picking up the kreg tool from lowes. The pocket holes for the 1x6. If I take two boards and lay them next to each other I will drill the pocket hole along the seam? Do that until all are joined and then attach to top by screwing along apron from underneath? Ok I believe last question. The bottom shelf you will join together by pocket holes along Sean similar to 1x6? Then pocket holes along outer from underneath?
MrsGig
Mon, 09/10/2012 - 21:18
Step 6 continued
Yes, you have the concept down.
MrsGig
Tue, 09/11/2012 - 03:06
Step 6 continued
Yes, you have the concept now. I would suggest watching a few videos on the Kreg site or check Ana's videos. Also try it out on scrap wood once you have your jig..
Jon (not verified)
Wed, 09/12/2012 - 17:28
STEP 5
Hi!
I was wondering you could elaborate on securing the smaller pieces of the X. It says to attach the screws out of site but where would that be?
I can't seem to see where they are screwed in the picture (which is a good thing I guess!)
Any input would be much appreciated!
Thanks!
Hillary (not verified)
Sun, 09/23/2012 - 11:46
Hi, Jon. I just attached the
Hi, Jon. I just attached the x pieces using screws wherever I could reach. For me, that was on top of the top x pieces and on the underside of the bottom ones -- I think I flipped the table over to do the bottom ones. I also used dark screws for that, so that they wouldn't be obvious. You can find them if you're looking for them, but they don't stand out. A pneumatic nailer would probably be better, but I didn't fee like firing up my air compressor!
Kris Taylor (not verified)
Sat, 09/15/2012 - 08:10
warped top??
I have made furniture before, however the top warped.. What kind of wood are you using for this project? How do you get your projects from warping?? Any help would be great!
Thanks!!!!
Hillary (not verified)
Sun, 09/23/2012 - 11:51
I've actually not had that
I've actually not had that problem unless the wood I bought was already warped. I'm pretty picky about what I bring home, especially if it is for a project that isn't meant to look rustic.
Buying the driest wood you can find will help. If it is cool to the touch and if it is especially heavy, it is still wet. Sometimes only wet wood is available, especially when you're buying 2x4s and 2x6s like for this project. Also, I think center-cut boards are supposed to warp less? Looking at the end grain to see the growth pattern can sometimes give you a clue. That would be a good thing to Google -- I know there is lots of info out there about it. Good luck!
Kris Taylor (not verified)
Tue, 10/02/2012 - 12:00
I have never used a Kreg Jig
I have never used a Kreg Jig before, but I just bought one. So with good wood and the kreg.. maybe it wont warp... Thank you so much!
Hillary (not verified)
Tue, 10/02/2012 - 13:47
Fantastic! I can't wait to
Fantastic! I can't wait to hear how it goes.
In reply to I have never used a Kreg Jig by Kris Taylor (not verified)
Jake
Tue, 10/02/2012 - 17:03
Using a Kreg Jig
You will love the Kreg Jig. When I first got mine I was confused but watched a video on the Kreg site and the heavens parted. I was drilling PHs today with the jig and got to thinking how many times I have used it and asking shouldn't it be worn out? Just one point and that is to make sure your pieces are securely in place (clamped) as the pocket hole screws can produce a lot of torque and all of a sudden you are out of line. You may also experience one piece moving away from the other as you drill the screw but keep going and they will come together nice and tight. My shelf pin jig should arrive tomorrow and I can finish my version of Ana's four cubby bookshelf.
Kris Taylor (not verified)
Sat, 10/20/2012 - 19:20
Thanks so much for the
Thanks so much for the tips!!! Cant wait to find time and get it started!! Thanks again!
Jake
Sun, 11/04/2012 - 17:28
X-End Table without the X
I love the shape, weight of 48 lbs, size and ruggedness of this table. Built it but left off the Xs because I just could not get them right. Not yet finished so no BRAG yet. I would like to add a photo of the unfinished table here but apparently you cannot. I think I will add 2x2s to enclose the bottom shelf and add ceramic tile to the shelf. Just a thought at the moment.
Hillary (not verified)
Wed, 01/02/2013 - 22:09
It sounds great, Jake! Can't
It sounds great, Jake! Can't wait to see the brag post!
In reply to It sounds great, Jake! Can't by Hillary (not verified)
Jake
Thu, 01/03/2013 - 04:14
My Version of the X-End Table
I hope this link works to my version of the x-end table:
http://ana-white.com/2012/11/x-end-table-without-xs
A Angel (not verified)
Tue, 12/04/2012 - 07:54
Hex bolts
How do you attach the Hex bolts?
Hillary (not verified)
Wed, 01/02/2013 - 22:10
Just drilled a 1/2" hole and
Just drilled a 1/2" hole and glued them in. :)
Elisha (not verified)
Wed, 01/02/2013 - 22:05
I just made two of these side
I just made two of these side tables yesterday and it was simple, quick and they look fantastic. So excited to have somewhere to tuck away the kids toys. Thank you for the great plans!
mainman38
Mon, 04/29/2013 - 22:00
Hardware
Can someone point me in the right direction where to get the decorative bolts and the corner brackets in black or any decorative type of color.
In reply to Hardware by mainman38
Jake
Tue, 04/30/2013 - 04:23
Kennedy Hardware
You will not find much at Big Blue or Big Orange so the best way is to check the internet. I use a firm called Kennedy Hardware. They have a great selection but you have to order enough to justify the shipping charge. www.kennedyhardware.com
Gibson_J45
Fri, 09/20/2013 - 15:15
Decorative Hardware
The hardware are just standard bolts and L-brackets that have been painted black. See below excerpt from "The Friendly House":
"There are two kinds of decorative hardware on the table. Down at the bottom of each leg is a 1/2" x 1" hex bolt, available for under fifty cents each at hardware stores. To attach them, I drilled 1/2" holes in the table legs where I wanted the bolts to go and then used wood glue to keep the bolts in the holes. The brackets at the top are simple L-brackets that cost a few bucks each. They don't come with screws -- I used #8 one inch screws to attach them to the corners of the table. Both the bolts and the brackets came in a shiny steel finish which I sprayed with flat black spray paint. Once the corner brackets were attached, the heads of the screws were painted with the same black paint,"
http://thefriendlyhome.blogspot.com/2012/07/oxidized-x-coffee-table.html
mainman38
Tue, 04/30/2013 - 14:42
Thank you
Appreciate it
mainman38
Tue, 04/30/2013 - 14:42
Thank you
Appreciate it
mainman38
Tue, 04/30/2013 - 14:44
one more question
what did you look under on the kennedy website
mainman38
Tue, 04/30/2013 - 14:44
one more question
what did you look under on the kennedy website
Jake
Tue, 04/30/2013 - 15:26
Kennedy Hardware
Well I just looked through the electronic catalog until I found what I was looking for. There are other sites that offer special hardware so just do a search. Some are really expensive so look around.