

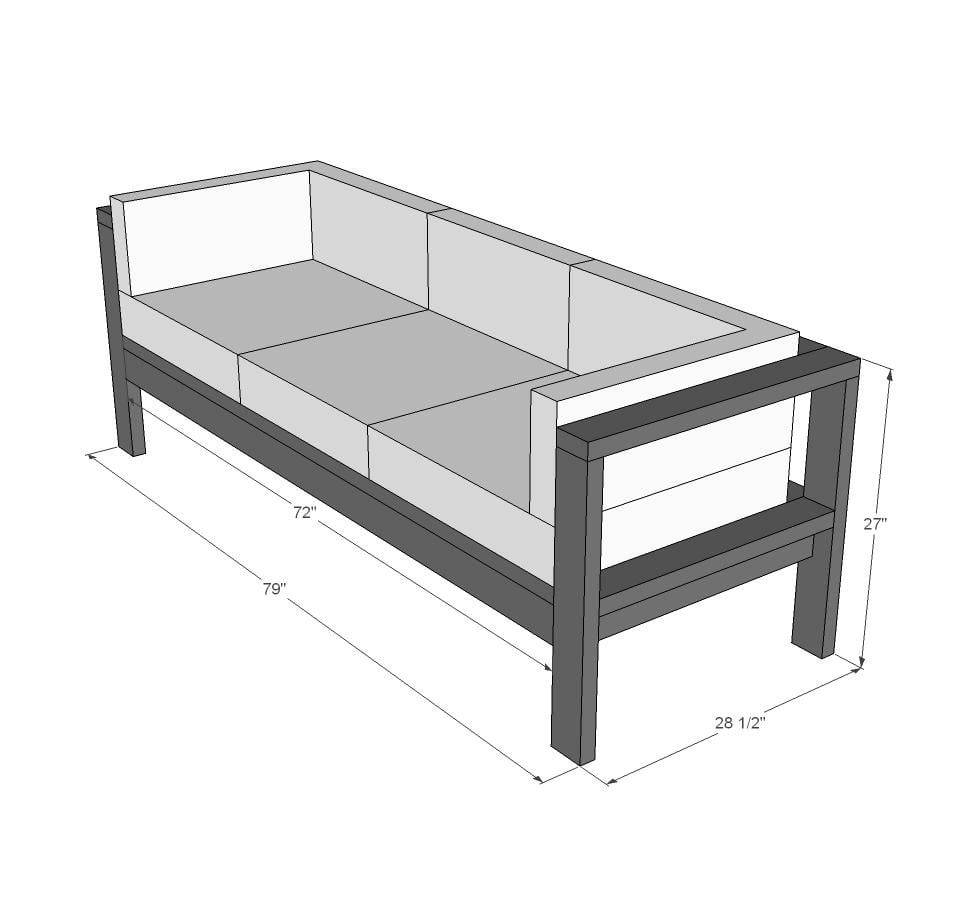
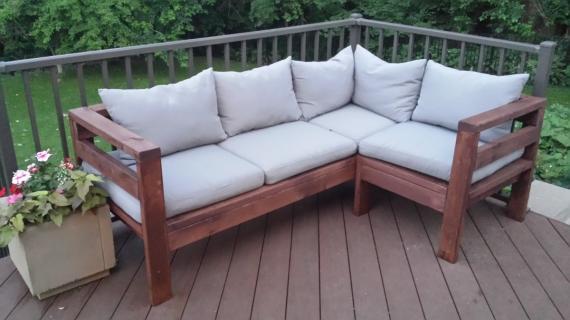
Build your own outdoor sofa with just 11 2x4s. Ana White plans include step by step diagrams and shopping and cut list.
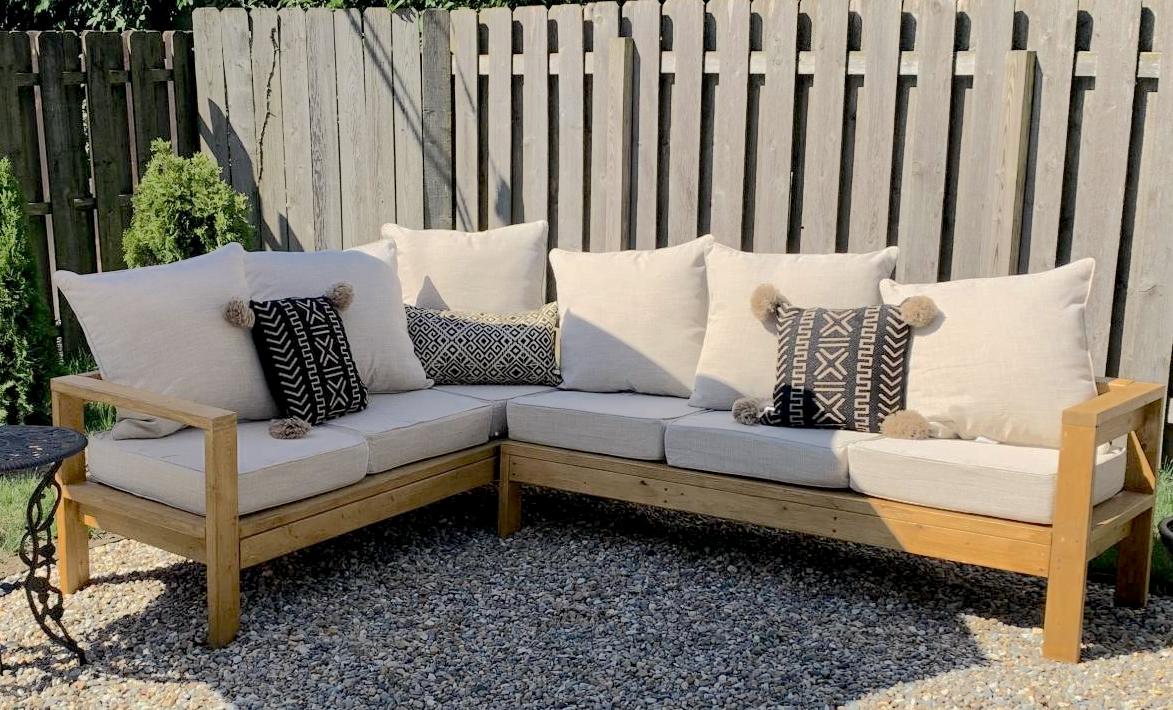
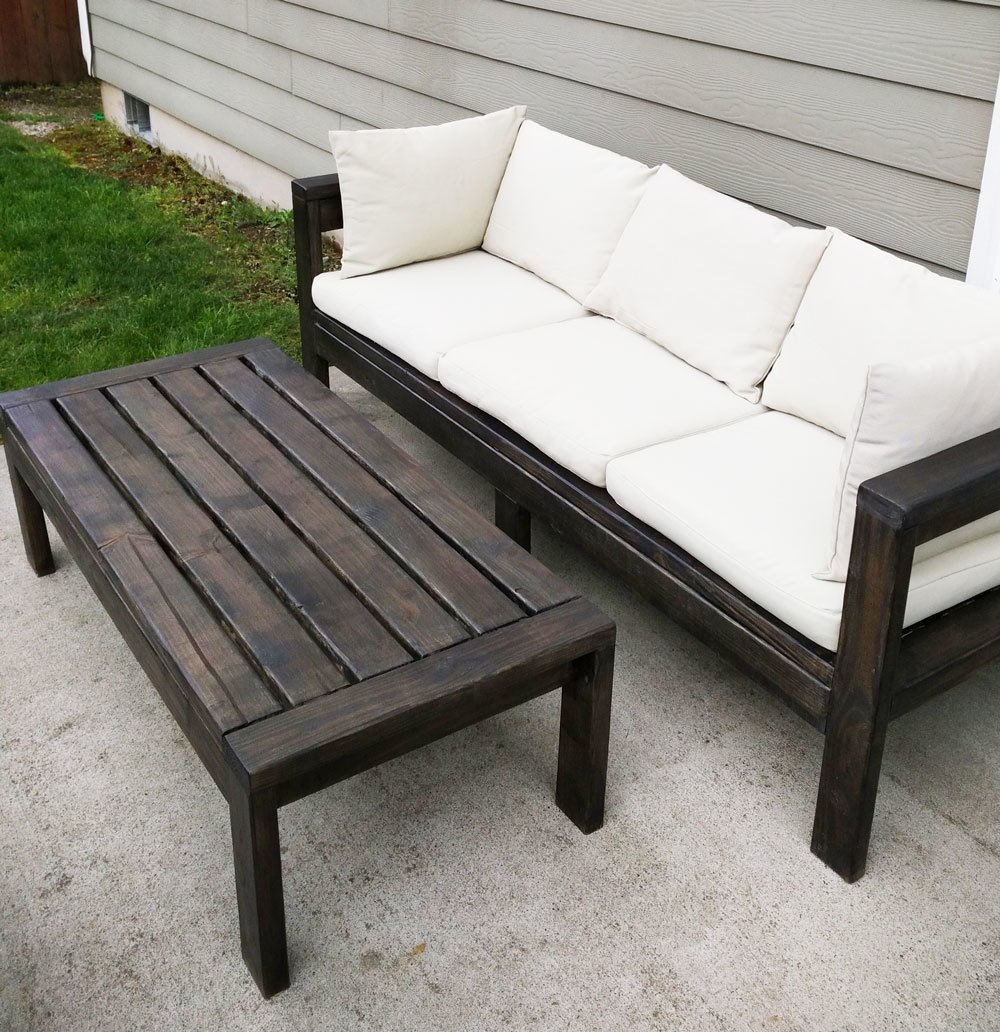
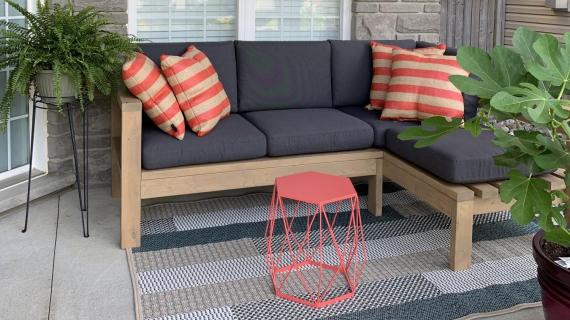
We also have a plans to convert this sofa to an outdoor sectional, a matching outdoor coffee table plan, and outdoor wood finishing secrets.
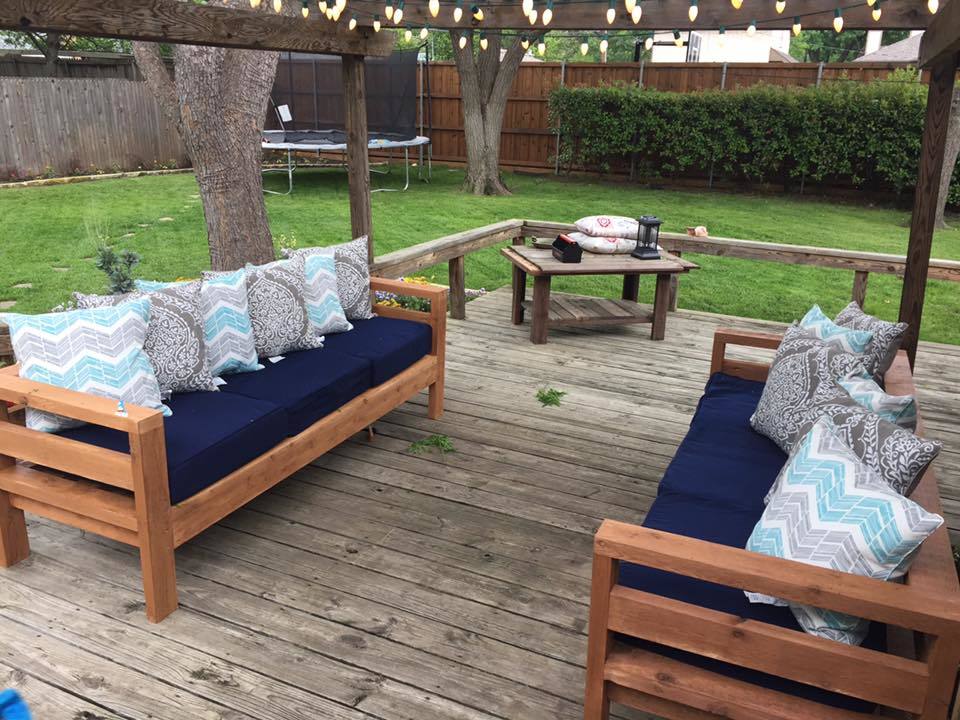
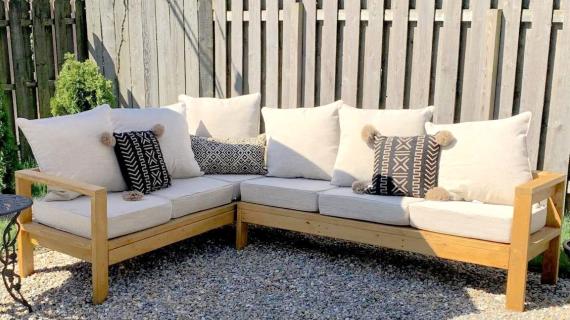
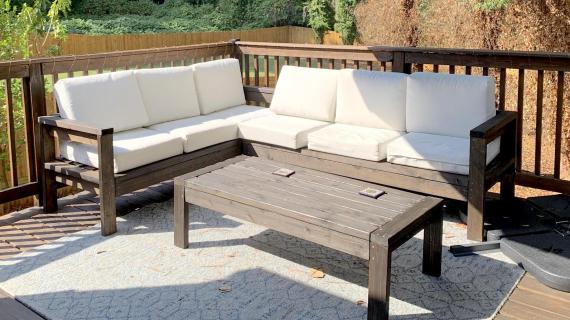
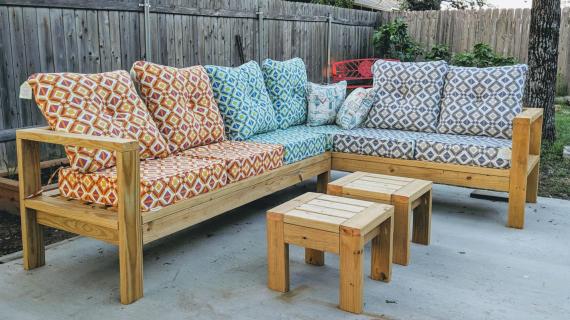
This simple plan is the foundation for amazing seating in your outdoor space. Easy to build and customize, designed for standard size cushions, this is one of our most popular plans for good reason.
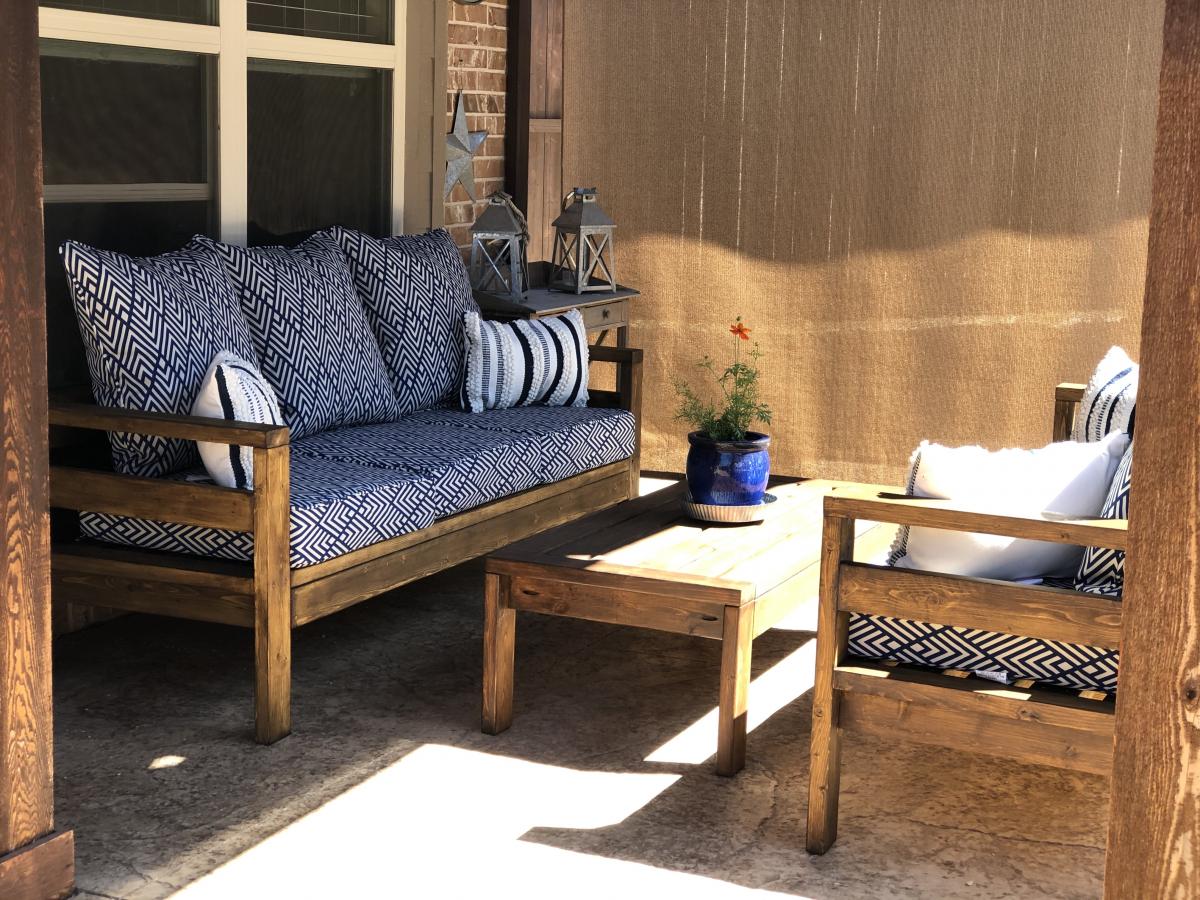
photo by 14ERMOM
More Plans in this Collection / Sectional Pieces
Turn your outdoor sofa into a sectional with these plans:
We also share our outdoor wood finishing secrets in this post.
Here's Some Tips to Build Better Outdoor Furniture
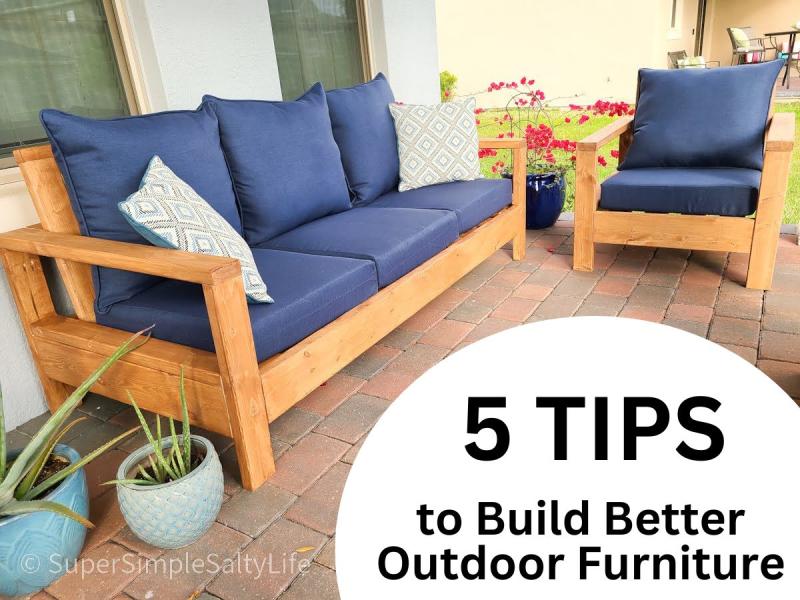
Want to build better outdoor furniture? Over the twenty years I've been building, maintaining, and enjoying my own outdoor furniture, I've learned a few tips that can help build longer lasting furniture.
Pin For Later!

Preparation
- 11 - 2x4x10’ (prefer cedar boards)
- 3 - Deep Seat Cushions, 24" x 24" x 4-5" deep, with matching pillows
- 150 - 2-1/2” to 3" long, self-tapping exterior decking screws (#8, #9 or #10 will all work)
RECOMMEND: Build to suit cushions.
9 - 2x4 @ 72” (or cushion width x times 3)
13 - 2x4 @ 25-1/2” (or cushion depth plus 1-1/2")
2 - 2x4 @ 28-1/2” (or cushion depth plus 4-1/2")


Instructions
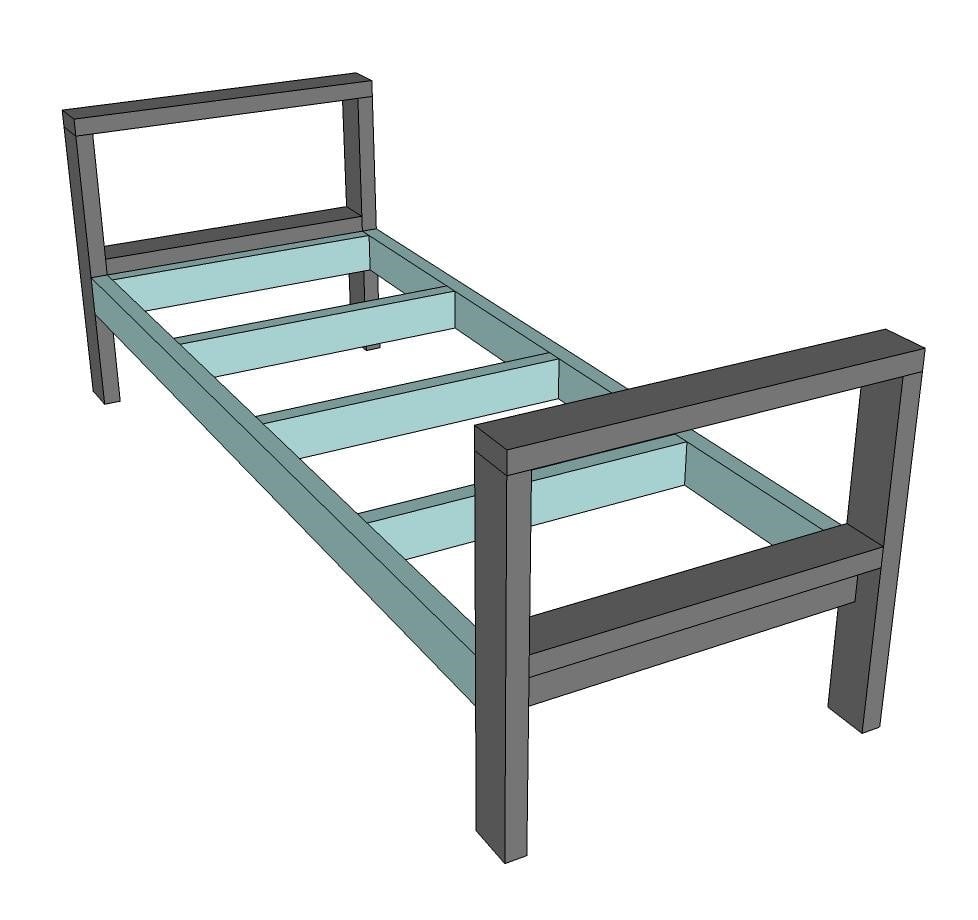
Step 1
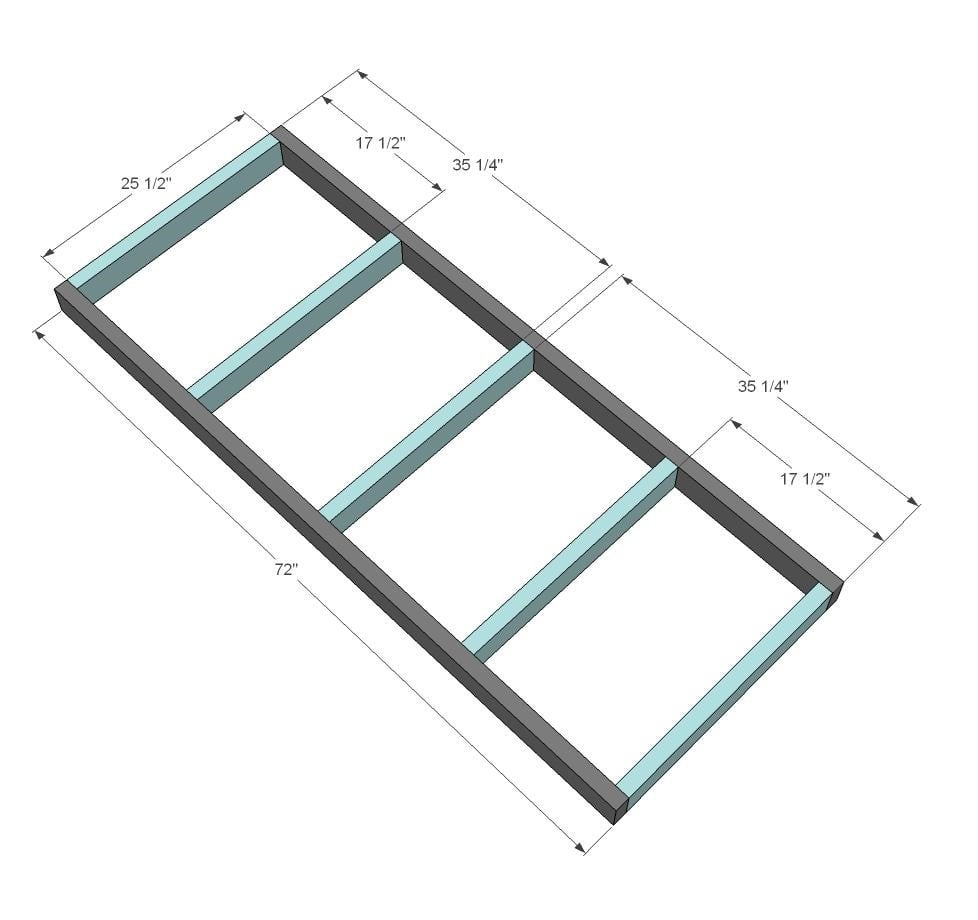
Cut the seat framing boards with compound miter saw or similar.
Screw together with self tapping screws.
Step 2
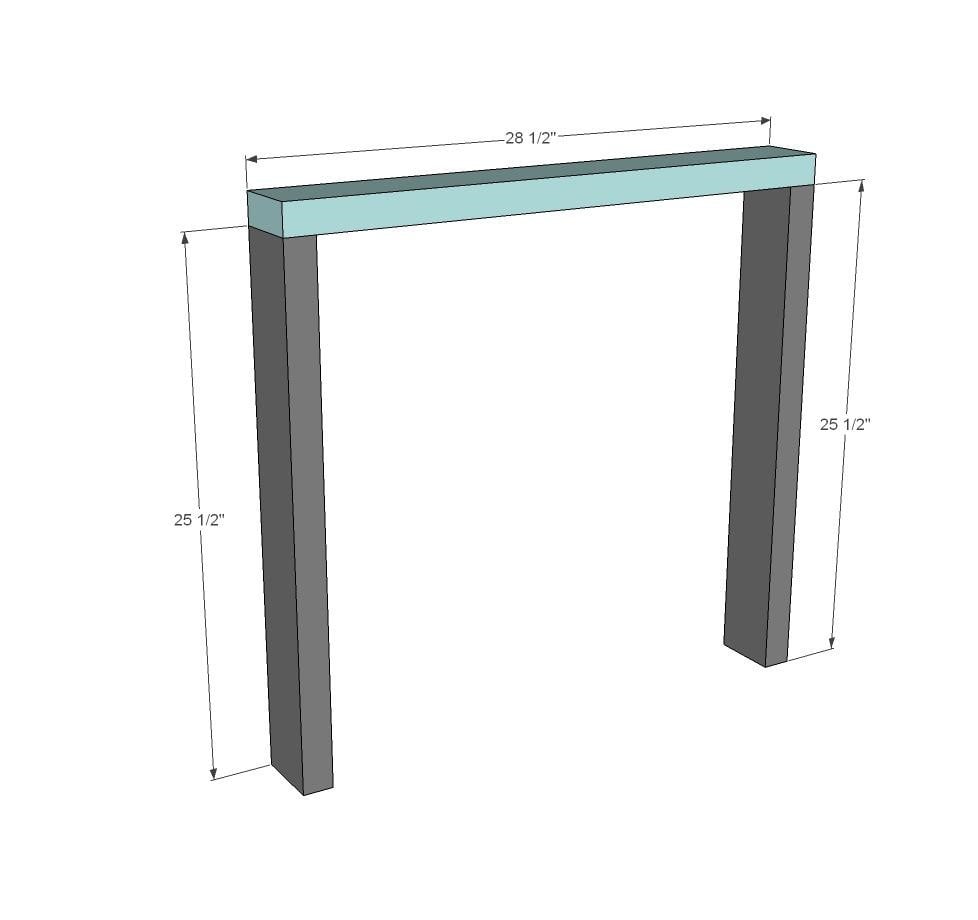
Now for the arms.
Cut the boards.
Attach longer 2x4 to two of the shorter 2x4s with screws.
Step 3

Screw together with screws.
Step 4
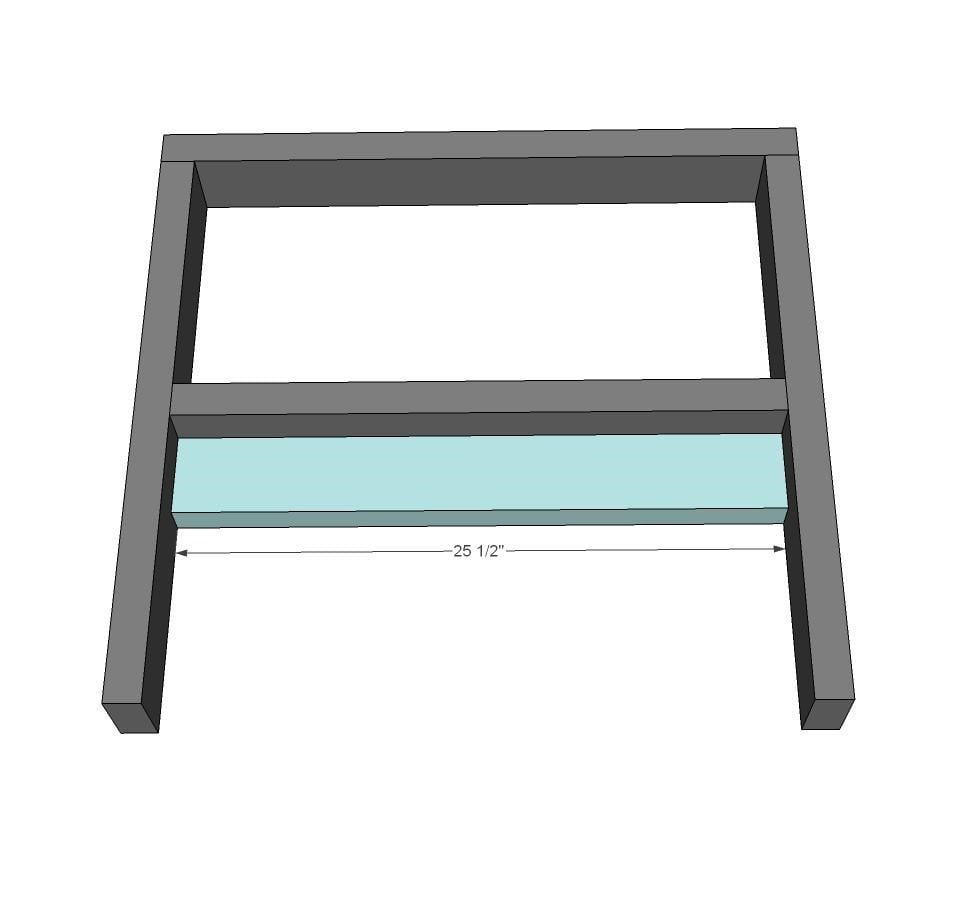
Screw together with screws, also attach to board from step 3.
Step 5
Step 6
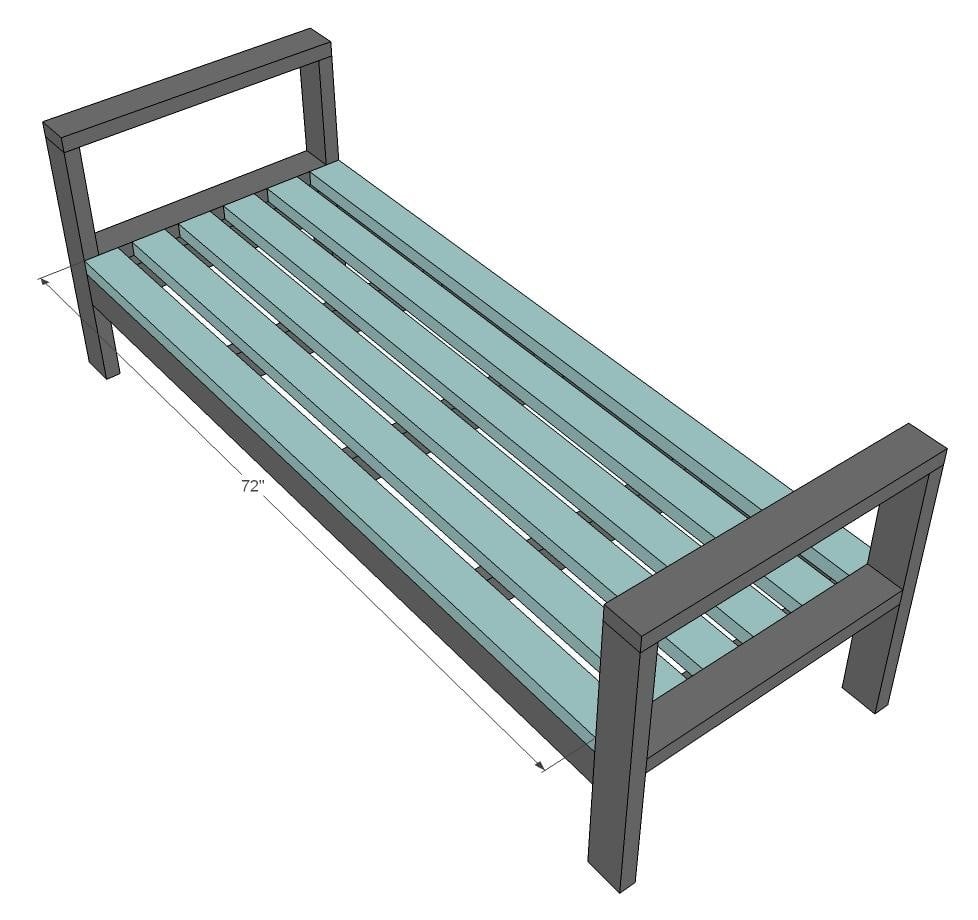
Attach seat boards to top of seat frame with 2-3/4" screws.
Step 7
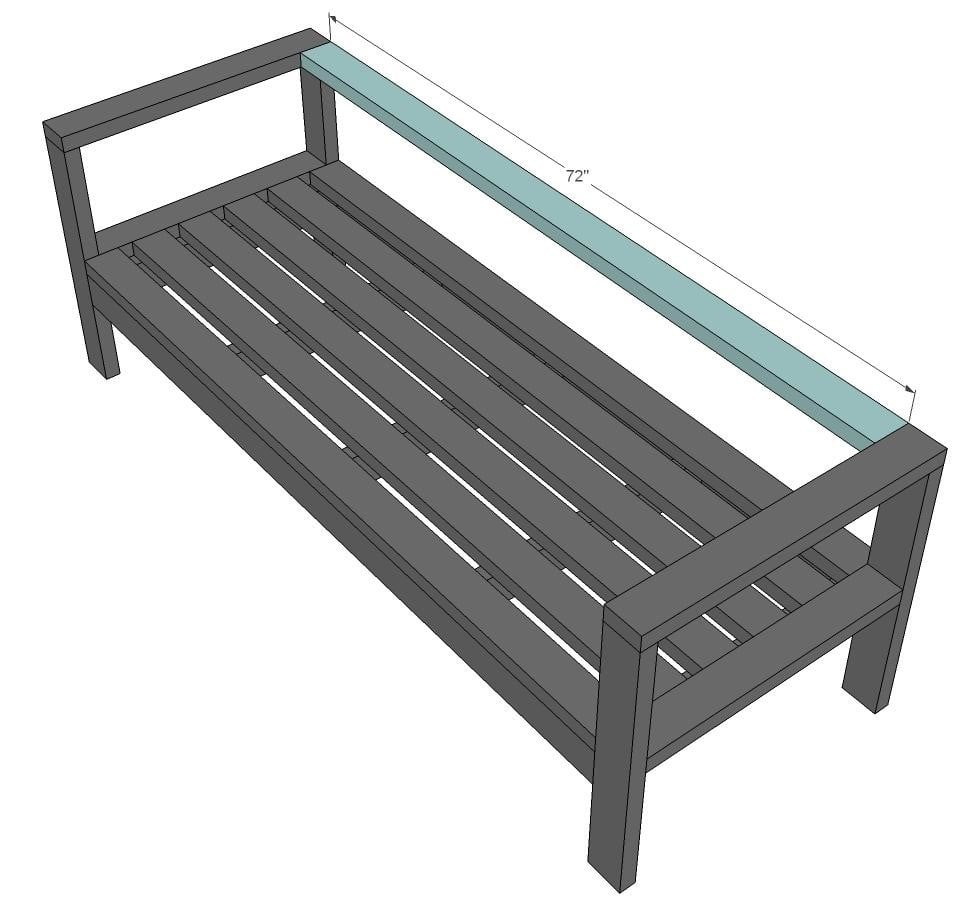
Screw back piece at an angle into the arms with 2-3/4" screws. You can also use pocket holes.
Step 8
Some builders add a middle row to the back/sides to help keep cushions in line.


Comments
RASMALICE
Fri, 05/24/2019 - 08:11
cut list for 2x4 sofa
Hi! I previously made two of these sofas into a sectional (amazing, easy, everyone loves them) and I'm planning on adding a third this weekend to make a u shape sectional. My question is: Do you have a cut list for the 11 2x4's? I used more than 11 each time. and I also had alot of waste...
In reply to cut list for 2x4 sofa by RASMALICE
Ana White
Fri, 05/31/2019 - 12:25
I'm so glad to hear! Maybe…
I'm so glad to hear!
Maybe try cutting all your long cuts first (the 72" ones) and then from the scrap pieces, cut the shorter arm/legs pieces
Steph84
Mon, 08/05/2019 - 00:58
HELP!!!!
Hey Anna just a quick one , how many 2x4s do I need to build both the two arm and one arm pieces????
emiliemag
Fri, 07/12/2019 - 21:03
Cut your 9 2x4x10 at 72”…
Cut your 9 2x4x10 at 72” first, then use scraps for 25 1/2
use the 10th 2x4x10 to cut the 4 other 25 1/2
the last 2x4 could be only 6” as you will cut your 2 last at 28 1/2
That’s 10 - 2x4x10 and 1 - 2x4x6 with 11 scraps (9x 22.5 - 1x19 - 1x15)
it is plenty!
Richard Ray
Sun, 04/24/2022 - 10:28
Ana's cut list is wrong ,…
Ana's cut list is wrong , found this out after i made the cuts according to her cut list, she hasn't taken into account the width of the legs at 2" thick so add that onto the 25.5" (25 1/2") it should be 29.5" not 28.5" now the top rails are too short by an inch so have to go and buy more wood now
nickus
Sun, 06/23/2019 - 12:09
Your cut list is deceiving…
Your cut list is deceiving. If I’m building to suit specific cushions I don’t need 13 pieces that length. 4 of them still need to be the length of the height of the arms. Kind of a pain in the ass when you’ve pre stained/sealed based on the cut list and then end up with pieces that won’t work.
Davidmarks
Sun, 07/19/2020 - 00:18
Hmmmmm.... did you use…
Hmmmmm.... did you use 2x4x10? Because the only way you would end up with 13 unusable pieces would be if you used 2x4x8 . One thing about Ana I noticed is all her plans Minimize scraps, if any at all.
Vikasberi
Fri, 06/28/2019 - 10:19
Cushions
Can you add a link to where you got your cushions?
jennilausiva
Tue, 06/02/2020 - 16:03
cusions
Did you ever find cushions? I'm having a hard time finding the dimensions I need.
laj2
Wed, 11/18/2020 - 16:11
Cushions
IKEA has some nice affordable cushions
carpenter_eagle
Sun, 08/25/2019 - 07:03
quwtkom
Thank you for this build. I just built the couch last night. My only question is this:
Step 5 doesn't have any instructions. It's kind of self explanatory as to how to connect the arms in Step 4 to the seat base of the couch, but what isn't clear is how many screws to use? I only attached the arms to the seat with 3, #10, 2 1/2" wood screws. So that's 3 wood screws on each arm holding up a lot of weight when you take into account the weight of the top of the couch and anyone sitting on the couch.Is this enough to hold the weight?.... or should I find a place to bolt the arms to the seat.
That particular piece of wood in Step 4 already has a ton of screws in it. It has pocket screws in each end and pockets screws in the side to attach it to the board in Step 3, and then it has 3 wood screws attaching it to the seat base.
Any help?
phil1964
Fri, 09/27/2019 - 09:26
First, I would not use…
First, I would not use pocket holes for this project. Second, when you are attaching the seat to the arm/leg assembly trying driving two screws at an angle into the legs. This will give you a lot more holding strength.
judie h
Tue, 06/30/2020 - 20:22
Did you ever figure it out?…
Did you ever figure it out? I just bought a few boards to see if I can get the pocket holes right and then I would decide if the plans were both easy enough for me and also if the plans were correct. I can see how that corner can get messy with three boards intersecting. I would appreciate any suggestions before I get into it too deep. I didn't see a reply to your post.
Thanks!
judie h
Mon, 07/13/2020 - 21:01
Did you ever figure it out?…
Did you ever figure it out? I built the couch (with two arms) and used pocket holes on everything. I didn't think it would be strong enough screwing into the ends. I think I may be running into the same issue with corner intersecting screws for the decking. I will have to look at it with a fresh eye this week.
carpenter_eagle
Sun, 08/25/2019 - 07:04
Question about Step 5. Please help....
Thank you for this build. I just built the couch last night. My only question is this:
Step 5 doesn't have any instructions. It's kind of self explanatory as to how to connect the arms in Step 4 to the seat base of the couch, but what isn't clear is how many screws to use? I only attached the arms to the seat with 3, #10, 2 1/2" wood screws. So that's 3 wood screws on each arm holding up a lot of weight when you take into account the weight of the top of the couch and anyone sitting on the couch.Is this enough to hold the weight?.... or should I find a place to bolt the arms to the seat.
That particular piece of wood in Step 4 already has a ton of screws in it. It has pocket screws in each end and pockets screws in the side to attach it to the board in Step 3, and then it has 3 wood screws attaching it to the seat base.
Any help?
oc man
Wed, 09/04/2019 - 18:36
Step 5 - need details
Hi
That's exactly I was thinking about as there is not much info provided for step 5. Even if we are using pocket holes, that is a lot of weight for 2x4s to lift (considering if 3 people are actually sitting on this sofa)
Hope to get some assistance on this topic
dktoronto
Mon, 08/10/2020 - 20:59
extra legs added
I just built this sofa using pocket holes and had the same concern.
I decided to add a few extra legs to the middle section - it's very sturdy now.
crazyascarl
Sun, 09/29/2019 - 10:32
Comfort of vertical back?
Does anybody have a feedback on the comfort of having the seat completely flat and the back completely vertical? I feel that most couches have a slight angle to both the seat and the back... Obviously that makes construction more difficult, but if I'm going to spend time/money on a project I want to make sure it's comfy.
Thanks!
RoBosch
Sat, 10/02/2021 - 10:03
I cut a 10 degree angle…
I cut a 10 degree angle using my mitre saw on both ends of the seatbacks to provide comfort. It works well. There is a diy youtuber who did it on his couch. He charges for his instructions. But he talked about it during the video.
aliasak
Sun, 01/12/2020 - 09:24
Add a slant back
Hello, I want to build this but with a slant back. Has anyone tried this? I made the simple outdoor furniture (loveseat and two chairs) many years ago and I love the slanted back. Should I adjust the depth of the overall plan and add a cleat to attach vertical boards to create a slanted back? Any recommendations are appreciated!
Pcreson
Wed, 03/25/2020 - 07:10
Board lengths?
Why do I need to buy 10ft length's?
Can I get away with 8th lengths?
My local store only carries 8ft and 12ft long boards.
ralfey
Wed, 04/01/2020 - 09:39
Cushions
I have 24.75 cushions, should I build this to 26.25” instead of 25.5”?
In reply to Cushions by ralfey
kmb23
Tue, 11/17/2020 - 17:35
Where did you find cushions?
Where did you find cushions?
GoDevils
Sat, 04/11/2020 - 08:05
Fun Pandemic Lockdown Project
My kids (10 and 13) had a great time building this set while on lockdown at home. We painted it all white. Now the challenge is getting cushions. We live in Arizona, so the sun destroys most material that is outside. I will likely purchase cushions that are made from Sunbrella material. Very expensive, but they will last longer.
In reply to Fun Pandemic Lockdown Project by GoDevils
kmb23
Tue, 11/17/2020 - 17:37
Did you find cushions? Do…
Did you find cushions? Do you know dimensions for cushions? We are in AZ too!
lknolan2
Sat, 04/18/2020 - 20:13
Great plan
Loved this plan! Super easy to follow and easy on the wallet. Only complaint is the amount of waste, but not really much could be done about that.
suev
Sun, 04/19/2020 - 13:17
How do you print so I can…
How do you print so I can have this built?
justinmgibson
Thu, 05/07/2020 - 09:50
Yes! Bring able to print the…
Yes! Bring able to print the plans would be incredible!
trfountain22
Sun, 04/19/2020 - 16:49
outdoor sofa help
Hi Ana,
I am getting ready to build this. I bought all the wood today. I have a couple questions though. For some reason I thought this planned called for pocket holes. (I have the Kreg kit). I guess I'm confusing it with another plan. So my question is it says to screw pieces together with the self tapping screws....but don't you see those after it's complete? I'm confused on why you wouldn't use pocket holes.
My next question is how hard would it be to make the back slanted? I saw a plan for a sofa that had a slanted back but I went this this plan because I am making a U shaped sectional. I would really like the back to be slanted though...but I don't think I could just wing it. I would need step by step directions and exact cuts. I'm a beginner!
Thanks for the help!
heathert
Mon, 04/20/2020 - 10:02
Cushions and pillows
Beautiful! Where did you get the cushions and pillows?
scott james
Wed, 04/29/2020 - 05:21
I've seen a few people ask. …
I've seen a few people ask. I can't seem to find them either.
kellya72
Fri, 05/01/2020 - 14:36
Outdoor Sofa Length
Can anyone tell me why the sofa and the one arm sofa that you put together to make the sectional are 2 different lengths? The cushions would be the same size so wouldn't you need the same length. One is 72" and one is 70 1/2". Unless I'm reading it wrong.
jupiter7
Thu, 05/21/2020 - 22:06
Outdoor Sofa Length
If you look closely at the diagrams for each sofa, on the sectional piece without the arm on one end, the back corner wood piece is turned differently since there is "no arm" attached on that end. It's turned sideways. So, that probably explains the slight difference in length.
tnbeard
Mon, 05/04/2020 - 10:43
Where did you buy your cushions??
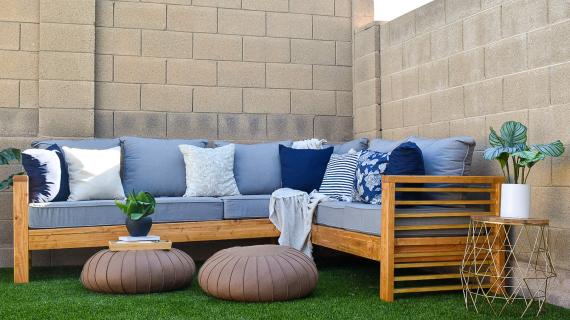
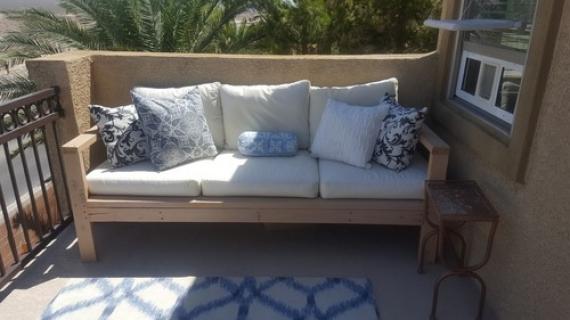
In the picture with the stained wood couch where did you buy your white cushions from?
mattstriker
Thu, 05/14/2020 - 10:13
Arm issues
Hi there. Just building this for our garden.
Having an issue with the arms. The 28 1/2” cut seems to be an inch too short for the frame and to get the 25 1/2” support in also.
As 25 1/2”+ 2”x 2 for both legs is 29 1/2”. Does this make sense? Has anyone else had this issue please?
jupiter7
Fri, 06/19/2020 - 23:10
Arm Issues
You may have figured it out by now. A 2 X 4 board is not actually 2 inches depth. It's 1 1/2 inches. So, the two 1/2 inch differences account for the 1 inch you are asking about.
Alfiepon
Wed, 07/08/2020 - 13:52
Yes @mattstriker you are…
Yes @mattstriker you are right. It's happened to me building the first sofa (not the sectional) and now I change the 28 1/2" for 29 1/2" and it's work perfect for the sectional part. @Ana White need to update the plans or make a comment to confirm this issue.
Joel Brown 1055
Mon, 05/18/2020 - 05:25
End grain vs pocket joints
Hi Ana, I notice a lot of the time in the project you’re drilling into the end grain. Does this have much impact on how robust the whole project is? Would it be better to use pocket holes?
MACMAN
Fri, 05/29/2020 - 13:30
2x4 couch
Nice project. I still have to sand and stain. I changed the 2x4 backrest and added another 2x4. In the process of getting cushions. Thank you!
MAC
Beryl
Tue, 06/02/2020 - 11:40
Why not pocket screws?
Looks nice and I'm planning to build it, and probably the sectional and table as well as soon as I get done with some things that I "must do" before I get to the "want to do" list. I was curious why you used regular wood screws on the butt joints, screwing into end grain, when you so often talk about pocket screws in that kind of application. I'd appreciate your insight.
jupiter7
Fri, 06/19/2020 - 23:13
Why not pocket screws?
I have seen her state that she wanted to keep it simple for beginners to be able to build it, but that you could use pocket holes if desired. The one arm sectional piece that goes with it does call for two pocket holes.
jennilausiva
Tue, 06/02/2020 - 16:04
cushions
I just made the couch and table - I cannot find cushions anywhere that fit the couch. I'm looking for three that are 24 x 27 - can anyone make some suggestions?
amazon, target, home depot, lowes...all don't have the size I need. thanks.
jupiter7
Fri, 06/19/2020 - 23:15
cushions
Did you find cushions? If not, is 27 your depth or width?
judie h
Tue, 06/30/2020 - 20:39
Walmart on line had 24" -…
Walmart on line had 24" - one set $40.
cocoloco182
Sun, 06/07/2020 - 10:26
2x4 outdoor sofa
I am a VERY beginner wood DIY builder and this project was super simple, easy and very clear with directions. My son and I completed the building in 5 hours and that was because I measured 5X and cut once! I used Valspar Black Midnight wood treatment so that I could still see the grain. Great time with my son and I saved mucho dinero $$$$$$$ since something like this at a place like "Clay Shack" without naming specific brands would have been out of my budget for now. THANKS SO MUCH for the plans and easy to follow diagrams! The next project is the outdoor outdoor Bar Table.
cocoloco182
Mon, 06/08/2020 - 11:53
2x4 outdoor sofa
Here is the finished product:
Enmanuel Campusano
Mon, 06/15/2020 - 08:01
Great!
Great!
kanga
Fri, 06/19/2020 - 10:50
My HD carries 2x4x104 size…
My HD carries 2x4x104 size boards, much easier for me to transport and much less waste in cutting. Once you cut the 72" and a 25.5" for a board you only have 6.5" of waste.
cassmae
Fri, 06/19/2020 - 18:23
Great first project
I just finished it! This was my first big project. I spent a couple hours yesterday cutting and then a couple hours today assembling. Super easy and can be done in half a day.
I didn’t have a miter saw, so I just used a circular saw. It worked, but it would have been MUCH easier with a miter saw.
judie h
Tue, 06/30/2020 - 20:36
Did you run into any issues…
Did you run into any issues or problems? I see those corners that tie in with the newly added back piece = being a bit messy with so many intersecting screws. And do you think seat is strong enough to hold weight of 2-3 people?
Thanks