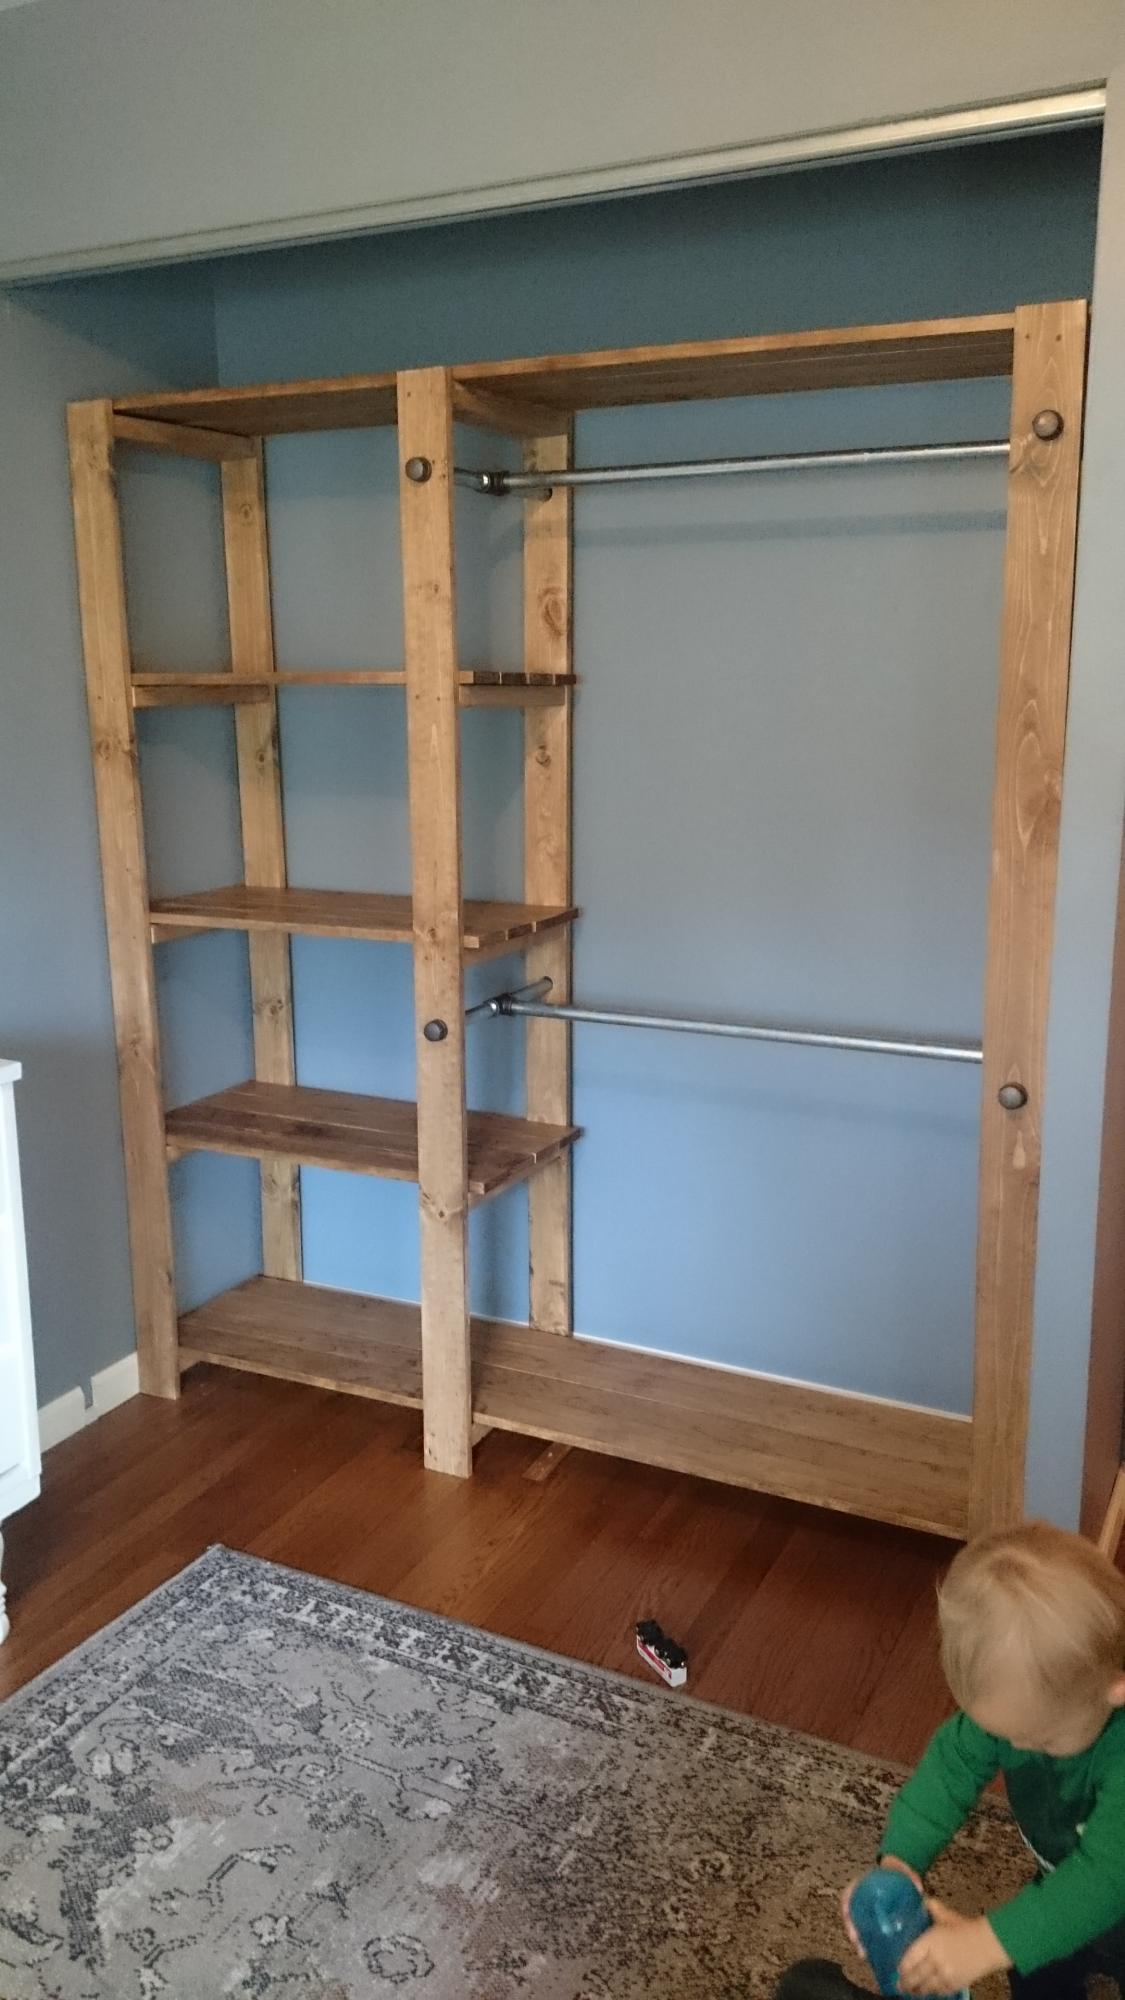
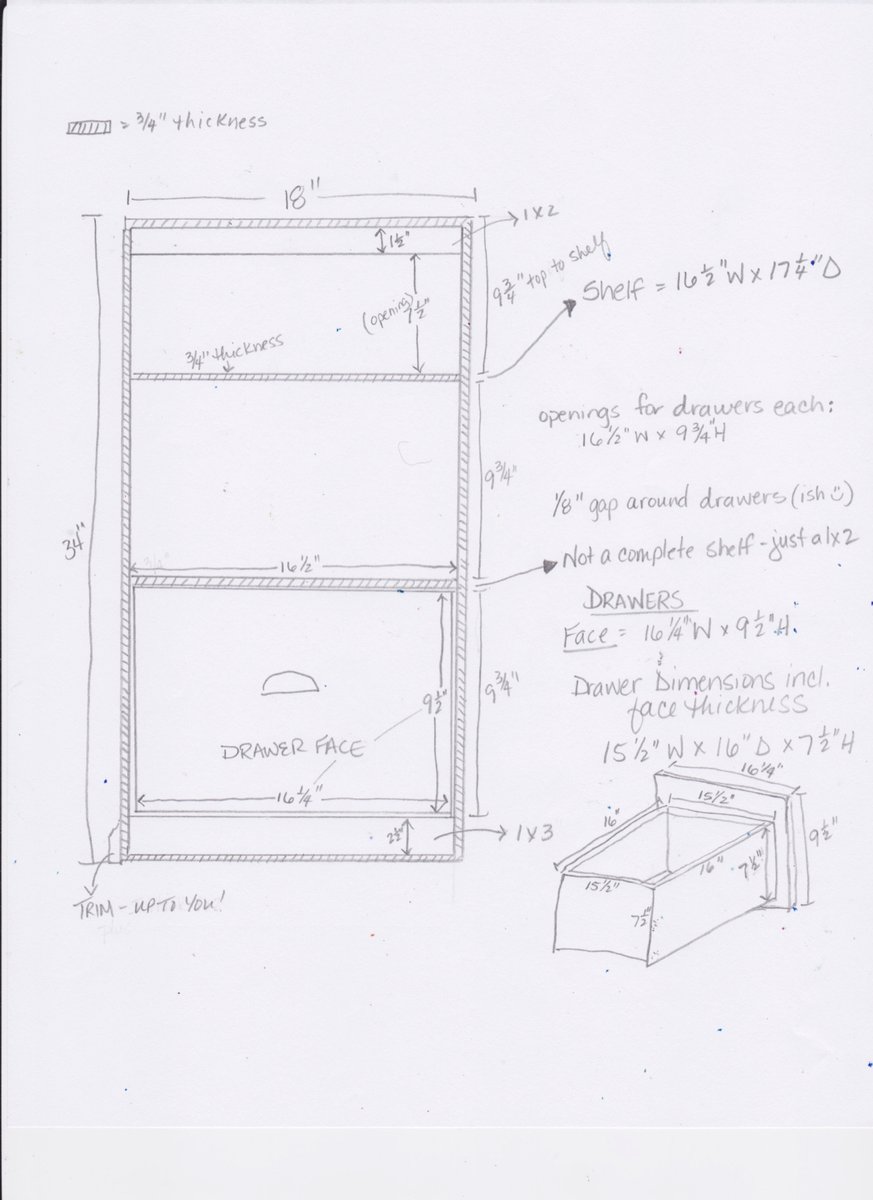
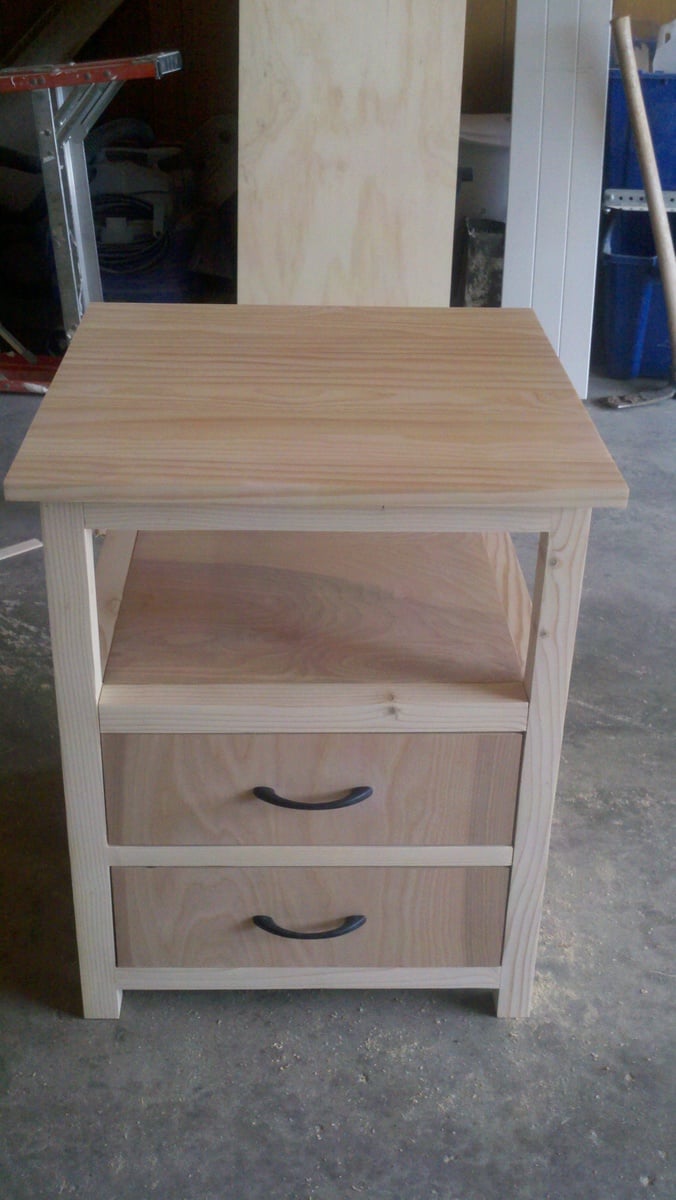
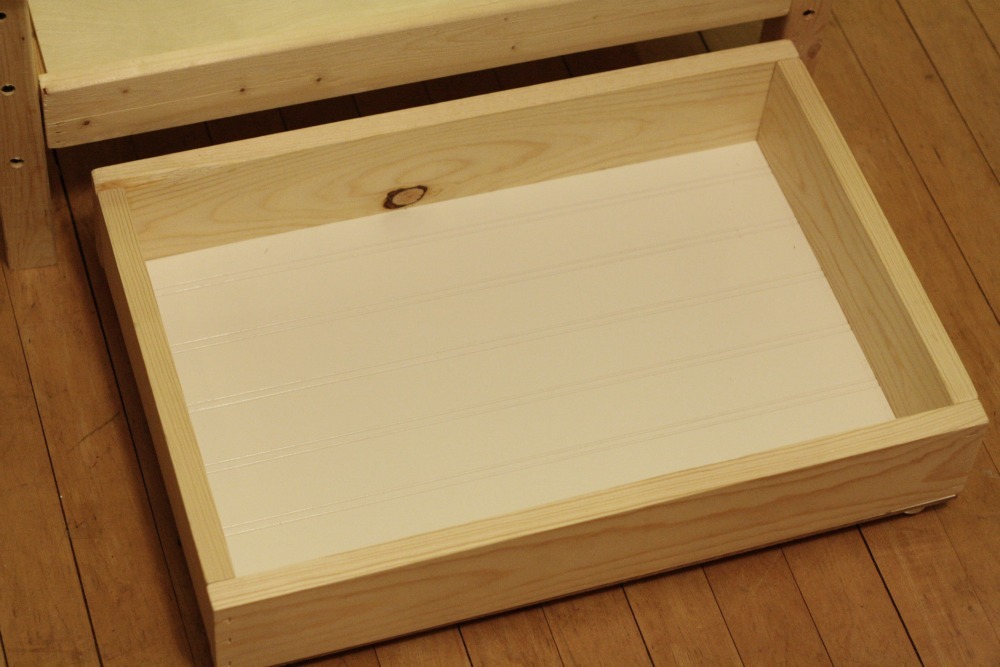
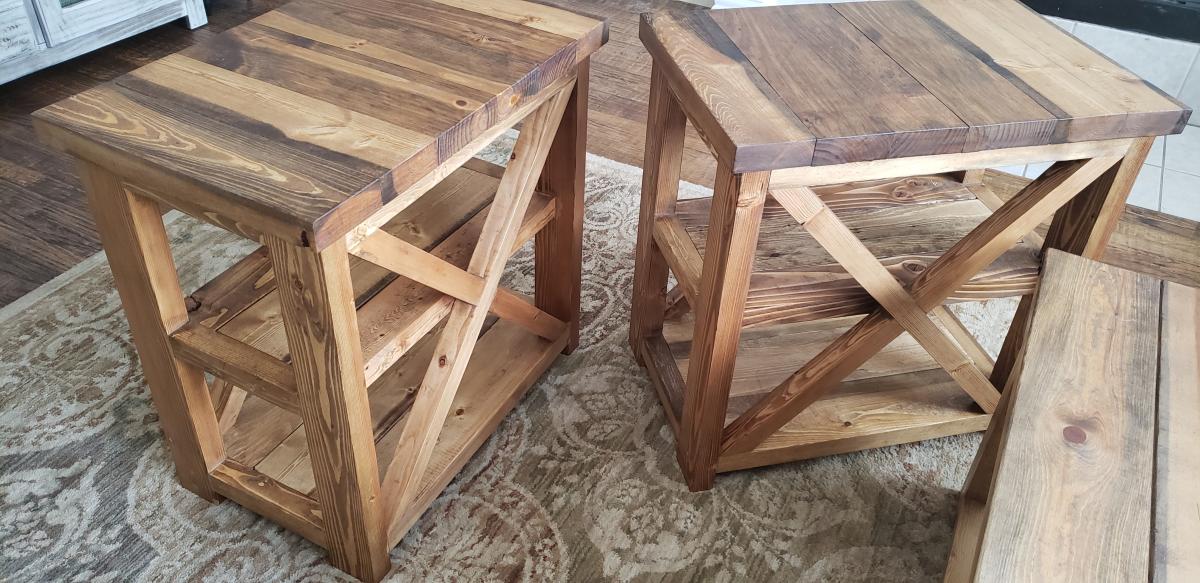
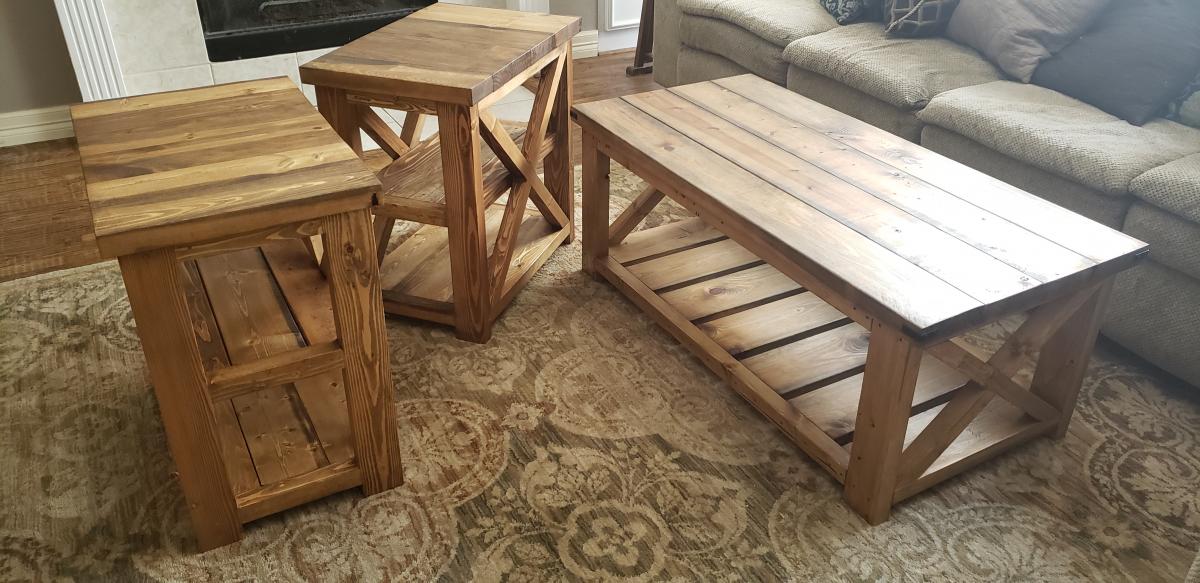
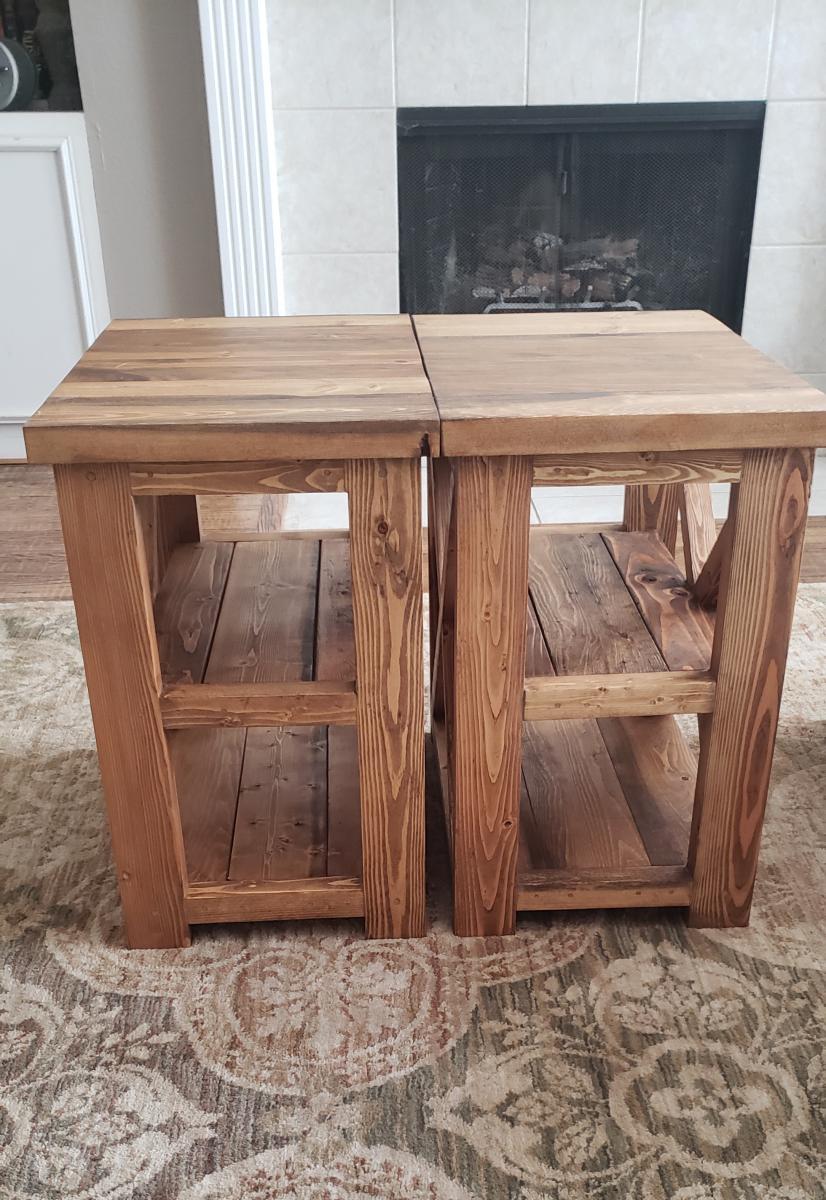
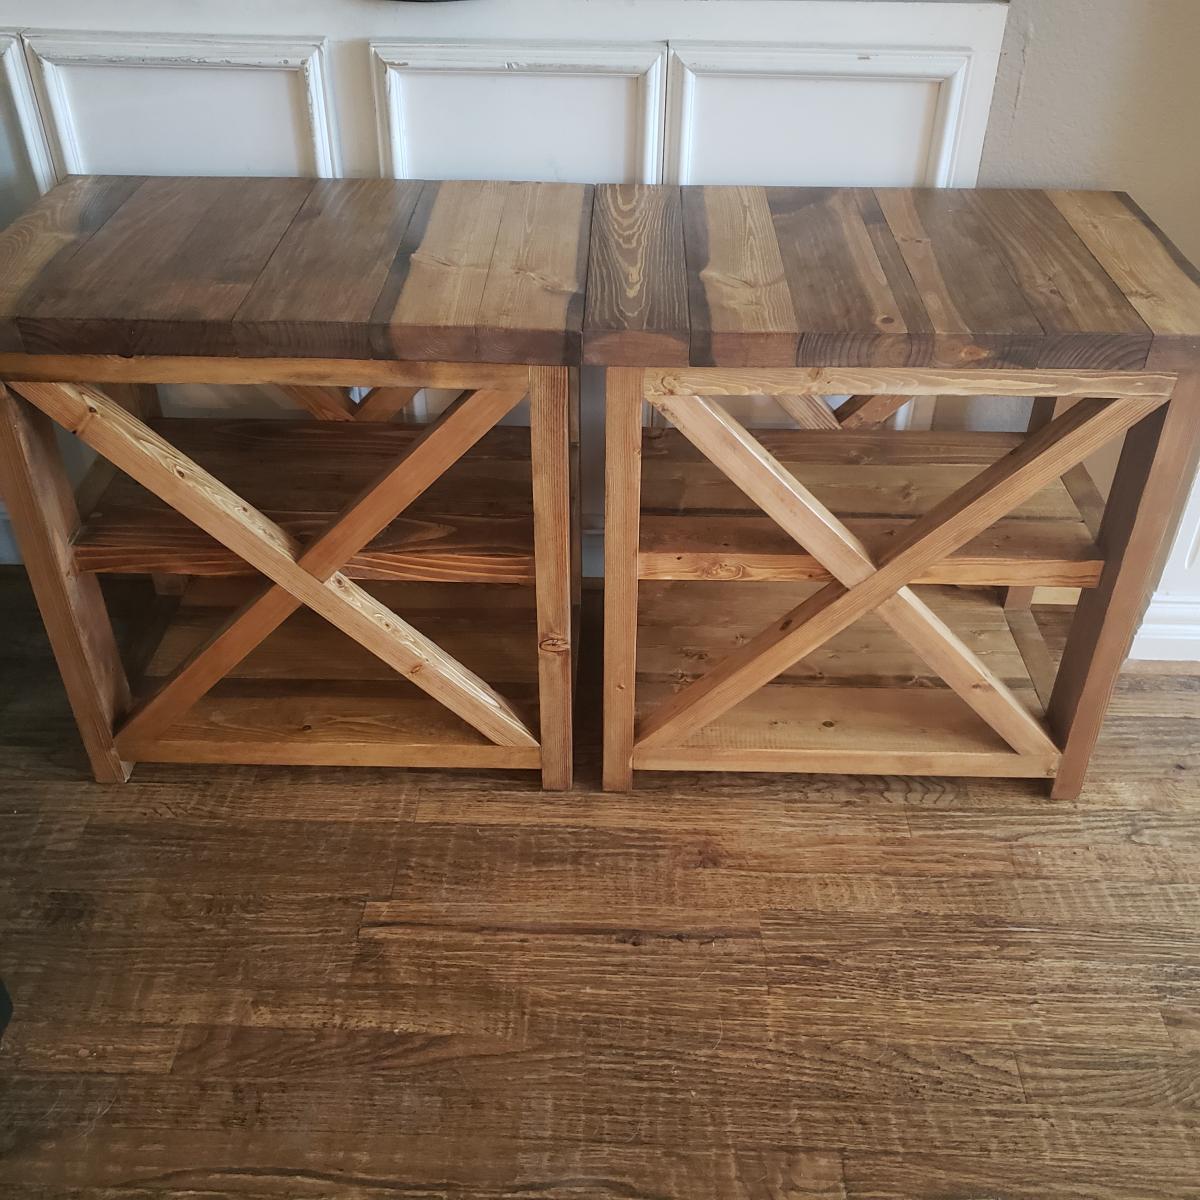
Community Brag Posts

Laundry Sorter

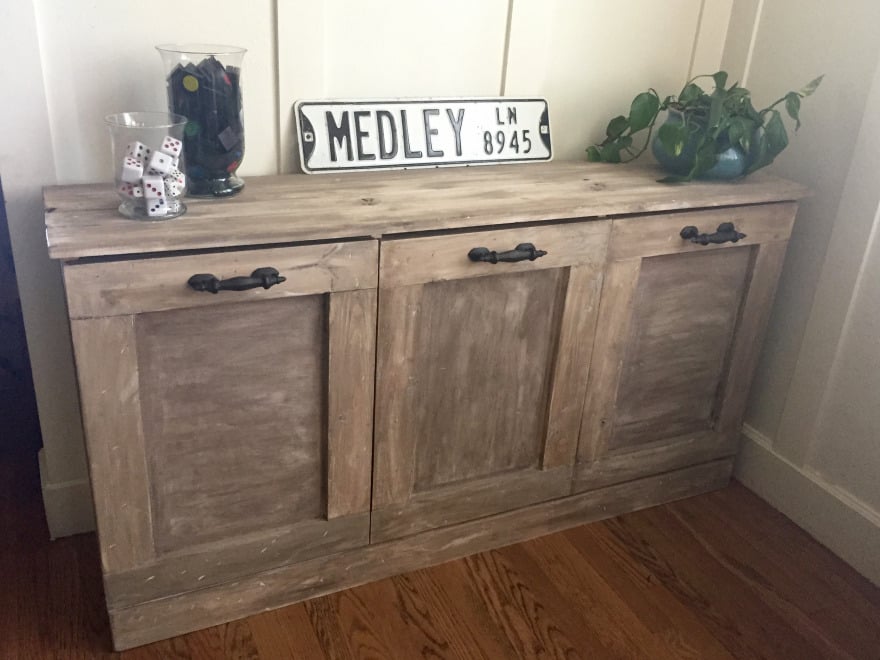
My laudry never looked so good!  I love these plans from shanty2chic and anawhite.  I spent a few days in the garage building, and now, my laundry can be hidden away in any room of my house.  


Thanks shanty2chic and anawhite for your excellent plans. 

http://www.shanty-2-chic.com/2014/08/diy-laundry-basket-dresser.html

http://www.ana-white.com/2011/04/wood-tilt-out-trash-or-recycling-cabin…

Estimated Cost
$200
Estimated Time Investment
Weekend Project (10-20 Hours)
Finish Used
Mix of paint and stain to create whitewashed look.
Recommended Skill Level
Intermediate

Popcorn Machine Stand and Storage on Wheels

Submitted by advanlente on Sat, 03/28/2020 - 10:55

My parent organization at the elementary school had just bought a brand new popcorn machine but had nowhere to store it. So, I offered to try my hand at building a stand with storage. I knew that we needed the stand to be mobile as the idea was to pop the popcorn in different classrooms for incentives, etc. I modified the kitchen prep cart to have a large cabinet underneath to store the popcorn, bags, etc. The pullout drawer was home to the measuring cups, directions, etc. I used my Cricut and cut out our school logo, placed on the popcorn machine and then polyurethaned it to the side. It turned out great!!! I could not be happier :)

Estimated Cost
$120
Estimated Time Investment
Weekend Project (10-20 Hours)
Finish Used
Red paint and polyurethane

Fire table sectional and conversation set

Submitted by Tbacks on Wed, 10/05/2016 - 04:54

Thank you for making these patterns available online!!  I was able to create wonderful seating areas for entertaining on our new deck.  I extended the ottoman legs by 4 inches to create the raised table in conversation set.  These were my very first woodworking projects and your patterns made it a fun adventure.  They add such a beautiful touch to our new space.


I chose to stick with the original pattern and love the results!  Very sturdy!  Only thing I would do differently would probably be to go pick my own wood instead of having all the wood needed delivered by Home Depot,  some pieces that I received I would have passed by had I selected them.

Finish Used
painted all seating with exterior paint and used Anna's online cushion pattern and Sun Shade water resistant fabric purchased on Amazon along with marine grade cushion foam that is mildew and mold resistant also purchased on Amazon.
Recommended Skill Level
Beginner
Seasonal And Holiday

Baby Ray's New Closet!

Submitted by Katurn89 on Wed, 11/14/2018 - 08:24

This was the second building project I've ever completed. I had to make a few adjustments to make it fit the size of ray's closet, but it was totally worth it. most of the work was in the measuring, sanding, and sealing of the wood. Ftting the frames can be a little tricky if your planks aren't perfectly straight. Otherwise, this project was pretty straight forward and can be done in just a few days depending on how much time you have to dedicate to it. Thanks Ana!

Built from Plan(s)
Estimated Cost
About $150
Estimated Time Investment
Week Long Project (20 Hours or More)
Finish Used
Early American stain and polyurethane
Recommended Skill Level
Beginner

Four station desk (PB inspired)

Submitted by monty742 on Sun, 03/15/2015 - 08:58

I really liked the PB mega desk, but I didn't want to spend $1600 on it.  After seeing someone's post here (a couple years ago...) asking for plans on that desk, I decided to do it myself.  I took these two plans and made 4 base units.  They are 18" square at the top and 34" tall.  I used 2 IKEA table tops connected underneath for the top, to make a total height of 36" - counter stool height.  I constructed them a little differently than the plans, but no matter how you make them, the idea is the same.  The plan is to take them apart and make 2 desks once everyone is too old and cool to do homework/artwork together.

Estimated Cost
$500
Estimated Time Investment
Week Long Project (20 Hours or More)
Finish Used
Kitchen and Bath finish paint (2 coats) - it's a little shinier than eggshell (I only used it because I had 2 or 3 gallons extra at home :) then 2 coats acrylic top coat matte finish.
Recommended Skill Level
Intermediate

Comments

monty742

Sat, 08/15/2015 - 04:33

Just seeing your comment...sorry for the delay!  I got the stools and the light fixture at a Ballard Backroom (outlet) store near me.  3 of the stools ended up being about $40 each with the sale they had at the time, and the 4th was $60? - bought at a later time than the first 3.

AlisaH

Wed, 11/04/2015 - 07:40

How did you connect the table tops from the bottom so that the tables were secure together? I'm curious what's the best way to do this. Since two of the four seats will be where the seam is, I want to make sure I secure it properly so it's not wobbly. Thanks so much.


monty742

Sat, 01/09/2016 - 05:06

I'm just seeing these latest comments for the first time, so you may have long finished this project already!  The tops were surprisingly sturdy but I did reinforce them.  I placed the tops on the floor upside down and screwed some metal brackets (about 12" long each) across the joint in four places.  I just screwed them in through holes already in the brackets.  This wasn't the most stable because those tops are particle board and don't hold screws very well...  But since it was already pretty sturdy, I figured it would do.  It has been fine, even with standing on the top (kids who get up there and me hanging the light fixture above).

Once the tops were joined, I placed the bases so there was about a 1" overhang on the top.  To hold the top in place, I used small pieces of wood screwed to the underside of the top at the inside corner to act as a placement stop.  The top is pretty big and heavy even though they are IKEA tops, so they don't have a tendency to move or slide at all anyway.  I'm going to try to figure out how to post another picture of the braces and corner stops...we'll see if I can do it!  Let me know if you have any more questions...again, sorry I didn't see this in a more timely manner!

Pmprdwife

Sat, 01/02/2016 - 05:55

Is the photo above the Pottery Barn version or your product result?  I'm trying to figure out the dimensions for the drawer and shelf configurations.  Thanks!  BTW, I'm totally addicted to your style and personality...my husband loves the productivity inspiration I've received. :-)


monty742

Sat, 01/09/2016 - 10:17

Hi!

I'm glad you like the desk!  The one in the picture is the one I built, not the pottery barn one!  My dimensions were a good bit different than the PB desk - square bases instead of rectangular and counter stool height instead of desk/table height.  So, I have no idea if I have my plans for this anymore, so I went and measured it again for you!  

So each base is 18" x 18" square and 34" high so that with the 2" top the total height is 36".


Each base was made of oak plywood that made with 3 sides, a top and a bottom.  All edges were rabbit joints (3/8" deep in thickness of boards and probably 3/8" wide - not 100% on width of rabbits).  It's kind of a pain to do rabbit joints if you don't have a dado blade for your table saw, so you could use pocket hole screws instead.  I glued and nailed these joints with a finish nailer, I believe.  

I figured a diagram with measurements would be easier than trying to write descriptions...so I'm adding another pic with the dimensions outlined.  Drawing is NOT to scale, so sorry about that!  I really need to learn to use SketchUp.  Let me know if you have any questions!  

Monty742

monty742

Sat, 01/09/2016 - 07:57

Hi!

I'm glad you like the desk!  The one in the picture is the one I built, not the pottery barn one!  My dimensions were a good bit different than the PB desk - square bases instead of rectangular and counter stool height instead of desk/table height.  So, I have no idea if I have my plans for this anymore, so I went and measured it again for you!  

So each base is 18" x 18" square and 34" high so that with the 2" top the total height is 36".


Each base was made of oak plywood that made with 3 sides, a top and a bottom.  All edges were rabbit joints (3/8" deep in thickness of boards and probably 3/8" wide - not 100% on width of rabbits).  It's kind of a pain to do rabbit joints if you don't have a dado blade for your table saw, so you could use pocket hole screws instead.  I glued and nailed these joints with a finish nailer, I believe.  

I figured a diagram with measurements would be easier than trying to write descriptions...so I'm adding another pic with the dimensions outlined.  Drawing is NOT to scale, so sorry about that!  I really need to learn to use SketchUp.  Let me know if you have any questions!  

monty742

Thu, 07/28/2016 - 14:13

No you can't buy them from Ikea.  I bought the table tops from Ikea, but I built the bases.  The dimensions for the bases are in one of the additional pictures with the post if you want to see them!

treverandamber

Mon, 10/10/2016 - 07:41

What are the total dimensions of the table top? Thinking of building something like this, but want to make sure it will fit in my space.

Simgre81

Thu, 12/28/2017 - 07:00

Are these just slide in drawers, or did you use some sort of hardware to have them slide in and out?

Simple Outdoor Table

Submitted by Kingsamui on Tue, 07/24/2018 - 17:24

Modifications to the simple outdoor table plan thanks to Finn’s dad. 

Built from Plan(s)
Estimated Cost
$200 -Found a place that had Cedar shorts “B quality”, but very few knots for an unbelievably cheap price. I ran all to boards through a planer to start and saved a bundle.
Estimated Time Investment
Week Long Project (20 Hours or More)
Finish Used
3coats Spar Urethane. I’ve heard the Spar doesn’t hold up well, so would have used something rlse if I knew that at the beginning.
Recommended Skill Level
Intermediate

chicken coop

Submitted by namaste7 on Mon, 05/11/2020 - 22:10

Modified to make the coop bigger and the planter smaller. Added 1" foam insulation on the inside and changed the design to use the "deep litter" method. This means the coop bottom goes all the way to the bottom of the support beam rather than using a removable tray. Added a steel roof with a ridge vent at the top. The chicken run under the coop is lined with buried hardware cloth so no animals can dig under the coop. All hinges are mortised and doors flush mounted. The coop is wired for power for a heat lamp. The planter is lined with a metal tray. The coop can be separated into two pieces so you can move it or rotate the top 180 deg if needed (so you can get to the eggs from the left or right side). Great plans, thanks Ana!

Estimated Time Investment
Week Long Project (20 Hours or More)
Finish Used
cedar deck stain. Olympic. brand
Recommended Skill Level
Advanced

Comments

Seasonal And Holiday

Chicken Coop

Submitted by Anonymous (not verified) on Mon, 10/04/2021 - 15:53

We made this Chicken Coop this summer , with lots of help. We doubled the coop and the chicken run is 8x8 . We used the base of a previous clubhouse!! Thanks so much for the plans

Comments

First nightstand

Submitted by juliec on Sat, 04/02/2011 - 13:24

We used ana's plan but modified the top

Built from Plan(s)
Estimated Cost
$35
Estimated Time Investment
Weekend Project (10-20 Hours)
Finish Used
We will use espresso general finishes and several top coats of poly.
Recommended Skill Level
Intermediate

Comments

bridgetschaefer

Thu, 05/30/2019 - 13:00

This is EXACTLY what I'm looking for but I can't find the plans that were used to build it. Do you happen to still have the link for them?

Deck Chairs

Submitted by mgb11184 on Thu, 07/21/2022 - 19:54

I made a couple of additions/modifications

I also made a couple of side tables and foot stools for the chairs. A total of four chairs, two tables and two foot stools for the deck set.

Comments

Standing Desk

Submitted by Anonymous (not verified) on Mon, 10/02/2023 - 10:53

I built this table be ie for a medical student w hi o wanted a standing desk. It’s a basic butcher block design ( my own design) and made from pine 2x10’s. I’m a self taught novice woodworker.

Scott F Hiorns ( Buggies Birdhouses and Other Crafts)

Master Bath Barn Door

Submitted by Anonymous (not verified) on Fri, 03/17/2017 - 16:34

Created this door with pine wood tongue and groove lumber and pine wood planks. Purchase barn door hardware / track from Jet.com and door handles from Hobby Lobby. 


This replaced my Master bath door and I think came out pretty good. Thank you for the ideas!!!  Jeff M.   Brownstown, Mi

Estimated Cost
Wood 55.00
Handles 2 for 8.00
Stain ( left overs)
Barn door track 54.00

Total $117.00 and 10 % Military discount at lowes
Estimated Time Investment
Weekend Project (10-20 Hours)
Finish Used
Minwax. Mix of Kona and Driftwood Grey
Recommended Skill Level
Intermediate

Teeter Totter

This is one of the cheapest projects for my kids I have ever completed!! And the most rewarding. I think everyone of my neighbors has been on the teeter totter...including adults :) My kids just love it and I am thinking of making a few for my nephews for Christmas. I was able to find all the wood I needed in my scrap pile. I had the PVC pipe and bolt already also so all I had to make a trip to the store for was the foam for the seats. My son helped me build this in an hour. I liked the unfinished look so I just sprayed it with a little Thompson Water Seal. Thank you Ana White!!

Built from Plan(s)
Estimated Cost
$0 Lumber (scrap wood) $5 Foam padding
Estimated Time Investment
An Hour or Two (0-2 Hours)
Finish Used
Thompson Water Seal
Recommended Skill Level
Starter Project

Comments

Seasonal And Holiday

Outdoor Play Kitchen!

Submitted by Anonymous (not verified) on Thu, 12/28/2023 - 08:57

We modified Ana White’s excellent Mud Kitchen plans, adding a third section and scaling the whole thing slightly larger to be a better size for our 4 and 6 year old grand daughters. It was so much fun to make and accessorize!

Built from Plan(s)
Seasonal And Holiday

Cluckingham Cottage

Cluckingham Cottage wasn’t built in a day, but it WAS built by a DAME!
A-frame instructions were pretty helpful considering the builder knows nothing about construction. I made a few modifications to accommodate my 5 chooks + 2 bantams . Sturdy and tight structure.

Estimated Cost
Under $400
Estimated Time Investment
Weekend Project (10-20 Hours)

2x4 outdoor couch

Submitted by Anonymous (not verified) on Sat, 07/18/2020 - 18:46

I used cedar and added the extra boards so the cushions would stay put. We also made the arms 2x6 boards so we wouldn’t need end tables for the couch. The plans were super easy to follow. I mostly used pocket holes so the screws wouldn’t be visible. Love how it came out! Thank you for the plans, Ana!!

Built from Plan(s)
Estimated Time Investment
Day Project (6-9 Hours)
Finish Used
Nothing yet. Deciding on whether to let it grey on its own
Recommended Skill Level
Beginner

Modified Beginner Farm Table and Bench

Submitted by Anonymous (not verified) on Tue, 06/28/2022 - 12:09

Altered the Beginner Farm Table plans to use 2x8s for the top and 4x4s for the legs. I used pocket holes for the table. I followed the bench plans almost exactly, adjusting slightly for the 2x8 tops. I am a beginner and I did it myself! The table and bench are beautiful and sturdy! Thanks Ana!

Comments

Queen Murphy Bed

Submitted by Jenga on Sun, 12/06/2015 - 12:59

Not too bad of a project but had to a good bit of guess work so I could changed the plans for a queen size bed and flip in on its side.

Estimated Cost
$200 if you already have the bed
Estimated Time Investment
Week Long Project (20 Hours or More)
Finish Used
White Paint and laminate flooring left over from the floor.
Recommended Skill Level
Beginner

Comments

Arilie

Sun, 05/29/2016 - 18:50

Good evening!

I am new at wood working, and would be very interrested in knowing the different measurements you changed to get from a twin to queen murphy bed. If it is posted on this page, I tried but couldn't find it. Thank you for your help. Have a good day.

Marie-Julie

Rustic X Side Tables - Added Shelf

Submitted by Anonymous (not verified) on Thu, 09/24/2020 - 13:07

This was a fun project! We had already made the coffee table and someone wanted side tables. We assisted the plans for the side table to make these 16w x 25h x 25d and added a center shelf. After getting our cut list the build was easy and quick. It took about 6-9 hours to cut, build, sand, stain, apply finish, and finish sand.

Estimated Cost
$60
Estimated Time Investment
Day Project (6-9 Hours)
Finish Used
Dark Walnut Stain with rubbed matte finish
Recommended Skill Level
Beginner

Comments

Basement Shelving....

Time to get organized in 2017....and what better way than with some custom shelving. This was not too bad of a project to complete. It only took about 6-8 hours to cut, frame, and assemble everything together (thanks to an interruption or two). 'Twas nice to have a project for once that I didn't have to care about finishing the project with wood filler, sanding, painting. I am sure my wife thanks me more as I would have been another week getting things just right​​​​​! 

A few changes that I made from the original plans:

- used 2x8 for the shelving runs as I only was dealing with a 10ft run and was a few bucks cheaper to buy 8 boards vs 16 boards. Plus less cuts!!! 

-installed adjustable furniture feet in the supports to deal with sloping basement floor. Unexpected side effect was it was easier to slide the unit around in the basement as I assembled it. 

Outside of those changes I remained faithful to the original design. I didn't bother filling the screw holes as we will be hiding the shelving unit with a curtain once  we turn the room into a TV/Office area. 

Also as it wasn't 100% clear from the original plans, but the height measurements for the shelf supports are to center... not sure why it didn't register with me right away... but just in case anyone else didn't realize that as well. 

Estimated Cost
$150 for wood, screws, wood glue, and adjustable furniture feet
Estimated Time Investment
Day Project (6-9 Hours)
Finish Used
None
Recommended Skill Level
Beginner
Back