Modern Farmhouse Bed Frame

I love how this bed frame turned out! Everywhere that has stain is cedar and the rest is all scrap spruce. Thanks for another great plan Ana!

Built from Plan(s)
I love how this bed frame turned out! Everywhere that has stain is cedar and the rest is all scrap spruce. Thanks for another great plan Ana!

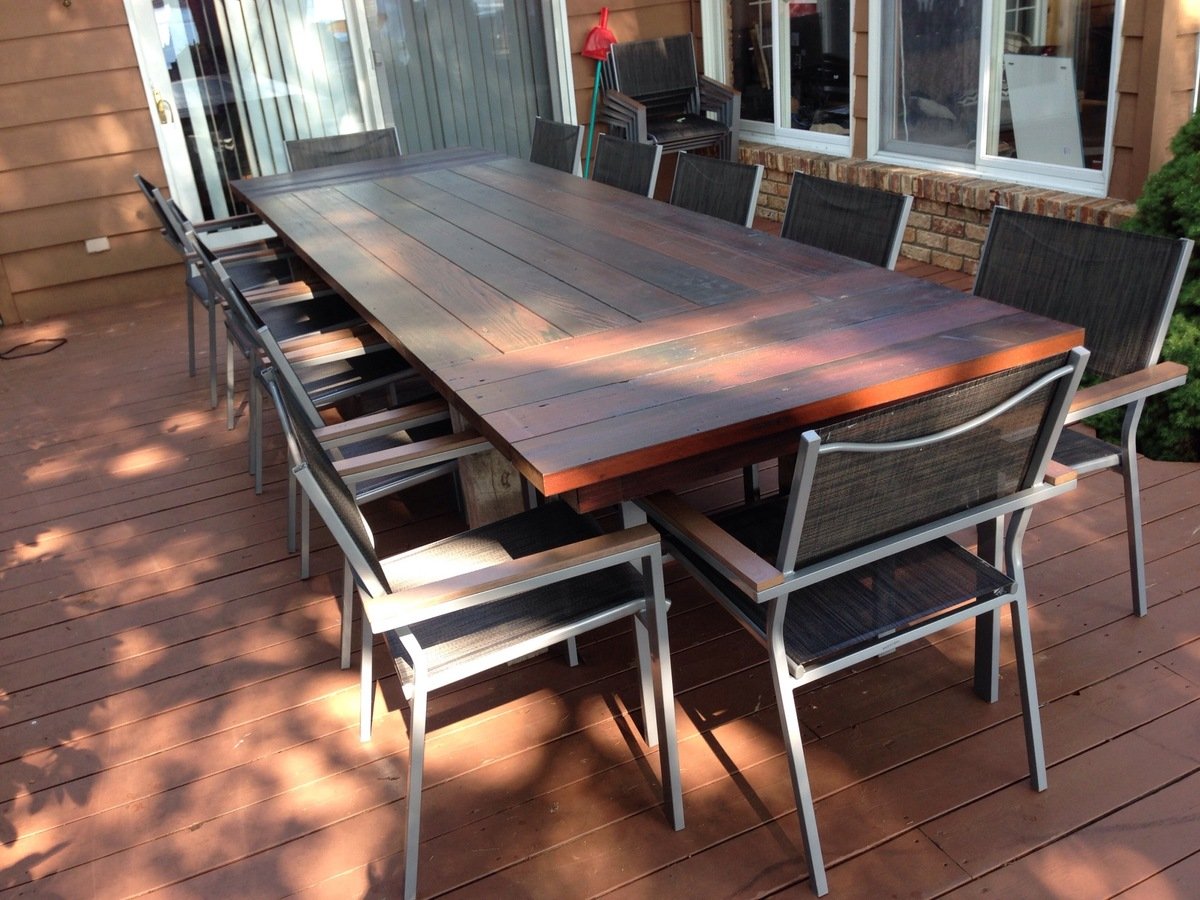
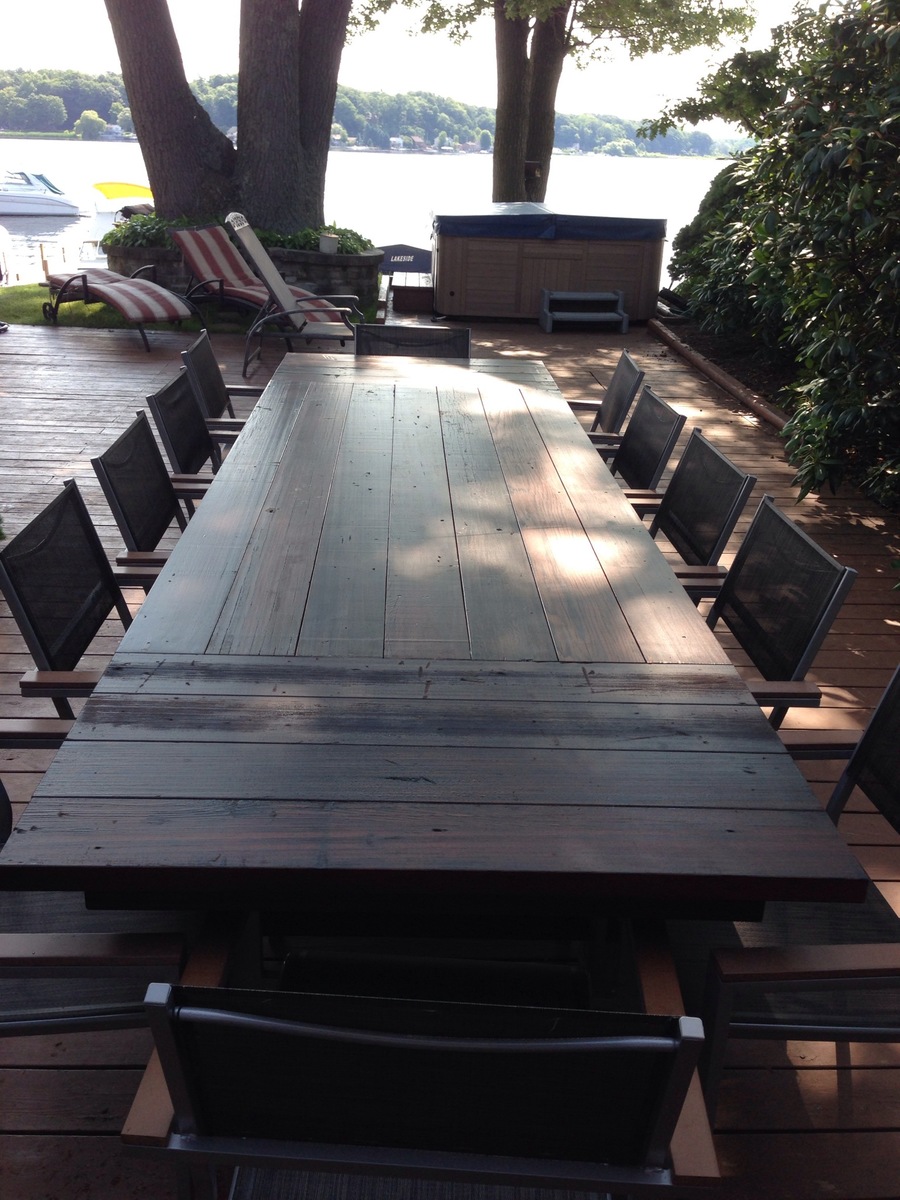
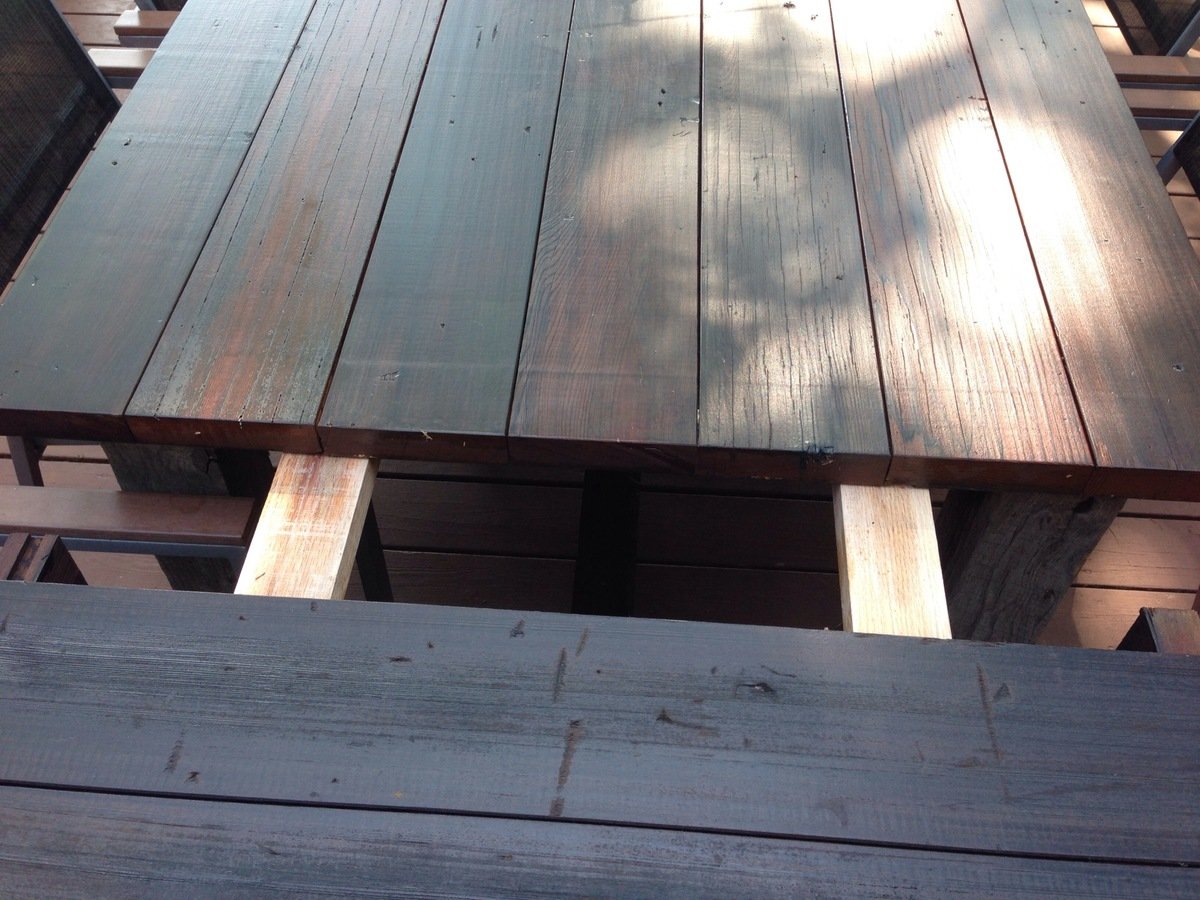
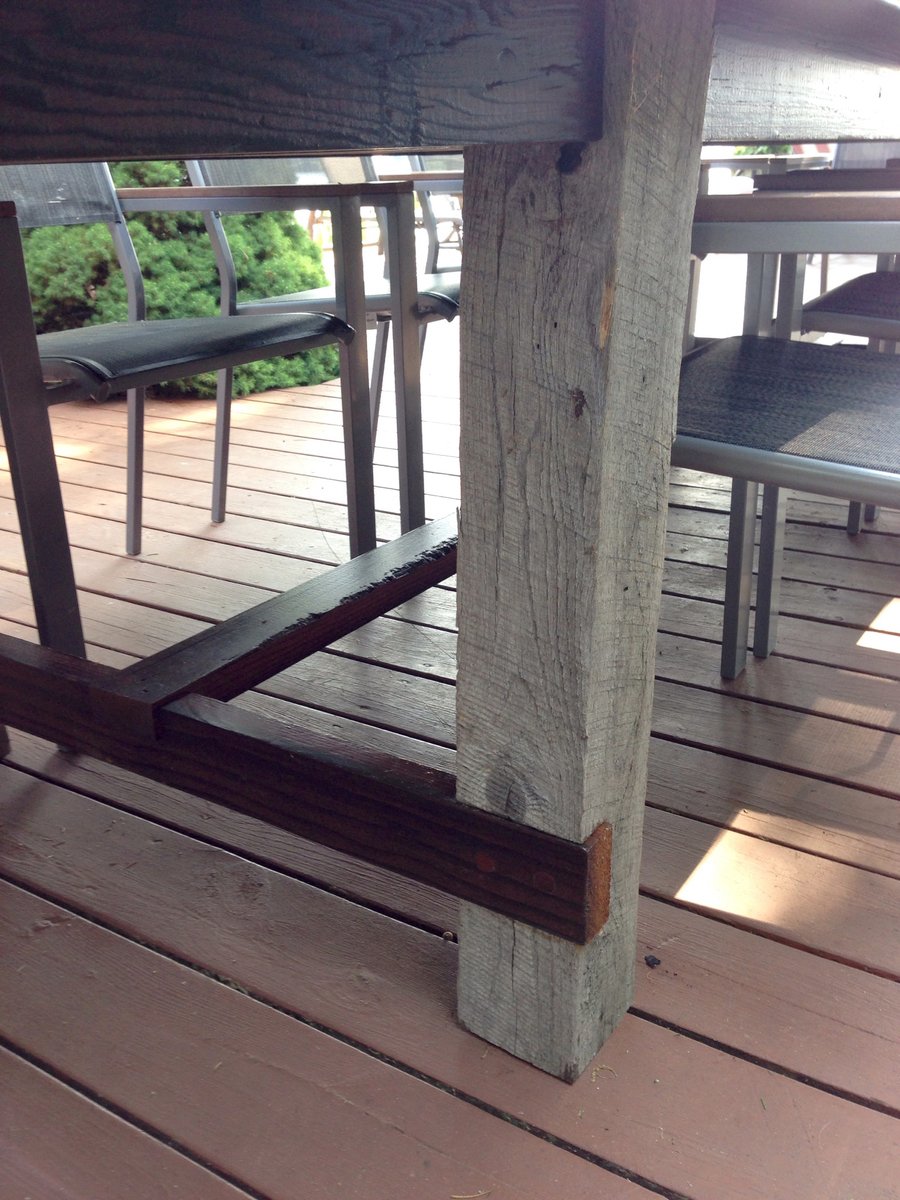
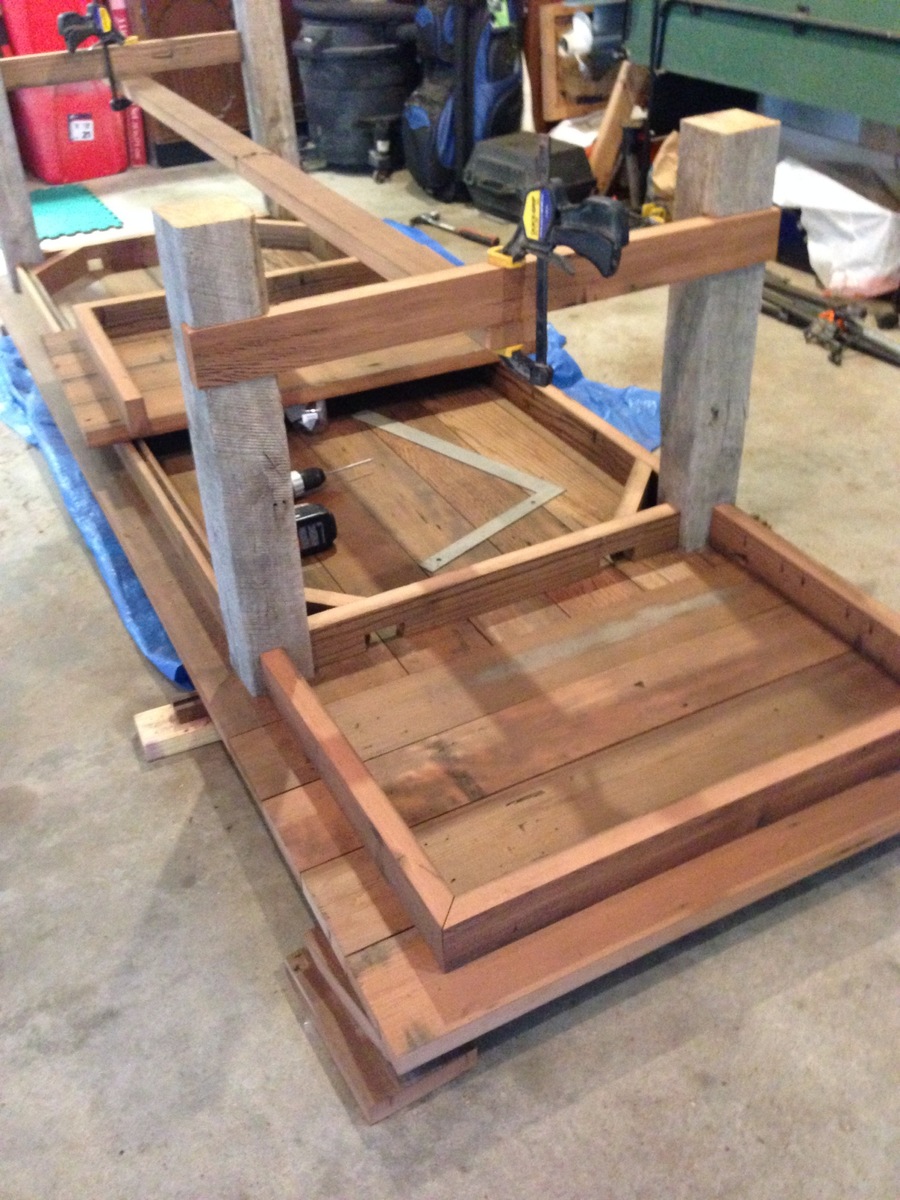
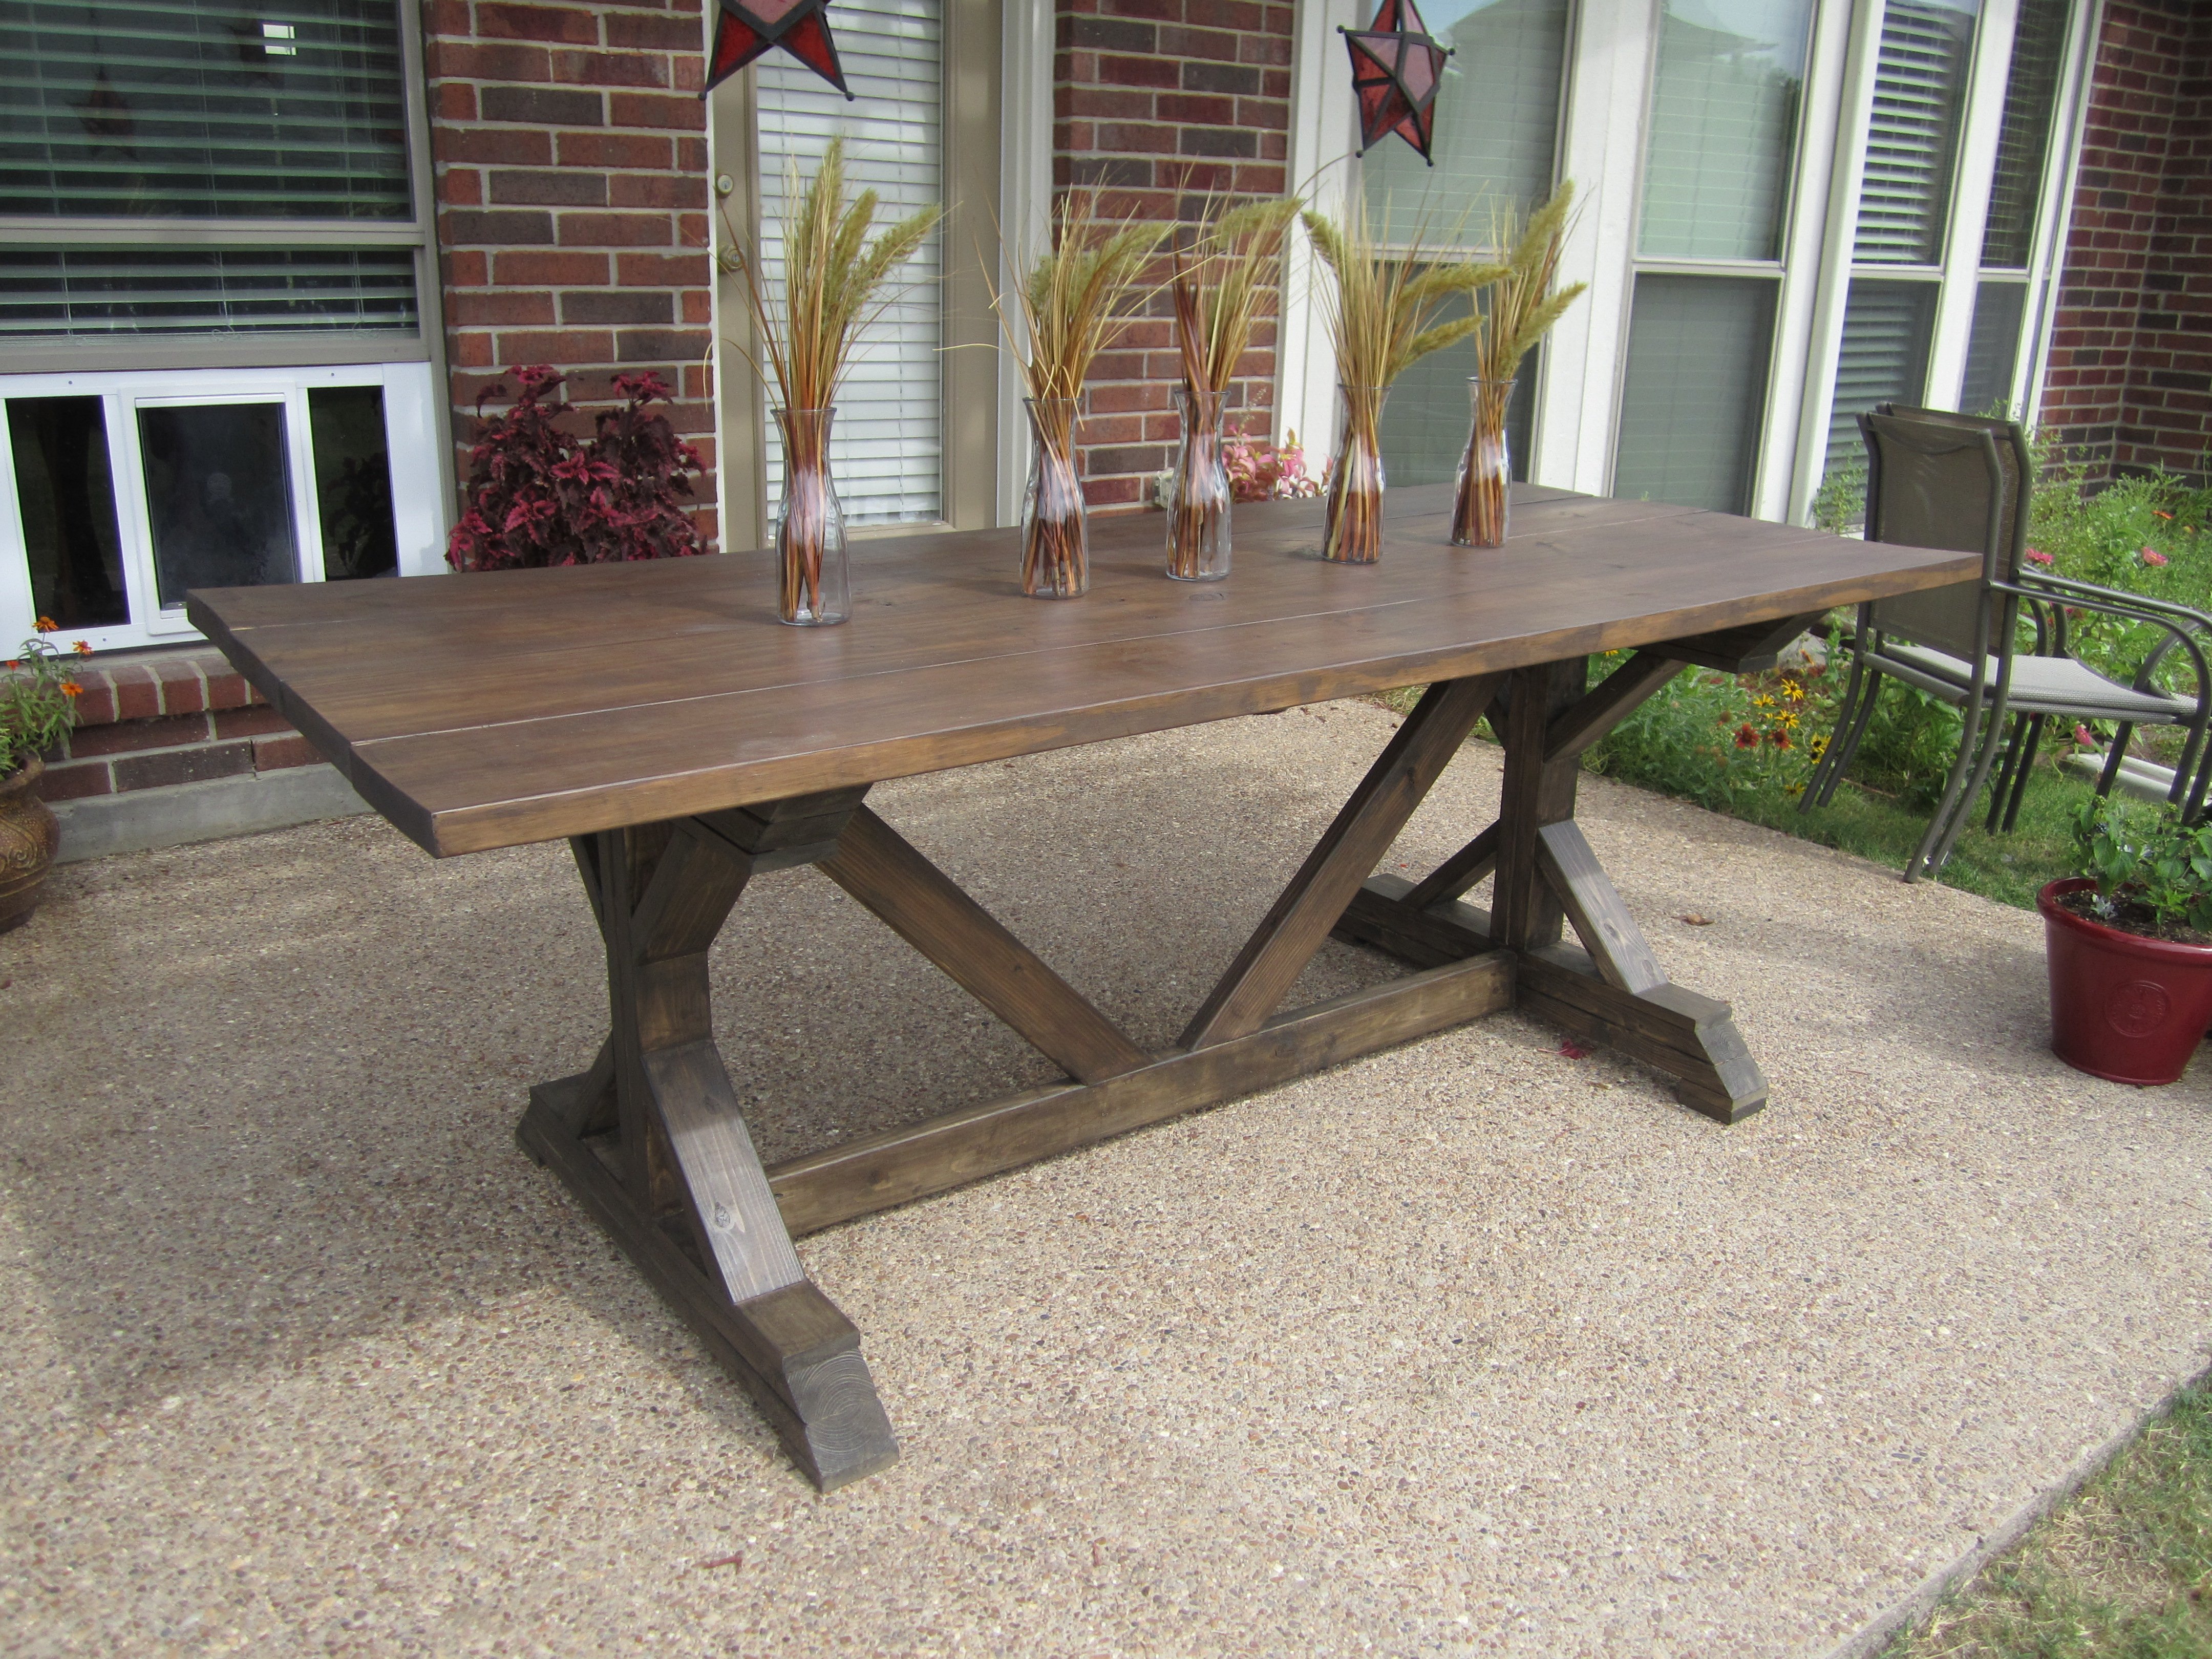
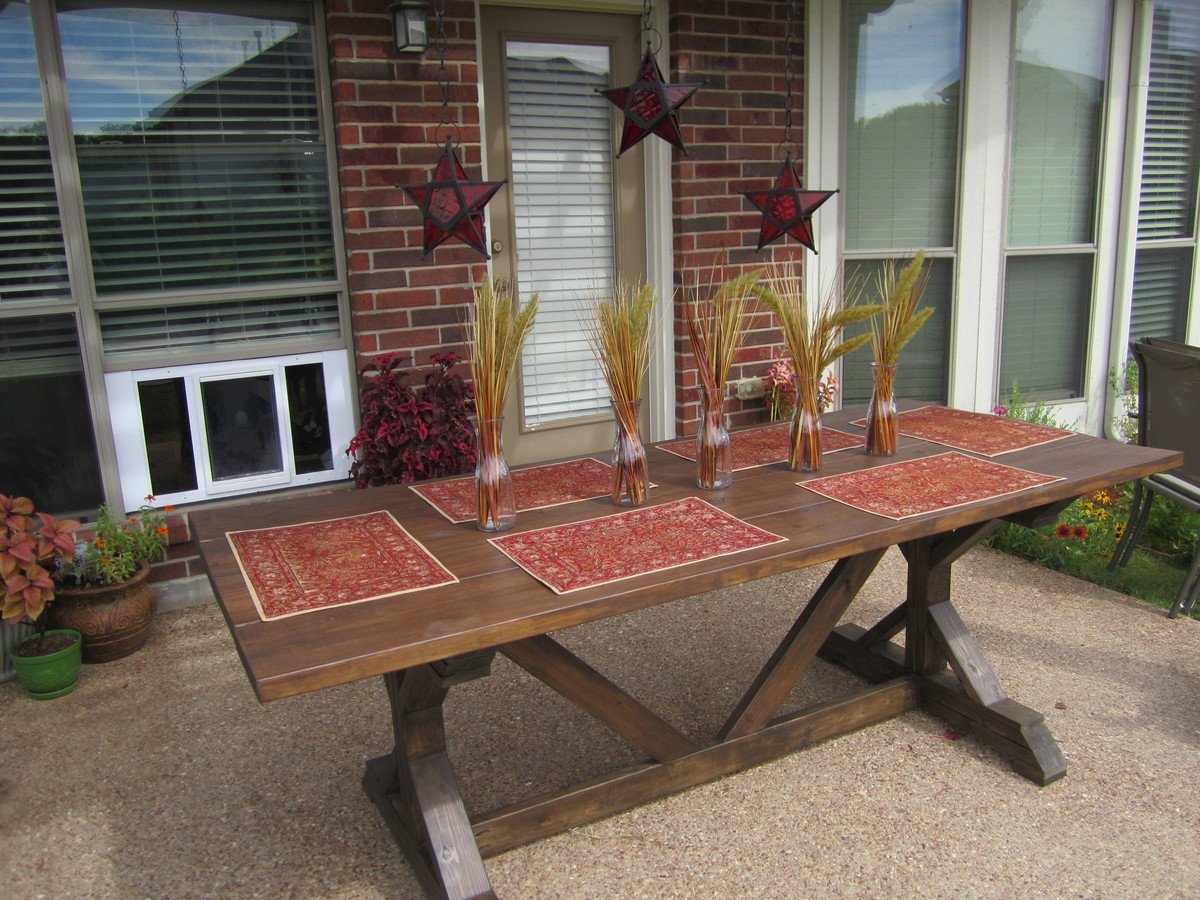
I had no experience building furniture prior to this project but I wanted a 12 ft outdoor table and could not find one. This tables center section is 8 ft and was built roughly following the plans for the farmhouse table. I added two 2 ft extensions at each end making the overall table 12 ft. The extensions included aprons so when installed they look to be part of the table. The extensions just plug into the end apron of the center section with 2x4 oak braces which engage in the apron and under the table approximately 2 ft from end. There is no visual sagging of the extensions. I finished the table with Sikkens DEK finish.
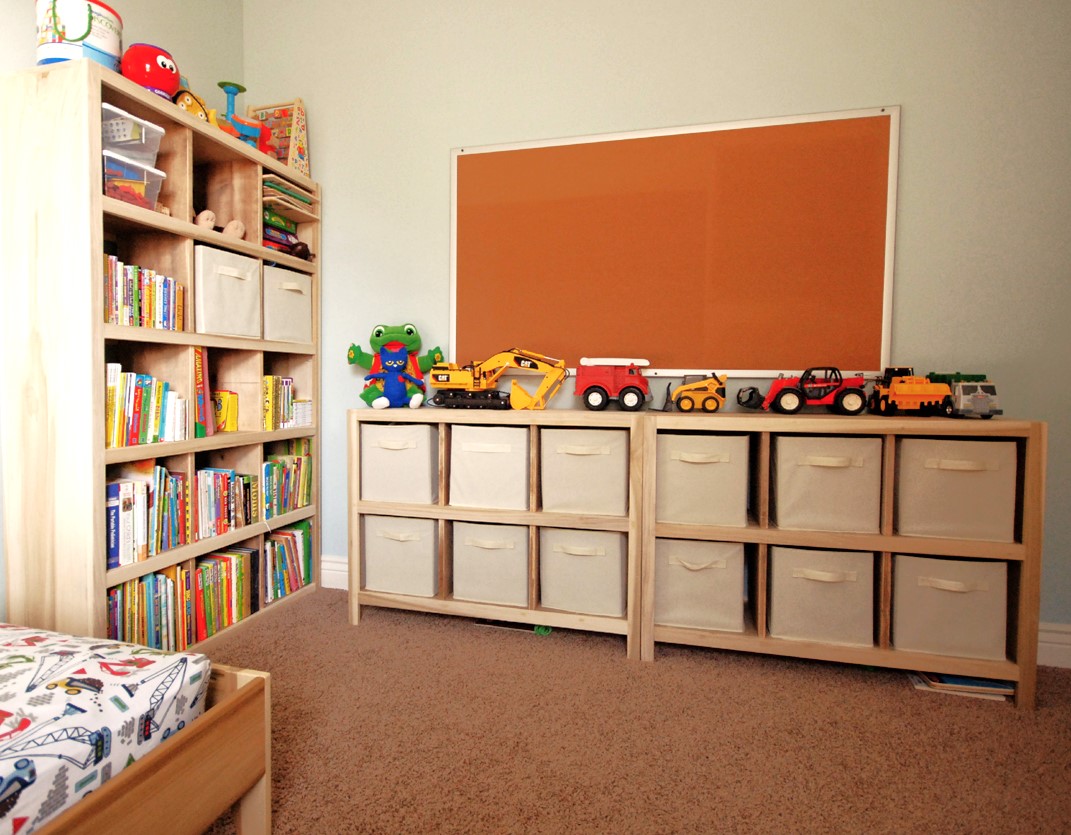
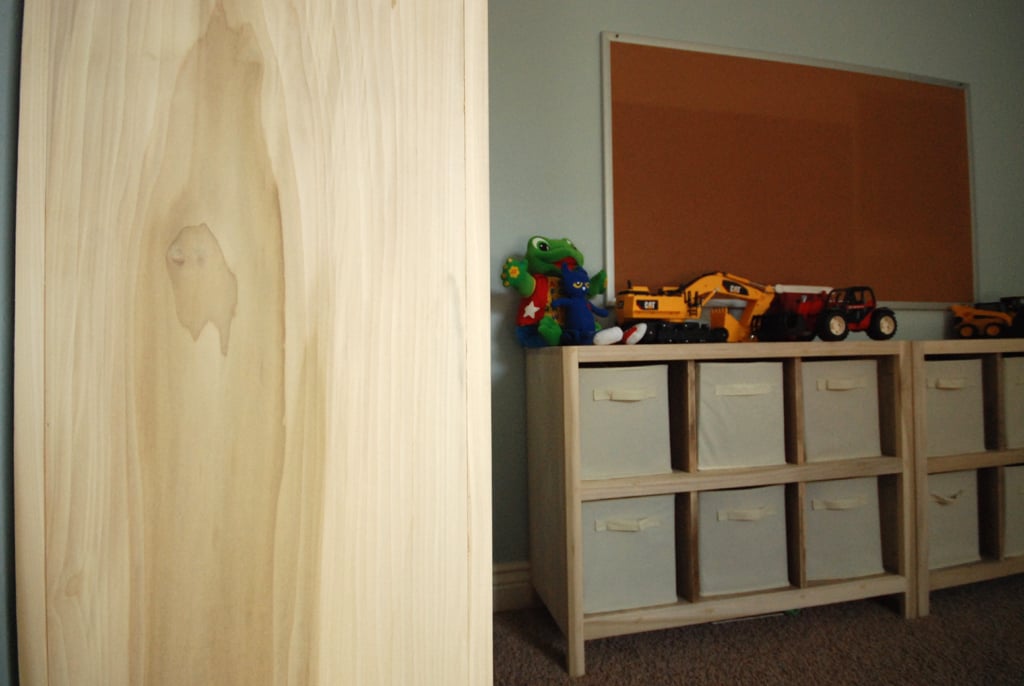
I built this set of cube shelves for my 3 yr old son's room. THANK YOU, ANA! I used poplar as I did not want to paint the wood and I love the irregular pattern of the wood grain. To save money, I used pine for the inner shelves and dividers. I stained it using the oxidized solution (http://www.friendly-home.net/2012/05/oxidized-x-console.html) that Ana recommended from the instructions of the Rustic Console. I added a cup of coffee to the solution to get a darker browner shade and unevenly sanded the wood for the distressed look. It matches the poplar wood more so than keeping the pine wood as is.
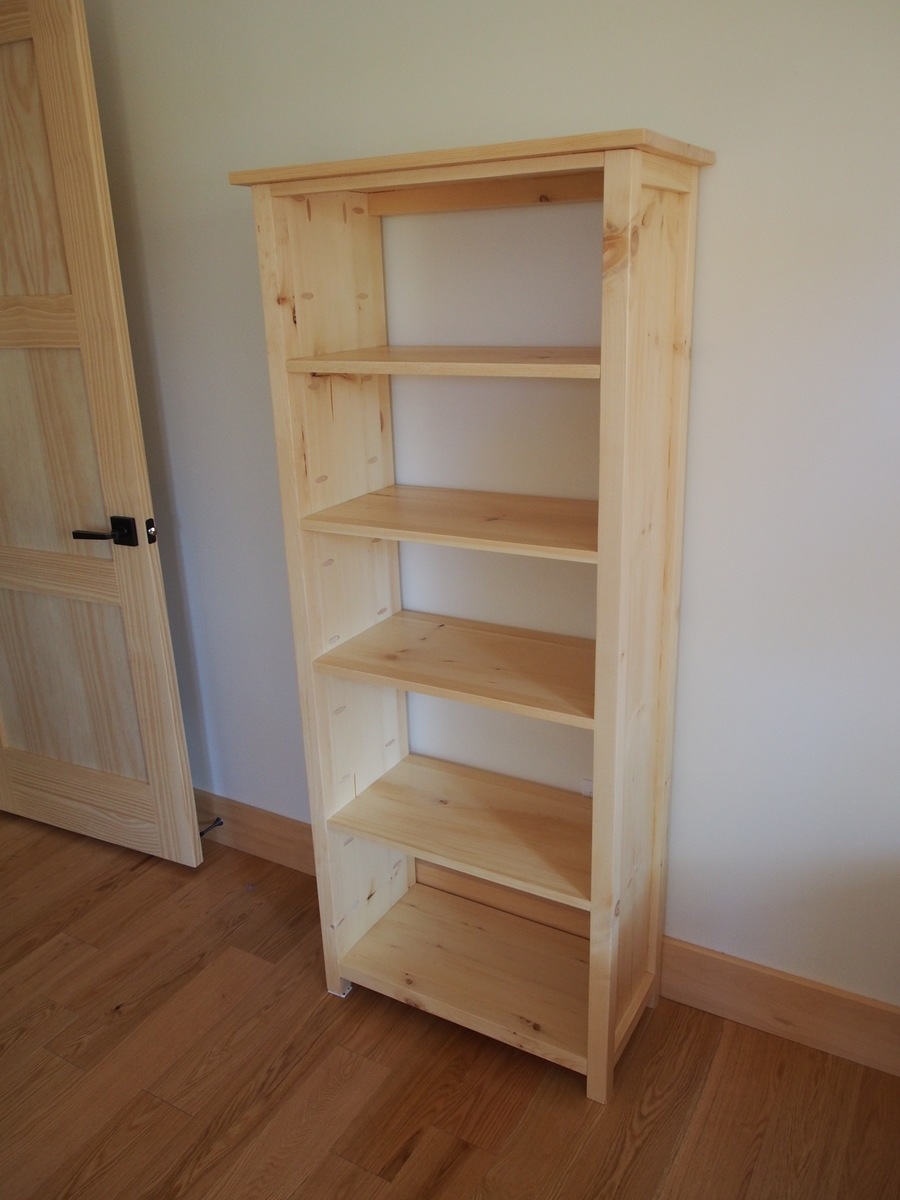
I also created a 5-tier version to match the 6 cube shelves but did not include the legs. I thought it would be more stable to keep the lower frame on the ground.
I purchased the storage boxes from Amazon It was around $20 for 6 boxes!
I am ready for the next project!
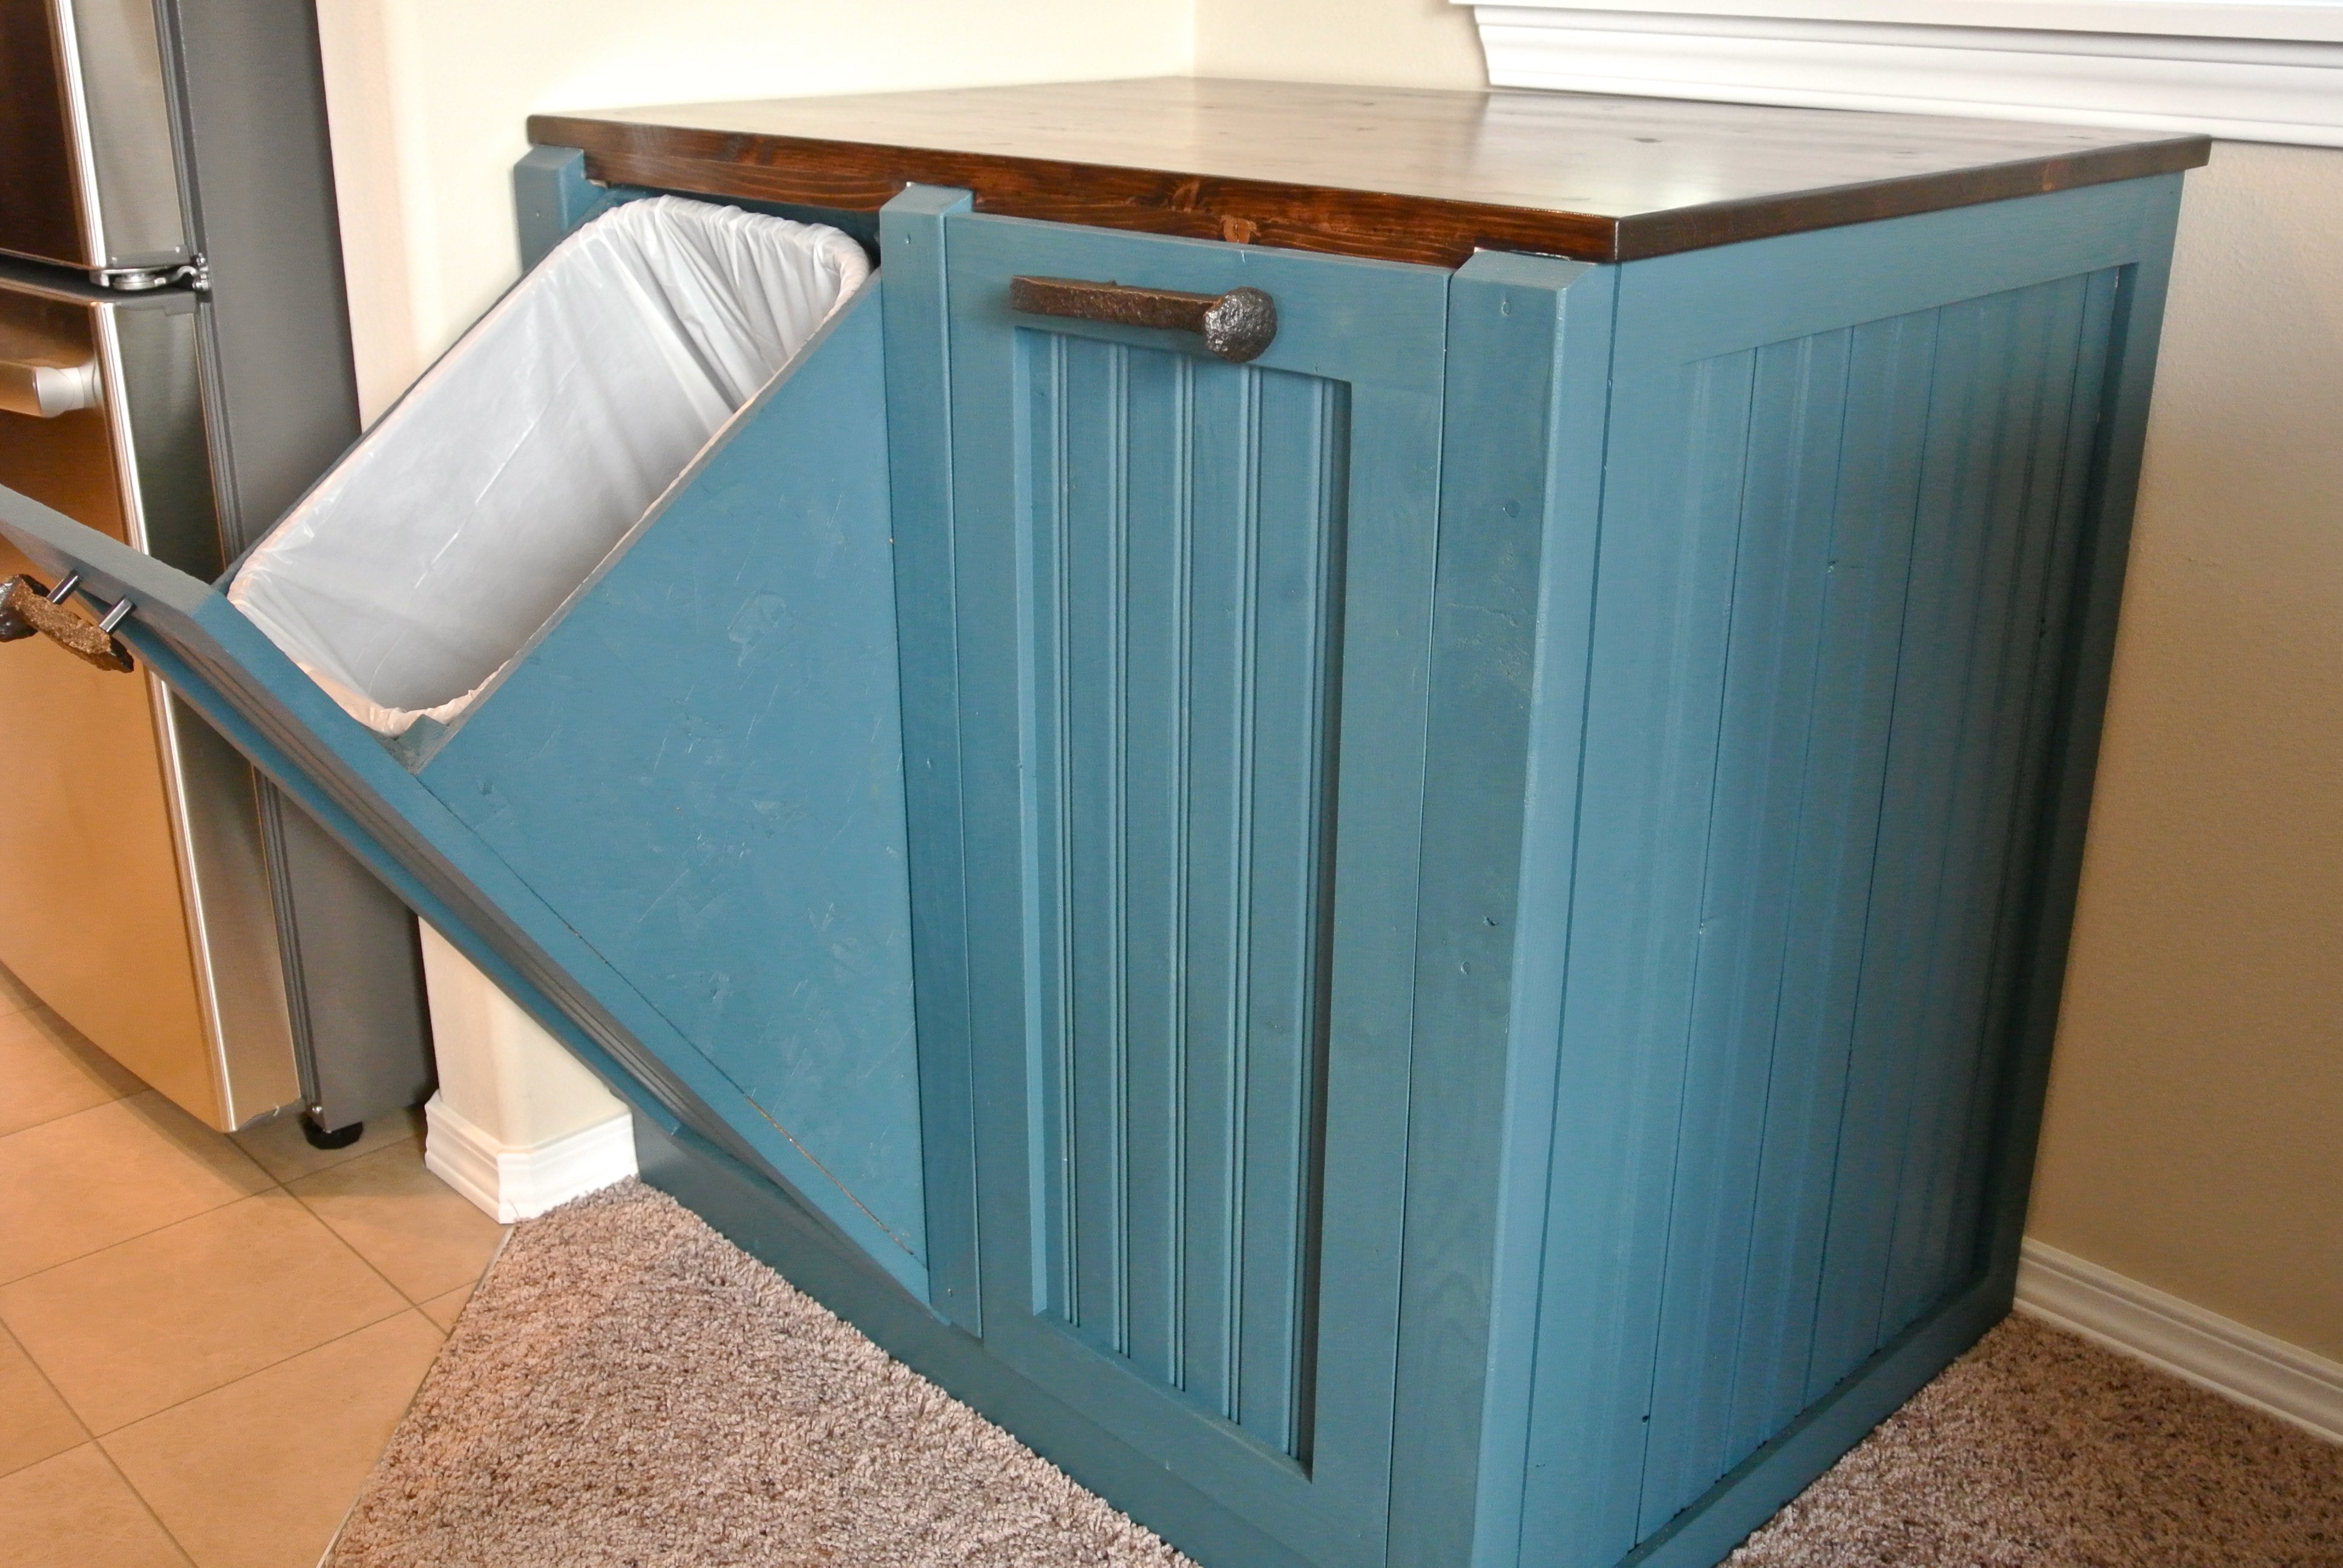
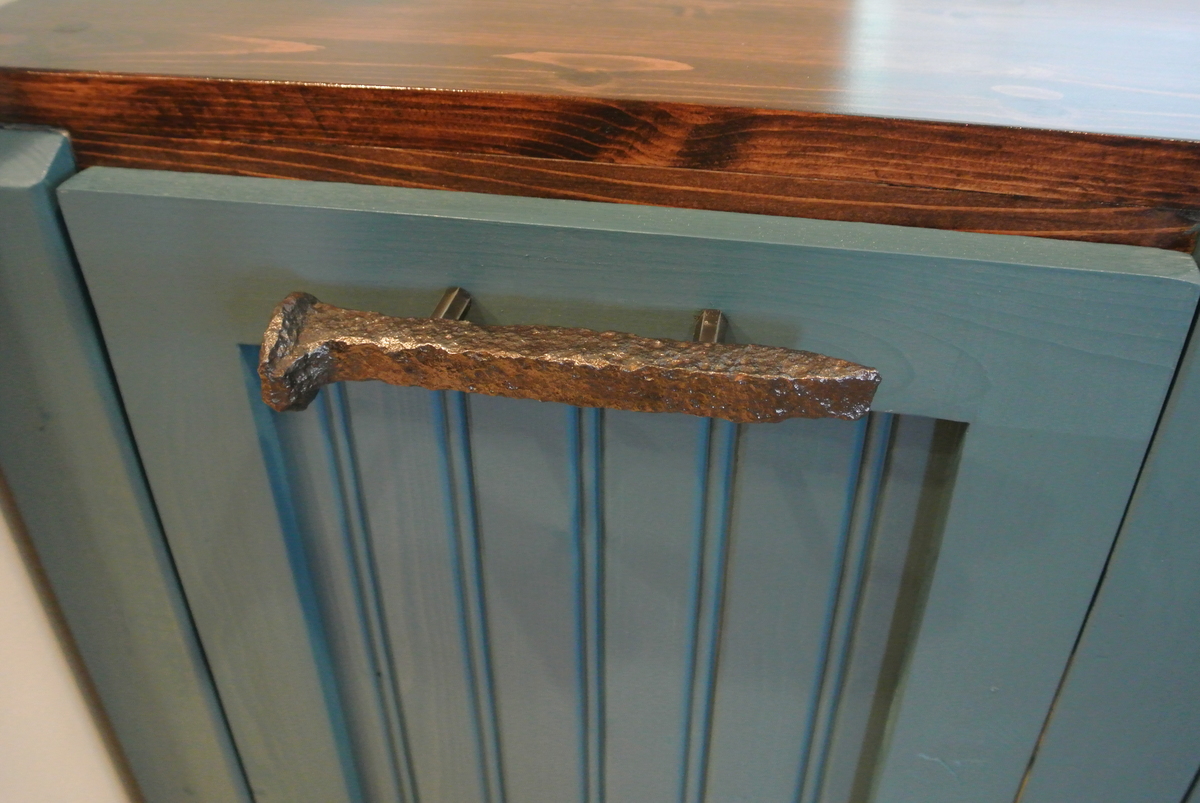
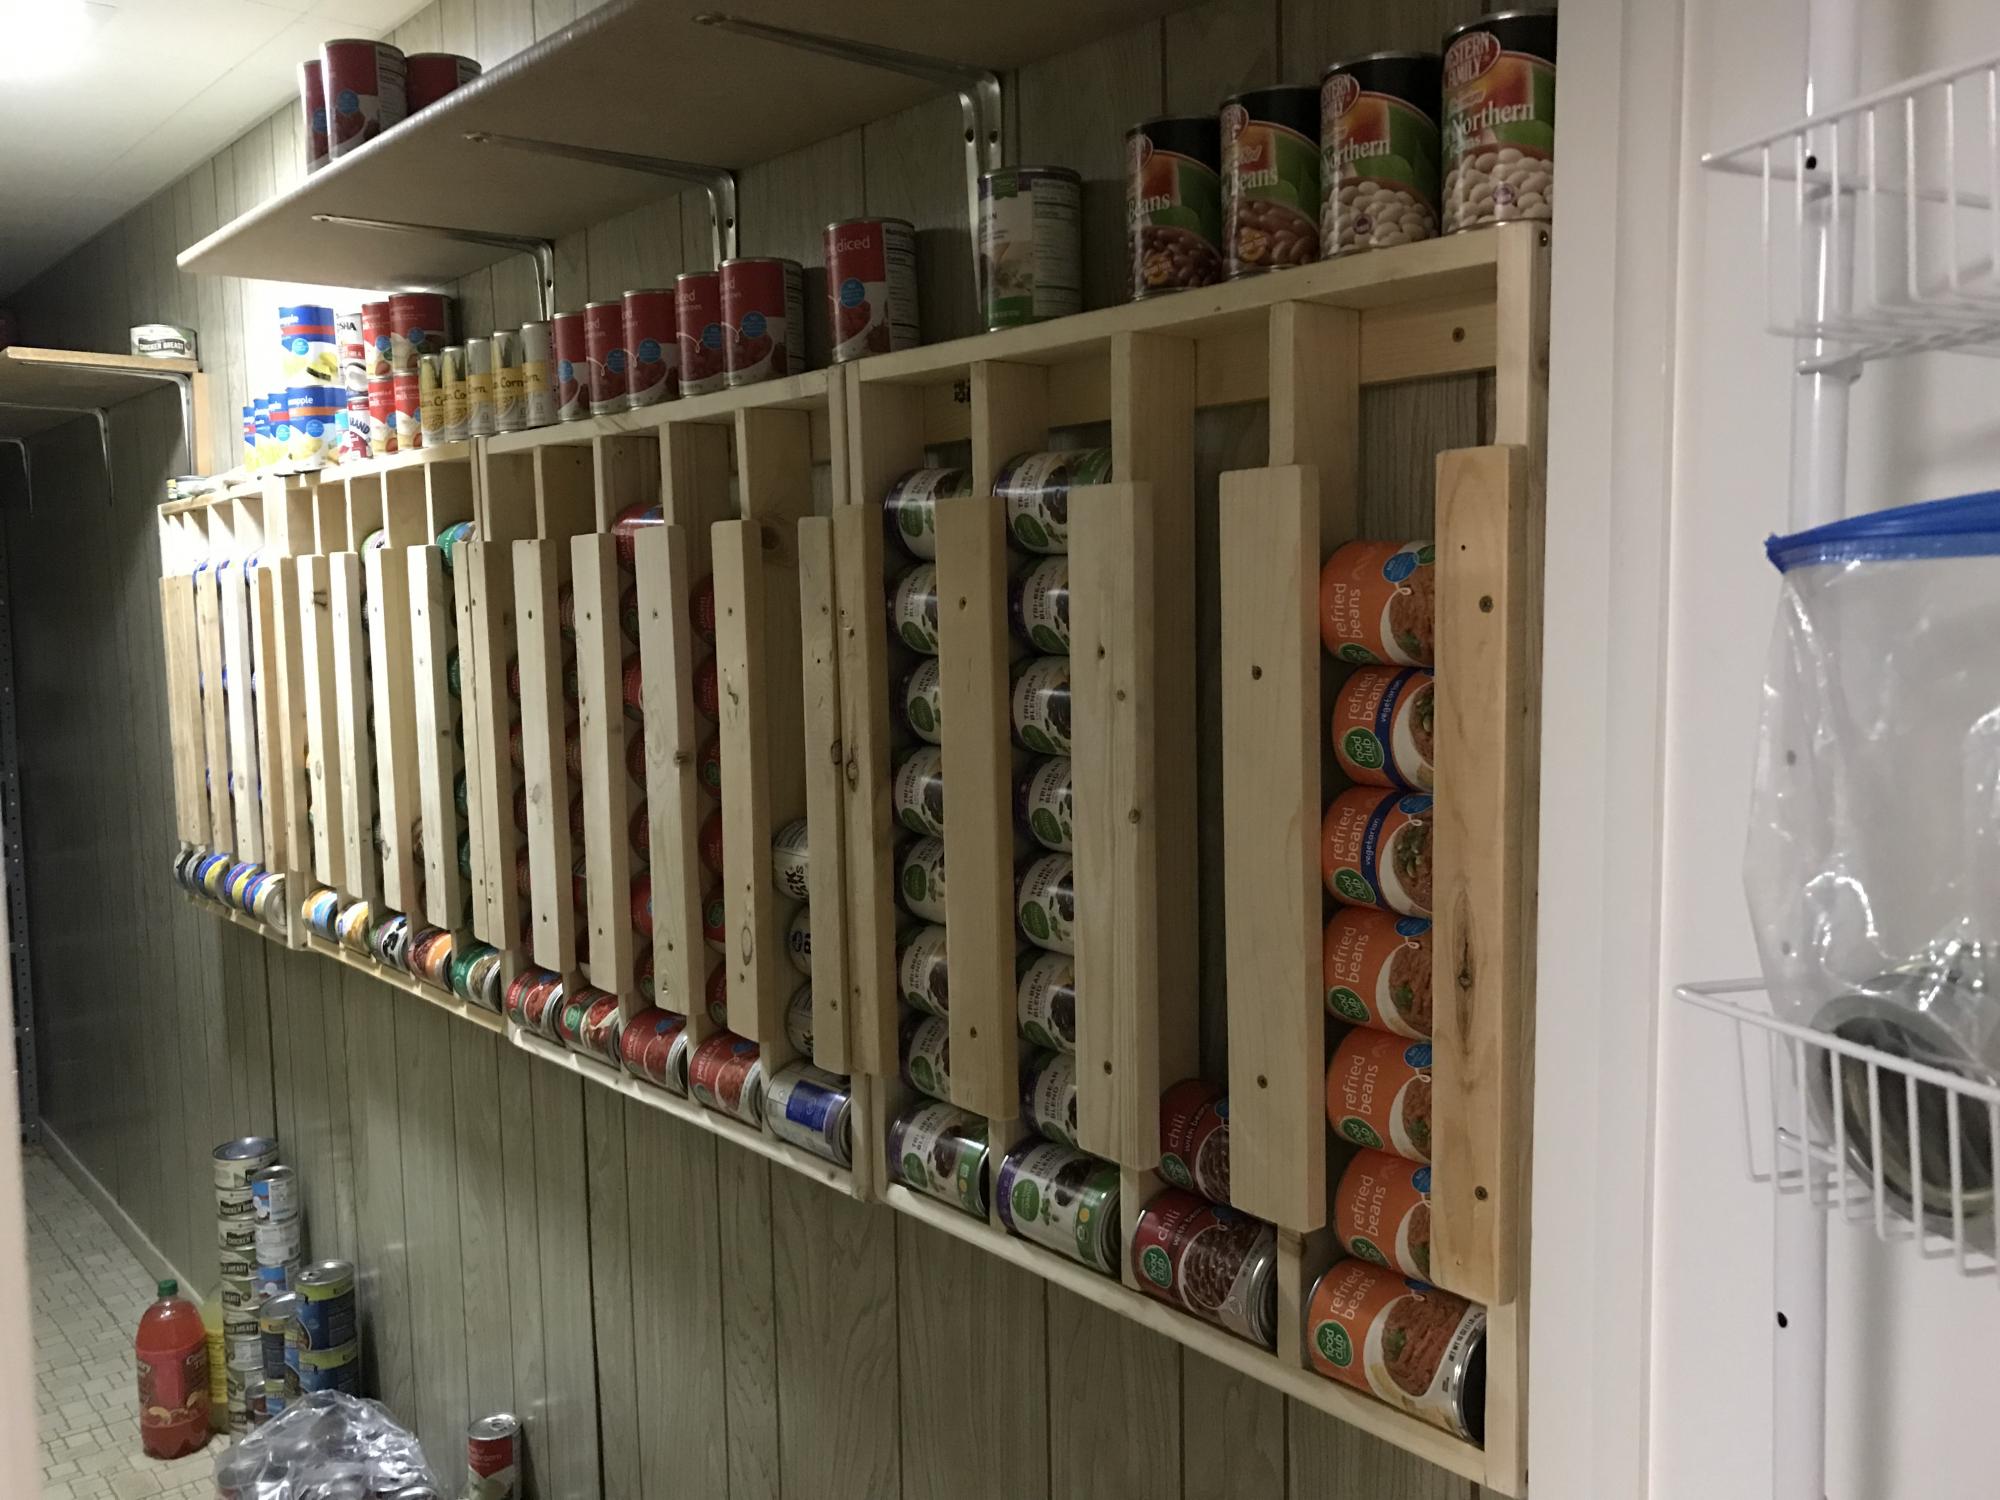
We just moved in to a newly built house, so it was important for everything to have a place. I don't like the garbage can to be under the sink, and my wife doesn't like the can just out on the floor...too many missed hook shots with the coffee filters I guess! This cabinet solves many kitchen problems all at once. An attractive cabinet that hides garbage and recycle, yet is easy to get in and out of. The railroad spike handles are something we sell on Etsy, as well as knobs and shelves. The shop name is YeenYus.

Wed, 07/24/2013 - 21:15
Yeah, I kind of built this on the run with nothing but the space it had to fit into. But it is 34" wide 32" deep and 24" high. I needed it to fit under the window and used the Home Depot garbage bins as the starting point.
I build a lot of stuff...and this was a tough one. The frame is 2x4's with pine facing and bead board. 4 hinges, stain and paint...less than $100.
I'd love to work with you on this if you want. The hard part was engineering the bins falling forward equally and not binding up. The back of the bin actually hits the counter top perfectly now. But you can see that I had to put an extra 1" under the top for it to hit something.
It' gonna take some work but this thing looks and works so smoothly. You can do it...I can help!
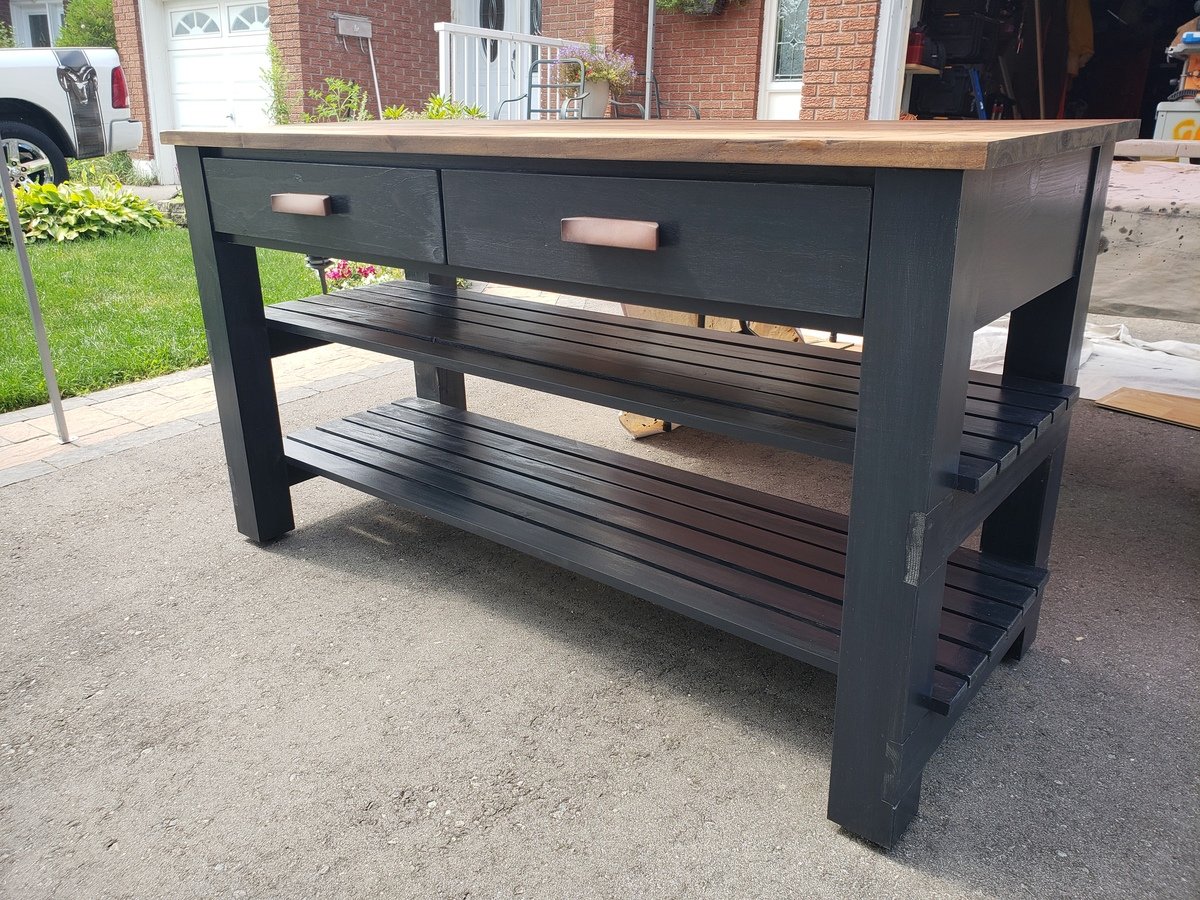
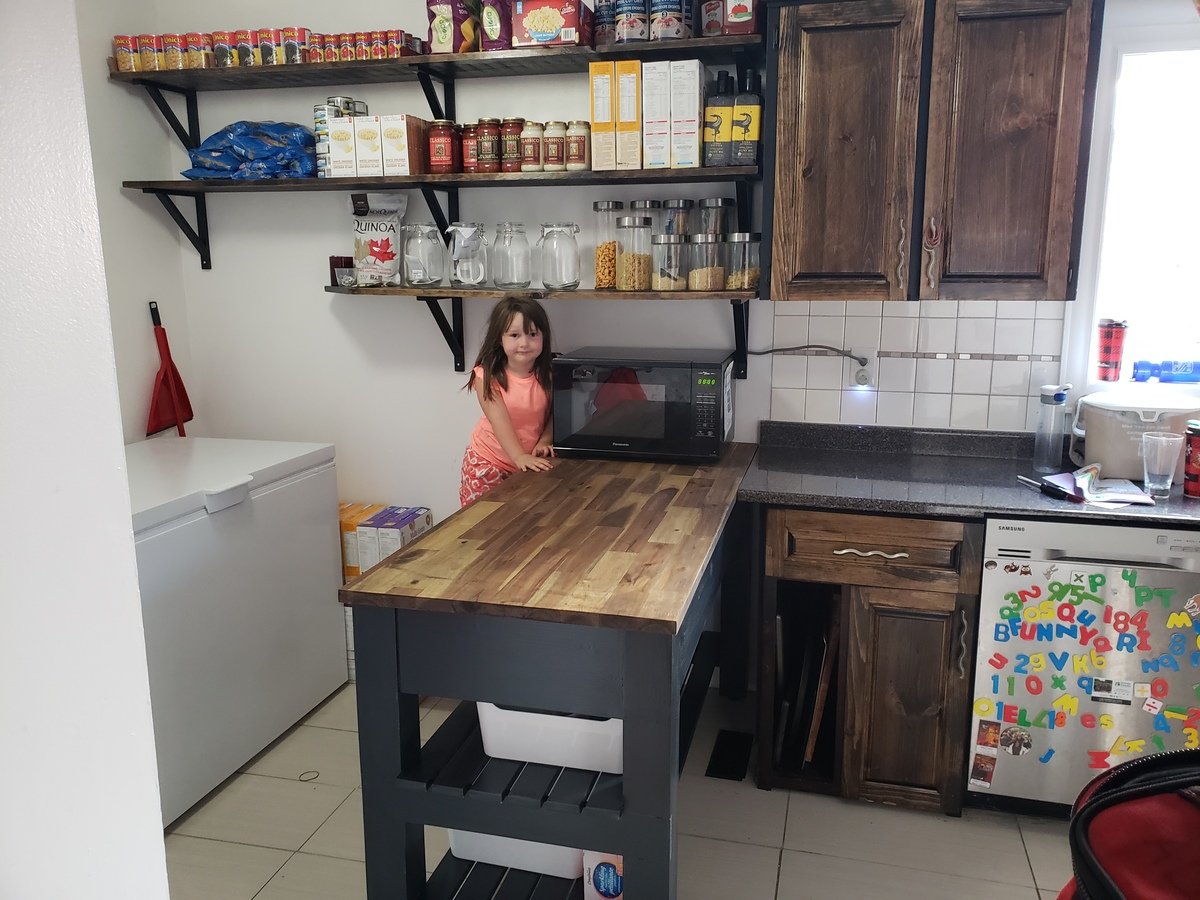
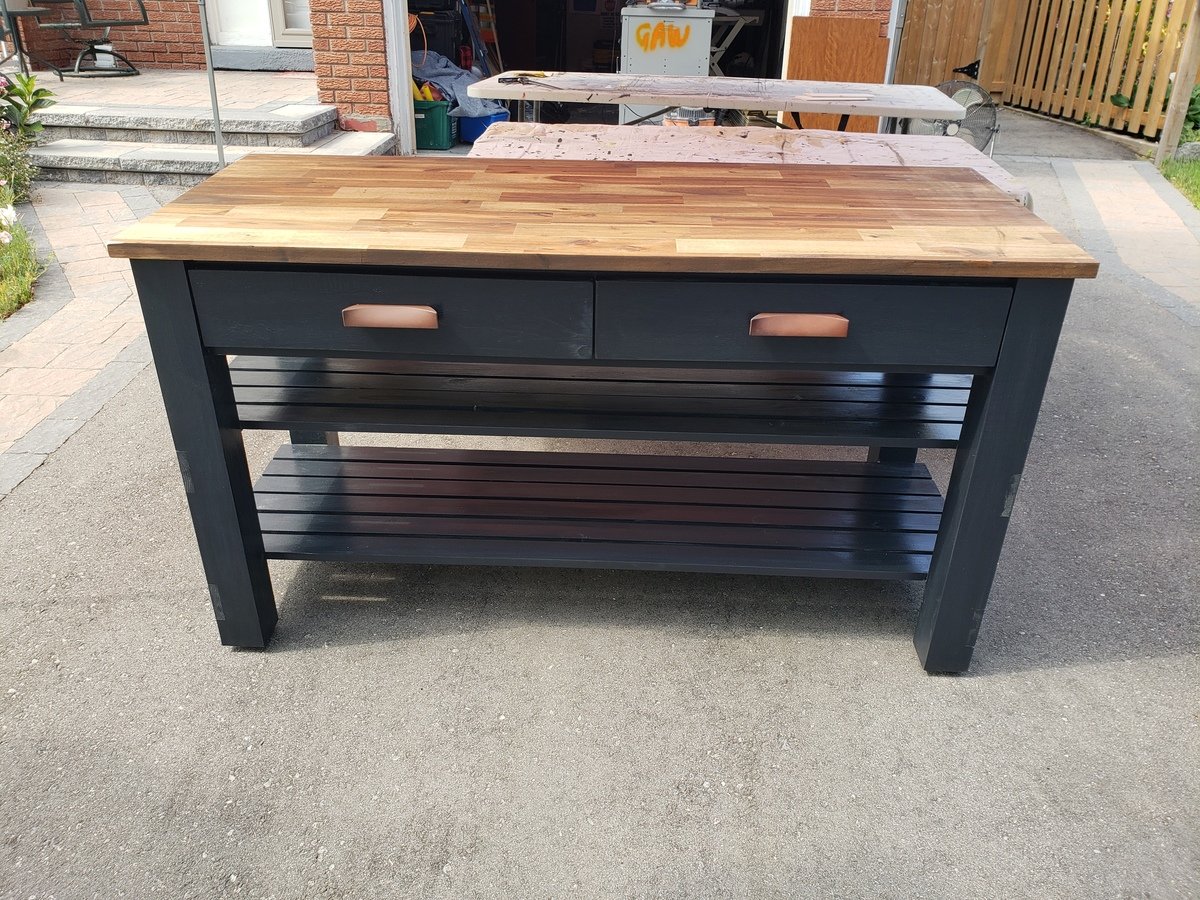
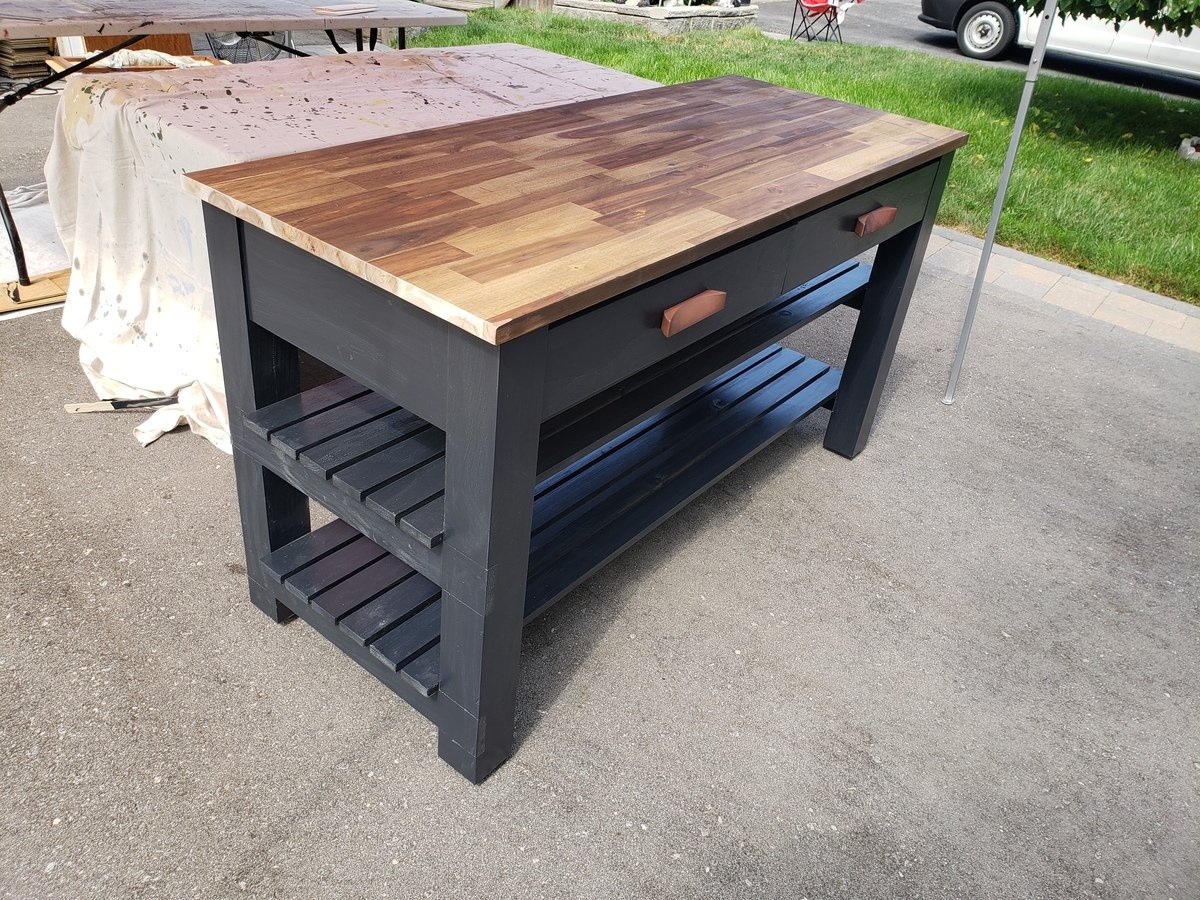
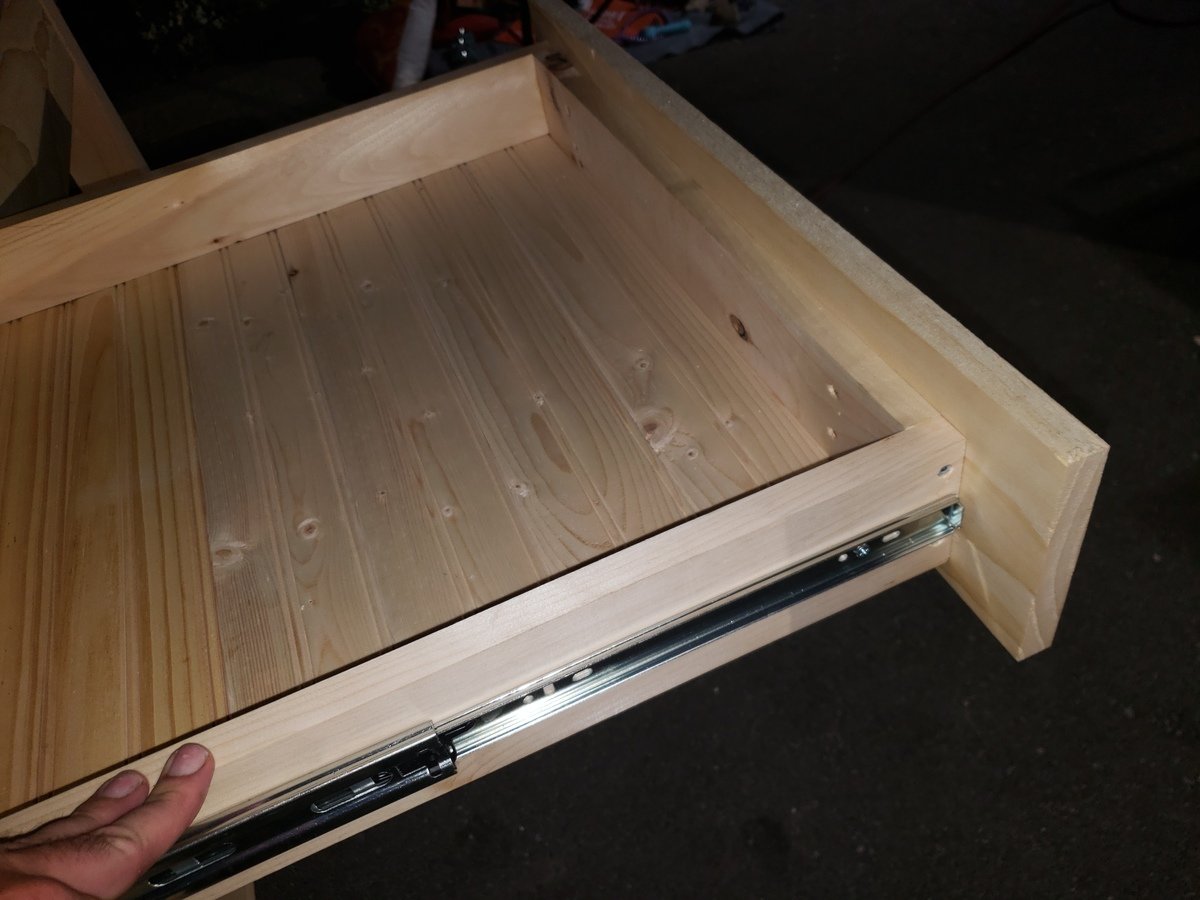
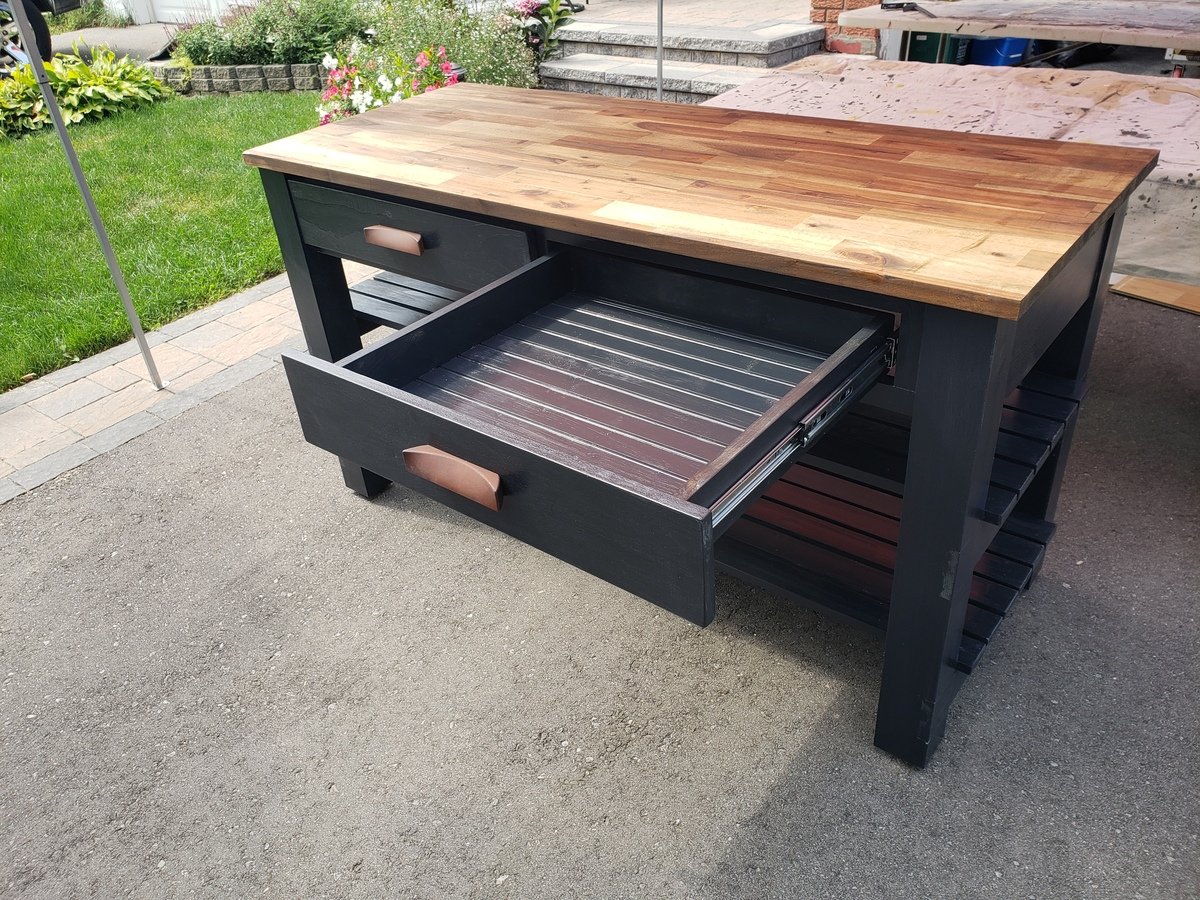
Took roughly 15hrs and $500... We bought the top at Lowes for $150 on sale (Acacia), because it turns out butcher block counter tops of this size (considered an "Island" top) are like $500 and I don't know who can afford those shenanigans but certainly not us. Interesting point: in as much as I totally appreciate the design (Thank You Ana!) the instructions are mostly beautiful but have a few key areas with room for improvement. If you are thinking of building this take some time to go over all the materials and really map out the project. I purchased everything in 8' lengths as per the shopping list, I realized afterwards that because my unit is only 5' long I now have many 3' cut-offs.... had I purhased 10' lengths, you see where I'm going with this yes? I would have paid more per board but had less leftovers. I think I also have a package of unopened screws and an extra board from the shopping list, no big deal, it's like the 10 hot dogs for an 8 pack of buns conundrum, I've now entered an infinite loop. I also realized too late that to use the pocket hole screws to secure the counter top I would need to drill the holes (using my handy dandy Kreg Jig) before putting the slats on the top shelf or else I couldn't get my drill in, rookie move I know...You may find, as I learned, Lowes/Home Depot do not carry such things as 4x4s that are not pressure treated and therefore not ideal to have in one's kitchen...I ended up purchasing all the lumber at an actual lumberyard (Peacock Lumber, Oshawa, Canada), which was cool, because now I know where that place is, and it smells nice. Have fun with your build. I tried to post some other pictures but they kept coming up sideways, story of my life. Take a look on Facebook if you want Adam Connor in Pickering, Canada, I'm not shy ;-)
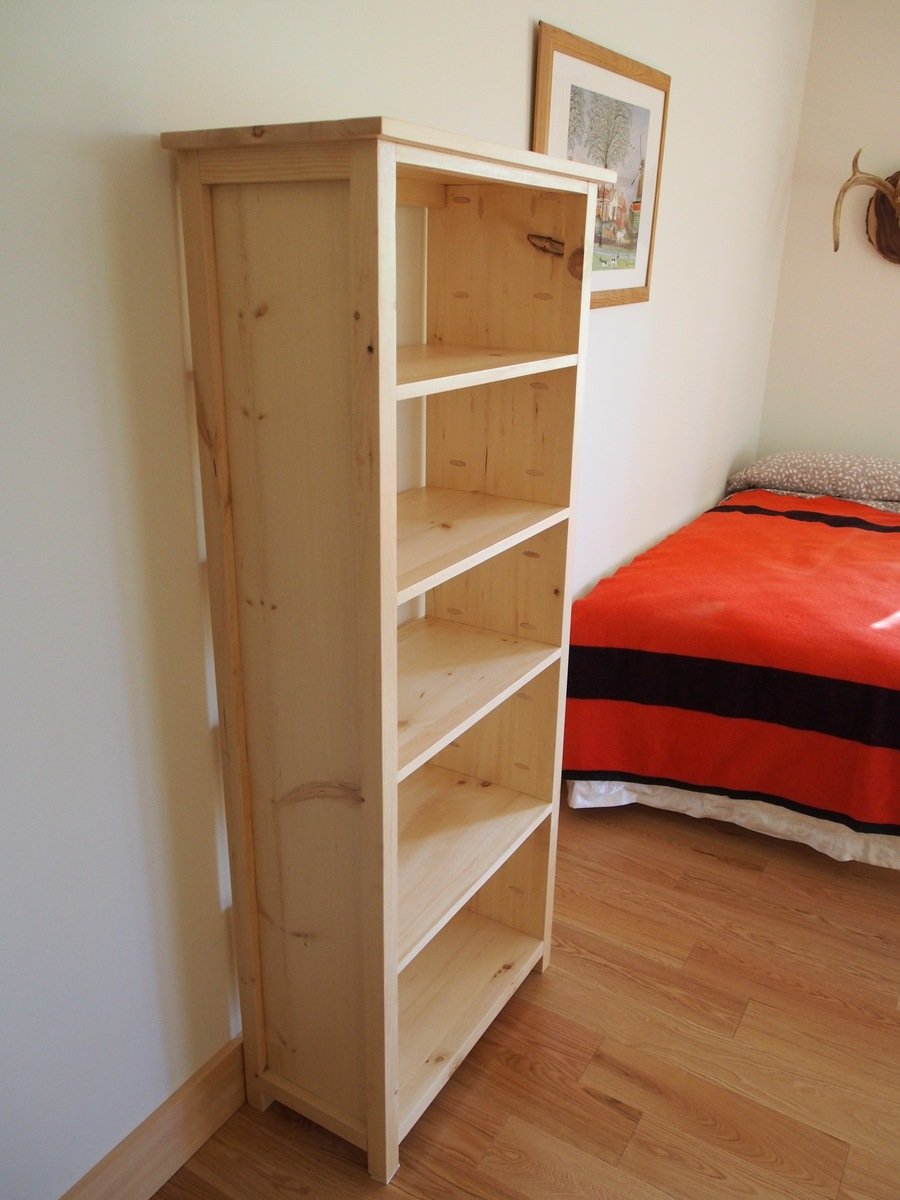
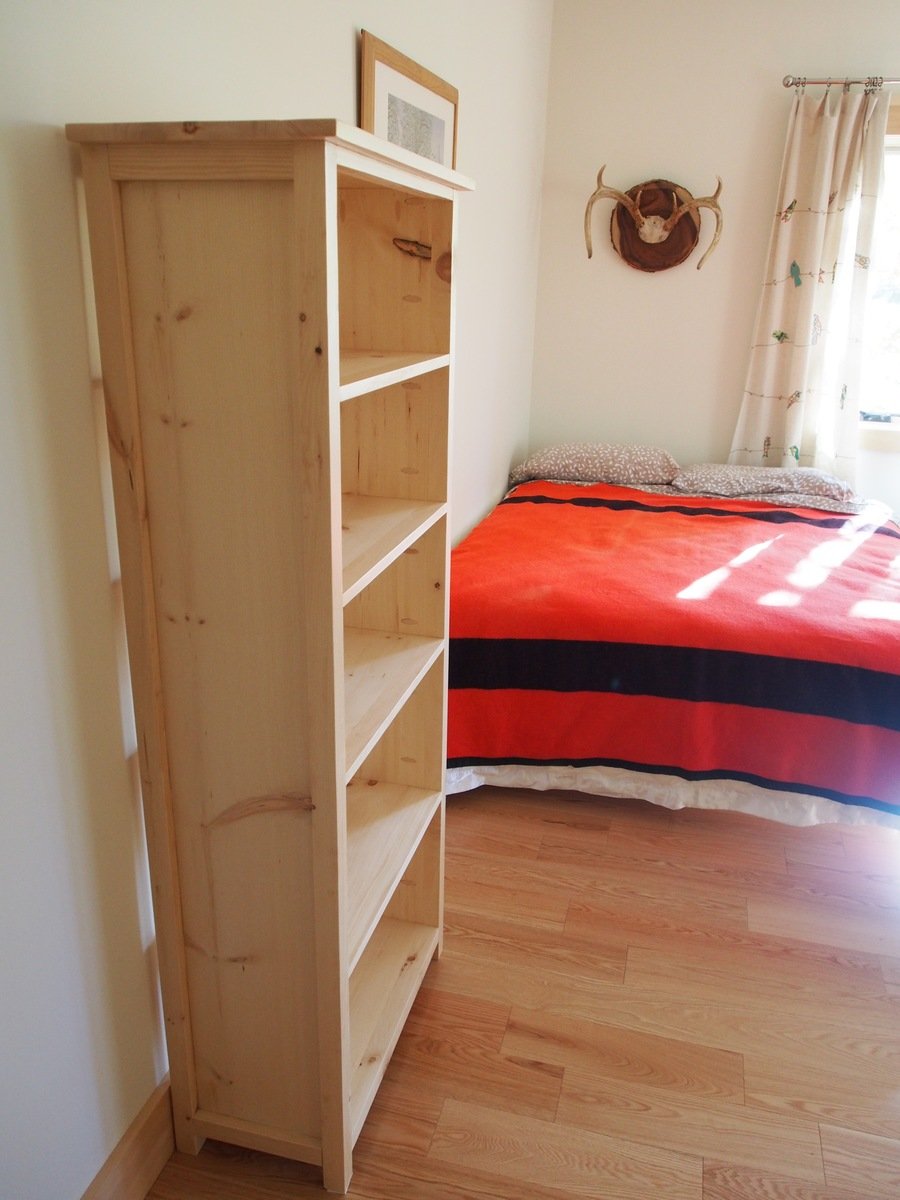
I used 1 x 10s to make the bookcase a little shallower, and left the back open. Thanks for the great plan.
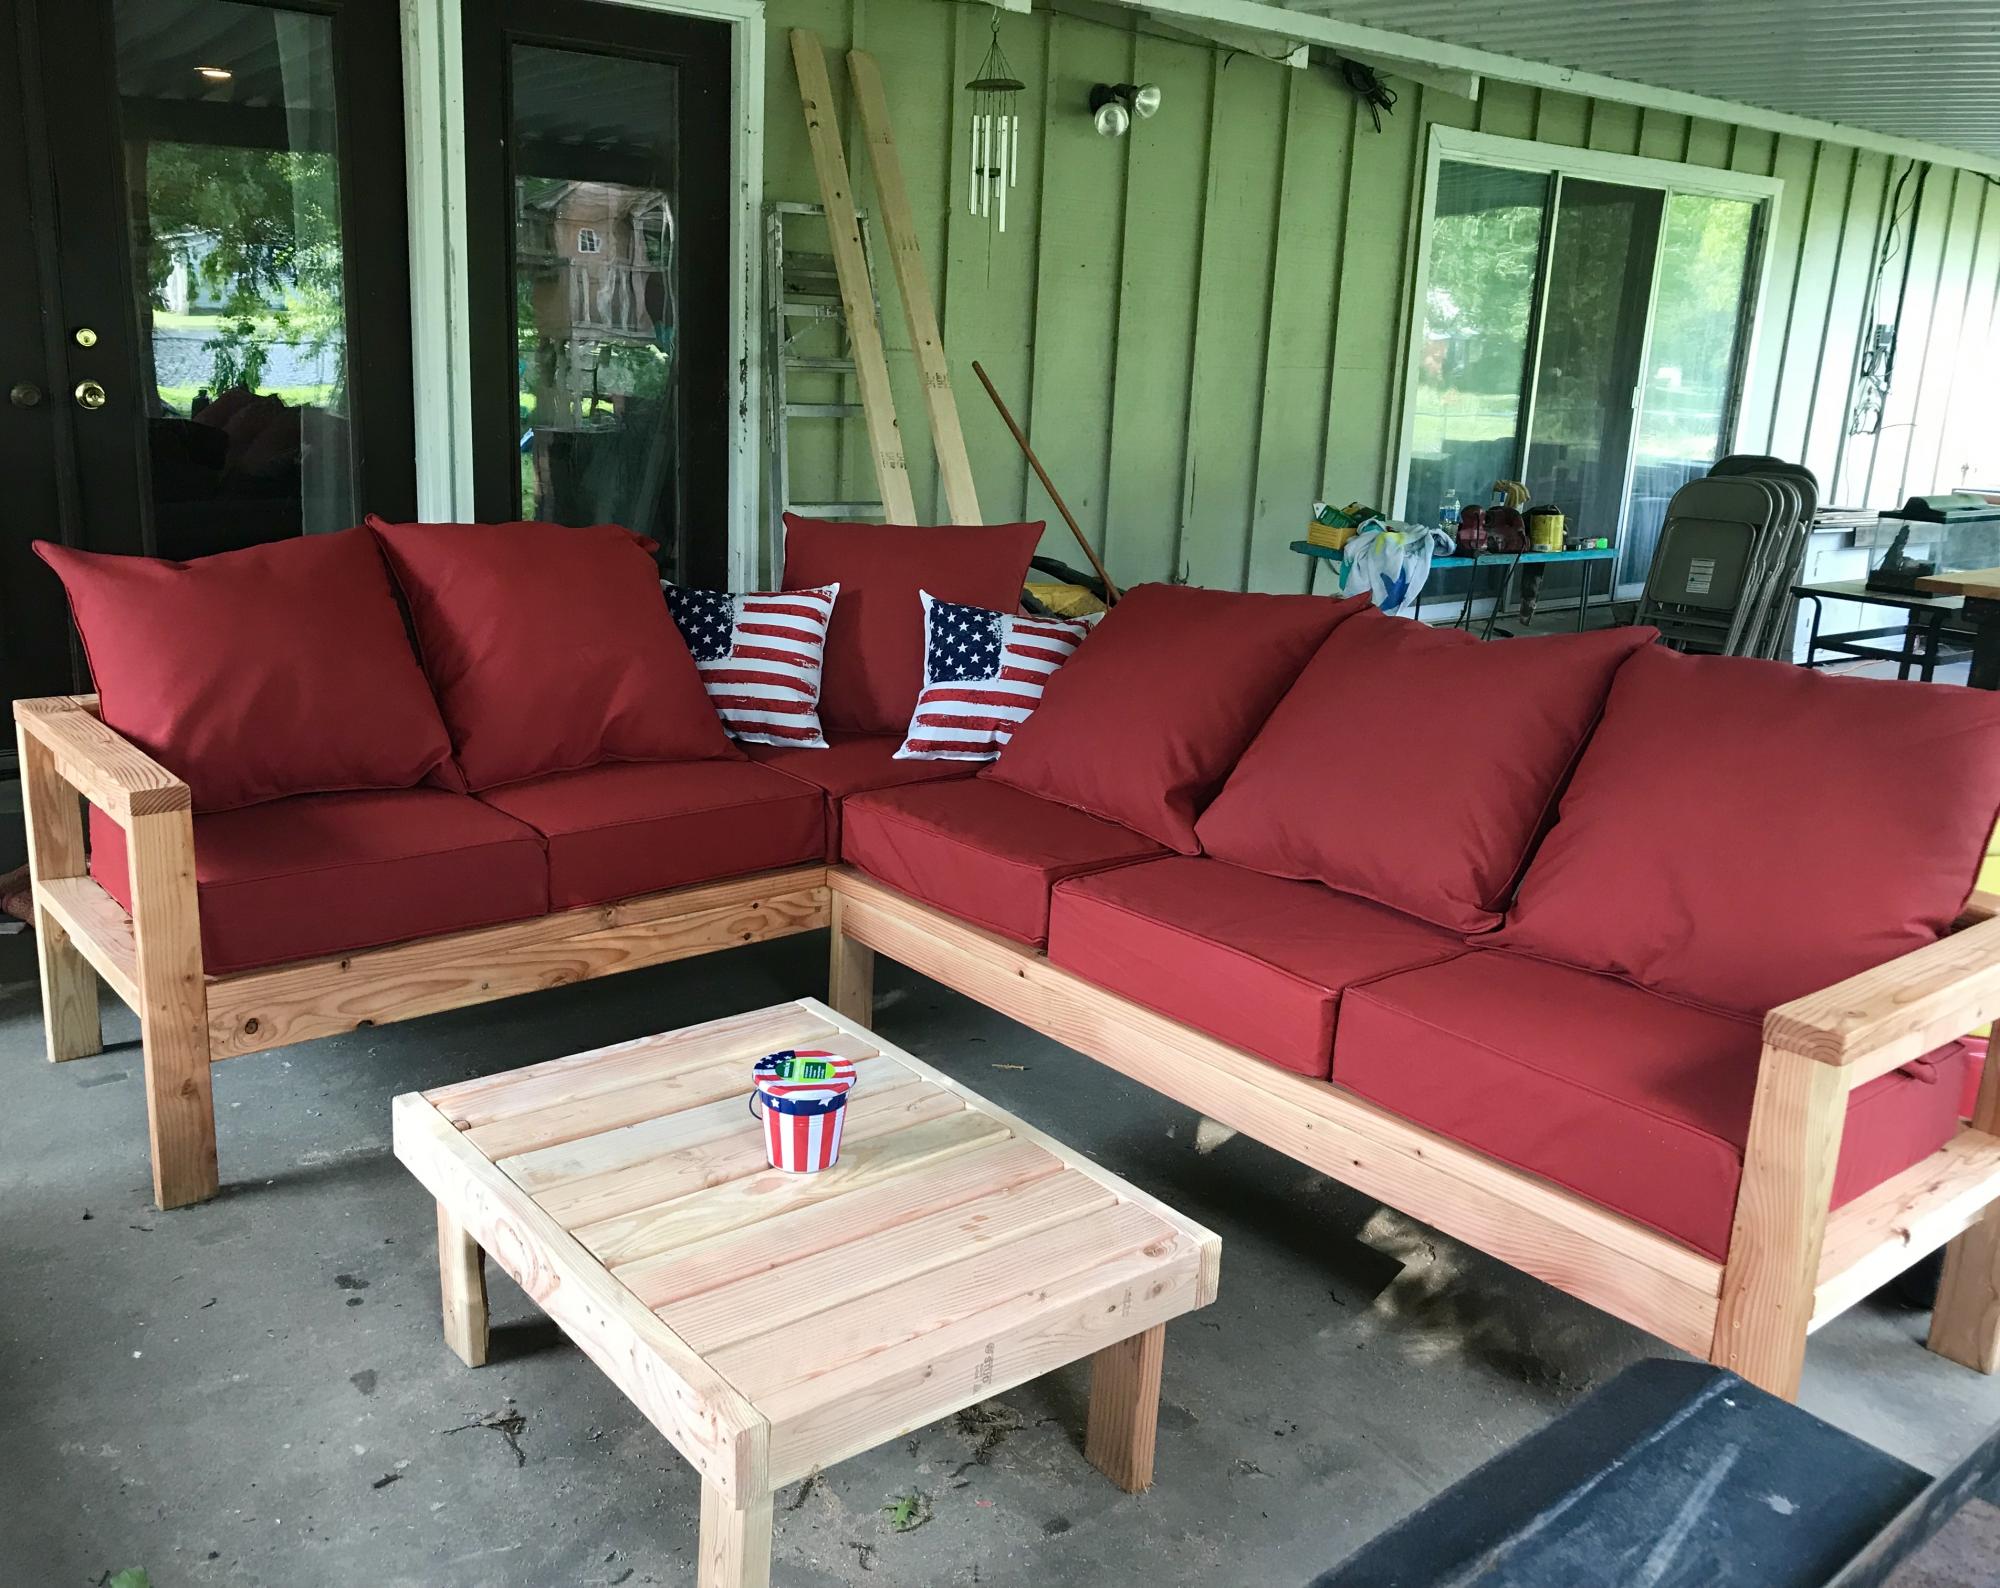
I followed the plans as written, It took me about 6 hours and that includes sanding and staining. Very simple yet offers a very wow finish. I think in total we spent about $300 for all supplies including cushions which was the most expensive part. I just finished it off with Teak Oil and an Americana theme for our covered patio. We love it.
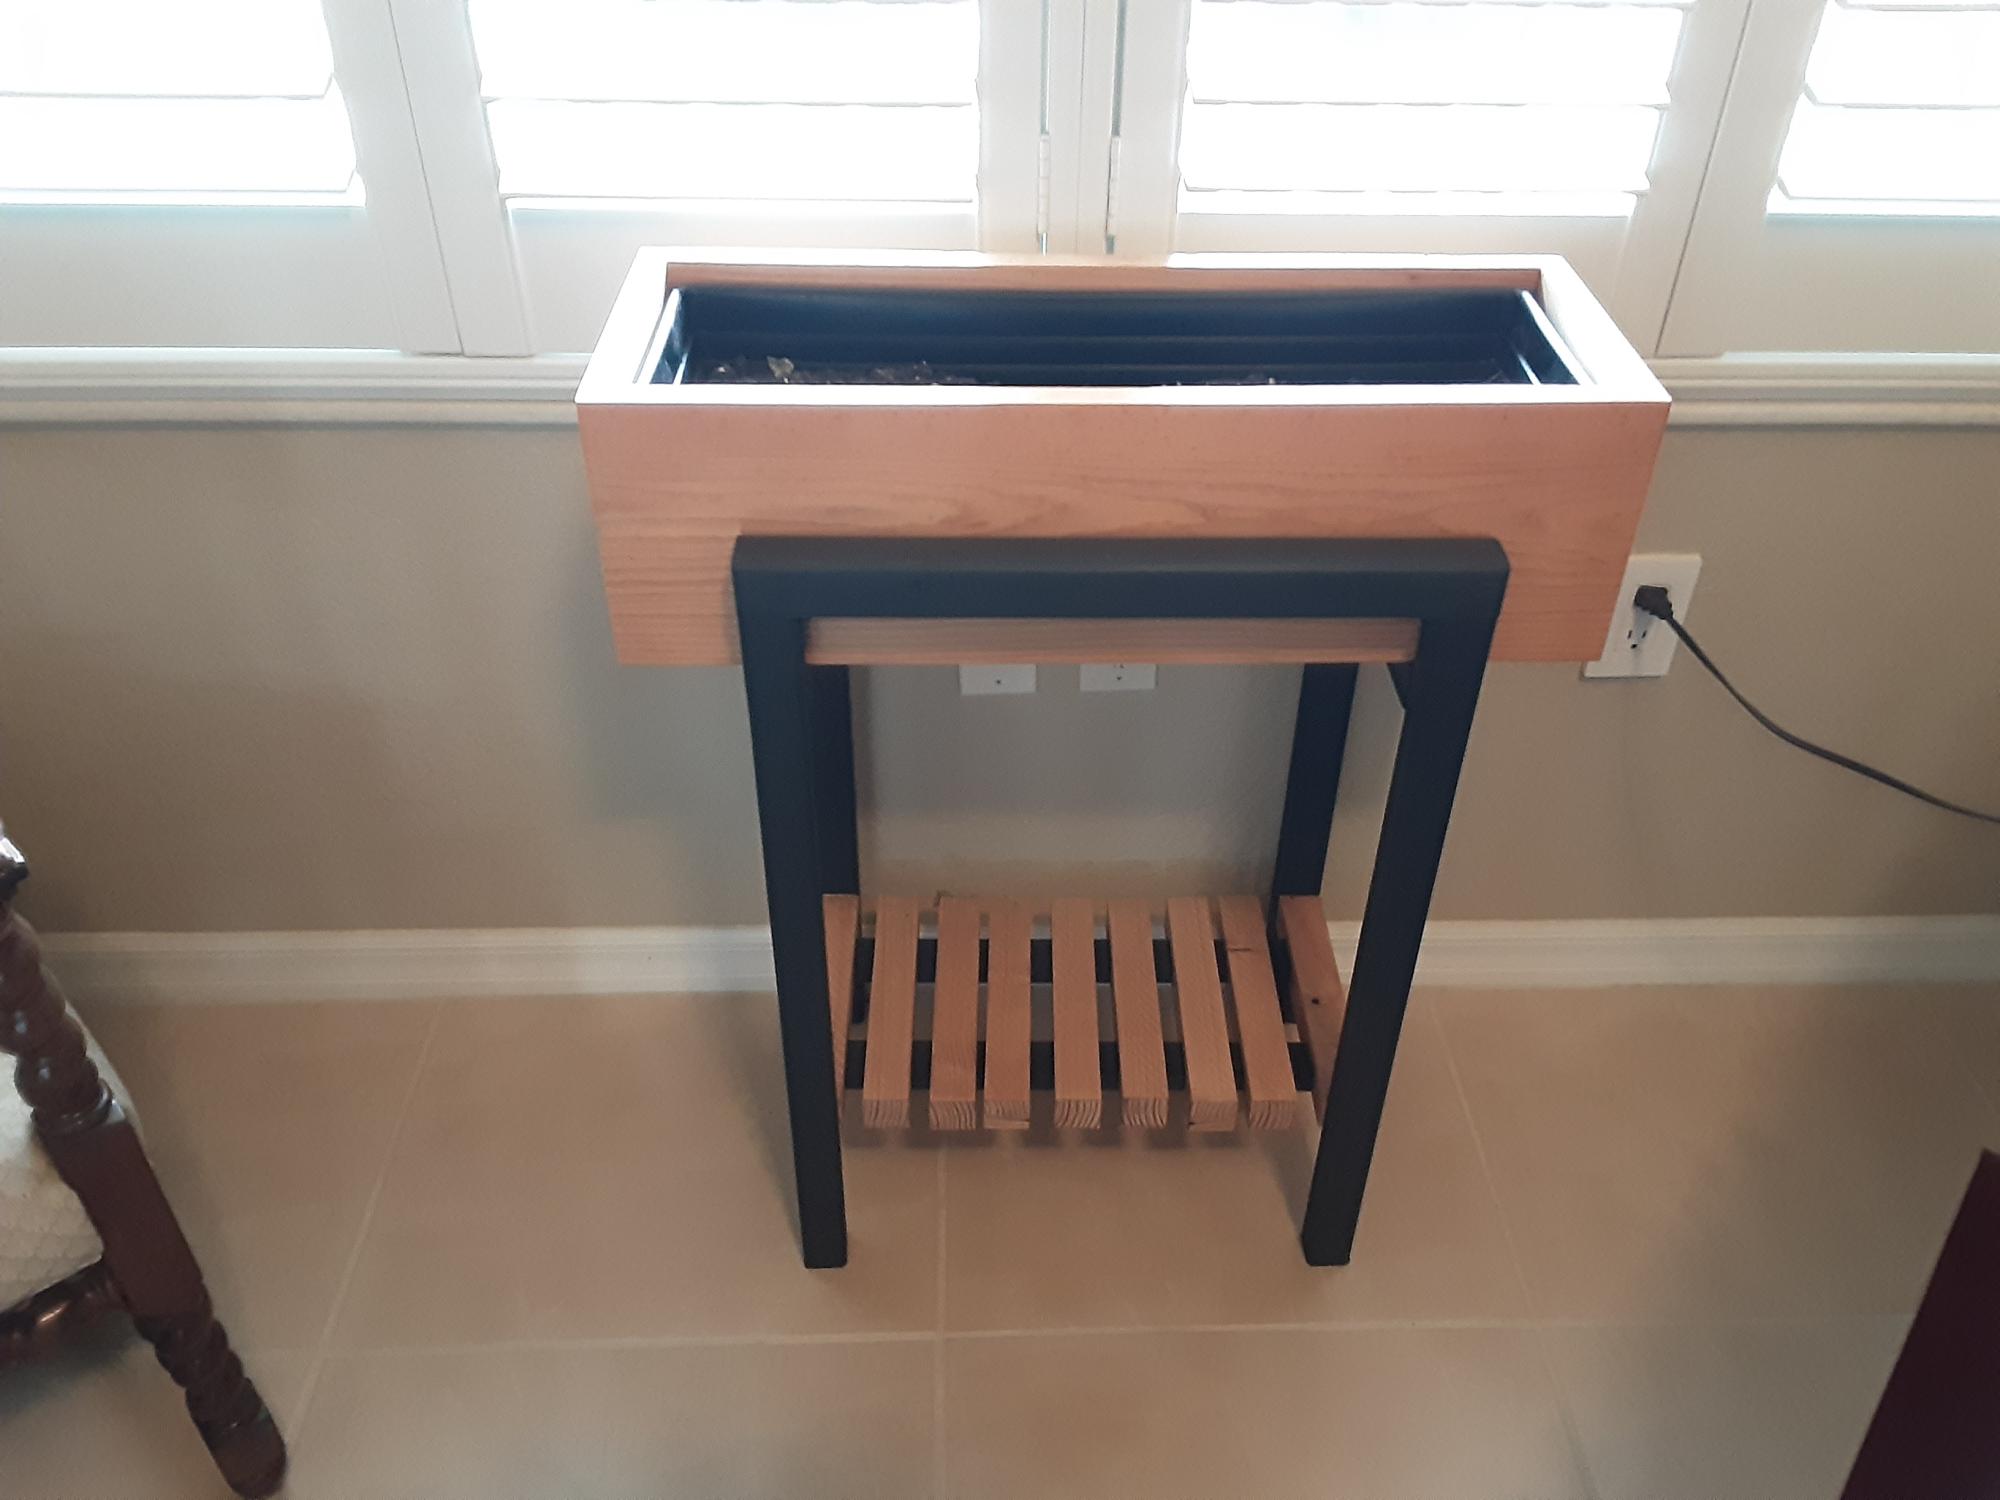
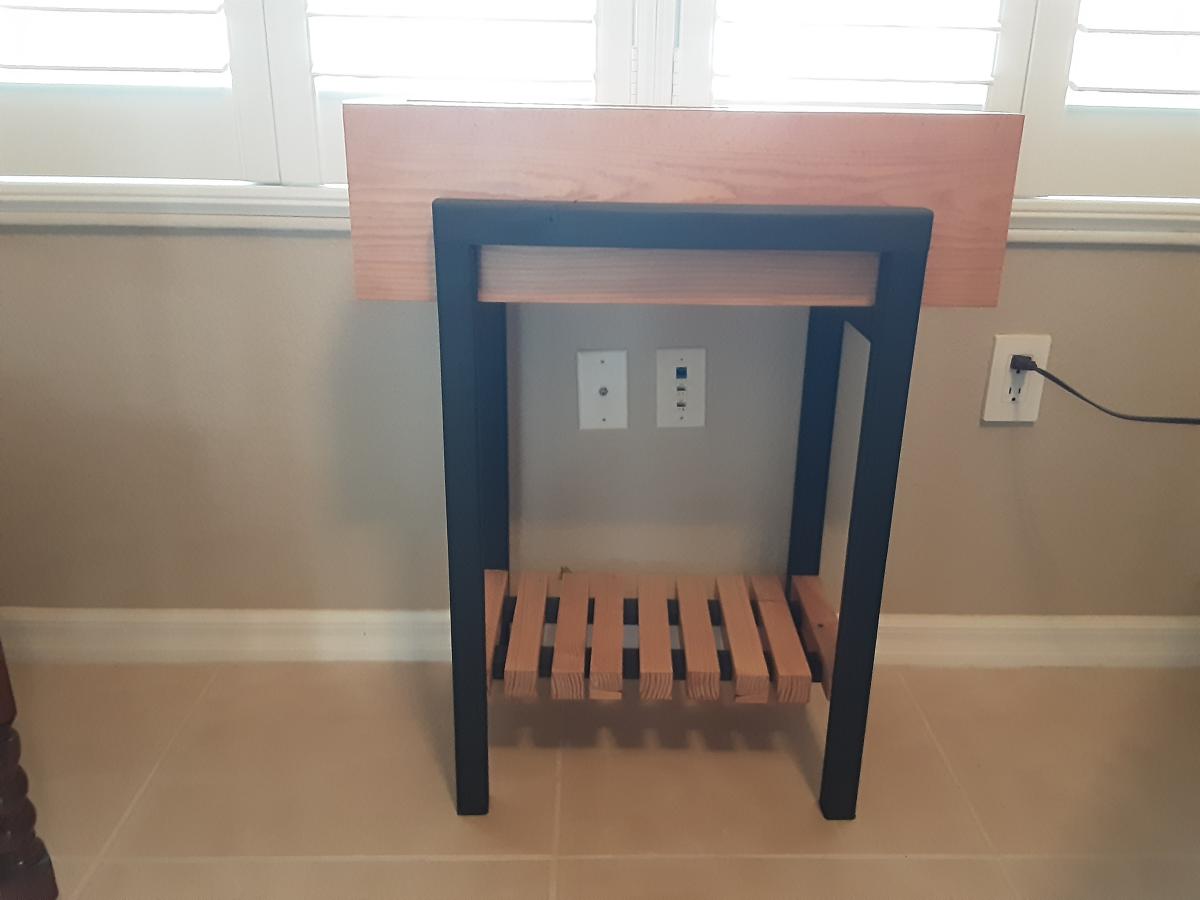
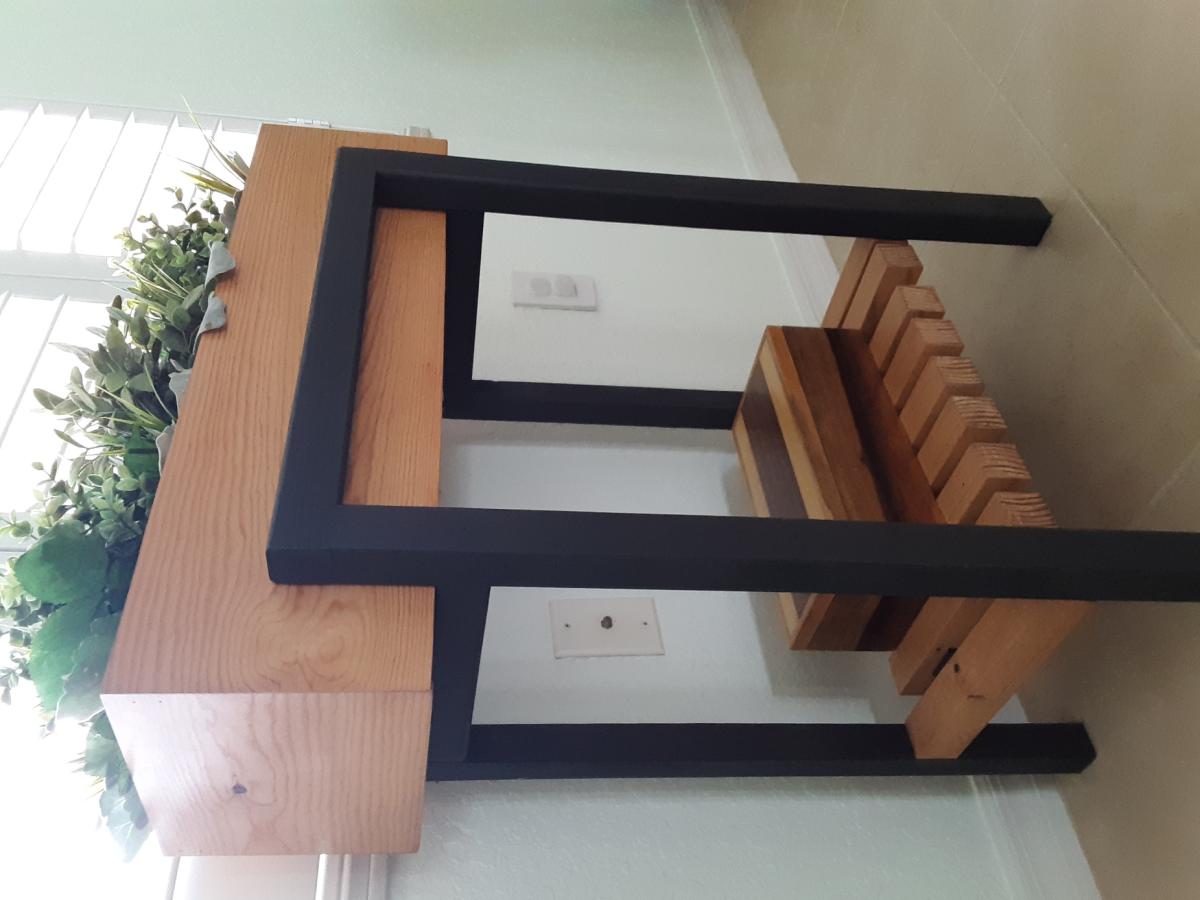
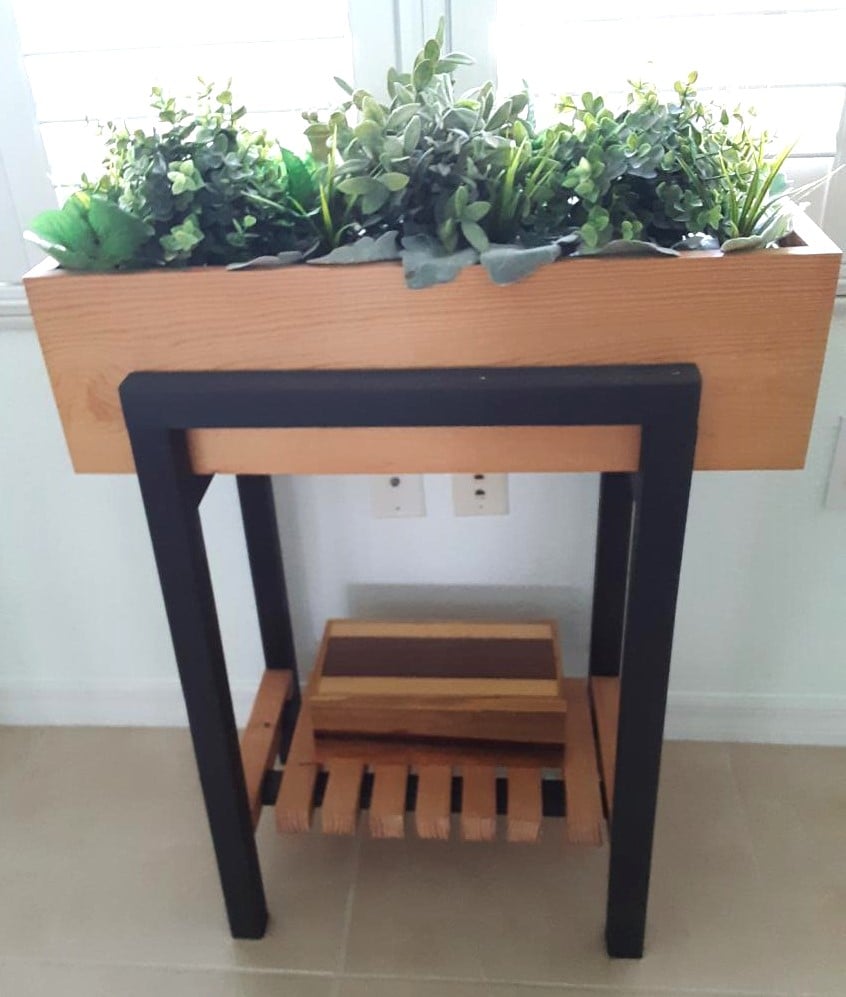
Created the stand for the raised planter using 2X2 assembled using dowels. Painted the stand mixing black with a bit of white to simulate metal. The actually plastic window box fits within a wood open box with mitered corners fir clean log. Bottom of the stand provides a shelf using (9) 2X2s with a dado placed on either end to fit on the runners of the stand.
Mon, 05/01/2023 - 08:24
It looks super high quality, love your take! Thanks for sharing.
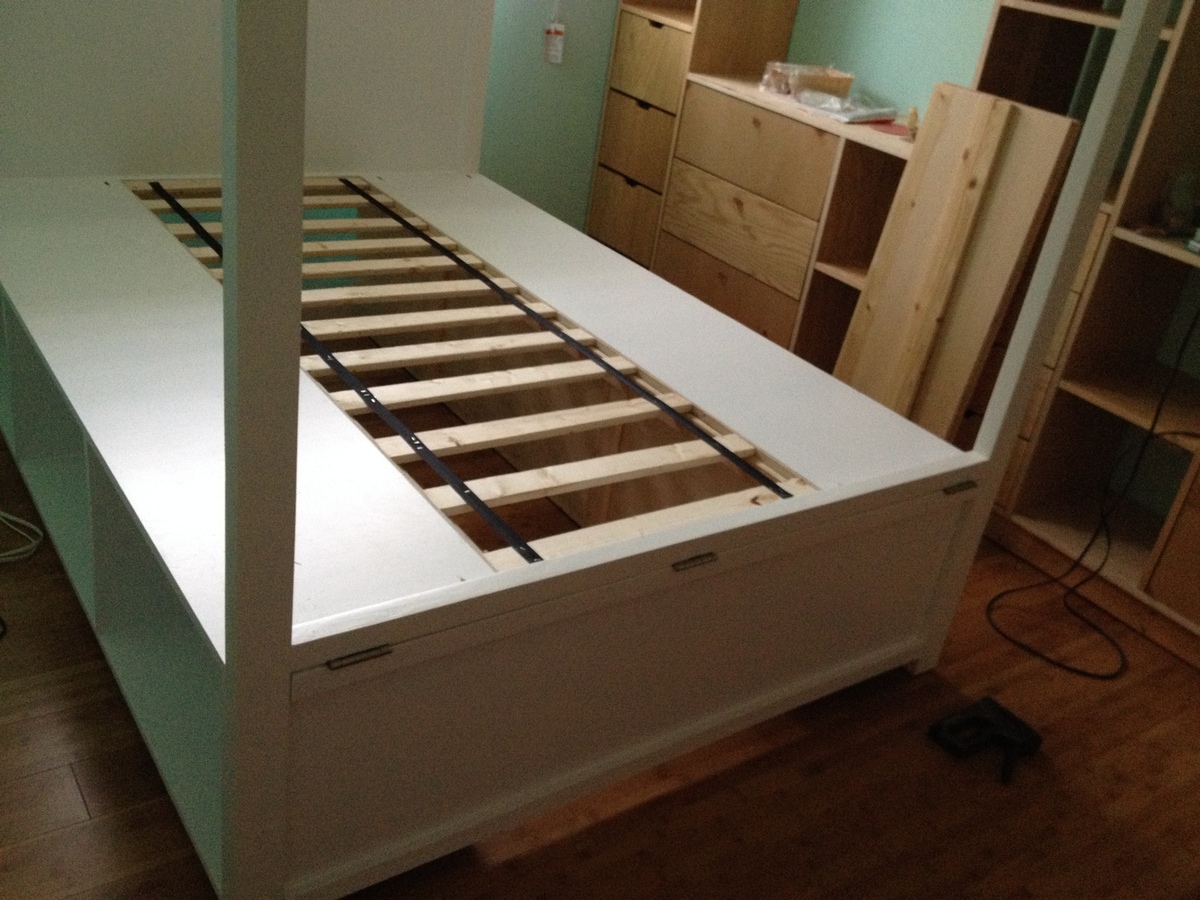
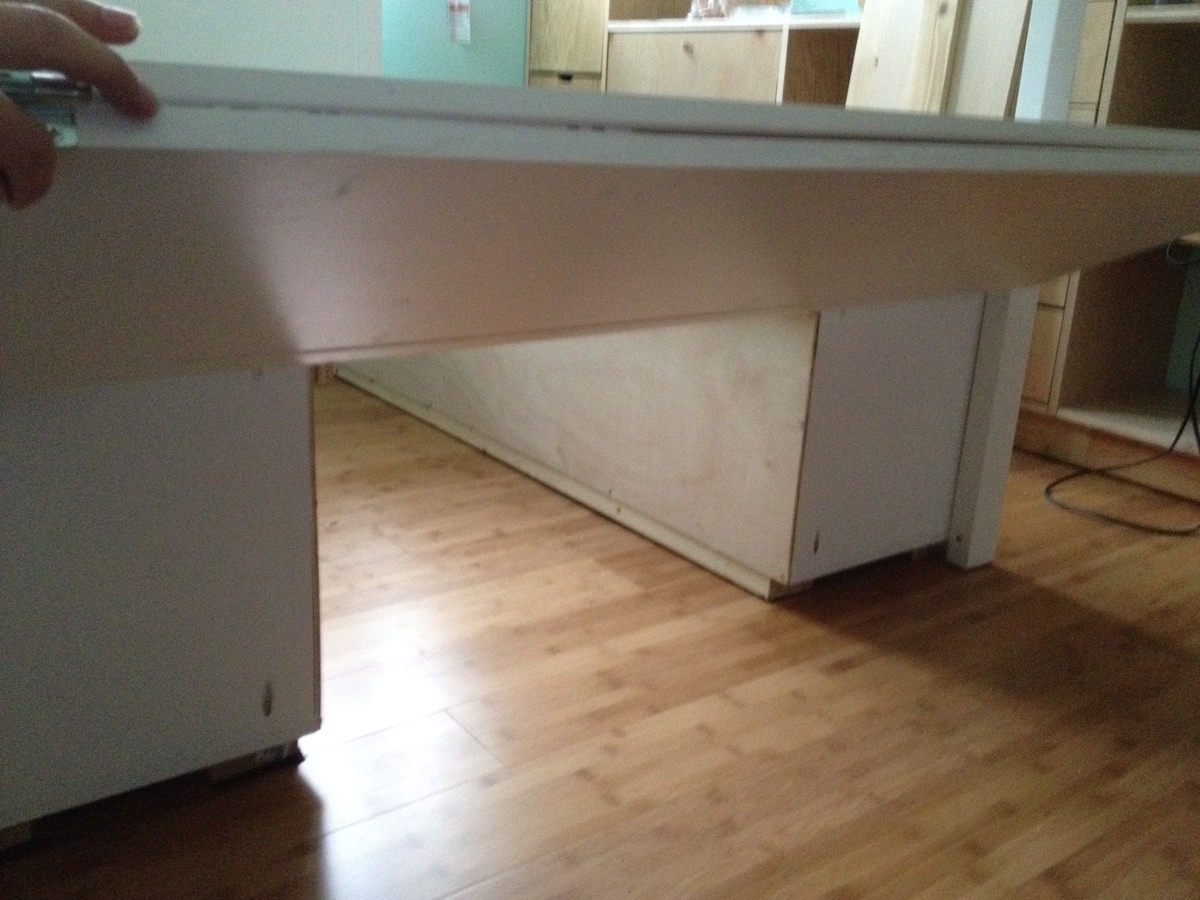
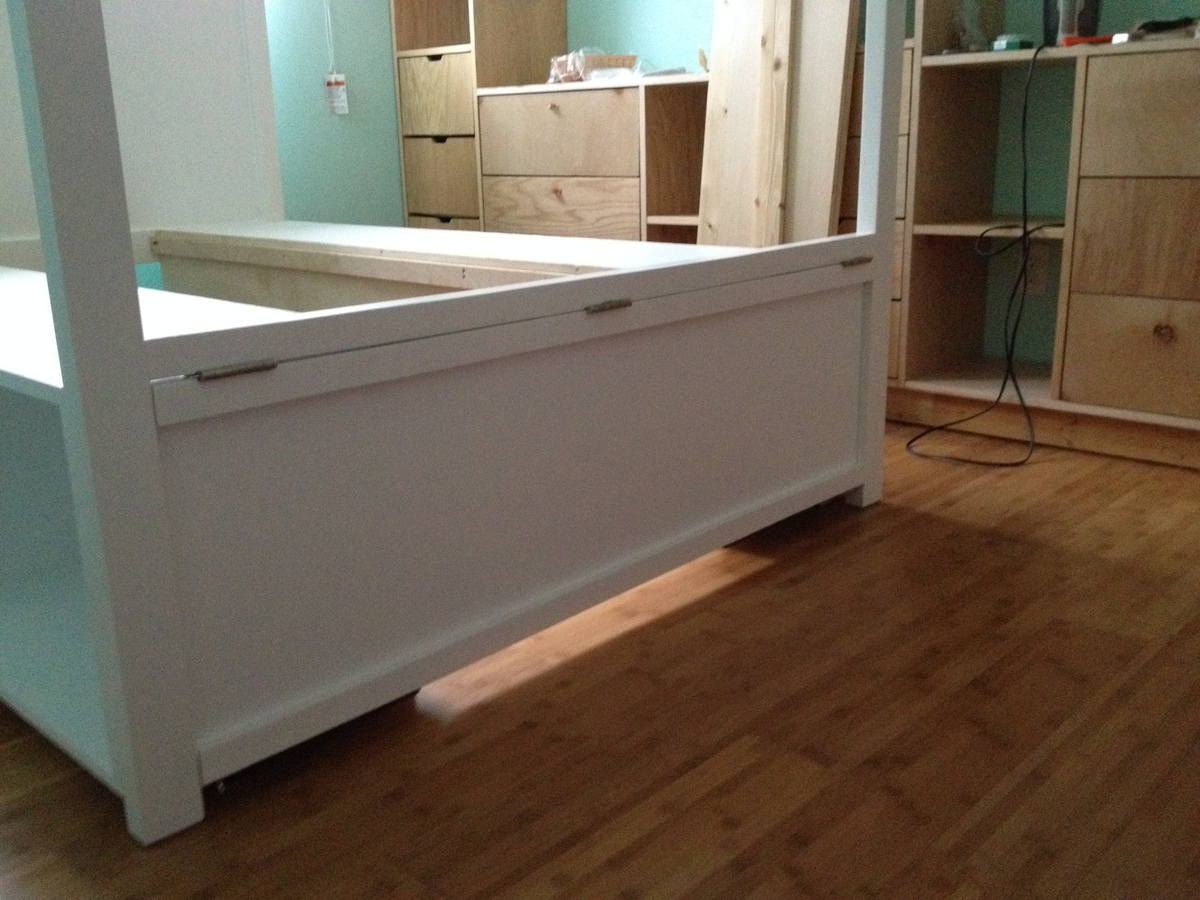
I combined the full-sized Hannah canopy bed plans with the Farmhouse Storage Bed with hinged footboard by birdandsoap here: http://ana-white.com/2011/07/farmhouse-storage-bed-hinged-footboard . Decided not to taper the ends of the 2x3s. There's so much storage underneath!


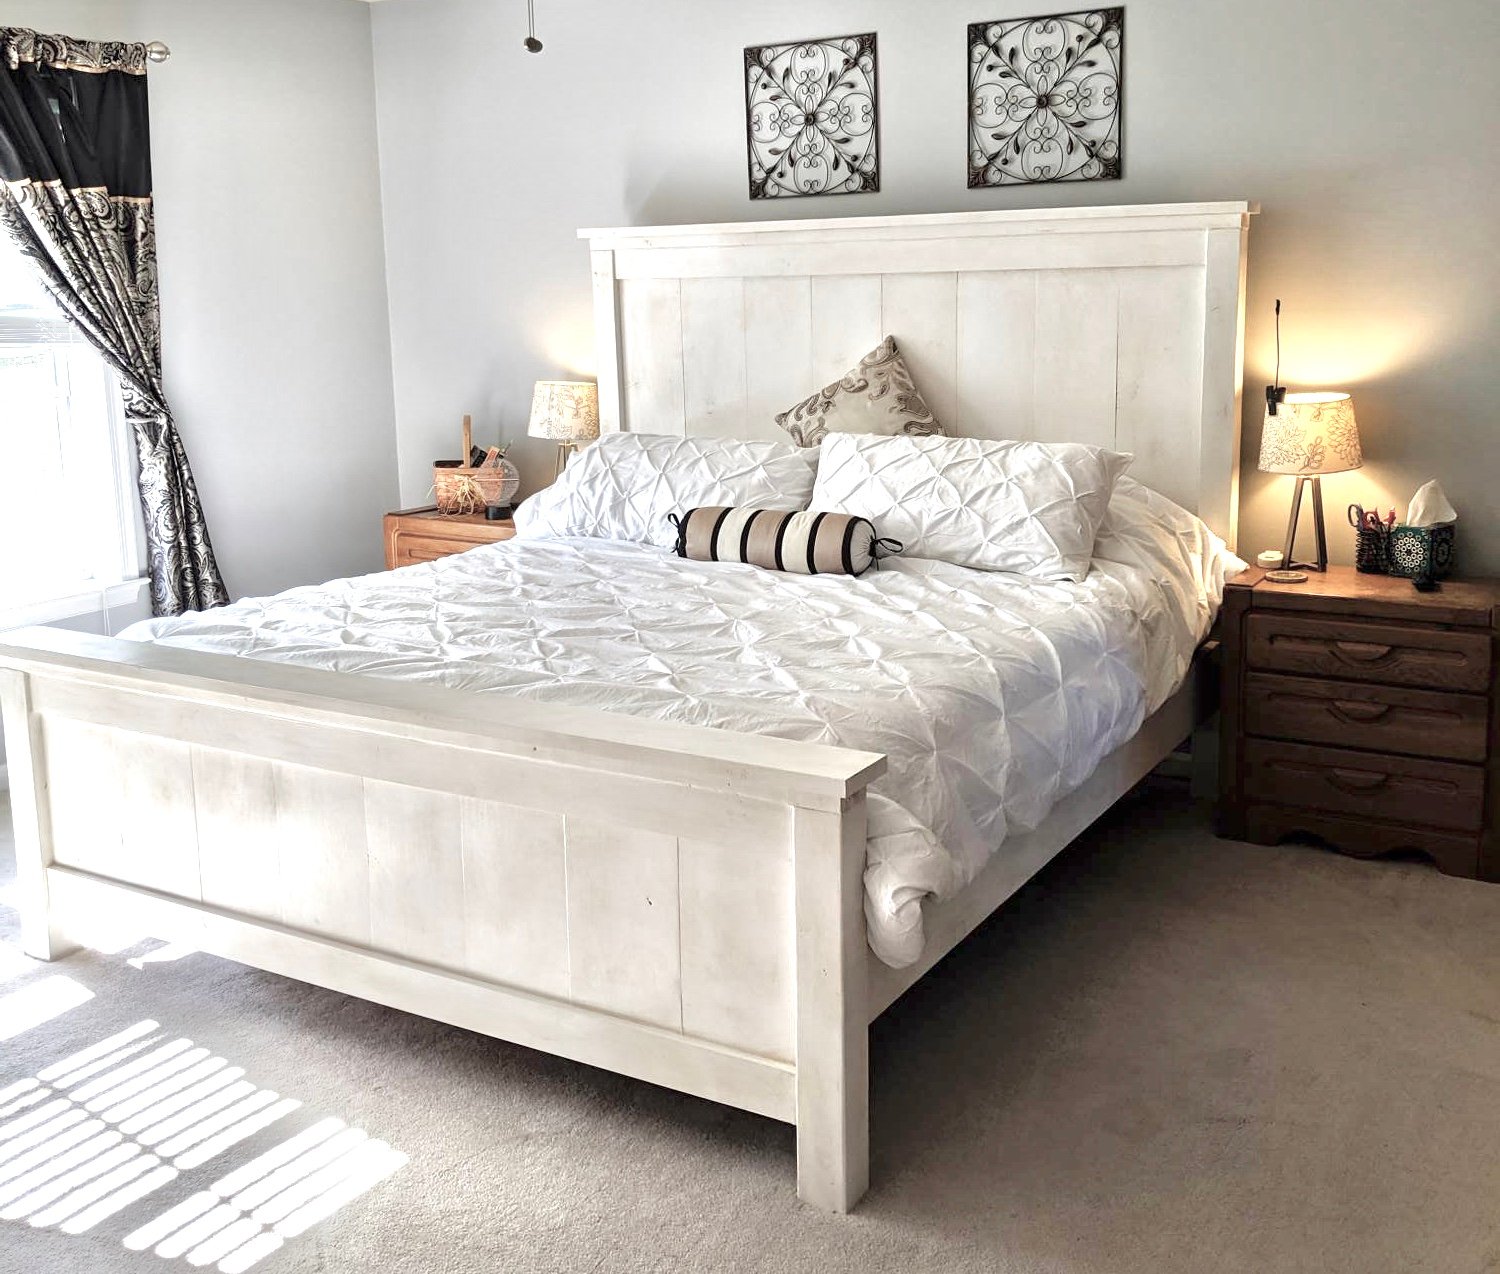
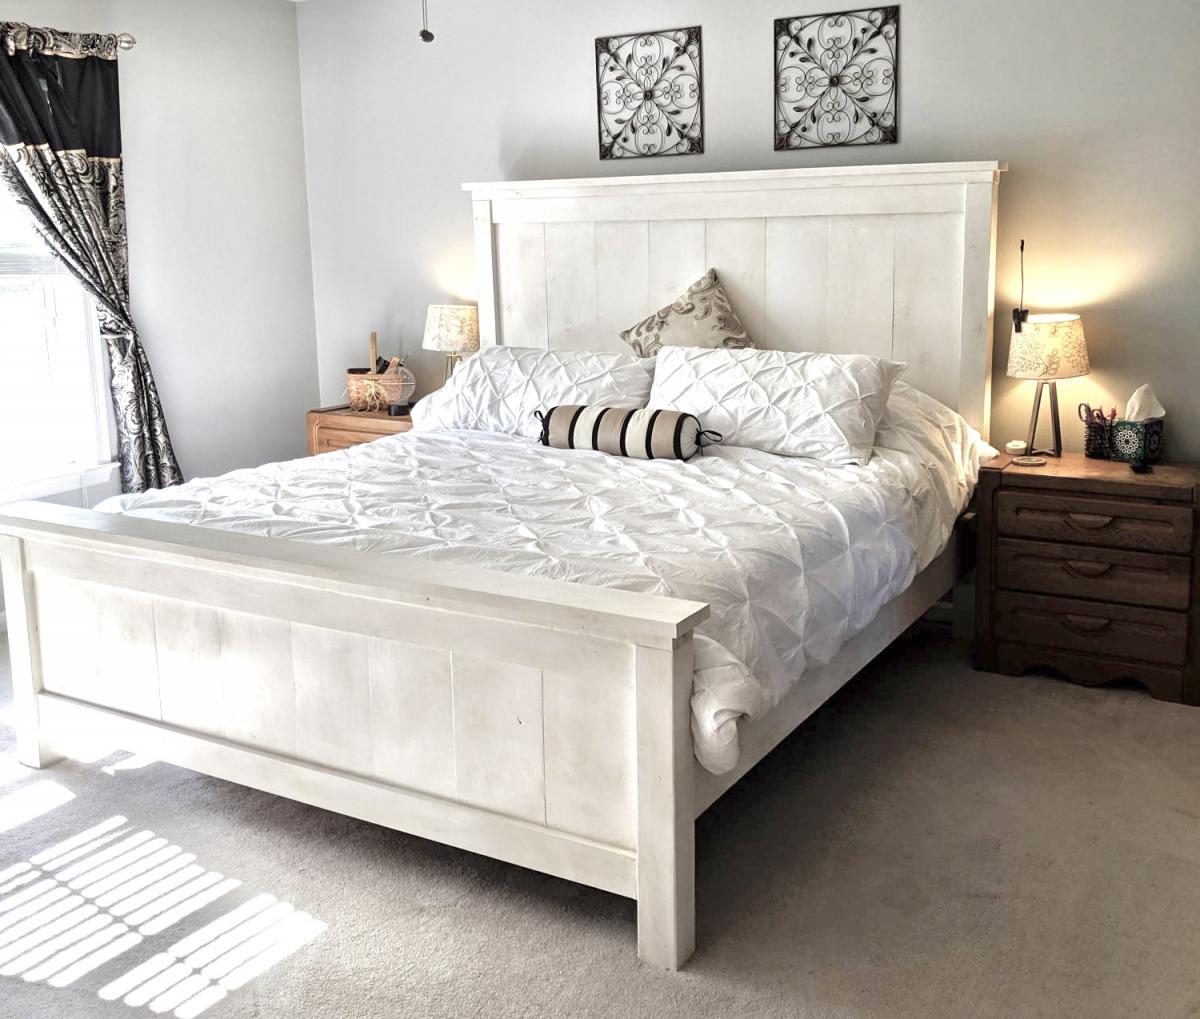
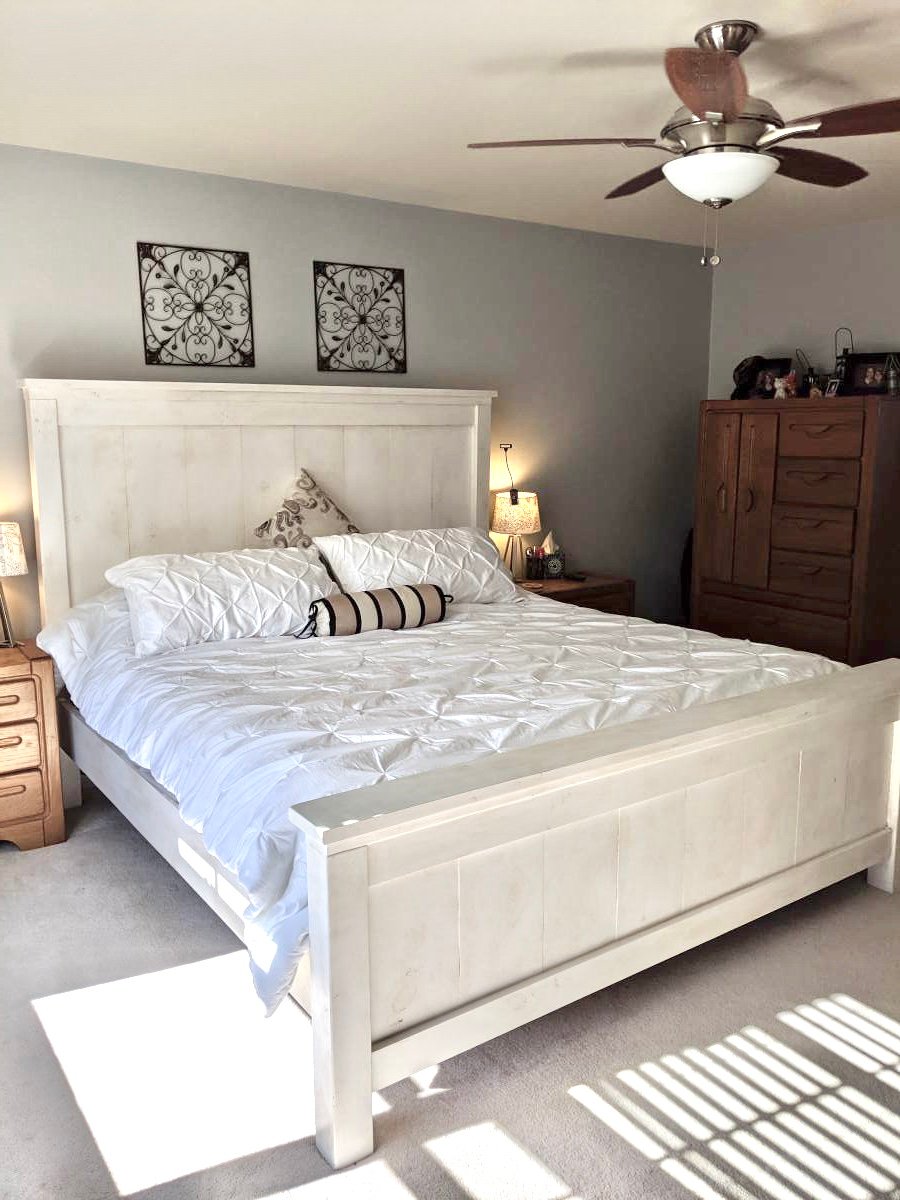
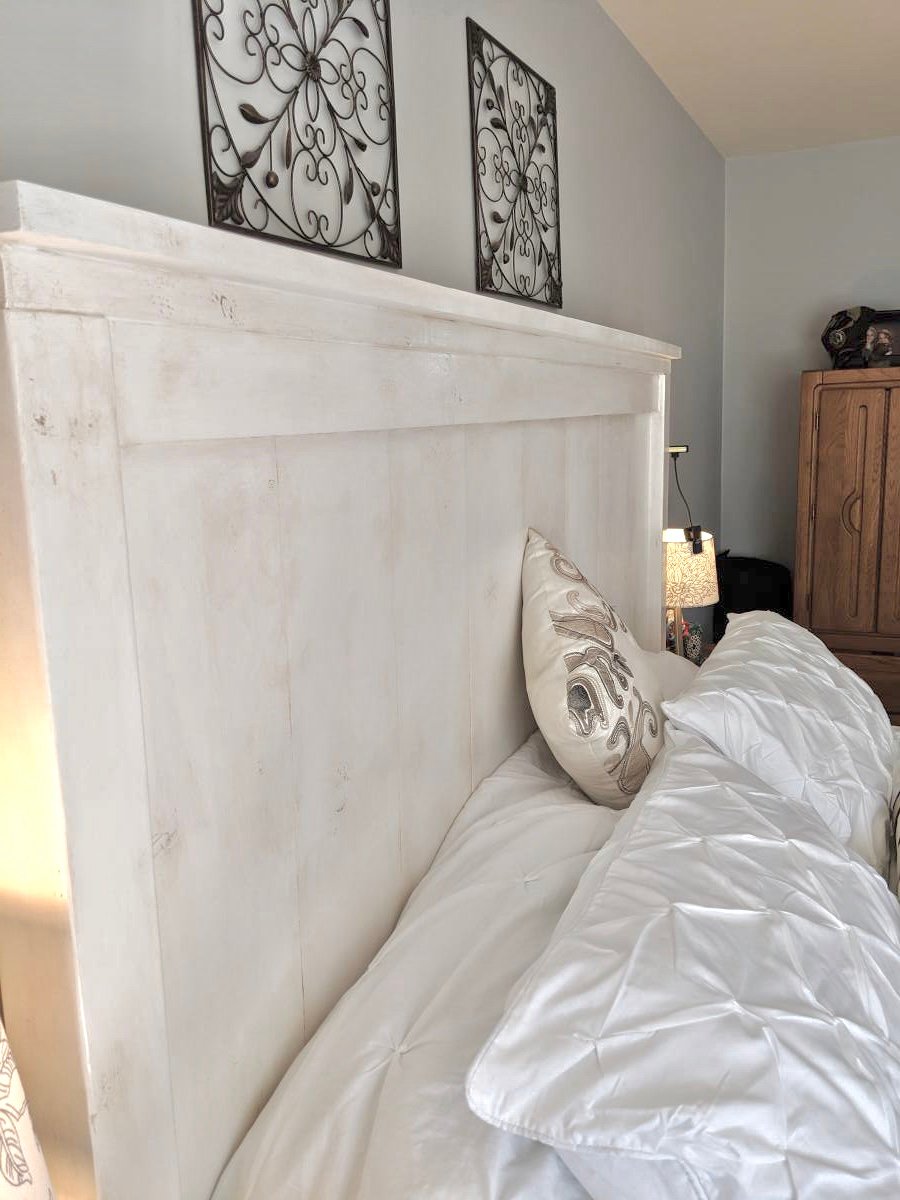
I could not find a frame which would accommodate my new adjustable king base. Modified Anna's plans by increasing the height of the headboard and footboard. Finished with chalk paint and antique finish for a rustic look. Side rails attached with mortises to allow for moving bed in 4 pieces if needed. Love my new bed
Sat, 11/30/2019 - 03:31
Hi! We are making this headboard this weekend. We want to increase the headboard height and footboard as well. Do you happen to know the cut measurements or how you adjusted the height of the 1x6 (or 1x8 as others used) to make it work? Yours looks perfect! Thank you in advance for any feedback!
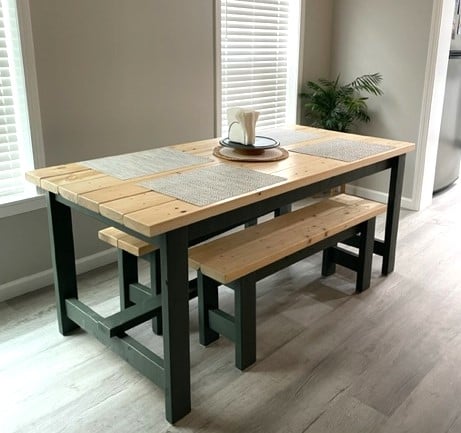
I used the farmhouse table plans, with a few modifications. I made two benches to go along with it. This was my first big wood project and I'm pretty proud of it. My daughter bought her first home and needed a table custom sized to her space so this was perfect. I love all of Ana's plans, so easy to follow.

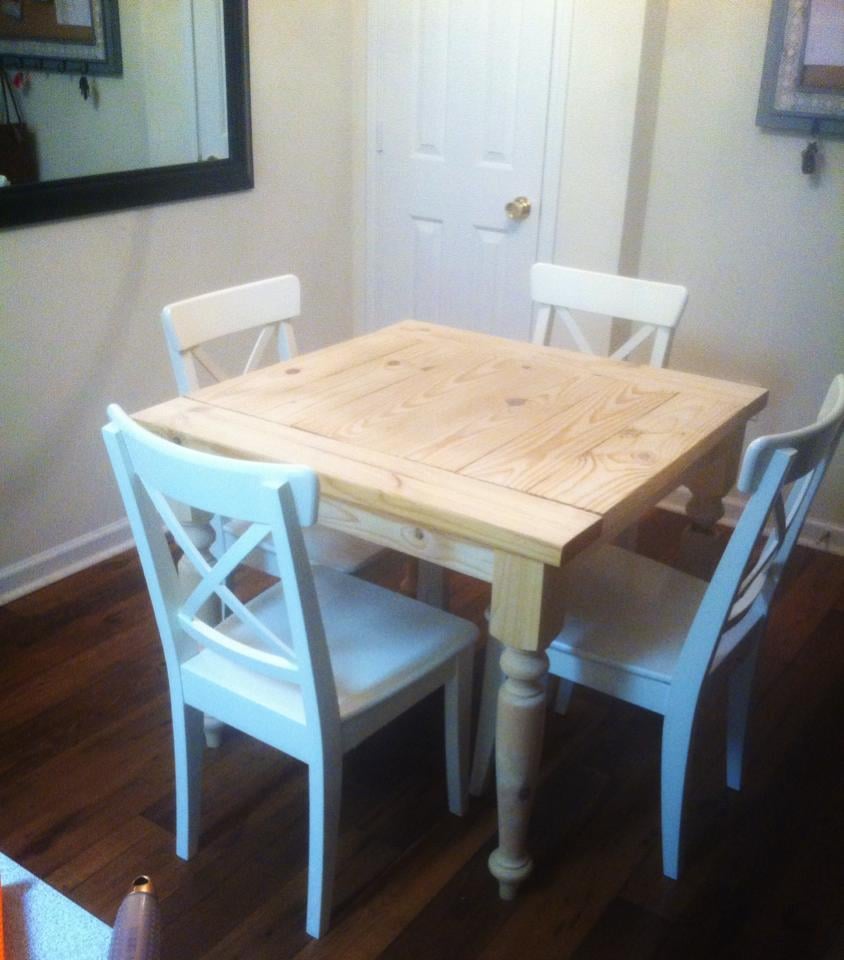
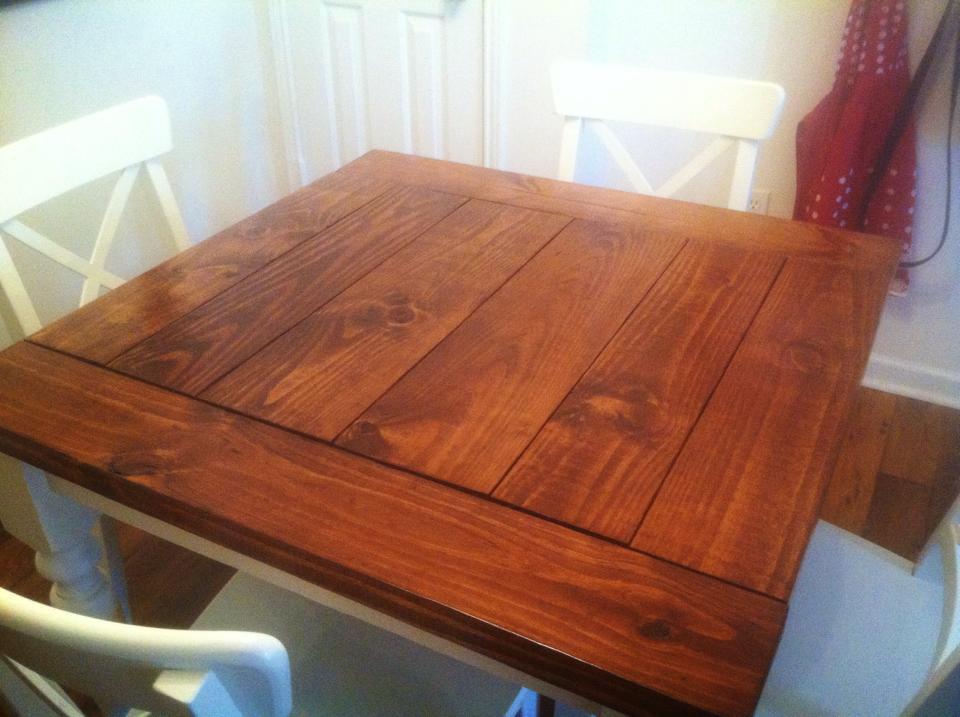
I had to do a 3ftx3ft square table since our eating area in the apartment isn't big enough for a dining table, but I really like how it turned out :) I also added breadboard ends because I can't stand how the cut ends look. I got the legs from osborne wood
Thu, 05/29/2014 - 23:09
I've been looking everywhere for a small farm table! Can you tell me which legs and lumber you used?
Sun, 01/22/2017 - 13:56
I love this table however i am a beginner. Where can i find the plans to this table and step by step instructions?
Thank you!
Tue, 03/28/2017 - 15:13
This 3x3 farmhouse table is exactly what I want to make with the breadboards. Any chance you can send your plans with the measurements for this 3x3 table. Thank you!

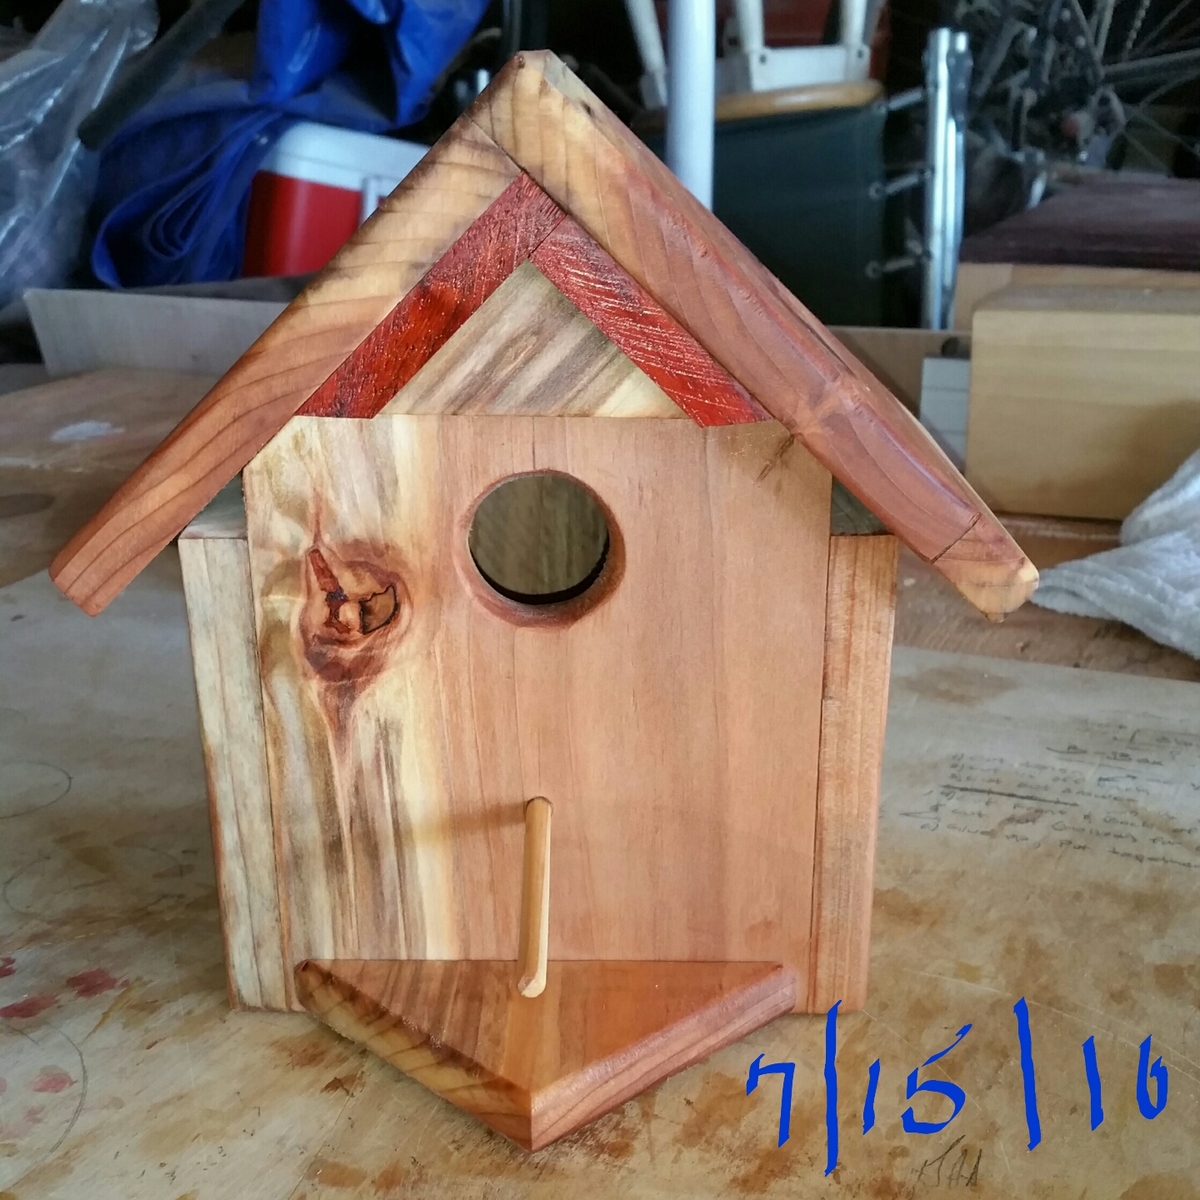
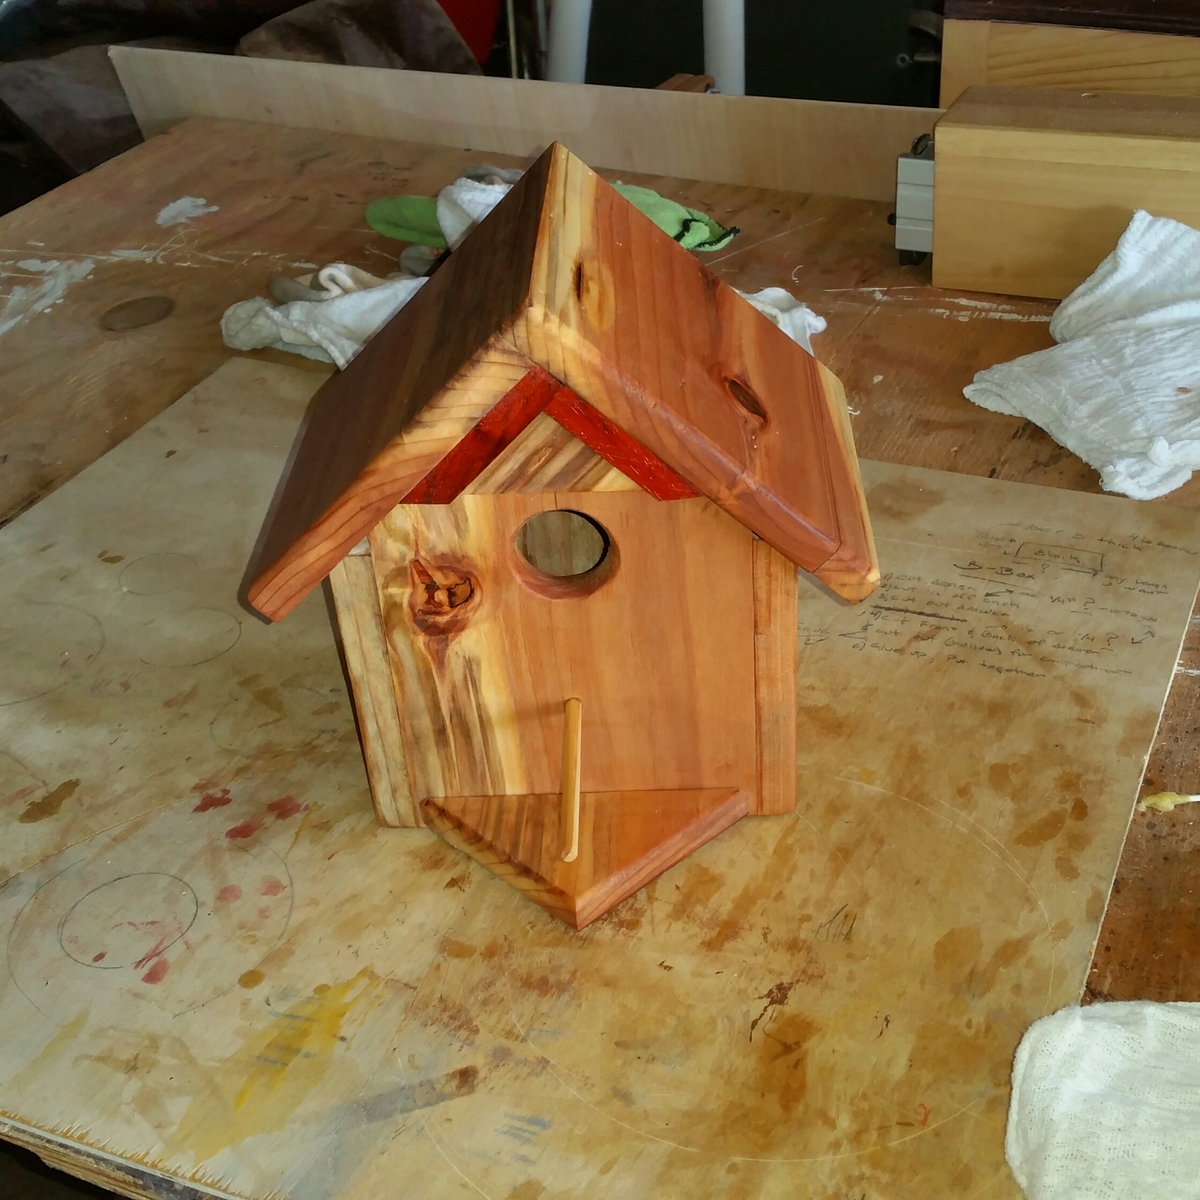
First bird house..!
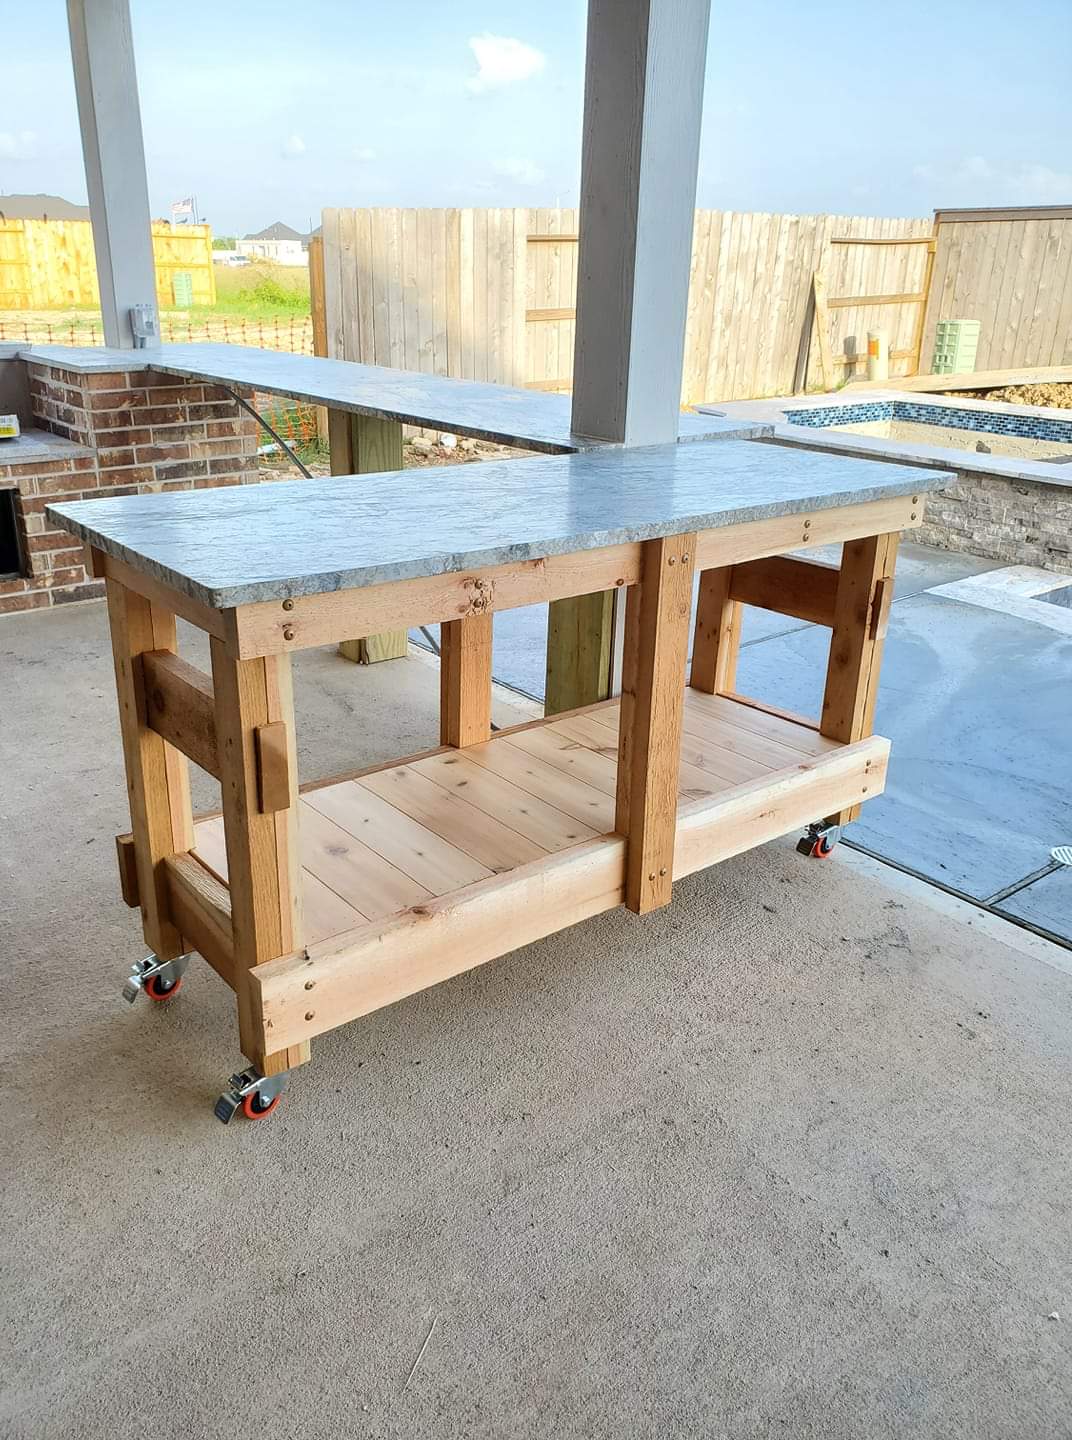
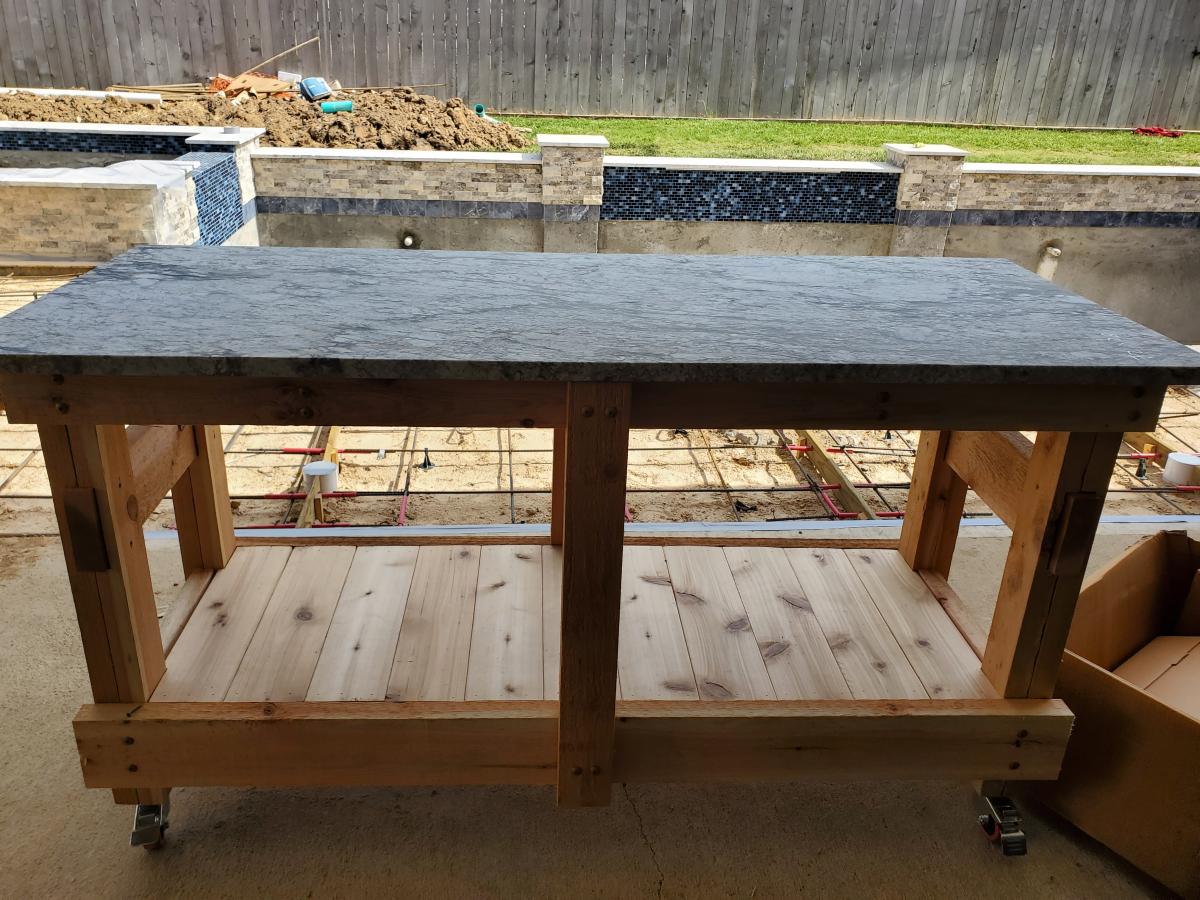
We had some leftover granite from an outdoor kitchen build and wanted to maximize the use of it. We loved the look of a rustic table from Pottery Barn and set out to find something that was asking the same aesthetic. I came across the Jilly and Mia workbench console and thought it would work great with some minor modifications. I shortened the overall length and height, went with some heavy duty casters to support the weight of the granite, and reinforced the cross beams that would support the 3/4" plywood sheet and granite. I went with cedar for this build since it was outdoors and I'll finish it with a clear sealant.
First build ever and we're thrilled with how it turned out. Definitely took us longer than the 4 hours other users have cited, but not bad for total newbies! Thanks for the plans, we love it.
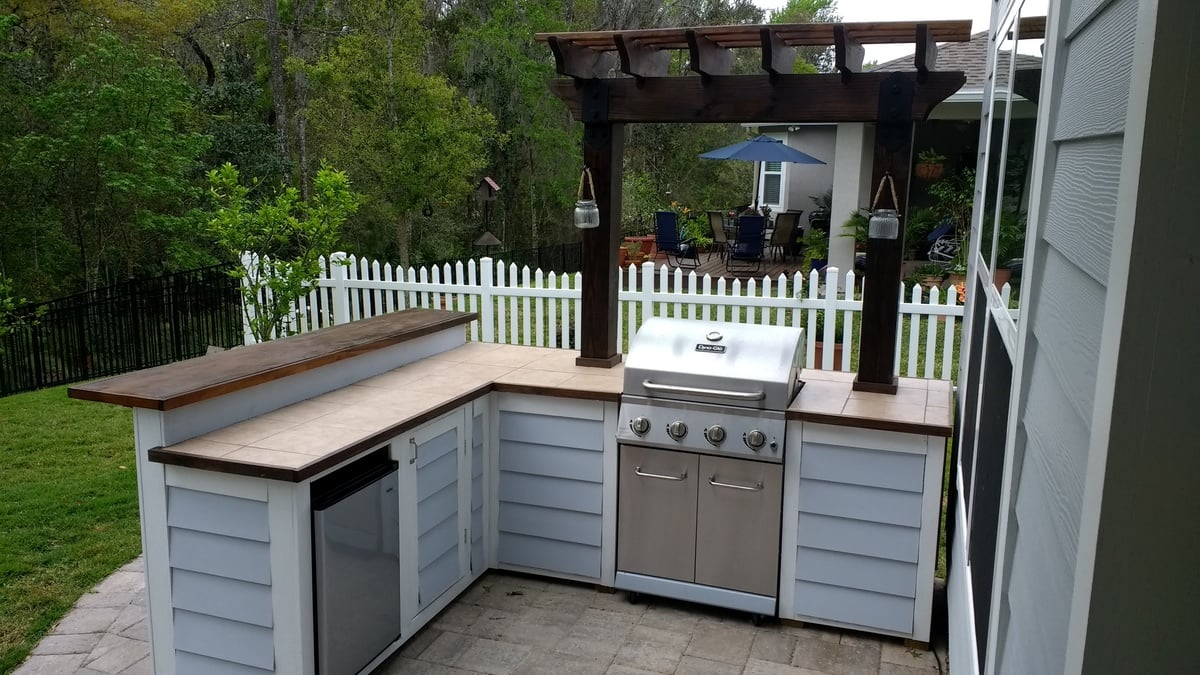
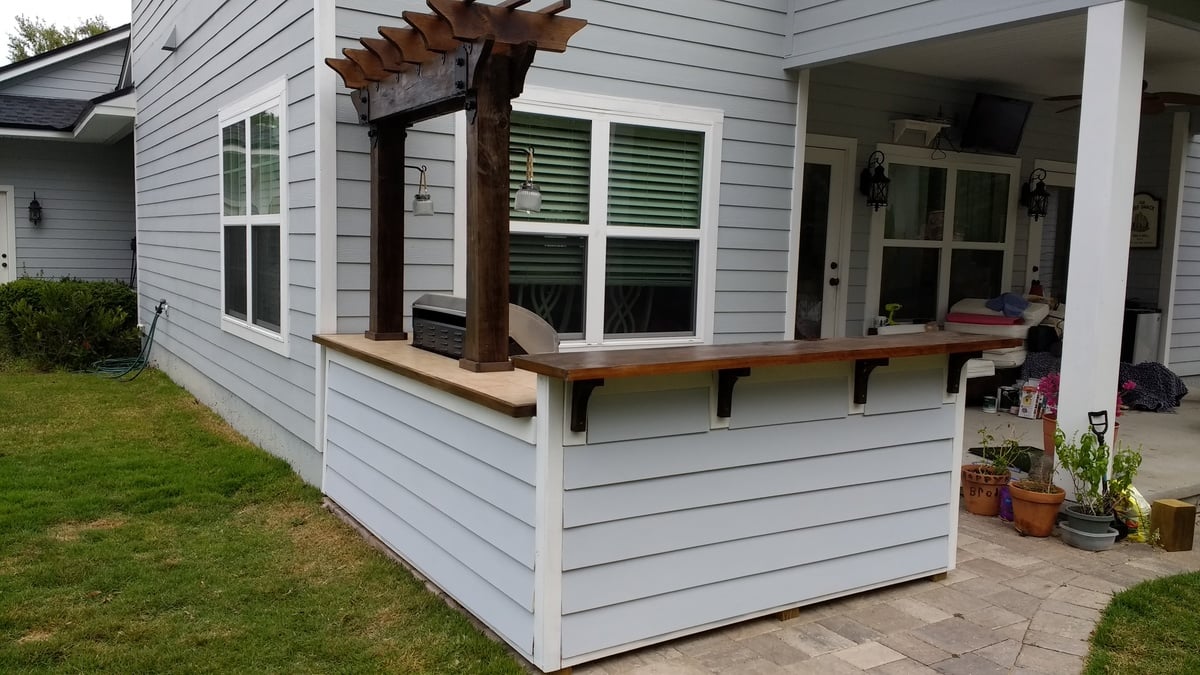
I wanted to build an L shaped outdoor bar with a 2 post pergola over the grill. I couldn't find any plans online that would fit the space I had, so I decided to build it myself with custom dimensions. The top bar is approx. 7'3" across, and 15" wide, while the distance from the right edge (next to the house) to the end of the bar is approx. 9'1".
I framed it with PT lumber and the 2 pergola posts are sitting on top of the pavers and supported internally within some of the framing studs. Since the pavers sit on top of concrete, I didn't feel the need to dig up the existing pavers and achor them in the ground.
I used hardiboard for the exterior and tiled the lower section of the bar.
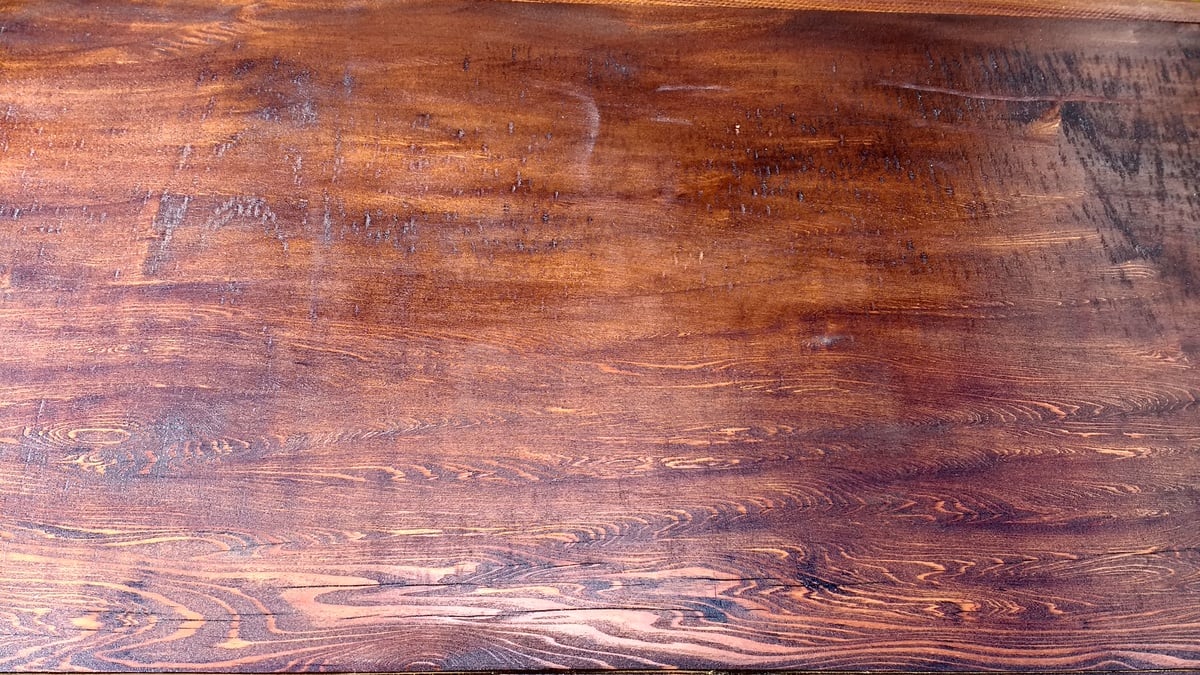
For the actual high bar top, I wanted to do something unique, and found a 900 year old scrap slab of Cypress at a local lumber yard. One side was smooth, but underneath was gouged out from different saw cuts and very uneven. I screwed a piece of 3/4" PT plywood underneath and trimmed it with 1-1/2" Cypress. I stained the whole thing with a dark honey colored stain and put a generous amount of poly on it once it was dry. There are a few cracks and nicks on it, but once it was stained, it looked awesome.

Wed, 06/19/2019 - 13:23
Looks awesome. I have been wanting something like this for a while now. Where can we can plans for this?
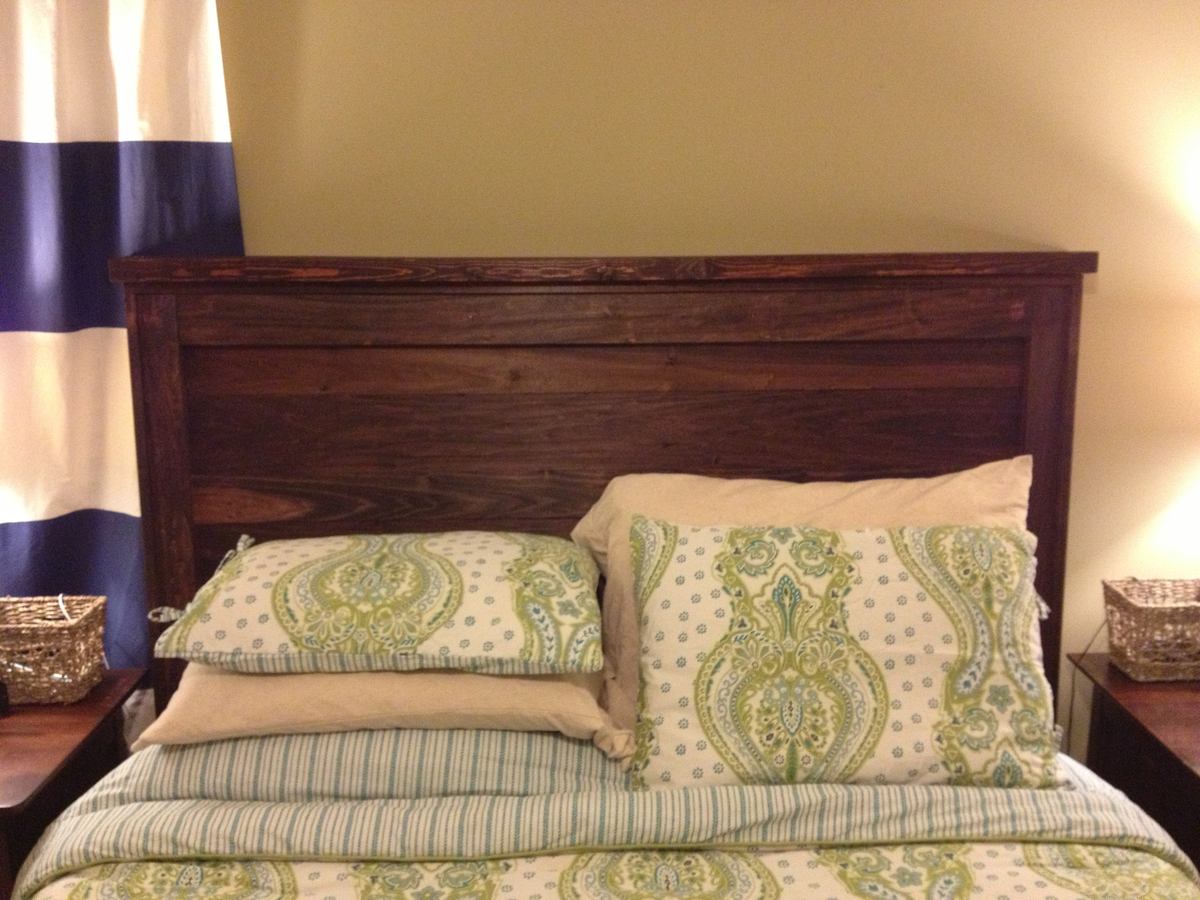
This is one of the coolest things I've ever built! My husband was so proud of me. :) I recently completed built-in bookcases in our 3rd bedroom/office and those were neat and much more complicated, but I think he likes this better because he sleeps next to it every night. This only took about 2 hours to build, but the staining made for a weekend project by the time it was completed and dry. We've gotten a TON of compliments on this and even had friends ask for me to make them one! Thanks, Ana!
Love this! My husband used this project to help boys learn to use power tools and work with wood. They made one and he did the others. THANK YOU!
Wed, 10/06/2021 - 10:15
Great way to get the kids involved, it looks very nice, organized and functional! Thank you for sharing~
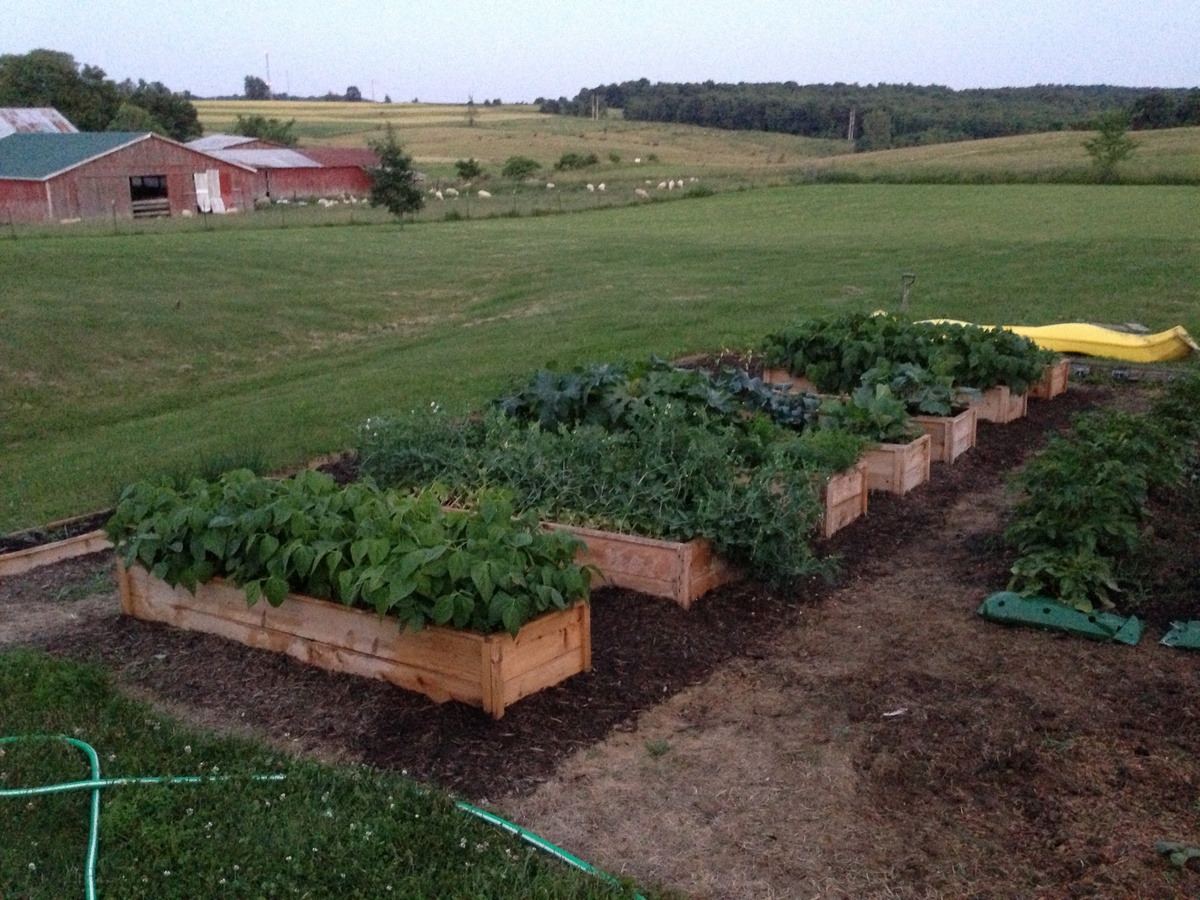
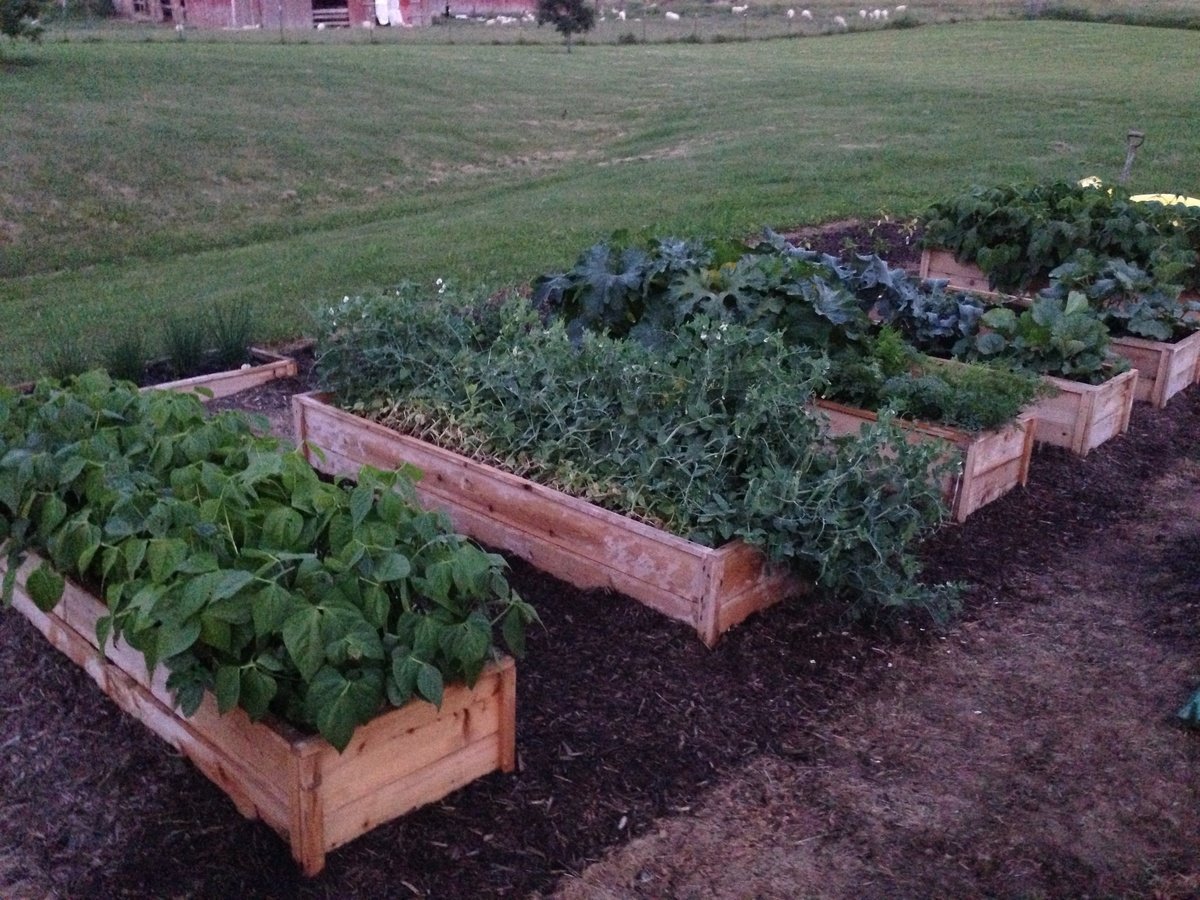
These garden beds are fantastic! They were so easy to build and look great in our backyard. We have always found ourselves with a garden covered in weeds or plants out of control. Our garden this year looks wonderful and we have hardly any weeds in the beds. Thanks for the great plans!

Fri, 05/24/2019 - 10:05
I'm so glad the plans worked for you! Your garden looks fantastic!

The plans on this were so easy to follow. Thanks so much for posting!
I ended up using screws instead of nails just because I am more comfortable with a drill than a nail gun. Seems like it is holding up fine :)
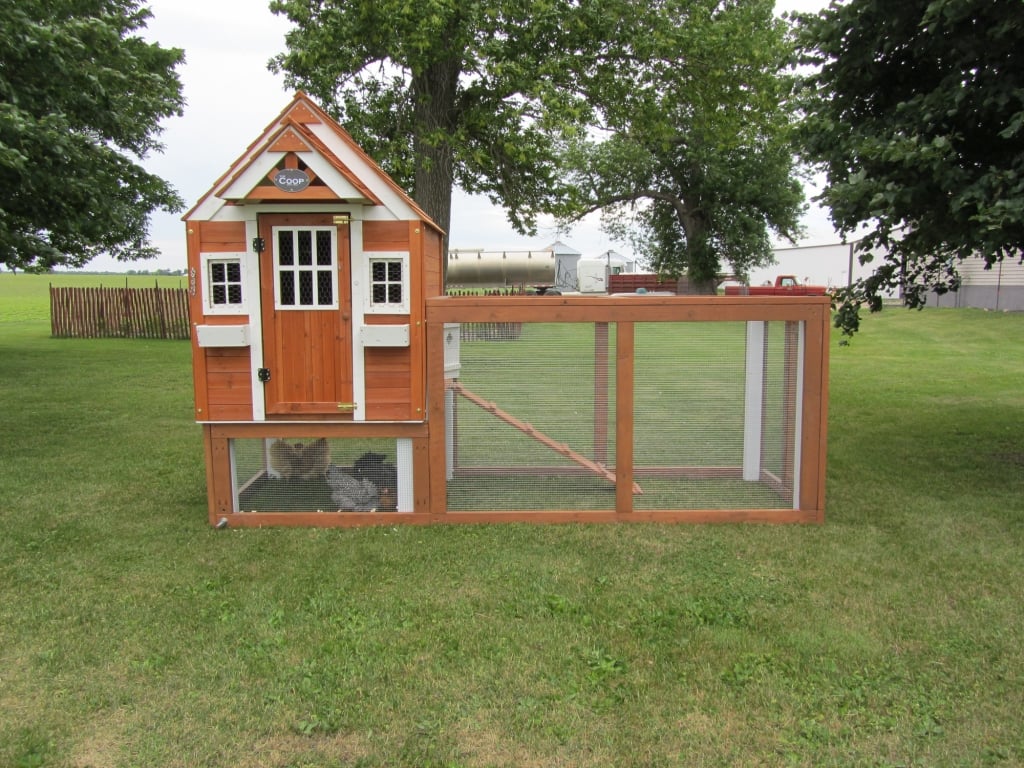
My husband and I live on a small hobby farm and are growing/raising a lot of our own food. We decided to venture into working with chickens. We wanted to start out small so we got 6 chickens and needed a home for them. We found a kids play house one day while shopping and got the idea of modifying it into a chicken coop with a run. We took off with this idea and with quite a bit of modification and some extra building materials we were able to raise it up in the air and attach a run so our chickens would have a nice home to protect them from preditors and the emements and not to mention one that looks good in our yard!

In reply to OMG! by benfoldsfivealive
Wed, 05/27/2015 - 18:42
Building chicken coop doesn't have to be expensive. Just get the easy-to-follow plan from this:
http://bit.ly/how-to-build-cheap-chicken-coop
Fri, 06/17/2011 - 21:26
Looks awesome! I just spent the evening building a coop for 4 hens of my own!
Tue, 02/21/2012 - 19:08
Are the plans available? I have Black Copper Marans and Lavender Ameraucanas and I really need to separate the LAs from the BCMs and this would be perfect!
Sun, 02/26/2012 - 18:00
When I click the link to get the plans for the standard coop, they are not there. Do you know where I can find the original plans? Thanks.
Tue, 02/28/2012 - 10:20
Yes - would love the plans please!!!
It's gorgeous - great job!
Sat, 06/02/2012 - 15:22
Sorry guys there are no plans for this coop. My husband and i just "winged it" and built it without any plans.
It is a play house that we found at Mills Fleet Farm and we modified it to make it a chicken coop. We put together the play house based on instructions from the box (with a few of our own modifications to make the window on the ground etc.) added some chicken wire to the doors and bay window, added some 4x4 "stilts" and a floor to get the house in the air, and constructed a frame around it with 2x4's and wire fencing to make the run
Sorry I dont have any plans to give you guys!

Comments
Ana White Admin
Fri, 01/07/2022 - 09:17
Gorgeous bed!
Love the whole looks, way to go!