

This beautiful farmhouse bed can be made for just a fraction of the cost to buy - all from standard, off the shelf lumber! You won't need a pocket hole jig or any special tools to build.
This bed has been built thousands of times and is a reader favorite. You can also find the twin version, king version, and all our farmhouse bed plans here.
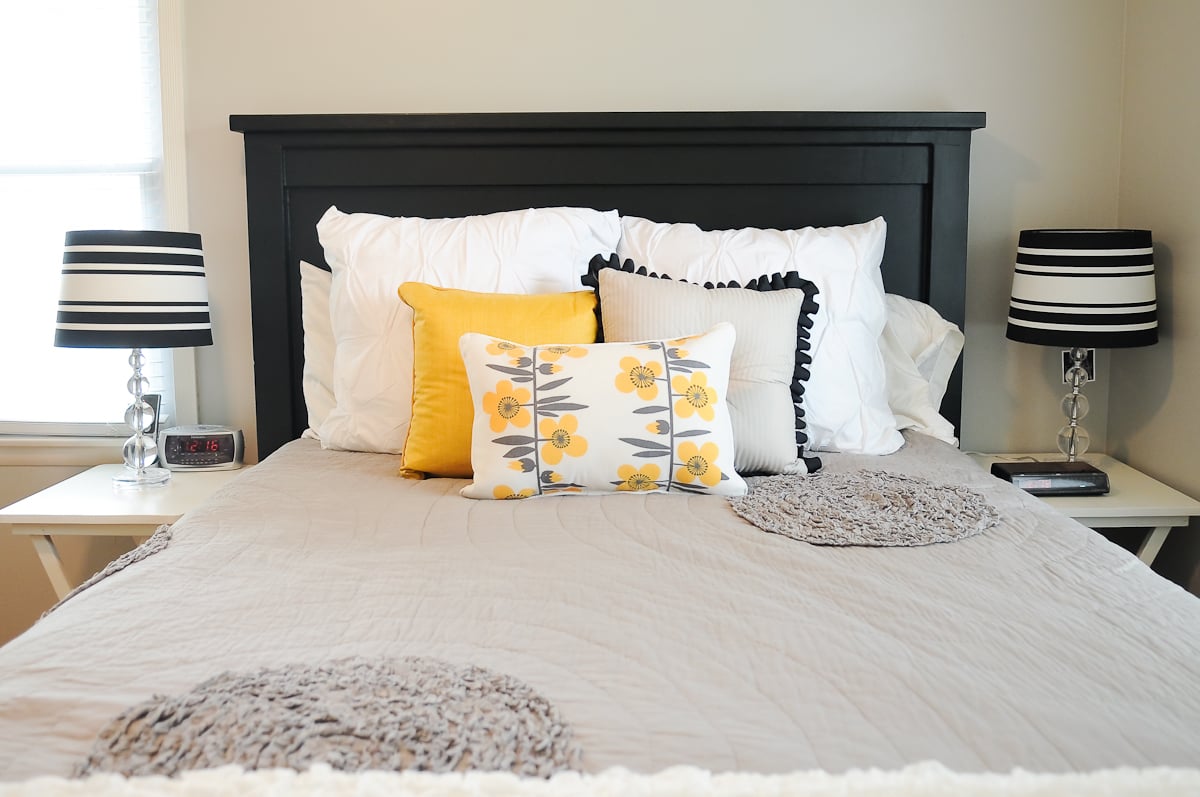
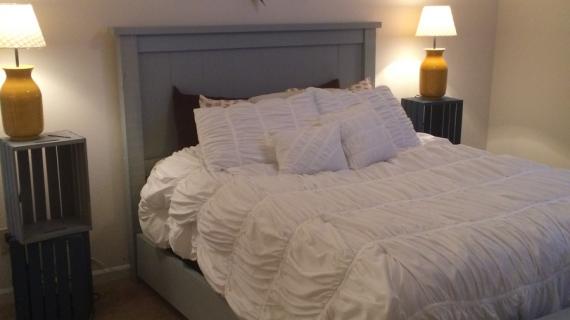
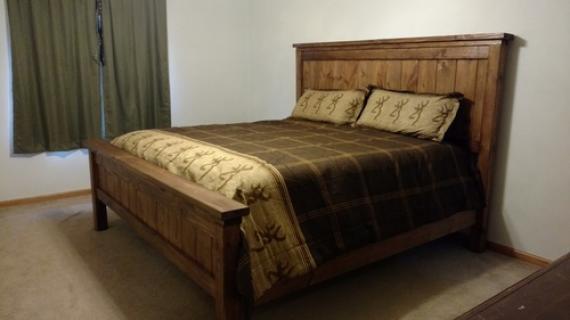
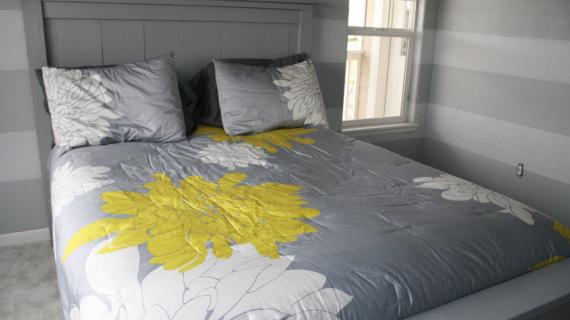
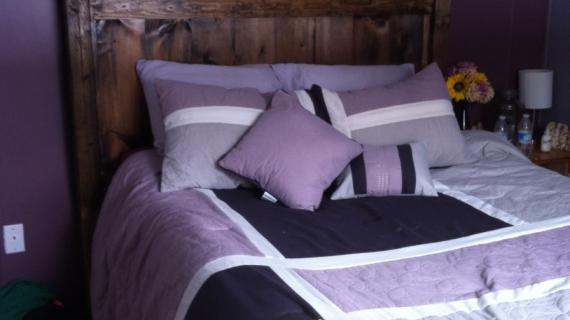
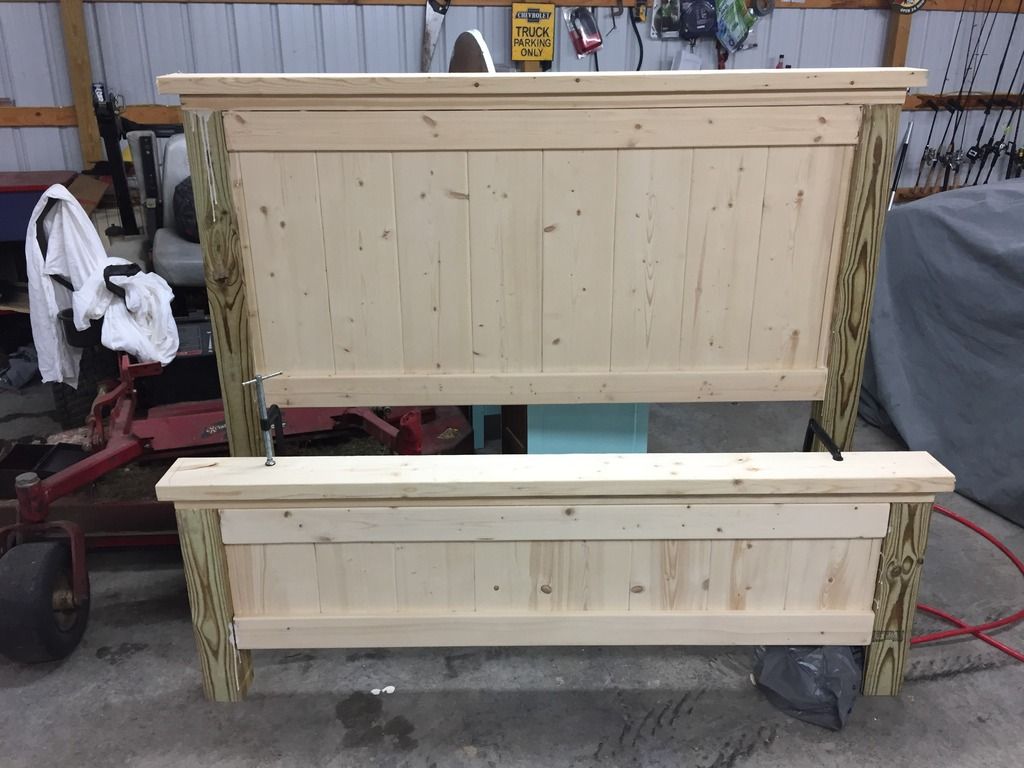
Reader submitted photo by KARAPOTHIER
Having a beautiful bed can transform any bedroom. It's the most important piece in your bedroom, but can also be the most expensive.
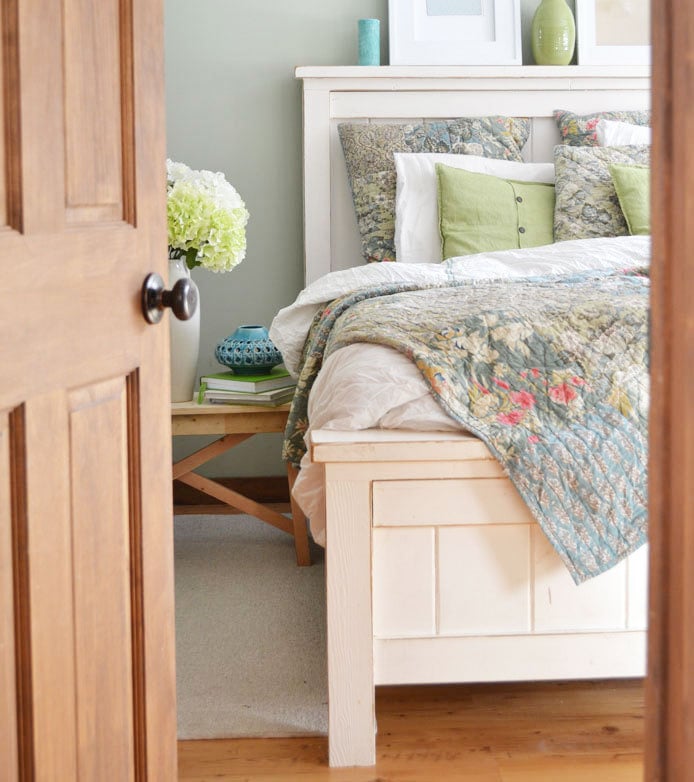
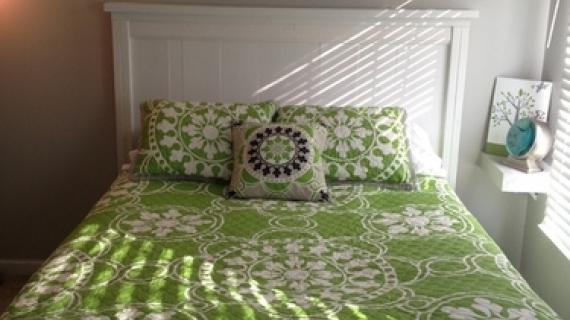
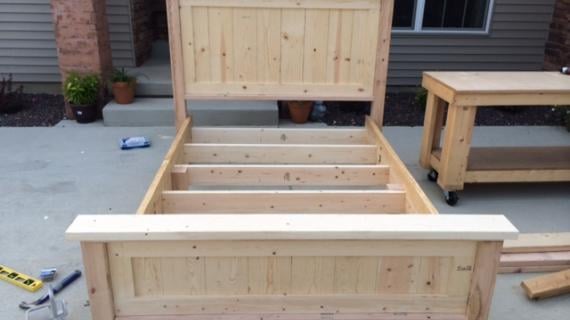
Over a decade ago, I built my first farmhouse bed (pictured above). We still use it today, it's still as strong and sturdy and beautiful as ever. And it only cost about $120 to build then - thousands less than buying!
Farmhouse Bed Plans
We updated the original farmhouse bed plans to use less tools, less materials, but be just as beautiful! You won't need a pocket hole jig - just a drill, nailer and a saw, to tackle this project.
The plans are below. Please let us know in the comments or add a brag post on how your farmhouse bed turned out. Thank you for using our plans.
NOTE: This bed plan has been updated and improved. If you need the original plans, we have created a printable PDF for your convenience.
Pin For Later!
Preparation
- 12 - 2x4 8 feet long
- 2 - 2x6 8 feet long
- 2 - 1x10 8 feet long
- 2 - 4x4 8 feet long
- 1 - 2x2 8 feet long
- 6 - 1x6 8 feet long
- 4 - 1x4 8 feet long
- 100 - 1-1/4" long brad nails
- 75 - 2-1/2" long self tapping wood screws (#8 star bit recommended)
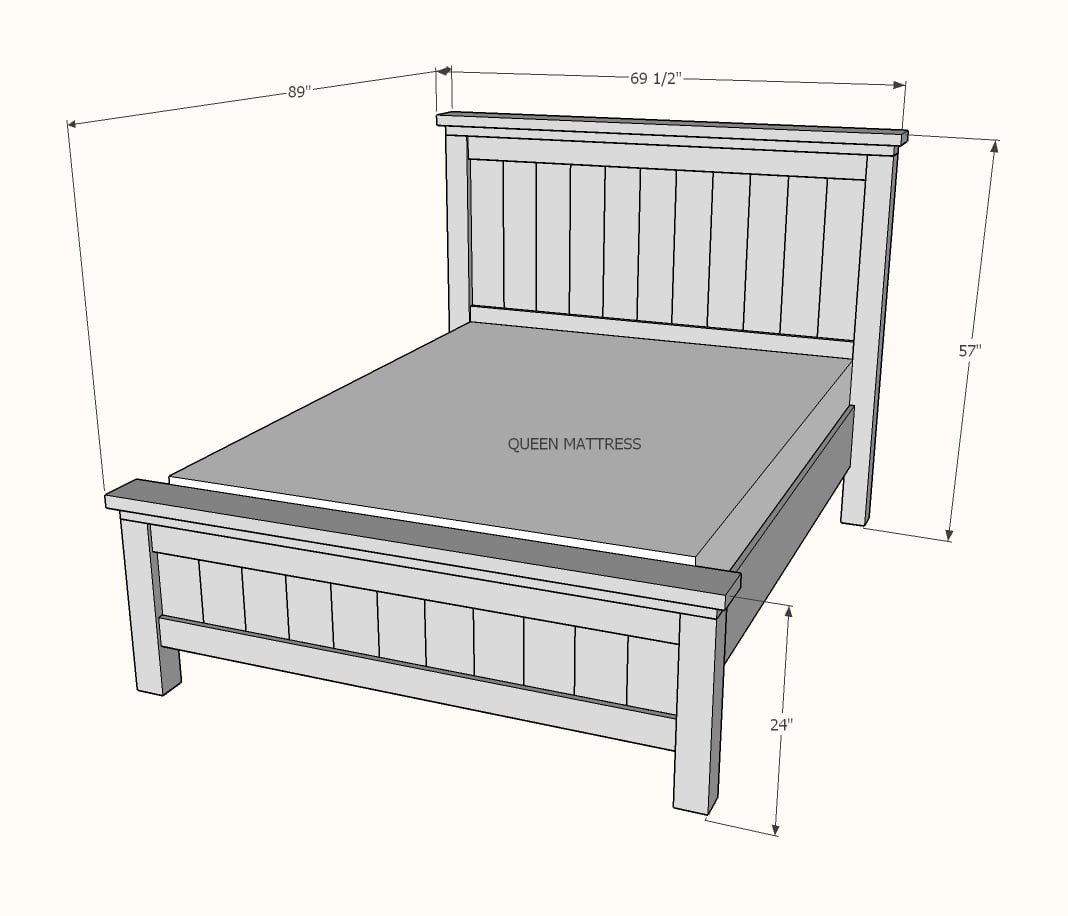
HEADBOARD CUT LIST
- 2 - 4x4 @ 54"
- 2 - 2x2 @ 30"
- 11 - 1x6 @ 30"
- 2 - 1x4 @ about 60-1/2" - measure and cut to fit
- 1 - 2x4@ 67-1/2" - measure and cut to fit
- 1 - 2x6 @ 69-1/2" - measure and cut to fit
FOOTBOARD CUT LIST
- 2 - 4x4 @ 21"
- 2 - 2x2 @ 8"
- 2 - 2x2 @ 3"
- 11 - 1x6 @ 15"
- 2 - 1x4 @ about 60-1/2" - measure and cut to fit
- 1 - 2x4@ 67-1/2" - measure and cut to fit
- 1 - 2x6 @ 69-1/2" - measure and cut to fit
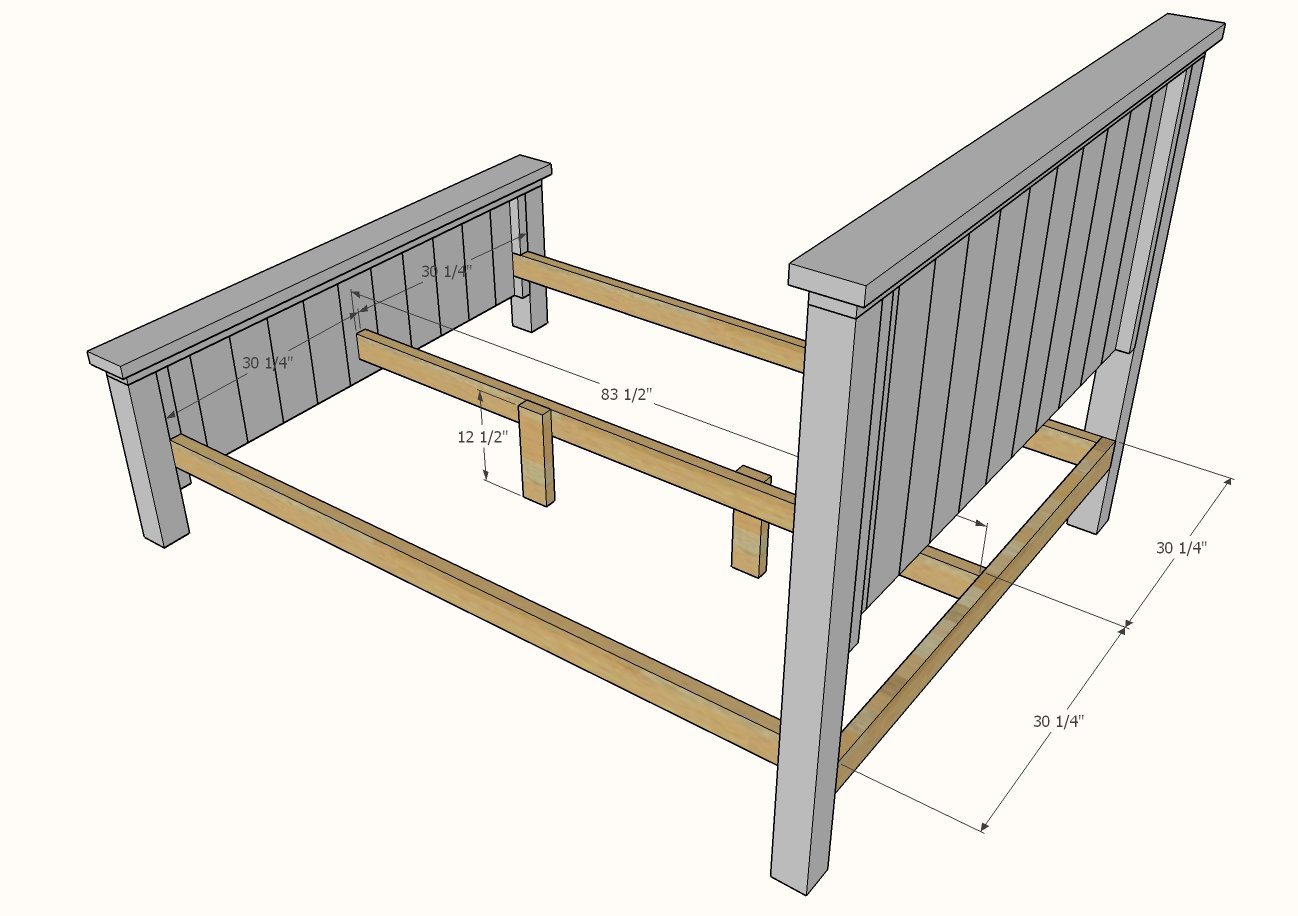
MATTRESS SUPPORT FRAME/SIDERAILS
- 3 - 2x4 @ 83-1/2"
- 1 - 2x4 @ 60-1/2"
- 2 - 2x4 @ 12-1/2"
- 2 - 1x10 @ 80"
- 20 - 2x4 @ 32" - can be as short as 30" if you need to burn up scraps
Cut all boards except as noted to measure and cut. We recommend using a compound miter saw for the straightest cuts, but you can also use a circular saw and a carpenter's square - just make sure your cut ends are nice and straight.


Instructions
Step 1
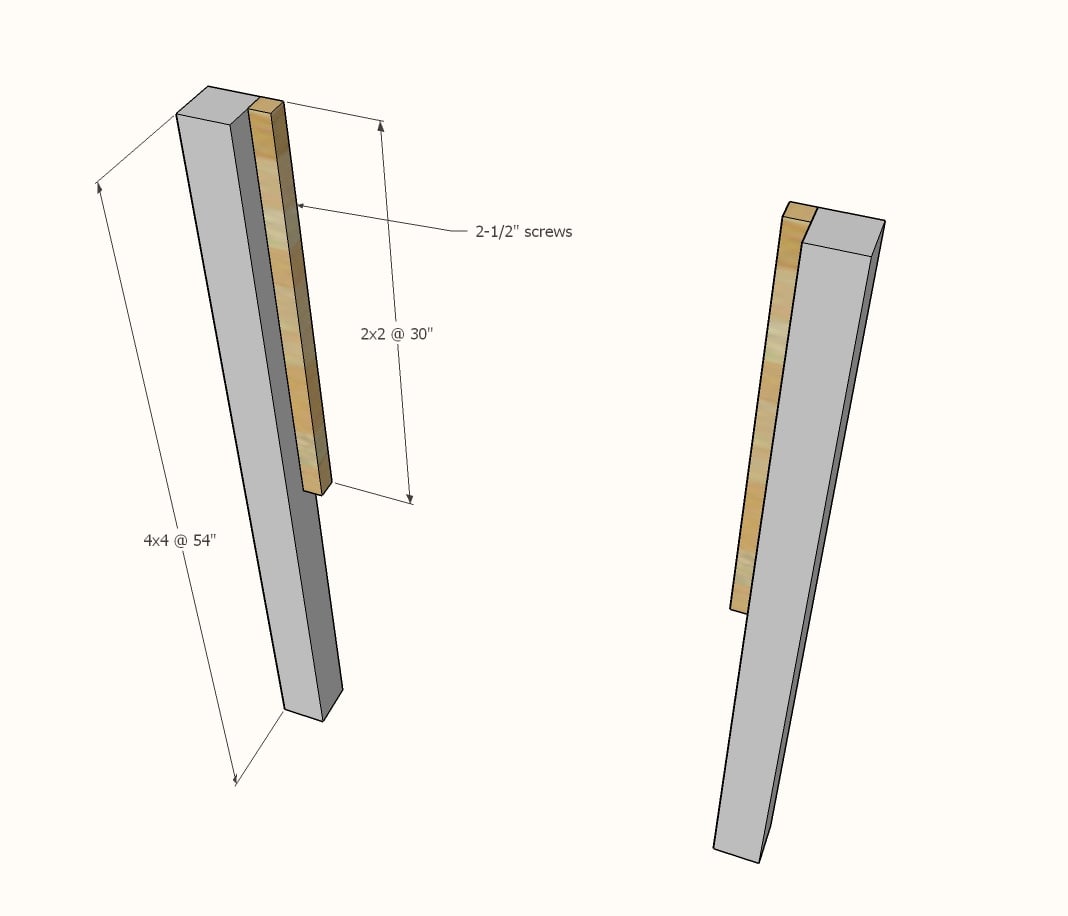
Attach the longest 2x2s to the longest 4x4s, flush to the back edge with 2-1/2" self tapping screws.
Step 2

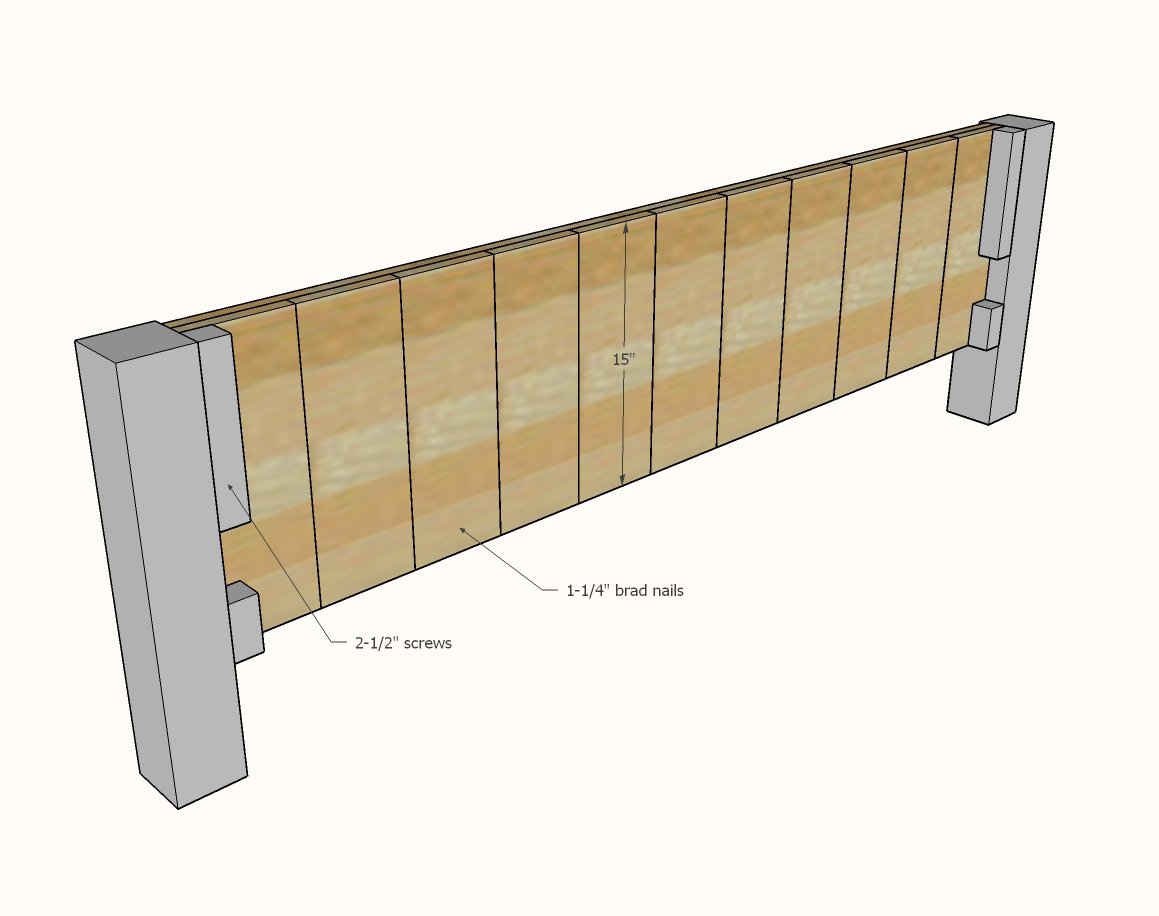
Layout the 30" 1x6 boards flat, side by side. Measure the overall width of all the 1x6 boards. Cut two 1x4s to this measurement.
Nail the 1x6 boards with glue to the 1x4s. Apply glue between the 1x6 boards as you go.
Make sure the panel is built square by measuring opposite diagonals (outside top corner of 1x4 to outside bottom corner of opposite 1x4) and adjusting so the opposite diagonals match.
Step 3
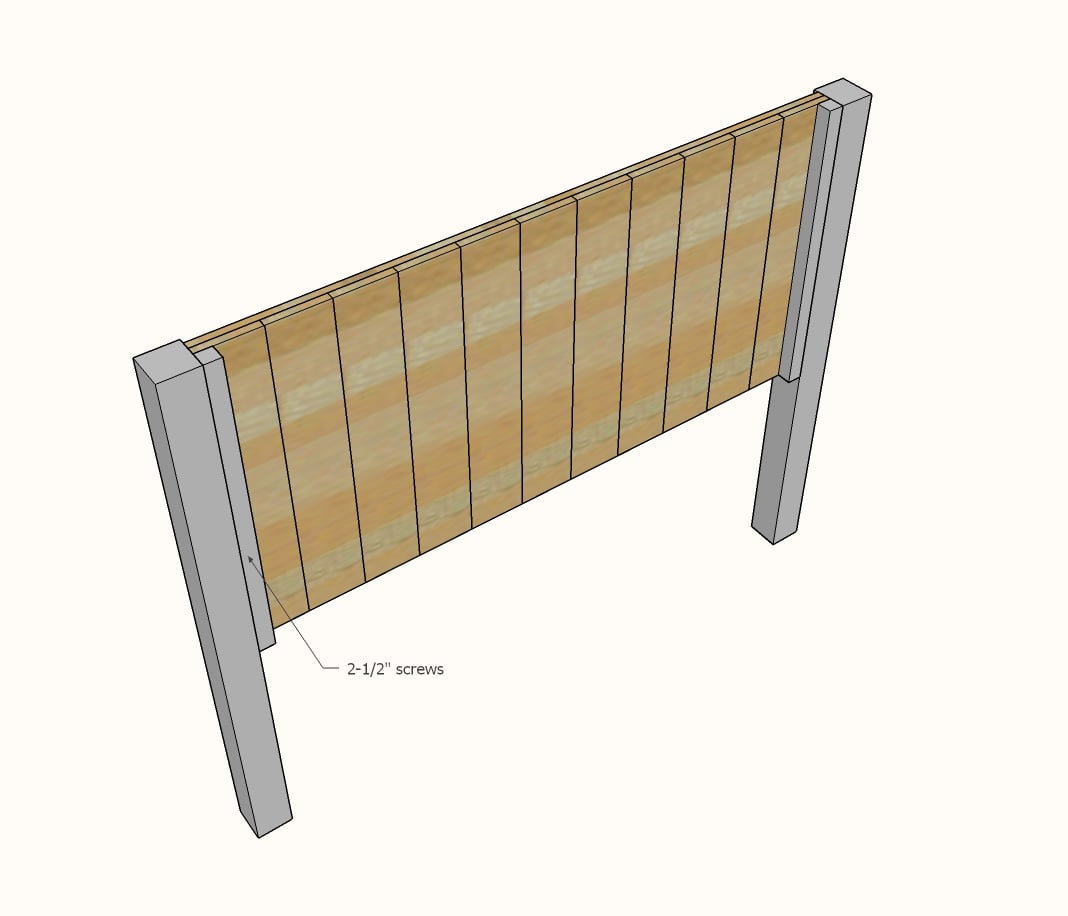
Attach the headboard panel to the 2x2s on the legs with 2-1/2" screws. Only screw to the headboard panel at the top and bottom portion backed by the 1x4s.
Also attach the panel from the front 1x6s to the 2x2s with 1-1/4" brad nails.
Step 4
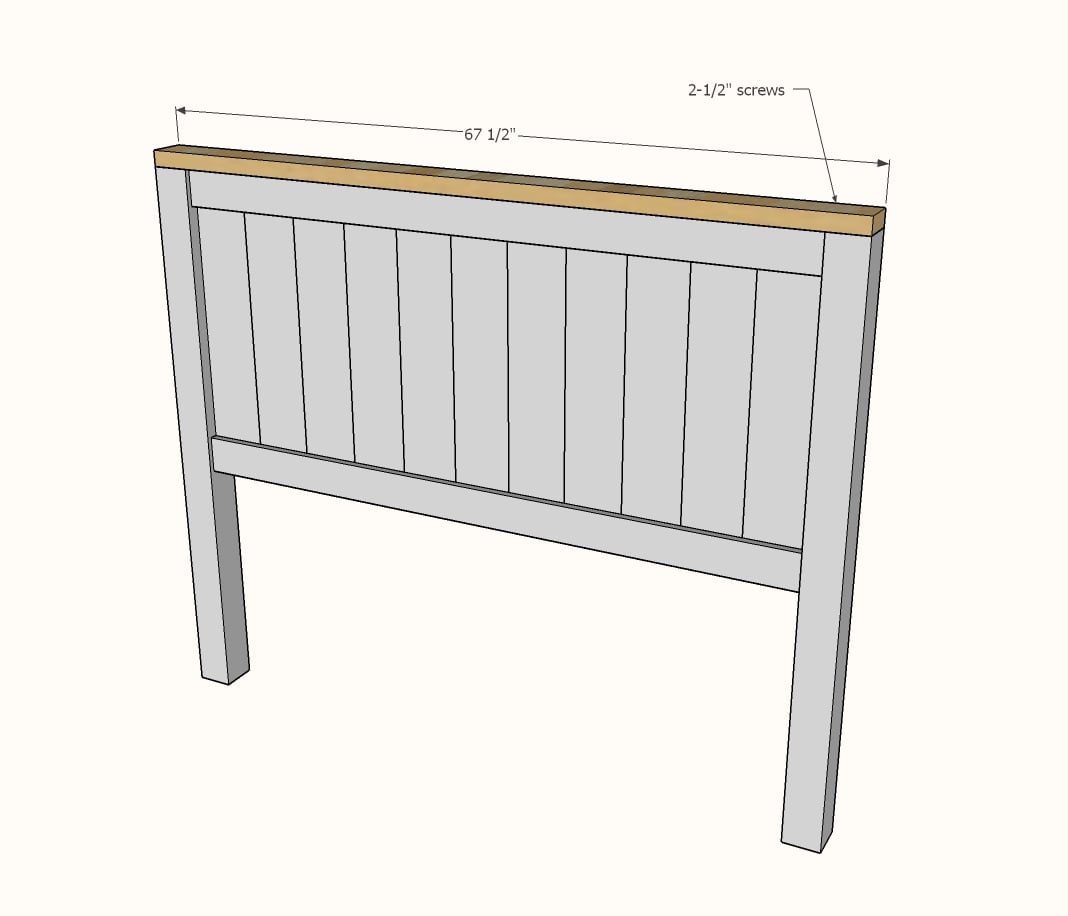
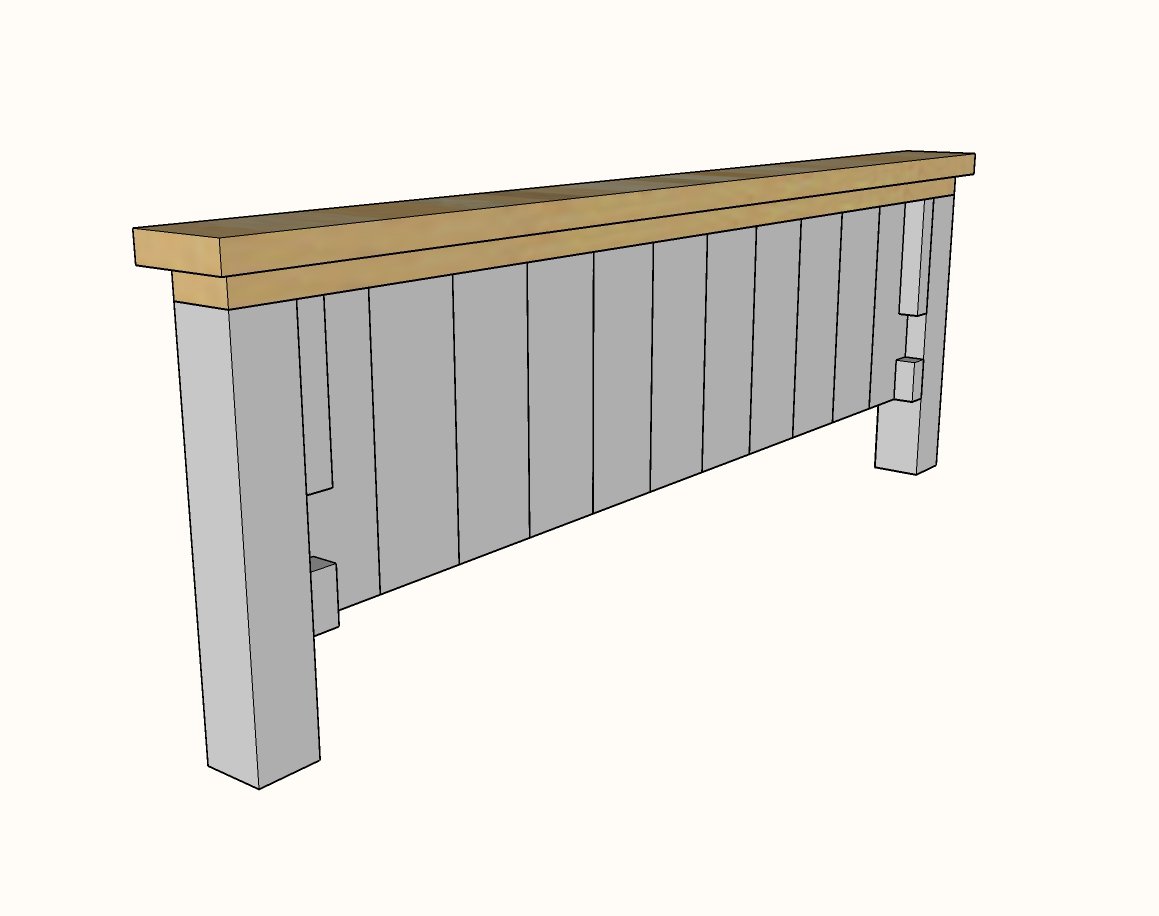
Measure and cut the 2x4 for the top. Attach with 2-1/2" screws.
Step 5
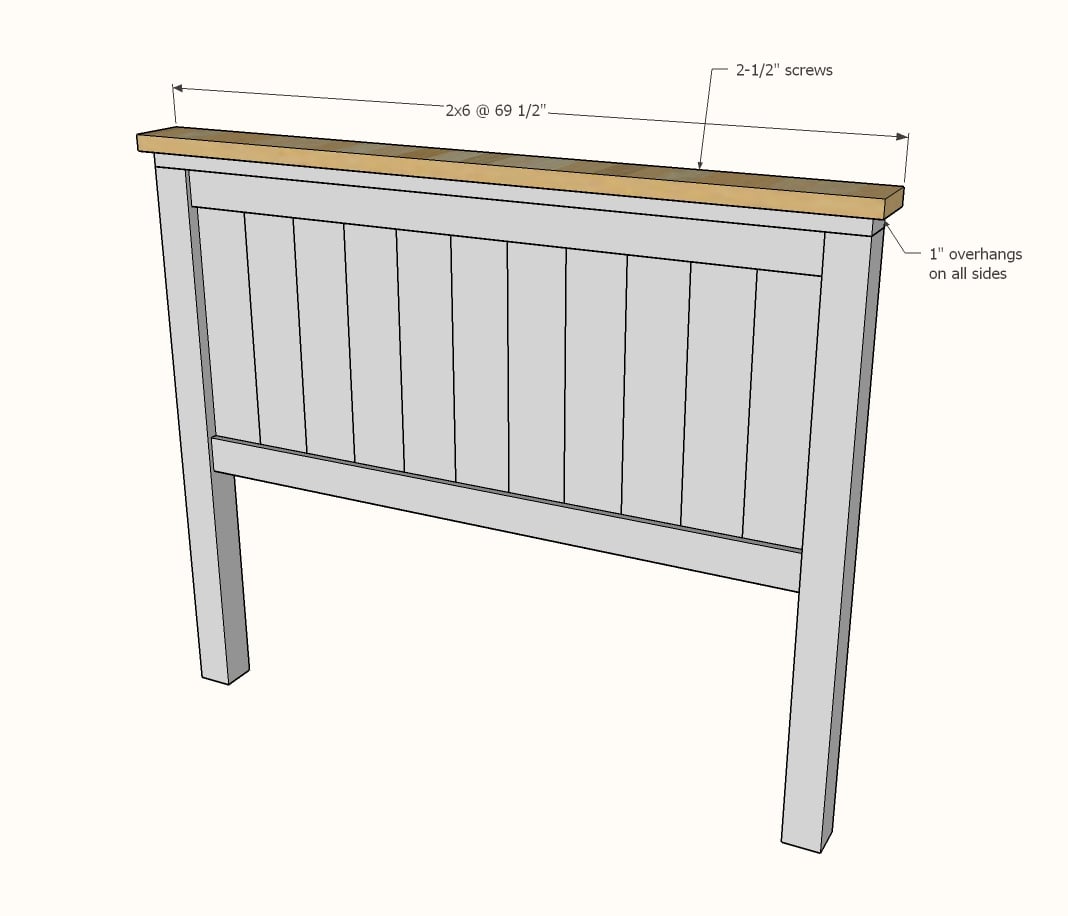
Repeat steps for the 2x6 top, leaving a 1" overhang on all four sides.
This completes the headboard build.
Step 6
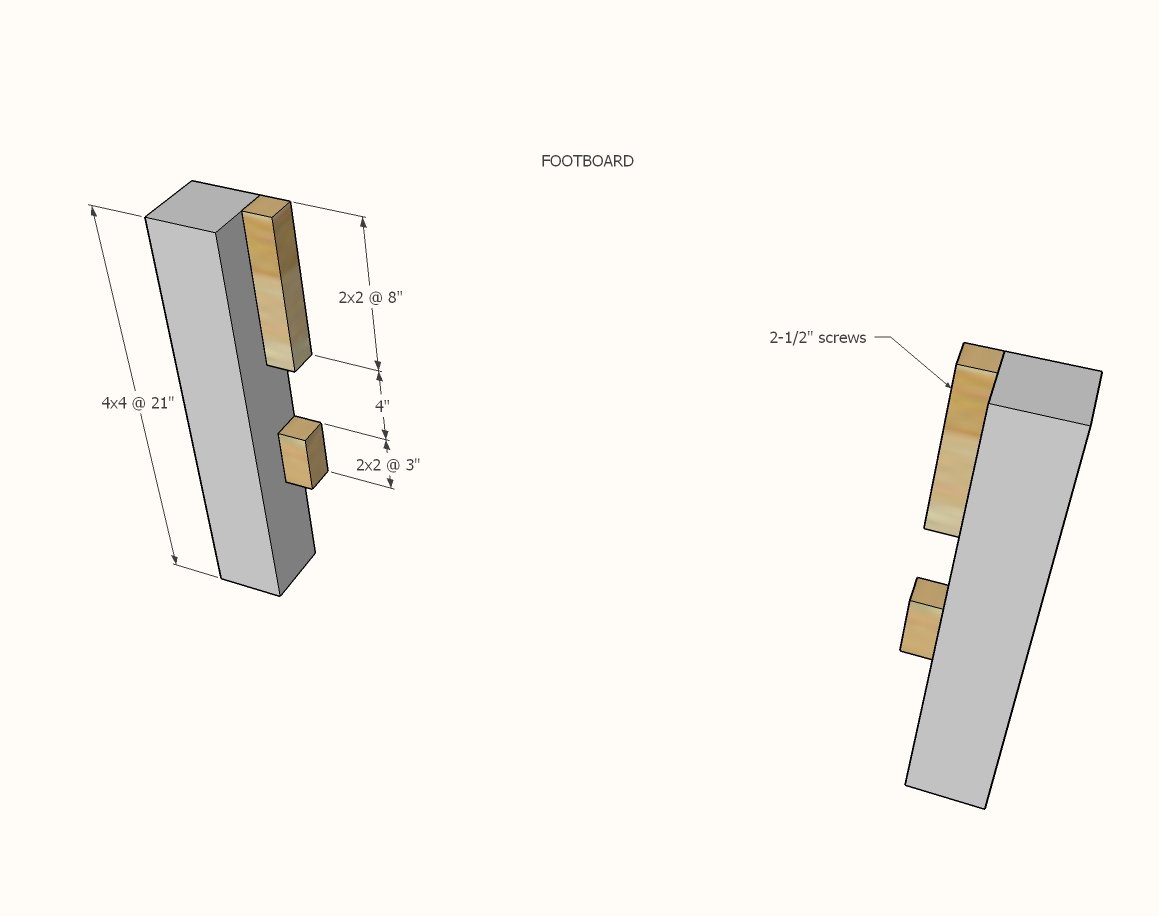
The footboard is constructed exactly as the headboard, with the exception of the 2x2 cleats and the overall height.
Attach the 2x2 cleats with 2-1/2" screws. The smaller cleat may split on you since the wood piece is so small. You can predrill holes to help prevent wood from splitting.
Step 7
Build the panel and attach to the 2x2 cleats.
Step 8
Attach top 2x4 and 2x6 to the footboard with 2-1/2" screws.
Step 9

Attach the 2x4 cleat to the footboard, set in the 2x2 cleats, resting on the bottom cleat. Use 2-1/2" screws to attach the 2x4 to the 4x4 legs.
Mark the headboard legs as shown in the diagram, and attach 2x4 cleat to the 4x4 legs with 2-1/2" screws.
Step 10
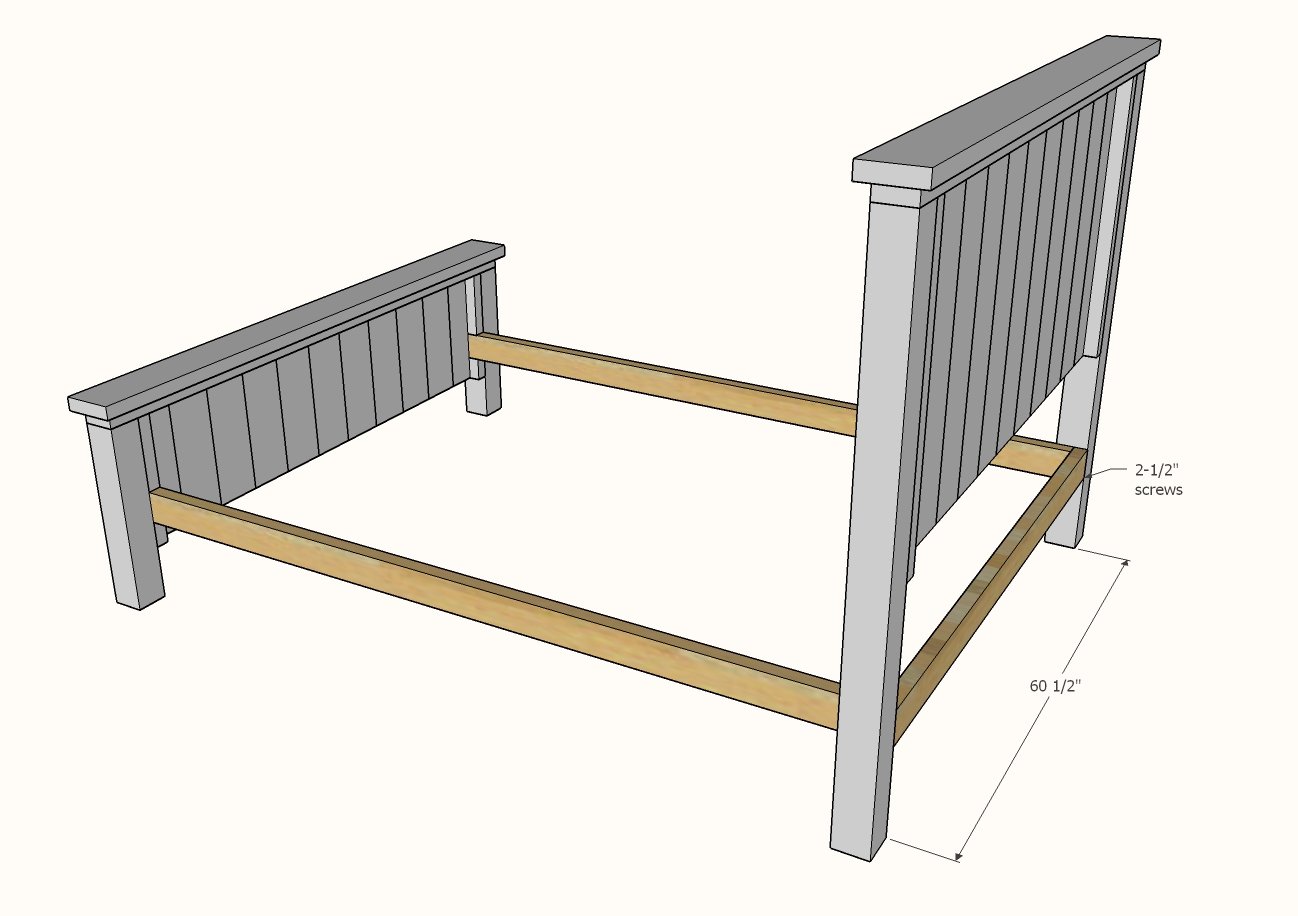
Use 2-1/2" screws to attach the headboard support between the cleats.
Step 11
Center legs add a ton of support and strength to the bed.
First attach the shorter 2x4 "legs" to the center 2x4. Then place the center 2x4 in place inside the bed, and attach to the footboard and the headboard 2x4.
Step 12

Measure and cut to fit the 1x10 siderails.
Attach with 1-1/4" brad nails and glue.
NOTE: If you find your 1x10s need to be attached at the top, you can buy small L brackets and use to attach
Step 13
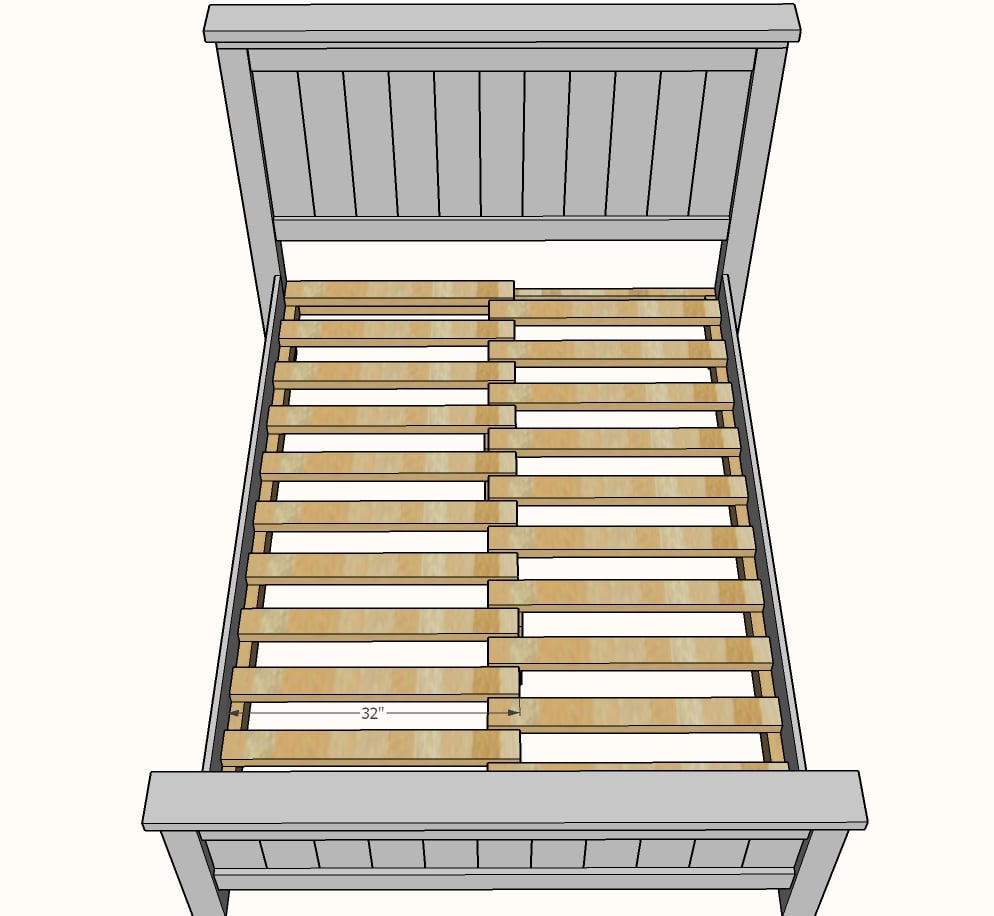
Cut the wood slats from remaining 2x4s and set inside the bed with about a 1/2" gap in between each slat. You only need one screw on the siderail cleat to attach - but you can also add screws to the center support.


Comments
bruceandwen
Sun, 03/03/2013 - 05:52
Full size farmhouse bed
Looking for the post on the dimensions for this bed did i miss it?
prescottmonkey
Sun, 04/21/2013 - 11:57
4 x 4 posts
I haven't been able to locate pine or whitewood 4 x 4 posts. I have found a Chinese fir post. What have other people used for this part of the plan?
Simone Ireland
Fri, 04/26/2013 - 11:01
Fìnally finished
Finally finished the bed today, can not wait to sleep in it tonight...
Thank you Ana, your bed is now complete & in use in Ireland...
You are a star girl, Thanks again
Zoe
Tue, 05/21/2013 - 14:09
FULL SIZE FRAME?
I was wondering if there was a plan for this bed but in the full size frame?
Thanks!!
Msbrowneyes27
Wed, 05/22/2013 - 07:24
Also looking for full size plans
Anyone found the link or plans for making a full size bed?
Ante
Wed, 07/10/2013 - 12:56
what type of wood.
Hi I just stumbled upon your site and love this bed. I looked everywhere high and low to find what type of material you used for the 2x4 2x6 and 4x4. Dis you use spruce or pine here? or is it doug fur.? whats the best to avoid twisting and bowing down the road. thanks so much, ante
Phil O'Connell…
Wed, 07/10/2013 - 18:14
Fantastic bed
Great plans - easy to work with and easy to build. Had to adjust the height for our boxspring, and added extra support by the footrest (the 1x6 boards weren't quite strong enough to support the weight given the positioning, so...
We'll be making many more of your plans, for sure! Thanks!
Ashleyanna14
Thu, 08/01/2013 - 18:08
Full Size Plans
Hi there,
I know that it has been mentioned that people are having trouble finding the full size plans for this Farmhouse Bed but I am as well. I see that Ana posted there is a post about it in Oct 2009 - but I can't find that post. I have looked through the California King Plans, King Plans, & Twin Plans and don't seem to be having any luck. Any help would be so appreciated!
Thanks,
Ashleyanna14
Thu, 08/01/2013 - 18:15
I FOUND THE FULL SIZE PLANS!
I found the full size plans just in case anyone else was having troubles finding it too.
All I know is in the search box I typed: full
Then I specified by room: Bedroom
Collection: Farmhouse
Scrolled down and it's there! Wooohooo - can't wait to make this!
Best of luck to you all!
1Monkey
Wed, 08/07/2013 - 18:25
Great design
Great design, I went with 1x6 for the panels which makes you get 1x3 for the sides. Took the idea of the accent reading lights from the king version. I highly recommend calling about 4x4s, in North Carolina it is almost impossible to find untreated posts. Literally had to drive an hour to find a supplier.
ehart3000
Sun, 08/25/2013 - 21:07
Building a modified version of this
I'm working on this bed right now (http://www.edhart.me/2013/08/making-a-farmhouse-bed/). In my post I have a couple of tips and sources for hardware. I'm making one to accommodate a box spring. Also using bed rails that attach to the posts with hardware making it much easier to disassemble the bed when I need to.
jtiffany83
Sun, 09/29/2013 - 19:06
Farmhouse king bed
Are there plans for a king bed?
nance002
Sat, 11/02/2013 - 18:05
What about measurements for a
What about measurements for a King size bed. Already have the mattresses
kaitichris
Sat, 05/17/2014 - 15:27
Question about the plywood
I have a question about the plywood 4'x8' sheet mentioned in the materials list. Where does it fit in the plans? I read through the plans several times, particularly about the joists for the sans box spring bed and don't see how the plywood fits into the frame of the bed. Any pointers...I realize this may be a silly question.
Nessa143j
Sun, 08/17/2014 - 14:32
Where Are The Full Size
Where Are The Full Size Measurments To This Build This Bed? Thanks
StaceyO
Tue, 11/04/2014 - 18:49
Attaching the 4x4s to the headboard
I found the screws, at Home Depot, it only took three trips. But now I can't figure out where to place them. Should I screw into the back like the 2x4 bed that I made for my daughter earlier this week? I just don't want to mess it up. I looks so cool. I had the same short board issue. I ended up using a short board, I think mine was 1 5/8 wide.
Stacey
jpmcarpenter
Sun, 11/16/2014 - 11:03
Nice and easy plan
Built the headboard and it went perfectly to plan. Now to do the rest of the bed!
Thank you
Joe
ahmills
Sun, 04/05/2015 - 19:36
Bed Frame
Modify for King
Ana White Admin
Sun, 04/05/2015 - 23:59
King
http://ana-white.com/2010/01/plans-how-to-modify-farmhouse-bed-to_09.ht…
Mehnaz
Wed, 04/15/2015 - 14:19
Brad Nailer
Do you have to use a Brad Nailer in order to do this or can it be done in a different method?
fairyprincess83
Thu, 04/23/2015 - 19:56
box springs use
How can I modify this for using box springs? I've tried looking in your plans but couldn't seem to find one with a frame where I could use box springs. Also how can I make this to come apart if I need it to? Thank you for your time. Linda
jnikolow
Tue, 12/29/2015 - 18:28
look at ehart3000's post a
look at ehart3000's post a few posts down from yours. has pictures and everything. much more detailed and instructional than ana.
Ashton1984
Sun, 06/21/2015 - 14:58
Building question
I needed to add the 1x2 trim to the headboard and footboard as the 1x8 were 7 1/4 wide. How should I attach the 4x4 posts? Screwing 4 1/2 inch screws into some 1x4 trim doesn't seem like it would hold very well.
Down Oxford Street
Sat, 06/27/2015 - 11:14
Twin size plan
I really want to build this bed for my kids in a twin. Do you have measurements and a plan for that?
In reply to Twin size plan by Down Oxford Street
Ana White
Sun, 06/28/2015 - 11:30
http://ana-white.com/2010/01
http://ana-white.com/2010/01/plans-how-to-modify-farmhouse-bed-to.html
waikoloasteve
Sat, 07/25/2015 - 01:28
Farmhouse King Plan
Beautiful bed. Do you have the plans for a king sized version of this bed. I would really like to make this for my wife and I. Thank you
lewinsc
Wed, 09/30/2015 - 12:18
2X6 toppers
In the instruction you say to lay the 2x6 on top of the 2x4 and screw together. How are you screwing them together? through the top of the board? If that is the case how are you hiding the srews on the 2x6. If there is another method, please explain how that is done. I just dont think you want screw heads showing on the top of the head board or footboard. Thank you and I LOVE this bed. I plan on building one for my daughter.
mnunez58
Tue, 12/29/2015 - 15:42
Farmhouse Bed Posts
Hello All,
I'm going to be making this bed for my daughters this weekend and am struggling to figure out how to connct the 4x4 post to the head board. From what I can gather the plans say to pre-drill and use a 4 1/2" screw. I can do that but was thinking of counter-sinking the screws so I can fill them in with wood putty or has anyone used pocket holes. Trying to figure out what would be the best and safest.
Thanks in advance.
jnikolow
Tue, 12/29/2015 - 18:02
slightly irritated .. someone please answer
Ok so I am trying to make this bed from the King Size version of the plans.
However, the king size version doesn't tell you how to attach the bed rails to the bed posts.
So I went to the Queen size version plans ... and my question was only 1/2 answered. When you attach the bed rail to the HEADBOARD POSTS, there is plenty of room to screw into the post because all of the paneling is higher up. Remember, the plans call for the rail to go on the insides of the posts.
However, when you try to attach the rail to the FOOTBOARD POST, you don't have any room to do it. So i kept searching all these beds on here and the only thing I found was this,
" Attach the bottom of the bed frame directly into the footboard"
Ok I obviously know i have to do that, but there are not directions telling me how. If the rails are meant to go on the insides of the posts for the HEADBOARD, then they will have to go on the insides of the posts for the FOOTBOARD. But there is no room for rail to go on the insides of the FOOTBOARD post because it is right where the paneling is.
Can someone please clarify this for me?
Thanks
Mikegarrod
Fri, 01/01/2016 - 10:08
Clarification
Just wanting a bit of clarification as to how the frame attaches to footboard. The illustration shown doesn't make it clear exactly where the two are screwed/joined together.
dthebate
Mon, 01/18/2016 - 13:08
Bed Frame with Box Spring?
In step 4, you say "optional." however, from the plan diagram it appears that the image you display is simply a support for the box spring. If I am using a box spring, should I set it down in the framing? or on top?
donly
Tue, 02/02/2016 - 17:19
Farmhouse bed
Would like to have the pattern for the full size using a box spring
thanks in advance
dillion88
Sun, 02/21/2016 - 08:53
king size plans using box spring
i was wondering if anyone has made this bed yet in king size. i am interested in doing so. how would you go about building a frame using the box spring? what are some recommendations for getting straight lumber? thanks
Tallywendy
Tue, 03/01/2016 - 14:55
Farmhouse bed
I was just wondering if you could tell me the plans for a twin size bed. Thanks so much.
In reply to Farmhouse bed by Tallywendy
Ana White
Wed, 03/02/2016 - 15:30
http://www.ana-white.com/2010
http://www.ana-white.com/2010/01/plans-how-to-modify-farmhouse-bed-to.h…
KeithFrohn
Mon, 03/21/2016 - 17:41
Attaching the legs
Hi Ana. Thank you for the wonderful plans. I am building the bed but my head boards are not quite 7 1/2" so I am also using the 1x2" trim to frame it. But how do I attach the legs? Without the head boards reaching the edge, the 4 1/2" screws have nothing to grab on to. There is a gap in the sandwich. Am I missing something? Please help! Thanks.
neddinger
Wed, 03/23/2016 - 12:34
BOX SPRING
Hi Ana, i am planning on building this but my only question is I have a box spring so how do i modify the plan so i can still use my box spring? Please Help! Thank you.
DMax32284
Sat, 04/16/2016 - 13:03
7 1/2" boards
Did you rip your boards to 7 1/2" from wider boards? 1" x 8" are generally 3/4" x 7 1/4".
Aroberts
Fri, 06/24/2016 - 16:41
Rails/box spring
I have a set of twin rails from a previous twin sized bed. My confusion is this: the box spring is 37 3/4" wide which is obviously smaller than the 38 1/2" panel rails that were cut. With this set up if I attach my bed rails it becomes too wide (40 1/2") therefore, I'll have roughly a 1 1/2" gap on each side. Am I missing something? My fault I should've measured the mattress/box spring before making my cuts and assembled according to those measurements, but now I can't take it apart and trim it down. Any suggestions??
AdkMac
Sat, 09/24/2016 - 15:53
screw placement/direction
Is it possible to get a schematic with arrows or icons to show screw placement, direction, angle for attaching the 4x4 side posts to the panels? I am not a carpenter and am not sure what 'sandwiched' means . Thank you.
jjjbluray
Sun, 10/23/2016 - 06:02
Attaching to footboard
I have looked through a few pages of comments but cannot find how exactly to attach the bedframe to the footboard. Can someone please give a little more detail on this part?
Thanks!
James
AbbieFisher
Sat, 12/17/2016 - 17:28
Attaching the frame?
Can someone please tell me how and where they attached the 2x10 side rails? I used bed rail hardware and attached lining up the outside edge of the 4x4 post, but now the frame is way too wide and too long. If I go on the inside of the post and use bolts, I think it will be too narrow. Maybe go through the post and into the end of the 2x 10?? Please help, love the bed, but it is too big for my mattress!
Bigwill1957
Mon, 01/30/2017 - 11:16
My Daughters Request Queen Farmhouse bed
Farmhouse Queen Bed
My first attempt at ever building a bed, but when you 13 year old daughter asked you to get her a bed just like this one I said I will try to find you one.....and jumped in and started to build her the bed she wanted!! This is actually a very easy to build and I agree with others to be sure to read comments to help you out on a few questions or concerns that will come up building this bed pattern.
I used Pine to build the bed, only issue I had was finding 4x4 post untreated, so I used treated post and worked fine but remember what finsih you plan on gonig with could effect the outcome if you use treated post. I was going to use a box springs so I modified the cross rails and used 2x4 instead of 2x6 to lower the box springs lower into the side rails keeping the bed from being so high up. One thing I used and loved was i used Joist hangers to mount the side rails and cross rails which makes moving this bed a breeze!! Cheap and very rewarding to say the least....joist hangers are a must as far as i am concerned.
For the finish of the bed I took a oribital sanderand 80 & 120 grit paper and knocked the edges down on the 1x6's just on the face of the board to have that ship lap look but left the back side normal. I also extended the very top 2x6 board on the head board to have a 1 1/4 overhang to give it a little more defintiion and like to my preference.
I stained the bed Dark Chesnut Minwax and then painted Valspar vintage White over the top and once dried completly I distressed the bed with the orbital sander using 80 & 120 grit paper.
One small jester I put into the bed that you Fathers out there that has as daughter that has you wrapped might appreciate and see where I was coming from when you see that I carved in the head board post " I Love Jessie" Dad with a knife like kids used to do when they was in love as a kid ........mainly so she will never forget that her dad built it for her....... Cheesy Im sure some will say but....... what we do for our kids.
Great Bed and Very pleased with the outcome
dkramer1995
Sat, 03/11/2017 - 13:48
Quick Question
Love the bed and I am also making for my daughter. I've got the head and footboards made, but cannot figure out how to attach the rails to the footboard. Do you have a pic you can share or let me know how you did it? I'm considering cutting an inch or so off the footboard so the side rails will hit the middle of the 4x4x and simply screw in from the front. Thoughts?
Srm330
Thu, 03/02/2017 - 05:25
Which nails??
why does this one call for 1 1/4 brad nails and the king call for 1 1/4 finish nails??
Goodaking
Wed, 12/27/2017 - 05:56
We are looking to build the farm house king bed.
we are hoping to buy our king size mattress today. Should we just get the mattress and build bed frame. Are there any pros or cons to getting a box spring with the mattress? Will it affect the look if we get the box spring with mattress ? Thanks Ian
mgreenfi
Sun, 12/31/2017 - 05:06
Queen Farmhouse bed question - rail height
I have a question regarding the queen size farmhouse bed. This is my first crack at building a bed and outside of the cost of wood in my area it's been a simple and enjoyable project for my son and I to tackle together. I have modified the plans slightly to use removable rails and slat instead of a frame since we have a box sping and because we need to be able to easily disassemble the bed. From the images and instructions, it appears as if the bottom of the rail is supposed to be even with the bottom of the footboard? I was hoping someone could confirm that for me. Thanks!!
goodaking@hotm…
Wed, 01/10/2018 - 06:40
Im building a queen and king farm bed with box spring.
Do i need to add three inches to the head and foot board account for the side rails for the box spring? whats the best way to attach the rails to the head board and foot board? Medal brackets?
vetta2323
Fri, 02/23/2018 - 02:08
Weight Capacity
Hey guys, weird question but do any of you have an estimated idea of a possible weight capacity of this bed. I know it would depend on the quality of wood. I was thinking of using a good quality pine so it is still affordable. I would appreciate any feedback. Love your stuff....:)