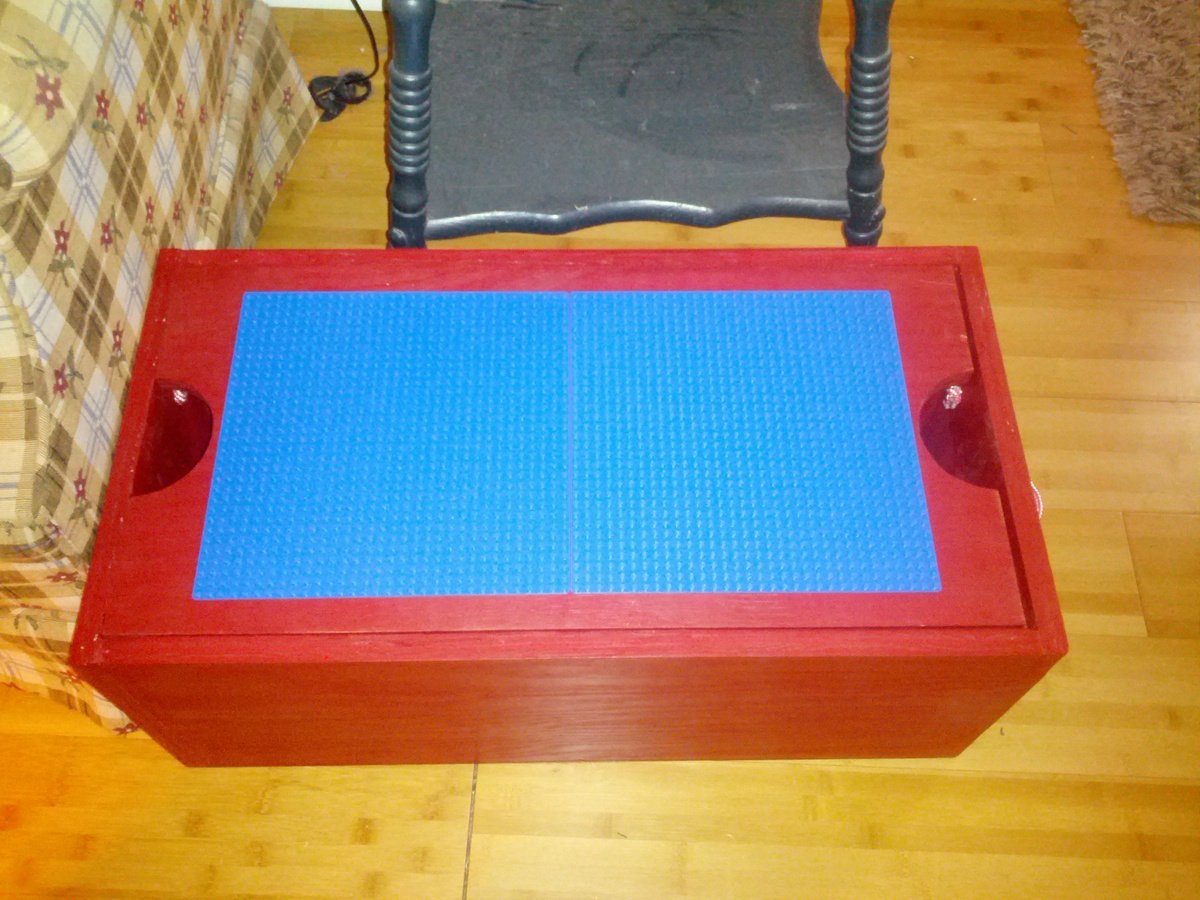
Community Brag Posts

Lego toy box

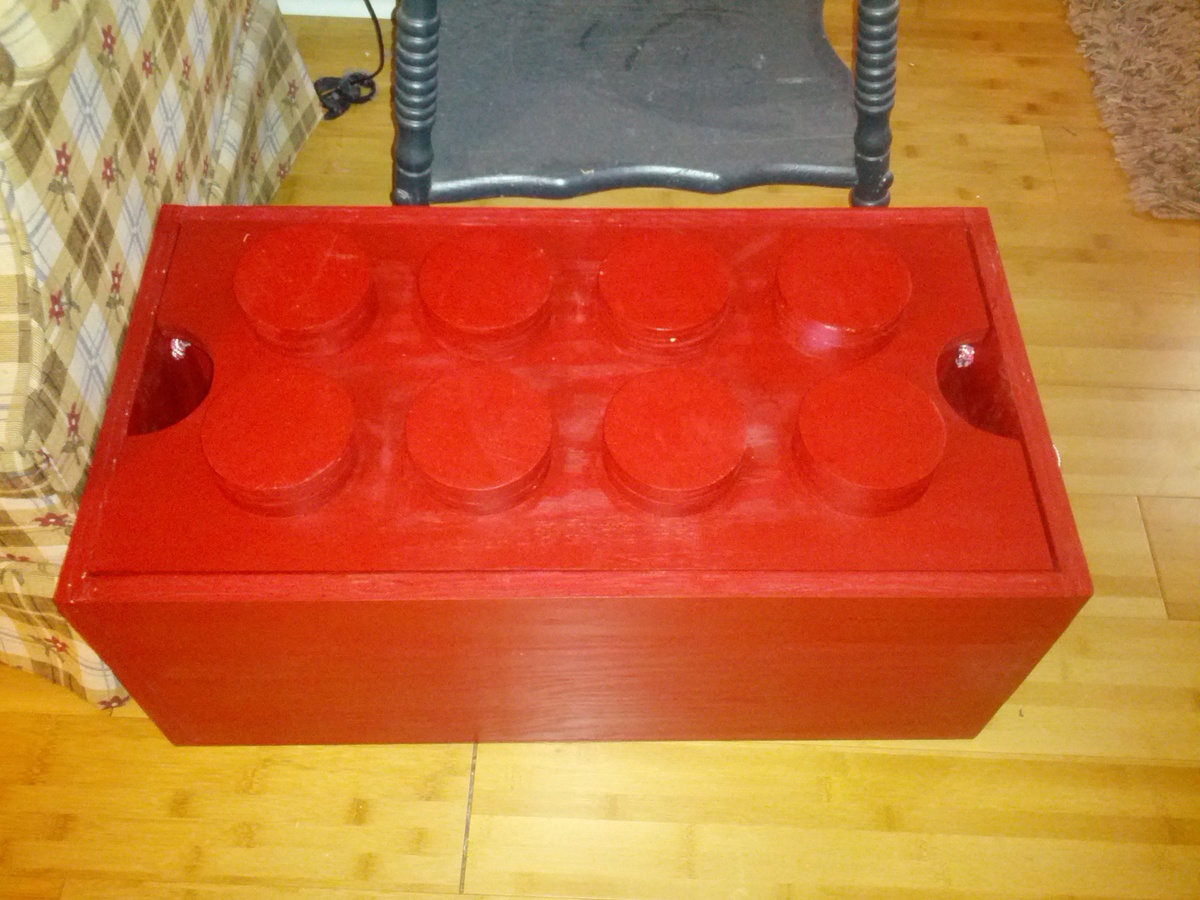
I built one for my kids and one for a nephew. I ordered the 10" x 10" Lego plates from Amazon. The sides and top are made from 3/4" plywood and the bottom is 1/4" plywood. The overall dimensions are 26 1/4" x 13 5/8" x 11 7/8" (not counting the top circles). I used a 4" hole saw to cut the circles then glued/nailed two together and used wood filler to fill the hole created in the center of the circles by the hole saw.

Other than changing the dimensions, I followed the original plans closely. The images in the original plans have 2 plates that are 15" x 15".

When cutting the circles, I clamped/screwed a scrap piece of wood under the plywood to produce much cleaner cuts.

I did paint the inside bottom white to make it easier to see the bottom and small pieces. I also drilled a pair of holes on each side to add rope handles.

Built from Plan(s)
Estimated Time Investment
Afternoon Project (3-6 Hours)
Finish Used
Valspar paint sample from Lowes
Recommended Skill Level
Beginner

My Potting Table

Submitted by Anonymous (not verified) on Mon, 02/29/2016 - 19:29

Loved making this.  Took less than 2 hours, not including painting, which I haven't done yet.  Plans were easy to follow but I couldn't find a cut list which would have made the trip to the lumber yard a little easier. I used some scrap wood and some new so very reasonable to make.

Estimated Cost
$40
Estimated Time Investment
An Hour or Two (0-2 Hours)
Finish Used
Haven't decided yet
Recommended Skill Level
Beginner

Clara Table

Submitted by WolffA on Fri, 10/11/2019 - 07:51

I stained the top with Dark Walnut stain and used perfect white paint. 

Built from Plan(s)
Estimated Cost
50
Estimated Time Investment
Day Project (6-9 Hours)
Finish Used
Dark Walnut Stain. Ultra White Paint
Recommended Skill Level
Starter Project

Comments

Basic Bookshelf

Built this over a couple of week nights. I used the basic bookshelf plans available on this site.

It was fun!

I do have a couple of observations though:
1- Sand all pieces of wood BEFORE you cut them, to the desired lengths! Make sure the wood is nice an smooth. So much easier to do with big pieces, that can be balanced on a good support! Especially important when using the cheapest pine available!

2- Take your time, double check measurements, and follow the assembly directions. (Yes.. I made a mistake on the assembly part... at least it's on the back, and no one can see it)

I did change the width to fit my wall space, and I did add adjustable shelves (1 fixed shelf, to help hold the whole thing square). (I used a piece of peg board to place the holes for the shelf supports). Pretty neat! I also added a couple of extra shelves. (I still needs some paint) I needed the extra storage for organizing the stuff we need in the family eating area.

I also changed up the top finishing details. I mitered the corners, and layed the 1x2's flat, offset by .75 of an inch. It gives a nice look.

Built from Plan(s)
Estimated Cost
$55.
Estimated Time Investment
Day Project (6-9 Hours)
Finish Used
plain, white, semi-gloss. It matches the trim in my house (and I had it in the basement!)
Recommended Skill Level
Beginner

Mason Jar Centerpieces

Submitted by bludevil35 on Tue, 12/24/2013 - 05:55

We decided this year to make gifts for our family's Secret Santa!

Thanks again for the plans!

Built from Plan(s)
Estimated Cost
$4 for the handles
Estimated Time Investment
An Hour or Two (0-2 Hours)
Finish Used
2 coats of Minwax Dark Walnut
Recommended Skill Level
Starter Project

Pantry

Submitted by Anonymous (not verified) on Fri, 03/04/2016 - 19:17

I copied my design from another brag. 48" wide, 14" deep, and 76" tall.

Estimated Cost
$200
Finish Used
Jacobean stain
Satin polyurethane
Recommended Skill Level
Intermediate

Closet remodel Shelves

Submitted by Anonymous (not verified) on Sun, 10/13/2019 - 13:15

My master closet was a mess when I moved in and something needed to be done. I moved the doorway to create more space in my bedroom and closet. I found this lan and modified it try needs. It works great!!

Note: It is much cheaper to purchase the long pipes and have Home Depot cut them down to the right length.

Estimated Cost
150
Estimated Time Investment
Weekend Project (10-20 Hours)
Finish Used
Water based poly
Recommended Skill Level
Intermediate

Doll bed factory

Submitted by sgilly on Mon, 02/20/2012 - 15:22

I fell in love with the darling bunk bed built by so many of Ana's readers. Since seeing it I've made several for my granddaughter, neighbors, and friends. What I've learned is that although they're cute, they take almost as much time as a full sized bed!

Estimated Cost
$20-30 (less if I used scraps!), another $10 for bedding materials
Estimated Time Investment
Afternoon Project (3-6 Hours)
Finish Used
I left most of the bunks natural. Filled, sanded and sprayed with 2 coats of clear poly. Others were painted white (after filling and sanding).
Recommended Skill Level
Beginner

Comments

Nora E. McClure (not verified)

Mon, 02/20/2012 - 18:54

I love the beds. My child wants one so badly. I like yours better then the one American Girl makes.

sgilly02 (not verified)

Fri, 02/24/2012 - 20:48

That's a sweet thing to say. Evidently, others feel the same; I can't make enough of them! They're really pretty easy to make, I hope you try your hand at it!

Andrea Franklin (not verified)

Mon, 05/28/2012 - 17:27

Hi, I see you've made the Ana-White doll cradle from this post. The link to the pattern for the doll cradle appears to be missing as it is a dead link now. Do you know how I might obtain the pattern? Thanks so much

Walnut Truss Beam Dining Table

Eight foot Truss Beam Table built out of pine, for about $250 for all of the lumber, pocket screws, stain and poly.

This was my second project, and I found it easier than the Benchright Coffee Table, except for the lifting of the wood. It was so heavy that I needed my husband's help to move the table top after it was pocket screwed together, and we waited until we brought the table inside to attach the base and the table top, due to weight and size.

More photos of the build process: http://thehandcraftedlife.blogspot.com/2013/11/dining-room-progress-diy…

Built from Plan(s)
Estimated Cost
$250
Estimated Time Investment
Weekend Project (10-20 Hours)
Finish Used
Rust-Oleum Ultimate Wood Stain in Dark Walnut (one coat, left on for 5 minutes before removing) + Rust-Oleum Ultimate Polyurethane in Satin (2 coats). Looks nice with a little Old English every once in a while.
Recommended Skill Level
Beginner

Comments

Rebecca.Marie

Sun, 01/25/2015 - 16:26

Gorgeous table, and it's now on my to-do list for this summer, but I also love the light fixture! Was this a DIY project as well? I've seen plenty of similar projects using mason jars but I much prefer the variety and shape of the glass covers used in this piece, are they upcycled? Any details I can get would be appreciated!

Workbench

Submitted by cjlaw on Mon, 03/07/2016 - 06:44

I built this to accommodate my miter saw but I also wanted a place for my band saw. I added drawers to make the table level with the miter saw and they add some extra storage space.

Estimated Time Investment
Weekend Project (10-20 Hours)
Recommended Skill Level
Intermediate

Comments

West elm knock off coffee table

Submitted by Anonymous (not verified) on Sat, 10/19/2019 - 00:36

This is the first piece of furniture I have built that I want to put in our house. I used a lot of our tools for the first time. It was really fun and definitely took me a long time but learned a lot in the process. I used all scrap wood from old fencing & old projects. And I had to make an opening for storage on one side! What do you think? :)

Estimated Cost
$50-60
Estimated Time Investment
Week Long Project (20 Hours or More)
Finish Used
Wood stain with a mix of royal blue unicorn spit and polyurethane top coat. I had to use a wood hardener as well because the old wood I used had some dry rot. It worked well but it changed how the stain took to it a bit
Recommended Skill Level
Intermediate

Magazine Boxes

Submitted by AshleyC on Fri, 02/24/2012 - 20:48

This project took us about a day. We made 15. Other then an incident where my boyfriend almost shot my father in the foot with a nail gun (accidently of course lol) it went pretty well. Way better then the paper and mismatched ones that I had before!!

Built from Plan(s)
Estimated Cost
About $30
Estimated Time Investment
Day Project (6-9 Hours)
Recommended Skill Level
Beginner

Bedside Table

Submitted by AndyH on Sun, 12/29/2013 - 07:34

First of your plans I followed and already have two more projects on the go for different tables. Great plans and ideas!!!

Estimated Time Investment
Weekend Project (10-20 Hours)
Finish Used
Minwax Ebony Stain and Satin Poly and then two coats of Minwax Wax to finish.
Recommended Skill Level
Beginner

New Kitchen Cabinet

Had a blast building this project. from printing the plan to first coatings of stain was roughly 10 -14 hours including 2 trips to HomeDepot. I opted to use the PineShop Laminated Pine Shelving / Project Wood It has a really great look when done, and as Im in Canada some prices where a little higher than i had hoped. when purchasing the laminated pine panels, i got 3 panels at 48 inch long by 16 wide (for the top bottom and shelf and 2 panels at 36 inch long by 16 inch wide for the sides. these are actually 16 inch wide so if you need to make them narrower run them through your table saw or have the home depot team trim them to the width you prefer or buy the narrower 12 inch panel . Again it was a blast to build, between the kreg screws needed and the panels and lumber and 1/4 plywood back panel and 3 centre mount drawer slides this project came in at $245 Canadian the Stain i used i have plenty of on hand, but if you don't have any on hand add $10 or $20 to your price

Estimated Cost
$200 - $300
Estimated Time Investment
Weekend Project (10-20 Hours)
Finish Used
Stain on hand
Recommended Skill Level
Intermediate

Bunk bed shelf

Submitted by dkkachik on Tue, 10/22/2019 - 09:31

My daughter asked me for a shelf near her bunk bed to put books, glasses, pen, etc. on.  I found this plan and made it that day.  Self cost less than $15!!  She loves it.  It was super simple to do!  

Estimated Cost
$15
Estimated Time Investment
Afternoon Project (3-6 Hours)
Finish Used
Gloss spray paint
Recommended Skill Level
Starter Project

Outdoor Sectional

Submitted by Boogiemy on Tue, 02/28/2012 - 05:54

We built this sectional for approximately $700. The wood and supplies cost about $200. The cushions were the most expensive, about $500. We wanted 24 inch wide and 5 inch thick cushions that were well made. I ended up ordering them online from Wal-Mart. The project could have taken about one day, but due to work and kids, it took us about a week.

Estimated Cost
$700
Estimated Time Investment
Day Project (6-9 Hours)
Finish Used
Cabot Australian Timber oil in honey teak
Recommended Skill Level
Beginner

Comments

Toy Storage

Submitted by bridge318 on Mon, 12/30/2013 - 14:17

Half of the spare bedroom in our basement is our toy room and I wanted to be able to host visitors without them being overwhelmed by our toys. The units on top are three separate units. We didn't divide the middle unit so we could use as book shelves. The open units on the bottom are tall enough for car elevators, etc. I like the half units on top for the plastic storage boxes where I have craft/art supplies (I don't want my kids getting that when I'm not in the room!). We used white paneling on the back of the shelving. We used a piece of trim on the bottom to cover up the legs, but I wanted to show you that the entire unit does not sit on the carpet. The totes are Martha Stewart brand from Home Depot. (I apologize for the blurriness of the last photo.)

Estimated Cost
$350
Estimated Time Investment
Weekend Project (10-20 Hours)
Finish Used
Kilz Primer (1 coat) and High-Gloss White paint (2 coats)
We waited to paint until it was all put together, but if I could do it over again, I would paint the boards before assembling and touch up what was needed. I sanded in between each coat.
Recommended Skill Level
Beginner