
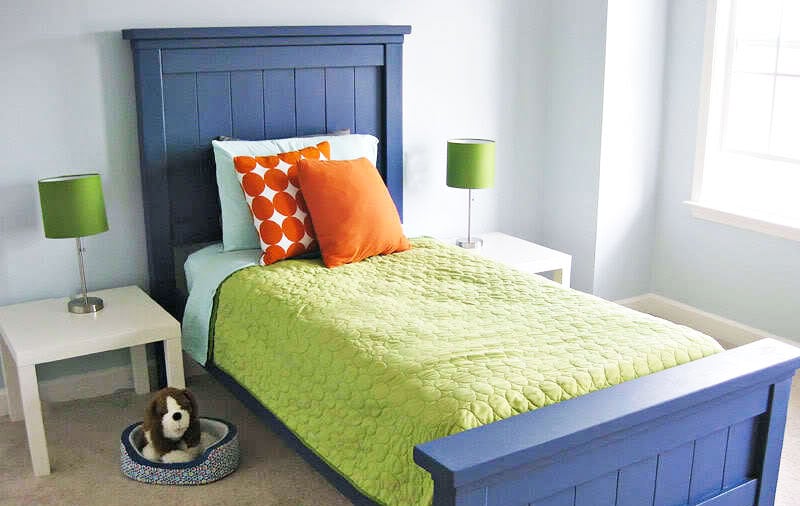

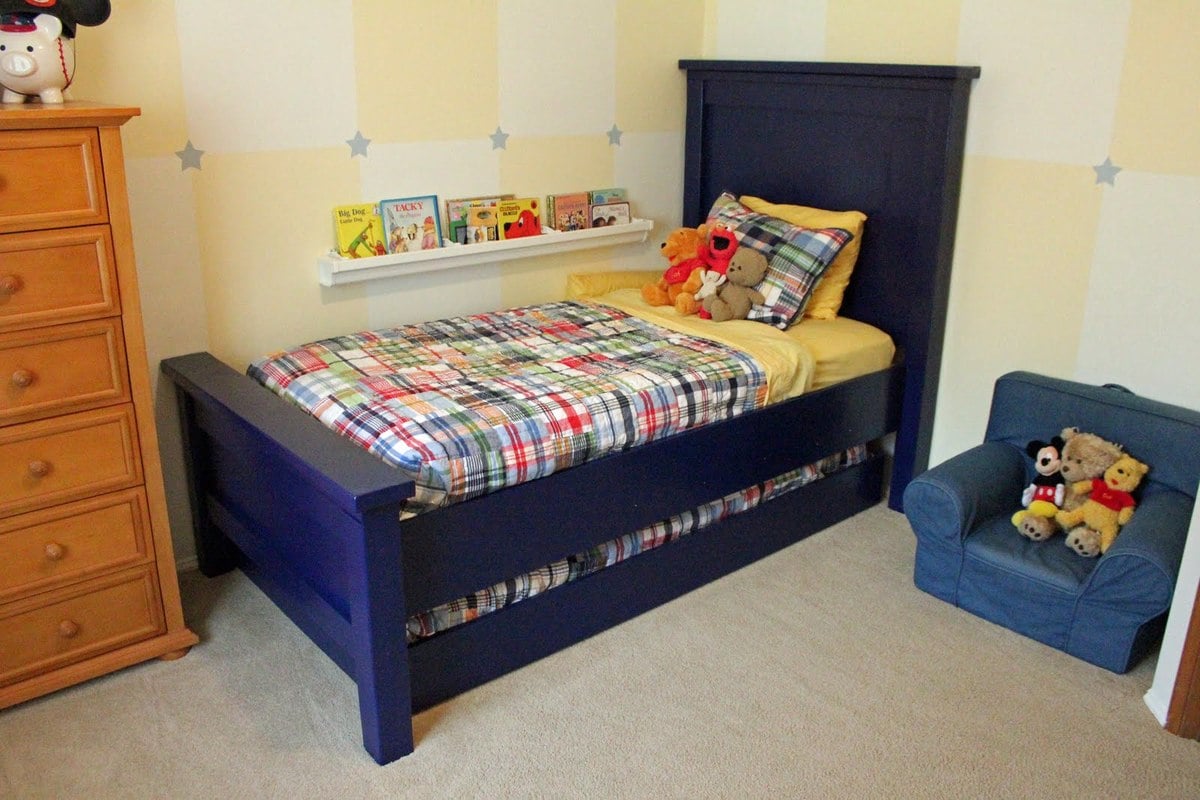
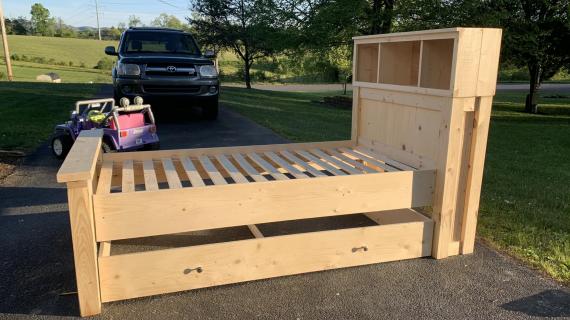
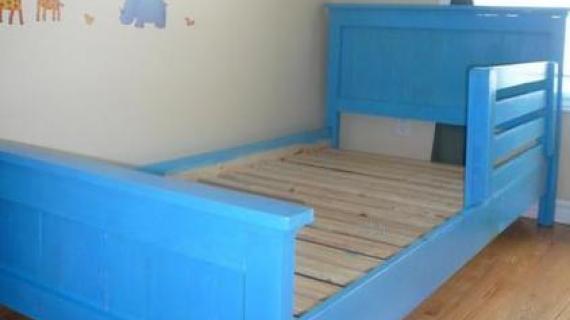
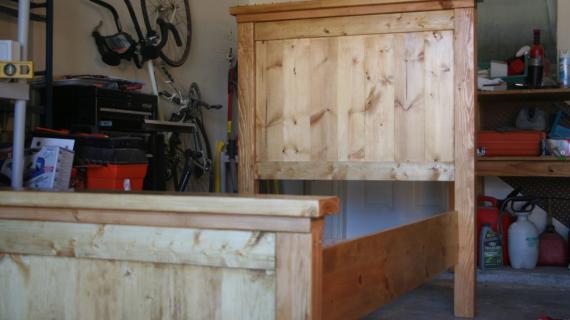
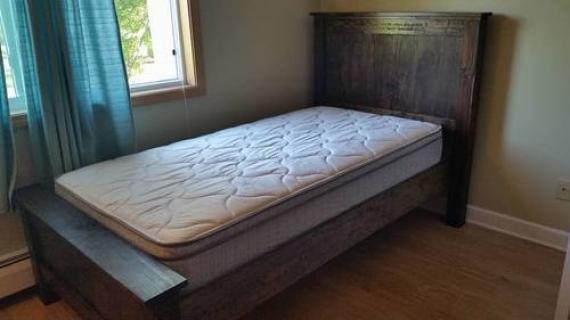
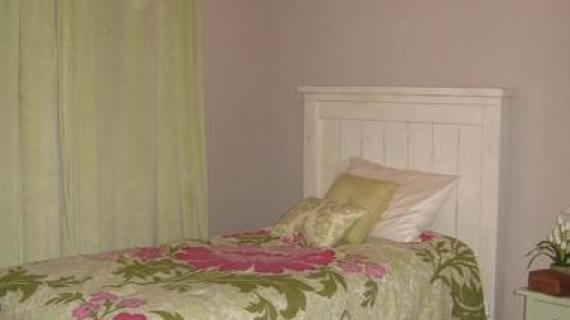
If you are looking for a classic farmhouse style bed for your child's room, this is the project for you. Featuring simple styling, large headboard and footboard tops, substantial legs, sturdy siderails, and the option to go with or without a boxspring, this beautiful bed is definitely worth your sweat!
Step by step plans with diagrams and lots of readers submitted photos. Check out all our Farmhouse Bed plans here.
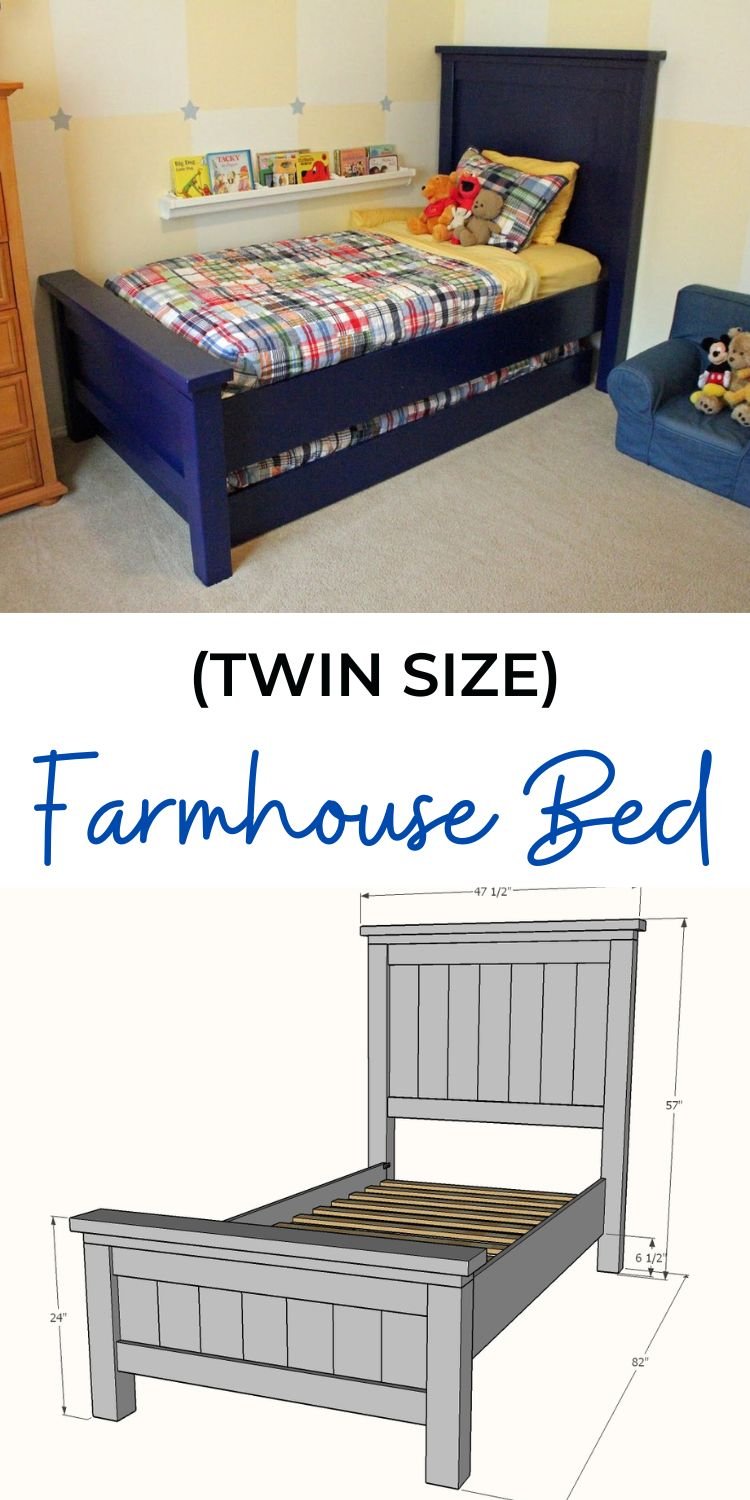
Pin For Later!
Preparation
3 - 1x6 @ 8 feet long
1 - 1x6 @ 4 feet long
2 - 1x4 @ 8 feet long
2 - 4x4 @ 8 feet long
1 - 2x2 @ 8 feet long
4 - 2x4 @ 8 feet long
2 - 2x6 @ 8 feet long
2 - 1x10 @ 8 feet long
6 - 1x3 @ 8 feet long
2 - 1-1/2" x 1-1/2" L brackets
2 - 3" long straight mending plate brackets
HEADBOARD
- 7 - 1x6 @ 30"
- 2 - 1x4 @ ~38-1/2" - measure and cut to fit
- 2 - 4x4 @ 54"
- 2 - 2x2 @ 30"
- 2 - 2x4 @ ~45-1/2" - measure and cut to fit
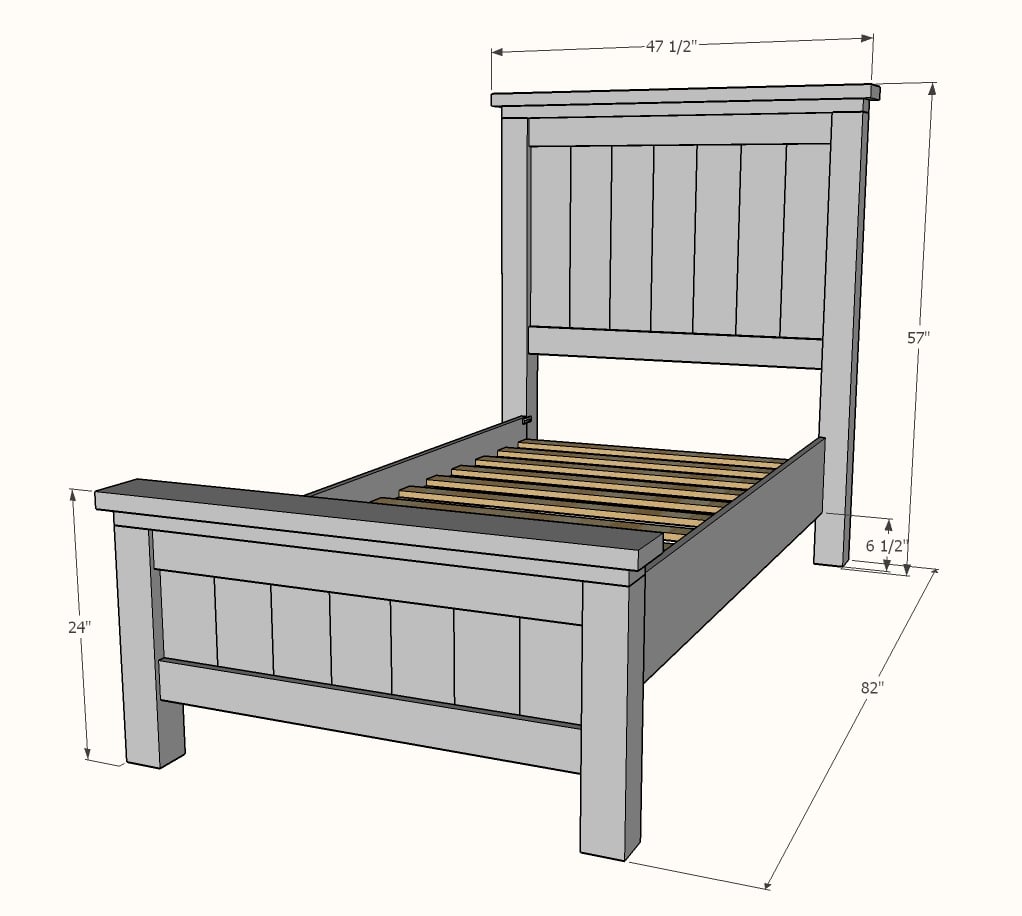
- 2 - 2x6 @ 47-1/2"
FOOTBOARD
- 7 - 1x6 @ 15"
- 2 - 1x4 @ ~38-1/2" - measure and cut to fit
- 2 - 4x4 @ 21"
- 4 - 2x2 @ 5-1/2"
- 2 - 2x4 @ ~45-1/2" - measure and cut to fit
- 2 - 2x6 @ 47-1/2"
BED FRAME & SIDERAILS
- 2 - 2x4 @ 80"
- 2 - 2x4 @ 8-1/2"
- 2 - 1x10 @ 75"
- 12 - 1x3 @ 38-1/2" - measure and cut to fit


Instructions
Step 1
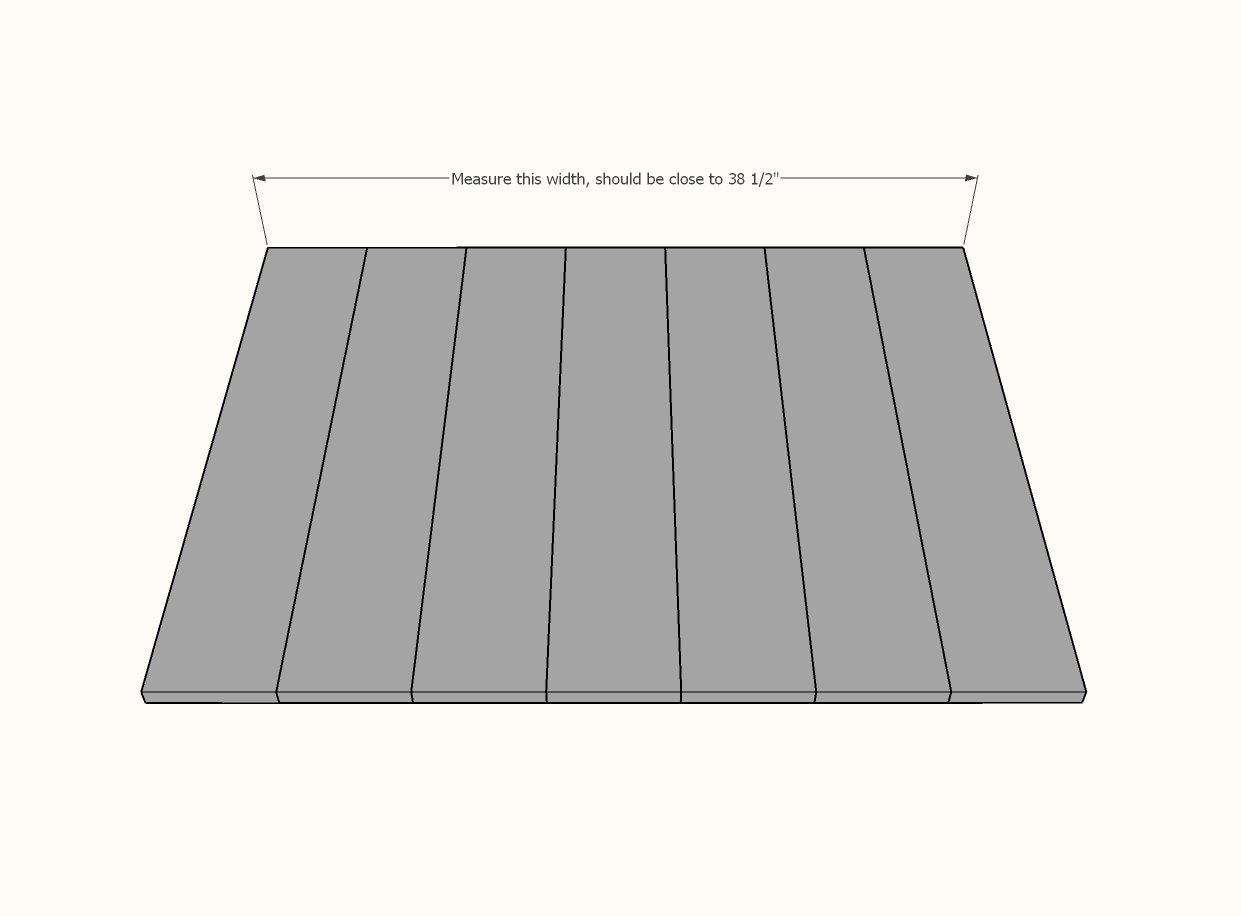
Cut the 1x6 headboard boards with a miter saw (preferred) or circular saw with straight edge.
Lay out as shown in diagram.
Measure the overall width.
POCKET HOLE USERS: You can join the 1x6 boards together edge to edge with 3/4" pocket holes and 1-1/4" pocket hole screws.
Step 2
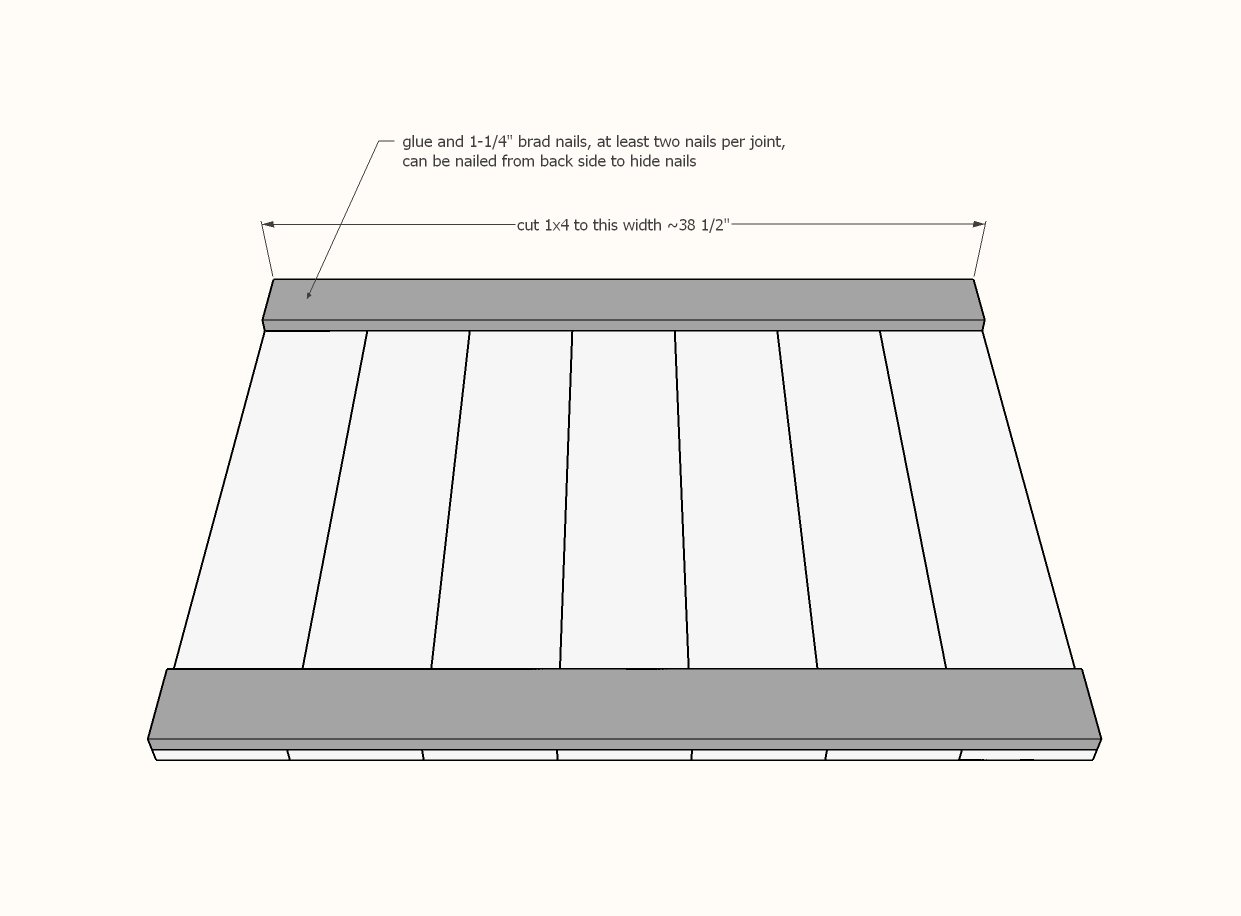
Attach 1x4 on top and bottom, with all outside edges flush, with 1-1/4" brad nails and glue.
Make sure the panel is square (not a parallelogram) by taking outside corner diagonal measurements and adjusting until the two opposite diagonals measurements match.
POCKET HOLE USERS: Drill two 3/4" pocket holes on each end of the 1x4 boards. Attach to the 4x4 legs with 1-1/4" pocket hole screws. Then nail the 1x6 boards to the 1x4s.
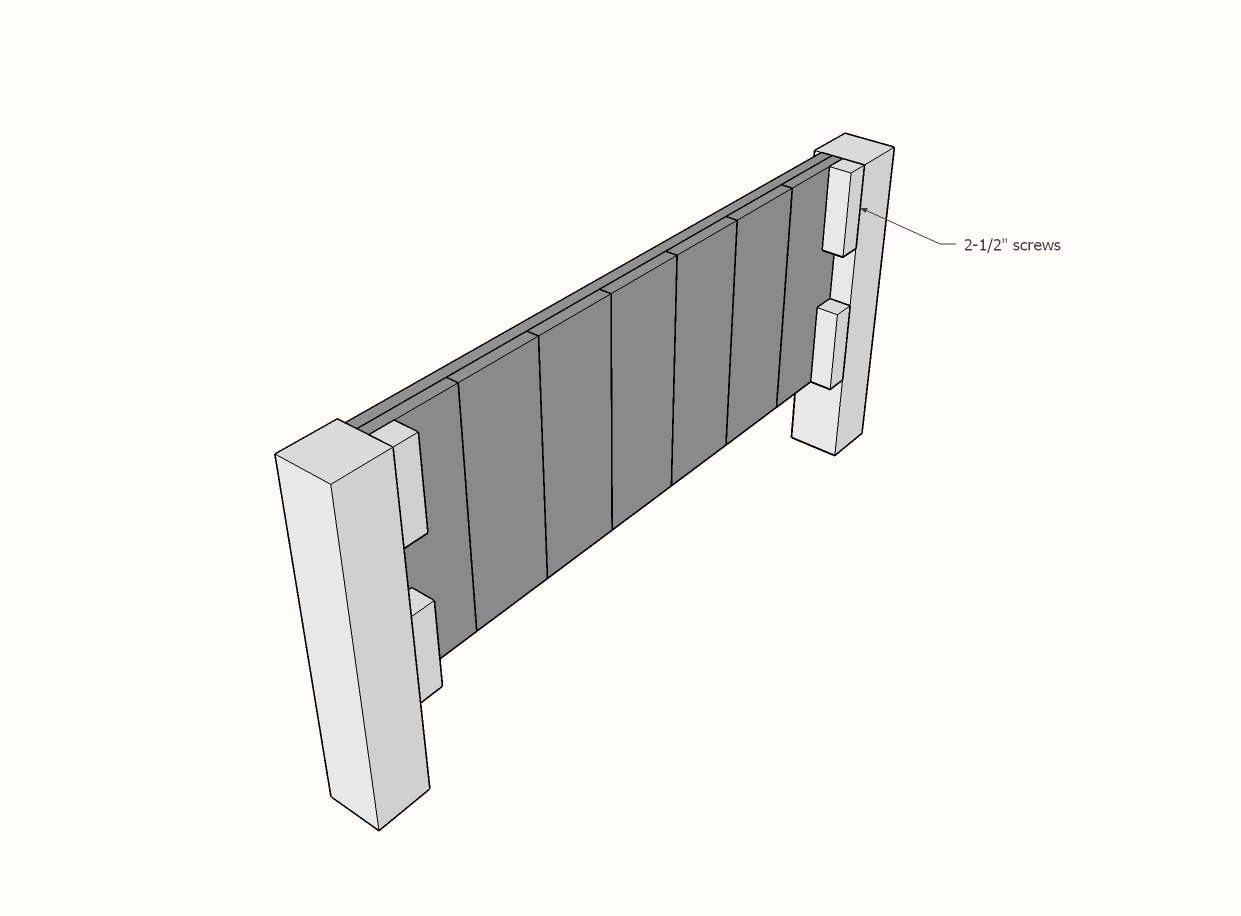
Step 3
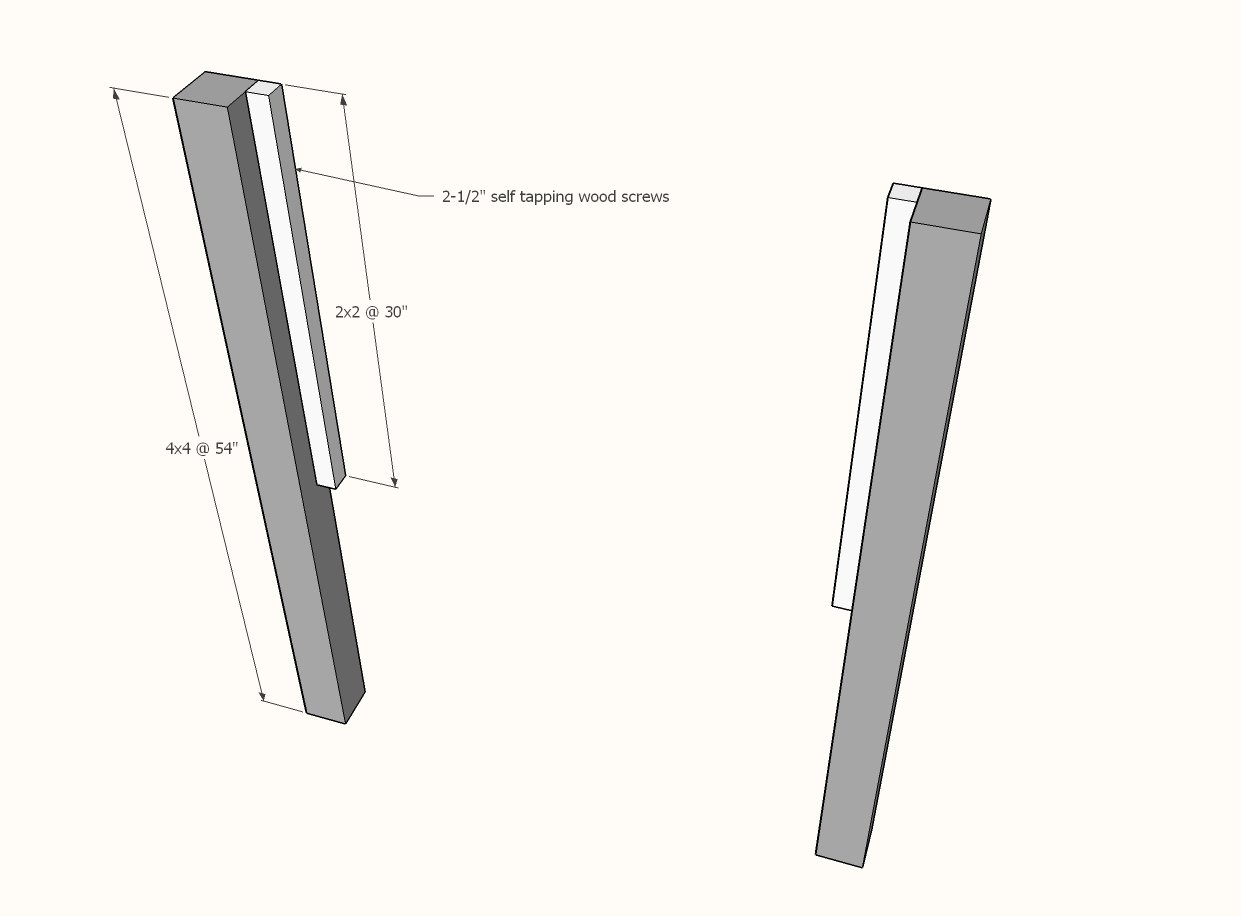
Use 2-1/2" screws to attach the 2x2 cleats to the inside back edge of the 4x4 legs.
POCKET HOLE USERS: Skip this step.
Step 4
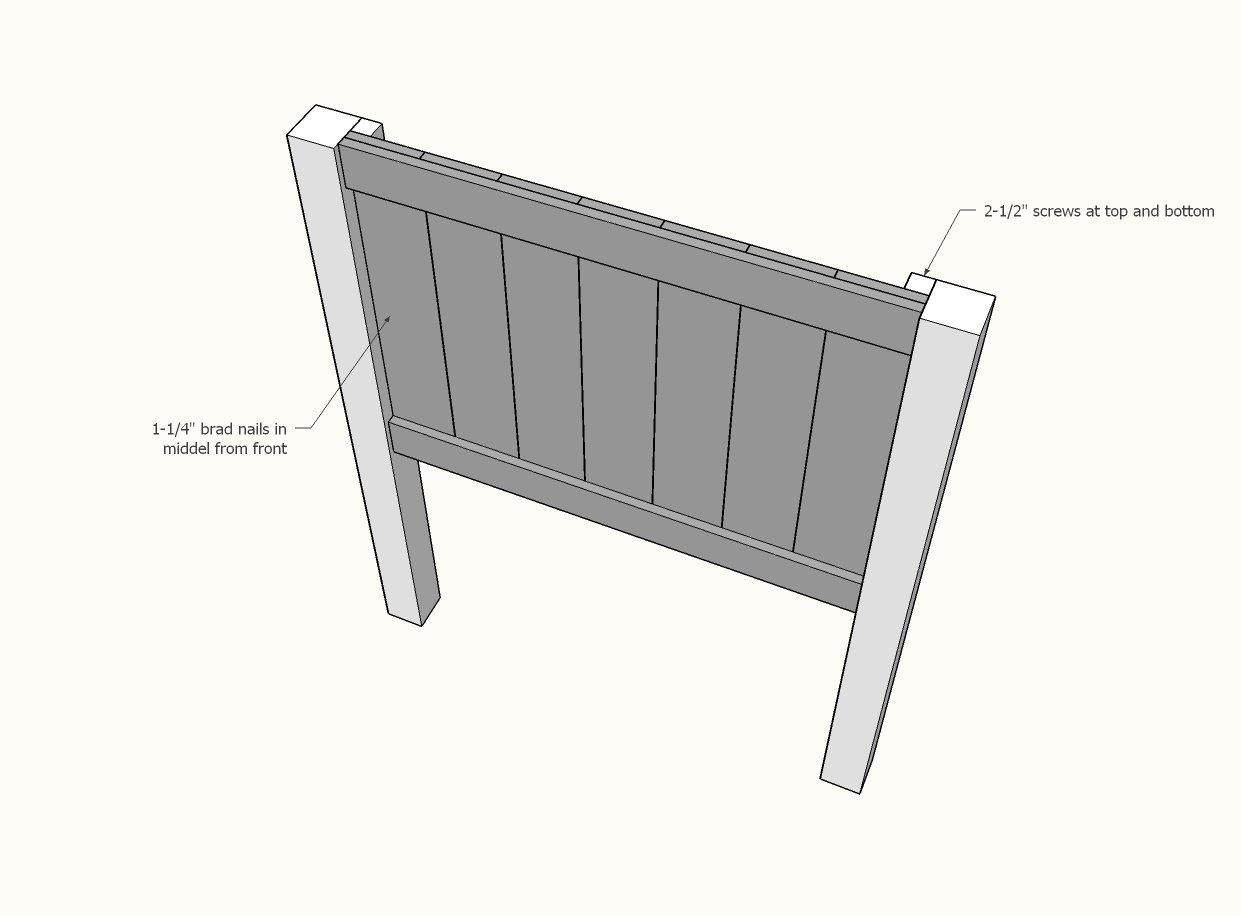
Attach panels to the 2x2 cleats with 2-1/2" screws and 1-1/4" brad nails and glue.
POCKET HOLE USERS: Skip this step.
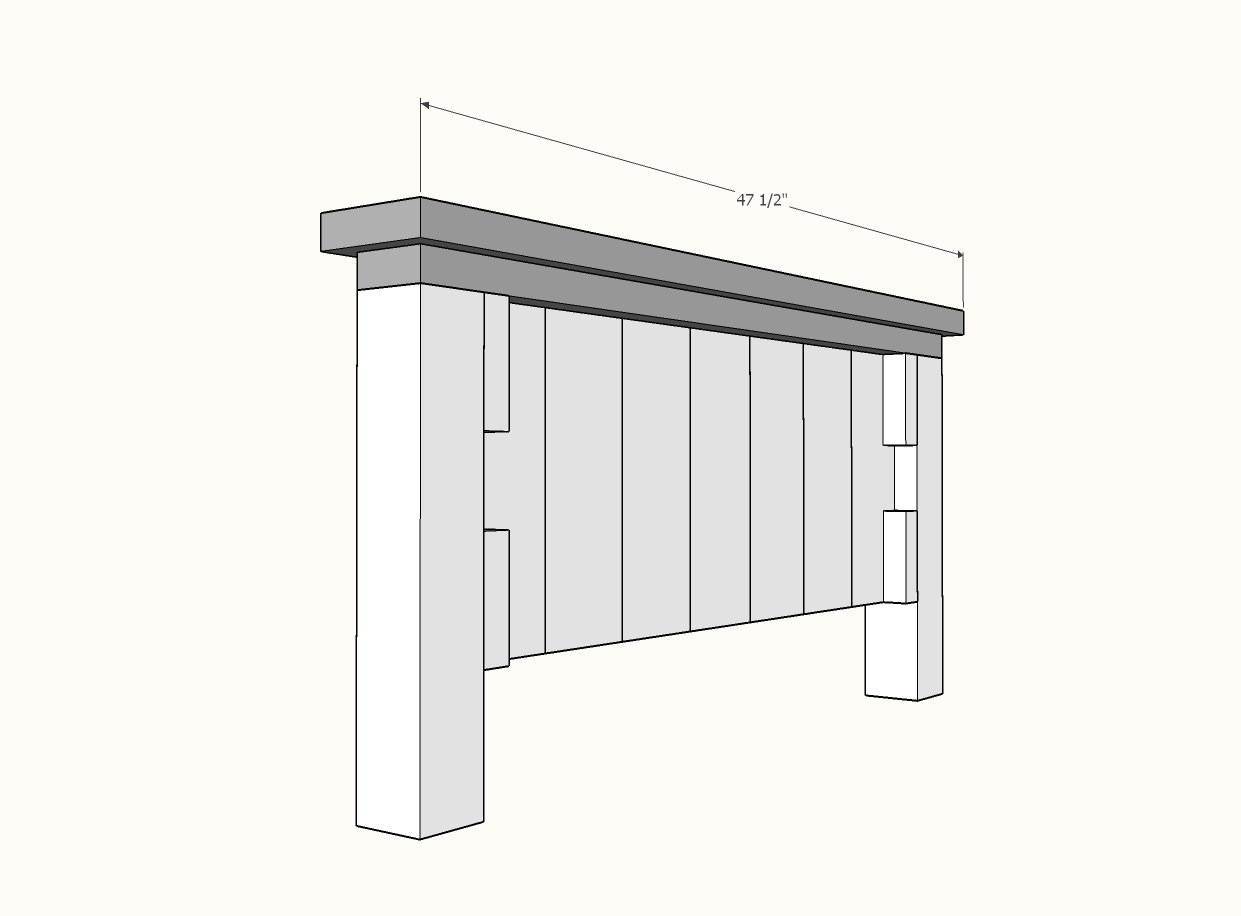
Step 5
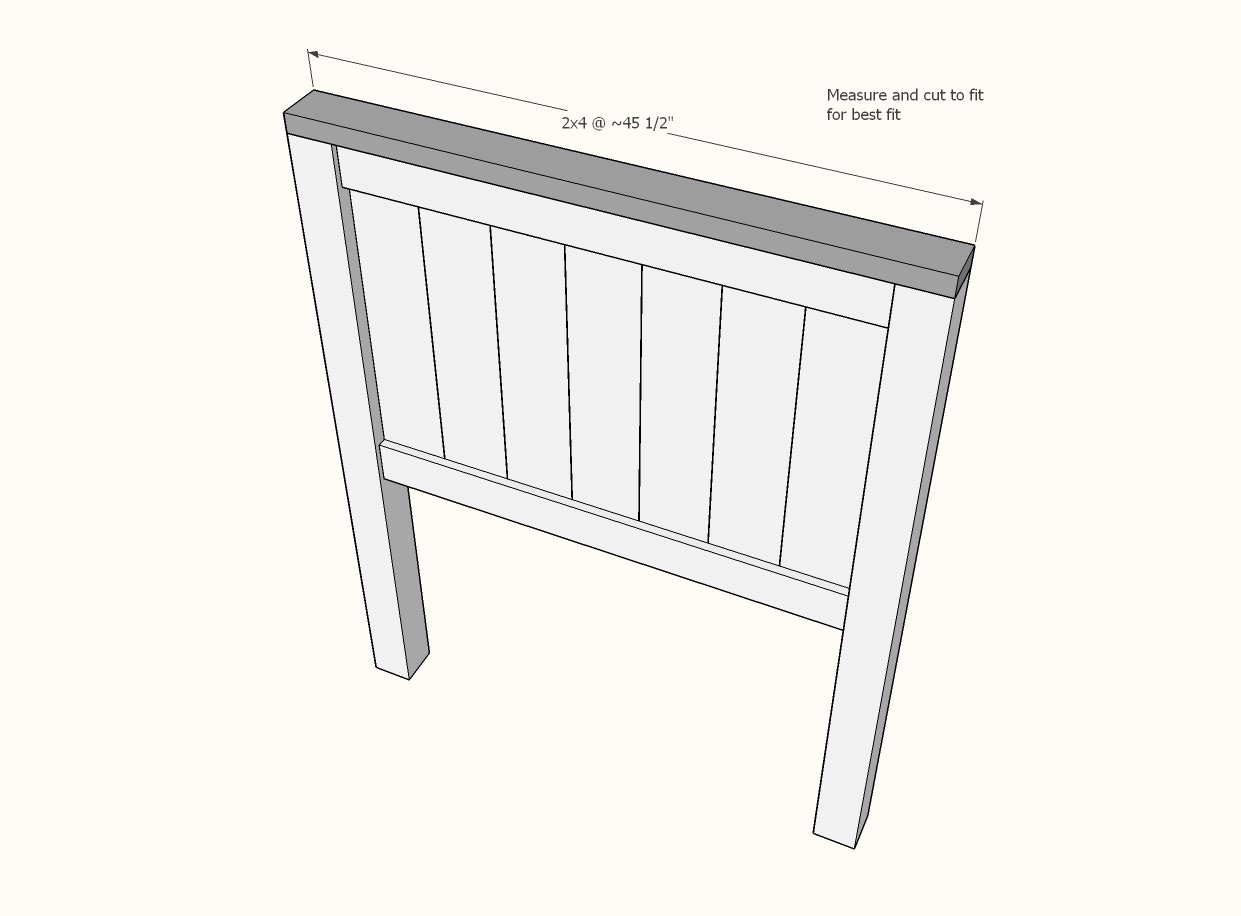
Measure and cut the top 2x4. Attach with 2-1/2" screws and glue.
Step 6
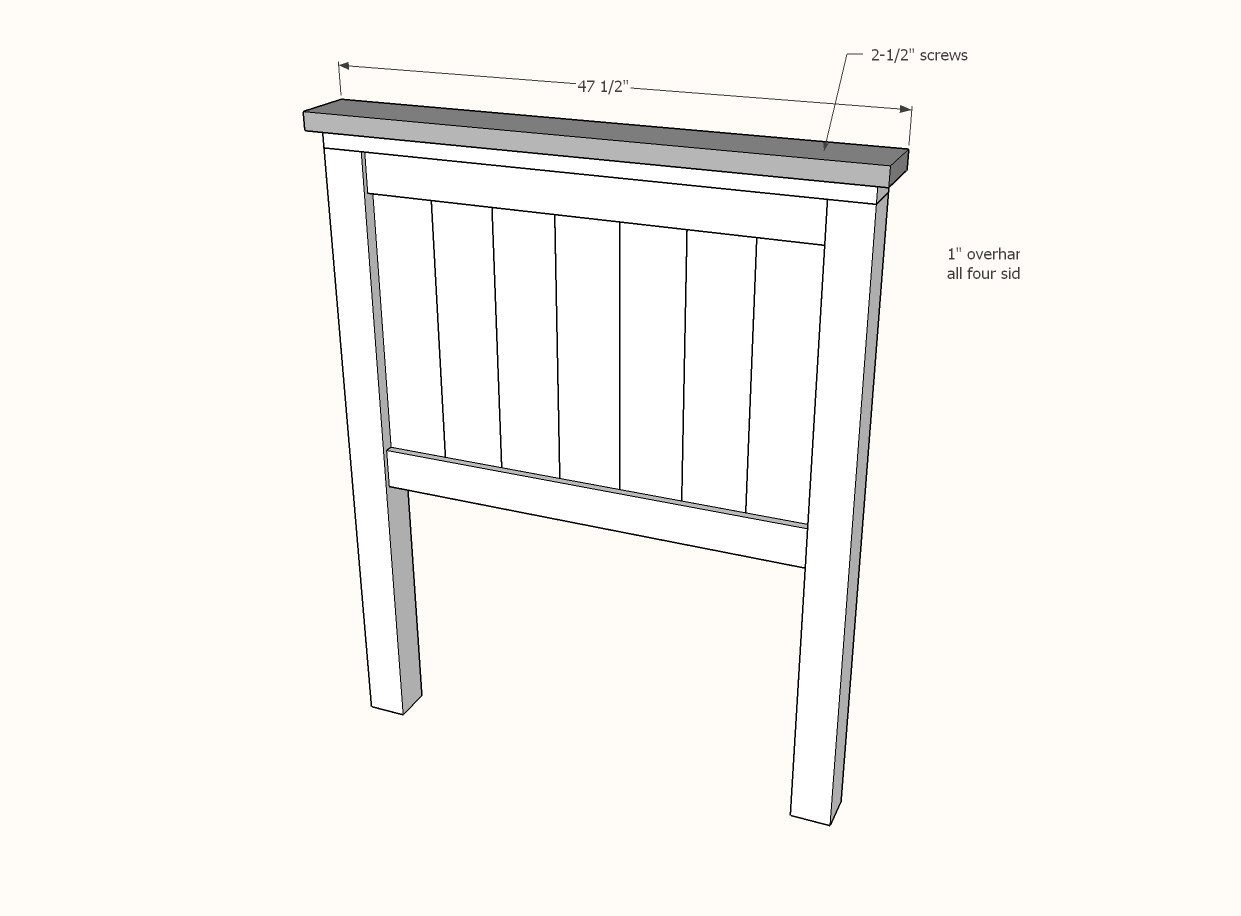
Place 2x6 on top of 2x4. Make sure all outside edge overhangs are even.
Screw on with 2-1/2" screws and glue.
Step 7
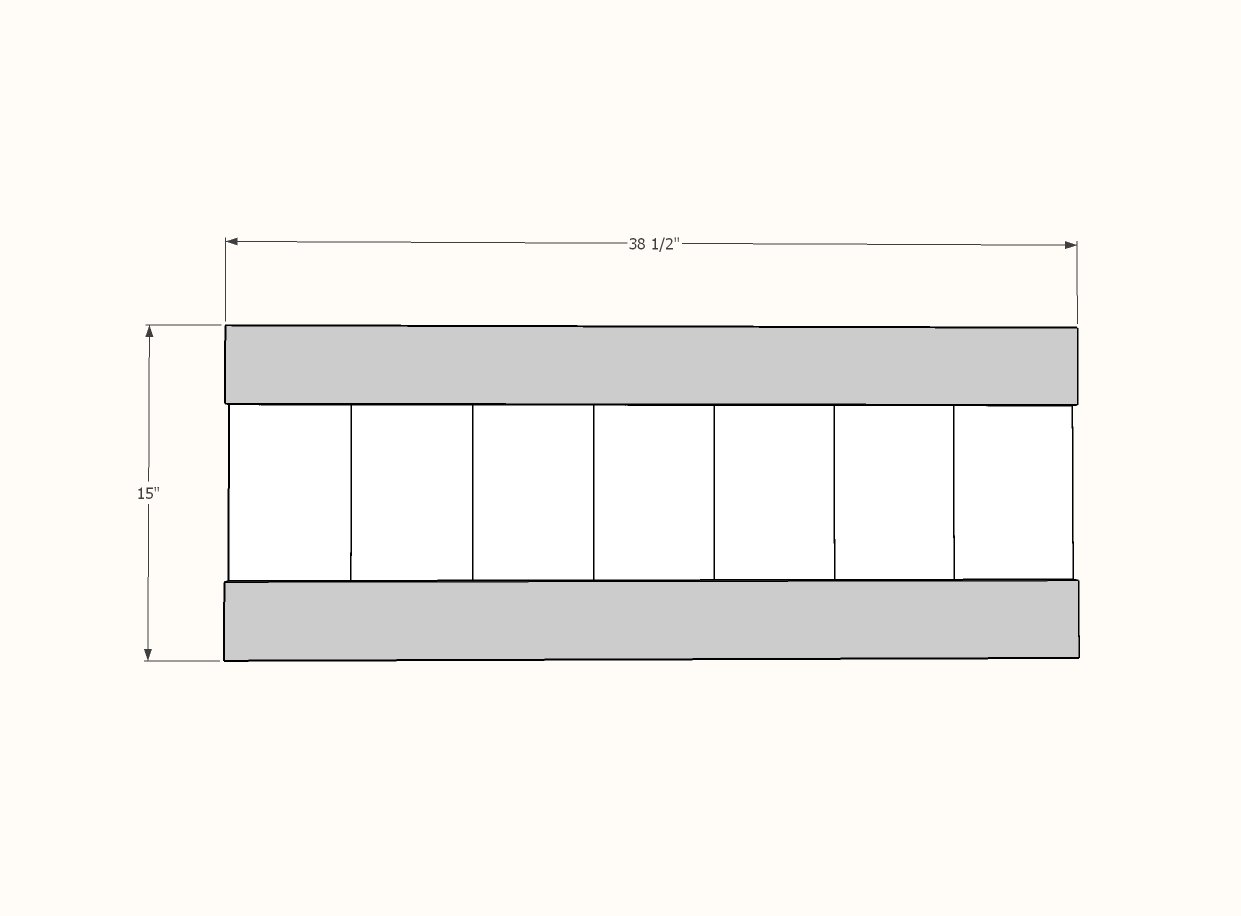
Repeat the same steps for building the footboard panel.
Step 8
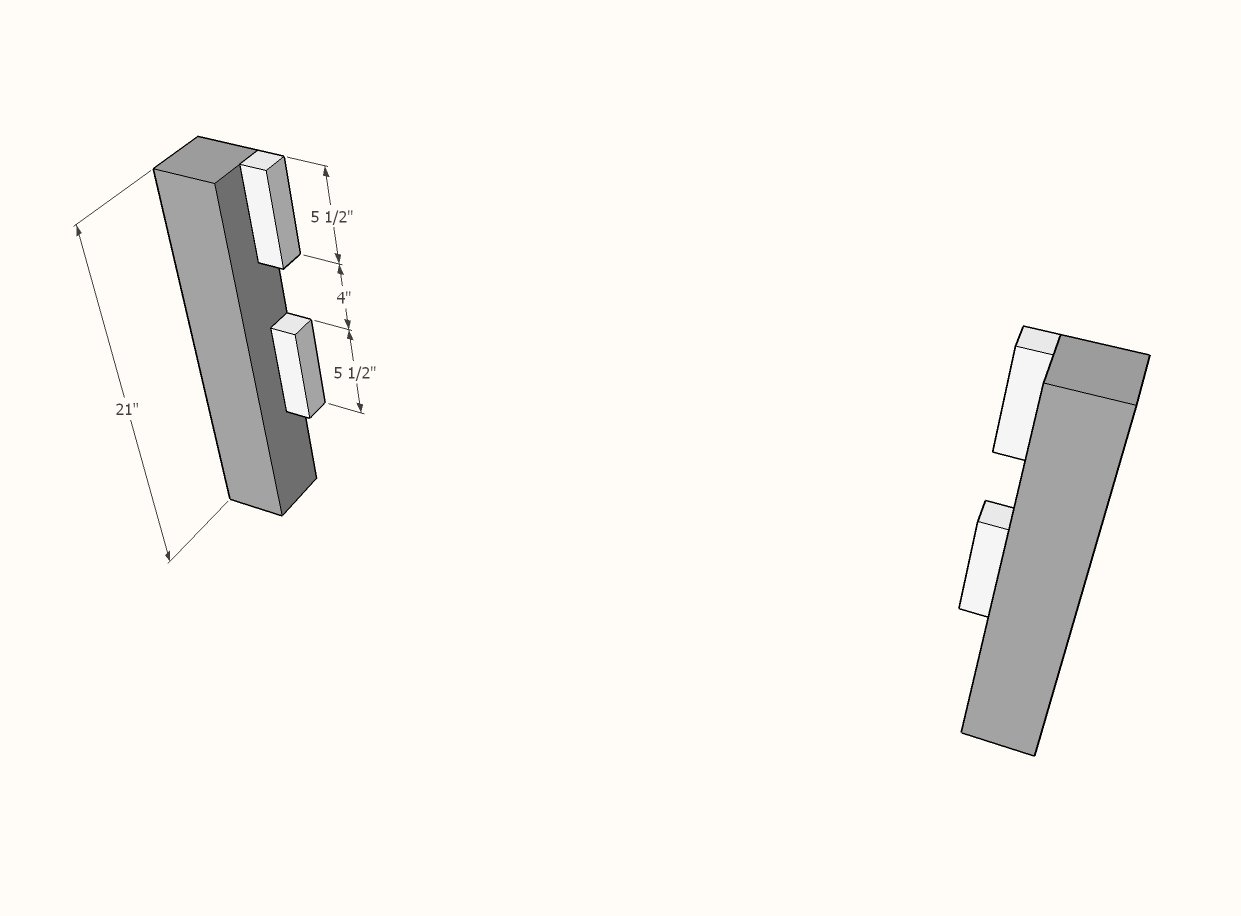
If using the cleats for attaching, leave a space in the cleats as shown for accepting the bed frame in later steps.
Step 9
Attach footboard panel as you did the headboard panel to the legs.
Step 10
Repeat steps to finish top of footboard.
Step 11
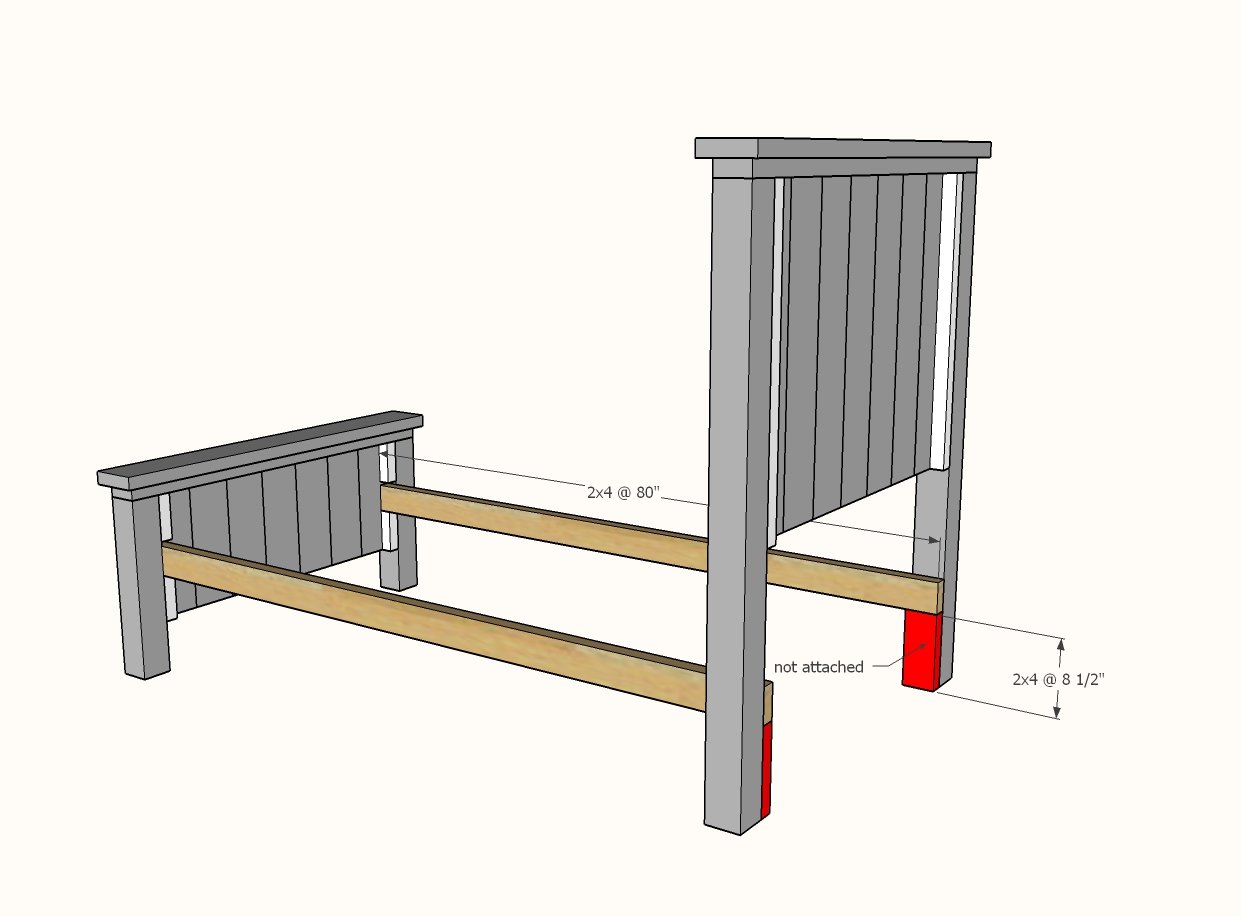
Attach 2x4 cleats to the 4x4 legs with 2-1/2" screws.
The spacer blocks are not attached and are just used as guides for setting up the bed.
Step 12
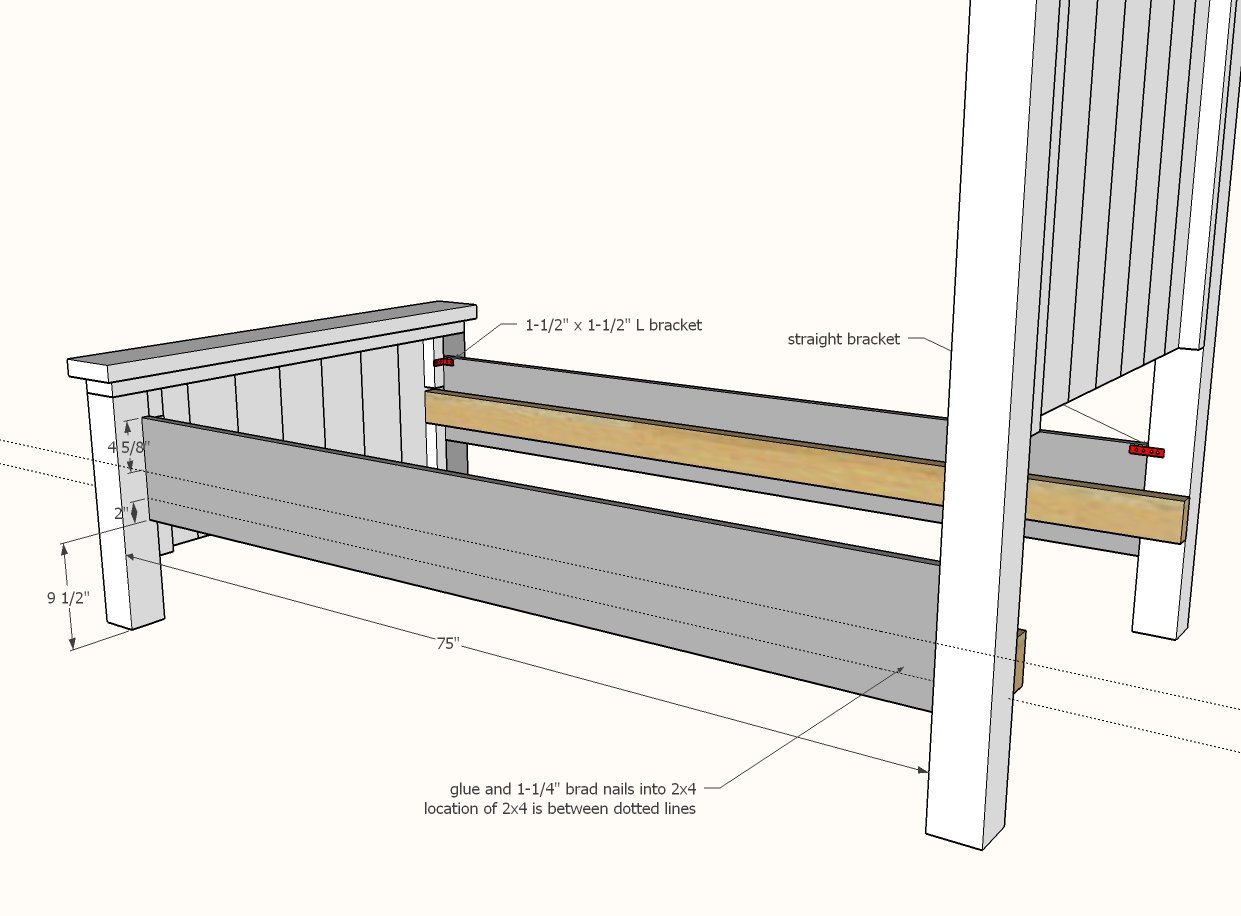
Place sidreails on cleats and attach with glue and 1-1/4" brad nails.
Also recommended is attaching with an L bracket and a straight bracket at tops. Pocket hole users can use a 3/4" pocket hole and 1-1/4" pocket hole screws.
Step 13
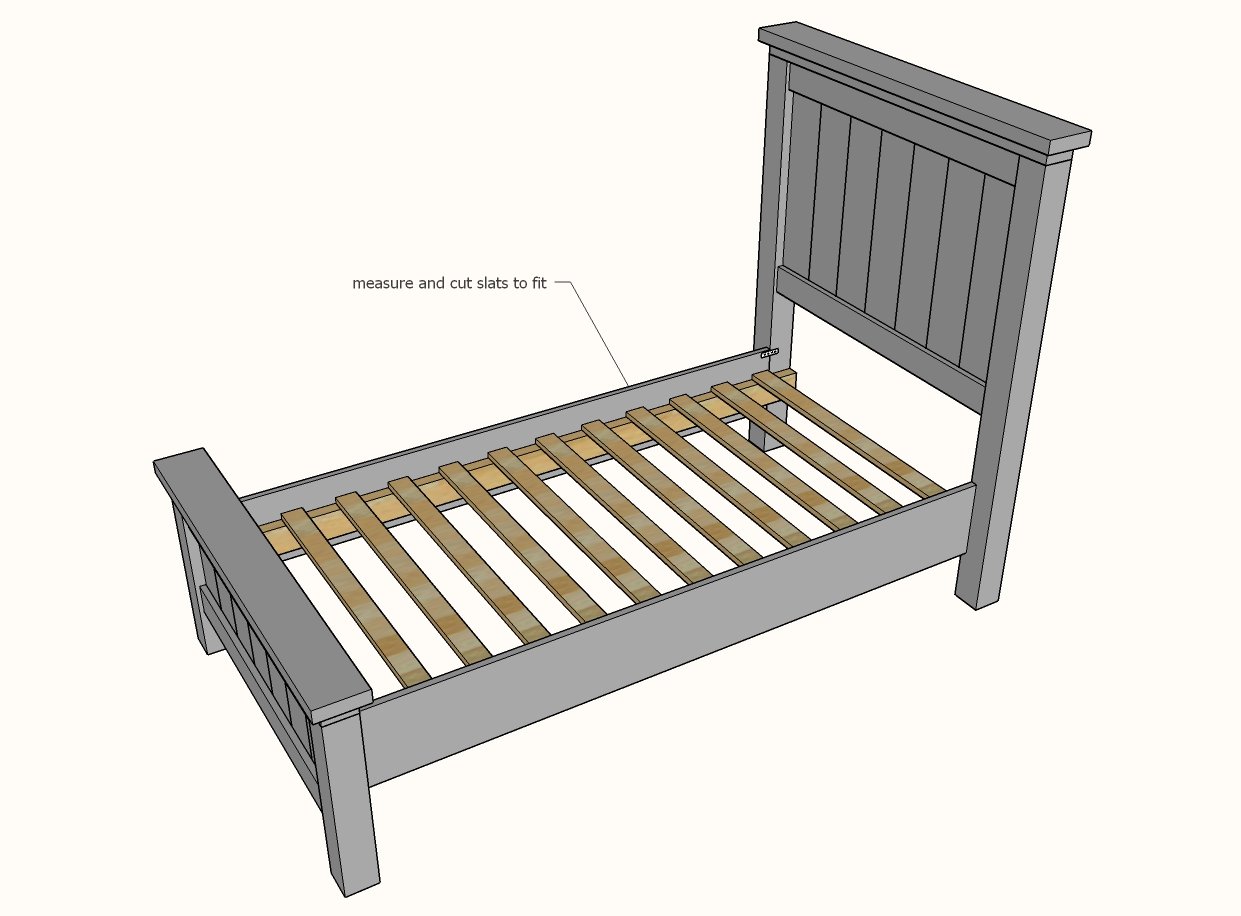
Lay slats in bed frame, space evenly. Screw down with 2" screws or 1-1/4" brad nails.


Comments
LenaLoo (not verified)
Tue, 12/07/2010 - 18:50
I would love to make this as
I would love to make this as a toddler bed using the crib mattress I already have. Has this already been adapted?
Melissa (not verified)
Thu, 12/30/2010 - 19:12
A few things to keep in mind
A few things to keep in mind if you are building this twin bed for a wiggly sleeper..
First let me say this was my first experience building, and I had a great time. (although it did take me a while to fit this in between work, kids, soccer, etc!) I built this bed for my 3 1/2 year old who falls out of bed regularly. When the headboard and footboard are flush with the wall, the space between the siderail and the wall are great enough that my son can fall between the bed and the wall. My 5 year old outgrew falling out of his bed and I assume my little one will too, so for now I have solved this problem with a very firm pillow stuffed in the space. If you have plans for siderails that can be easily attached I would love them.
Also, I am living in the south and can tell you 4x4's were impossible to find unless I wanted Yellawood. Not comfortable using chemically treated wood for my toddlers bed, so we went with two 2x4's nailed and glued together. They worked fine.
Teresa (not verified)
Sat, 01/01/2011 - 13:23
We would LOVE to make this
We would LOVE to make this for our daughters who share a room and this is almost identical to the bunk beds we were planing on purchasing. How would you modify the farmhouse bed to bunk beds? To come apart later for twin beds after we move. I just glanced through the previous posts so I'm sorry if it was mentioned before.
Pottery Barn O… (not verified)
Fri, 01/07/2011 - 06:09
[...] was originally $499 and
[...] was originally $499 and today it is marked down to $299… but for way less than that you can build your own with Ana White’s Knock-Off Wood plans. I guess if you have no tools and don’t like to build furniture (and it’s not as hard [...]
Lindsey (not verified)
Sat, 01/08/2011 - 12:39
Ana, we can't wait to finish
Ana, we can't wait to finish this! We finished cutting and sanding the boards for this bed today and are hoping to get it together tomorrow. Would you suggest painting the boards before assembling or after the bed is together? We are going to be using a crisp white with no distressing (for a little girls room!) Can't wait to share our results! Thanks!
Heather M (not verified)
Sun, 01/16/2011 - 19:19
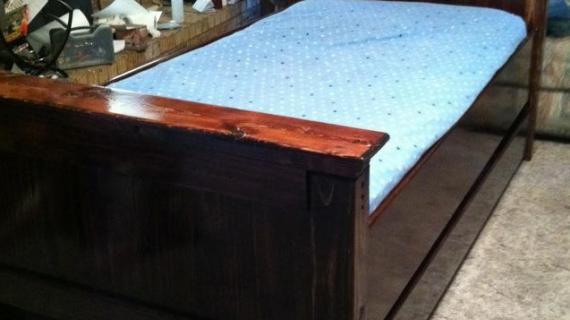
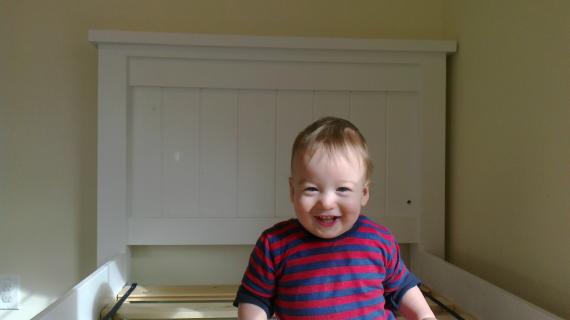
Here is the bed I made in a
Here is the bed I made in a twin! I will post another picture tomorrow after we get the mattress and the bedding on it. Thank you for the tutorial and it's the first thing I made with wood!
http://www.facebook.com/photo.php?fbid=10150127592180477&set=a.46409964…
john (not verified)
Thu, 02/10/2011 - 16:14
i have a question...
i have a question... hopefully someone can answer... with this bed ( twin ) when attatching the "legs" to the headboard .. how many 4.5" screws are being used... can someone please give me an idea .. i am done but don't want to do "final" assembly..... i jused 4 --- 2 on each side.
Natalie&Morgan (not verified)
Fri, 05/13/2011 - 08:39
i just used 6 per leg.. 3 at
i just used 6 per leg.. 3 at the top of the panel, and 3 at the bottom of the panel.. just in 1 vertical line so it screwed into the sandwiched panel.. i could only find 4" screws (i looked in every single hardware/metal store in town !) so i just sunk the screws about 1/2 an inch into the post.. and it is SOO sturdy !
Twin Farm Hous… (not verified)
Mon, 02/14/2011 - 09:28
[...] in Brag Blog Put on
[...] in Brag Blog Put on my TO-DO List Save as PDF Print this PostShare/Bookmark Builder: Cory and Ashley Blog or Website:http:// Experience Level: Some Experience Estimated Cost: $100 Estimated Time Investment: ~12 Hours? From Plan: http://ana-white.com/2010/01/plans-how-to-modify-farmhouse-bed-to.html [...]
smalls444
Mon, 04/04/2011 - 13:02
Farmhouse Bunk beds
Hi Ana,
mom@home (not verified)
Thu, 04/07/2011 - 17:29
twin farmhouse into bunkbed?
I love this bed! But I need two and would love for them to be able to convert to a bunk bed. Do you have plans for this farm house twin bed that are for bunk beds?
ShelleyP (not verified)
Mon, 05/02/2011 - 22:49
I was looking at all the
I was looking at all the comments hoping to see something about bunk beds and the last 2 are exactly that! I want to make this into bunk beds as well! Do you think you'll do plans for this?
Areka (not verified)
Tue, 05/10/2011 - 23:31
I an interested in making
I an interested in making this with a trundle underneath as well and could not get the link you mentioned in the comments (above) to work. Is there an updated link? Thanks!!
Natalie&Morgan (not verified)
Fri, 05/13/2011 - 07:57
Measurements for Full Farmhouse box spring cleats ??
i am in the process of making the farmhouse, in full size, for my daughter.. needs to be finished for her bday on sunday..
i like the idea of the side rail cleats in this tutorial, so we can adjust the height for storage, but i dont understand how to convert the measurements from twin to full (this is my first build)..
so could anyone please provide me with the measurements of the cuts needed to make side rail cleats for a full/double size bed.. (cuts k,l & m) thanks !
Michelle C (not verified)
Sun, 05/22/2011 - 23:15
How far apart should 2 x 4 slats be spaced for a twin bed?
The 2 x 2 selection at our Lowes is pitiful. They are all cracked and warped. I thought I might use 2 x 4's for the slats instead. How far apart would it be best to place those for a twin bed? Just wondering! Thank you so much for these beautiful plans.
Michelle
Saadia (not verified)
Mon, 06/13/2011 - 23:43
Modification to Make Side Flush with Wall?
Hello Ana and everyone,
I am interested in making this bed for my 3 1/2 year old daughter. However, I am concerned about the fact that the bed does not fit flush against a wall along the side. My daughter is still young and I don't want to worry about her falling in the side. Is there anyway to modify the bed so that the the bed rails are attached closer to the outer edge of the headboard/footboard posts. I am very new to building so I don't know if this modification would make the bed less sturdy or otherwise wouldn't work?
Thanks!
Jeff (not verified)
Fri, 02/17/2012 - 10:54
It doesn't look to me that
It doesn't look to me that you would want to attach the side rails further out. One possibility would be to cut a piece of foam rubber to fill up the gap.
Saadia (not verified)
Thu, 03/01/2012 - 22:13
More Explanation?
Hi Jeff,
Would you mind explaining why that would be a problem? I understand that I would need to adjust the width of the headboard/footboard to make it work so that the mattress still fits properly, but since I am new to building, I just want to make sure that I don't do anything to mess up the structure and stability of the bed! I hope to make this for my daughter and want to make sure it's still safe! Plus I hate to have wasted space in any room and having the bed not flush against the wall is just wasted space!
Thanks for your help!
Saadia
Mamasra
Fri, 07/01/2011 - 20:25
Just made my own version of a
Just made my own version of a farmhouse table, this is next X 2!!! THanks ANa!!!
guest (not verified)
Mon, 08/01/2011 - 08:54
I am in the process of
I am in the process of building this bed for my daughter. Although ive had a few set backs its coming along. When attaching the panel to the legs someone please tell me what screws to use. I told my husband i thought we needed to use 4 1/2 screws and pre drill in the 4x4 but he seems to think it will split the 1x4 please help...
Ezzo (not verified)
Sat, 09/10/2011 - 03:19
I'm newbie in bed building,
I'm newbie in bed building, can you help me to select the right one?
WVUBAKER
Sun, 09/11/2011 - 18:15
how to attach siderails?
I've got most of the bed finished... but I'm having a hard time understanding the directions on attaching the siderails. I bout the rail connectors from Rockler that everyone has talked about. Do I attach these connectors to the Siderails or to the cleats? I'm confused.
Thanks!
Tasha Cordel (not verified)
Thu, 02/02/2012 - 17:57
Bed Rails...
Hey there,
I am just about to finish this bed...but really wondering what the best way to do the siderails is. Any chance you would share with me what you did?
Thnx
Tasha
littleislandgirl
Fri, 09/30/2011 - 16:26
Military Families who needs beds to break down easy...
Saw a few posts from military families that are constantly on the move and need beds to break down easily and still be sturdy when you reach the next duty station. Found some bed brackets that help with break down and easy set up for you or the movers:
Surface Mounted Keyhole Bed Rail Brackets
This set got the best ratings and seems to be the easiest to use!!
Thanks Ana for this website. I have a list of projects that I want to get started on and a few friends requesting pieces. As a military wife who constantly moves it is wonderful to have nice things that are easily fixed and doesn't make my heart stop because something really expensive got damaged in the move.
Aprince60
Sun, 01/31/2016 - 05:24
Bed rail brackets
This may be a silly question, but I'm a bit confused! I'm planning to make the headboard and footboard, but then use metal bedrails for ease of disassembling the bed when needed. Question: I've seen discussions re: rockler (or similar brand) bed rail brackets. If you use these, you still have to make the siderails to connect, right? And then if you use these, how do you get a boxspring to set in the frame? Sorry, so many questions for a probably simple thing!
Dexter (not verified)
Wed, 10/05/2011 - 11:13
Twin bed - farmhouse
Would it be possible for you to update the material list? i don't see how the 3 in screws will go through the 4x4's and attach to the panel. In the Queen version you call for 4-1/2 screws but not here. Any idea of how many each? you had posted 20 for the 4-1/2' but indicate you need 6 in each post for the foot board and headboard - that's at least 24. grreat plans by the way, just need an update on list!
Thanks.
Candace (not verified)
Wed, 10/26/2011 - 20:06
Ashby?
I stumbled across your site today while searching for plans to build a bed like the Ashby from Pottery Barn. Like many people on this site, I have Pottery Barn taste on a Walmart Budget. Any chance you'd be willing to check her out and consider posting queen-size plans for it? Its similar to some of the reclaimed and farmhouse styles up on this site, but different in that the headboard is curved. Thanks alot and keep up the good work!
Candace
noviceman
Sat, 11/12/2011 - 09:38
Printer friendly
printed out these plans and print sosmall I cant read them.,.most of the plans have a PRINTER FRIENDLY app to click on...didnt see one for these plans..Please help..thanks
Sandie
Thu, 01/12/2012 - 12:24
Try copy & paste
I had the same issue with it, and decided to copy & paste it into Word...worked very well for me.
Janis (not verified)
Fri, 12/23/2011 - 13:46
1st Project
I have been asking "Santa" to bring me tools for Christmas for years and he finally listened. I have always wanted to build furniture and would love to make this the Farmhouse Bed for my grandaughter. Is this bed simple enough for a first project or should I set my sights a little lower to start? It looks simple enough but I know things are not always as they look. BTW, I just love this site!
ChristiV
Tue, 12/27/2011 - 00:35
Thanks so much!!
I'm so thankful for finding your site, I came to you from Shanty 2 Sheik, and I found that site when I was on www.stumbleupon.com a few days ago.
We have four kids and a tight budget and I was looking for bunk bed plans for our boys a few months ago. I searched and searched but all I could find was a couple of sites who had bunk bed plans for sale. I didn't see a point in paying for professional plans being an beginner; I need tips and help....not just plans.
So I just want to say thanks so much for sharing your know-how for free and creating a community where fellow thrifty moms can try something new and help each other out. I can't wait to get started on projects and I'll be sure to post brags!
June (not verified)
Fri, 01/06/2012 - 19:18
Something to Improvise for 4x4s?
In the process of making this bed. Thanks, Ana for the wonderful, detailed plans! I just wanted to comment that untreated 4x4s are nowhere to be found where we live in the Southern US. We tried both big chain stores (orange and blue) and called 2 local lumber yards. All said they've never carried non-pressure treated 4x4s. Our only option was 4x4 cedar posts at $15 each. Any suggestions on something else we could use for the 4x4s or a way to improvise when we build this bed again in a king size? Thanks so much!
Tasha Cordel (not verified)
Thu, 02/02/2012 - 18:00
Bed Rails
What is the best way to attach the fram to the headboard and footboard? And then do I just screw the siderails to the frame from the inside. OR do I attach the siderails to the headboard and footboard using kreg pocketholes and then attach the frame? I am building this for a girlfriends' daughter..and want to make sure it lasts a long time without falling apart! Thanks for the help....ANYONE - PLEASE!!
Daniel Dube (not verified)
Sat, 02/11/2012 - 22:22
Hey everyone, Getting ready
Hey everyone,
Getting ready to build this bed for my two daughters. I would like to set it up to have a trundle underneath. Does anyone have a recommendation on what size mattress to use for the trundle and how I should adjust the height? Also need the top bed to be adjusted to accommodate only a mattress, no box sprint. Any and all advice is welcome.
t00court
Fri, 08/22/2014 - 16:39
Same here
These are my exact questions as well. I want to build this with no box spring, and would like to accommodate a trundle bed as well.
Did you ever get answers to your question? Thanks for sharing.
Guest (not verified)
Wed, 02/22/2012 - 06:07
DO YOU HAVE THIS PLAN FOR A FULL SIZE BED FRAME?
DO YOU HAVE THIS PLAN FOR A FULL SIZE BED FRAME?
Guest (not verified)
Sun, 03/04/2012 - 07:06
Printer Friendly Version?
I noticed the Queen sized version of this bed has a link to a "printer friendly version", but this one does not...any chance you can add? Thanks!
Great site by the way!
Saadia (not verified)
Sun, 03/11/2012 - 13:29
1/2 Inch Boards for Headboard/Footboard
Hi,
I was wondering if anyone has tried making this bed with 1/2 inch thick boards for the paneling on the headboard/footboard? I think the 4x4 posts and 1 x boards are too bulky (and heavy!) for what I am looking for. I found some 1/2 inch thick pine boards that I could use for the paneling and am trying to get a hold of a 3x3 or 2/4 for the posts. I am just concerned about when I attach the posts to the headboard. I'm afraid I'll split the 1/2 inch panel when I screw into it. Any advice would be greatly appreciated!
Thanks!
roosta (not verified)
Sat, 03/17/2012 - 12:37
my 1yr old is loving it in advance!
just finished building this bed. looks amazing but weighs a tonne! i have used 1x8's for the side rails with 2x2 cleats attached and 1x4 slats spaced every 3 1/2 inches. also used galvanized plates for brackets on the side rails in order to disassemble. thanks anna :-) awesome site. will post to brag board soon....
NHMama (not verified)
Tue, 07/10/2012 - 12:36
Clearance?
I am looking to do the exact same thing for my 2 yr old (no box spring/use galvanized brackets) - I'm wondering... could you tell me the clearance below the side rails? I'm thinking of cutting off some height to make it lower to the ground, but wanted to keep at least a 7" clearance.
Saadia (not verified)
Sun, 03/25/2012 - 12:33
Rockler Brackets and Cleats
Hello Everyone!
I am in the process of building this bed and am planning on using the Rockler brackets to attach the siderails to the legs of the bed. I was wondering how everyone adjusted the cleats to make this work. It seems like I would have to make the cleats a bit shorter than the length of the siderail to leave room to attach the brackets on the edges of the siderail. Just wondering if that's what everyone did!
Thanks!
Guest (not verified)
Fri, 04/06/2012 - 17:11
Cost
How much do you think this will cost to build?
CristinaCS (not verified)
Wed, 06/06/2012 - 16:08
Also wondering about cost...
Anybody out there able to comment on how much it cost to build this bed? Trying to figure out whether the cost of all that lumber will save me much in the long run...I think we already have most of the tools. ALso, how long did it take most of you to build? (another factor to consider) DH is pretty handy, but hasn't done anything with his tools in awhile.
Rob (not verified)
Thu, 07/12/2012 - 17:40
2 Questions Before I Start This Project
1. Twin size mattresses are 39" wide and these plans look like they are made for a 38 1/2" width. How is everyone fitting their twin mattress into this or what am I missing.
2. The plans call for 3" screws only. How do I attached the 2x4 frame to the 1x10 bed rails? If I use the 3" screws here it would go through both pieces of wood.
Thanks.
Rob (not verified)
Thu, 07/12/2012 - 19:10
Sorry, did some more research
Sorry, did some more research and found plenty of twin mattresses at 38". Shouldn't have trusted wikipedia.
The second question still stands.
sambenedetto7@…
Thu, 08/02/2012 - 05:54
bed height
i want to adjust the height of the bed. my goal is to be able to use under bed space for storage( maybe a 10" high basket) . I also do not want the mattress( i will be using a box spring) to "sit" above the end of footboard. please Ana , help! i want specific measurements prior to going to buy supplies. I have one week to get the details down . thank you
Michela (not verified)
Fri, 08/24/2012 - 15:09
Ciao a tutti, cerco questo
Ciao a tutti, cerco questo letto ma le cifre qui in Italia sono esorbitanti, poi lo vedo qui proprio come lo vorrei....
Il tutorial però riporta misure che non riesco a tradurre in centimetri qualcuno potrebbe aiutarmi?
Grazie in anticipo!!
bethanysmom
Mon, 10/08/2012 - 16:44
4 x 4's
any clue where to get them down here in the south that arent pressure treated?
bethanysmom
Mon, 10/08/2012 - 16:46
4 x 4's
any clue where to get them down here in the south that arent pressure treated? anyone know if 84 lumber would have?
mier
Wed, 05/11/2016 - 13:00
I got my non pressure treated
I got my non pressure treated 4" X 4" at Home Depot.