Community Brag Posts

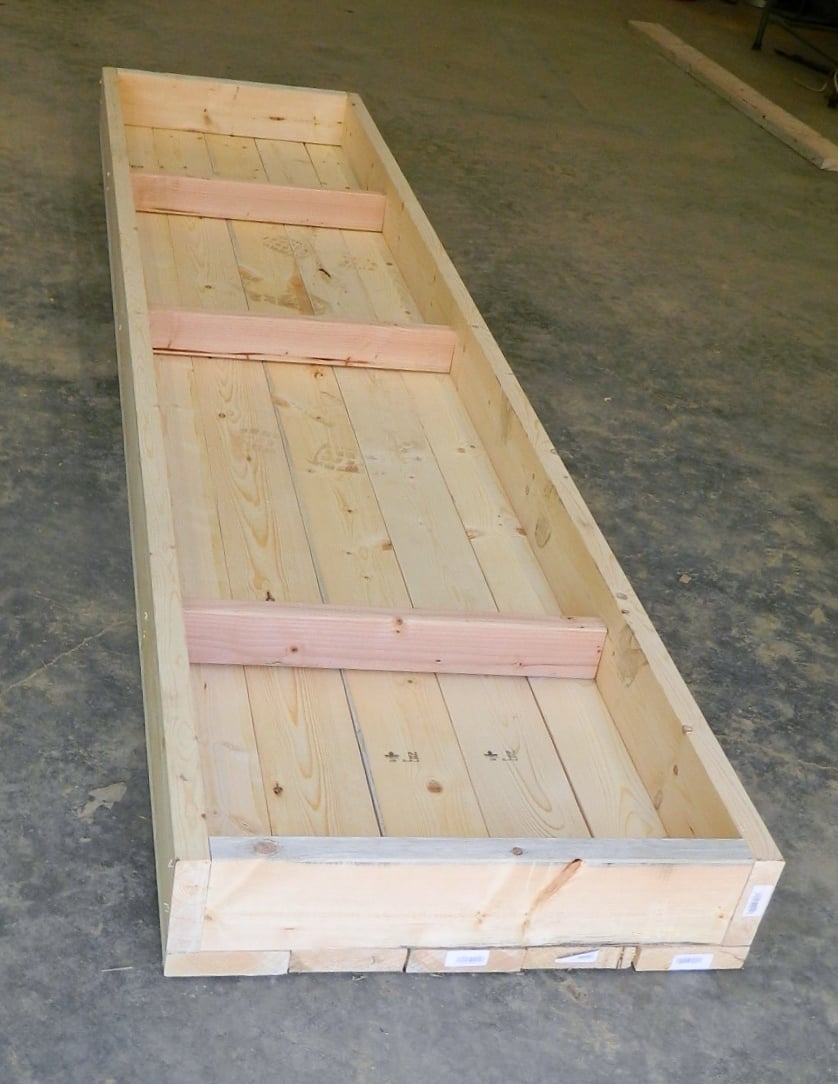
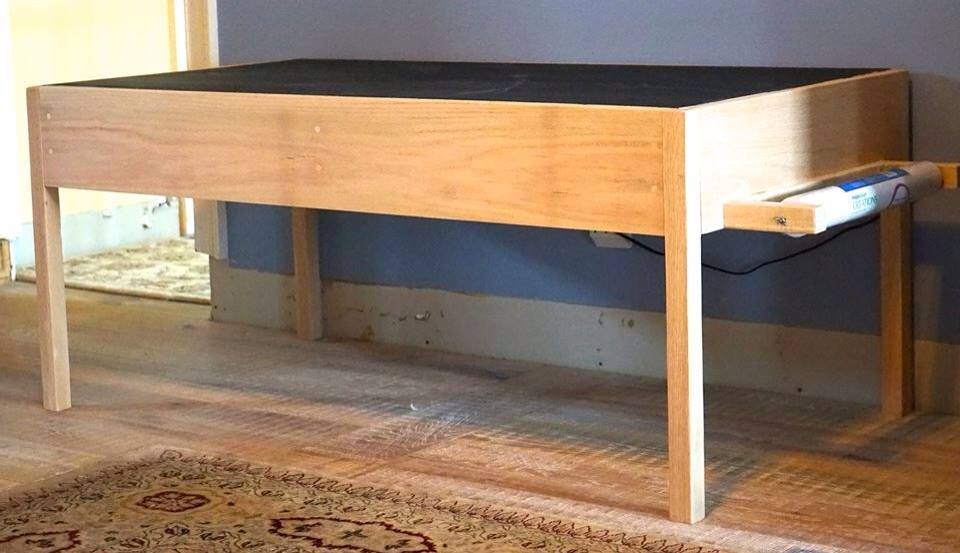
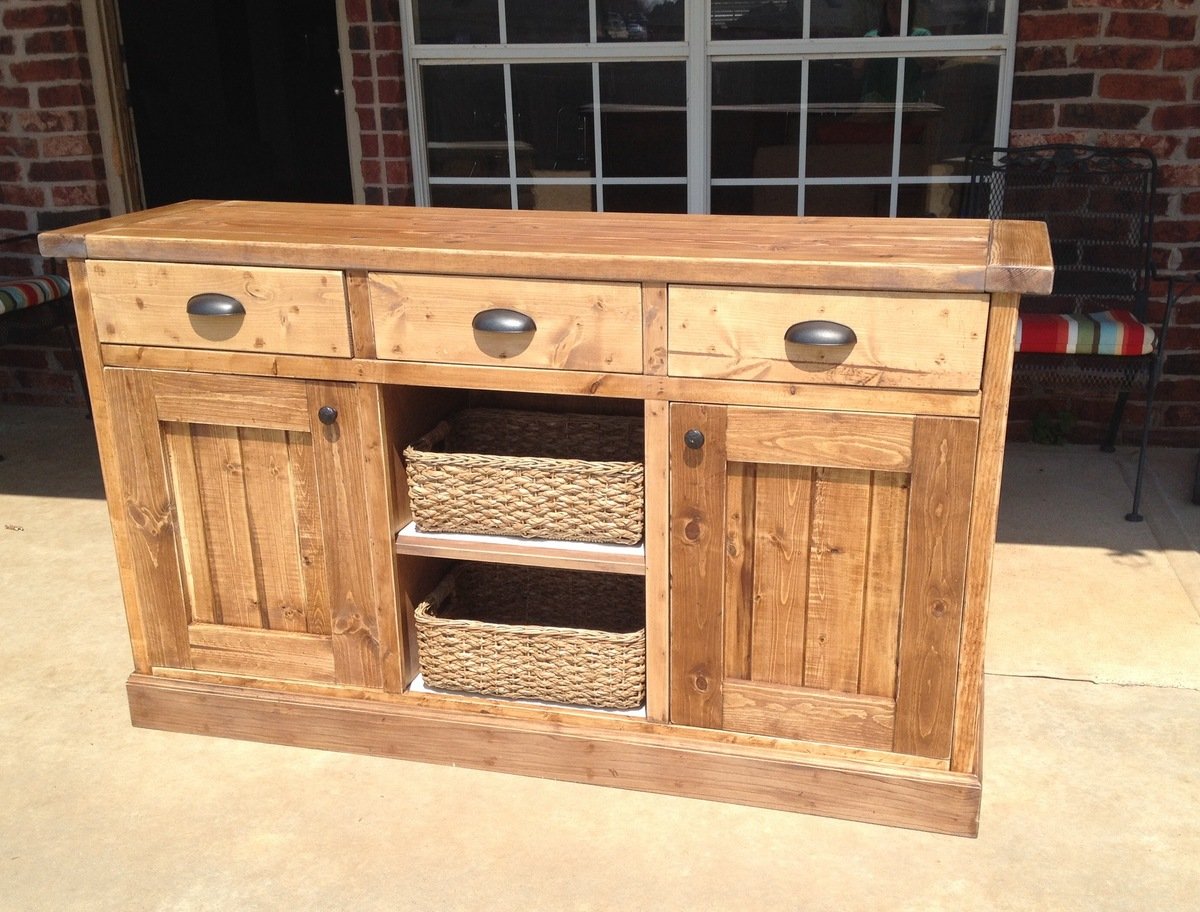
Modified Laundry Basket Dresser

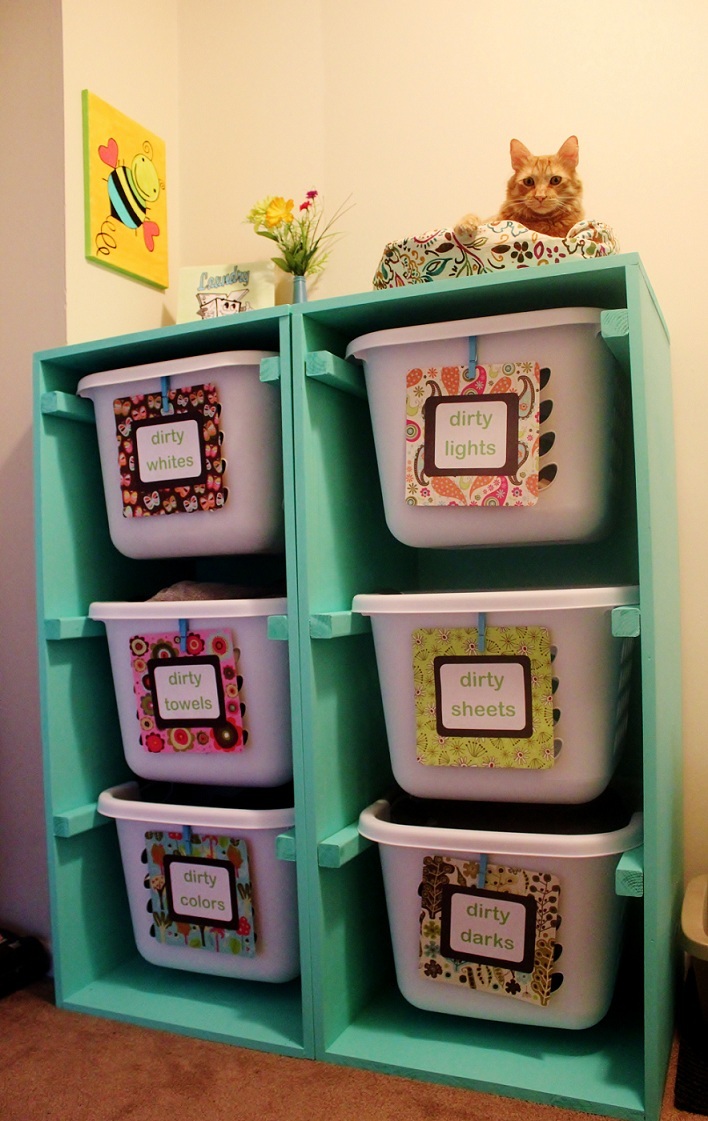
Both dressers were completed in one (long) day by my boyfriend and his father. Modifications were made to make it fit square Sterilite 1.5 Bu./ 53 L laundry baskets (serial/bar code # 073149121789).

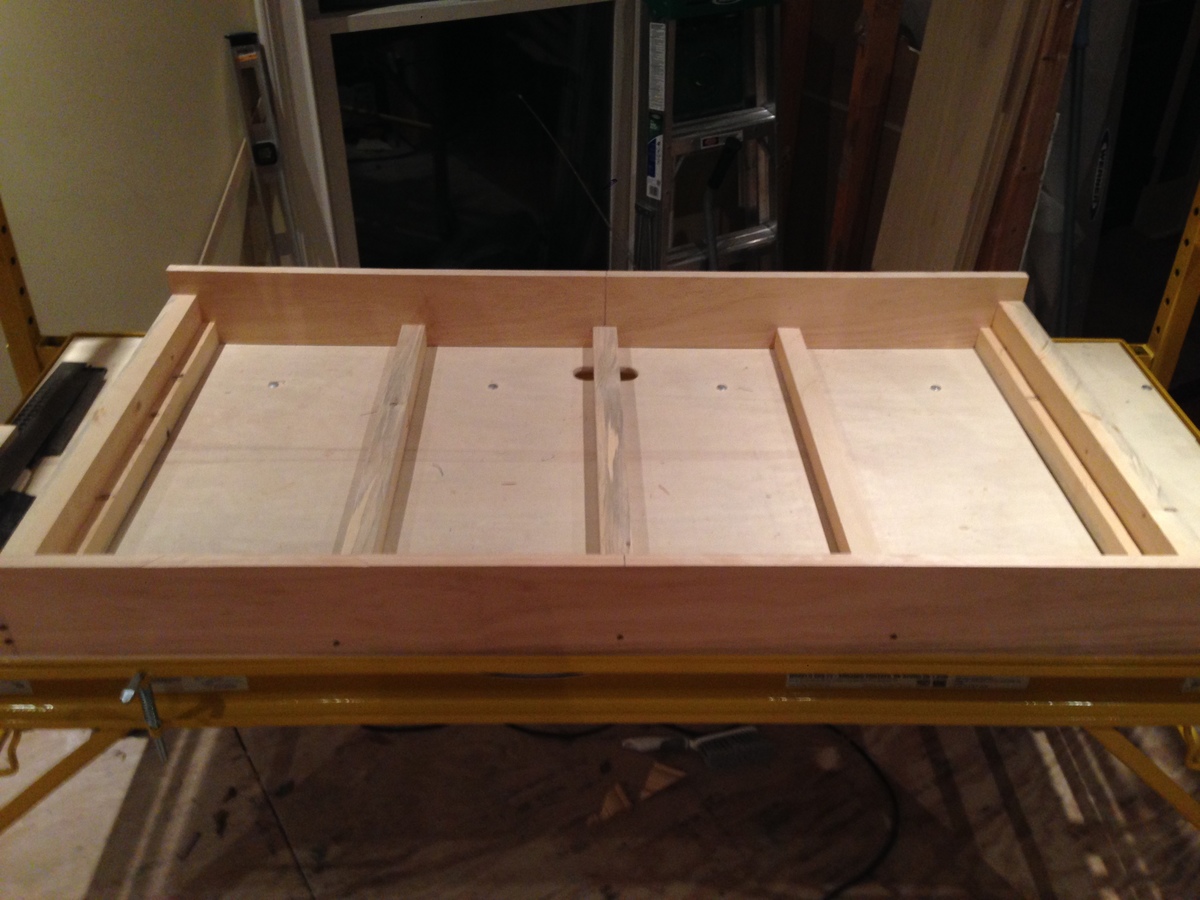
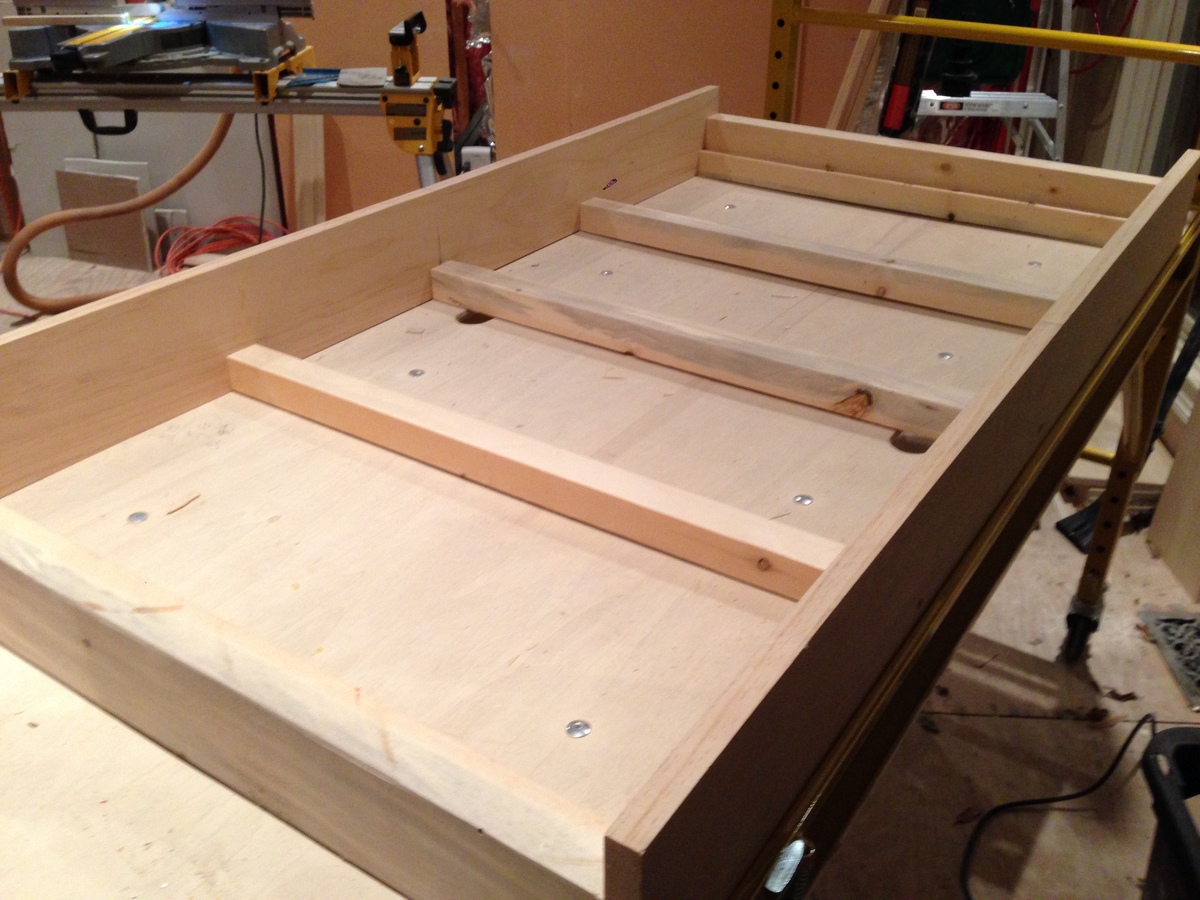
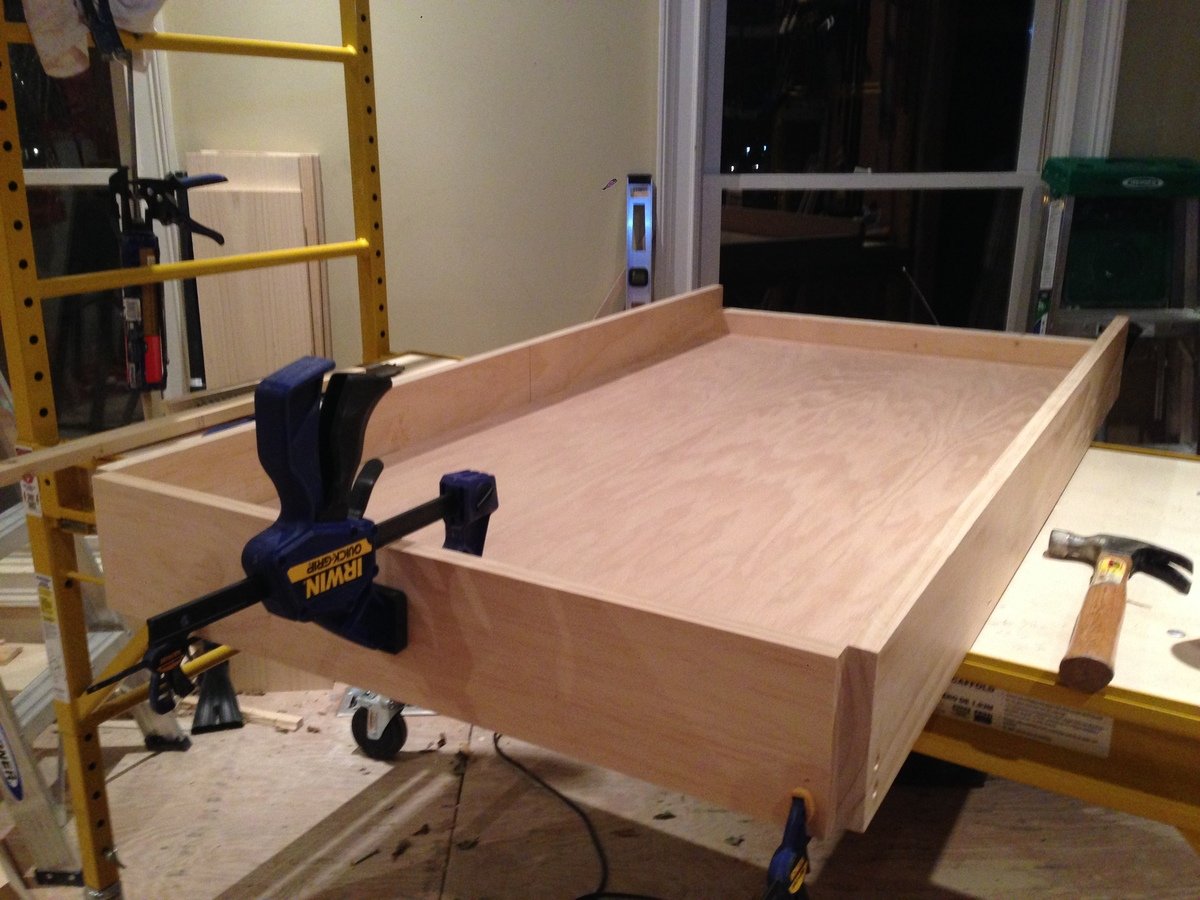
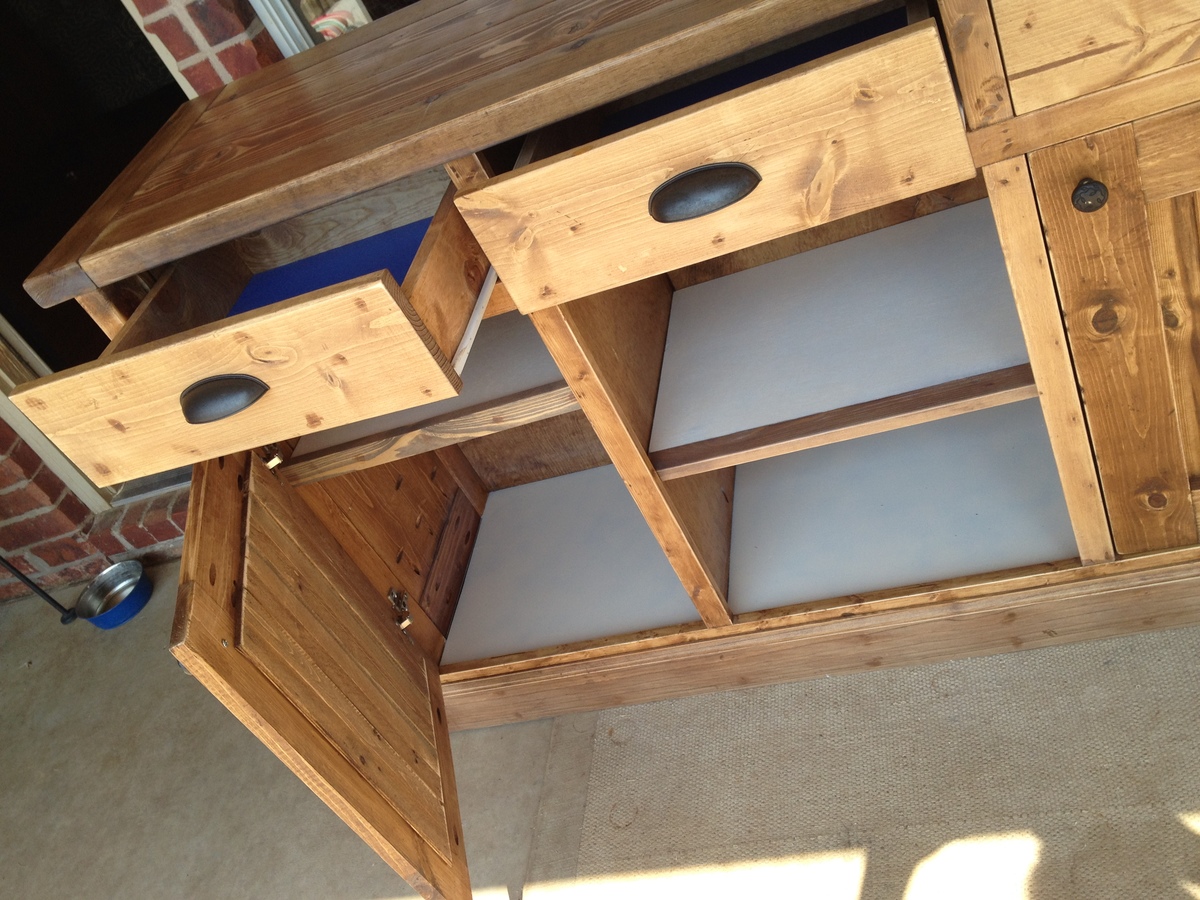
I'm not sure what size pieces they purchased, however this is the cut list (for one dresser, 3 laundry baskets):
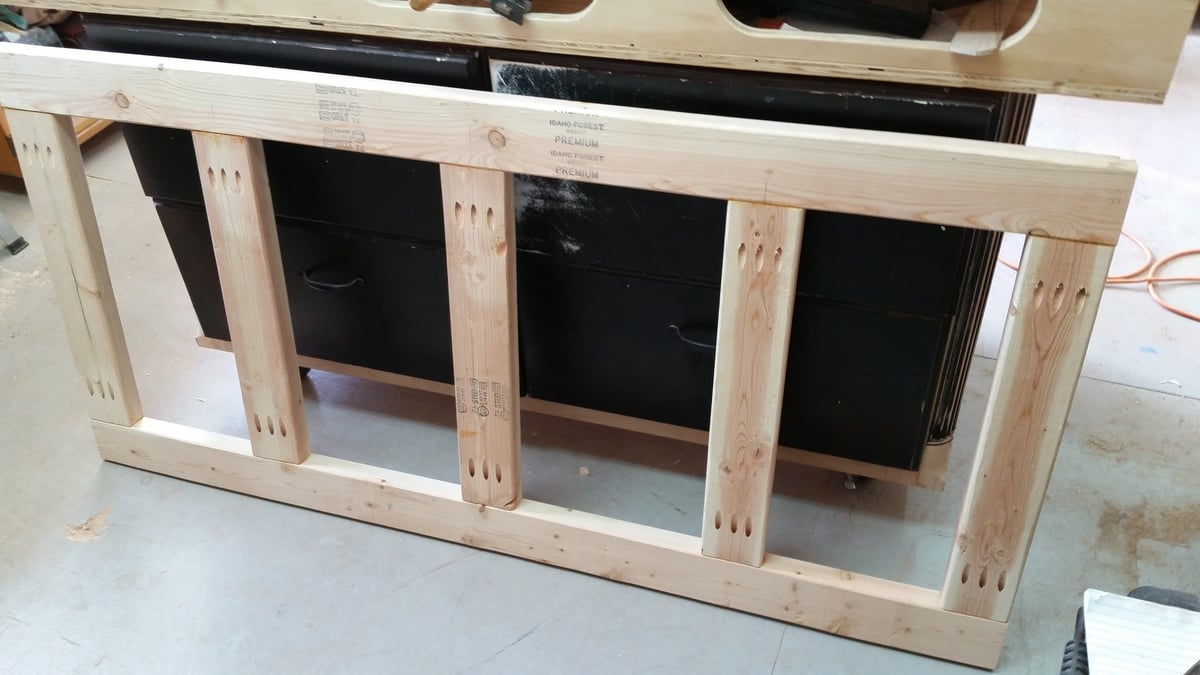
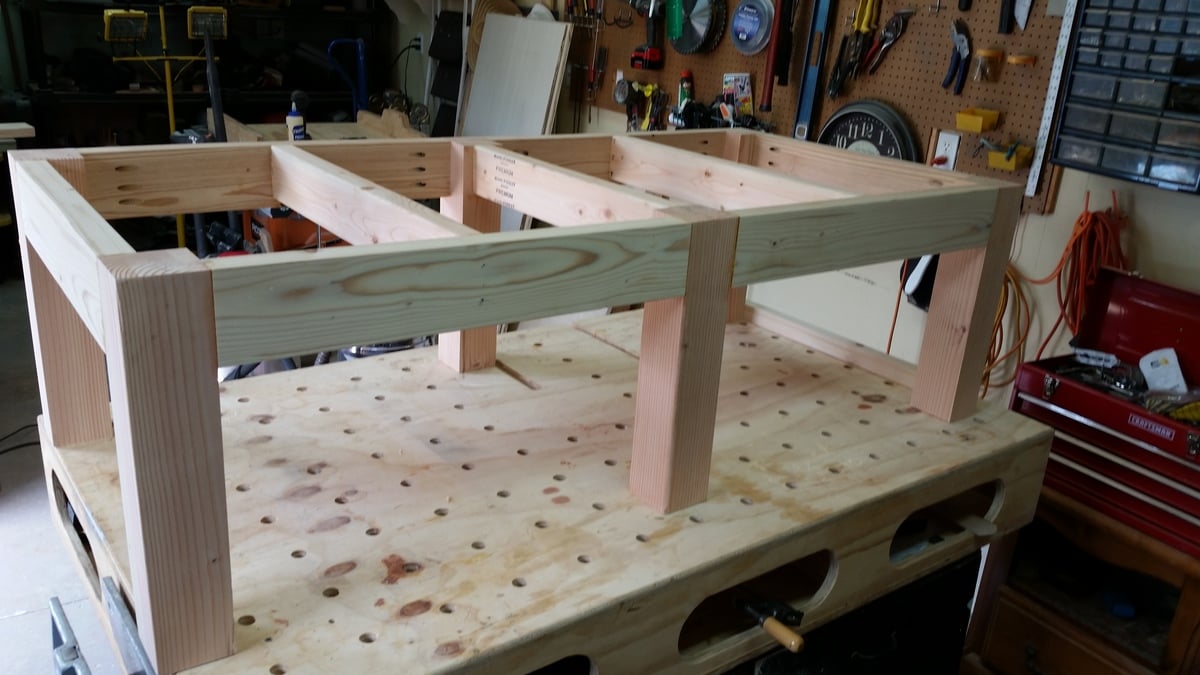
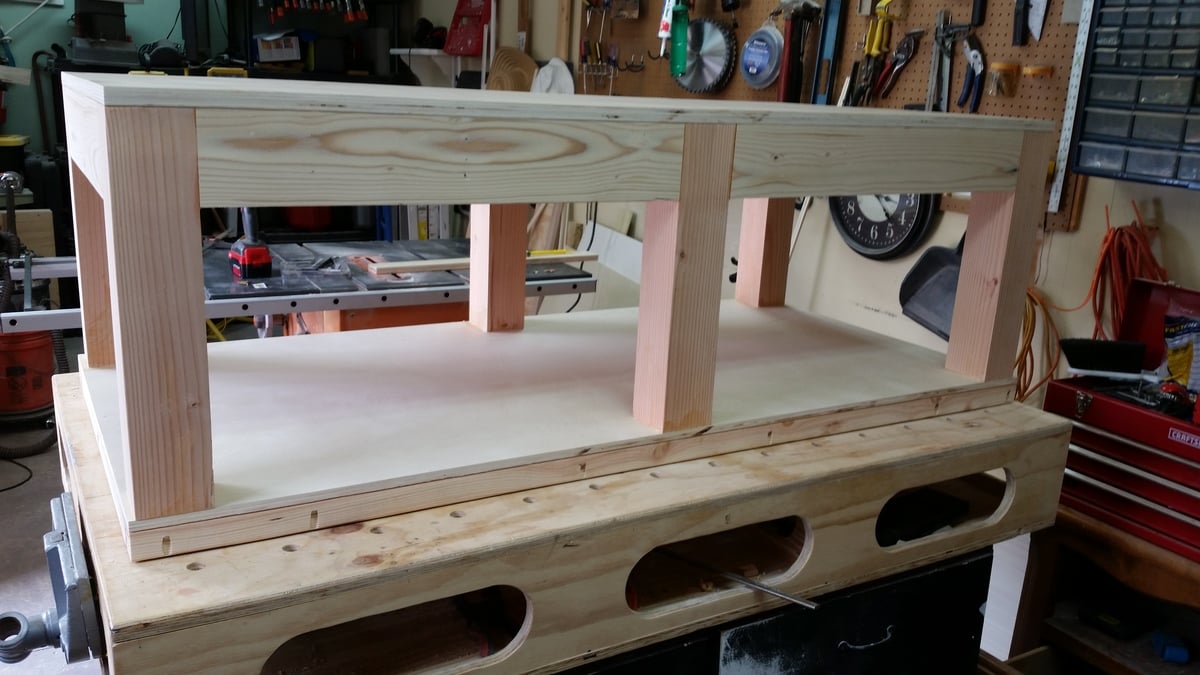
2 - 48" x 20" (sides) - could possibly be shorter, we had a little bit of extra space
1 - 20" x 20" (bottom)
1 - 21.5" x 20" (top)
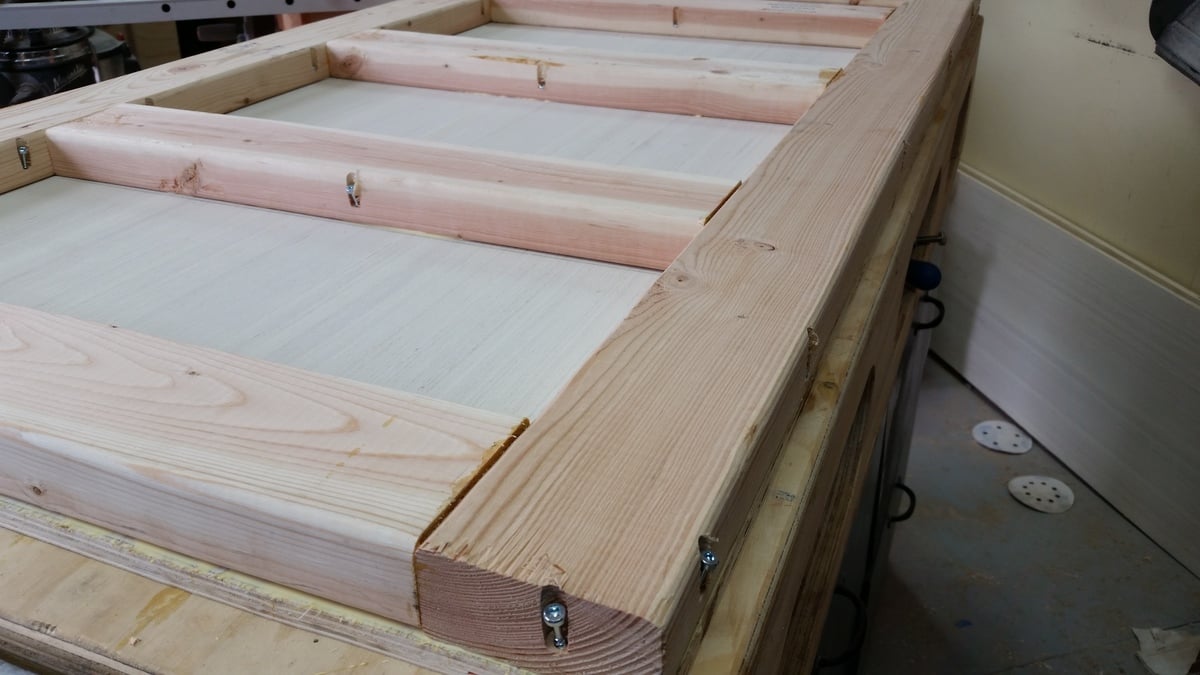
1 - 48.5" x 21.5" (back)
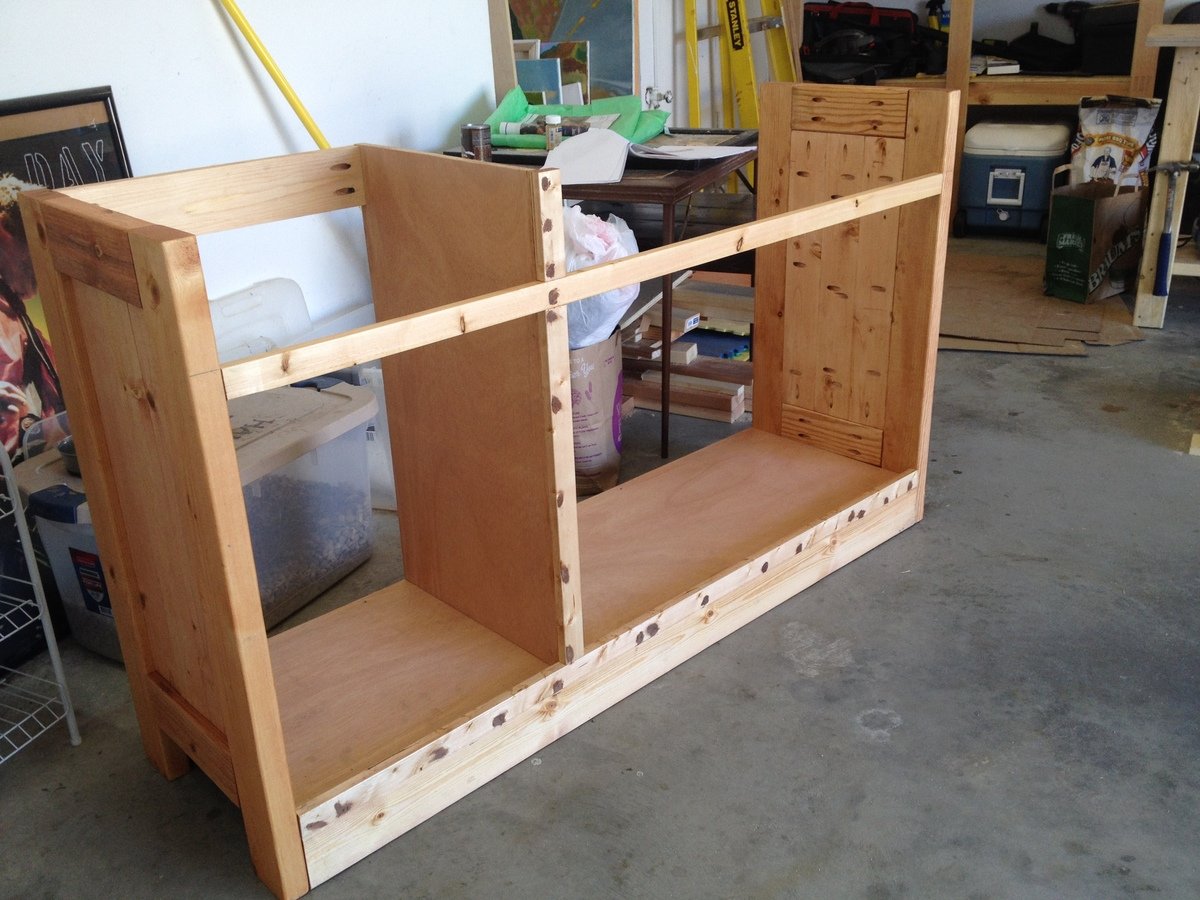
6 - (2" x 2")'s cut into 20" pieces (or the metal angle option in the original design)

They did not distance the spaces perfectly for the (2" x 2")'s, but every 14-16 inches should be about right.

I'm sorry these instructions are void of a lot of information, but I hope they can help.
I think this project can take a shorter amount of time if no mistakes are made. They had to run to Lowe's 2 times in the middle of the project because they forgot to purchase a second size of screws and then they cut the back too thin.

Good luck, and have fun! It is a fabulous project and oh so very useful.

Built from Plan(s)
Estimated Cost
$50 - $100
Estimated Time Investment
Day Project (6-9 Hours)
Finish Used
Lowe's Creative Ideas for Color, "Dive In" CI 249
Recommended Skill Level
Beginner

Comments

Katie B. of Ho… (not verified)

Mon, 05/28/2012 - 09:53

This is a brilliant solution, particularly since most sorters don't have enough compartments to separate the whites, sheets and towels from each other. But we really don't want to wash them together, do we?

Love how cozy your kitty looks up there, too.

Little Helper Tower

Submitted by aoliaak on Wed, 03/12/2014 - 16:48

Loved building this for my son, much easier than I expected it to be.

Total build time was about 3 hours, and another 3 hours for finishing. We've had it only a few days and it's already a staple in the kitchen, used for everything from peeling potatoes to feeding his horse!

Thank you so much for making these plans freely available.

Built from Plan(s)
Estimated Time Investment
Day Project (6-9 Hours)
Finish Used
2 coats of Sico's Luster Gloss in Desert Sun + 1 coat of polyurethane spray.
Recommended Skill Level
Beginner

John's Washer/Dryer Pedestal

Submitted by coveyjt on Sun, 06/12/2016 - 10:59

The wife has a hard time bending down so she wanted pedestals for the washer and dryer.  The metal ones with a drawer were too tall.  I showed her Sausha's and she really loved that design.  I basically used the same construction plans idea from Sausha's project and some tips from Ryan's brag post.  But, I wanted to beef it up some.  I didn't like the L-bracket to attach the top and 4X4 legs.  It didn't seem sturdy enough for me.  I used my table saw to square the edges on the 4X4 posts and the 2X6 rails.  Then I used my Kreg jig and glued and screwed everything together.  I liked Ryan's trim ideas, so I used baseboard trim for the bottom and flipped it for the top trim.  I made a 1/2" lip so if it were to vibrate, the washer/dryer would not fall.  I put the trim on the bottom of the legs and was considering putting on the top but I put some different trim all the way around the bottom of the 2X6 rails.  The wife liked that.  I also added some carpet on the top to cut down on vibration and to help keep the units in place. I also put some 4X4 pieces of carpet on the bottom to keep the noise down and to help in moving it. I primed and used an gravity sprayer to paint it.  Then I put 3 coats of polyacrylic to help in cleaning and to cut down on scratches from the laundry baskets. 

laundry pedestals diy

Estimated Cost
150.00
Estimated Time Investment
Week Long Project (20 Hours or More)
Finish Used
Paint
Recommended Skill Level
Intermediate

Comments

zoolander

Wed, 06/29/2016 - 14:31

I think you could probably drive a truck on top of yours.  :)  I was a bit concerned about the strength of the construction when I first decided to build it, but I decided that since it would be stationary once I have it in place and the only force would be straight down, it would be fine.  Once I got it put together, it was actually sturdier than I thought it was going to be...from a horizontal force perspective.  Virtically, that thing could hold 100 washer/dryer pairs...the plywould would give out before the 2x4s and 4x4s would even budge.

Anyway, nice work!  I love the Kreg Jig...I need one of those. 

Rustic X End Table

Submitted by B.W.Martin on Thu, 04/16/2020 - 20:35

I used the rustic X end table plan to make a set, went a different route on the color and stain. I also used plywood on the bottom instead of 1" by 12".

Built from Plan(s)
Estimated Cost
$20
Estimated Time Investment
Day Project (6-9 Hours)
Finish Used
Eggshell antique white was used for the paint. I used minwax pre-stain, one cost of minwax honey stain, and two coats of minwax polyurethane.
Recommended Skill Level
Intermediate

Coffee Table with Drawers

Submitted by Anonymous (not verified) on Sat, 11/18/2023 - 12:14

This was inspired by a Potter Barn table that looked similar. It was one of my first projects. I couldn’t afford the 2000 plus from there so built it. Sanded very fine and used Dark Walnut stain. Sealed four times with polyurethane sanding between each. Rubbed last coat of polyurethane on with cloth and used 0000 steel wool to give it a very soft and smooth finish.

Lynn

Modified Hailey Platform Bed

Submitted by Jake on Wed, 05/30/2012 - 16:15

I took the Hailey Platform Bed plan and cut to a twin bed size. I used some old wood I found in the garage for the head and foot boards and the legs. Notice the legs are 4x4s. The grandkids had some old bed springs under their mattresses so I incorporated the spring into the build. That required that I lower the cleat a couple of inches and it meant I had a very complicated leg geometry in order to get it deep enough to support the bed. I built the frame with Kreg Jig pocket joints and they made the work very easy with such large and heavy timbers. Notice I attached the legs to the frame with 5/16" lag screws which allows easy removal of the legs if you need to make it easier to move. Came out very good but I think I will build the second bed without the springs and go for the slat method as shown in the plans.The result is beautiful. My neighbor commented that it looked very Pottery Barnish!

The second bed I finished yesterday is made with slats. A very smart move. The legs are so much easier to attach to the frame. Both beds are beautiful and sturdy. One grandkid told me that when the hurricane comes he is going to get under his bed because it is so strong. He may be right but I will be in Laredo or San Antonio.

Built from Plan(s)
Estimated Cost
$70 for two beds and I also got free wood from the garage.
Estimated Time Investment
Weekend Project (10-20 Hours)
Finish Used
Red Oak stain on the legs and head and foot boards. The rest was primed then given two coats of a good satin paint called Benjamin Moore Impervo. It is expensive but I used it on repainting the kitchen cabinets and it was worth the cost. Best advice is good primer, sand with 150 grit, then two coats of final paint but light sanding with 320 grit between coats.
Recommended Skill Level
Beginner

Sissy's Toddler Farmhouse Bed

Submitted by Wifey on Sun, 03/16/2014 - 15:16

I'm so excited, this is my first furniture project. My husband was a little hesitant initially but is happy with the completed bed. This bed is so sturdy, I can easily sit on the edge and even lay down with my daughter. She loves her new bed and her brothers are a bit jealous. I told them to go through Ana's site and find something they like! Thank you so much for the projects you offer on here.

I altered the plans for a 28" wide crib mattress. Instead of a 1 x 3 on the ends of the head and footboard, I used 1 x 4s all the way across.

I also altered it to be 3" taller because I need a little extra storage space under my daughter's bed.

I did not use a nailer, just a hammer and nails. I found that it helped to use legs and shims on the bed rails frame and get to perfect level and then nail the footboard to the frame. Next, I screwed the frame into the footboard. This might be unnecessary info, but as a beginner, this part gave me a bit of trouble.

I used Behr Premium in Ultra Pure White with an Eggshell finish.

Built from Plan(s)
Estimated Cost
$60
Estimated Time Investment
Afternoon Project (3-6 Hours)
Finish Used
Behr Interior Premium Eggshell finish in Ultra Pure White.

Used a small roller on larger areas and a brush in all others.
Recommended Skill Level
Beginner

Counter Height Chunky X Table Long and Skinny

This is an adapted plan from the:

Chunky X Base Table

http://www.ana-white.com/2016/02/free_plans/chunky-x-base-table-featuri…


I made it counter height, made it skinnier at 27" depth and really long at 72" long.

Estimated Cost
$100-$150
Estimated Time Investment
Weekend Project (10-20 Hours)
Finish Used
Red Mahogany Oil Based Interior Stain. First using wood conditioner, stain than a semi-gloss polyeurathane
Recommended Skill Level
Intermediate

Workbench

This morning my dad decided to help my build the workbench I've been wanting since we moved to our new house. I would usually do it myself but being 37 weeks pregnant I wasn't wanting to get out there on my own and lift a bunch of 10 ft boards. So we got a bunch of 2x4s and some 2x6s and threw one together... it ended up being 10 ft long and around 28 inches wide and a good 36 inches tall. Now I have a nice place to put my new saw I got for Mother's Day

Estimated Time Investment
An Hour or Two (0-2 Hours)
Recommended Skill Level
Beginner

Carolina Craft Table Modified

http://ana-white.com/2010/09/pb-kids-caroline-craft-table

 *** apologies for the missing baseboard in the photo- we are in the midst of a remodel ***

We wanted a high quality table so we researched the Parker Play Table ($1200) and the Carolina Craft Table- ($600). 

In the research i found the plans for the Carolina table on this site- and modified them a bit (we wanted the removable storage top). 

We painted the top with White board on one side and Chalkboard on the other. 

The table has 22" legs and they can be changed out with a second set of legs when our daughter gets taller.

There is plenty of storage for all the art supplies in the unit and a art paper dispenser on the end. 

The unit is made of poplar on the inside and the legs and facia are all red oak- a very dense and beautiful wood. 

All exterior screws are counter sunk and hidden under face grain wood plugs that are surface sanded.  i chose to do no finish as the wood grain is beautiful- although i may do a timber oil or tung oil at some point - 

the project took about 2 days total time- $150 in supplies (including paint) and the piece feels substantial..... like it will be used for my daughters children. 

you will want to have access to a table saw and some clamps, wood plugs and a countersink bit for your drill

Estimated Cost
150
Estimated Time Investment
Weekend Project (10-20 Hours)
Finish Used
none- light hand sand with 180 grit sandpaper
Recommended Skill Level
Intermediate

Just a beginner! Second Project

Submitted by Rifka on Tue, 06/21/2016 - 18:35

Great first project!

Built from Plan(s)
Estimated Cost
$20
Estimated Time Investment
Afternoon Project (3-6 Hours)
Finish Used
Annie Sloan chalk paint with clear wax.
Works great for outside too.
Recommended Skill Level
Beginner

Nursery Dresser

Submitted by Anonymous (not verified) on Sun, 11/26/2023 - 12:18

My first attempt at a dresser before my first grandson arrives.

Rick White

Comments

Console Table w/Drawer & Raised Dog Bowls

Submitted by Booooozle on Tue, 06/05/2012 - 18:00

I actually designed & built this table on my own but it is very similar to Ana’s Simple, Cheap, & Easy Console Table. When we moved from an apartment to a house our lil neurotic jack Russell terrier decided he wasn’t going to eat unless we were both in the same room as him. So his food was put in a spot where he could see both of us even if we were in separate rooms, it just turned out that where that spot was, is the exact spot I wanted a console table. Well I couldn’t find a console table with a raised dog bowl shelf in it so I built my own. Now the dog bowls are up off the floor at a comfortable level for our fur babies & I keep all their vet paperwork, sweaters & toy stash in the drawer, all puppies things in one place.

Estimated Cost
$35
Estimated Time Investment
Afternoon Project (3-6 Hours)
Finish Used
Valspar Flat Black Indoor/Outdoor Enamel
Recommended Skill Level
Intermediate

Planked Wood Sideboard

Submitted by emilykay on Tue, 04/01/2014 - 18:42

This was my first build from this site! It took me about a month working on-and-off during my toddler's nap time. I thought this project was very accessible for a beginner--or, in my case, a distracted mom who is six months pregnant. I scaled down the plans to fit my dining nook, but I forgot to account for a half width of face framing when I subtracted so my third door hole came out a little narrow. I decided to just put open shelves in odd-sized middle opening. I used euro cabinet hinges instead of the butt hinge style because they are more adjustable for not-so-perfect openings/doors. I bought a 1 3/8" Forstner bit to drill the hinge mortises. I was intimidated by the hinges & drawer glides but that part went surprisingly well! I used a plastic template to locate the cup handles on the drawer faces--that purchase was definitely worth a couple of bucks! I wish I had borrowed a router to make a rabbet for the door panels, but I got impatient & just tacked them on. I also wished I had replaced or sharpened the blade on my circular saw because it chewed up the plywood making long cuts. (There's a lot of wood filler on those plywood edges. I ended up painting the shelves with leftover interior latex because they looked like a dog attacked them.) There are also a few shims under the drawer glides to correct the width, but oh well, you can't see them :) Before my next project, I am going to get a couple right angle clamps and make sure I buy the BIG box of pocket hole screws!

Built from Plan(s)
Estimated Cost
$250
Estimated Time Investment
Week Long Project (20 Hours or More)
Finish Used
Minwax Pre-Stain Conditioner, Early American Stain (distressed after dry with 220 grit) & Paste Finishing Wax
Recommended Skill Level
Beginner

Comments

Leaning wall desk/bookshelf

Using only scraps from all my other projects, I modified Ana's plans to create this workspace in the house we just moved into. I changed the dimensions of the shelves to take advantage of the materials I had on hand. Additionally, though I have a lot of different things on the shelves in this picture, I'll be using the shelves more for books and reference materials, so I needed standard shelf sizes. Though this is a simple design, cutting some of the angles and installing the shelves was a bit tricky, therefore I think this is more of an intermedite project. I also added 2x4 legs to support my Mac. Can't have that tumbling to the ground!

Built from Plan(s)
Estimated Cost
I used all scraps and left over lumber from other projects to make this. My actual cost was $25.
Estimated Time Investment
Week Long Project (20 Hours or More)
Finish Used
I used an all-in-one Verathane stain+finish (ebony). I put on 3 coats, sanded with a fine grit sponge and put on one additional coat.
Recommended Skill Level
Intermediate

Simple Small Trestle Desk

Submitted by Anonymous (not verified) on Mon, 04/20/2020 - 19:57

This project was my first woodworking attempt ever! I had some assistance when it came to technique and how to use tools from my awesome uncle. I did shorten the length by 3 inches due to the space I had in my home, nothing else was changed. Overall I was able to complete the whole thing mostly on my own, I am so excited and love the way it turned out!

Built from Plan(s)
Estimated Time Investment
Day Project (6-9 Hours)
Finish Used
Clark + Kensington Paint
29B-2 Clouds Arising in eggshell finish
Recommended Skill Level
Beginner

Comments

10 Dollar Ledges in Espresso

Submitted by Kimiemich on Thu, 06/07/2012 - 15:17

I made these ledges with pine and white wood, 4' long. I wish I had used pocket hole screws to connect them, but instead I just counter-sank the screw holes and butt jointed the boards with wood screws. I filled the screw holes with 5/16" wood plugs and sanded them down flat. Then I sanded, stained, varnished, and sanded again.

Please see my process below on my blog.

Thanks, Ana!

Estimated Cost
$30
Estimated Time Investment
Afternoon Project (3-6 Hours)
Finish Used
A mix of "ebony" and "walnut" oil-based stains, then 2 coats of varnish and a light sanding with 600 grit paper.
Recommended Skill Level
Starter Project
Back