Community Brag Posts
Low Bunk Bed - By Brian
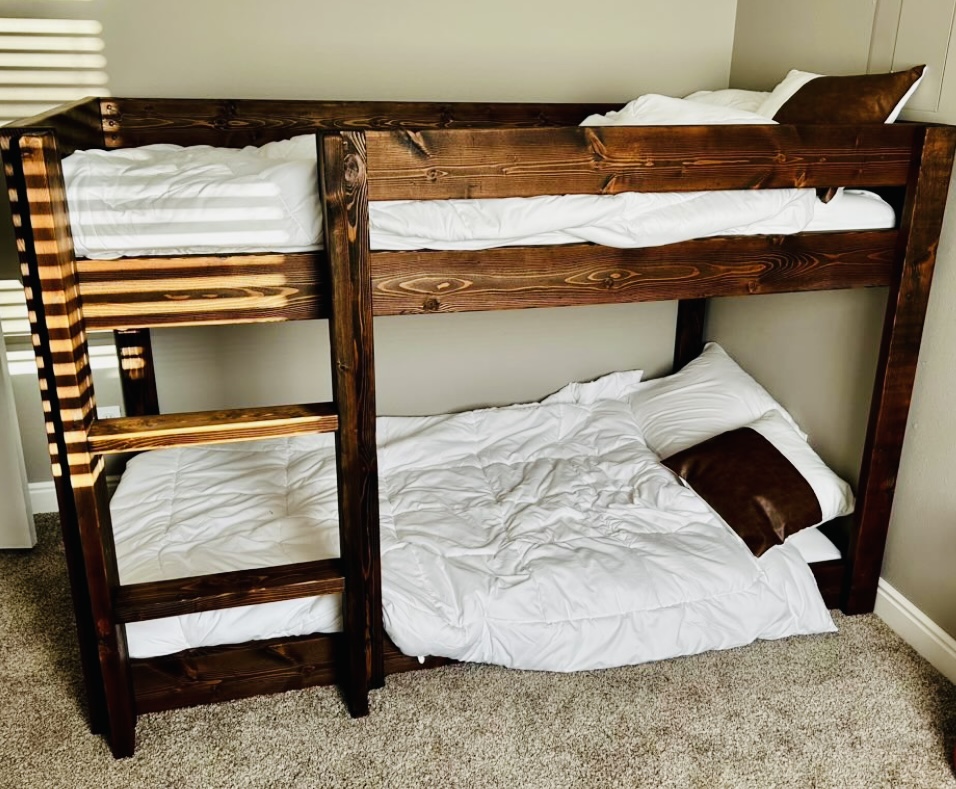
Essential Low Bunk Bed by Brian James
Built from Plan(s)
Tower
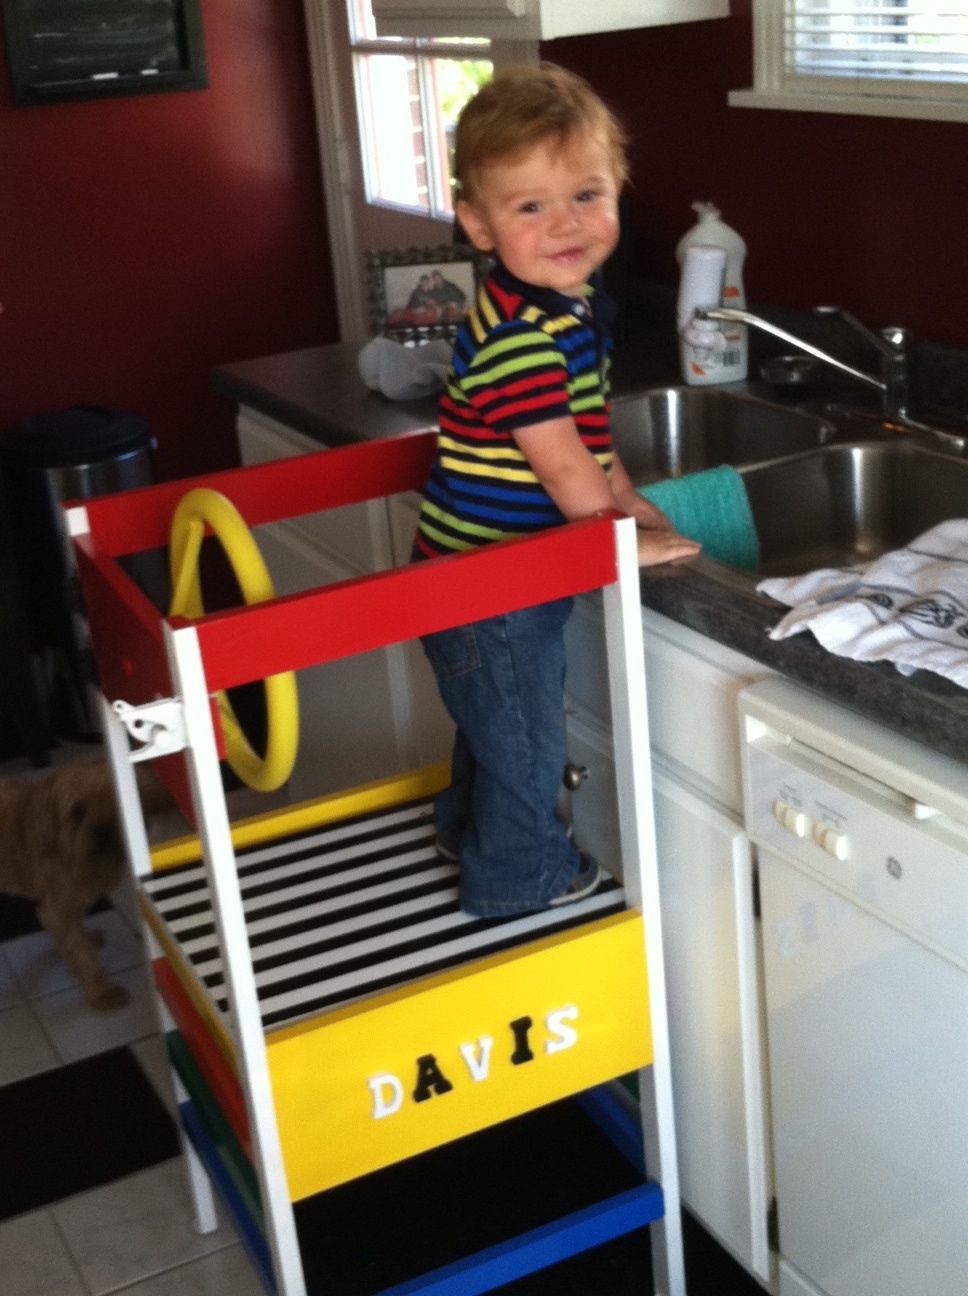
My son loves his tower! We didn't attempt the curved sides, but made it work by adding a door with a toy steering wheel instead :)
Built from Plan(s)
Recommended Skill Level
Intermediate
Comments
Fri, 10/07/2011 - 06:24
So Cute! I wish my guys were
So Cute! I wish my guys were this little again - enjoy him!
Fri, 10/14/2011 - 19:16
I think the added steering
I think the added steering wheel is a great idea!
Wed, 12/05/2012 - 18:58
I love the paint and steering
I love the paint and steering wheel! I'm making this now and, first time using a jigsaw, my arches look awful! I think I'll just go with them but this was a good innovation.
Sun, 02/10/2013 - 17:57
Dropping the arches was a good idea
We're actually going to drop the arches so ours will fit underneath our counter when not in use. :)
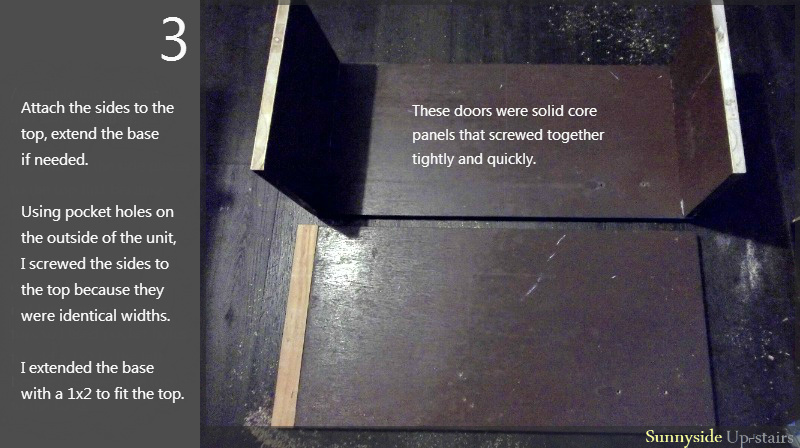
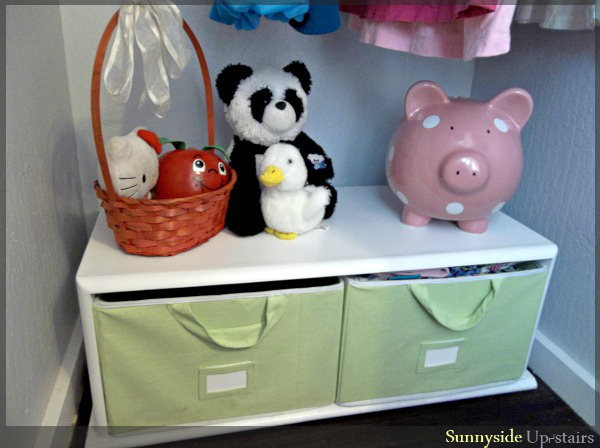
Toddler Closet Cubby
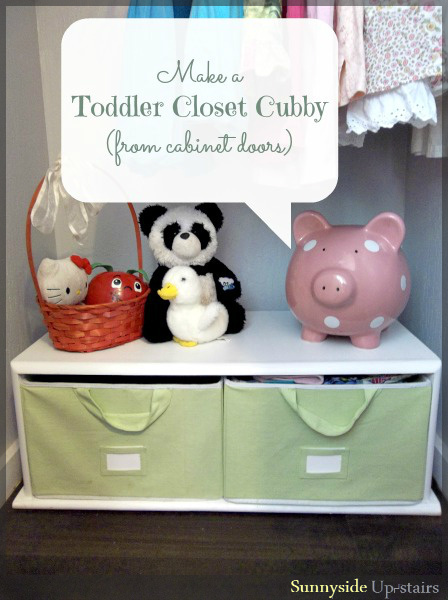
Solid wood is an amazing material because it can be cut, re-shaped, extended, filled, sanded, stained, painted, and essentially re-used almost endlessly.
Last week, I took old cabinet doors (from when we gutted the mouse-hole kitchen cabinets that used to be in our apartment before we moved in) and turn them into a free cubby for my daughter's closet. :)

Estimated Cost
$0, with new purchases, $20 estimate
Estimated Time Investment
Afternoon Project (3-6 Hours)
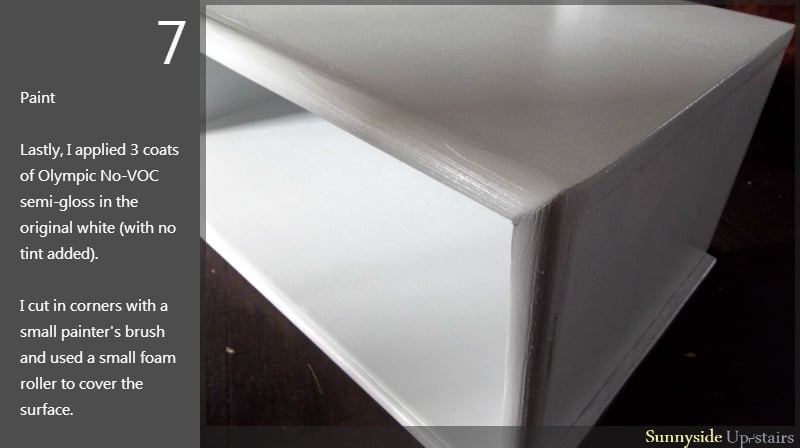
Finish Used
3 coats Olympic No-VOC semi-glass straight from the paint can.
Small paint brush for cut-ins, foam roller for surface coverage. Allow recommended dry time between re-coats.
Small paint brush for cut-ins, foam roller for surface coverage. Allow recommended dry time between re-coats.
Recommended Skill Level
Beginner
Comments

Mon, 10/07/2013 - 19:43
Great project!
Beautiful Cubby from old doors! The trim adds elegance with the white color and it fits perfectly. Looks adorable! :)

In reply to Great project! by JoanneS
Tue, 10/08/2013 - 19:30
Mahalo, Joanne! :) I'm
Mahalo, Joanne! :) I'm looking forward to your great builds coming up! =D
My First Project

I used Poplar for the top and Pine for everyting else. Only took about two hours from start to finish. This is my first project using a Kreg Jig and now I don't know why I didn't get one of these years ago!
Estimated Cost
Total cost was $175. Can be done for less, but I upgraded the top to Poplar which cost more.
Estimated Time Investment
Afternoon Project (3-6 Hours)
Finish Used
Minwax Golden Oak Stain and MInwax Gloss Poly. Satin finish interior white paint for the remainder. I applied two coats of stain and paint and three coats of Poly.
Recommended Skill Level
Beginner
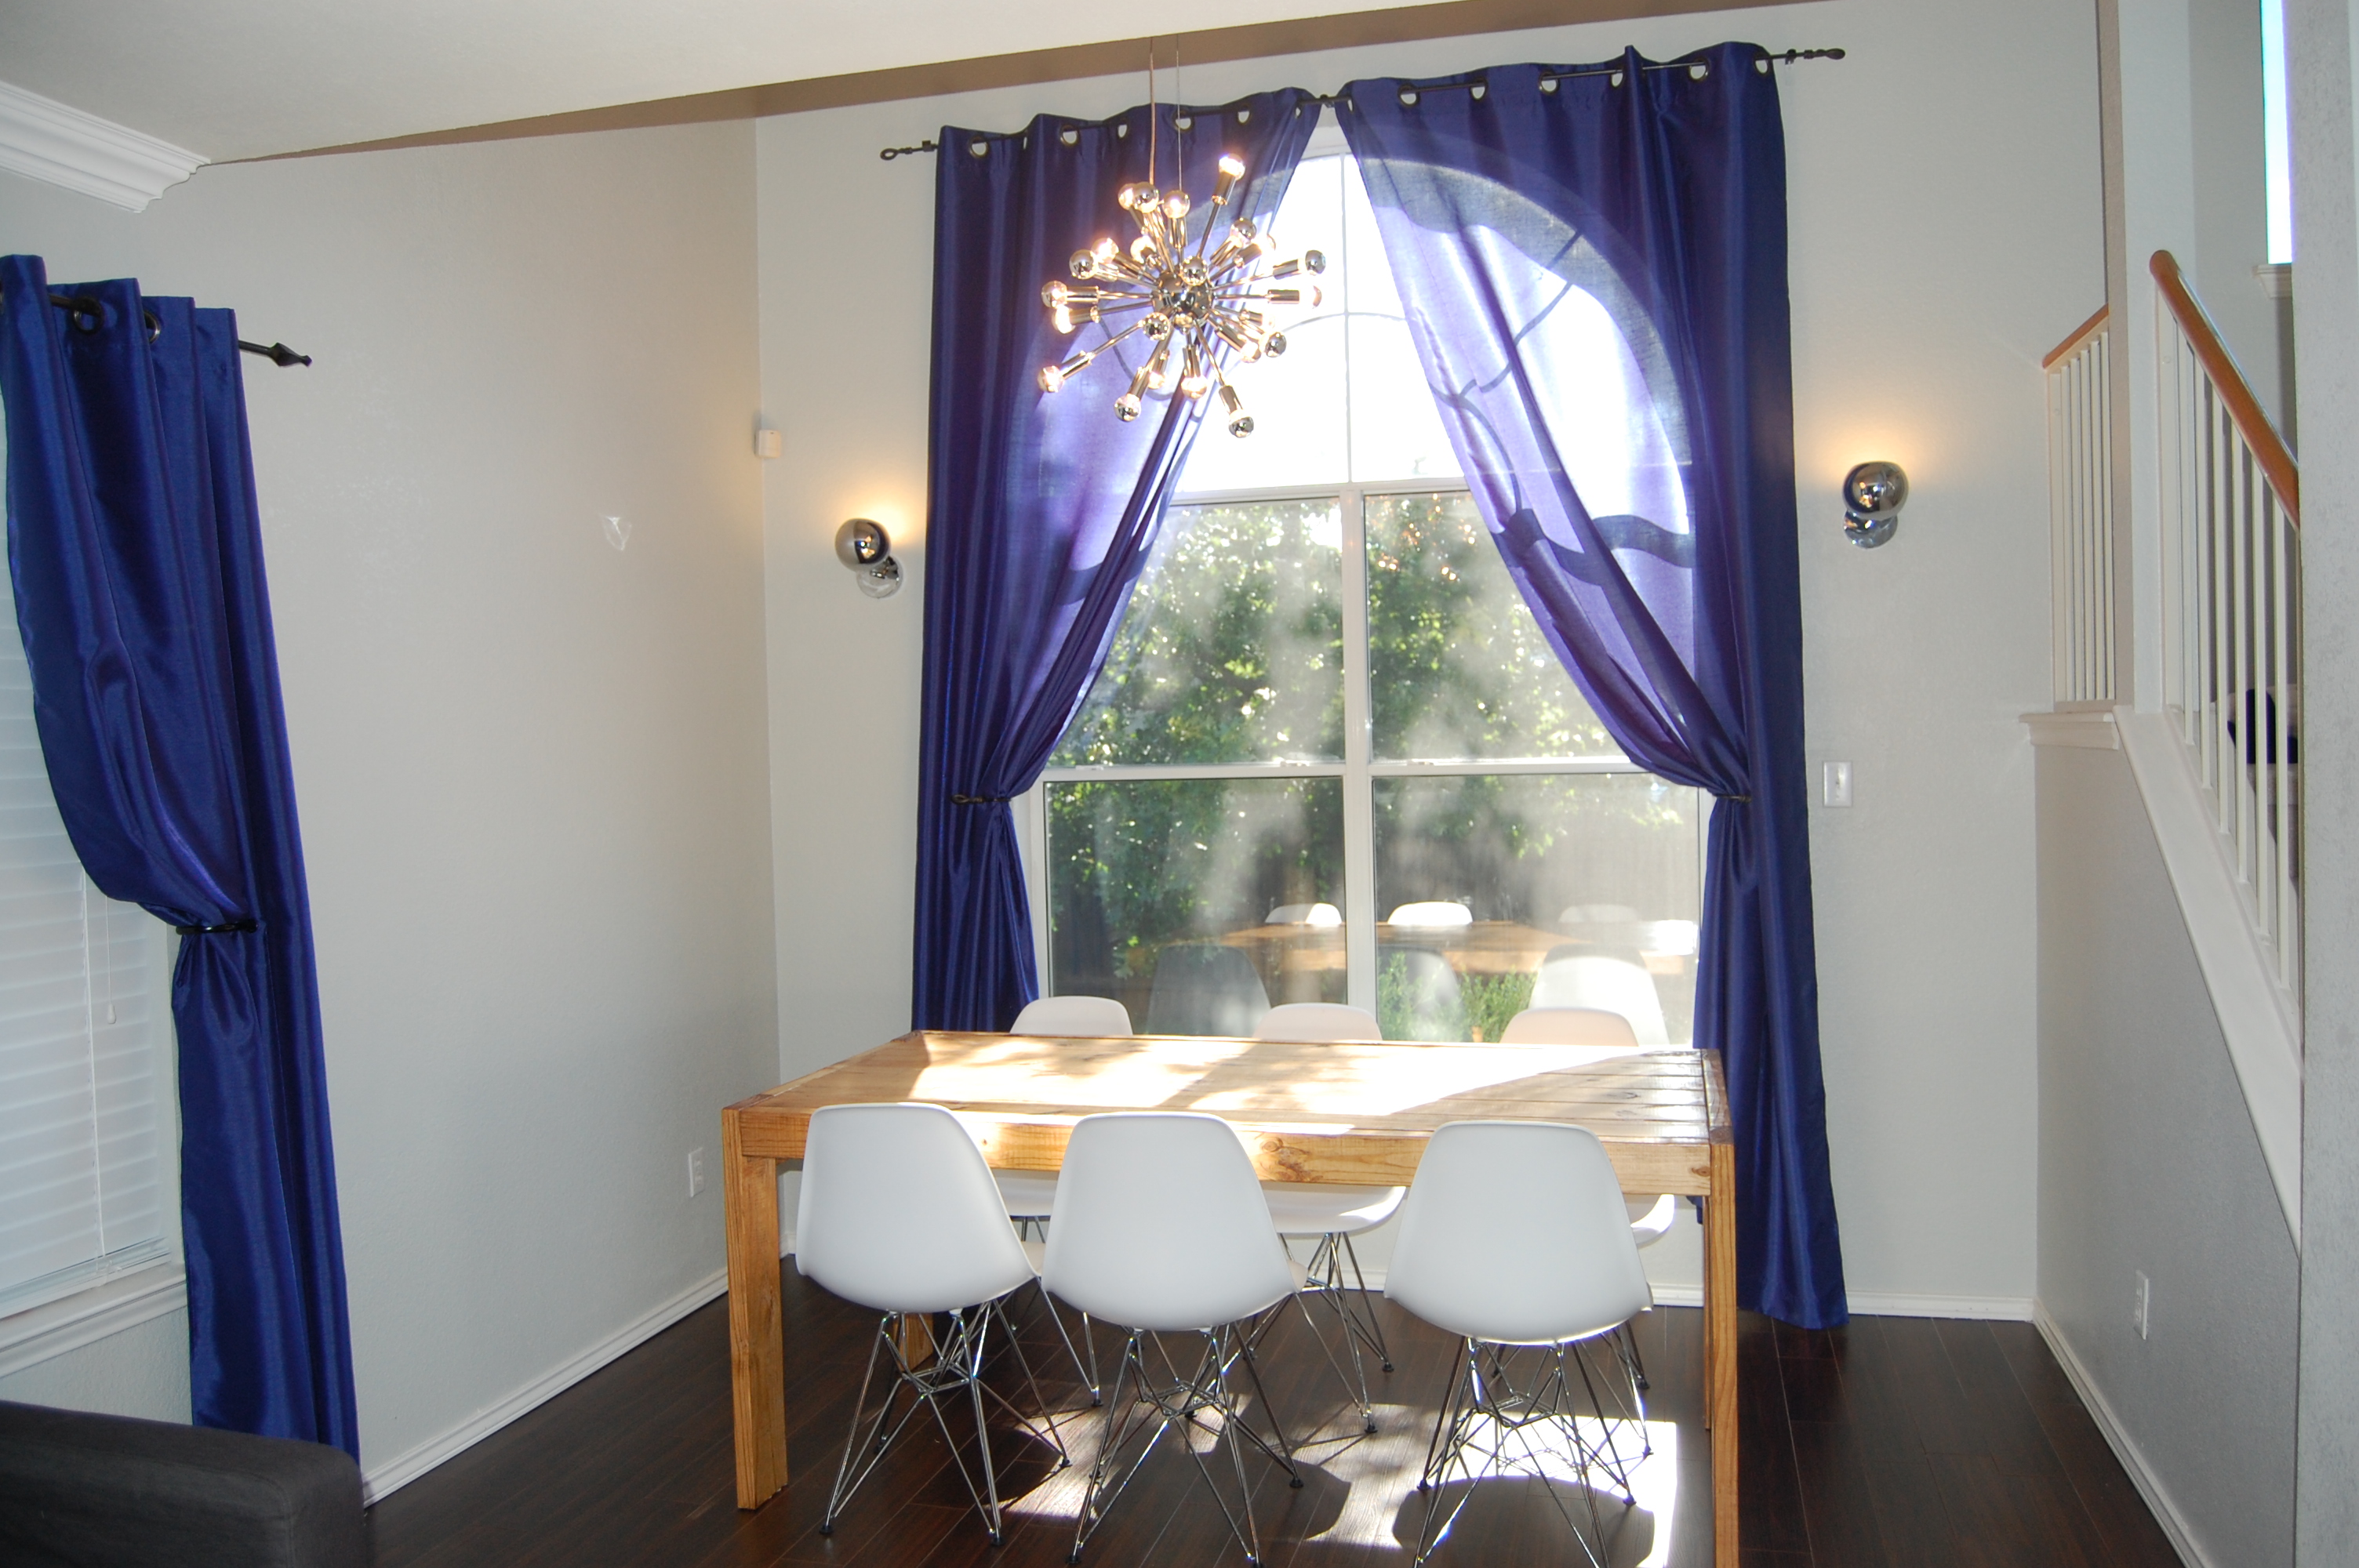
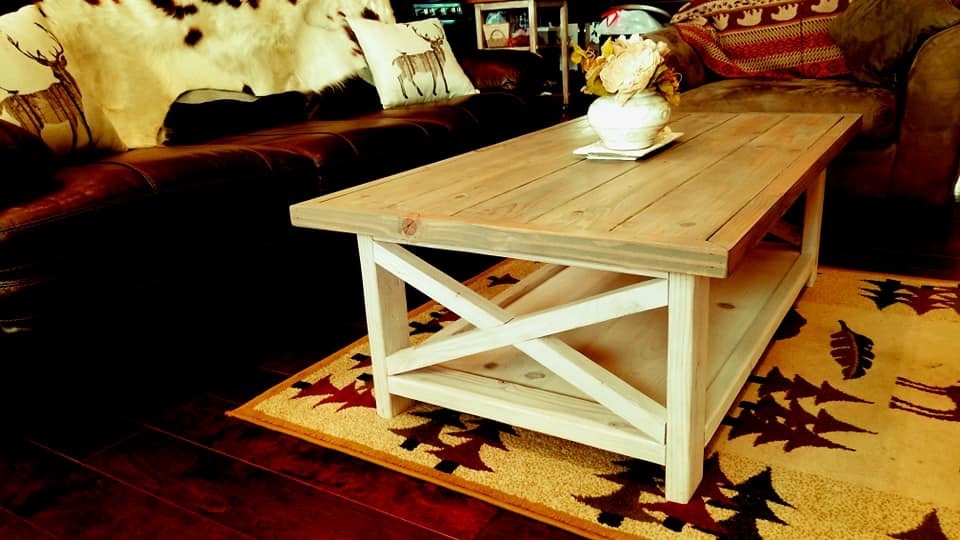
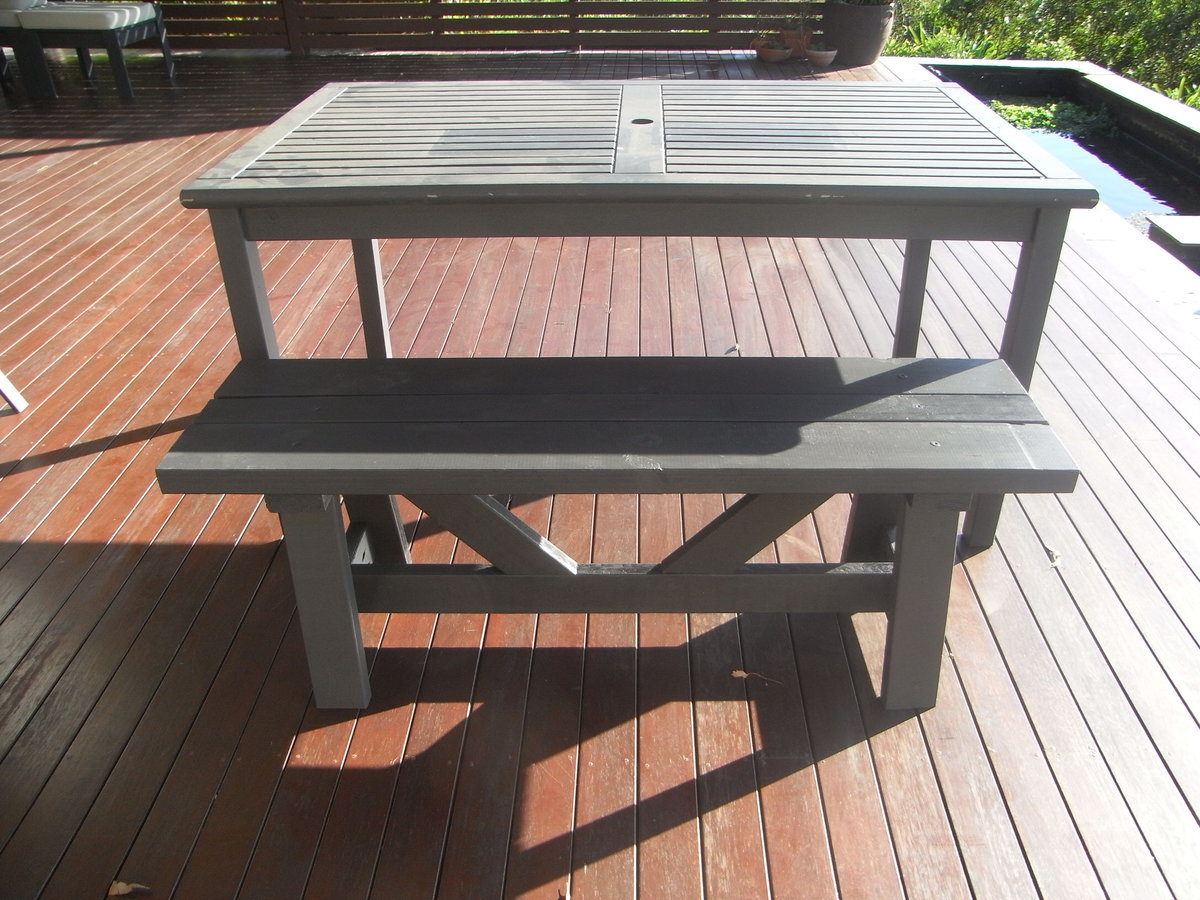
Dinning Table
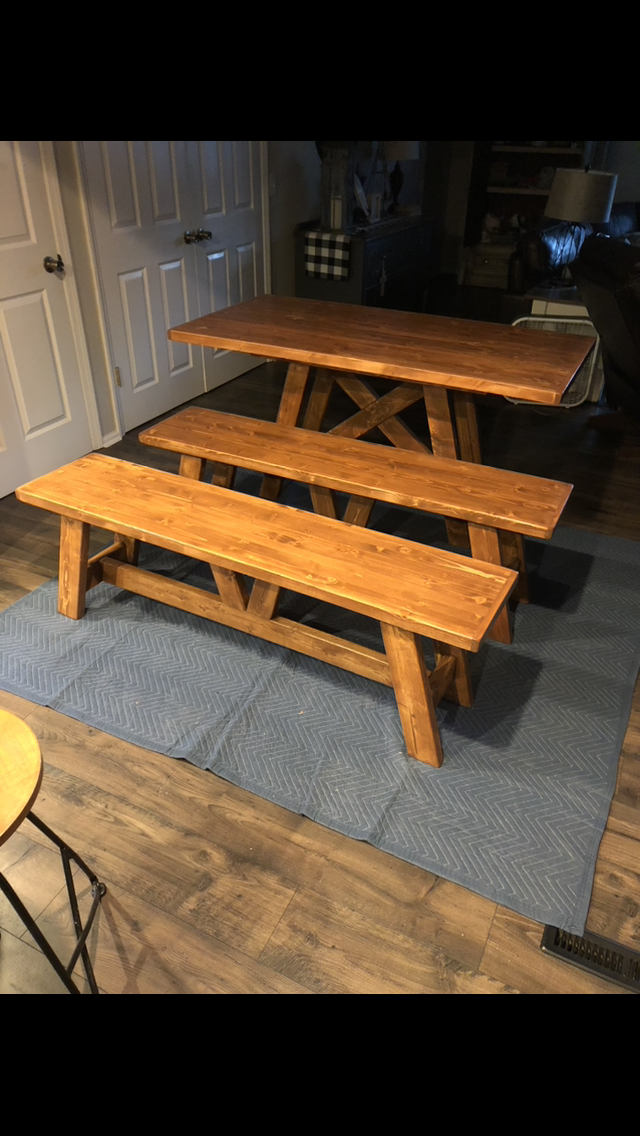
Dinning Table in honey brown finish!
Comments
So easy, so quick, so awesome drawer organizers
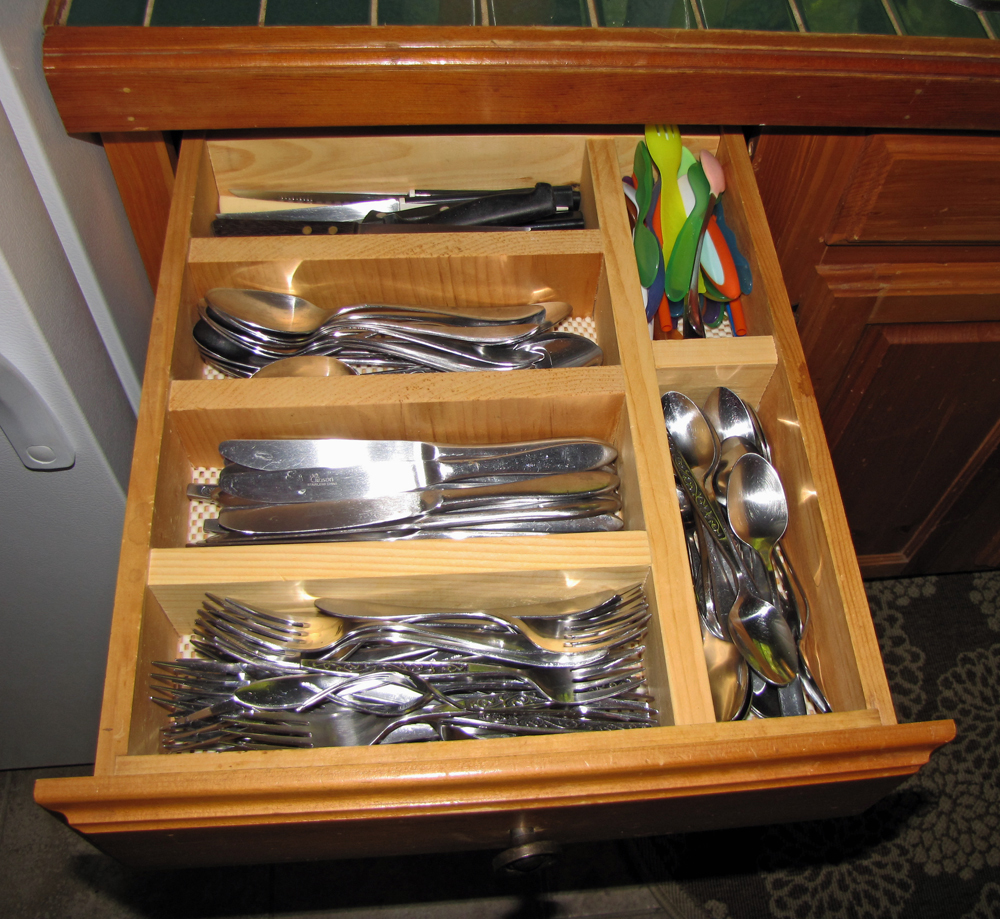
Had some scraps hanging around and thought I would try using Ana's plan to organize the mess. Wow. What a difference. So nice to build something to fit your space rather than working around a preformed, plastic or metal utensil holder. Thank you Ana!
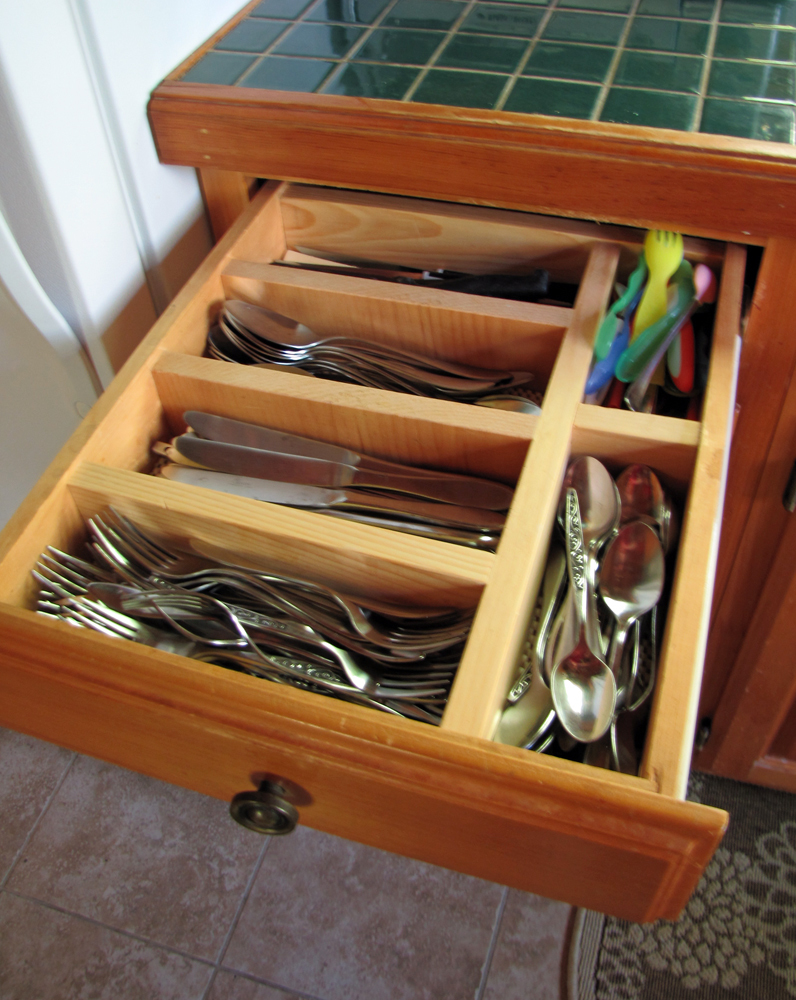
Built from Plan(s)
Estimated Time Investment
An Hour or Two (0-2 Hours)
Finish Used
just sanded to get rid of rough edges and added a coat of poly. done.
Recommended Skill Level
Starter Project
Comments
Hannah Canopy Bed
Utilizing the Hannah Canopy Bed plans, I made 2 changes that I am really glad I made. First, I added bead board to the headboard to give it a little style instead of the flat plywood. Second, I used 2x4's on all 4 corners because I could not find any 2x3's that were anywhere close to being straight. Overall I love the final project! It was nice, simple, and quick to get it all put together!

Built from Plan(s)
Estimated Time Investment
Weekend Project (10-20 Hours)
Finish Used
Painted white
Recommended Skill Level
Beginner
My first wood project thank you Ana!
This is my first wood project, and first time using a Kregg jig. A HUGE THANK YOU TO ANA! Next is the matching end table and then outside chairs and a pagoda.
Jeff F.
Finish Used
Grey minute wax stain, and white antique wash fr the bottom.
Recommended Skill Level
Starter Project
Kitchen Table Storage Bench
I built this storage bench and my wife stained and painted it. It is for use at the kitchen table as well as have storage for baskets underneath. This is my 1st project I have used my Kreg Jig on. Absolutely love it!!!

Built from Plan(s)
Estimated Time Investment
Weekend Project (10-20 Hours)
Finish Used
Maple Finish with mixed paint to match our kitchen table for bottom.
Recommended Skill Level
Beginner
Comments
Tue, 04/24/2012 - 08:54
Like the top
I was thinking about building mine with the top having some over hang and like how yours turned out. Did you lay the boards on top of another piece used to make the top or where they laid on the open top and screwed to the sides?
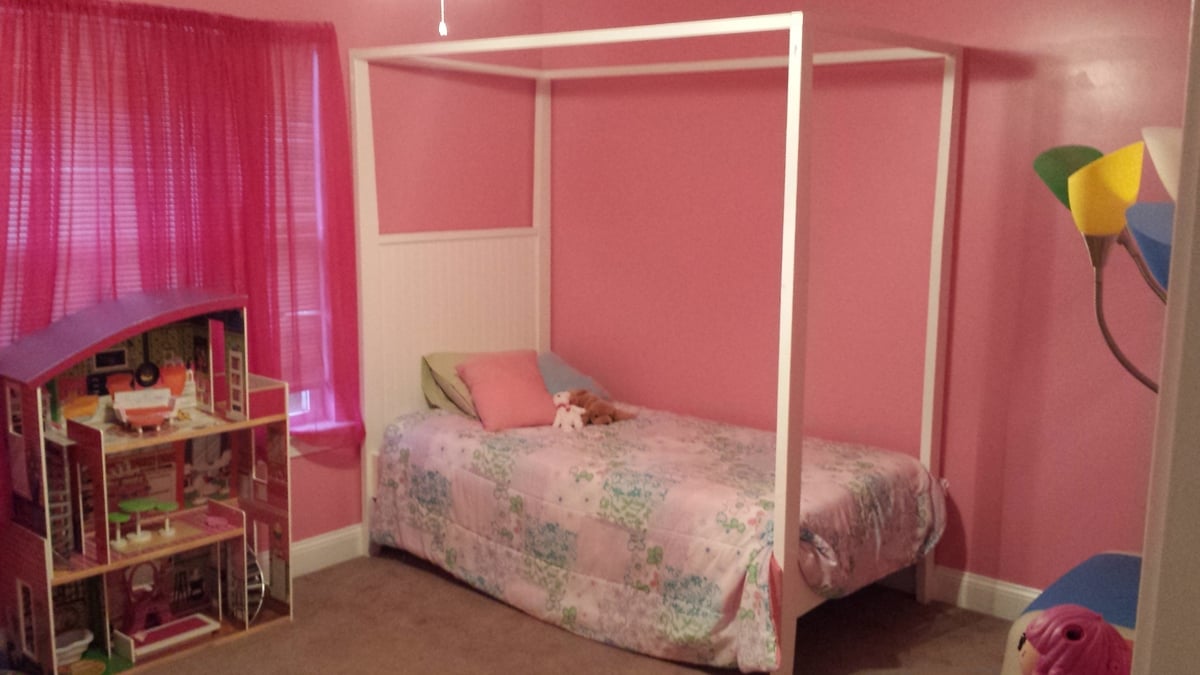
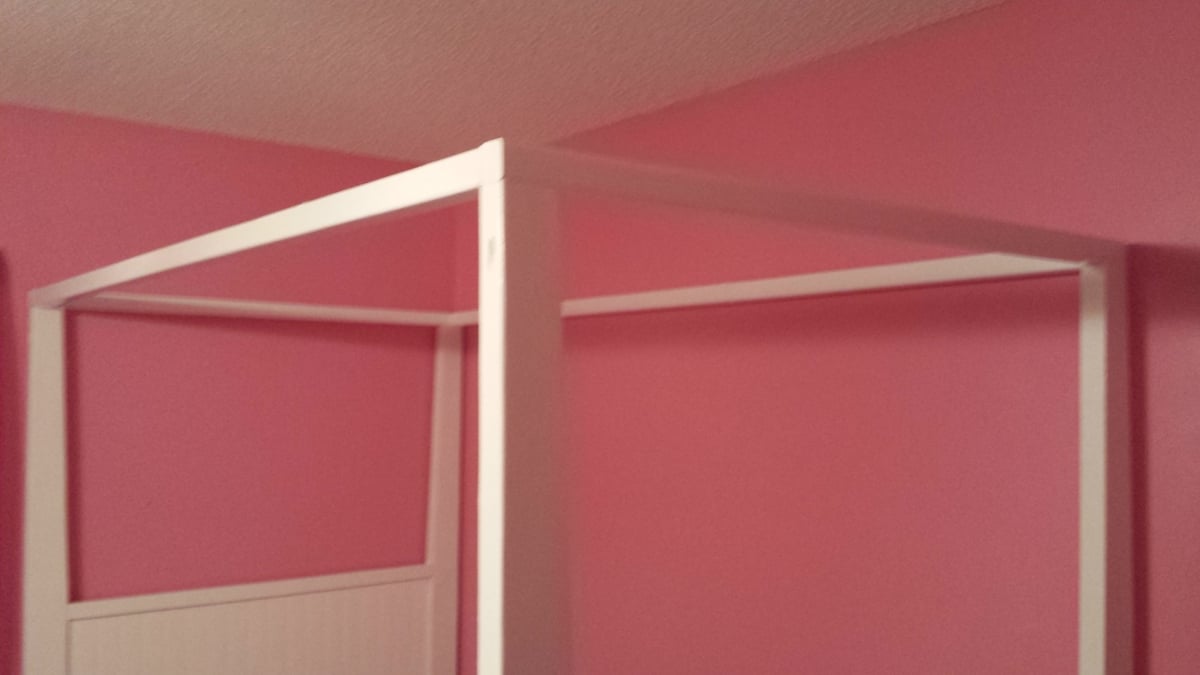
Pretty in Pink
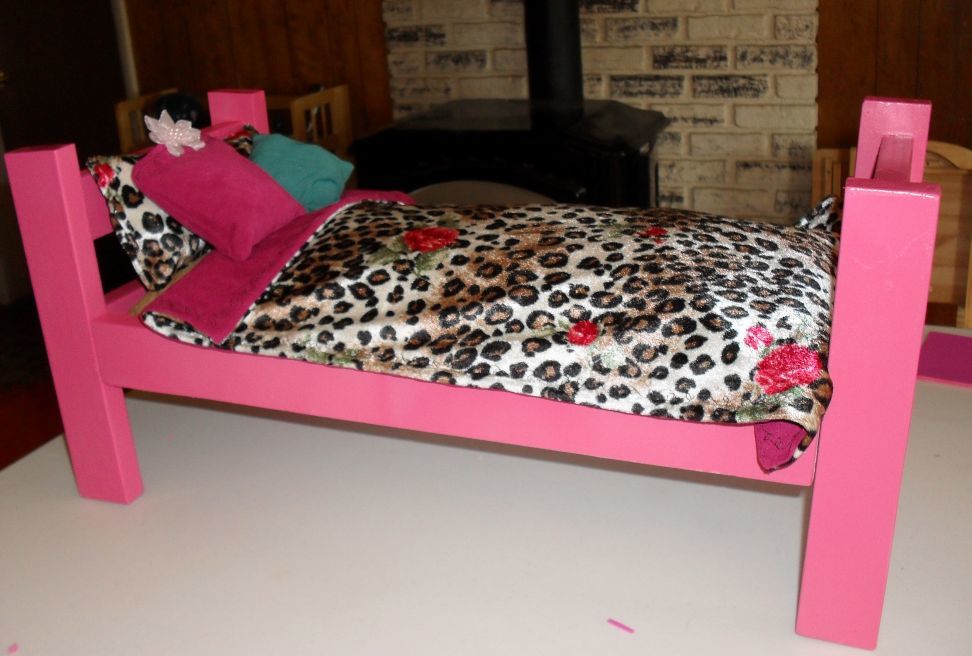
I made this as a gift for my niece. I fully assembled it, instead of presenting it as a kit. When I made the frame, I hadn't quite figured out how to make perfectly straight cuts with my circular saw, and I cut all the pieces before I came across Ana's tutorial on using a circular saw. So the bed is not perfectly square. Fortunately, a few pieces of thin craft foam glued to the bottom of a couple of the legs eliminated most of the wobble. That, and a generous application of pocket holes and screws. Each side rail is attached to the headboard/footboard with (6) 1 1/2" screws! I could probably jump up and down on the frame and it wouldn't budge. And I think I over-painted. Not to good with my spray painting technique yet. Plus, I forgot to sand between coats, and I didn't have time to add a clear topcoat.
When I look at this project, I see every flaw and mistake and feel dissatisfied. But, I just remind myself that I am my own worst critic. My niece, on the other hand, loved it. And no one else seemed to notice the mistakes: I received several nice complements. And the best part: it was practically free! I bought a can of pink spray paint, but everything else came out of my wood stash or my fabric stash. A present made with love, not money. And my first "real" building project.
Built from Plan(s)
Estimated Cost
$3
Estimated Time Investment
Afternoon Project (3-6 Hours)
Recommended Skill Level
Starter Project
Table and bench design
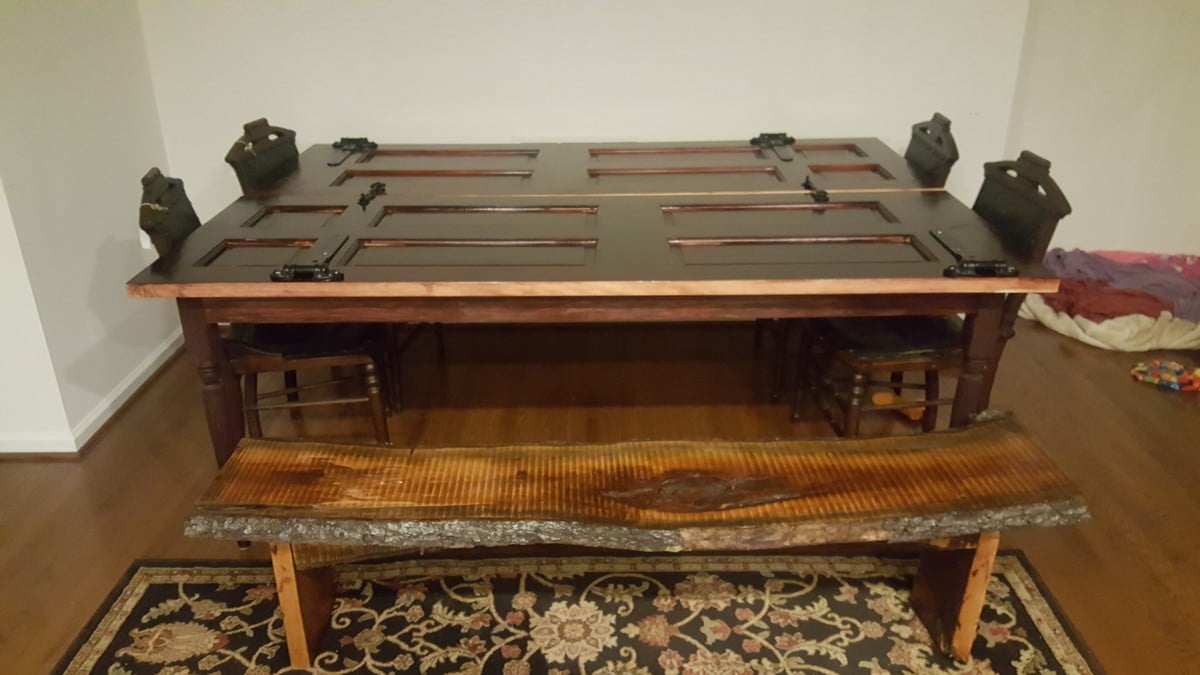
Okay, I hope you like this... it was the second and third thing I ever built!!! The table is made from 2 doors hinged together with accent hinges screwed on top. In the middle there are locks (hook and latch) for design. The frame is oak. measures 81X 56 and fits a good 10 people around.
The bench is an old cherry tree slab that someone I know did not want. its about 72 inches long and it is slighly curved. I ushed a shilac and kept the same color.... I just sanded it down.
Estimated Cost
250.00 (table)
bench was even less because the wood was free and I reused some stain from a previous projects.
bench was even less because the wood was free and I reused some stain from a previous projects.
Estimated Time Investment
Weekend Project (10-20 Hours)
Finish Used
black cherry, mahogany, and shilac
Recommended Skill Level
Beginner
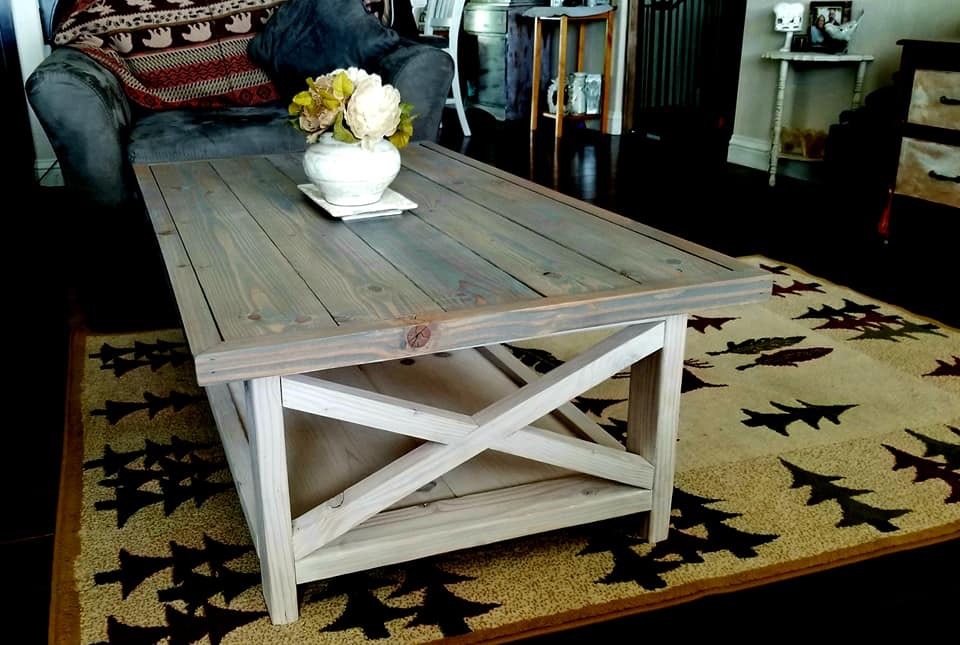
4x4 Truss Beam Table
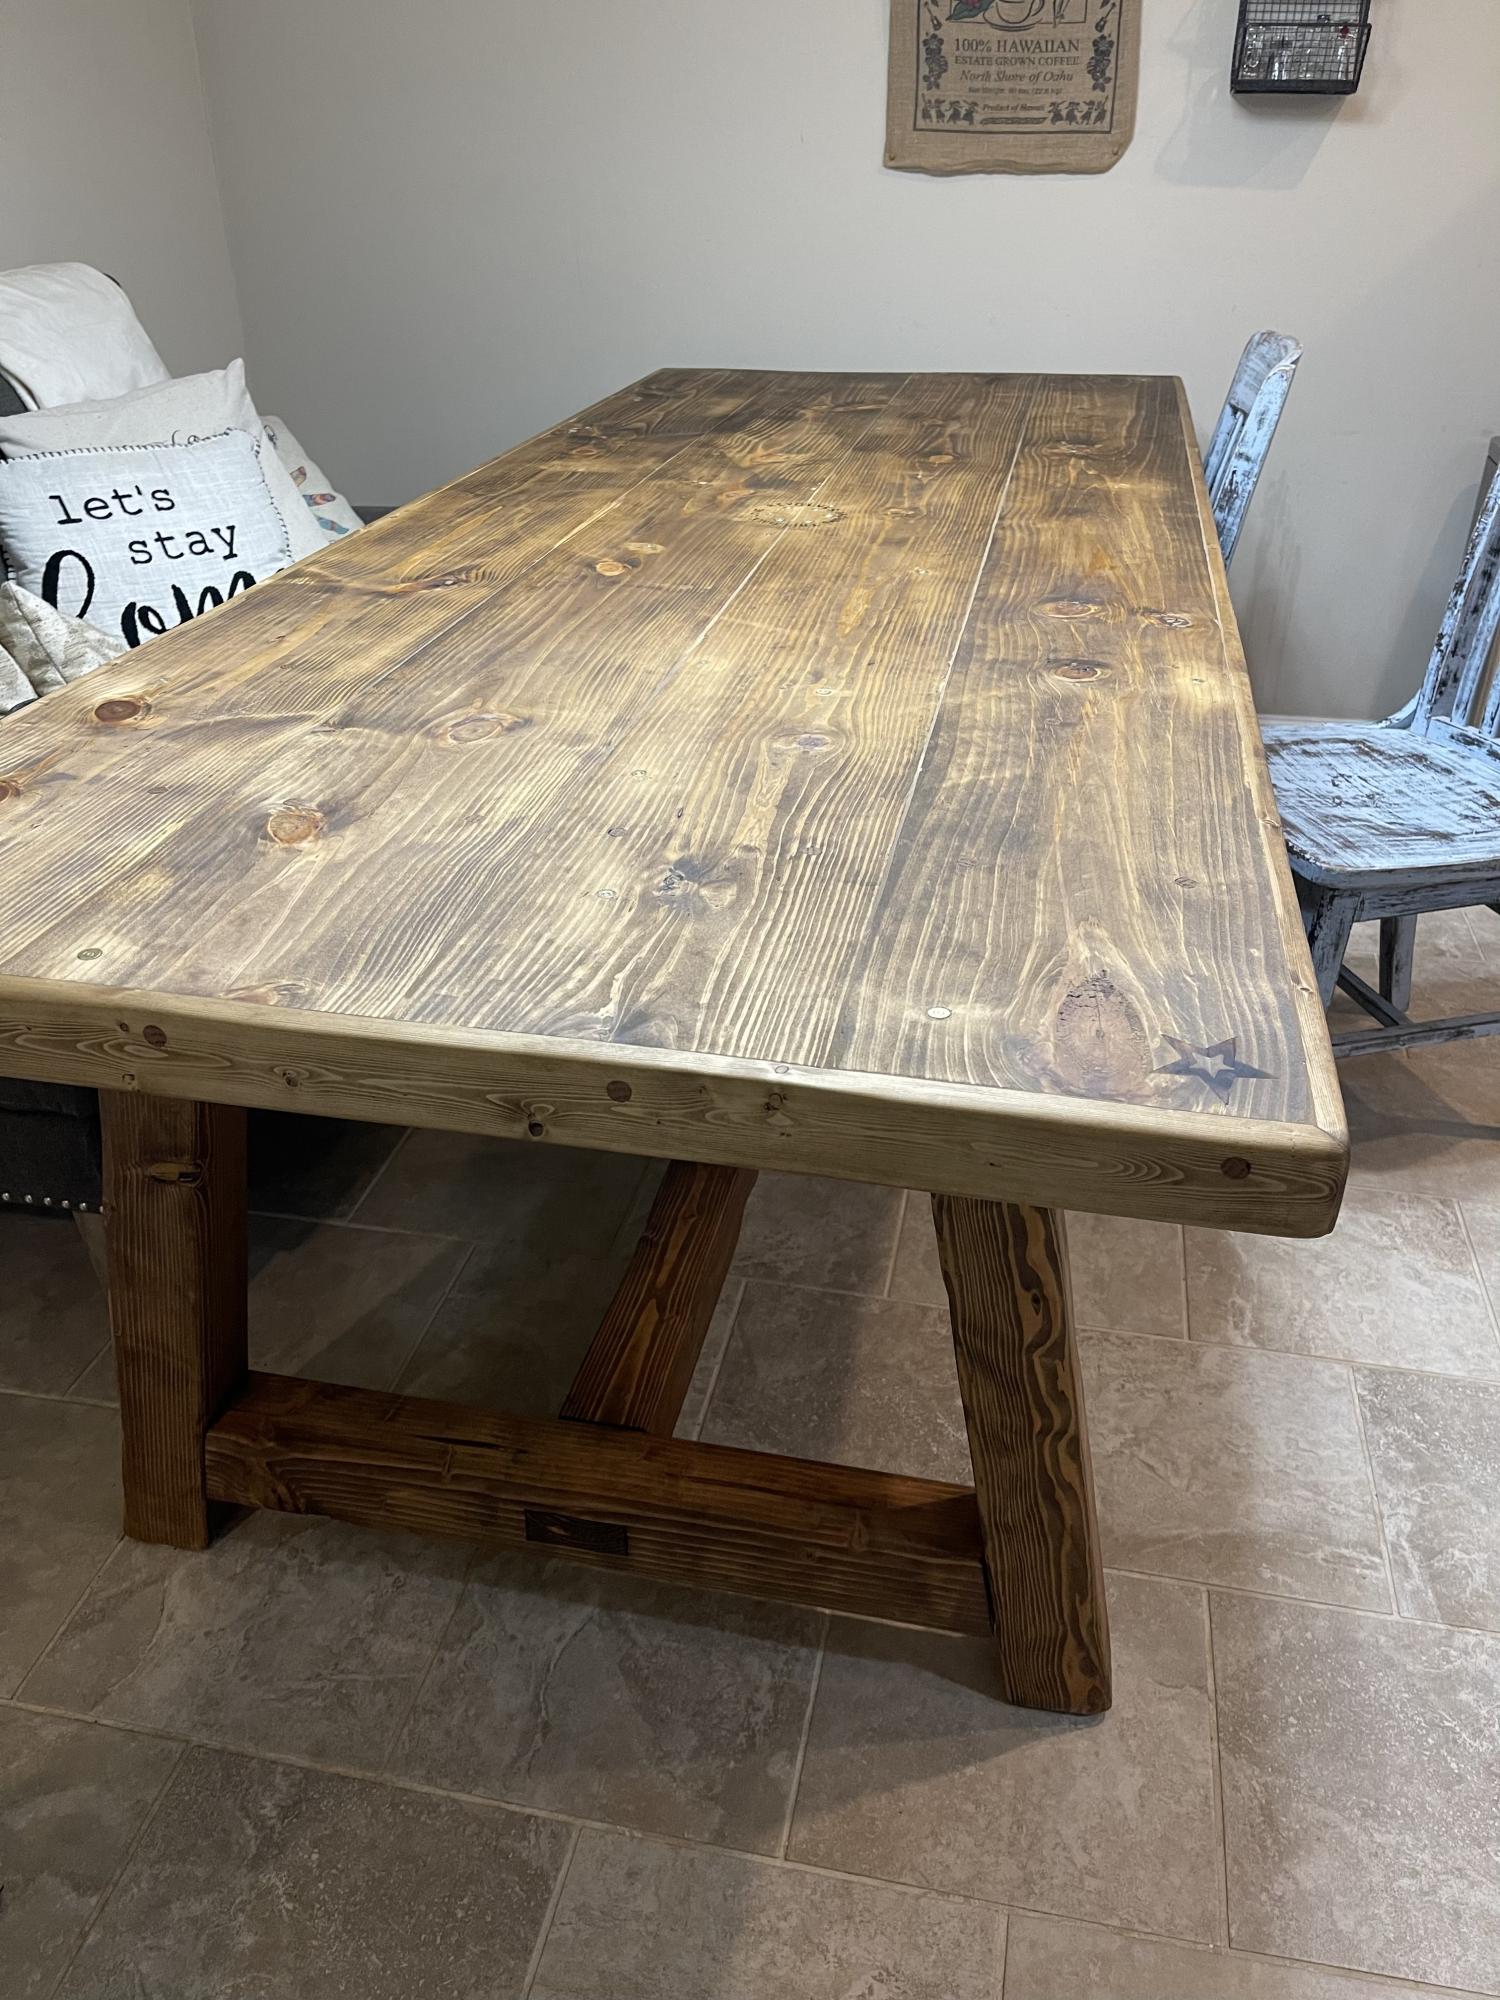
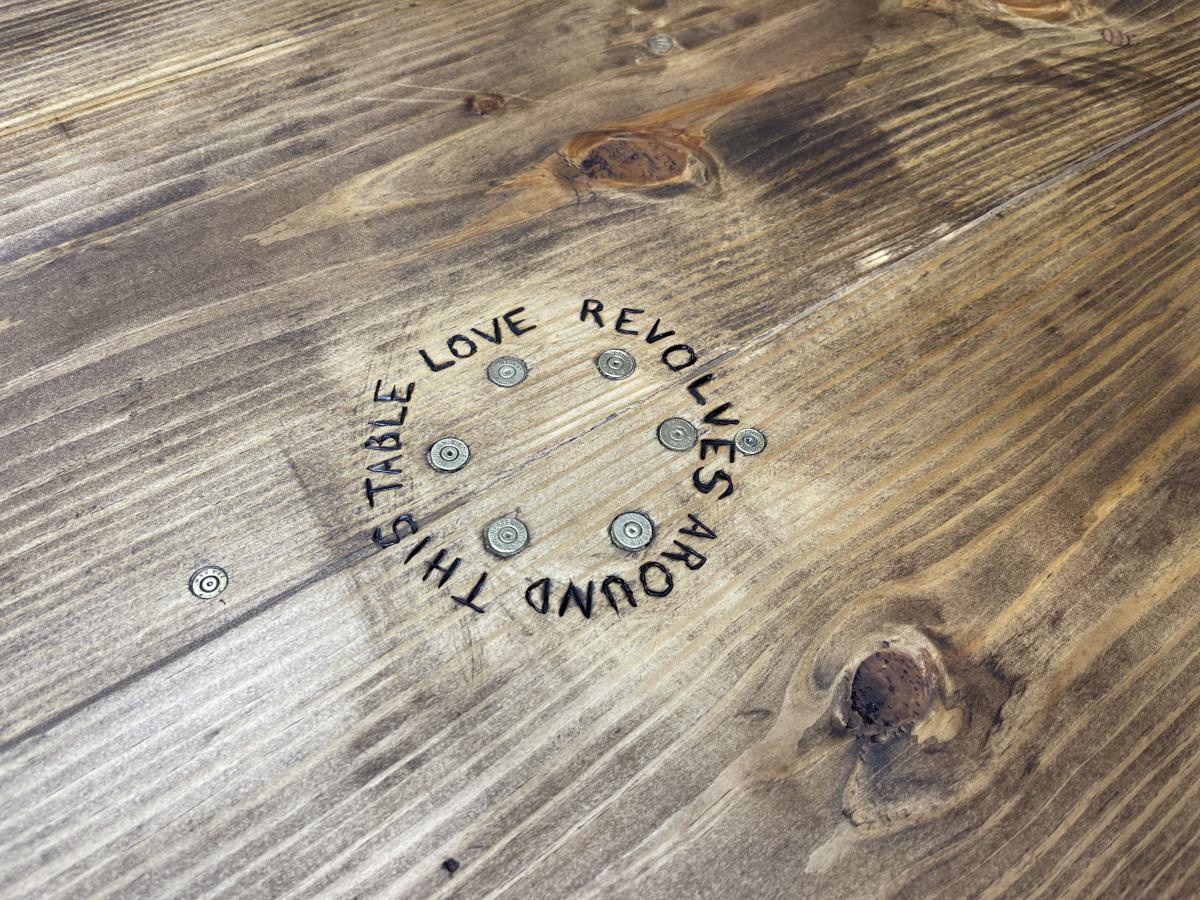
We stuck with th original plans, but instead of making table ends, we did full 2x10x8 boards and capped it with 1/3’s. We filled in the gaps in the wood with stainable wood filler. We also used a 1/2@ Forstner bit and recessed the screws and used wooden dowels to cover the screw holes. It gives it a beautiful finish. We also enjoy our pew pews, so we recessed .40, .45, .223, and .22 empty shells into the table. My husband wood burnt a message in the center of the table, then we sealed it all with one step minwax finish in mission oak.
Built from Plan(s)
Comments
Storage Shelf
After replacing that trashed out IKEA dresser with the fire fighter style locker in the boys room I started taking apart said dresser to put out on heavy trash day. It was then I realized that while it wasnt the BEST materials, the top and sides were actually not all that bad. As it was the piece was too wide for the space I was looking to fill, so I did a little trim of the top, replaced the supports and framing and rebuilt this into a shelving unit.
I bought a couple 1x2s to frame shelf supports and actually used the base of the drawers as a shelf.
My neighbor across the street is a DJ and has about 100 million plastic crates in his garage that he is getting rid of (they used to hold his vinyl). So I took a few and have been finding uses for them. I spray painted 2 of them red and used them as the basis for where to attach the shelves.
I also had a couple of other baskets for toys that were just the right size for the small top shelf. I just need to go back and paint those red too.
Estimated Cost
just a couple bucks for those 1x2s
Estimated Time Investment
Afternoon Project (3-6 Hours)
Recommended Skill Level
Beginner
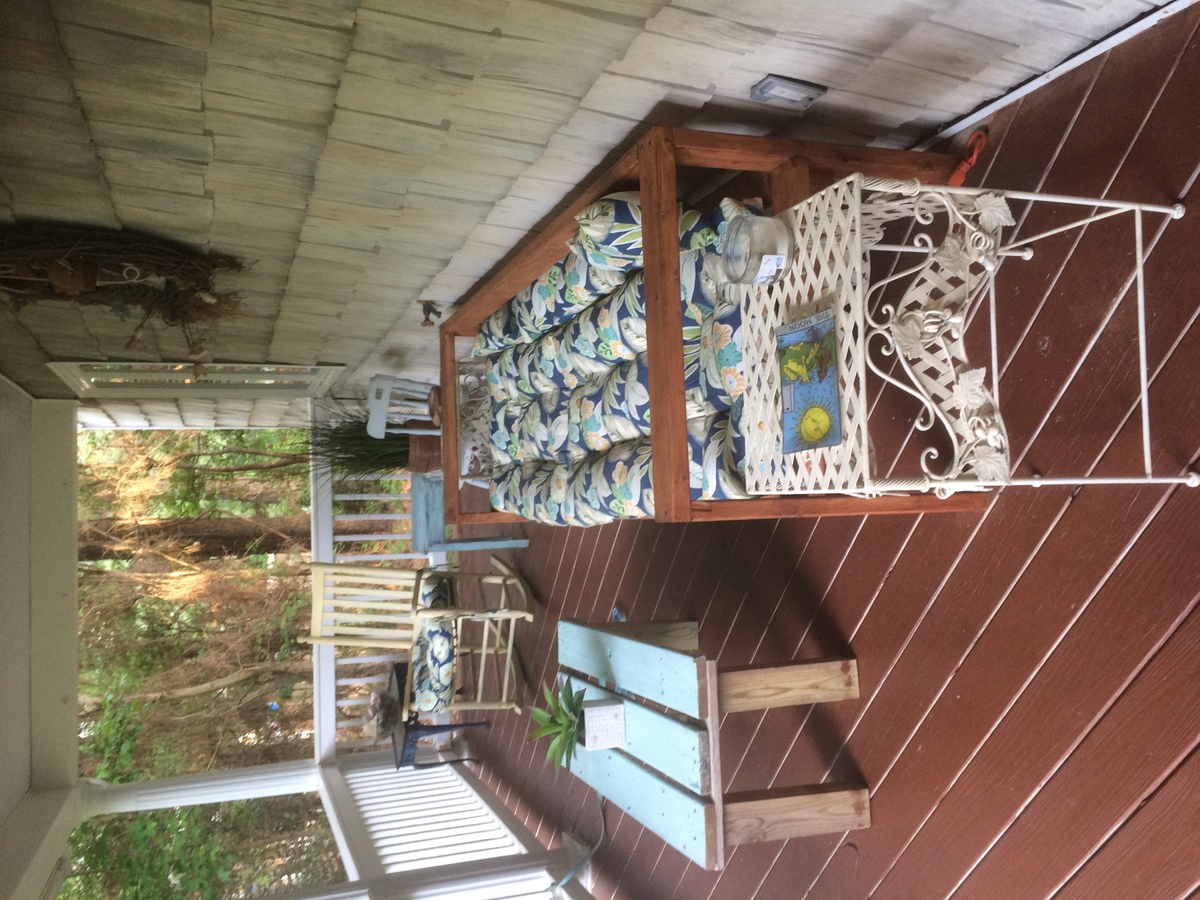
Bench
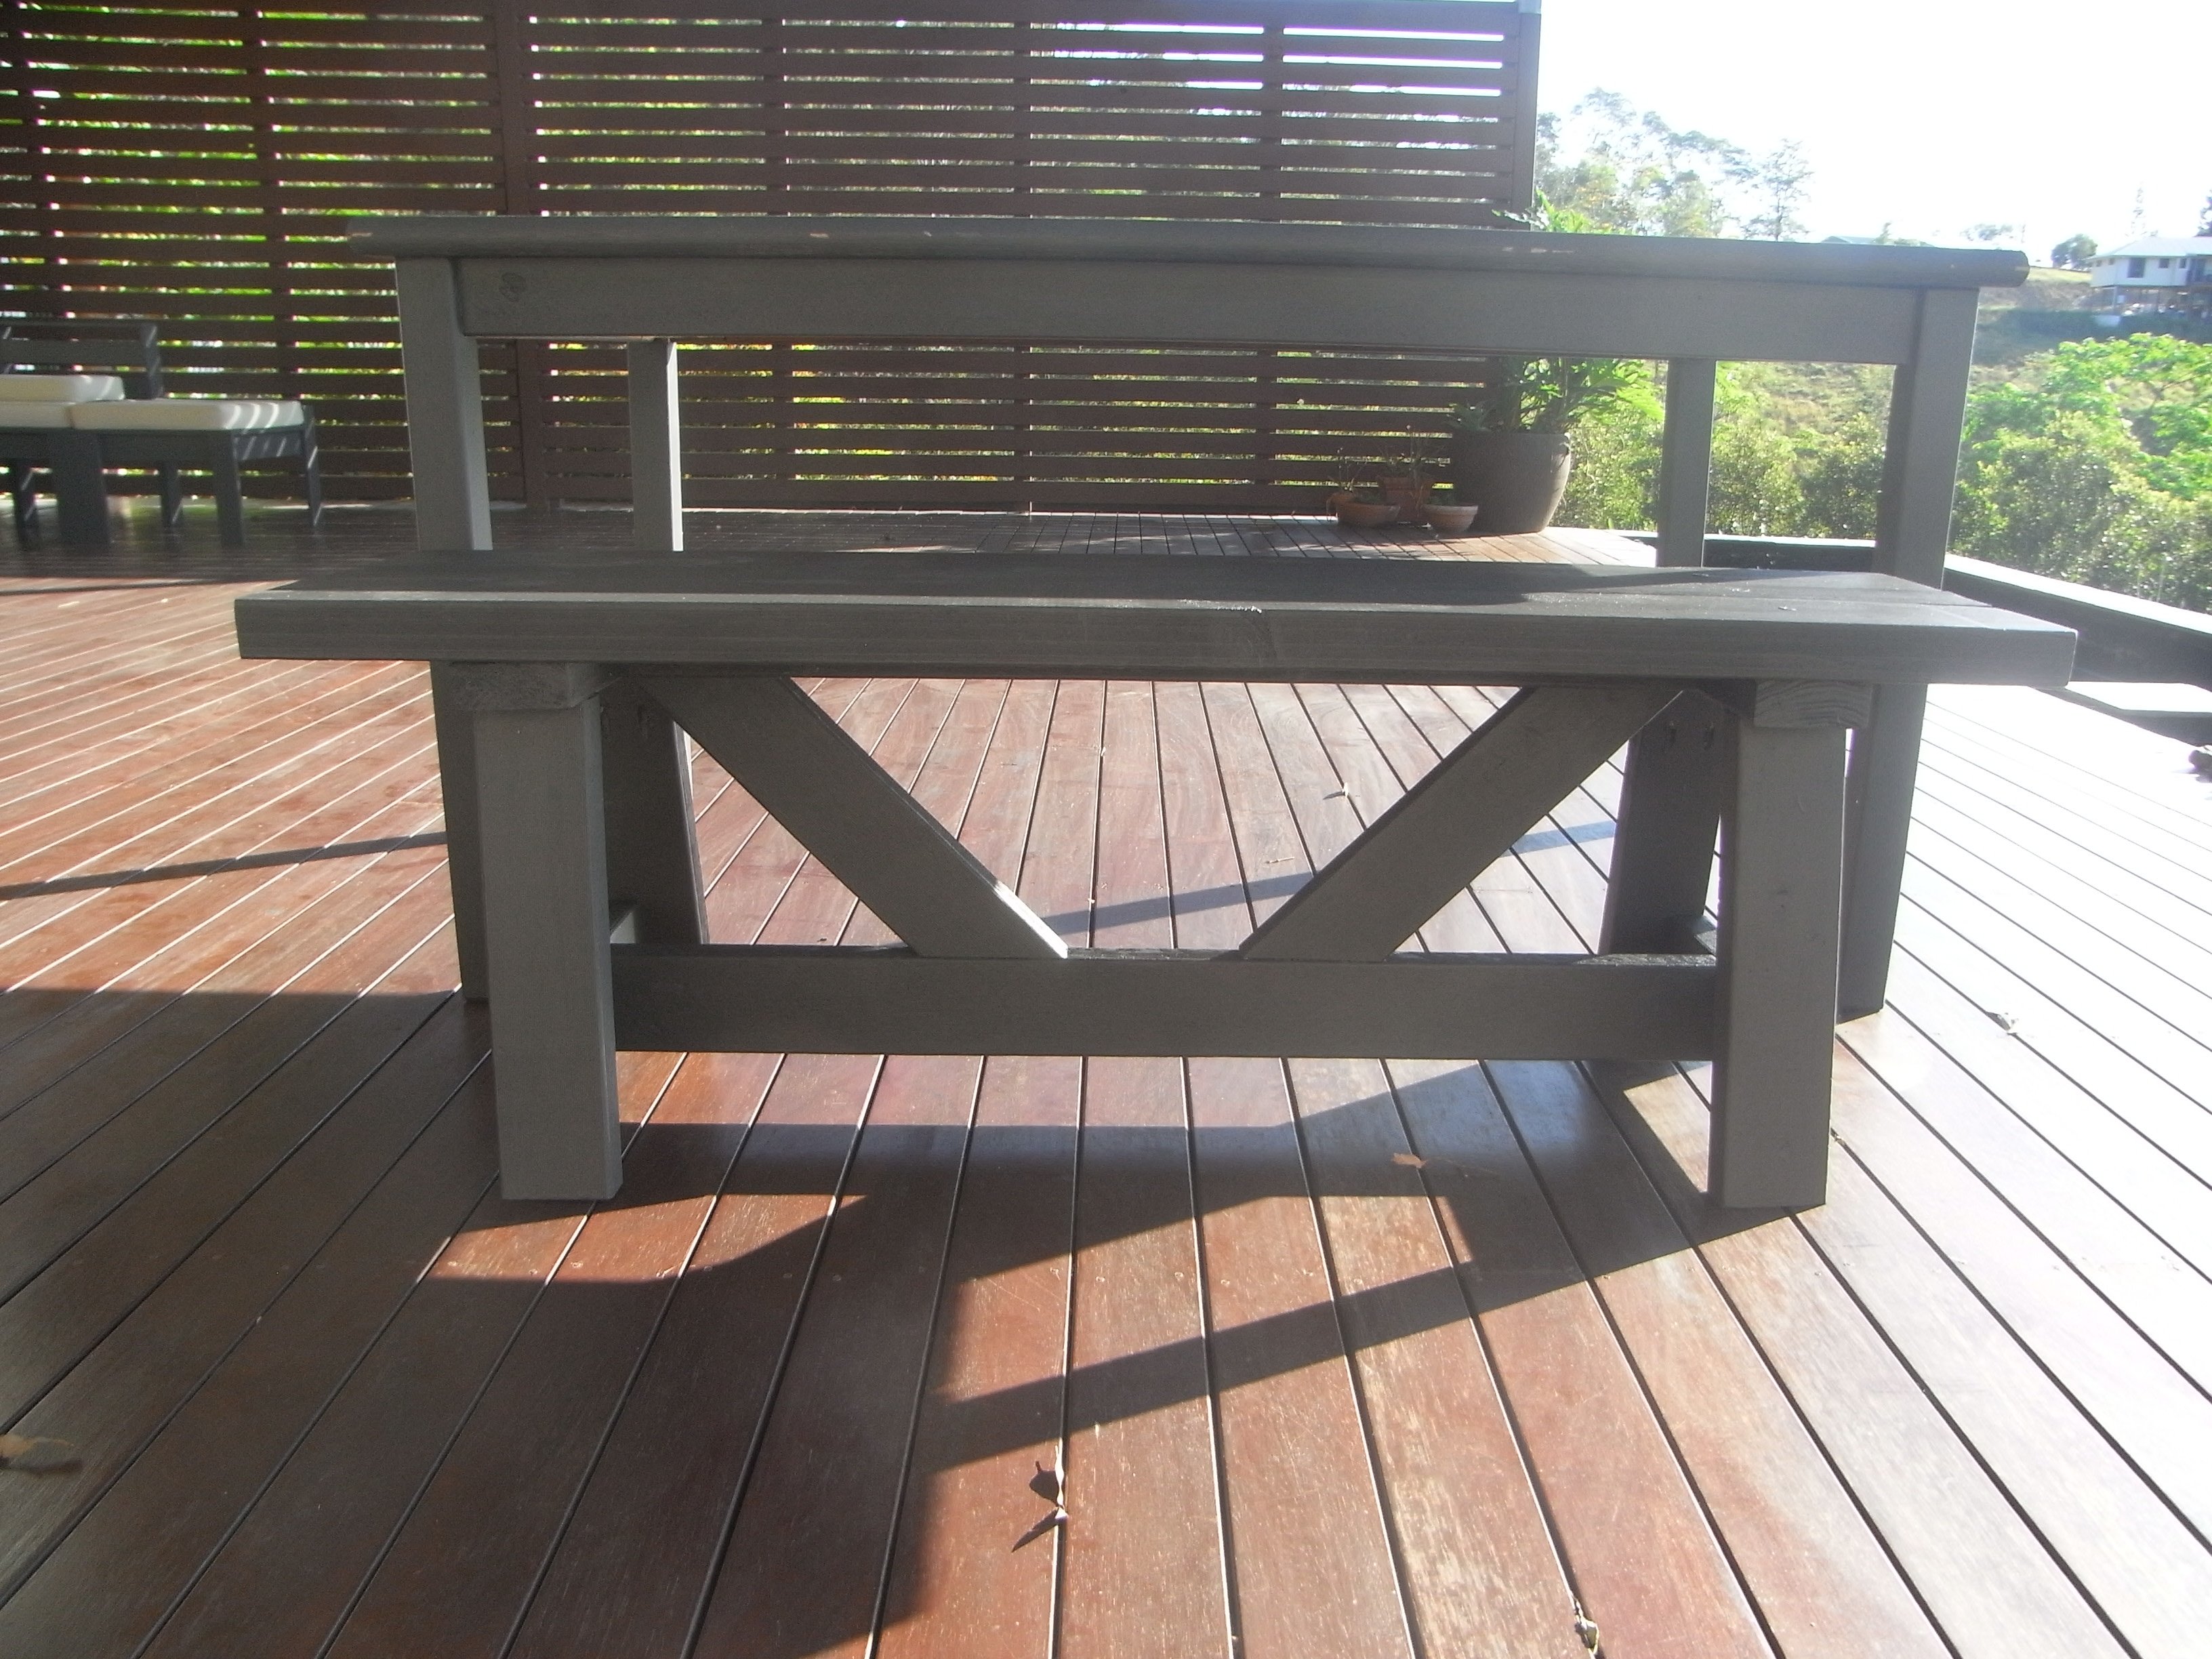
Love this bench, you can fit lots of kids on it and it is very sturdy.
Built from Plan(s)
Estimated Cost
$0
Estimated Time Investment
An Hour or Two (0-2 Hours)
Finish Used
Left over treated pine framing timber from our garage construction.
Recommended Skill Level
Intermediate
CA King Farmhouse Bed
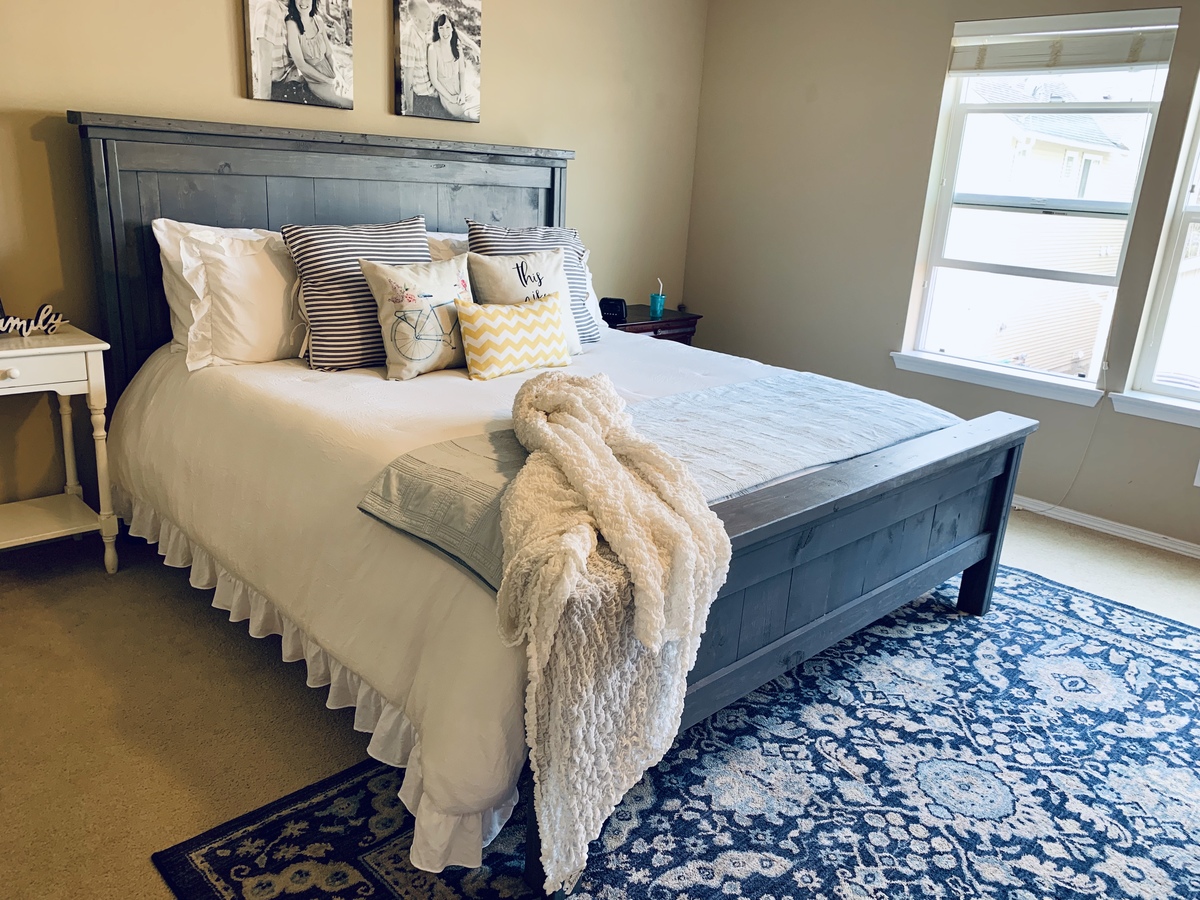
This was my husband's 3rd or 4th Ana White project. We also had to go back for mre wood as the shopping list was not complete.
Estimated Cost
$350
Estimated Time Investment
Week Long Project (20 Hours or More)
Recommended Skill Level
Intermediate
Comments
Mon, 05/13/2019 - 15:53
farmhouse bed
This is gorgeous, can you share what you had to go back for? Also, what is the finish?
Barnwood Electric Fireplace Surround
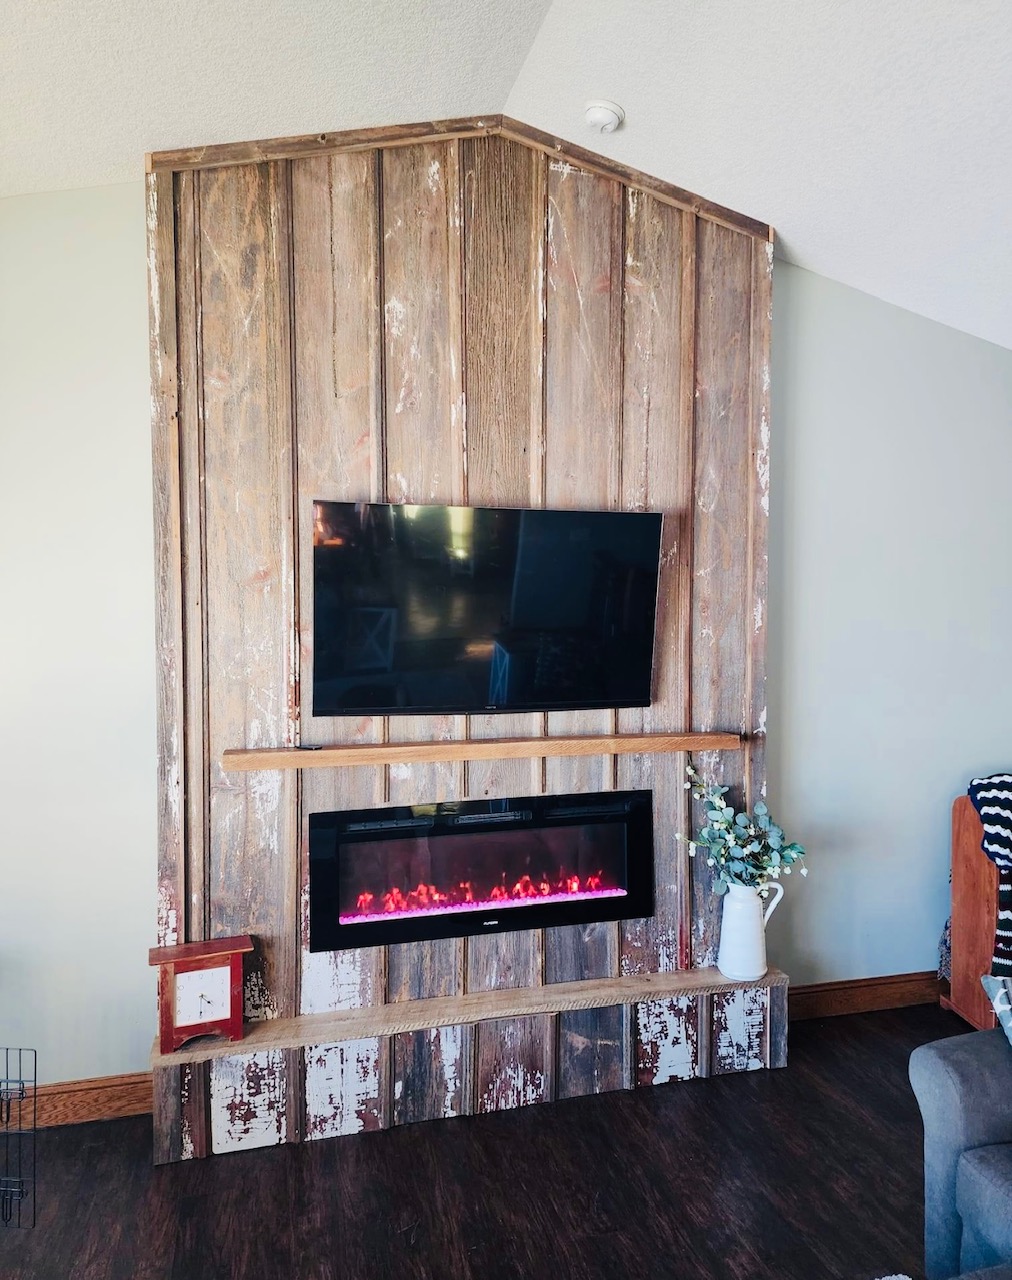
Gorgeous Barnwood Fireplace Surround by Scott Snyder
Built from Plan(s)
6 Cube Bookcase
We are redoing our almost 3 year old girls room to a big girl room and we started with this! The Bed is almost finished and I can't wait to share it! I think adding the moulding to the top makes it look very pretty and professional. Our other two rooms have real PBK furniture in it but I honestly think this is going to look better!
Built from Plan(s)
Estimated Time Investment
Afternoon Project (3-6 Hours)
Finish Used
White Paint
Recommended Skill Level
Beginner
Comments
Tue, 02/07/2012 - 06:15
Beautiful!
This will look just perfect in my kid's room. I can't wait to try it out. Going to my local Lowe's in 30 minutes.
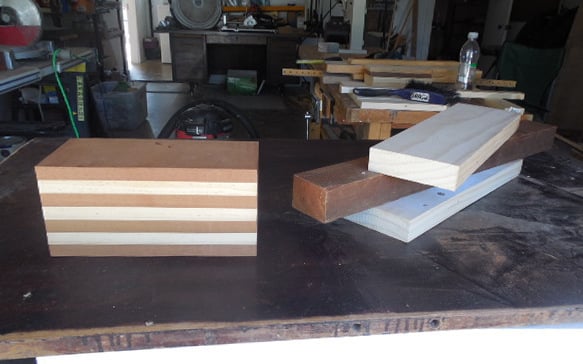
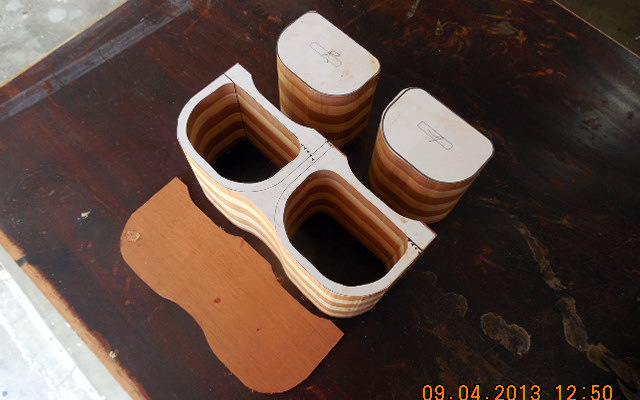
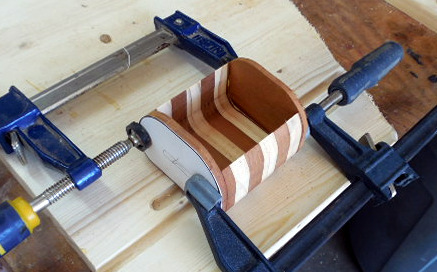
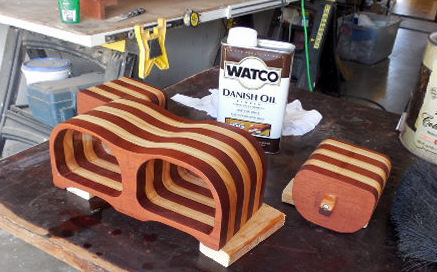
The Bandsaw and Boxes Go Together

I just wish to point new bandsaw users toward trying to make bandsaw boxes as a way to really learn blade differences, tensioning, cutting curves, setting up the bandsaw and generally getting comfortable with your new tool.
The fun thing about bandsaw boxes is you can just almost cut free form and still have a great result. From start to finish it takes about two days some of which is just waiting and sanding.

Estimated Time Investment
Weekend Project (10-20 Hours)
Finish Used
I use Danish oil but you can use what you want except I would shy away from paint.
Recommended Skill Level
Beginner
Comments
Fri, 10/18/2013 - 16:31
Very nice
I love the boxes, Jake. I did have an inexpensive band saw and I tried using it to make small boxes similar to yours. The saw scared me to death - when the blade came flying off I put everything back in the box and returned it! I'd like to, someday, try again.
Fri, 10/18/2013 - 18:14
Bandsaws are Safe
I have only had my bandsaw about 6 months and in that time I have had two blades break and occasionally slip off the wheels. Bandsaws are considered to be one of the safest power saws you can use so don't be afraid but know where the off switch is if something happens. You just need to experiment with proper setup including the placement of guiding blocks or bearings, blade tension, and blade choice. Also a 3/16" blade can make a very tight turn where it would be foolish to try it with a 1/4" blade. I like a 3/16", 4 teeth per inch skip tooth. Youtube has many tutorials on how to make a bandsaw box.
Fri, 10/18/2013 - 16:31
Very nice
I love the boxes, Jake. I did have an inexpensive band saw and I tried using it to make small boxes similar to yours. The saw scared me to death - when the blade came flying off I put everything back in the box and returned it! I'd like to, someday, try again.
Fri, 10/18/2013 - 17:04
Awesome project!
These are awesome! My son was looking over my shoulder at these and said, "Mom, you have to comment and tell this guy your son says these things are awesome!" And I agree with him! How did you cut them to fit the drawers? These are so cool, do you have any in-work pictures?
In reply to Awesome project! by JoanneS
Fri, 10/18/2013 - 18:24
Bandsaw Boxes are Easy - Sort of!
Many thanks to your son for recognizing genius. Ha Ha Sure!
Everything fits because every piece is cut from the same block of wood. I want you to go to this link http://www.woodworkingformeremortals.com/2010/05/how-to-make-bandsaw-bo…
I was inspired to try it by Steve Ramsey of Woodworking for Mere Mortals and slowly progressed to what you see in my pics. Search Youtube and you will find a ton of bandsaw box videos.
I am limited to the size because of my small bandsaw but they are really fun to design and build, especially when you mix a variety of wood (including plywood) in your product. For your first box just take a 4x4 of any wood and cut into a 8 or 10 inch length and go from there. If you screw up it hasn't cost too much.
In reply to Awesome project! by JoanneS
Fri, 10/18/2013 - 18:28
Work in Progress Pictures
Yes I did document the building process of one box and I will try to add the pics in the Brag post within a day. I may be limited on the number of pics however.

Fri, 10/18/2013 - 20:37
Thank you, Jake, for
Thank you, Jake, for introducing us to bandsaw boxes! I've seen these for sale at craft shows and always wondered how they were made. They always look so complicatedly intricate. After watching that tutorial I now know that I CAN make them, too!!!! I've had a bandsaw sitting in my barn/workshop for several years and have only used it once. Now I think I'll be using it quite a bit more!