Community Brag Posts

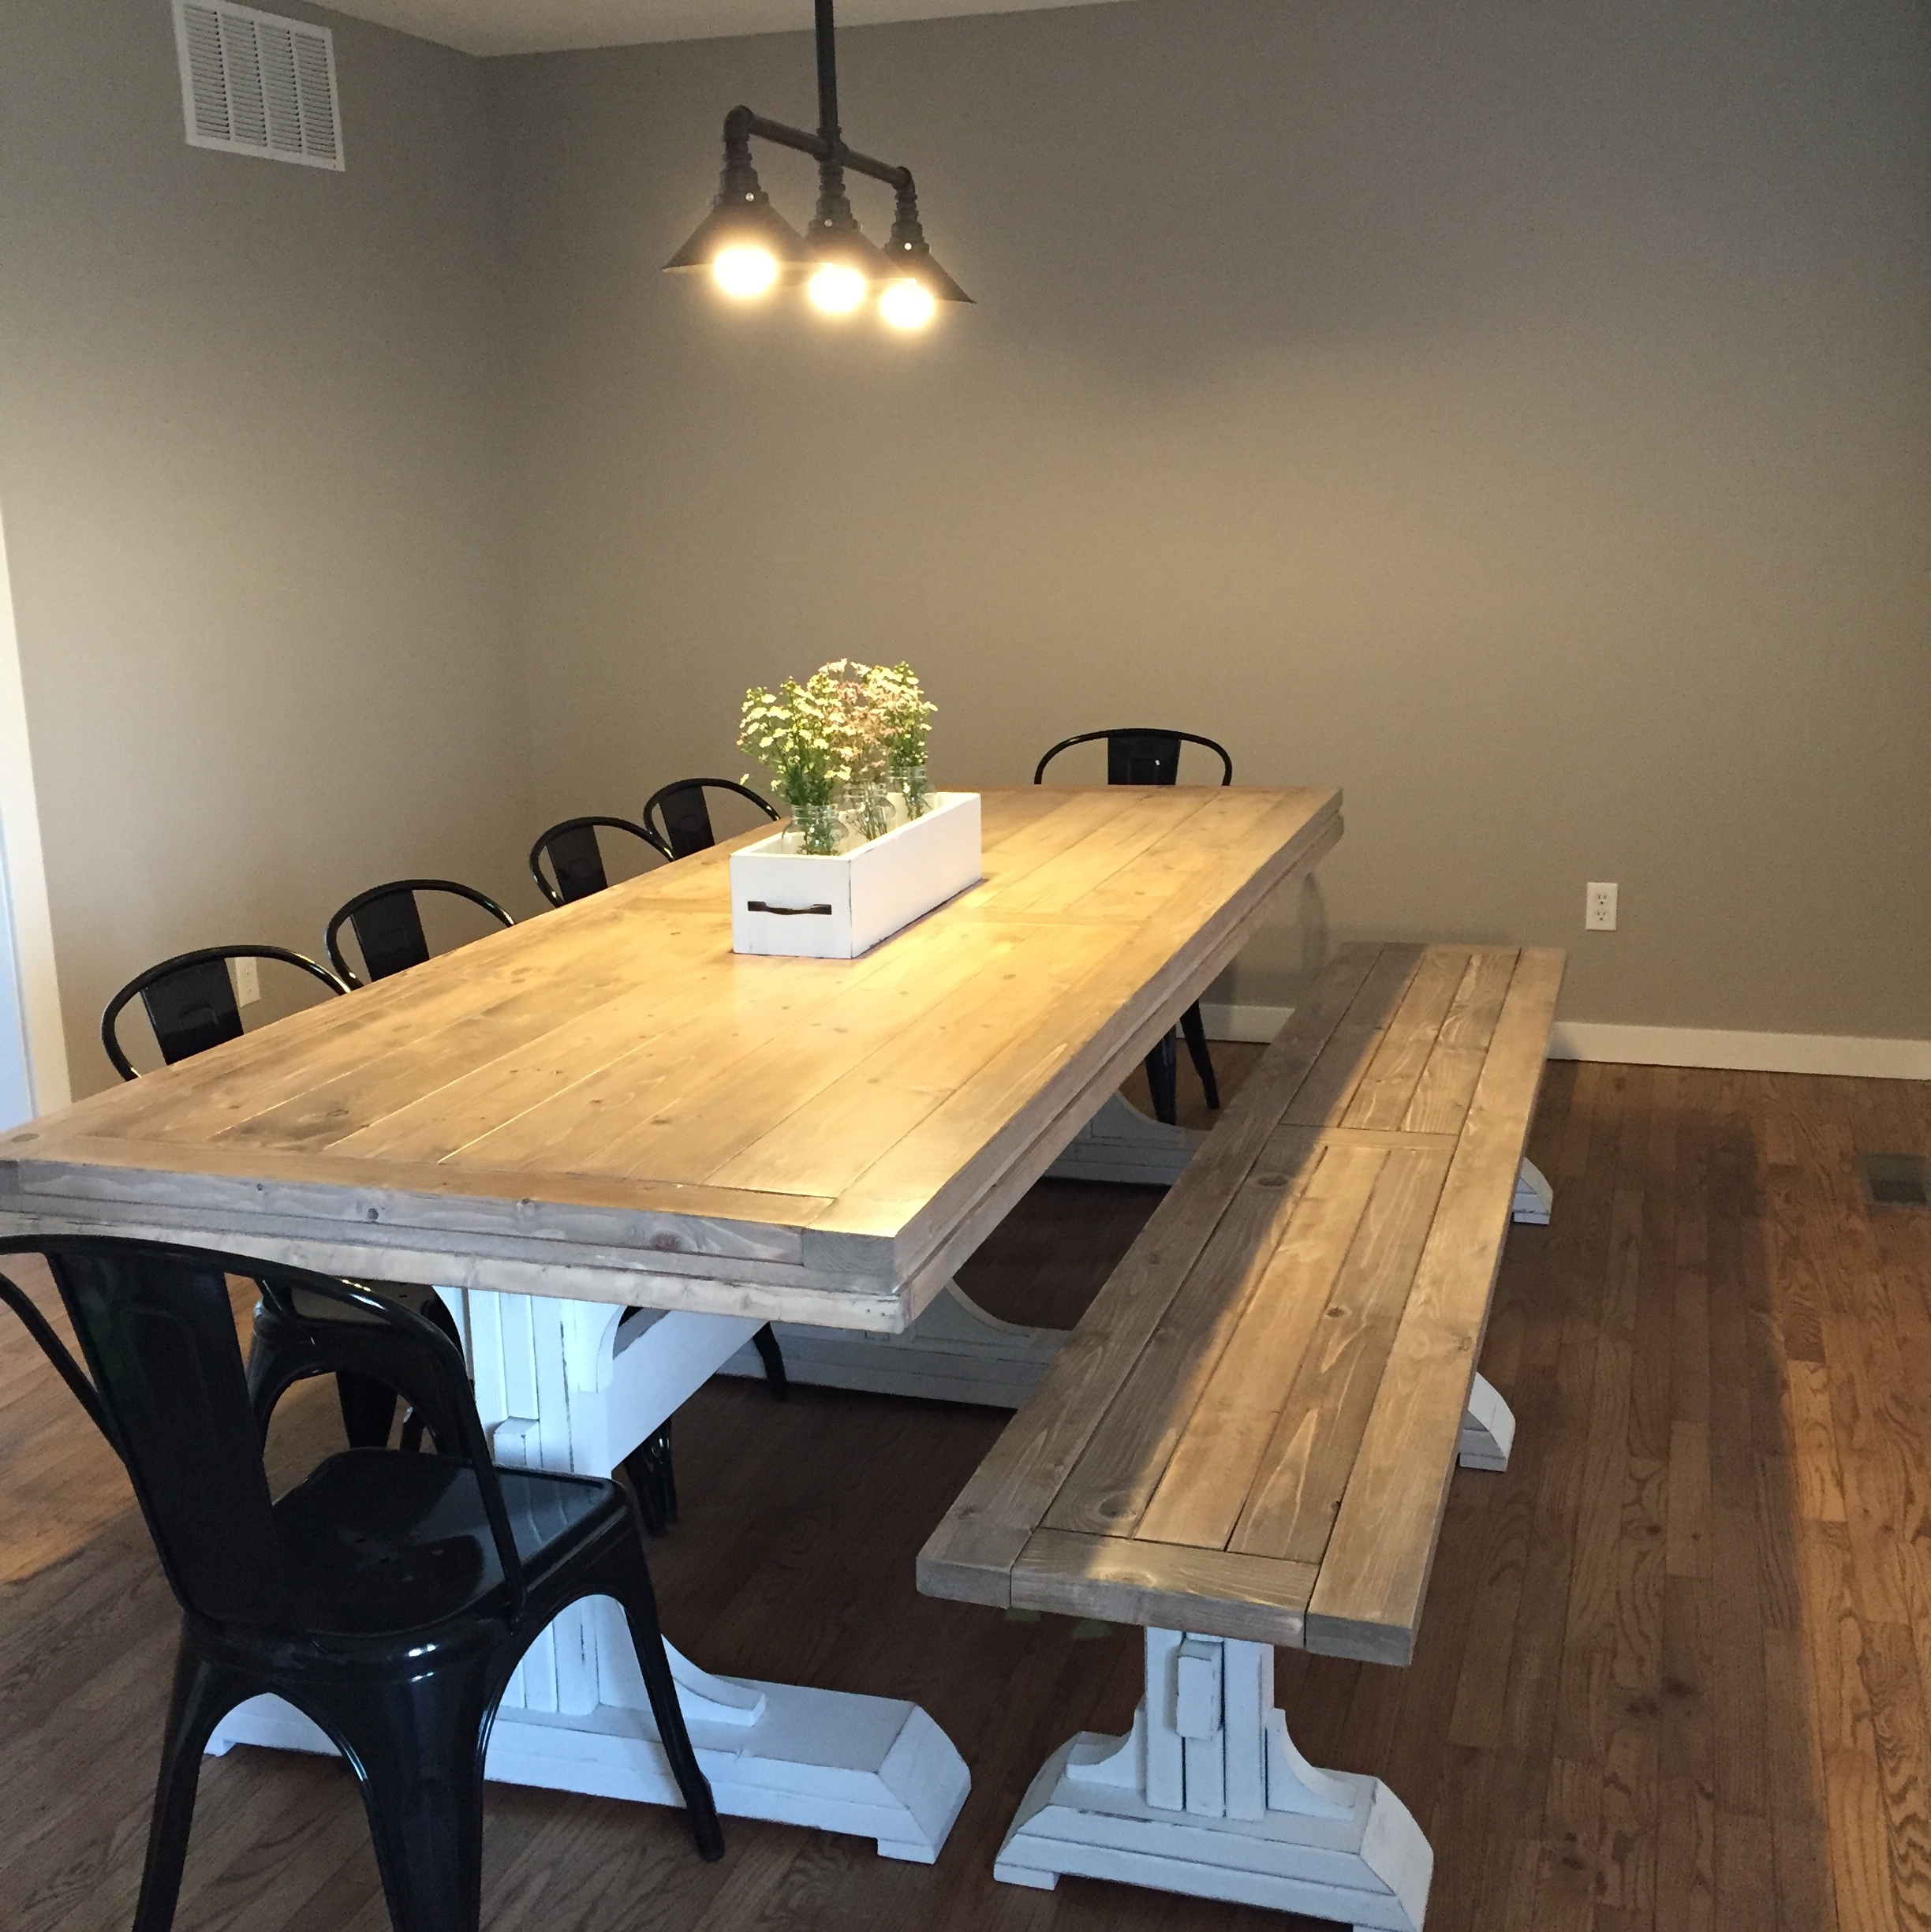
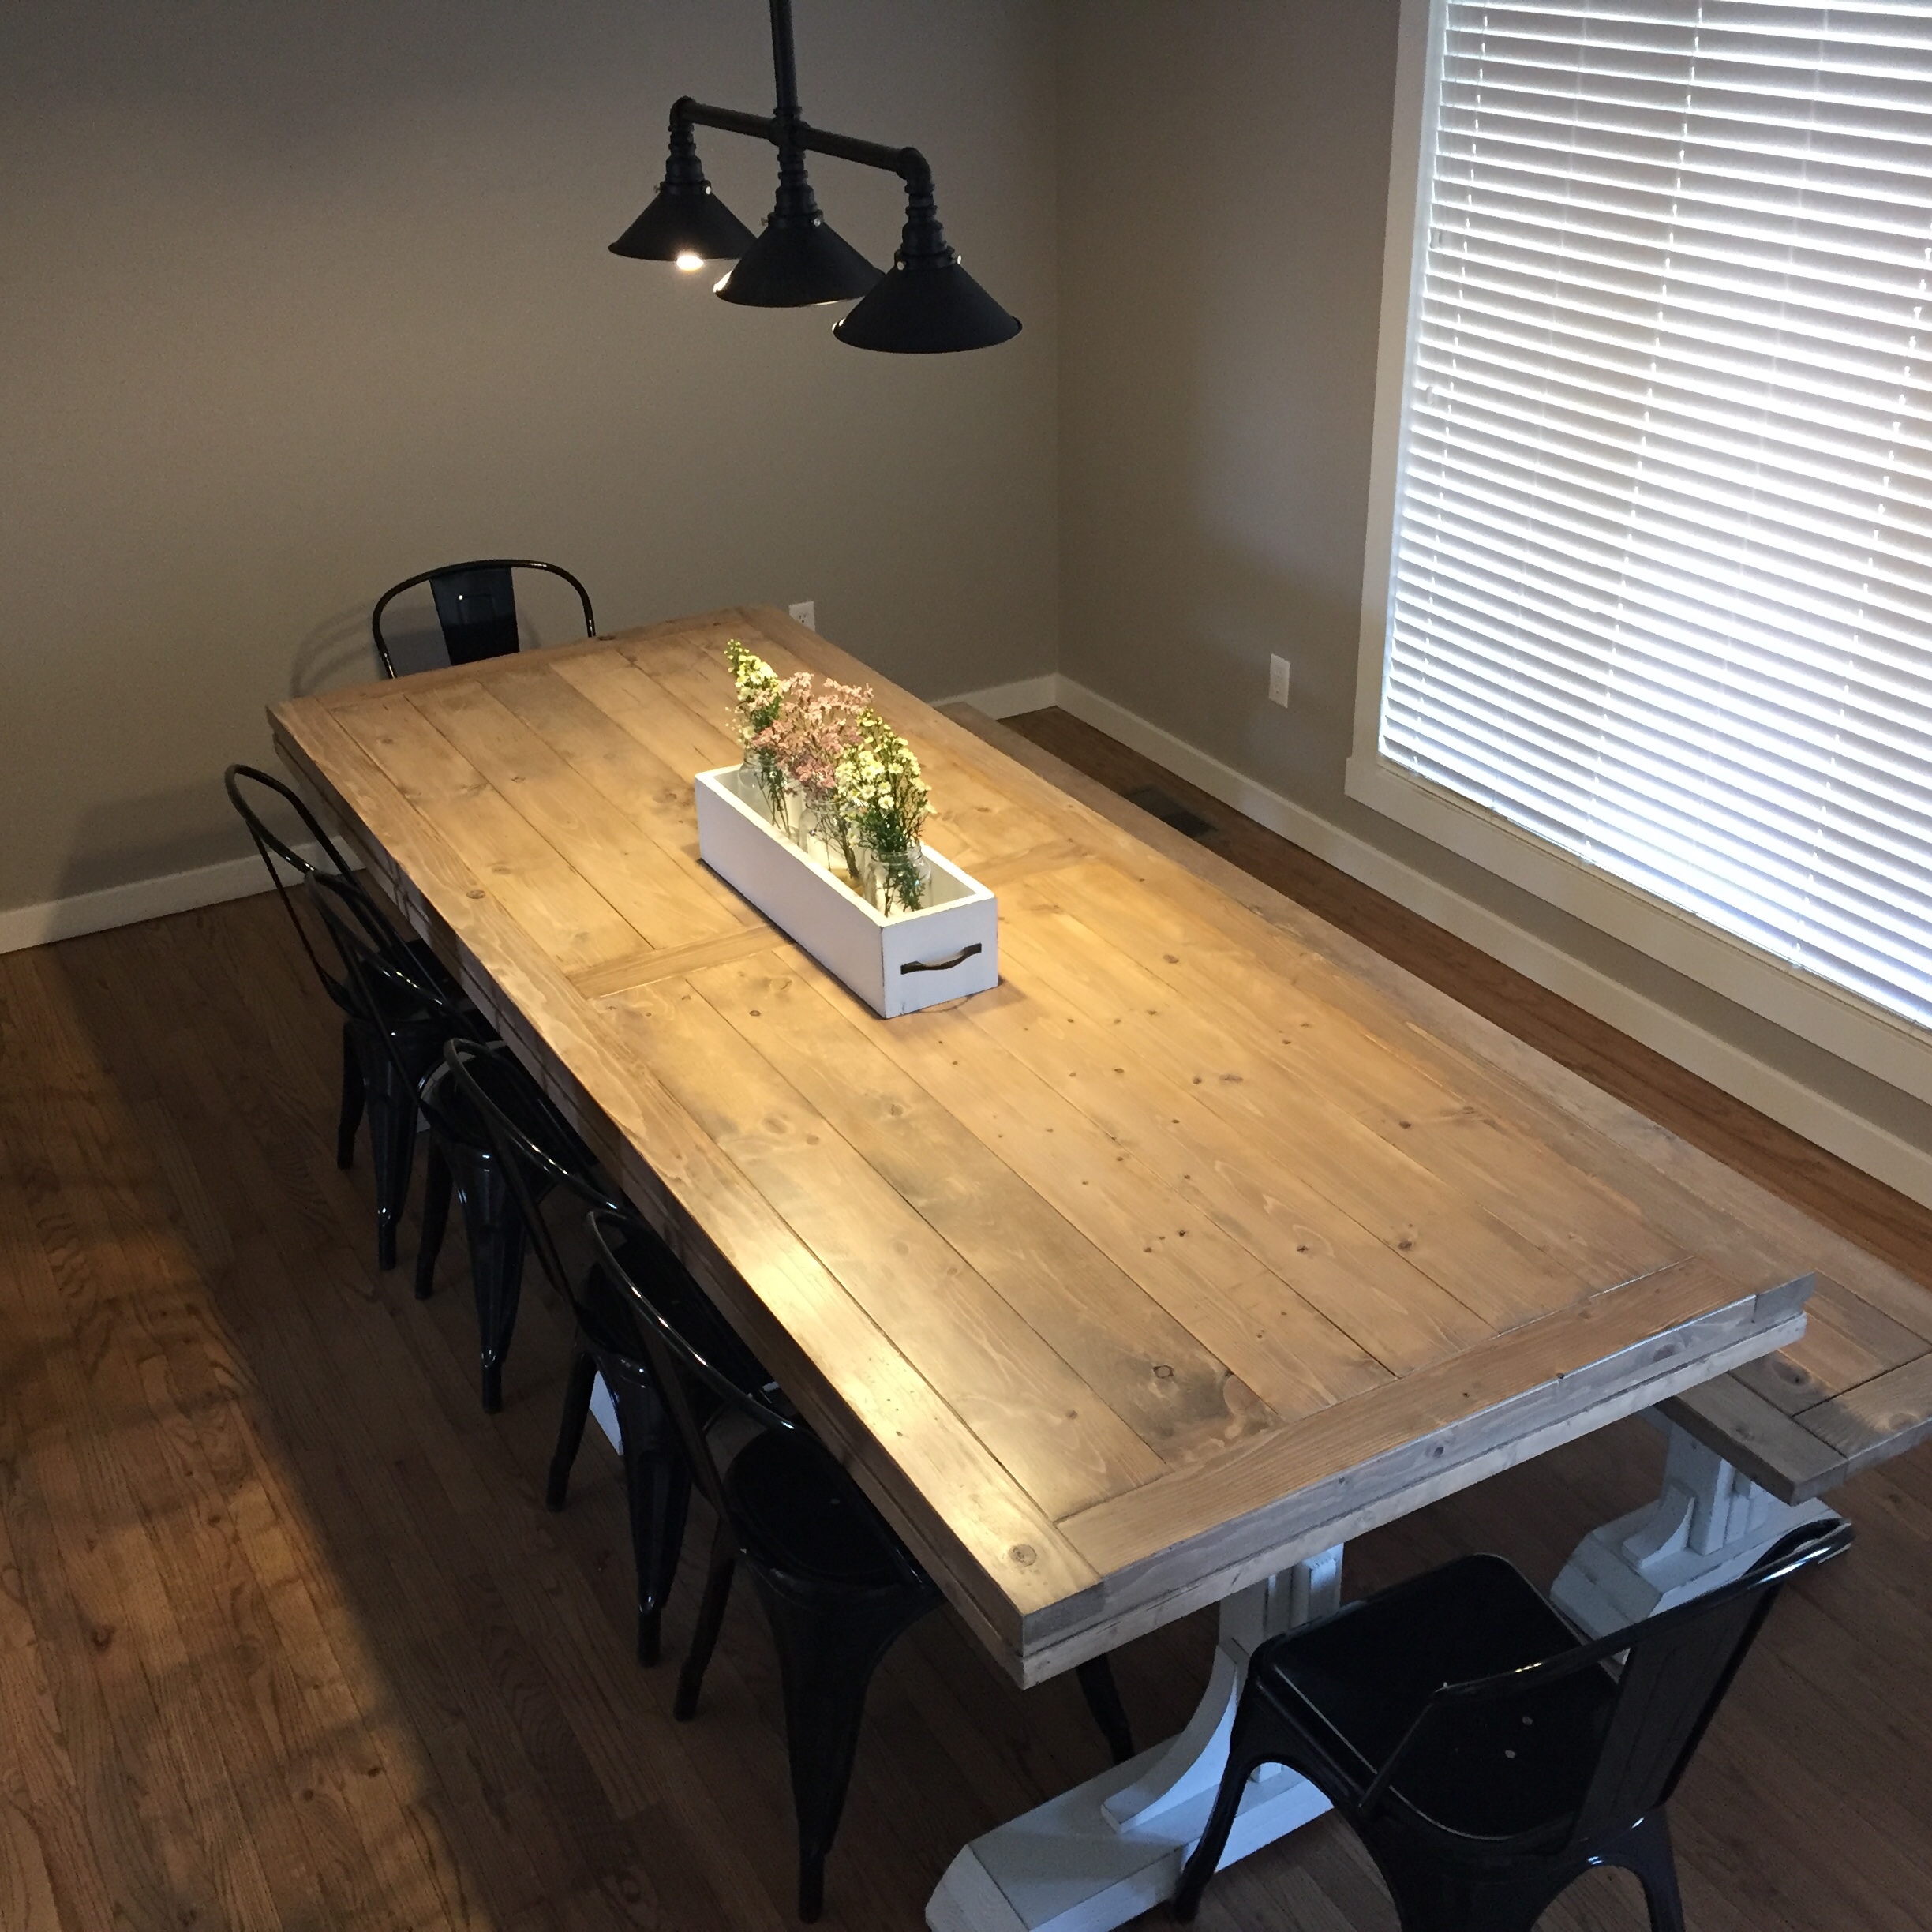
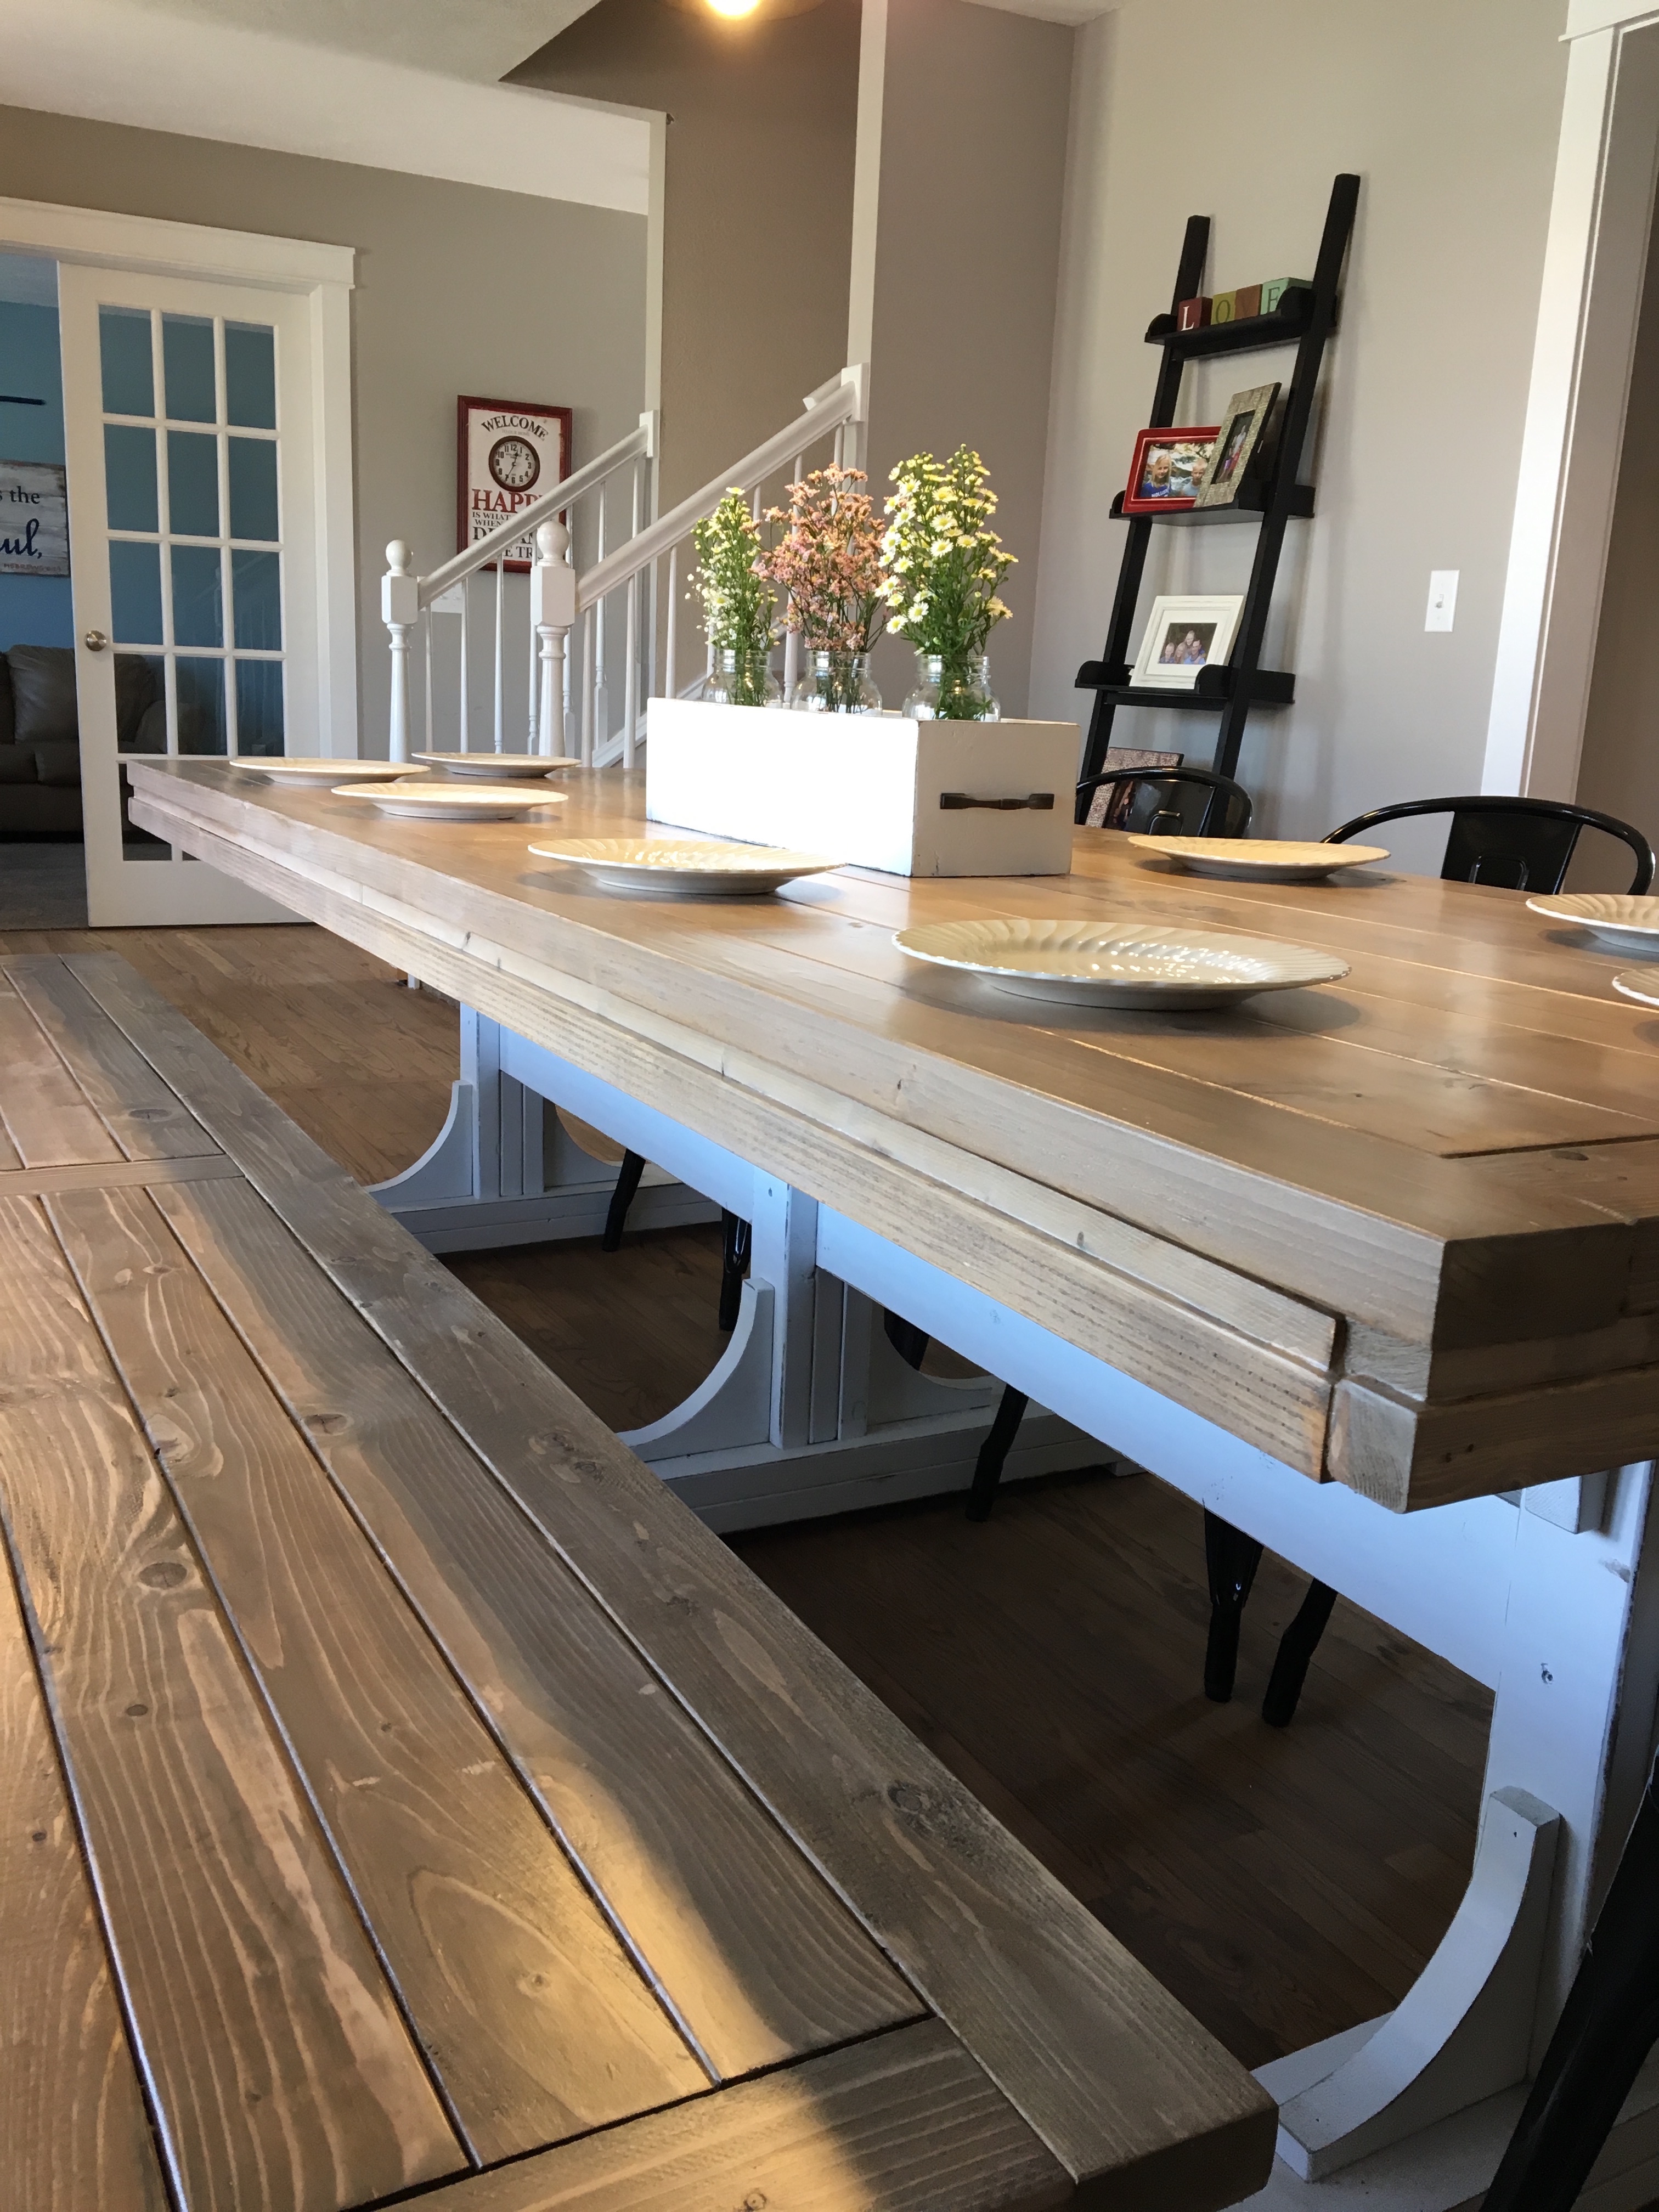
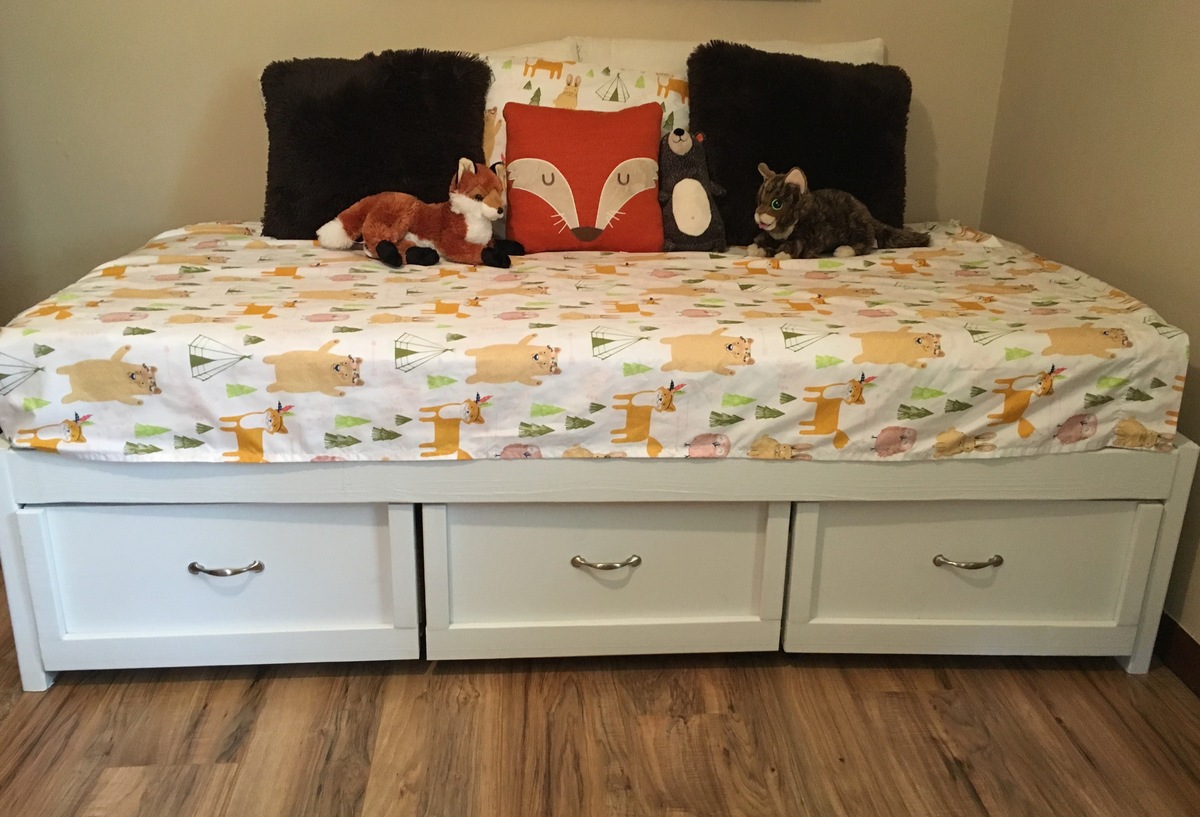
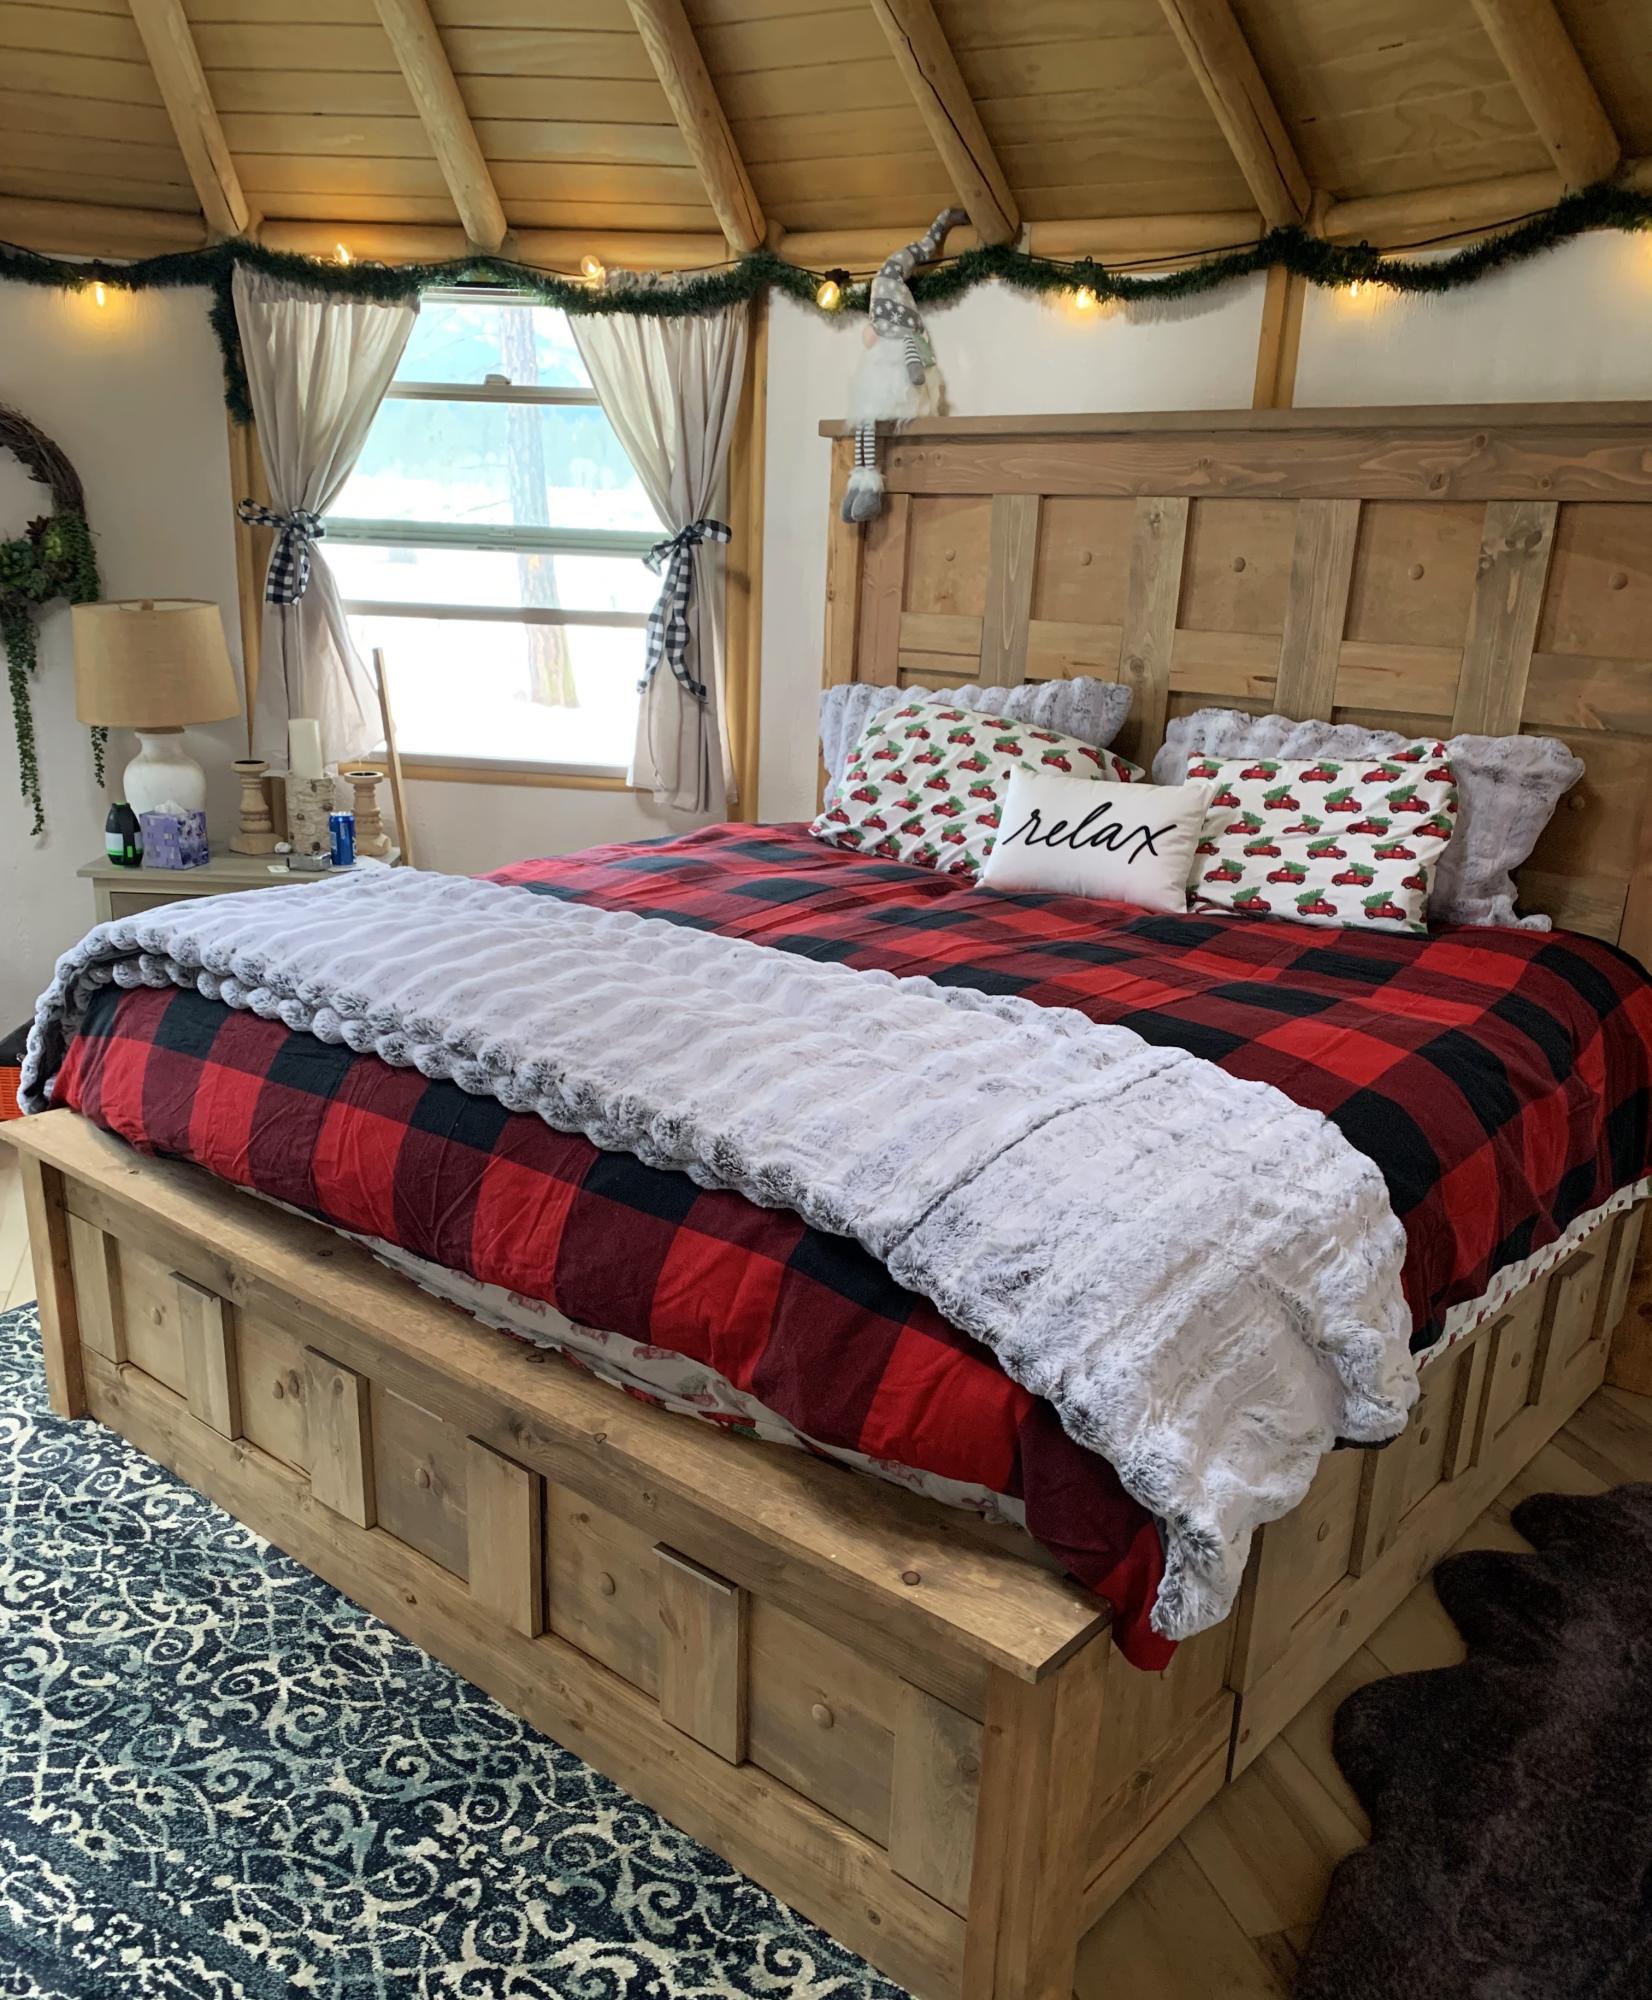
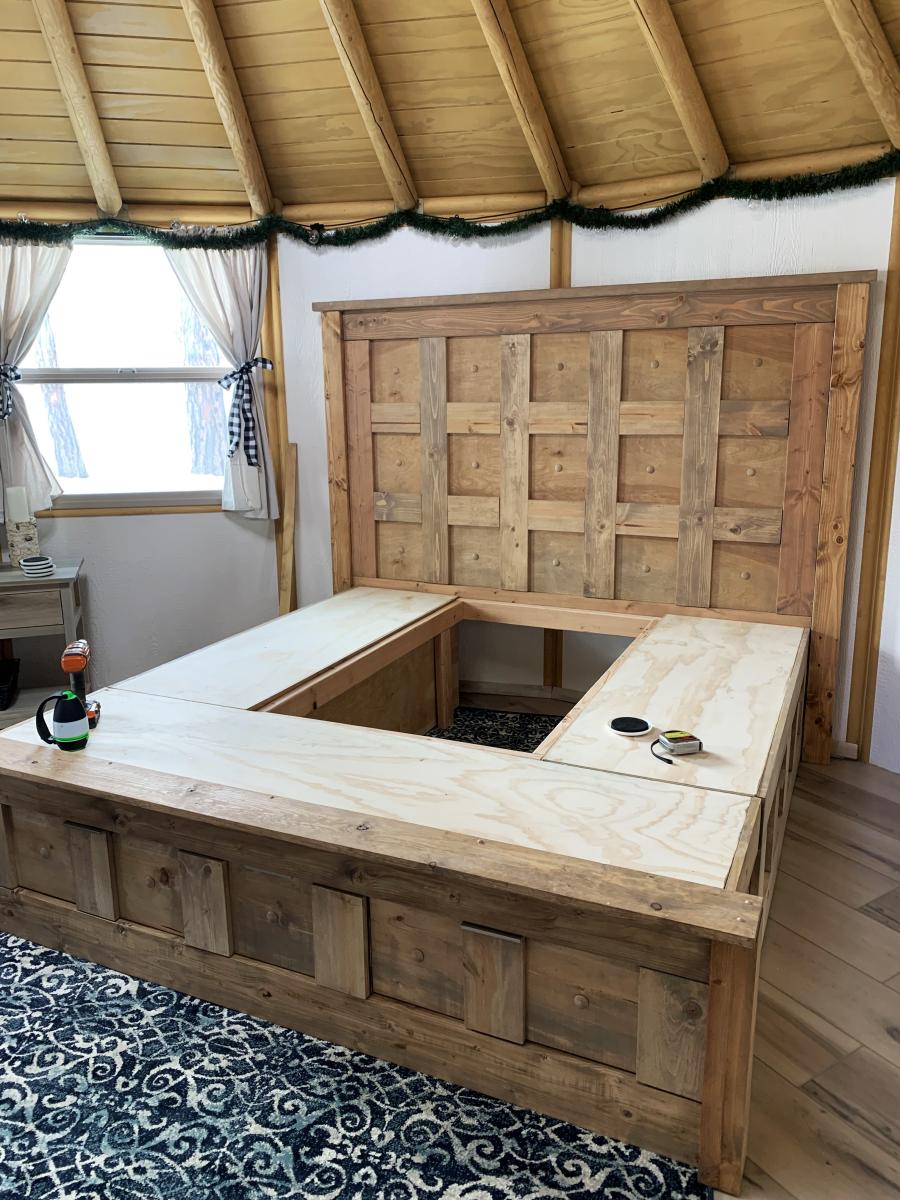
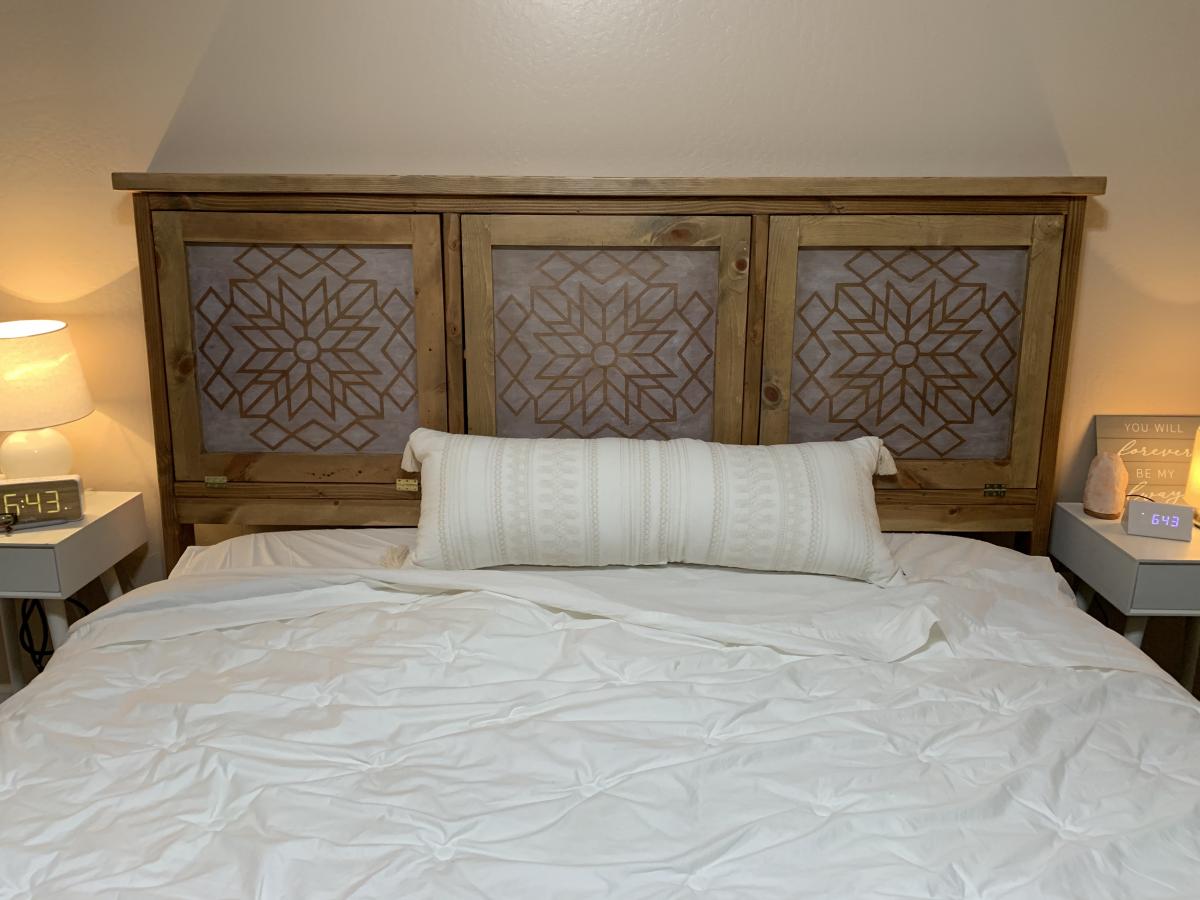
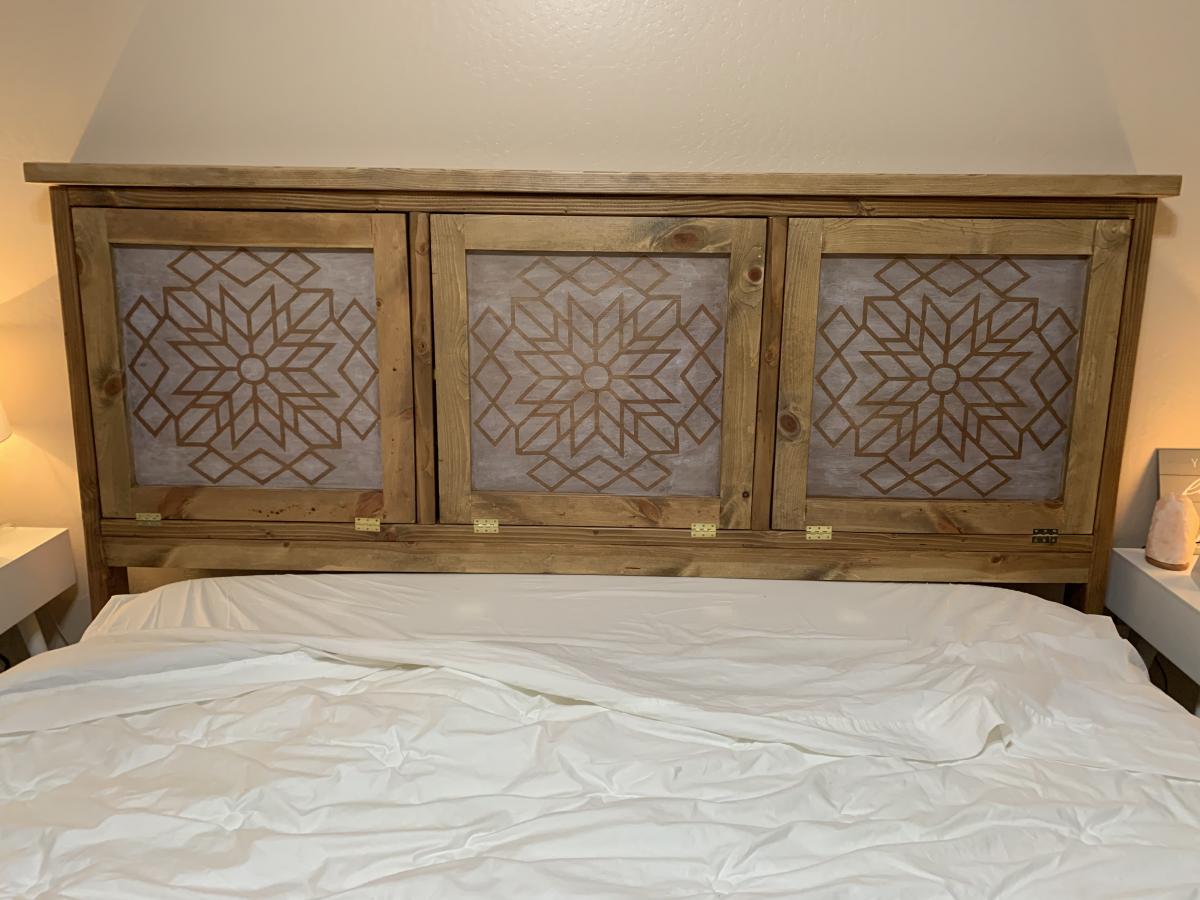
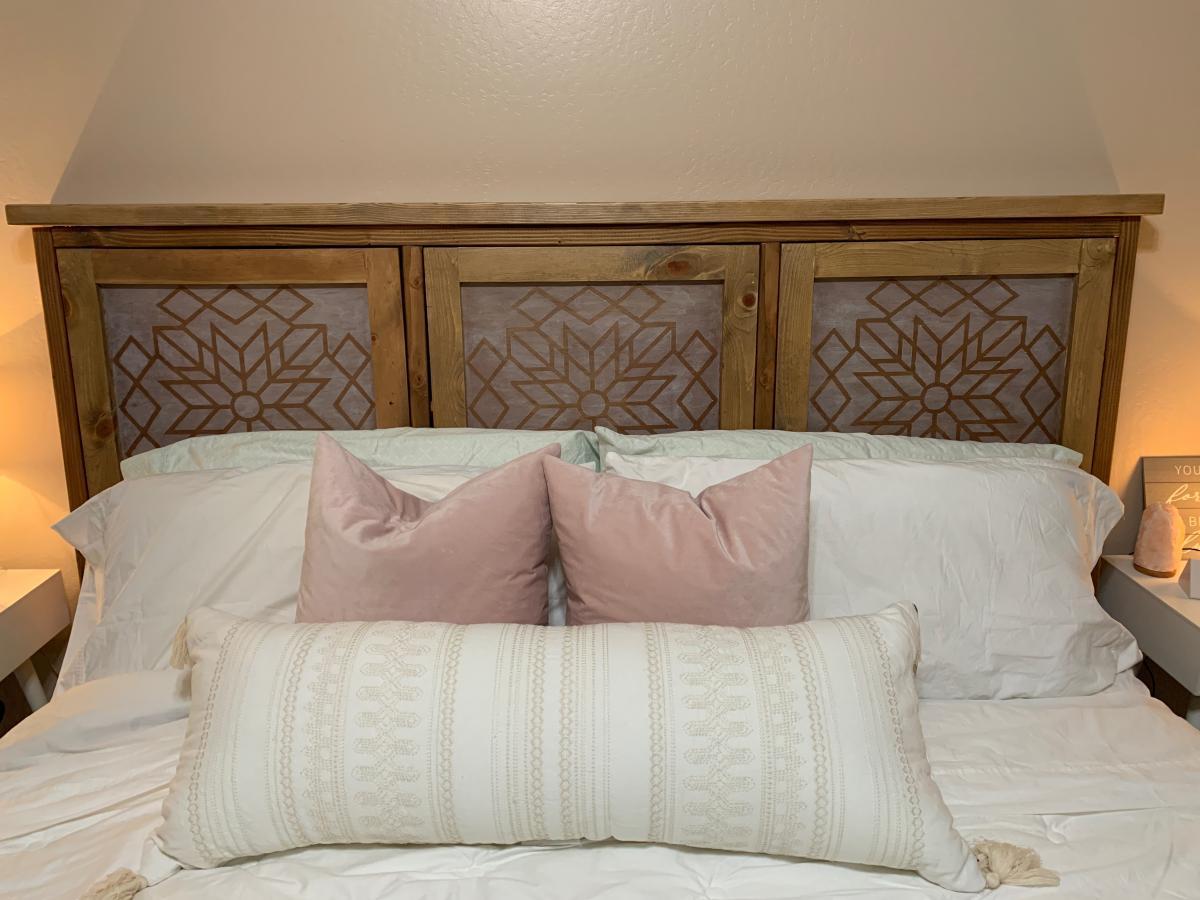
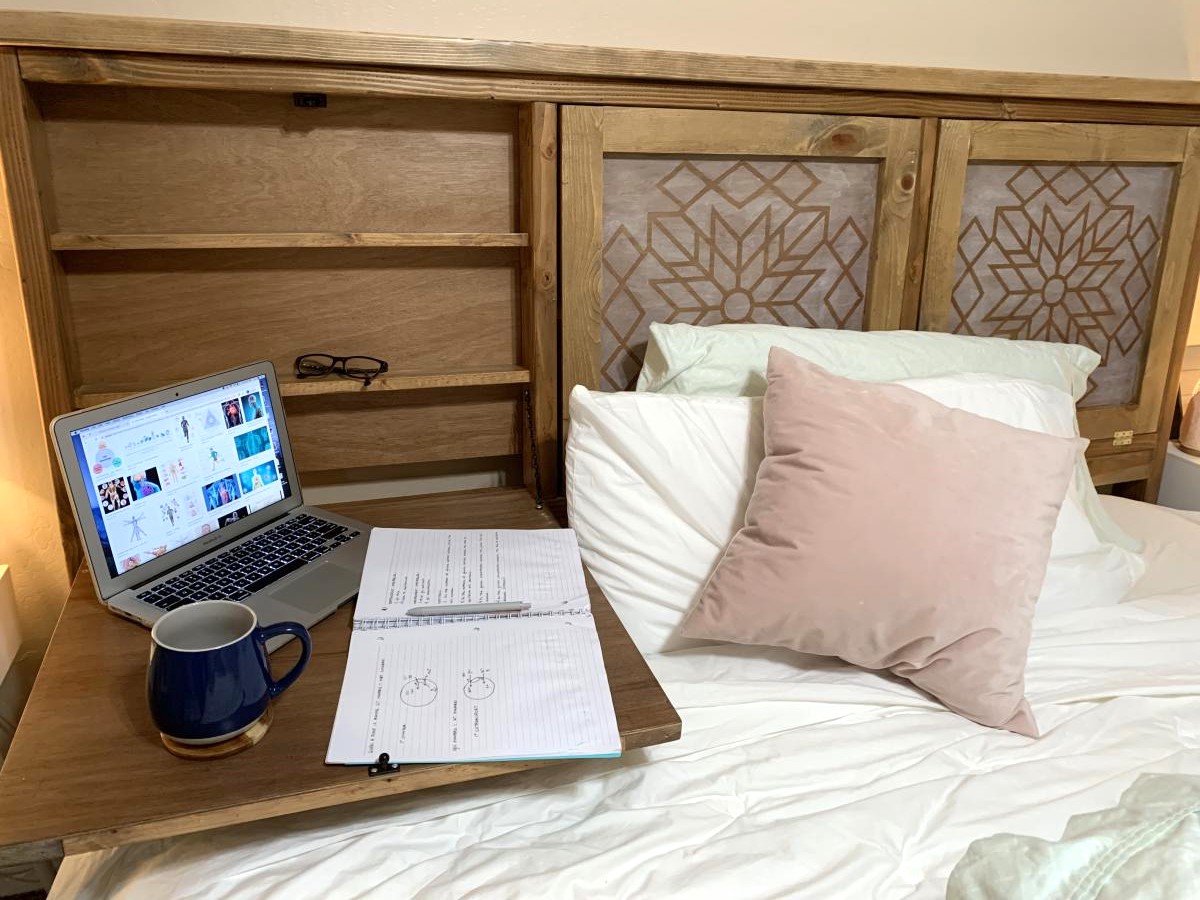
King Size Bed From Ana White's plans

Submitted by Anonymous (not verified) on Mon, 02/10/2020 - 12:19

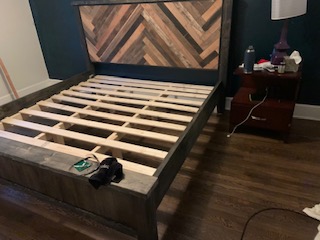
Decided to try out my new tools on making a bed frame. Please note, I have NEVER made anything before, this was my very first project (go big or go home, right?). After a bit of research, I found Ana White's site, and am so thankful. I took the basic plans for a king size bed, but modified them to fit the look I wanted. I found old flooring at Habitat for Humanity and sanded/ stained/ sanded/ stained. I used four different stain colors, but really tried to mix everything up with the colors. The bed frame turned out amazing!

Estimated Cost
$105.00
Estimated Time Investment
Week Long Project (20 Hours or More)
Finish Used
I sanded everything then used 4 different stains. some pieces I used multiple different colors of stains, other pieces I stained then sanded. The darker parts of the frame are grey and black stains.
Recommended Skill Level
Starter Project

Custom Entertainment Console

Submitted by Anonymous (not verified) on Mon, 10/02/2023 - 11:08

5ft Barn Door TV Stand.
I used the Grandy Barn Door Console as inspiration. I made it as 3 separate units and screwed them together. The shelves are adjustable, the bead board back was done on the table saw, the doors are maple with a hickory diagonal centre panel! This is my largest project so far and I have have to thank Ana White for the beautiful plans that you produce. Without you I’m not sure I would have attempted this. I am one proud lady 🥰

Debbie P

Built from Plan(s)

Modified Flat Wall Book Shelves

I modified Ana's plans a little for our own needs. The simplified design feels a little more masculine to me and matches my boys' bunk beds a little better, too. I used pine. The 1 x 2's are select pine, not rustic, because that's all our HD had to offer. I wiped the whole thing down in tea, let it dry and then used a rusty vinegar solution as a stain. Gave it a few coats of varnish and voila! Love the final product. Thanks, Ana, for an incredibly empowering and motivating website. :)

Built from Plan(s)
Estimated Time Investment
Day Project (6-9 Hours)
Finish Used
Strong tea to bring out the tannins. Aged rusty vinegar solution (as per Shanty 2 Chic's instructions) as stain and a diamond varnish to finish.
Recommended Skill Level
Beginner

Comments

Triple Pedestal Table

Submitted by jiles95 on Thu, 05/12/2016 - 07:27

I built this for my wife for Mother's Day 2016!  Also built the centerpiece box.  If you know how to use a miter saw, jig saw, and read a tape measure....then you can build it too!!  It was a lot of fun and very rewarding!!  Took around 25-28 hours to build and finish.  Let me know if you have any questions.  My email is [email protected]

Estimated Cost
$275
Estimated Time Investment
Week Long Project (20 Hours or More)
Finish Used
Legs - one coat of dark walnut minwax, then painted with valspar project perfect satin latex enamel in white (mix of spray paint and brush), distressed
Top - one coat of early american minwax, sanded, then white washed with 1:4 ratio of same valspar white and water. 4-5 coats of poly/crylic minwax clear matte.
Recommended Skill Level
Intermediate

Hall tree

Submitted by Anonymous (not verified) on Sun, 02/16/2020 - 21:38

Hand made hall tree

Estimated Time Investment
Afternoon Project (3-6 Hours)
Recommended Skill Level
Intermediate

Super Simple Farmhouse Coffee Table

Submitted by Anonymous (not verified) on Thu, 10/05/2023 - 16:09

This is my first piece of furniture I've ever made that didn't come in a box ;) The instructions were so clear and easy to follow. I wish I'd had a table saw for the piece of live edge (it had live edge on both sides so I had to make a 6 foot cut with my circular saw that came out not quite perfect, but I am choosing to think of it as adding to the charm. Might go back and add some shine to the top, but for now I'm super happy with it.

emily.rhoades_

Fabric Covered wood Frames

This is a simple and cheap way to decorate any space. Just use some 1x2's to make a square frame. Stretch the fabric over the frame and staple it. You can make one large one or many different sized ones to cover a boring wall.

Estimated Cost
15 depending on fabric and size
Estimated Time Investment
An Hour or Two (0-2 Hours)
Finish Used
Pretty Fabric
Recommended Skill Level
Starter Project

Cute wall shelf for my son's bedroom

Submitted by kristyzed on Sun, 02/16/2014 - 14:10

I saw this plan posted and knew I had to have it for my son's new bedroom. Most of the build was simple, it just got a bit tricky fitting in the angle piece at the top because I wasn't sure how to attach it without having a nail gun. Every time I line it up to nail it in with a hammer it would slip a bit. So I ended up using Gorilla Glue Epoxy to attach it. Since it's not hanging on the wall by the very top shelf, I didn't need it to be rock solid to support any weight, just needed it to stay in place.
I had scrap plywood laying around so it was free for me to make.

Built from Plan(s)
Estimated Cost
30
Estimated Time Investment
Afternoon Project (3-6 Hours)
Finish Used
I applied two coats of Valspar's Heirloom Red and didn't seal it. I wanted a matte finish.
Recommended Skill Level
Beginner

First build using Farmhouse Truss Kitchen Table plans

Submitted by Anonymous (not verified) on Tue, 02/18/2020 - 01:24

I followed the basic plans but added a couple 12x2” metal supports for each breadboard. This was a must. I used Douglas fir for the entire project from Home Depot.

My 2 kids helped me put a few screws in, otherwise I did this myself. The wife really loved it and was a bit surprised coming back from her facial spot on Valentines Day. It turned out better than I could have hoped, especially considering this was my first real woodworking build.

Great plans and nuggets of advice from everyone else made this really fun and not so scary!

Built from Plan(s)
Estimated Cost
$200
Estimated Time Investment
Week Long Project (20 Hours or More)
Finish Used
Used 2 coats of all-purpose primer and 2 coats of classic white indoor paint. For the top, I just used 3 coats of Semi-gloss polyurethane(thinned out with mineral spirits), but I most likely will be adding 2 more and finishing with a satin polyurethane to get extra protection from the kids.
Recommended Skill Level
Beginner

DIY Slat Headboard

Submitted by Anonymous (not verified) on Wed, 10/11/2023 - 10:51

My biggest woodworking project yet. I used espresso gloss stain and polyurethane finish.

Playground-6ea61.firebaseapp.com


Easy Kids' Tent / Reading Nook

I had been wanting to make this for sometime but didn't have the curtains. I was at a friend house and she asked if I wanted the red curtains that she was going to throw them away. So I got to make the tent, her daughters got a cool place to play and the curtains got a new purpose also the tent was made to fold for storage!!!

Thanks Ana for all the plans and ideas you give us!!

Built from Plan(s)
Estimated Cost
$3 for hardware and wood curtains were FREE!!!
Estimated Time Investment
An Hour or Two (0-2 Hours)
Recommended Skill Level
Starter Project

Jasika's (First) Farmhouse Table

This was the first piece of furniture we ever built and it was a big success, although knowing what I know now, I certainly would have done a few things differently. Luckily for me, following Ana's plans don't require a very steep learning curve if you have read The Handbuilt Home! Instead of investing $1500 into the brand new table I wanted from Pottery Barn, I decided to invest that money in power tools, equipment and materials for the table, which I acquired for about $900 (I had no tools in my possession at all so was basically starting from nothing). The price of this table decreases every time I make a new piece of furniture from scratch, and in the year that I began making furniture, I have made the farmhouse bench that accompanies this table, a coffee table, an upholstered vanity seat, a kitchen island, a book shelf, lots of shelves and small tables, and I am currently in the process of making a bathroom vanity for our newly renovated master bathroom. Each project I make from Ana's plans is easier than the one before it, and I continue to feel more confident in the work and in my understanding of how furniture is built. I feel so grateful to Ana for sharing her work and for inspiring so many people, both men and women alike, to reach a bit outside of their comfort zone and develop new hobbies that they never would have imagined having.

Estimated Cost
$115 for materials
Estimated Time Investment
Week Long Project (20 Hours or More)
Finish Used
Can't remember.
Recommended Skill Level
Beginner

Comments

Rustic American Flag

This was a fun build.  I used common board for the the stripes and a left over piece of cabnet grade plywood for the union.  Whole thing is 37 x 19.5.  The stripes are 1.5 wide.  I painted all the pieces then sanded then down to expose the grain and give it a worn look.  Then I took a handheld propane torch to it.  I used small 1 in tin stars which were the most challenging and expensive part of it. I painted them then distressed them with sandpaper.  I attached the stars with super glue.  All in all a fun project.

Estimated Cost
Wood and paint 30
Tin stars 30
Glue 10
Estimated Time Investment
Afternoon Project (3-6 Hours)
Recommended Skill Level
Beginner

Comments

In reply to by trojan24man

Tony Garcia

Fri, 05/20/2016 - 05:49

Thank you. This was a gift for my Fath in Law, I think he is going to put it on his patio.  I added a lip a the top on the back so it can rest on some anchored screws. Depending on where he puts it though I might add a wire across the back so it will hold a little tighter outside with the wind.

Tony Garcia

Fri, 05/20/2016 - 05:46

It was a gift for my Father in Law.  I think he is going to hang it on his patio.  When I built it I added a lip rail along the top so you can rest it on an anchor. If it does go outside I might add a wire across the back so it can catch and won't blow off in high wind.

Clara Table & Chairs

Fun, easy build. This is the first project from this site and the kids loved helping make their own chairs. They got to pick their own color paint - I think I spent more on paint than I did on the wood!

Built from Plan(s)
Recommended Skill Level
Starter Project

Rustic X table

I saw this project and fell in love with it. Ive never done a wood working project before and wanted to do this all on my own so i wouldnt let anyone help just to know if i could do it. It didnt turn out perfect but i CAN NOT stop looking at it. Ana thank you somuch for theses plans!

Estimated Cost
$70
Estimated Time Investment
Weekend Project (10-20 Hours)
Finish Used
I didnt really use a finish just used coffee and vinegar and rubbed a small sbount of orange essential oil on the top to give it a better smell.
Recommended Skill Level
Beginner

Comments

CreativeChaos

Mon, 02/24/2014 - 11:22

Looks amazing! I'm dying to build this also and am nervous about trying out that finish. Where did you get the corner hardware?

kennasmomma

Wed, 04/30/2014 - 20:44

Sorry I got locked out of my account but I got plain silver corner pieces from walmart and spray painted them with a matte black.

Stenciled Fold Down Headboard

Submitted by Jaime04285 on Wed, 02/26/2020 - 11:11

I made the fold down headboard to fit a California King bed and added a design to the panels using my vinyl cutter. The last picture continues to be flipped when I try to post it here sorry.

Estimated Cost
$75.00
Estimated Time Investment
Weekend Project (10-20 Hours)
Finish Used
mixture of stains then a slight white wash followed by a top coat of polyurethane. The designs were cut on my vinyl cutter and stenciled in with a white wash.
Recommended Skill Level
Intermediate

Comments

Back