

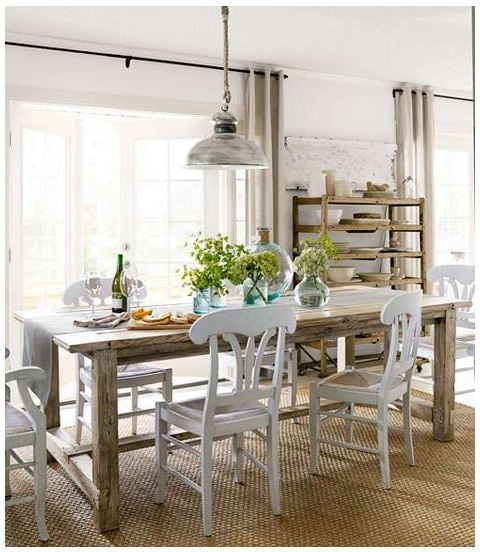
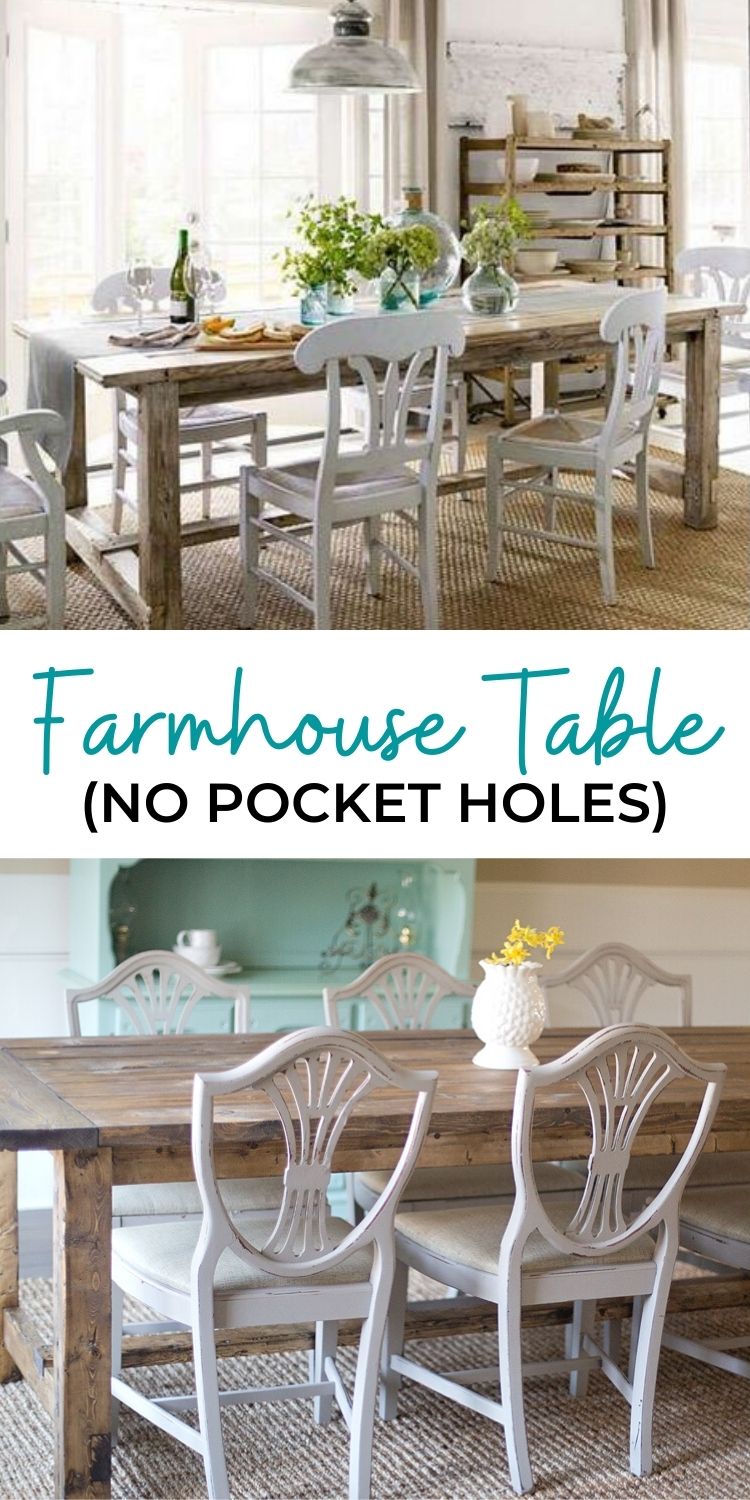
Do you want a farmhouse table, but don't want to spend thousands of dollars? Have you thought about building your own? Check out this free, step by step plan to build your own with basic tools. From Ana-White.com
The Farmhouse Table Story
Beloved for hundreds of years, the Farmhouse Table was usually made by the family that used it, from wood that was locally harvested, using basic tools. Soft woods were easier to use, but the soft wood dents easily, and the tables showed wear, creating that authentic distressed look.
Today, a true farmhouse table is just that - built by hand by the family that uses it, using soft woods, and finished by hand. The tables are meaningful, with each scratch and scuff having a story, each moment creating memory for the family that uses it.
Start your family's Farmhouse Table Story by building your own table, and gathering around it to share a meal, to fold laundry on and do homework on - to create the foundation of your family's home.
The Farmhouse Table Plans
Our Farmhouse Table plans have been built tens of thousands of times and are in homes all over the world. The extremely sturdy, rustic styling is easy to build and authentic to history.
Built out of all off the shelf lumber - builders spend between $50 and $100 making their farmhouse tables.
You just need a saw and a drill to make this farm table.
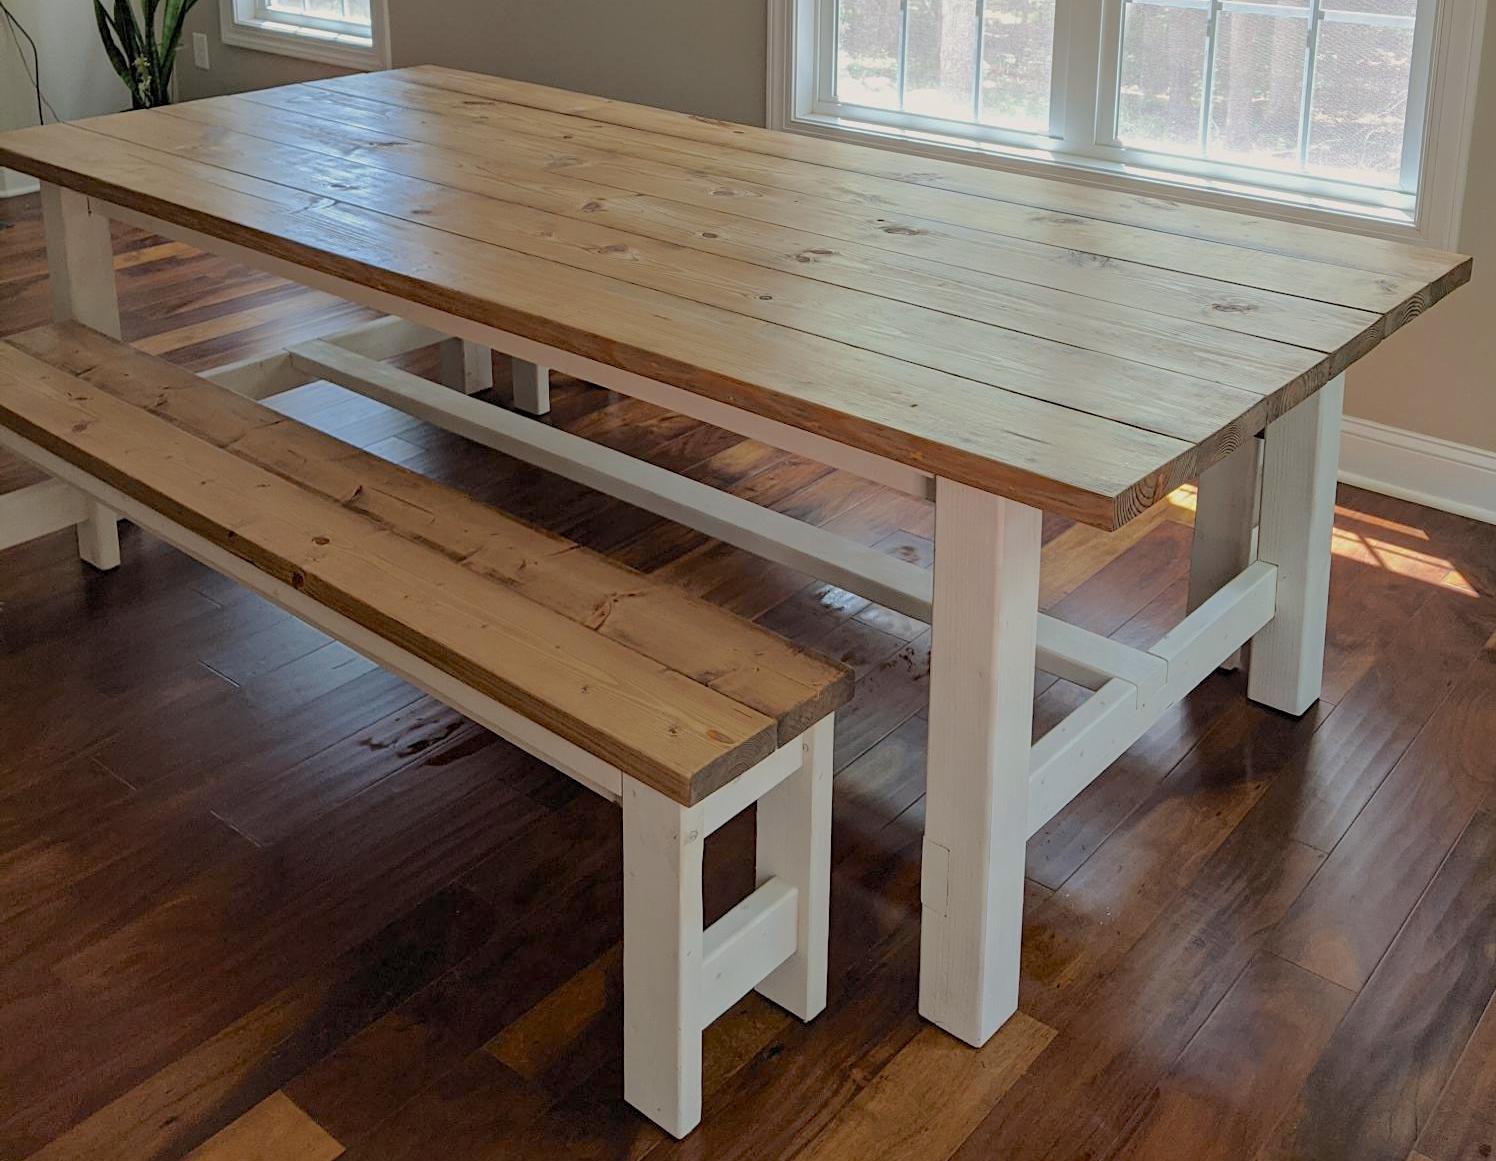
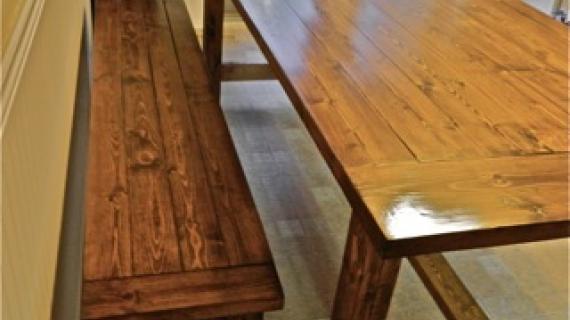
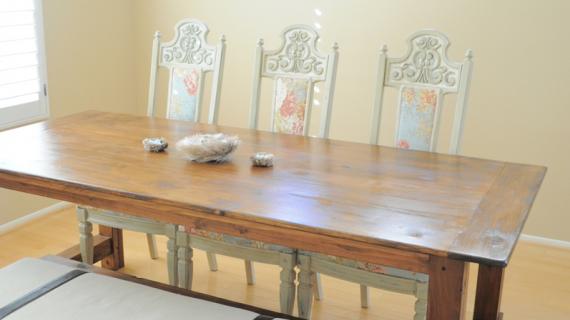
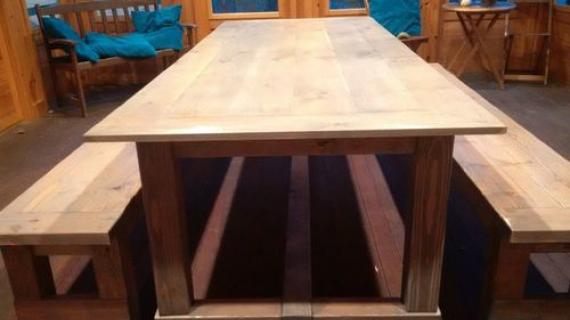
Special thanks to ssshindler for the featured photo.

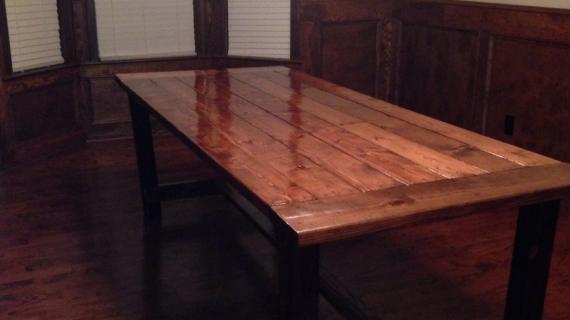
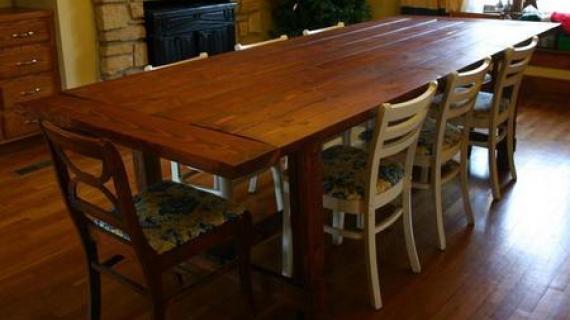
This table was also featured in Country Living Magazine! Built by Michael and Emily Knotts, photo by Lucas Allen
The plans for this farmhouse table follow. Also check out these other plans:
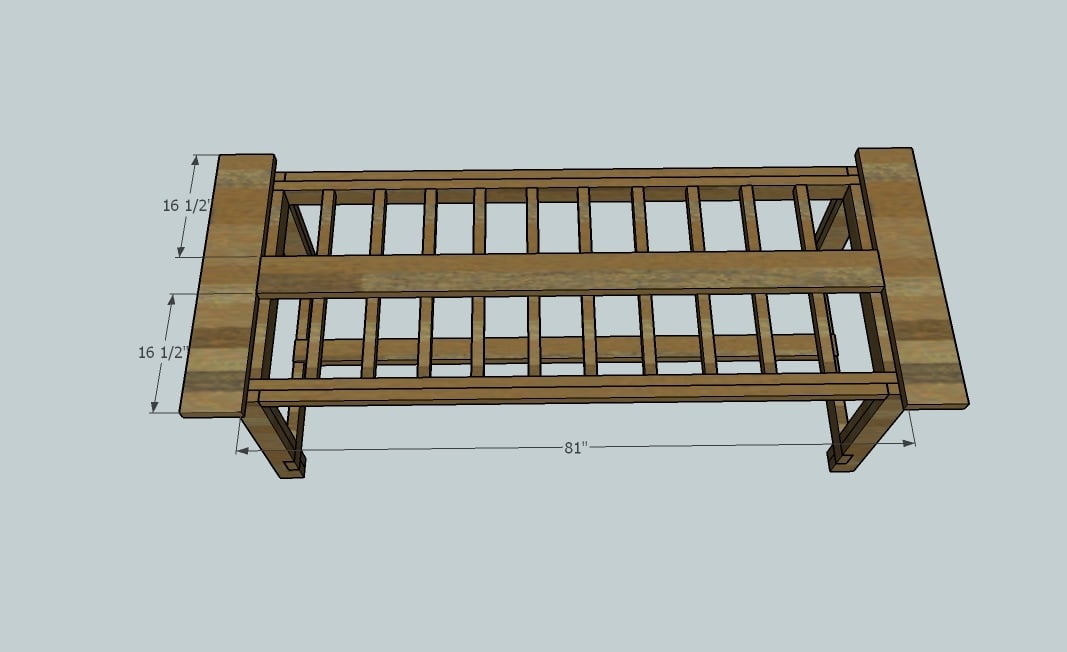
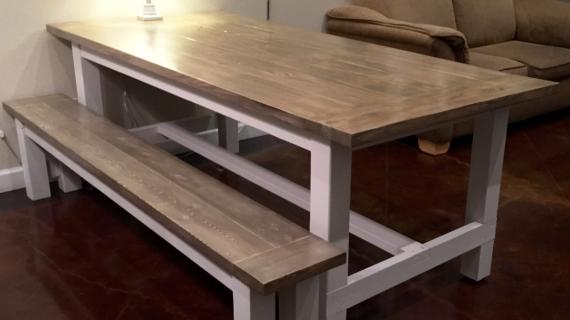
- Matching NO Pocket Hole Farmhouse Bench
- Farmhouse Table built with Pocket Holes (no screw holes showing)
- $50 Farmhouse Table - The most beginner friendly table you can build
Thank you so much for using our plans. If you build, please share a photo and let us know how your build went in the comments or a brag post.
Pin For Later!
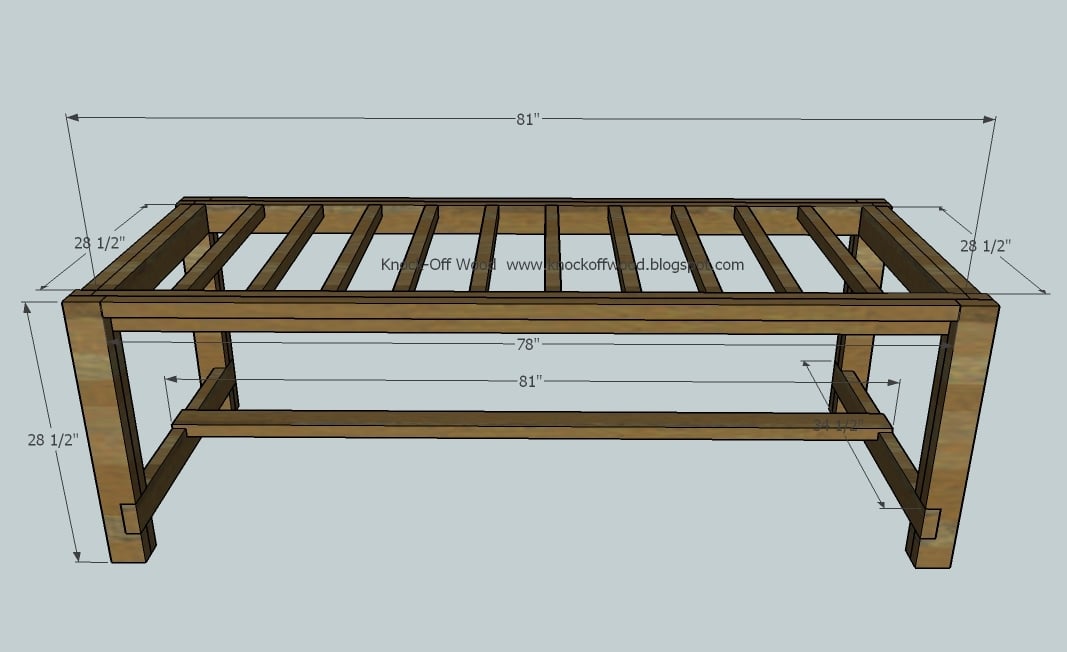
Preparation
- 8 – 2x4 8 feet long
- 6 – 2x2s 8 feet long
- 1 - 2×8 8 feet long
- 7 – 2x6s 8 feet long
- 2 3/4″ Self Tapping Wood Screws (About 100) (try spax brand or similar)
- 4″ Self tapping wood Screws (About 20)
A) 4 - 2×4 @ 28 1/2″ (Outside Legs)
B) 4 – 2×4 @ 28 1/2″ (Inside Legs)
C) 2 -2×4 @ 34 1/2″ (Bottom End Supports for the Stretcher)
D) 1 – 2×4 @ 81″ (Stretcher)
E) 2 – 2×4 @ 81″ (Side Aprons)
F) 2 – 2×4 @ 28 1/2″ (End Aprons)
G) 2 – 2×2 @ 28 1/2″ (Overhang Supports, Ends)
H) 2 – 2×2 @ 78″ (Overhang Supports, Sides)
I) 10 – 2×2 @ 28 1/2″ (Under Tabletop Supports)
J) 2 – 2×8 @ 38 1/2″ (Breadboard Ends)
K) 7 – 2×6 @ 81″ (Tabletop Pieces)
Start by cutting all your boards. The best way to cut is with a compound miter saw. You can also use a circular saw with a guide - good square cuts are very important.


Always use glue. Use the longest possible screws, and predrill with a countersink bit to hide the screw heads.
Instructions
Step 1
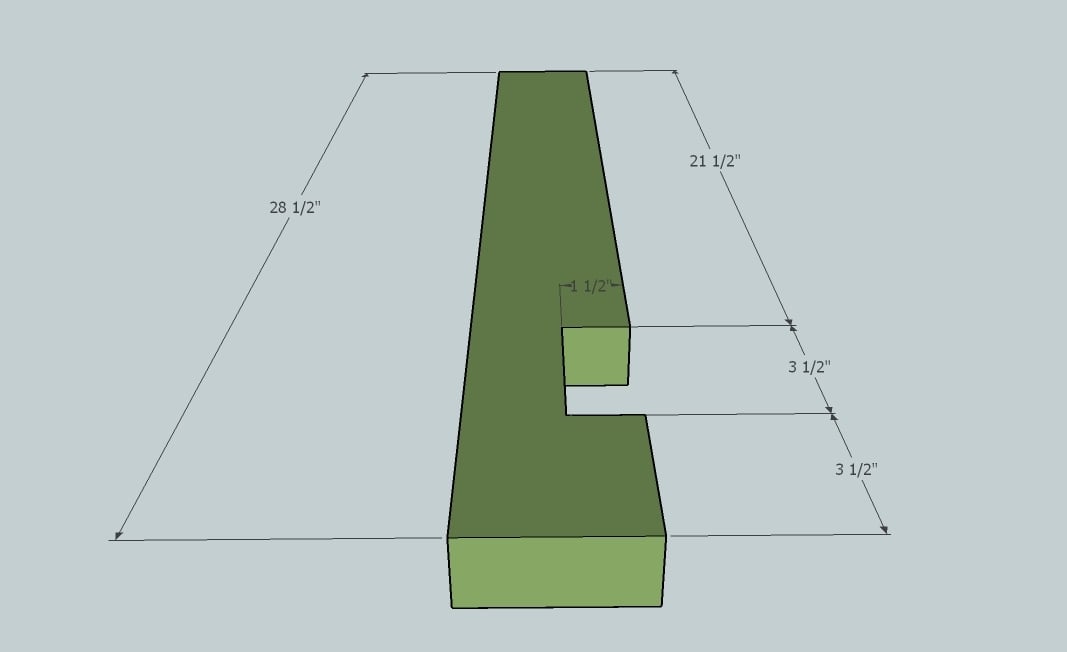
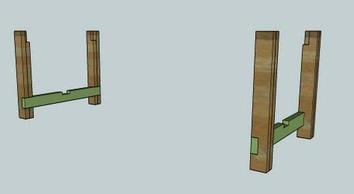
Notch out boards A, the Outside Legs, as shown above. If you do not know how to notch out boards, watch me notch the boards out for my table in my HOW-TO section.
Step 2

Notch out the inside leg as shown above. Make sure you notch both the top and the bottom as shown above. Use the measurements from step 2 to notch the bottom. See the below diagram for a closeup on notching the top.
Step 3
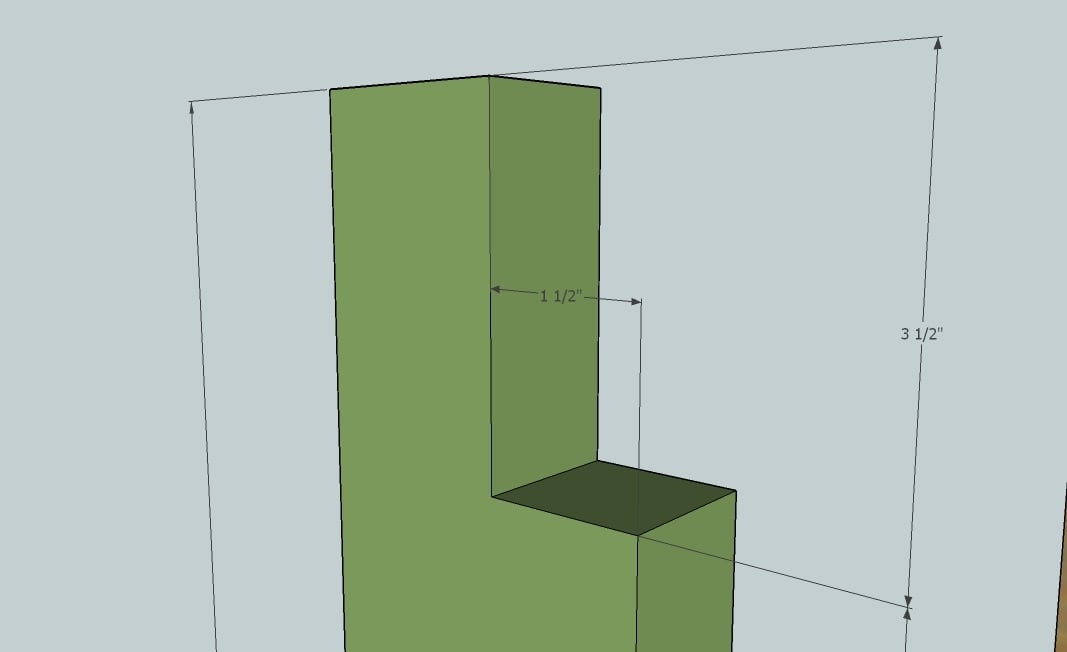
The above diagram show you how to notch out the top of the inside legs.
Step 4
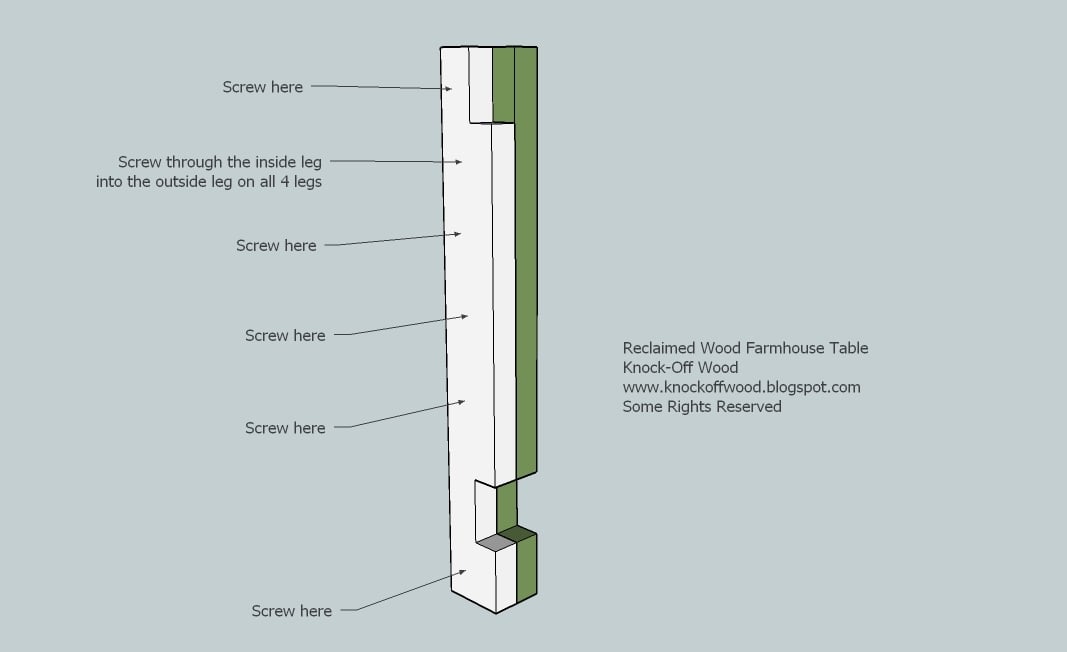
Now screw an inside leg to an outside leg, using glue and 2 3/4″ screws. Be aware of where each leg is placed – it does matter on what sides the inside leg sits. Also, screw through the inside leg into the outside leg to keep your screw holes on the inside.
Step 5
Step 6
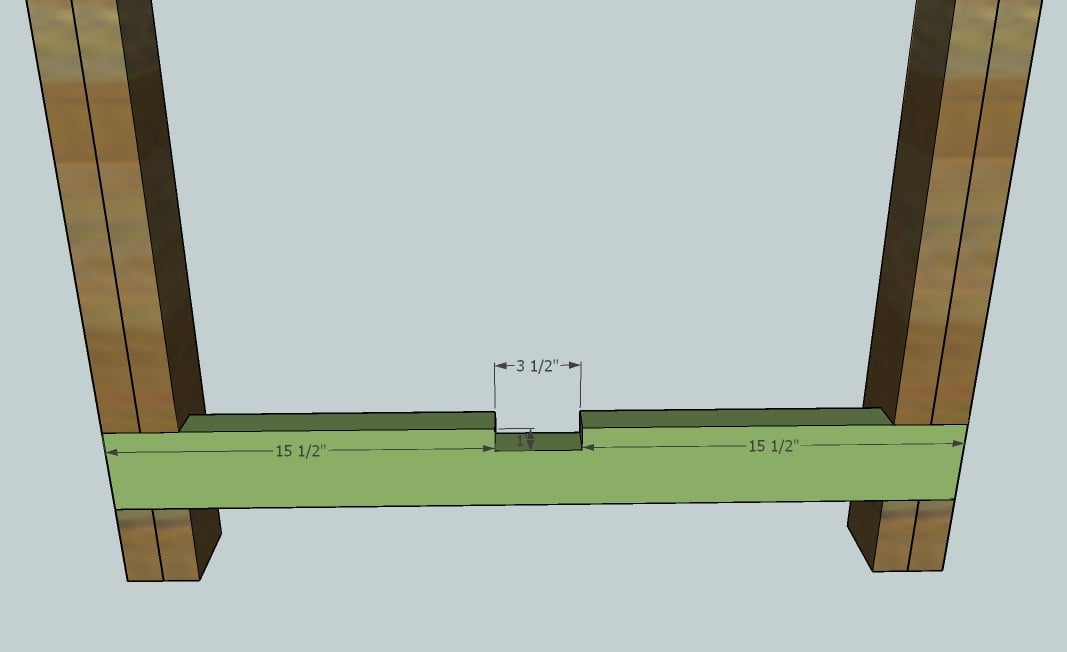
Screw the support, C, into the legs, as shown above. Make sure you use 2 screws on the inside leg and 2 screws on the outside legs per side of the end supports. NOTE: If you would like the support to be on the outside, rotate the legs, keeping the inside legs on the inside, and add 4″ to your stretcher, D. This will reduce your leg room for end chairs, but the notch out will be more visible, like my table and the Restoration Hardware table.
Step 7
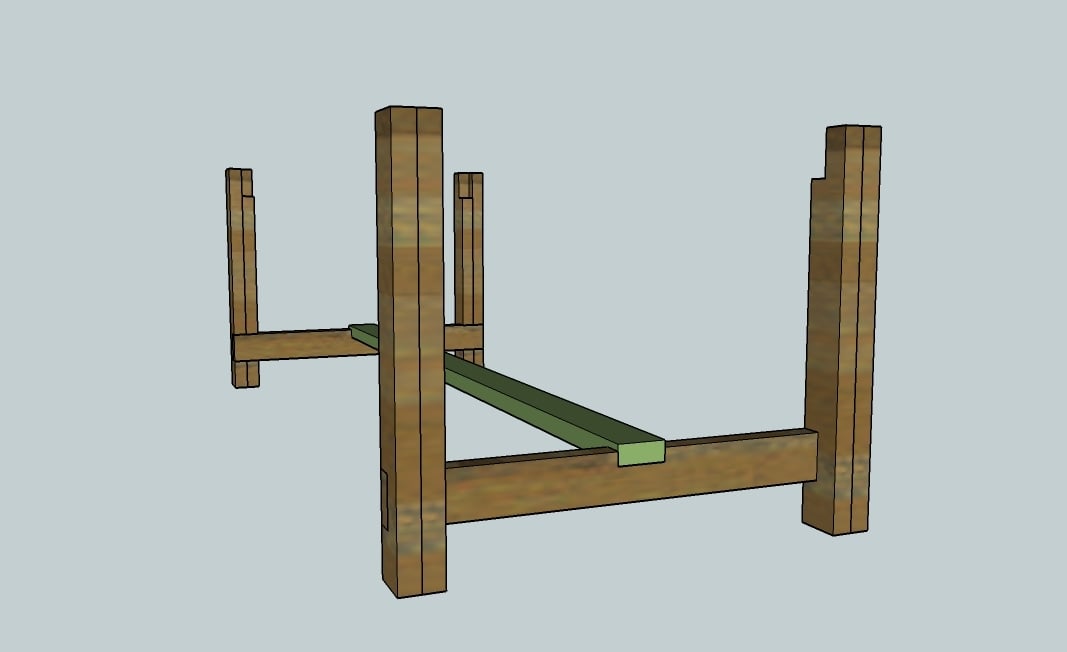
Put your stretcher in place and screw down.
Step 8
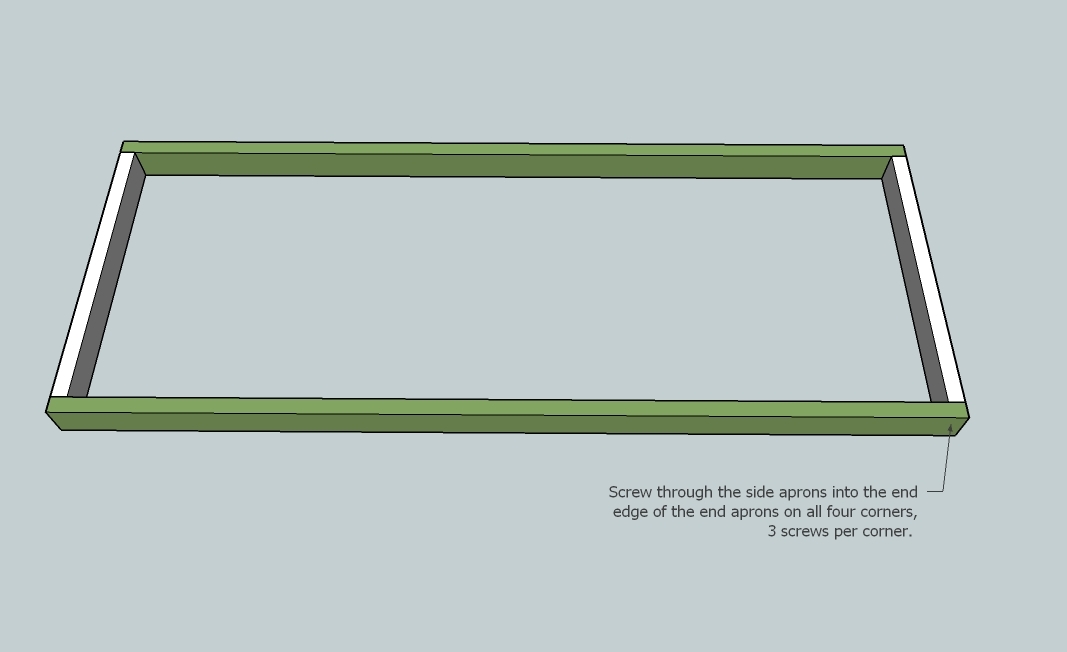
Build your apron on a level surface as shown above, using side apron boards E and end apron boards F.
Step 9
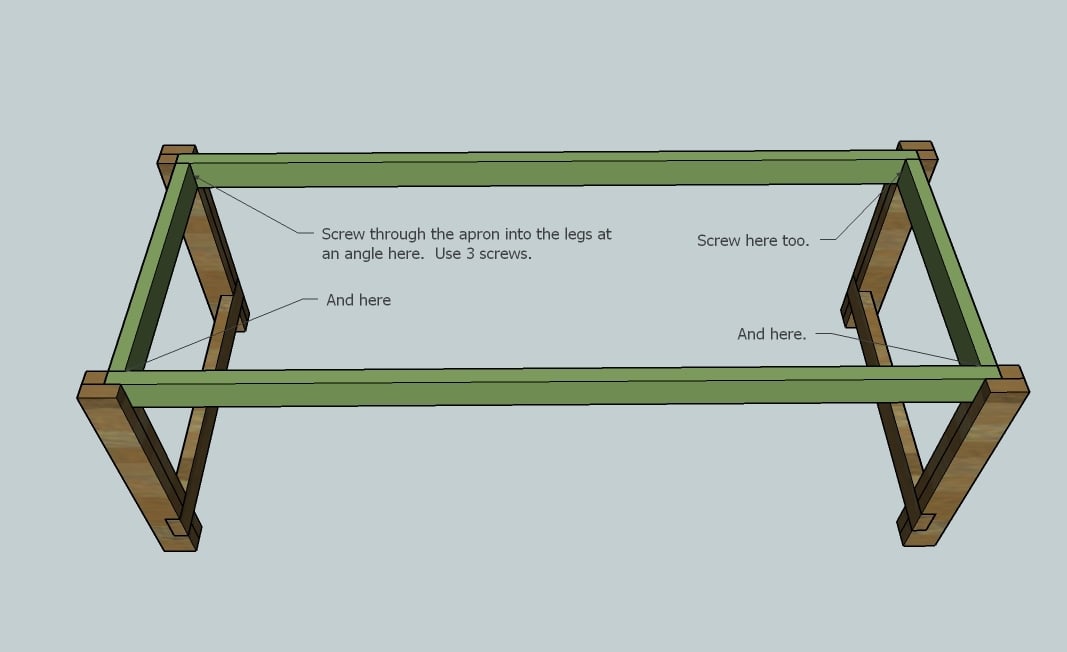
Fit the apron frame into the base of the table as shown above. Use the long screws to screw at an angle through the apron into the legs. Use 3 screws per leg on all legs. Lots of glue here. Now is a good time to check your table for square. Visit the HOW-TO section if you do not know how to check for square.
Step 10
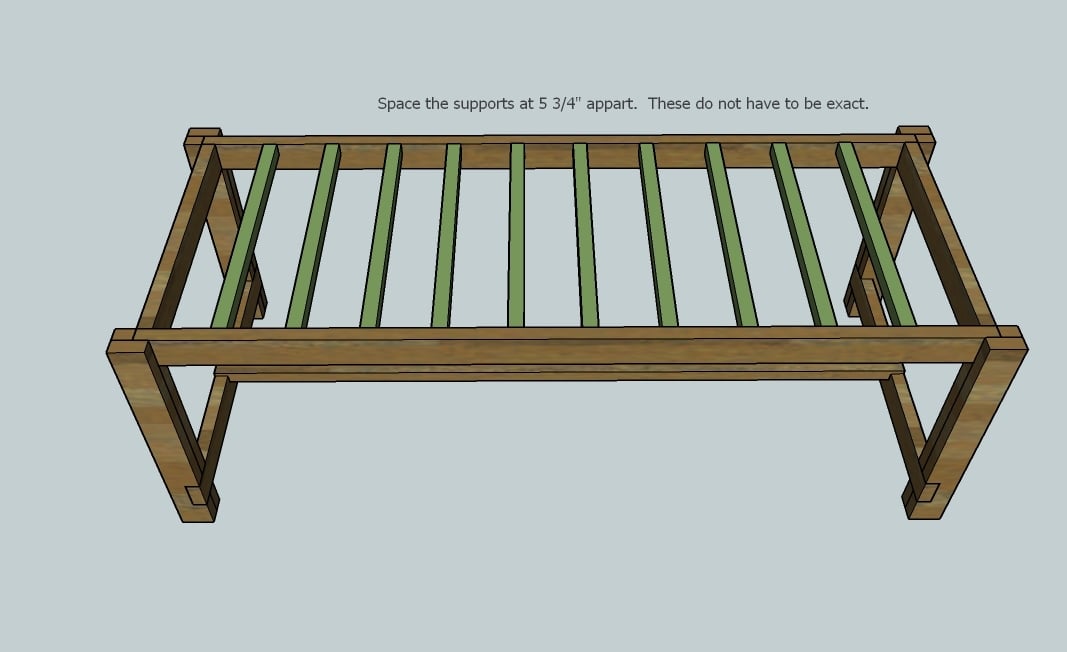
Mark the side apron every 5 3/4″ and place the 2×2 supports, I, as shown above. Remember that a 2×2 is 1 1/2″ wide. This does not have to be exact and the last support will not be exactly 5 3/4″ from the end. Use the 2 3/4″ screws here.
Step 11
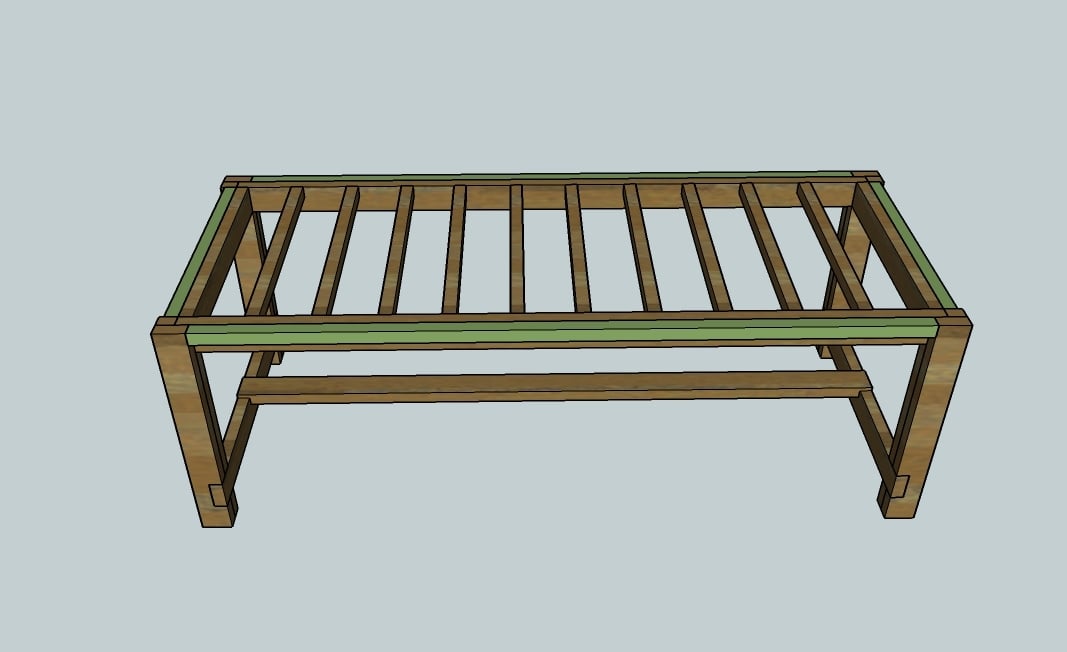
Add the overhang supports, G and H, as shown above. Keep the top edges flush, use the 2 3/4″ screws. Make sure you screw these in good.
Step 12
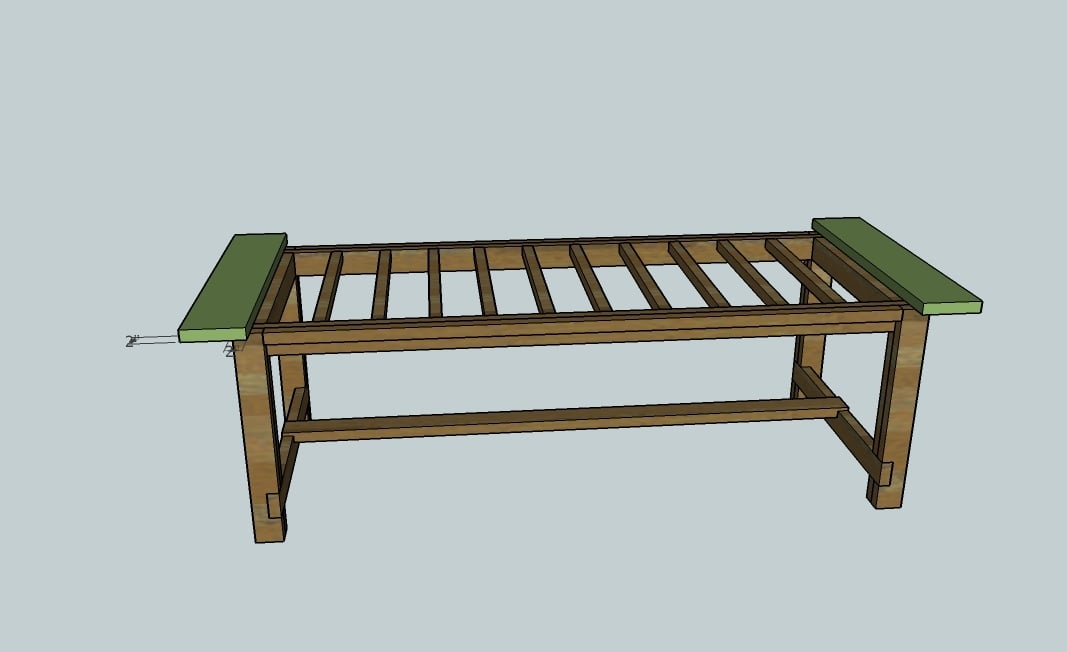
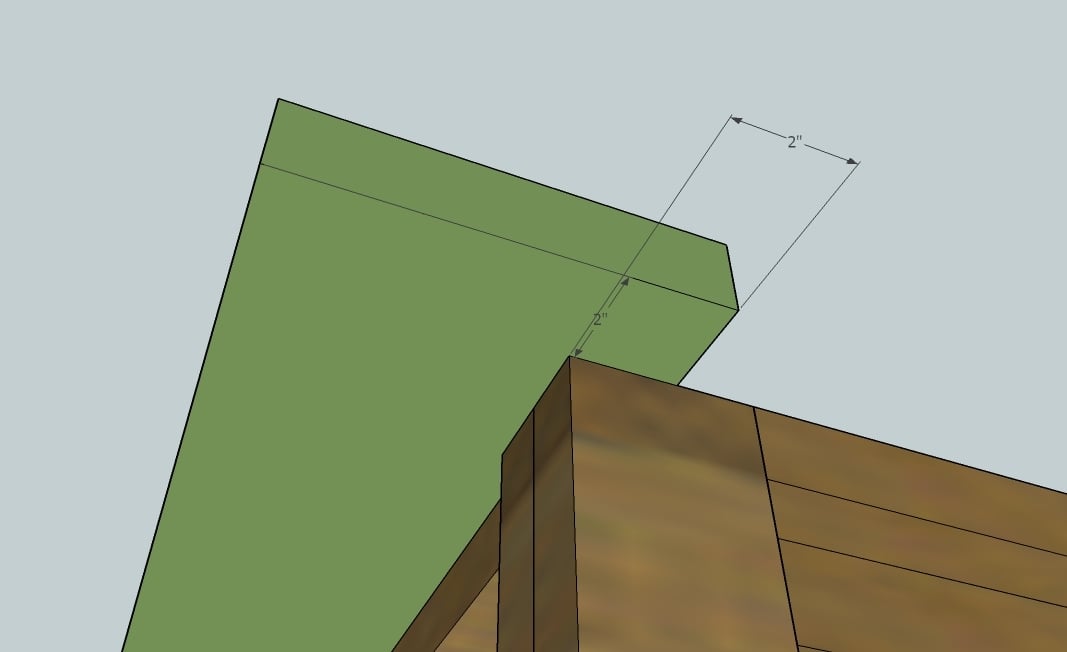
Now the breadboard ends, J. See the below diagram for measurements:
Step 13
Use the long screws to screw the breadboard end into the legs. Then screw from the underside of the overhang support, board G, into the underside of the breadboard end.
Step 14
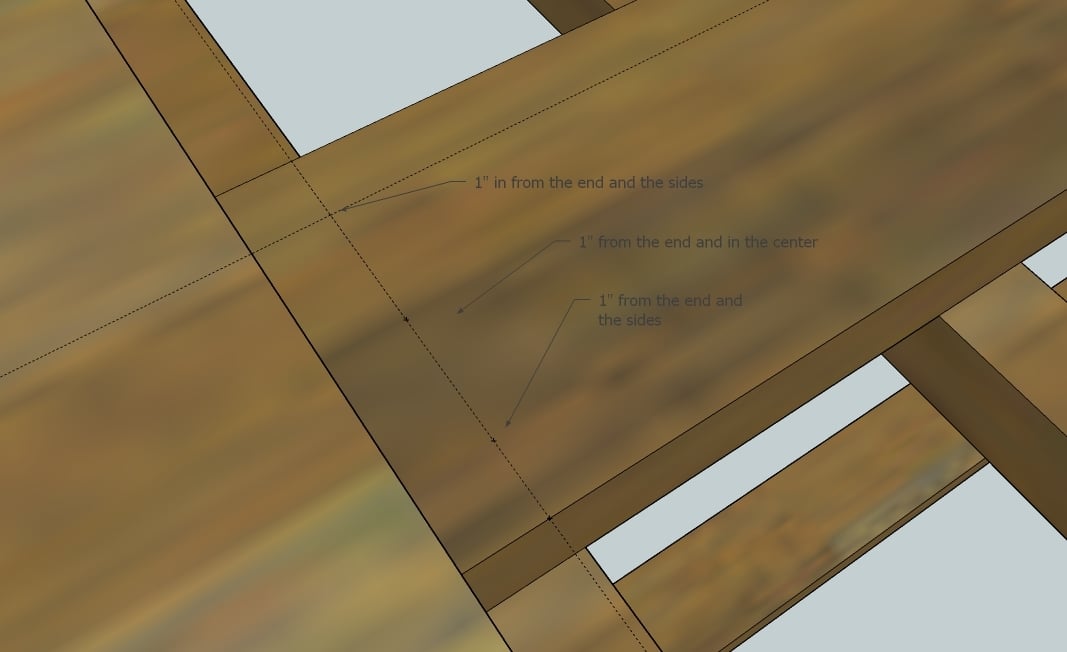
First mark all the ends of the tabletop boards, K, for the screw pattern. The screw pattern I used was 1″ from the end, and 1″ from each side and one in the middle. Predrill the ends on the marked pattern, as shown above.
Step 15
Then begin adding the tabletop pieces K, starting with the center piece. Screw the center board in place on the ends through the top, pre,drilled and marked in step 15. Then from the underside of the table, screw through the tabletop supports, I, into the underside of the tabletop boards, K.
Step 16
Add the next tabletop boards, K, as shown below. As you screw each board down, take special care to line up the edges with the existing boards. You do not want a gap between the boards on the tabletop. Remember to screw through the top on the ends and then screw through the bottom of the under supports to the underside of the tabletop boards.
After all the boards are screwed in place, then use the long screws to screw through the tabletop boards into the breadboard ends, as shown above.
Sand the entire table with 120 grit sandpaper, working in the direction of the wood grain.
Refill holes with wood filler if needed.
Sand table with 180 grit sandpaper.
Stain or paint. If the table feels rough between coats, lightly sand with 180 grit sandpaper.
A final coat of poly on the top can help keep the top easy to finish and wipe cleanable.


Comments
Rachael McKenzie (not verified)
Sun, 12/30/2012 - 07:28
I built this table!
We built this table! Here is the link just in case ya'll want to see. It is gorgeous and sturdy and looks like we spent a thousand dollars on it, when really all of the materials cost less then $200. Thank you Ana! http://rmhouseofnoise.blogspot.com/2012/11/our-new-kitchen-table.html
Donnie (not verified)
Sun, 12/30/2012 - 15:09
Warped table
Just finished putting the base together and the table is a little warped and I can't seem to get it straight, any ideas or solutions?
Chris P. (not verified)
Thu, 01/03/2013 - 05:42
Some extra pictures
Ana (or anyone else) - My wife loves this table, and wants me to make one for her, but after looking at the racks of lumber at Lowes and the other big box and a lumber yard, none of the 2x4s are exactly perfect, which I expected.
So as I was sitting there looking at my choices I started to worry about how a stack of 2x4 would look. So long story short, can someone send me some pictures of how the legs looked when finished?
I found a guy that was using 4x4s instead of the 2x4s, but my problem there is where do I find 4x4 legs that aren't pressure treated?
So if I can get pictures, that would be great! Thanks
C
Rockonnell (not verified)
Mon, 01/07/2013 - 05:17
I used 4x4s from Home Depot.
I used 4x4s from Home Depot. They re untreated Douglas fir. I had them cut to length at the store since my circular saw couldn't handle 4" material. The only real hitch to this is that 1) the top notch that the 2x4 table top frame sits into at the top of the legs will need to be chiseled by hand since you can't do it with a power saw since it is on a corner. It only took about 2 hours to do this carefully for a first timer like me. Measure carefully and work slowly with a sharp chisel. Mine was 1". 2) be aware that using 4x4 stock will slightly throw off the measurements. Allow for the fact that 2 2x4s screwed together are only 3 inches wide by 3 1/2 due to actual measurements vs. labeled measurements. A 4x4 is 3 1/2 x 3 1/2. Just make this adjustment on the line drawings above. Basically it means that the finished gap on the ends of the tables between the table legs will be one inch narrower. I hope this helps.
Rockonnell (not verified)
Fri, 01/11/2013 - 13:17
Missing directions
Finally found the missing diagrams to go with the last few steps. http://furniturehacked.wordpress.com/category/favorites/page/2/
Rockonnell (not verified)
Fri, 01/11/2013 - 13:21
Missing diagrams step 17 etc
http://furniturehacked.wordpress.com/category/favorites/page/2/
lincey23
Fri, 02/22/2013 - 08:41
LOVE THIS TABLE
Was curiuos as to about how much it costs to make this table and the benches to go with it, was thinking about making one.
AshleyHaney
Sat, 03/02/2013 - 20:37
OMG I LOVE IT!
My husband and father just built this for me and I love it! They used Cedar lumber, which did cost a little more, but just looks amazing! :)
magillj
Wed, 04/10/2013 - 03:27
Lengthening Table
Can anyone post these plans so that i can 5 people to each side making table longer etc
jc9794
Thu, 04/18/2013 - 18:15
Lengthening Table
I usually have large family dinners and I am going to make this table longer. Instead of using the 7 2x6x81" boards, I am going to use 7 2x6x10' boards.
My concern is the stretcher board underneath might bow a little bit and/or if I need additional support, where would you place it. If anyone has diagrams they can share to show there lengthened table and any modifications, it would be deeply appreciated.
Thank you
Allen Lulu
Sun, 05/05/2013 - 11:41
What is the bench for this table?
I am hoping one day to build this table but I really want a bench for my dining room. It looks like the Modern Farm Table but is it that? Or is there another bench for this table that I just can't find the plans for?
Allen Lulu
Sun, 05/05/2013 - 14:25
Sander
Dumb question. What kind of sander do you recommend for this project? I only have a handheld, but I'm thinking that a power sander might be a better solution. Thoughts?
yorheal75
Thu, 05/16/2013 - 16:12
YOR Health
It is very rare these days to find blogs that provide information someone is looking for. I am glad to see that your blog share valued information that can help to many readers. Thanks and keep writing.-YOR Health
kariusername
Tue, 06/04/2013 - 10:42
Drawers Under Farmhouse Table
I would LOVE it if you could provide plans to add drawers on the long side of this table. I remember my grandparents had an old kitchen table with drawers for napkins and extra cutlery and as kids we always thought it was so cool. Fast forward many decades and my table doubles as a desk and I would love to be able to store my laptop, calculator and misc office supplies in a drawer under the table. http://www.potterybarn.com/products/norfolk-dining-table/?pkey=csquare-…
tivicak
Tue, 06/11/2013 - 08:39
4x4 post
Has anyone ever had any concerns on the 4x4 posts, used for the legs, twisting or warping? I've been thinking of laminating posts from 1x's.
bbradfor
Mon, 06/17/2013 - 14:22
Zinc Top
Im about to start this project but am going to use a zinc top rather than wood. Pics soon to come!
bbradfor
Mon, 06/17/2013 - 14:23
Zinc Top
Im about to start this project but am going to use a zinc top rather than wood. Pics soon to come!
jawoods
Tue, 07/02/2013 - 20:28
How do you take the table
How do you take the table apart if you need to move it? Looking through the plans I don't see how it's possible, so if you could clue me in that'd be great! Thanks :)
claydowling
Wed, 07/03/2013 - 06:03
Taking the table apart
This table isn't meant to be taken apart. It's not a terribly difficult change to make if you would like to take it apart. At one time I built tables like this for sale, but I had to stop. I do have a video of my daughter assembling on though, and there's a close up of the joint you can look at, so you can build your own. http://www.youtube.com/watch?v=ESCdiohSOHM
tcollins1965
Sat, 07/20/2013 - 19:17
Alternate dimensions
Are there alternate plans for the farmhouse table for different lengths? My wife and I love it, but 96" is way too long for our house. We are looking for something in the 72" range.
kossnh
Sat, 08/10/2013 - 18:37
Dining Table with Leaf
This table plan is great. Do you have any suggestions to add a table leaf to this plan or do you have other dining table plans that include a leaf? Thank you.
dana16
Sun, 08/11/2013 - 22:16
Step 17 unclear
I'd like to build this table , but I don't understand exactly how I'm to screw the table top boards to the breadboard ends in step 17. The depiction is missing. Thanks, Dana Harris
Lyndzie P.
Wed, 08/21/2013 - 22:01
Table stain
How can we achieve a stain close to the country home and gardens photo?
ehart3000
Tue, 09/03/2013 - 13:50
Made a version of this
I made this table (with some very slight modifications) and love it! You can see my step by step version at http://www.edhart.me/2012/10/rustic-farmhouse-table-plan/. We get comments on it by everyone who comes over. I tried to explain how I did some of the techniques with pictures. Also described my finish with what products I used. Thanks for the plan Ana!
ehart3000
Tue, 09/03/2013 - 13:52
Also made a bench to match
Forgot to mention in my previous comment that I also made a bench to match & wrote up another play-by-play at http://www.edhart.me/2012/12/rustic-farmhouse-table-bench-plans/
ew1226
Sun, 10/13/2013 - 13:51
finish on table from Country Living Magazine
What finish was used on the table built and published in country living magazine by Lucas Allen? I love it!
njderoy
Fri, 11/22/2013 - 08:48
How exactly did you connect
How exactly did you connect the bread boards to the planks?
Leah Michigander
Thu, 12/26/2013 - 11:30
Missing Images
Hi Ana,
I'm so excited to try out this plan! But I'm concerned about steps 16-19. Are the images for these steps missing? I think I can figure everything out except for step 17. I'm not sure I understand that one.
Thanks for all that you do!
dyemond47
Thu, 02/20/2014 - 08:44
Screws for Farmhouse Table
I am having issues finding 2 3/4" screws for the table, can you suggest another size screw? Would 2 1/2" work?
bullitt453
Thu, 02/20/2014 - 10:30
2.5" screws will be fine
Yes, 2.5" screws would be fine, especially if you countersink them a bit into the first 2x4.
mpupillo76
Fri, 05/02/2014 - 22:31
Making table longer
If I want a longer table what cuts do I need to take into consideration while doing this? I'm thinking everything cut at 81" are the only cuts that would change. Is correct?
3deacs
Fri, 06/27/2014 - 18:20
Finish
I am in love with this table. I plan to start this project for our new home :). Can anyone tell me the name of the "weathered stain" used in the Country Living Magazine?
Thanks so much!
kat.rowe92
Sun, 07/20/2014 - 13:01
Dimension change
If I am trying to make the table about 5' before I put the breadboard ends on. I'm pretty sure I just need to change the lengths of the stretcher, side aprons, and table top boards. Does that sound right?
kat.rowe92
Sun, 07/20/2014 - 13:02
Dimension change
If I am trying to make the table about 5' before I put the breadboard ends on. I'm pretty sure I just need to change the lengths of the stretcher, side aprons, and table top boards. Does that sound right?
lbadger
Mon, 11/17/2014 - 18:58
Table selling on Craigslist...
Wow! I just saw this ad in our local Craigslist - look like same exact table built from these plans selling for $1600!!! Thank you Ana for providing the means for us to build this table (and everthing else) for a fraction of that!!
http://burlington.craigslist.org/fud/4743364906.html
Tracy Goode
Tue, 12/02/2014 - 14:57
Moving the Table
My only real question is how difficult is it to move this table? My family is looking at moving from our current home in the future; as a former mover, if this cannot come apart for moving, it's going to take up a lot of space in a moving van, leading to higher costs.
louyoung
Tue, 08/11/2015 - 16:57
hardwood support
Hi Ana,
I've just bought some wood for this project. I couldn't find pine in this size at my local hardware, so i went to a timber yard and bought hardwood. Thought it would also last longer and look great in my home.
I'm quite new to this stuff, so i'm very nervous about cutting my wood and building the table. Do you think i will need to add more support due to the heaviness of the hardwood?
Any other tips for using hardwood would be appreciated.
Thanks,
Louise
perfectlyflwed
Tue, 12/01/2015 - 06:42
Warping
After time has gone by how has the table held up? How much if any did the table top boards warp, expand, etc? Love the table but would like to know how it's fairing after time.
Thedtuck1
Fri, 12/04/2015 - 08:01
I can't find 2 3/4 acrews. Do I use 3 or 2 1/2 inch instead?
Can't find 2 3/4 screws. Only 2 1/2 or 3 inch screws?
smwood
Thu, 01/07/2016 - 10:13
Brad nailer?
Do these plans actually call for the brad nailer? I read through them and didnt see where it was used. Figuring out if I need to purchase or not.
chammocks
Sat, 03/12/2016 - 20:59
excellent
Excellent designed table. I am looking for unique design furniture for my new home i think its perfect for me.Thanks@ http://classyhammocks.com/jumbo-hammocks/
louyoung
Thu, 03/17/2016 - 19:05
Step 8 how to screw top piece in?
Hi Anna,
I need your help, i'm not sure how to screw the top piece in at step 8, do i screw in on each side of the corners? Or directly at the interesection of the corner?
I have used a hard wood and its getting tough to predrill. Also my table is a little wobbily so far. Any advice?
Thanks,
Louise
mrs_sgt_myh
Fri, 04/08/2016 - 08:35
Two questions
My first question may seem silly, but I'm a serious beginner here! What type of wood did you use? I was looking at Douglas Fir but have heard its very soft and won't work.
Secondly, Kreg Jig... which one will do? I'm looking at the R3 Junior OR the K4 System? Hoping to not spend the price of the table on a tool LOL
Thanks! :)
moonprysm
Wed, 05/25/2016 - 19:13
Lumber size
The lumber list on this project doesn't say the length of the boards purchased... 8 - 2x4s...but are they 2x4x8, 2x4x10, 2x4x12, or 2x4x16? Etc.
In reply to Lumber size by moonprysm
Ana White
Thu, 05/26/2016 - 16:30
8' unless otherwise specified
8' unless otherwise specified
In reply to Lumber size by moonprysm
Ana White
Thu, 05/26/2016 - 16:30
8' unless otherwise
8' unless otherwise sspecified
hulkster51
Fri, 11/04/2016 - 16:57
farm table
wow just finnished , a little at a time , looks great , dont know how to post picture
Jeanne624
Wed, 12/28/2016 - 16:47
HELP please:)
So I finally feel my farmhouse table. I've been waiting for this project it was my first big one and I did it I am so proud of it. Then I tried to stain it. Somehow I have messed it up. I'm attaching some pictures just hoping that somebody can help me out. The only thing I haven't done is put the last coat on the polyurethane. I guess I can just leave it the way it is but the spots are driving me insane. Thanks for any help in advance. I do not know how to post the pics so if anyone contacts me I can show them to you. Unless someone wants to tell me how to post the pics. Thanks so much.