Community Brag Posts

Rustic End Table

My table is without the X's because I was having some trouble with the angles. I am just starting out, so I think it turned out pretty well!

Built from Plan(s)
Estimated Cost
$40-$50
Estimated Time Investment
Afternoon Project (3-6 Hours)
Finish Used
Dark Walnut stain & poly
Recommended Skill Level
Intermediate

Comments

Phil P

Submitted by Anonymous (not verified) on Wed, 03/01/2017 - 02:45

Treated myself to a load of new electrical tools and bought a kreg jig, this was my first project of this size for many years and also using the pocket hole method, my wife was very happy with the end result as was I. The doors, all made from scratch using the jig also finish the shrine off well. I'll be hunting around on the site for a new project soon, this one took me a lot longer to complete than I anticipated, it ook months before I finally managed to finish if off but then I had an issue with the amount of time available I could spend on it on a weekly basis.

Built from Plan(s)
Estimated Cost
not calculated, between £400 - £500
Estimated Time Investment
Week Long Project (20 Hours or More)
Finish Used
wood primer followed by cookie dough emulsion for the shelves and satin white for the doors, door panels cut from pre painted mdf 3mm decorative panels and glued and pinned into recesses created.
Recommended Skill Level
Intermediate

Barn door bookcase

Submitted by Anonymous (not verified) on Thu, 12/17/2020 - 07:07

This was based of Ana’s barn door bookcase and was exactly what my mom needed to hide her grandkid’s toys while she’s not watching them. Thanks for the idea!

Built from Plan(s)
Finish Used
Pratt & Lambert Aquanamel semi-gloss in Valspar’s Timber Green, and semi-gloss polycrylic on the oak shelves and top (no stain, I liked the natural oak color).
Recommended Skill Level
Beginner

Comments

PIrate ship for my sons pirate party

Submitted by Uberhandy on Mon, 01/28/2013 - 21:36

I made this for my sons pirate party. It has an entrace under the plank to the pirateships "basement"

Estimated Time Investment
Week Long Project (20 Hours or More)
Recommended Skill Level
Intermediate

Comments

Modern Coffee Table

Modern style coffee table

Estimated Time Investment
Weekend Project (10-20 Hours)
Finish Used
Walnut stain satin finish
Recommended Skill Level
Intermediate

X Farm House Desk

First time trying one of the plans from here. Absolutely loved the desk when the wife and I seen it. And shopping around for a desk we liked was way out of the prices we were looking for. Instead of using the pine boards and pocket holing them together. I purchased a top the exact size the boards would have made. The top is made of poplar. Sanded and stained. Waiting on the epoxy to arrive to apply to the top for a harder top to work on. Pine and poplar are soft woods and if writing on them it would groove the wood.
Thank you so much for the beautiful plans.

Built from Plan(s)
Estimated Cost
Around 110 dollars

Farmhouse Table (wooden pallets)

Submitted by dak1ne on Thu, 01/31/2013 - 20:36

Hello, I'm doing furniture with wooden pallets and I found your awesome website with nice explanations and plans so I decided to make this nice farmhouse table but with wood from shipment wooden pallets.
Thank you very much for all your work and plans !

I will make other furnitures from your plans with wooden pallets :D and post the brags here soon.

Estimated Time Investment
Afternoon Project (3-6 Hours)
Finish Used
mahogany wax
Recommended Skill Level
Beginner

Kids Lounge Bench

We made this in just over 2.5 hours with the kids "helping."  We made it a bit taller, with the seat at 19 inches, so the leg pieces were 25.25 inches instead of 18.25.  Because of this, we will probably add two supports across each side as it seems a bit wobbly when the kids all wiggle on it.  Now we finally have a seat where all 3 kids can sit together to play on the computer.  Thanks for the plans!

Built from Plan(s)
Estimated Cost
$54 for all the wood and #100 screws.
Estimated Time Investment
Afternoon Project (3-6 Hours)
Finish Used
for the kids
Recommended Skill Level
Beginner

Comments

Laundry Orgainized

We needed to organize in the laundry room. This was the perfect idea.

Estimated Time Investment
Weekend Project (10-20 Hours)
Finish Used
This was easy and fun to do. My husband and I worked on it together and we are both alive to brag about it.
Recommended Skill Level
Beginner

Comments

Aromatic Cedar trinket box

Submitted by JoanneS on Fri, 12/05/2014 - 14:33

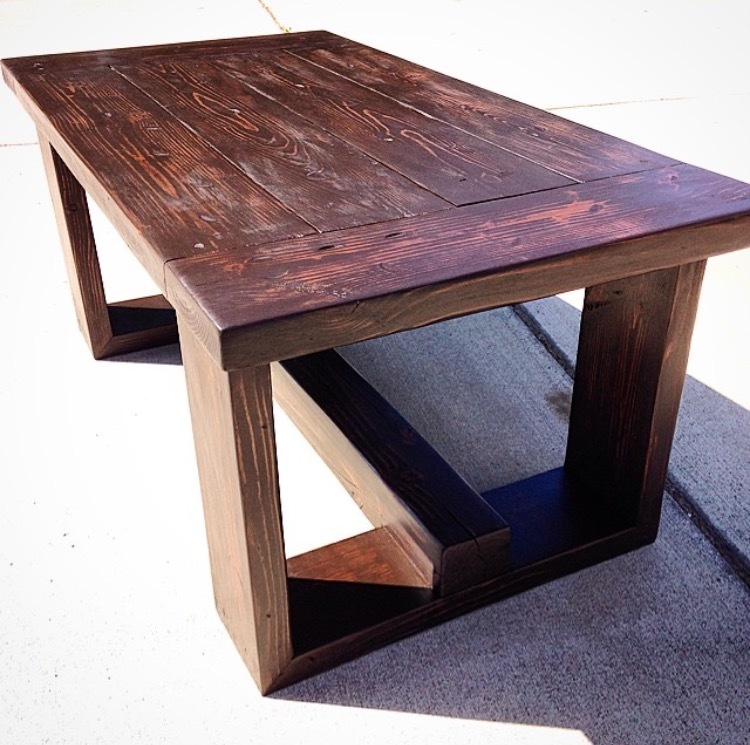
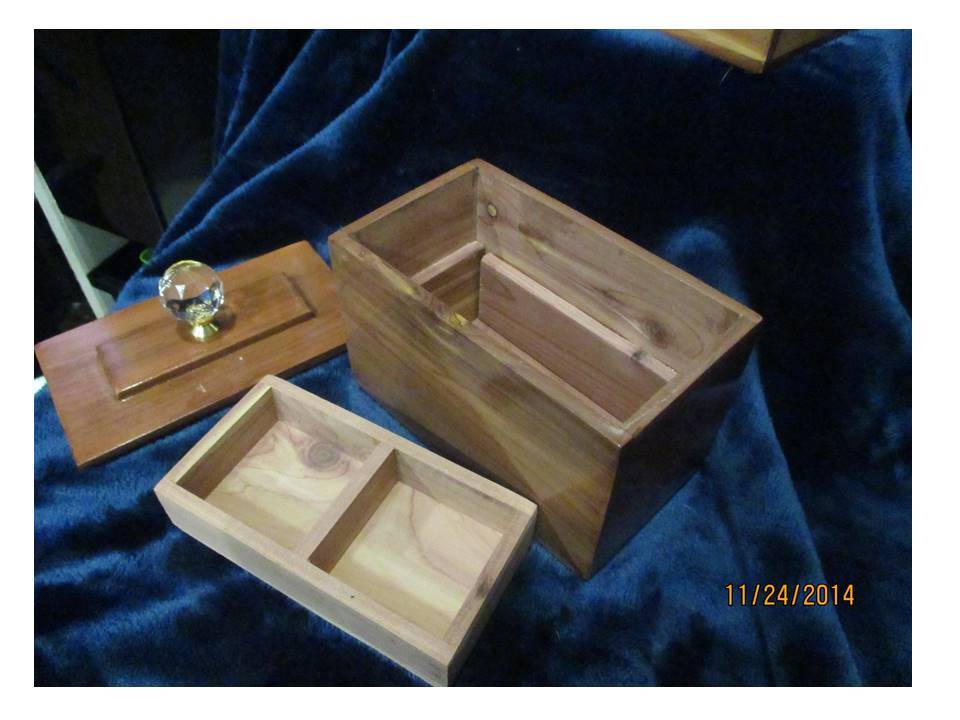
This was a project to use some pieces of left over ¼” thick aromatic cedar closet lining board.  I cut off the tongues and grooves with the sliding miter saw, and calculated the measurements for the box to fit the size of the wood.  For this build I used the micro-pin nailer with compressor, and ½” headless pin nails.  The finished box measures 4 1/8” tall, 6” long, and 3 3/8” wide.

Inside, a divided lift-out tray sits on rails made from small pieces of the cedar board glued to the inside.  The addition of an extra decorative board to the top made it ¾” thick, to work with a regular knob.  The inside of the box stayed unfinished to preserve the cedar fragrance.  This was an afternoon project.

Built from Plan(s)
Estimated Cost
The cost of this build is just for the knob, since the wood and finishing materials were already on hand.
Estimated Time Investment
Afternoon Project (3-6 Hours)
Finish Used
On this build I ended up with some discoloration from the glue. I re-sanded and touched it up with some Minwax express color in Mahogany on those areas to even up the color and make it all look natural again. Then everything received 3 coats of gloss polycrylic, topped off with an acrylic crystal knob from Lowes.
Recommended Skill Level
Beginner

Comments

Linda7

Fri, 12/05/2014 - 17:56

Joanne, you are the queen of trinket/jewelry boxes! I love all of your posts which show how something simple can be so different and special. These would make wonderful Christmas presents for loved ones, friends, or co-workers. Thanks for sharing.

JoanneS

Sat, 12/06/2014 - 04:58

Linda, thanks so much for the nice comment!  I have such fun doing hand built gifts for Christmas!  Thinking up how to decorate them and what to make them from is a big part of the fun!  smiley

Farmhouse Desk

Submitted by ottawaguy on Tue, 12/29/2020 - 14:15

Super easy build!

After months of working from home and using an old dining room table as my desk I built this desk in an afternoon. The finishing probably took longer than the build. A stained and grey washed top, with a simple while base turned out well. I built it a little larger than the plans and used 2 laminated pine panels I had already for the table top.

Built from Plan(s)
Estimated Cost
100
Estimated Time Investment
Afternoon Project (3-6 Hours)
Finish Used
Top - minwax “provincial” stain then grey-washed.
Base - white latex paint
Clear coat the whole desk
Recommended Skill Level
Beginner

Comments

ottawaguy

Mon, 06/28/2021 - 19:30

Sorry, i just noticed this comment. I only did a light sanding on the legs, leaving things a bit rough. If i were to do it again i'd probably spend more time sanding.

Customized Kentwood Bookshelf

Submitted by mamahowell on Mon, 02/04/2013 - 07:34

I built this bookshelf for my husband's office. He wanted a shorter, wider shelf than the original plans, and this is what I came up with! :)

Estimated Cost
Around $50
Estimated Time Investment
Day Project (6-9 Hours)
Finish Used
I used Minwax PolyShades
Recommended Skill Level
Intermediate

Comments

mamahowell

Sun, 03/24/2013 - 13:53

Romanweel, I'm so sorry, didn't see your comment! It is Polyshade in Mission Oak Gloss. And Countrysideworkshop, it is 15 deep by 33 wide by 32.25 high. Hope that helps! :)

peneyraa

Mon, 02/26/2018 - 21:42

I having been searching for a  bookcase just like it!!! I want the shelf space for decoration, but I am dying to have the wall space above for wedding pictures I have never built anything before, but need to start somewhere. Any chance you can share what you changed to make this book shelf instead of the super tall one : ) 

Hanging Wall File

Submitted by naomi on Mon, 12/08/2014 - 03:38

This was just a quick little project as we decided we needed a bit of organisation in the office.

I just used scrap mdf and leftover bits and pieces from other projects for this wall file. We now have somewhere to put all the postage stuff for our online sales site.

Cheers... Nay

Built from Plan(s)
Estimated Time Investment
Afternoon Project (3-6 Hours)
Finish Used
White enamel paint
Recommended Skill Level
Starter Project

Liam's Christmas Day Barn Bed

Submitted by Anonymous (not verified) on Sat, 03/11/2017 - 17:52

Our son Liam-Joseph wanted a "Big-Boy Bed" and then he added "I want Daddy and Santa to make it".  Well "Santa" and my wife Jacques looked all over the internet and finally found your Cabin Bed via jennwoodhouse.com.  Jacques altered the plans demensions and she realized the bed could be barn-like so she came up with the red and gray paint job.  She actually wanted a cupola but I thankfully talked her out of that.  Well somehow we keep the construction from Liam 2 weeks before Christmas.  On Christmas Eve Liam's Grandparents keep him at their house while "Santa" and I put the bed together (I never did a trial run so I was relieved when everything fit right together).  The next day after opening his presents he ran up to his room and saw his bed for the first time.

The project isn't completed.  I recently finished the roof with wood pallets but I need to finish the trimming of the interior of the bed walls.  

Estimated Time Investment
Week Long Project (20 Hours or More)
Recommended Skill Level
Intermediate

Rustic X console table

So excited with how this table turned out!! I absolutely love it❤️ My daughter helped me build it. It’s been fun teaching her how to build things!

Estimated Cost
100
Finish Used
Minwax Special Walnut stain and polycrylic

Comments

My first dining table and chairs project

Submitted by Javata on Wed, 02/06/2013 - 17:19

We used carraige bolts to make the legs removable. Very happy with the results!

Built from Plan(s)
Recommended Skill Level
Beginner

Comments

Javata

Thu, 02/07/2013 - 05:16

Jake,
Thanks so much! I spent about two months working evenings and weekends as weather permitted, to complete this project. My daughter chose two stain colors and we mixed them together. I'm happy with the way the color came out.

Debbie440

Thu, 11/21/2013 - 18:27

I made the same 30" tall bar stools. I love the whole look of your set. Did you adjust the height of the table for the chairs? Or is the table high enough for these chairs? Also, did you make the table top smaller?

You did a great job!

Javata

Sat, 11/23/2013 - 18:13

Debbie,
Thanks so much for the compliments! My daughter didn't like the "plank" version of the table top so I used oak plywood and framed it with oak 1X4s. I believe the measurements of the table are 48" by 48". I don't think I adjusted the chair height but I did add a foot at the bottom of the table legs. That may have added an inch or so to the overall height of the table.

Chris22

Tue, 02/10/2015 - 13:22

I really like how you added the foot and removable legs to this table! I would like to make mine with removable legs as well. How did you modify the table to use the bolts?

velvetechos

Tue, 07/14/2015 - 06:31

Hello! This plan is EXACTLY what I am looking for except there is a huge difference.......it will be the ritual platform for a traditional Tibetan Sand Painting.  I am seeking a plan just like this for a square table that is 6' square and 3 1/2' high......is it possible to purchase a plan of that dimension or does anyone have a recommendation where I can find that.  THIS would be truly lovely in this design.  THANKS for any help!!!  

Javata

Thu, 07/16/2015 - 12:08

I really just followed the Ana White plans for the Pub Table but used one solid piece of plywood instead of the 1x4s for the top. Since plywood comes in 4x8 foot sheets, you might need to get creative to get it to 6 feet. Good luck, and don't forget to post pictures when you finish!

Crayola2

Sun, 06/21/2020 - 11:52

I really want to make there chairs too! Please post the link to the plans.

American Girl Dollhouse Masterpiece!

Submitted by MendiB on Mon, 03/13/2017 - 12:06

This dollhouse was super easy to make! Harper (the doll) wanted an open concept living/kitchen, and that is the first floor. Second floor are the bedroom and bathroom. Top floor is the closet. The roof is made from 3.5" slats of luan glued together and painted with black sanded paint. Notice the baseboards and crown molding? The window boxes are really cute, too! I still owe my granddaughter a garage and patio with pergola, and kitchen appliances and chairs, but that will wait until summer when she can help craft/build them. 

Harper's bed is modeled after the farmhouse bed plans available on this site, but I used smaller scrap lumber. I wanted milk paint but was unwilling to pay the high price, so I bought a sample jar of antique ivory paint and watered it down. It turned out great!

Estimated Time Investment
Week Long Project (20 Hours or More)
Finish Used
Kilz primer, Behr satin indoor paint (leftovers from our house)
Recommended Skill Level
Intermediate

Loft Bed

Submitted by Genetics on Fri, 02/08/2013 - 16:13

My wife and I completed our son's loft bed in December for his Christmas present. My wife found this bed on Pottery Barn's website and I found these plans on Ana White. Everything was pretty straight-forward. It was a great project and we had a lot of fun building something together. We made a few mods to the plans like height and the railings. I really like how it comes apart for moving and our son loves sleeping up there! Protip: Be careful with the wood glue where the bed is designed to come apart. I got a little sloppy and had to do some hammering to disassemble for staining/sealing. Everything went back together very easily, though.

Built from Plan(s)
Estimated Cost
$275
Estimated Time Investment
Week Long Project (20 Hours or More)
Finish Used
Minwax Red Mahogany stain and Minwax Clear Satin Polyurethane. Sand before sealing then wipe down with mineral spirits repeat between coats. We only did 2 coats.
Recommended Skill Level
Beginner

Economical Basement Shelving 2

Submitted by Veronica P on Sun, 12/14/2014 - 19:41

I've been organizing our unfinished basement so that my boys have more space to run and ride their bikes over the winter. I needed something to organize our off season clothes and bins of clothes that my boys are growing in/out of. This plan was perfect. It's not my prettiest build but it's soooo functional!

Estimated Cost
$100
Estimated Time Investment
Afternoon Project (3-6 Hours)
Finish Used
None
Recommended Skill Level
Starter Project

Comments

Joe Shape

Submitted by Anonymous (not verified) on Wed, 03/15/2017 - 21:19

Fun and easy project. I couldn't be happier with the end results. Great plan from Ana White. 

Estimated Cost
$83 for coffee and end table.
Estimated Time Investment
Weekend Project (10-20 Hours)
Finish Used
Waterlox on top and Sherwin Williams furniture paint on frame.
Recommended Skill Level
Intermediate