Community Brag Posts
Beer Wall for Wedding

My cousin recently got married and wanted a beer wall at her wedding. I quickly searched Ana's site for the perfect plan and chose the Tall Panel Headboard for my starting point. With a few modifications it became a beer wall in no time at all. I love how Ana's plans can be easily modified to make a totally different project.
No fancy wood was used here. Just regular wood from the big box store. A jockey box was attached to the back side of the wall. It worked awesome!
Since I discovered this site in January, I've made close to 30 items from her plans. I'm ridiculously addicted and not just with Ana's site but also with her blog friends. For Valentine's Day I asked for a Air Strike gun and got it. It was better than jewelry and chocolates! I'm well on my way to collecting my own tools and learning how to save money by making it myself. Oh, and I can't even begin to tell you how impressed everyone is with my finished products.
Built from Plan(s)
Estimated Cost
roughly $200.00
Estimated Time Investment
Weekend Project (10-20 Hours)
Finish Used
Valspar paint from Lowes
Recommended Skill Level
Intermediate
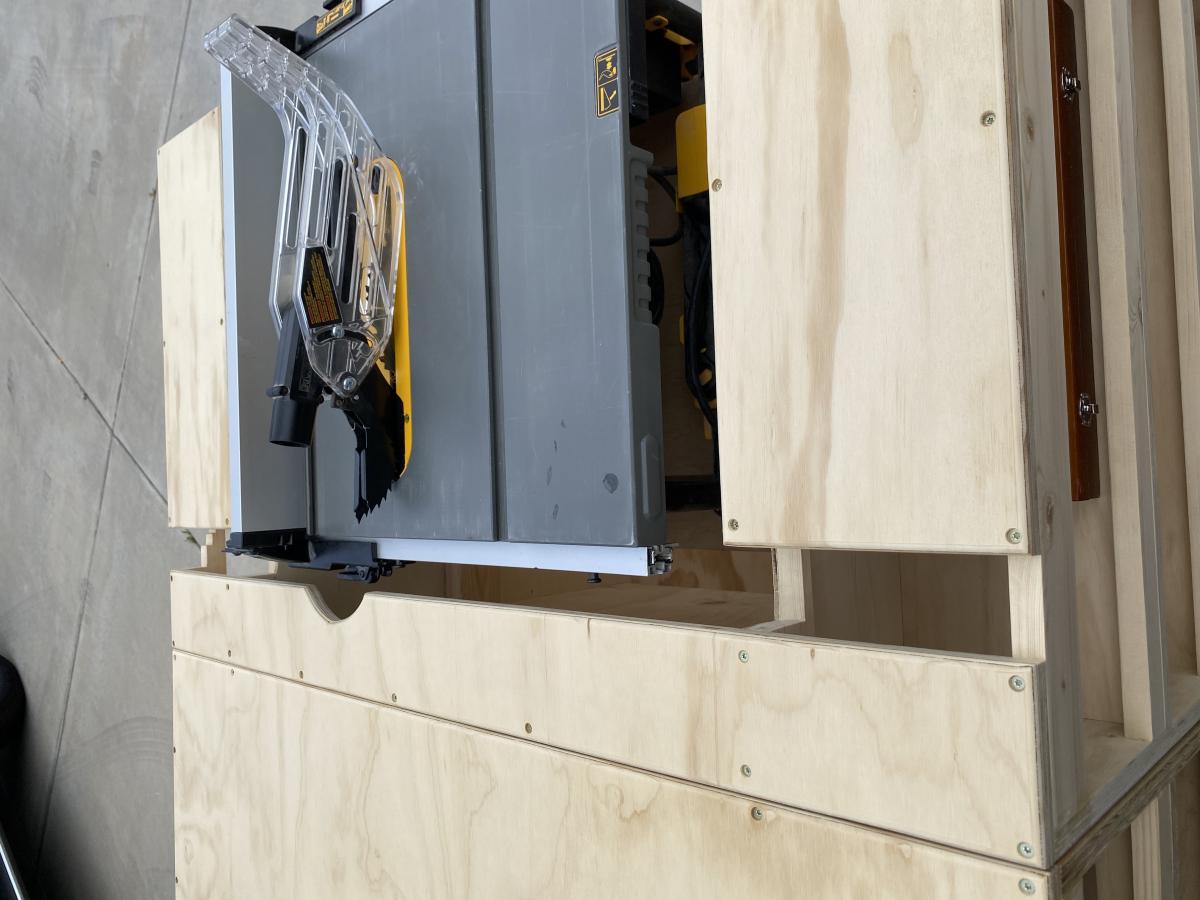
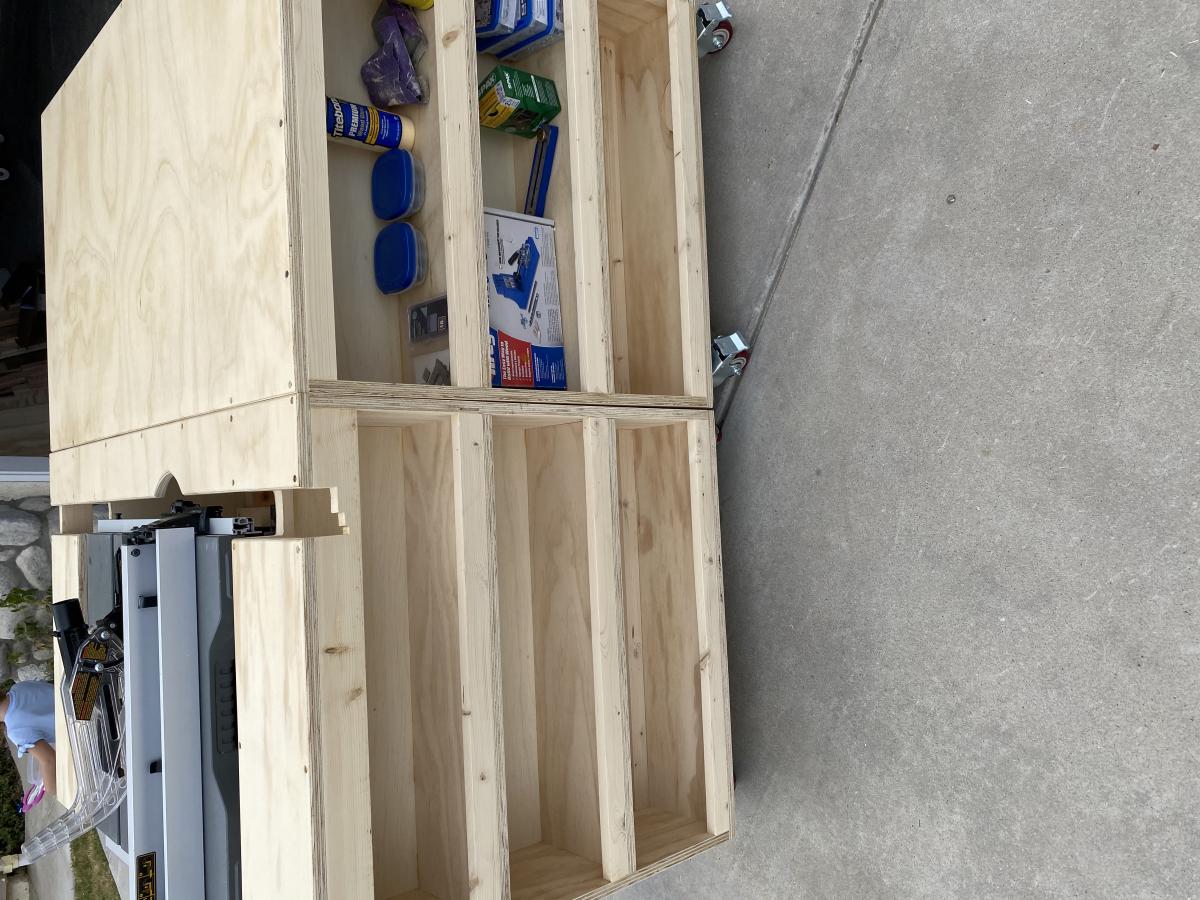
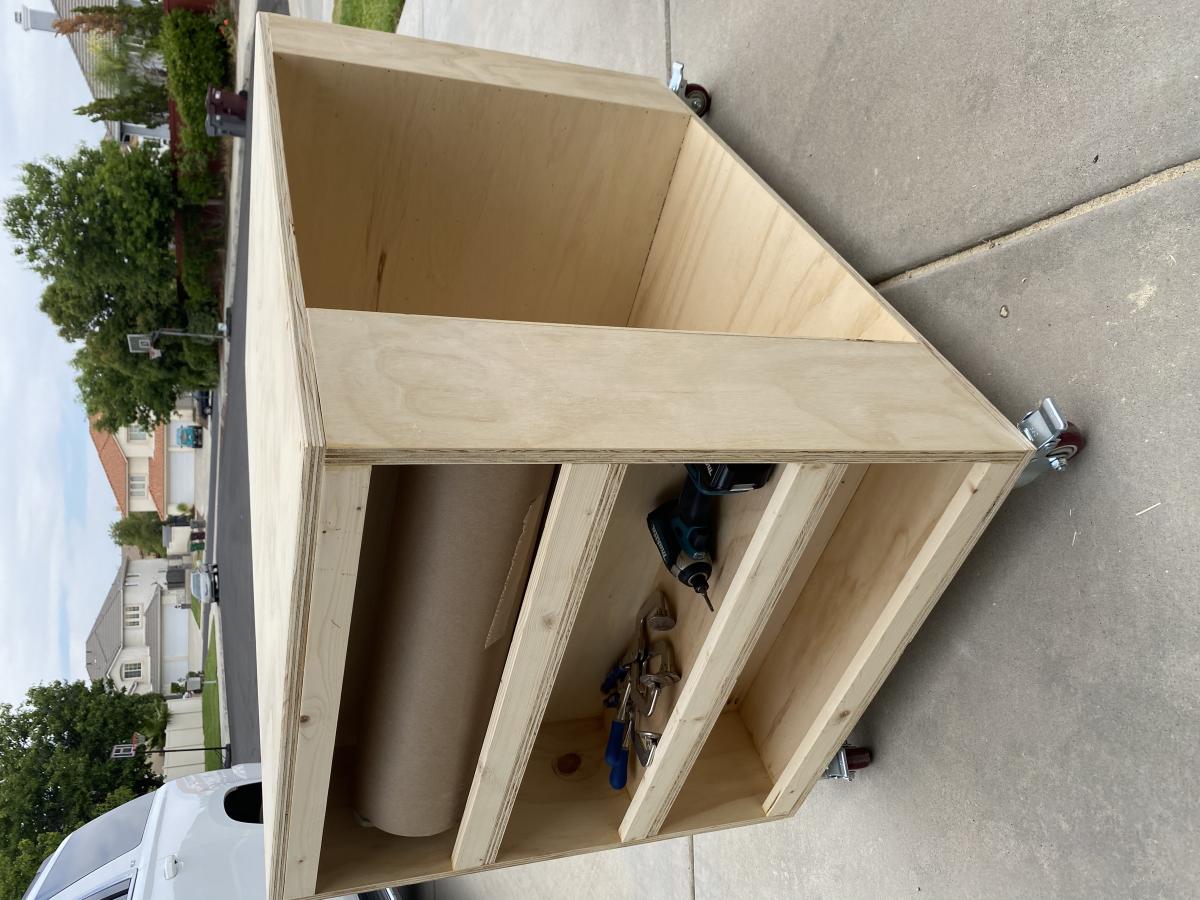
Ultimate workbench

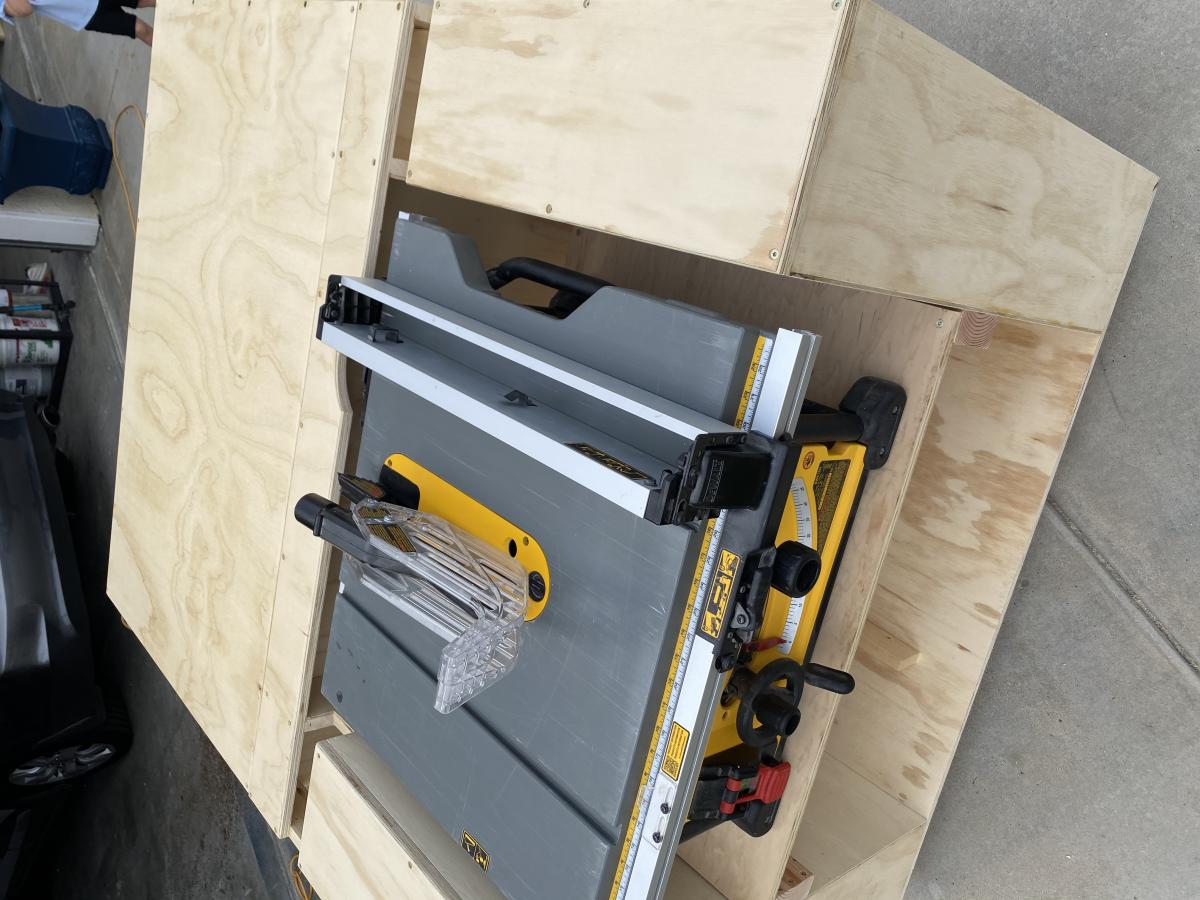
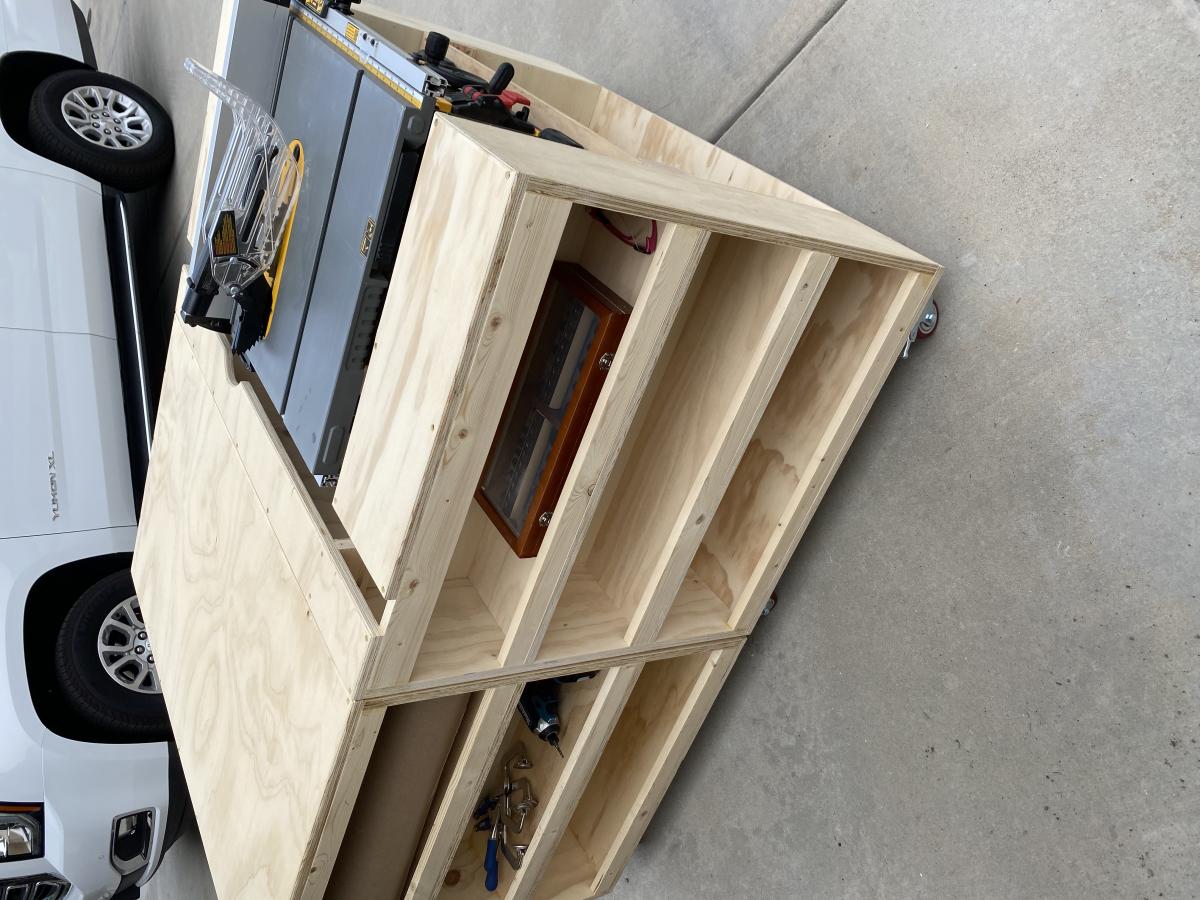
I absolutely love this build. I did end up using pocket holes for the carts to make them slightly stronger. I also had to do custom work on the top of my table saw cart due to rack and pinion fence. I routed the the plywood tops with a slight round over and waxed them smooth. I plan to add a dust collection hood around the miter saw and then install an inset stop block for the miter fence.
Built from Plan(s)
Estimated Cost
300
Estimated Time Investment
Week Long Project (20 Hours or More)
Finish Used
Wax
Recommended Skill Level
Intermediate
Comments
Fri, 07/24/2020 - 16:08
Very nicely done! It never…
Very nicely done! It never even crossed my mind that the cart would need modifications to fit that table saw. That's the exact same table saw I've had my eye on, and I plan on purchasing any day now; so that is definitely good to know! My project is still a work in progress. I currently only have one cart built.
Do you have enough room to adjust your miter saw to make 45 degree cuts from the position pictured? Or do you have to move it forward in order to clear the work bench frame? I only ask because that's what I have to do with mine at the moment. I have to have it all the way forward on the shelf. I am considering making the miter saw shelf a little bit wider to remedy that minor issue.
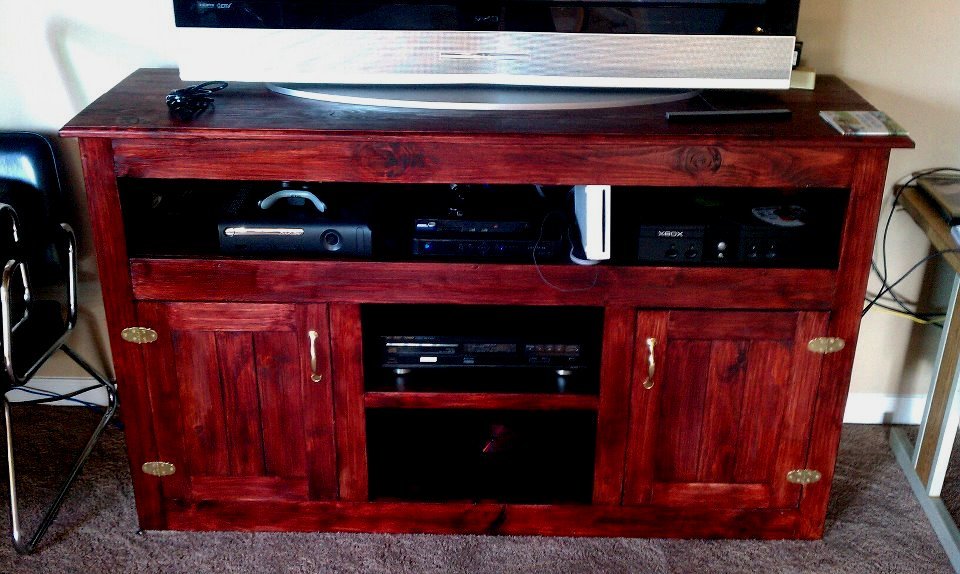
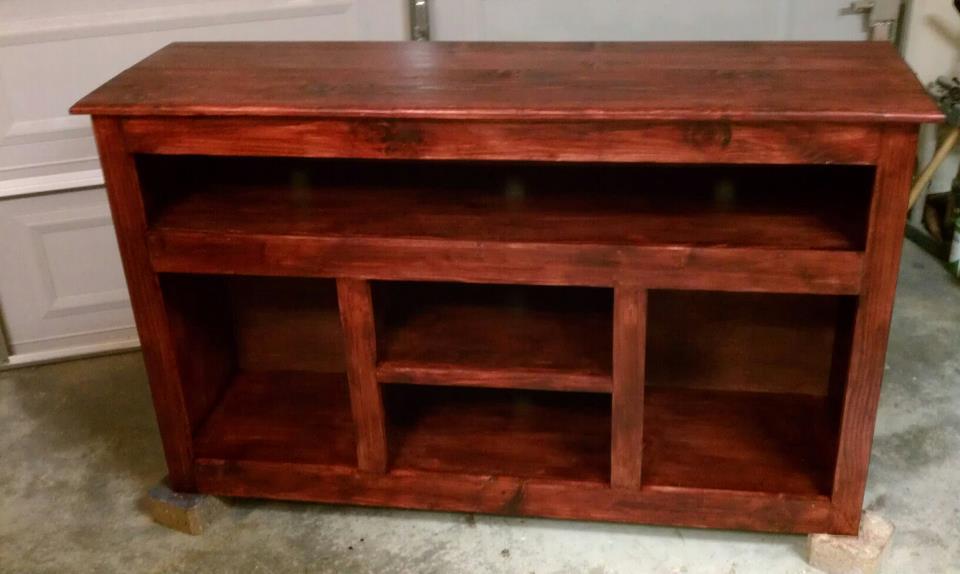
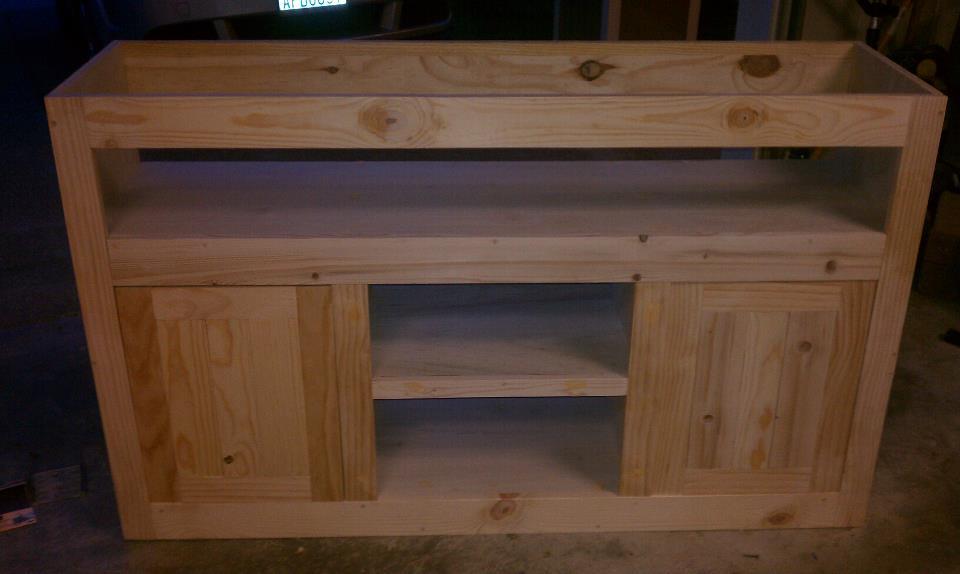
Large Entertainment Center
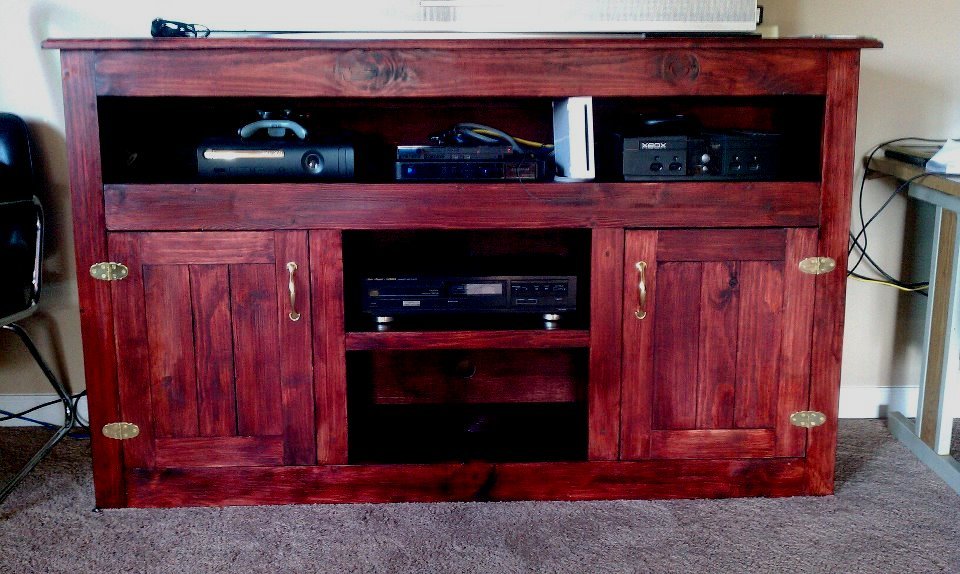
This design is a modification from another entertainment center I built earlier this year. I had a neighbor come over and fall in love with mine and asked if I could build another. I think it cam out pretty well, but tell me what you think....
Estimated Cost
$140.00
Estimated Time Investment
Day Project (6-9 Hours)
Finish Used
Minwax Bombay Mahoganay
Recommended Skill Level
Intermediate
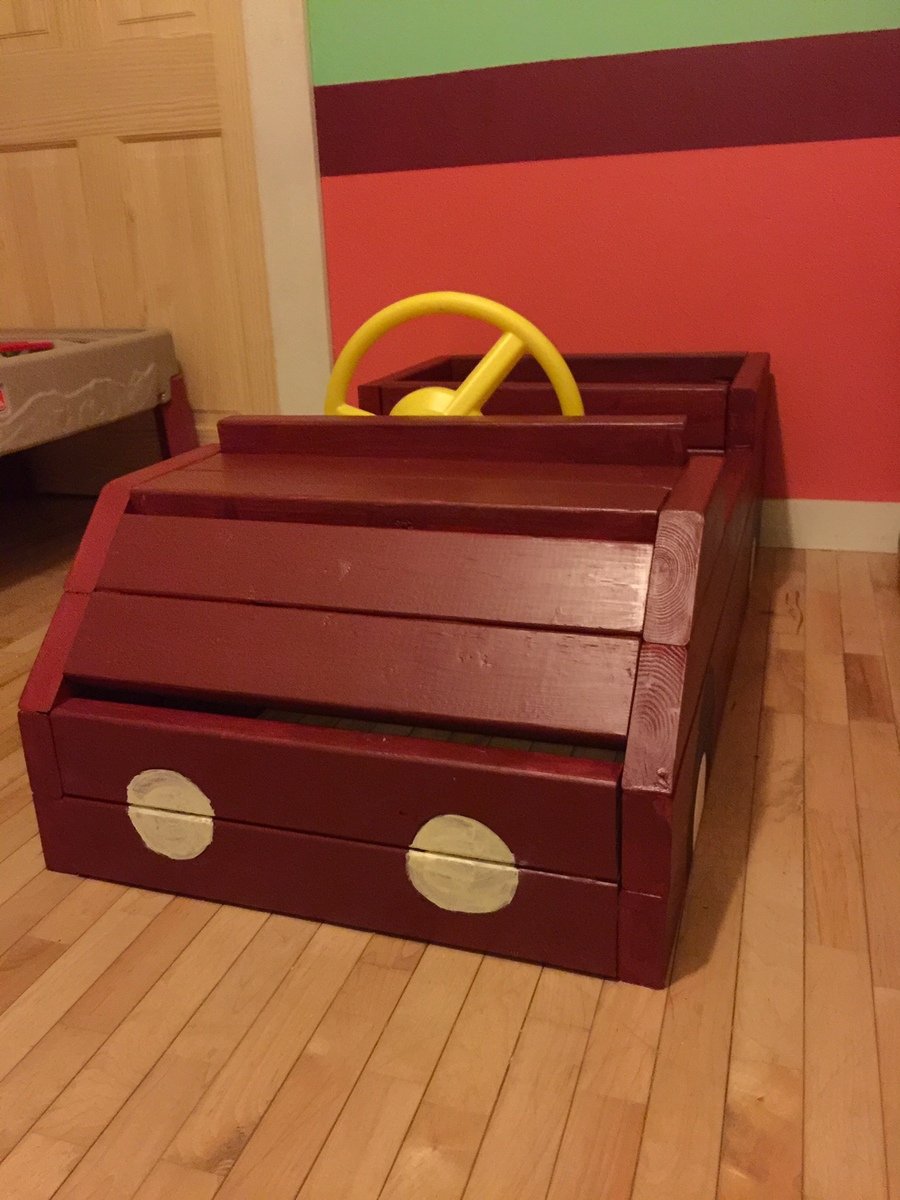
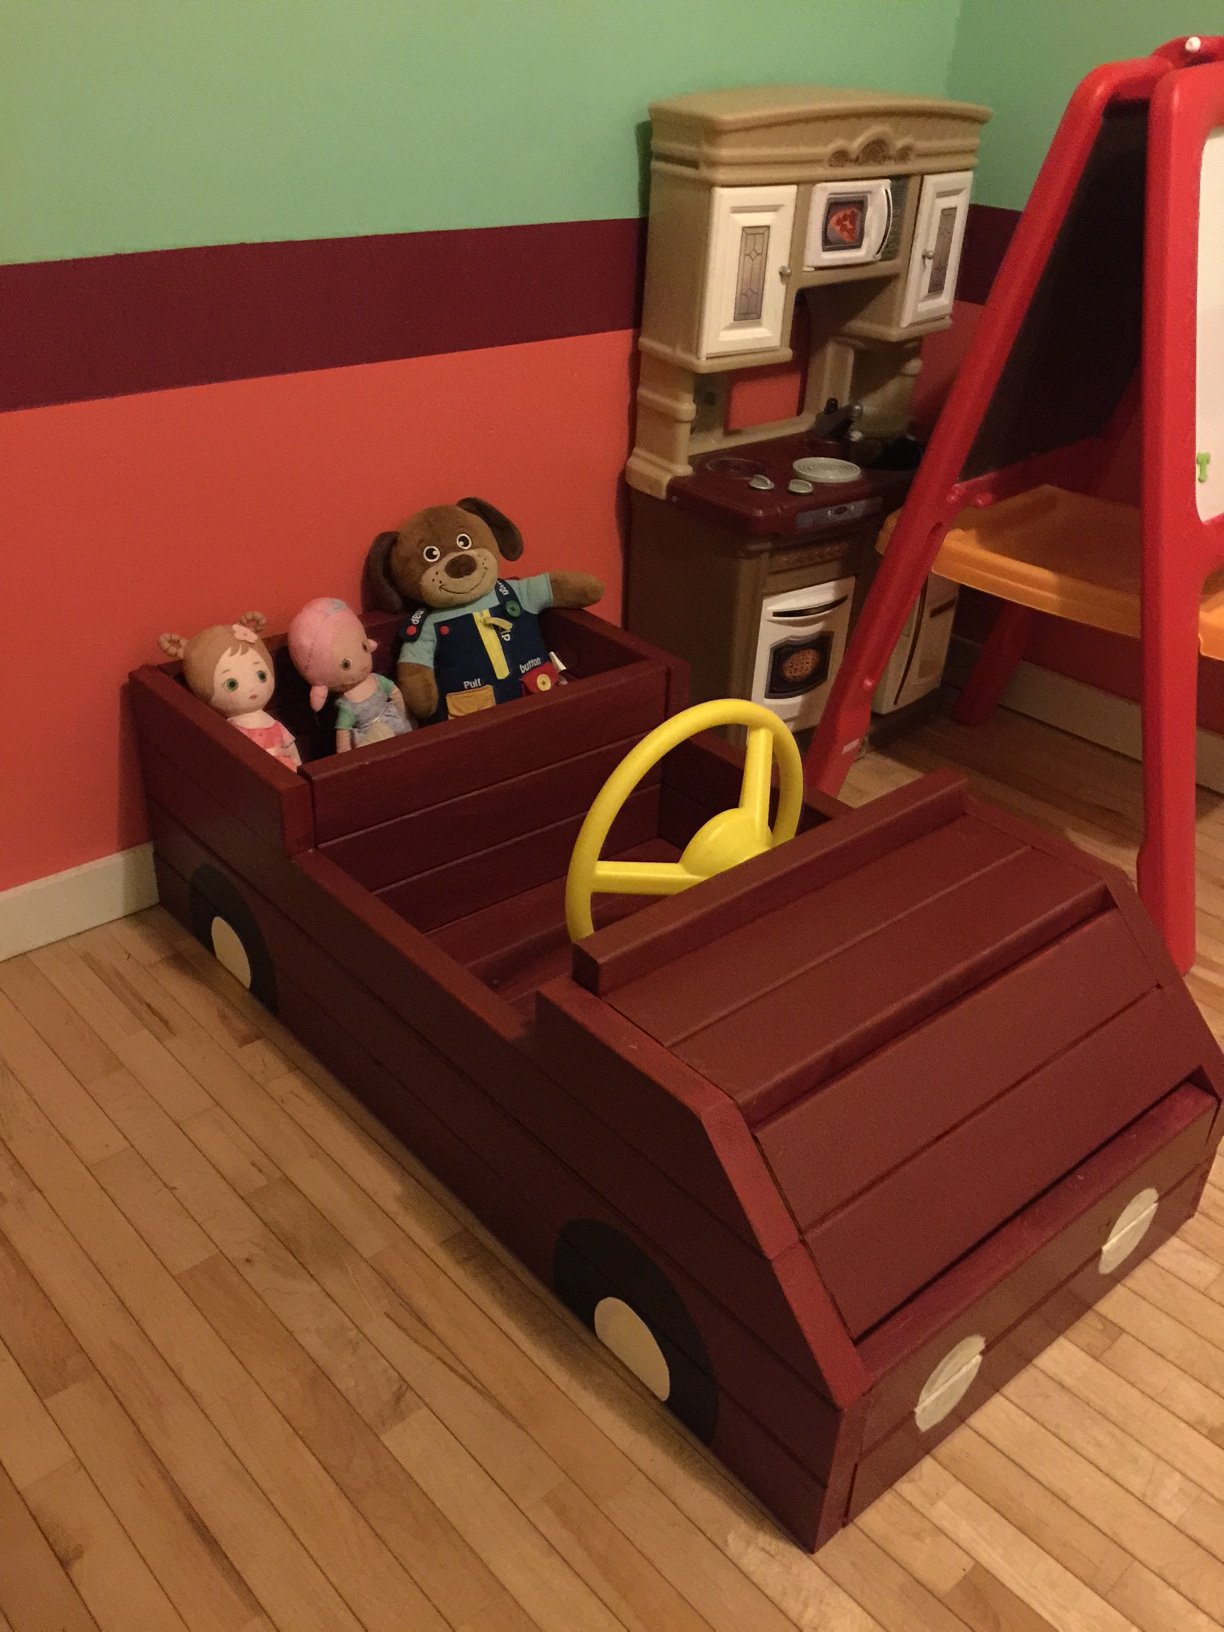
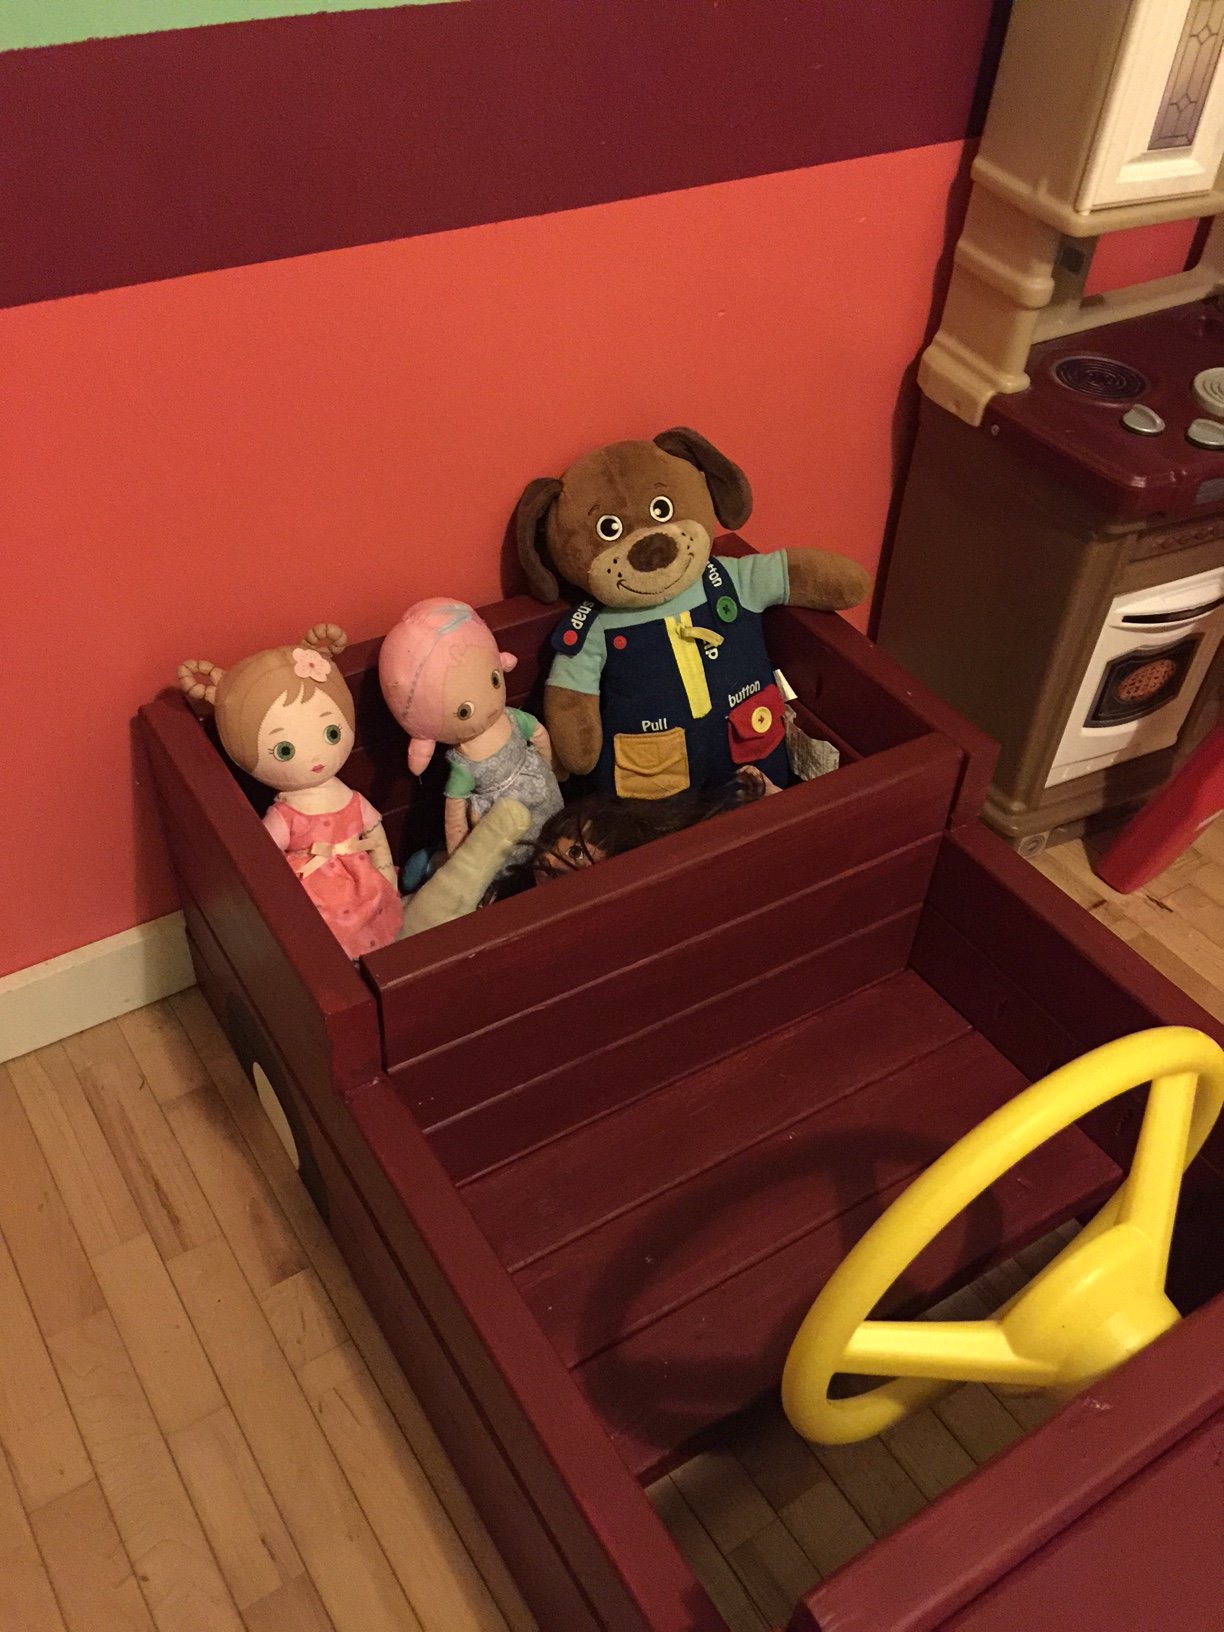
Potatoe bin
I loved this project. Took me a couple hours. Since I didn’t want to go out and buy material I used what I had which was 1x3s. I altered a little but still has the same look. Love it.

Built from Plan(s)
Estimated Cost
$0
Estimated Time Investment
An Hour or Two (0-2 Hours)
Finish Used
None. Just paint
Recommended Skill Level
Beginner
My Greenhouse
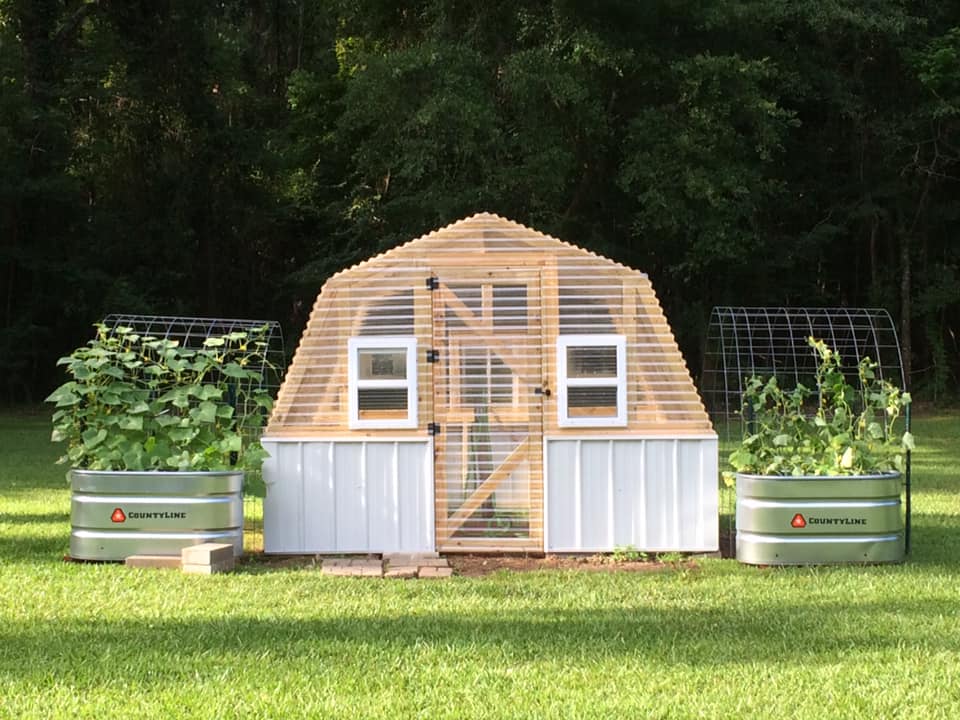
I went from a 6 x 8 Harbor Freight Greenhouse to this one 10 x 12. I added a few windows...
Built from Plan(s)
Comments
Seasonal And Holiday
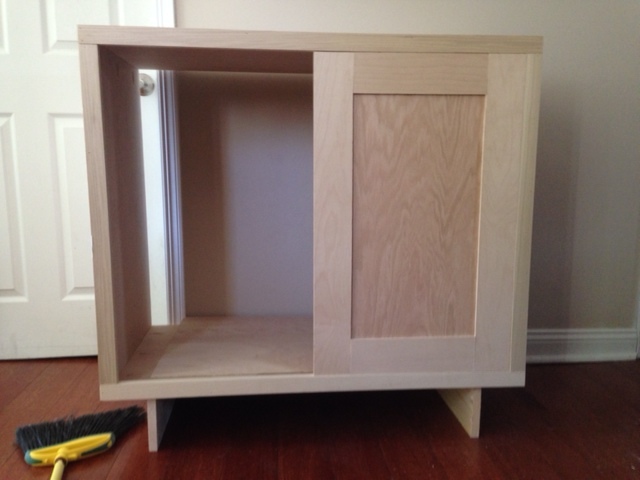
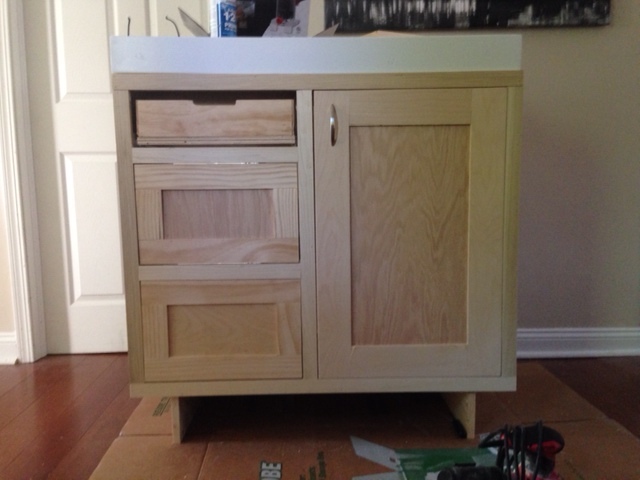
Changing Table
After building the Emerson console for our living room, and seeing how Ana modified the plans for a changing table, I decided to do the same. Although I eliminated one of the doors to make it fit our room a little better and also cut down on plywood costs, I'm VERY happy with how this turned out.
I also decided to use shaker style drawers and a shaker style cabinet door to give it a slightly more polished or modern look. Our baby is due in July and these drawers are already full of diapers and clothes!

Built from Plan(s)
Estimated Cost
$175
Estimated Time Investment
Weekend Project (10-20 Hours)
Finish Used
Kilz primer on the bare wood, followed by Valspar Ultimate paint in Ultra White, and finally protected with Minwax water based polyurethane to prevent the white from yellowing. Lots of sanding to smooth out the painted surfaces and get rid of any runs/brush strokes/lap marks.
Recommended Skill Level
Intermediate
Comments

Mon, 06/09/2014 - 07:19
This turned out BEAUTIFUL!
I love the modifications you made to this! Definitely looks modern and polished. Great job!
Wed, 06/11/2014 - 12:28
Thank you!
Thank you for the kind words! I visit all of your sites daily so I appreciate the feedback
Double Wide Bookshelf
So excited about how good this turned out!!!
Mo Harris
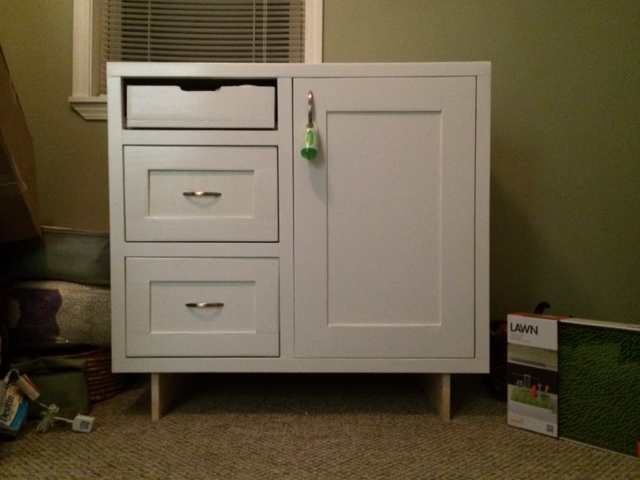
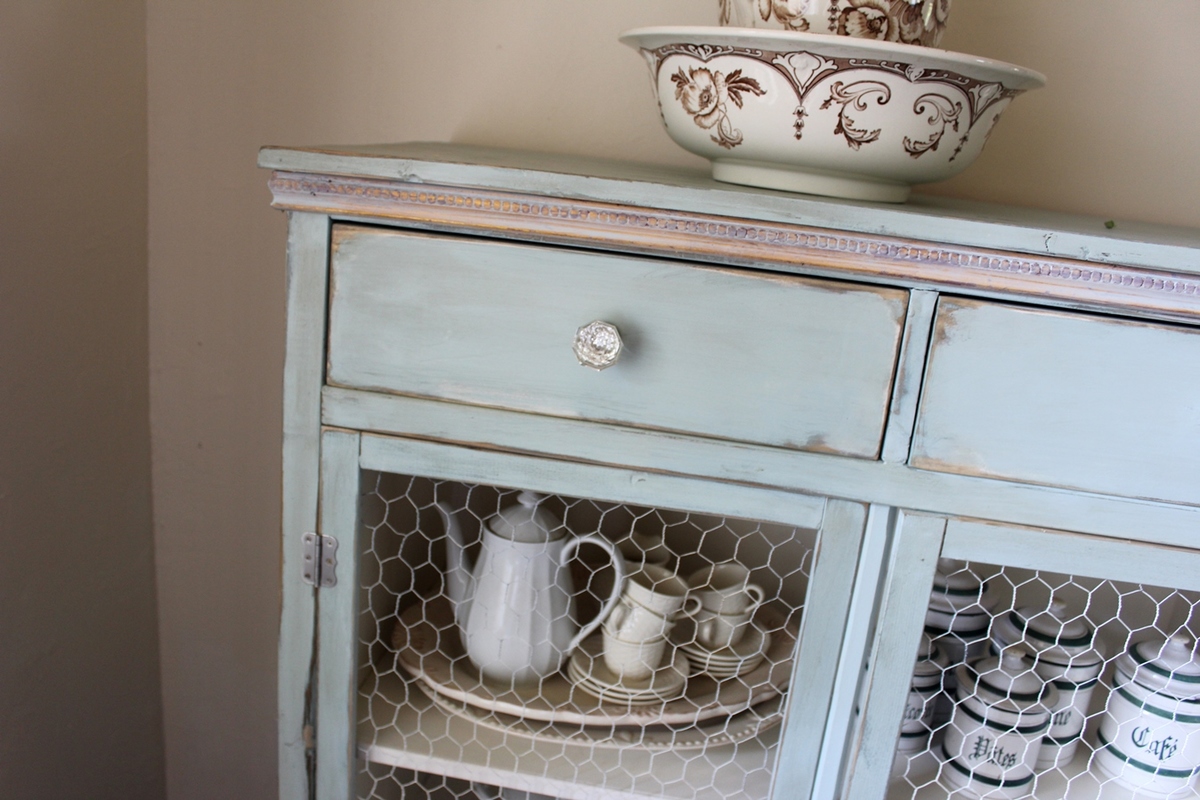
Hemnes cabinet with wire mesh
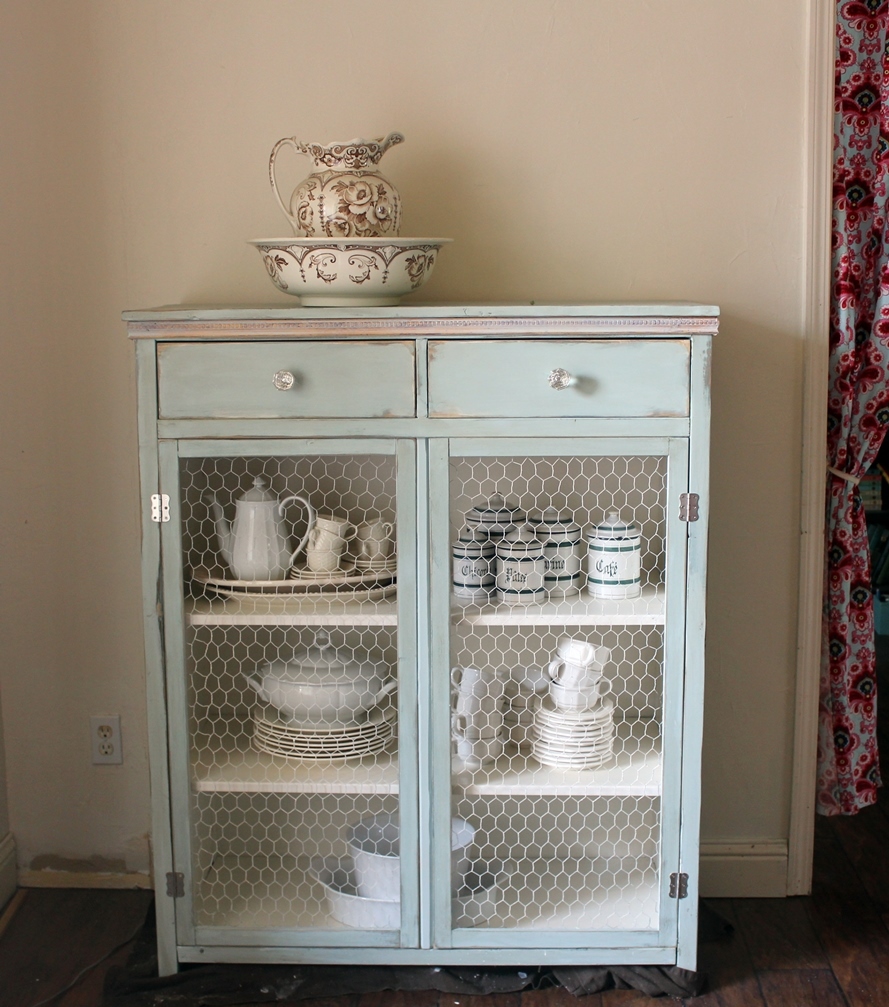
I'm still pretty new to woodworking so this cabinet took a little longer than it probably should have. I made the drawers a little deeper than the plans originally called for, which changed the height of the cabinet doors, but otherwise, all the other dimensions are the same. The laminated glass would have added another $100 to the cost so I used a chicken wire mesh that I dry brushed with the white I used on the interior. The knobs are from Anthropologie and I added a little trim piece around the top. I really love how much this cabinet holds. It is very versatile.
Built from Plan(s)
Estimated Cost
$100 including wood, hardware and paint
Estimated Time Investment
Weekend Project (10-20 Hours)
Finish Used
I used a custom mixture of Annie Sloan's Chalk Paint ( Duck egg Blue) and an antique white. The mixture was about half blue and half white. I finished with a couple of coats of dark wax.
Recommended Skill Level
Beginner
Comments

Tue, 08/19/2014 - 13:05
Thank you for the kind
Thank you for the kind comments! I am excited to build another one of these for my mom.
Sun, 10/30/2016 - 13:07
Drawer Slides
love it! Did you have any issues getting the drawer in when the slides are installed? We installed the slides on the drawer box and then the slides on the case and we had to loosen some to actually get the drawer in, because the little wheels of the slides were basically blocking us from pivoting it in. Thanks!
Simple Dock Bench and Chair
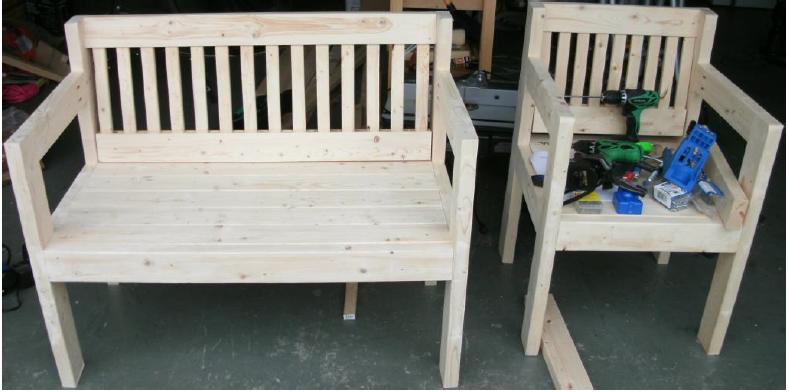
If you'd like to build a very inexpensive chair and bench for your boat dock out of just 2 x 4s and 1 x 2's that is extremely sturdy, then this project is for you. As you can see by the picture, I used the Kreg jig, 2 cordless drills. Also a chop saw to cut the materials.
Estimated Cost
$30 for all
Estimated Time Investment
Afternoon Project (3-6 Hours)
Finish Used
The picture shows the bare wood, but I used a walnut colored stain followed by a clear sealer
Recommended Skill Level
Starter Project
Comments
Wed, 01/02/2013 - 20:23
plans for simple dock bench
These are great! Where are the plans for these??? I've been looking for a bench just like this.
Workbench
Great beginner project. I needed minimal help from my husband. Everyone in the family now wants a bench like mine. Thanks a bunch for the easy to follow plans. Love your website!
Built from Plan(s)
Estimated Cost
$75.00
Estimated Time Investment
Afternoon Project (3-6 Hours)
Recommended Skill Level
Beginner
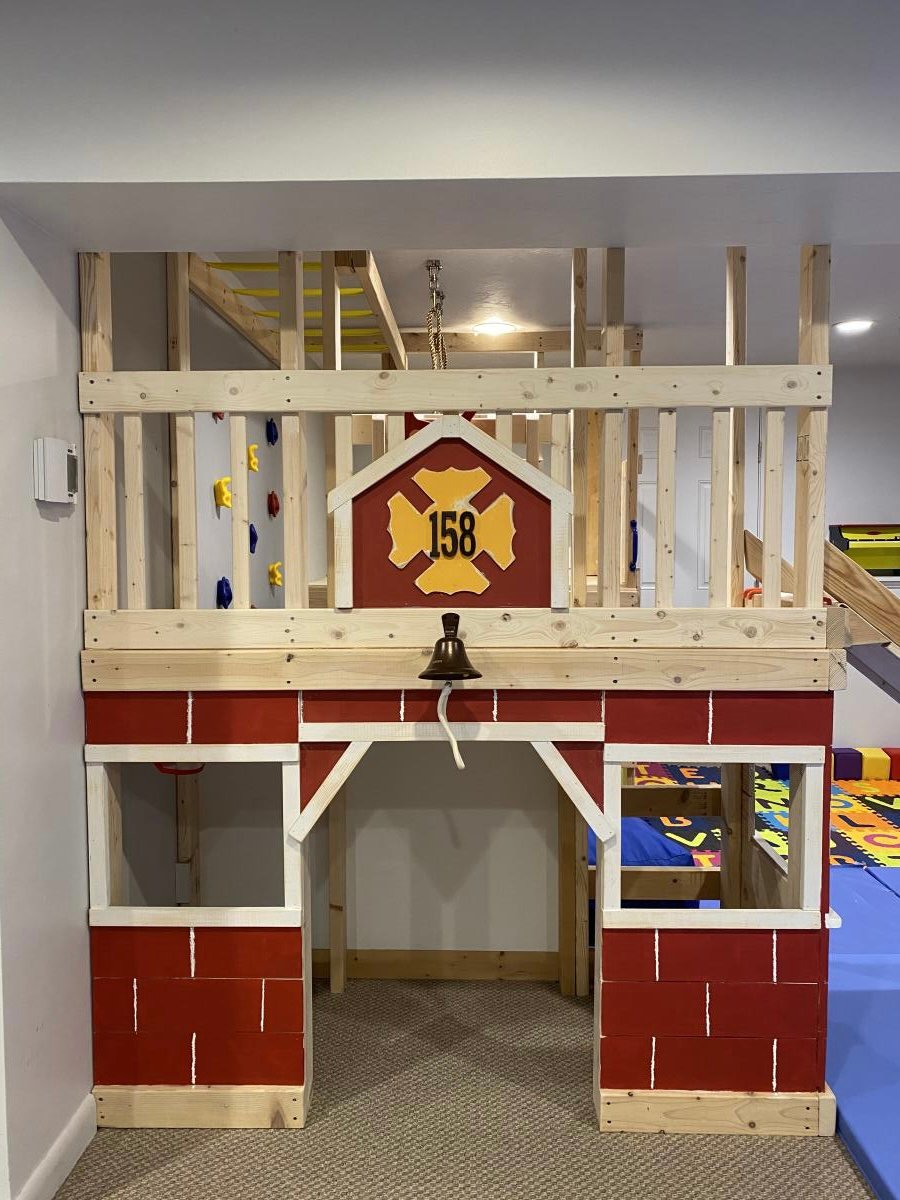
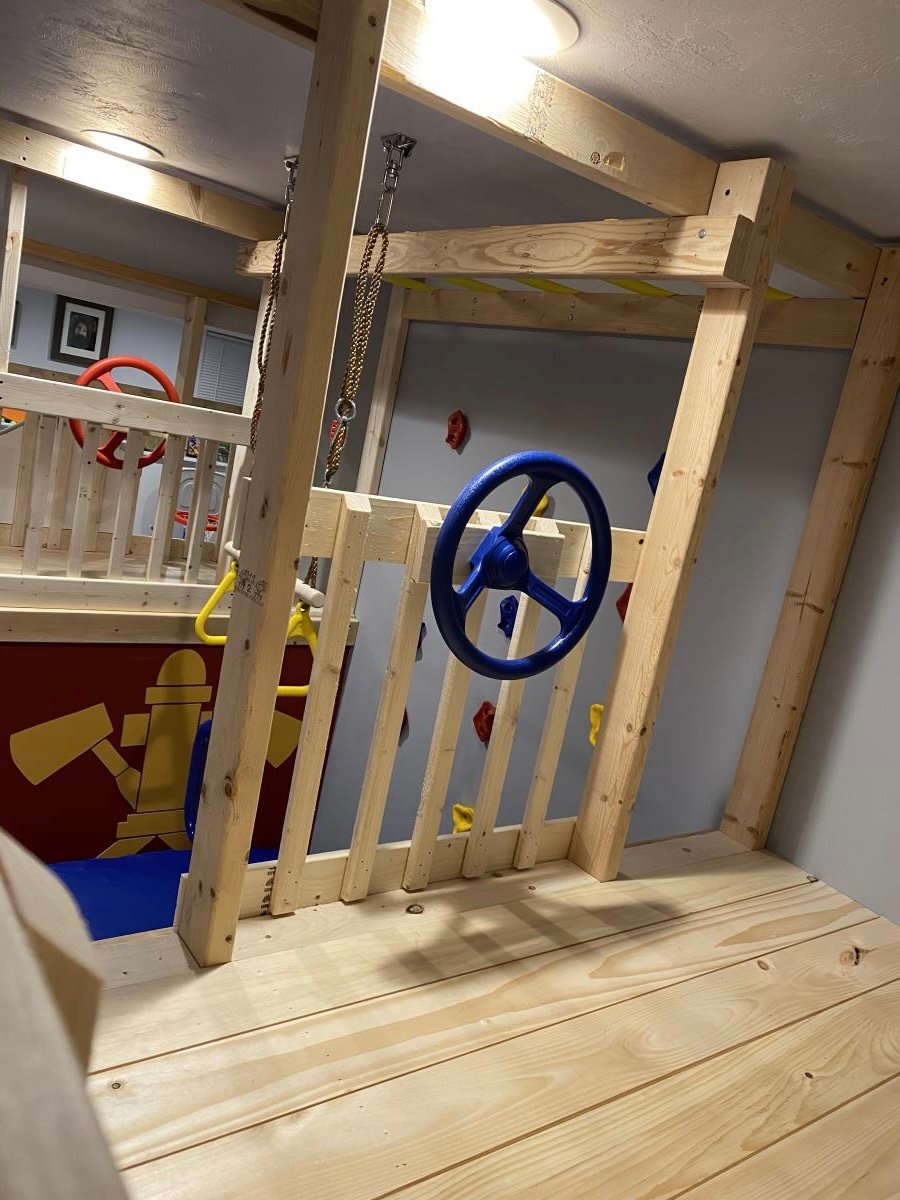
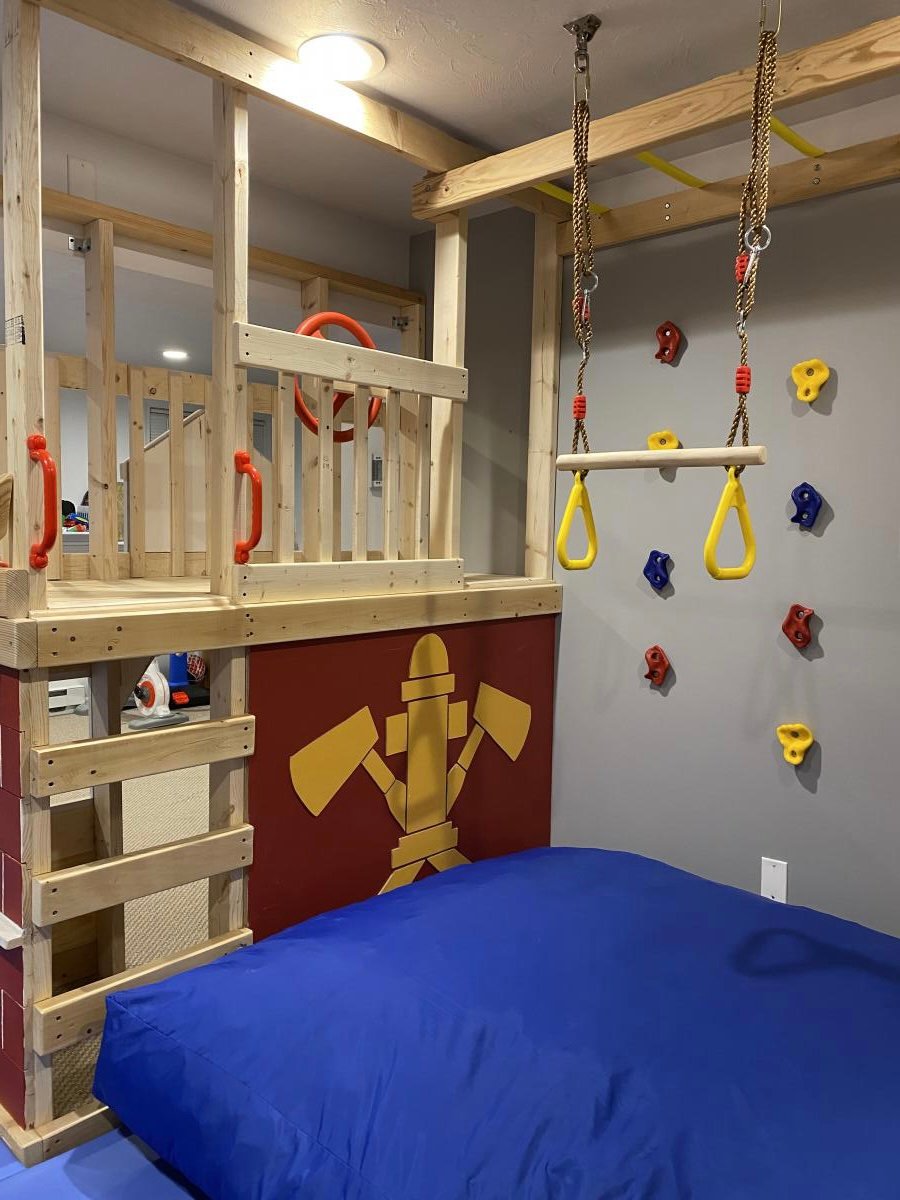
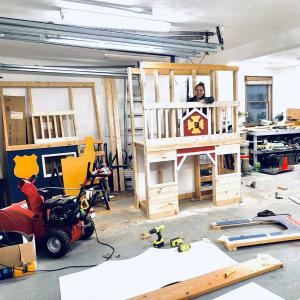
Basement Play Gym
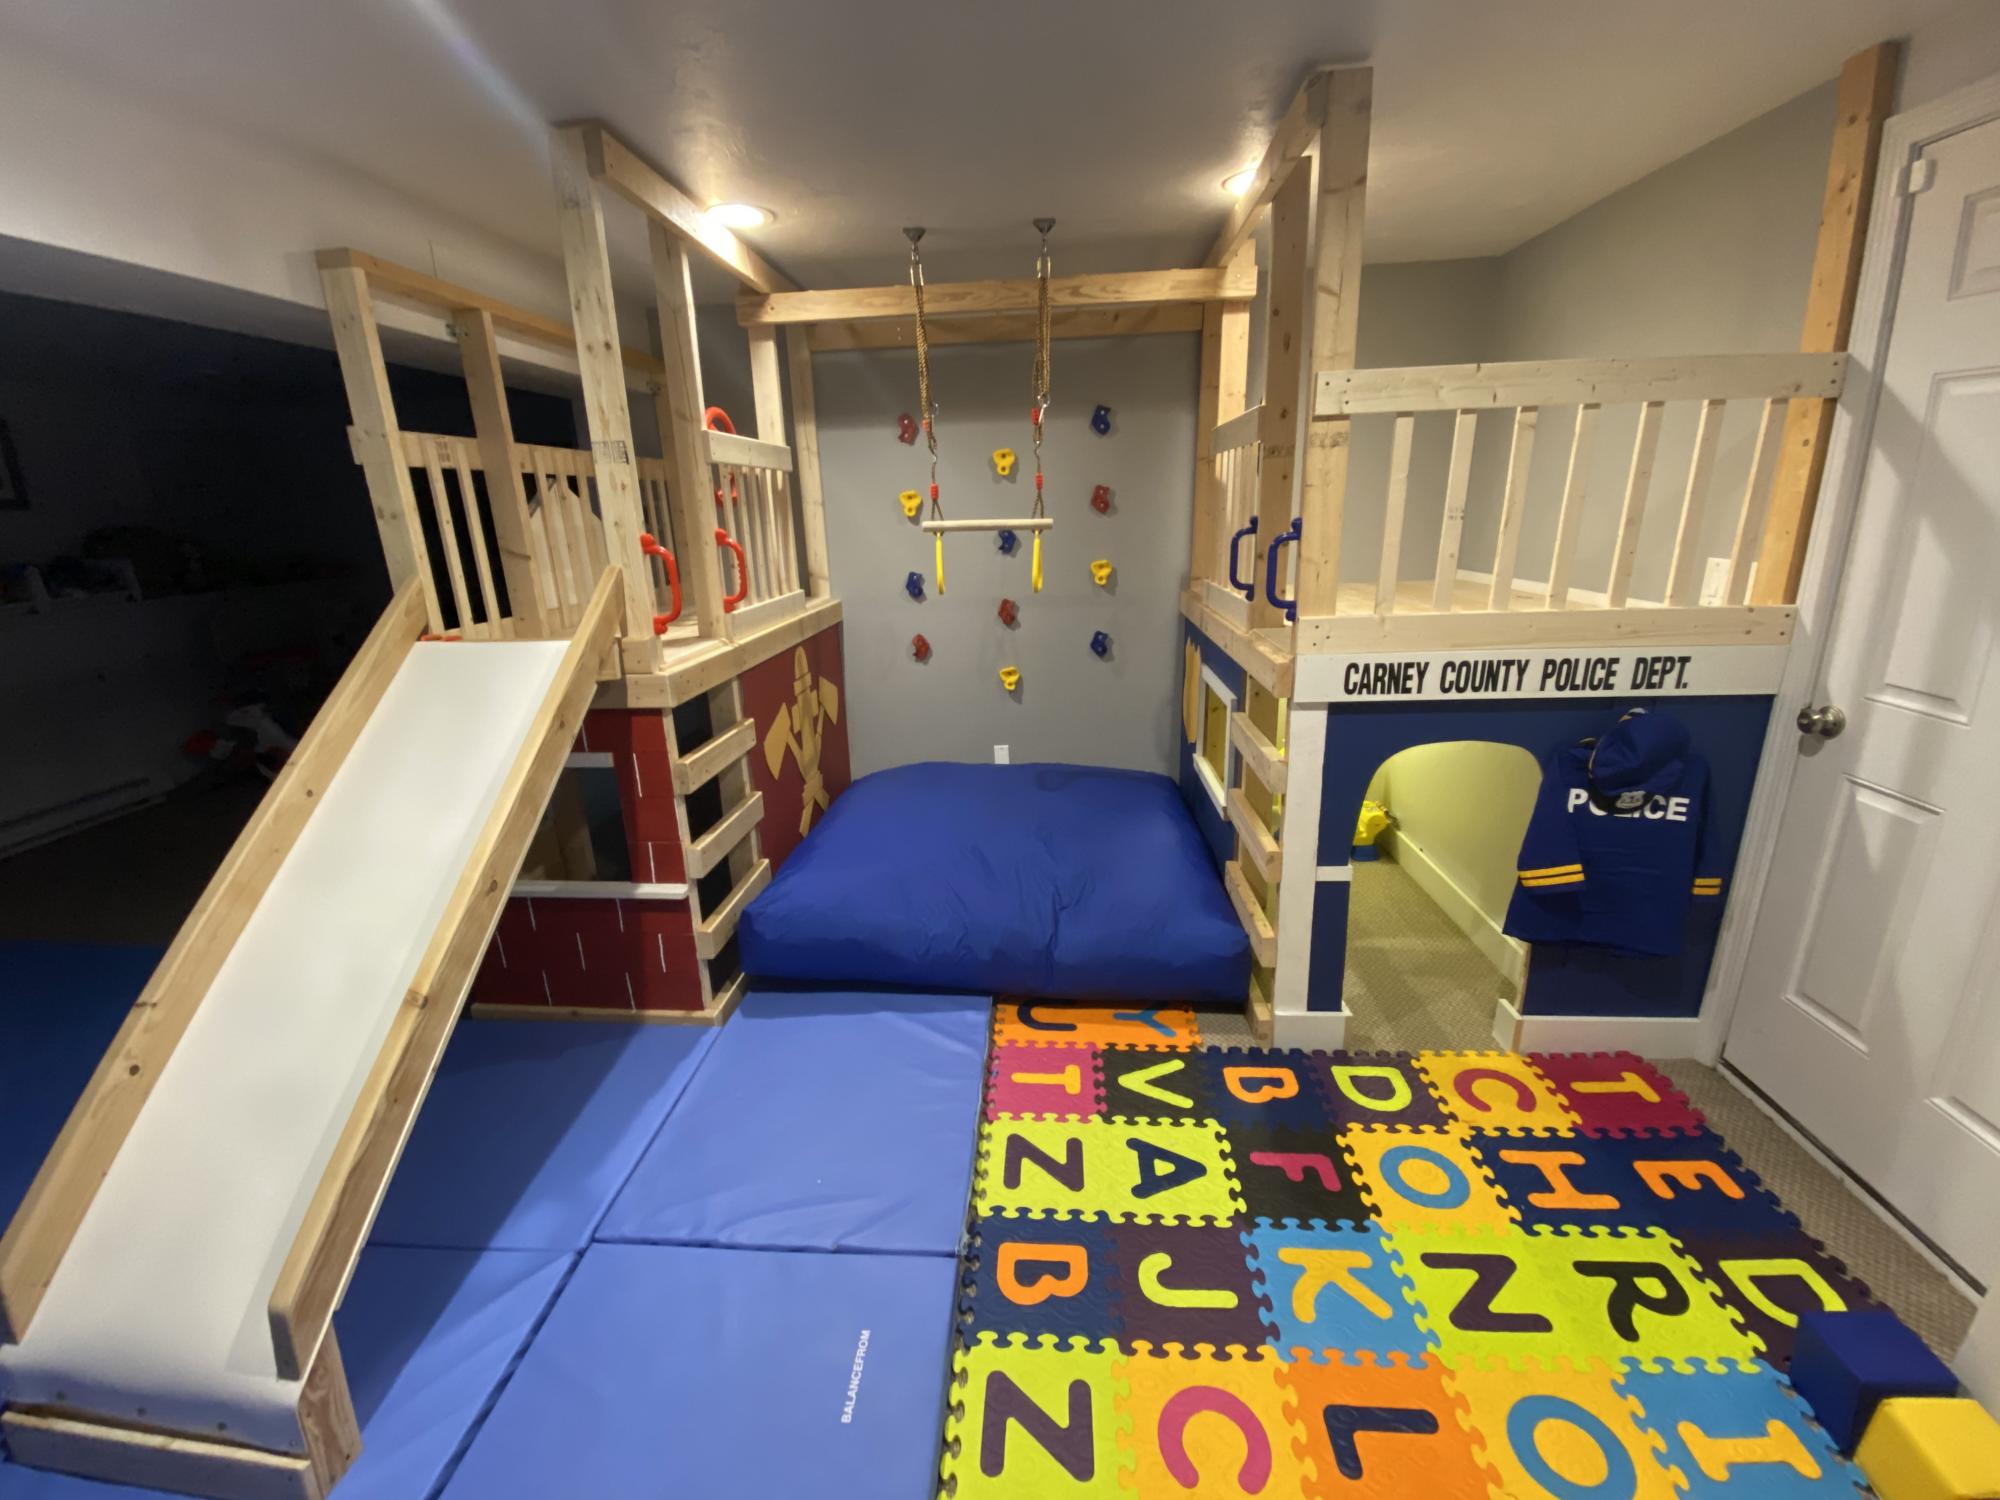
With Christmas approaching and the realization that my three young boys had way too much “stuff”, I enrolled the help of my dad to build this amazing basement play area. When I found Ana’s plans for the play gym with monkey bars, I knew we were in business. I modified the design to fit our space and we were off. Such a fun build and my boys absolutely love spending time down there. Thanks so much for your continued inspiration and the confidence you give us mamas to build with the big boys, Ana!!

Built from Plan(s)
Estimated Cost
$1000
Estimated Time Investment
Week Long Project (20 Hours or More)
Recommended Skill Level
Intermediate
Comments
In reply to Fabulous! by Ana White Admin
Fri, 01/08/2021 - 16:23
Thank you so much!! 🙏
Thank you so much!! 🙏
My spin on the Counter Height Farmhouse Table from Amazon White’s free plans!
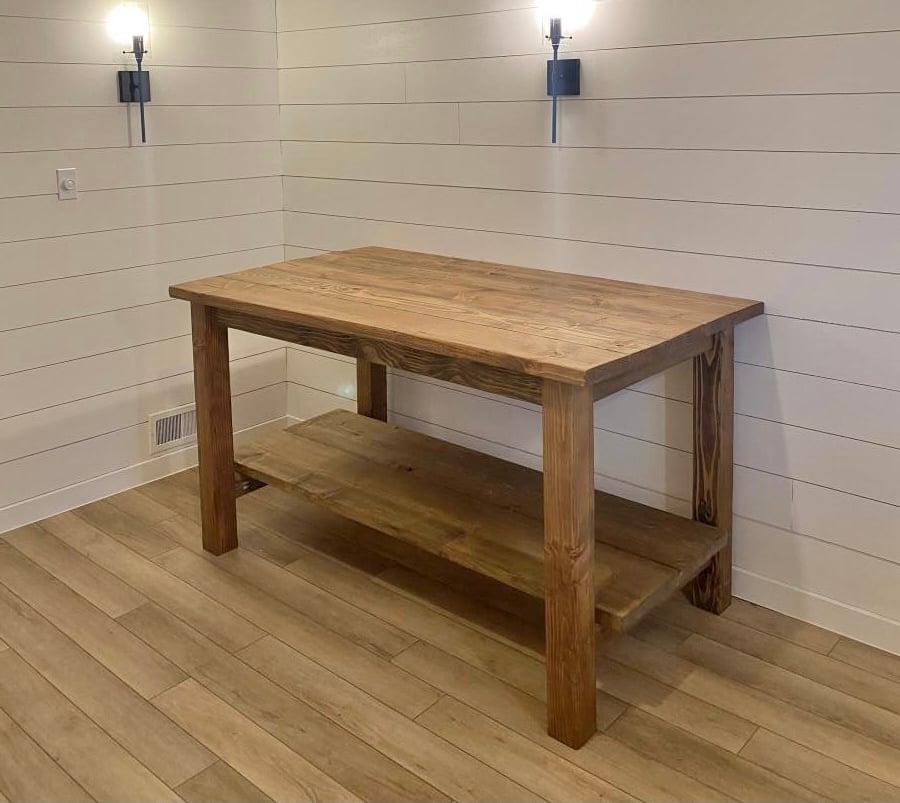
The counter height farmhouse table plans were so helpful! Thank you Ana White! I replaced plywood on top with 2x8s and added a shelf underneath the table for some kitchen storage! I am in love thanks again😍 Follow me on Instagram @abbbclark_homeee for more home renovations, decor and DIY!
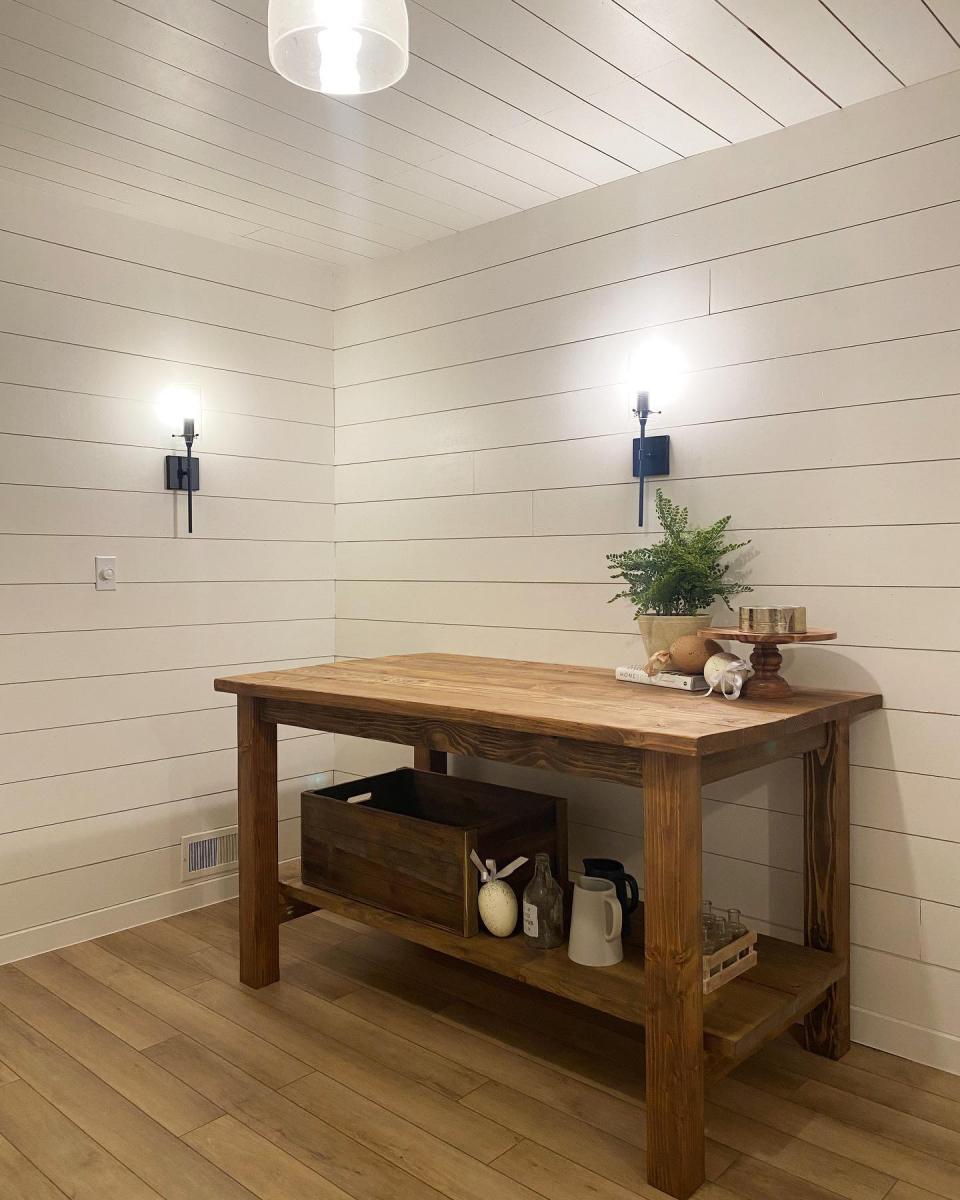
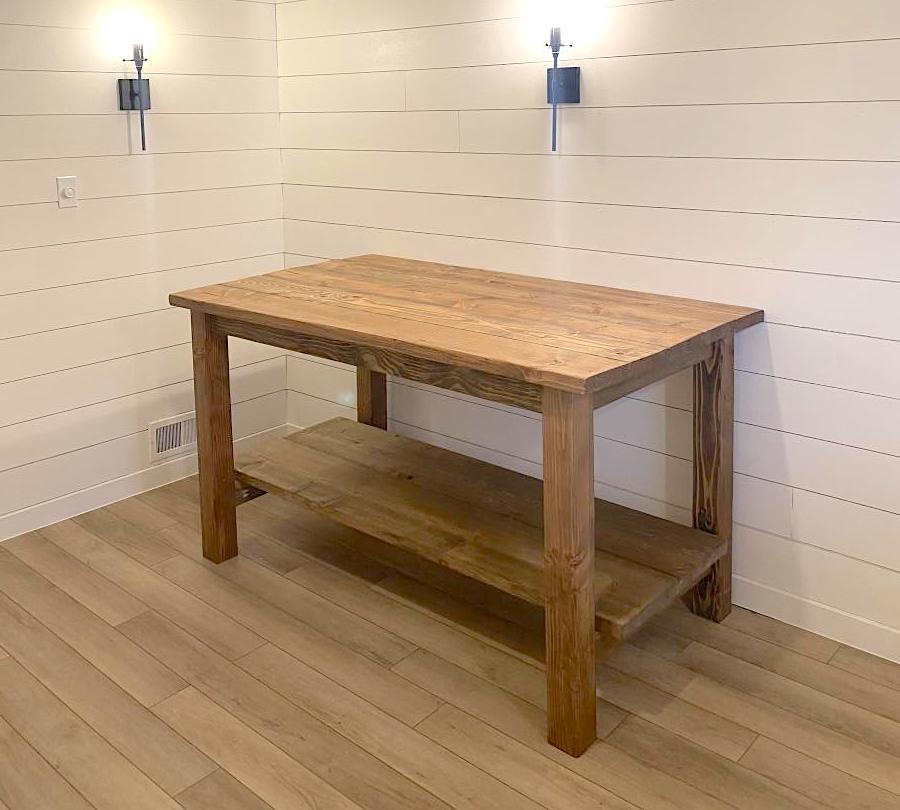
Built from Plan(s)
Estimated Cost
$200
Estimated Time Investment
Day Project (6-9 Hours)
Finish Used
Weathered oak oil based stain
Recommended Skill Level
Beginner
Comments
corner shelf
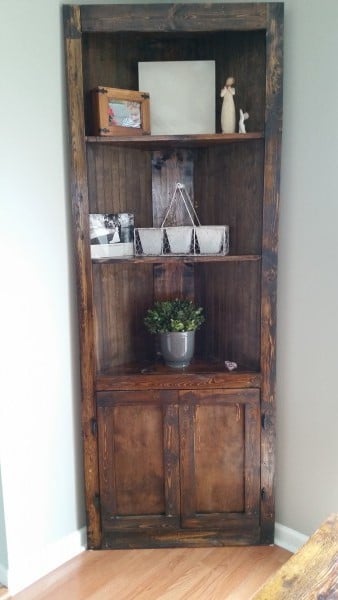
This was very easy to make. Stained with minwax dark walnut. It's very sturdy too.
Built from Plan(s)
Estimated Time Investment
Day Project (6-9 Hours)
Finish Used
Minwax dark walnut
Recommended Skill Level
Beginner
Comments
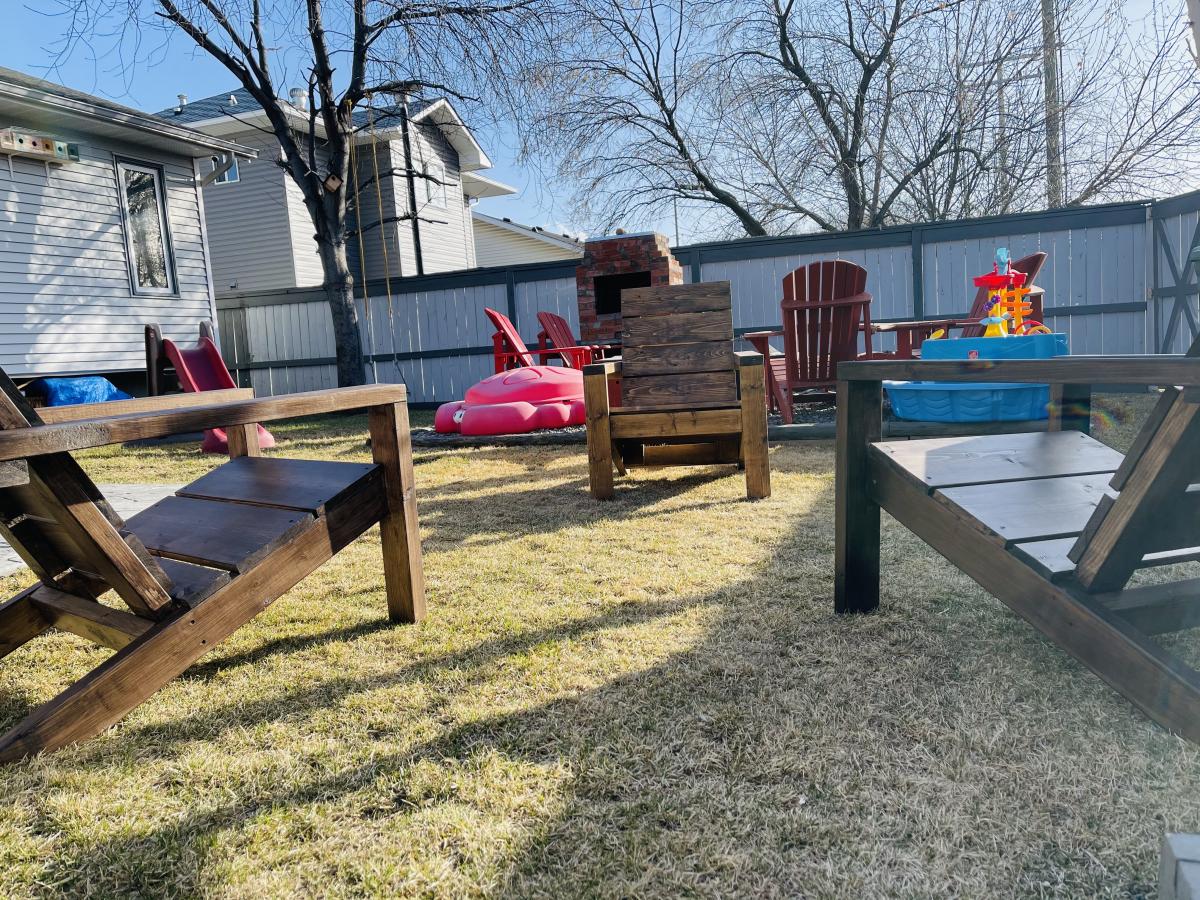
2 X 4 Adirondack Chair
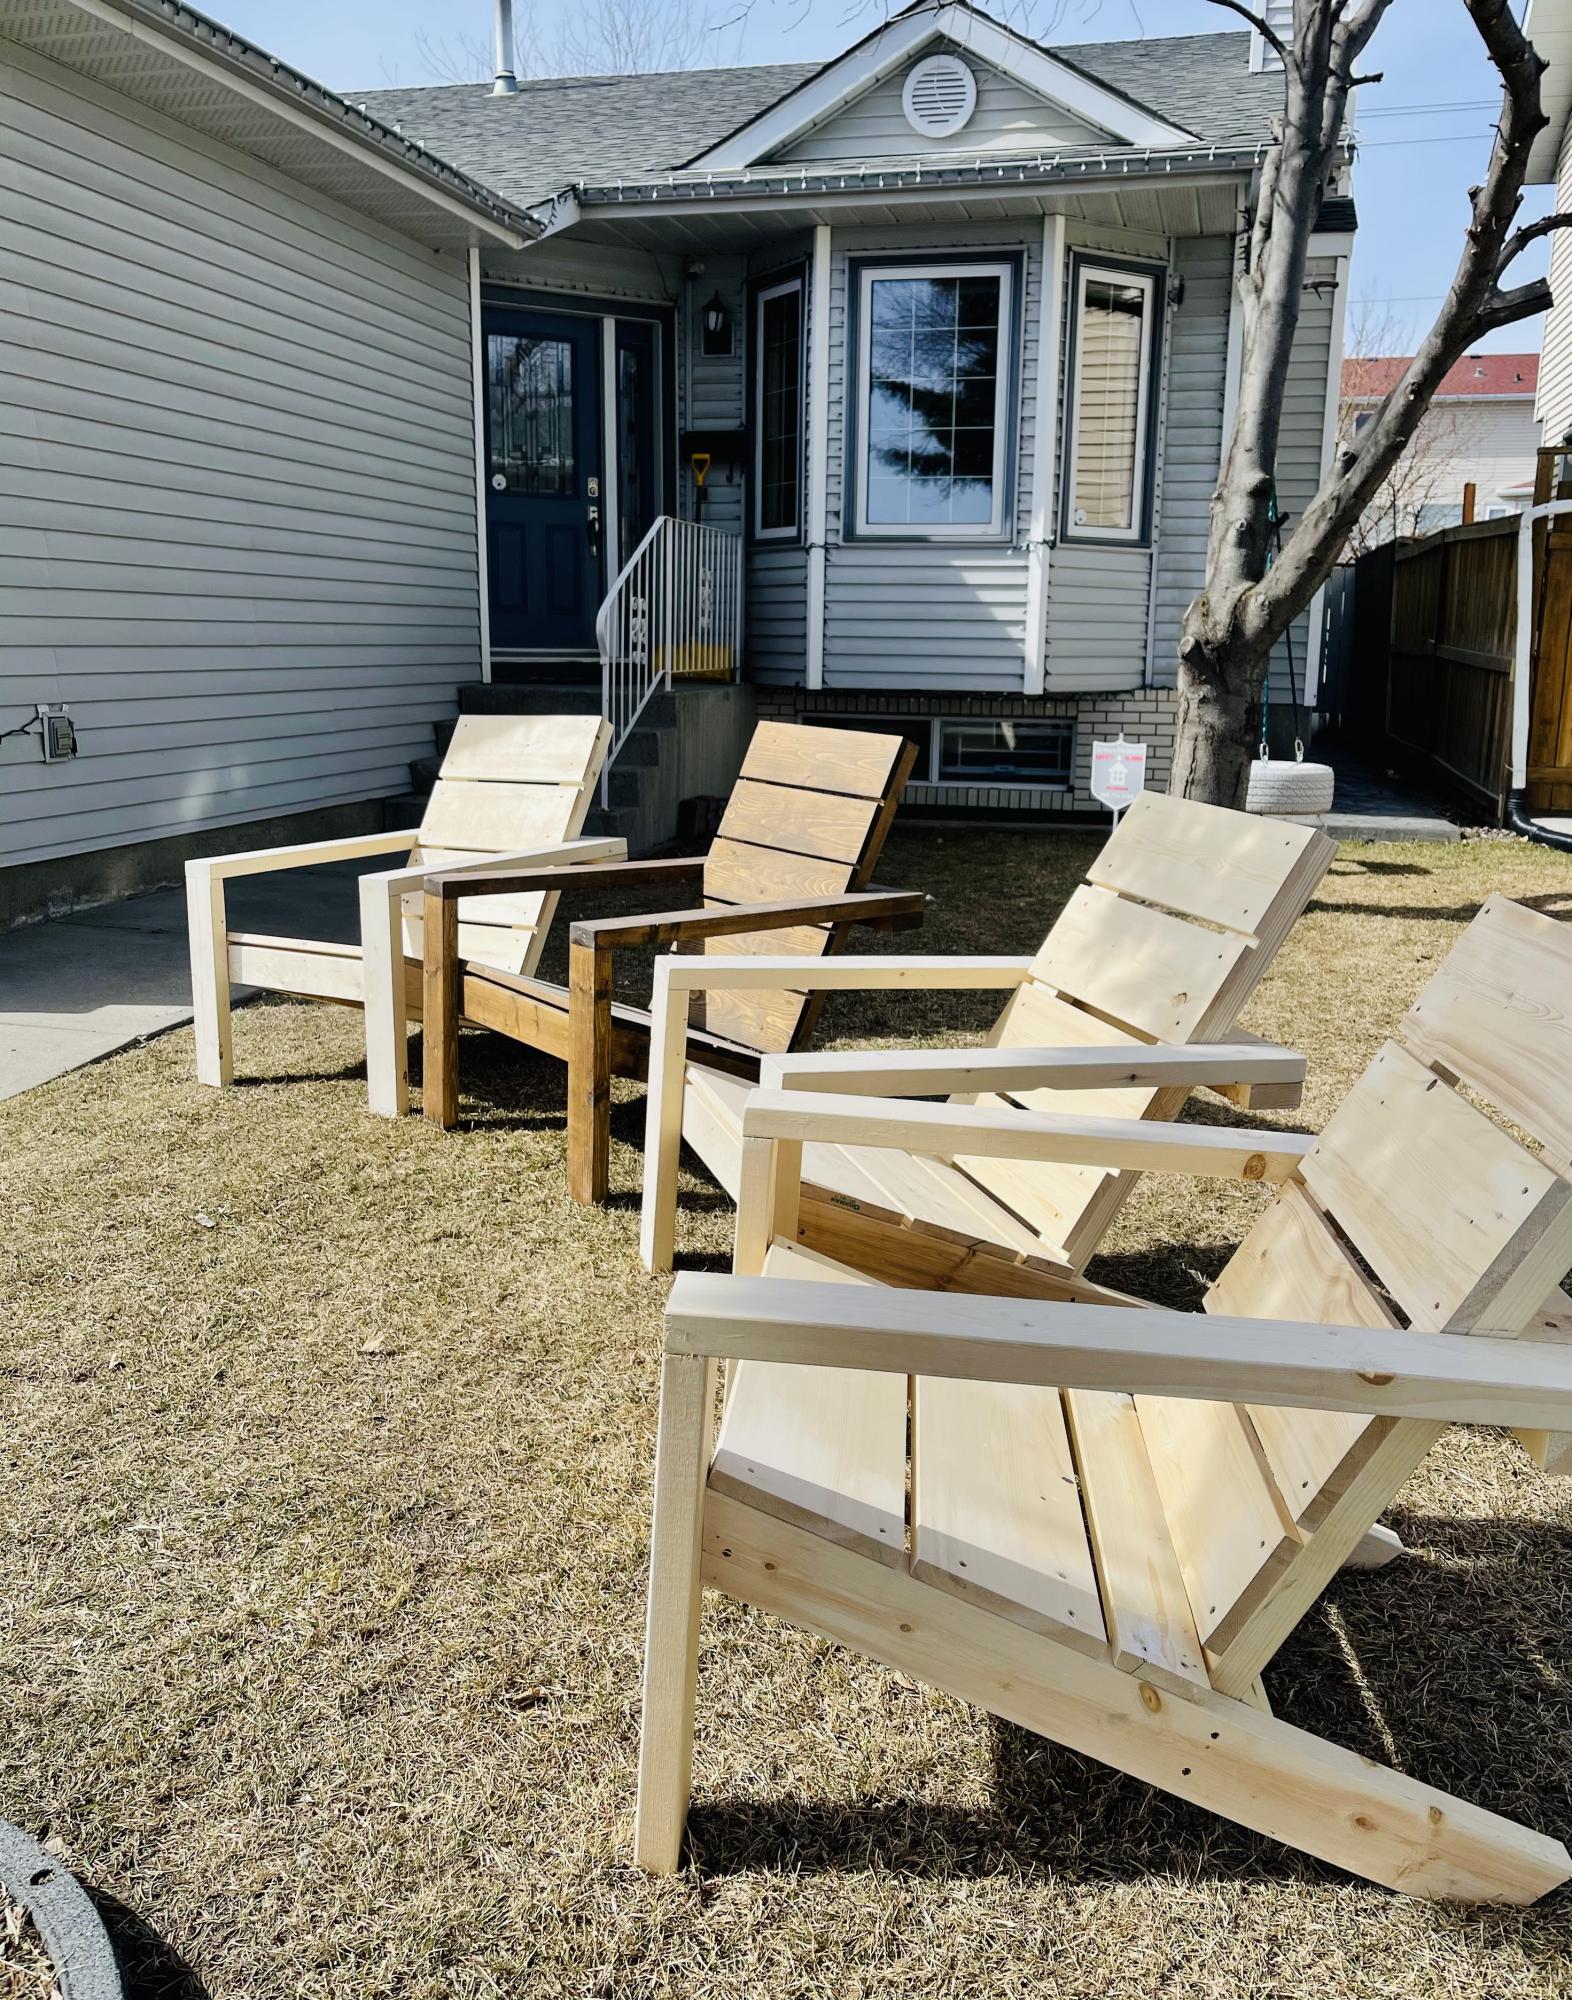
I decided to try to do some chairs for my backyard , guess what ........ i end up with very nice chairs.
It's very comfortable and looks great. My friends already asked me to do some for them.
Thanks Ana White for the great free plan.
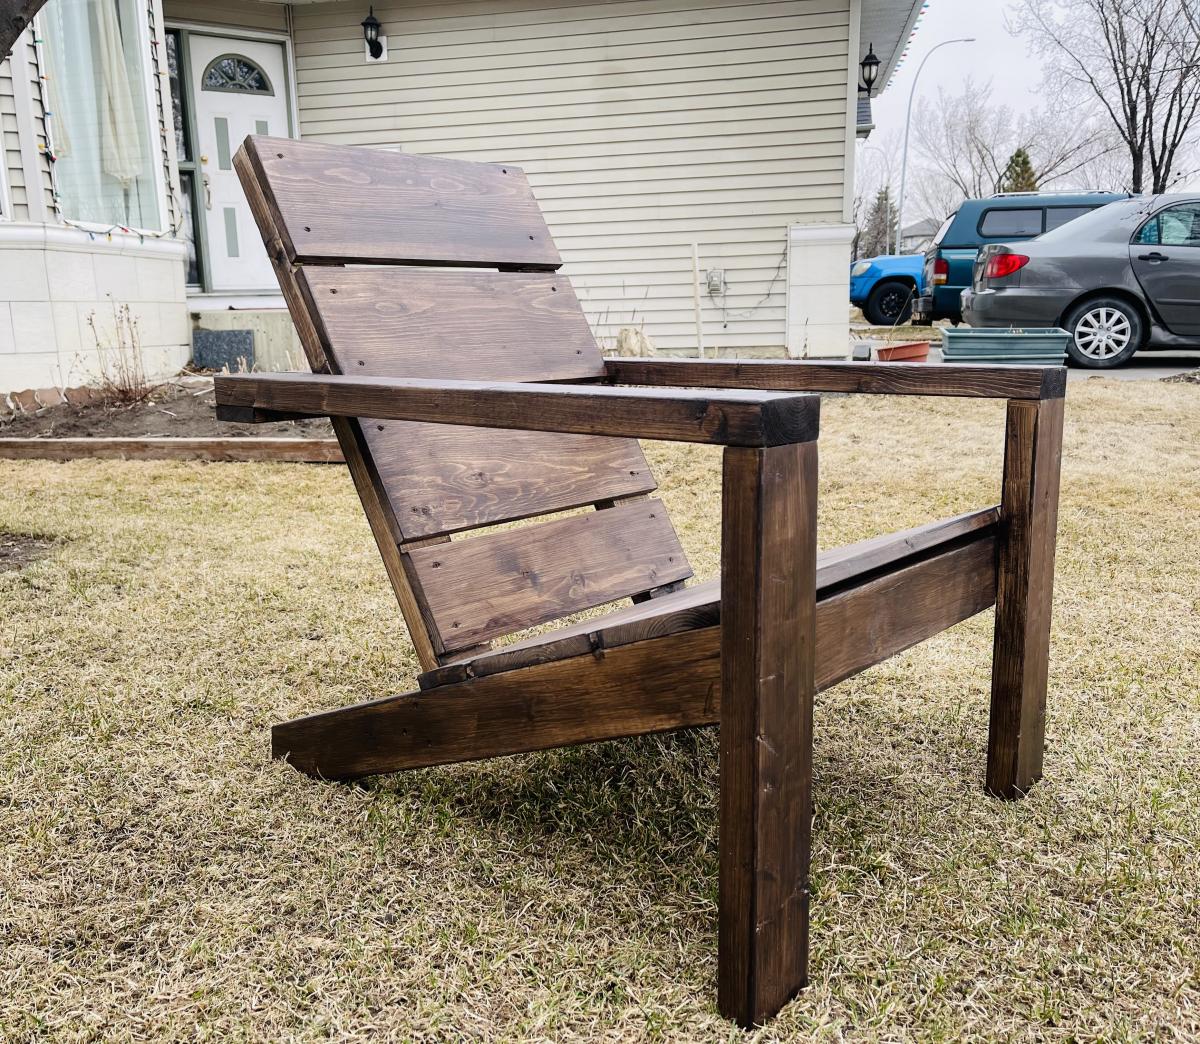
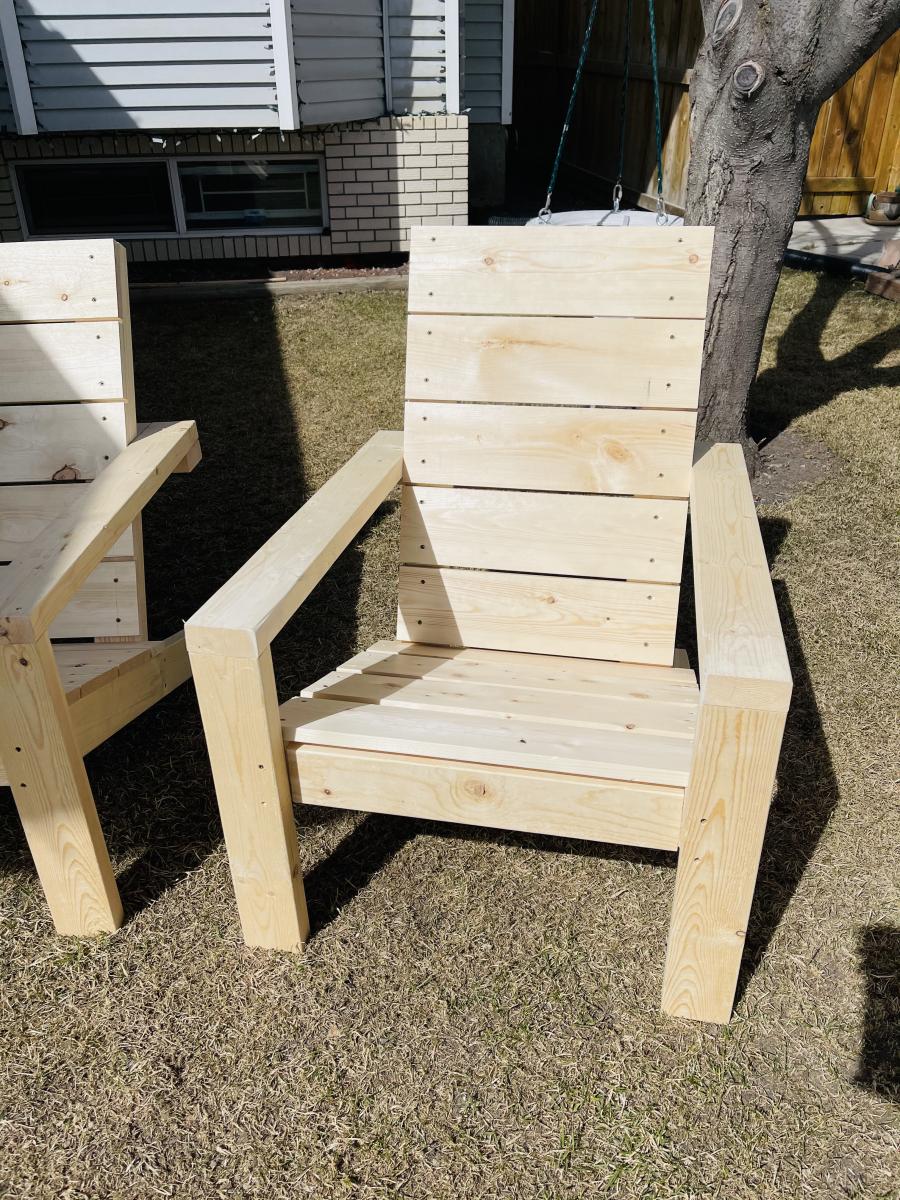
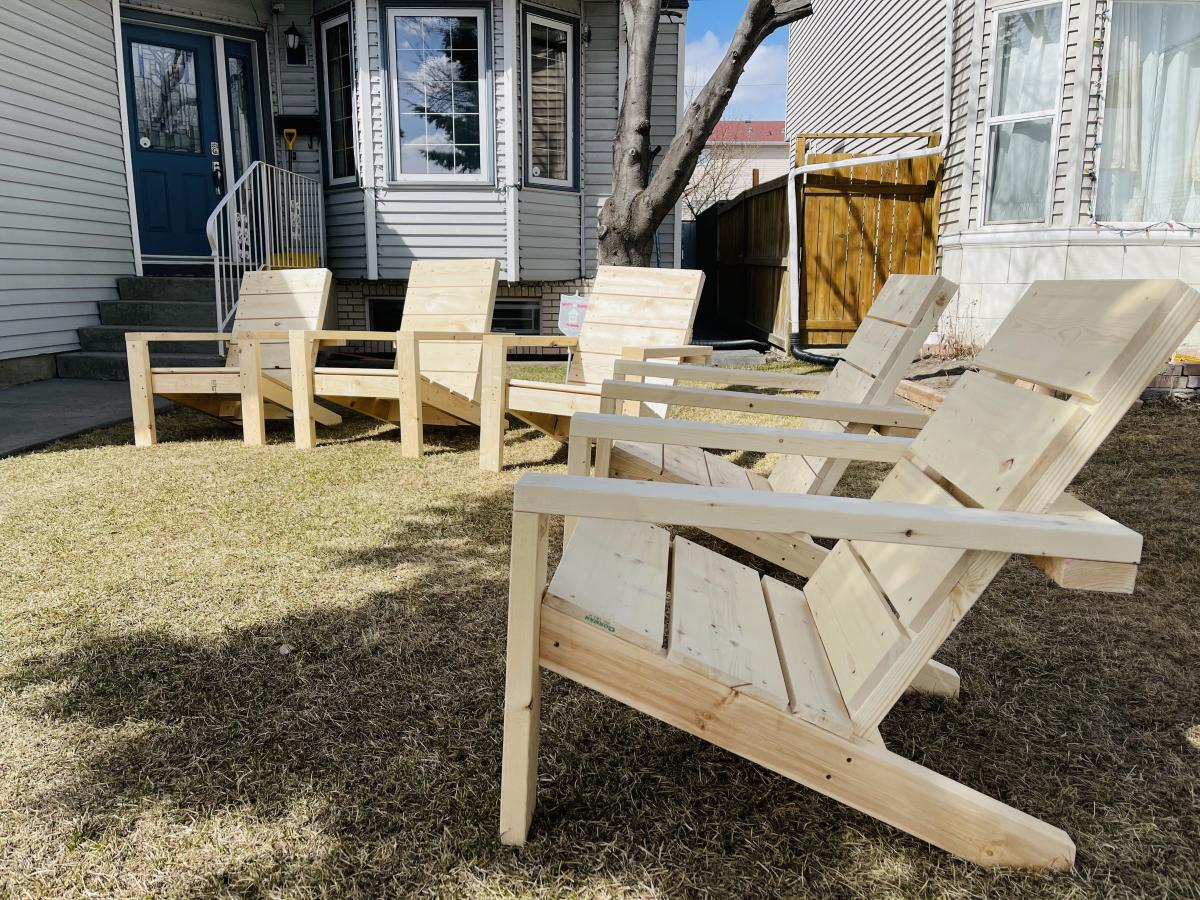
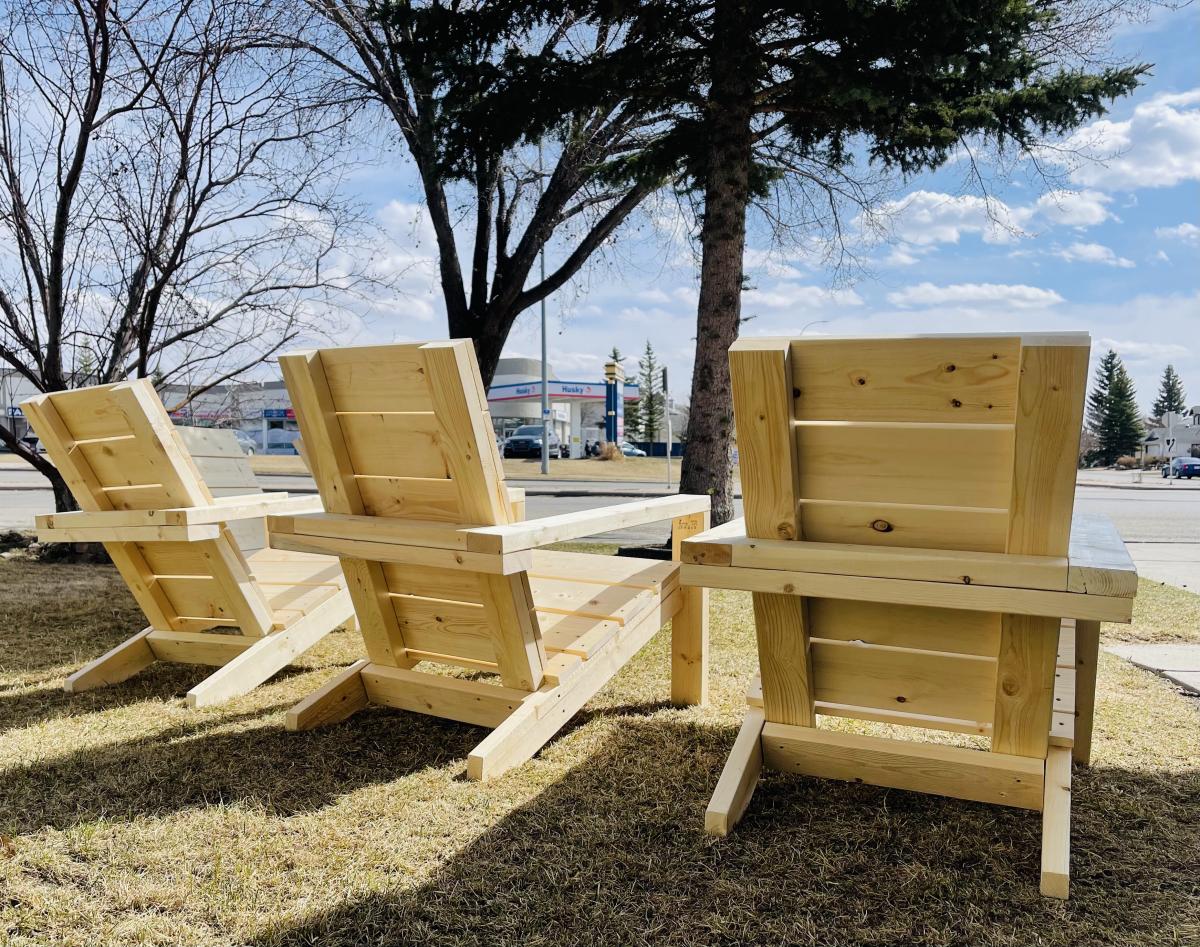
Estimated Cost
$60 Canadian dollar
Estimated Time Investment
An Hour or Two (0-2 Hours)
Finish Used
Behr Waterproof Stain and Sealer
Recommended Skill Level
Beginner
Comments
Tue, 04/13/2021 - 21:01
Yes yes yes
Thanks
Yes i am busy
Did 8 already and have 8 more to do
Great chairs
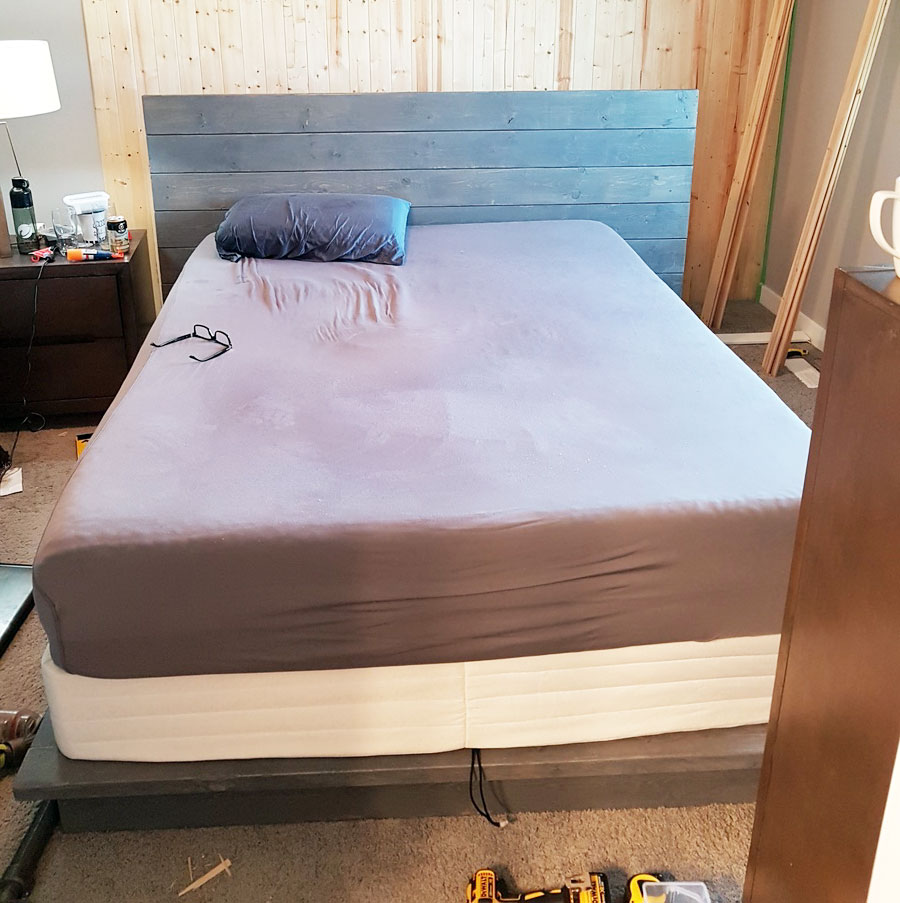
Great DYI platform bed!
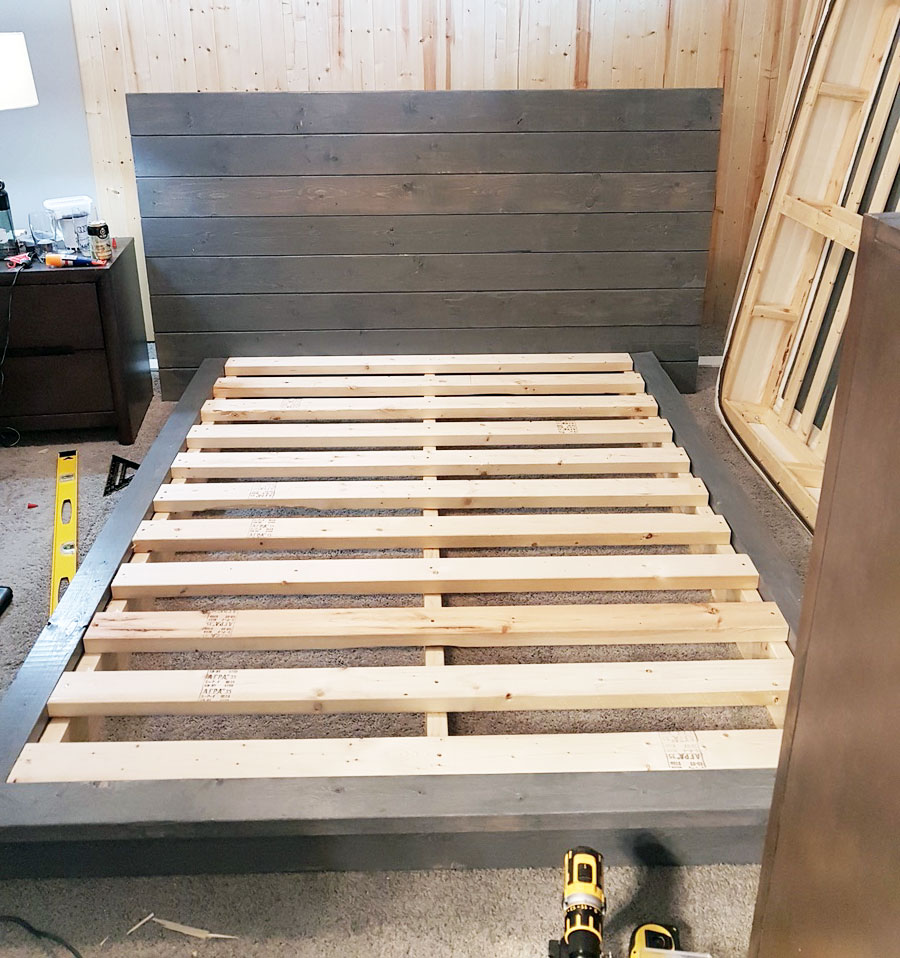
The bed in grey, also made the backboard taller (and doubled support on back) because the bed will have a box spring (photo 2). Awesome plans, love the look already. Excuse the background mess. The back wall is part of the same project! Thanks again for the plans!!
Note to future builders, learn from my one fatal mistake, be really picky on your quality of wood. I had some slight frame issues because on a bad board that resulted in about a 1/4 inch bow on one side. My slats are all use rival but you can see some done touch both sides...that is the bow. Still no one will likely notice but me.
Second, there was no info on spacing along the frame for attaching the 2x4 to the 2x6. I used 12", maybe overkill.
Built from Plan(s)
Estimated Cost
Excluding the Kreig jig that I did not have materials cost about 200. I had the 2x4 already and I uses more 2x6 to raise the backboard higher so this is estimate.
Remember to account for time to:
Let wood acclimate (min 48 hrs), dry times between coats. I did 2 coats then a sealant with a day inbetween each. Also I was solo on this so 2 people could be even quicker.
Remember to account for time to:
Let wood acclimate (min 48 hrs), dry times between coats. I did 2 coats then a sealant with a day inbetween each. Also I was solo on this so 2 people could be even quicker.
Estimated Time Investment
Day Project (6-9 Hours)
Finish Used
Grey varnish sanded a bit to look work then sealant.
Recommended Skill Level
Beginner
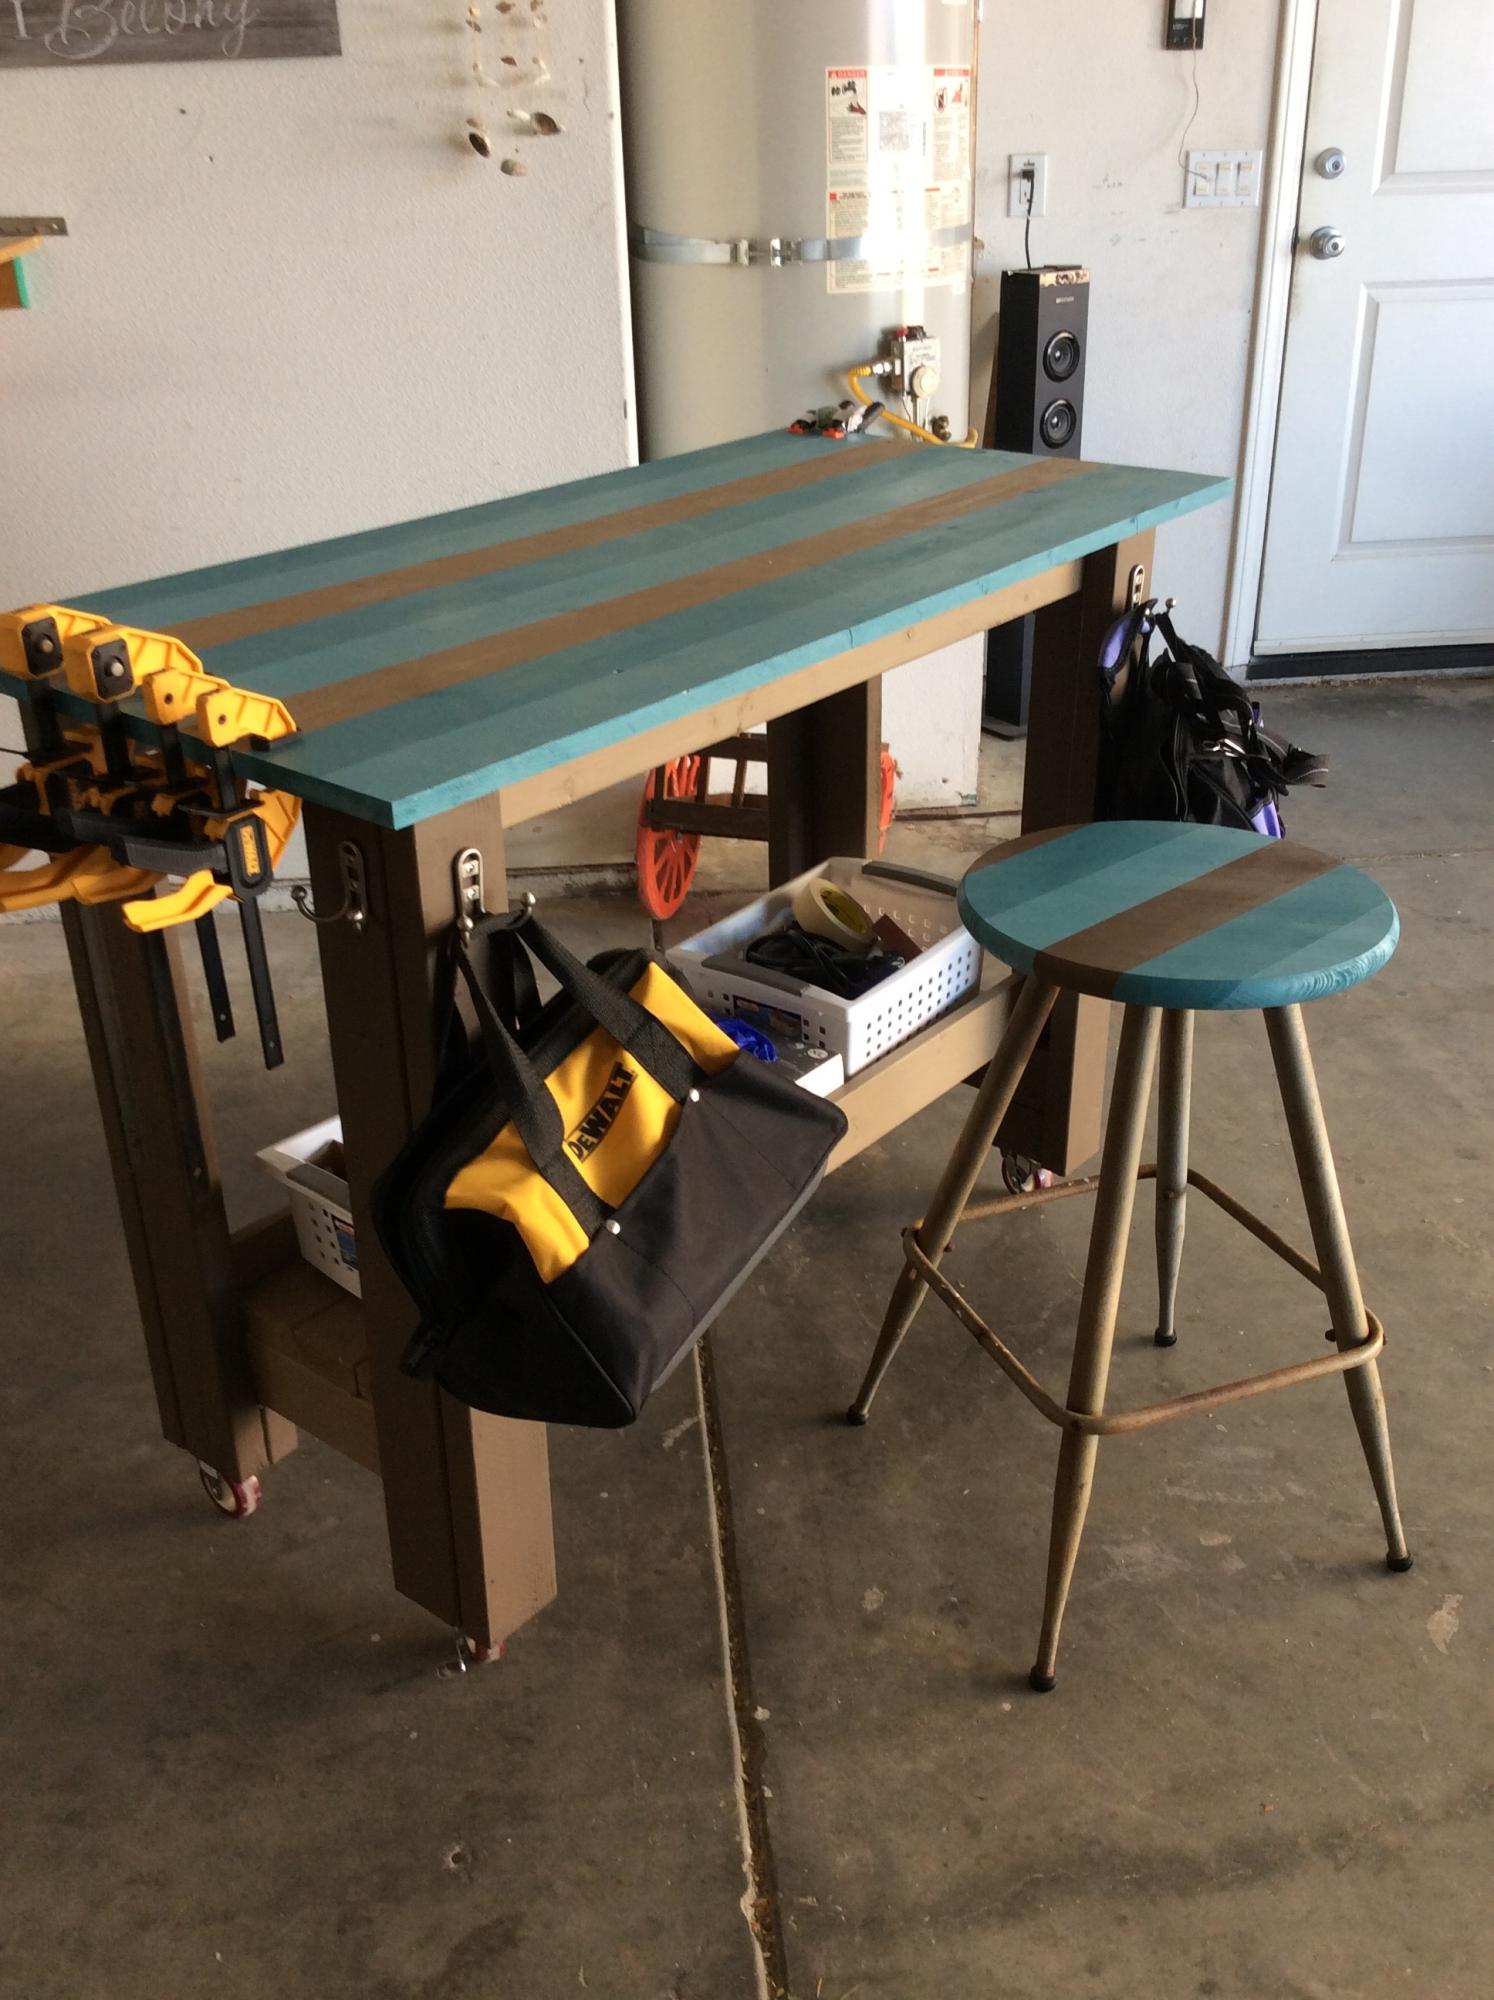
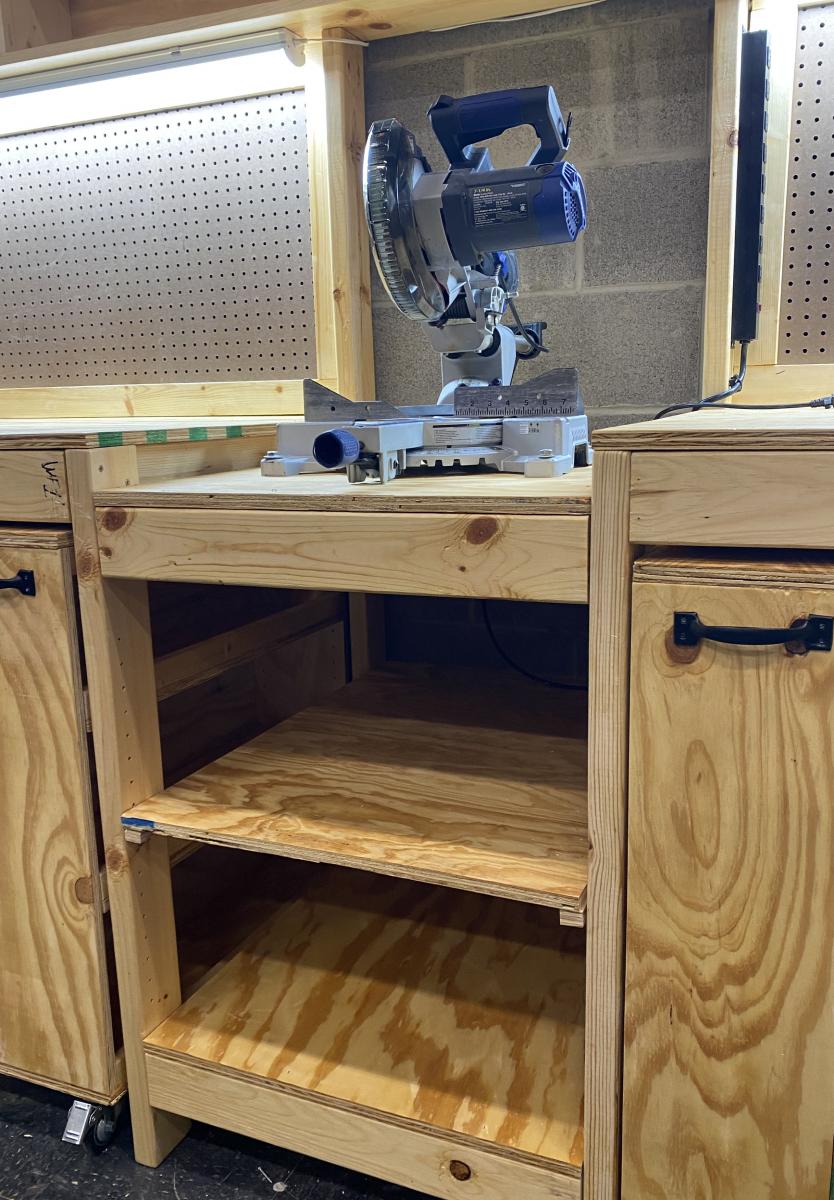
Eagle Project Workbench - Ultimate Roll Away Workbench with Miter Saw Stand
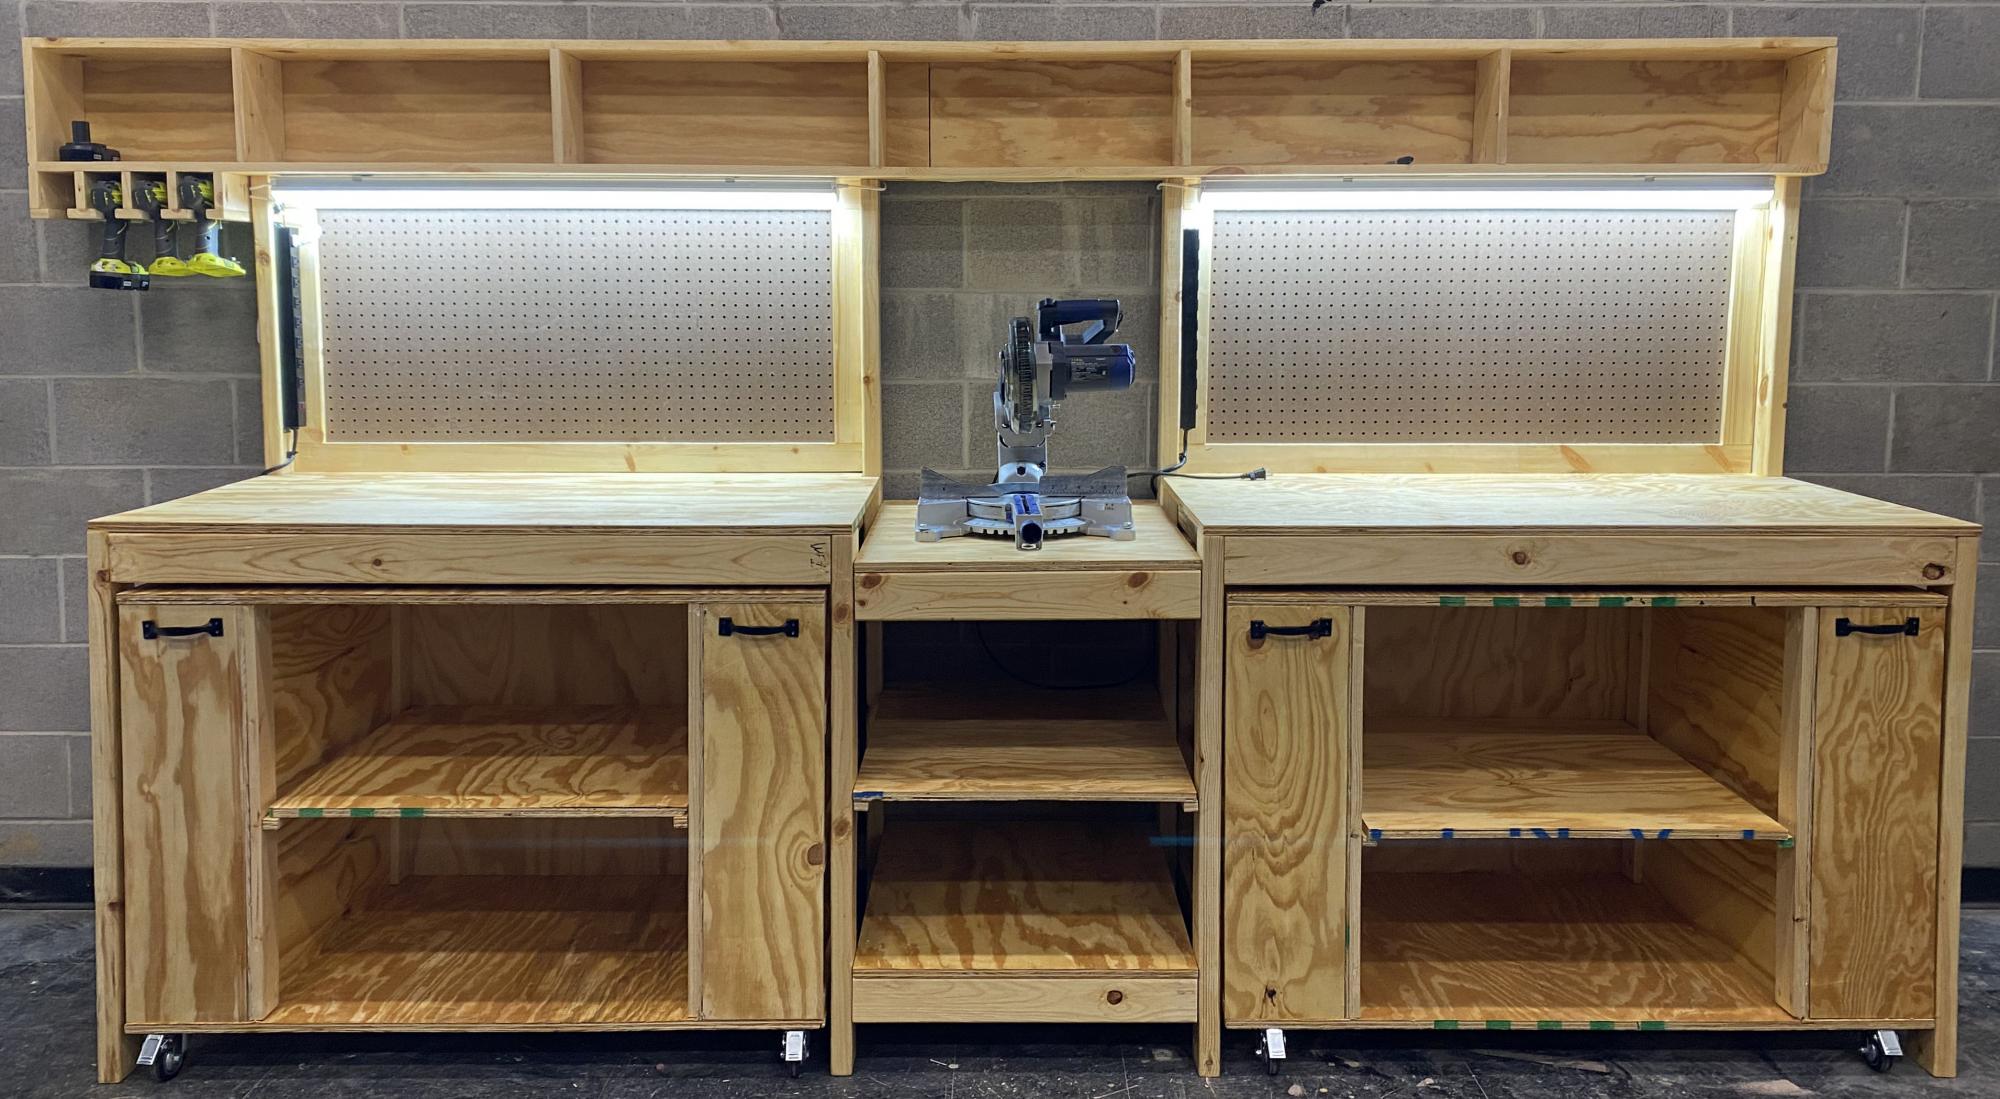
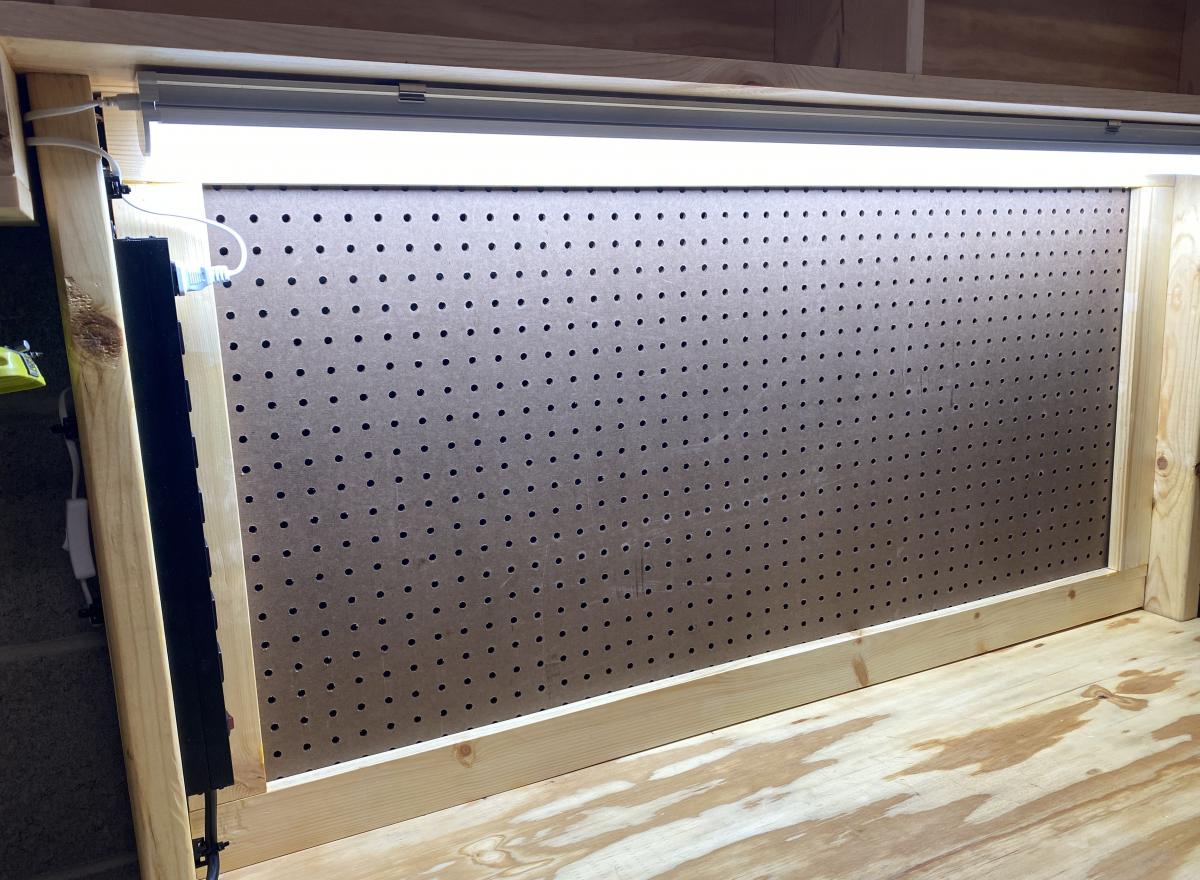
My son chose to make a workbench for his high school theater for his Eagle Scout project, and selected the Ultimate Roll Away Workbench with Miter Saw Stand as the basis for the project. The theater teacher wanted pegboard for tool storage, so we extended the rear legs on each workbench and notched the top to allow them to pass through. We built two frames from 1x3s to fit inside the rear legs, then put a pegboard inside each one.
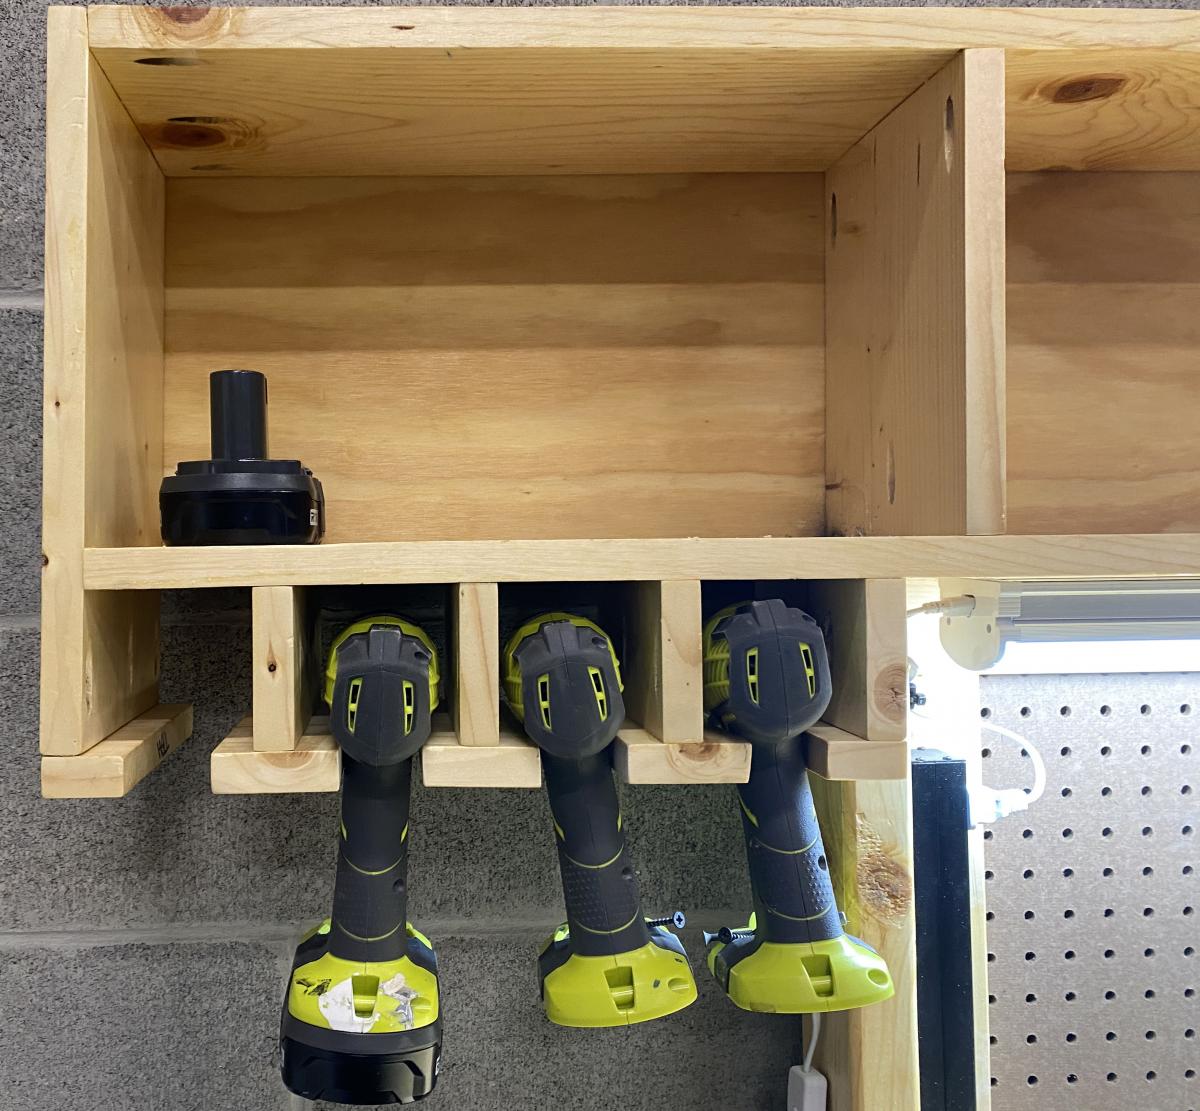
To secure the extended legs, we added a riser shelf from 1x8s. We put a storage station for drills at one end of the riser shelf.
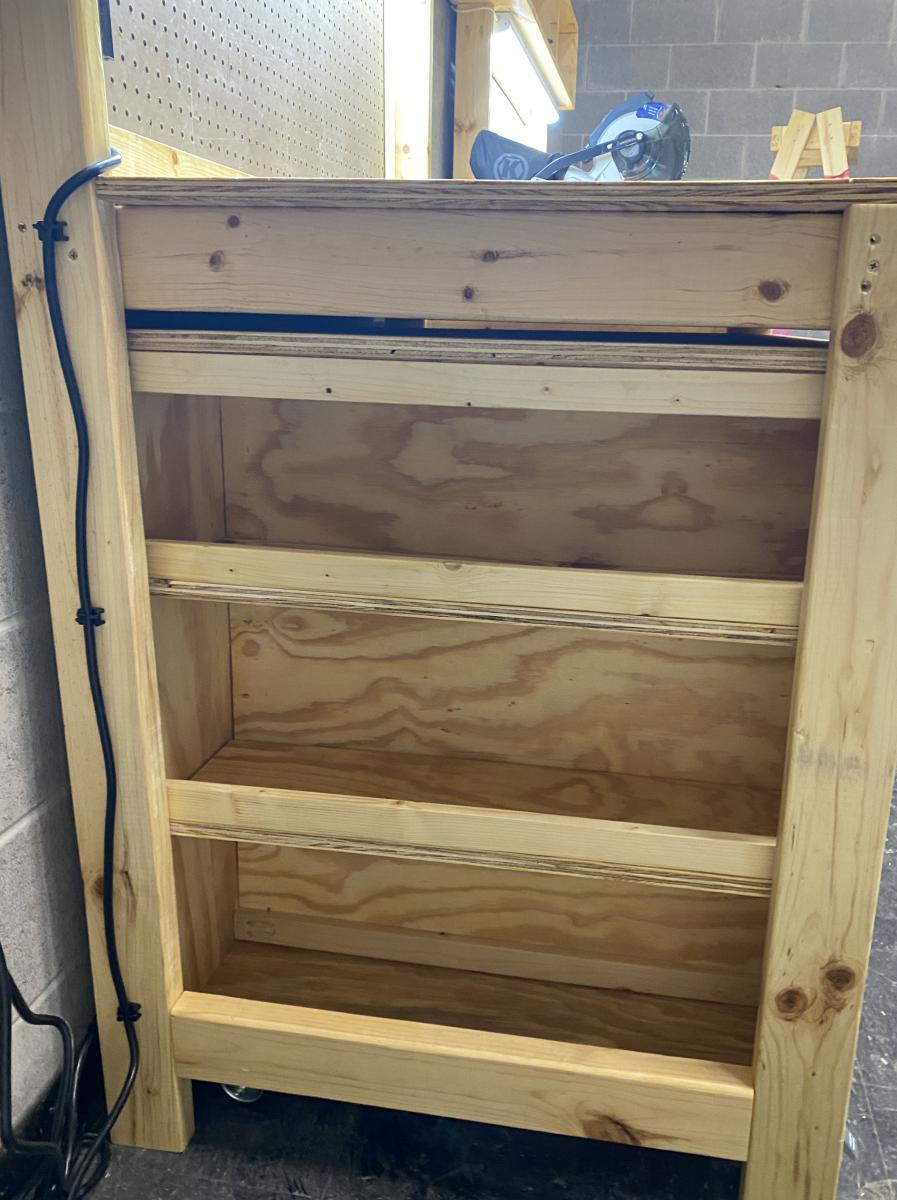
We also made all the cart shelves adjustable and added an adjustable shelf under the miter saw, and added lighting and power strips.
We left out the panels at the end of the workbench to allow access to the shelves there without having to remove the carts. Once we had constructed it, we added a brace at each end of the workbench to better support the outside front legs.
This plan was the perfect one for the theater, giving a stable work area for the miter saw and allowing for tool and materials storage. The carts can be rolled around to where a work surface is needed. This will come in handy for years of set construction in the theater. So proud of my son and all the leadership and hard work he put into this project!
Built from Plan(s)
Comments
Mon, 10/18/2021 - 11:54
Proud indeed!
WOW, that is absolutely amazing, thank you so much for sharing this story!
Fri, 05/31/2024 - 00:38
Wow, what an impressive…
Wow, what an impressive project! Your son did an amazing job with his Eagle Scout project. The Ultimate Roll Away Workbench with Miter Saw Stand sounds like a perfect fit for the high school theater's needs. I love how you customized it by adding pegboard for tool storage and making the shelves adjustable I remember how I do similar things all day long and I don't have any time left to do housework. Then I use https://essays.edubirdie.com/personal-statement-writing and it's a really great solution. The addition of lighting and power strips is a fantastic touch too. It's clear that a lot of thought and effort went into ensuring the workbench is both functional and durable. Your son's leadership and hard work really shine through in this project. This workbench will definitely be a valuable asset for the theater for many years to come. Great job!
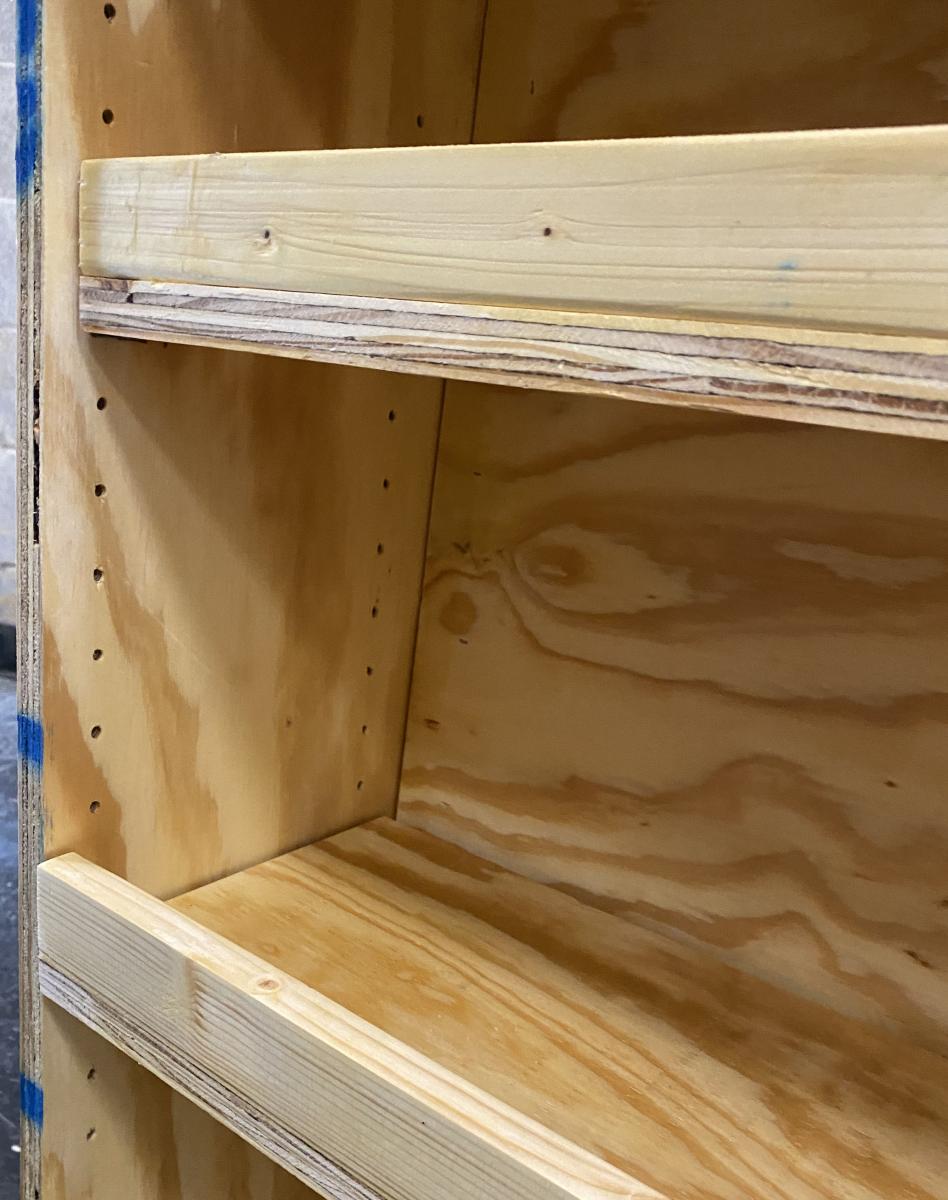
AG doll house
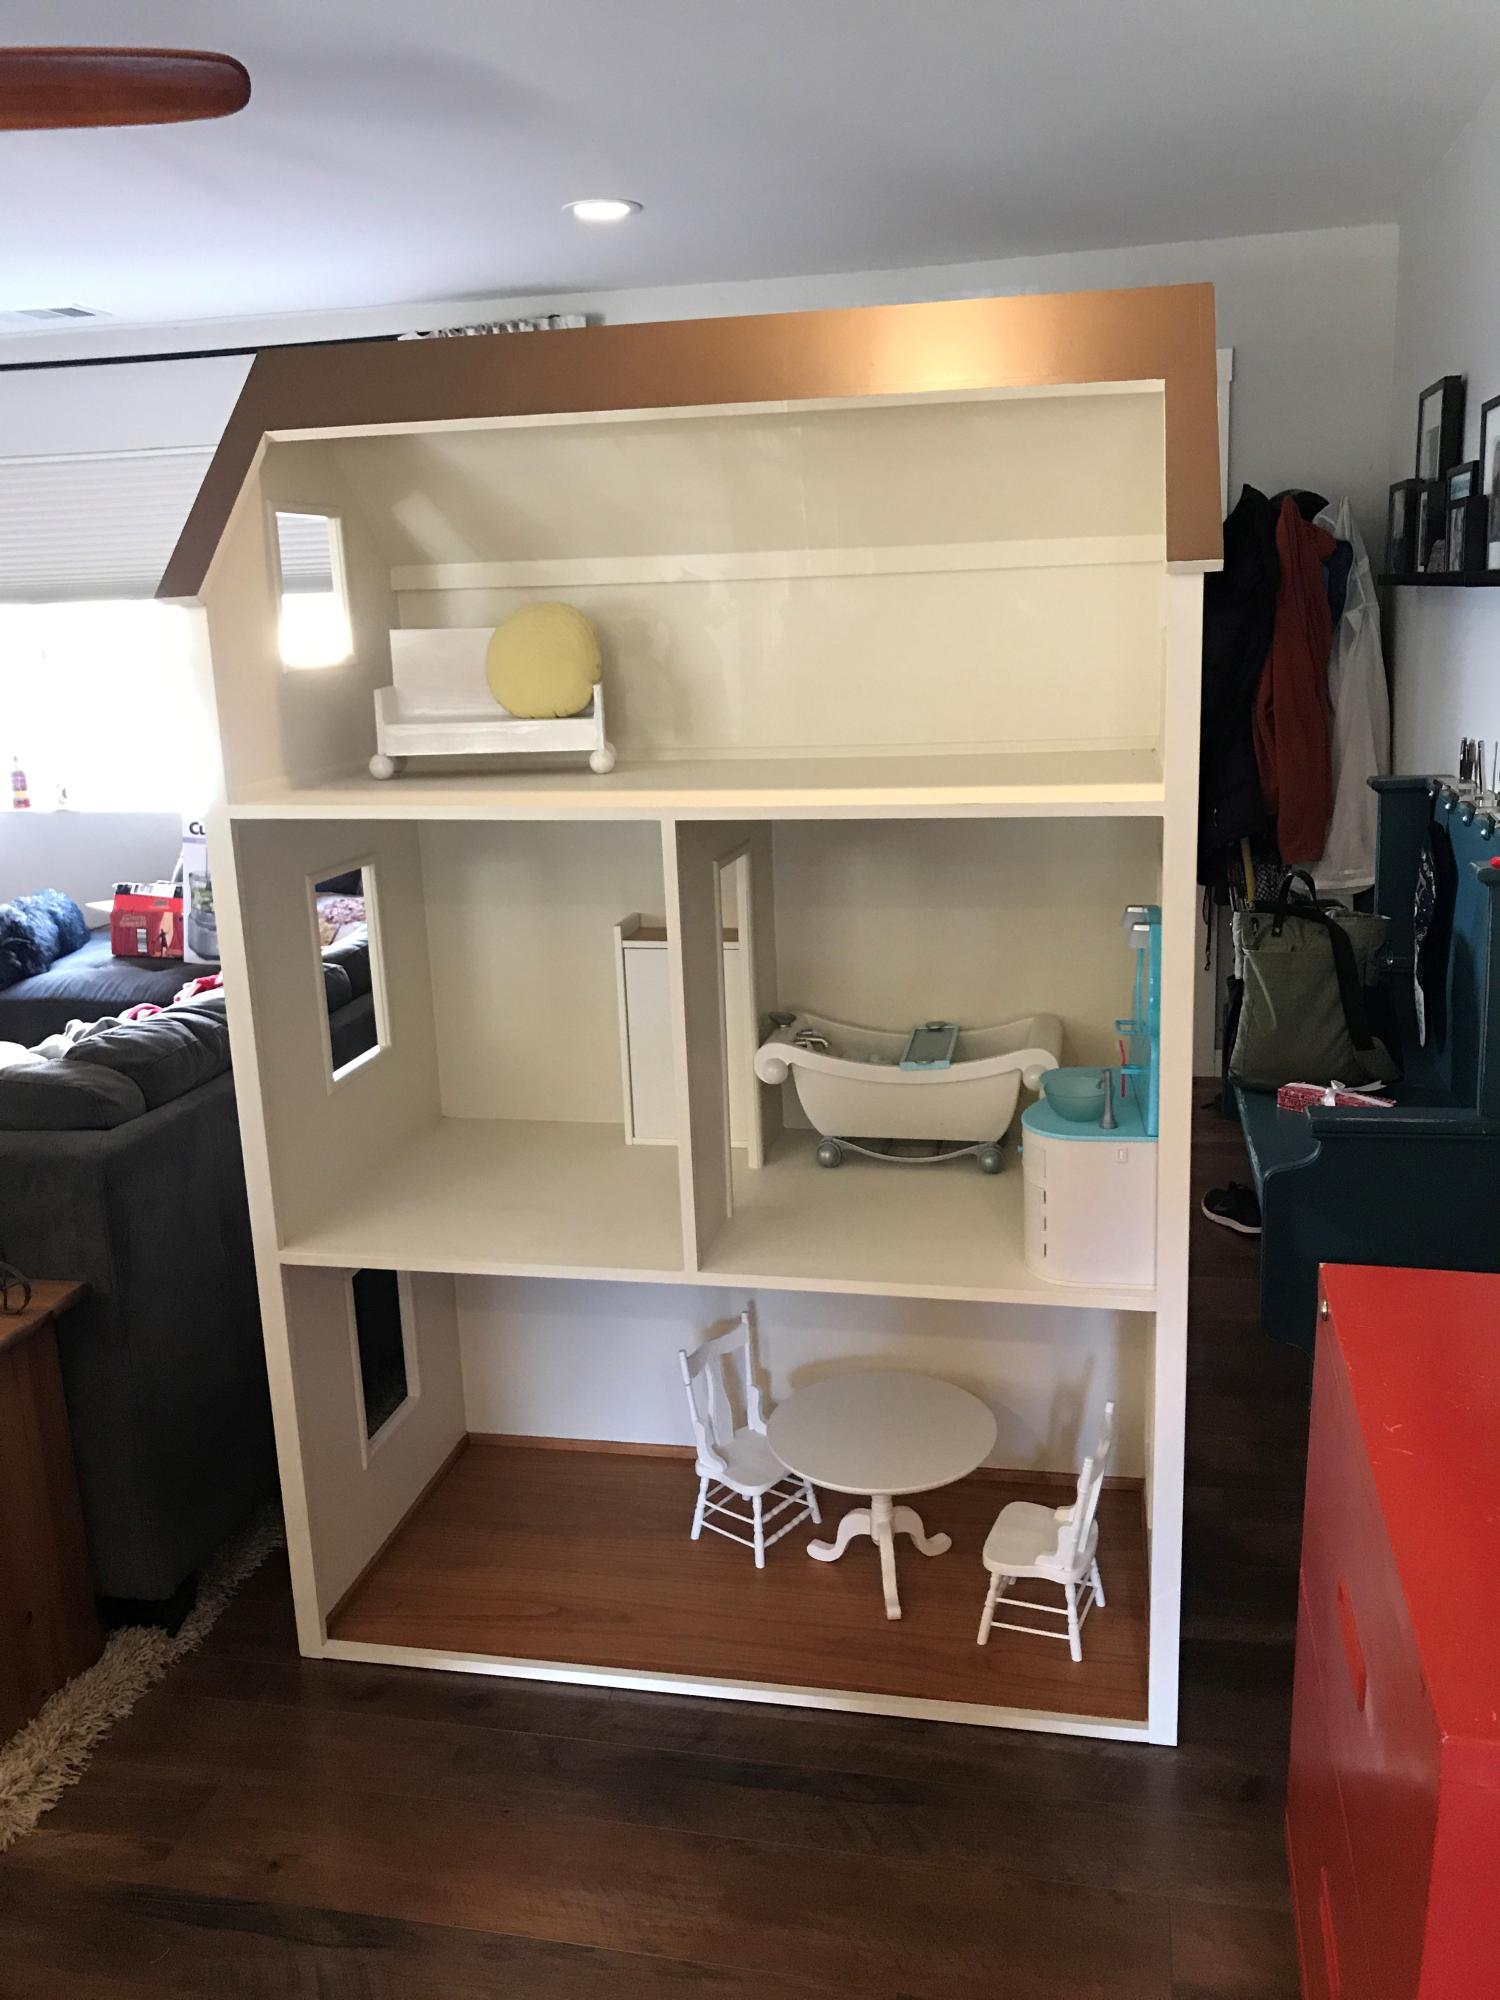
Thank you for generously sharing these plans. My husband built this for our 9 year old. It's beautiful and perfect!
Thanks again!
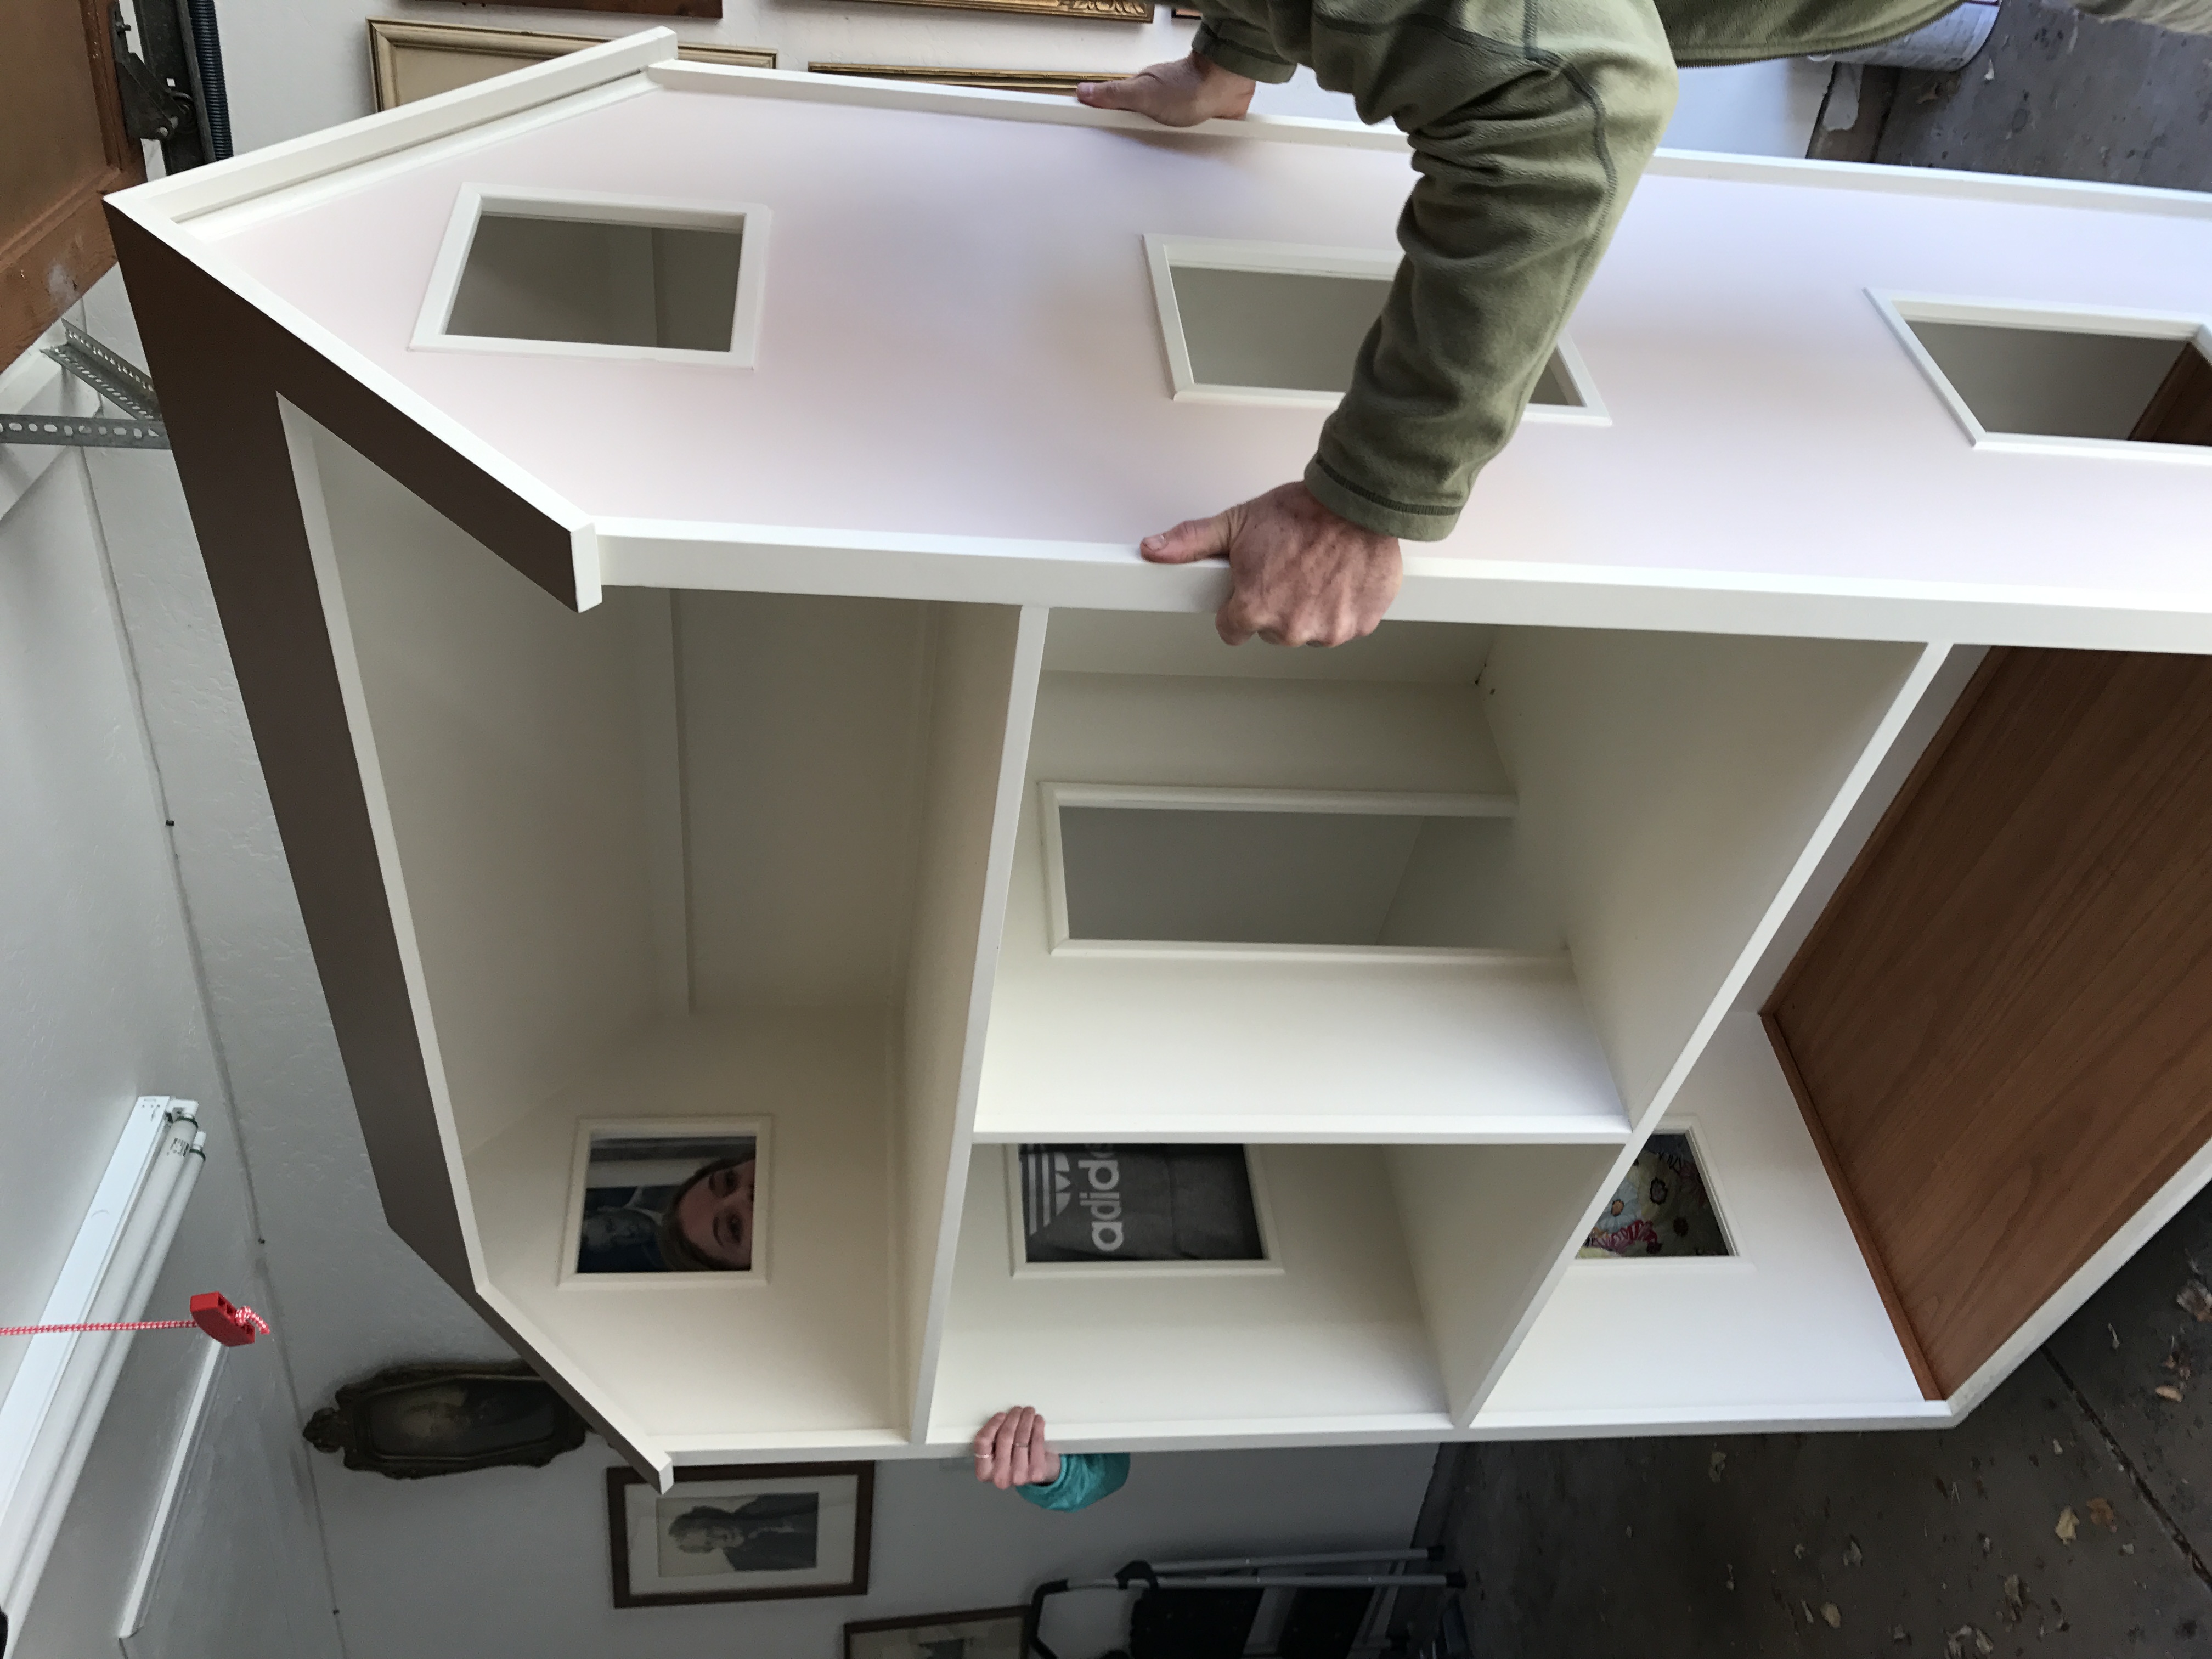
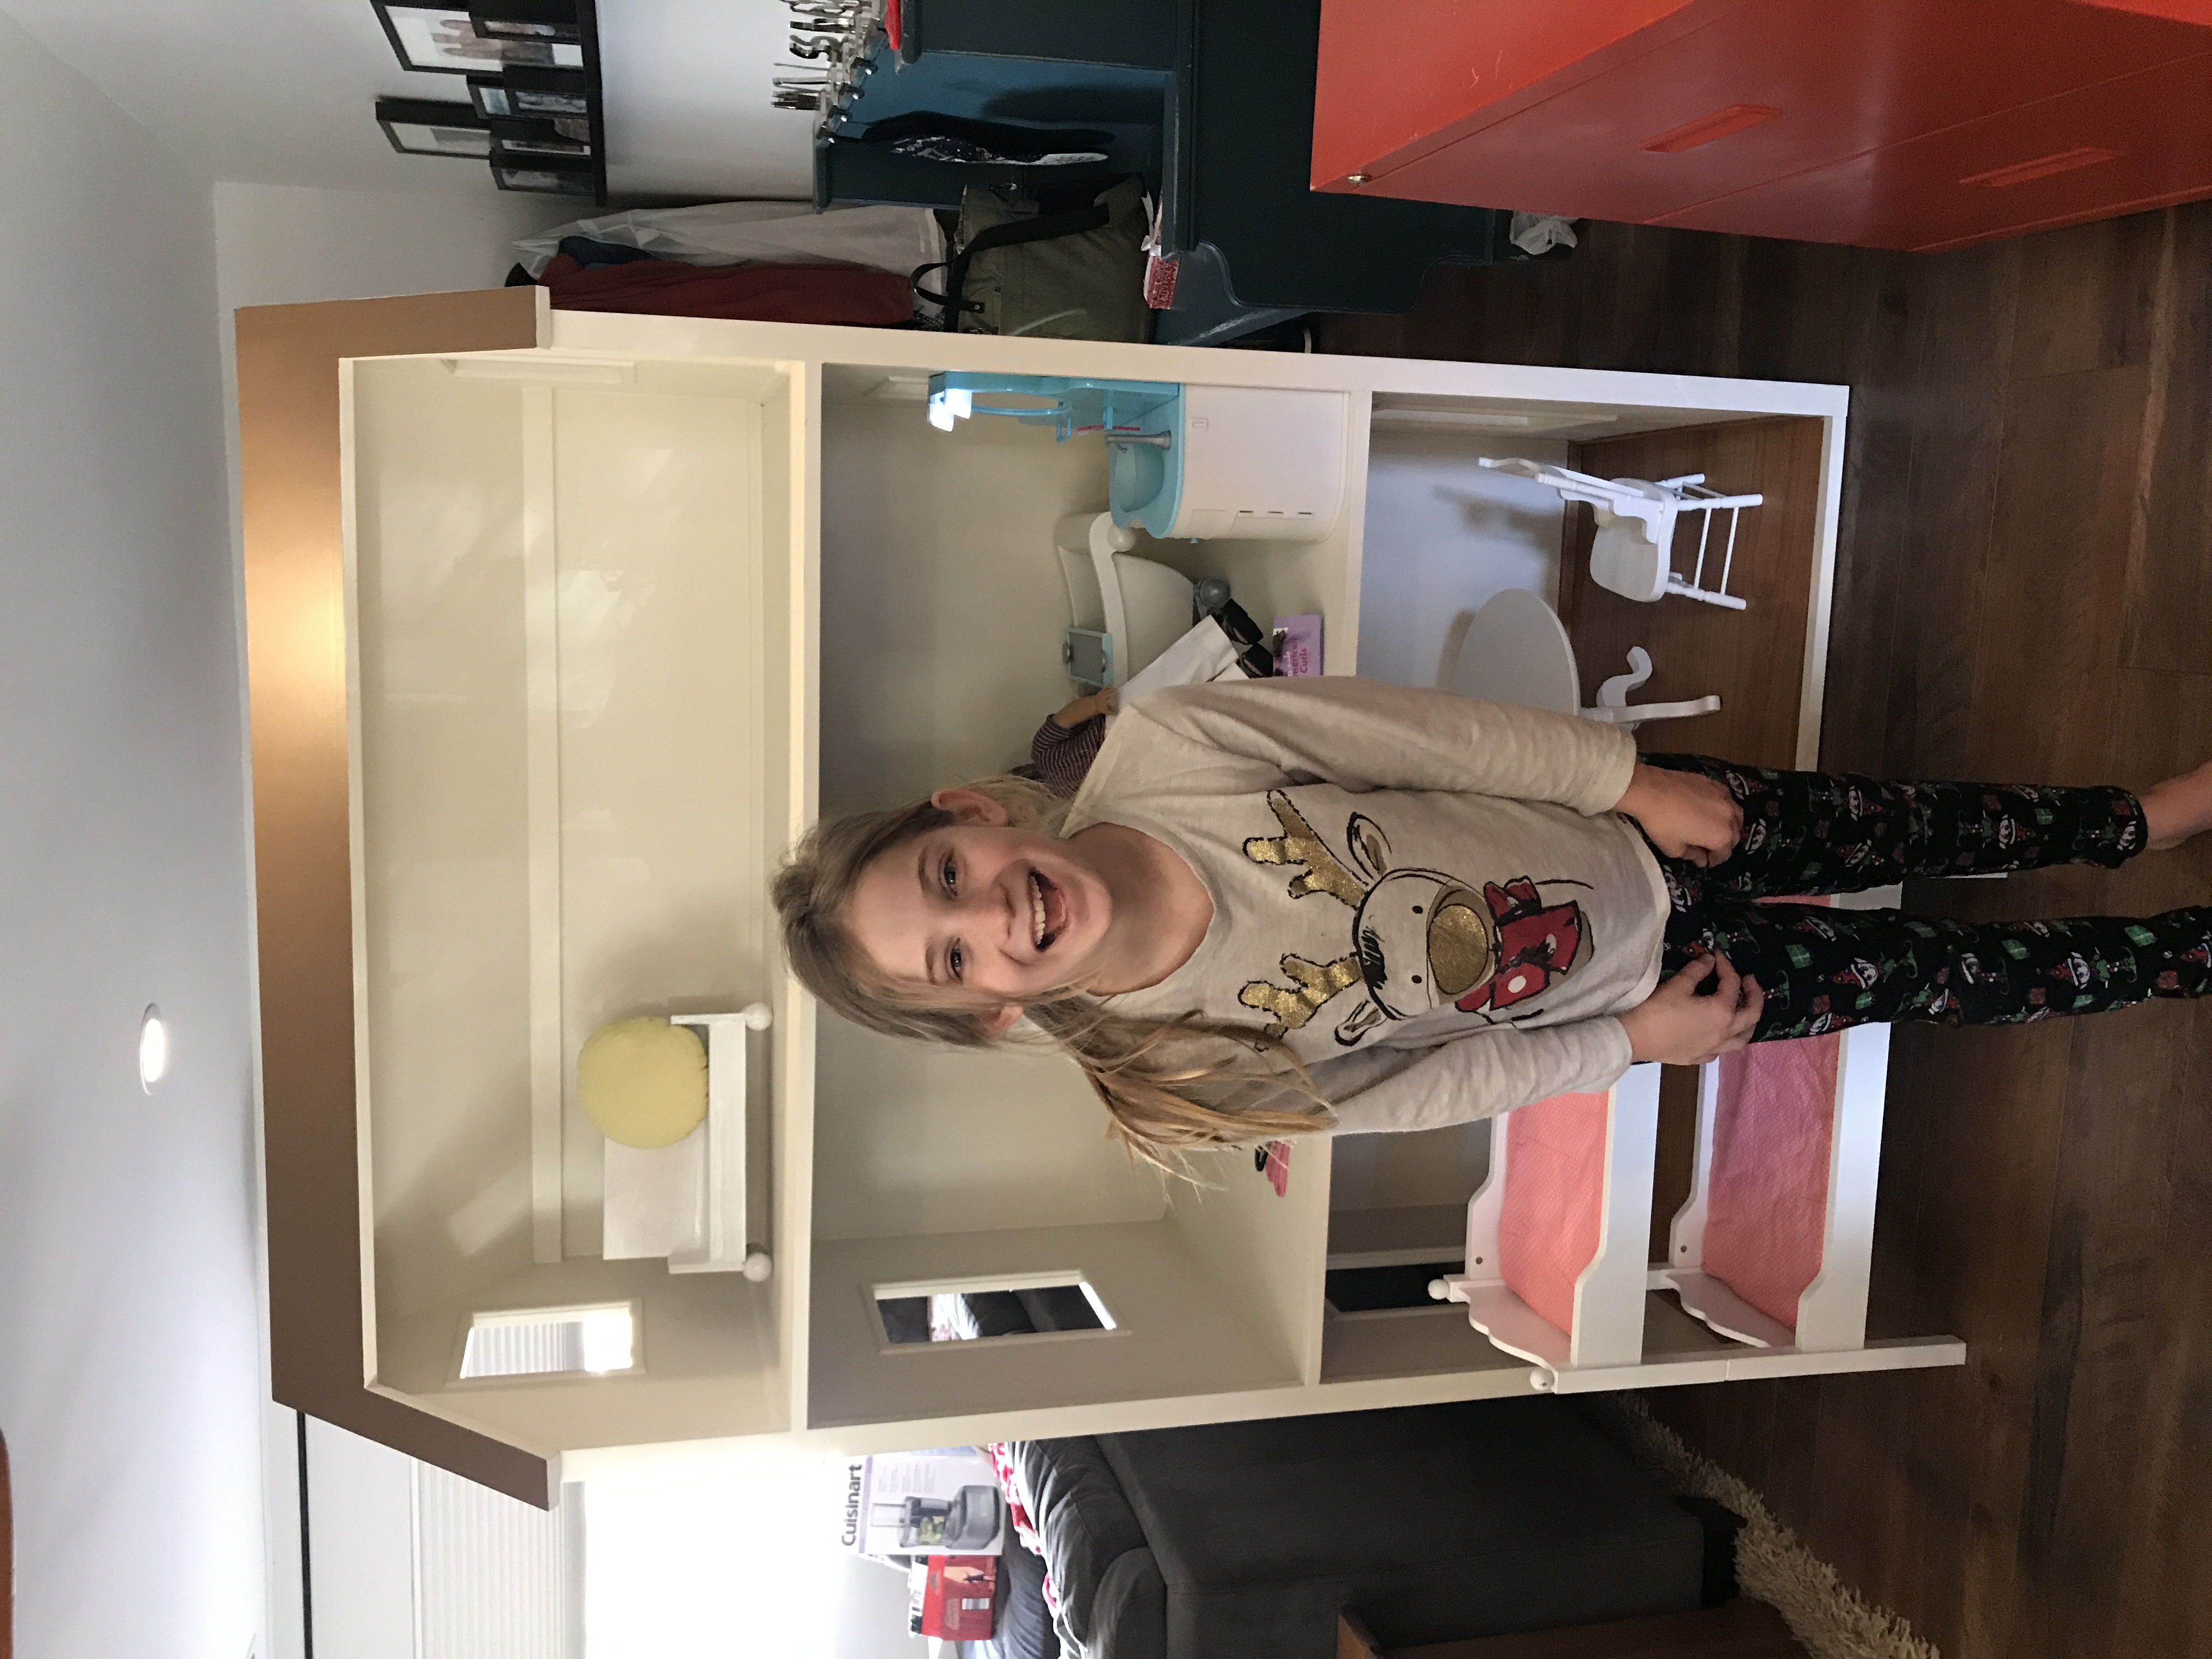
Built from Plan(s)
Estimated Time Investment
Week Long Project (20 Hours or More)
Recommended Skill Level
Intermediate
King Shiplap Headboard.
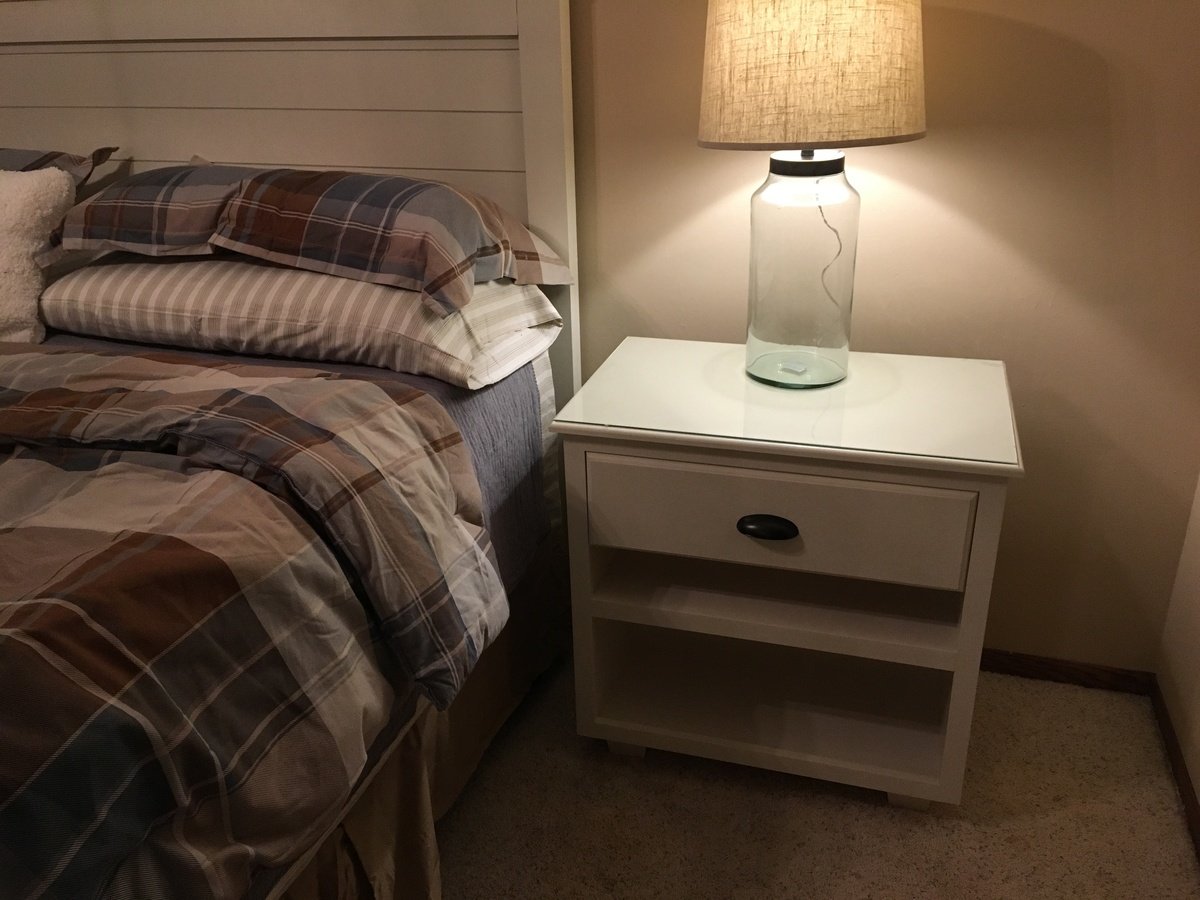
The Beauty Queen described a headboard with shiplap and sort of cottage style. I modified the Ana White plan to fit my needs and the wife’s taste. I used the preprimed shiplap and 1x material from the big box store so it was a little more expensive but still very reasonable. Then I made side tables.
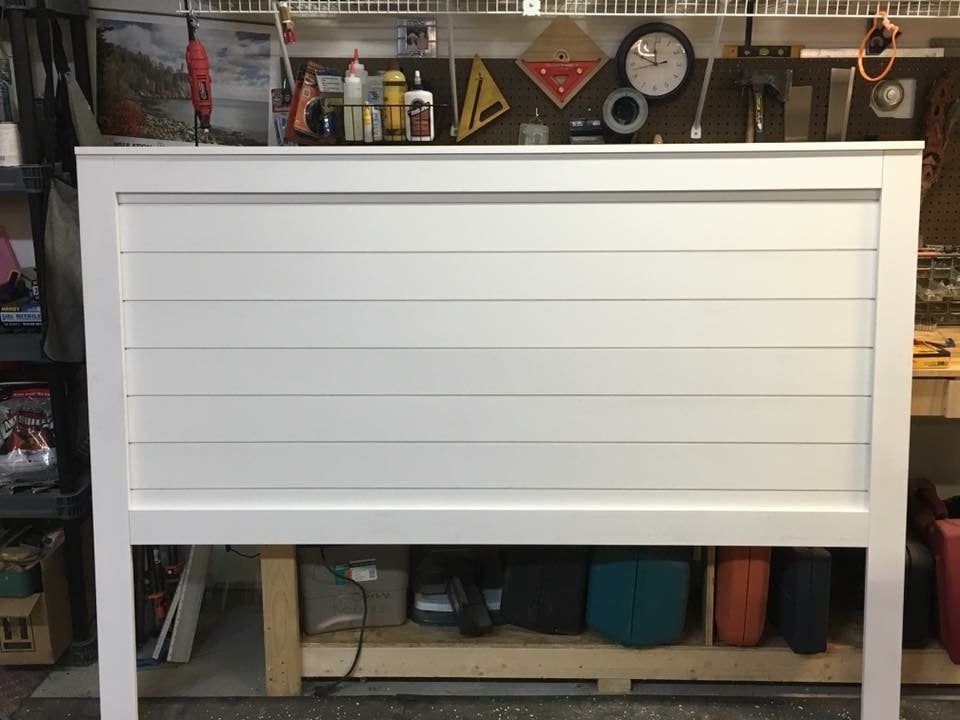
Built from Plan(s)
Estimated Cost
$100
Estimated Time Investment
Afternoon Project (3-6 Hours)
Finish Used
Marquee Semi-gloss enamel in antique white
Recommended Skill Level
Beginner
Simplest Stool
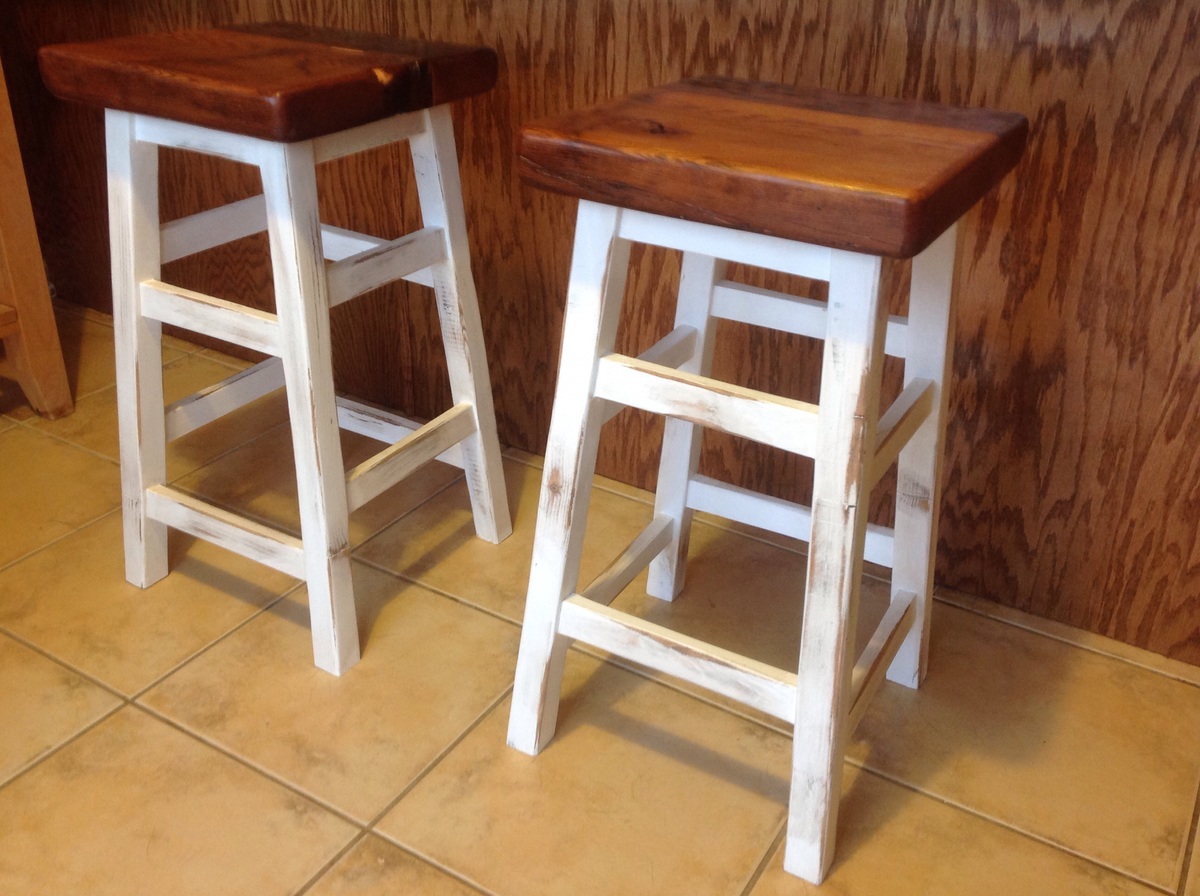
I modified the Simplest Stool plan for this project to use some old threshing floor boards that I had leftover from another project. I like the blocky and chunky look it gives it. We chose to distress these stools to make them look as though they've been around for awhile. The stools didn't take long to build, but since the finish needed time to cure between coats, the overall length of time for the project was about a week.
Built from Plan(s)
Estimated Time Investment
Afternoon Project (3-6 Hours)
Finish Used
Minwax 'Early American' with two coats of polyurethane. The legs and rungs were painted with Behr semi-gloss white paint, and distressed using Minwax 'Early American' stain.
Recommended Skill Level
Beginner
Comments
Ana White Admin
Mon, 03/08/2021 - 10:46
First Build!?
Amazing job, thank you for sharing!